cleanmail server manual - byteplant gmbh - antispam filter|email
TRANSCRIPT

CleanMail Server Version 5 Manual
Byteplant GmbH
March 1, 2017

Contents
1 Introduction 7
1.1 SMTP Proxy Filtering . . . . . . . . . . . . . . . . . . . . . . . . 8
1.2 POP3 Proxy Filtering and POP3 Connectors . . . . . . . . . . . . 8
1.3 Overview . . . . . . . . . . . . . . . . . . . . . . . . . . . . . . 9
2 Installation 10
2.1 System Requirements . . . . . . . . . . . . . . . . . . . . . . . . 10
2.2 Recommended Network Configurations . . . . . . . . . . . . . . 11
2.3 Quick Start Installation . . . . . . . . . . . . . . . . . . . . . . . 13
2.3.1 SMTP Filtering . . . . . . . . . . . . . . . . . . . . . . . 13
2.3.1.1 CleanMail runs on the Mail Server . . . . . . . 13
2.3.1.2 CleanMail runs on a separate server . . . . . . . 14
2.3.2 POP3 Filtering . . . . . . . . . . . . . . . . . . . . . . . 15
2.3.2.1 POP3 Proxy Setup . . . . . . . . . . . . . . . . 15
2.3.2.2 POP3 Connector Setup . . . . . . . . . . . . . 16
2.4 CleanMail Setup . . . . . . . . . . . . . . . . . . . . . . . . . . 17
2.4.1 Using NAT to Reroute SMTP . . . . . . . . . . . . . . . 18
2.4.2 Changing the MX Record to Reroute SMTP . . . . . . . . 18
2.5 Relaying and the Handling of Outgoing Mail . . . . . . . . . . . 19
2.6 Troubleshooting the CleanMail Installation . . . . . . . . . . . . 19
2.6.1 About Sockets, Ports, and Listeners . . . . . . . . . . . . 20
2.6.2 Testing the Basic Proxy Setup . . . . . . . . . . . . . . . 20
2.6.3 CleanMail and Microsoft Exchange . . . . . . . . . . . . 21
2.6.3.1 Receive Connector Configuration . . . . . . . . 21
2.6.3.2 Backscatter . . . . . . . . . . . . . . . . . . . 22
1

2.6.3.3 SMTP Port in Use . . . . . . . . . . . . . . . . 22
2.7 Registering CleanMail . . . . . . . . . . . . . . . . . . . . . . . 22
2.8 Uninstalling CleanMail . . . . . . . . . . . . . . . . . . . . . . . 23
2.8.1 Using CleanMail Uninstall . . . . . . . . . . . . . . . . . 23
2.8.2 Using The Microsoft Windows Control Panel . . . . . . . 23
3 Concepts 24
3.1 CleanMail Architecture . . . . . . . . . . . . . . . . . . . . . . . 24
3.2 Proxy Ports . . . . . . . . . . . . . . . . . . . . . . . . . . . . . 25
3.3 Filter Pipeline . . . . . . . . . . . . . . . . . . . . . . . . . . . . 25
3.4 Mail Storage . . . . . . . . . . . . . . . . . . . . . . . . . . . . . 27
3.5 Remote Access . . . . . . . . . . . . . . . . . . . . . . . . . . . 27
4 Configuration 28
4.1 Global Settings . . . . . . . . . . . . . . . . . . . . . . . . . . . 28
4.1.1 HTTP server settings . . . . . . . . . . . . . . . . . . . . 28
4.1.1.1 HTTP Server and Port . . . . . . . . . . . . . . 29
4.1.1.2 HTTP User and Password . . . . . . . . . . . . 29
4.1.1.3 Host Allow and Host Deny . . . . . . . . . . . 29
4.1.1.4 Applying Changes . . . . . . . . . . . . . . . . 30
4.1.2 CleanMail Admin Mail Options . . . . . . . . . . . . . . 30
4.1.3 Logging Options . . . . . . . . . . . . . . . . . . . . . . 30
4.1.4 Memory and Buffering Options . . . . . . . . . . . . . . 31
4.1.4.1 Message Size Limit . . . . . . . . . . . . . . . 31
4.1.4.2 Memory Usage . . . . . . . . . . . . . . . . . 31
4.2 POP3 Proxy Port Setup . . . . . . . . . . . . . . . . . . . . . . . 32
4.2.1 POP3 Server and Port Settings . . . . . . . . . . . . . . . 32
4.2.2 Changing the Mail Account Settings . . . . . . . . . . . . 33
4.3 POP3 Connector Setup . . . . . . . . . . . . . . . . . . . . . . . 33
4.3.1 POP3 Server and Account Settings . . . . . . . . . . . . . 33
4.3.2 POP3 Mailboxes and Forwarding Account . . . . . . . . 34
4.3.3 POP3 Connector Options . . . . . . . . . . . . . . . . . . 34
4.4 SMTP Proxy Port Setup . . . . . . . . . . . . . . . . . . . . . . . 34
4.4.1 Incoming and Outgoing SMTP Settings . . . . . . . . . . 35
2

4.4.2 Reject Options . . . . . . . . . . . . . . . . . . . . . . . 36
4.4.2.1 Mail Reject Message . . . . . . . . . . . . . . 36
4.4.2.2 Mail Redirect Address . . . . . . . . . . . . . . 36
4.4.3 Relay Settings . . . . . . . . . . . . . . . . . . . . . . . 36
4.4.4 Auth Attack Protection . . . . . . . . . . . . . . . . . . . 37
4.4.5 Directory Harvest Attack Protection . . . . . . . . . . . . 38
4.4.6 Connection Limit . . . . . . . . . . . . . . . . . . . . . . 38
4.4.7 Mail Flooding Protection . . . . . . . . . . . . . . . . . . 38
4.4.7.1 NAT and Flooding Protection . . . . . . . . . . 39
4.4.7.2 Host BlackList . . . . . . . . . . . . . . . . . . 39
4.4.7.3 Connection Count . . . . . . . . . . . . . . . . 40
4.4.7.4 NDR Connection Count . . . . . . . . . . . . . 40
4.5 Mail Filter Setup . . . . . . . . . . . . . . . . . . . . . . . . . . 40
4.5.1 Filter Name . . . . . . . . . . . . . . . . . . . . . . . . . 41
4.5.2 Recipient Address Patterns . . . . . . . . . . . . . . . . . 41
4.5.2.1 Enable/Disable Address Pattern Settings . . . . 41
4.5.2.2 Same Address Settings As Previous . . . . . . . 42
4.5.3 Filter Results . . . . . . . . . . . . . . . . . . . . . . . . 42
4.5.4 Subject Tag . . . . . . . . . . . . . . . . . . . . . . . . . 44
4.6 Attachment Filter Setup . . . . . . . . . . . . . . . . . . . . . . . 44
4.6.1 Attachment Filtering Options . . . . . . . . . . . . . . . 44
4.6.2 Ignore Whitelist . . . . . . . . . . . . . . . . . . . . . . 45
4.6.3 MIME Error Policy . . . . . . . . . . . . . . . . . . . . . 45
4.7 Blacklist Filter Setup . . . . . . . . . . . . . . . . . . . . . . . . 45
4.7.1 Sender Address Patterns . . . . . . . . . . . . . . . . . . 46
4.7.2 Policy . . . . . . . . . . . . . . . . . . . . . . . . . . . . 46
4.8 Whitelist Filter Setup . . . . . . . . . . . . . . . . . . . . . . . . 46
4.8.1 Sender Address Patterns . . . . . . . . . . . . . . . . . . 46
4.9 Delay Filter Setup . . . . . . . . . . . . . . . . . . . . . . . . . . 46
4.9.1 Delay . . . . . . . . . . . . . . . . . . . . . . . . . . . . 47
4.9.2 Skip Size . . . . . . . . . . . . . . . . . . . . . . . . . . 47
4.10 RBL Filter Setup . . . . . . . . . . . . . . . . . . . . . . . . . . 47
4.10.1 DNSBL Zone List . . . . . . . . . . . . . . . . . . . . . 47
3

4.10.2 Policy . . . . . . . . . . . . . . . . . . . . . . . . . . . . 47
4.10.3 Relay Check Option . . . . . . . . . . . . . . . . . . . . 48
4.11 Shared Real-Time Fingerprint Filter . . . . . . . . . . . . . . . . 48
4.11.1 Fingerprint Database . . . . . . . . . . . . . . . . . . . . 48
4.11.2 Fingerprint Filter Settings . . . . . . . . . . . . . . . . . 49
4.11.2.1 Policy . . . . . . . . . . . . . . . . . . . . . . 49
4.11.2.2 Skip Size . . . . . . . . . . . . . . . . . . . . . 49
4.12 External Filter Setup . . . . . . . . . . . . . . . . . . . . . . . . 49
4.12.1 Command Line . . . . . . . . . . . . . . . . . . . . . . . 49
4.12.1.1 Message Text Input and Output . . . . . . . . . 50
4.12.1.2 Batch Files . . . . . . . . . . . . . . . . . . . . 50
4.12.2 Advanced Settings . . . . . . . . . . . . . . . . . . . . . 51
4.12.2.1 Timeout . . . . . . . . . . . . . . . . . . . . . 51
4.12.2.2 Ignore Whitelist . . . . . . . . . . . . . . . . . 52
4.12.2.3 Skip Size . . . . . . . . . . . . . . . . . . . . . 52
4.12.2.4 Memory Usage . . . . . . . . . . . . . . . . . 52
4.12.3 Return Code Policy . . . . . . . . . . . . . . . . . . . . . 52
4.13 Anti Virus Filter Setup . . . . . . . . . . . . . . . . . . . . . . . 52
4.14 SpamAssassin Filter Setup . . . . . . . . . . . . . . . . . . . . . 54
4.14.1 How SpamAssassin Works . . . . . . . . . . . . . . . . . 54
4.14.2 SpamAssasssin Options . . . . . . . . . . . . . . . . . . 55
4.14.2.1 Required Score . . . . . . . . . . . . . . . . . 55
4.14.2.2 Subject Tag . . . . . . . . . . . . . . . . . . . 56
4.14.2.3 Tweaking The SpamAssassin Rule Set . . . . . 56
4.14.3 CleanMail SpamAssasssin Options . . . . . . . . . . . . 56
4.14.3.1 Spam Mail Policy Options . . . . . . . . . . . . 56
4.14.3.2 Multiple SpamAssassin Filters . . . . . . . . . 57
4.15 Spam Trap Setup . . . . . . . . . . . . . . . . . . . . . . . . . . 57
4.15.1 Usage . . . . . . . . . . . . . . . . . . . . . . . . . . . . 57
4.15.2 Multiple Spam Trap Filters . . . . . . . . . . . . . . . . . 58
4.16 Mail Storage Setup . . . . . . . . . . . . . . . . . . . . . . . . . 58
4.16.1 Storage Directory . . . . . . . . . . . . . . . . . . . . . . 58
4.16.2 Max. No. of Days . . . . . . . . . . . . . . . . . . . . . 59
4

4.16.3 Max. No. of Messages . . . . . . . . . . . . . . . . . . . 59
4.16.4 Max. Cache Size . . . . . . . . . . . . . . . . . . . . . . 59
5 Using CleanMail 60
5.1 Live CleanMail Status . . . . . . . . . . . . . . . . . . . . . . . 60
5.2 Server Log . . . . . . . . . . . . . . . . . . . . . . . . . . . . . 61
5.3 Report . . . . . . . . . . . . . . . . . . . . . . . . . . . . . . . . 62
5.4 Search . . . . . . . . . . . . . . . . . . . . . . . . . . . . . . . . 64
5.5 Statistics . . . . . . . . . . . . . . . . . . . . . . . . . . . . . . . 64
5.6 Remote Monitoring . . . . . . . . . . . . . . . . . . . . . . . . . 64
5.7 Learning Messages . . . . . . . . . . . . . . . . . . . . . . . . . 66
5.8 Using Blacklists and Whitelists . . . . . . . . . . . . . . . . . . . 67
5.9 Tuning The CleanMail Filter Pipeline . . . . . . . . . . . . . . . 67
5.9.1 Choosing the Right Filters . . . . . . . . . . . . . . . . . 69
5.9.2 Example Filtering Results . . . . . . . . . . . . . . . . . 70
5.9.3 Troubleshooting . . . . . . . . . . . . . . . . . . . . . . 71
5.10 Web Dashboard . . . . . . . . . . . . . . . . . . . . . . . . . . . 71
6 Reference 72
6.1 CleanMail Configuration File . . . . . . . . . . . . . . . . . . . . 72
6.1.1 General Structure . . . . . . . . . . . . . . . . . . . . . . 72
6.1.2 Value Types . . . . . . . . . . . . . . . . . . . . . . . . . 73
6.1.3 Session Manager Settings . . . . . . . . . . . . . . . . . 73
6.1.4 Port Settings . . . . . . . . . . . . . . . . . . . . . . . . 75
6.1.4.1 General Proxy Port Settings . . . . . . . . . . . 75
6.1.4.2 HTTP Port Settings . . . . . . . . . . . . . . . 76
6.1.4.3 POP3 Connector Settings . . . . . . . . . . . . 76
6.1.4.4 POP3 Port Settings . . . . . . . . . . . . . . . 77
6.1.4.5 SMTP Port Settings . . . . . . . . . . . . . . . 77
6.1.5 Filter Settings . . . . . . . . . . . . . . . . . . . . . . . . 79
6.1.5.1 General Filter Settings . . . . . . . . . . . . . . 79
6.1.5.2 Attachment Filter Settings . . . . . . . . . . . . 80
6.1.5.3 Blacklist and Whitelist Filter Settings . . . . . . 81
6.1.5.4 Delay Filter Settings . . . . . . . . . . . . . . . 81
5
6.1.5.5 RBL Filter Settings . . . . . . . . . . . . . . . 82
6.1.5.6 Shared Real-Time Fingerprint Filter Settings . . 82
6.1.5.7 External Filter Settings . . . . . . . . . . . . . 82
6.1.5.8 Return Code Settings . . . . . . . . . . . . . . 84
6.1.5.9 Mail Storage Settings . . . . . . . . . . . . . . 84
6.1.5.10 Antivirus Filter Settings . . . . . . . . . . . . . 84
6.1.5.11 SpamAssassin Filter Settings . . . . . . . . . . 85
6.1.6 Search Settings . . . . . . . . . . . . . . . . . . . . . . . 86
6.2 Log Files . . . . . . . . . . . . . . . . . . . . . . . . . . . . . . 87
6.3 SpamAssassin . . . . . . . . . . . . . . . . . . . . . . . . . . . . 88
6.3.1 SpamAssassin Main Configuration Files . . . . . . . . . . 88
6.3.2 SpamAssassin Ruleset Updates . . . . . . . . . . . . . . 89
6.3.3 Using Sa-learn in a Command Window . . . . . . . . . . 89
6.3.4 SpamAssassin Database Expiry . . . . . . . . . . . . . . 90
6.4 SMTP Command Quick Reference . . . . . . . . . . . . . . . . . 90
6.4.1 Example SMTP Session . . . . . . . . . . . . . . . . . . 91
6.4.2 SMTP commands . . . . . . . . . . . . . . . . . . . . . . 92
6.4.3 Server replies . . . . . . . . . . . . . . . . . . . . . . . . 92
6.5 POP3 command quick reference . . . . . . . . . . . . . . . . . . 93
6.5.1 Example POP3 Session . . . . . . . . . . . . . . . . . . . 93
6.5.2 POP3 commands . . . . . . . . . . . . . . . . . . . . . . 94
6.5.3 Server replies . . . . . . . . . . . . . . . . . . . . . . . . 94
7 Licensing and Contact Information 95
7.1 License Information . . . . . . . . . . . . . . . . . . . . . . . . . 95
7.2 Ordering CleanMail . . . . . . . . . . . . . . . . . . . . . . . . . 95
7.3 Support . . . . . . . . . . . . . . . . . . . . . . . . . . . . . . . 96
7.4 Copyright . . . . . . . . . . . . . . . . . . . . . . . . . . . . . . 96
7.5 License and Usage Terms . . . . . . . . . . . . . . . . . . . . . . 96
6

Chapter 1
Introduction
Spam wastes time, clogs mail servers, can slow your server to a crawl, and is verydifficult to get rid of. Most mailboxes today are constantly flooded with SPAM -unwanted advertising of any kind. Today the majority of all emails worldwide arespam mails.
While there is no shortage of solutions to this ever-growing problem, installing,using, and working with them often proves to be very complex. CleanMail isthe mail filter software that was designed from the beginning to make installation,configuration, and maintenance as simple as possible.
The CleanMail product family brings the power of the award-winning open-sourcespam filter SpamAssassin™1 to the Windows®2 environment.
The filter pipelining architecture makes CleanMail a flexible multi-purpose mailprocessing tool. It allows for an easy integration of additional filtering programslike virus filters into the SMTP/POP3 checking pipeline.
These filter types are included in CleanMail:
Blacklist/Whitelist Filter Blacklist and whitelists allow filtering based on thesender address of a message.
Delay Filter (SMTP filtering only) The delay filter has proven to be very effectiveagainst the bulk mailer software used by spammers.
DNSBL Filter The DNSBL filter (also known as remote blacklist filter) can getrid of spam messages at the cost of a few DNS lookups.
Attachment Filter The attachment filter can remove potentially malicious attach-ments at very little processing cost.
1SpamAssassin is a trademark of the Apache Software Foundation2Windows is registered trademark of Microsoft Corporation
7

Virus Filter CleanMail uses ClamWin (Clam Anti-Virus) to protect you fromemail-borne viruses. It also supports many third-party virus scanners out-of-the-box, e.g. Computer Associates Anti Virus, F-Prot Anti Virus, Kaspersky,NOD32, just to name a few. Virus mails are rejected and deleted by default.
SpamAssassin Filter SpamAssassin is the world-leading open source spam filter.Though it is one of the best spam filters around, with a very good spamdetection rate and only few false positives, it processes mails only slowlyand causes a rather high CPU load.
Spamtrap Filter (SMTP filtering only) This filter can be used together with Spa-mAssassin to train the spam mail database (Bayes database) used by Spa-mAssassin.
Mail Storage Use this filter to store verbatim copies of incoming messages some-where on your hard disk or on network attached storage, in a folder you canconfigure.
External Commandline Filter This is the swiss army knife of mail filtering. Youcan supply your own home-made filters, and integrate them easily into thefiltering pipeline of CleanMail.
1.1 SMTP Proxy Filtering
The best place to stop SPAM is at the mail server, for two reasons:
• Spam mails can be deleted outright, before they enter your system. Thissaves your money, as you need less storage, bandwidth, and less of yourusers’ time.
• If a legitimate email is identified as spam (false positive), the sender can benotified that his message might not be read by the recipient.
CleanMail works as a transparent proxy, designed to work with any SMTP serversoftware, such as IMail, Lotus Domino, MS Exchange, or Novell Groupwise.
1.2 POP3 Proxy Filtering and POP3 Connectors
You can use CleanMail to filter mail fetched using the POP3 protocol. CleanMailcan either act as a transparent proxy, filtering messages retrieved by your mailclient from your Internet service provider’s POP3 server, or it can fetch mail on itsown and forward the retrieved and filtered messages to an SMTP mail server.
8
All messages have already been accepted and acknowledged by your ISP’s mailserver, so CleanMail is unable to reject the messages received. For this reasonthere can be no feedback to the sender of a message, if a message is classifed asspam and deleted
CleanMail is designed to work with all known POP3 and SMTP servers, and withall mail clients supporting the POP3 protocol. This includes popular mail clientsas MS Outlook, Mozilla Thunderbird, Eudora, or The Bat!.
Note that the APOP and IMAP protocols are not supported. Mail retrieved usingthese protocols is not filtered by CleanMail.
1.3 Overview
Installation procedures and recommended network configurations are covered inInstallation (chapter 2). This chapter also introduces the CleanMail application.This application gives you access to all configuration options and lets you view theCleanMail filtering status and statistics.
To learn about the concepts implemented in CleanMail, see Concepts (chapter 3).
Configuration of CleanMail is described in Configuration (chapter 4).
To find out what happens to your mail, CleanMail offers a lot of useful monitoringand reporting features. Learn about these capabilities in Using CleanMail (chap-ter 5).
See the Reference (chapter 6) chapter for details about the structure and content ofthe CleanMail configuration file.
See Licensing (chapter 7) for ordering and license details.
There are additional resources available online. Take a look at the FAQ list if youare running into problems. You will also find some ’How to...’ documents there.
You may also want to look in the CleanMail support forum.
CleanMail support can also be contacted by email to [email protected].
9

Chapter 2
Installation
The installation section covers system requirements, CleanMail installation, andCleanMail uninstallation procedures. It applies to any mail server software, suchas
• Microsoft Exchange 5.5/2000/2003/2007/2010
• Microsoft Small Business Server (SBS)
• Lotus Notes/Domino Server
• IMail
2.1 System Requirements
CleanMail runs as a Windows Service. For this reason Windows version 5 (Win-dows 2000/XP) or later is required. CPU and memory requirements depend on thedesired e-mail throughput. Spam checkers and virus filters need a lot more systemresources than simple E-Mail delivery.
Apply the following rules of thumb when planning your system:
• Filtering messages requires more CPU performance than just receiving mes-sages, so the server running the filter should perform at least as well as yourmail server. To process 1000 mails per hour, an 800MHz CPU should besufficient. As a rule of thumb, CleanMail can process one message per Mhzof CPU clock frequency.
• Each concurrent instance of the SpamAssassin filtering engine requires about20-30MB of memory. To optimize throughput, CleanMail runs the SpamAs-sassin engine only if all the other mail filters are unable to determine that a
10
mail is spam. Also, CleanMail will automatically check the amount of avail-able memory on your system and limit the number of concurrent instancesaccordingly. Increase system memory to improve mail throughput.
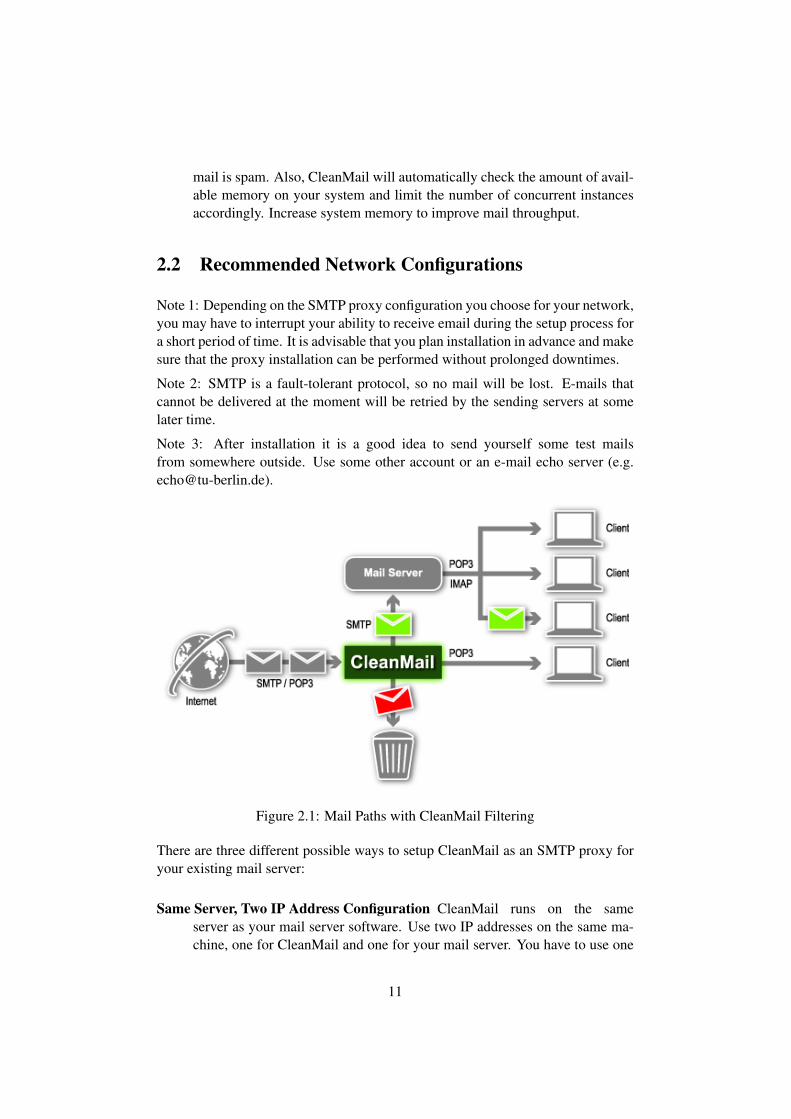
2.2 Recommended Network Configurations
Note 1: Depending on the SMTP proxy configuration you choose for your network,you may have to interrupt your ability to receive email during the setup process fora short period of time. It is advisable that you plan installation in advance and makesure that the proxy installation can be performed without prolonged downtimes.
Note 2: SMTP is a fault-tolerant protocol, so no mail will be lost. E-mails thatcannot be delivered at the moment will be retried by the sending servers at somelater time.
Note 3: After installation it is a good idea to send yourself some test mailsfrom somewhere outside. Use some other account or an e-mail echo server ([email protected]).
Figure 2.1: Mail Paths with CleanMail Filtering
There are three different possible ways to setup CleanMail as an SMTP proxy foryour existing mail server:
Same Server, Two IP Address Configuration CleanMail runs on the sameserver as your mail server software. Use two IP addresses on the same ma-chine, one for CleanMail and one for your mail server. You have to use one
11

of these IP addresses in your e-mail server software as the incoming mail IPaddress. The other IP address will be used by CleanMail. You can use thedefault SMTP port number (25) in both cases.
Same Server, Same IP Address Configuration CleanMail runs on the sameserver as your mail server software. Use the same IP address for both Clean-Mail and your mail server, but use different ports. There are two variationsof this setup:
• Set the incoming SMTP port of your e-mail server software to a num-ber other than 25. CleanMail Server listens, instead of your mail server,at your original SMTP address/port. Note that this approach will dis-rupt e-mail delivery while you are configuring. Depending on the mailserver software you use, you may need to restart this software afterchanging the port or you may even need to restart the server machineto activate this setting.
• Set the incoming SMTP port of CleanMail to a number other than 25.This requires a firewalled network, where you can change your NATsettings (network address translation, sometimes also called port for-warding, or IP forwarding) to redirect SMTP traffic to a different port.There is no need to modify your mail server’s settings address and portsettings.
Separate Server Configuration CleanMail runs on its own server. CleanMail lis-tens on port 25 and forwards SMTP to your existing mail server. There is noneed to modify your mail server’s address and port settings.
There are some things you should consider before making a decision:
• Adding an IP address to a Windows machine is only a few mouse-clicksaway and IP addresses in the 192.168.x.x or 10.x.x.x ranges areplentiful. Make sure both your mail server and CleanMail are listening onlyon their own IP addresses and not on all IP addresses. With some mail serversthis setup this is required to correctly configure the relay settings. CAVEAT:In a two IP address setup, Microsoft Exchange sometimes grabs the SMTPport on all interfaces, even when it has been configured not to. In thesecases it is recommended to use different ports for CleanMail and Exchangeto avoid conflicts.
• If you keep the old IP address and port settings for your mail server, you donot need to reconfigure the SMTP server settings of your users’ mail clients(after all, you don’t want to check outgoing mail from your users for spam).
• Avoid using the loopback interface 127.0.0.1 as outgoing server address,because some mail servers consider all mails delivered from localhost
12

connections as ’trusted’. This makes it more difficult to configure the mailserver’s relay settings correctly.
2.3 Quick Start Installation
When you start CleanMail for the first time, the Quick Start wizard will guide youthrough the installation process. The quickstart installation procedure covers theSMTP filtering setup (in one of the recommended network configurations outlinedabove), and POP3 filtering setup.
SMTP filtering is suitable when a maintain your own SMTP mail service, whereasPOP3 filtering is used when you fetch mail from your ISP using the POP3 protocol.
2.3.1 SMTP Filtering
With SMTP filtering, the client is some other MTA (mail transfer agent), trying tosend mail, and the server is your mail server. The MTA that connects to CleanMailcan be either another mail server or a mail client. CleanMail acts as a transparentproxy, and you need to change your mail configuration to redirect inbound SMTPtraffic through CleanMail.
2.3.1.1 CleanMail runs on the Mail Server
Running CleanMail on the same server as your mail server can be recommendedfor sites with only little mail traffic, as mail filtering (AV and spam filtering) cancause heavy CPU and memory usage.
The following setup instructions assume that your mail server software listens onthe default SMTP port (25), and that you are installing CleanMail on the samemachine as your mail server. After installing CleanMail, you have to re-configureyour firewall/router to redirect incoming SMTP traffic to CleanMail.
• Install CleanMail on the Mail Server using the setup program (section 2.4)
• Launch the CleanMail Admin application, and choose ’SMTP TransparentProxy’ in the ’Choose Configuration Type’ dialog that appears.
• In CleanMail’s Quickstart Wizard, set the Incoming IP to<all interfaces> and set the Incoming Port Number to 26. SetOutgoing Server to the internal network address (usually something like10.x.x.x or 192.168.x.x) of your mail server and leave the OutgoingPort Number at its default setting (Port 25).
13

• Press the Test button to check if the Outgoing Server is available. If thisfails, your mail server is not running, or it is listening on some other IPaddress/port.
• On the next page, you can configure CleanMail’s Open Relay Protection. Atthis point you can just click ’Next’. You may need this feature later if yoursetup fail to pass the open relay test. CleanMail internally runs this test onceyou have finished setup.
• Click through the following pages of the Quickstart Wizard. Usually it issafe to accept the defaults until you arrive on the CleanMail Admin MailOptions page.
• On this page you should enter the IP address or name of your mailserver, an existing recipient address and a descriptive sender address (e.g.cleanmail@<your-domain.com>). Activate both the Send DailySpam Filtering Report and the Send CleanMail Update Information options.Again, use the test button to test your admin mail settings. This will makesure that you can receive all admin mail messages from CleanMail.
• Complete the Wizard by clicking ’Next’ and then ’Finish’. The CleanMailWindows service will be restarted automatically to put your configurationchanges into effect.
• IMPORTANT: Re-configure your firewall/router to redirect incoming SMTPtraffic to port 26 (CleanMail’s incoming port number).
2.3.1.2 CleanMail runs on a separate server
Installing on a separate server has many advantages, especially for sites with heavymail traffic. After installing CleanMail, you have to reroute incoming SMTP trafficto the CleanMail server.
• Depending on which one of the three configurations outlined above (sec-tion 2.2) you use, now is the time to change the network settings of yourmail server software, if needed, or to change the network settings of Win-dows to assign an additional IP address to this server.
• Launch the CleanMail Admin application, and choose ’SMTP TransparentProxy’ in the ’Choose Configuration Type’ dialog that appears.
• In the Quick Start Wizard set the Incoming IP address and port to whereCleanMail should be waiting for SMTP connections. Enter the IP addressand port number of your e-mail server as the ’outgoing server’ settings.
14

• On the relay settings page, to be on the safe side, enter the nameof your domains and do not forget to add *@ at the beginning, e.g.*@yourdomain.com, to make CleanMail accept only recipient addressesthat belong to your domain.
• Choose your desired settings on the rest of the Quick Start Wizard pages (orjust keep the defaults and modify these settings any time later). At the endof the Quick Start Wizard, start the CleanMail service.
• Now you have to reroute mail incoming from the Internet to the CleanMailproxy server. in most cases, one of these options will be applicable:
– Use NAT to reroute SMTP (section2.4.1) in a firewalled network withNAT.
– Use the DNS MX record (section2.4.2) to reroute SMTP.
If CleanMail replaces your existing mail server at the same IP address/portsettings, there is nothing you need to do in this step.
• To check if CleanMail is up and running, use your favorite web browser toload the CleanMail monitoring page (http://localhost:8086/index.html. Youshould also send yourself a couple of test mails from outside using e.g. somefree mail service.
If you run into troubles, see Troubleshooting the Installation (section 2.6) for trou-bleshooting tips.
2.3.2 POP3 Filtering
CleanMail supports two methods for POP3 filtering: you can set up a POP3 proxy,to intercept all traffic between your mail client and your ISP’s POP3 server, oryou can set up a POP3 connector, to fetch mail from the ISP in regular intervals,forwarding filtered mail to your SMTP mail server.
2.3.2.1 POP3 Proxy Setup
POP3 filtering with a transparent POP3 proxy is the only available CleanMail setupif you do not maintain your own mail server. POP3 filtering in general is lessversatile than SMTP filtering, and as an additional drawback users sometimes needto wait for a long time until their mail is downloaded and filtered, for examplewhen returning from a vacation.
• Download CleanMail
• Install CleanMail using the setup program (section 2.4)
15

• Launch the CleanMail Admin application, and choose ’POP3 TransparentProxy’ in the ’Choose Configuration Type’ dialog that appears.
• The Quick Start Wizard will appear. On the POP3 settings page, follow theinstructions to configure your mail client.
• Step to the following pages, and make adjustments according to your wishes.Save the configuration by pressing the ’Finish’ button on the last page.
• Now retrieve a couple of mails from your mail box, if necessary, send your-self a couple of test mails. If you run into troubles, see Troubleshooting theInstallation (section 2.6) for troubleshooting tips.
• In your mail client, add mail filtering rules to automatically move spam mailsto a separate mail folder, or to automatically delete them. Refer to the manualof your mail client for instructions on how to do this.
2.3.2.2 POP3 Connector Setup
POP3 filtering with a POP3 connector requires that you maintain your own SMTPmail server. CleanMail fetches mail from your POP3 account regularly, to forwardit to your mail server after filtering.
• Download CleanMail
• Install CleanMail using the setup program (section 2.4)
• Launch the CleanMail Admin application, and choose ’POP3 to SMTP Con-nector’ in the ’Choose Configuration Type’ dialog that appears.
• The Quick Start Wizard will appear. Set the POP3 server name according tothe information given by your ISP, and enter your SMTP mail server’s nameor IP address. A POP3 connector can be used to fetch mail for more than onemailbox, be sure to enter the mailbox credentials for at least one mailbox onthis page. You can add more mailboxes later.
• Step to the following pages, and make adjustments according to your wishes.Save the configuration by pressing the ’Finish’ button on the last page.
• Send yourself a couple of test mails. Mails should be placed in a mailboxon your mail server within 5 minutes. If you run into troubles, see Trou-bleshooting the Installation (section 2.6) for troubleshooting tips.
• In your mail client, add mail filtering rules to automatically move spam mailsto a separate mail folder, or to automatically delete them. Refer to the manualof your mail client for instructions on how to do this.
16

2.4 CleanMail Setup
CleanMail setup features a standard Microsoft Windows®setup interface and youneed only complete a few steps. You can cancel setup at any time by clicking the’Cancel’ button.
Double click cleanmail.exe (or similar filename) file on either the distributionmedia or from the downloaded .ZIP file. This will launch the CleanMail SetupWizard.
Click ’Next’ on the Welcome screen.
Read the CleanMail license and click ’I accept’ to agree with this license.
Choose a folder where CleanMail should be installed. The setup program willsuggest a default location. If you do not want to use the default location, you canbrowse for a specific directory in the provided input field (placing CleanMail in alocation other than the default will not affect the operation of the program). Unlessyour CleanMail directory already exists (either the suggested, default directory orone of your choosing), the setup program will ask you if it can create that directory.Click ’Yes’. If you want to change the location of the program, click ’No’. Thiswill keep you on the directory screen to choose another location.
The next step is to decide upon the name of the CleanMail program group namethat you will see in the Start Menu. CleanMail suggests a default, but you canchange that to whatever name you would like (changing the name of the CleanMailprogram group will not affect the program operation in any way). After you havedecided upon a name, click ’Next’.
There are some optional CleanMail Setup tasks that you may choose to have done.You can select these tasks by clicking on the appropriate check-box:
• Install additional ruleset - Installs additional spam filtering rules, not part ofthe SpamAssassin distribution
• Create a desktop icon - put a shortcut for CleanMail Administration Wizardon your desktop
• Create a quick launch icon - put a CleanMail Administration Wizard iconinto the quick launch bar
• Windows Firewall Setup - check this to create Windows Firewall exceptionsthat allow mail transfers to pass through CleanMail (not for all versions ofWindows)
Click on the ’Next’ button to continue. CleanMail will now install the program filesand options. If there were no problems during installation, you will see the Finishscreen. From here you can launch the CleanMail Administration Application. If
17

Figure 2.2: Installation Options
you don’t want to launch CleanMail, un-check the corresponding checkbox. Alter-natively, you can just start the CleanMail service. Click the ’Finish’ button whendone.
2.4.1 Using NAT to Reroute SMTP
Firewalls (or routers that implement firewall functionality) do generally not allowinbound connections from the Internet, unless they are specifically instructed todo so by a mechanism called network address translation (NAT, port forwarding,IP forwarding). This allows incoming connections to a specific port number to berouted to some other IP address and port on your internal network, and behind thefirewall.
If CleanMail uses IP address and port settings different from the mail server IPaddress and port settings you used before, you have to change the NAT settings ofyour firewall (or router) to forward all SMTP requests to the incoming SMTP portthe CleanMail service is listening on. It is beyond the scope of this document toinstruct you how to configure your firewall or router to do these things.
2.4.2 Changing the MX Record to Reroute SMTP
MX (=Mail eXchanger) records in DNS tell other mail servers where to forwardmail for a domain. The primary MX record for your domain will be set to your ex-isting email server. This setting has to be changed to the server you run CleanMailon.
18

Note: Don’t set any secondary MX records to show your existing mail server.Many spammers send to the secondary MX, because they assume the secondaryservers are less well protected (which is unfortunately true in many installations).The best idea is to make the IP of your mail server completely invisible to the openInternet.
The new DNS setting will take up to 48 hours to propagate throughout the entireInternet.
2.5 Relaying and the Handling of Outgoing Mail
The forwarding of mail to a domain other than your own is called relaying. If yourmail client connects to a SMTP server to deliver mail, this server is providing arelay service for you.
Usually, the e-mail server software is configured to offer relay services to users inthe internal corporate network.
If you configure CleanMail to replace your existing mail server at the same IPaddress and port settings, you should change the SMTP transport settings of themail client software used. Have the mail clients connect to your server directly.The CleanMail server is meant to filter incoming emails from the Internet and notthe mail of your trusted users. So, as a general rule, avoid relaying outgoing mailthrough CleanMail.
Also, make sure you exclude the IP of the CleanMail server from the list of hoststhat your mail server software relays for (otherwise, you may get an open relay).Run CleanMail’s built-in open relay test to verify your setup.
Note: Some servers implicitly trust all mails from localhost, or from its ownIP address. If this is the case, run CleanMail on another server, or use a differentIP address for CleanMail (see Recommended Configurations (section 2.2)).
Caution: If your setup is an open relay, your mail service may end up in theopen relay databases. The majority of sites nowadays reject mail from known openrelays.
2.6 Troubleshooting the CleanMail Installation
This section is intended to help you if you run into trouble during installation. Ifthis section does not help with your problem, please consult the FAQ list. Thispage also offers access to some ’How to..’ documents.
19

2.6.1 About Sockets, Ports, and Listeners
A network server is constantly ready to receive incoming connections from net-work clients. In other words, it is listening.
An SMTP server will be listening on the SMTP port of your machine, waiting forincoming connections from other mail transfer agents (MTAs, mail clients, or othermail servers) to send mail. SMTP (simple mail transfer protocol) is used to forwardor deliver mail, and cannot be used to fetch mail.
POP3 servers listen on the POP3 port, providing a service for mail clients only.Mail clients can use POP3 (post office protocol version 3) to lookup if there arenew mails available, and to fetch mails. POP3 cannot be used to send mail.
Ports are identified by port numbers: by convention the SMTP listening port is port25, and the POP3 listening port is 110.
As a rule, only one program can be listening at the same time at any given port andIP address combination.
If you run CleanMail and the mail server software on the same machine, this isthe first trouble you may run into: Your mail server and CleanMail contend forthe SMTP port of your machine, but only one can use it, while the other fails toinitialize. If CleanMail fails to grab the port, it will write an error message in itslog file (look for a ’address in use’ message in cleanmail.log) and exit.
To fix this problem, make sure CleanMail is the only program configured to listenon the SMTP port. This can be done two ways: by using different ports for themail server and for CleanMail or by using different IP addresses for CleanMail andfor your mail server.
Once both your mail server and CleanMail are up and running, it is time to checkthat everything is working right.
2.6.2 Testing the Basic Proxy Setup
SMTP communication was designed to be readable by human eyes. Because ofthis, the ubiquitous telnet program proves most useful to test your setup. In Win-dows, you can run telnet from the start menu (choose ’Execute’, and type ’telnet’),or from the command prompt. Try to connect with telnet to both your mail serverand to CleanMail. Once you have seen the SMTP server’s welcome message (start-ing with 220), issue a QUIT command. Here is the transcript of a sample telnetsession:
C:\>telnet 192.168.0.12 25Trying 192.168.0.12...Connected to mail.byteplant.com.Escape character is ’ˆ]’.
20

220 mail.byteplant.com readyQUIT221 mail.byteplant.com closing connectionConnection closed by foreign host.
If everything works, you will get exactly the same replies both times. If you can’tconnect to the mail server, troubleshoot the mail server software. If you can’tconnect to CleanMail, or if CleanMail sends you a 421 reply, look into CleanMail’slog file for an error message (the simplest way to access the log is by viewing the’Log’ tab of CleanMail Admin).
2.6.3 CleanMail and Microsoft Exchange
In some aspects Microsoft Exchange does not completely adhere to Internet stan-dards, and this may lead to problems when you install CleanMail in a MicrosoftExchange environment.
2.6.3.1 Receive Connector Configuration
Exchange 2007 or later in its default configuration is unable to receive messagesfrom the Internet. To fix this, you can either add a custom receive connector, orchange the configuration of the default receive connector:
• Launch the Exchange Management Console (EMC)
• Click on Server Configuration, select the default Receive Connector andgo to Properties.
• Switch to the Permission tab.
• Check Anonymous Users and save your changes.
You should also verify the following exchange settings:
• If your Windows domain is different from your Internet domain, make surethere is an appropriate entry in the Accepted Domains setting.
• To block messages to accounts that do not exist on your server, RecipientFiltering should be enabled.
21

2.6.3.2 Backscatter
In its default configuration, Exchange 2003 or earlier silently accepts mail ad-dresses that do not even exist on your server. Once Exchange has falsely accepteda message, it is required to create a ”non-delivery report” (NDR) for each undeliv-erable mail received, and tries to send it to the sender of this spam or virus mes-sage. This costs you bandwidth, CPU load, and disk space. Typically, the senderaddresses of spam and virus mails are fakes, so the NDRs are undeliverable andremain in the outgoing queue of your mail server for days. Upon a heavy virus orspam wave, this can crash your mail server, once thousands of undeliverable NDRsin your outgoing mail queue use up all your disk space.
Most spam and virus messages have forged sender addresses, so the NDR, if it isdeliverable, is returned to an innocent third party. This is commonly referred to asthe ”backscatter” problem.
To make sure that Exchange only accepts mails, Exchange 2003 allows you toenable recipient checking, there are step-by-step instructions available on the In-ternet.
If you use a version earlier than Exchange 2003, you can configure CleanMail toaccept only the recipient addresses you want. This is done on the ”Relay Protec-tion” page of the admin wizard. Instead of a domain, like *@byteplant.com,you can alternatively enter a list of acceptable mail addresses and aliases. Clean-Mail can also load mail addresses from the Active Directory.
2.6.3.3 SMTP Port in Use
In a two IP address setup, Microsoft Exchange™1 sometimes grabs the SMTP porton all interfaces, even when it has been configured not to. Look at this URL for aMicrosoft knowledge base article that tells you what to do.
2.7 Registering CleanMail
To register CleanMail, enter the registration name and license key you receivedwhen you purchased in the registration window. To make sure you enter the licensekey correctly, use copy/paste (CTRL-C and CTRL-V keys).
To obtain a license key, please visit our online shop.1Microsoft Exchange is a trademark of Microsoft Corporation
22

2.8 Uninstalling CleanMail
When uninstalling CleanMail, do not forget to undo any changes you might havemade to your network (firewall configuration, DNS MX records, mail client con-figuration). CleanMail itself can be uninstalled in one of two ways.
2.8.1 Using CleanMail Uninstall
This program is located in the CleanMail program group (the program group namemay be different if you chose another name during setup). You can access itthrough the Start menu: Find and select ’Uninstall CleanMail’ to run the uninstallprogram.
You will be asked if you want to completely remove CleanMail and all of its com-ponents. Click ’Yes’ to continue with the de-installation or ’No’ to cancel. If youclick ’Yes’, all installed files will be removed, any configuration files you createdwill be preserved. If removal was successful, a success message will appear (ifyou encounter problems during de-installation, please visit the Trouble Shootingsection of this manual). Click okay to close this message. CleanMail is no longerinstalled on your computer.
2.8.2 Using The Microsoft Windows Control Panel
Select ’Add or Remove Programs’ icon and then CleanMail. This will launchthe CleanMail uninstall program. Follow the process as described in the previoussection (section2.8.1).
23

Chapter 3
Concepts
This chapter is intended to help you understand the basic concepts in the design ofCleanMail.
3.1 CleanMail Architecture
The CleanMail email security package consists of several parts:
CleanMail Service The main part of the package is the CleanMail Service. It runsin the background, intercepting mail transfers, and dispatches mail filters asneeded. It also offers HTTP access to reporting pages you can access with aweb browser.
CleanMail Admin The admin application allows to edit the configuration filesused by the service. It can be used to define connectivity settings and filteringrules, and also displays runtime information such as statistics, system load,or the CleanMail Service’s logs. If you have a mail storage configured, italso lets you browse stored messages.
SpamAssassin This is a filtering package from the SpamAssassin open sourceproject. CleanMail supports two configurations: With Client/Server filtering,CleanMail will run one or more spamd filtering daemons, and uses the spamcprogram to submit mails to spamd for filtering. If Client/Server filtering isdisabled (the default) the CleanMail service will run a SpamAssassinexecutable for every message to filter.
ClamWin This an open source virus scanner package you can choose to installwith CleanMail. It is invoked whenever needed from the CleanMail serviceto filter messages. The ClamWin package contains its own maintenance andsupport programs to update the filter database, or to check your hard disksfor virus infections.
24
3.2 Proxy Ports
A proxy is a server that sits between a client and a server. The proxy interceptsall requests to the server to either handle them by itself or to forward them to theserver.
With SMTP filtering, the client is some other MTA (mail transfer agent), trying tosend mail, and the server is your mail server. The MTA that connects to CleanMailcan be either another mail server or a mail client.
CleanMail is a transparent proxy: It is intended to be invisible to the outside. TheMTA that connects to CleanMail does not see any difference in the service yourmail server usually provides. By default, CleanMail does not accept or reject mailon its behalf, it always checks with your mail server to find out if a certain recipientaddress is acceptable or not, even before acknowledging an address to the MTAconnected to CleanMail. This way, most of your mail server settings remain ineffect, even while CleanMail intercepts unwanted mail.
CleanMail can act as a proxy service for more than one mail server. This allowsyour CleanMail server to filter mail for many servers and domains. To do this, youcan configure multiple proxy ports, each with its own transport settings (incomingand outgoing server IP address and port). Each of this ports has its own filterpipeline, which can be configured for each proxy separately, and thus be easilyadapted to the needs of your users and clients.
CleanMail also features a proxy port type for use with mail clients (using the POP3protocol). With POP3 filtering, a mail client (such as MS Outlook) initiates thetransfer, by connecting to the CleanMail proxy, which forwards this request toyour ISP’s POP3 server, and returns any new message only after they have beenfiltered. The mail client that connects to CleanMail does not see any difference inthe service your ISP’s POP3 server usually provides.
You can also configure POP3 connectors in CleanMail. A POP3 connector is aPOP3 to SMTP protocol adapter. It can be used to retrieve messages from a POP3server, and forward these messages (after filtering) to a mail account on your SMTPserver. The POP3 connector implements a safe transaction scheme: Only mailscompletely transmitted and accepted by the SMTP mail server are deleted from thePOP3 mailbox. Mails not forwarded (ie. spam messsages, if you choose to deletespam messages) are just deleted and never enter your mail server.
3.3 Filter Pipeline
CleanMail feeds incoming mail to a series of mail filters, the so-called filterpipeline. Examples of mail filters are the built-in attachment blocker, third-partyvirus checkers, or SpamAssassin.
25

Figure 3.1: Example Filter Pipeline
Each filter analyzes the message and returns a filter result telling CleanMail whatto do with it. Example filter results are: accept and deliver, or reject and delete.The overall filtering result is always the ”worst” result, for example if the viruschecker returns ’reject and delete’, it will override another filter returning ’acceptand deliver’.
The location of a filter in the filter pipeline matters: To help conserve resourcesand to increase throughput, filters lower down in the filter pipeline are not invokedif an earlier filter has already decided that a mail should be deleted. Filters are alsoskipped if the filtering result so far can’t be exceeded by the worst result a filtermay return.
CleanMail by default orders the filters to optimize throughput, using the followingguidelines:
• Filters with the lowest resource usage and the highest selectiveness shouldgo first. For this reason the attachment filter is always be one of the firstfilters in the filter pipeline, because of its low resource usage and its goodresults in finding and removing malware.
• Filters which use a lot of processing power and with low selectiveness shouldgo last. Most people won’t delete spam mails without at least giving hu-mans the chance to look them over: For this reason, the selectiveness of theSpamAssassin filter is low, while it uses a lot of resources. Therefore, theSpamAssassin filter should be one of the last filters.
When configuring CleanMail with the Admin application, every new filter will beautomatically moved to the best position in the filter pipeline. Afterwards, you canstill change the order of filters, but only within limits. You can also move filters as
26
you please (though we do not recommend it), by editing the configuration file witha text editor (see CleanMail Configuration File (section 6.1)).
3.4 Mail Storage
You can configure a mail storage in a proxy port’s filter pipeline. The mail stor-age takes a copy of the message it processes and saves it on disk. You can laterbrowse stored messages, and view messages or message transport information. Ifa message has been blocked, you can choose to unblock it.
Like with filters, order matters: If you choose to place the mail storage before thefirst filter of you pipeline, all messages, including each and every spam messageare saved. Put a mail storage here if you want to be able to unblock false positives.
If you place the mail storage after all filters, only messages actually delivered arestored. You can use this to archive messages.
3.5 Remote Access
The CleanMail Service allow remote access using the HTTP protocol to view logsand statistics. Access is read-only in general, with some enhanced functionalityto browse the mail storage (if configured). Administrators may choose to restrictaccess by using passwords, and by using host allow/deny lists.
To avoid port conflicts, CleanMail Service listens by default on a non-standard port(8086) for HTTP connections.
27

Chapter 4
Configuration
Configuration of CleanMail is best done using CleanMail Admin. The settingsare organized in a set of configuration dialogs, each covering some aspect of theconfiguration. You can access these dialogs from the ’Proxy Setup’ and ’FilterSetup’ menus; note that some of the dialogs are only available if you have a filteror a proxy port selected on the configuration page of the CleanMail Admin.
Within the configuration dialogs, you can freely step forward and backward usingthe ’Next’ and ’Back’ buttons. You can cancel your changes anytime by pressing’Cancel’. Once you pressed ’Finish’ your changes become permanent and arestored in CleanMail’s configuration file, cleanmail.cf.
Important: Once you have saved new settings, they are not yet in use by the Clean-Mail service. To make the service re-read the configuration file, choose ’ApplySettings’ from the file menu once you are ready.
Note: ’Apply Settings’ automatically runs the open relay test.
4.1 Global Settings
The Global Settings dialog can be found in the ’File’ menu.
4.1.1 HTTP server settings
The CleanMail service has a built-in HTTP server, used by the CleanMail adminapplication to retrieve status information, such as system load and mail statistics.In order the avoid port conflicts if you run a web server at the same time, the HTTPserver uses a non-standard listening port (port 8086, instead of the default HTTPport 80).
28

The CleanMail admin application can be used to monitor remote CleanMail serversas well, if you know the remote server’s name and HTTP listening port, and theHTTP user/password (if set).
Apart from the HTTP server’s use as a source of monitoring data, it also offersstandard HTTP access to reporting pages that can be accessed with a web browser.To access these pages, enter this URL into the address field of your browser:
http://localhost:8086/index.html
Access to the CleanMail HTTP server can be restricted by requiring a password,or by using host allow/deny lists.
4.1.1.1 HTTP Server and Port
These settings determine the listening interfaces. With the default setting, theCleanMail HTTP server listens on port 8086 on all interfaces.
4.1.1.2 HTTP User and Password
If you wish to require password authentication to access monitoring data, you needto enter both a password and a user name. If set, the web browser will prompt fora password if you try to access the reporting pages, and you also need to enter theuser name and password in the CleanMail admin application’s connection settings(choose ’Connect...’ from the ’File’ menu).
Basic HTTP password authentication is inherently unsafe, because user names andpasswords are passed over the network without encryption, and can be sniffed byanyone with access to your network.
4.1.1.3 Host Allow and Host Deny
You can enter IP addresses or host names into the Host Allow and Host Deny fieldsto restrict access to the CleanMail HTTP server. The allow/deny setting applies toaccess from both the CleanMail admin application and from a web browser. Ifaccess is denied, you will only receive a 403 Forbidden error response fromthe server.
The Host Allow setting takes a list of IP addresses or hostnames that may accessthe monitoring port. All addresses within private network IP address blocks (suchas localhost, 10.x.x.x or 192.168.x.x) are always allowed. If you wantclient access over the Internet, enter the remote hosts that may access the server.CleanMail also supports dynamic DNS. To enable access from all hosts, enter a
29
single asterisk (’*’) character. The default setting is empty (granting access to allclients or web browsers within the same private network).
IP addresses or hostnames on the Host Deny list are blocked. This setting canalso be used to block specific hosts on a private network. This setting is empty bydefault.
4.1.1.4 Applying Changes
For any changes to take effect, you need to apply the settings by restarting theCleanMail service. After the service has been restarted, you may need to changethe CleanMail admin application’s connection settings as well, to allow the clientto retrieve status data from the server again. To change the connection settings,choose ’Connect...’ from the ’File’ menu.
4.1.2 CleanMail Admin Mail Options
On this page a mail account to receive daily CleanMail statistics and importantadministration information can be configured. You have to enter a mail server(default is the outgoing server, see above), a recipient, and a sender email address.Use the test button to see if your settings really work.
Check the Daily Spam Filtering Report option to get a daily mail filtering sum-mary. If you want to check the recipient addresses currently in use by CleanMail,select the Daily Licensing Summary option. By checking Check For Updatesyou will receive information about important new versions of CleanMail once theybecome available. This feature requires a http (port 80) connection to the webserver www.byteplant.com. Be sure to configure your firewall appropriately.If you run an HTTP proxy server, use the Check For Updates Proxy setting, touse this proxy for the update check connection.
4.1.3 Logging Options
The log output can be seen on the ”Log” page of CleanMail Admin, or by viewingthe file cleanmail.log.
The log file is cycled whenever its size exceeds the limit, or at midnight when aconfigurable number of days has passed. The verbosity of the log file is controlledby the following flags:
• Extended logging adds some more output to the log that might be interesting.Turning this option on will log the To, From, and Subject mail headers ofevery mail received.
30

• Detailed logging, among other things, adds a transcript of the entireSMTP/POP3 communication to the log. This is most useful for debuggingmail transport problems.
• Filter error logging collects error or debug output of the mail filters andwrites it to the log file. Virus filters often log the type of virus found totheir error output. With this option on, you can see it in CleanMail’s log.
4.1.4 Memory and Buffering Options
This page allows you to configure CleanMail’s resource usage.
Figure 4.1: Memory Options Setup Page
4.1.4.1 Message Size Limit
The message size limit is the maximum amount of storage that will be available tobuffer a message. If a message exceeds this size, the message will be rejected anddeleted.
If you set this too high, CleanMail’s throughput will be reduced, and large mailscan destabilize or even crash your system. Typical values are in the range of 10 to20MB.
4.1.4.2 Memory Usage
The memory usage high watermark controls the maximum amount of memory usedby CleanMail and its filters. Once the memory usage high watermark has beenreached, CleanMail will delay pending incoming connections.
The maximum memory CleanMail may use is entered as a percentage of systemRAM.
31

The primary purpose of this setting is intended to keep mail filtering from drainingresources away from other services. The default setting is 80%. For a dedicatedserver, running nothing else but CleanMail values in the range of 80-100% arebest. Use a value of 40-80% if CleanMail shares the server hardware with othersoftware.
• If you find that CleanMail operates close to its memory limit over lengthyperiods of time, while at the same time CPU load is comparatively low, in-crease this setting. If you are already at 100% memory usage, upgrade yourhardware with more system RAM.
• If you are being flooded by non-delivery messages or other unwanted traffic,activate selective traffic limiting to reduce the load. The SMTP proxy portsetting wizard gives you a number of effective options.
• If you find, during normal operation, that the server’s CPU load is at 100%over extended periods of time, caused by multiple instances of SpamAssas-sin or other filters, you should consider to decrease this limit, to make thesystem more responsive to other tasks. Also, faster hardware might be anoption.
Always provide enough system RAM. As a rule of thumb, the maximum numberof simultaneous connections will be the available RAM memory divided by 25MB.
4.2 POP3 Proxy Port Setup
The POP3 Proxy Port Setup dialog is invoked whenever you edit or add a POP3proxy port.
4.2.1 POP3 Server and Port Settings
This page allows to set the basic connectivity settings of the proxy port you areconfiguring.
Incoming IP Address/Port
Choose one of the IP addresses available. Use ’<all interfaces>’ if youwant the proxy to listen on all interfaces. This setting will make CleanMail listenon all IP addresses, including the loopback interface (127.0.0.1).
Usually, the port number will be the POP3 port number, 110.
Outgoing IP Address/Port
The outgoing IP address cannot be configured in advance. It depends on the ac-count a user wants to connect to, and it is specified in the mail client (see below).The outgoing port number is always set to 110.
32

4.2.2 Changing the Mail Account Settings
If you want to use the POP3 proxy to filter incoming mail, you have to changethe mail account settings in the configuration of the mail client software you use.Usually you will find the following settings:
Outgoing mail server (SMTP server): Do not modify this setting, the POP3 fil-ter of CleanMail does not interfere with outgoing mail.
Incoming mail server (POP3 server): Write down this setting, and modify it tothe hostname or to the IP address of your CleanMail server. Make sure youuse the POP3 protocol to fetch mail.
User (Account): Modify this setting to username:mailserver, using the mailserver name you wrote down in the previous step.
Password: Leave this unchanged.
Note that CleanMail does not support the IMAP protocol. If your mail client isconfigured to use IMAP, reconfigure it to use POP3.
Repeat this procedure for all mail accounts and mail clients you use. Test yournew settings immediately: Send yourself a test mail. Use your account to send amessage to yourself, or use an e-mail echo server (e.g. [email protected]).
4.3 POP3 Connector Setup
The POP3 Connector Setup dialog is invoked whenever you edit or add a POP3connector.
4.3.1 POP3 Server and Account Settings
This page allows to set the basic connectivity settings of the POP3 connector youare configuring, and the accounts and mailboxes involved.
POP3 Server/Port
Set this to the POP3 server and port information of your ISP’s POP3 server. Youcan use both a domain name, or an IP address. Usually, the port number will be thedefault setting, the POP3 port number 110.
Your Mail Server/Port
Enter the name or IP address of your SMTP mail server here. The default SMTPport number is 25. If you have configured an SMTP proxy at the same time, besure to forward to the mail server directly, and not to the SMTP proxy provided byCleanMail.
33

4.3.2 POP3 Mailboxes and Forwarding Account
CleanMail can poll multiple mailboxes on the same POP3 mail server for newmessages. For each mailbox, you have to specify the user name and password, anda forwarding account on your mail server. If you want to, you can forward multiplePOP3 mail boxes to the same mail account.
4.3.3 POP3 Connector Options
These can be used to modify the operational parameters of the POP3 connector.Usually, there is no need to change the defaults.
Mail Sender Address
SMTP requires a MAIL TO command to be submitted. Usually using an emptyaddress in this command, or the special address postmaster will work, but mailservers exist that do not accept one or the other. If mail forwarding fails for anon-empty POP3 mailbox, try different settings here.
Note that the mail sender address is an entity different from the From header fieldof a message, even though they often happen to be set to the same address.
Mail Redirect Address
Some mail filters allow to redirect spam messages to another account. Redirectedmessages are delivered to the address specified in this setting. If you use thisfeature, the redirect address must be a valid mail address on the outgoing mailserver, otherwise POP3 mail retrival will be stalled.
Mails per Session
Messages already forwarded to the SMTP server are only deleted from the POP3server after the POP3 session is regularly terminated. If the connection to thePOP3 server is unstable you may experience duplicated messages. If this happensrepeatedly, reduce the mail per session count.
POP3 Scan Interval
This settings defines the time between scans of the mailboxes. The default settingis 300 seconds, or five minutes.
4.4 SMTP Proxy Port Setup
The SMTP Proxy Port Setup dialog is invoked whenever you edit or add an SMTPproxy port.
34

4.4.1 Incoming and Outgoing SMTP Settings
This page allows to set the basic connectivity settings of the proxy port you areconfiguring. Consult Recommended Configurations (section 2.2), when in doubt.
Incoming IP Address/Port
Choose one of the IP addresses available. Use ’<all interfaces>’ if youwant the proxy to listen on all interfaces. This setting will make CleanMail listenon all IP addresses, including the loopback interface (127.0.0.1).
Usually, the port number will be the SMTP port number, 25.
Outgoing IP Address/Port
Set the server and port number to which CleanMail forwards all incoming SMTPrequests here.
Figure 4.2: Incoming and Outgoing Server Setup
The ’Test’ button can be used to test if the server and port settings do in fact pointto a live mail server. It sends a test message to the ”postmaster” account on thisserver. RFC-2821 specifically requires that mail to the postmaster account mustalways be accepted, so if this test fails, you can be fairly sure there is no mailserver listening at the server/port settings you have chosen. If you’re sure that youroutgoing server settings are OK, check if your mail server is up and running withthe correct configuration settings.
35

4.4.2 Reject Options
4.4.2.1 Mail Reject Message
When configuring your mail filters, you can choose to reject mail. If a mail isrejected, the sending mail transfer agent (MTA) notifies the sender that his mailcould not be delivered. You can configure a short response in CleanMail that theMTA that connects to CleanMail is supposed to pick up and return to the user. Inthe case of a mail client, this will be a popup window, if it is another mail server, itwill be a delivery failure notice.
Note: You can configure this in CleanMail (reject message setting), but the mes-sage will always be created by the MTA that connects to CleanMail. Don’t entervery long or multi-line responses, our experience has shown that there are manyMTAs about that only pick up the first or last line of such a response and drop theremainder.
4.4.2.2 Mail Redirect Address
When configuring your mail filters, you can choose to reject mails and redirectthem to another account.
The redirect address you enter MUST be a valid mail address on the outgoing mailserver, otherwise all redirected mail will be deleted. Use the ’Test’ button to verifythat the redirect address works.
4.4.3 Relay Settings
CleanMail operates as a transparent proxy. To avoid that your mail server becomesan open relay and to stay within the licensing, you should configure your mailserver to accept mails only for valid recipient addresses in your domains and toreject all other addresses. It is important to make sure that your SMTP server isconfigured in a way that mail received from CleanMail is not relayed unless au-thenticated using e.g. SMTP-AUTH. Only if this is not possible for some reason,you must enter all the recipient addresses in this setting (or a pattern that matchesall recipient addresses). If you want to limit the set of recipient addresses Clean-Mail accepts, enter the valid recipient domains or recipient addresses below. Mailto other addresses will be rejected. You can use the wildcard characters ? (anycharacter) and * (any number of any character). Normally, you will want to acceptmail for recipients in your domain only, like in *@byteplant.com. Multipleaddress patterns can be separated by blanks.
In environments using Active Directory (most MS Exchange installations), thevalid email addresses can be loaded from the Active Directory by pressing the Load
36

Figure 4.3: Relay Settings Setup Page
from Active Directory button. This feature requires that the .NET 2.0 framework(or later) is installed.
Once your done with SMTP port setup, run the ’Open Relay Test’ from the ’File’menu to make sure your setup is not an open relay that can be abused by spammers.
Note 1: Be very careful when using this option since all recipients not listed hereWILL NO LONGER RECEIVE ANY MAIL AT ALL. A spelling error here maycut you off completely.
Note 2: With this setting in use, your CleanMail server will not relay outbound mailof your users. Consult Relaying and the Handling of Outgoing Mail (section 2.5)for a discussion of this topic.
Note 3: Some mail servers have the vexing habit to accept mails to any recipientaddress in the local domain. Undeliverable mails are silently forwarded to thepostmaster. If you can’t find a way to turn this off, you can use CleanMail’s relaysettings to achieve the same. Enter all allowable mail addresses and aliases hereand all other mail will be rejected outright by the CleanMail proxy.
4.4.4 Auth Attack Protection
Some spammers try to guess your server passwords to use your server as spam re-lay. To protect against this type of attacks, remote hosts are blocked for 20 minutesafter a configurable number of authentication failures have been detected.
You can set the number of allowable authentication failures on this page of theSMTP proxy port setup wizard. The default setting is 2.
37

4.4.5 Directory Harvest Attack Protection
Directory harvest attacks are used by spammers to find valid mail addresses in yourdomain. The attacker, for example, goes through a list of common first names andcombines them with your domain name to issue SMTP RCPT TO commands, likethis:
RCPT TO [email protected]
If a your mail server accepts this address, the spammer takes this as an indicationthat this address is valid.
CleanMail counts the number of failed RCPT TO commands in a SMTP session.As soon as this counter exceeds a configurable limit, the remote host is discon-nected and blocked for another 20 minutes. This counter is reset whenever a RCPTTO command is successful.
You can set the limit on this page of the SMTP proxy port setup wizard. The defaultsetting is 10.
Note: If your server is behind a mail relay and not exposed to the Internet, youshould disable this setting (leave it empty), otherwise the relay might get blockedif it accepts messages for non-existent users.
4.4.6 Connection Limit
You can impose an absolute limit of simultaneous connections on a port. This limitmight never be reached, depending on system memory size and the memory usagelimit you configured in the CleanMail’s memory settings.
4.4.7 Mail Flooding Protection
CleanMail’s traffic limiting options are also useful to protect yourself against theimpact of mail flooding.
The most common kind of mail flooding are excessive amounts of non-deliveryreports. This can happen after a spammer or a virus has used one of your emailaddresses as ’From’-address. After that you may get thousands of non-deliveryreports from all around the world within a short period of time. Typically, you willfind a pattern: only a few badly configured mail hosts are the source of these mails.
Mail servers try to deliver mail as fast as possible, and so they open more than oneconnection to your mail server. If a server has thousands of non-delivery reportsqueued for you, it can easily happen that this server alone is capable of pushingyour server to its limit with spam filtering and anti-virus checking for several hours.
38

During this time, your legitimate incoming mail traffic can be slowed down to atrickle.
Sometimes it might help to send the admin of these sites a mail to inform themof the errors of their ways (they could have rejected the mail outright, instead ofaccepting it and sending a non-delivery report to the wrong person afterwards), butthis is rarely successful.
CleanMail provides the means to reduce the impact of this problem. You can putthe offending mail host on a reject list, and/or you can limit the number of simul-taneous connections accepted from the same host.
Figure 4.4: Traffic Limiting
4.4.7.1 NAT and Flooding Protection
If you use a firewall with network address translation (NAT), CleanMail will nolonger be able to see the real host address of the incoming connection, insteadall incoming connections are forwarded from the firewall. The incoming host ad-dresses in this case will be something like 10.x.x.x or 192.168.x.x, undyou can’t use IP addresses to block sending hosts.
4.4.7.2 Host BlackList
Hosts can be rejected either by host IP address (the IP address of the MTAthat connects to CleanMail), or by the name the MTA supplies with the SMTPHELO/EHLO command. All mail from a host matching an entry on the blacklistwill be rejected with a permanent error response.
Mail from hosts that call themselves friend or localhost rarely come up withlegitimate mail, so it might be a good idea to put those on the blacklist. To findmore host names and IP addresses to put on the list, statistics of mails received
39

and what host names were used by the sender can be found on the report tab of themain window. It often helps to put an offending host on the blacklist temporarilyonly. You usually can revoke this restriction after a few days.
The Host Blacklist option also supports wild cards. You can use 11.22.33.*or similar to reject IP address ranges. Likewise, you can use wildcards with hostnames, which is helpful if the site flooding you operates a pool of mail servers:
*.somedomain.org
blocks all mail hosts of somedomain.org.
4.4.7.3 Connection Count
Setting the ’Connection Count’ restricts the number of simultaneous connectionsper host. Additional connection requests are delayed with a temporary error re-sponse (the temporary error response causes the submitting host to retry deliverylater). This way, a single host can no longer occupy all your mail server’s resources.
4.4.7.4 NDR Connection Count
This setting works similar to the ’Connection Count’ setting, with the differencethat the limit is applied to connections trying to send a non-delivery report. Con-nections sending other messages are not affected.
Any mail you send should not result in the return of more than a few non-deliveryreports (NDRs), so it is acceptable to limit the traffic of incoming NDRs to only1..2 at the same time from the same site. By setting the ’NDR Connection Count’to a small numeric value (in the range of 1..2), only 1..2 simultaneous connec-tions per host to send a non-delivery report are allowed, all others are delayedwith a temporary error response. This way, no non-delivery report is lost, whilea single server can no longer flood your mail server with (in most cases useless)non-delivery reports.
4.5 Mail Filter Setup
This section discusses filter settings common to all filters. Please read FilterPipeline (section 3.3) for an intorduction to filter pipelines.
40

4.5.1 Filter Name
Filter names are used to identify individual filters in statistics charts and reports.The name should be unique.
If you do not have more than one filter of the same type, there is usually no needto override the default name. Therefore, this setting is usually hidden. It is onlyaccessible once you have more than one filter of the same type in use.
4.5.2 Recipient Address Patterns
Filters are applied only to messages addressed to selected recipients. You can (butneed not) specify these recipients for each filter individually.
Note: The address patterns apply to the envelope recipient address (the recipientaddress used in the SMTP commands issued by the sending mail server). The To:field of the MIME message headers may show a different address.
4.5.2.1 Enable/Disable Address Pattern Settings
There are two settings that control the recipient addresses where a filter is applied:
• Address Patterns To Enable Filter put all the addresses here, were the filtershould be applied. If you leave this empty, CleanMail applies this filter toall addresses (except those that are listed in the Address Patterns To DisableFilter setting).
• Address Patterns To Disable Filter put all the addresses here, were thefilter should not be applied. This setting overrides the Address Patterns ToEnable Filter setting.
You can use the wildcard characters ? (any character) and * (any number of anycharacter), for example like in *@byteplant.com.
Here are some examples:
Address Patterns To Enable Filter: * (or empty)
Address Patterns To Disable Filter: [email protected]
The filter is applied to all recipients, with the exception of one mail address:[email protected].
Address Patterns To Enable Filter: *@yourdomain.com
Address Patterns To Disable Filter: (empty)
The filter is only applied to: *@yourdomain.com.
If a message is addressed to multiple recipients, the message is filtered if filteringis enabled for at least one of the recipients.
41

4.5.2.2 Same Address Settings As Previous
If you do not want to specify the address settings for every filter separately, leavethis setting enabled for all filters. Enter the address pattern settings only for thefirst filter of your filter pipeline. All other filters then use the settings of the firstfilter.
If you add a new filter to a filter pipeline, Same Address Settings As PreviousFilter is checked by default.
4.5.3 Filter Results
All filter configurations have a setting that allows you to choose what happens witha mail if the filter finds unwanted content, such as a virus, or spam. The followingsummarizes the filter results you may encounter, and their reasons:
accept/deliver (check disabled) A filter returns this result if the filter has beendisabled for all recipients of a message. Look at Recipient Address Patterns(section4.5.2) to find out how to configure this.
accept/deliver The filter did not find unwanted content.
accept/deliver (skip size exceeded) Some filters do not check mails larger thana configurable size. For example, spam mails are typically small, so theSpamAssassin filter by default passes large mails without checking.
accept/deliver (junk) The filter found unwanted content, but the mail is acceptedand delivered nonetheless. If the Subject Tag setting is not empty, Clean-Mail will flag the message as junk by modifying the subject.
accept/deliver (unknown result) For some reason, the filter was unable to checkthe message. The filter will write additional information about the problemto cleanmail.log. The mail is accepted and delivered.
reject/deliver The filter found unwanted content. Receipt of the mail is rejected.The MTA that connects to CleanMail is supposed to notify the user, see MailReject Message (section4.4.2.1) for details. The message is still delivered toits recipients. If the Subject Tag setting is not empty, CleanMail will flagthe message as junk by modifying the subject.
reject/redirect The filter found unwanted content. Receipt of the mail is re-jected. The MTA that connects to CleanMail is supposed to notify theuser, see Mail Reject Message (section4.4.2.1) for details. The mail is redi-rected to a quarantine account you can configure, see Mail Redirect Address(section4.4.2.2). If the Subject Tag setting is not empty, CleanMail will flagthe message as junk by modifying the subject.
42

accept/redirect The filter found unwanted content. The mail is accepted. Themail is redirected to a quarantine account you can configure, see Mail Redi-rect Address (section4.4.2.2). If the Subject Tag setting is not empty, Clean-Mail will flag the message as junk by modifying the subject.
reject/delete The filter found unwanted content. Receipt of the mail is rejected.The MTA that connects to CleanMail is supposed to notify the user, see MailReject Message (section4.4.2.1) for details. The mail is deleted.
accept/delete The filter found unwanted content. Receipt of the mail is acknowl-edged, but the mail is deleted. The mail simply vanishes, the sender is notnotified, and the recipient never sees it.
accept/deliver (whitelisted) The sender address is whitelisted. All filters (exceptattachment blockers and anti virus filters) are bypassed, and the mail is ac-cepted and delivered.
delete (unexpected client disconnect) The client disconnected without waitingfor the mail server to acknowledge receipt of the message. The mail wasprobably spam, so good riddance. A legitimate sender will try to resend themessage later.
reject/delete (non-recoverable error) Some processing error in the filter causedthe message to be irretrievably lost. The MTA that connects to CleanMailis supposed to notify the user, see Mail Reject Message (section4.4.2.1) fordetails. If this filtering result appears, it is usually due to a configurationproblem. Check the log for details.
reject/delete (mail too large) The mail was larger than the message size limit(section4.1.4.1) you have configured. The message is rejected, and the MTAthat connects to CleanMail is supposed to notify the user, see Mail RejectMessage (section4.4.2.1) for details.
accept/deliver (license count exceeded) The filter was disabled because the re-cipient address count covered by your license was exceeded. The mail isaccepted and delivered.
All messages that have been processed by CleanMail will have a ”X-CleanMail-Result” header field. This can be used by the mail client or server to quarantineor delete mails. See your mail software’s documentation to find out how to set upfiltering rules.
Note: Filter results lower down in the list take precedence. Filters further down inthe filter pipeline can override results of earlier filters. For a discussion of this, seeFilter Pipeline (section 3.3).
Note: Rejecting a message, or redirecting a message is not possible when POP3 isused.
43

4.5.4 Subject Tag
Set the text added to the subject of mails considered spam. This setting allowsUS-ASCII non-control characters only (character codes 32-127).
4.6 Attachment Filter Setup
Most worms and viruses are spread by attachments. Getting rid of messages con-taining potentially malicious attachments before even starting virus checkers orspam filters can be very helpful to reduce system load.
4.6.1 Attachment Filtering Options
CleanMail’s built-in attachment blocker allows you to specify a list of attachmentsthat you want to accept, or, the other way round - you can specify a list of attach-ments you do not want to accept. The attachment filter is pre-configured to rejectall attachment types known as potential virus vectors.
The configuration page allows you to enter attachment types in three input fields.Settings in fields lower down override settings in the fields higher up. You can usethe wildcard characters ? (any character) and * (any number of any character), forexample like in vb*.
Figure 4.5: Attachment Filter Setup
Here is an example:
Pass Attachment List: zip bmpBlock Attachment List: *Delete Attachment List: scr pif
44

This passes only zip and bmp attachments, all else are blocked. If a mail has apif or scr attachment, the attachment is not only blocked, but the entire mail isdeleted (pif and scr are very common as virus vectors).
4.6.2 Ignore Whitelist
For security reasons, anti virus filters and the attachment blocker by default ignorewhitelisting. You can change this behaviour by removing the check mark from theIgnore Whitelist setting.
4.6.3 MIME Error Policy
MIME violations can disrupt mail server operation and sometimes crash mailclients. Also, worm authors try to hide executable attachments with deliberateMIME syntax violations.
The attachment blocker is also capable of detecting MIME violations, and you canchoose which policy to apply for messages affected:
• General MIME syntax violation (SEVERE) Worm authors could try tohide executable attachments with deliberate MIME syntax violations.
• ASCII-0 character (SEVERE) The mail contains an ASCII-0 character.This problem can disrupt mail server operation and sometimes crash mailclients.
• Line Break Error The message has a single carriage return or line feedcharacter in the message or a line is too long. These MIME violations arevery common in spam messages, but also sometimes present in legitimatemessages.
• 8-bit character in header This MIME violation is very common and, forthis reason, only reported in the log.
For severe MIME violations, we recommend deleting messages. You can choose adifferent setting, if desired. The policy you apply has to be chosen with the MIMEError Policy setting.
The Line Break Policy setting controls the handling of wrong line breaks. Mes-sages with wrong line breaks are passed by default.
4.7 Blacklist Filter Setup
The Blacklist filter uses static address patterns to check the sender address fields ofa message. A blacklist filter is very time-consuming to maintain, and usually notvery effective, as spammers can easily fake a different sender address.
45

4.7.1 Sender Address Patterns
This is the list of sender addresses or address patterns to blacklist. You can use thewildcard characters ’?’ (any character) and ’*’ (any number of any character), forexample like in *@obnoxious.site. Addresses you enter here are automati-cally normalized (lower-case characters), and sorted by domain.
4.7.2 Policy
The policy you choose in this setting is applied when a sender matches one of thesender address patterns.
4.8 Whitelist Filter Setup
The Whitelist filter uses static address patterns to check the sender address fields ofa message. Mail from whitelisted addresses is accepted and bypasses all filters butthe attachment filter and anti-virus filter. (You can configure those filters to passwhitelisted messages as well.)
4.8.1 Sender Address Patterns
This is the list of sender addresses or address patterns to whitelist. You can use thewildcard characters ’?’ (any character) and ’*’ (any number of any character), forexample like in *@byteplant.com. Addresses you enter here are automaticallynormalized (lower-case characters), and sorted by domain.
Important: For security reasons, anti virus filters and the attachment blocker bydefault ignore whitelisting. You can change this behaviour by removing the checkmark from the Ignore Whitelist setting in these filters.
4.9 Delay Filter Setup
The concept of a delay filter was born out of the observation that most spammersand bulk mailers are an impatient lot, they do not wait for even a short period oftime to see if a message will be accepted by a mail server at all.
So the delay filter is a very simple filter: the mail transaction is frozen for a shorttime period, while further processing (which may be rather costly both in terms ofmemory and CPU usage) is delayed. If the mail client disconnects during this timeperiod, the message is simply discarded. Even short delays of 20 to 30 seconds areusually sufficient to get rid of about a third of all spam messages.
The delay filter is best placed directly in front of costly filters, such as the SpamAs-sassin filter, and after low-cost filters such as the attachment filter.
46

4.9.1 Delay
The delay in seconds. After the delay time has elapsed, the SMTP session is thawedand message processing continues.
Make sure that overall processing of messages (the total time it takes for a messageto pass all filters) does not exceed about one or two minutes on average, becauseeven legitimate senders may disconnect if the processing takes too long (more thanabout 5minutes). However, legitimate senders will retry to transmit the messagelater, so no mail will be lost.
4.9.2 Skip Size
While an SMTP session is frozen, the message is held on the server. Occupying theserver’s resources by holding large messages during the delay time is not necessary,as large messages usually are legitimate messages. So to conserve system resourcesand increase throughput, it is recommended to skip delaying mails exceeding acertain size.
4.10 RBL Filter Setup
DNS blacklists are Internet resources maintaining databases of known spam relayhosts. Mail servers can query these databases in an efficient manner using theDNS (domain name service) protocol. The RBL filter rejects all mail that has beenrelayed by a blacklisted host.
The RBL filter is highly efficient, and typically capable of getting rid of half thespam messages at a low resource usage.
4.10.1 DNSBL Zone List
This setting defines the DNSBL blacklists to query. If a relay host is listed in oneof these zones, the message is blocked using the filter policy you can define below.
Choose with care, because picking the right zones affects the RBL filter’s effec-tiveness. When in doubt, stick with the default setting.
4.10.2 Policy
If a relay host is listed on one of the configured DNS blacklists, the mail is blockedusing this policy.
47

4.10.3 Relay Check Option
All relays forwarding a mail message prepend a new received header field to themail header, with information about the servers involved (host name and IP), theprotocols used, and a time stamp.
The header lines are parsed by the RBL filter to find the IP addresses to checkagainst the DNS blacklists defined in the Zone List setting. The last receivedheader (at the top of the message header) marks the transfer to the server han-dling final delivery, and the first received header contains information about whena message was first submitted for transmission to an SMTP server. Between theseentries, there can be any number of relays forwarding the message. The first andlast received headers can be the same, when a message was directly submitted toyour server.
The Relay Check Option defines which received headers (relays) are checked bythe filter. If DNS blacklists contain the IP addresses used by dial-up services, youcan reduce the risk of false positives by skipping the DNSBL check for the firstreceived header (created when a dial-up sender submits his message to the firstSMTP server). Note that the last received header (final delivery) will always bechecked, even when there is only one received header. Allowable values are all,all but first, and last only. The default setting is all but first.
4.11 Shared Real-Time Fingerprint Filter
The fingerprint filter calculates message fingerprints and compares them againsta database of known spam message fingerprints. If a message is blocked by an-other filter, its fingerprints are automatically added to the database, speeding upthe processing of similar spam messages.
4.11.1 Fingerprint Database
The fingerprint filter maintains a file of known message fingerprints. This file iscontinuously updated using the results of local message processing (using yourfilter pipeline), and from a remote database, which is queried in regular intervals.The remote database is a central database maintained by Byteplant and availablefrom our servers for use of all CleanMail customers.
Communication with the remote fingerprint database is two-way:
Shared Real-Time Fingerprint Filtering Any new spam fingerprints detected bylocal filtering are used to refine and improve the remote fingerprint database.Local filtering automatically improves filtering and performance for allCleanMail customers.
48

Firewalls and HTTP Proxies The fingerprint filter uses the HTTP protocol to ac-cess our web servers for the exchange of fingerprint data. Please allow theCleanMail process to access http://www.byteplant.com in your firewall con-figuration. If you use a HTTP proxy, be sure to configure the Check ForUpdates Proxy setting on the admin mail options settings page.
Privacy Fingerprint data submitted to our server does not allow to reconstruct thecontents of a message, or to identify the senders or recipients of messages.Access to the fingerprint server is logged using our standard web server log-ging policy. Please see http://www.byteplant.com/company/privacy for de-tails.
Abuse The fingerprint database server has safeguards in place to prevent abusiveuse or manipulation of the database.
4.11.2 Fingerprint Filter Settings
4.11.2.1 Policy
If a message fingerprint matches a known spam message fingerprint, the mail isblocked using this policy.
4.11.2.2 Skip Size
Spam and virus messages are usually small. To conserve system resources andincrease throughput, it is recommended to skip filtering mails exceeding a certainsize.
4.12 External Filter Setup
The external filter is used to pass a mail through another program. The SpamAs-sassin filter and the anti virus filter both are based on external filters.
External filters can be used for many tasks, such as archiving mails, providingadditional statistics, or storing mails in an SQL database.
The CleanMail development team is ready to provide custom-made filters designedto fit your specifications.
4.12.1 Command Line
The command line setting page is the core of external filter setup. Here you cancontrol which program to run with what arguments.
49

Figure 4.6: External Filter Setup
4.12.1.1 Message Text Input and Output
The message to check is passed to the standard input of a external program.
If a program does not modify a message (virus checkers, for example, only analyzea message), you can choose to ignore the output of a program, in this case theunmodified message will be forwarded to the next filter. Otherwise, standard outputof the program will be used.
If you’ve enabled filter error logging (see Global Settings (section4.1.3)), the stan-dard error output of a program is collected and printed to the log.
Instead of piping the message through standard input or output, you can use theplaceholders %IN%, %OUT%, and %ERR% as arguments to a program. Here is anexample:
"c:\dir\clamscan.exe" "%IN%" --mbox --no-summary
Notes:Be sure to use double quotes where needed. If your temporary directory path, forexample, contains blanks, %IN%must be quoted, because the filter input and outputfiles reside in the temporary directory.
The working directory of external programs always is the CleanMail installationdirectory.
To test your settings with a sample spam mail or a sample virus mail, use the testbuttons provided.
4.12.1.2 Batch Files
You can also run batch files instead of running a program. Depending on the Win-dows version you are using, it may be necessary to explicitly run a command line
50

Figure 4.7: Test Filter Screen
interpreter with your batch file as an argument. Here is an example what this mightlook like for Windows XP:
cmd /Q /D /C "c:\dir\batch.bat" %IN% %OUT% %ERR%
To learn more about cmd, type help cmd in a command prompt window.
4.12.2 Advanced Settings
The advanced settings allow choosing a timeout for the external program, a sizelimit, and setting the memory usage.
4.12.2.1 Timeout
If the external program does not return a result within the set timeout period, theprogram is terminated and the filter result is set to accept/deliver (unknown result)(section4.5.3).
The program will also be terminated when the SMTP session times out or if theMTA that connects to CleanMail disconnects. The SMTP timeouts used by mostMTAs are in the range of 5 to 10 minutes.
If you set a timeout, a value in the range of 3-4 times the normal execution timeis advisable. External filter programs should not take longer than 20 seconds toexecute.
51

4.12.2.2 Ignore Whitelist
Use this setting to configure if the filter should run for whitelisted senders or not.This setting is disabled by default for all types of external filters, with the exceptionof anti-virus filters, where it is enabled by default for security reasons.
4.12.2.3 Skip Size
Spam and virus messages are usually small. To conserve system resources andincrease throughput, it is recommended to skip filtering mails exceeding a certainsize.
4.12.2.4 Memory Usage
Specify here how much system RAM your filtering program needs. This settinghelps CleanMail to optimize resource allocation. Worst-case memory usage ofvirus checkers for large mails is usually about 3-4 times the size of the checkedmail.
4.12.3 Return Code Policy
On this page, configure the mapping of exit codes (0-255) to filter results.
Clam Anti Virus, for example, returns 0 if a mail is not infected with a virus, 1 if avirus is found. Therefore, the return code 0 is mapped to the result accept/deliver,and return code 1 is mapped to reject/delete.
Consult the sections on filter pipelines (section 3.3), and on filter results(section4.5.3) for more info.
4.13 Anti Virus Filter Setup
Every virus checker that offers a command line interface can be integrated intoCleanMail. In the Anti Virus Filter Setup dialog you can easily adapt and test theoperation of third-party virus checkers.
The Anti Virus Filter Setup dialog is based on the External Filter Setup (sec-tion 4.12) dialog. See there for an explanation of settings not explained here.
To configure a virus filter, CleanMail needs to know the vendor name. You canset the scanner path in the ’Scanner Executable’ setting if you did not install yourvirus checker in its default location.
52

Figure 4.8: Anti Virus Filter Setup
If your virus scanner is not on the list of supported scanners, choose ’Other’ on thefirst page of the setup dialog. Consult the virus scanner’s documentation to findout command line options and usage instructions.
For most filters, the output of a filter is forwarded to the next filter as its input. Thiscan’t be applied to most virus checkers, because virus checkers analyze a messageonly, signalling ”yes, this is a virus”, or ”no, this is not a virus” with differentprogram exit codes. For this reason virus filters are by default configured in a waythat the input file is forwarded to the output, by leaving the ”use console output”switch unchecked.
Normally, you will want to delete a message if the return code of the filter indicatesa virus has been found, and deliver a message if not. Set the return code policiesaccordingly.
When testing a virus filter, test it both against the sample virus mail, and against thesample spam mail. The virus mail must be blocked (reject/delete), with the filteroutput empty, while the spam mail must pass (filter output the same as the input).
Important: For security reasons, anti virus filters and the attachment blocker bydefault ignore whitelisting. You can change this behaviour by removing the checkmark from the Ignore Whitelist setting.
Note 1: Integrating a virus checker in CleanMail requires that you install the viruschecker software first. If you have not installed the virus checker yet, run the antivirus setup wizard again once you have installed the virus checker.
Note 2: If you want to use F-Prot for DOS, right-click F-PROT.EXE in the Win-dows Explorer to bring up the properties dialog, and make sure the ’close windowon terminate’ (or similar) property is checked.
Note 3: If you have a virus scanner with On-Access scanning enabled, it mayinterfere with the temporary files CleanMail creates for filtering in the temporarydirectory. To get rid of the error messages that may occur in CleanMail’s log file,
53

make sure you disable On-Access scanning for the temporary directory used byCleanMail. On startup, CleanMail writes the location of the temporary directoryused to the log file cleanmail.log.
Note 4: If you enabled POP3 mail virus checking in your anti virus software,don’t integrate the virus scanner in the POP3 filter pipeline. Otherwise you mightend up checking your mails twice. Note also, that in this case both CleanMailand your virus scanner may contend for the POP3 port of your machine. ReadTroubleshooting (section 2.6) for more information.
4.14 SpamAssassin Filter Setup
The SpamAssassin filter setup dialog is available in two modes: normal and ad-vanced. Advanced mode is based on the External Filter Setup (section 4.12) dialog.This section discusses normal mode setup.
The SpamAssassin filter setup dialog allows you to configure two aspects of Spa-mAssassin filters:
• A plugin part that controls to what messages the filter is applied and what isdone with a mail, once it is tagged as spam (filter policy (section4.5.3)). Thesettings in this part are stored in the cleanmail.cf file.
• Configuration of SpamAssassin itself. The settings in this part are stored inthe file local.cf in the SpamAssassin rule set directory.
It is important to remember this, especially when you are planning to use multipleSpamAssassin filters (section4.14.3.2) in your configuration.
4.14.1 How SpamAssassin Works
SpamAssassin is a well-known open-source spam detection engine. It uses thefollowing techniques to identify spam:
• The mail headers are scanned for some small inconsistencies that can giveaway forgeries: A mail date in the past or in the future, forged message IDs,and the like.
• The mail body is scanned for typical spam mail content, such as spam key-words, capitalized letters, or invitations to buy or click something.
• Queries to blacklist servers are used, e.g. to see if a mail has been submittedfrom a known open mail relay.
54

• Probability analysis of mails (Bayes filtering). Spam mails can be trained,so that similar mails are more likely to be identified as spam in the future.
• Analysis of the URLs a mail refers to: Spammers want you to click on hy-perlinks referring to their sites, so a lookup in a database of known spam-advertised sites has proven to be highly effective in identifying spam mails.
The result of all these tests is added up to form a spam score. A message is con-sidered spam if the score exceeds a configurable threshold. You can modify theaggressiveness of the spam checker by modifying this threshold: an aggressive set-ting with a low threshold will find more spam mails, at a higher risk of legitimatemails falsely identified as spam (false positives).
In the typical configuration, the subject of mail identified as spam is modified toflag it as spam mail and the message is quarantined within a SpamAssassin wrapperto prevent accidental infection with dialers, spyware, trojans, or viruses by viewingHTML content.
Now it is up to your mail server (or client) software to decide what to do. You candelete spam mails or move spam mails to a spam folder or leave the decision whatto do with spam mails to your users.
4.14.2 SpamAssasssin Options
Figure 4.9: SpamAssassin Options Setup
4.14.2.1 Required Score
SpamAssassin tests each incoming mail against its spam detection ruleset. Eachmatching rule adds a predefined score to the overall spam score.
55
Set the threshold score required for a mail to be considered spam. The defaultsetting is 5.0, which is quite aggressive, increase this value to reduce the probabilityof false positives.
4.14.2.2 Subject Tag
Set the text added to the subject of mails considered spam. The keyword _SCORE_will be substituted by the calculated spam score for the message, _REQD_ will bereplaced by the threshold value (see above). This setting allows US-ASCII non-control characters only (character codes 32-127). Do NOT use the # character.
Note: The SpamAssassin Filter is the only filter that supports substitutions in thesubject tag (e.g. spam score).
4.14.2.3 Tweaking The SpamAssassin Rule Set
If you want to further customize SpamAssassin, consult the SpamAssassin docu-mentation files included with the installation files (find it in the sa\doc subdirec-tory of the installation directory).
To customize the SpamAssassin rule set, for example to modify the score for aparticular rule, you can do so by editing the corresponding configuration file usingyour favorite text editor. See the document Mail_SpamAssassin_Conf.htmfor details.
Note 1: Configuration changes in files other than local.cf are not backed upupon installation of an update. If you want to keep your changes, copy the files youchanged, and restore them after installation.
Note 2: To validate your changes, use the --lint option of SpamAssassin:
cd [InstallationDirectory]sa\spamassassin -x --siteconfigpath="sa\ruleset" --lint
4.14.3 CleanMail SpamAssasssin Options
4.14.3.1 Spam Mail Policy Options
On the first page of the spam mail policy options you can choose what happens withspam. See Filter Result (section4.5.3) for a list of different spam mail policies.
The second page allows to set a Reject and Delete threshold. Mails are deleted(reject/delete policy) if the spam score is higher than this value, regardless of thepolicy setting you entered on the previous page.
56

Figure 4.10: Spam Filter Policy Setup
4.14.3.2 Multiple SpamAssassin Filters
If you are using multiple SpamAssassin filters, by default all filters use the sameSpamAssassin configuration settings, stored in the local.cf file of your defaultrule set directory (the sa\ruleset subdirectory of your installation).
If you intend to use different SpamAssassin configurations for your SpamAssassinfilters, copy the sa\ruleset directory to a different directory and update the fil-ter settings of the SpamAssassin filter that uses this directory accordingly (a specialsetup page to enter the directory becomes visible in the SpamAssassin filter setupwizard as soon as you add a second SpamAssassin filter to your configuration).
Note that CleanMail’s installer only updates the default SpamAssassin rule set,never any additional rule sets. You may need to update additional rule set directo-ries (add/remove/update configuration files other than local.cf) manually.
4.15 Spam Trap Setup
A spam trap learns all messages sent to a honeypot address as spam. This automat-ically updates the Bayes DB of SpamAssassin with the latest spam available, andadds the message fingerprints to the database of known spam message fingerprints.
4.15.1 Usage
To use this filter, create a new account such as [email protected],With this address, do all the things you shouldn’t do: Put it somewhere on yourweb site for a spam bot to pick up; post into newsgroups with this address as yourmail address; use it on every web site that takes registrations; etc.
57

Enter this as a spam trap address for the spam trap filter (you do not need to con-figure this account on your mail server, it is not necessary that this account exists).
After some time, you should get lots of spam mail to this address.
CAUTION: Never forward spam mail to the honeypot address for learning. Theact of forwarding modifies mails in unexpected ways; to learn a forwarded mailwill be useless or even counter-productive.
4.15.2 Multiple Spam Trap Filters
As with the SpamAssassin filter, you can configure the rule set path for the spamtrap filter as soon as you are using multiple SpamAssassin filters. The rule set pathdecides which Bayes DB will be trained by the spam trap.
4.16 Mail Storage Setup
The mail storage filter can be used to archive mails on the file system of yourserver. The mail files (*.eml) are stored in MIME-Format (RFC-822) and canbe viewed with the majority of mail client software. In addition to the mail file,message transmission data, such as the SMTP sender and recipients, is saved in an.envelope file. The envelope file can be viewed with a text editor.
Many of the message browsing and learning functions (see Learning Messages(section 5.7)) require that a message has been saved with a mail storage filter.
4.16.1 Storage Directory
Sets the directory where the mail files will be stored. If empty, the system tempo-rary directory is used.
Note 1: Make sure that CleanMail (or the account used by the service, normallythe system account) has access permissions to create, read, write, or delete files inthe target directory. This is especially important if the target directory resides on anetwork drive.
Note 2: Make sure that unprivileged users do not have access to this directory,otherwise a user’s mail would be readable by others.
Note 3: If you have a virus scanner with On-Access scanning enabled, it mayinterfere with the mail storage whenever a virus message is stored. As a result youmay see error messages in CleanMail’s log file.
58
4.16.2 Max. No. of Days
This sets the maximum number of days messages are kept in storage. Leave thissetting empty if you don’t want to use this feature.
4.16.3 Max. No. of Messages
This sets the number of messages to store in the cache. Once the limit is exceeded,the storage manager starts deleting old messages. Leave this setting empty if youdon’t want to use this feature.
4.16.4 Max. Cache Size
This sets the maximum disk space used by the cache. Once the limit is exceeded,the storage manager starts deleting old messages. Leave this setting empty if youdon’t want to use this feature.
59

Chapter 5
Using CleanMail
CleanMail offers a comprehensive suite of reports and statistics to allow moni-toring its activities. You can find and view mail messages, whitelist mail senderaddresses, and improve mail filtering by adding spam messages to its database ofknown spam message fingerprints, or to the SpamAssassin Bayes database.
You can not only monitor local installations but also remote installations, eitherusing the CleanMail Admin application, or a web browser.
5.1 Live CleanMail Status
This page shows the CleanMail status. The following live data is available:
• The number of recipient addresses in use and the number of recipient ad-dresses licensed.
• CleanMail’s resource usage. If the bar is at 100% CleanMail is at the pre-configured memory usage limit.
• The number of currently active SMTP or POP3 sessions, and a graph show-ing the traffic on this port.
If the resource usage bar is at 100% for prolonged periods of time, there are threepossible reasons for this:
• The memory usage limit is too small. Within bounds, it may help to in-crease this limit. This setting is configured with the global settings wizard(section 4.1).
60

Figure 5.1: Status View
• The server hardware might need upgrading. Adding more memory usuallyhelps too handle load peaks, but increasing raw CPU power is best suited toget more mail processed. See the description of the global settings wizard(section 4.1) for more information.
• You are being flooded by a badly configured mail host, usually with bogusdelivery failure notices. Activate traffic limiting (section4.4.7) to counterthis.
5.2 Server Log
To view the server log, switch to the Log tab of the CleanMail Admin appli-cation. This page is a live view of messages written to CleanMail’s log filecleanmail.log, located in the installation directory.
The verbosity of the messages in the log can be modified using in the global set-tings wizard (section 4.1).
To view the logfile with your default text editor, press the ’View Log File WithEditor’ button.
You will probably find many ”connection closed by client” messages in the log.These messages do not indicate an error on your side of the mail transaction. Thesemessages appear whenever a mail client disconnects, thus violating the SMTP stan-dard. (The SMTP standard says that only the server is allowed to disconnect andend a mail transaction.)
To get a deeper understanding of SMTP and what happens in the log, especially ifyou enabled detailed logging, please refer to RFC-2821. For a POP3 specificationrefer to RFC-1939
61

Figure 5.2: Log View
5.3 Report
A choice of reports can be viewed on the report tab of the CleanMail admin appli-cation.
Journal All messages handled in the past few days. The length of the backlog islimited and depends on mail traffic.
Top Recipients A list of people that received mail in the last 24 hours or yesterday,complete with message counts and the total number of bytes received.
Top Senders A list of senders that mailed to accounts in your domain in the last24 hours or yesterday, complete with message counts and total bytes.
Top Hosts A list of mail hosts (IP address and name) that delivered mail in thelast 24 hours or yesterday, complete with message counts and total bytes.
Top Spam Hosts A list of mail hosts (IP address and name) that delivered a spammessage in the last 24 hours or yesterday, complete with message counts andtotal bytes.
For all reports, you can change the sort order by clicking the column headers. Tofilter the results, choose another time range, or a specific port, or enter a filter string.
The Source input field gives you a choice of data source. You can choose betweenthe following:
Mail Log Displayed data is taken from CleanMail’s mail log file (section 6.2).This includes all messages received or rejected in the last few days.
62

Mail Storage Displayed data is taken from the index of a mail storage. All mes-sages listed are found in the mail storage. The time range of messages foundhere depends on the settings of the mail storage.
Search Displayed data is taken only messages that satisfy the search criteria youhave defined and stored.
After selecting a line in a report, you can right-click the line or press the Messagebutton to choose from a menu of actions:
Open Message The message is opened using the application associated with.eml. With many versions of Windows, the default application associatedwith this file type is Outlook Express. This feature requires that a copy ofthe message is cached in a mail storage. This action is unsafe to use withvirus messages, depending on the associated application.
Unblock This is similar to Send Message, but the message is automatically for-warded to its original recipients, if this information is available. This featurerequires that a copy of the message is cached in a mail storage. This actionis unsafe to use with virus messages, depending on the mail client used byits recipients.
Send Message A verbatim copy of the message is submitted to a recipient of yourchoice, using a mail server of your choice. This feature requires that a copyof the message is cached in a mail storage. This action is unsafe to use withvirus messages, depending on the mail client used by the recipient.
View Message The contents of the message are displayed in an internal viewerwindow. The display is plain ASCII text, no attachments are unpacked andno HTML code is interpreted, so it is safe to use this action with virus mes-sages. This feature requires that a copy of the message is cached in a mailstorage.
View Envelope Displays mail transmission data, depending on the transmissionprotocol used. This feature requires that a copy of the message is cached ina mail storage.
Transmission Log Searches the CleanMail log file to find the session that actu-ally handled the selected message, and displays all information about thissession. The transmission log may be unavailable if the log file has alreadybeen cycled. To get the most from this feature, enable detailed logging.
Copy To Clipboard Use this menu item to copy ie. the message subject, sender,or the recipient to the clipboard.
63
Learn Use these menu items to train CleanMails spam database (section 5.7),improving results for the fingerprint filter, and for the SpamAssassin filter.Learning a message requires that a copy of the message is cached in a mailstorage.
Export Table... Export the data displayed to a file of comma-separated values(verb.csv). The exported file can be loaded into spreadsheet software suchas Microsoft Excel for further processing.
Blacklist Messages using a blacklisted sender address are always blocked in thefuture. This rarely works, as spammers usually use a new sender addressfor every mail they send. If you use blacklist or whitelist filters, be sureto check and optimize these filters regularly. Bloated blacklists/whitelistsmay degrade overall performance. You can blacklist a sender even when themessage is not stored.
Whitelist Messages sent from a whitelisted address are always passed in the fu-ture. Some filters such as Antivirus filters may choose to ignore this setting(you can configure this filter behavior). You can whitelist a sender even whenthe message is not stored.
5.4 Search
The Search page allows to save search configurations you can later access again,both from the report page and the web dashboard.
5.5 Statistics
CleanMail maintains a number of counters to collect statistics data, such as rawSMTP network traffic, mail counters, and filter result counters.
The Statistics of the CleanMail Admin application offers a graphical visualizationof these counters: total mail received, mail passed, mail blocked. Historical datadisplayed is read from the statistics file (section 6.2). Additionally, the graph iscontinuously updated with live data.
5.6 Remote Monitoring
To monitor a remote CleanMail installation, you can either access its web dash-board, or connect the CleanMail Admin application to the remote server.
64

Figure 5.3: Statistics View
• Using a web browser, you can access the web dashboard of a remote Clean-Mail host. In the dashboard URL (http://localhost:8086/index.html), replacelocalhost with the name or IP address of the remote computer.
• To connect the CleanMail Admin application to a remote CleanMail instal-lation, change the connection info in the (’File’ -¿ ’Connection’) dialog. Toconnect to a remote host, replace localhost with the name or IP addressof the remote computer.
The default setup if CleanMail’s HTTP port only allows access from localhost orprivate networks. To allow access from the Internet, you need to edit the Clean-Mail’s HTTP settings HTTP Server Settings (section 4.1). You can specify theremote hosts allowed to connect to your CleanMail server, you can also specify apassword.
When allowing access from the Internet, you should also enable the use of SSL toencrypt all transmissions.
Remote access is always restricted. You can’t change the configuration of a remoteCleanMail installation, or start or stop the CleanMail service. But you gain full readaccess to all statistics and status information, and to the mail storage, allowing youto read messages, to unblock messages, or to learn messages as spam.
Remote access allows viewing private data such as stored messages and messagetransmission logs. This acess is provided for administrative purposes only, andshould not be available to other users. Therefore, you should always protect accessto CleanMail’s HTTP port with a password HTTP Server Settings (section 4.1).
65
5.7 Learning Messages
Sometimes spam messages are not detected by CleanMail (false negatives), andsome are tagged as spam even when they aren’t (false positives). Learning mes-sages, in short, is about teaching CleanMail to do better for similar messages in thefuture.
There are two filter types supporting this type of learning: Fingerprint filters, andSpamAssassin filters.
Fingerprint filters use a proprietary technique to create one or more short hashcodes (fingerprints) of a message to summarize its structure and content. Knownspam message fingerprints are stored in a file. You can explicitly add fingerprintsof spam messages to this file.
SpamAssassin stores the relationships of words in a small database (the SpamAs-sassin Bayes database). Words stored in this database may increase or decrease thetotal spam score of a message. You can add words to this database by learning amessages either as ham or as spam.
Learning messages requires the use of a mail storage filter ((see Mail Storage Setup(section 4.16)). To learn a message, locate the message in the Journal Report(section 5.3) of the admin application. Right-clicking the message opens a menuthat allows learning messages:
Learn As Ham: The message is learned as a ham message.
Learn As Spam: The message is learned as a spam message.
Forget: All database entries already learned from a message are deleted. If youaccidentally learned a spam message as ham (or spam), you can undo it thisway.
Depending on how you configured the the mail storage filter, a message file mayhave been deleted already when you try to learn it as either spam or ham. To avoidthis in the future, change your mail storage settings to keep a longer backlog ofolder messages.
Similarly, messages can also be learned from the Journal view of the Web Dash-board.
NOTE: The results of the Bayes tests are ignored by SpamAssassin until at least200 messages have been learned.
CAUTION: Never learn forwarded spam mails. The act of forwarding modi-fies mails in unexpected ways, learning a forwarded mail will be useless or evencounter-productive.
You can also train the SpamAssassin Bayes database from a command window byusing sa-learn. For more information on this procedure, see Using Sa-learn ina Command Window (section6.3.3).
66

5.8 Using Blacklists and Whitelists
Blacklist and Whitelist filters can be used to permanently block specific senderaddresses (blacklist), or to permanently allow messages from specific sender ad-dresses to bypass all filtering (whitelist).
Addresses can be added to both the whitelist and the blacklist very comfortablyfrom the Report page of the CleanMail Admin application. While the whitelisthas proven to be very useful, however, but the blacklist rarely is. Often senders ofspam or virus messages do not use a particular sender address mor than once, soblacklists are regularly and easily bypassed. If you freely add mail addresses toyour blacklist, it will soon get large, unwieldy, and ever more difficult to maintain.So, whenever you add an address to the blacklist, ask yourself these questions:
• Is it really likely that I will receive another message with the same address?When in doubt, it is better to learn this message as spam, so that its finger-prints can be identified when you receive it next time with a different senderaddress.
• Is it more efficient to block messages from an entire domain, using wildcards,like in *@obnoxious.com?
5.9 Tuning The CleanMail Filter Pipeline
A central part of the CleanMail configuration is the tuning and optimization of thefilter pipeline. As each filter analyzes a message in turn, it uses resources such asCPU processing power or memory. Obviously, the order of the filters in the pipelinematters. If the first filter is known to consume lots of resources overall serverthroughput will be reduced. On the other end of the spectrum, light-weight filtersmay be used as a ”triage” stage: obvious spam is discarded, freeing precious serverresources, possibly at the cost of a higher probability of classifying legitimate mailsas spam (false positives). However, resource usage is only one aspect of a muchmore complex issue, there are other criteria to look at when configuring your filters.Here’s a list:
Aggressivity This term describes the likelihood of a filter discarding a legitimatemessage, resulting in a so called false positive. Usually you do not want toget false positives, but unfortunately aggressive filters often execute very fastwith little resource usage. The aggressivity of some filters can be configured,but configuring a filter to be less aggressive also increases the likelihood ofspam messages passing through (false negatives).
Resource Usage Filters performing complex tests, and providing a high degree offlexibility usually also require a large amount of system resources, such as
67

memory or raw computing power. Depending on the amount of mail youwant to filter, this may not be an issue at all, but if it is, you should avoidrunning these filters for each and every message you get.
Selectivity Filters able to classify only a small percentage of messages as defi-nitely legitimate or definitely not legitimate, passing a large percentage of”undecided” messages to the following filters are said to have a low selec-tivity. For example, it may not be worthwhile to run a resource-consumingfilter, if its selectivity is very low.
Type Malicious message fall into two categories: spam messages (includingscams and phishing attacks), and virus messages (containing and propagat-ing worms, trojans and viruses). Some filters are effective against spam only,others are effective on virus messages only, and some are effective againstboth.
CleanMail message filters can be classified according to the following table:
Filter Aggressivity Resource Usage Selectivity ProtectionAnti-Virus low high medium anti-virusAttachment low low medium anti-virusSMTP Delay low low medium bothDNSBL high low high bothFingerprint medium low high bothSMTP Checks low low medium bothSpamAssassin low high medium anti-spam
The built-in SMTP-level filtering (traffic limiting, anti-abuse), is not configurablein filter pipeline, and is only available in SMTP proxies.
CleanMail by default orders the filters to optimize throughput, using the followingguidelines:
• Filters with the lowest resource usage and the highest selectiveness go first.For this reason the fingerprint filter is always be one of the first filters inthe filter pipeline, because of its low resource usage and its good results inblocking spam and malware.
• Filters which use a lot of processing power and with low selectiveness golast. Therefore, SpamAssassin is one of the last filters. It does a good jobat detecting spam, but its CPU and memory usage may prohibit its use forevery message received.
68

5.9.1 Choosing the Right Filters
Judging from the list above, the following filters are a must-have in every Clean-Mail configuration, in order of their execution:
Attachment Blocker A no-brainer, with a static set of blocked attachments, thisfilter gets rid of many virus messages at practically no cost.
Fingerprint Filter This filter gets rid of spam and virus messages without usingup resources. Though long-term studies are still unavailable, the additionalrisk of false positives appears to be very small.
SMTP Delay Another no-brainer. This filter in its simplicity makes you wonder,why it hasn’t been countered by spammers yet. Sometimes legitimate batchmailers run into problems with this, if they have set their timeouts set toolow. In this case, remove this filter.
SpamAssassin A classic. The leading open-source spam filter, highly flexiblewith exceptionally good results, though at the cost of heavy resource usage.
Anti-Virus You can use the open source Clam AV scanner, or integrate any otherthird party scanner. Use multiple virus scanners, if you have the necessaryprocessing power available.
The other filters are situational - your milage may vary:
Blacklist There are situations where this filter is useful, but in general it is largelyineffective, as spammers usually use a different fake address for every mes-sage.
DNSBL DNSBLs sometimes are too aggressive, but overall the low resource us-age of these filters may help you out of a tight spot if your filtering serverruns into system load trouble. If not, there is no need to add this filter, asSpamAssassin already integrates DNSBLs in a less aggressive form. Theeffectiveness of DNSBLs for IPv6 is in doubt, given the fact that a spammercan use a different IP address for every message he sends. At the momentonly a small percentage of spam and viruses delivered using IPv6, so this isnot an issue (yet).
Whitelist Use if needed. You can configure for every filter individually if thewhitelist should be ignored, as some users prefer to run anti-virus and at-tachment filtering even for messages originating from whitelisted senders.
When configuring CleanMail with the Admin application, every new filter will beautomatically moved to the best position in the filter pipeline. Afterwards, you canstill change the order of filters, but only within limits.
69

5.9.2 Example Filtering Results
The figure below shows typical filtering results for a CleanMail filter pipeline,using an attachment blocker, the fingerprint filter, the delay filter, SpamAssassinand Clam Anti-Virus, in that order, with the built-in SMTP checks as an addedbonus filter getting rid of abusive SMTP traffic even before the filter pipeline isinvoked.
Figure 5.4: CleanMail Filtering Results
The low-resource usage filters are able to discard 77.6% of all incoming mail traf-fic, before the rest (22.4%) is passed to the more elaborate filters such as Spa-mAssassin and Anti-Virus, finally leaving only 15.2% of all messages classifiedas legitimate and passed on to the recipients. The fingerprint filter in this exam-ple, being one of the first filters, is able to get rid of the lion’s share of all un-wanted messages, removing this filter would increase the slices for SpamAssassinand Anti-Virus proportionately. In summary, the light-weight filters are able toincrease your CleanMail server’s message throughput almost five-fold, in compar-ison to a solution only using SpamAssassin and Anti-Virus.
Looking at the chart and the numbers, you might be misled into thinking that Spa-mAssassin and Anti-Virus have a rather small effect on the filtering results andcan be removed from the filter pipeline with only little impact on results. How-ever, precisely these filters are needed to teach spam fingerprints to your fingerprintdatabase, as a spam message has to be filtered at least once by some other filter,before all subsequent occurrences of similar messages can be discarded by the fin-gerprint filter. After removing SpamAssassin and Anti-Virus from the pipeline, thefingerprint filter would effectively stop to work.
70

5.9.3 Troubleshooting
Too many false positives Chances are you are using one of the more aggressivemail filters. Get rid of DNSBL, if the processing power of your server per-mits. Always learn false positives as ham to improve future results, andwhitelist any senders that are repeatedly blocked by your filtering. Makesearches available to your users on your Intranet, so they can check the listof blocked messages themselves.
Too many false negatives Add more filters. With every new filter the chancesincrease that a particular spam or virus message could have been detected.Learn false negatives as as spam.
Server is at 100% CPU constantly Check for mail flooding. If you are not beingflooded, and the high resource usage is constant, add filters with low resourceusage and high selectivity. The fingerprint filter is a must, and you may alsoneed DNSBL. If all of this does not help, upgrade your hardware.
5.10 Web Dashboard
You can also monitor your CleanMail installation using a web browser. Use thisURL to access the monitoring page served by the CleanMail service while it isrunning: http://localhost:8086/index.html.
The web dashboard allows access to almost all of the monitoring and reportingfunctions.
71

Chapter 6
Reference
6.1 CleanMail Configuration File
CleanMail’s configuration is saved in a plain text file, cleanmail.cf. For easyconfiguration, you can access the configuration settings using the cleanmail adminapplication, but advanced users can also use a simple text editor to change thesettings by modifying the file directly.
Note: To make CleanMail re-read its configuration file, simply restart the service,using either the Windows services manager, or the admin application (choose ’Ap-ply Settings’ from the file menu). Likewise, the admin application only re-readsthe configuration file upon restart.
Note: Some configuration files originated on other operating systems than Win-dows, and the editor supplied with Windows (notepad may be unsuitable forediting these files. Install some other text editor package available in the Internet,such as crimson, textpad or ultraedit, just to name a few.
6.1.1 General Structure
The configuration file format is similar to the Windows *.ini file format.
• The first line identifies the file format version. At present, only file formatversions 3.0, 2.1, and legacy files (CleanMail version 1.x) are supported.
• Configuration settings are grouped in sections. Each section starts with asection label in square brackets ([]).
• A section may include other sections (subsections). The section label of sucha section repeats the section label of the enclosing section, and its own label.
72

• Configuration settings are given as <name>="<value>". Note that valuesshould always be quoted (using double-quote characters ("). Empty values(denoted by a pair of double quotes with no other characters between) maybe allowable for some settings.
• Lines starting with the # character are ignored, and can be used to add com-ments.
All settings not explicitly overridden in the configuration file, take on their defaultvalue.
6.1.2 Value Types
Configuration settings can have the following types:
boolean Set to either 0 (meaning false, no, disable), or to 1 (meaning true, yes,enable). In some cases it may be allowable that a boolean value may beempty or unset (meaning unset, undefined, unknown).
numeric Set to a numerical value. Numbers must be given as classic decimalnumbers, a leading - denotes negative numbers, the dot character . is usedas decimal point. In some cases it may be allowable that a numeric value isunset (empty).
string A sequence of printable US-ASCII characters, other than the double quotecharacter.
6.1.3 Session Manager Settings
The first section of the config file is a session manager section, labelled[ServerSessionManager].
CheckForUpdates (boolean) Enables or disables the check for program updatesat midnight. This value defaults to "1" (enabled).
CheckForUpdatesProxy (string) Sets the HTTP proxy server and port used forthe update check. Defaults to an empty value, in this case CleanMail con-nects directly to www.byteplant.com, port 80, to perform the updatecheck.
DetailedLogging (numeric) Sets the logging level of cleanmail. Individual bitsin the binary representation of this number enable different logging options.Defaults to "16":
1 Detailed logging
73

2 Filter error output
16 Extended logging
DNSServer (string) List of DNS servers to use. Defaults to an empty value. inthis case CleanMail tries to determine the DNS servers automatically.
MailRecipient (string) Daily admin mail is sent to this recipient address.
MailSender (string) Daily admin mail sender address.
MailServer (string) Mail server used for sending the daily admin mail. Canbe given as host name, or IP address. You can optionally add a portnumber separated by the : character. Some examples: 127.0.0.1:25,localhost:25.
MailStatistics (boolean) If enabled, CleanMail sends a message every midnightwith statistics data and other info. Defaults to ”false”.
IncludeRecipientsList (boolean) If enabled, sends daily a list of licensed recipi-ents to the admin account. Defaults to ”false”.
MaxBufferSize (numeric) The maximum message size in Byte, larger messagesare rejected. This is an important security feature, if you set this toolarge, users of your mail service can crash your server by submitting avery large message. Allowable values are 10485760 (10MB) to 1048576000(1000MB), the default is 41943040 (40MB).
MaxLogFileDays (numeric) The log file is cycled after so many days. Set to "1"by default (daily log file cycling), both unsetting this value or setting it to 0disables this feature.
MaxLogFileSize (numeric) The log file is cycled once it is larger than the givensize. Allowable values are 1048576 (1MB) to 1048576000 (1000MB), thedefault is unset, disabling this feature.
MaxMemoryUsage (numeric) A load factor determining cleanmail’s memory us-age. The default value is 0.8, allowable values are in the range between 0 to1.
PreferEnableFilter (boolean) Determines cleanmail’s filter behaviour if a mailis addressed to multiple recipients. Defaults to ”true”, in this case a filteris applied if the filter is enabled for at least one recipient, and not appliedotherwise. If set to false, a filter is not applied, if the filter is disabled for atleast one recipient, and applied otherwise.
StatisticsTimeFrame (boolean) Sets the number of days how long statistics datais kept. Defaults to 365, allowable values are in the range of 7 (one week) to10000 (about 30 years).
74

TemporaryDirectory (string) Directory used to store temporary files. Leave thisempty to use the default temporary directory of the account (as set in theTMP and TEMP environment variables).
6.1.4 Port Settings
The session manager section may contain multiple proxy port subsections. Clean-Mail supports different types of proxy ports, with the port type determined bythe section label. A POP3 port, for example, has the following section label:[ServerSessionManager\Ports\POP3Port]. All types of proxy portshave several settings in common.
6.1.4.1 General Proxy Port Settings
These settings apply to all types of ports.
IncomingConnectionCount (numeric) Sets the length of the listening queue onthe proxy port server socket. Defaults to 20, allowable values are operatingsystem dependent.
IncomingPort (numeric) Sets the port number of the server socket. The defaultdepends on the protocol involved. Allowable values are in the range of 0 to65535.
IncomingServer (string) Sets the IP address or name of the server socket. Ifempty, the socket is bound to all interfaces. Defaults to an empty value.
IncomingTimeout (numeric) Sets a timeout, in seconds, for waiting on data fromthe client connected. Upon timeout, the incoming connection is reset andresources held by the connection are freed. The default depends on the pro-tocol involved. Allowable values are in the range of 10 to 3600.
Name (string) Port name, used for housekeeping purposes. Port names should beunique. The default depends on the protocol involved.
OutgoingConnectionCount (numeric) Set the maximum number of simultaneousactive connections on this port. Defaults to 1000, allowable values are in therange of 1 to 1000.
OutgoingTimeout (numeric) Sets a timeout, in seconds, for waiting on data fromthe server connected. Upon timeout, the incoming connection is reset andresources held by the connection are freed. The default depends on the pro-tocol involved. Allowable values are in the range of 10 to 3600.
75

6.1.4.2 HTTP Port Settings
Monitoring ports (HTTP ports) only support the general port settings, and the fol-lowing additional settings:
Allow (string) A list of IP addresses or hostnames that may access the monitoringport. All addresses within private network IP address blocks (RFC-1918)are automatically allowed. If you want client access over the Internet, enterthe remote hosts that may access the server. Note that dynamic DNS issupported. Defaults to an empty value.
Deny (string) A list of IP addresses or hostnames that may not access the moni-toring port. Defaults to an empty value.
Password (string) Password required to access monitoring and admin data. Ifboth user and password are set, the web browser will prompt for a passwordif you try to access the reporting pages, and you also need to enter the username and password in the CleanMail admin application’s connection settings(choose ’Connect...’ from the ’File’ menu).
User (string) User name required to access monitoring and admin data. If bothuser and password are set, the web browser will prompt for a password ifyou try to access the reporting pages, and you also need to enter the username and password in the CleanMail admin application’s connection settings(choose ’Connect...’ from the ’File’ menu).
UseSSL (boolean) Enables SSL for the HTTP port. This will only workif both a certificate file (CleanMail.cert) and a private key file(CleanMail.key) are present in the configuration directory. Read per-missions of the key file must be restricted to the account running Cleanmail.Check the log after startup if your certificate has been accepted. This settingdefaults to false.
6.1.4.3 POP3 Connector Settings
POP3 connectors support the general port settings. Diffent semantics apply to theincoming server and port settings: They do not describe a local listening port, buta remote server instead.
POP3 connectors contain one or more account sections to define the mailboxesretrieved from the server, and the forwarding address. Each account section, holdsthe following settings:
Password (string) POP3 account password. This setting must not be empty.
76

Recipient (string) Messages retrieved from this mailbox are forwarded to the re-cipient mail address on your mail server. This setting must not be empty.
User (string) POP3 account name. This setting must not be empty.
Several additional settings can be defined for POP3 connectors:
MailsPerSession (numeric) Number of messages retrieved in a POP3 session. Al-lowable values are in the range of 1 to 100, the default is 10. This settingmust not be empty.
RedirectRecipient (string) Recipient mail account for redirected messages.Must be a valid mail address on your mail server, the default value ispostmaster.
ScanInterval (numeric) Sets the interval in seconds between connections to thePOP3 server to poll a mailbox. The default setting is 300, allowable valuesare in the range from 60 seconds to 86400 seconds (one day). This settingmust not be empty.
Sender (string) Sender mail address used when forwarding to your mail server.The default value is empty. Try postmaster or a real mail address if thedefault setting is not accepted by your mail server.
POP3 connectors may contain multiple filter sections, describing the filters config-ured for this port, see filter settings (section6.1.5).
6.1.4.4 POP3 Port Settings
POP3 ports support the general port settings. Also, POP3 ports may contain mul-tiple filter sections, describing the filters configured for this port, see filter settings(section6.1.5).
6.1.4.5 SMTP Port Settings
In addition to the general proxy port settings, SMTP ports support the followingconfiguration settings.
DomainList (string) Limits the recipients CleanMail accepts. You can use thewildcard characters ? (any character) and * (any number of any character)to define address patterns. Multiple address patterns can be separated byblanks. If empty, mail to all recipients is accepted. Defaults to empty.
77

HostConnectionCount (numeric) Restricts the number of simultaneous connec-tions from a single mail host, identified by its IP address or by the namegiven in the SMTP HELO command. Unset by default. Allowable valuesare in the range of 1 to 1000.
HostNDRConnectionCount (numeric) Restricts the number of simultaneousconnections for delivery status notifications from a single mail host, iden-tified by its IP address. Unset by default. Allowable values are in the rangeof 1 to 1000.
HostRejectList (string) List of mail hosts, as identified by IP address or by thename given in the SMTP HELO command. Mail from these hosts is notaccepted at all. You can use the wildcard characters ? (any character) and *(any number of any character) to define address patterns. Multiple patternscan be separated by blanks. If empty, mail from all hosts is accepted. Thedefault setting is empty.
HostWhiteList (string) List of mail hosts, as identified by IP address or by thename given in the SMTP HELO command. Mail from these hosts is handledthe same way as if the sender had been whitelisted. You can use the wildcardcharacters ? (any character) and * (any number of any character) to defineaddress patterns. Multiple patterns can be separated by blanks. If empty, nohosts are whitelisted. The default setting is empty.
MaxAuthFailures (numeric) Auth Attack Protection: As soon as the number offailed AUTH attempts exceeds this limit, the remote host is disconnected andblocked for 20 minutes. This counter is reset whenever an AUTH commandis successful. Set to 2 by default. Allowable values are in the range of 2 to1000.
MaxRejectRecipients (numeric) Directory Harvesting Protection: As soon as thenumber of rejected RCPT TO addresses exceeds this limit, the remote hostis disconnected and blocked for 20 minutes. This counter is reset whenevera RCPT TO command is successful. Set to 10 by default. Allowable valuesare in the range of 5 to 1000.
OutgoingPort (numeric) Sets the port number of the SMTP service CleanMailconnects to. The default depends on the protocol involved. Allowable valuesare in the range of 0 to 65535.
OutgoingServer (string) Sets the IP address or host name of the SMTP serviceCleanMail connects to.
RedirectRecipient (string) Sets the recipient address where redirected mailsare sent to (reject/redirect or accept/redirect filter actions). Defaults topostmaster.
78

RejectMessage (string) Sets the error string returned with the550 error code when a message is rejected. Defaults to:Your message was not delivered for policy reasons.
TLS (boolean) Enables or disables TLS negotiation between mail servers. Mailstransmitted using TLS are not scanned. Disabling TLS makes sure that allmails received and forwarded by an unprotected relay, or mails received fromspammers supporting TLS, are scanned. Disabled by default.
The SMTP port section may contain multiple filter subsections, see filter settings(section6.1.5).
6.1.5 Filter Settings
6.1.5.1 General Filter Settings
AddressList (string) Sets the recipients where the filter is enabled. You can usethe wildcard characters ? (any character) and * (any number of any charac-ter) to define address patterns. Multiple address patterns can be separatedby blanks. If empty, the filter is enabled for all recipients. Address patternsthat pass this test, are then checked against the patterns in the AddressListExsetting below. Defaults to empty. Note: This setting is ignored for filtersconfigured for POP3 ports.
AddressListEx (string) Sets the recipients where the filter is disabled. You can usethe wildcard characters ? (any character) and * (any number of any charac-ter) to define address patterns. Multiple address patterns can be separated byblanks. If empty, the filter is enabled for all recipients. Defaults to empty.Note: This setting is ignored for filters configured for POP3 ports.
AddressListSameAsPrevious (boolean) If this is set to true, the CleanMail adminapplication copies the address list of the previous filter to this filter. Ignoredby the CleanMail service. Defaults to true for every filter but the first.
ID (string) Unique, short filter identifier used internally. A unique ID is automati-cally generated by default. Allowable identifiers are not empty, and have upto 7 characters.
IgnoreWhitelist (boolean) If true, the filter is always applied, even to whitelistedmessages. Defaults to false for most filters, with the exception of attach-ment filters and anti-virus filters.
Name (string) Filter name, used in statistics and log files. Filter names should beunique. A unique name is usually generated by default. Allowable identifiersare not empty, and up to 30 characters.
79

SubjectTag (string) If not empty, the message subject is modified to indicate thata message is junk. This setting allows US-ASCII non-control charactersonly (character codes 32-127). The default setting is ”*SPAM*”. Note:This setting has no effect for the SpamAssassin filter. Change the local.cffile instead (see SpamAssassin documentation).
6.1.5.2 Attachment Filter Settings
Attachment filter settings are defined in an AttachmentConfig section[(...)\Filters\AttachmentConfig]. Attachment filters support thefollowing additional configuration options:
BlockList (string) Sets the attachment types you want to block (deliver the mes-sage with the attachment(s) removed). You can use the wildcard characters? (any character) and * (any number of any character) to define attachmenttypes. Multiple attachment types can be separated by blanks. If empty, no at-tachments are blocked. The block list is the first attachment type list checked,attachments that match a type pattern on this list are not checked against thedrop list. Defaults to a list of attachment types that may carry macro viruses.
BlockListPolicy (string) Filter action applied to messages containing attach-ment(s) of a blocked type. Defaults to reject/deliver. Allowablevalues are: accept/deliver, reject/deliver. The attachment isalways removed.
DropList (string) Sets the attachment types where you want to delete the entiremessage if it contains a restricted attachment. You can use the wildcardcharacters ? (any character) and * (any number of any character) to defineattachment types. Multiple attachment types can be separated by blanks. Ifempty, no messages are deleted. The block list is the last attachment typelist checked. Defaults to a list of attachment types commonly used in virusmessages.
DropListPolicy (string) Filter action applied to messages containing attach-ment(s) of a blocked type. Defaults to reject/delete. Allowable valuesare (in order of precedence): reject/redirect, accept/redirect,reject/delete, accept/delete.
ErrorLineBreak (boolean) If this is set to true, bad line breaks are treated likeother MIME errors, and handled as defined in the ErrorPolicy setting. De-faults to false.
ErrorPolicy (string) Filter action applied to messages with unrecoverable MIMEsyntax violations. This usually involves malformed attachment specifica-tions, or other techniques that could be exploited to bypass the attachment
80

filter or virus checkers. Defaults to accept/deliver. Allowable valuesare (in order of precedence): accept/deliver, reject/redirect,accept/redirect, reject/delete, accept/delete.
PassList (string) Sets the attachment types you want to always accept. You canuse the wildcard characters ? (any character) and * (any number of any char-acter) to define attachment types. Multiple attachment types can be separatedby blanks. The pass list is the first attachment type list checked, attachmentsthat match a type pattern on this list are not checked against the block list orthe drop list. Defaults to empty.
6.1.5.3 Blacklist and Whitelist Filter Settings
Blacklist filter settings are defined in a BlacklistConfig section[(...)\Filters\BlacklistConfig], whitelist filters in a Whitelist-Config section [(...)\Filters\WhitelistConfig]. The followingadditional configuration options are supported:
SenderList (string) List of sender address patterns. You can use the wildcardcharacters ? (any character) and * (any number of any character). Multipleaddresses are separated by blanks.
Policy (string) Filter action applied to messages that have a sender address match-ing a pattern in the sender list. Defaults to reject/delete for a blacklistfilter, and to accept/deliver (whitelisted) for a whitelist filter.
6.1.5.4 Delay Filter Settings
Attachment filter settings are defined in an DelayConfig section[(...)\Filters\DelayConfig]. Delay filters support the followingadditional configuration options:
Delay (numeric) The delay time, in seconds. The default value is 20 seconds,allowable values are in the range from 5 to 100 seconds.
MaxFilterSize (numeric) Spam and virus messages are usually small. To con-serve system resources and increase throughput, it is recommended to skipfiltering mails exceeding a certain size, given in Byte. Allowable values arein the range of 1024 (1kB) to 1048576000 (1000MB). Defaults to 1048576(1MB).
81

6.1.5.5 RBL Filter Settings
RBL filter settings are defined in a DNSBLConfig section[(...)\Filters\DNSBLConfig]. The following additional configu-ration options are supported:
ZoneList (string) List of DNSBL zones to query. Multiple zones are separated byblanks.
Policy (string) Filter action applied to blocked messages. Defaults toreject/delete.
RelayCheck (string) Defines which received headers (relays) are checked bythe filter. If DNS blacklists contain dial-up services, you can reduce therisk of false positives by skipping the DNSBL check for the first receivedheader (created when a dial-up sender submits his message to the firstSMTP server). Note that the last received header (last relay) will alwaysbe checked, even when there is only one received header. Allowable val-ues are all, all but first, and last only. The default setting isall but first.
Timeout (numeric) When the timeout is exceeded, all DNS queries are cancelledand the message is forwarded to the next filter (Result: ’unknown’). Recom-mended values are in the range of 15-30 seconds, the default is 30 seconds.
6.1.5.6 Shared Real-Time Fingerprint Filter Settings
Shared Real-Time Fingerprint Filter settings are defined in a FingerPrintCon-fig section [(...)\Filters\FingerPrintConfig]. The following ad-ditional configuration options are supported:
Policy (string) Filter action applied to blocked messages. Defaults toreject/delete.
MaxFilterSize (numeric) Spam and virus messages are usually small. To con-serve system resources and increase throughput, it is recommended to skipfiltering mails exceeding a certain size, given in Byte. Allowable values arein the range of 1024 (1kB) to 1048576000 (1000MB). Defaults to 524288(512kB).
6.1.5.7 External Filter Settings
These settings can be used with all filters based on this filter type. External filtersmay also be used by themselves, in this case the settings are defined in a Comman-dLineConfig section ([(...)\Filters\CommandLineConfig]. Externalfilters support the following additional configuration options:
82

CommandLine (string) Sets the command line to execute this filter. You can use%IN%, %OUT%, or %ERR% as placeholders for the input, output and error filenames. If %IN% is not used, the input message is available as standard input,if %OUT% is not used, output is collected from standard output, if %ERR% isnot used, error output is collected from standard error. The defaults dependon the filter implementation.
CommandLineOutput (boolean) Some filters do not modify a message. If youunset this option the filter input is forwarded to the next filter in queue, andany filter output other than the exit code is ignored. Defaults to true in plaincommand line filters, but this default is overridden in other filters based onthe command line filter.
CommandLinePriority (numeric) Sets the scheduling priority of the process exe-cuted. On Linux/Mac this setting corresponds to the process nice value, anddefaults to "0" (normal priority). On Windows, allowable values are"0"for low priority, and "1" for normal priority (the default).
CommandLineTimeout (numeric) Sets a timeout, in seconds. If the timeout isexceeded the message is accepted without changes (Result: ’unknown’). Al-lowable values are in the range of 10-1000s. Defaults to 60s in plain com-mand line filters, but this default is overridden in other filters based on thecommand line filter.
MaxFilterSize (numeric) Spam and virus messages are usually small. To con-serve system resources and increase throughput, it is recommended to skipfiltering mails exceeding a certain size, given in Byte. Allowable values arein the range of 1024 (1kB) to 1048576000 (1000MB). Defaults to empty inplain command line filters, but this default is overridden in other filters basedon the command line filter.
MaxMemoryRequired (numeric) Specifies how much system RAM the filteringprogram needs. This setting helps CleanMail to optimize resource alloca-tion. Allowable values are in the range of 1048576 (1MB) to 1048576000(1000MB). Defaults to empty in plain command line filters, but this defaultis overridden in other filters based on the command line filter.
UseDOSPathNames (boolean) Set to true if the filter is a DOS program that re-quires DOS 8.3 file names on the commandline. This setting has no effectunder operating systems other than Windows.
Commandline filters may contain multiple return code sections.
83

6.1.5.8 Return Code Settings
Return codes are defined in ReturnCode sections:[(...)\Filters\CommandLineConfig\ReturnCodes\ReturnCode]
Code (numeric) The program exit code. Allowable values are in the range of 0 to255.
Policy (string) Sets the filter action to apply if the command line programreturns the exit code defined in the Code setting. Allowable values are:accept/deliver accept/deliver (junk), reject/deliver,reject/redirect, accept/redirect, reject/delete,accept/delete.
6.1.5.9 Mail Storage Settings
Mail storage filter settings are defined in a CacheConfig section.
CacheDirectory (string) Specifies the directory where messages are stored. De-faults to empty. If empty, the filter will store files in the temporary directory.
MaxCacheDays (numeric) Sets the maximum number of days messages are keptin storage. Values can be in the range of 1 to 365 days. Defaults to unset.
MaxCacheFiles (numeric) Sets the number of messages to store in the cache di-rectory. Once the limit is reached, for every new message stored, the oldestmessage is deleted.’ Allowable values depend on the file system used. De-faults to 1000.
MaxCacheSize (numeric) Sets the maximum disk space used in KByte (note thatvalues are displayed as MByte in the admin application). Allowable valuesare in the range of 102,400 (100MB) to to 10,485,760 (10GB). Defaults tounset.
6.1.5.10 Antivirus Filter Settings
Anti virus filter settings are defined in a AntiVirusConfig section. In addition tothe general filter settings and the command line filter settings, the anti virus filtersupports the following settings:
CommandLine (string) In difference to plain command line filters, antivirus fil-ters substitute the %SCANNER% placeholder with the executable defined inthe scanner setting. The default setting is operating system dependent, andvendor dependent.
84
Scanner (string) Specifies the complete path and file name of the command linescanner executable. Defaults to empty.
VendorName (string) The name of the anti virus scanner vendor. Defaults toempty. Allowable names are operating system dependent. This setting onlyaffects the CleanMail admin application.
6.1.5.11 SpamAssassin Filter Settings
SpamAssassin filter settings are defined in a SpamAssassinConfig section. In addi-tion to the general filter settings and the command line filter settings, the SpamAs-sassin filter supports the following settings:
CommandLine (string) In difference to plain command line filters,SpamAssassin filters substitute the %CONFIGPATH% placeholderwith the ruleset path defined in the SpamAssassinRulesetPath set-ting. Also the %FLAGS% placeholder is substituted with run-time flags and should not be omitted. The default setting issa\spamassassin.exe %FLAGS% -x -c \"%CONFIGPATH%\" -e 255.
DropThreshold (numeric) If you set a DropThreshold, mails are deleted if thespam score is higher than this value, regardless of the return code policysettings. Allowable values are in the range of 3.0 to 1000.0, the default isempty. If empty, this feature is disabled.
SpamAssassinRulesetPath (string) Specifies the complete path and of the Spa-mAssassin ruleset directory. The default is operating system dependent.
CommandLineOutput (boolean) Defaults to false, see section Command LineFilter Settings (section6.1.5.7) for more information.
CommandLineTimeout (numeric) Defaults to unset (disabled), see section Com-mand Line Filter Settings (section6.1.5.7) for more information.
MaxFilterSize (numeric) Defaults to 524288 (512kB), see section Command LineFilter Settings (section6.1.5.7) for more information.
MaxMemoryRequired (numeric) Defaults to 268435456 (25MB), see sectionCommand Line Filter Settings (section6.1.5.7) for more information.
SpamAssassin filters define two return codes: one for exit code 0 (non-spam or ham message), and for exit code 255 (spam message). As hammessage policy accept/deliver is recommended, and as spam policyone oft the following should be chosen: accept/deliver (junk),reject/deliver, reject/redirect, accept/redirect,reject/delete, accept/delete).
85

6.1.6 Search Settings
The SessionManager section of the config file may contain one or moreCacheSearch sections, holding search definitions. The settings are:
CacheName (string) The name of the mail storage to search in. Set to a combina-tion of the mail storage name followed by the proxy port name in parenthe-ses. A typical example could be Mail Storage (SMTP Proxy) (us-ing the default mail storage name and the default SMTP proxy port name).The search will fail if no mail storage with this name exists.
Name (string) The name of the search, used to identify a search. The search namemust be unique.
Password (string) Password required to access the search using the web interface.If both user and password are set, the web browser will prompt for a pass-word if you try to access the reporting pages. The global allow/deny hostssettings for the HTTP port always apply.
User (string) User name required to access monitoring and admin data. If bothuser and password are set, the web browser will prompt for a password ifyou try to access the reporting pages. The global allow/deny hosts settingsfor the HTTP port always apply.
Message in the cache can be filtered using search terms, which basically arename/value pairs, with the name defining an envelope field or message header fieldto scan, and the value a pattern matched against the content field of this headerfield. Search patterns support the wildcard characters ? (any character) and * (anynumber of any character), for example like in *@byteplant.com.
A search without any search terms will return all message in the mail storage, amessage with search terms returns all messages matching with at least one searchterm.
For performance reasons, only a subset of header fields can be searched:
MessageID The X-CleanMail message ID assigned by CleanMail. This can beused to find a particular message in the cache.
Action The filter action taken for a message.
From The mail address extracted out of the ’From’ header field of a message. Thefrom field often does not match the from address used in during transport.To check against the transport sender address, use SMTPSender.
HostIP The IP address of the host submitting the message (in case of POP3 filter-ing, this is the address of your ISP’s POP3 server).
86
HostName The name of the host submitting the message, usually the name givenin the SMTP HELO command. This name does not necessarily match thehost name returned by a reverse lookup of the host IP address.
Policy The filter policy returned by the filtering pipeline.
POP3Account Can be used with POP3 proxy ports and POP3 connectors tosearch for a POP3 account.
SMTPRecipient The recipient address used during the SMTP transport of themessage, set by both SMTP ports and by POP3 connectors.
SMTPSender The sender address used during the SMTP transport of the message,set by both SMTP ports and by POP3 connectors.
Port Matches against the port name that transported this message.
Subject The message subject. Searches against the subject may not match if thesubject contains special characters, or unsupported character encodings.
To The mail address(es) extracted out of the ’To’ header field of a message. Theto field often does not match the recipient address used in during the SMTPtransport. To check against a transport recipient address, use SMTPRecipi-ent.
6.2 Log Files
The location of the log files depends on the operating system version and the oper-ating system language. The main log file us called CleanMail.log.
Statistics data is kept in a file called CleanMail_Statistics.csv. Thestatistics file is a list of comma separated values, and thus can be easily read andprocessed by spread sheet software such as Microsoft Excel.
The data is organized in lines, each line the counter values for a day. The first fieldof a line contains the date.
The statistics file is cycled every day at midnight, or whenever the service isstopped. At the same time today’s values will be added or updated.
Once the date of the first line is older than 365 days, CleanMail will delete thisline. This way the statistics file keeps data for up to one year back.
Statistics counters are identified by descriptive names. The data collected includesthe following:
• Totals counted for a proxy port (mails filtered, mails passed, mails blocked,total, traffic received/sent on the incoming/outgoing ports)
87

• Filter results for different filters, counted separately for each proxy port.
• The number of attachments blocked by the attachment blocker, and the num-ber of mails were MIME violations were detected (only if attachment filteris used).
For every mail received or rejected a line is added in CleanMail’s mail log file(CleanMail_mail.csv). The mail log file is a list of comma separated values.Like the statistics file it can be read and processed by spread sheet software suchas Microsoft Excel®1.
6.3 SpamAssassin
The Windows release of CleanMail is bundled with a ready-to-run SpamAssassininstallation. All related files are located in the sa subdirectory of the CleanMailinstallation path, including all executable files and scripts, and the configurationfiles.
6.3.1 SpamAssassin Main Configuration Files
SpamAssassin’s main configuration files can be found in the sa\ruleset folder:
local.cf
user_prefs
init.pre
v310.pre
v312.pre
v320.pre
v330.pre
sa-updatechannels.txt
All configuration changes in these files are preserved during updates, whereas otherruleset files are likely to change, so do not edit any other files.
1Microsoft Excel is a registered trademark of Microsoft Corporation
88

6.3.2 SpamAssassin Ruleset Updates
CleanMail automatically updates the SpamAssassin rules and scores in thesa\share\ruleset folder every 24 hours by running sa-update.The update channels (download locations) can be configured in thesa-updatechannels.txt file (located in the sa folder).
You can also manually update the SpamAssassin ruleset by running thesa-update.bat batch file.
6.3.3 Using Sa-learn in a Command Window
Using sa-learn directly allows learning multiple messages or entire mail foldersat once, and it gives you more flexibility to adapt your CleanMail installation toyour environment. However, you must be sure that messages are either availableas an ASCII file in its raw MIME format (RFC-2822), or in the mbox format.Many popular mail software packages such as Mozilla Thunderbird support theseformats, whereas some, like all Microsoft products, do not.
The documentation of sa-learn can be found in the sa\doc subdirectory oronline. However, the ”official” documentation has to be taken with a grain of salt,as it hasn’t been written with Windows as a target operating system in mind. Mostimportant: Beware of blanks in pathnames. Be sure to use double quotes if a pathor file name contains blanks!
CAUTION: Never learn forwarded spam mails. The act of forwarding modi-fies mails in unexpected ways; to learn a forwarded mail will be useless or evencounter-productive.
Learn single messages
Find the X-CleanMail-MessageID header in the message you want to learn. Usingthe MessageID you can locate the .eml-file in the mail storage directory. To learna message as spam from the command window, use the following command line:
cd [InstallationDirectory]sa\sa-learn --siteconfigpath="sa\ruleset" --spam "[Path]"
To forget or learn as ham, use --forget or --ham instead of the --spam op-tion.
Learn a message folder
Most mail clients are using the mbox mail folder format or have an export functionto export a mail folder to an mbox file. Collect the spam messages you want tolearn in a mail folder and export this folder to an mbox file. Then use the followingcommands in a command line window:
89

cd [InstallationDirectory]sa\sa-learn --siteconfigpath="sa\ruleset" --spam --mbox "[Path]"
For repeated use, create a batch file with the commands above. An example isprovided in the installation directory of CleanMail.
If you are using Microsoft Outlook™or Outlook Express™2, you can’t learn entiremail folders, because there is no simple way to export to an mbox file. There is noteven a way to export a single message to a text file in RFC-822 format. (There aresome tools around, look for outlook2mbox or similar with your favorite Internetsearch engine, but your mileage may vary.)
However, there is a way, even if you are using Microsoft Exchange as mail server.This requires the administrator to install one email client other than Outlook orOutlook Express. This mail client can then be used to fetch the mails to learn byPOP3 or IMAP. A step-by-step example, using Mozilla Thunderbird, is describedon this web page:.
6.3.4 SpamAssassin Database Expiry
As SpamAssassin continues to learn from spam and ham mails, its Bayes databasecontinues to grow. CleanMail regularly checks if the SpamAssassin database ex-ceeds a certain size limit (100,000 tokens or words, about 5MB in database size).Once the limit is reached, old tokens (words that were not encountered in mails fora long time) are removed from the database. This is called database expiry.
On slow systems, it can happen that a mail transmission is stalled for several min-utes while the database expiry is underway. CleanMail tries to pick an expire timewhere no transmission is in progress (typically during the night).
Normally, SpamAssassin database maintenance does not require any user interac-tion. You can use sa-learn to examine the state of the SpamAssassin database fromtime to time, or to manually force a database expiry. Please check the sa-learndocumentation (located in the sa\doc subdirectory).
6.4 SMTP Command Quick Reference
SMTP is readable by humans. This section provides the necessary knowledge tointerpret the information given in cleanmail’s logs (if you enable detailed logging)and understand what happens during a mail transfer. The complete specificationof the SMTP protocol is given in the RFC-2821 document, and available online:http://www.ietf.org/rfc/rfc2821.txt.
2Microsoft, Microsoft Outlook and Microsoft Outlook Express are (registered) trademarks ofMicrosoft Corporation
90

6.4.1 Example SMTP Session
For testing purposes, you can also deliver mail by means of a text-only terminalsession, e.g. using telnet to connect to the SMTP port of a mail server.
After connection, the mail server presents a greeting message:
220 mail.byteplant.com ready
The client then issues a greeting, usually specifying his own name or IP address.This is done by issuing a HELO (hello) or EHLO (extended helo) command, likethis:
HELO name
After that the server’s replies something like:
250 OK
After this, the client first specifies the sender’s email address, and after that therecipient address, by issuing MAIL FROM and RCPT TO commands:
MAIL FROM: <[email protected]>
RCPT TO: <[email protected]>
Each command should receive a server reply like this:
250 OK
Now it is time to start transmitting the message itself. The client starts transmissionof the message with a DATA command, and again waits for the reply, like this:
DATA 354 Start mail input; end with <CRLF>.<CRLF>
The client now transmits the message, beginning with the header fields, and sepa-rated by an empty line, the message body. The mail is terminated with a line thatconsists of one single dot character (.):
From: god@heavenTo: mortal@earthSubject: Test Message
This is the body of the test message.
Now the server will reply something like this:
250 Message scheduled for delivery
You may have noticed that the addresses you used in the ”To:” and ”From:” headerfields are complete bogus addresses, that have nothing to do with the addresses youused in the SMTP commands earlier (the so-called envelope addresses). Nonethe-less, the message will be delivered.
91

A polite mail client will now issue a QUIT command, and in reply the server willdismiss the SMTP session and disconnect:
QUIT221 ByeConnection closed by foreign host.
6.4.2 SMTP commands
HELO hostname, EHLO hostname Initiates an SMTP session.
MAIL FROM: address Sets the envelope sender address
RCPT TO: address Defines the recipient address. There can be multiple RCPTTO commands, when a message is delivered to multiple recipients.
DATA Request start message transmission, after sender and recipients have beenspecified.
QUIT End SMTP session.
RSET Reset session, make the server forget sender and recipient addresses.
NOP No operation, a null command where the server just replies OK.
6.4.3 Server replies
Server replies begin with a 3-digit reply code. The first digit defines if the replymeans OK, or if an error is indicated by the server. The first digit is always ’2’, ’3’,’4’, or ’5’.
2xx The request was accepted, and no error occurred.
354 This is the only reply code starting with a ’3’ as the first digit, and it is onlyissued by the server in reply to a DATA command. The client is asked to goahead with the mail transmission.
4xx This reply indicates a temporary error. The request could not be fulfilled atthis time, but it may be possible to fulfil the request at some later time. Theclient should try again later.
5xx This reply indicates a permanent error. The request could not be fulfilled,and it is pointless to try again. The mail client is supposed to inform the userabout this error condition, either by popping up a window to inform the clientabout the error, or if the client in fact is another mail server, by generating amail delivery failure notice and sending it to the message’s sender.
92

6.5 POP3 command quick reference
POP3 is readable by humans. This section provides the necessary knowledge tointerpret the information given in cleanmail’s logs (if you enable detailed logging)and understand what happens during a POP3 mail retrieval session. The completespecification of the POP3 protocol is given in the RFC-1939 document, and avail-able online: http://www.ietf.org/rfc/rfc1939.txt.
6.5.1 Example POP3 Session
For testing purposes, you can also retrieve mail by means of a text-only terminalsession, e.g. using telnet to connect to the POP3 port of a POP3 server.
Once the connection has been opened, the POP3 server issues a one line greeting.Here’s an example:
+OK pop3.byteplant.com ready
Now is the time for the client to sign in, issuing the USER and PASS commands:
USER test+OKPASS fred+OK
The LIST command can now be used to get a listing of all messages stored in themail box.
LIST+OK 2 messages1 3442 857.
In the example, two messages are in the mailbox, numbered 1 and 2, with lengthsof 344 and 857 byte.
The RETR command now fetches the message, the argument is the number of themessage to be fetched:
RETR 1+OK 344 octetsReceived: from [127.0.0.1] ...From: god@heavenTo: mortal@earth
93

Subject: Test Message
This is the body of the test message.
Fetching a message with the RETR command does not delete this message, it stillremains in the mailbox. For deleting a message, the DELE command is used:
DELE 1+OK message 1 deleted
However, POP3 servers do not actually delete messages until the session has beenclosed. Interrupting a POP3 session for this reason may cause messages to betransmitted to the POP3 clients multiple times. So in order to make deleting themessage permanent, the session has to be closed using the QUIT command.
QUIT+OK ByeConnection closed by foreign host.
6.5.2 POP3 commands
USER Specify a mailbox or user name
PASS The password for the mailbox.
LIST Lists messages in the mailbox
RETR Fetch a particlar mail from the mailbox
DELE Mark a message for deletion
QUIT End POP3 session, delete messages marked for deletion.
6.5.3 Server replies
POP3 server replies begin with a +OK, if no error occurred, or with -ERR in caseof an error.
94

Chapter 7
Licensing and ContactInformation
7.1 License Information
Licenses are restricted by the number of recipient addresses, a 250 recipients li-cense will enable you to check the mail of up to 250 different recipient addresses.There are licenses on sale for 25, 50, 100, or 250 recipient addresses. Please in-quire at [email protected] for information about unlimited or site licenses, aswell as volume discounts.
You can explicitly specify a number of recipients for which spam checking is en-abled. Mail to recipients within the list is checked up to the maximum count ofdifferent addresses. Mail to recipients in excess of the maximum count is notchecked. Mail to recipients not matching an entry in this list is not counted andnot checked. Recipient addresses rejected by your mail server never count.
You can upgrade to a higher address count anytime by simply paying the pricedifference.
The number of virtual hosts/domains is not restricted.
7.2 Ordering CleanMail
For the latest pricing information, please visit our online shop.
CleanMail is distributed online electronically and shipped on CD-ROM, if re-quested. Please visit our online shop to place your order online. Ordering onlineand paying by credit card is by far the fastest way to order: Your license key isusually delivered in a matter of minutes.
95
If you do not want to order online using your credit card, we offer a variety ofalternative ordering methods. Please visit our online shop to find out more.
For high-volume and multi-server license packages of CleanMail Server pleasecontact [email protected] for a price quote.
7.3 Support
A purchase of CleanMail includes maintenance and support for 12 months. Pleasewrite to us at [email protected]. We will also try to help you with the Trialversion of CleanMail if we can.
Contact us for information regarding other support options by email [email protected]
For the latest version always check the CleanMail download page.
Byteplant offers consulting and the development of custom software. Please in-quire by email to [email protected].
7.4 Copyright
CleanMail is copyright ©by Byteplant GmbH
Byteplant GmbH
Heilsbronner Strasse 4
D-91564 Neuendettelsau / Germany
E-Mail: [email protected]
Company Homepage: http://www.byteplant.com
7.5 License and Usage Terms
END-USER LICENSE AGREEMENT FOR CLEANMAIL This End-User Li-cense Agreement (”EULA”) is a legal agreement between you (either an individualor a single entity) and byteplant GmbH. If you do not agree to the terms of thisEULA, do not install, copy, or use CleanMail.
SOFTWARE PRODUCT LICENSE CleanMail is protected by copyright laws andinternational copyright treaties, as well as other intellectual property laws andtreaties. CleanMail is licensed, not sold.
LICENSE/USAGE TERMS Freeware Edition: The Freeware Edition of CleanMailmay be used freely without purchase of a license for personal and non- commercialuse only. It is limited to scanning mail for up to 10 email addresses. It is expressly
96

forbidden to install CleanMail for commercial use, instead a commercial licensemust be purchased.
Trial Edition: The Trial Version of CleanMail may be used freely without purchaseof a license for commercial and non-commercial use for up to 30 days. After thistime a commercial license must be purchased.
Commercial Editions: For payment of the license fee the licensee is granted one(1) non-exclusive, non-transferable license to install and use CleanMail on one (1)computer at a time or install CleanMail on one (1) computer to be used by multipleusers. It is expressly forbidden to install CleanMail for use on multiple computerswithout paying additional license fees. Licensee warrants that they will make areasonable effort to remove unused licenses of CleanMail. Please contact us viaemail at mailto:[email protected] for site licenses and volume discounts.
DISCLAIMER OF WARRANTY CLEANMAIL AND THE ACCOMPANYINGFILES ARE SOLD ”AS IS”. BYTEPLANT MAKES AND CUSTOMER RE-CEIVES FROM BYTEPLANT NO EXPRESS OR IMPLIED WARRANTIESOF ANY KIND WITH RESPECT TO THE SOFTWARE PRODUCT, DOCU-MENTATION, MAINTENANCE SERVICES, THIRD PARTY SOFTWARE OROTHER SERVICES. BYTEPLANT SPECIFICALLY DISCLAIMS AND EX-CLUDES ANY AND ALL IMPLIED WARRANTIES OF MERCHANTABIL-ITY, FITNESS FOR A PARTICULAR PURPOSE, AND NON-INFRINGEMENT.DUE TO THE VARIETY OF USER EXPERTISE, HARDWARE AND SOFT-WARE ENVIRONMENTS INTO WHICH CLEANMAIL MAY BE SUB-JECTED, THERE IS NO WARRANTY FOR TECHNICALLY ACCURATE PER-FORMANCE. THE USER ASSUMES ALL RISK OF USING CLEANMAIL.THE MAXIMUM LIABILITY OF BYTEPLANT WILL BE LIMITED EXCLU-SIVELY TO THE PURCHASE PRICE.
LIMITATION OF LIABILITY NO LIABILITY FOR CONSEQUENTIAL DAM-AGES. To the maximum extent permitted by applicable law, in no event shallbyteplant GmbH or its suppliers be liable for any damages whatsoever (includ-ing, without limitation, damages for loss of business profit, business interruption,loss of business information, or any other pecuniary loss) arising out of the use of,or inability to use, this software product, even if byteplant GmbH has been advisedof the possibility of such damages.
LEGAL NOTICES CleanMail uses the spam filtering engine of theApache Software Foundation open source project SpamAssassin(TM).’SpamAssassin’ and ’Powered by SpamAssassin’ are trademarks of theApache Software Foundation. The SpamAssassin(TM) open sourceproject resides at http://spamassassin.apache.org. CleanMail uses the cairo(http://www.cairographics.org) and wxWidgets (http://www.wxwidgets.org)libraries.
97