classic - carkeysexpress.com · suzuki esteem 98-00 tulplupl 735 grand vitara 99-00 tulplupl 735...
TRANSCRIPT

PANEL 1 PANEL 2 PANEL 3
USER GUIDE V1.1018
PANEL 4 PANEL 5 PANEL 6
STATUS LIGHT (Blue): Indicates when a button is pressed and when the Universal Car
Remote is in ACTIVATION mode.
LOCK: Locks vehicle doors.
FUNCTION I: Additional feature (if equipped).
FUNCTION II: Additional feature
(if equipped).
PANIC: Sounds factory alarm panic alert (if equipped).
UNLOCK: Unlocks vehicle
doors.
TRUNK: Releases
vehicle trunk lid (if equipped).
MAKE/ YEAR BUTTON PAIRINGMODEL SEQUENCE NO.
VEHICLE LOOK UP
PANEL 7 PANEL 8
Classic
DODGE
Caravan 90-92 TULPLLPL 995Caravan 96, 98 TULPLLLL 240Colt 90-94 TULPLLPL 995D-Series Truck 90-93 TULPLLPL 995Dakota 90-96 TULPLLPL 995Daytona 90-93 TULPLLPL 995Dynasty 90-92 TULPLLPL 995Grand Caravan 90-92 TULPLLPL 995Grand Caravan 96-98 TULPLLLL 240Neon 95 TULPLLLL 995Ram Truck 90-95 TULPLLPL 995Ram Van 90-93 TULPLLPL 995Shadow 93-94 TULPLLPL 995Spirit 93-95 TULPLLPL 995Stealth 91-92 TULPLLPL 995W-Series Truck 90 TULPLLPL 995
TOYOTA
4Runner 90-97 TULPLUPU 7104Runner 98 TULPLUPT 710Avalon 95-97 TULPLUPU 710Avalon XL 95-97 TULPLUPT 710Camry 90-96 TULPLUPU 710Celica 90-97 TULPLUPU 710Celica 98-99 TULPLUPT 710Corolla 90-97 TULPLUPU 710Corolla 98-02 TULPLUPT 710Cressida 90-92 TULPLUPU 710Land Cruiser 90-97 TULPLUPU 710MR2 91-95 TULPLUPU 710Paseo 92-97 TULPLUPU 710Pickup 90-95 TULPLUPU 710Previa 91-97 TULPLUPU 710RAV4 96-97 TULPLUPU 710RAV4 98-03 TULPLUPT 710Supra 90-97 TULPLUPU 710Supra 98 TULPLUPT 710T100 93-97 TULPLUPU 710T100 98 TULPLUPT 710Tacoma 95-97 TULPLUPU 710Tacoma 98-01 TULPLUPT 710Tercel 90-97 TULPLUPU 710Tercel 98-99 TULPLUPT 710Tundra 00-02 TULPLUPT 710
VOLKSWAGEN
Cabrio 95-97 TULPLLPL 995Cabriolet 90-93 TULPLLPL 995Corrado 90-95 TULPLLPL 995Eurovan 93-97 TULPLLPL 995Fox 90-93 TULPLLPL 995Golf 90-97 TULPLLPL 995GTI 90-97 TULPLLPL 995Jetta 90-97 TULPLLPL 995Passat 90-97 TULPLLPL 995Vanagon 90-91 TULPLLPL 995
FORD
Aerostar 93-97 TULPLLPL 995Aspire 94-97 TULPLLPL 995Bronco 93 TULPLLPL 995Escort 93-96 TULPLLPL 995Escort 97-98 TULPLLUU 430Expedition 97-98 TULPLLUU 430Explorer 97 TULPLLUL 430F-Series Truck 97 TULPLLUL 430Festiva 90-93 TULPLLPL 995Mustang 90-93 TULPLLPL 995Probe 90-92 TULPLLPL 995Ranger 90-94 TULPLLPL 995Ranger 95-97 TULPLLUL 430Taurus 96-97 TULPLLUU 430Tempo 93-94 TULPLLPL 995Thunderbird 90-92 TULPLLPL 995
NISSAN
200SX 95-98 TULPLUTT 800240SX 95 TULPLUTP 830240SX 96-98 TULPLUTP 800300ZX 93-96 TULPLLPT 810Altima 93-96 TULPLTLP 835Altima 97 TULPLTLP 800Altima 98-99 TULPLUTT 800Altima 00-01 TULPLUTP 800Frontier 98-00 TULPLUTT 800Pathfinder 93-95 TULPLTUL 820Pathfinder 96-97 TULPLTUT 800Pathfinder 98-99 TULPLUTT 800Quest 94-02 TULPLUTT 800Sentra 95-96 TULPLTUT 800Sentra 97-99 TULPLUTP 800Xterra 00 TULPLUTT 800
PLYMOUTH
Acclaim 93-95 TULPLLPL 995Grand Voyager 90-92 TULPLLPL 995Grand Voyager 96-98 TULPLLLL 240Laser 90-94 TULPLLPL 995Neon 95 TULPLLLL 995Prowler 97-98 TULPLLLL 240Sundance 90-94 TULPLLPL 995Voyager 90-92 TULPLLPL 995Voyager 96-98 TULPLLLL 240
PONTIAC
Firebird 90-92 TULPLLPL 995Grand AM 90-92 TULPLLPL 995Grand Prix 90 TULPLLPL 995Lemans 90-93 TULPLLPL 995Sunbird 90-94 TULPLLPL 995Sunfire 95 TULPLLPL 995Trans Sport 90-91 TULPLLPL 995
GMC
CK-Series Truck 90-94 TULPLLPL 995G-Series Van 90-92,
94-96TULPLLPL 995
Jimmy 90-92 TULPLLPL 995Safari 90-94 TULPLLPL 995Sonoma 91-94 TULPLLPL 995Suburban 90-94 TULPLLPL 995Syclone 91 TULPLLPL 995Typhoon 92 TULPLLPL 995Vandura 90-96 TULPLLPL 995Yukon 92-94 TULPLLPL 995
HONDA
Accord 95 TULPLLPU 704Accord 96 TULPLLPU 702Accord EX Wagon 96-97 TULPLLPU 100Odyssey 95-98 TULPLLPU 100Passport 96-97 TULPLULL 710
GEO
Metro 90-92, 94-97
TULPLLPL 995
Prizm 90-97 TULPLLPL 995Storm 90-93 TULPLLPL 995Tracker 90-97 TULPLLPL 995
CHEVROLET
Astro 91-94 TULPLLPL 995Beretta 90-96 TULPLLPL 995Blazer 90-93, TULPLLPL 995Camaro 93 TULPLLPL 995Cavalier 93-95 TULPLLPL 995Corsica 93-96 TULPLLPL 995Express 96 TULPLLPL 995G-Series Van 90-96 TULPLLPL 995Lumina 90-92 TULPLLPL 995Lumina 93-94 TULPLLUT 995Metro 98-01 TULPLLPL 995Suburban 90-94 TULPLLPL 995Tracker 98 TULPLLPL 995
MAZDA
323 90-95 TULPLLPL 995626 90-92 TULPLLPL 995929 90-92 TULPLLPL 995B-Series 95-97 TULPLLUL 430Millenia 96-00 TULPLUUP 750MPV 93-98 TULPLULP 750MX-3 95 TULPLUUL 750MX-5 Miata 95 TULPLULT 820MX-5 Miata 96 TULPLULT 750MX-5 Miata 97-00 TULPLUUP 750MX-6 95-97 TULPLUUL 750Protege 96-98 TULPLULT 750Protege 99-00 TULPLUUT 750
MERCURY
Capri 91-94 TULPLLPL 995Cougar 90-92 TULPLLPL 995Grand Marquis 90-92 TULPLLPL 995Mountaineer 97 TULPLLUL 430Sable 90-92 TULPLLPL 995Sable 96-97 TULPLLUU 430Topaz 90-94 TULPLLPL 995Tracer 91-96 TULPLLPL 995Tracer 97 TULPLLUU 430Villager 93-94 TULPLLPL 995
MITSUBISHI
3000GT 91-95 TULPLLPL 995Diamante 96-98 TULPLLPL 995Eclipse 93-95 TULPLLPL 995Expo 92-95 TULPLLPL 995Galant 93-96 TULPLLPL 995Mirage 90-02 TULPLLPL 995Montero 90-94,
96-00TULPLLPL 995
Precis 90-94 TULPLLPL 995
ISUZU
Oasis 96 TULPLLPU 711Oasis 97-99 TULPLLPU 100Rodeo 96-97 TULPLULL 711Trooper 93-95 TULPLLPU 100Trooper 96-97 TULPLULL 711VehiCROSS 99-01 TULPLULL 711
SUZUKI
Esteem 98-00 TULPLUPL 735Grand Vitara 99-00 TULPLUPL 735Sidekick 98 TULPLUPL 735Vitara 99-00 TULPLUPL 735X-90 98 TULPLUPL 735
HYUNDAI
Accent 95-99 TULPLLTU 725Elantra 96-00 TULPLLTU 725Sonata 94-00 TULPLLTU 725Tiburon 97-01 TULPLLTU 725
INFINITI
G20 93-96 TULPLLPT 810I30 96 TULPLLPP 830J30 93-97 TULPLLPT 810Q45 94-96 TULPLLPT 810
SUBARU
Forester 98-00 TULPLLPL 995Impreza 93-00 TULPLLPL 995Justy 93-94 TULPLLPL 995Loyale 93-94 TULPLLPL 995
VOLVO
240 93 TULPLTLU 990850 93-94 TULPLTLU 990940 93-95 TULPLTLU 990960 93-95 TULPLTLU 990
CHRYSLER
LeBaron 90-94 TULPLLPL 995Town and Country 90-92 TULPLLPL 995Town and Country 96, 98 TULPLLLL 240
LINCOLN
Continental 90-91 TULPLLPL 995Mark VII 90-92 TULPLLPL 995Town Car 90-92 TULPLLPL 995
SATURN
SC 91-95 TULPLLPL 995SL 91-95 TULPLLPL 995SW 93-95 TULPLLPL 995
EAGLE
Premier 90-92 TULPLLPL 995Summit 90-96 TULPLLPL 995Talon 90-94 TULPLLPL 995
ACURA
SLX 96-97 TULPLULL 711TL 96-98 TULPLLPU 100
BUICK
Skylark 91-92 TULPLLPL 995
LEXUS
LX450 96-97 TULPLULL 710
PAIRING INSTRUCTIONS
100
To pair the remote, you will be asked toINSERT and REMOVE your key from the ignitionlock cylinder 5 times within 10 seconds. This action triggers your keyless entry computer to go into PAIRING MODE and makes it able to accept new remotes into its memory. When doing each insertion/removal cycle, be sure to move quickly, yet smoothly (about one insert/remove cycle per second) and WITHDRAW THE KEY COMPLETELY from the keyslot.
Begin with all doors closed. Open driver’s door and leave open. Enter vehicle. PRESS and HOLD the driver’s side power door lock switch in the UNLOCK position. Continue to hold until instructed to release in step 4.
1. Slowly insert and remove your ignition key from the ignition lock cylinder 5 times WITHIN 10 SECONDS. The power door locks will automatically cycle indicating you have
successfully entered PAIRING MODE.2. Within 5 SECONDS, press the LOCK button
ONCE on the remote that you want to pair. The power door locks will automatically cycle to confirm pairing.
3. To pair an additional remote, including your existing, working remote, WITHIN 5 SECONDS, PRESS the LOCK button on that remote. The power locks will cycle to confirm pairing.
4. RELEASE the driver’s side power door lock switch.
5. Exit the vehicle, close the door, and test remotes for functionality.
240
1. Insert key and turn to the RUN position as far forward you can go WITHOUT cranking the engine). Wait for chime sound to stop.
2. Using your existing, paired remote, press and hold down the UNLOCK button for between 4 and 10 Seconds. WHILE HOLDING THE UNLOCK button press the PANIC button on the existing, paired remote for 1 second and release all buttons. Within 3 seconds, you’ll hear a chime indicating you have successfully entered PAIRING MODE.
3. Within 30 seconds, press a button on all transmitters to be paired, including the existing, paired remote. A chime should sound to confirm pairing.
4. To exit PAIRING MODE, turn the ignition to the OFF position.
5. Remove key, exit the vehicle, close the door, and test remotes for functionality.
430
1. Open vehicle driver’s door and cycle the power door lock/unlock switch on the driver’s door panel TWICE, going from LOCK to UNLOCK.
2. Sit in driver’s seat and insert key into ignition.3. Turn key in ignition from OFF to RUN 5
times within 10 seconds, ending in the RUN position. Your power locks should automatically cycle indicating successful entry into PAIRING MODE. At this time, all previously stored remotes are erased from memory and will need to be paired.
4. Within 20 seconds, press any button on the first remote to be paired. Locks will cycle to confirm pairing.
5. Within 20 seconds, press any button on second transmitter (up to 4 may be paired). Do this for every remote you want to use on the vehicle, including any of your old remotes.
6. Turn ignition to OFF position. Locks will cycle to indicate exit of PAIRING MODE.
7. Exit the vehicle, close the door, and test remotes for functionality.
702
1. Start with doors and trunk closed tightly. Have the key in one hand and the remote in the other.
2. Insert the key.3. The following three steps should be
conducted 3 consecutive times. Each cycle should be performed within 5 seconds of each other. A. Turn the ignition switch to the ON position (usually marked “II” on the ignition bezel) as far forward you can go WITHOUT cranking the engine. B. Press UNLOCK on the remote and release. C. Turn the ignition back to the OFF position. Do not remove the key.
4. Within 5 seconds of the previous step, turn the ignition switch to the ON position.
5. Using the SAME REMOTE, press the UNLOCK button. Power locks will automatically lock and unlock (“cycle”) to confirm entry into “program mode”
6. Within 10 seconds of the previous step, press the UNLOCK button on the SAME REMOTE. The power locks will cycle to confirm that
the remote has been programmed.7. If you’re programming additional remotes,
REPEAT STEP 6. The system will accept up to 3 remotes total.
8. Remove key.9. Test each remote for functionality.
710
1. Locate the keyless entry receiver module. On the vast majority of Toyota vehicles, it’s underneath either the driver or the passenger seat. Much more rarely, it’s behind the dashboard. Some Camrys may have the computer just behind the power mirror control switch backing plate. Gently pry off the backing plate/switch. If you cannot locate the module, consult your local dealer for help in locating the module.
2. Locate the pairing button on the keyless entry receiver module (don’t press the button yet). It’s on the side, and may be recessed in a hole and covered with a label or piece of tape. Poke a hole in the tape to determine if you can use your finger to press the button. Some modules require the use of a pencil or pen to depress the button.
3. Insert key and turn to the ON position (as far as you can go without cranking the engine).
4. Press the pairing button for 3 seconds, release.
5. Within 5 seconds of step 4, press and release the top button of the remote to be paired. There may be a confirmation from the system to indicate successful pairing, including horn beep, chirp, or vehicle lights flashing.
6. If you have additional remotes to pair, repeat steps 4-5.
7. Turn ignition switch to OFF to exit PAIRING MODE.
8. Test all remotes for functionality.
711
1. Locate the keyless entry receiver module. It is mounted on the wall under the driver’s dash left knee area. If you cannot locate the module, consult your local dealer for help in locating the module.
2. Locate the pairing button on the keyless entry receiver module (don’t press the button yet). It’s on the side, and may be recessed in a hole and covered with a label or piece of tape. Poke a hole in the tape to determine if you can use your finger to press the button. You may use a pencil or pen to press the button.
3. Insert key and turn to the ON position (as far as you can go without cranking the engine).
4. Press the green pairing button for 3 seconds, then release.
5. Within 5 seconds, press and release the top button of the remote to be paired. There may be a confirmation from the system to indicate successful pairing, including horn beep, chirp, or vehicle lights flashing.
6. If you have additional remotes to pair, repeat steps 4 and 5.
7. Turn ignition switch to OFF to exit PAIRING MODE.
8. Test all remotes for functionality.
725
1. Open the driver’s side door.2. Insert key into the ignition.3. Turn the ignition to the ON position (as far
forward as possible WITHOUT cranking the engine).
4. If you have a VALET SWITCH, turn the switch on and off 13 consecutive times (26 clicks total).
5. If you don’t have a valet switch, then touch the black wire to the white wire 13 consecutive times.
6. Now, get the remote you want to pair and PRESS LOCK.
7. Turn the ignition to the OFF position. Once again, press LOCK on the remote that you’re
pairing. The electronic door locks should automatically lock and unlock cycle as feedback.
8. IF THIS DOESN’T HAPPEN YOU MUST START OVER.
9. Turn the ignition to the ON position (as far forward as possible WITHOUT cranking the engine) and touch the black wire to the white wire 14 consecutive times (or, if you have a VALET SWITCH, turn it on and off 14 consecutive times).
10. Press LOCK on the remote you’re pairing.11. Turn the ignition to the OFF position. PRESS
LOCK on the remote you’re pairing. The driver’s side door should automatically unlock (NOTE: if it locked, then PRESS LOCK again to unlock it).
12. Press LOCK. All other doors should automatically unlock. IF THEY DO NOT, then REPEAT STEPS 8 AND 9.
13. Test the remote for functionality.
735
All existing, working remotes must be present during the pairing process. Once you pair a new remote, all previous remotes will be erased from the memory. The others will not be functional until you pair them again.
1. Locate the keyless entry module beneath the driver’s side dash.
2. Locate the PUSH SWITCH located next to the red LED.
3. Use a pen to push down on the PUSH SWITCH until the red LED begins to flash, indicating that you have successfully entered pairing mode. Your vehicle is now ready to register new remotes.
4. PRESS then RELEASE the LOCK button on the remote you want to program. Look at the red LED light. It should light up and stay lit, then flash after a few seconds, indicating you have successfully programmed the remote.
5. Within 5 seconds, REPEAT STEP 4 using the second remote, including any old, existing remotes. Remember, once you enter into programming model, your old remotes have been cancelled, so you must reprogram them at this step.
6. Remove key, exit vehicle and test your remotes for functionality.
750
All existing, working remotes must be present during the pairing process. Once you pair a new remote, all previous remotes will be erased from the memory. The others will not be functional until you pair them again.
1. Start with the key out of the ignition. Close all of the doors on your vehicle.
2. Open driver’s side door AND LEAVE OPEN.3. COMPLETE THESE WITHIN 25 SECONDS: A. Insert key into ignition and turn to ON
position (as far forward you can go without cranking the engine) THEN BACK TO THE OFF position.
4. REMOVE KEY from ignition.5. REPEAT STEPS 3A and 7B TWICE. OPEN,
then CLOSE driver’s door THREE TIMES (alternatively, you may press and release the driver’s door frame button three times).
6. You should now hear a chime or buzzer, letting you know you have successfully entered PAIRING MODE. If not, wait 40 SECONDS and go back to step 3.
7. You will now pair all the remotes that will work on the system, including any existing remotes. Gather all the remotes you will use on the vehicle, including any currently working remote(s). According to the number of remotes you want to pair, follow the instruction below that applies. Choose ONE of the following three steps:
A. If you have only ONE remote in total to pair, press any button on the remote TWICE until the door locks automatically cycle.
Packaging part number: UFCRA-7060
Thank you for purchasing the world’s first Universal Car Remote!
For custom instructions for your vehicle, visit http://UniversalCarRemote.com/help
Visit www.iKeyless.com for a complete line of replacement keys and remotes.
NOTE: The Universal Car Remote is designed to work on vehicles equipped with a factory-installed remote keyless entry system. If you are unsure if your vehicle has a factory-installed keyless entry system, please check with a local car dealership.
ALL COMPATIBLE VEHICLES ARE LISTED ON PANELS 3-5 UNDER “VEHICLE LOOK UP”.
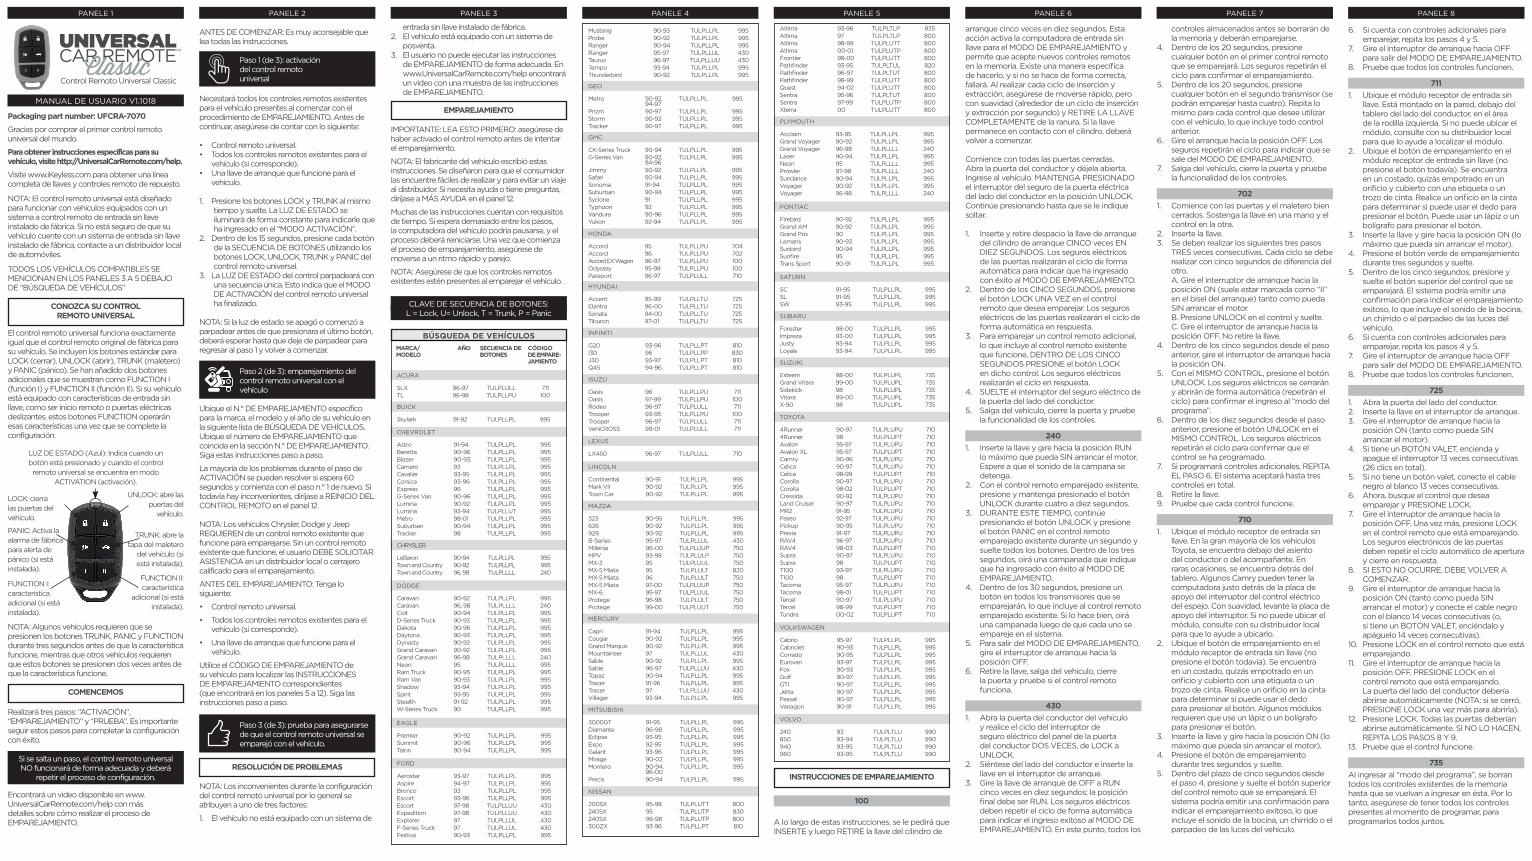
GET TO KNOW YOUR UNIVERSAL CAR REMOTE
The Universal Car Remote works exactly like the original, factory remote for your vehicle. Standard buttons for LOCK, UNLOCK, TRUNK, and PANIC are included. We’ve added two additional buttons shown below as FUNCTION I and FUNCTION II. If your vehicle is equipped with keyless entry features such as remote start or power sliding door(s), these FUNCTION buttons will operate those features once setup is complete.
NOTE: Some vehicles require holding the TRUNK, PANIC, and/or FUNCTION BUTTONS for up to 3 seconds before the feature operates, while some vehicles require these buttons to be pressed twice before the feature operates.
LET’S GET STARTED
You will perform three steps: “ACTIVATION,” “PAIRING,” and “TESTING.” It is important to follow these steps in order to successfully complete setup.
If you skip a step, the Universal Car Remote WILL NOT work properly, and you’ll have
to repeat the setup process.
A video is available at: www.UniversalCarRemote.com/help with more details on how to do the PAIRING process.
BEFORE YOU BEGIN: It is highly recommended you read through all instructions.
STEP 1 (of 3) ACTIVATEActivating your Universal Car Remote
You will need any existing remotes for the vehicle present when beginning the PAIRING procedure.
Many of the instructions have timing requirements. Waiting too long between steps may result in your vehicle’s computer timing out, requiring you to start over. Once you begin the pairing procedure, be sure to move at a quick and even pace.
NOTE: Ensure any existing remotes are present when pairing to vehicle.
BUTTON SEQUENCE KEY:L = Lock, U= Unlock, T = Trunk, P = Panic
Before continuing, ensure you have the following:
• Universal Car Remote.• Any existing remotes for the vehicle (if applicable). • A working ignition key for the vehicle. 1. Press the LOCK and TRUNK buttons at the
same time and release. The STATUS LIGHT will illuminate steadily indicating you have entered “ACTIVATION MODE”.
2. Within 15 seconds, push each button from your BUTTON SEQUENCE using the Universal Car Remote’s LOCK, UNLOCK, TRUNK and PANIC buttons.
3. Your remote’s STATUS LIGHT will flash back a unique sequence. This indicates that your Universal Car Remote ACTIVATION MODE is complete.
NOTE: If your status light went out or started flashing earlier than when you pushed your last button, you will need to wait until the STATUS LIGHT stops flashing and go back to Step 1 and begin again.
STEP 2 (of 3) PAIRPairing your Universal Car Remote to your vehicle
Locate the PAIRING NO. specific to your vehicle’s make, model, and year on the VEHICLE LOOK UP list below. Locate the matching PAIRING number from the PAIRING NO. section. Follow these instructions step-by-step.
Most issues during the ACTIVATION step can be resolved by waiting 60 seconds and beginning from Step #1 again. If issues still occur, see RESETTING THE REMOTE on panel 11. NOTE: Chrysler, Dodge, and Jeep vehicles REQUIRE one existing, working remote to pair. Without an existing, working remote the user MUST SEEK ASSISTANCE from a local dealership or qualified locksmith for pairing. BEFORE PAIRING: Have the following:
• Universal Car Remote.• Any existing remotes for the vehicle (if
applicable). • A working ignition key for the vehicle.
Use your vehicle’s PAIRING CODE to locate the corresponding PAIRING INSTRUCTIONS (found on panels 5-11). Follow the step-by-step instructions.
STEP 3 (of 3) TESTTESTING ensures the Universal Car Remote has been paired to your vehicle.
TROUBLESHOOTING
NOTE: Issues when setting up the Universal Car Remote are typically attributed to one of three factors:
1. The vehicle is not equipped with a factory- installed keyless entry system,
2. The vehicle is equipped with an aftermarket system or
3. The user is failing to execute the PAIRING instructions properly. A video sample is available at: www.UniversalCarRemote.com/help with a sample of PAIRING instructions.
PAIRING
IMPORTANT: READ THIS FIRSTMake sure you have activated yourremote before attempting to pair.
NOTE: These instructions were written by the vehicle manufacturer. They were designed to be easily performed by the consumer to avoid a trip to the dealership. If you need assistance or have questions, see MORE HELP on panel 11.
PANEL 9 PANEL 10 PANEL 11 PANEL 12 PANEL 13 PANEL 14 PANEL 15 PANEL 16
Perform this step twice more with the SAME REMOTE for 3 times with the same remote.
B. If you have TWO remotes in total to pair, press any button on the FIRST remote
TWICE until the door locks automatically cycle.8. Now press any button on the SECOND
REMOTE TWICE until the door locks automatically cycle. Then, again press any button on the SECOND REMOTE TWICE (for a total of three pairings with the two remotes) until the door locks automatically cycle.
9. If you have THREE remotes in total to pair, press any button on the FIRST REMOTE TWICE until the door locks automatically cycle. Press any button on the SECOND REMOTE TWICE until the door locks automatically cycle. Finally, press any button on the THIRD REMOTE TWICE (for a total of three pairings with the three remotes) until the door locks automatically cycle.
10. Open and close the driver’s door ONCE. You should hear another buzz or chime indicating you have completed the process.
11. Remove key, exit vehicle, close door and test remotes for functionality. If any of the remotes don’t work start over from step 1.
800
1. Enter vehicle, close and lock all doors using power lock switch on drivers door.
2. Insert and remove (do not turn) key from ignition at least 6 times within 10 seconds.
3. Tail lamps will flash to indicate original code has been erased.
4. Insert and turn key to ACC position.5. Press LOCK on first keyless remote. Tail
lamps will flash to confirm programming.6. To add additional remotes, unlock then lock
the doors using power lock switch on drivers door.
7. Press LOCK button on second keyless remote. Tail lamps will flash to confirm programming.
8. Open drivers door, turn ignition to OFF.
810
1. Close all doors/trunk.2. Open trunk3. Open driver’s door and sit in driver’s seat.4. Lock all doors using the driver’s side power
lock/unlock switch.5. Slowly insert and remove your ignition key
from the ignition lock cylinder SIX times WITHIN 10 SECONDS. Your dashboard blinker/hazard indicator lights will flash indicating you have successfully entered into PAIRING MODE.
6. Unlock, then lock driver’s door using the manual (not power) door lock/unlock knob.
7. Within 5 SECONDS, press the LOCK button ONCE on the remote that you want to pair. The dashboard blinker/hazard indicator lights will flash as feedback.
8. To pair additional remotes, including your existing, working remotes, UNLOCK, then LOCK the doors same way as in step 5.
9. THEN WITHIN 5 SECONDS, PRESS the LOCK button on the next remote. Again, the dashboard blinker/hazard lights will flash as feedback.
10. Exit vehicle, close door, and test remote(s) for functionality
829
1. Look under the driver’s seat for a plastic box with a label/sticker on it.
2. Press firmly on the sticker until you feel a hole with a button in it. DO NOT PRESS THE BUTTON YET.
3. Put the keys in the ignition and leave them OFF.
4. Push and hold the button in the box until the car starts beeping.
5. Release the button. The car will beep regularly now to indicate that you have
entered PAIRING MODE.6. One at a time, press the LOCK buttons on all
the remotes you wish to use.7. Turn the key in the ignition to ON and then
back OFF.8. Exit vehicle, close door, and test remote(s)
for functionality.
830
1. Close all doors/trunk.2. Open driver’s door and sit in driver’s seat.3. Lock all doors using the driver’s side power
lock/unlock switch.4. Slowly insert and remove your ignition key
from the ignition lock cylinder SIX times WITHIN 10 SECONDS. Your dashboard blinker/hazard indicator lights will flash indicating you have successfully entered into PAIRING MODE.
5. Re-insert the key and turn the ignition to the ACC position.
6. Within 5 SECONDS, press the LOCK button ONCE on the remote that you want to pair. The dashboard blinker/hazard indicator lights will flash as feedback.
7. To pair additional remotes, including your existing, working remotes, UNLOCK, then LOCK, the driver’s door using the MANUAL (not power) lock/unlock knob on the driver’s door panel. WITHIN 5 SECONDS, PRESS the LOCK button on the next remote. Again, the dashboard blinker/hazard lights will flash as feedback.
8. Turn key to the OFF position, remove key, UNLOCK the doors using the DRIVER’S SIDE POWER LOCK/UNLOCK SWITCH.
9. Exit vehicle, close door, and test remote(s) for functionality
990
All existing, working remotes must be present during the pairing process. Once you pair a new remote, all previous remotes will be erased from the memory. The others will not be functional until you pair them again.
1. Enter the vehicle, close the door, and insert key into ignition.
2. Turn the key from the OFF to ON, FIVE TIMES within 10 SECONDS, ENDING IN THE ON POSITION.
3. WITHIN 30 SECONDS, press either the LOCK or the UNLOCK button on each remote that you want to pair, including any old, existing remotes.
4. Remove key from the ignition, exit vehicle, and close door. Test remote(s) for functionality.
995
All existing, working remotes must be present during the pairing process. Once you pair a new remote, all previous remotes will be erased from the memory. The others will not be functional until you pair them again.
1. Open the driver’s side door.2. Insert key into the ignition.3. Turn ignition to the ON position (that’s as far
as it will go without cranking the engine).4. Locate the pairing button. It’s commonly
found in one of three possible places: A) near the base of the driver’s side dash, near the underside of the steering wheel base, or B) near the hood pop lever, or C) near or in a blue LED switch on the dash. NOTE: The button may be recessed in a plastic ring.
5. PRESS and HOLD the pairing button (DO NOT release until instructed to do so in step 8).
6. Within about 20 seconds, the electronic door locks will automatically cycle and the siren (if equipped) will chirp three times.
7. Congratulations, you have entered PAIRING MODE. Now the computer is ready to learn
new remotes.8. Press the LOCK (the left button) on the
remote you wish to pair. The electronic locks will cycle and the siren (if equipped) will chirp once. This indicates that the remote has been paired.
9. For each additional remote (including your existing, working remotes) —up to 4 total, REPEAT STEP 6.
10. To exit PAIRING MODE release the pairing button and turn the ignition to the OFF position.
11. Remove key, exit vehicle, close door and test remote(s)
RESETTING THE REMOTE
You will need:• Small flat-head screwdriver.• Small piece of wood or plastic such as a pen-
cap or toothpick.
1. Insert the screwdriver into the notch on the left side of the remote. Gently twist the top and bottom shell of the remote until it separates.
2. Remove the rubber insert and the remote circuit board. Do not place the circuit board on any metal surface!
3. Using the wood or plastic tool, carefully push the battery out of the bottom of the holder. Keep battery removed for 10 seconds. Make sure the + mark faces AWAY from the green board, so the + side touches the metal clip.
4. Insert the battery and retry activation, pairing or usage with your vehicle.
5. If it still does not work correctly try replacing with a new CR1632 battery.
6. If you are still having trouble see MORE HELP on panel 11.
MORE HELP
EMAIL SUPPORT: Send questions or concerns to: [email protected]. As with all forms of correspondence, be prepared to provide:
1. The year, make, and model of your vehicle.2. Product information - the product you are
inquiring about, which is the Universal Car Remote.
TELEPHONE SUPPORT: Phone support is available for Universal Car Remotes still covered under the standard warranty. Have the following items ready when you call: 1. Purchase receipt. 2. The Universal Car Remote.
Call Car Keys Express Tech Support between the hours of 8:30am to 5pm EST at:
1-888-598-8910
Car Keys Express POSTAL MAILCar Keys Express828 East Market St.Louisville, KY 40206United States
FREQUENTLY ASKED QUESTIONS
Q: The car won’t go into PAIRING mode.A1. Verify the year of your car then check in the
VEHICLE LOOK UP list in panel 3-5 that the PAIRING CODE is the correct one for your car. Then, retry the PAIRING instructions.
A2. If you’ve never had one of the remotes that originally came with the car, it is possible that the car does not have a factory-installed keyless entry system.
Q: Car is in PAIRING mode, but doesn’t respond when the Universal Car Remote buttons are pressed.
A1. Redo all steps to activate, pair, and test the remote.
A2. Try resetting the Universal Car Remote.
Q: Some of the buttons on the Universal Car Remote are not working.
A: The Universal Car Remote works with hundreds of different factory remotes. Some vehicles use buttons that others will not use. All vehicles will use the LOCK and UNLOCK buttons.
NOTE: Some vehicles require the user to hold a button for up to three seconds before a feature will operate, while others require pressing the button twice within 2 seconds. This is particularly common for PANIC, TRUNK, FUNCTION I and FUNCTION II buttons.
Q: Can I pair the Universal Car Remote to work with more than one vehicle?
A: No, the Universal Car Remote is designed to work with one vehicle.
Q: I successfully paired the Universal Car Remote to my vehicle but my old remote no longer works.
A: All remotes, old and new, must be paired at once. Refer to the PAIRING procedure for your vehicle for more information.
Q: STATUS LIGHT remains lit and will not turn off. A: See “RESETTING THE UNIVERSAL CAR
REMOTE”.
Q: I missed the STATUS LIGHT sequence after I entered my vehicle code. Can I check it?
A: Yes, press FUNCTION I and PANIC at the same time until the STATUS LIGHT stays illuminated. Then, press FUNCTION I and PANIC again. The STATUS LIGHT should turn off and blink back the code you entered from Step 1 in Panel 2.
FCC & WARRANTY
FCC ID: X32-MECJ
This device complies with Part 15 of the FCC Rules. Operation is subject to the following two conditions: (1) This device may not cause harmful interference, and (2) this device must accept any interference received, including interference that may cause undesired operation.
WARNING: Changes or modifications to this device not expressly approved by iKeyless LLC could void the user’s authority to operate the equipment. DISCLAIMER: Customer accepts all responsibility and liability for any and all injuries, damages, costs, or claims as a result of the correct or incorrect use of setup and/ or pairing instructions. Some states do not allow the exclusion or limitation of incidental or consequential damages, so the above limitation or exclusion may not apply to you.
3 YEAR LIMITED WARRANTY
Car Keys Express warrants this product against manufacturing defects for a period of three years from the date of purchase. This warranty covers any product defects that result in poor performance of the remote control. It does not cover cosmetic appearance, battery depletion, nor poor performance of the remote control due to damage resulting from impact, exposure to water, exposure to excessive heat, improper handling or improper use. This warranty does not cover customer inability or unwillingness to perform the required procedures that triggers vehicle’s keyless entry system to enter ‘activation mode’ or ‘pairing mode’, nor does it cover defects in a vehicle’s keyless entry system. Warranty claims are limited to the replacement of the product at Car Keys Express’ discretion. To submit a warranty claim, contact the retail store from which the Universal Car Remote was
originally purchased. Customer must provide proof of purchase including UPC label from packaging and copy of store receipt showing date of purchase. This warranty gives you specific legal rights and you may also have other rights which vary from state to state. This information may not be reproduced, copied, or distributed by any means without prior written consent from Car Keys Express.
© 2018 Car Keys Express
PANELE 1 PANELE 2 PANELE 3
MANUAL DE USUARIO V1.1018
Packaging part number: UFCRA-7070
Gracias por comprar el primer control remoto universal del mundo.
Para obtener instrucciones específicas para su vehículo, visite http://UniversalCarRemote.com/help.
Visite www.iKeyless.com para obtener una línea completa de llaves y controles remoto de repuesto.
NOTA: El control remoto universal está diseñado para funcionar con vehículos equipados con un sistema a control remoto de entrada sin llave instalado de fábrica. Si no está seguro de que su vehículo cuente con un sistema de entrada sin llave instalado de fábrica, contacte a un distribuidor local de automóviles.
TODOS LOS VEHÍCULOS COMPATIBLES SE MENCIONAN EN LOS PANELES 3 A 5 DEBAJO DE “BÚSQUEDA DE VEHÍCULOS”
CONOZCA SU CONTROL REMOTO UNIVERSAL
El control remoto universal funciona exactamente igual que el control remoto original de fábrica para su vehículo. Se incluyen los botones estándar para LOCK (cerrar), UNLOCK (abrir), TRUNK (maletero) y PANIC (pánico). Se han añadido dos botones adicionales que se muestran como FUNCTION I (función I) y FUNCTION II (función II). Si su vehículo está equipado con características de entrada sin llave, como ser inicio remoto o puertas eléctricas deslizantes, estos botones FUNCTION operarán esas características una vez que se complete la configuración.
NOTA: Algunos vehículos requieren que se presionen los botones TRUNK, PANIC y FUNCTION durante tres segundos antes de que la característica funcione, mientras que otros vehículos requieren que estos botones se presionen dos veces antes de que la característica funcione.
COMENCEMOS
Realizará tres pasos: “ACTIVACIÓN”, “EMPAREJAMIENTO” y “PRUEBA”. Es importante seguir estos pasos para completar la configuración con éxito.
Si se salta un paso, el control remoto universal NO funcionará de forma adecuada y deberá
repetir el proceso de configuración.
Encontrará un video disponible en www.UniversalCarRemote.com/help con más detalles sobre cómo realizar el proceso de EMPAREJAMIENTO.
Control Remoto Universal Classic
PANELE 4 PANELE 5 PANELE 6
entrada sin llave instalado de fábrica. 2. El vehículo está equipado con un sistema de
posventa. 3. El usuario no puede ejecutar las instrucciones
de EMPAREJAMIENTO de forma adecuada. En www.UniversalCarRemote.com/help encontrará un video con una muestra de las instrucciones de EMPAREJAMIENTO.
EMPAREJAMIENTO
IMPORTANTE: LEA ESTO PRIMERO: asegúrese de haber activado el control remoto antes de intentar el emparejamiento.
NOTA: El fabricante del vehículo escribió estas instrucciones. Se diseñaron para que el consumidor las encuentre fáciles de realizar y para evitar un viaje al distribuidor. Si necesita ayuda o tiene preguntas, diríjase a MÁS AYUDA en el panel 12.
Muchas de las instrucciones cuentan con requisitos de tiempo. Si espera demasiado entre los pasos, la computadora del vehículo podría pausarse, y el proceso deberá reiniciarse. Una vez que comienza el proceso de emparejamiento, asegúrese de moverse a un ritmo rápido y parejo.
NOTA: Asegúrese de que los controles remotos existentes estén presentes al emparejar el vehículo.
CLAVE DE SECUENCIA DE BOTONES:L = Lock, U= Unlock, T = Trunk, P = Panic
ANTES DE COMENZAR: Es muy aconsejable que lea todas las instrucciones.
Paso 1 (de 3): activación del control remoto universal
Necesitará todos los controles remotos existentes para el vehículo presentes al comenzar con el procedimiento de EMPAREJAMIENTO. Antes de continuar, asegúrese de contar con lo siguiente:
• Control remoto universal.• Todos los controles remotos existentes para el
vehículo (si corresponde).• Una llave de arranque que funcione para el
vehículo.
1. Presione los botones LOCK y TRUNK al mismo tiempo y suelte. La LUZ DE ESTADO se iluminará de forma constante para indicarle que ha ingresado en el “MODO ACTIVACIÓN”.
2. Dentro de los 15 segundos, presione cada botón de la SECUENCIA DE BOTONES utilizando los botones LOCK, UNLOCK, TRUNK y PANIC del control remoto universal.
3. La LUZ DE ESTADO del control parpadeará con una secuencia única. Esto indica que el MODO DE ACTIVACIÓN del control remoto universal ha finalizado.
NOTA: Si la luz de estado se apagó o comenzó a parpadear antes de que presionara el último botón, deberá esperar hasta que deje de parpadear para regresar al paso 1 y volver a comenzar.
Paso 2 (de 3): emparejamiento del control remoto universal con el vehículo
Ubique el N.° DE EMPAREJAMIENTO específico para la marca, el modelo y el año de su vehículo en la siguiente lista de BÚSQUEDA DE VEHÍCULOS. Ubique el número de EMPAREJAMIENTO que coincida en la sección N.° DE EMPAREJAMIENTO. Siga estas instrucciones paso a paso.
La mayoría de los problemas durante el paso de ACTIVACIÓN se pueden resolver si espera 60 segundos y comienza con el paso n.° 1 de nuevo. Si todavía hay inconvenientes, diríjase a REINICIO DEL CONTROL REMOTO en el panel 12. NOTA: Los vehículos Chrysler, Dodge y Jeep REQUIEREN de un control remoto existente que funcione para emparejarse. Sin un control remoto existente que funcione, el usuario DEBE SOLICITAR ASISTENCIA en un distribuidor local o cerrajero calificado para el emparejamiento.
ANTES DEL EMPAREJAMIENTO: Tenga lo siguiente:
• Control remoto universal.
• Todos los controles remotos existentes para el vehículo (si corresponde).
• Una llave de arranque que funcione para el vehículo.
Utilice el CÓDIGO DE EMPAREJAMIENTO de su vehículo para localizar las INSTRUCCIONES DE EMPAREJAMIENTO correspondientes (que encontrará en los paneles 5 a 12). Siga las instrucciones paso a paso.
Paso 3 (de 3): prueba para asegurarse de que el control remoto universal se emparejó con el vehículo.
RESOLUCIÓN DE PROBLEMAS
NOTA: Los inconvenientes durante la configuración del control remoto universal por lo general se atribuyen a uno de tres factores:
1. El vehículo no está equipado con un sistema de
MARCA/ AÑO SECUENCIA DE CÓDIGOMODELO BOTONES DE EMPARE- JAMIENTO
BÚSQUEDA DE VEHÍCULOS
PANELE 7 PANELE 8
Classic
DODGE
Caravan 90-92 TULPLLPL 995Caravan 96, 98 TULPLLLL 240Colt 90-94 TULPLLPL 995D-Series Truck 90-93 TULPLLPL 995Dakota 90-96 TULPLLPL 995Daytona 90-93 TULPLLPL 995Dynasty 90-92 TULPLLPL 995Grand Caravan 90-92 TULPLLPL 995Grand Caravan 96-98 TULPLLLL 240Neon 95 TULPLLLL 995Ram Truck 90-95 TULPLLPL 995Ram Van 90-93 TULPLLPL 995Shadow 93-94 TULPLLPL 995Spirit 93-95 TULPLLPL 995Stealth 91-92 TULPLLPL 995W-Series Truck 90 TULPLLPL 995
TOYOTA
4Runner 90-97 TULPLUPU 7104Runner 98 TULPLUPT 710Avalon 95-97 TULPLUPU 710Avalon XL 95-97 TULPLUPT 710Camry 90-96 TULPLUPU 710Celica 90-97 TULPLUPU 710Celica 98-99 TULPLUPT 710Corolla 90-97 TULPLUPU 710Corolla 98-02 TULPLUPT 710Cressida 90-92 TULPLUPU 710Land Cruiser 90-97 TULPLUPU 710MR2 91-95 TULPLUPU 710Paseo 92-97 TULPLUPU 710Pickup 90-95 TULPLUPU 710Previa 91-97 TULPLUPU 710RAV4 96-97 TULPLUPU 710RAV4 98-03 TULPLUPT 710Supra 90-97 TULPLUPU 710Supra 98 TULPLUPT 710T100 93-97 TULPLUPU 710T100 98 TULPLUPT 710Tacoma 95-97 TULPLUPU 710Tacoma 98-01 TULPLUPT 710Tercel 90-97 TULPLUPU 710Tercel 98-99 TULPLUPT 710Tundra 00-02 TULPLUPT 710
VOLKSWAGEN
Cabrio 95-97 TULPLLPL 995Cabriolet 90-93 TULPLLPL 995Corrado 90-95 TULPLLPL 995Eurovan 93-97 TULPLLPL 995Fox 90-93 TULPLLPL 995Golf 90-97 TULPLLPL 995GTI 90-97 TULPLLPL 995Jetta 90-97 TULPLLPL 995Passat 90-97 TULPLLPL 995Vanagon 90-91 TULPLLPL 995
FORD
Aerostar 93-97 TULPLLPL 995Aspire 94-97 TULPLLPL 995Bronco 93 TULPLLPL 995Escort 93-96 TULPLLPL 995Escort 97-98 TULPLLUU 430Expedition 97-98 TULPLLUU 430Explorer 97 TULPLLUL 430F-Series Truck 97 TULPLLUL 430Festiva 90-93 TULPLLPL 995
NISSAN
200SX 95-98 TULPLUTT 800240SX 95 TULPLUTP 830240SX 96-98 TULPLUTP 800300ZX 93-96 TULPLLPT 810
Altima 93-96 TULPLTLP 835Altima 97 TULPLTLP 800Altima 98-99 TULPLUTT 800Altima 00-01 TULPLUTP 800Frontier 98-00 TULPLUTT 800Pathfinder 93-95 TULPLTUL 820Pathfinder 96-97 TULPLTUT 800Pathfinder 98-99 TULPLUTT 800Quest 94-02 TULPLUTT 800Sentra 95-96 TULPLTUT 800Sentra 97-99 TULPLUTP 800Xterra 00 TULPLUTT 800
PLYMOUTH
Acclaim 93-95 TULPLLPL 995Grand Voyager 90-92 TULPLLPL 995Grand Voyager 96-98 TULPLLLL 240Laser 90-94 TULPLLPL 995Neon 95 TULPLLLL 995Prowler 97-98 TULPLLLL 240Sundance 90-94 TULPLLPL 995Voyager 90-92 TULPLLPL 995Voyager 96-98 TULPLLLL 240
PONTIAC
Firebird 90-92 TULPLLPL 995Grand AM 90-92 TULPLLPL 995Grand Prix 90 TULPLLPL 995Lemans 90-93 TULPLLPL 995Sunbird 90-94 TULPLLPL 995Sunfire 95 TULPLLPL 995Trans Sport 90-91 TULPLLPL 995
GMC
CK-Series Truck 90-94 TULPLLPL 995G-Series Van 90-92,
94-96TULPLLPL 995
Jimmy 90-92 TULPLLPL 995Safari 90-94 TULPLLPL 995Sonoma 91-94 TULPLLPL 995Suburban 90-94 TULPLLPL 995Syclone 91 TULPLLPL 995Typhoon 92 TULPLLPL 995Vandura 90-96 TULPLLPL 995Yukon 92-94 TULPLLPL 995
HONDA
Accord 95 TULPLLPU 704Accord 96 TULPLLPU 702Accord EX Wagon 96-97 TULPLLPU 100Odyssey 95-98 TULPLLPU 100Passport 96-97 TULPLULL 710
GEO
Metro 90-92, 94-97
TULPLLPL 995
Prizm 90-97 TULPLLPL 995Storm 90-93 TULPLLPL 995Tracker 90-97 TULPLLPL 995
CHEVROLET
Astro 91-94 TULPLLPL 995Beretta 90-96 TULPLLPL 995Blazer 90-93, TULPLLPL 995Camaro 93 TULPLLPL 995Cavalier 93-95 TULPLLPL 995Corsica 93-96 TULPLLPL 995Express 96 TULPLLPL 995G-Series Van 90-96 TULPLLPL 995Lumina 90-92 TULPLLPL 995Lumina 93-94 TULPLLUT 995Metro 98-01 TULPLLPL 995Suburban 90-94 TULPLLPL 995Tracker 98 TULPLLPL 995
MAZDA
323 90-95 TULPLLPL 995626 90-92 TULPLLPL 995929 90-92 TULPLLPL 995B-Series 95-97 TULPLLUL 430Millenia 96-00 TULPLUUP 750MPV 93-98 TULPLULP 750MX-3 95 TULPLUUL 750MX-5 Miata 95 TULPLULT 820MX-5 Miata 96 TULPLULT 750MX-5 Miata 97-00 TULPLUUP 750MX-6 95-97 TULPLUUL 750Protege 96-98 TULPLULT 750Protege 99-00 TULPLUUT 750
MERCURY
Capri 91-94 TULPLLPL 995Cougar 90-92 TULPLLPL 995Grand Marquis 90-92 TULPLLPL 995Mountaineer 97 TULPLLUL 430Sable 90-92 TULPLLPL 995Sable 96-97 TULPLLUU 430Topaz 90-94 TULPLLPL 995Tracer 91-96 TULPLLPL 995Tracer 97 TULPLLUU 430Villager 93-94 TULPLLPL 995
MITSUBISHI
3000GT 91-95 TULPLLPL 995Diamante 96-98 TULPLLPL 995Eclipse 93-95 TULPLLPL 995Expo 92-95 TULPLLPL 995Galant 93-96 TULPLLPL 995Mirage 90-02 TULPLLPL 995Montero 90-94,
96-00TULPLLPL 995
Precis 90-94 TULPLLPL 995
ISUZU
Oasis 96 TULPLLPU 711Oasis 97-99 TULPLLPU 100Rodeo 96-97 TULPLULL 711Trooper 93-95 TULPLLPU 100Trooper 96-97 TULPLULL 711VehiCROSS 99-01 TULPLULL 711
SUZUKI
Esteem 98-00 TULPLUPL 735Grand Vitara 99-00 TULPLUPL 735Sidekick 98 TULPLUPL 735Vitara 99-00 TULPLUPL 735X-90 98 TULPLUPL 735
HYUNDAI
Accent 95-99 TULPLLTU 725Elantra 96-00 TULPLLTU 725Sonata 94-00 TULPLLTU 725Tiburon 97-01 TULPLLTU 725
INFINITI
G20 93-96 TULPLLPT 810I30 96 TULPLLPP 830J30 93-97 TULPLLPT 810Q45 94-96 TULPLLPT 810
SUBARU
Forester 98-00 TULPLLPL 995Impreza 93-00 TULPLLPL 995Justy 93-94 TULPLLPL 995Loyale 93-94 TULPLLPL 995
VOLVO
240 93 TULPLTLU 990850 93-94 TULPLTLU 990940 93-95 TULPLTLU 990960 93-95 TULPLTLU 990
CHRYSLER
LeBaron 90-94 TULPLLPL 995Town and Country 90-92 TULPLLPL 995Town and Country 96, 98 TULPLLLL 240
LINCOLN
Continental 90-91 TULPLLPL 995Mark VII 90-92 TULPLLPL 995Town Car 90-92 TULPLLPL 995
SATURN
SC 91-95 TULPLLPL 995SL 91-95 TULPLLPL 995SW 93-95 TULPLLPL 995
EAGLE
Premier 90-92 TULPLLPL 995Summit 90-96 TULPLLPL 995Talon 90-94 TULPLLPL 995
ACURA
SLX 96-97 TULPLULL 711TL 96-98 TULPLLPU 100
BUICK
Skylark 91-92 TULPLLPL 995
LEXUS
LX450 96-97 TULPLULL 710
INSTRUCCIONES DE EMPAREJAMIENTO
100
A lo largo de estas instrucciones, se le pedirá queINSERTE y luego RETIRE la llave del cilindro de
arranque cinco veces en diez segundos. Esta acción activa la computadora de entrada sin llave para el MODO DE EMPAREJAMIENTO y permite que acepte nuevos controles remotos en la memoria. Existe una manera específica de hacerlo, y si no se hace de forma correcta, fallará. Al realizar cada ciclo de inserción y extracción, asegúrese de moverse rápido, pero con suavidad (alrededor de un ciclo de inserción y extracción por segundo) y RETIRE LA LLAVE COMPLETAMENTE de la ranura. Si la llave permanece en contacto con el cilindro, deberá volver a comenzar.
Comience con todas las puertas cerradas. Abra la puerta del conductor y déjela abierta. Ingrese al vehículo. MANTENGA PRESIONADO el interruptor del seguro de la puerta eléctrica del lado del conductor en la posición UNLOCK. Continúe presionando hasta que se le indique soltar.
1. Inserte y retire despacio la llave de arranque del cilindro de arranque CINCO veces EN DIEZ SEGUNDOS. Los seguros eléctricos de las puertas realizarán el ciclo de forma automática para indicar que ha ingresado con éxito al MODO DE EMPAREJAMIENTO.
2. Dentro de los CINCO SEGUNDOS, presione el botón LOCK UNA VEZ en el control remoto que desea emparejar. Los seguros eléctricos de las puertas realizarán el ciclo de forma automática en respuesta.
3. Para emparejar un control remoto adicional, lo que incluye al control remoto existente que funcione, DENTRO DE LOS CINCO SEGUNDOS PRESIONE el botón LOCK en dicho control. Los seguros eléctricos realizarán el ciclo en respuesta.
4. SUELTE el interruptor del seguro eléctrico de la puerta del lado del conductor.
5. Salga del vehículo, cierre la puerta y pruebe la funcionalidad de los controles.
240
1. Inserte la llave y gire hacia la posición RUN lo máximo que pueda SIN arrancar el motor. Espere a que el sonido de la campana se detenga.
2. Con el control remoto emparejado existente, presione y mantenga presionado el botón UNLOCK durante cuatro a diez segundos.
3. DURANTE ESTE TIEMPO, continúe presionando el botón UNLOCK y presione el botón PANIC en el control remoto emparejado existente durante un segundo y suelte todos los botones. Dentro de los tres segundos, oirá una campanada que indique que ha ingresado con éxito al MODO DE EMPAREJAMIENTO.
4. Dentro de los 30 segundos, presione un botón en todos los transmisores que se emparejarán, lo que incluye al control remoto emparejado existente. Si lo hace bien, oirá una campanada luego de que cada uno se empareje en el sistema.
5. Para salir del MODO DE EMPAREJAMIENTO, gire el interruptor de arranque hacia la posición OFF.
6. Retire la llave, salga del vehículo, cierre la puerta y pruebe si el control remoto funciona.
430
1. Abra la puerta del conductor del vehículo y realice el ciclo del interruptor de seguro eléctrico del panel de la puerta del conductor DOS VECES, de LOCK a UNLOCK.
2. Siéntese del lado del conductor e inserte la llave en el interruptor de arranque.
3. Gire la llave de arranque de OFF a RUN cinco veces en diez segundos; la posición final debe ser RUN. Los seguros eléctricos deben repetir el ciclo de forma automática para indicar el ingreso exitoso al MODO DE EMPAREJAMIENTO. En este punto, todos los
controles almacenados antes se borrarán de la memoria y deberán emparejarse.
4. Dentro de los 20 segundos, presione cualquier botón en el primer control remoto que se emparejará. Los seguros repetirán el ciclo para confirmar el emparejamiento.
5. Dentro de los 20 segundos, presione cualquier botón en el segundo transmisor (se podrán emparejar hasta cuatro). Repita lo mismo para cada control que desee utilizar con el vehículo, lo que incluye todo control anterior.
6. Gire el arranque hacia la posición OFF. Los seguros repetirán el ciclo para indicar que se sale del MODO DE EMPAREJAMIENTO.
7. Salga del vehículo, cierre la puerta y pruebe la funcionalidad de los controles.
702
1. Comience con las puertas y el maletero bien cerrados. Sostenga la llave en una mano y el control en la otra.
2. Inserte la llave.3. Se deben realizar los siguientes tres pasos
TRES veces consecutivas. Cada ciclo se debe realizar con cinco segundos de diferencia del otro. A. Gire el interruptor de arranque hacia la posición ON (suele estar marcada como “II” en el bisel del arranque) tanto como pueda SIN arrancar el motor. B. Presione UNLOCK en el control y suelte. C. Gire el interruptor de arranque hacia la posición OFF. No retire la llave.
4. Dentro de los cinco segundos desde el paso anterior, gire el interruptor de arranque hacia la posición ON.
5. Con el MISMO CONTROL, presione el botón UNLOCK. Los seguros eléctricos se cerrarán y abrirán de forma automática (repetirán el ciclo) para confirmar el ingreso al “modo del programa”.
6. Dentro de los diez segundos desde el paso anterior, presione el botón UNLOCK en el MISMO CONTROL. Los seguros eléctricos repetirán el ciclo para confirmar que el control se ha programado.
7. Si programará controles adicionales, REPITA EL PASO 6. El sistema aceptará hasta tres controles en total.
8. Retire la llave.9. Pruebe que cada control funcione.
710
1. Ubique el módulo receptor de entrada sin llave. En la gran mayoría de los vehículos Toyota, se encuentra debajo del asiento del conductor o del acompañante. En raras ocasiones, se encuentra detrás del tablero. Algunos Camry pueden tener la computadora justo detrás de la placa de apoyo del interruptor del control eléctrico del espejo. Con suavidad, levante la placa de apoyo del interruptor. Si no puede ubicar el módulo, consulte con su distribuidor local para que lo ayude a ubicarlo.
2. Ubique el botón de emparejamiento en el módulo receptor de entrada sin llave (no presione el botón todavía). Se encuentra en un costado, quizás empotrado en un orificio y cubierto con una etiqueta o un trozo de cinta. Realice un orificio en la cinta para determinar si puede usar el dedo para presionar el botón. Algunos módulos requieren que use un lápiz o un bolígrafo para presionar el botón.
3. Inserte la llave y gire hacia la posición ON (lo máximo que pueda sin arrancar el motor).
4. Presione el botón de emparejamiento durante tres segundos y suelte.
5. Dentro del plazo de cinco segundos desde el paso 4, presione y suelte el botón superior del control remoto que se emparejará. El sistema podría emitir una confirmación para indicar el emparejamiento exitoso, lo que incluye el sonido de la bocina, un chirrido o el parpadeo de las luces del vehículo.
6. Si cuenta con controles adicionales para emparejar, repita los pasos 4 y 5.
7. Gire el interruptor de arranque hacia OFF para salir del MODO DE EMPAREJAMIENTO.
8. Pruebe que todos los controles funcionen.
711
1. Ubique el módulo receptor de entrada sin llave. Está montado en la pared, debajo del tablero del lado del conductor, en el área de la rodilla izquierda. Si no puede ubicar el módulo, consulte con su distribuidor local para que lo ayude a localizar el módulo.
2. Ubique el botón de emparejamiento en el módulo receptor de entrada sin llave (no presione el botón todavía). Se encuentra en un costado, quizás empotrado en un orificio y cubierto con una etiqueta o un trozo de cinta. Realice un orificio en la cinta para determinar si puede usar el dedo para presionar el botón. Puede usar un lápiz o un bolígrafo para presionar el botón.
3. Inserte la llave y gire hacia la posición ON (lo máximo que pueda sin arrancar el motor).
4. Presione el botón verde de emparejamiento durante tres segundos y suelte.
5. Dentro de los cinco segundos, presione y suelte el botón superior del control que se emparejará. El sistema podría emitir una confirmación para indicar el emparejamiento exitoso, lo que incluye el sonido de la bocina, un chirrido o el parpadeo de las luces del vehículo.
6. Si cuenta con controles adicionales para emparejar, repita los pasos 4 y 5.
7. Gire el interruptor de arranque hacia OFF para salir del MODO DE EMPAREJAMIENTO.
8. Pruebe que todos los controles funcionen.
725
1. Abra la puerta del lado del conductor.2. Inserte la llave en el interruptor de arranque.3. Gire el interruptor de arranque hacia la
posición ON (tanto como pueda SIN arrancar el motor).
4. Si tiene un BOTÓN VALET, encienda y apague el interruptor 13 veces consecutivas (26 clics en total).
5. Si no tiene un botón valet, conecte el cable negro al blanco 13 veces consecutivas.
6. Ahora, busque el control que desea emparejar y PRESIONE LOCK.
7. Gire el interruptor de arranque hacia la posición OFF. Una vez más, presione LOCK en el control remoto que está emparejando. Los seguros electrónicos de las puertas deben repetir el ciclo automático de apertura y cierre en respuesta.
8. SI ESTO NO OCURRE, DEBE VOLVER A COMENZAR.
9. Gire el interruptor de arranque hacia la posición ON (tanto como pueda SIN arrancar el motor) y conecte el cable negro con el blanco 14 veces consecutivas (o, si tiene un BOTÓN VALET, enciéndalo y apáguelo 14 veces consecutivas).
10. Presione LOCK en el control remoto que está emparejando.
11. Gire el interruptor de arranque hacia la posición OFF. PRESIONE LOCK en el control remoto que está emparejando. La puerta del lado del conductor debería abrirse automáticamente (NOTA: si se cerró, PRESIONE LOCK una vez más para abrirla).
12. Presione LOCK. Todas las puertas deberían abrirse automáticamente. SI NO LO HACEN, REPITA LOS PASOS 8 Y 9.
13. Pruebe que el control funcione.
735
Al ingresar al “modo del programa”, se borran todos los controles existentes de la memoria hasta que se vuelvan a ingresar en ésta. Por lo tanto, asegúrese de tener todos los controles presentes al momento de programar, para programarlos todos juntos.
LOCK: cierra las puertas del vehículo.
FUNCTION I: característica adicional (si está instalada).
FUNCTION II: característica
adicional (si está instalada).
PANIC: Activa la alarma de fábrica para alerta de pánico (si está instalada).
UNLOCK: abre las puertas del
vehículo.
TRUNK: abre la tapa del maletero
del vehículo (si está instalada).
LUZ DE ESTADO (Azul): Indica cuando un botón está presionado y cuando el control remoto universal se encuentra en modo
ACTIVATION (activación).
Mustang 90-93 TULPLLPL 995Probe 90-92 TULPLLPL 995Ranger 90-94 TULPLLPL 995Ranger 95-97 TULPLLUL 430Taurus 96-97 TULPLLUU 430Tempo 93-94 TULPLLPL 995Thunderbird 90-92 TULPLLPL 995
PANELE 9 PANELE 10 PANELE 11 PANELE 12 PANELE 13 PANELE 14 PANELE 15
1. Ubique el módulo de entrada sin llave debajo del tablero del lado del conductor.
2. Ubique el BOTÓN INTERRUPTOR ubicado al lado del LED rojo.
3. Utilice un bolígrafo para presionar el BOTÓN INTERRUPTOR hasta que el LED rojo comience a parpadear, lo que indica que ha entrado con éxito al modo de programación. El vehículo está listo para registrar controles nuevos.
4. PRESIONE y luego SUELTE el botón LOCK del control que desea programar. Observe la luz LED roja: deberá encenderse y permanecer encendida, para luego parpadear tras unos pocos segundos, lo que indicará que ha programado con éxito el control.
5. Dentro de los cinco segundos, REPITA EL PASO 4 con el segundo control existente, aunque sea un control nuevos. Recuerde que una vez que ingresó al modo de programación, los controles anteriores se han cancelado, por lo que debe reprogramarlos en este paso.
6. Retire la llave, salga del vehículo y pruebe la funcionalidad de los controles.
750
Al ingresar al MODO DE EMPAREJAMIENTO, se borran todos los controles existentes de la memoria hasta que se vuelvan a ingresar en ésta.Por lo tanto, asegúrese de tener todos los controles presentes al momento de emparejar para poder emparejarlos a todos juntos.
1. Comience con la llave fuera del interruptor de arranque. Cierre todas las puertas del vehículo.
2. Abra la puerta del conductor y DÉJELA ABIERTA.
3. FINALICE DENTRO DE LOS 25 SEGUNDOS: A. Inserte la llave en el arranque y gírela hacia la posición ON (tanto como pueda sin arrancar el motor) Y LUEGO REGRÉSELA A LA posición OFF.
4. RETIRE LA LLAVE del interruptor de arranque.
5. REPITA LOS PASOS 3A y 7B DOS VECES. ABRA y luego CIERRE la puerta del conductor TRES VECES (como alternativa, puede presionar y soltar el botón del bastidor de la puerta del conductor tres veces).
6. En este momento, debe oír una campanada o un timbre que le indicará que ha entrado con éxito al MODO DE EMPAREJAMIENTO. Si no ocurre, espere 40 SEGUNDOS y regrese al paso 3.
7. Ahora emparejará todos los controles que funcionarán con el sistema, lo que incluye controles existentes. Reúna todos los controles que utilizará con el vehículo, lo que incluye controles que funcionen en la actualidad. De acuerdo con la cantidad de controles que desee emparejar, siga la instrucción que aplique a continuación. Elija UNO de los siguientes tres pasos: A. Si solo tiene UN control para emparejar, presione cualquier botón del control DOS VECES hasta que los seguros eléctricos de las puertas repitan el ciclo de forma automática. Realice este paso dos veces más con el MISMO CONTROL para un total de tres veces con el mismo control. B. Si solo tiene DOS controles en total para emparejar, presione cualquier botón del PRIMER control DOS VECES hasta que los seguros de las puertas repitan el ciclo de forma automática.
8. Ahora, presione cualquier botón del SEGUNDO CONTROL DOS VECES hasta que los seguros de las puertas repitan el ciclo de forma automática. Vuelva a presionar cualquier botón del SEGUNDO CONTROL DOS VECES (para un total de tres emparejamientos con los dos controles) hasta que los seguros de las puertas repitan
el ciclo de forma automática.9. Si solo tiene TRES controles en total para
emparejar, presione cualquier botón del PRIMER CONTROL DOS VECES hasta que los seguros eléctricos de las puertas repitan el ciclo de forma automática. Presione cualquier botón del SEGUNDO CONTROL DOS VECES hasta que los seguros de las puertas repitan el ciclo de forma automática. Por último, presione cualquier botón del TERCER CONTROL DOS VECES (para un total de tres emparejamientos con los tres controles) hasta que los seguros de las puertas repitan el ciclo de forma automática.
10. Abra y cierre la puerta del conductor UNA VEZ. Deberá oír otro zumbido o campanada que indique que ha completado el proceso.
11. Retire la llave, salga del vehículo, cierre la puerta y pruebe si los controles remotos funcionan. Si alguno de los controles no funciona, vuelva a empezar desde el paso 1.
800
1. Ingrese al vehículo, cierre y asegure todas las puertas con el interruptor del seguro eléctrico de la puerta del conductor.
2. Inserte y retire (sin girar) la llave del arranque al menos seis veces en diez segundos.
3. Las luces traseras parpadearán para indicar que se ha borrado el código original.
4. Inserte y gire la llave hacia la posición ACC.5. Presione LOCK en el primer control sin
llave. Las luces traseras parpadearán para confirmar la programación.
6. Para añadir más controles, desactive el seguro de las puertas con el interruptor del seguro eléctrico de la puerta del conductor.
7. Presione el botón LOCK del segundo control sin llave. Las luces traseras parpadearán para confirmar la programación.
8. Abra la puerta del conductor y apague el interruptor de arranque.
810
1. Cierre todas las puertas y el maletero.2. Abra el maletero.3. Abra la puerta del conductor y siéntese.4. Asegure todas las puertas con el interruptor
de seguro eléctrico del lado del conductor.5. Despacio, inserte y retire despacio la llave
de arranque del cilindro de arranque SEIS veces EN DIEZ SEGUNDOS. Las luces del tablero indicadoras de luces de giro y peligros parpadearán para indicar que ha entrado con con éxito al MODO DE EMPAREJAMIENTO.
6. Quite el seguro y vuelva a asegurar la puerta del lado del conductor con la perilla de seguro manual (no eléctrico) de la puerta.
7. Dentro de los CINCO SEGUNDOS, presione el botón LOCK UNA VEZ en el control remoto que desea emparejar. Los luces del tablero indicadores de luces de giro o peligros parpadearán en respuesta.
8. Para emparejar un control remoto adicional, lo que incluye controles existentes que funcionen, QUITE EL SEGURO y ASEGURE las puertas de la misma manera que en el paso 5.
9. DENTRO DE LOS CINCO SEGUNDOS, PRESIONE el botón LOCK del siguiente control. Una vez más, las luces del tablero indicadoras de luces de giro y peligros parpadearán en respuesta.
10. Salga del vehículo, cierre la puerta y pruebe la funcionalidad de los controles.
829
1. Busque debajo del asiento del conductor una caja de plástico con una etiqueta o una pegatina encima.
2. Presione con firmeza sobre la pegatina hasta sentir un orificio con un botón dentro. NO PRESIONE EL BOTÓN AÚN.
3. Coloque las llaves en el interruptor de arranque y déjelo apagado.
4. Mantenga presionado el botón de la caja
hasta que el vehículo comience a sonar.5. Suelte el botón. El vehículo sonará con
frecuencia para indicar que ha entrado en el MODO DE EMPAREJAMIENTO.
6. De a uno, presione los botones LOCK en todos los controles que desee utilizar.
7. Gire la llave en el interruptor de arranque hacia la posición ON y de regreso a OFF.
8. Salga del vehículo, cierre la puerta y pruebe la funcionalidad de los controles.
830
1. Cierre todas las puertas y el maletero.2. Abra la puerta del conductor y siéntese.3. Asegure todas las puertas con el interruptor
de seguro eléctrico del lado del conductor.4. Despacio, inserte y retire despacio la llave
de arranque del cilindro de arranque SEIS veces EN DIEZ SEGUNDOS. Las luces del tablero indicadoras de luces de giro y peligros parpadearán para indicar que ha entrado con con éxito al MODO DE EMPAREJAMIENTO.
5. Vuelva a insertar la llave y gire el interruptor de arranque hacia la posición ACC.
6. Dentro de los CINCO SEGUNDOS, presione el botón LOCK UNA VEZ en el control remoto que desea emparejar. Las luces del tablero indicadoras de luces de giro y peligros parpadearán en respuesta.
7. Para emparejar controles remotos adicionales, lo que incluye controles existentes que funcionen, QUITE EL SEGURO y luego ASEGURE la puerta del acompañante con la perilla de seguro MANUAL (no eléctrico) en el panel de la puerta del conductor. Dentro de los CINCO SEGUNDOS, PRESIONE el botón LOCK del siguiente control. Una vez más, las luces del tablero indicadoras de luces de giro y peligros parpadearán en respuesta.
8. Gire la llave hacia la posición OFF, retírela, QUITE EL SEGURO de las puertas con el INTERRUPTOR DE SEGURO ELÉCTRICO DEL LADO DEL CONDUCTOR.
9. Salga del vehículo, cierre la puerta y pruebe que los controles funcionen.
990
1. Al ingresar al MODO DE EMPAREJAMIENTO, se borran todos los controles existentes de la memoria hasta que se vuelvan a ingresar en ésta. Por lo tanto, asegúrese de tener todos los controles que utilizará presentes al momento de realizar el emparejamiento para poder emparejarlos todos juntos. Cierre todas las puertas del vehículo.
2. Ingrese al vehículo, cierre la puerta e inserte la llave en el interruptor de arranque.
3. Gire la llave de la posición OFF a ON, CINCO VECES en DIEZ SEGUNDOS, CON LA POSICIÓN FINAL EN ON.
4. Dentro de los 30 SEGUNDOS, PRESIONE el botón LOCK o el botón UNLOCK en cada control remoto que desea emparejar, lo que incluye a todos los controles anteriores existentes.
5. Retire la llave del interruptor de arranque, salga del vehículo y cierre la puerta. Pruebe si el control remoto funciona.
995
1. Al ingresar al MODO DE EMPAREJAMIENTO, se borran todos los controles existentes de la memoria hasta que se vuelvan a ingresar en ésta. Por lo tanto, asegúrese de tener todos los controles que utilizará presentes al momento de realizar el emparejamiento para poder emparejarlos todos juntos.
2. Abra la puerta del lado del conductor.3. Inserte la llave en el interruptor de arranque.4. Gire el interruptor de arranque hacia la
posición ON (tanto como pueda sin arrancar el motor).
5. Ubique el botón de emparejamiento. Se lo suele encontrar en uno de tres lugares posibles: A) cerca de la base del tablero
del lado del conductor, cerca de la parte inferior de la base del volante, o B) cerca de la palanca para abrir el capó, o C) cerca o en un botón con LED azul en el tablero. NOTA: El botón podría estar empotrado en un anillo de plástico.
6. MANTENGA PRESIONADO el botón de emparejamiento (NO lo suelte hasta que se le ordene hacerlo en el paso 8).
7. Dentro de los 20 segundos, los seguros electrónicos de las puertas repetirán el ciclo de forma automática y la sirena (si está instalada) chirriará tres veces.
8. Felicitaciones, ha ingresado al MODO DE EMPAREJAMIENTO. Ahora la
computadora está lista para leer controles nuevos.
9. Presione LOCK (el botón izquierdo) del control que desea emparejar. Los seguros electrónicos repetirán el ciclo y la sirena (si está instalada) chirriará una vez. Esto indica que el control se ha emparejado.
10. Para cada control remoto adicional (lo que incluye controles existentes que funcionen), hasta cuatro en total, REPITA EL PASO 6.
11. Para salir del MODO DE EMPAREJAMIENTO, suelte el botón de emparejamiento y gire el interruptor de arranque hacia la posición OFF.
12. Retire la llave, salga del vehículo, cierre la puerta y pruebe los controles.
REINICIO DEL CONTROL REMOTO
Necesitará:• Un destornillador plano pequeño.• Un trozo pequeño de madera o plástico,
como ser la tapa de un bolígrafo o un mondadientes.
1. Inserte el destornillador en la muesca del lado izquierdo del control remoto. Despacio, gire la carcasa superior y la inferior del control hasta que se separen.
2. Retire el inserto de goma y el circuito impreso. No coloque el circuito impreso en ninguna superficie de metal.
3. Con la herramienta de madera o plástico, extraiga con cuidado la batería del fondo del compartimento. Mantenga la batería afuera por diez segundos. Asegúrese de que la marca + apunte hacia AFUERA del tablero verde, de forma que el lado + toque la abrazadera metálica.
4. Inserte la batería y vuelva a intentar la activación, el emparejamiento o el uso con su vehículo.
5. Si aún no funciona correctamente, intente reemplazarla con una batería CR1632 nueva.
6. Si aún tiene problemas, diríjase a MÁS AYUDA en el panel 14.
MÁS AYUDA
SOPORTE POR CORREO ELECTRÓNICO: Envíe preguntas o inquietudes a: [email protected]. Como sucede en todo tipo de correspondencia, debe estar preparado para brindar:
1. El año, la marca y el modelo de su vehículo.2. Información del producto: el producto por
el que realiza la consulta, que sería el control remoto universal.
SOPORTE TELEFÓNICO: El soporte telefónico está disponible para controles remotos universales que aún estén cubiertos por la garantía estándar. Tenga listos los siguientes elementos cuando llame:
1. Recibo de compra.2. Control remoto universal.
Llame al soporte técnico de Car Keys Express entre las 8:30 a.m. y las 5:00 p.m. EST al: 888-598-8910.
CORREO POSTAL de Car Keys Express Car Keys Express
828 East Market St. Louisville, KY 40206 Estados Unidos
PREGUNTAS FRECUENTES
P. El vehículo no ingresa al modo de EMPAREJAMIENTO.
R1. Verifique el año de su vehículo y luego revise la lista de BÚSQUEDA DE VEHÍCULOS en los paneles 6 a 8 para corroborar que el CÓDIGO DE EMPAREJAMIENTO sea el correcto para su vehículo. Luego vuelva a intentar con las instrucciones de EMPAREJAMIENTO.
R2. Si nunca ha tenido uno de los controles que originalmente vinieron con el vehículo, es posible que el vehículo no cuente con un sistema de entrada sin llave instalado de fábrica.
P. El vehículo está en modo EMPAREJAMIENTO, pero no responde cuando presiono los botones del control remoto universal.
R1. Vuelva a realizar todos los pasos para activar, emparejar y probar el control.
R2. Intente reiniciar el control remoto universal.P. Algunos de los botones del control remoto
universal no funcionan.R. El control remoto universal funciona con
cientos de controles de fábrica diferentes. Algunos vehículos utilizan botones que otros no usarán. Todos los vehículos utilizarán los botones LOCK y UNLOCK.
NOTA: Algunos vehículos requieren que el usuario presione un botón por hasta tres segundos antes de que una característica funcione, mientras que otros requieren que se presione el botón dos veces en dos segundos. Esto es muy común para los botones PANIC, TRUNK, FUNCTION I y FUNCTION II.
P. ¿Puedo emparejar el control remoto universal para que funcione con más de un vehículo?
R. No, el control remoto universal está diseñado para funcionar con un solo vehículo.
P. Emparejé con éxito el control remoto universal con mi vehículo, pero mi control remoto anterior ya no funciona.
R. Todos los controles, anteriores y nuevos, se deben emparejar juntos. Revise el procedimiento de EMPAREJAMIENTO para obtener más información sobre su vehículo.
P. La LUZ DE ESTADO permanece encendida y no se apaga.
R. Diríjase a “REINICIAR EL CONTROL REMOTO UNIVERSAL.”
P. Me perdí la secuencia de la LUZ DE ESTADO después de que ingresé el código de mi vehículo. ¿Puedo verificarla?
R. Sí, presione FUNCTION I y PANIC al mismo momento hasta que la LUZ DE ESTADO permanezca iluminada. Luego, vuelva a presionar FUNCTION I y PANIC. La LUZ DE ESTADO debería apagarse y volver a parpadear el código que ingresó en el Paso 1 en el panel 2.
FCC Y GARANTÍA
ID DE LA FCC: X32-MECJ
Este dispositivo cumple con la Parte 15 de las Reglas de la FCC. El funcionamiento está sujeto a las dos condiciones siguientes: (1) Este dispositivo no puede causar interferencias perjudiciales, y (2) este dispositivo debe aceptar cualquier interferencia recibida, incluidas las interferencias que puedan causar un funcionamiento no deseado.
Advertencia: Los cambios o modificaciones a este dispositivo que no estén expresamente aprobados por iKeyless LLC podrían anular la autoridad del usuario para operar el equipo.
GARANTÍA LIMITADA DE TRES AÑOS
Car Keys Express proporciona una garantía para este producto por defectos de fabricación por un período de tres años desde la fecha de compra. Esta garantía cubre cualquier defecto del producto que resulte en un mal funcionamiento
PANELE 16
del control remoto. No cubre el aspecto estético, el deterioro de la batería ni el mal funcionamiento del control remoto debido a daños que resulten de un golpe, la exposición al agua, la exposición excesiva al calor, la manipulación incorrecta o el uso incorrecto. Esta garantía no cubre la incapacidad o falta de voluntad del cliente de realizar los procedimientos necesarios para activar el sistema de entrada sin llave para ingresar al “modo de activación” o al “modo de emparejamiento”, ni cubre defectos en el sistema de entrada sin llave de un vehículo. Los reclamos de garantía se limitan al reemplazo del producto a criterio de Car Keys Express. Para presentar un reclamo de garantía, comuníquese con la tienda donde compró el control remoto universal. El cliente debe aportar evidencia de la compra, lo que incluye etiqueta UPC del embalaje y una copia del recibo de la tienda donde aparezca la fecha de compra. Esta garantía le otorga derechos legales específicos; usted podría además contar con otros derechos que varían de estado a estado. Esta información no se reproducirá, copiará ni distribuirá por ningún otro medio sin el consentimiento previo escrito de Car Keys Express.
© 2018 Car Keys Express