classcharts user guide - edukey · icon on your seating charts. pupils without a photo in your...
TRANSCRIPT

Edukey Education Ltd 1
Detailed user guide

Edukey Education Ltd 2
Table of Contents
What’s New? 3
Icon Usage
Error! Bookmark not defined.
Logging In 3
Starting your Classes 4
Classroom Setup 5
Applying Behaviour Points 8
Adding Behaviour Notes 9
Editing a Pupil’s Icon/Photo
Error! Bookmark not defined.
Award Multiple Pupils 10
Taking Attendance 11
Optimise Seating 12
Printing Options 13
Ending a Class 15
Parent & Parent Accounts 16
Creating more Behaviour Selections 21
Editing the class icon 22
Changing Language 24
Creating a Room 25
Creating a Class 23
Cloning a Class 24
Security 27

Edukey Education Ltd 3
Further Support 27
What’s New?
All of your pupil data is readily
available. No more importing and
data is updated nightly. If a change
has been made to your MIS, it will
be reflected in Class Charts.
All of your classes have also been
added and assigned to you. Your
pupils are automatically assigned to
their classes to remove the hassle of
manually configuring each class.
Easily learn names and recognise
your pupils. Each pupil now has a
school photo associated with their
icon on your seating charts. Pupils
without a photo in your school MIS
can be assigned alternative icons.
Cover classes, with a seating chart
and behaviour data ready to use
with the Cover Class feature. Simply
select the class you wish to cover
and you’re ready to go.
Customise fields for each of your
classes. Display target grades,
current grades and more. Custom
fields are easily adjustable and
displayed on your seating charts.
Attendance is automatically
updated through your school MIS
and is viewable during class and
after-class reports. Other features
include a reward store where pupils
can spend their behaviour points.
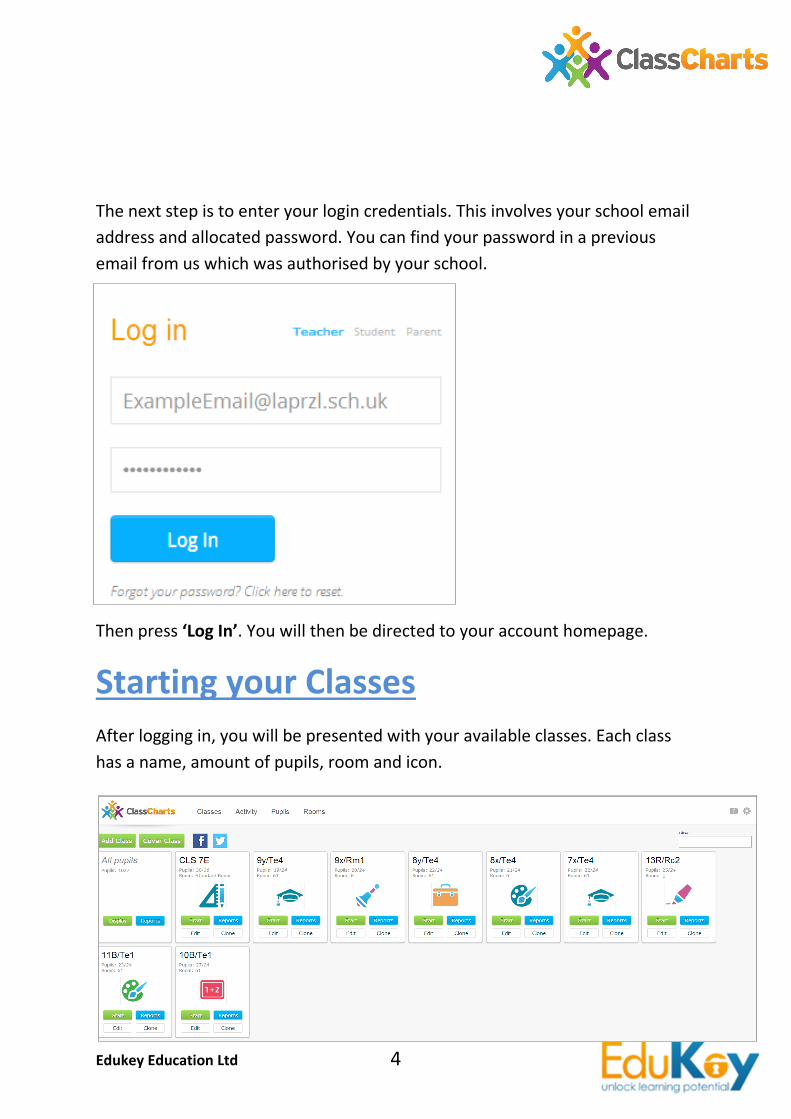
Logging In
To login to your account, access www.ClassCharts.com and select the ‘Log in’
button as shown below.
Edukey Education Ltd 4
The next step is to enter your login credentials. This involves your school email
address and allocated password. You can find your password in a previous
email from us which was authorised by your school.
Then press ‘Log In’. You will then be directed to your account homepage.
Starting your Classes
After logging in, you will be presented with your available classes. Each class
has a name, amount of pupils, room and icon.
Edukey Education Ltd 5
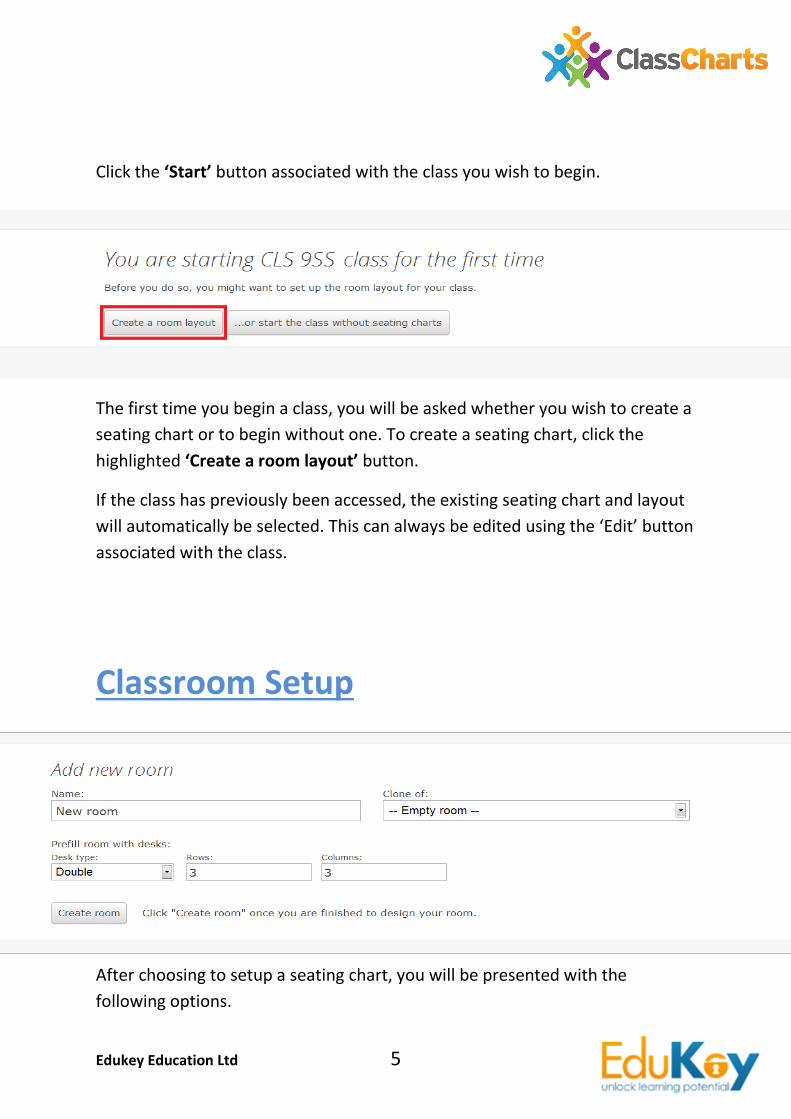
Click the ‘Start’ button associated with the class you wish to begin.
The first time you begin a class, you will be asked whether you wish to create a
seating chart or to begin without one. To create a seating chart, click the
highlighted ‘Create a room layout’ button. If the class has previously been accessed, the existing seating chart and layout
will automatically be selected. This can always be edited using the ‘Edit’ button
associated with the class.
Classroom Setup
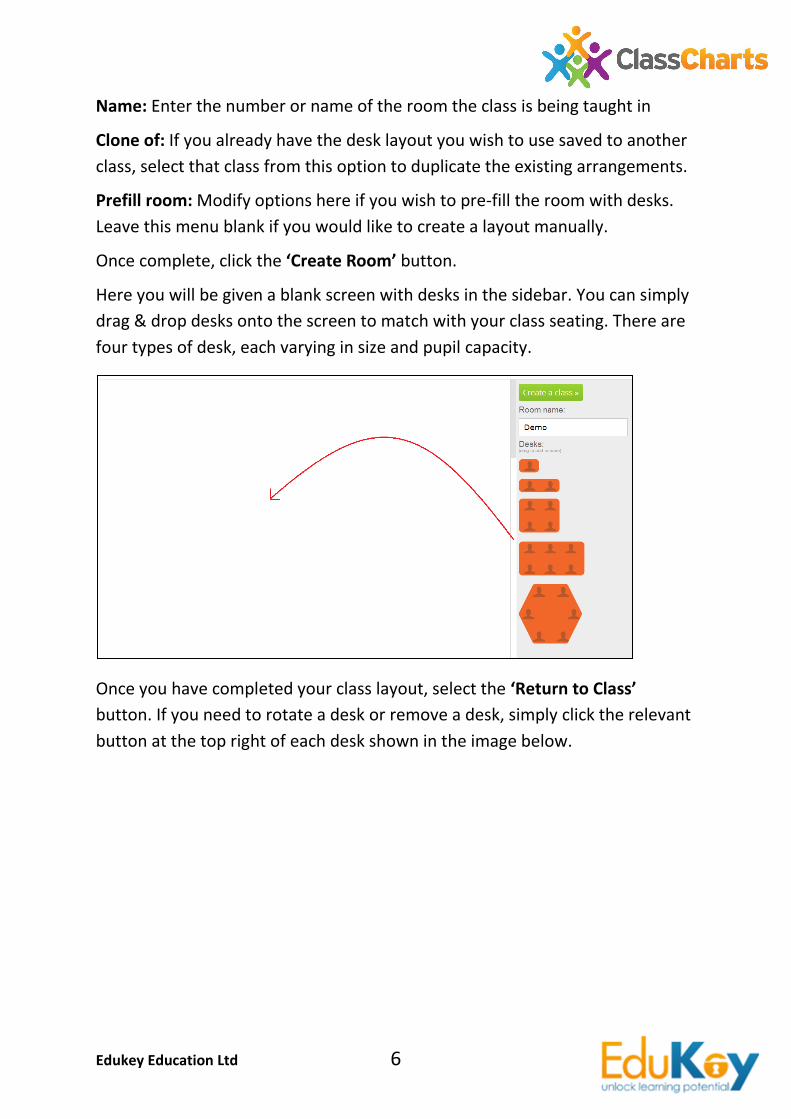
After choosing to setup a seating chart, you will be presented with the
following options.
Edukey Education Ltd 6
Name: Enter the number or name of the room the class is being taught in
Clone of: If you already have the desk layout you wish to use saved to another
class, select that class from this option to duplicate the existing arrangements.
Prefill room: Modify options here if you wish to pre-fill the room with desks.
Leave this menu blank if you would like to create a layout manually.
Once complete, click the ‘Create Room’ button.
Here you will be given a blank screen with desks in the sidebar. You can simply
drag & drop desks onto the screen to match with your class seating. There are
four types of desk, each varying in size and pupil capacity.
Once you have completed your class layout, select the ‘Return to Class’
button. If you need to rotate a desk or remove a desk, simply click the relevant
button at the top right of each desk shown in the image below.

Edukey Education Ltd 7
After selecting the ‘Return to Class’ button, you will then be taken to the
seating plan layout. From here you can drag pupils from the right pane and
allocate them to a desk.
Drag pupils from the right pane then drop them in the desired seating area.

Edukey Education Ltd 8
Applying Behaviour Points
To apply a behaviour point, simply click on the students icon.
This will then open a new window, the first choice is to decide whether to
apply a positive or negative behaviour point. To switch to negative, click the
red ‘negative’ box.
You will then be presented from a selection of behavioural choice. Select the
appropriate choice. In this example we will give Jose Bandaras 1 positive
behaviour for ‘Good work’.

Edukey Education Ltd 9
Manual notes can also be added to each behaviour point.
Adding Behaviour Notes
If you would like to add a custom note to expand the detail of the behaviour
given, click the ‘click to add note’ button found at the bottom right of the
pupil’s behaviour panel.
A text box will then appear below the selected behaviour summary. Enter your
desired text here. Once completed, click the ‘click to add note' button again.
If you would like to edit the comment at a later date or spotted a mistake, click
the comment to re-open the text box and edit the text as you wish. If you
would like to delete the comment, click the bin icon.
Edukey Education Ltd 10
Award Multiple Pupils
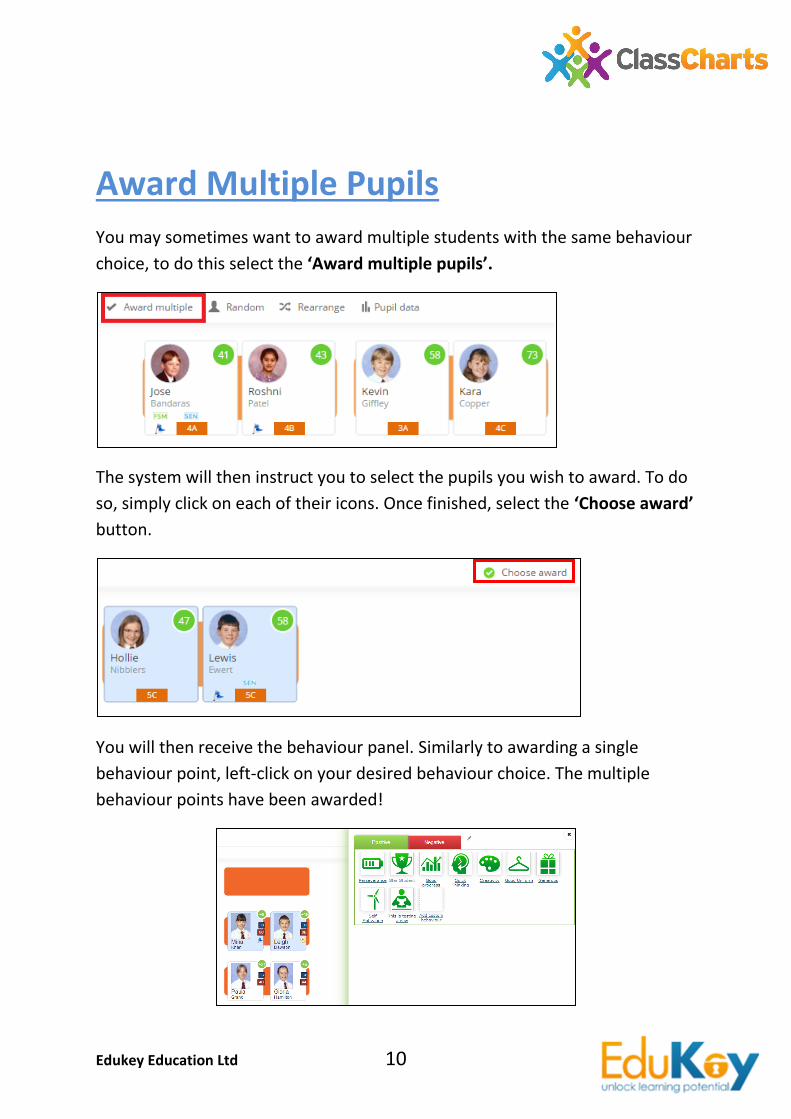
You may sometimes want to award multiple students with the same behaviour
choice, to do this select the ‘Award multiple pupils’.
The system will then instruct you to select the pupils you wish to award. To do
so, simply click on each of their icons. Once finished, select the ‘Choose award’
button.
You will then receive the behaviour panel. Similarly to awarding a single
behaviour point, left-click on your desired behaviour choice. The multiple
behaviour points have been awarded!

Edukey Education Ltd 11
Taking Attendance
Taking attendance is a simple and quick feature, however it will not write back
to your school Management Information System. If your school administrator
has chosen to use SIMS attendance, all your pupil attendance records will be
automatically updated and viewable at the class report.
Begin by selecting the ‘Attendance’ button from the top toolbar.
By default, the system marks all attendances as present. However, if there is
an absent pupil, left click on their icon as shown below.
Once all absent pupils have been selected, click the ‘Close register’ button
found at the top right of the screen.
Edukey Education Ltd 12
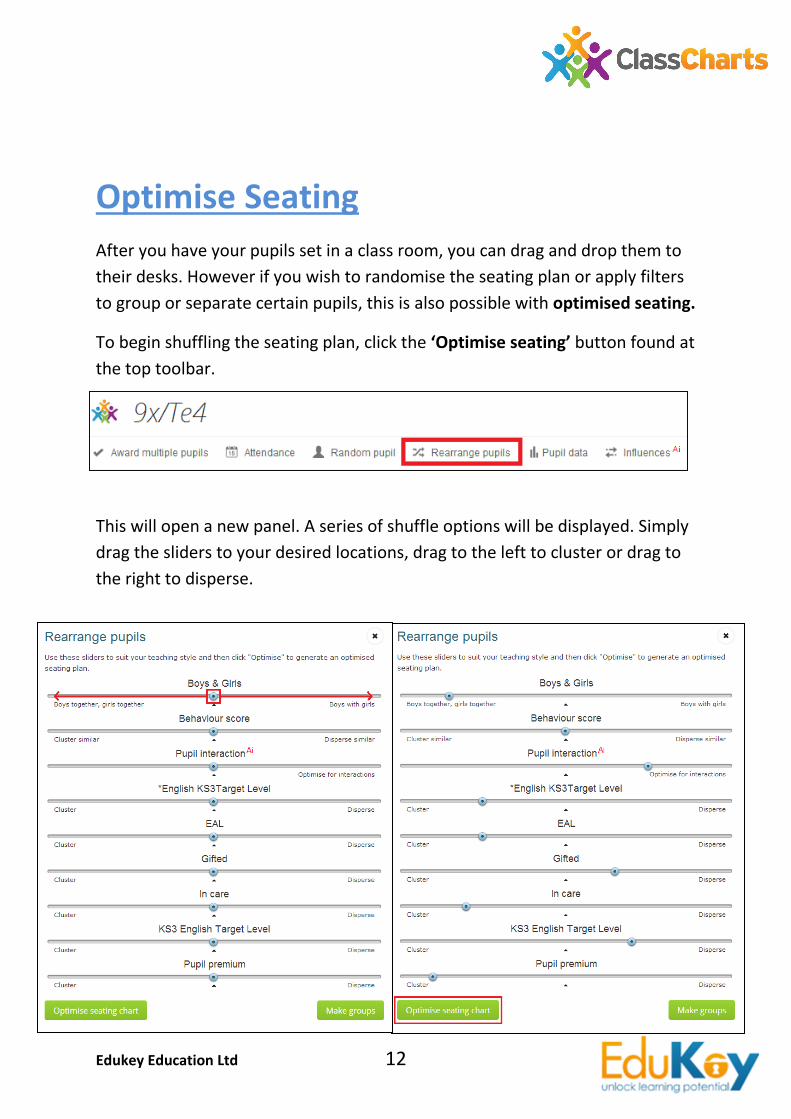
Optimise Seating
After you have your pupils set in a class room, you can drag and drop them to
their desks. However if you wish to randomise the seating plan or apply filters
to group or separate certain pupils, this is also possible with optimised seating.
To begin shuffling the seating plan, click the ‘Optimise seating’ button found at
the top toolbar.
This will open a new panel. A series of shuffle options will be displayed. Simply
drag the sliders to your desired locations, drag to the left to cluster or drag to
the right to disperse.
Edukey Education Ltd 13
Once you are happy with your selections, click the ‘Shuffle’ button found at
the bottom of the panel.
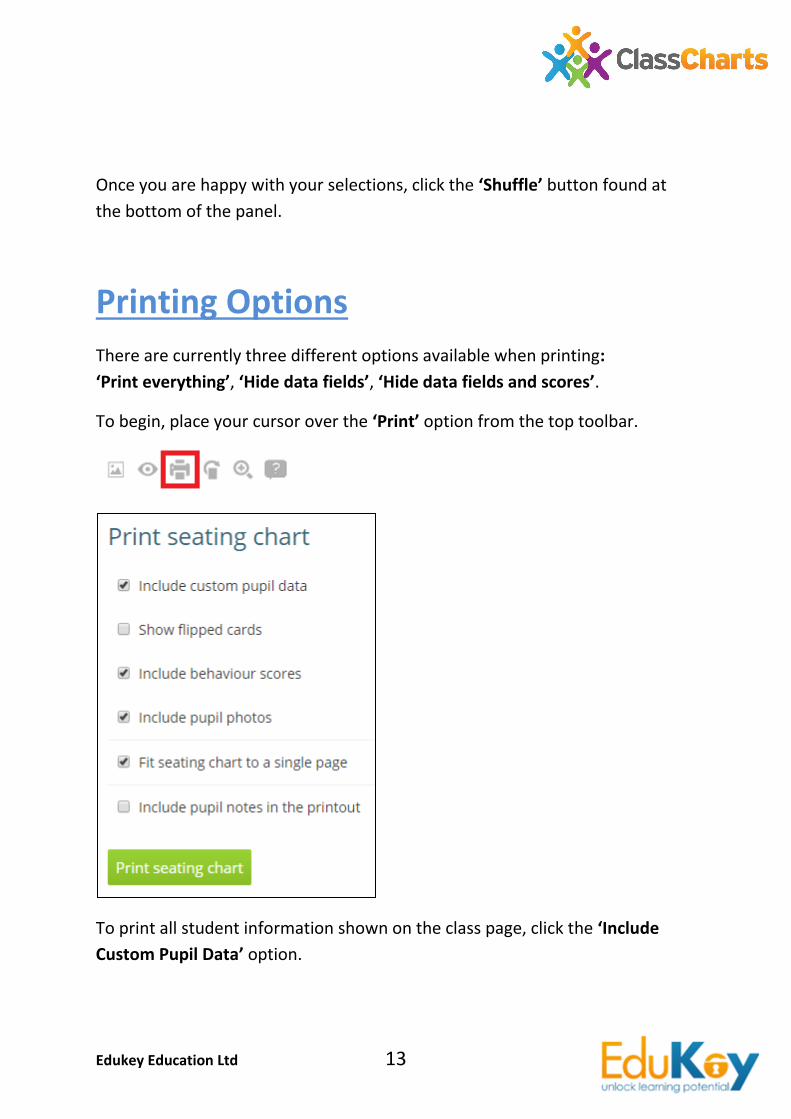
Printing Options
There are currently three different options available when printing:
‘Print everything’, ‘Hide data fields’, ‘Hide data fields and scores’.
To begin, place your cursor over the ‘Print’ option from the top toolbar.
To print all student information shown on the class page, click the ‘Include
Custom Pupil Data’ option.

Edukey Education Ltd 14
To print everything except student groups – free school meals,
literacy/behaviour target groups & medical needs – select the ‘Hide data
fields’ option.
To print only the seating plan with no student data displayed, deselect all
options. This is useful for printing out seating plans or displaying them on a
projected screen.
The next step is to select your page layout & options such as number of copies,
then click the ‘Print’ button found at the top left of the printing page.
Edukey Education Ltd 15
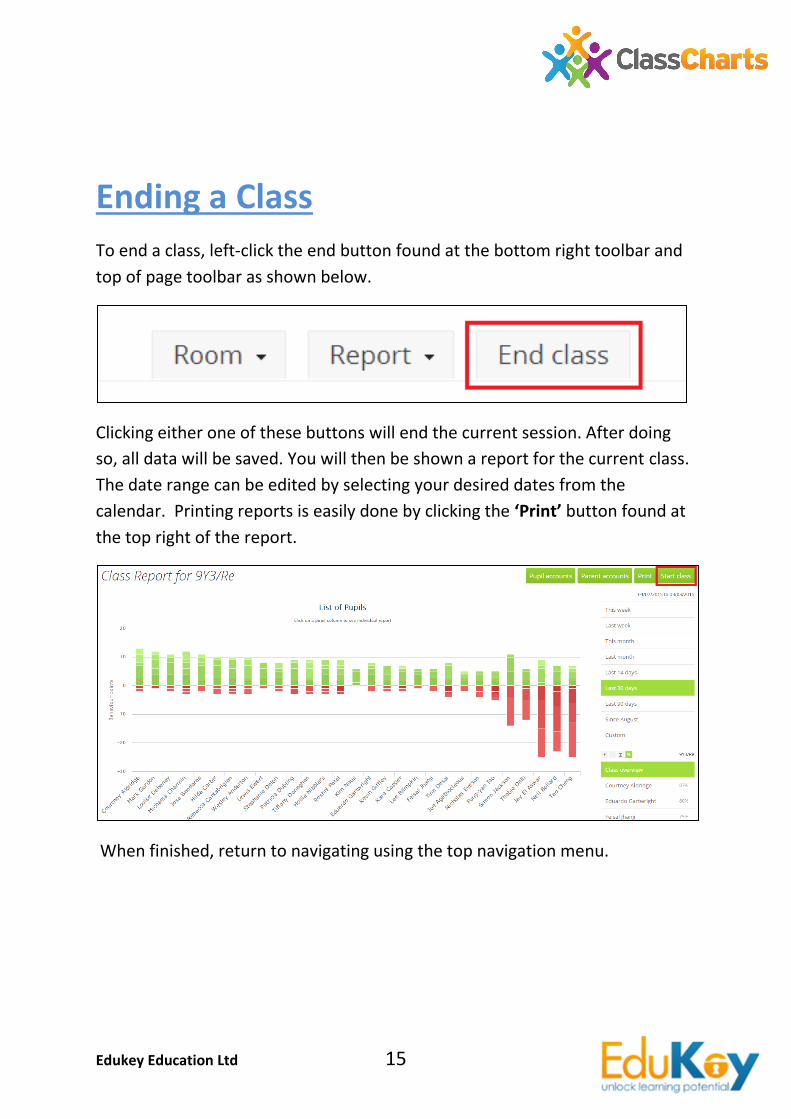
Ending a Class
To end a class, left-click the end button found at the bottom right toolbar and
top of page toolbar as shown below.
Clicking either one of these buttons will end the current session. After doing
so, all data will be saved. You will then be shown a report for the current class.
The date range can be edited by selecting your desired dates from the
calendar. Printing reports is easily done by clicking the ‘Print’ button found at
the top right of the report.
When finished, return to navigating using the top navigation menu.
Edukey Education Ltd 16
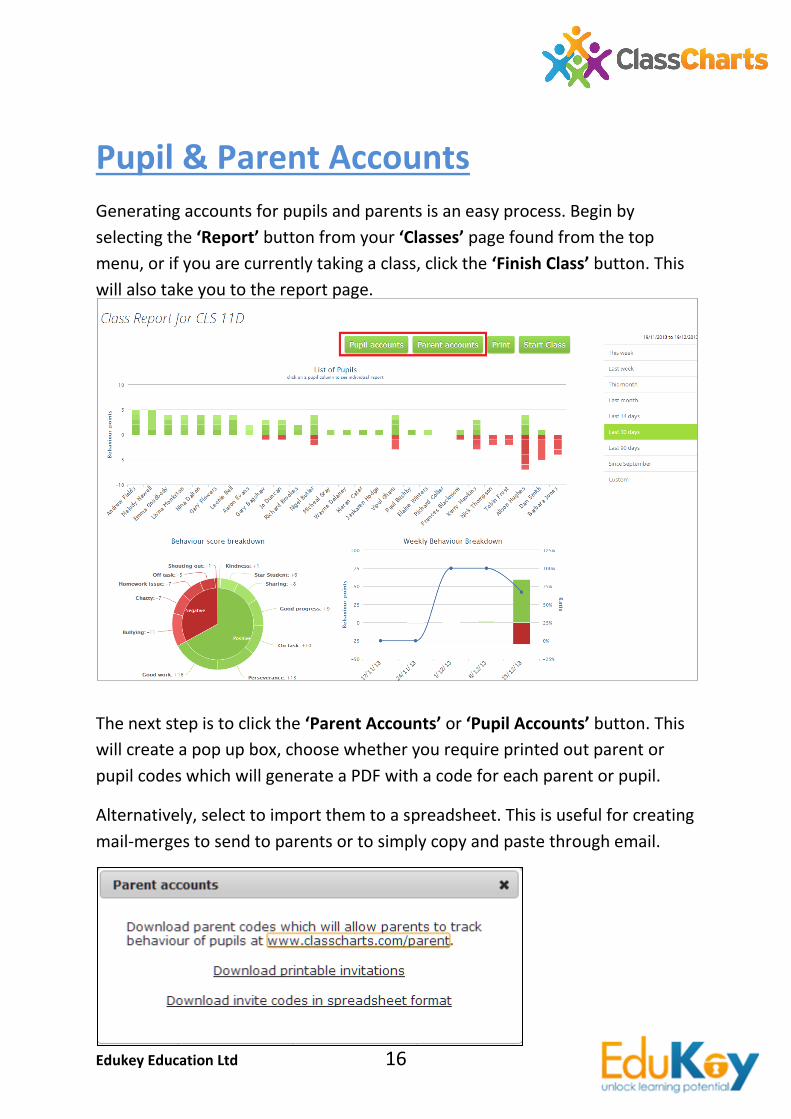
Pupil & Parent Accounts
Generating accounts for pupils and parents is an easy process. Begin by
selecting the ‘Report’ button from your ‘Classes’ page found from the top
menu, or if you are currently taking a class, click the ‘Finish Class’ button. This
will also take you to the report page.
The next step is to click the ‘Parent Accounts’ or ‘Pupil Accounts’ button. This
will create a pop up box, choose whether you require printed out parent or
pupil codes which will generate a PDF with a code for each parent or pupil.
Alternatively, select to import them to a spreadsheet. This is useful for creating
mail-merges to send to parents or to simply copy and paste through email.
Edukey Education Ltd 17
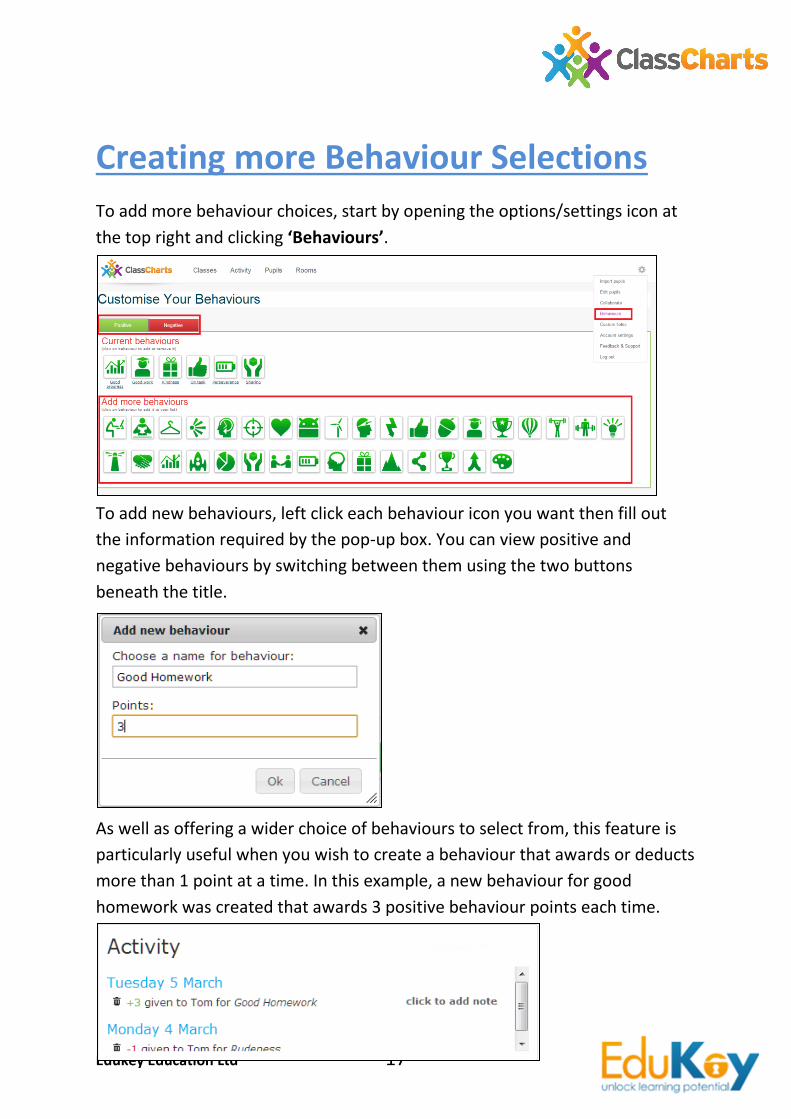
Creating more Behaviour Selections
To add more behaviour choices, start by opening the options/settings icon at
the top right and clicking ‘Behaviours’.
To add new behaviours, left click each behaviour icon you want then fill out
the information required by the pop-up box. You can view positive and
negative behaviours by switching between them using the two buttons
beneath the title.
As well as offering a wider choice of behaviours to select from, this feature is
particularly useful when you wish to create a behaviour that awards or deducts
more than 1 point at a time. In this example, a new behaviour for good
homework was created that awards 3 positive behaviour points each time.

Edukey Education Ltd 18
Editing the class icon
By default, the system will assign a random icon to the class as shown below:
Editing the class icon is a simple process, simply click the edit button from the
class icon you wish to edit.
From this new pop-up panel, you can edit all aspects of the class you
previously entered.

Edukey Education Ltd 19
To edit the logo, simply click the left or right arrows near the current logo until
you find a suitable icon.
Once you find a suitable icon, click the ‘x’ found at the top right of the panel.
Your class list will then be updated to reflect the changes you have made.

Edukey Education Ltd 20
Changing Language
To switch between languages, select your desired language from the bottom
left of the screen as shown below.
The current languages available include:
English (UK & International)
English (USA)
Spanish
Portuguese
French
German
Italian
Dutch
Chinese
Japanese

Edukey Education Ltd 21
Creating a Room
If you have been assigned a temporary room which is not listed on your SIMS
server, you can manually add a room. To begin creating a room, select the
‘Rooms’ button from the main navigation menu.
This will take you to the rooms page. From here you can view previews of all
your rooms, clone rooms, delete rooms and edit rooms. To create a new room,
select the ‘Add Room’ button.
Edukey Education Ltd 22
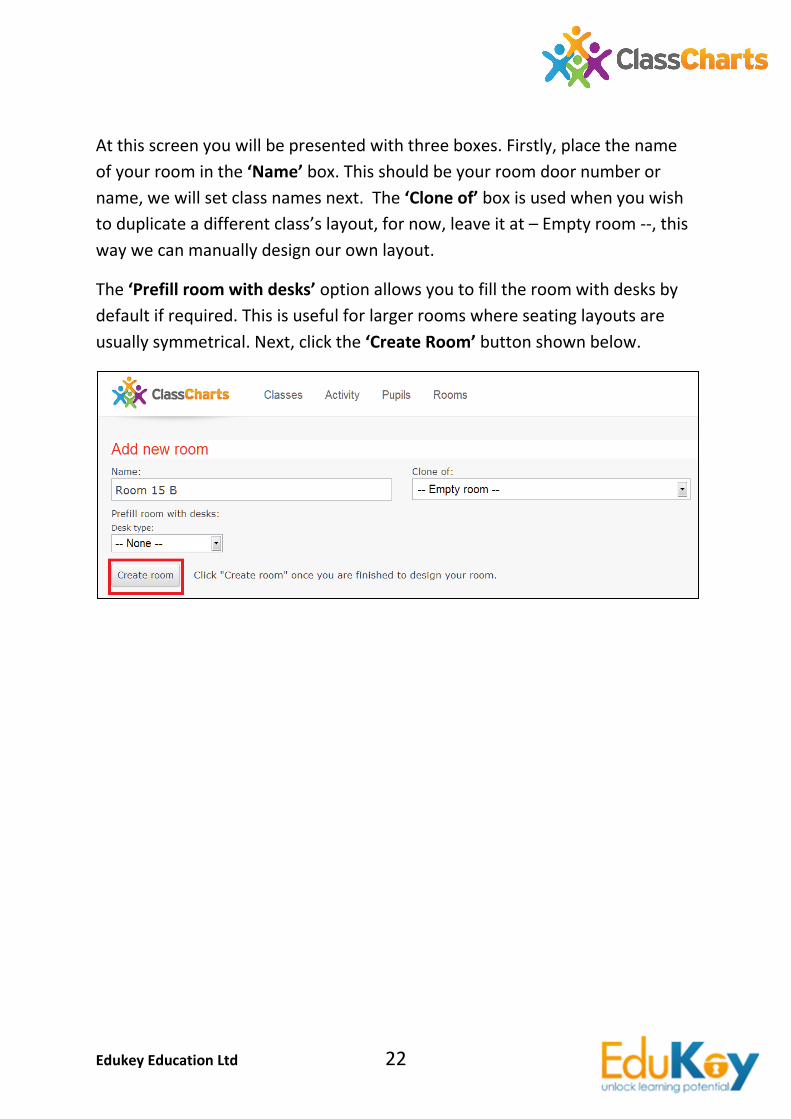
At this screen you will be presented with three boxes. Firstly, place the name
of your room in the ‘Name’ box. This should be your room door number or
name, we will set class names next. The ‘Clone of’ box is used when you wish
to duplicate a different class’s layout, for now, leave it at – Empty room --, this
way we can manually design our own layout.
The ‘Prefill room with desks’ option allows you to fill the room with desks by
default if required. This is useful for larger rooms where seating layouts are
usually symmetrical. Next, click the ‘Create Room’ button shown below.

Edukey Education Ltd 23
Creating a Class
If you have been assigned a temporary class, then you may not find it on the
current list. Creating a classroom is a simple process using ClassCharts. The first
step is to click the ‘Add Class’ button from the ClassCharts homepage.
This is the classroom creation page. Enter the class name in the highlighted box
shown below; this would usually be the subject as well as the year group, for
example – English Year 8.
After the class name has been entered, you will see a drop down menu to the
right of it to allocate a room to this class. Any rooms you have created will be
listed here, select the appropriate room by selecting the ‘add new room’
button beneath.
The next step is to add pupils to the class, below the room selection area you
will see the ‘Pupils’ heading, in this box you can left click on each pupil to place
them into the class (the empty adjacent box). You can also filter your student
Edukey Education Ltd 24
list here by name, gender and group using the drop down menus. Once you are
happy with your pupil list, click the ‘Create class’ button.
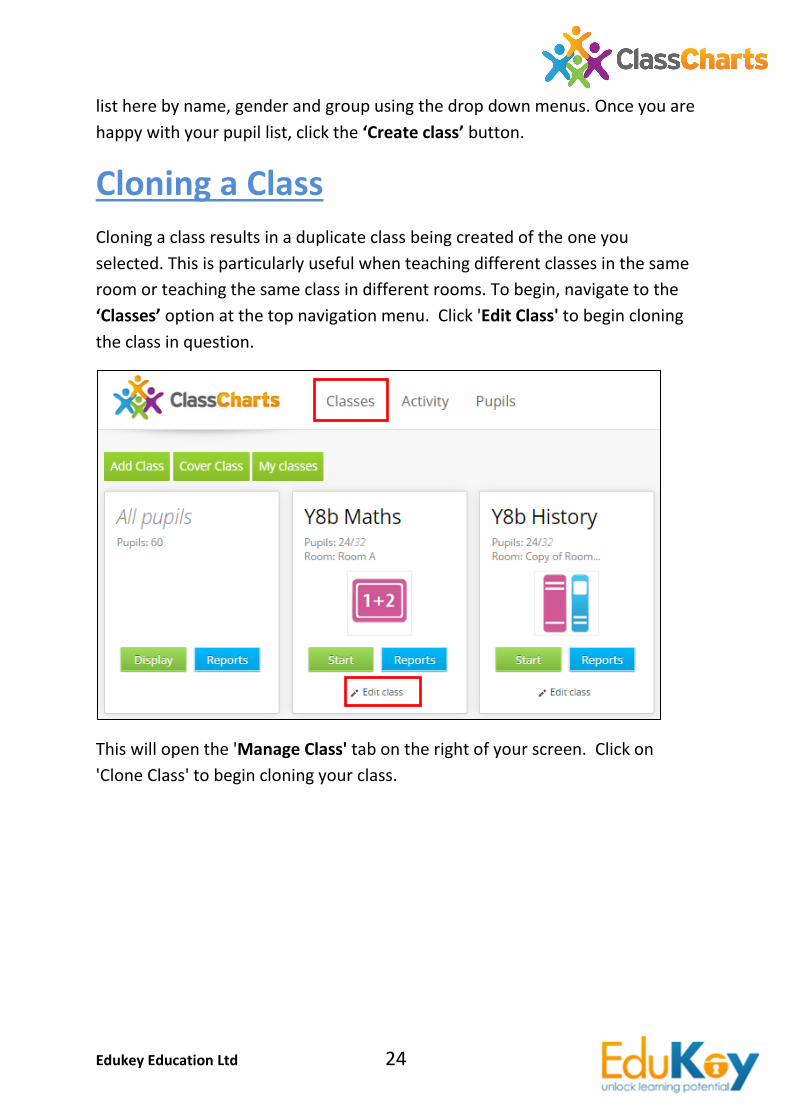
Cloning a Class
Cloning a class results in a duplicate class being created of the one you
selected. This is particularly useful when teaching different classes in the same
room or teaching the same class in different rooms. To begin, navigate to the
‘Classes’ option at the top navigation menu. Click 'Edit Class' to begin cloning
the class in question.
This will open the 'Manage Class' tab on the right of your screen. Click on
'Clone Class' to begin cloning your class.

Edukey Education Ltd 25
This will open up your class tab. Pupils from the original class will automatically
be populated. If you wish to add or remove pupils, just drag and drop them
into the main Pupil Box.
Name your class and choose the room you want the class to be held in and
click 'Create Class'.

Edukey Education Ltd 26
The clone button creates a new class for you with identical pupils from the
selected class. From here, edit the class as you like and continue with the
‘Create class’ button.
The next section, you drag and drop pupils to seats again and begin classes,
however this time your class layout will already be present.

Edukey Education Ltd 27
Security
Security is of paramount importance to us and we have a range of industry standard measures in place to ensure safeguarding of all pupil data.
We use Geo Trust 256 bit SSL (secure socket layer) encryption for all data transfers and our database uses encryption for key data.
All of our staff are enhanced CRB checked. We are registered with the Data Protection Commissioner and comply with all aspects of the Data Protection Act.
We employ a penetration testing company to ensure our systems are secure, they perform system security tests on a regular basis.
Our data centre has a range of security features such as CCTV, dual access locks and triplicate backups.
If you have real data concerns then just provide us with surname initials and dates of birth in mm/yyyy format.
Further Support
Should you require further support for any issues at all, then please do not hesitate to get in contact with us at: