clare strand ten least most wanted installation instructions
TRANSCRIPT

Brancolini Grimaldi
43–44 Albemarle StreetLondon W1S 4JJ United Kingdom
+44 (0)20 7493 [email protected]
Clare Strand
Ten Least Most Wanted
Installation Instructions
When opening the crate please handle all the parts with care. The perspex top is very fragile

Brancolini Grimaldi
Parts
Legs D Legs A
Rails
Long Sides Short Sides
Screws A and Screws BPerspex top
Perspex rods: A x 20, B x 8, C x 12Art works
Table top

Brancolini Grimaldi
1) Set the leg Sections 3m apart. Take each Rail and match the corresponding Rail to the ply plate. Screw in 4 screws (with washers) from Screw bag A. Make the rails as flush as possible to the legs and tighten completely when the rail is attached to the 2 leg legs.
Once the legs are attached to the rails the table will now be extremely strong and can be moved into position.

Brancolini Grimaldi
2) Take the Side sections and place them on corresponding tops of the table. Place all the sides on the table and line them up BEFORE screwing them down. Once in position use screws B to secure. Do not tighten fully at once it is best the 3/4 tighten and make sure everythign is lined up before tightening them fully. The Long sides may need continusous holding to make sure that they do not bow out when screwing them down.
Brancolini Grimaldi
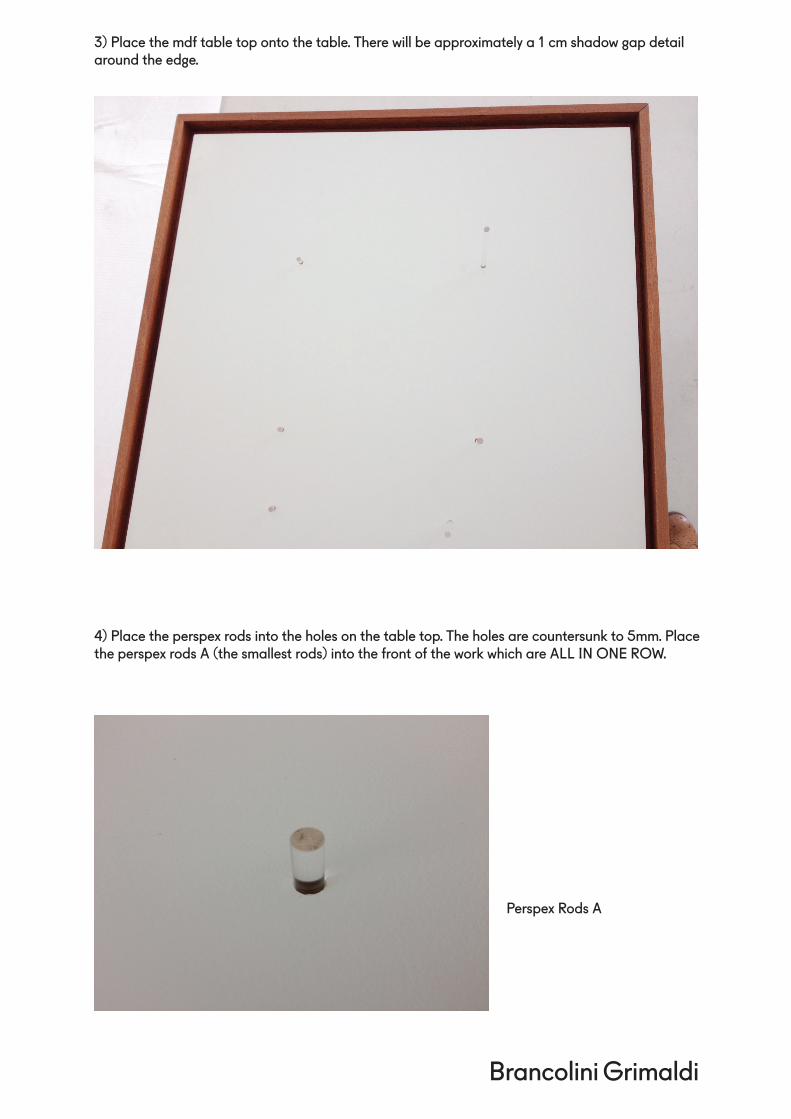
3) Place the mdf table top onto the table. There will be approximately a 1 cm shadow gap detail around the edge.
4) Place the perspex rods into the holes on the table top. The holes are countersunk to 5mm. Place the perspex rods A (the smallest rods) into the front of the work which are ALL IN ONE ROW.
Perspex Rods A

Brancolini Grimaldi
Once all of perspex rods A have been placed we can place perspex rods B and C.
PERSPEX RODS B (x8) are for the portrait works which are closest to the outside edge.
PERSPEX RODS C (x12) are for the Landscape works which are closest to Rods A.
Rods A and B are angled for the works to sit on. The rods make need to slightly adjusted so that they sit flusly on the works and all are even.
Once all rods are in place the works are ready to be added.

5) U
sing
glov
es p
lace
the
10 le
ast m
ost i
n th
e fo
llowi
ng o
rder
.
6) P
lace
the
pers
pex t
op o
ntop
of t
he ta
ble
top.
Bef
ore
the
top
is pl
aced
obe
r the
wor
k it
is re
com
men
ded
to u
se a
mic
ro fi
bre
clot
h to
cle
an it
.
It wi
ll sit
on th
e to
p an
d le
ave
the
shad
ow g
ap a
roun
d.
This
is ho
w th
e wo
rks s
houl
d be
inst
alle
d.

Brancolini Grimaldi
The Work is now complete.