city of philadelphia accessing your check point vpn … · page 3 step 4 check point will now scan...
TRANSCRIPT
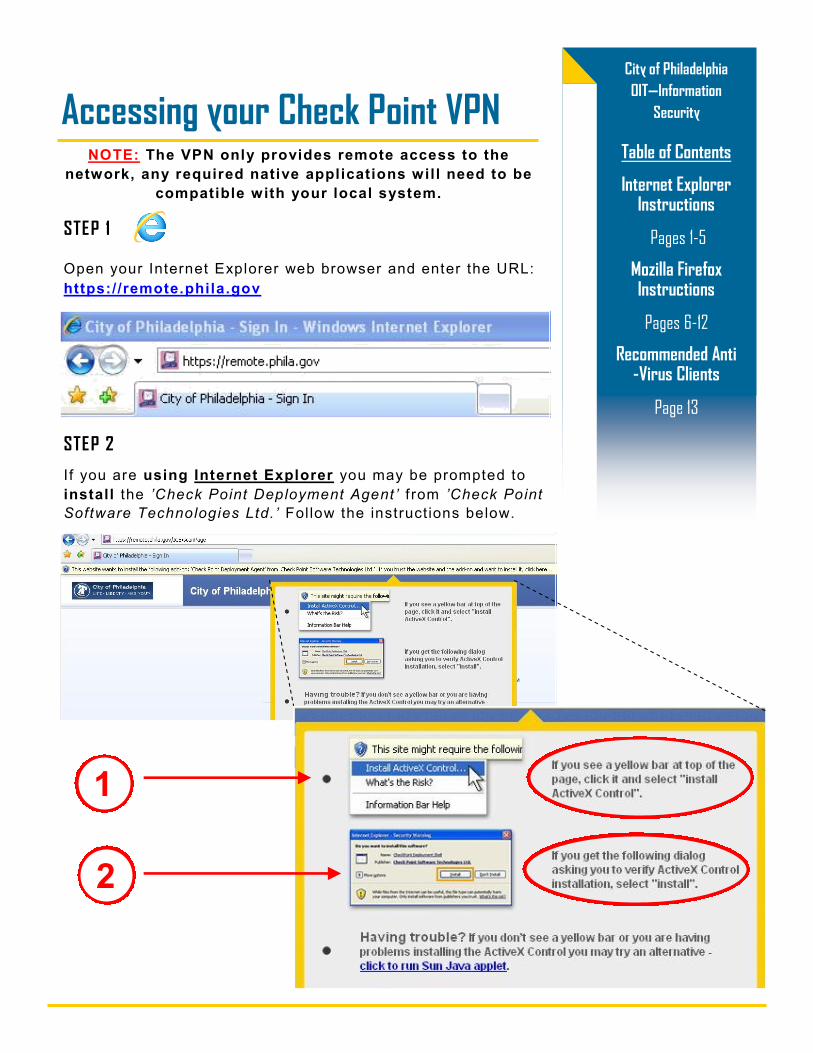
STEP 1
Table of Contents
Internet Explorer Instructions
Pages 1-5
Mozilla Firefox Instructions
Pages 6-12
Recommended Anti-Virus Clients
Page 13
City of Philadelphia
OIT—Information
Security Accessing your Check Point VPN
Open your Internet Explorer web browser and enter the URL:
https://remote.phila.gov
NOTE: The VPN only provides remote access to the
network, any required native applications will need to be
compatible with your local system.
STEP 2
I f you are using Internet Explorer you may be prompted to
install the ’Check Point Deployment Agent ’ f rom ’Check Point
Software Technologies Ltd. ’ Follow the instruct ions below.
1
2

Page 2
STEP 3
Install the Check Point Deployment Agent when prompted.
STEP 4
Check Point wi l l be ask if you trust the server for remote.phila.gov. Click Trust
Server.
Accessing your Check Point VPN

Page 3
STEP 4
Check Point wi l l now scan your computer for security threats and check if your
computer ’s ant i-virus client is in compliance with the City of Phi ladelphia’s
Information Secur ity pol ic ies.
Note : I f the scan is taking a long t ime or does not f inish, please close the browser
window and begin the process again at Step 1.
NOTE: I f your Ant i-Virus scan FAILS PROCEED to page 13 of this document to see
the l ist of approved Check Point Anti -virus cl ients that wil l al low you to access your
VPN!
Accessing your Check Point VPN
Page 4
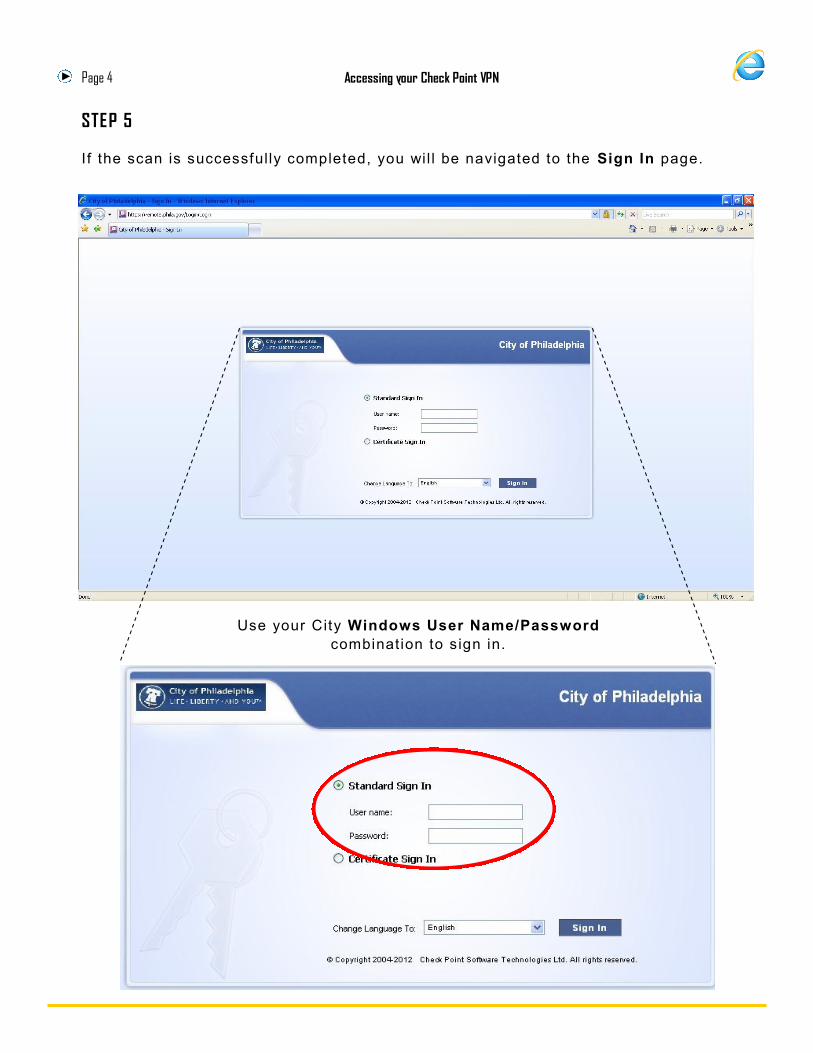
STEP 5
I f the scan is successfully completed, you wil l be navigated to the Sign In page.
Use your City Windows User Name/Password
combination to sign in.
Accessing your Check Point VPN
Page 5
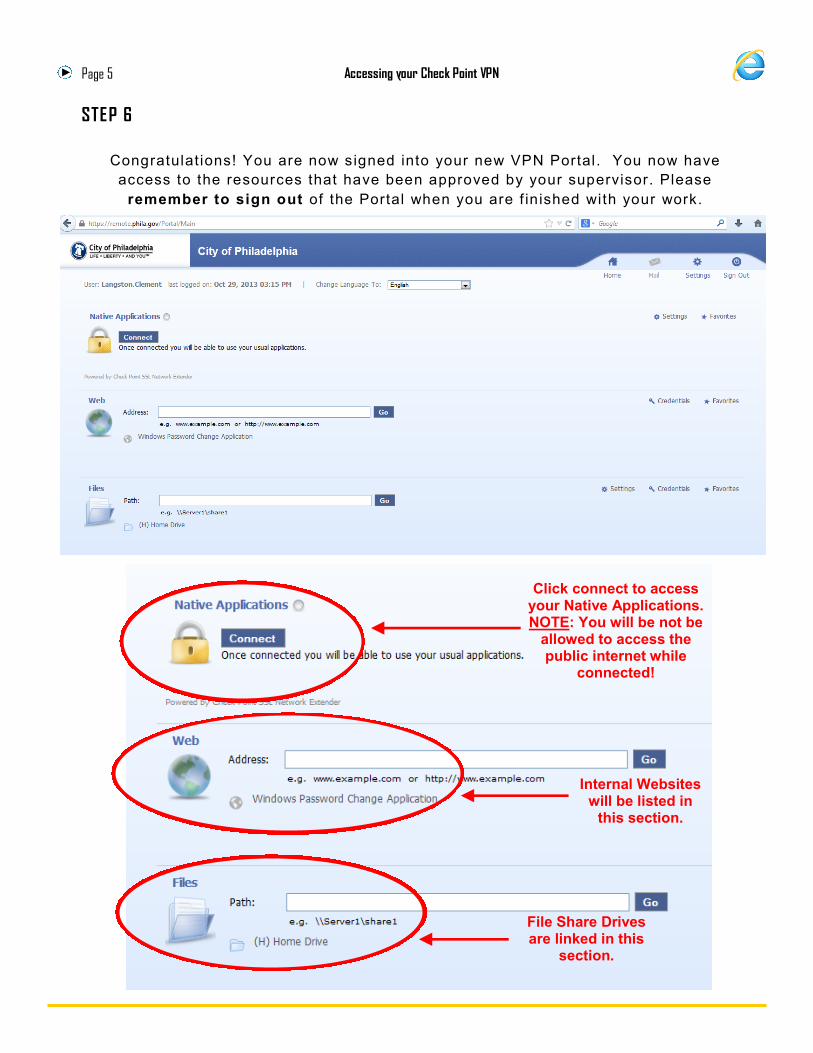
STEP 6
Congratulat ions! You are now signed into your new VPN Portal. You now have
access to the resources that have been approved by your supervisor. Please
remember to sign out of the Portal when you are f inished with your work.
Accessing your Check Point VPN
Click connect to access your Native Applications. NOTE: You will be not be
allowed to access the public internet while
connected!
Internal Websites will be listed in
this section.
File Share Drives are linked in this
section.
Page 6
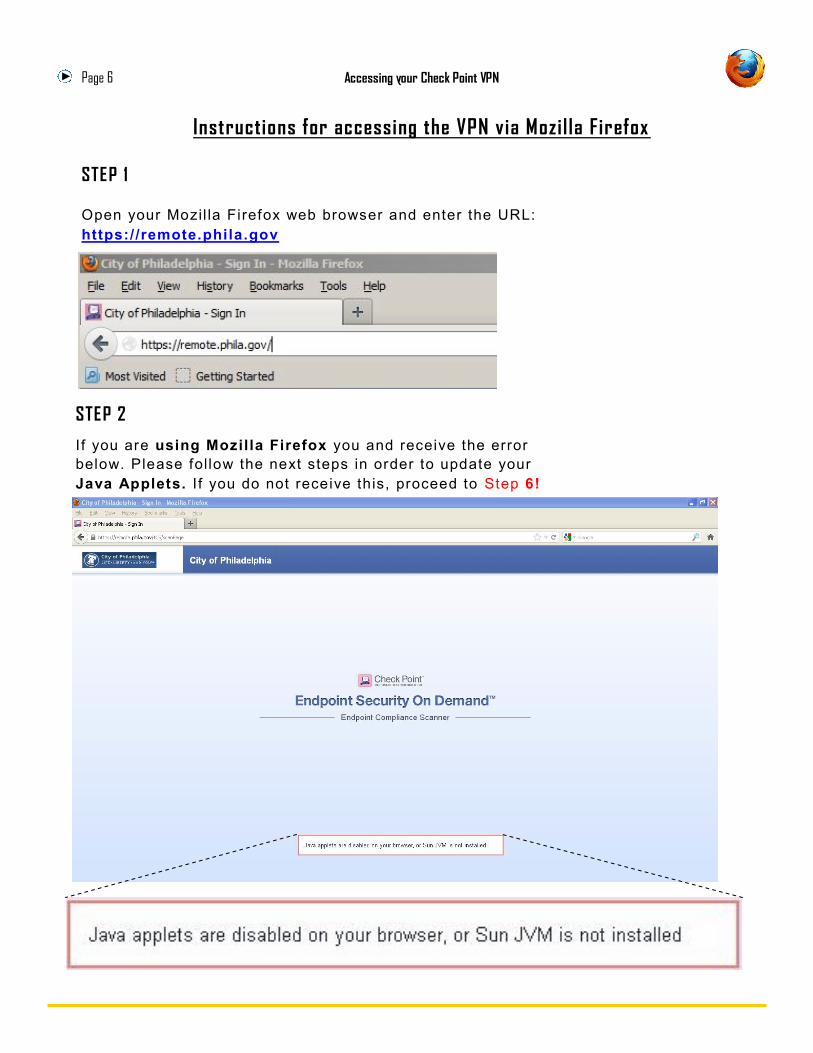
STEP 1
Open your Mozil la Firefox web browser and enter the URL:
https://remote.phila.gov
Instructions for accessing the VPN via Mozil la Firefox
STEP 2
I f you are using Mozilla Firefox you and receive the error
below. Please follow the next steps in order to update your
Java Applets. I f you do not receive this, proceed to Step 6!
Accessing your Check Point VPN

Page 7
STEP 3
Open a new browser Tab or Window in Firefox and enter the
URL: http:/ /www.java.com/en/download/ and CLICK the ‘Free
Java Download’ Button.
STEP 4
After you download the Java f i le, follow the instruct ions unti l i t is instal led on your
system.
Accessing your Check Point VPN
Page 8
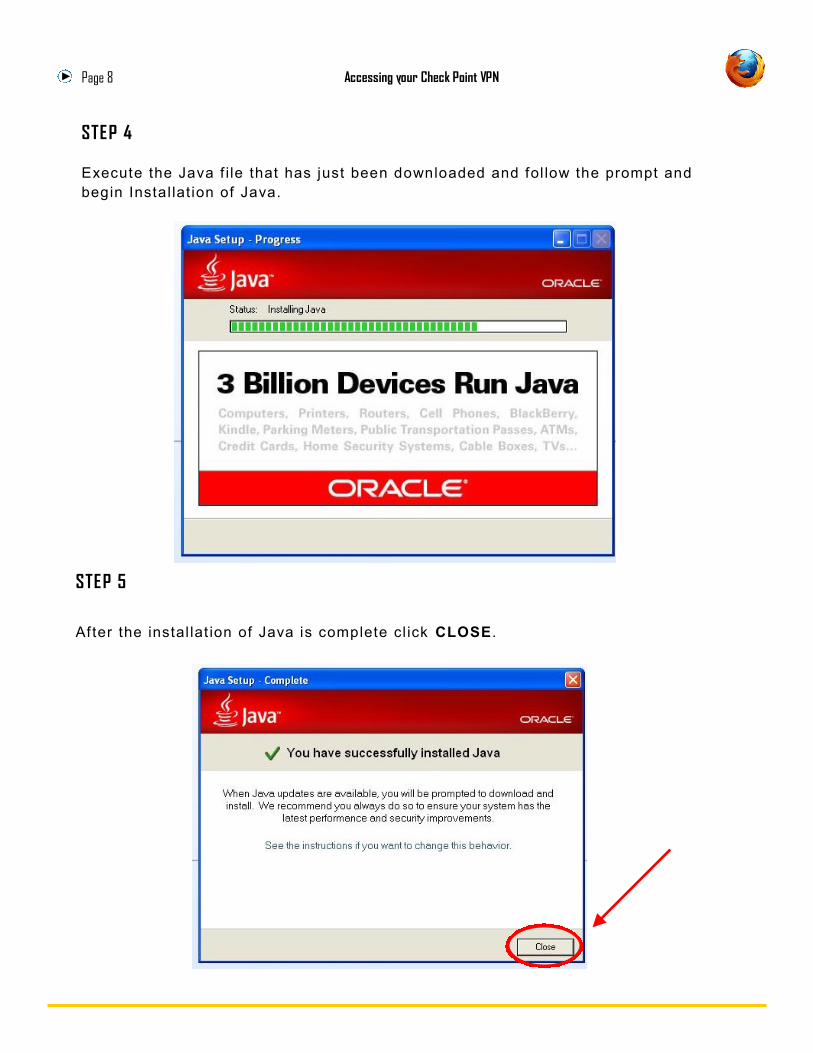
STEP 4
Execute the Java f i le that has just been downloaded and fol low the prompt and
begin Instal lat ion of Java.
STEP 5
After the instal lat ion of Java is complete cl ick CLOSE .
Accessing your Check Point VPN
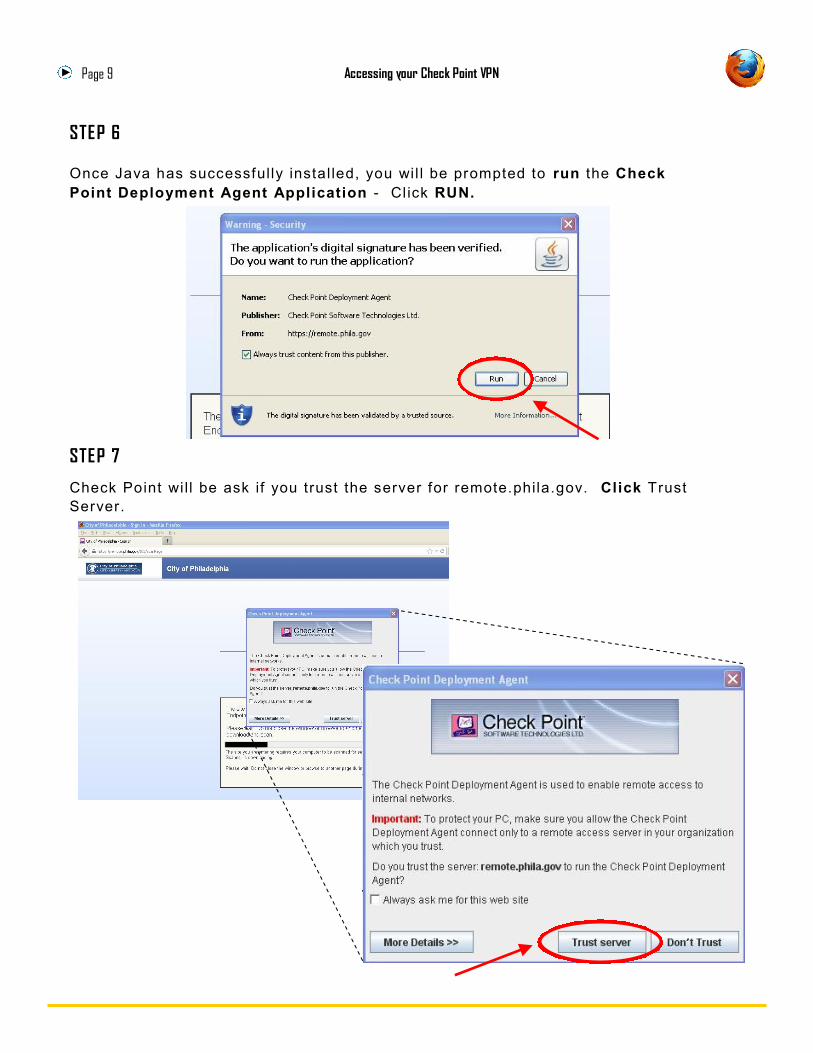
STEP 6
Once Java has successfully instal led, you wil l be prompted to run the Check
Point Deployment Agent Application - Cl ick RUN.
Page 9
STEP 7
Check Point wi l l be ask if you trust the server for remote.phila.gov. Click Trust
Server.
Accessing your Check Point VPN
Page 10
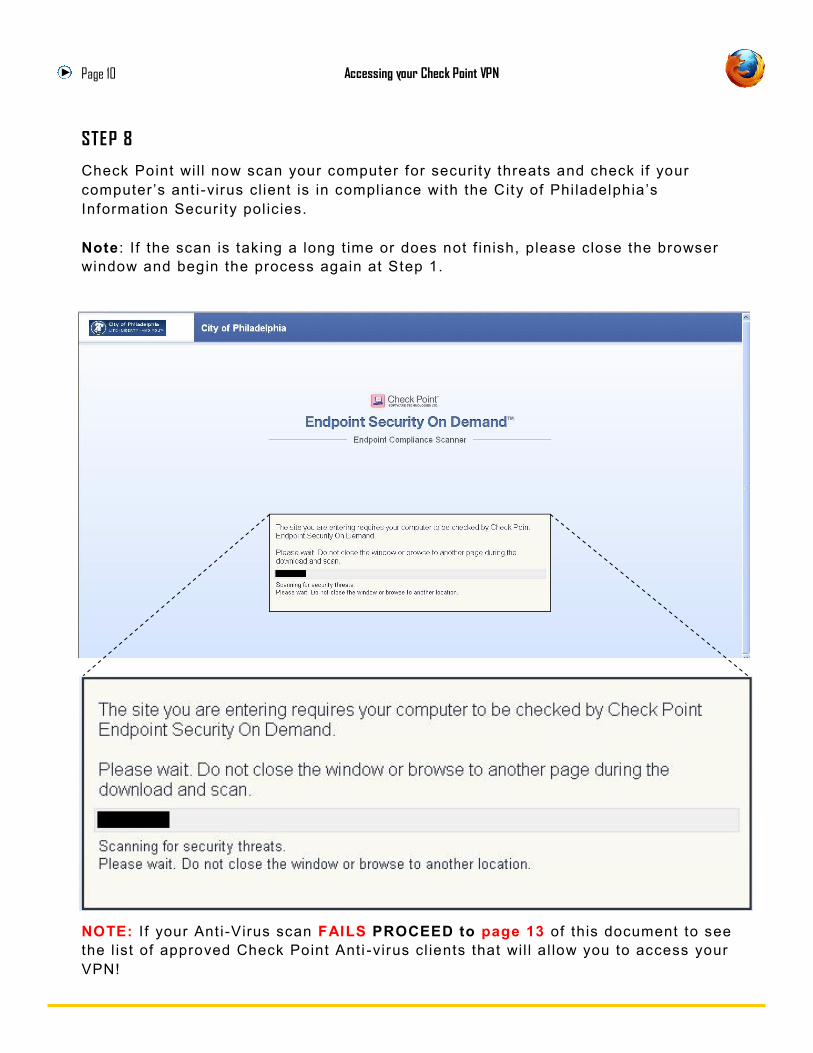
STEP 8
Check Point wi l l now scan your computer for security threats and check if your
computer ’s ant i-virus client is in compliance with the City of Phi ladelphia’s
Information Secur ity pol ic ies.
Note : I f the scan is taking a long t ime or does not f inish, please close the browser
window and begin the process again at Step 1.
NOTE: I f your Ant i-Virus scan FAILS PROCEED to page 13 of this document to see
the l ist of approved Check Point Anti -virus cl ients that wil l al low you to access your
VPN!
Accessing your Check Point VPN
Page 11
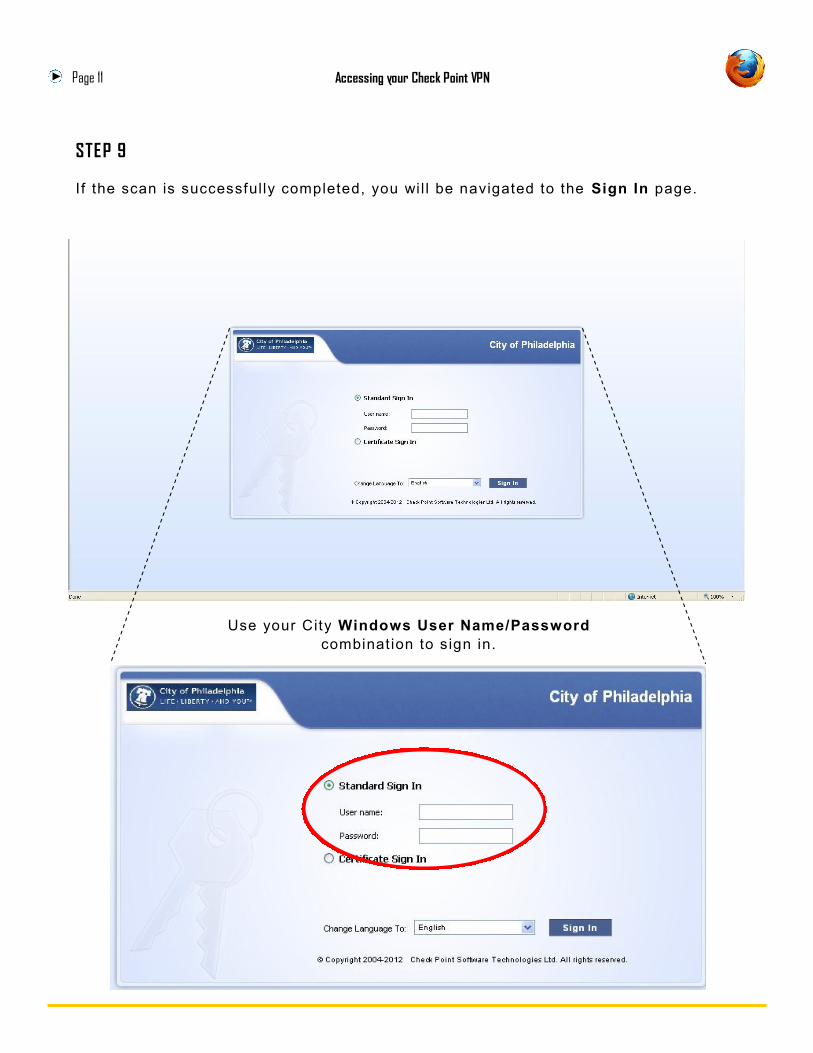
STEP 9
I f the scan is successfully completed, you wil l be navigated to the Sign In page.
Use your City Windows User Name/Password
combination to sign in.
Accessing your Check Point VPN

Page 12
STEP 6
Congratulat ions! You are now signed into your new VPN Portal. You now have
access to the resources that have been approved by your supervisor. Please
remember to sign out of the Portal when you are f inished with your work.
Accessing your Check Point VPN
Click connect to access your Native Applications. NOTE: You will be not be
allowed to access the public internet while
connected!
Internal Websites will be listed in
this section.
File Share Drives are linked in this
section.
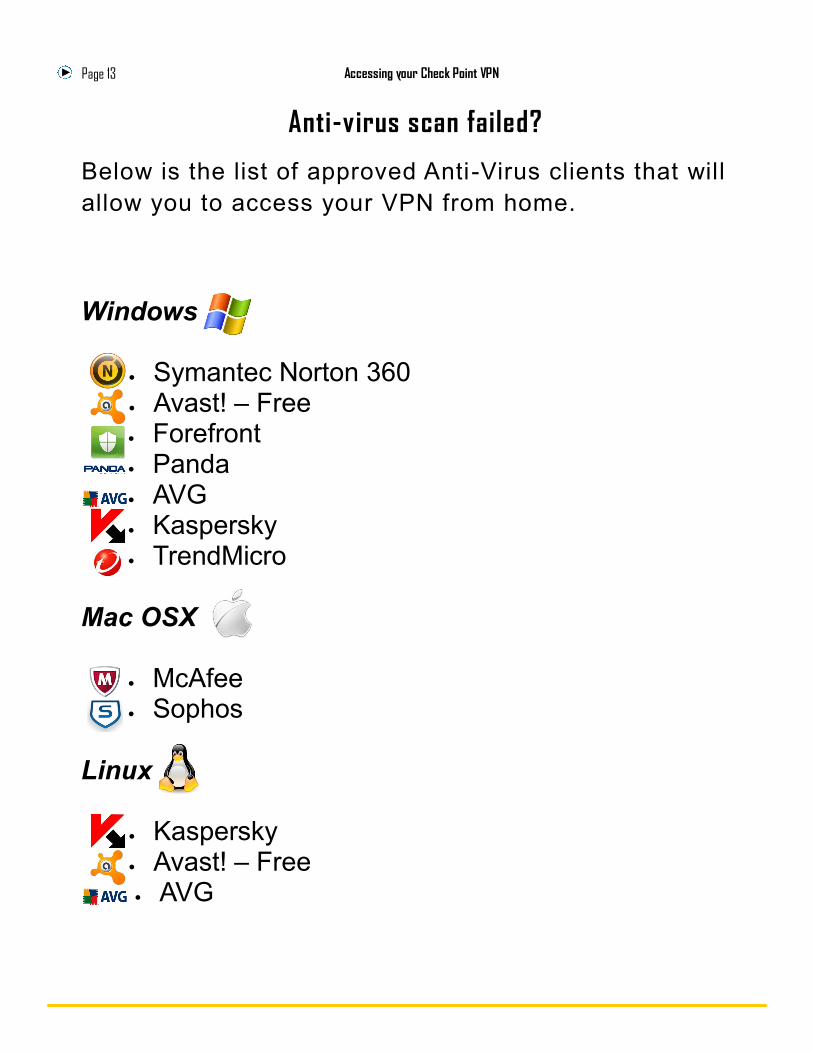
Page 13
Anti-virus scan failed?
Below is the list of approved Anti-Virus clients that will
allow you to access your VPN from home.
Windows Symantec Norton 360 Avast! – Free Forefront Panda AVG Kaspersky TrendMicro
Mac OSX
McAfee Sophos
Linux
Kaspersky Avast! – Free AVG
Accessing your Check Point VPN