citrix xendesktop 5.6 cookbook - packt publishing · pdf fileand optimization activities for...
TRANSCRIPT

Citrix XenDesktop 5.6 Cookbook
Gaspare A. Silvestri
Chapter No. 6 "Creating and Configuring a
Desktop Environment"
In this package, you will find: A Biography of the author of the book
A preview chapter from the book, Chapter NO.6 "Creating and Configuring a Desktop Environment"
A synopsis of the book’s content
Information on where to buy this book
About the Author Gaspare A. Silvestri is an IT Technical Director for an Italian Hosting Provider company with 10 years of experience in the Information Technology market. Being a Multicertified IT Director, he considers his job as the first of all his passions, with a particular preference for the virtualization and the Unix technology areas. He is always curious and in search of new IT projects on which he performs research activities. Gaspare has been involved in the design, tuning, and consolidation of physical and virtual infrastructures for important system integration companies based in Italy.
For More Information: www.packtpub.com/citrix-xendesktop-5-6-cookbook/book

Thanks to Viola and Manuela, the shining stars of my life.
Thanks to all my family, for the strength and the support they have always given to me.
Thanks to Roberto, who gave me, some years ago, an opportunity to start working on the Citrix platforms.
Thanks to the coffee and Miles Davis, which have been my main fellowship during the working hours.
A special thanks to Stephanie Moss, Abhishek Kori, Arun Nadar, and the entire staff at Packt Publishing for the exceptional work they have done with me, and for all the work we have done together.
For More Information: www.packtpub.com/citrix-xendesktop-5-6-cookbook/book
Citrix XenDesktop 5.6 Cookbook In the last few years, the way we work has changed and has evolved to the point that we now have the opportunity to access personal data not just when we are at our personal office desk. Thanks to new technologies such as smart phones and tablets, more and more users are now able to have the feeling of being able to work everywhere and anywhere. However, despite the advances, this feeling is not always supported by the real ability to operate this way.
In the current post-PC age, we need to change the approach.
Citrix is a market leader for end-user virtualization. In the range of products offered to IT customers, we are now able to implement a powerful solution such as XenDesktop 5.6, which allows users to have the published desktops and/or applications on platforms that can be Windows aware (for example, Android or Apple iOS), without losing agility and the rich user experience of the original.
With this book we'll cover the main implementation aspects, advanced features, and all the activities required to tune the infrastructure and enrich the final user impact.
At the end of this book, we're going to explain XenDesktop PowerShell, with real-case practical implementation; by this, any virtualization engineer will improve and consolidate his knowledge of XenDesktop.
What This Book Covers Chapter 1, XenDesktop Installation and Configuration, presents the prerequisites to install the platform, the differences between the two most important architectures, operations to perform during the installation phase, and the first configuration step for each component.
Chapter 2, Deploying Virtual Machines for XenDesktop, shows the way to interface XenDesktop with hypervisor hosts for farm and VM base image creation. This part will also include the second configuration phase for the XenDesktop components.
Chapter 3, Master Image Configuration and Tuning, is focused on configuration and optimization operations realized on the base desktop image for future deployments.
Chapter 4, User Experience – Planning and Configuring, helps the customers to implement all basic and advanced features of user experience (ICA and HDX).
Chapter 5, Configuring Additional Architectural Components, performs implementation and optimization activities for infrastructural satellite components such as Citrix Merchandising Server or the Citrix Branch Repeater virtual appliance.
For More Information: www.packtpub.com/citrix-xendesktop-5-6-cookbook/book
Chapter 6, Creating and Configuring a Desktop Environment, explains administrative tasks for the desktop environment such as catalog creation, power management, resource allocation.
Chapter 7, Deploying Applications, shows the way to assign and publish applications only to specified users; we'll also explain interfacing with XenApp 6.5 and Microsoft App-V.
Chapter 8, XenDesktop Tuning and Security, performs optimization activities to enrich quality level for VDI. In this chapter, we'll also learn how to secure the XenDesktop system components.
Chapter 9, Working with XenDesktop PowerShell, will be an advanced guide to the XenDesktop PowerShell modules; with these, we'll realize high-level configurations by command line.
Chapter 10, Configuring the XenDesktop Advanced Logon, explains the operations to implement the secure and strong authentication for the Citrix XenDesktop architectures.
At the end of every chapter there will be a laboratory, a set of practical exercises used to test the comprehension of the chapter by the readers. Every laboratory will be a link to the exercises written in its next chapter, in order to implement a full functioning environment, without constraining the users in a predefined configuration, giving the ability to operate with a little bit more of a freedom regarding the operations to perform.
For More Information: www.packtpub.com/citrix-xendesktop-5-6-cookbook/book

6Creating and
Confi guring a Desktop Environment
In this chapter we will cover:
Creating and confi guring the machine catalog
Modifying an existing machine catalog
Using Citrix Desktop Director
Confi guring printers
Confi guring USB devices
IntroductionIn the fi rst fi ve chapters of this book, we have installed and confi gured all the main architectural components used to implement the XenDesktop suite and different useful technologies.
Now it's time to proceed with the creation of the virtual desktop instances; the linked clone of the virtual image template will be released to and used by the end users. In this chapter we'll learn how to perform this task, and how to maintain and modify the desktop collections.
For More Information: www.packtpub.com/citrix-xendesktop-5-6-cookbook/book
Creating and Confi guring a Desktop Environment
160
Creating and confi guring the machine catalog
All the virtual resources released to the end users are part of a group collection called a catalog; this contains information about the type and number of virtual desktop instances, the confi gurations, and the assignment, based on the Active Directory objects (users, groups, computers). In this recipe we're going to perform a full creation and confi guration of all these elements.
Getting readyTo correctly perform the confi guration tasks, you need administrative credentials for the XenDesktop Controller server, and to be able to use the created virtual desktop, you fi rst need to install and confi gure the required VDA plugin on the client device, as explained in the previous chapter.
You also have to generate a snapshot within your hypervisor environment for the master image virtual machine created to deploy the virtual desktop instances; the VM creation has been discussed in Chapter 3, Master Image Confi guration and Tuning.
How to do it...In this recipe we will explain how to create and manage a XenDesktop machine catalog. Perform the following steps to do so:
1. Connect to the Desktop Controller server with an administrative domain user.
2. Select Start | All Programs | Citrix, and click on the Desktop Studio link. Now we will see how to create the machine's catalog.
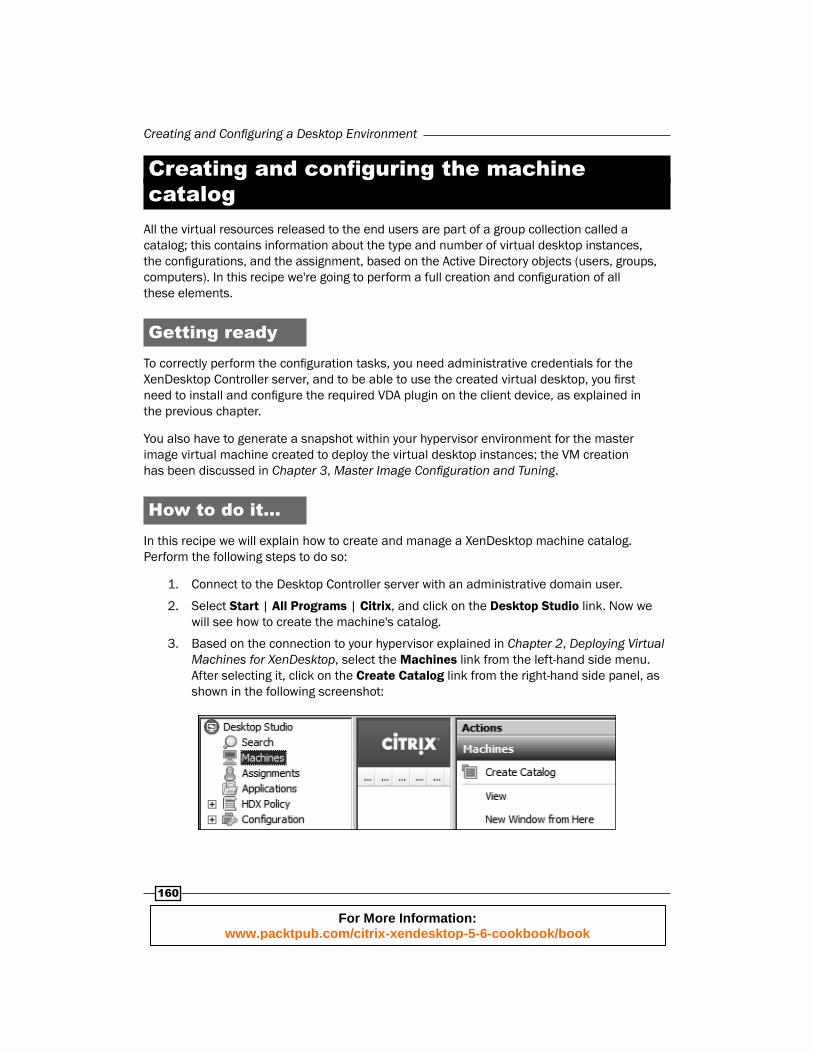
3. Based on the connection to your hypervisor explained in Chapter 2, Deploying Virtual Machines for XenDesktop, select the Machines link from the left-hand side menu. After selecting it, click on the Create Catalog link from the right-hand side panel, as shown in the following screenshot:
For More Information: www.packtpub.com/citrix-xendesktop-5-6-cookbook/book

Chapter 6
161
Alternatively you can click on the Configure button, in the Machine creation section from the main menu of the Desktop Studio link.
4. In the Machine Type section, from the drop-down list, select the type of deployment to be performed (Pooled, Pooled with personal vDisk, Dedicated, Existing, Physical, Streamed, and Streamed with personal vDisk). In the Machine Assignment section select the appropriate radio button (Random or Static). After completing this click on the Next button.
Please refer to the How it works… section of this recipe to understand the differences between the listed catalogs.
The options available under the Machine Type section are shown in the following screenshot:
5. Select a master image from the list, from which we will generate the desktop instances. Then click on Next.
The image selected from the list is a snapshot that refers to the original virtual machine disk.
For More Information: www.packtpub.com/citrix-xendesktop-5-6-cookbook/book
Creating and Confi guring a Desktop Environment
162
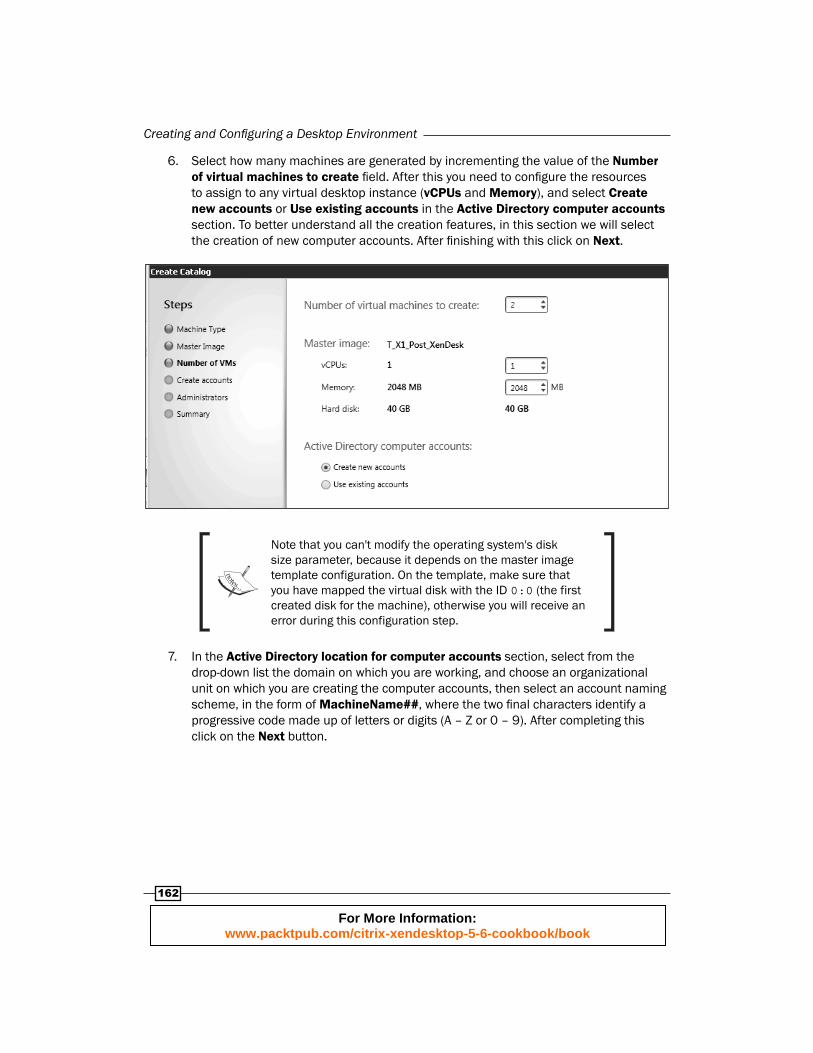
6. Select how many machines are generated by incrementing the value of the Number of virtual machines to create fi eld. After this you need to confi gure the resources to assign to any virtual desktop instance (vCPUs and Memory), and select Create new accounts or Use existing accounts in the Active Directory computer accounts section. To better understand all the creation features, in this section we will select the creation of new computer accounts. After fi nishing with this click on Next.
Note that you can't modify the operating system's disk size parameter, because it depends on the master image template configuration. On the template, make sure that you have mapped the virtual disk with the ID 0:0 (the first created disk for the machine), otherwise you will receive an error during this configuration step.
7. In the Active Directory location for computer accounts section, select from the drop-down list the domain on which you are working, and choose an organizational unit on which you are creating the computer accounts, then select an account naming scheme, in the form of MachineName##, where the two fi nal characters identify a progressive code made up of letters or digits (A – Z or 0 – 9). After completing this click on the Next button.
For More Information: www.packtpub.com/citrix-xendesktop-5-6-cookbook/book

Chapter 6
163
8. If you want, you can insert a catalog description to help administrators in identifying the generated pool. To continue click on Next.
9. On the Summary screen, assign a name to the catalog, and click on the Finish button to complete the procedure, as shown in the following screenshot:
For More Information: www.packtpub.com/citrix-xendesktop-5-6-cookbook/book

Creating and Confi guring a Desktop Environment
164
10. To verify that the catalog has been successfully created, click on the Machines link in the left-hand side menu.
11. To verify that all the required machines have been generated, right-click on the catalog name in the Machines section and select the View machines option. You will get back the full list of generated desktop instances, as follows:
Now we will perform the machine assignment operation phase. Perform the following steps to do so:
1. In the left-hand side menu, click on the Assignments link, then select the Create Desktop Group option on the right-hand side of the window. Alternatively, you can click on the Confi gure button in the User assignment section from the Desktop Studio's main menu, as shown in the following screenshot:
For More Information: www.packtpub.com/citrix-xendesktop-5-6-cookbook/book

Chapter 6
165
2. Select an existing catalog from the list and then choose the number of machines to assign to the users in the Add machines section from the available machine pool(s). After completing this click on Next.
For More Information: www.packtpub.com/citrix-xendesktop-5-6-cookbook/book
Creating and Confi guring a Desktop Environment
166
3. Click on the Add button and choose the users or the groups from your Active Directory's domain to which you are assigning the existing desktops. After this operation, choose the number of desktops to assign for each user and click on Next to proceed further.
Be careful with the desktop assigned to every user. You must respect both the number of generated machines and the available licenses.
4. In the Delegation section, leave checked the confi gured administration group; this will be the entity that will be able to manage and administer the user assignment. To continue click on the Next button.
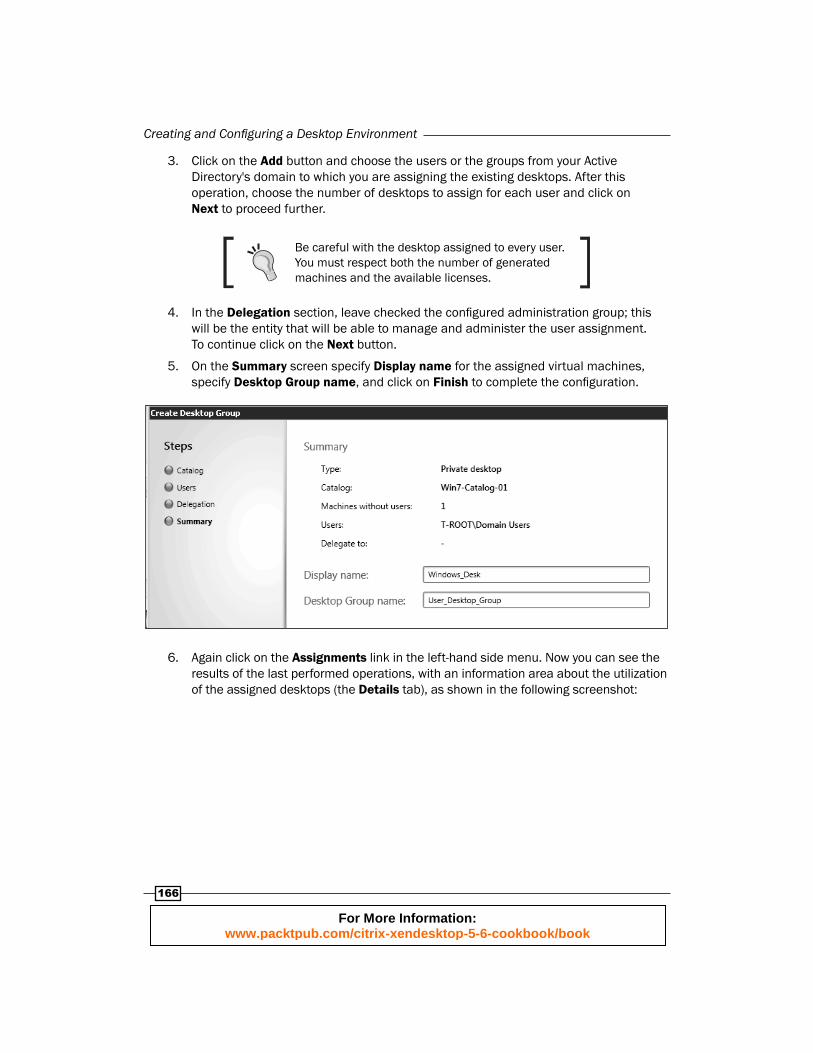
5. On the Summary screen specify Display name for the assigned virtual machines, specify Desktop Group name, and click on Finish to complete the confi guration.
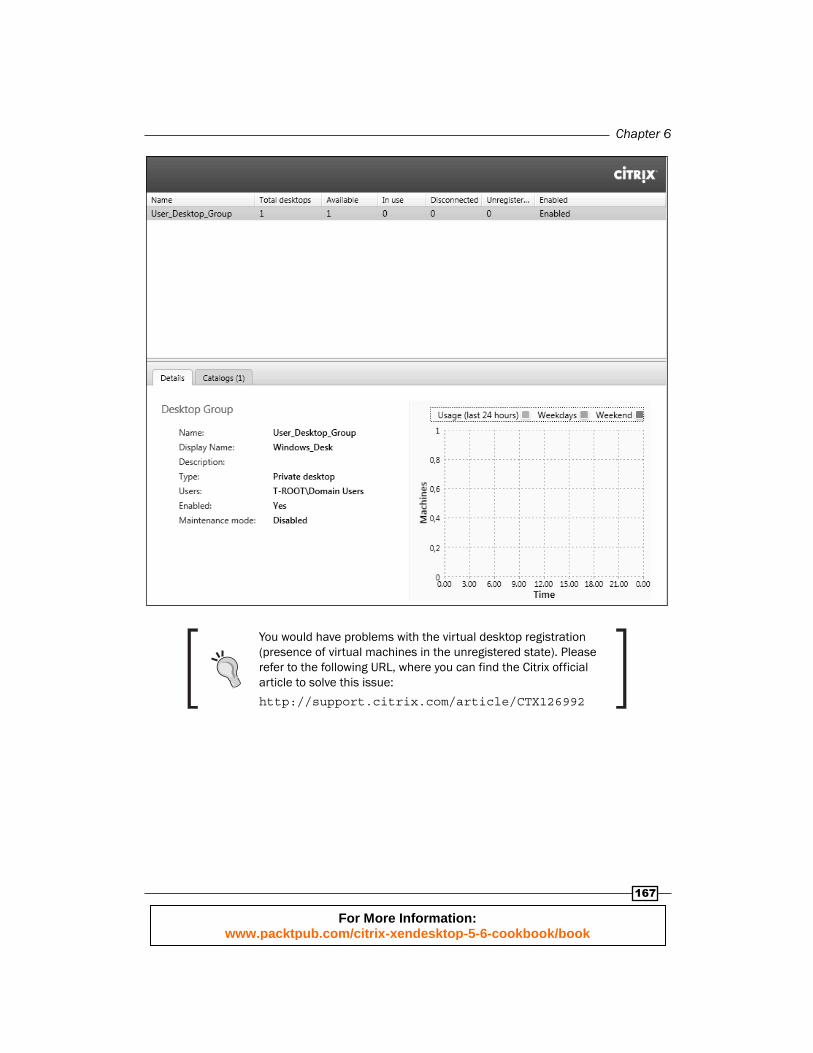
6. Again click on the Assignments link in the left-hand side menu. Now you can see the results of the last performed operations, with an information area about the utilization of the assigned desktops (the Details tab), as shown in the following screenshot:
For More Information: www.packtpub.com/citrix-xendesktop-5-6-cookbook/book
Chapter 6
167
You would have problems with the virtual desktop registration (presence of virtual machines in the unregistered state). Please refer to the following URL, where you can find the Citrix official article to solve this issue:
http://support.citrix.com/article/CTX126992
For More Information: www.packtpub.com/citrix-xendesktop-5-6-cookbook/book

Creating and Confi guring a Desktop Environment
168
7. Using a confi gured client device, open a web browser and type in the URL of your Citrix Web Interface in the address bar. Log in with the credentials of one of the users with an assigned desktop. After the login phase, you will receive a screen with the desktop published to that user. Connecting through the PNAgent services site, in the presence of a single resource assigned to the user, this will be directly sent to the Windows logon.
The virtual desktop icon shown in the preceding screenshot will turn blue in the presence of an available virtual desktop instance, otherwise it will be gray, waiting for an available resource.
8. Click on the published resource or wait for some minutes in order to let Citrix connect to the desktop. Once connected, the desktop instance is available for use.
Now we will manage the power and access management. Perform the following steps to do so:
1. Click on the Assignments link located in the left-hand side menu, right-click on the desired desktop group, and select the Edit Desktop Group option, as shown in the following screenshot:
For More Information: www.packtpub.com/citrix-xendesktop-5-6-cookbook/book

Chapter 6
169
2. Select the Power management section, and choose from the Power on/off machines area the week period to confi gure (Weekdays or Weekend). Click on the Peak hours bar to set the time interval to consider as the highest working activities' period (in the screenshot it's confi gured from 9 a.m. to 6 p.m.):
In the presence of more than five virtual machines, if you specify to start up only one virtual desktop, the XenDesktop broker will automatically power up three virtual desktops, in order to prevent a user from having to wait till a virtual desktop is powered up.
3. In the During peak hours area, assign a time period in minutes for the two confi gured conditions (When disconnected and When logged off), and select the action to execute in case of a condition verifi cation (Suspend for the disconnection, and Suspend or Shutdown for the logoff). Repeat the same steps for the During off-peak hours section.
4. Select the Access policy section, and choose the desired option(s) in the Allow the following connection area (All connection not through Access Gateway or Connections through Access Gateway). If you want, you can confi gure personalized fi lters by fl agging the third option, Connections meeting any of the following fi lters, and clicking on the Add button to insert the fi lter rule.
For More Information: www.packtpub.com/citrix-xendesktop-5-6-cookbook/book
Creating and Confi guring a Desktop Environment
170
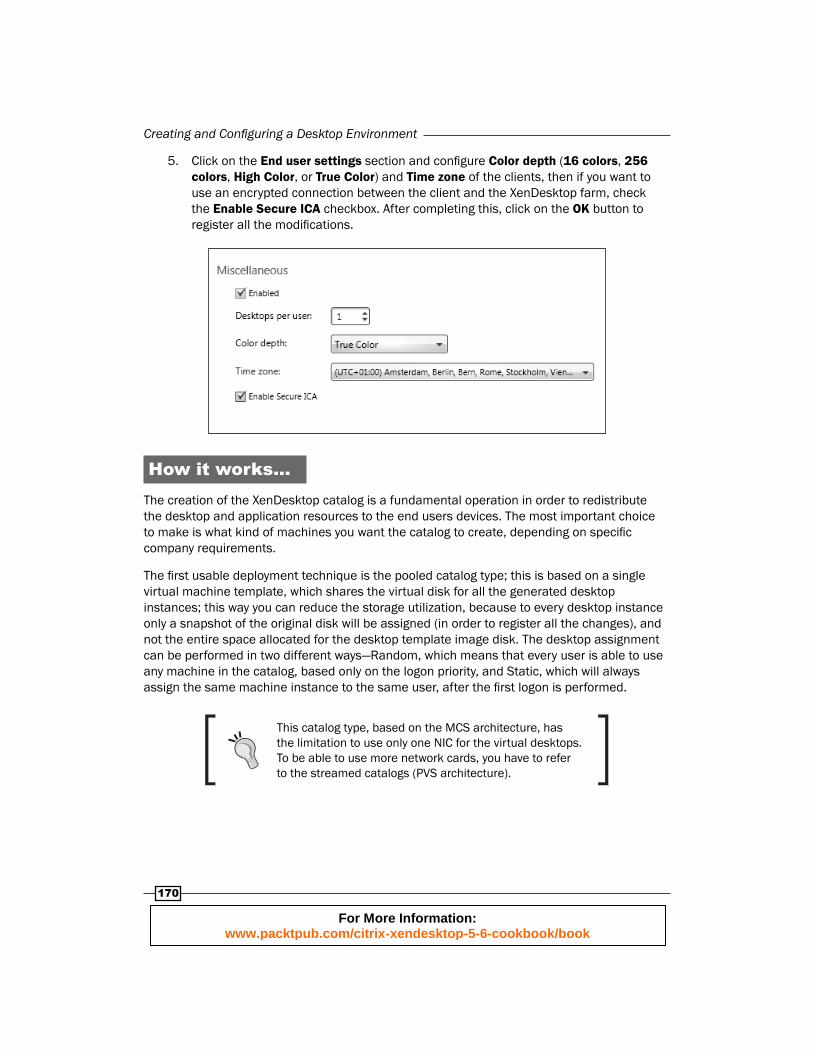
5. Click on the End user settings section and confi gure Color depth (16 colors, 256 colors, High Color, or True Color) and Time zone of the clients, then if you want to use an encrypted connection between the client and the XenDesktop farm, check the Enable Secure ICA checkbox. After completing this, click on the OK button to register all the modifi cations.
How it works...The creation of the XenDesktop catalog is a fundamental operation in order to redistribute the desktop and application resources to the end users devices. The most important choice to make is what kind of machines you want the catalog to create, depending on specifi c company requirements.
The fi rst usable deployment technique is the pooled catalog type; this is based on a single virtual machine template, which shares the virtual disk for all the generated desktop instances; this way you can reduce the storage utilization, because to every desktop instance only a snapshot of the original disk will be assigned (in order to register all the changes), and not the entire space allocated for the desktop template image disk. The desktop assignment can be performed in two different ways—Random, which means that every user is able to use any machine in the catalog, based only on the logon priority, and Static, which will always assign the same machine instance to the same user, after the fi rst logon is performed.
This catalog type, based on the MCS architecture, has the limitation to use only one NIC for the virtual desktops. To be able to use more network cards, you have to refer to the streamed catalogs (PVS architecture).
For More Information: www.packtpub.com/citrix-xendesktop-5-6-cookbook/book

Chapter 6
171
You have to take care about where the users save their profi le data; no critical information must be saved on the operating system disk, because with this form of catalog, the machines are in a nonpersistent state. This means that after every logoff, reboot, or shutdown activity, all the changes made to the main disk will be lost. To avoid this problem, as previously seen in this book, you can choose to deploy a different kind of catalog, pooled with a personal vDisk. The manner of operating the operating system disk is the same as that of the general pooled catalog, but in this case, additionally you have the persistent disk assigned to the users for their profi les. The personal vDisk is a virtual disk created on the hypervisor's data store; this fi le will be paired to the quota assigned in the user disk creation procedure according to the size, but it will be generated as a thin virtual disk. In this case, the virtual disk's fi le size will increase only when the space will actually be used by a user, up to the predefi ned maximum size.
The third kind of catalog is made up of dedicated machines; in this case, you will move from a nonpersistent machine state to a persistent pool of desktops, which means that any changes made to the operating system disk will be saved and maintained. This solution is necessary when using a noncentralized user profi le technique (local profi les), or when it's an alternative in the presence of centralized profi les (Microsoft roaming and/or Citrix Profi le Manager).
In the fourth case, we can generate a catalog of an existing virtual machine. By the use of XenDesktop Controller, it will be possible to import already generated virtual machines with a supported hypervisor, and assign them to the domain users. This way to operate is quite different from the general purpose of a VDI infrastructure; you could use this way to manage the existing virtual machines under the central XenDesktop management console, but this is not the standard VDI pooling approach.
Similar to the existing catalog type is the physical pool; in this way, you can attach a physical machine to the XenDesktop management console, permitting access to the virtual resources using the physical devices of the attached machine. For instance, this could be useful when you need to use a CD or DVD recorder in order to create a removable media. By default, XenDesktop does not support the mapping of these kinds of peripherals under a Citrix virtual desktop. By publishing the physical machine to the users, they will be able to perform the previously shown operation.
For More Information: www.packtpub.com/citrix-xendesktop-5-6-cookbook/book

Creating and Confi guring a Desktop Environment
172
The last available catalog is the streamed catalog; in this case, the Desktop Controller will create machines starting from an existing desktop, physical or virtual, generated under the Citrix Provisioning Services machine, as explained in Chapter 1, XenDesktop Installation and Confi guration. For this kind of deployment you have to connect to the PVS server created in Chapter 1. Right-click on the confi gured site, and select the XenDesktop Setup Wizard… option from the menu, as shown in the following screenshot:
Make sure that you have confi gured at least one of your PVS confi gured vDisks in Standard Image access mode, otherwise you will not be able to deploy a XenDesktop Streamed catalog.
You can also create the streamed catalog from the XenDesktop Desktop Studio wizard (typing the PVS server address, specifying the Windows domain to operate, and the type of the existing target device (virtual or physical)). This method should be used only to synchronize Desktop Studio with an already existing streamed catalog created under the PVS server.
For all the supported catalogs, except the existing and physical types, you have to specify the operating system disk size and the way by which you are creating the computer accounts under your Active Directory domain. In this last situation, you can re-use already existing domain accounts or generate them from scratch, choosing the right naming convention for your company.
For More Information: www.packtpub.com/citrix-xendesktop-5-6-cookbook/book
Chapter 6
173
Be sure to create the computer and the user accounts within an OU included in the Citrix Policies application, as discussed earlier in this book.
An important component contained by the catalog is the desktop group; this object allows you to allocate all or some of the available machines in the catalog to the domain users. You can create more than one desktop group; the only required parameter that you should have available is machine instances to populate the group.
In the next chapter, we'll discuss about another kind of resource group, called application desktop group.
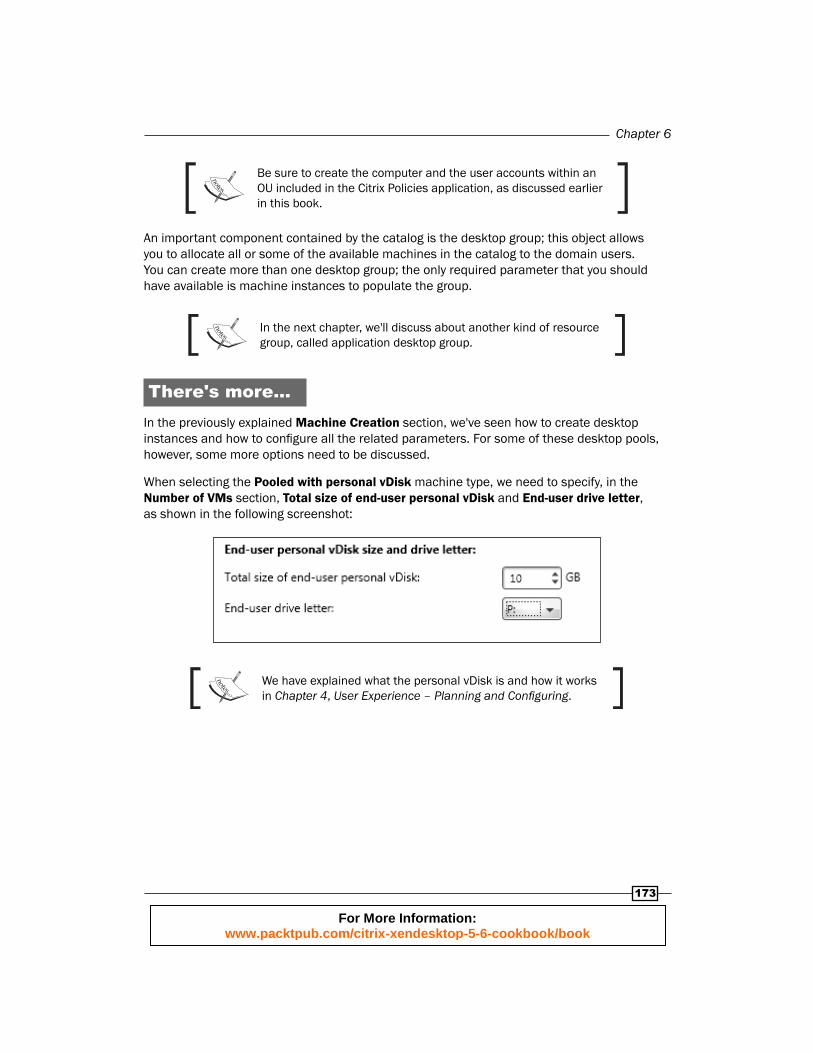
There's more...In the previously explained Machine Creation section, we've seen how to create desktop instances and how to confi gure all the related parameters. For some of these desktop pools, however, some more options need to be discussed.
When selecting the Pooled with personal vDisk machine type, we need to specify, in the Number of VMs section, Total size of end-user personal vDisk and End-user drive letter, as shown in the following screenshot:
We have explained what the personal vDisk is and how it works in Chapter 4, User Experience – Planning and Confi guring.
For More Information: www.packtpub.com/citrix-xendesktop-5-6-cookbook/book
Creating and Confi guring a Desktop Environment
174
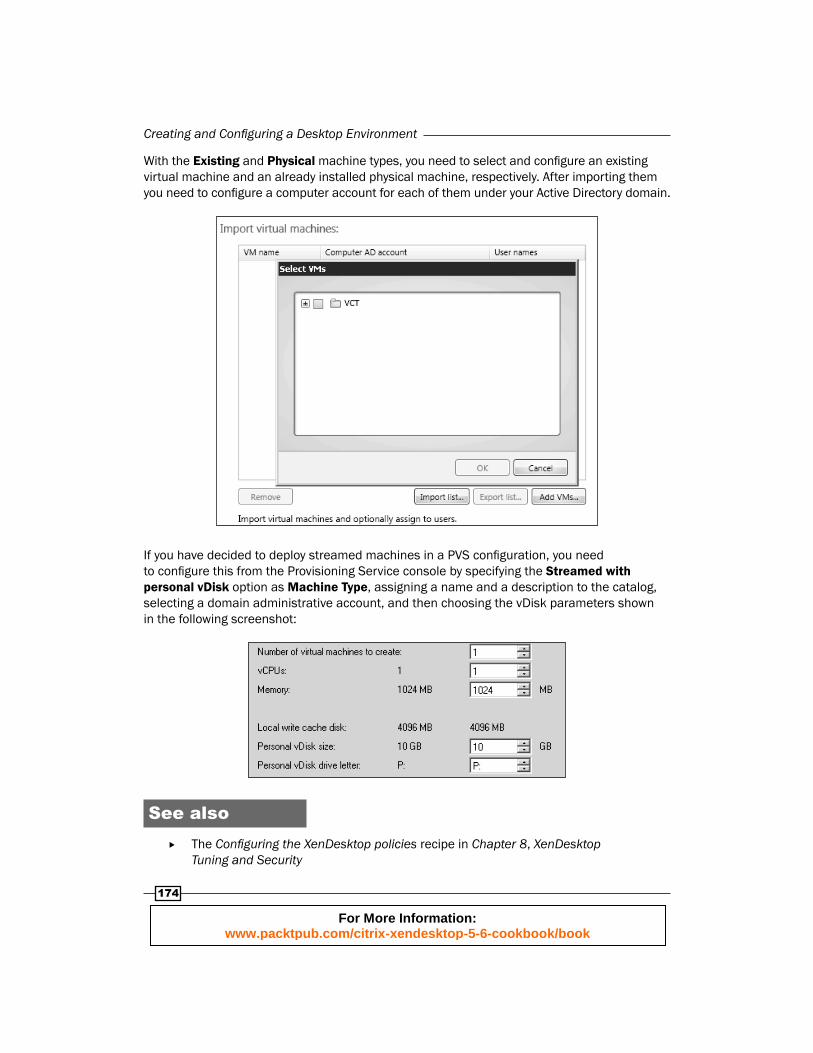
With the Existing and Physical machine types, you need to select and confi gure an existing virtual machine and an already installed physical machine, respectively. After importing them you need to confi gure a computer account for each of them under your Active Directory domain.
If you have decided to deploy streamed machines in a PVS confi guration, you need to confi gure this from the Provisioning Service console by specifying the Streamed with personal vDisk option as Machine Type, assigning a name and a description to the catalog, selecting a domain administrative account, and then choosing the vDisk parameters shown in the following screenshot:
See also The Confi guring the XenDesktop policies recipe in Chapter 8, XenDesktop
Tuning and Security
For More Information: www.packtpub.com/citrix-xendesktop-5-6-cookbook/book
Chapter 6
175
Modifying an existing machine catalogNow that we've deployed and confi gured the machine catalog, we will be able to use and work on the Citrix Desktop Infrastructure. In some cases it could be necessary to modify the confi gurations, for instance, when it's necessary to add a new desktop to the catalog because of a new colleague in the company. In this recipe we will explain how to modify the machines, their assignments, and the confi gured catalogs.
Getting readyAll the operations performed in this recipe are on the already existing objects; so, all you need is to have administrative credentials at two different levels. You have to be the administrator of the involved virtual machine's templates and administrator of your XenDesktop architecture to be able to modify the director confi gurations.
How to do it...Let's start by updating the existing virtual desktop machines. Perform the following steps to do so:
1. Log in to the Windows desktop template, apply all the system and confi guration changes you need, and then log off.
2. Connect to your hypervisor machine(s) or management console with administrative credentials on the specifi c machine, and generate a new snapshot for the virtual machine disk, in order to register the applied modifi cations.
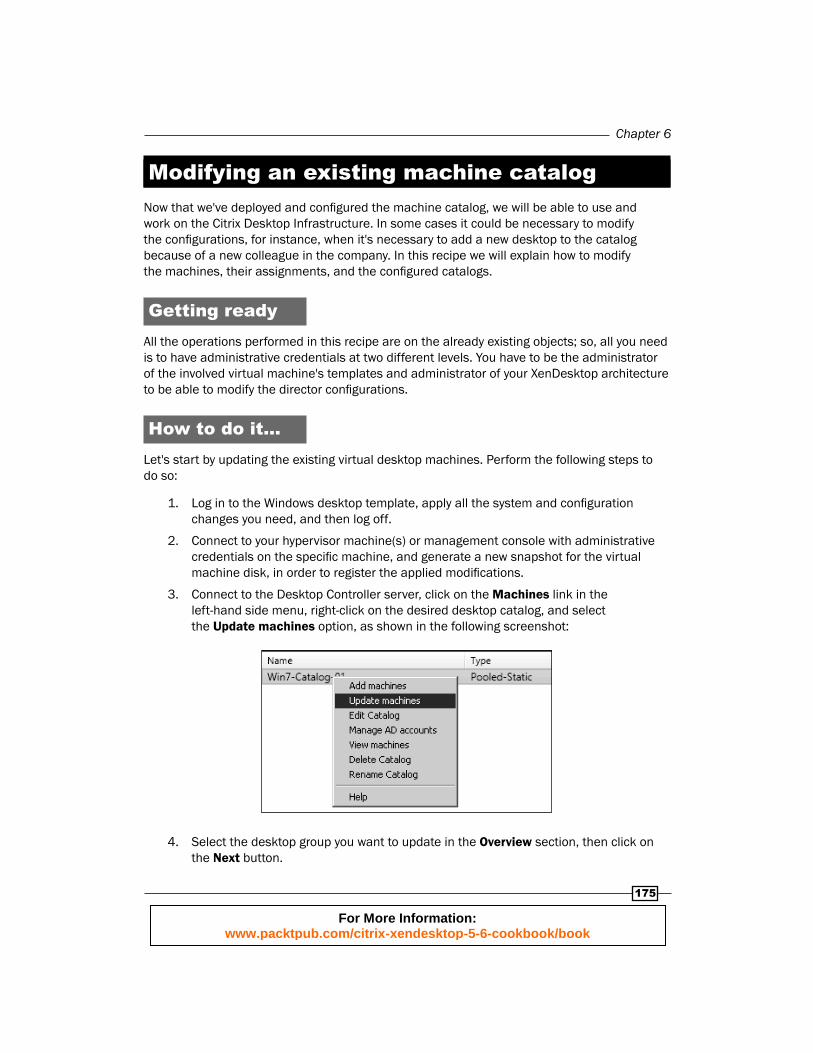
3. Connect to the Desktop Controller server, click on the Machines link in the left-hand side menu, right-click on the desired desktop catalog, and select the Update machines option, as shown in the following screenshot:
4. Select the desktop group you want to update in the Overview section, then click on the Next button.
For More Information: www.packtpub.com/citrix-xendesktop-5-6-cookbook/book

Creating and Confi guring a Desktop Environment
176
5. Select the most recently created virtual machine's snapshot as your master image, then click on Next as shown in the following screenshot:
6. In the Strategy section select an option from the Rollout strategy drop-down menu (None, Send message, Restart immediately, or Send message then restart after delay). After selecting it click on the Next button.
7. After reviewing the information in the Summary section, click on Finish to complete the machine's update.
8. Click on the Desktop Studio link in the left-hand side menu, and in the main panel select the Actions tab; here you can verify the status of the updating task.
9. After all the operations have been completed, connect to a desktop instance through the Web Interface, and verify if all the updates are available.
For More Information: www.packtpub.com/citrix-xendesktop-5-6-cookbook/book
Chapter 6
177
Now we will explain how to modify the machine assignment. Perform the following steps:
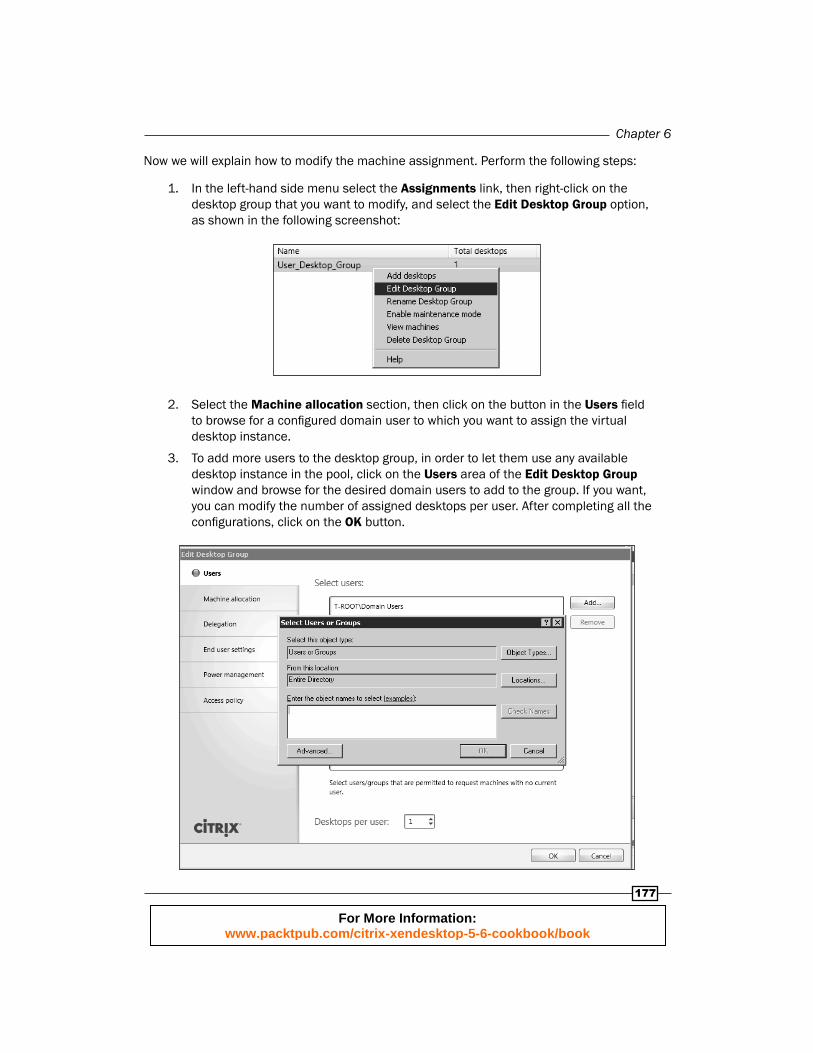
1. In the left-hand side menu select the Assignments link, then right-click on the desktop group that you want to modify, and select the Edit Desktop Group option, as shown in the following screenshot:
2. Select the Machine allocation section, then click on the button in the Users fi eld to browse for a confi gured domain user to which you want to assign the virtual desktop instance.
3. To add more users to the desktop group, in order to let them use any available desktop instance in the pool, click on the Users area of the Edit Desktop Group window and browse for the desired domain users to add to the group. If you want, you can modify the number of assigned desktops per user. After completing all the confi gurations, click on the OK button.
For More Information: www.packtpub.com/citrix-xendesktop-5-6-cookbook/book
Creating and Confi guring a Desktop Environment
178
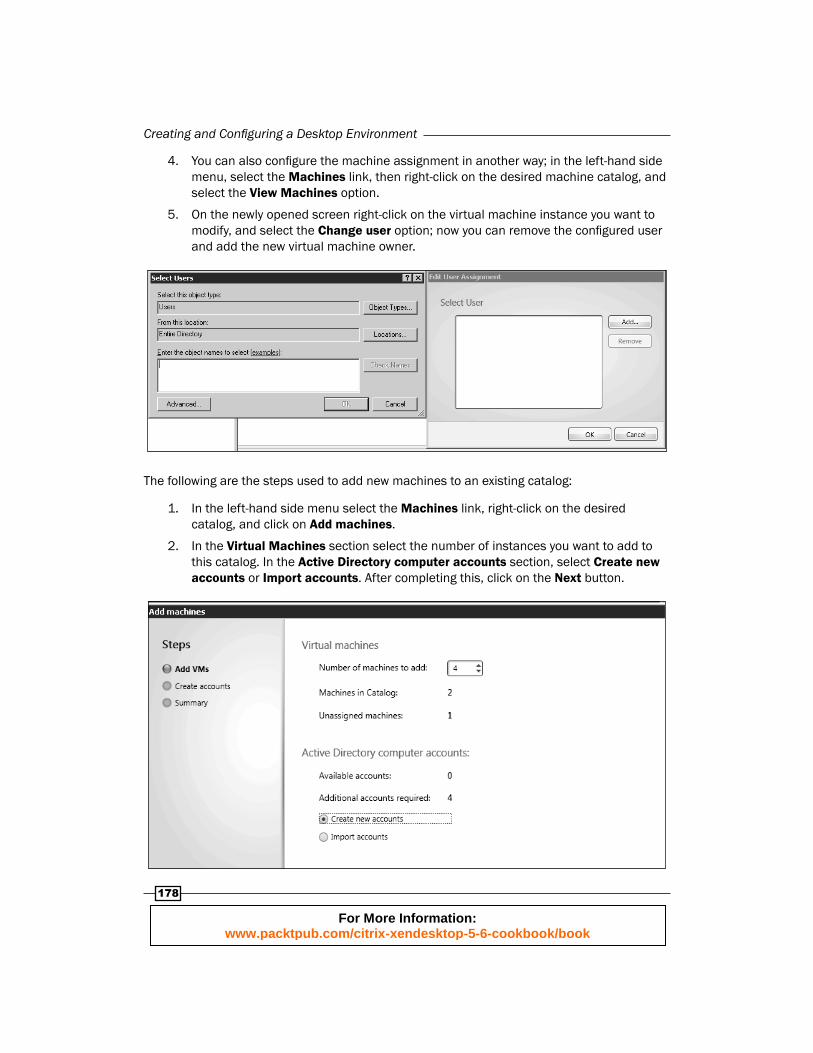
4. You can also confi gure the machine assignment in another way; in the left-hand side menu, select the Machines link, then right-click on the desired machine catalog, and select the View Machines option.
5. On the newly opened screen right-click on the virtual machine instance you want to modify, and select the Change user option; now you can remove the confi gured user and add the new virtual machine owner.
The following are the steps used to add new machines to an existing catalog:
1. In the left-hand side menu select the Machines link, right-click on the desired catalog, and click on Add machines.
2. In the Virtual Machines section select the number of instances you want to add to this catalog. In the Active Directory computer accounts section, select Create new accounts or Import accounts. After completing this, click on the Next button.
For More Information: www.packtpub.com/citrix-xendesktop-5-6-cookbook/book
Chapter 6
179
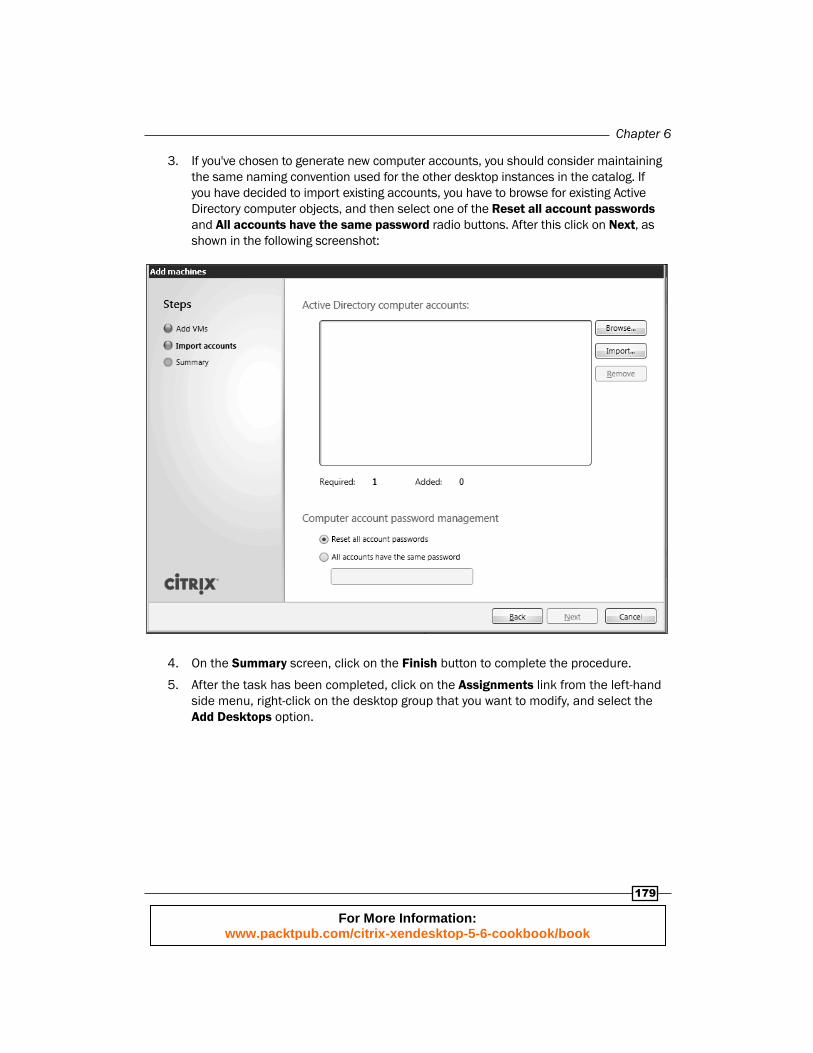
3. If you've chosen to generate new computer accounts, you should consider maintaining the same naming convention used for the other desktop instances in the catalog. If you have decided to import existing accounts, you have to browse for existing Active Directory computer objects, and then select one of the Reset all account passwords and All accounts have the same password radio buttons. After this click on Next, as shown in the following screenshot:
4. On the Summary screen, click on the Finish button to complete the procedure.
5. After the task has been completed, click on the Assignments link from the left-hand side menu, right-click on the desktop group that you want to modify, and select the Add Desktops option.
For More Information: www.packtpub.com/citrix-xendesktop-5-6-cookbook/book

Creating and Confi guring a Desktop Environment
180
6. Highlight the catalog and insert the number of machines you want to add. This number must be equal to or less than the number of machines listed in the Available column. After this click on Next.
7. If all the information on the Summary screen appears to be correct, click on Finish to complete.
Now we will see how to remove assigned machines from an existing catalog. Perform the following steps:
1. Click on the Machines link in the left-hand side menu, right-click on the desired catalog, and select the View machines option.
2. In the machine list, select the machine that you want to remove from the desktop group in the catalog, right-click on it, and select Enable maintenance mode. Click on the Yes button to confi rm the operation.
3. After the operation has been completed (you can verify it by checking the presence of the Enabled value in the Maintenance Mode column), right-click again on the desktop instance, and select the Remove from Desktop Group option. Click on Yes to confi rm the operation.
4. After completing this, you will fi nd no more information about desktop group assignment for the desktop machine. To completely remove the desktop right-click on it and select the Delete option.
For More Information: www.packtpub.com/citrix-xendesktop-5-6-cookbook/book
Chapter 6
181
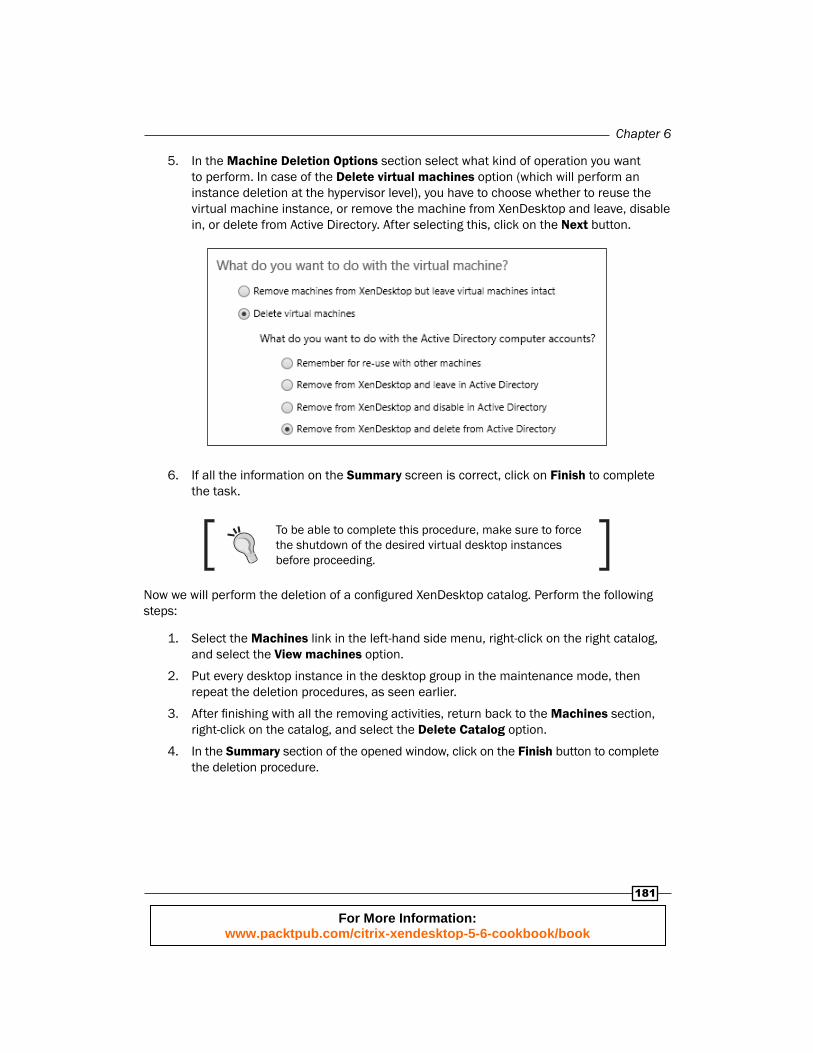
5. In the Machine Deletion Options section select what kind of operation you want to perform. In case of the Delete virtual machines option (which will perform an instance deletion at the hypervisor level), you have to choose whether to reuse the virtual machine instance, or remove the machine from XenDesktop and leave, disable in, or delete from Active Directory. After selecting this, click on the Next button.
6. If all the information on the Summary screen is correct, click on Finish to complete the task.
To be able to complete this procedure, make sure to force the shutdown of the desired virtual desktop instances before proceeding.
Now we will perform the deletion of a confi gured XenDesktop catalog. Perform the following steps:
1. Select the Machines link in the left-hand side menu, right-click on the right catalog, and select the View machines option.
2. Put every desktop instance in the desktop group in the maintenance mode, then repeat the deletion procedures, as seen earlier.
3. After fi nishing with all the removing activities, return back to the Machines section, right-click on the catalog, and select the Delete Catalog option.
4. In the Summary section of the opened window, click on the Finish button to complete the deletion procedure.
For More Information: www.packtpub.com/citrix-xendesktop-5-6-cookbook/book

Creating and Confi guring a Desktop Environment
182
How it works...The XenDesktop machine catalog is a modifi able entity, which allows you to update or roll back the previously implemented confi gurations.
In the presence of the MCS architecture, the machines update is, maybe, the most used and important modifi cation task; this procedure is usually executed when modifi cation occurs to the desktop base image template; for instance, software changes that must be applied to all the created desktop instances. This procedure is made up of four main steps; after all the required updates to the machine template have been completed, you have to regenerate a virtual machine snapshot under your hypervisor platform, then update the desktop instances content through the Desktop Studio console starting from this last created snapshot. An important option is the Rollout strategy; with this option, you can choose the correct way to interact with the users in order to complete the regeneration step; so, before restarting the desktop instances that are necessary to effectively apply the changes, you have to decide whether to send a message to the connected users about the required restart, that is, restarting the desktops immediately, or alerting the users and then restarting after a confi gured delay time.
In order to avoid problems when stopping the desktops during the working hours, it should be better to update the machines during the off-peak working hours, and restart the desktops immediately.
You can also add or remove machines from the catalog; these are quite simple operations, which contain all the powerful maintenance tasks of a VDI architecture. In fact, you can add instances simply by selecting the number of desired desktops; the bigger part of this activity has already been performed during the creation and the confi guration of the desktop base image template. In the same way, you can remove single desktop instances from the catalog by right-clicking on a particular instance and selecting the appropriate deletion option; in this case, you can choose whether to completely delete a computer account (from both the XenDesktop architecture and Active Directory), or simply to remove its assignment and preserve the desktop instance to be re-used by another user.
There's more...In case your users face problems after updating the desktop image, Desktop Studio allows you to roll back to a previous consistent machine state.
In the Machines section that we have already used in this chapter, by right-clicking on the desired catalog name, you will have the possibility to use the Rollback machine update command. This will let you choose from previously created restore checkpoints, which are equivalent to every machine's update performed previously.
For More Information: www.packtpub.com/citrix-xendesktop-5-6-cookbook/book
Chapter 6
183
Also, in this case, you need to select a Rollout strategy when stopping the desktop instances to complete the rollback activities; as previously described, you should plan a rollback strategy with a really low impact on the user operations during the working hours.
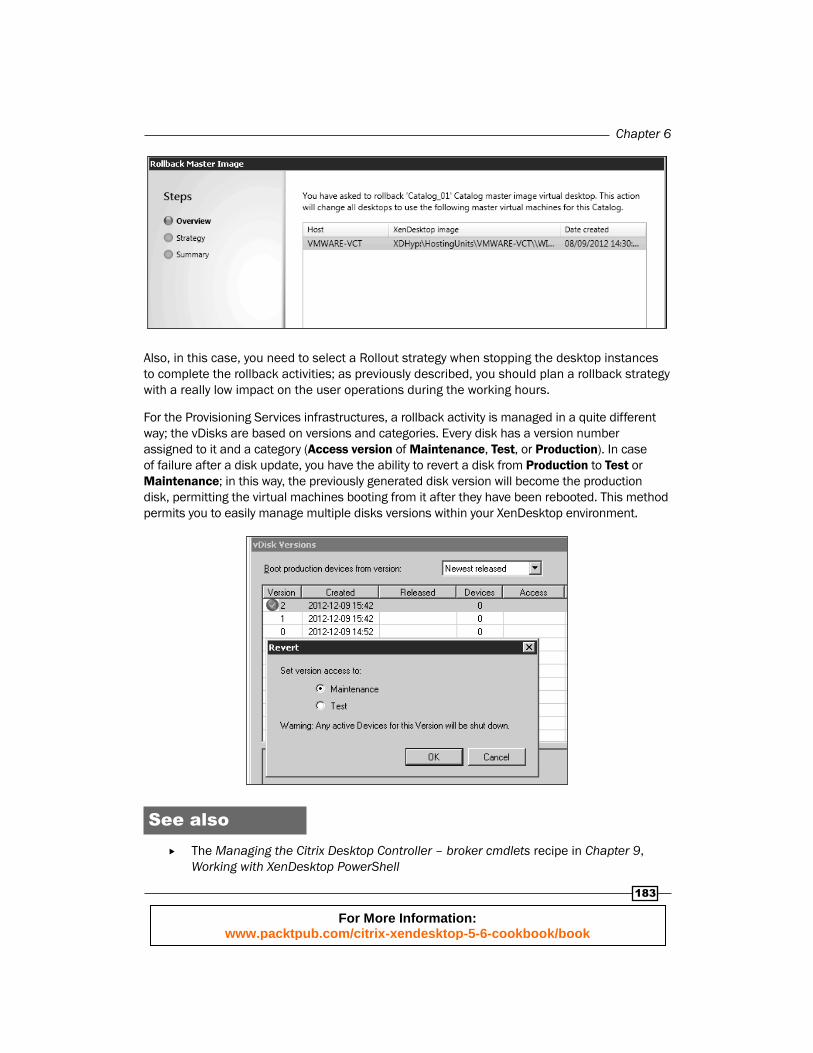
For the Provisioning Services infrastructures, a rollback activity is managed in a quite different way; the vDisks are based on versions and categories. Every disk has a version number assigned to it and a category (Access version of Maintenance, Test, or Production). In case of failure after a disk update, you have the ability to revert a disk from Production to Test or Maintenance; in this way, the previously generated disk version will become the production disk, permitting the virtual machines booting from it after they have been rebooted. This method permits you to easily manage multiple disks versions within your XenDesktop environment.
See also The Managing the Citrix Desktop Controller – broker cmdlets recipe in Chapter 9,
Working with XenDesktop PowerShell
For More Information: www.packtpub.com/citrix-xendesktop-5-6-cookbook/book

Creating and Confi guring a Desktop Environment
184
Using Citrix Desktop DirectorIn the presence of huge VDI architectures, it could be hard to fi nd standard and advanced information about the generated desktop instances, the confi gured users, and the relations that may occur between these two objects. The Citrix Desktop Director is a useful web console that helps system administrators to easily fi nd information about the status and the operation of the desktop infrastructure.
Getting readyTo use the Desktop Director, you need an already installed and confi gured Citrix XenDesktop architecture; because of its necessity to interface with your Active Directory domain, you need to confi gure and use a username that is able to read your AD structure.
In order to view the generated graphs under the Director console, it's necessary that you have installed Adobe Flash Player 10 or a later version.
How to do it...In this recipe we will explain the Citrix Desktop Director platform and how to use it. Perform the following steps:
1. Connect to the XenDesktop Controller machine, then click on Start | All Programs | Citrix | Desktop Director.
2. On the login screen type in a valid username and password, specifying the domain on which XenDesktop is operating, and click on the Log On button.
3. In the Machines section, select All as Category, then click on one of the available views (Servers, Catalogs, or Desktop Groups), as shown in the following screenshot:
4. In the Filters section, apply the required fi lters to list all the necessary machines by selecting from the list of available fi lters and conditions. If you want, you can save the generated query by clicking on the Save or Save as… button.
For More Information: www.packtpub.com/citrix-xendesktop-5-6-cookbook/book
Chapter 6
185
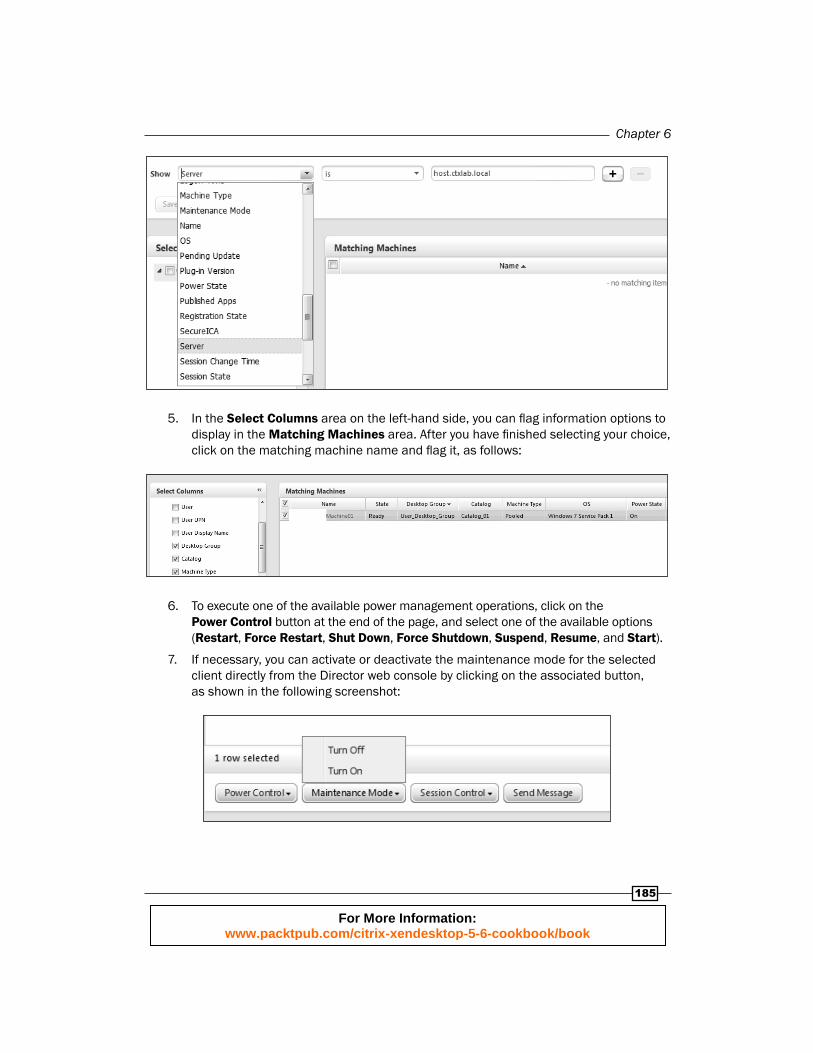
5. In the Select Columns area on the left-hand side, you can fl ag information options to display in the Matching Machines area. After you have fi nished selecting your choice, click on the matching machine name and fl ag it, as follows:
6. To execute one of the available power management operations, click on the Power Control button at the end of the page, and select one of the available options (Restart, Force Restart, Shut Down, Force Shutdown, Suspend, Resume, and Start).
7. If necessary, you can activate or deactivate the maintenance mode for the selected client directly from the Director web console by clicking on the associated button, as shown in the following screenshot:
For More Information: www.packtpub.com/citrix-xendesktop-5-6-cookbook/book
Creating and Confi guring a Desktop Environment
186
8. To force the logoff of an active session, click on the Session Control button and select whether to log off or disconnect the user.
9. Click on the Send Message button and populate all the required fi elds (the Subject and Message textboxes) to send a communication message to every logged on user. After this, click on the Send button to continue, or on the Cancel button to not send the message.
10. After you've operated on the command buttons in the web console, fl ag the desktop that you want to manage, then click on the hyperlink corresponding to its name.
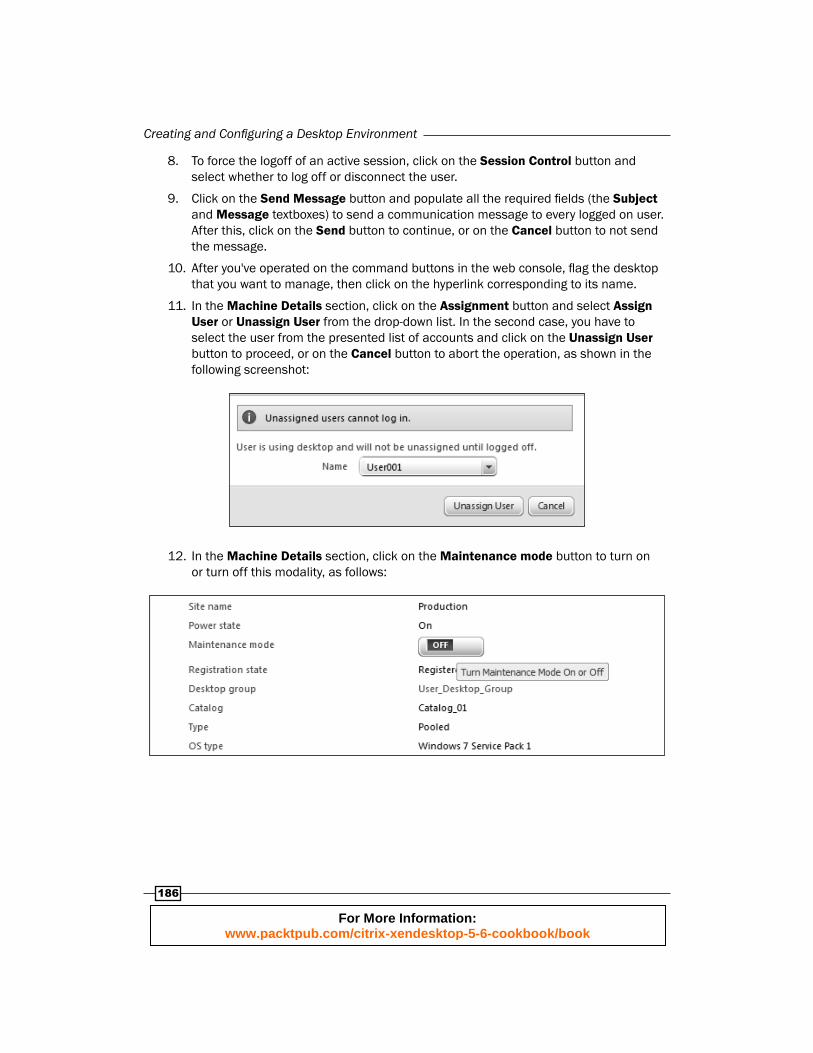
11. In the Machine Details section, click on the Assignment button and select Assign User or Unassign User from the drop-down list. In the second case, you have to select the user from the presented list of accounts and click on the Unassign User button to proceed, or on the Cancel button to abort the operation, as shown in the following screenshot:
12. In the Machine Details section, click on the Maintenance mode button to turn on or turn off this modality, as follows:
For More Information: www.packtpub.com/citrix-xendesktop-5-6-cookbook/book
Chapter 6
187
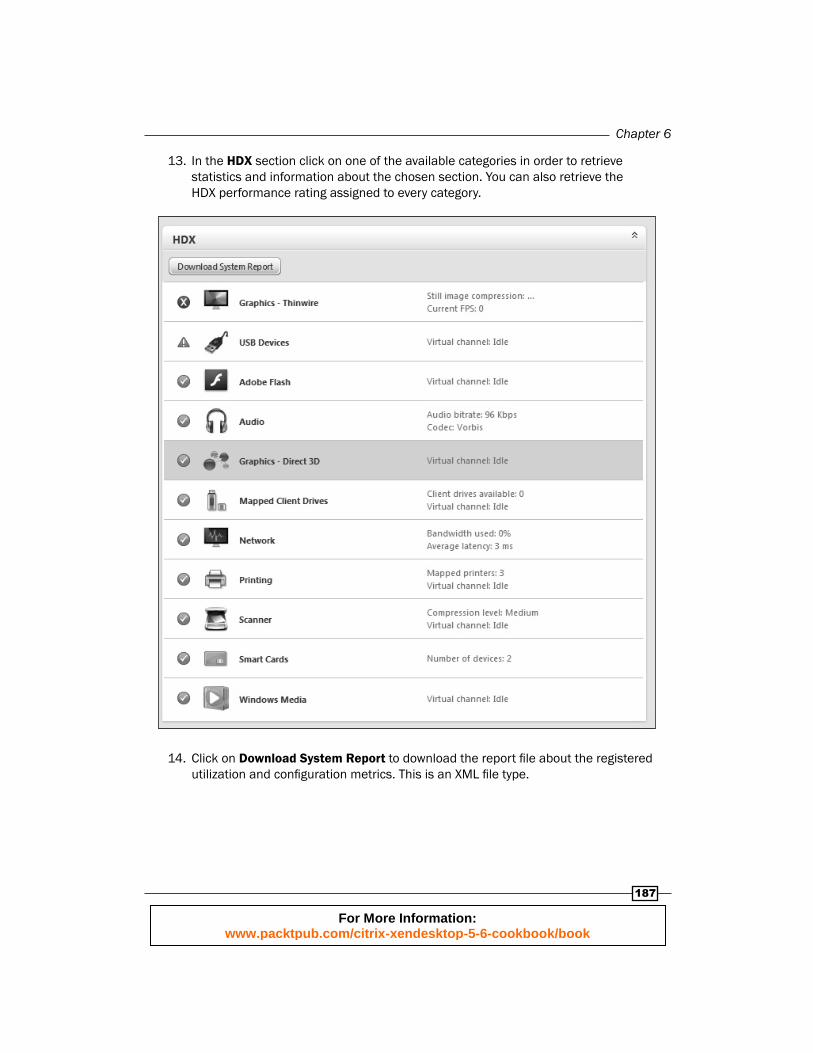
13. In the HDX section click on one of the available categories in order to retrieve statistics and information about the chosen section. You can also retrieve the HDX performance rating assigned to every category.
14. Click on Download System Report to download the report fi le about the registered utilization and confi guration metrics. This is an XML fi le type.
For More Information: www.packtpub.com/citrix-xendesktop-5-6-cookbook/book
Creating and Confi guring a Desktop Environment
188
How it works...The Citrix Desktop Director is a web application that allows system administrators to verify the status of the machines and to check the utilization statistics of the confi gured XenDesktop infrastructures. The Desktop Director also permits administrators operating on the power management and the user assignment for the confi gured desktop instances. The metrics can be retrieved from the remote desktops by the use of Windows Remote Management (WinRM) , the Microsoft version of the web services management technology. This can be activated either by the XenDesktop installation process or manually by the administrators.
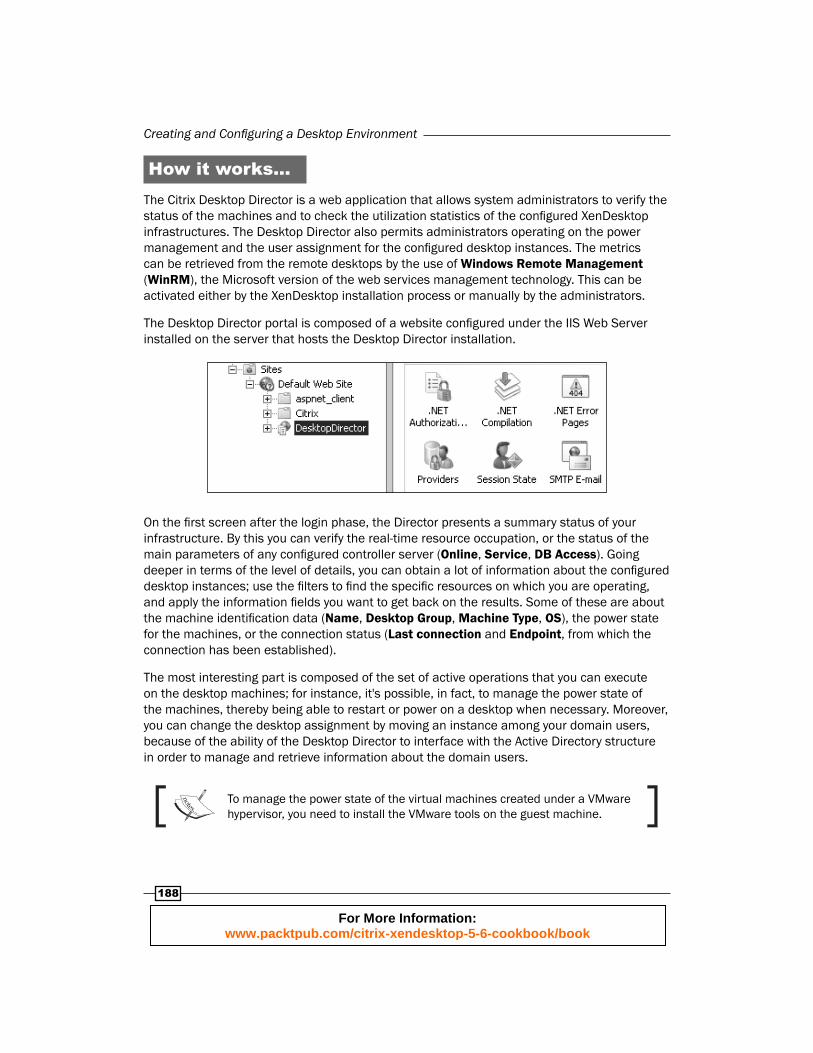
The Desktop Director portal is composed of a website confi gured under the IIS Web Server installed on the server that hosts the Desktop Director installation.
On the fi rst screen after the login phase, the Director presents a summary status of your infrastructure. By this you can verify the real-time resource occupation, or the status of the main parameters of any confi gured controller server (Online, Service, DB Access). Going deeper in terms of the level of details, you can obtain a lot of information about the confi gured desktop instances; use the fi lters to fi nd the specifi c resources on which you are operating, and apply the information fi elds you want to get back on the results. Some of these are about the machine identifi cation data (Name, Desktop Group, Machine Type, OS), the power state for the machines, or the connection status (Last connection and Endpoint, from which the connection has been established).
The most interesting part is composed of the set of active operations that you can execute on the desktop machines; for instance, it's possible, in fact, to manage the power state of the machines, thereby being able to restart or power on a desktop when necessary. Moreover, you can change the desktop assignment by moving an instance among your domain users, because of the ability of the Desktop Director to interface with the Active Directory structure in order to manage and retrieve information about the domain users.
To manage the power state of the virtual machines created under a VMware hypervisor, you need to install the VMware tools on the guest machine.
For More Information: www.packtpub.com/citrix-xendesktop-5-6-cookbook/book
Chapter 6
189
Reset Personal vDisk is a powerful task; in case of desktops confi gured with the personal vDisk technology, the Director will allow you to check the status of the assigned user disks, and if necessary, reset their confi guration to the fabric default.
All the collected metrics are exportable from the Desktop Director as a report, in the form of an XML fi le.
The Citrix Desktop Director is also able to retrieve information about the applications created and published from a XenApp farm.
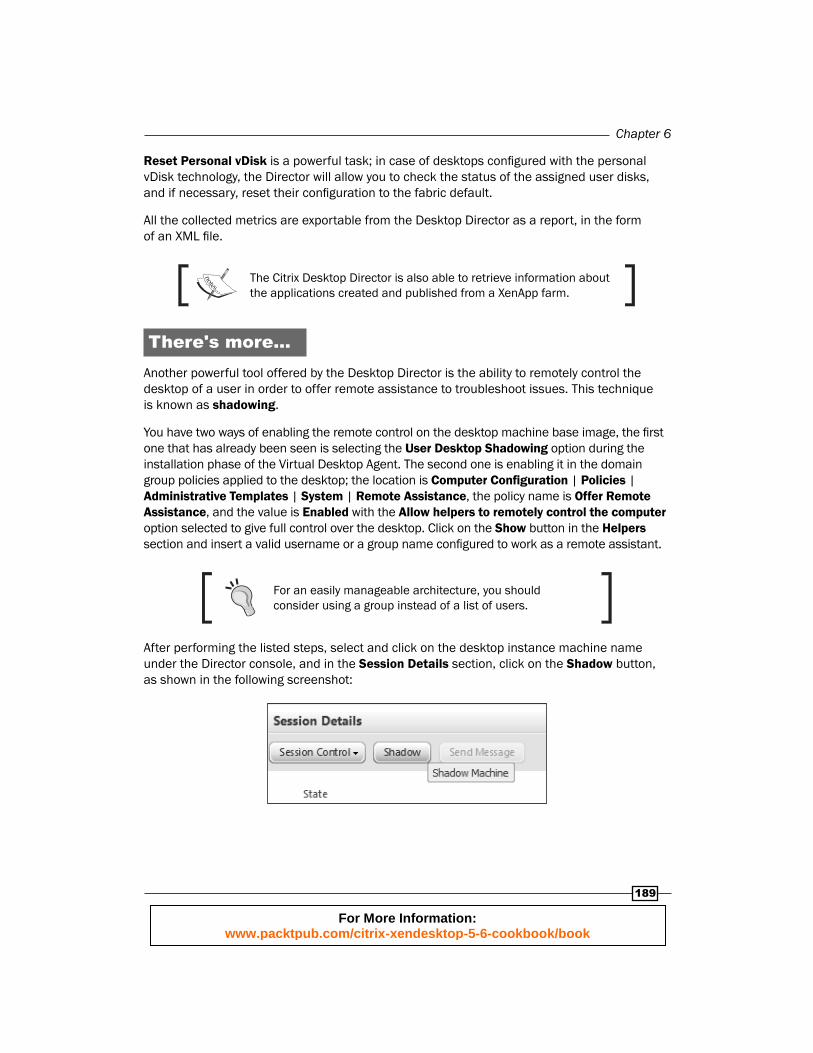
There's more...Another powerful tool offered by the Desktop Director is the ability to remotely control the desktop of a user in order to offer remote assistance to troubleshoot issues. This technique is known as shadowing .
You have two ways of enabling the remote control on the desktop machine base image, the fi rst one that has already been seen is selecting the User Desktop Shadowing option during the installation phase of the Virtual Desktop Agent. The second one is enabling it in the domain group policies applied to the desktop; the location is Computer Confi guration | Policies | Administrative Templates | System | Remote Assistance, the policy name is Offer Remote Assistance, and the value is Enabled with the Allow helpers to remotely control the computer option selected to give full control over the desktop. Click on the Show button in the Helpers section and insert a valid username or a group name confi gured to work as a remote assistant.
For an easily manageable architecture, you should consider using a group instead of a list of users.
After performing the listed steps, select and click on the desktop instance machine name under the Director console, and in the Session Details section, click on the Shadow button, as shown in the following screenshot:
For More Information: www.packtpub.com/citrix-xendesktop-5-6-cookbook/book

Creating and Confi guring a Desktop Environment
190
On the desktop instance accept the remote control request; from the newly opened windows you will be able to remotely manage the virtual desktop generated from XenDesktop.
Be sure to have considered all the security aspects of the Remote Management implementation!
See also The Confi guring advanced user experience – HDX 3D Pro recipe in Chapter 4, User
Experience – Planning and Confi guring
Confi guring printersTo give the users the feeling of working on a virtual system as near as possible to a standard physical workstation, you have to furnish all the peripherals available in a non-VDI architecture. One of these is given by the confi guration and use of printers. With the latest release of XenDesktop, Citrix has implemented a set of improvements to manage and choose the quality of the launched prints. In this recipe we're going to discuss about these kind of policies.
Getting readyDepending on your company requirements, you could have a lot of different network printers to confi gure within the virtual desktop environment. In this case, a prerequisite (and also a best practice) is confi guring a print server on which you want to install all the devices, and then deploying them through the use of Microsoft domain GPO.
In case of a single printer for the entire organization, you can install the required drivers for the printer using which the users will do their jobs on the desktop base image template; as you've already seen, by this way, you will propagate the printer mapping to all the desktop instances in the pool.
How to do it...In this recipe we will perform the confi guration of the printers within the XenDesktop environment. Perform the following steps to do so:
1. Connect to the Desktop Controller machine and run the Desktop Studio by clicking on Start | All Programs | Citrix | Desktop Studio.
For More Information: www.packtpub.com/citrix-xendesktop-5-6-cookbook/book

Chapter 6
191
2. In the left-hand side menu expand the HDX Policy link and select the Users category, as shown in the following screenshot:
3. Click on the New… button in the Users menu area, enter a name for the new policy, choosing it to match the printer policy confi guration, optionally write a description for the policy, and click on the Next button.
4. In the Categories list, select the Printing section and choose whether and how you are going to confi gure the following policies:
Client printer redirection
Default printer
Printer auto-creation event log preference
Session printers
Wait for printers to be created (desktop)
For More Information: www.packtpub.com/citrix-xendesktop-5-6-cookbook/book

Creating and Confi guring a Desktop Environment
192
5. In the Printing section select the Client Printers subsection and choose whether and how you are going to confi gure the following policies:
Auto-create client printers
Auto-create generic universal printer
Client printer names
Direct connections to print servers
Printer driver mapping and compatibility
Printer properties retention
Retained and restored client printers
The settings discussed for the Client Printers subsection are shown in the following screenshot:
6. In the Printing section select the Drivers subsection and choose whether and how you are going to confi gure the following policies:
Automatic installation of in-box printer drivers
Universal driver preference
Universal print driver usage
For More Information: www.packtpub.com/citrix-xendesktop-5-6-cookbook/book

Chapter 6
193
The settings discussed for the Drivers subsection are shown in the following screenshot:
7. In the Printing section select the Universal Printing subsection and choose whether and how you are going to confi gure the following policies:
Universal printing EMF processing mode
Universal printing image compression limit
Universal printing optimization defaults
Universal printing preview preference
Universal printing print quality limit
8. After completing the confi gurations click on the Next button.
9. For the moment, do not apply any kind of fi lter; so on the fi lters screen, click on the Next button to proceed.
10. After completing all the steps click on the Create button to generate the printer policy group.
Later in this book, we will discuss, in a deeper way, about the configuration of the most important machine and user XenDesktop policies.
For More Information: www.packtpub.com/citrix-xendesktop-5-6-cookbook/book
Creating and Confi guring a Desktop Environment
194
How it works...The printer confi guration process is a quite complex activity, which requires you to deeply understand and study the specifi c needs of the users in your company.
The following is an explanation about the main confi guration policies in the Printing section:
Client printer redirection: (Values are Allowed or Prohibited) Allowed by default, this policy permits you to redirect to a server the client printer mapping.
Default printer: (Values are Set default printer to the client's main printer or Do not adjust the user's default printer) With this policy you can confi gure the way by which you have chosen the default user printer. The fi rst option uses the current confi gured printer as a default device, the second instead loads the printer from the user profi le, based on the domain policies and the loaded printer driver. This technique is usually used for the proximity printing approach, the technique of publishing the closer network printer to a user.
Printer auto-creation event log preference: (Values are Log errors and warnings, Log errors only, or Do not log errors or warnings) This policy allows you to confi gure the level of logging for the printer autocreation activities. You can decide to log no errors and warnings, or errors, or both.
Session printers: This policy permits you to add the list of the network printers, which can be autocreated with XenDesktop. You have to specify the printer UNC path when adding the network resource.
Wait for printers to be created (desktop): (Values are Enabled or Disabled) With this parameter you can decide to wait or not wait for the printer creation process when connecting with your user profi le. You can't apply this policy to a published resource.
The following is an explanation about the confi guration policies in the subsections of the Printing section:
The following are the confi guration policies for the Client Printers subsection:
Auto-create client printers: (Values are Auto-create all client printers, Auto-create local (non-network) client printers only, Auto-create the client's default printer only, and Do not auto-create client printers) With this policy you can decide whether to autocreate all the listed categories by default, or one of them, including local attached printers. You can also configure to not automatically operate on the creation of the printers.
Auto-create generic universal printer: (Values are Enabled or Disabled) With this policy you can decide whether or not to use the Citrix Universal Printer object. As explained earlier, this could be a useful option when trying to avoid printer and drivers fragmentation, because of the use of a single generic printing driver.
For More Information: www.packtpub.com/citrix-xendesktop-5-6-cookbook/book

Chapter 6
195
Client printer names: (Values are Standard printer names or Legacy printer names) This policy permits you to choose the naming convention to use in phase of generic printer creation. You should always use the standard naming convention, and only use the other option when a compatibility with old Citrix versions is required.
Direct connections to print servers: (Values are Enabled or Disabled) With this configuration, you can permit the users to directly access the network printer in order to make printing faster. This is only available in case of LAN connections. In case of WAN printer mappings you have to use a nondirect connection.
Printer driver mapping and compatibility: With this policy you can import a set of printer drivers on which you are operating to define compatibility and substitutions for the client drivers. This means that you can define a rule to override customized settings, in order to standardize the printing architecture.
Printer properties retention: (Values are Held in profile only if not saved on the client, Retained in user profile only, Saved on the client device only, or Do not retain printer properties) This policy lets you decide whether and where you are saving the configured printer settings. You should consider saving these settings in the user profile, especially in the presence of a centralized profile manager and a nonpersistent desktop machine.
Retained and restored client printers: (Values are Allowed or Prohibited) In case of customized printer configurations, you can have the ability of maintaining these settings and restoring them in case of configuration problems.
The following are the confi guration policies for the Drivers subsection:
Automatic installation of in-box printer drivers: (Values—Enabled or Disabled) This policy permits or blocks the automatic installation of the drivers that are collected in the form of packages and deployed through the use of the Citrix Receiver plugin component called PnPUtil.
Universal driver preference: By the use of this policy you can choose the order of use of the Universal Printer drivers, such as PCL in its different versions, XPS or PS.
Universal print driver usage: (Values are Use only printer model specific drivers, Use universal printing only, Use universal printing only if requested driver is unavailable, or Use printer model specific drivers only if universal printing is unavailable) This policy manages the situations in which you are using the Universal Printer driver. By default, this driver is used only when a specific driver is not available.
For More Information: www.packtpub.com/citrix-xendesktop-5-6-cookbook/book

Creating and Confi guring a Desktop Environment
196
The following are the confi guration policies for the Universal Printing subsection:
Universal printing image compression limit: (Values are No compression – Best quality (lossless compression), High quality, Standard quality, or Reduced quality (maximum compression)) This is an important policy that allows you to configure the quality level of the printed images, deciding to give precedence to the quality level or to the compression level.
Universal printing print quality limit: (Values are No limit, Draft (150 DPI), Low Resolution (300 DPI), Medium Resolution (600 DPI), or High Resolution (1200 DPI)) The configuration of this policy permits you to force the users to print documents at the preconfigured resolution.
When possible, you should only use the generic Citrix Universal Printer driver instead of many different printer drivers, and avoid automatically installing the printer drivers on the desktop instances, in order to reduce the troubleshooting activities in case of issues. If you do not have client printers, consider using unifi ed printer drivers and try to consolidate the printer types in your company, if possible.
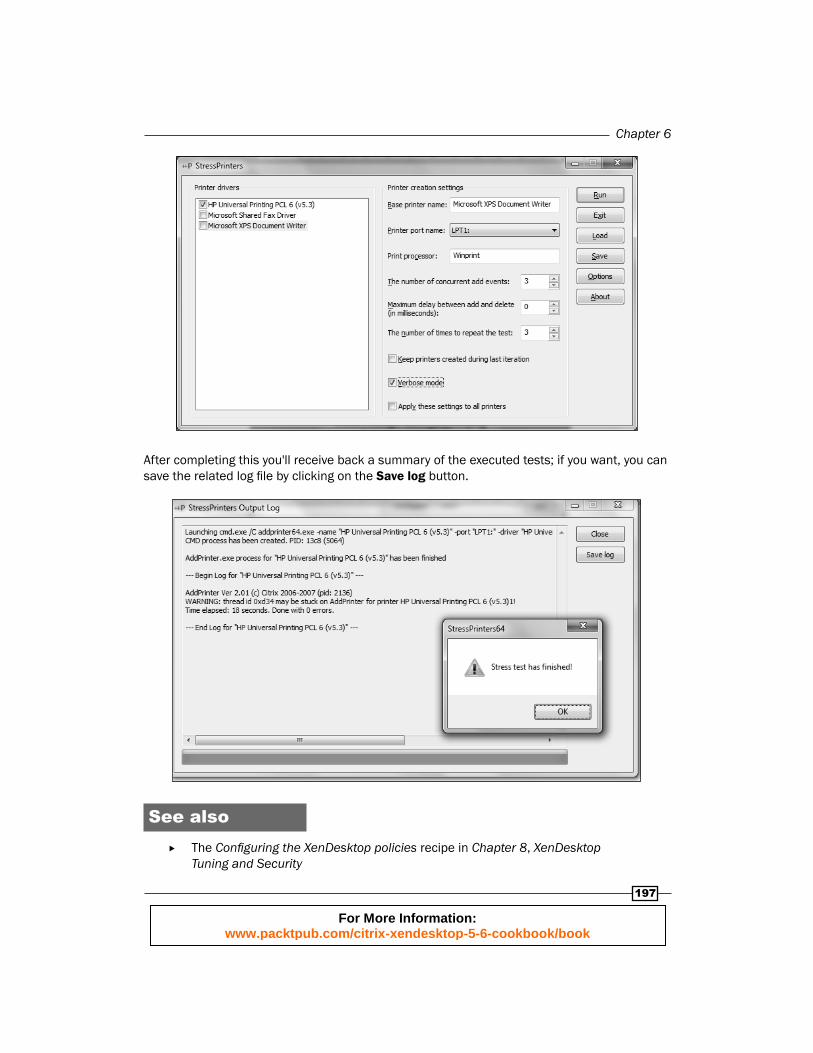
There's more...In the wide range of the Citrix free tools, you can fi nd the Citrix StressPrinters software , which allows you to simulate multiple sessions using a confi gured printer driver, in order to test the capability of using the driver and its response in terms of physical and virtual resources usage.
You can download the ZIP fi le archive from http://support.citrix.com/article/CTX109374.
Run the correct version for your infrastructure by double-clicking on the 32-bit or 64-bit executable fi le. The software will let you select the driver on which you want to perform the load tests. You have to specify the printer name and port (for instance, LPT1 for a local printer or the confi gured IP address for a network device), the number of concurrent events, and the number of times you will repeat the tests. If you want, you can run the test in verbose mode by checking the appropriate checkbox. By clicking on the Save button you can archive, in a text fi le, the confi gured tests to be loaded and run them again afterwards. To execute the tests you have to click on the Run button, as shown in the following screenshot:
For More Information: www.packtpub.com/citrix-xendesktop-5-6-cookbook/book
Chapter 6
197
After completing this you'll receive back a summary of the executed tests; if you want, you can save the related log fi le by clicking on the Save log button.
See also The Confi guring the XenDesktop policies recipe in Chapter 8, XenDesktop
Tuning and Security
For More Information: www.packtpub.com/citrix-xendesktop-5-6-cookbook/book
Creating and Confi guring a Desktop Environment
198
Confi guring USB devicesWhen making a decision about the migration from a physical to a virtual desktop infrastructure, the managers and the IT technicians should always consider maintaining a high operational level for their users, such as an elevated user experience, or the ability to use external devices. In this recipe we will discuss how to use and map the USB devices, also with an eye on the security aspects involved in this operation.
Getting readyYou need an administrative access to the Desktop Controller machine in order to confi gure the required policies. The presence of the Citrix Receiver on the desktop base image template is, of course, a mandatory prerequisite.
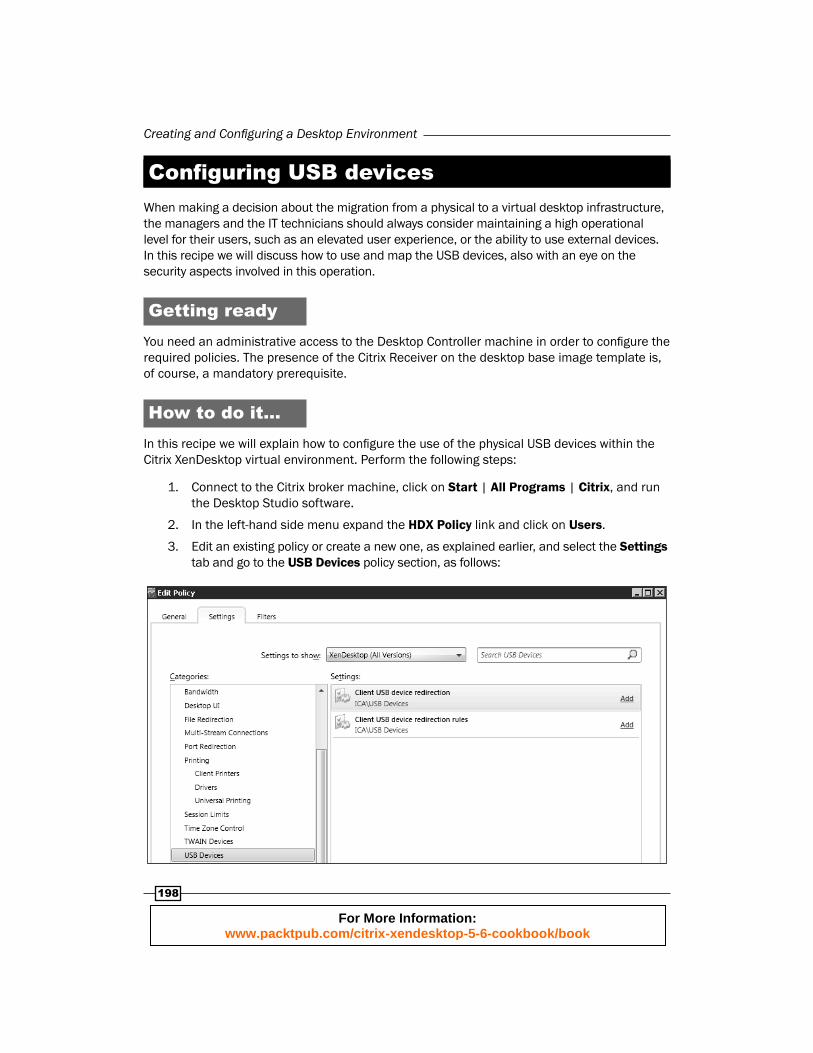
How to do it...In this recipe we will explain how to confi gure the use of the physical USB devices within the Citrix XenDesktop virtual environment. Perform the following steps:
1. Connect to the Citrix broker machine, click on Start | All Programs | Citrix, and run the Desktop Studio software.
2. In the left-hand side menu expand the HDX Policy link and click on Users.
3. Edit an existing policy or create a new one, as explained earlier, and select the Settings tab and go to the USB Devices policy section, as follows:
For More Information: www.packtpub.com/citrix-xendesktop-5-6-cookbook/book

Chapter 6
199
4. Edit the Client USB device redirection policy, by choosing to allow or prohibit the mappings of the USB devices. After selecting, click on the OK button.
5. Connect to one of the desktop instances, and in the Citrix Receiver menu bar, click on the Preferences tab, as shown in the following screenshot:
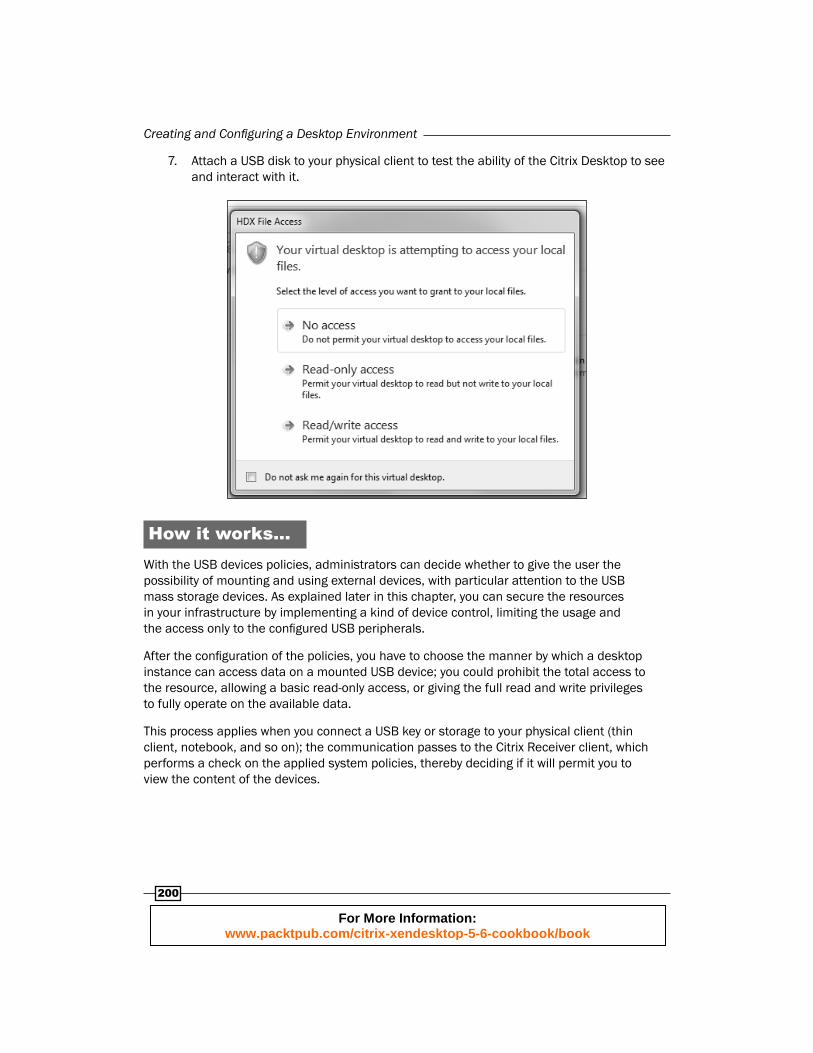
6. Select the File Access section, and decide which type of access to the USB device, you want to give the virtual desktop (No access, Read only, Read and write, or Ask me each time). After selecting this, click on the OK button, as shown in the following screenshot:
For More Information: www.packtpub.com/citrix-xendesktop-5-6-cookbook/book
Creating and Confi guring a Desktop Environment
200
7. Attach a USB disk to your physical client to test the ability of the Citrix Desktop to see and interact with it.
How it works...With the USB devices policies, administrators can decide whether to give the user the possibility of mounting and using external devices, with particular attention to the USB mass storage devices. As explained later in this chapter, you can secure the resources in your infrastructure by implementing a kind of device control, limiting the usage and the access only to the confi gured USB peripherals.
After the confi guration of the policies, you have to choose the manner by which a desktop instance can access data on a mounted USB device; you could prohibit the total access to the resource, allowing a basic read-only access, or giving the full read and write privileges to fully operate on the available data.
This process applies when you connect a USB key or storage to your physical client (thin client, notebook, and so on); the communication passes to the Citrix Receiver client, which performs a check on the applied system policies, thereby deciding if it will permit you to view the content of the devices.
For More Information: www.packtpub.com/citrix-xendesktop-5-6-cookbook/book
Chapter 6
201
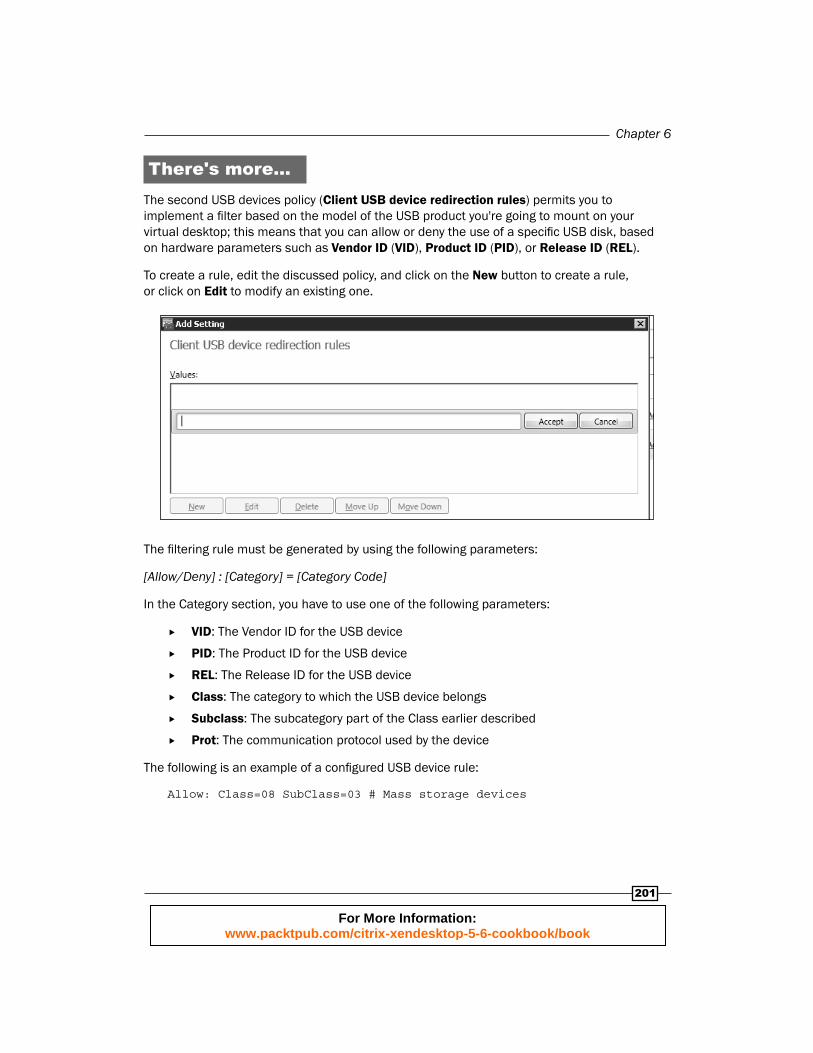
There's more...The second USB devices policy (Client USB device redirection rules) permits you to implement a fi lter based on the model of the USB product you're going to mount on your virtual desktop; this means that you can allow or deny the use of a specifi c USB disk, based on hardware parameters such as Vendor ID (VID), Product ID (PID), or Release ID (REL).
To create a rule, edit the discussed policy, and click on the New button to create a rule, or click on Edit to modify an existing one.
The fi ltering rule must be generated by using the following parameters:
[Allow/Deny] : [Category] = [Category Code]
In the Category section, you have to use one of the following parameters:
VID: The Vendor ID for the USB device
PID: The Product ID for the USB device
REL: The Release ID for the USB device
Class: The category to which the USB device belongs
Subclass: The subcategory part of the Class earlier described
Prot: The communication protocol used by the device
The following is an example of a confi gured USB device rule:
Allow: Class=08 SubClass=03 # Mass storage devices
For More Information: www.packtpub.com/citrix-xendesktop-5-6-cookbook/book

Creating and Confi guring a Desktop Environment
202
Please refer to the USB corporation (http://www.usb.org/home) to fi nd all the required information about the Vendor and Product IDs of the USB devices.
See also The Confi guring the XenDesktop policies recipe in Chapter 8, XenDesktop
Tuning and Security
Chapter 6 XenDesktop labIn this chapter we've seen how to create and confi gure the Desktop's catalog containing the resources to distribute among the end users, and how to implement specifi c confi gurations such as the ability to use printers and USB devices.
In this laboratory we're going to confi gure one of the available catalog types, confi guring a set of printers and USB devices policies. Perform the following steps to do so:
1. Connect to the domain controller server (vmctxdc01 – 192.168.1.50) and generate a group called MCSDesk-GRP, assigning to it the membership of four users. If you have no suffi cient user accounts, create them in a number useful to cover the required number.
2. Still connected with administrative credentials to your DC server, confi gure the domain GPO to permit the remote assistance on the machines that are part of the VDI domain OU.
3. Connect to your MCS desktop base image template with administrative credentials, and force the applications of the domain policies.
4. Connect to your hypervisor infrastructure, and after you've completed all the necessary modifi cations to the MCS desktop base image virtual machine, generate a snapshot disk for it.
5. Connect to the Desktop Controller machine (vmctxddc01 – 192.168.1.60) and run the confi guration wizard in order to create a desktop catalog with the parameters given next. Perform the following steps to do so:
i. Create a pooled machine type catalog with a static machine assignment technique.
ii. Set number of generated instances equal to 4—allocation of the resources that are same as that of the master image.
iii. Create new machine accounts in the form of MCSDesk<progressive-number>.
For More Information: www.packtpub.com/citrix-xendesktop-5-6-cookbook/book

Chapter 6
203
iv. Assign the generated machines to previously created MCSDesk-GRP.
v. Configure the peak and the off-peak hours based on your company's working hours with the parameters such as suspending the machine if disconnected for 15 minutes, of turning it off if logged off for 10 minutes.
vi. Enable the use of the Secure ICA protocol, and set color desktop resolution at the maximum level.
6. Connect to the Citrix Desktop Director web console, and try to change the assignment of a desktop for one of the confi gured users. After completing this step, check the metrics collection and export them to a report.
7. Using the Desktop Director web console, run a shadow session for one of the existing virtual desktop instances.
8. Connect to the Desktop Controller machine (vmctxddc01 – 192.168.1.60) and confi gure the following policies:
Permitting to the client only mappings of the Citrix Universal Printer driver.
Allowing users to map external USB devices, and asking them for confirmation of the type of access to the resources.
Connecting to the appropriate site, retrieving information about an available USB mass storage device in your company, and creating a filter rule to only use that hardware on your virtual desktops.
For More Information: www.packtpub.com/citrix-xendesktop-5-6-cookbook/book

Where to buy this book You can buy Citrix XenDesktop 5.6 Cookbook from the Packt Publishing website: http://www.packtpub.com/citrix-xendesktop-5-6-cookbook/book. Free shipping to the US, UK, Europe and selected Asian countries. For more information, please read our shipping policy.
Alternatively, you can buy the book from Amazon, BN.com, Computer Manuals and most internet book retailers.
www.PacktPub.com
For More Information: www.packtpub.com/citrix-xendesktop-5-6-cookbook/book