citrix receiver for ios 6 · citrix receiver for ios 6.1.5 works with ios 9.3. what's new in...
TRANSCRIPT
© 1999-2017 Citrix Systems, Inc. All rights reserved. p.1https://docs.citrix.com
About Receiver for iOS 6
System requirements
Configuring your environment
Configuring StoreFront
Configuring client certification authentication
Configuring Secure Gateway
Configuring Access Gateway Enterprise
Configuring Web Interface
Configuring accounts manually
Configuring mobile devices automatically
Providing RSA SecurID authentication for iOS devices
Providing access information to end users for iOS devices
Enabling Citrix X1 Mouse, external display, and presentation features
Blocking jailbroken devices
Saving passwords
Try the Demonstration Site
Troubleshooting
Citrix Receiver for iOS 6
Oct 01, 2015
© 1999-2017 Citrix Systems, Inc. All rights reserved. p.2https://docs.citrix.com
About Citrix Receiver for iOS 6
Apr 01, 2016
In this article
What's new
What's new in 6.1.5
What's new in 6.1
What's new in 6.0
Fixed issues
Issues fixed in 6.1.5
Issues fixed in 6.1.3
Issues fixed in 6.1.2
Issues fixed in 6.1.1
Issues fixed in 6.1
Issues fixed in 6.0.1
Known issues
Known issues in 6.1.1
Known issues in 6.1
Known issues running 6.0 and 6.0.1 on iOS 9
Other known issues in 6.0
What's new in 6.1.5
Net Promoter Score (NPS) enhancements
Enhancements to iOS Receiver NPS functionality have been included in this release. Citrix Receiver for iOS now prompts
users to rate their experience when downloading it from the Apple App Store. This provides Citrix with end user feedback to
drive continual product development.
Support for split view
This release of iOS Receiver introduces support for the new split view feature in iPad and iPad Pro devices. Using split view,
Citrix Receiver for iOS allows you to open two apps simultaneously and display them side-by-side. This feature helps
improve worker productivity by allowing you to use your iPad device as a standalone desktop replacement when used in
conjunction with XenApp or XenDesktop, especially when combined with other peripheral devices, such as a soft keyboard,
X1 mouse and the Apple Pencil.
© 1999-2017 Citrix Systems, Inc. All rights reserved. p.3https://docs.citrix.com
Additional improvements at this release
This release includes the following additional improvements and enhancements:
In-session support for SITHS smart card
Ability to enable the caffeine option (which prevents an iPad from entering sleep mode) before adding a store
added support for WebFront (for unauthenticated StoreFront)
NoteCitrix Receiver for iOS 6.1.5 works with iOS 9.3.
What's new in 6.1
Support for iOS 9.
Alert when an iOS device has been jailbroken and allow you to block jailbroken devices from running applications through
StoreFront or Web Interface. You can read more about this new feature here: Blocking jailbroken devices.
Citrix Receiver for iOS 6.1.1 and 6.1.2 include no additional new features beyond those included in 6.1.0, but do include fixes
for issues.
The Citrix Receiver for iOS 6.1.3 maintenance release provides a number of enhancements and fixes, including:
iPad Pro compatibility enhancements, with support for the iPad Pro's full on-screen keyboard.
iOS spotlight search for published app content; with this feature, you have the ability to search published apps and
desktops using the Spotlight search mechanism.
X1 Mouse speed control; use a setting in Citrix Receiver to customize the X1 mouse speed.
The Citrix Receiver for iOS 6.1.4 maintenance release addresses the following:Fixes an authentication issue with a NetScaler policy. [#616573]
Resolves an issue related to an unexpected crash when disconnecting from a session. [#616611]
NoteFor information related to fixes at release 6.1.0 (and beyond) refer to the Fixed Issues lists later in this article.
What's new in 6.0
This release includes support for the Framehawk Virtual Channel, a new ICA virtual channel that extends Citrix HDX
technologies to improve user experience on broadband wireless connections where packet loss and latency are common
issues. For more information, see New in XenApp 7.6 and XenDesktop 7.6. When using Framehawk functionality:
Common Gateway Protocol (CGP) must be enabled.
In the template ICA f ile, add "Framehawk=yes".
Despite enabling CGP to connect to Framehawk sessions, session reliability is not available.
© 1999-2017 Citrix Systems, Inc. All rights reserved. p.4https://docs.citrix.com
Receiver for iOS 6.0 now includes 64-bit support built with the iOS 8 SDK, included in Xcode 6 or later. Consider the
following when using this functionality: iOS devices containing Apple A7 and Apple A8 chips contain 64-bit chips, which
include:
iPhone 5S or newer
iPad Air or newer
iPad Mini 2 or newer
Issues fixed in 6.1.5
Fixed an issue where an app would fail to launch.
Numerous additional test cases used to verify integrity
Additional metrics captured to improve the user experience
Issues fixed in 6.1.4
Fixes an authentication issue with a NetScaler policy. [#616573]
Resolves an issue related to an unexpected crash when disconnecting from a session. [#616611]
Issues fixed in 6.1.3
Fixed an issue related to time zones.
Fixed a number of issues related to session crashes.
Issues fixed in 6.1.2
Fixed an issue where users could not log back into their accounts after manual log offs or if sessions reached idle
timeouts.
[#600659]
Improved the RSA token authentication workflow so that users are not prompted twice for their tokens.
[#597857]
Fixed a compatibility issue that prevented users from authenticating to their stores when using NetScaler 11.0 as a
gateway.
[#558212]
Resolved an issue related to iPad Pro screen resolution.
Issues fixed in 6.1.1
Fixed an issue where Citrix Receiver fails to log into an account through Netscaler Gateway when its common name in
the certif icate is its IP address.
[#594157]
Fixed an issue where Citrix Receiver continuously displays "Please wait..." after you add an account.
[#595978]
Fixed an issue where Citrix Receiver when logging level is set to Debug crashes after you tap "Request Help from
Support."
[#595980]
Fixed an issue where an application crashes after relaunching it.
[#596993]
Issues fixed in 6.1
© 1999-2017 Citrix Systems, Inc. All rights reserved. p.5https://docs.citrix.com
Fixed an issue where Citrix Receiver does not recognize some Smart card certif icates.
[#587428]
Fixed an issue concerning reconnecting or roam to a Linux VDA session.
[#558369]
General improvements for soft-tokens and client certif icates.
[#586361]
We fixed several issues related to use on iOS 9:
Keyboard extended dock is misplaced when using a Bluetooth keyboard.
[#579307]
New iOS9 undo and redo buttons are not fully functional.
[#579318]
Citrix X1 Mouse clicks do not focus on text f ields when using a Bluetooth keyboard. Instead, tap the text f ield.
[#579362]
Keyboard displays abnormally after turning on or off the Use Unicode Keyboard button in session.
[#579496]
The extended keys list and the Citrix Keyboard overlap in landscape mode.
[#580117]
The application switcher displays previews abnormally after rotating the device.
[#580980]
Session becomes unresponsive after using Siri voice input from the keyboard.
[#582046]
Issues fixed in 6.0.1
Fixes an issue where Receiver crashes launching a seamless app.
[#584383]
You can now access Citrix X1 Mouse settings without having to create an account.
[#587422]
Fixes an issue where an RSA SoftToken cannot be read by Receiver.
[#587423]
Fixes an issue where StoreFront accounts cannot be added through NetScaler when using webfront.
[#587426]
Fixes an issue where smart cards are not recognizing certif icates.
[#587428]
Known issues in 6.1.1
When a new password is set, an "Incorrect Credentials" error appears. Although the error message appears, the new
password is correctly set. The error message can be ignored. Use the new password at next logon process. [#70576123]
Known issues in 6.1
© 1999-2017 Citrix Systems, Inc. All rights reserved. p.6https://docs.citrix.com
Citrix Receiver can fail to launch a session with smart card through NetScaler Gateway after log off it.
[#586984]
You may see a connection- failure error after logging out of a session using a smart card.
[#577175]
Citrix Receiver fails to read a smart card when sending email encrypted by a smart card certif icate.
[#587869]
Citrix Receiver pops up error when adding a StoreFront account through NetScaler Gateway through manual setup.
[#590576]
Known issues running 6.0 and 6.0.1 on iOS 9
If you are running Citrix Receiver for iOS 6.0 or 6.0.1 on iOS 9, you may experience the following issues:
Keyboard extended dock is misplaced when using a Bluetooth keyboard.
[#579307]
New iOS9 undo and redo buttons are not fully functional.
[#579318]
Citrix X1 Mouse clicks do not focus on text f ields when using a Bluetooth keyboard. Instead, tap the text f ield.
[#579362]
Keyboard displays abnormally after turning on or off the Use Unicode Keyboard button in session.
[#579496]
The extended keys list and the Citrix Keyboard overlap in landscape mode.
[#580117]
The application switcher displays previews abnormally after rotating the device.
[#580980]
Session becomes unresponsive after using Siri voice input from the keyboard.
[#582046]
Other known issues in 6.0
When using a CMP app, setting Receiver to use a f ixed resolution results in an incorrect session resolution. To resolve this
issue, use auto-fit when configuring the screen resolution.
[#574443]
When using a smartcard for authentication, Receiver fails to gracefully log off of a session; after logging off , the
desktop appears active despite a successful logoff .
[#577175]
When setting the screen to a f ixed resolution, the mouse cursor may travel beyond the screen boundaries.
[#578081]
When using NetScaler passthrough with certain graphics policies applied, Receiver may disconnect a session when 1080p
video is played.
[#569392]
In some cases where the Framehawk virtual channel policy is applied, a session may exhibit poor performance when
executing certain keyboard sequences using the SHIFT key; this impacts the following characters: %, #, :, !, ?. To resolve
this issue Citrix recommends disconnecting, then reconnecting the session.
[#570236]
When using smartcard authentication, Receiver may fail to properly display the login screen requesting the user’s PIN
© 1999-2017 Citrix Systems, Inc. All rights reserved. p.7https://docs.citrix.com
after logging off . In addition, logging off then adding a favorite app fails; Receiver displays an error indicating that the
session could not be restarted because the user ‘Could not log on.’
[#555804, #556580]
Receiver may fail to reconnect to a Linux VDA session.
[#558369]
In a Chinese localized environment, Receiver may crash when inserting certain symbols (“{“ or “}”) in the app list search
area.
[#578322]

© 1999-2017 Citrix Systems, Inc. All rights reserved. p.8https://docs.citrix.com
Citrix Receiver for iOS 6 system requirements
Oct 16, 2015
In this article:
Device requirements
Server requirements
Connectivity and authentication
Smart cards
Device requirements
Citrix Receiver for iOS 6.1, 6.1.1 and 6.1.2 supports iOS 7, 8, and 9.
Citrix Receiver for iOS 6.0 and 6.0.1 support iOS 7, 8, and 9 (with issues).
This software update is supported on the following devices:
iPhone 4, 4S, 5, 5c, 5s, 6, 6 Plus, 6s, and 6s Plus.
All iPad models (including iPad Pro). Support for iPad Pro does not include:
Apple Pencil
Split-view
Native soft keyboard
5th generation iPod Touch.
External display support
iPhone - as supported by the device's iOS.
iPad - as supported by iOS (does not use the whole screen).
ImportantFor information regarding secure connections to your Citrix environment, please see Connectivity and authentication (below).
For information about issues running Citrix Receiver 6.0 and 6.0.1 on iOS 9, please see Support for iOS 9.
Server requirements
Make sure you install all the latest hotfixes for your servers.
For connections to virtual desktops and apps, Citrix Receiver supports Citrix StoreFront and Web Interface.
StoreFront:
StoreFront 3.0 (recommended)
Provides direct access to StoreFront stores. Receiver also supports prior versions of StoreFront.
Note: This release of Receiver for iOS incorporates the Framehawk virtual channel. This feature integrates with the
latest version of StoreFront 3.0. To leverage this new feature, Citrix recommends that you install the latest version of
StoreFront.
StoreFront configured with a Receiver for Web site
© 1999-2017 Citrix Systems, Inc. All rights reserved. p.9https://docs.citrix.com
Provides access to StoreFront stores from a Safari web browser. Users must manually open the ICA file using the
browser Open in Receiver function. For the limitations of this deployment, see the StoreFront documentation.
Web Interface:
Web Interface 5.4 with Web Interface sites
Web Interface 5.4 with XenApp Services sites
Web Interface on NetScaler (browser-based access only using Safari)
You must enable the rewrite policies provided by NetScaler.
XenDesktop and XenApp (any of the following products):
Citrix XenDesktop 4, 5, 5.5, 5.6, 7, 7.x, 7.5, and 7.6
Citrix XenApp 7.5 and 7.6
Citrix XenApp 6.5 for Windows Server 2008 R2
Citrix XenApp 6 for Windows Server 2008 R2
Citrix XenApp Fundamentals 6.0 for Windows Server 2008 R2
Citrix XenApp 5 for Windows Server 2008
Citrix XenApp 5 for Windows Server 2003
Citrix Presentation Server 4.5
VDI-in-a-Box 5.2.x and 5.3.x
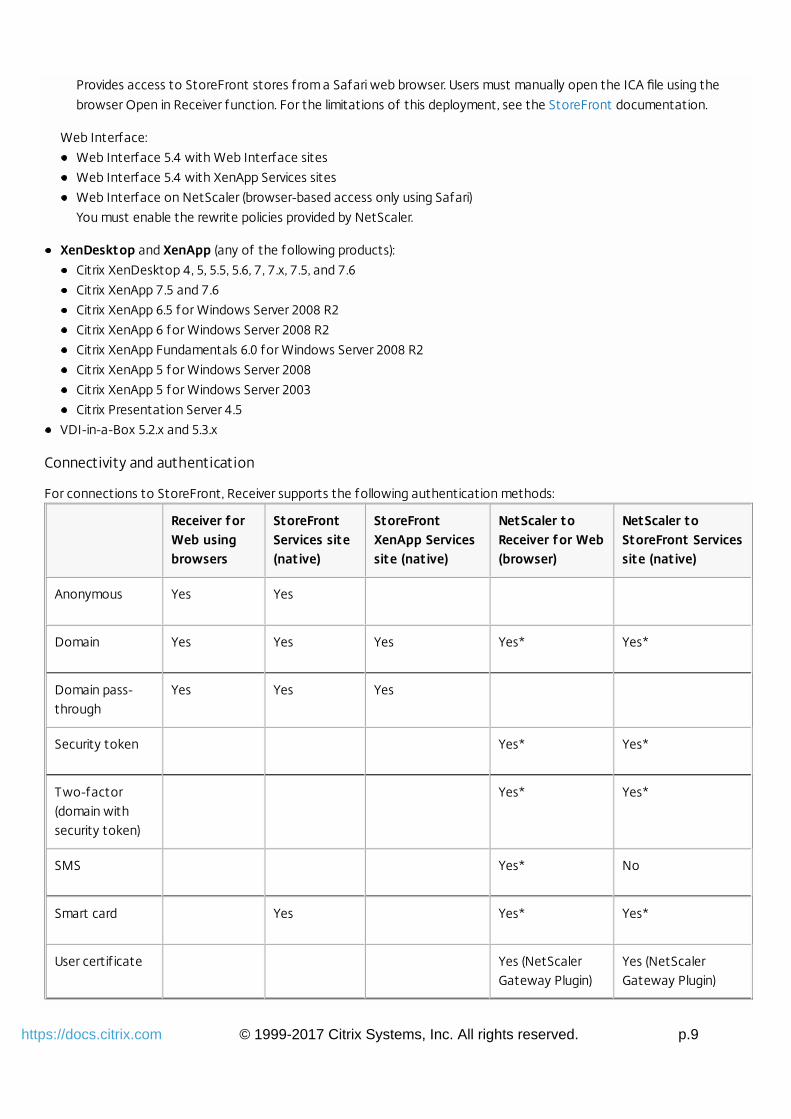
Connectivity and authentication
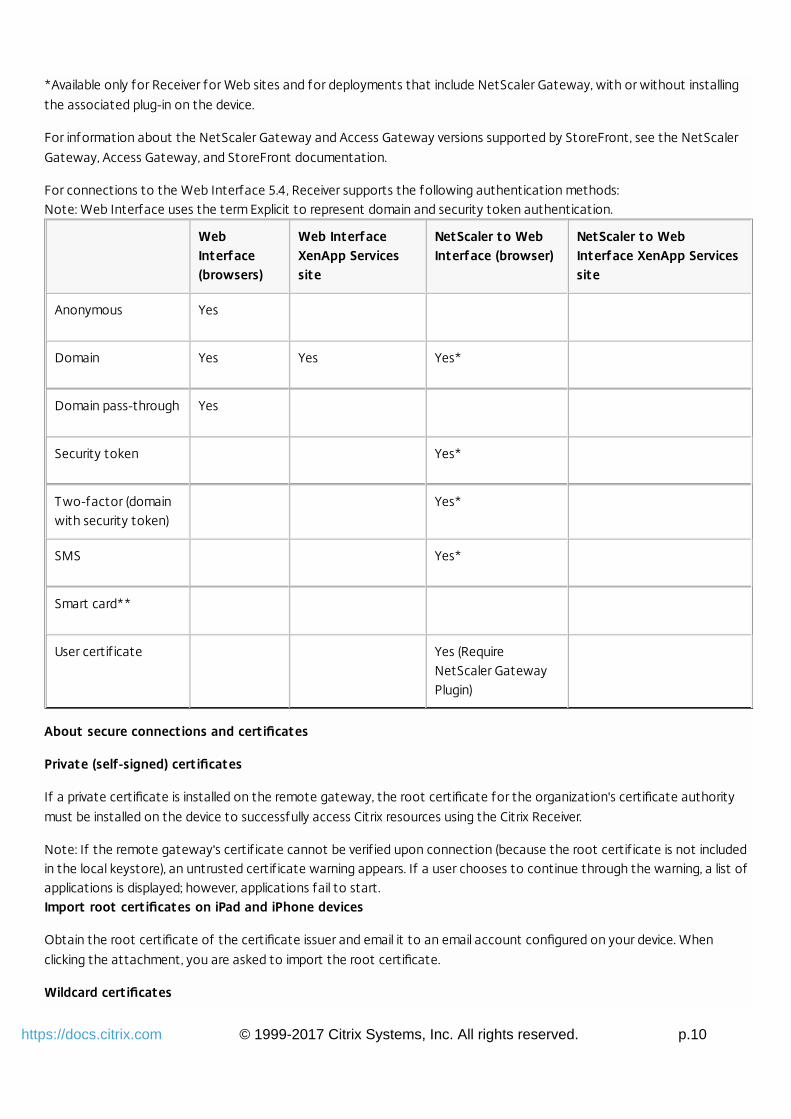
For connections to StoreFront, Receiver supports the following authentication methods:
Receiver forWeb usingbrowsers
StoreFrontServices site(native)
StoreFrontXenApp Servicessite (native)
NetScaler toReceiver for Web(browser)
NetScaler toStoreFront Servicessite (native)
Anonymous Yes Yes
Domain Yes Yes Yes Yes* Yes*
Domain pass-through
Yes Yes Yes
Security token Yes* Yes*
Two-factor(domain withsecurity token)
Yes* Yes*
SMS Yes* No
Smart card Yes Yes* Yes*
User certif icate Yes (NetScalerGateway Plugin)
Yes (NetScalerGateway Plugin)
© 1999-2017 Citrix Systems, Inc. All rights reserved. p.10https://docs.citrix.com
*Available only for Receiver for Web sites and for deployments that include NetScaler Gateway, with or without installing
the associated plug-in on the device.
For information about the NetScaler Gateway and Access Gateway versions supported by StoreFront, see the NetScaler
Gateway, Access Gateway, and StoreFront documentation.
For connections to the Web Interface 5.4, Receiver supports the following authentication methods:Note: Web Interface uses the term Explicit to represent domain and security token authentication.
WebInterface(browsers)
Web InterfaceXenApp Servicessite
NetScaler to WebInterface (browser)
NetScaler to WebInterface XenApp Servicessite
Anonymous Yes
Domain Yes Yes Yes*
Domain pass-through Yes
Security token Yes*
Two-factor (domainwith security token)
Yes*
SMS Yes*
Smart card**
User certif icate Yes (RequireNetScaler GatewayPlugin)
About secure connections and certificates
Private (self-signed) certificates
If a private certificate is installed on the remote gateway, the root certificate for the organization's certificate authority
must be installed on the device to successfully access Citrix resources using the Citrix Receiver.
Note: If the remote gateway's certif icate cannot be verif ied upon connection (because the root certif icate is not includedin the local keystore), an untrusted certif icate warning appears. If a user chooses to continue through the warning, a list ofapplications is displayed; however, applications fail to start.Import root certificates on iPad and iPhone devices
Obtain the root certificate of the certificate issuer and email it to an email account configured on your device. When
clicking the attachment, you are asked to import the root certificate.
Wildcard certificates
© 1999-2017 Citrix Systems, Inc. All rights reserved. p.11https://docs.citrix.com
Wildcard certificates are used in place of individual server certificates for any server within the same domain. Receiver for
iOS supports wildcard certificates.
Intermediate certificates and the NetScaler Gateway
If your certificate chain includes an intermediate certificate, the intermediate certificate must be appended to the
NetScaler Gateway (or Access Gateway) server certificate. For information about installing intermediate certificates in the
NetScaler Gateway or on the Access Gateway, see the documentation in eDocs. Additionally, for Access Gateway
installations, see the Knowledge Base article that matches your edition:
CTX114146: How to Install an Intermediate Certificate on Access Gateway Enterprise Edition
See also:
CTX124937: How to Configure Citrix Access Gateway Enterprise Edition for Use with Citrix Receiver for Mobile Devices
RSA SecurID authentication is supported for Secure Gateway configurations (through the Web Interface only) and all
supported Access Gateway configurations.
Receiver supports all authentication methods supported by Access Gateway. For information about authentication, see
the NetScaler Gateway (or Access Gateway) documentation and the "Manage" topics in the StoreFront documentation in
eDocs. For information about other authentication methods supported by Web Interface, see Configuring Authentication
for the Web Interface in the Web Interface documentation.
Smart cards
Citrix Receiver offers limited smart card support.
If you are using FIPS NetScaler devices, configure your systems to deny SSL renegotiations. For details, see How toconfigure the -denySSLReneg parameter.The following products and configurations are supported:
Supported readers:
Precise Biometrics Tactivo for iPad Mini Firmware version 3.8.0
Precise Biometrics Tactivo for iPad (4th generation) and Tactivo for iPad (3rd generation) and iPad 2 Firmware version
3.8.0
BaiMobile® 301MP and 301MP-L Smart Card Readers
Supported VDA Smart Card Middleware
ActiveIdentity
Supported smartcards:
PIV cards
Common Access Card (CAC)
Supported configurations:
Smartcard authentication to NetScaler Gateway with StoreFront 2.x and XenDesktop 5.6 and later or XenApp 6.5
and later.
© 1999-2017 Citrix Systems, Inc. All rights reserved. p.12https://docs.citrix.com
Configure your environment
Apr 13, 2015
Receiver supports the configuration of Web Interface for your XenApp deployment. There are two types of Web Interface
sites: XenApp Services (formerly Program Neighborhood Services) sites and XenApp Web sites. Web Interface sites enable
client devices to connect to the server farm. Authentication between Receiver and a Web Interface site can be handled
using a variety of solutions, including Citrix Access Gateway and Citrix Secure Gateway.
Additionally, you can configure StoreFront to provide authentication and resource delivery services for Receiver, enabling
you to create centralized enterprise stores to deliver desktops, applications, and other resources to users.
For more information about configuring connections, including videos, blogs, and a support forum, refer to
http://community.citrix.com.
Before your users access applications hosted in your XenApp or XenDesktop deployment, configure the followingcomponents in your deployment as described here.
When publishing applications on your farms or sites, consider the following options to enhance the experience for users
accessing those applications through StoreFront stores.
Ensure that you include meaningful descriptions for published applications because these descriptions are visible to
users in Citrix Receiver.
You can emphasize published applications for your mobile device users by listing the applications in the Featured list of
Citrix Receiver. To populate this list on Citrix Receiver, edit the properties of applications published on your servers and
append the KEYWORDS:Featured string to the value of the Application description f ield.
To enable the screen-to-fit mode that adjusts the application to the screen size of mobile devices, edit the properties
of applications published on your servers and append the KEYWORDS:mobile string to value of the Application
description f ield. This keyword also activates the auto-scroll feature for the application.
To automatically subscribe all users of a store to an application, append the KEYWORDS:Auto string to the
description you provide when you publish the application in XenApp. When users log on to the store, the application is
automatically provisioned without users needing to manually subscribe to the application.
For more information, see the StoreFront documentation.
If the Web Interface of your XenApp or XenDesktop deployment does not have a Web site or XenApp Services site,
create one. The name of the site and how you create it depends on the version of the Web Interface you have installed.
For instructions on how to create one of these sites, see the "Creating Sites" topic for your version of the Web
Interface.
© 1999-2017 Citrix Systems, Inc. All rights reserved. p.13https://docs.citrix.com
Configure StoreFront
Apr 13, 2015
To configure StoreFront
Important:When using StoreFront, Receiver supports Citrix Access Gateway Enterprise Edition versions from 9.3, and NetScaler
Gateway versions through 11.
Receiver for iOS supports only XenApp Services sites on Web Interface.
Receiver for iOS supports launching sessions from Receiver for Web, provided that the web browser will work with
Receiver for Web. If launches do not occur, please configure your account through Receiver for iOS directly. Users must
manually open the ICA f ile using the browser Open in Receiver function. For the limitations of this deployment, see the
StoreFront documentation.
With StoreFront, the stores you create consist of services that provide authentication and resource delivery infrastructure
for Citrix Receiver. Create stores that enumerate and aggregate desktops and applications from XenDesktop sites and
XenApp farms, making these resources available to users.
1. Install and configure StoreFront. For details, see StoreFront in the Technologies > StoreFront section of eDocs. For
administrators who need more control, Citrix provides a template you can use to create a download site for Receiver for
iOS.
2. Configure stores for StoreFront just as you would for other XenApp and XenDesktop applications. No special
configuration is needed for mobile devices. For details, see— User Access Options
in the StoreFront section of eDocs. For mobile devices, use either of these methods:
Provisioning f iles. You can provide users with provisioning f iles (.cr) containing connection details for their stores. After
installation, users open the f ile on the device to configure Citrix Receiver automatically. By default, Receiver for Web
sites offer users a provisioning f ile for the single store for which the site is configured. Alternatively, you can use the
Citrix StoreFront management console to generate provisioning f iles for single or multiple stores that you can
manually distribute to your users.
Manual configuration. You can directly inform users of the Access Gateway or store URLs needed to access their
desktops and applications. For connections through Access Gateway, users also need to know the product edition
and required authentication method. After installation, users enter these details into Citrix Receiver, which attempts
to verify the connection and, if successful, prompts users to log on.
Automatic configuration. Tap Add Account on the Welcome screen and enter the URL of the StoreFront server in
the address f ield. The configuration of the account happens automatically as the account is added.
To configure Access Gateway and NetScaler Gateway
If you have users who connect from outside the internal network (for example, users who connect from the Internet offrom remote locations), configure authentication through Access Gateway or NetScaler Gateway.
When using StoreFront, Receiver supports Citrix Access Gateway Enterprise Edition versions from 9.3, and NetScaler
Gateway versions through 11.
For details, see your version of Access Gateway or NetScaler Gateway in eDocs.
To configure Receiver to access apps
1. If you want to configure Receiver to automatically access apps when creating a new account, in the Address f ield, enter
© 1999-2017 Citrix Systems, Inc. All rights reserved. p.14https://docs.citrix.com
the matching URL of your store, such as storefront.organization.com.
2. Select the Use Smartcard option if you are using a smart card to authenticate.
3. For manual configuration (accessible by tapping Options>Manual Setup), continue by completing the remaining f ields
and select the Access Gateway (or NetScaler Gateway) authentication method, such as enabling the security token,
selecting the type of authentication, and saving the settings.
Note: Logons to the store are valid for about one hour. After that time, users must log on again to refresh or launch otherapplications.
© 1999-2017 Citrix Systems, Inc. All rights reserved. p.15https://docs.citrix.com
Configure client certificate authentication
Apr 13, 2015
Important:When using StoreFront, Receiver supports Citrix Access Gateway Enterprise Edition versions from 9.3, and NetScaler
Gateway versions through 11.
Client certif icate authentication is supported by Receiver for iOS starting with version 5.5.
Only Access Gateway Enterprise Edition 9.x and 10.x (and subsequent releases) support client certif icate authentication.
Double-source authentication types must be CERT and LDAP.
Receiver also supports optional client certif icate authentication.
Only P12 formatted certif icates are supported.
Users logging on to an Access Gateway (or NetScaler Gateway) virtual server can also be authenticated based on the
attributes of the client certificate that is presented to the virtual server. Client certificate authentication can also be used
with another authentication type, LDAP, to provide double-source authentication.
To authenticate users based on the client-side certificate attributes, client authentication should be enabled on the virtual
server and the client certificate should be requested. You must bind a root certificate to the virtual server on Access
Gateway.
When users log on to the Access Gateway virtual server, after authentication, the user name and domain information is
extracted from the specified field of the certificate. This information must be in the certificate's
SubjectAltName:OtherName:MicrosoftUniversalPrincipalName field. It is in the format "username@domain." If the user
name and domain are extracted successfully, and the user provides the other required information (for example, a
password), then the user is authenticated. If the user does not provide a valid certificate and credentials, or if the
username/domain extraction fails, authentication fails.
If a user provides the username and domain information (rather than the certificate providing them (essentially a more
secure paradigm), then remove the SubjectAltName:OtherName:MicrosoftUniversalPrincipalName field from the client
certificate.
You can authenticate users based on the client certificate by setting the default authentication type to use the client
certificate. You can also create a certificate action that defines what is to be done during the authentication based on a
client SSL certificate.
To configure the XenApp Services site
If you do not already have a XenApp Services site created, in the XenApp console or Web Interface console (depending on
the version of XenApp you have installed), create a XenApp Services site for mobile devices.
The Receiver for mobile devices uses a XenApp Services site (formerly Program Neighborhood Agent site) to get information
about the applications a user has rights to and presents them to the Receiver running on the device. This is similar to the
way you use the Web Interface for traditional SSL-based XenApp connections for which an Access Gateway can be
configured.
Configure the XenApp Services site for the Receiver for mobile devices to support connections from an Access Gateway
connection.
1. In the XenApp Services site, select Manage secure client access > Edit secure client access settings.
© 1999-2017 Citrix Systems, Inc. All rights reserved. p.16https://docs.citrix.com
2. Change the Access Method to Gateway Direct.
3. Enter the FQDN of the Access Gateway appliance.
4. Enter the Secure Ticket Authority (STA) information.
To configure the Access Gateway appliance
For client certificate authentication, configure the Access Gateway with two-factor authentication using two
authentication policies: Cert and LDAP. For details, refer to your version of the Access Gateway Enterprise Edition (9.x only)
or Access Gateway 10 in eDocs and search for the topic:— Configuring Client Certificate Authentication
.
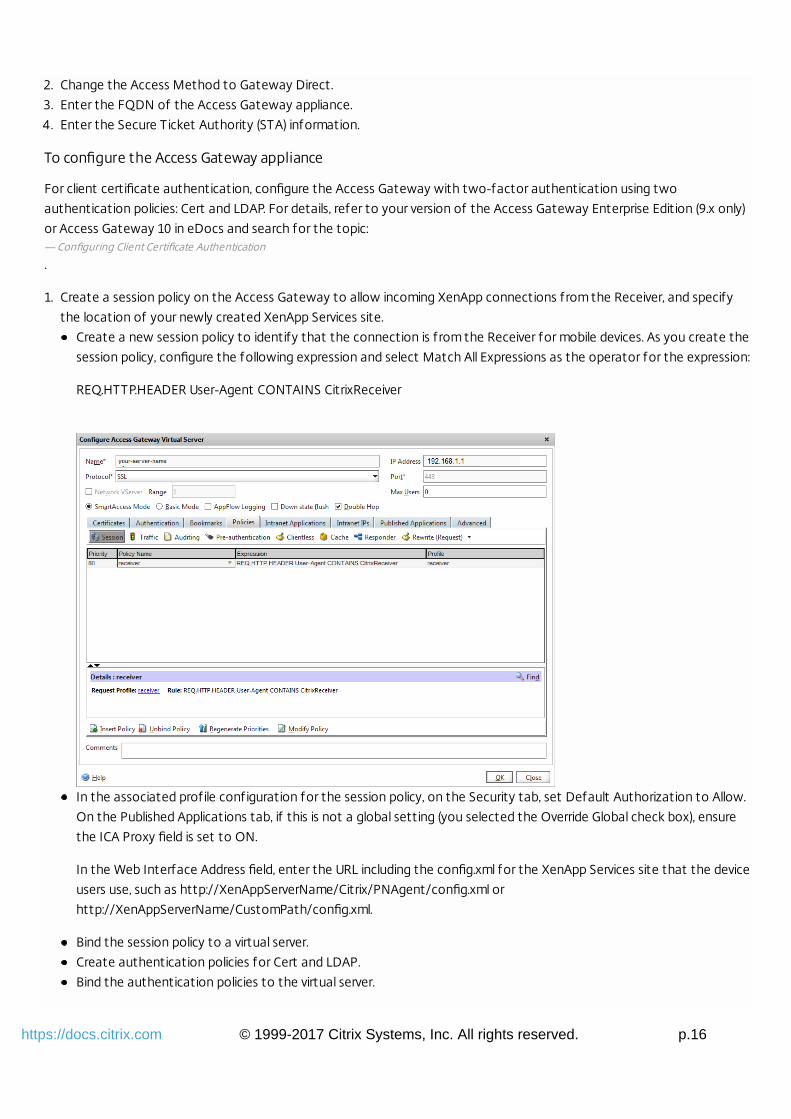
1. Create a session policy on the Access Gateway to allow incoming XenApp connections from the Receiver, and specify
the location of your newly created XenApp Services site.
Create a new session policy to identify that the connection is from the Receiver for mobile devices. As you create the
session policy, configure the following expression and select Match All Expressions as the operator for the expression:
REQ.HTTP.HEADER User-Agent CONTAINS CitrixReceiver
In the associated profile configuration for the session policy, on the Security tab, set Default Authorization to Allow.
On the Published Applications tab, if this is not a global setting (you selected the Override Global check box), ensure
the ICA Proxy field is set to ON.
In the Web Interface Address field, enter the URL including the config.xml for the XenApp Services site that the device
users use, such as http://XenAppServerName/Citrix/PNAgent/config.xml or
http://XenAppServerName/CustomPath/config.xml.
Bind the session policy to a virtual server.
Create authentication policies for Cert and LDAP.
Bind the authentication policies to the virtual server.
© 1999-2017 Citrix Systems, Inc. All rights reserved. p.17https://docs.citrix.com
Configure the virtual server to request client certif icates in the TLS handshake (on the Certif icate tab, open SSL
Parameters, and for Client Authentication, set Client Certif icate to Mandatory.
Important: If the server certif icate used on the Access Gateway is part of a certif icate chain (with an intermediate
certif icate), make sure that the intermediate certif icates are also installed correctly on the Access Gateway. For
information about installing certif icates, see the Access Gateway documentation.
To configure the mobile device for the Receiver application
If client certificate authentication is enabled on Access Gateway, users are authenticated based on certain attributes of
the client certificate. After authentication is completed successfully, the user name and domain are extracted from the
certificate and any policies specified for that user are applied.
1. From Receiver, open the Account, and in the Server f ield, enter the matching FQDN of your Access Gateway server, such
as GatewayClientCertif icateServer.organization.com. Receiver automatically detects that the client certif icate is
required.
2. Users can either install a new certif icate or select one from the already installed certif icate list. For iOS client certif icate
authentication, the certif icate must be downloaded and installed by the Receiver application only.
3. After selecting a valid certif icate, the user name and domain f ields on the logon screen is prepopulated using the user
name information from the certif icate, and a user enters the remaining details, including the password.
4. If client certif icate authentication is set to optional, users can skip the certif icate selection by pressing the Back button
on the certif icates page. In this case, Receiver proceeds with the connection and provides the user with the logon
screen.
5. After users complete the initial logon, they can launch applications without providing the certif icate again. Receiver
stores the certif icate for the account and uses it automatically for future logon requests.
© 1999-2017 Citrix Systems, Inc. All rights reserved. p.18https://docs.citrix.com
Configure Secure Gateway
Apr 13, 2015
To configure the XenApp Services site
Important:Secure Gateway 3.x is supported by Receiver for iOS using XenApp Services sites.
Secure Gateway 3.x is supported by Receiver for iOS using XenApp Web sites.
Only single-factor authentication is supported on XenApp Services sites, and both single-factor and dual factor are
supported on XenApp Web sites.
You must use the Web Interface 5.4, which is supported by all built-in browsers.
Before beginning this configuration, install and configure the Secure Gateway to work with Web Interface. You can adapt
these instructions to fit your specific environment.
If you are using a Secure Gateway connection, do not configure Citrix Access Gateway settings on the Receiver.
The Receiver for mobile devices uses a XenApp Services site (formerly Program Neighborhood Agent site) to get information
about the applications a user has rights to and presents them to the Receiver running on the device. This is similar to the
way you use the Web Interface for traditional SSL-based XenApp connections for which an Access Gateway can be
configured. XenApp Services sites running on the Web Interface 5. x have this configuration ability built in.
Configure the XenApp Services site to support connections from a Secure Gateway connection:
1. In the XenApp Services site, select Manage secure client access > Edit secure client access settings.
2. Change the Access Method to Gateway Direct.
3. Enter the FQDN of the Secure Gateway.
4. Enter the Secure Ticket Authority (STA) information.
Note: For the Secure Gateway, Citrix recommends using the Citrix default path for this site
(http://XenAppServerName/Citrix/PNAgent). The default path enables your users to specify the FQDN of the Secure
Gateway they are connecting to instead of the full path to the config.xml f ile that resides on the XenApp Services site
(such as http://XenAppServerName/CustomPath/config.xml).
To configure the Secure Gateway
1. On the Secure Gateway, use the Secure Gateway Configuration wizard to configure the Secure Gateway to work with
the server in the secure network hosting the XenApp Service site. After selecting the Indirect option, enter the FQDN
path of your Secure Gateway Server and continue the wizard steps.
2. Test a connection from a user device to verify that the Secure Gateway is configured correctly for networking and
certif icate allocation.
To configure the mobile device for the Receiver application
1. When adding a Secure Gateway account, enter the matching FQDN of your Secure Gateway server in the Address f ield:
If you created the XenApp Services site using the default path (/Citrix/PNAgent), enter the Secure Gateway FQDN:
FQDNofSecureGateway.companyName.com
If you customized the path of the XenApp Services site, enter the full path of the config.xml f ile, such as:
FQDNofSecureGateway.companyName.com/CustomPath/config.xml
2. If you are manually configuring the account, then turn off the Access Gateway option New Account dialog.

© 1999-2017 Citrix Systems, Inc. All rights reserved. p.19https://docs.citrix.com
© 1999-2017 Citrix Systems, Inc. All rights reserved. p.20https://docs.citrix.com
Configure Access Gateway Enterprise Edition
Apr 13, 2015
Important:Access Gateway Enterprise Edition 9.x and 10.x are supported by Receiver for iOS using XenApp Services sites or Legacy
mode on StoreFront servers.
Access Gateway Enterprise Edition 9.x and 10.x are supported by Receiver for iOS using XenApp Web Sites.
Receiver for Web is not supported by Receivers for iOS.
Access Gateway Enterprise Edition 9.x and 10.x are supported by Receiver for iOS to access StoreFront stores.
Both single-source and double-source authentication are supported on Web Interface sites and StoreFront.
You must use the Web Interface 5.4, which is supported by all built-in browsers.
You can create multiple session policies on the same virtual server depending on the type of connection (such as ICA,
CVPN, or VPN) and type of Receiver (Web Receiver or locally installed Receivers). All of the policies can be achieved from a
single virtual server.
When users create accounts on Receiver, they should enter the account credentials, such as their email address or the
matching FQDN of your Access Gateway server. For example, if the connection fails when using the default path, users
should enter the full path to the Access Gateway server.
To enable remote users to connect through Access Gateway to your CloudGateway deployment, you can configure Access
Gateway to work with StoreFront. The method for enabling access depends on the edition of CloudGateway in your
deployment:
If you deploy CloudGateway Express in your network, allow connections from internal or remote users to StoreFront
through Access Gateway by integrating Access Gateway and StoreFront. This deployment allows users to connect to
StoreFront to access published applications from XenApp and virtual desktops from XenDesktop. Users connect through
Citrix Receiver.
For information about configuring these connections, see Integrating Access Gateway with CloudGateway and the other
topics under that node in eDocs.
Information about the settings required for Receiver for mobile devices are in the following topics:
Creating the Session Profile for Receiver for CloudGateway Enterprise
Creating the Session Profile for Receiver for CloudGateway Express
Configuring Custom Clientless Access Policies for Receiver
Configuring Secure Browse in Access Gateway (iOS devices only, not needed for Android devices)
Allowing Access from Mobile Devices
MDX Toolkit for Mobile Apps
To enable remote users to connect through Access Gateway to your Web Interface deployment, configure Access
Gateway to work with Web Interface, as described in Configuring Access Gateway Enterprise Edition to Communicate with
the Web Interface and its sub-topics in Citrix eDocs.
© 1999-2017 Citrix Systems, Inc. All rights reserved. p.21https://docs.citrix.com
Configure Web Interface
Apr 13, 2015
To configure the Web Interface site
Users with iPhone and iPad devices can launch applications through your Web Interface site and the built-in Safari browser
on the mobile device. Configure the Web Interface site the same as you would for other XenApp applications. If no XenApp
Services site is configured for the mobile device, Receiver automatically uses your Web Interface site. No special
configuration is needed for mobile devices.
Web Interface 5.x is supported by the built-in Safari browser.
To launch applications on the iOS device
On the mobile device, users can log on to the Web Interface site using their normal logon and password.
© 1999-2017 Citrix Systems, Inc. All rights reserved. p.22https://docs.citrix.com
Configure mobile devices automatically
Oct 01, 2015
Use the Citrix Mobile Receiver Setup URL Generator on a PC or Mac to expedite configuring the Citrix Receiver for
applicable mobile devices. Use the utility to configure settings for XenApp accounts and email the configurations to many
devices at once.
Because the username and password are entered by the user, the configuration requires only the server name, server
address, domain name, and Access Gateway information (if applicable).
1. From a PC or Mac, open the Mobile Receiver Setup URL Generator from
http://community.citrix.com/MobileReceiverSetupUrlGenerator/.
2. For Account Description, enter the name for the account, such as the group or department, for example, Production or
Sales.
3. For Server Address, type the address of your XenApp server farm, for example, gateway.myserverfarm.net.
4. For Domain, type the domain name of the server farm to which you are connecting your users.
5. To enable an Access Gateway configuration, select the Use Gateway check box.
1. Under Gateway type, choose the Access Gateway edition deployed in server farm to which you are connecting your
users. (If you do not know the correct edition, contact your administrator.)
2. Under Gateway Authentication Type, choose the authentication method used in your infrastructure.
6. Click Generate URL.
7. In Your Result, click configuration link, and copy the generated link.
Use email to send the link directly to mobile devices for users to complete their configuration account for the Receiver onthe device.Important: Some BlackBerry devices require a plain-text formatted email to properly associate the pre-configured URL withthe Receiver. Therefore, it is recommended that the URL is always sent as a plain-text formatted email message toBlackBerry users.
© 1999-2017 Citrix Systems, Inc. All rights reserved. p.23https://docs.citrix.com
Configure Accounts manually
Apr 13, 2015
In general, when Receiver connects to an Access Gateway, Receiver attempts to locate a XenApp Services site or XenAppWeb site after authenticating. If no site is detected, Receiver displays an error. To avoid this situation, you can configure anaccount manually so Receiver can connect to the Access Gateway.
To configure accounts manually
1. Tap the Accounts icon in the upper right corner and then in the Accounts screen, tap the Plus Sign (+). The New Account
screen appears.
2. In the lower left corner of the screen, tap the icon to the left of Options and tap Manual setup. Additional f ields appear
on the screen.
3. In the Address f ield, type the secure URL of the site or Access Gateway to which you want to connect (for example,
agee.mycompany.com).
4. Select one of the following connection options. The remaining f ields on the screen change, depending on your selection.
Web Interface - Select for Receiver to display a XenApp Web site similar to a Web browser. This is also known as Web
View.
XenApp Services - Select for Receiver to locate a specif ic XenApp Services site for which authentication through
Access Gateway is not configured. In the additional options that appear on this screen, provide site logon credentials.
http://<StoreFront FQDN>: If there are multiple stores, a list will be presented and the user can choose the store
to add.
http://<StoreFront FQDN>/citrix/<Store Name>: This will add the StoreFront store <Store Name>.
http://<StoreFront FQDN>/citrix/PnAgent/config.xml: This will add the default legacy PNAgent store.
http://<StoreFront FQDN>/citrix/<Store Name>/PnAgent/config.xml: This will add the legacy PNAgent store
associated with <Store Name>.
Access Gateway - Select for Receiver to connect to a XenApp Services site through a specif ic Access Gateway. In the
additional options on this screen, select the server edition and its logon credentials, including whether it requires a
security token for authentication.
5. For certif icate security, use the setting in the Ignore certif icate warnings f ield to determine whether you want to
connect to the server even if it has an invalid, self-signed, or expired certif icate. The default setting is OFF.
Important: If you do enable this option, make sure you are connecting to the correct server. Citrix strongly recommends
that all servers have a valid certif icate to protect user devices from online security attacks. A secure server uses an SSL
certif icate issued from a certif icate authority. Citrix does not support self-signed certif icates and does not recommend
by-passing the certif icate security.
6. Tap Save.
7. Type your user name and password (or token, if you selected two-factor authentication), and then tap Log On. The
Citrix Receiver screen appears, in which you can access your desktops and add and open your apps.
© 1999-2017 Citrix Systems, Inc. All rights reserved. p.24https://docs.citrix.com
Provide RSA SecurID authentication for iOS devices
Dec 16, 2015
RSA SecurID authentication for Citrix Receiver is supported for Secure Gateway configurations (through the Web Interface
only) and all NetScaler Gateway configurations.
For instructions to configure RSA SecurID authentication on NetScaler Gateway, see:
Configuring RSA SecurID Authentication on NetScaler Gateway 11.0
Configuring RSA SecurID Authentication on NetScaler Gateway 10.5
Configuring RSA SecurID Authentication on NetScaler Gateway 10.1
URL scheme required for the software token on Receiver: The RSA SecurID software token used by the Receiverregisters the URL scheme com.citrix.securid, only. If users have installed both the Citrix Receiver app and the RSA SecurID app on their iOS device, users must select the URLscheme “com.citrix.securid” to import the RSA SecurID Software Authenticator (software token) to Receiver on theirdevices.
To import an RSA SecurID soft token into Citrix Receiver
To use an RSA Soft Token with the Citrix Receiver, have your users follow this procedure.
The policy for PIN length, type of PIN (numeric only, alphanumeric), and limits on PIN reuse are specified on the RSA
administration server.
Your users should only need to do this once, after they have successfully authenticated to the RSA server. After your users
verify their PINs, they are are also authenticated with the StoreFront server, and it presents available, published applications
and desktops.
To use an RSA soft token with Citrix Receiver
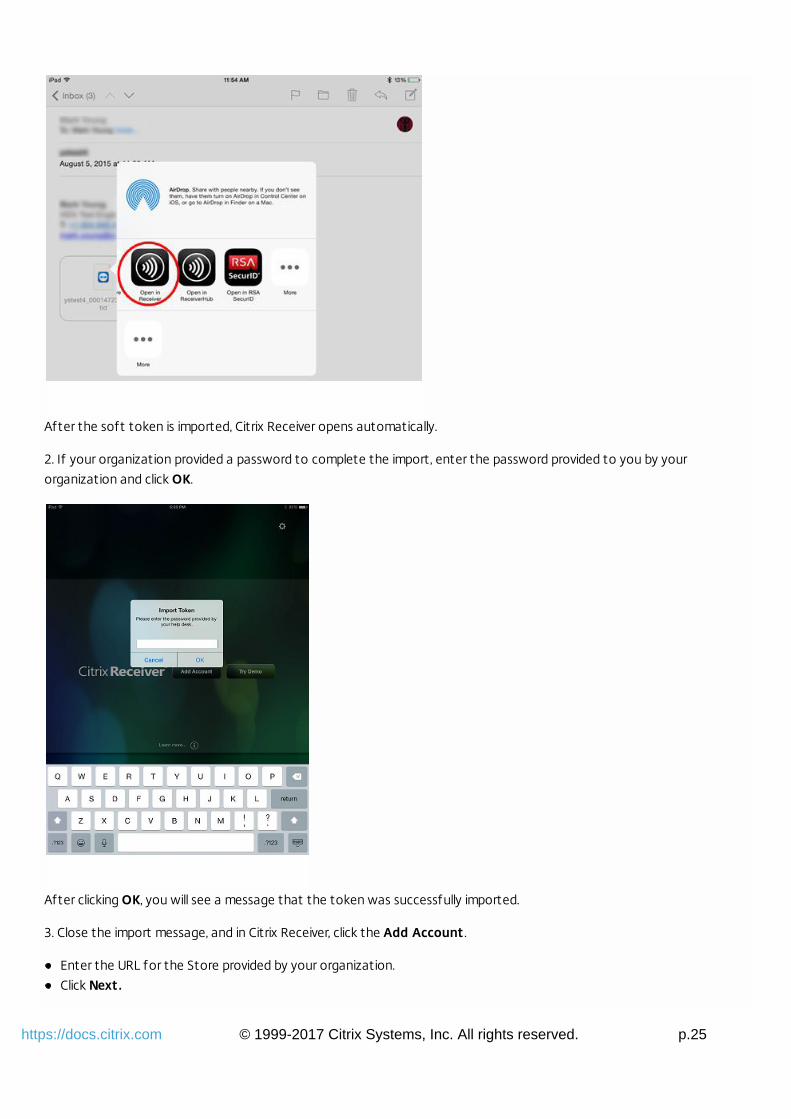
1. Import the RSA soft token provided to you by your organization.
From the email with your SecurID file attached, select Open in Receiver as the import destination.
© 1999-2017 Citrix Systems, Inc. All rights reserved. p.25https://docs.citrix.com
After the soft token is imported, Citrix Receiver opens automatically.
2. If your organization provided a password to complete the import, enter the password provided to you by your
organization and click OK.
After clicking OK, you will see a message that the token was successfully imported.
3. Close the import message, and in Citrix Receiver, click the Add Account .
Enter the URL for the Store provided by your organization.
Click Next.
© 1999-2017 Citrix Systems, Inc. All rights reserved. p.26https://docs.citrix.com
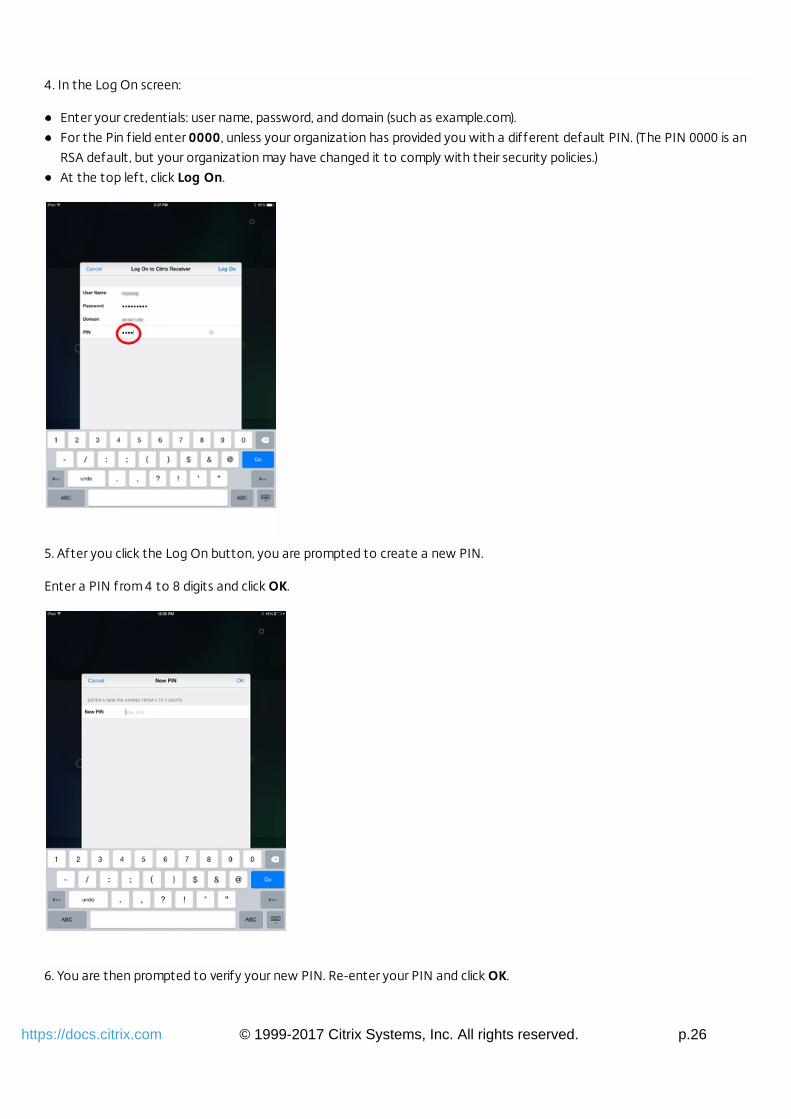
4. In the Log On screen:
Enter your credentials: user name, password, and domain (such as example.com).
For the Pin f ield enter 0000, unless your organization has provided you with a different default PIN. (The PIN 0000 is an
RSA default, but your organization may have changed it to comply with their security policies.)
At the top left, click Log On.
5. After you click the Log On button, you are prompted to create a new PIN.
Enter a PIN from 4 to 8 digits and click OK.
6. You are then prompted to verify your new PIN. Re-enter your PIN and click OK.
© 1999-2017 Citrix Systems, Inc. All rights reserved. p.27https://docs.citrix.com
After clicking OK, you will be able to access your apps and desktops.
Support for Next Token Mode
If you configure the Access Gateway for RSA SecurID authentication, the Receiver supports Next Token Mode. With this
feature enabled, if a user enters three (by default) incorrect passwords, the Access Gateway plug-in prompts the user to
wait until the next token is active before logging on. The RSA server can be configured to disable a user's account if a user
logs on too many times with an incorrect password.
© 1999-2017 Citrix Systems, Inc. All rights reserved. p.28https://docs.citrix.com
Provide access information to end users for iOSdevices
Jun 26, 2013
You must provide users with the Receiver account information they need to access their hosted their applications,desktops, and data. You can provide this information by:
Configuring email-based account discovery
Providing users with a provisioning f ile
Providing users with an auto-generated setup URL
Providing users with account information to enter manually
Configure email-based account discovery
You can configure Receiver to use email-based account discovery. When configured, users enter their email address rather
than a server URL during initial Receiver installation and configuration. Receiver determines the Access Gateway or
StoreFront server, or AppController virtual appliance associated with the email address based on Domain Name System
(DNS) Service (SRV) records and then prompts the user to log on to access their hosted applications, desktops, and data.
Note: Email-based account discovery is not supported if Receiver is connecting to a Web Interface deployment.To configure your DNS server to support email-based discovery, see Configure email-based account discovery in the
StoreFront documentation.
To configure Access Gateway to accept user connections by using an email address to discover the StoreFront or Access
Gateway URL, see Connecting to StoreFront by Using Email-Based Discovery in the Access Gateway documentation.
Provide users with a provisioning file
You can use StoreFront to create provisioning files containing connection details for accounts. You make these files
available to your users to enable them to configure Receiver automatically. After installing Receiver, users simply open the .cr
file on the device to configure Receiver. If you configure Receiver for Web sites, users can also obtain Receiver provisioning
files from those sites.
For more information, see the StoreFront documentation.
Provide users with an auto-generated setup URL
You can use the Setup URL Generator to configure Receiver for mobile devices. After installing Receiver, users simply click on
the URL to configure their account and access their resources. Use the utility to configure settings for accounts and email
or post that information to all your users at once.
For more information, see To configure mobile devices automatically.
Provide users with account information to enter manually
If providing users with account details to enter manually, ensure you distribute the following information to enable them toconnect to their hosted and desktops successfully:
The StoreFront URL or XenApp Services site hosting resources; for example: servername.company.com.
For access using the Access Gateway, provide the Access Gateway address and required authentication method.
For more information about configuring the Access Gateway or Secure Gateway, see the Access Gateway or XenApp
© 1999-2017 Citrix Systems, Inc. All rights reserved. p.29https://docs.citrix.com
(for Secure Gateway) documentation.
When a user enters the details for a new account, Receiver attempts to verify the connection. If successful, Receiver
prompts the user to log on to the account.
Session sharing
On the iPad, when users log off from a Receiver account, if there are still connections to applications or desktops, theyhave the option to disconnect or log off :
Disconnect : Logs off from the account, but leaves the Windows application or desktop running on the server, and the
user can then start another device, launch Receiver, and reconnect to the last state before disconnecting from the iPad.
This option allows users to reconnect from one device to another device and resume working in running applications.
Log off : Logs off from the account, closes the Windows application, and logs off from the XenApp or XenDesktop
server. This option allows users to disconnect from the server and log off the account; when they launch Receiver again,
it opens in the default state.
© 1999-2017 Citrix Systems, Inc. All rights reserved. p.30https://docs.citrix.com
Enabling Citrix X1 Mouse, external display, andpresentation features
Aug 19, 2015
To make it much easier to use Windows applications on your iOS device, you can configure Citrix Receiver to use a special
Citrix X1 Mouse with HDX apps running in a XenApp or XenDesktop session.
You can also configure Receiver settings to use an external monitor and use your iOS device to control the display using
your device as a keyboard or touchpad. This enables you to run presentations on your iOS device.
Enabling Receiver for use with Citrix X1 Mouse
You can connect and use the Citrix X1 Mouse within Citrix HDX Sessions. Currently, Receiver only supports one mouse
model. For details about the Citrix X1 Mouse, see http://www.citrix.com/products/mouse/overview.html.
The Citrix X1 Mouse is a bluetooth device, so to use it, you must enable bluetooth on your iOS device.
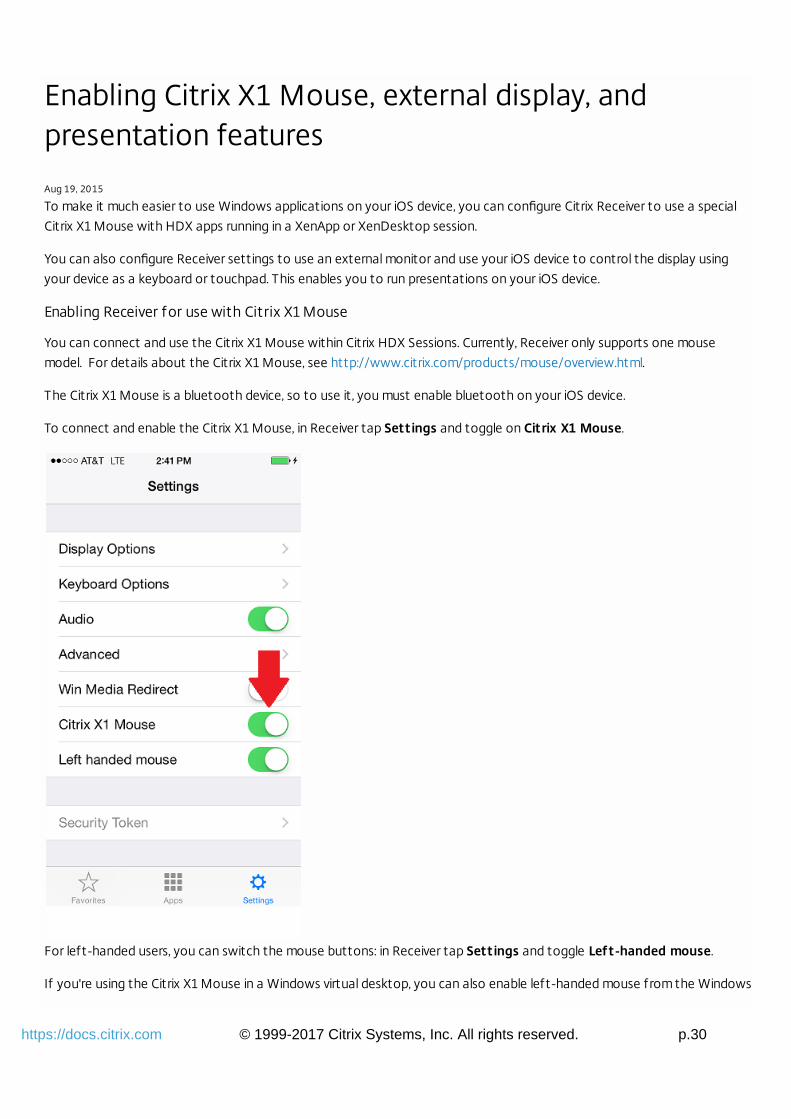
To connect and enable the Citrix X1 Mouse, in Receiver tap Settings and toggle on Citrix X1 Mouse.
For left-handed users, you can switch the mouse buttons: in Receiver tap Settings and toggle Left-handed mouse.
If you're using the Citrix X1 Mouse in a Windows virtual desktop, you can also enable left-handed mouse from the Windows
© 1999-2017 Citrix Systems, Inc. All rights reserved. p.31https://docs.citrix.com
Control Panel. Go to Mouse Properties to configure your mouse.
Enabling Receiver to use an external display
Receiver for iOS supports external display with iPhone and iPads.
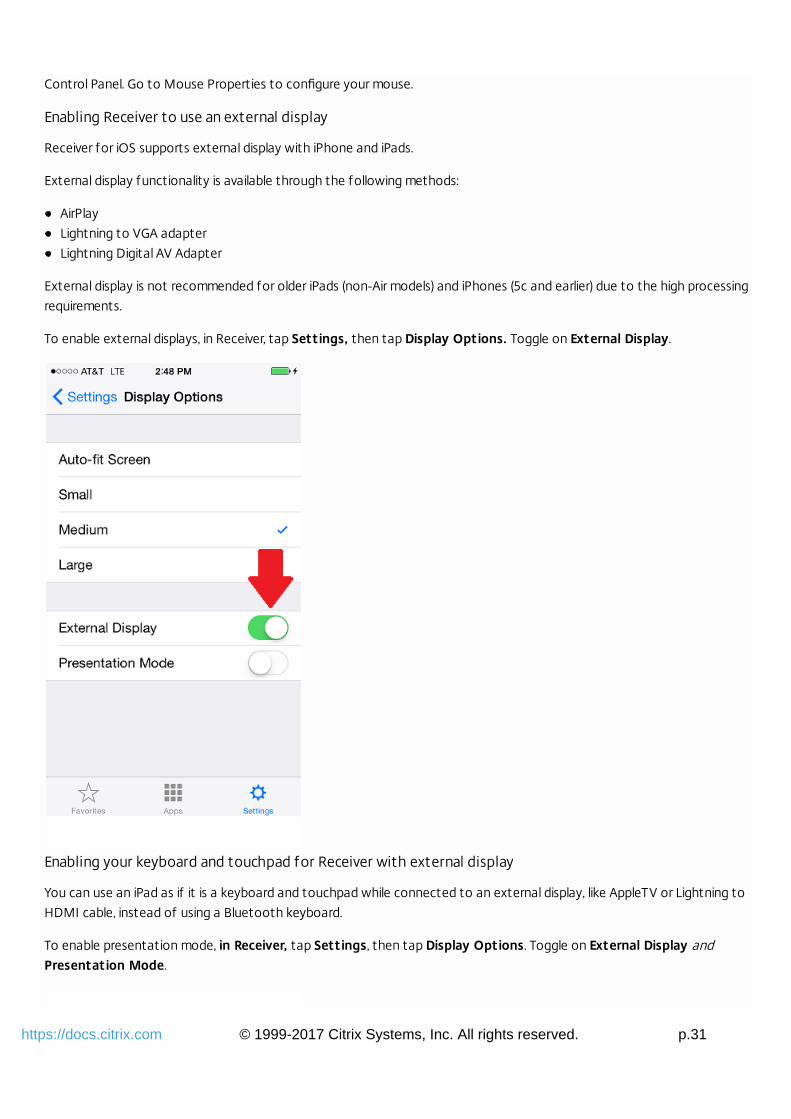
External display functionality is available through the following methods:
AirPlay
Lightning to VGA adapter
Lightning Digital AV Adapter
External display is not recommended for older iPads (non-Air models) and iPhones (5c and earlier) due to the high processing
requirements.
To enable external displays, in Receiver, tap Settings, then tap Display Options. Toggle on External Display.
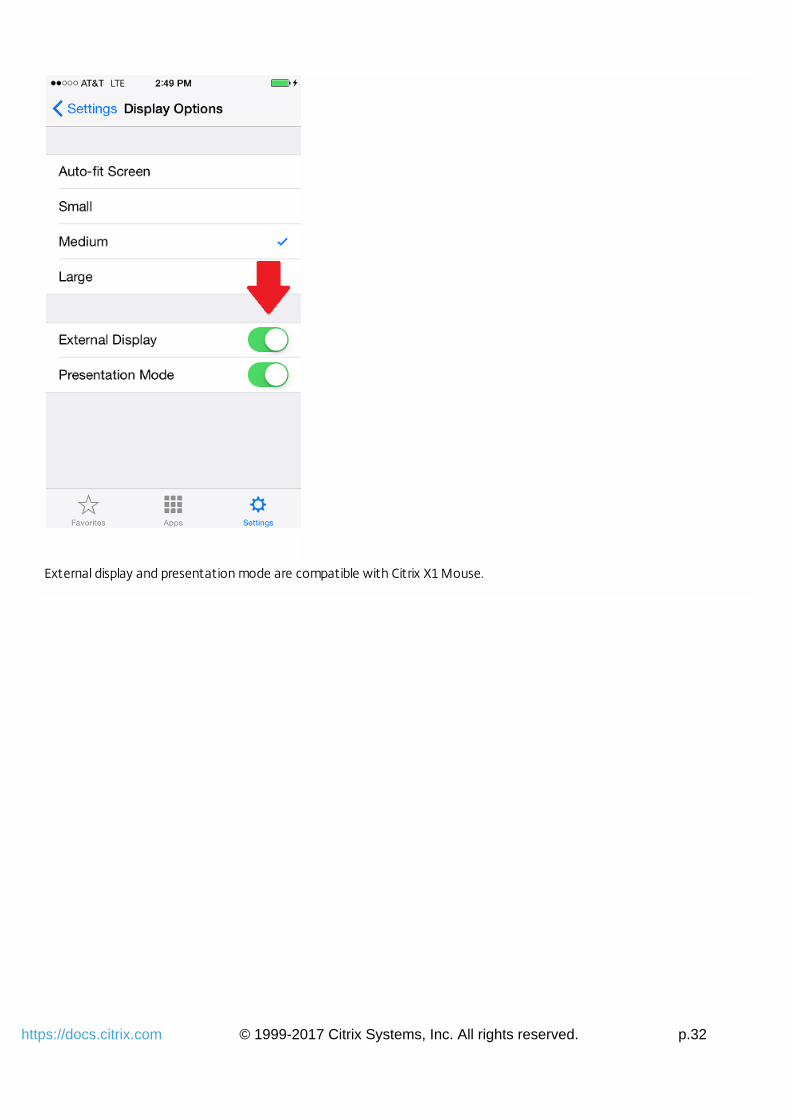
Enabling your keyboard and touchpad for Receiver with external display
You can use an iPad as if it is a keyboard and touchpad while connected to an external display, like AppleTV or Lightning to
HDMI cable, instead of using a Bluetooth keyboard.
To enable presentation mode, in Receiver, tap Settings, then tap Display Options. Toggle on External Display andPresentation Mode.
© 1999-2017 Citrix Systems, Inc. All rights reserved. p.32https://docs.citrix.com
External display and presentation mode are compatible with Citrix X1 Mouse.
© 1999-2017 Citrix Systems, Inc. All rights reserved. p.33https://docs.citrix.com
Blocking jailbroken devices from running applicationsfrom StoreFront
Oct 01, 2015
In this article:
Requirements
To help to prevent detected jailbroken devices from running apps
To allow detected jailbroken devices to run apps
Your users can compromise the security of your deployment by connecting with jailbroken iOS devices. Jailbroken devices are
those whose owners have modified them, usually with the effect of bypassing certain security protections.
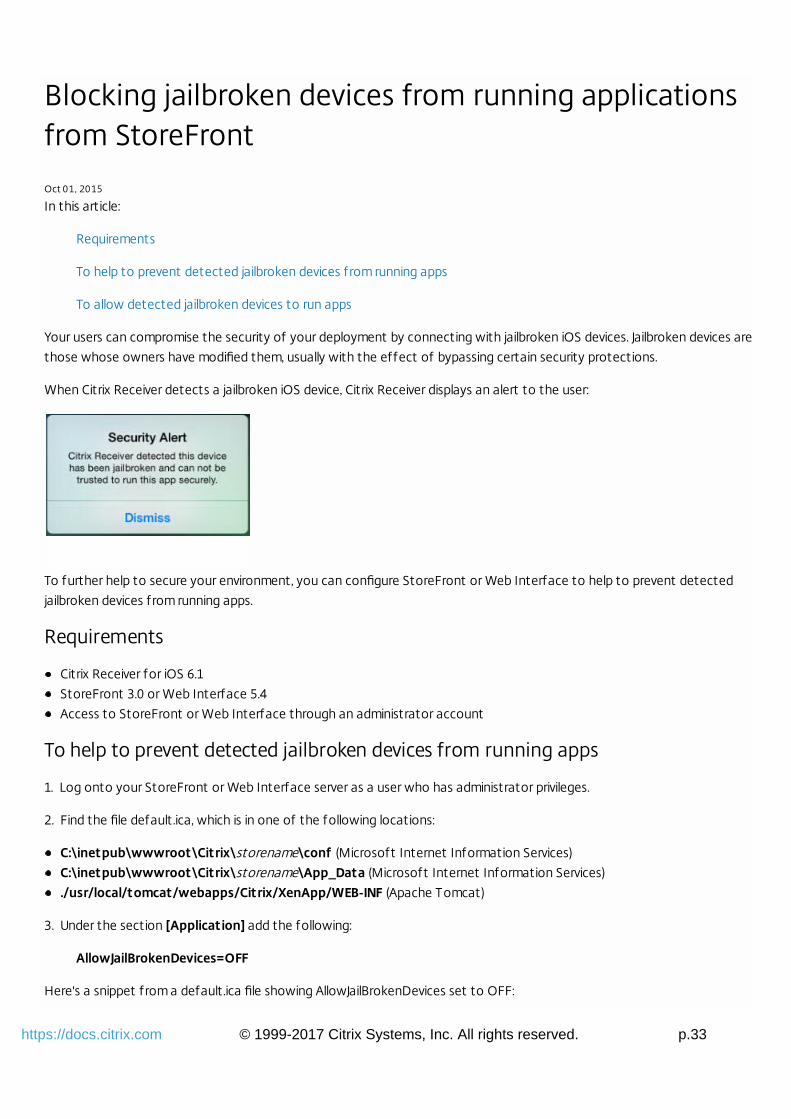
When Citrix Receiver detects a jailbroken iOS device, Citrix Receiver displays an alert to the user:
To further help to secure your environment, you can configure StoreFront or Web Interface to help to prevent detected
jailbroken devices from running apps.
Requirements
Citrix Receiver for iOS 6.1
StoreFront 3.0 or Web Interface 5.4
Access to StoreFront or Web Interface through an administrator account
To help to prevent detected jailbroken devices from running apps
1. Log onto your StoreFront or Web Interface server as a user who has administrator privileges.
2. Find the file default.ica, which is in one of the following locations:
C:\inetpub\wwwroot\Citrix\storename\conf (Microsoft Internet Information Services)
C:\inetpub\wwwroot\Citrix\storename\App_Data (Microsoft Internet Information Services)
./usr/local/tomcat/webapps/Citrix/XenApp/WEB-INF (Apache Tomcat)
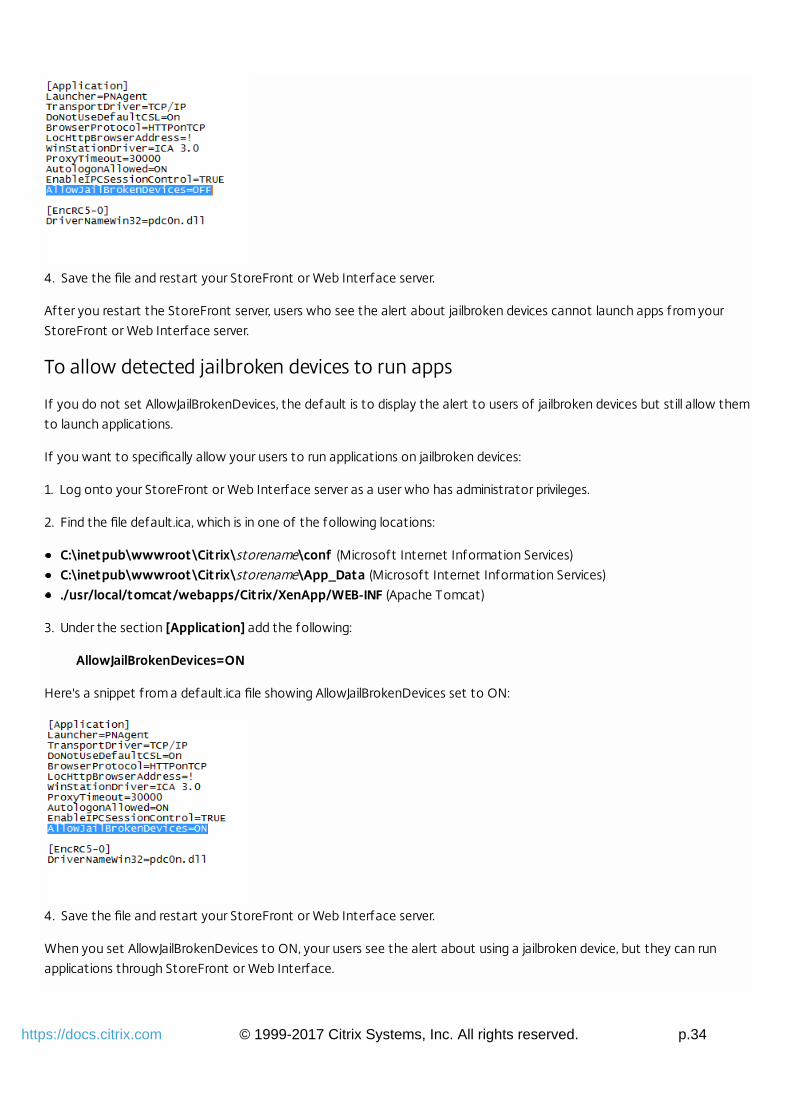
3. Under the section [Application] add the following:
AllowJailBrokenDevices=OFF
Here's a snippet from a default.ica file showing AllowJailBrokenDevices set to OFF:
© 1999-2017 Citrix Systems, Inc. All rights reserved. p.34https://docs.citrix.com
4. Save the file and restart your StoreFront or Web Interface server.
After you restart the StoreFront server, users who see the alert about jailbroken devices cannot launch apps from your
StoreFront or Web Interface server.
To allow detected jailbroken devices to run apps
If you do not set AllowJailBrokenDevices, the default is to display the alert to users of jailbroken devices but still allow them
to launch applications.
If you want to specifically allow your users to run applications on jailbroken devices:
1. Log onto your StoreFront or Web Interface server as a user who has administrator privileges.
2. Find the file default.ica, which is in one of the following locations:
C:\inetpub\wwwroot\Citrix\storename\conf (Microsoft Internet Information Services)
C:\inetpub\wwwroot\Citrix\storename\App_Data (Microsoft Internet Information Services)
./usr/local/tomcat/webapps/Citrix/XenApp/WEB-INF (Apache Tomcat)
3. Under the section [Application] add the following:
AllowJailBrokenDevices=ON
Here's a snippet from a default.ica file showing AllowJailBrokenDevices set to ON:
4. Save the file and restart your StoreFront or Web Interface server.
When you set AllowJailBrokenDevices to ON, your users see the alert about using a jailbroken device, but they can run
applications through StoreFront or Web Interface.
© 1999-2017 Citrix Systems, Inc. All rights reserved. p.35https://docs.citrix.com
Save Passwords
Jan 05, 2016
Using the Citrix Web Interface Management console, you can configure the XenApp authentication method to allow users
to save their passwords. When you configure the user account, the encrypted password is saved until the first time the user
connects. Consider the following:
If you enable password saving, Citrix Receiver stores the password on the device for future logons and does not prompt
for passwords when users connect to applications.
NoteThe password is stored only if users enter a password when creating an account. If no password is entered for the account, no
password is saved, regardless of the server setting.
If you disable password saving (default setting), Citrix Receiver prompts users to enter passwords every time they
connect.
NoteFor StoreFront direct connections, password saving is not available.
To override password saving
If you configure the server to save passwords, users who prefer to require passwords at logon can override password
saving:
When creating the account, leave the password f ield blank.
When editing an account, delete the password and save the account.
Using the Save Password feature
Beginning with release 6.1.2, iOS for Citrix Receiver introduces a feature that streamlines the connection process by
allowing you to save your password, which eliminates the extra step of having to authenticate a session everytime you
open Citrix Receiver.
NoteThe save password functionality currently works with the PNA protocol. It does not work with StoreFront native mode; however, this
functionality works when StoreFront enables PNA legacy mode.
Configuring StoreFront PNA legacy mode
© 1999-2017 Citrix Systems, Inc. All rights reserved. p.36https://docs.citrix.com
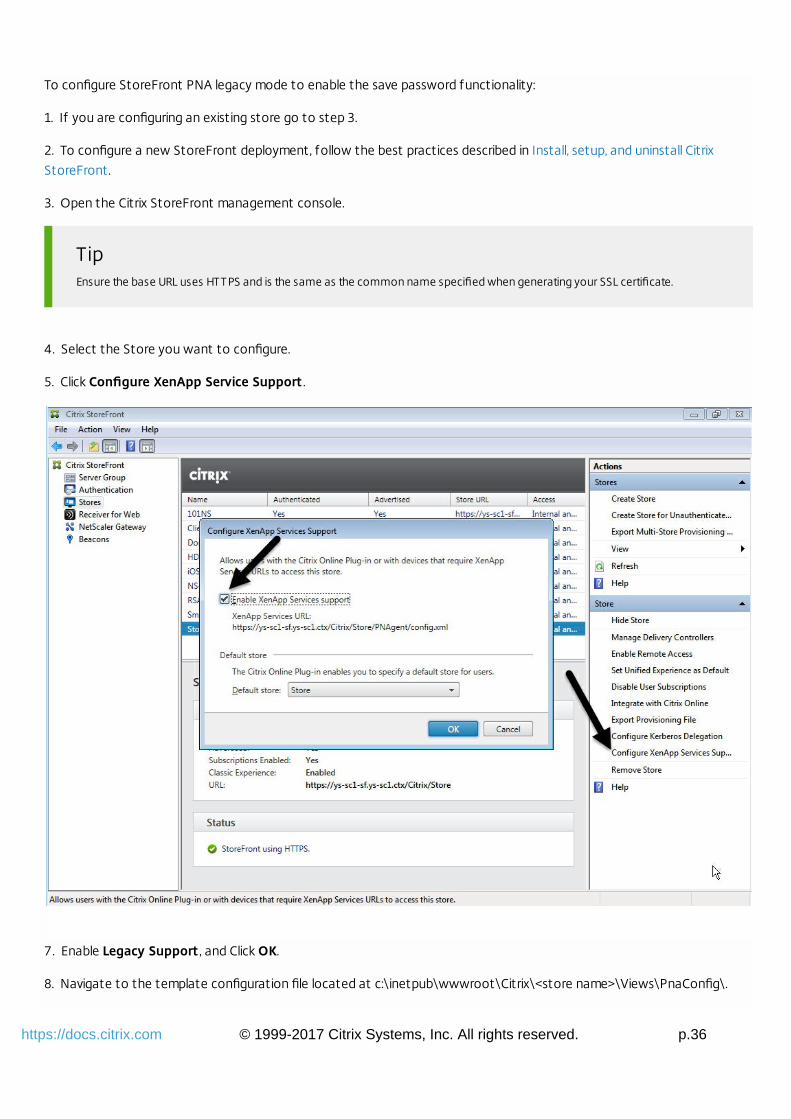
To configure StoreFront PNA legacy mode to enable the save password functionality:
1. If you are configuring an existing store go to step 3.
2. To configure a new StoreFront deployment, follow the best practices described in Install, setup, and uninstall Citrix
StoreFront.
3. Open the Citrix StoreFront management console.
TipEnsure the base URL uses HTTPS and is the same as the common name specified when generating your SSL certificate.
4. Select the Store you want to configure.
5. Click Configure XenApp Service Support .
7. Enable Legacy Support , and Click OK.
8. Navigate to the template configuration file located at c:\inetpub\wwwroot\Citrix\<store name>\Views\PnaConfig\.
© 1999-2017 Citrix Systems, Inc. All rights reserved. p.37https://docs.citrix.com
9. Make a backup of the Config.aspx.
10. Open the original Config.aspx file.
11. Edit the line <EnableSavePassword>false</EnableSavePassword> change the false value to true.
12. Save the edited Config.aspx file.
13. On the StoreFront server, run PowerShell with Administrative rights.
14. In the PowerShell console:
a. cd “c:\Program Files\Citrix\Receiver StoreFront\Scripts”
b. Type “Set-ExecutionPolicy RemoteSigned”
c. Type “.\ImportModules.ps1”
d. Type “Set-DSDerviceMonitorFeature – ServiceUrl https://localhost:443/StorefrontMonitor”
15. If you have a StoreFront group, run the same commands on all the members in the group.
Configuring NetScaler
To configure NetScaler to support the save password functionality:
1. Log in to the NetScaler management console.
NoteThis configuration uses NetScaler load balance servers. If your environment does not have NetScaler already configured, follow the
Citrix best practice deployment guide located here: Citrix NetScaler and Citrix XenDesktop 7 deployment guide.
2. Follow the Citrix best practices to create a certificate for your load balance virtual server(s).
3. On the configuration tab navigate to Traffic Management -> Load Balancing -> Servers. Click Add.
4. Enter the Server name and IP address of the StoreFront server. Click Create.
TipIf you have a StoreFront group, repeat step 5 for all the servers in the group.
5. On the configuration tab navigate to Traffic Management -> Load Balancing -> Monitor. Click Add.
6. Enter a name for the monitor. Select STOREFRONT as the Type.
7. At the bottom of the page, select Secure (this is required since the StoreFront server is using HTTPS).
8. Click the Special Parameters Tab. Enter the StoreFront name configured earlier, and select the Check Backed Services.
© 1999-2017 Citrix Systems, Inc. All rights reserved. p.38https://docs.citrix.com
Click Create.
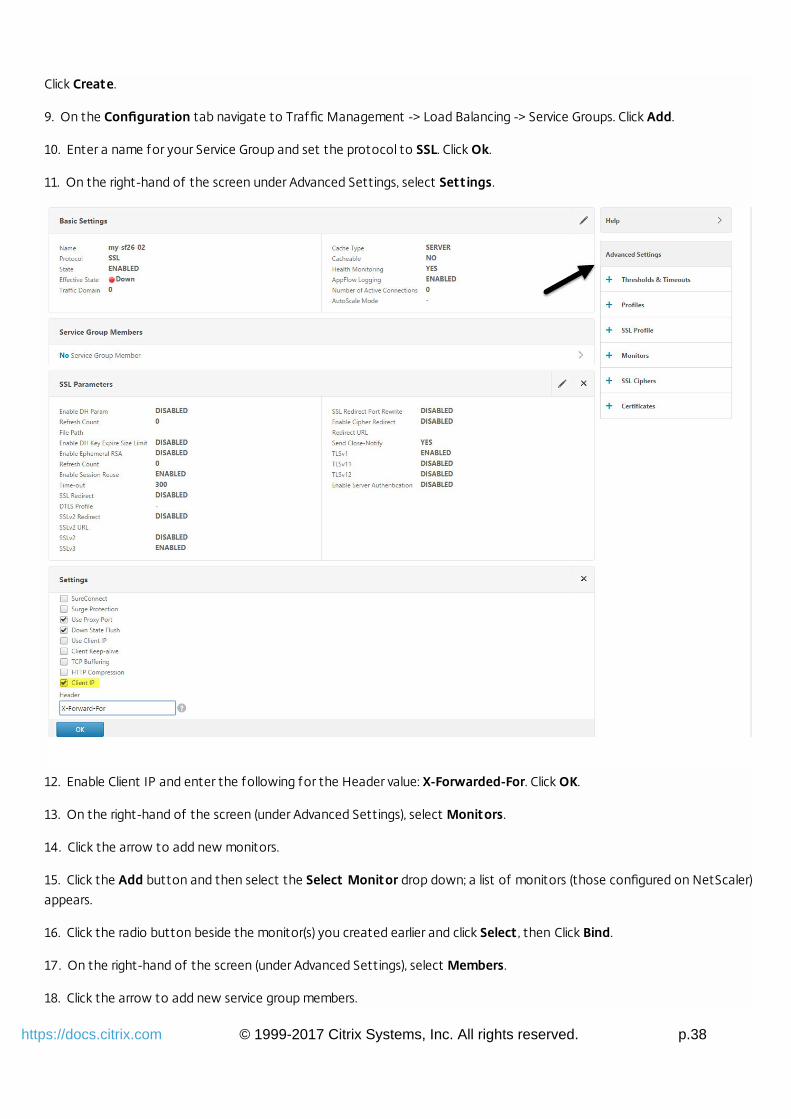
9. On the Configuration tab navigate to Traffic Management -> Load Balancing -> Service Groups. Click Add.
10. Enter a name for your Service Group and set the protocol to SSL. Click Ok.
11. On the right-hand of the screen under Advanced Settings, select Settings.
12. Enable Client IP and enter the following for the Header value: X-Forwarded-For. Click OK.
13. On the right-hand of the screen (under Advanced Settings), select Monitors.
14. Click the arrow to add new monitors.
15. Click the Add button and then select the Select Monitor drop down; a list of monitors (those configured on NetScaler)
appears.
16. Click the radio button beside the monitor(s) you created earlier and click Select , then Click Bind.
17. On the right-hand of the screen (under Advanced Settings), select Members.
18. Click the arrow to add new service group members.
© 1999-2017 Citrix Systems, Inc. All rights reserved. p.39https://docs.citrix.com
19. Click the Add button and then select the Select Member drop down.
20. Select the Server Based radio button; a list of server members (those configured on NetScaler) appears.
21. Click the radio button beside the StoreFront server(s) you created earlier.
22. Enter 443 for the port number and specify a unique number for the Hash ID, then click Create.
23. Click Done.
TipIf everything has been configured properly the Effective State should show a green light, indicating that monitoring is functioning
properly.
24. Navigate to Traffic Management -> Load Balancing -> Virtual Servers and click Add.
25. Enter a Name for the server and select SSL as the protocol.
26. Enter the IP address for the StoreFront load-balanced server. Click OK.
27. Select the Load Balancing Virtual Server Service Group binding, click the arrow then add the Service Group created
previously.
28. Click OK twice.
29. Assign the SSL certificate created for the Load Balance virtual server. Select No Server Certificate.
30. Select the Load Balance server certificate from the list and click Bind.
31. Add the domain certificate to the Load Balance Server. Click No CA certificate.
32. Select the domain certificate and click Bind.
33. On the right side of the screen, select Persistence.
34. Change the Persistence to SOURCEIP and set the time out to 20. Click Save.
35. Click Done.
37. On your domain DNS server, add the load balance server (if not already created).
38. Launch Citrix Receiver on your iOS device and enter the full XenApp URL. For example:
https://<LB Virtual Server>/Citrix/<Store Name>PNAgent/Config.xml
TipFor additional information, see Citrix NetScaler and Citrix XenDesktop 7 deployment guide and Install, Setup, and uninstall Citrix
StoreFront.

© 1999-2017 Citrix Systems, Inc. All rights reserved. p.40https://docs.citrix.com

© 1999-2017 Citrix Systems, Inc. All rights reserved. p.41https://docs.citrix.com
Try the Demonstration Site
Oct 30 , 2012
When users launch Citrix Receiver for the first time, the welcome page offers the option to launch a demonstration
account in the Citrix Cloud.
Users complete the account registration by entering their names and email addresses (email addresses are prepopulated on
some devices). The demonstration site is already configured with published applications so your users can try Citrix Receiver
right away.
Users can add, change, and remove their own accounts in Receiver.
© 1999-2017 Citrix Systems, Inc. All rights reserved. p.42https://docs.citrix.com
Troubleshooting
Dec 08 , 2014
Disconnected sessions
Users can disconnect (but not log off) from a Receiver session in the following ways:While viewing a published app or desktop in session:
tap the arrow at the top of the screen to expose the in-session drop down menu.
tap the Home button to return to the launch pad.
notice the white shadow under the icon of one of the published apps that are still in an active session; tap the icon.
tap disconnect.
Close Receiver:
double tap the device's Home button.
locate Receiver in the iOS app switcher view.
tap disconnect in the dialog that appears.
Pressing the home button on their mobile device.
Tapping Home or Switch in the app's drop-down menu.
The session remains in a disconnected state. Although the user can reconnect at a later time, you can ensure disconnected
sessions are rendered inactive after a specific interval. To do this, configure a session timeout for the ICA-tcp connection in
Remote Desktop Session Host Configuration (formerly known as "Terminal Services Configuration"). For more information
about configuring Remote Desktop Services (formerly known as "Terminal Services"), refer to the Microsoft Windows Server
product documentation.
Issues with numeric keys in applications
If users have issues with numeric keys not working correctly in published applications, they can try disabling the Unicode
keyboard in Receiver. To do this, from the Settings tab, tap Keyboard Options, and for Use Unicode Keyboard, toggle the
switch to Off .
Loss of HDX audio quality from XenDesktop
From XenDesktop, HDX audio to Receiver for iOS might lose quality when using audio plus video. This issue occurs when the
XenDesktop HDX policies cannot handle the amount of audio data with the video data. For suggestions about how to
create policies to improve audio quality, see http://support.citrix.com/article/ctx123543.
Demonstration accounts available from the Citrix Cloud
Users who do not currently have an account can create a demonstration user account at the Citrix Cloud demo site at
http://citrixcloud.net/.
The Citrix Cloud offers users the ability to experience the power of Citrix solutions without having to set up and configure
their own environment. The Citrix Cloud demo environment uses a number of key Citrix solutions including XenServer,
XenApp, NetScaler, and Access Gateway.
However, in this demo environment, data is not saved, and when you disconnect, you might not get able to get back to
your session.
Expired passwords
© 1999-2017 Citrix Systems, Inc. All rights reserved. p.43https://docs.citrix.com
The Receiver supports the ability for users to change their expired passwords. Prompts appear for users to enter the
required information.
Slow connections
If you experience slow connections to the XenApp Services site, or issues such as missing application icons or "ProtocolDriver Error" messages, as a workaround, on the XenApp server and Citrix Secure Gateway or Web Interface server, disablethe following Citrix PV Ethernet Adapter Properties for the network interface (all enabled by default):
Large Send Offload
Offload IP Checksum
Offload TCP Checksum
Offload UDP Checksum
No server restart is needed. This workaround applies to Windows Server 2003 and 2008 32-bit. Windows Server 2008 R2 is
not affected by this issue.
Applications might open in different sessions
This server-side issue can occur even when application sharing is enabled. This is an intermittent issue, and there is no
workaround.