cisco unified cm user options guide · cisco unified cm user options download plugins ... cisco...
TRANSCRIPT
Cisco Unified CM User Options GuideFirst Published: July 18, 2012
Last Modified: July 18, 2012
Americas HeadquartersCisco Systems, Inc.170 West Tasman DriveSan Jose, CA 95134-1706USAhttp://www.cisco.comTel: 408 526-4000 800 553-NETS (6387)Fax: 408 527-0883
Text Part Number: OL-27066-01

© 2012 Cisco Systems, Inc. All rights reserved.
C O N T E N T S
C H A P T E R 1 Cisco Unified CM User Options 1
User Options settings 1
Graphical user interface 2
Select phone and line 4
Change user password 4
Change phone PIN 4
Download plugins 5
Check notifications 5
Change table view using filter tool 5
C H A P T E R 2 Home page 7
Set Do Not Disturb 7
Set call forwarding 7
Add alternate number 8
Enable Reach Me Anywhere 9
Edit Reach Me Anywhere schedule 9
Allowed lists and blocked lists 9
Create allowed lists and blocked lists 9
Assign allowed lists or blocked lists to alternate number 10
Phone button setup 10
Assign speed dial number 11
C H A P T E R 3 Contacts page 13
Add contact 13
Phone contact 14
Email contact 14
C H A P T E R 4 Directory page 15
Cisco Unified CM User Options Guide OL-27066-01 iii
Add name from directory to contacts 15
Dial a name from the directory 16
C H A P T E R 5 Line Settings page 17
Set line labels 17
Set phone behavior for calls that cannot be completed 17
Set up voicemail notification 18
Set ring settings 18
Log missed calls 19
C H A P T E R 6 Phone Settings page 21
Change phone settings 21
Download phone user guide 21
C H A P T E R 7 Services page 23
Add service 23
Cisco Unified CM User Options Guideiv OL-27066-01
Contents
C H A P T E R 1Cisco Unified CM User Options
This document describes how to use Cisco Unified CM User Options web pages. Cisco Unified CM UserOptions provides a web-based interface that allows users and administrators to configure settings for theirCisco IP Phones. Using Cisco Unified CM User Options, users can configure speed dials, create contactlists, subscribe to phone services, and create contact lists for their Cisco IP Phones.
This chapter contains the following topics:
• User Options settings, page 1
• Graphical user interface, page 2
• Select phone and line, page 4
• Change user password, page 4
• Change phone PIN, page 4
• Download plugins, page 5
• Check notifications, page 5
• Change table view using filter tool, page 5
User Options settingsThis guide documents all the configuration options available in Cisco Unified CM User Options. This guideassumes that your phone supports all the available user options and that Cisco Unified CommunicationsManager enterprise parameters are set so that all user options are displayed.
Note that the user options that are displayed when you configure your phone in Cisco Unified CM UserOptions may differ from the user options that are displayed in this guide depending on the following factors:
• Phone Capabilities—If a feature is not available for your particular phone model, that user option doesnot appear when you set up that phone model in Cisco Unified CM User Options. For example, if yourphone does not support call forwarding, the call forwarding feature does not appear as an user option.
• Enterprise Parameters—Administrators can set enterprise parameters in Cisco Unified CommunicationsManager Administration to determine which user options are available for users to configure. Forexample, administrators can configure Cisco Unified CM User Options to remove all call forwardingoptions.
Cisco Unified CM User Options Guide OL-27066-01 1

Enterprise parameters are set by system administrators in Cisco Unified Communications ManagerAdministration. They appear in the Enterprise Parameters Configuration window, under User OptionsParameters.
If a user option that is in this guide does not appear when you configure your phone in Cisco Unified CMUser Options, check the phone documentation to ensure that the feature is available with your phone. If thefeature is available for your phone, ask one of your administrators to check the enterprise parameters withinCisco Unified Communications Manager to make sure that the feature is available for configuration by endusers.
Graphical user interfaceCisco Unified CM User Options uses a web-based graphical interface that is viewable within a web browser.The screen is split into four main sections:
• Header—Cisco Unified CM User Options uses a global header that remains the same regardless of thecontent that is on screen. The header contains options that are set at the user level, such as changing theuser password.
• Toolbar—The toolbar contains the main set of links for navigating the different content pages availablein Cisco Unified CMUser Options. By clicking the links in the toolbar, you can navigate to the differentcontent pages available such as Contacts, Directory and Phone Settings.
• Left pane—The left pane displays the phones and phone lines that are available for you to configure.Phone lines appear in a nested list underneath the phone to which they apply.
• Content page—The content page displays the main user options that can be configured. Click thecorresponding link on the toolbar to open the applicable content page.
Cisco Unified CM User Options has the following content pages:
• Home
• Contacts
• Directory
• Line Settings
• Phone Settings
• Services
Cisco Unified CMUser Options uses a common set of icons to represent configuration actions. The followingtable describes the icons that are used in Cisco Unified CM User Options.
DescriptionIcon
Edit Settings—Click this icon to open a configuration windowwhere you can edit the configurationsettings for this user option.
Delete—Click this icon to delete the item.
Click to Call—Click this icon to place a call to the contact.
Cisco Unified CM User Options Guide2 OL-27066-01
Cisco Unified CM User OptionsGraphical user interface
DescriptionIcon
Email—Click this icon to send an email message to the contact.
Additional Information—Click this icon to open a dialog box with additional information orsettings.
Add to contacts—Click this icon to add this directory entry to your list of personal contacts.
Notifications—Click this icon to open the Notifications window.
Settings—Click this icon to send an email message to the contact.
Filter—Click this icon to filter which table rows are displayed.
Last Update—Click this icon to view the last time the page was updated.
Personal Contact—This person is a personal contact.
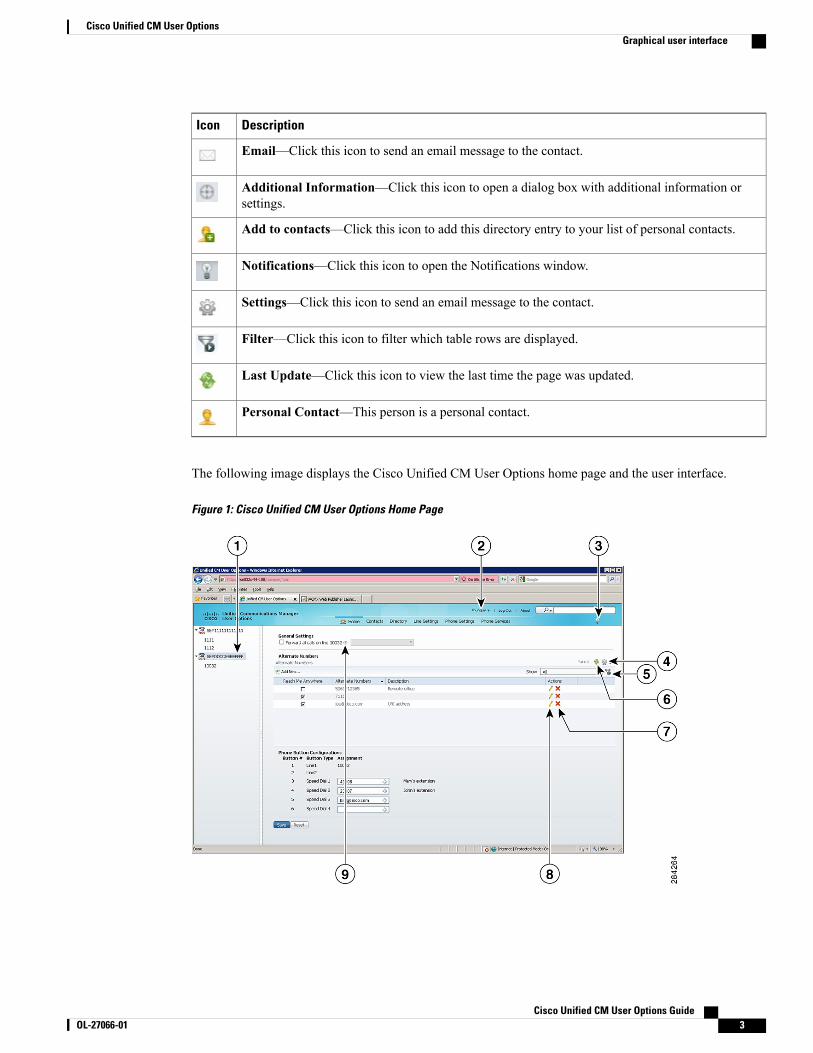
The following image displays the Cisco Unified CM User Options home page and the user interface.
Figure 1: Cisco Unified CM User Options Home Page
Cisco Unified CM User Options Guide OL-27066-01 3
Cisco Unified CM User OptionsGraphical user interface
Phone and line—The phone and line that are being configured. If you have more than one phone, clickhere to select which phone and line to configure.
1
Username—Click the username to bring up an additional menu on which you can change the userpassword.
2
Notifications—Click this icon to view notifications and tips.3
Settings—Click this icon to adjust which columns are displayed on the table.4
Filter—Click this icon to change filtering options on table views.5
Last Update—Click this icon to view the last time the page was updated.6
Delete—Click this icon to delete the item.7
Edit Settings—Click this icon to edit the settings for this item.8
Additional Information—Click this icon to open a dialog box with additional information or settings.9
Select phone and lineYour list of available phones and phone lines appear in the left pane beside the content page. You can clickon your phone to view a nested list of phone lines that are available for that phone.
If you have more than one phone or phone line, you must choose which phone and line you want to configure.Click your phone to view the list of available phones and click the phone line that you want to configure.
If you have just a single phone and phone line, then by default your single phone line is selected forconfiguration.
Change user passwordTo change the password you use to log in to Cisco Unified CM User Options, follow these steps:
Procedure
Step 1 In the Cisco Unified CMUser Options header, click the drop-down arrow that appears beside your username.Step 2 From the drop-down list box, choose Change Password.Step 3 In the Change Password window, enter the new password in both the Change Password and Confirm Password
fields.Step 4 Click OK.
Change phone PINTo change the Phone PIN, follow these steps:
Cisco Unified CM User Options Guide4 OL-27066-01
Cisco Unified CM User OptionsSelect phone and line
Procedure
Step 1 In the Cisco Unified CMUser Options header, click the drop-down arrow that appears beside your username.Step 2 From the drop-down list box, choose Change Phone PIN.Step 3 In the Change Phone PIN window, enter the new phone PIN in the New Phone PIN and Confirm Phone PIN
fields.Step 4 Click OK.
Download pluginsThe Plugins window displays the plugins that are available for the user to download. To download plugins,follow these steps:
Procedure
Step 1 In the Cisco Unified CMUser Options header, click the drop-down arrow that appears beside your username.Step 2 From the drop-down list box, choose Plugins. The Plugins window appears with a table that displays the
available plugins for download.Step 3 For each plugin that you want to download, click Download.
Check notificationsWhen the lightbulb icon appears on the right side of the toolbar, it means that notifications are available. Userscan click the lightbulb icon to open the Notifications window, which displays a list of helpful hints and tipsfor how to configure specific user option settings.
To edit a user option based on a notification, click the pencil icon beside the notification to open a configurationwindow that corresponds to the user option that is discussed in the notification. To delete a notification, clickthe Delete (X) icon
Change table view using filter toolThe Filter tool gives users the ability to filter table views so that only those table entries that meet specificfiltering criteria are displayed. Filtering can be used on any of the table views that are available in CiscoUnified CM User Options, but may be particularly useful on the Directory page as a company directory maycontain thousands of people.
Click the Filter icon at the top right corner of any table in the Cisco Unified CMUser Options pages to accessthe Filter tool. Cisco Unified CM User Options provides two main filtering methods:
Cisco Unified CM User Options Guide OL-27066-01 5
Cisco Unified CM User OptionsDownload plugins

• Quick Filter—Provides the ability to display only those table rows where the column entry matches theexact filter input, such as searching under the Name column to display all directory entries named“Smith”.
• Advanced Filter—Provides more sophisticated filter options, such as displaying phone numbers thatend in “1234” or names that begin with “S”.
To change the table view using the filter tool, perform the following steps:
Procedure
Step 1 Click the Filter icon that appears in the top right corner of the table.Step 2 From the Show drop-down list box, choose Quick Filter or Advanced Filter.Step 3 For Quick Filter, do the following:
a) In all of the filtering text boxes that appear in the header table rows, enter the exact filtering criteria forthat column. If you want to filter based on multiple columns, enter your filtering criteria for each column.
b) Press Enter. Cisco Unified CM User Options adjusts the table display to those table rows that meet allyour search criteria.
Step 4 For Advanced Filter, do the following:a) In the filtering drop-down list boxes, choose the filtering criteria that you want to use.b) If you want to add a new row where you can enter additional filtering criteria, click the Plus (+) button.c) Click Go.
Cisco Unified CM User Options Guide6 OL-27066-01
Cisco Unified CM User OptionsChange table view using filter tool
C H A P T E R 2Home page
The Home page appears immediately after users log in to Cisco Unified CM User Options. It can also beaccessed by clicking Home in the Toolbar. The Home page contains general settings. The Home page givesusers the ability to program Do Not Disturb, call forwarding, Reach Me Anywhere and speed dial.
This chapter contains the following topics:
• Set Do Not Disturb, page 7
• Set call forwarding, page 7
• Add alternate number, page 8
• Enable Reach Me Anywhere, page 9
• Edit Reach Me Anywhere schedule, page 9
• Allowed lists and blocked lists, page 9
• Phone button setup, page 10
• Assign speed dial number, page 11
Set Do Not DisturbWhen Do Not Disturb is activated, the phone does not ring when an incoming call is received. To turn on DoNot Disturb, check the Do Not Disturb check box that appears on the Home page and click Save.
If the pencil icon appears on the same line as the Do Not Disturb check box, advanced settings for Do NotDisturb are available for the phone. Click the pencil icon to open the Do Not Disturb Settings configurationwindow. In this window, you can configure advanced Do Not Disturb settings, such as how the phone directsan incoming call when Do Not Disturb is enabled and how the phone alerts the user that a call has beenreceived. After you have finished configuring Do Not Disturb, click Save.
Set call forwardingWhen the Forward all Calls check box is checked, all calls that you receive on the phone line will be forwardedto another phone line. The drop-down list box stores a history of the last five numbers that the Call Forwardingfeature was set to forward to.
Cisco Unified CM User Options Guide OL-27066-01 7
To set Call Forwarding, follow these steps:
Procedure
Step 1 On the Home page, check the Forward all calls check box.Step 2 From the Forward all calls drop-down list box, choose one of the options, or enter the number in the list box.Step 3 Click Save.
Add alternate numberAlternate numbers are other phone numbers where you can be reached, besides your main phone number.Cisco Unified CMUser Options displays all your alternate numbers on the Home page. Youmust add alternatenumbers to use the Reach Me Anywhere feature.
To add alternate numbers, you must have a Remote Destination Profile and Mobility enabled on your userprofile in Cisco Unified Communications Manager.
Note
To add alternate numbers, follow these steps:
Procedure
Step 1 On the Home page, under Alternate Numbers, click Add New. The Add New Alternate Numbers windowappears.
Step 2 In the Alternate Number text box, enter the alternate phone number.Step 3 In the Description text box, enter a description of the phone. For example, “home phone number.”Step 4 From the Use settings from drop-down list box, select a Remote Destination Profile.Step 5 If the number is a mobile number, check the This is a mobile device check box.Step 6 If you want Reach Me Anywhere enabled for this alternate number, check the Enable Reach Me Anywhere
for this alternate number check box.Step 7 Complete the additional settings under Configure Reach Me Anywhere Settings.Step 8 Complete the Schedule settings to schedule the times at which this phone number will be used by Reach Me
Anywhere.Step 9 Under Configure Incoming Call Settings, choose whether you want to assign an allowed list, assign a blocked
list, or allow all calls.Step 10 If you are assigning an allowed or blocked list, select the list you want to assign from the corresponding
drop-down list box.Step 11 Click OK.
Cisco Unified CM User Options Guide8 OL-27066-01
Home pageAdd alternate number
Enable Reach Me AnywhereReach Me Anywhere is a feature you can program on your alternate numbers so that when someone dialsyour main phone number, the phone also rings at an alternate phone number, such as a mobile phone or yourhome phone.
Enable Reach Me Anywhere from the Home page. In the Alternate Numbers table, check the Reach MeAnywhere check box for each alternate number that you want to ring when someone dials your main number.To disable Reach Me Anywhere, uncheck the Reach Me Anywhere check box. Click Save to save yourchanges.
To use Reach Me Anywhere, you must have alternate numbers programmed into your phone.Note
Edit Reach Me Anywhere scheduleYou can configure Reach Me Anywhere to only be enabled at specific times of the day. For example, youcan configure ReachMeAnywhere to only be active during business hours. To change the ReachMeAnywhereschedule, follow these steps:
Procedure
Step 1 On the Toolbar, click Home.Step 2 In the Alternate Numbers table, click the pencil icon that appears in the same row as the alternate number for
which you want to change the Reach Me Anywhere schedule.Step 3 Under Configure Reach Me Anywhere schedule, change the schedule settings.Step 4 Click OK.
Allowed lists and blocked listsYou can create and then assign allowed and blocked lists to each of your alternate numbers to restrict the useof Reach Me Anywhere on that alternate number.
• With allowed lists, the alternate number rings only when the incoming call is from one of the numberson the allowed list.
• With blocked lists, the alternate number does not ring if the incoming call is from one of the numberson the blocked list.
Create allowed lists and blocked listsTo create an allowed or blocked list for an existing alternate number, follow these steps:
Cisco Unified CM User Options Guide OL-27066-01 9
Home pageEnable Reach Me Anywhere
Procedure
Step 1 On the Toolbar, click Home.Step 2 In the Alternate Numbers table, click the pencil icon that corresponds to the alternate number on which you
want to create a list. The Edit Alternate Numbers window appears.Step 3 Click the Allowed or Blocked tab.Step 4 Under Allowed or Blocked, click Add New.Step 5 In the Name field, enter a unique name for your list.Step 6 In the Description field, enter a description of the list.Step 7 Depending on whether you want the list to be an allowed list or a blocked list, click the Allowed List for
Alternate Numbers or Blocked List for Alternate Numbers radio button.Step 8 Click OK. The Allowed or Blocked table is updated the new list.Step 9 In the Allowed or Blocked table, click the pencil icon that corresponds with the new list. The Edit Allowed
or Blocked List window appears.Step 10 For each phone number you want to add to the list, enter the phone number in the Phone field and click the
Arrow (>) to add the phone number to the list.Step 11 Click OK twice.
Assign allowed lists or blocked lists to alternate numberTo assign an allowed list or a blocked list to an alternate number, do the following:
Procedure
Step 1 On the Toolbar, click Home.Step 2 In the Alternate Numbers table, click the pencil icon that appears in the same row as the alternate number on
which you want to change the Reach Me Anywhere schedule.Step 3 Under Configure Incoming Call Settings, choose whether you want to assign an allowed list, assign a blocked
list, or allow all calls.Step 4 If you want to assign an allowed list or blocked list, choose the list from the corresponding drop-down list
box.Step 5 Click OK.
Phone button setupCisco Unified CM User Options allows you to configure the main button assignments for your phone fromthe home page. Note that the template used for the button layout is different for each phone. As a result, forsome phones you may be able to configure speed dial assignments or phone services assignments from thispage, and for other phones those options may not appear.
Cisco Unified CM User Options Guide10 OL-27066-01
Home pageAssign allowed lists or blocked lists to alternate number
Assign speed dial numberTo set speed dial for the main buttons on your phone, follow these steps:
Procedure
Step 1 On the toolbar, click Home.Step 2 Click the + sign that corresponds to the phone button you want to assign.Step 3 If you want to assign a phone number that is not saved in your list of contacts, do the following:
a) Click the Enter Number radio button.b) Enter the phone number and text label you want to assign to the button.
Step 4 If you want to assign a phone number for one of your contacts, do the following:a) To use a contact, click the Enter Speed Dial from Contact radio button.b) In the Contact Name drop-down list box, select the contact you want to assign to the button.c) From the Phone drop-down list box, select the phone number for the contact.
Step 5 Click Save.
Cisco Unified CM User Options Guide OL-27066-01 11
Home pageAssign speed dial number

Cisco Unified CM User Options Guide12 OL-27066-01
Home pageAssign speed dial number
C H A P T E R 3Contacts page
The Contacts page displays the user’s contact list. Contacts allow you to create a summarized list of contactsso that you can quickly look up people you frequently communicate with without having to go through acorporate directory. The Contacts page also provides action icons that you can click to phone or email acontact.
This chapter contains the following topics:
• Add contact, page 13
• Phone contact, page 14
• Email contact, page 14
Add contactContacts contain detailed personal information for your personal contacts, such as names, email addressesand phone numbers. In addition, you can configure fast dial and speed dial information.
To add a contact, follow these steps:
Procedure
Step 1 In the toolbar, click Contacts.Step 2 Click Add New. The Add Contact window appears.Step 3 Under the Contact Information heading, enter the contact’s personal information and email address.Step 4 Under Phone Information, enter the customer’s phone numbers.Step 5 If you want to assign a speed dial number, choose the number from the Speed Dial drop-down list box and a
label from the Speed Dial Phone Label drop-down list box.Step 6 Click OK.
Cisco Unified CM User Options Guide OL-27066-01 13
Phone contactCisco Unified CM User Options gives you the ability to make phone call from the Contacts page. For thisfeature to work, you must save a phone number or email address in the contact information.
To initiate a phone call or email message to a directory entry, follow these steps:
Procedure
Step 1 On the toolbar, click Contacts.Step 2 Locate the person you want to phone.Step 3 In the Actions column, click the phone handset icon.Step 4 If the contact has multiple phone numbers, select the number you want to dial.Step 5
Email contactCisco Unified CM User Options gives you the ability to initiate an email message to a personal contact. Forthis feature to work, you must have the email address saved in the contact information.
To initiate an email message to a personal contact, follow these steps:
Procedure
Step 1 On the toolbar, click Contacts.Step 2 Locate the person you want to email.Step 3 In the Actions column, click the envelope icon. If the Actions column does not display the envelope icon
beside the contact you want to email then an email address has not been saved in that person’s contactinformation.
Cisco Unified CM User Options Guide14 OL-27066-01
Contacts pagePhone contact
C H A P T E R 4Directory page
The Directory page gives users the ability to view a company directory. You can add people from the corporatedirectory to your personal contacts. You can also use the Click to Call feature to place phone calls to peoplein the corporate directory.
In situations where the directory is from a large company, the list of names could contain hundreds, or eventhousands, of names. In these situations you can use the filter tool to limit the output to those names thatmeet specific criteria.
This chapter contains the following topics:
• Add name from directory to contacts, page 15
• Dial a name from the directory, page 16
Add name from directory to contactsIf a person in your company directory is also saved as a personal contact, a check mark will appear in theContacts column for the company directory. If the check mark does not appear, the person is not saved inyour personal contacts.
To add a person from the directory to your personal contacts, follow these steps:
Procedure
Step 1 On the toolbar, click Directory.Step 2 In the company directory, locate the person that you want to add to your contacts.Step 3 Click the Personal Contact icon that appears in the Actions column for that person.Step 4 Complete the fields in the Add a Contact window.Step 5 Click OK.
Cisco Unified CM User Options Guide OL-27066-01 15

Dial a name from the directoryCisco Unified CM User Options gives you the ability to make a phone call from the company directory byclicking the person’s phone extension. For this feature to work, the person that you want to call must have aphone extension saved in the directory.
Cisco Unified CM User Options Guide16 OL-27066-01
Directory pageDial a name from the directory
C H A P T E R 5Line Settings page
The Line Settings page gives users the ability to configure line-specific settings for their phones. From theLine Settings page you can configure how calls are handled, voicemail notifications, rings settings andlogging missed calls in the call history.
This chapter contains the following topics:
• Set line labels, page 17
• Set phone behavior for calls that cannot be completed, page 17
• Set up voicemail notification, page 18
• Set ring settings, page 18
• Log missed calls, page 19
Set line labelsLine labels allow you to identify your phone line so that you can distinguish between different phone lines.Set line labels on the Line Settings page. To add a line label, enter the text label in the Label text box thatappears under Line Label Settings and click Save.
Set phone behavior for calls that cannot be completed
This feature appears only if the Show Call Forwarding enterprise parameter in Cisco UnifiedCommunications Manager is set to Show All Settings.
Note
The Line Settings page allows you to configure the phone behavior in situations where a call cannot becompleted. You can configure different settings for how the phone handles internal calls and external callsunder the following circumstances:
• If the line is busy
• If there is no answer
Cisco Unified CM User Options Guide OL-27066-01 17
• If there is no coverage
• If the phone cannot register
To set phone behavior for calls that cannot be completed, follow these steps:
Procedure
Step 1 On the toolbar, click Line Settings.Step 2 Set the phone behavior for internal calls by doing the following:
a) For the check boxes that appear under For All Internal Calls on Line, check each check box that correspondsto the phone behavior that you want to implement
b) For each checked item, choose an option from the corresponding drop-down text box.
Step 3 Set the phone behavior for external calls by doing the following:a) For the check boxes that appear under For All External Calls on Line, check each check box that corresponds
to the phone behavior that you want to implement.b) For each checked item, choose an option from the corresponding drop-down text box.
Step 4 Click Save.
Set up voicemail notificationVoicemail notifications alert you that a message has been saved to your voicemail. Depending on which phoneyou are using, you may configure your phone to turn on a message waiting light or display a prompt on thescreen.
To set voicemail notifications, follow these steps:
Procedure
Step 1 On the toolbar, click Line Settings.Step 2 Under the Voicemail Notifications heading, check the text boxes that correspond to features you want to add.Step 3 Click Save.
Set ring settingsRing settings determine how your phone rings when an incoming call is received. You can configure differentrings for when you are already on a call and situations when you are not on a call.
To configure Ring settings, follow these steps:
Cisco Unified CM User Options Guide18 OL-27066-01
Line Settings pageSet up voicemail notification
Procedure
Step 1 On the toolbar, click Line Settings.Step 2 Choose an option from the When I Am on a Call, My Phone Will drop-down list box.Step 3 Choose an option from the When I Am Not on a Call, My Phone Will drop-down list box.Step 4 Click Save.
Log missed callsWhen you check the Log Missed Calls check box on the Line Settings page, your phone will save a recordof all missed calls in the Call History for the phone. If you do not want your phone to save a record of missedcalls, leave the Log Missed Calls check box unchecked.
Cisco Unified CM User Options Guide OL-27066-01 19
Line Settings pageLog missed calls

Cisco Unified CM User Options Guide20 OL-27066-01
Line Settings pageLog missed calls
C H A P T E R 6Phone Settings page
The Phone Settings page displays the basic phone settings that can be configured by an end user, such asphone description and language settings. The phone settings that are displayed depends on which phone youare configuring.
This chapter contains the following topics:
• Change phone settings, page 21
• Download phone user guide, page 21
Change phone settingsTo change a phone setting, click Phone Settings in the toolbar to open the Phone Settings page. Enter thenew text, and click Save.
Download phone user guideCisco Unified CM User Options gives users the ability to download the user guide for their specific phonemodel. To download the phone user guide, from the Phone Settings page, click Download User Guide.
Cisco Unified CM User Options Guide OL-27066-01 21

Cisco Unified CM User Options Guide22 OL-27066-01
Phone Settings pageDownload phone user guide
C H A P T E R 7Services page
The Services page gives you the ability to add services to your phone. The Services page displays a tablethat shows the list of services the phone currently subscribes to. Users can subscribe or unsubscribe to theservices that are available with their phone.
The list of available services depends on which phone you are using. Cisco Unified CM User Optionsdisplays only the services that are available with the phone that is being configured.
Note
This chapter contains the following topics:
• Add service, page 23
Add serviceTo add a service, follow these steps:
Procedure
Step 1 On the toolbar, click Services.Step 2 Click Add New.Step 3 In the Service Name drop-down list box, choose the service that you want to add.Step 4 In the Displayed Service Name on phone text box, enter the name of the service as you want it to be displayed
on your phone.Step 5 Click OK.
Cisco Unified CM User Options Guide OL-27066-01 23

Cisco Unified CM User Options Guide24 OL-27066-01
Services pageAdd service