cisco ucs director emc vnx management guide, release 5 · cisco ucs director emc vnx management...
TRANSCRIPT
Cisco UCS Director EMC VNX Management Guide, Release 5.0First Published: July 31, 2014
Americas HeadquartersCisco Systems, Inc.170 West Tasman DriveSan Jose, CA 95134-1706USAhttp://www.cisco.comTel: 408 526-4000 800 553-NETS (6387)Fax: 408 527-0883
Text Part Number: OL-32422-01

© 2014 Cisco Systems, Inc. All rights reserved.
C O N T E N T S
P r e f a c e Preface vii
Audience vii
Conventions vii
Related Documentation ix
Documentation Feedback ix
Obtaining Documentation and Submitting a Service Request ix
C H A P T E R 1 New and Changed Information for this Release 1
New and Changed Information 1
C H A P T E R 2 Overview 3
About Cisco UCS Director for EMC VNX 3
VNX Tasks 4
C H A P T E R 3 Adding an Account 5
Account Types 5
Adding a VNX File Account 5
Adding a VNX Block Account 7
Adding a VNX Unified Account 9
C H A P T E R 4 Managing VNX Block Storage 13
VNX Block Storage Management 13
Summary of Steps 14
Storage Pools 15
Creating a Storage Pool 15
RAID Groups 16
Creating A RAID Group 17
Cisco UCS Director EMC VNX Management Guide, Release 5.0 OL-32422-01 iii

Host Initiators 18
Registering a Host Initiator 18
Storage Groups 19
Creating a Storage Group 20
LUNs 20
Creating a LUN 21
Adding a Host to a Storage Group 22
Adding a LUN to a Storage Group 23
Creating a Meta LUN 24
Associate a LUN as a Datastore 25
C H A P T E R 5 Managing VNX File Storage 27
VNX File Storage Management 27
Summary of Steps 28
Using CIFS 28
CIFS Servers 28
Creating a CIFS Server 29
CIFS Shares 30
Creating CIFS Shares 31
DNS Domains 32
Creating a DNS Domain 32
Using NFS Export 33
Storage Pools for Files 33
Creating a Storage Pool for Files 34
Volumes 34
Creating a Volume 35
File Systems 36
Creating an NFS File System 36
Data Mover Interfaces 37
Creating a Data Mover Interface 38
NFS Export 38
Exporting an NFS File System 39
Mounts 39
Edit a File System 40
Deleting a File System 41
Cisco UCS Director EMC VNX Management Guide, Release 5.0iv OL-32422-01
Contents
C H A P T E R 6 Managing VNX Unified Storage 43
VNX Unified Storage Management 43
Summary of Steps 43
Cisco UCS Director EMC VNX Management Guide, Release 5.0 OL-32422-01 v
Contents

Cisco UCS Director EMC VNX Management Guide, Release 5.0vi OL-32422-01
Contents

Preface
This preface contains the following sections:
• Audience, page vii
• Conventions, page vii
• Related Documentation, page ix
• Documentation Feedback, page ix
• Obtaining Documentation and Submitting a Service Request, page ix
AudienceThis guide is intended primarily for data center administrators who use Cisco UCS Director and who haveresponsibilities and expertise in one or more of the following:
• Server administration
• Storage administration
• Network administration
• Network security
• Virtualization and virtual machines
ConventionsIndicationText Type
GUI elements such as tab titles, area names, and field labels appear in this font.
Main titles such as window, dialog box, and wizard titles appear in this font.
GUI elements
Document titles appear in this font.Document titles
In a Text-based User Interface, text the system displays appears in this font.TUI elements
Cisco UCS Director EMC VNX Management Guide, Release 5.0 OL-32422-01 vii

IndicationText Type
Terminal sessions and information that the system displays appear in thisfont.
System output
CLI command keywords appear in this font.
Variables in a CLI command appear in this font.
CLI commands
Elements in square brackets are optional.[ ]
Required alternative keywords are grouped in braces and separated by verticalbars.
{x | y | z}
Optional alternative keywords are grouped in brackets and separated by verticalbars.
[x | y | z]
A nonquoted set of characters. Do not use quotation marks around the string orthe string will include the quotation marks.
string
Nonprinting characters such as passwords are in angle brackets.< >
Default responses to system prompts are in square brackets.[ ]
An exclamation point (!) or a pound sign (#) at the beginning of a line of codeindicates a comment line.
!, #
Means reader take note. Notes contain helpful suggestions or references to material not covered in thedocument.
Note
Means the following information will help you solve a problem. The tips information might not betroubleshooting or even an action, but could be useful information, similar to a Timesaver.
Tip
Means reader be careful. In this situation, you might perform an action that could result in equipmentdamage or loss of data.
Caution
Means the described action saves time. You can save time by performing the action described in theparagraph.
Timesaver
Cisco UCS Director EMC VNX Management Guide, Release 5.0viii OL-32422-01
PrefaceConventions
IMPORTANT SAFETY INSTRUCTIONS
This warning symbol means danger. You are in a situation that could cause bodily injury. Before youwork on any equipment, be aware of the hazards involved with electrical circuitry and be familiar withstandard practices for preventing accidents. Use the statement number provided at the end of each warningto locate its translation in the translated safety warnings that accompanied this device.
SAVE THESE INSTRUCTIONS
Warning
Related DocumentationCisco UCS Director Documentation Roadmap
For a complete list of Cisco UCS Director documentation, see the Cisco UCS Director DocumentationRoadmap available at the following URL: http://www.cisco.com/en/US/docs/unified_computing/ucs/ucs-director/doc-roadmap/b_UCSDirectorDocRoadmap.html.
Cisco UCS Documentation Roadmaps
For a complete list of all B-Series documentation, see theCiscoUCS B-Series Servers Documentation Roadmapavailable at the following URL: http://www.cisco.com/go/unifiedcomputing/b-series-doc.
For a complete list of all C-Series documentation, see theCiscoUCSC-Series Servers Documentation Roadmapavailable at the following URL: http://www.cisco.com/go/unifiedcomputing/c-series-doc.
The Cisco UCS B-Series Servers Documentation Roadmap includes links to documentation for CiscoUCSManager and Cisco UCSCentral. TheCiscoUCSC-Series Servers Documentation Roadmap includeslinks to documentation for Cisco Integrated Management Controller.
Note
Documentation FeedbackTo provide technical feedback on this document, or to report an error or omission, please send your commentsto [email protected]. We appreciate your feedback.
Obtaining Documentation and Submitting a Service RequestFor information on obtaining documentation, submitting a service request, and gathering additional information,see the monthly What's New in Cisco Product Documentation, which also lists all new and revised Ciscotechnical documentation.
Subscribe to theWhat's New in Cisco Product Documentation as a Really Simple Syndication (RSS) feedand set content to be delivered directly to your desktop using a reader application. The RSS feeds are a freeservice and Cisco currently supports RSS version 2.0.
Cisco UCS Director EMC VNX Management Guide, Release 5.0 OL-32422-01 ix
PrefaceRelated Documentation

Cisco UCS Director EMC VNX Management Guide, Release 5.0x OL-32422-01
PrefaceObtaining Documentation and Submitting a Service Request
C H A P T E R 1New and Changed Information for this Release
•
• New and Changed Information, page 1
New and Changed InformationThe following table provides an overview of the significant changes to this guide for this current release. Thetable does not provide an exhaustive list of all changes made to this guide or of all new features in this release.
Table 1: New Features and Changed Behavior in Cisco UCS Director EMC VNX Version 5.0.
Where DocumentedDescriptionFeature
See Adding an Account, onpage 5
New user controls and documentationprovide ease of use improvements,security.
New simplified UI for adding anaccount speeds the process, andsupports policy-based security andfeatures.
See Adding an Account, onpage 5
New user controls and documentationsupport this new CLI.
As a consequence of this Navisphererequirement, you must replace thelegacy CLI, navicli with the Secure CLIcalled navisec CLI.
New secure Navisphere CLIsupport.
Because someNavisphere featuresare now only supported with anSSH CLI, the new secure CLIcalled navisec CLI is required.
See "Creating a Lun" in thesection on Managing VNXBlock Storage, on page 13
Enhanced UI, with new user controlsand documentation supporting thechanges.
Changes and improvements insetting up LUNs.
Cisco UCS Director EMC VNX Management Guide, Release 5.0 OL-32422-01 1
Where DocumentedDescriptionFeature
New System Tasks tab in Physical >Storage for VNX_Block page providesmore immediate access to ManageVNX Block tasks; no need to navigatethrough the Administration > System> System Tasks page.
New System Task Managementcapabilities
Cisco UCS Director EMC VNX Management Guide, Release 5.02 OL-32422-01
New and Changed Information for this ReleaseNew and Changed Information
C H A P T E R 2Overview
This chapter contains the following sections:
• About Cisco UCS Director for EMC VNX, page 3
• VNX Tasks, page 4
About Cisco UCS Director for EMC VNXCisco UCSDirector supports EMCVNXBlock, File, and Unified accounts for the VNX versions 5100, 5200,5300, 5400, 5500, 5600, 5700, and 7500.
For a VNX Block account, you create the following:
• Storage pools
• Storage groups
• RAID groups
• Initiators
• Logical Unit Numbers (LUNs)
The reports available for VNX Block accounts include details on all of these items, as well as on storageprocessors, ports, data movers, and disk devices. You can also view tabular reports for RAID groups or hosts,and instant reports for file system allocation, the top five storage capacity file systems, the top five file systemsfile count, and the top five storage capacity volumes.
For a VNX File account, you create use either Common Internet File Servers (CIFS) or Network File System(NFS) Export. For CIFS, you create the CIFS servers and shares, and the Domain Name System (DNS)domains.
For NFS Export, you create the following:
• Storage pools for files
• File systems
• Interfaces
• Volumes
Cisco UCS Director EMC VNX Management Guide, Release 5.0 OL-32422-01 3

• Mounts
The reports available for VNX File accounts include details on these items, as well as system overviewsummaries.
For a VNX Unified account, which combines VNX Block and VNX File, you perform all the steps neededfor both VNX block and VNX file accounts.
You can view any of the reports available for VNX block or VNX file accounts.
VNX Tasks
Step 1 On the menu bar, choose Policies and choose Orchestration.
Step 2 ChooseWorkflows.Step 3 Click Physical Storage Tasks, and choose EMC VNX > EMC VNX Tasks.
The tasks available for EMC VNX appear.
Cisco UCS Director EMC VNX Management Guide, Release 5.04 OL-32422-01
OverviewVNX Tasks

C H A P T E R 3Adding an Account
This chapter contains the following sections:
• Account Types, page 5
• Adding a VNX File Account, page 5
• Adding a VNX Block Account, page 7
• Adding a VNX Unified Account, page 9
Account TypesIn Cisco UCS Director you can add three different types of VNX accounts:
• VNX File account—X-Blade enclosured, 2 to 8 blades, configurable failover options, and flexible I/Oconnectivity. There is one datamover per license.
• VNX Block account—Storage or data processor enclosure, dual active storage processors, automaticfailover, and flexible I/O connectivity. There are two service providers per license.
• VNXUnified account—Single platform for VNX File and VNX Block. There are two service providersper license.
Adding a VNX File AccountBefore You Begin
You must create a data center for the account.
Step 1 On the menu bar, choose Administration > Physical Accounts.Step 2 In the Physical Acccounts pane, click Add.Step 3 In the Add Account dialog box, complete the following fields, then click Submit:
Cisco UCS Director EMC VNX Management Guide, Release 5.0 OL-32422-01 5

Table 2: Add Account
DescriptionName
Choose the pod (data center) for this account.Pod drop-down list
Choose Storage.Category drop-down list
Choose EMC VNX File.Account Type drop-down list
Another Add Account dialog box appears to collect data.Step 4 In the longer Add Account dialog box, complete the following fields:
DescriptionName
The pre-selected pod (data center) for this account appears.Pod drop-down list
The pre-selected type for this account appears.Account Type drop-down list
The account name.Account Name field
Describe this account so that others can distinguish it from similar accounts.Description field
The Control Station IP address of the VNX device.Control Station IP Address field
Checkmark this box to apply a new or existing policy to the VNX. See thedescription of your options below.
If you click this option and apply a policy, the Control Station Nameand Password, and the Protocol/Transport type and Port fields describedbelow will not appear in this form. They are administered by the policy.
Note
Use Credential Policy checkbox
You have these two options if you check the Use Credential Policy checkbox.
• From a drop-down list, select a pre-defined policy for this type of accountand apply that policy data to this account
• Click the icon to open the Add Credential Policy form, and use it to definea policy for this type of account. You can use a defined Credential Policyin future sessions; it will appear in the drop-down list.
Credential Policy drop-down listand Add Credential Policy formicon
The password associated with the specified Control Station address.Password field
Choose the transport type.Transport Type drop-down list
The port.Port field
The contact's email.Contact Email field
The contact's location (user defined).Location field
Cisco UCS Director EMC VNX Management Guide, Release 5.06 OL-32422-01
Adding an AccountAdding a VNX File Account
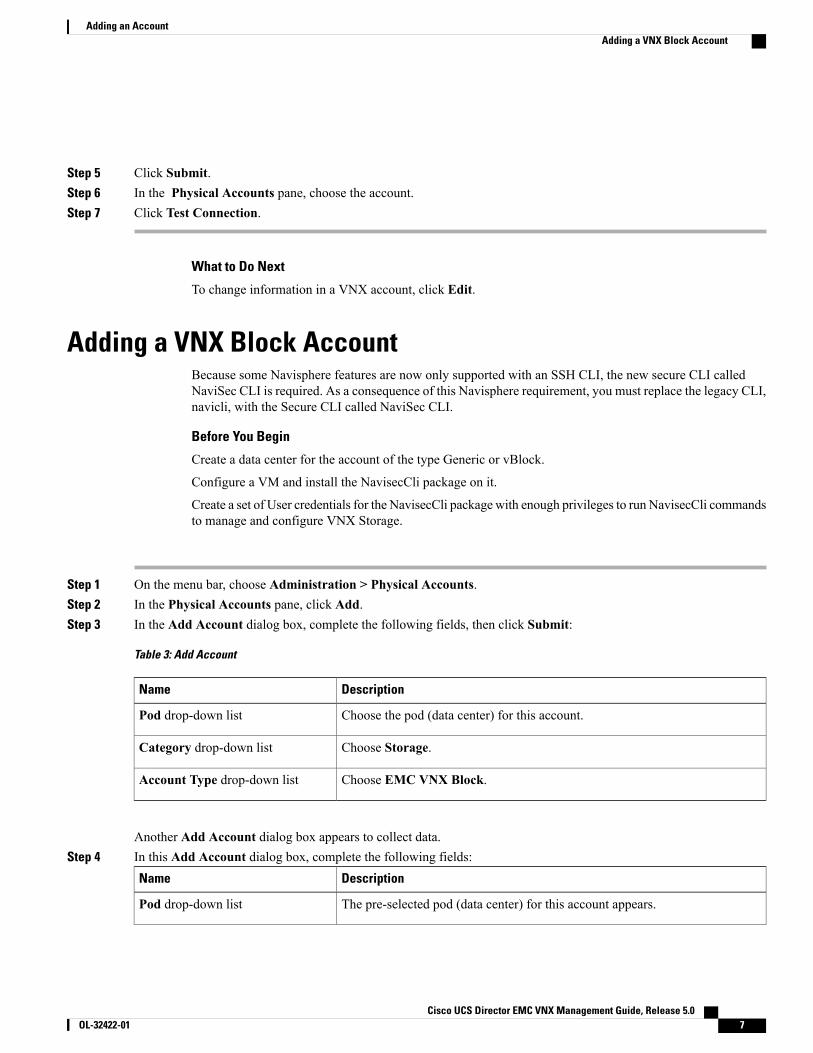
Step 5 Click Submit.Step 6 In the Physical Accounts pane, choose the account.Step 7 Click Test Connection.
What to Do Next
To change information in a VNX account, click Edit.
Adding a VNX Block AccountBecause some Navisphere features are now only supported with an SSH CLI, the new secure CLI calledNaviSec CLI is required. As a consequence of this Navisphere requirement, you must replace the legacy CLI,navicli, with the Secure CLI called NaviSec CLI.
Before You Begin
Create a data center for the account of the type Generic or vBlock.
Configure a VM and install the NavisecCli package on it.
Create a set of User credentials for the NavisecCli package with enough privileges to run NavisecCli commandsto manage and configure VNX Storage.
Step 1 On the menu bar, choose Administration > Physical Accounts.Step 2 In the Physical Accounts pane, click Add.Step 3 In the Add Account dialog box, complete the following fields, then click Submit:
Table 3: Add Account
DescriptionName
Choose the pod (data center) for this account.Pod drop-down list
Choose Storage.Category drop-down list
Choose EMC VNX Block.Account Type drop-down list
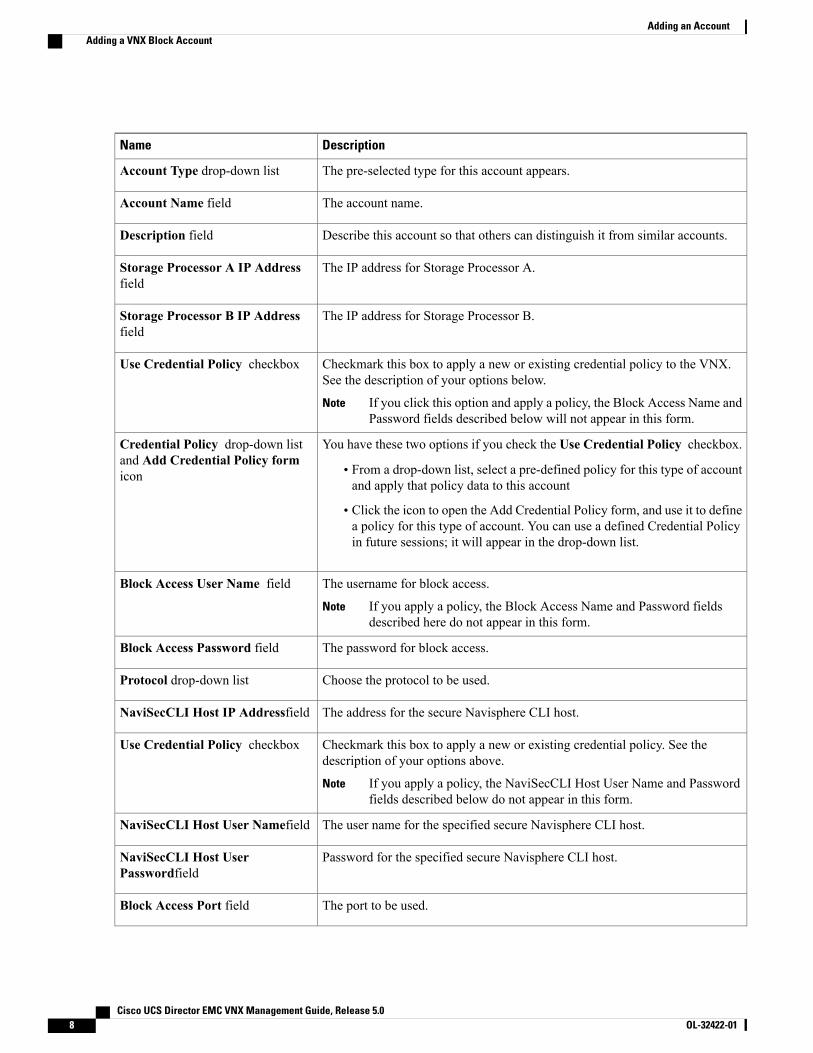
Another Add Account dialog box appears to collect data.Step 4 In this Add Account dialog box, complete the following fields:
DescriptionName
The pre-selected pod (data center) for this account appears.Pod drop-down list
Cisco UCS Director EMC VNX Management Guide, Release 5.0 OL-32422-01 7
Adding an AccountAdding a VNX Block Account
DescriptionName
The pre-selected type for this account appears.Account Type drop-down list
The account name.Account Name field
Describe this account so that others can distinguish it from similar accounts.Description field
The IP address for Storage Processor A.Storage Processor A IP Addressfield
The IP address for Storage Processor B.Storage Processor B IP Addressfield
Checkmark this box to apply a new or existing credential policy to the VNX.See the description of your options below.
If you click this option and apply a policy, the Block Access Name andPassword fields described below will not appear in this form.
Note
Use Credential Policy checkbox
You have these two options if you check the Use Credential Policy checkbox.
• From a drop-down list, select a pre-defined policy for this type of accountand apply that policy data to this account
• Click the icon to open the Add Credential Policy form, and use it to definea policy for this type of account. You can use a defined Credential Policyin future sessions; it will appear in the drop-down list.
Credential Policy drop-down listand Add Credential Policy formicon
The username for block access.
If you apply a policy, the Block Access Name and Password fieldsdescribed here do not appear in this form.
Note
Block Access User Name field
The password for block access.Block Access Password field
Choose the protocol to be used.Protocol drop-down list
The address for the secure Navisphere CLI host.NaviSecCLI Host IP Addressfield
Checkmark this box to apply a new or existing credential policy. See thedescription of your options above.
If you apply a policy, the NaviSecCLI Host User Name and Passwordfields described below do not appear in this form.
Note
Use Credential Policy checkbox
The user name for the specified secure Navisphere CLI host.NaviSecCLI Host User Namefield
Password for the specified secure Navisphere CLI host.NaviSecCLI Host UserPasswordfield
The port to be used.Block Access Port field
Cisco UCS Director EMC VNX Management Guide, Release 5.08 OL-32422-01
Adding an AccountAdding a VNX Block Account
DescriptionName
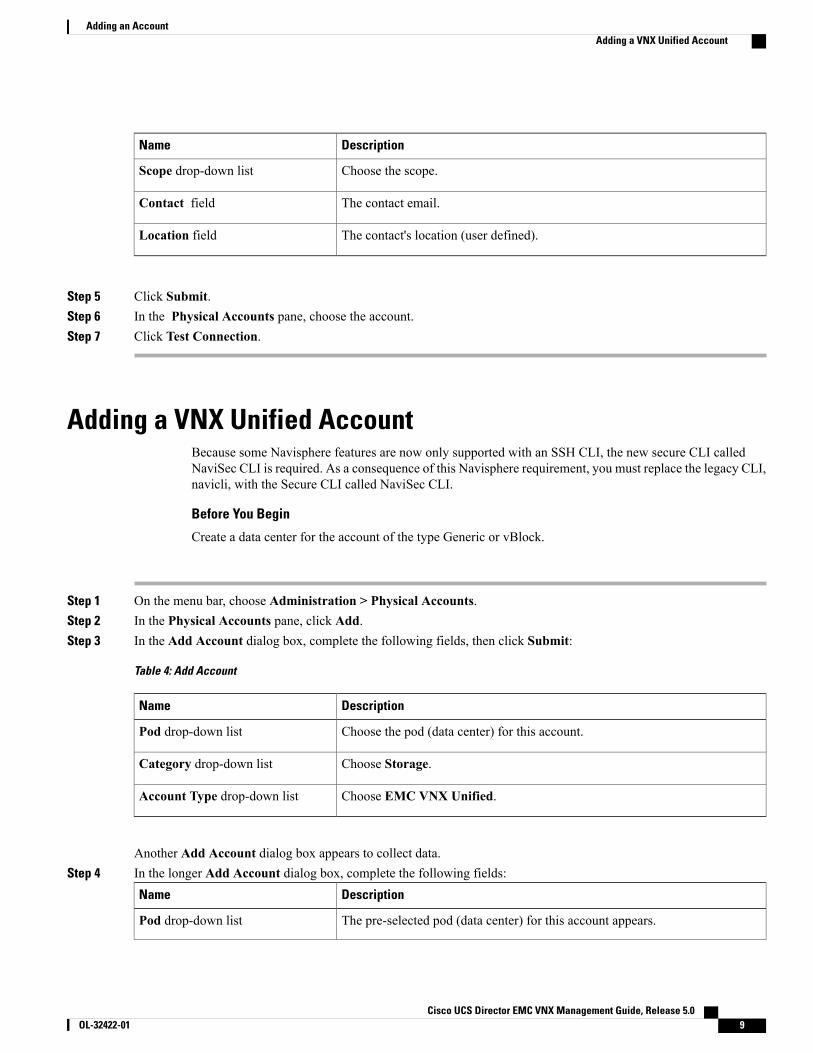
Choose the scope.Scope drop-down list
The contact email.Contact field
The contact's location (user defined).Location field
Step 5 Click Submit.Step 6 In the Physical Accounts pane, choose the account.Step 7 Click Test Connection.
Adding a VNX Unified AccountBecause some Navisphere features are now only supported with an SSH CLI, the new secure CLI calledNaviSec CLI is required. As a consequence of this Navisphere requirement, you must replace the legacy CLI,navicli, with the Secure CLI called NaviSec CLI.
Before You Begin
Create a data center for the account of the type Generic or vBlock.
Step 1 On the menu bar, choose Administration > Physical Accounts.Step 2 In the Physical Accounts pane, click Add.Step 3 In the Add Account dialog box, complete the following fields, then click Submit:
Table 4: Add Account
DescriptionName
Choose the pod (data center) for this account.Pod drop-down list
Choose Storage.Category drop-down list
Choose EMC VNX Unified.Account Type drop-down list
Another Add Account dialog box appears to collect data.Step 4 In the longer Add Account dialog box, complete the following fields:
DescriptionName
The pre-selected pod (data center) for this account appears.Pod drop-down list
Cisco UCS Director EMC VNX Management Guide, Release 5.0 OL-32422-01 9
Adding an AccountAdding a VNX Unified Account

DescriptionName
The pre-selected type for this account appears.Account Type drop-down list
The account name.Account Name field
Describe this account so that others can distinguish it from similar accounts.Description field
The Control Station IP address of the VNX device.The Control Station IP Addressfield
Checkmark this box to apply a new or existing policy to the VNX. See thedescription of your options below.
If you click this option and apply a policy, the Control Station Nameand Password, and the file Access Protocol and Port fields describedbelow will not appear in this form. They are administered by the policy.
Note
Use Credential Policy checkbox
You have these two options if you check the Use Credential Policy checkbox.
• From a drop-down list, select a pre-defined policy for this type of accountand apply that policy data to this account
• Click the icon to open the Add Credential Policy form, and use it to definea policy for this type of account. You can use a defined Credential Policyin future sessions; it will appear in the drop-down list.
Credential Policy drop-down listand Add Credential Policy formicon
The user name associated with the specified Control Station address.Control Station User Name field
The password associated with the Control Station IP address and user name.Password field
Choose the protocol to be used.File Access Protocol drop-down list
Choose the port to be used.File Access Port field
The IP address for Storage Processor A.Storage Processor A IP Addressfield
The IP address for Storage Processor B.Storage Processor B IP Addressfield
Checkmark this box to apply a new or existing credential policy to the VNX.See the description of the Credential Policy options, above.
If you click this option and apply a policy, the Name and Passwordfields described below will not appear in this form.
Note
Use Credential Policy checkbox
The username for block access.Block Access User Name field
The associated password for block access.Block Access Password field
The address for the secure Navisphere CLI host.NaviSecCLI Host IP Addressfield
Cisco UCS Director EMC VNX Management Guide, Release 5.010 OL-32422-01
Adding an AccountAdding a VNX Unified Account

DescriptionName
Checkmark this box to apply a new or existing credential policy. See thedescription of your options above.
If you apply a policy, the NaviSecCLI Host User Name and Passwordfields described below do not appear in this form.
Note
Use Credential Policy checkbox
The user name for the specified secure Navisphere CLI host.NaviSecCLI Host User Namefield
Password for the specified secure Navisphere CLI host.NaviSecCLI Host UserPasswordfield
The port to be used.Block Access Port field
Choose the scope.Scope drop-down list
The contact email.Contact field
The contact's location (user defined).Location field
Step 5 Click Submit.Step 6 In the Physical Accounts pane, choose the account.Step 7 Click Test Connection.
What to Do Next
To change information in a VNX account, click Edit.
Cisco UCS Director EMC VNX Management Guide, Release 5.0 OL-32422-01 11
Adding an AccountAdding a VNX Unified Account
Cisco UCS Director EMC VNX Management Guide, Release 5.012 OL-32422-01
Adding an AccountAdding a VNX Unified Account

C H A P T E R 4Managing VNX Block Storage
This chapter contains the following sections:
• VNX Block Storage Management, page 13
• Summary of Steps, page 14
• Storage Pools, page 15
• RAID Groups, page 16
• Host Initiators, page 18
• Storage Groups, page 19
• LUNs, page 20
• Adding a Host to a Storage Group, page 22
• Adding a LUN to a Storage Group, page 23
• Creating a Meta LUN, page 24
• Associate a LUN as a Datastore, page 25
VNX Block Storage ManagementFor VNX Block (and VNX Unified) accounts, you manage the following pools, groups, devices, and views:
• Storage pools—Name, description, RAID type (RAID 1/0, RAID-5, RAID-6), disks, and percentagefull threshold
• RAID groups—RAID group ID, RAID Type (RAID 1,0, 3, or 5, disk, hot spare),expansion/defragmentation priority, disks. You have options to automatically destroy after the last LUNis unbound, and for power saving.
• Host initiators—Add to new or existing host, hostname, WWN/IQN, SP port, initiator type (CLARiionOpen, HP Auto Trespass, HP No Auto Trespass, SGI, Fujitsu Siemens, Compaq Tru64), and failovermode (Active-Active mode (ALUA)-Failover Mode 4, Active-Passive mode (PNR)-Failover Mode 1,AIX Active-Passive mode (PAR)-Failover Mode 3, Legacy Failover Mode 2, Legacy Failover Mode0). You add hosts to the storage groups.
Cisco UCS Director EMC VNX Management Guide, Release 5.0 OL-32422-01 13
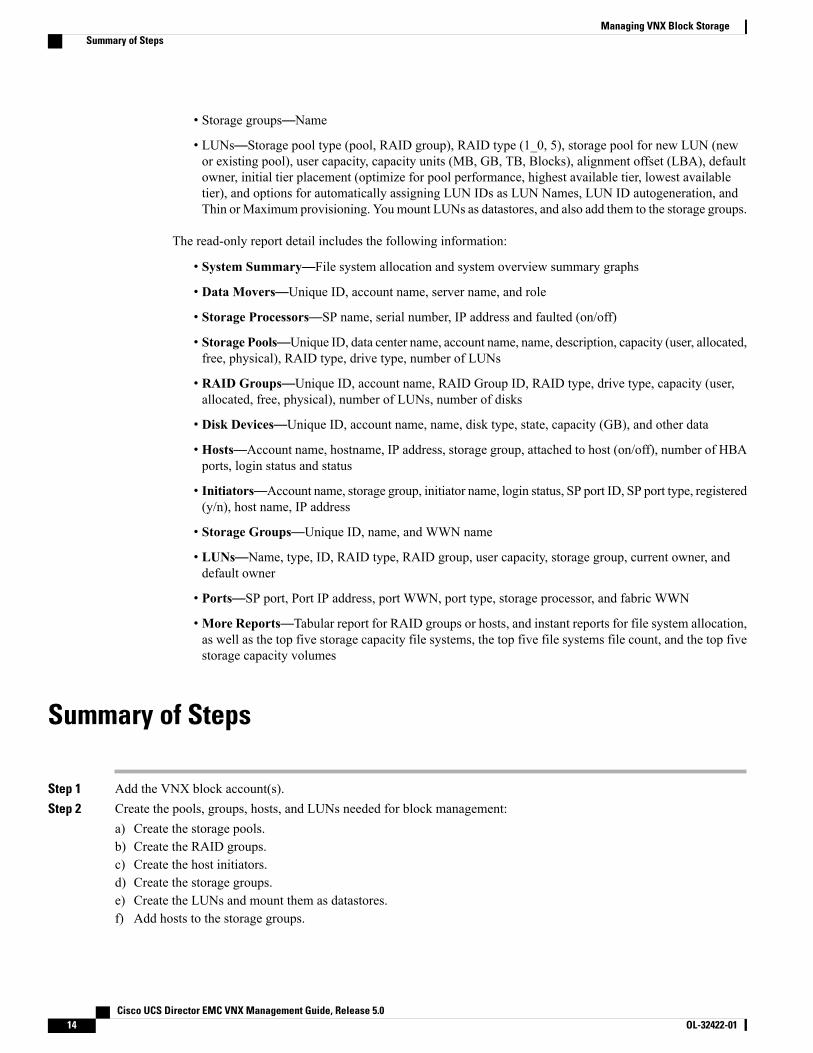
• Storage groups—Name
• LUNs—Storage pool type (pool, RAID group), RAID type (1_0, 5), storage pool for new LUN (newor existing pool), user capacity, capacity units (MB, GB, TB, Blocks), alignment offset (LBA), defaultowner, initial tier placement (optimize for pool performance, highest available tier, lowest availabletier), and options for automatically assigning LUN IDs as LUN Names, LUN ID autogeneration, andThin orMaximum provisioning. Youmount LUNs as datastores, and also add them to the storage groups.
The read-only report detail includes the following information:
• System Summary—File system allocation and system overview summary graphs
• Data Movers—Unique ID, account name, server name, and role
• Storage Processors—SP name, serial number, IP address and faulted (on/off)
• Storage Pools—Unique ID, data center name, account name, name, description, capacity (user, allocated,free, physical), RAID type, drive type, number of LUNs
• RAID Groups—Unique ID, account name, RAID Group ID, RAID type, drive type, capacity (user,allocated, free, physical), number of LUNs, number of disks
• Disk Devices—Unique ID, account name, name, disk type, state, capacity (GB), and other data
• Hosts—Account name, hostname, IP address, storage group, attached to host (on/off), number of HBAports, login status and status
• Initiators—Account name, storage group, initiator name, login status, SP port ID, SP port type, registered(y/n), host name, IP address
• Storage Groups—Unique ID, name, and WWN name
• LUNs—Name, type, ID, RAID type, RAID group, user capacity, storage group, current owner, anddefault owner
• Ports—SP port, Port IP address, port WWN, port type, storage processor, and fabric WWN
•More Reports—Tabular report for RAID groups or hosts, and instant reports for file system allocation,as well as the top five storage capacity file systems, the top five file systems file count, and the top fivestorage capacity volumes
Summary of Steps
Step 1 Add the VNX block account(s).Step 2 Create the pools, groups, hosts, and LUNs needed for block management:
a) Create the storage pools.b) Create the RAID groups.c) Create the host initiators.d) Create the storage groups.e) Create the LUNs and mount them as datastores.f) Add hosts to the storage groups.
Cisco UCS Director EMC VNX Management Guide, Release 5.014 OL-32422-01
Managing VNX Block StorageSummary of Steps

g) Add LUNs to the storage groups.
Step 3 Review reports.
Storage PoolsA storage pool requires the following parameters:
• Storage pool name
• Description
• RAID type—1/0, 5, or 6
• Disks
• Percent full threshold
You click buttons on the Block Storage Pools tab for the following actions:DescriptionButton Name
Create a new storage pool.Create
Expand a selected storage pool.Expand
View details on selected storage pool.View Details
Delete a selected storage pool.Delete
Creating a Storage Pool
Step 1 Log into Cisco UCS Director.Step 2 On the menu bar, choose Physical > Storage.Step 3 On the Storage pane, choose the VNX pod.Step 4 Click the Block Storage Pools tab.Step 5 Click Create.Step 6 In the Create Storage Pool dialog box, complete the following fields:
DescriptionName
The storage pool name.Storage Pool Name field
The description.Description field
Cisco UCS Director EMC VNX Management Guide, Release 5.0 OL-32422-01 15
Managing VNX Block StorageStorage Pools
DescriptionName
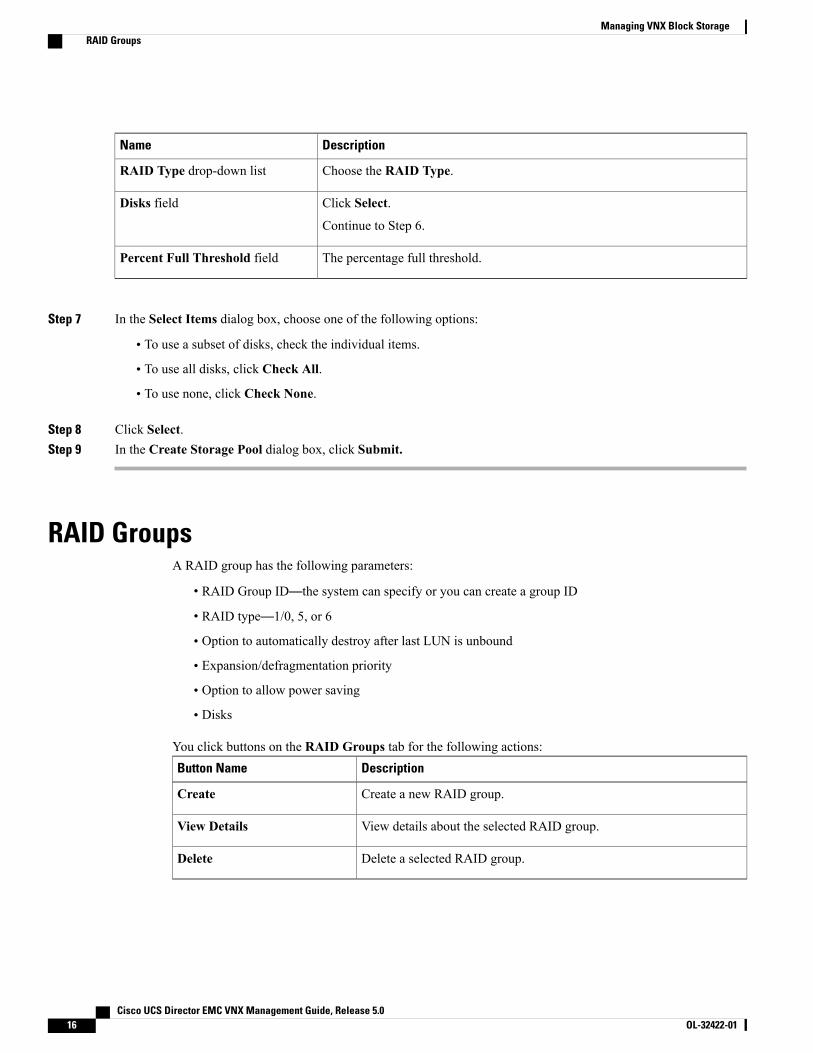
Choose the RAID Type.RAID Type drop-down list
Click Select.
Continue to Step 6.
Disks field
The percentage full threshold.Percent Full Threshold field
Step 7 In the Select Items dialog box, choose one of the following options:
• To use a subset of disks, check the individual items.
• To use all disks, click Check All.
• To use none, click Check None.
Step 8 Click Select.Step 9 In the Create Storage Pool dialog box, click Submit.
RAID GroupsA RAID group has the following parameters:
• RAID Group ID—the system can specify or you can create a group ID
• RAID type—1/0, 5, or 6
• Option to automatically destroy after last LUN is unbound
• Expansion/defragmentation priority
• Option to allow power saving
• Disks
You click buttons on the RAID Groups tab for the following actions:DescriptionButton Name
Create a new RAID group.Create
View details about the selected RAID group.View Details
Delete a selected RAID group.Delete
Cisco UCS Director EMC VNX Management Guide, Release 5.016 OL-32422-01
Managing VNX Block StorageRAID Groups
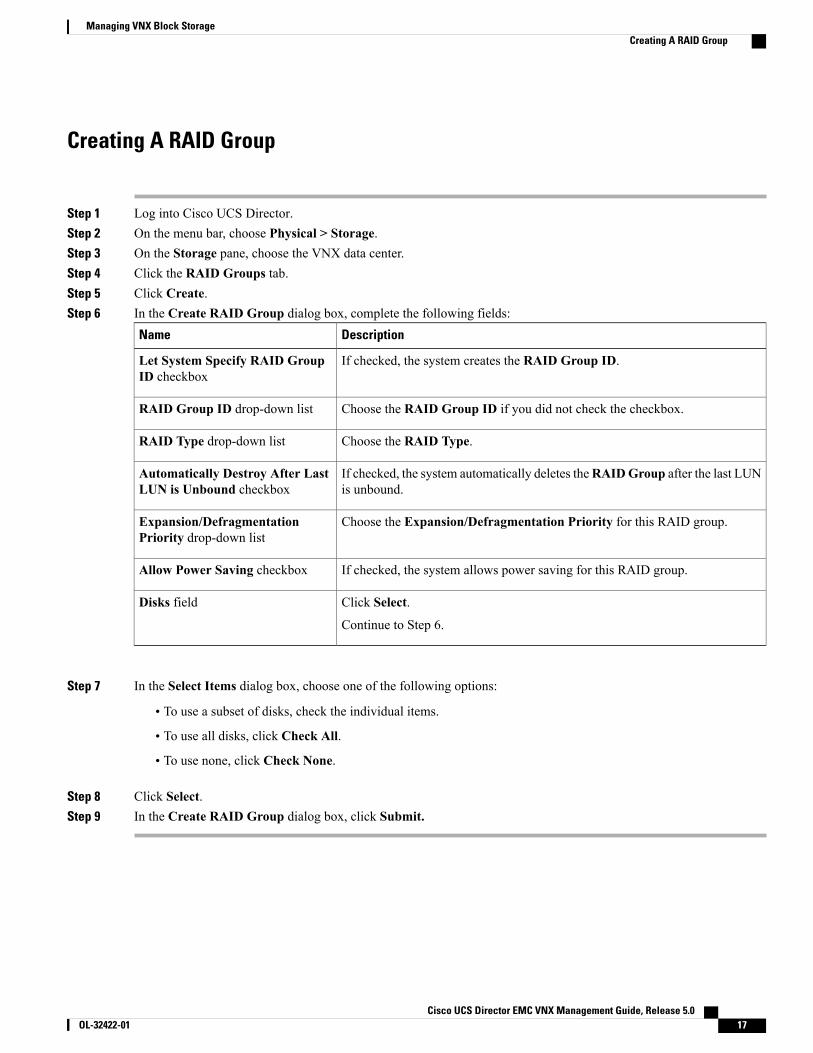
Creating A RAID Group
Step 1 Log into Cisco UCS Director.Step 2 On the menu bar, choose Physical > Storage.Step 3 On the Storage pane, choose the VNX data center.Step 4 Click the RAID Groups tab.Step 5 Click Create.Step 6 In the Create RAID Group dialog box, complete the following fields:
DescriptionName
If checked, the system creates the RAID Group ID.Let System Specify RAID GroupID checkbox
Choose the RAID Group ID if you did not check the checkbox.RAID Group ID drop-down list
Choose the RAID Type.RAID Type drop-down list
If checked, the system automatically deletes theRAIDGroup after the last LUNis unbound.
Automatically Destroy After LastLUN is Unbound checkbox
Choose the Expansion/Defragmentation Priority for this RAID group.Expansion/DefragmentationPriority drop-down list
If checked, the system allows power saving for this RAID group.Allow Power Saving checkbox
Click Select.
Continue to Step 6.
Disks field
Step 7 In the Select Items dialog box, choose one of the following options:
• To use a subset of disks, check the individual items.
• To use all disks, click Check All.
• To use none, click Check None.
Step 8 Click Select.Step 9 In the Create RAID Group dialog box, click Submit.
Cisco UCS Director EMC VNX Management Guide, Release 5.0 OL-32422-01 17
Managing VNX Block StorageCreating A RAID Group

Host InitiatorsA host initiator requires the following parameters:
• Add initiator to—you can add an initiator to a new or existing host
• Host
•WWN/IQN
• SP port
• Initiator type
• Failover mode
You click buttons on the Initiators tab for the following actions:DescriptionButton Name
Register a new initiator.Register
View details about the selected initiator.View Details
Deregister a selected initiator.Deregister
Registering a Host Initiator
Step 1 On the menu bar, choose Physical > Storage.Step 2 On the Storage pane, choose the VNX data center.Step 3 Click the Initiators tab.Step 4 Click Register.Step 5 In the Register Host Initiator dialog box, complete the following fields:
DescriptionName
Choose either Existing Host or New Host.
If you chose New Host, continue to Step 6.
Add Initiator to drop-down list
If you chose Existing Host, click Select.
Continue to Step 7.
Host field
The WWN/IQN for the new or existing host.WWN/IQN
Click Select.
Continue to Step 8.
SP Port field
Cisco UCS Director EMC VNX Management Guide, Release 5.018 OL-32422-01
Managing VNX Block StorageHost Initiators
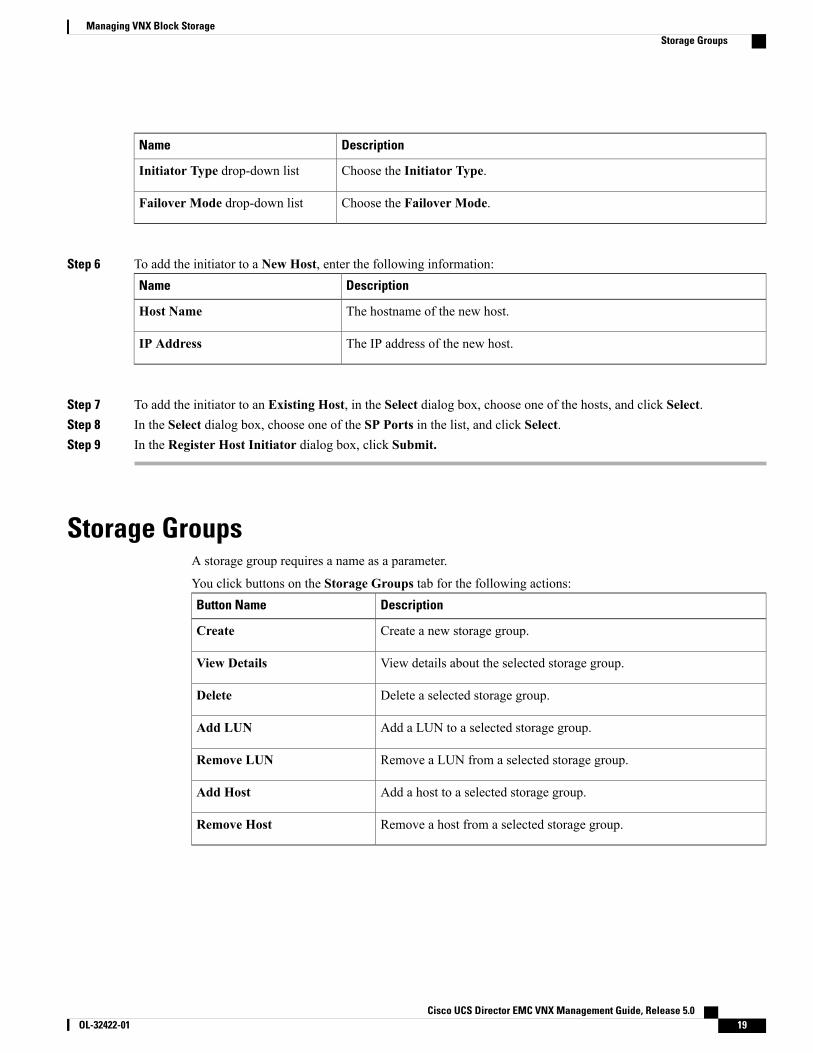
DescriptionName
Choose the Initiator Type.Initiator Type drop-down list
Choose the Failover Mode.Failover Mode drop-down list
Step 6 To add the initiator to a New Host, enter the following information:DescriptionName
The hostname of the new host.Host Name
The IP address of the new host.IP Address
Step 7 To add the initiator to an Existing Host, in the Select dialog box, choose one of the hosts, and click Select.Step 8 In the Select dialog box, choose one of the SP Ports in the list, and click Select.Step 9 In the Register Host Initiator dialog box, click Submit.
Storage GroupsA storage group requires a name as a parameter.
You click buttons on the Storage Groups tab for the following actions:DescriptionButton Name
Create a new storage group.Create
View details about the selected storage group.View Details
Delete a selected storage group.Delete
Add a LUN to a selected storage group.Add LUN
Remove a LUN from a selected storage group.Remove LUN
Add a host to a selected storage group.Add Host
Remove a host from a selected storage group.Remove Host
Cisco UCS Director EMC VNX Management Guide, Release 5.0 OL-32422-01 19
Managing VNX Block StorageStorage Groups
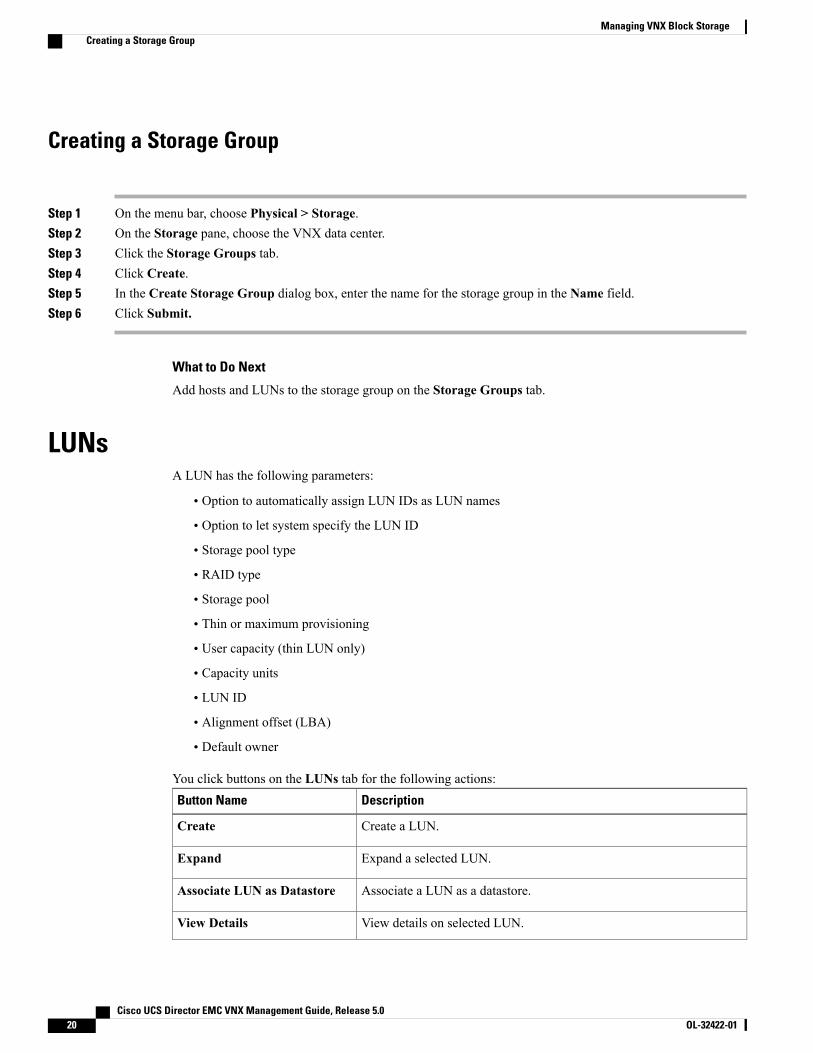
Creating a Storage Group
Step 1 On the menu bar, choose Physical > Storage.Step 2 On the Storage pane, choose the VNX data center.Step 3 Click the Storage Groups tab.Step 4 Click Create.Step 5 In the Create Storage Group dialog box, enter the name for the storage group in the Name field.Step 6 Click Submit.
What to Do Next
Add hosts and LUNs to the storage group on the Storage Groups tab.
LUNsA LUN has the following parameters:
• Option to automatically assign LUN IDs as LUN names
• Option to let system specify the LUN ID
• Storage pool type
• RAID type
• Storage pool
• Thin or maximum provisioning
• User capacity (thin LUN only)
• Capacity units
• LUN ID
• Alignment offset (LBA)
• Default owner
You click buttons on the LUNs tab for the following actions:DescriptionButton Name
Create a LUN.Create
Expand a selected LUN.Expand
Associate a LUN as a datastore.Associate LUN as Datastore
View details on selected LUN.View Details
Cisco UCS Director EMC VNX Management Guide, Release 5.020 OL-32422-01
Managing VNX Block StorageCreating a Storage Group
DescriptionButton Name
Delete a selected LUN.Delete
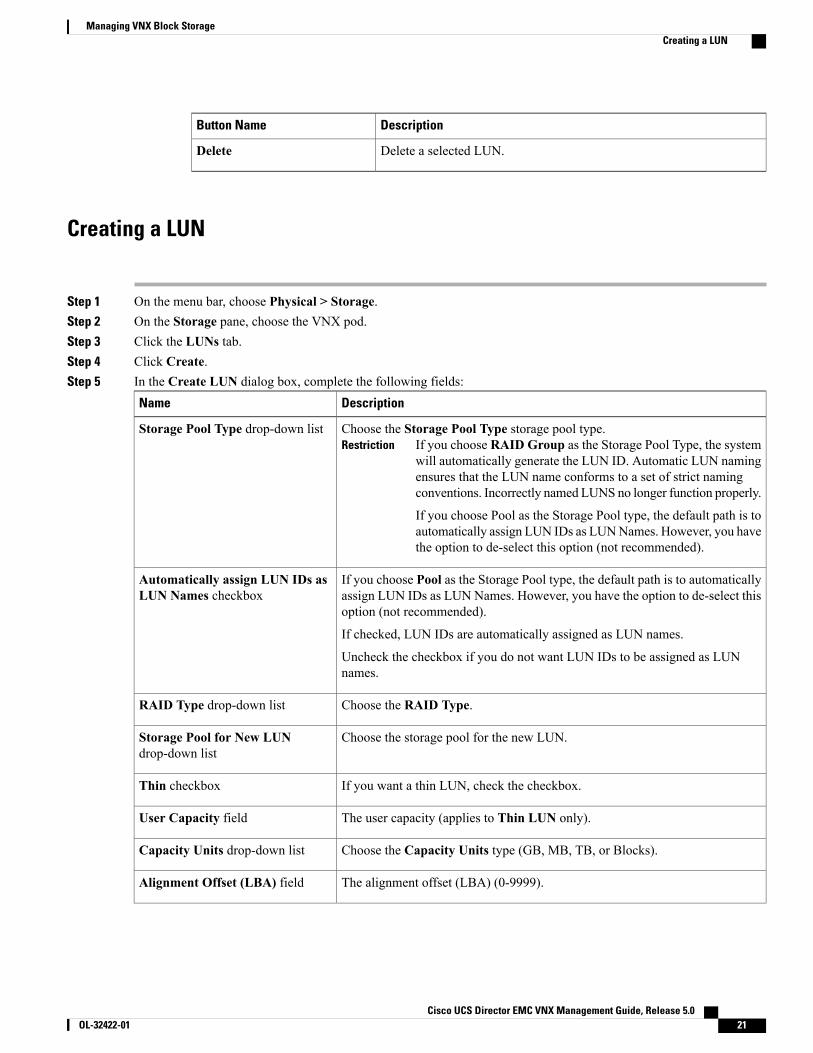
Creating a LUN
Step 1 On the menu bar, choose Physical > Storage.Step 2 On the Storage pane, choose the VNX pod.Step 3 Click the LUNs tab.Step 4 Click Create.Step 5 In the Create LUN dialog box, complete the following fields:
DescriptionName
Choose the Storage Pool Type storage pool type.If you choose RAID Group as the Storage Pool Type, the systemwill automatically generate the LUN ID. Automatic LUN namingensures that the LUN name conforms to a set of strict namingconventions. Incorrectly named LUNS no longer function properly.
If you choose Pool as the Storage Pool type, the default path is toautomatically assign LUN IDs as LUNNames. However, you havethe option to de-select this option (not recommended).
RestrictionStorage Pool Type drop-down list
If you choose Pool as the Storage Pool type, the default path is to automaticallyassign LUN IDs as LUN Names. However, you have the option to de-select thisoption (not recommended).
If checked, LUN IDs are automatically assigned as LUN names.
Uncheck the checkbox if you do not want LUN IDs to be assigned as LUNnames.
Automatically assign LUN IDs asLUN Names checkbox
Choose the RAID Type.RAID Type drop-down list
Choose the storage pool for the new LUN.Storage Pool for New LUNdrop-down list
If you want a thin LUN, check the checkbox.Thin checkbox
The user capacity (applies to Thin LUN only).User Capacity field
Choose the Capacity Units type (GB, MB, TB, or Blocks).Capacity Units drop-down list
The alignment offset (LBA) (0-9999).Alignment Offset (LBA) field
Cisco UCS Director EMC VNX Management Guide, Release 5.0 OL-32422-01 21
Managing VNX Block StorageCreating a LUN

DescriptionName
If checked, enables Auto-assign. This option enables or disables Auto-assignonly to a storage system that has two SPs and a LUN that is not a hot spare.
Enable Auto-assign checkbox
To enable reading the storage pool cache, check this box.SP Read Cache checkbox
To enable writing the storage pool cache, check this box.SP Write Cache checkbox
If you do not want an initial verify, check this box.No Initial Verify checkbox
Assign a priority to the rebuild of this LUN.Rebuild Priority drop-down list
Assign a priority to the verification of this LUN.Verify Priority drop-down list
Choose the Default Owner.Default Owner drop-down list
Step 6 Click Submit.
What to Do Next
Mount the LUN as a datastore.
Adding a Host to a Storage GroupBefore You Begin
A host and a storage group must exist in the system.
Step 1 On the menu bar, choose Physical > Storage.Step 2 On the Storage pane, choose the VNX data center.Step 3 Click the Storage Groups tab.Step 4 Click Add Host.Step 5 In the Add Host(s) to Storage Group dialog box, complete the following fields:
DescriptionName
Choose Include Connected or Not Connected.Show Hosts drop-down list
Click Select.
Continue to Step 6.
Hosts field
Cisco UCS Director EMC VNX Management Guide, Release 5.022 OL-32422-01
Managing VNX Block StorageAdding a Host to a Storage Group

Step 6 In the Select dialog box, choose a host.Step 7 Click Select.Step 8 In the Add Host(s) to Storage Group dialog box, click Submit.
Adding a LUN to a Storage GroupBefore You Begin
A LUN and a storage group must exist in the system.
Step 1 On the menu bar, choose Physical > Storage.Step 2 On the Storage pane, choose the VNX data center.Step 3 Click the Storage Groups tab.Step 4 Click Add LUN.Step 5 In the Add LUN to Storage Group dialog box, complete the following fields:
DescriptionName
If you want to choose the LUN yourself, click Select.
Continue to Step 6.
LUN field
If checked, the system autogenerates the HLU (Host LUNID).
Let System Specify HLU checkbox
Step 6 In the Host LUN ID field, enter the Host LUN ID.Step 7 Click Submit.
Cisco UCS Director EMC VNX Management Guide, Release 5.0 OL-32422-01 23
Managing VNX Block StorageAdding a LUN to a Storage Group

Creating a Meta LUNBefore You Begin
Create a LUN.
Step 1 On the menu bar, choosePhysical > Storage.Step 2 On the Storage pane, choose the VNX Pod.Step 3 Click theMeta LUNs tab.Step 4 Click Create Meta LUN.Step 5 In the Create Meta LUN dialog box, complete the following fields:
DescriptionName
Choose an expansion type:
Stripe Expansion.
Concatenate Expansion.
Expansion Type drop-down list
Choose a Flare LUN that is added to the base LUN.Flare LUNs drop-down list
The LUN name.Meta LUN Name field
If checked, creates a MAX LUN size.MAX check box
The LUN capacity units (applies to Thin LUN only).User Capacity field
Choose a capacity unit.Capacity Units drop-down list
Choose the default owner.Default Owner drop-down list
The element size multiplier. This field displays the stripelement size multiplier for the metaLUN. The default valueis 4.
Element size Multiplier field
The alignment offset (LBA) value. The value range is from0-9999.
Alignment Offset field
If checked, enables Auto-assign. This option enables ordisables Auto-assign only to a storage system that has twoSPs and a LUN that is not a hot spare.
Enable Auto-assign check box
Choose an expansion rate (specifies the relative importanceof making additional LUN capacity available to the host.
Expansion Rate drop-down list
Cisco UCS Director EMC VNX Management Guide, Release 5.024 OL-32422-01
Managing VNX Block StorageCreating a Meta LUN

Step 6 Click Submit.
What to Do Next
Associate a LUN to a datastore.
Associate a LUN as a DatastoreBefore You Begin
Create a LUN.
Step 1 On the menu bar, choose Physical > Storage.Step 2 On the Storage pane, choose the VNX Pod.Step 3 Click theMeta LUNs tab.Step 4 Click Associate LUN As Datastore.Step 5 In the Associate LUN As a Datastore dialog box, complete the following fields:
DescriptionName
Choose the Storage Processor.Select Storage Processor drop-down list
The datastore.Datastore Name field
The hostnode.Select Hostnode field
Choose the Initiator Type.Initiator Type drop-down list
The LUN name.LUN Name field
Choose the VDC Name.VDC Name drop-down list
Step 6 Click Submit.
What to Do Next
Verify that the datastore is associated to the LUN. For example, you can choose Virtual > Storage and clickon vCenter (left pane) to view the related datastores.
Cisco UCS Director EMC VNX Management Guide, Release 5.0 OL-32422-01 25
Managing VNX Block StorageAssociate a LUN as a Datastore

Cisco UCS Director EMC VNX Management Guide, Release 5.026 OL-32422-01
Managing VNX Block StorageAssociate a LUN as a Datastore

C H A P T E R 5Managing VNX File Storage
This chapter contains the following sections:
• VNX File Storage Management, page 27
• Summary of Steps, page 28
• Using CIFS, page 28
• Using NFS Export, page 33
VNX File Storage ManagementFor VNX File (and VNX Unified) accounts, you can use either Common Internet File System (CIFS) orNetwork File System (NFS) Export.
For CIFS, you create and manage the following:
• CIFS servers—Server type, computer, NetBIOS name, aliases, domain. You can choose to join a domain,enable local users, and select interfaces.
• CIFS shares—CIFS share name, file systems, path, CIFS server, user limit and comments.
• DNS domains—Name, DNS servers, and protocol (UDP or TCP).
For NFS Export, you create and manage the following:
• Storage pools for files—Name, description, and subnet mask for the interface. You can create from ametavolume or a storage pool. There is an option to slice pool volumes by default.
• Volumes—Name, type (stripe, meta, slice), stripe size (32, 64, 256), and which volumes to select. Youcan mount volumes to the datastore.
• File systems—Name, storage pool, storage capacity, capacity units (GB, MB, TB), and the options tocreate from a storage pool or volume, and to contain slices. You can mount file systems to the datastore.
• Data mover interfaces—Name, device name, address, subnet mask, MTU, and VLAN ID
• NFS export—File systems, read/write hosts, root hosts, and an option to host access read-only export
Cisco UCS Director EMC VNX Management Guide, Release 5.0 OL-32422-01 27

• Mounts—Path, file system name, server, read-only or read/write, and access-checking policy (NT, UNIX,Secure, Native, Mixed, or Mixed/Compatible). You can choose to enable virus checking, CIFS oplocks,and set advanced options.
The read-only reports includes the following information:
• System overview summary—data center, account, host, role, and mode
• CIFS server and shares detail
• DNS domain detail
• For NFS, storage pool for files, file system, NFS export, and data mover detail
Summary of Steps
Step 1 Add the VNX fille account(s).Step 2 Choose either CIFS or NFS Export.
• For CIFS, create the CIFS servers, CIFS shares, and DNS domains.
• For NFS Export, create the following:
a) Storage pools for filesb) Volumesc) File systemsd) Interfacese) NFS export informationf) Mounts
Step 3 Review reports.
Using CIFSIn Cisco UCSDirector, you can use CIFS to export files or directories. A client can mount any server-exporteddirectory.
To use CIFS, you create the CIFS servers, CIFS shares, and DNS domains.
CIFS ServersA CIFS server requires the following parameters:
• Server type
• Computer name
Cisco UCS Director EMC VNX Management Guide, Release 5.028 OL-32422-01
Managing VNX File StorageSummary of Steps
• NetBIOS name
• Aliases
• Domain
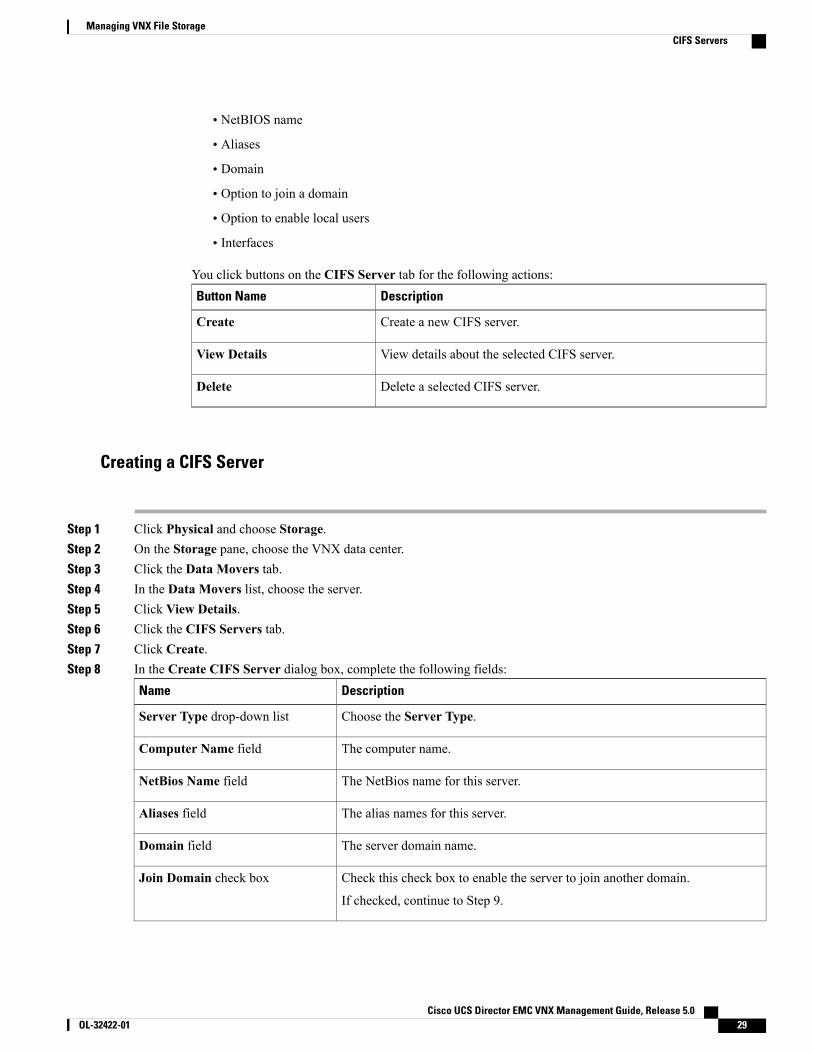
• Option to join a domain
• Option to enable local users
• Interfaces
You click buttons on the CIFS Server tab for the following actions:DescriptionButton Name
Create a new CIFS server.Create
View details about the selected CIFS server.View Details
Delete a selected CIFS server.Delete
Creating a CIFS Server
Step 1 Click Physical and choose Storage.Step 2 On the Storage pane, choose the VNX data center.Step 3 Click the Data Movers tab.Step 4 In the Data Movers list, choose the server.Step 5 Click View Details.Step 6 Click the CIFS Servers tab.Step 7 Click Create.Step 8 In the Create CIFS Server dialog box, complete the following fields:
DescriptionName
Choose the Server Type.Server Type drop-down list
The computer name.Computer Name field
The NetBios name for this server.NetBios Name field
The alias names for this server.Aliases field
The server domain name.Domain field
Check this check box to enable the server to join another domain.
If checked, continue to Step 9.
Join Domain check box
Cisco UCS Director EMC VNX Management Guide, Release 5.0 OL-32422-01 29
Managing VNX File StorageCIFS Servers
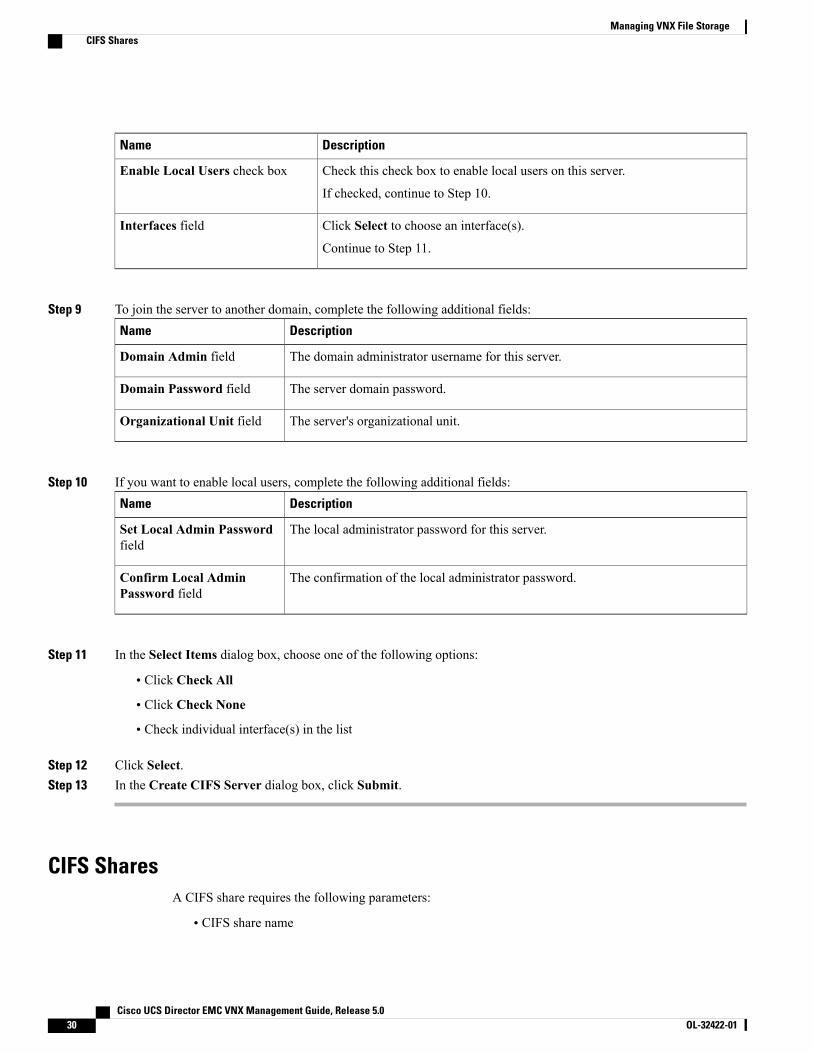
DescriptionName
Check this check box to enable local users on this server.
If checked, continue to Step 10.
Enable Local Users check box
Click Select to choose an interface(s).
Continue to Step 11.
Interfaces field
Step 9 To join the server to another domain, complete the following additional fields:DescriptionName
The domain administrator username for this server.Domain Admin field
The server domain password.Domain Password field
The server's organizational unit.Organizational Unit field
Step 10 If you want to enable local users, complete the following additional fields:DescriptionName
The local administrator password for this server.Set Local Admin Passwordfield
The confirmation of the local administrator password.Confirm Local AdminPassword field
Step 11 In the Select Items dialog box, choose one of the following options:
• Click Check All
• Click Check None
• Check individual interface(s) in the list
Step 12 Click Select.Step 13 In the Create CIFS Server dialog box, click Submit.
CIFS SharesA CIFS share requires the following parameters:
• CIFS share name
Cisco UCS Director EMC VNX Management Guide, Release 5.030 OL-32422-01
Managing VNX File StorageCIFS Shares
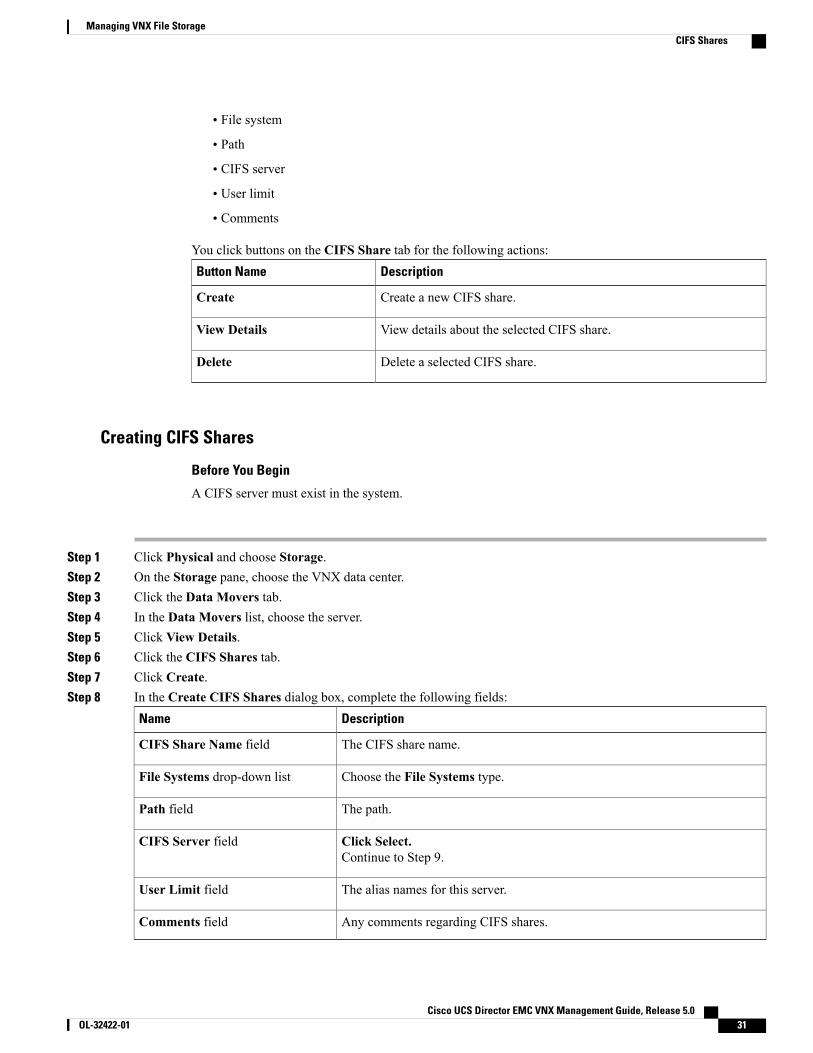
• File system
• Path
• CIFS server
• User limit
• Comments
You click buttons on the CIFS Share tab for the following actions:DescriptionButton Name
Create a new CIFS share.Create
View details about the selected CIFS share.View Details
Delete a selected CIFS share.Delete
Creating CIFS Shares
Before You Begin
A CIFS server must exist in the system.
Step 1 Click Physical and choose Storage.Step 2 On the Storage pane, choose the VNX data center.Step 3 Click the Data Movers tab.Step 4 In the Data Movers list, choose the server.Step 5 Click View Details.Step 6 Click the CIFS Shares tab.Step 7 Click Create.Step 8 In the Create CIFS Shares dialog box, complete the following fields:
DescriptionName
The CIFS share name.CIFS Share Name field
Choose the File Systems type.File Systems drop-down list
The path.Path field
Click Select.Continue to Step 9.
CIFS Server field
The alias names for this server.User Limit field
Any comments regarding CIFS shares.Comments field
Cisco UCS Director EMC VNX Management Guide, Release 5.0 OL-32422-01 31
Managing VNX File StorageCIFS Shares

Step 9 To choose CIFS shares, complete the following additional fields in the Select Items dialog box:
• Click Check All
• Click Check None
• Check individual interface(s) in the list
Step 10 Click Select.Step 11 In the Create CIFS Shares dialog box, click Submit.
DNS DomainsA DNS domain requires the following parameters:
• Name
• DNS servers
• Protocol
You click buttons on the DNS Domains tab for the following actions:DescriptionButton Name
Create a new DNS domain.Create
View details on selected DNS domain.View Details
Delete a selected DNS domain.Delete
Creating a DNS Domain
Step 1 Click Physical and choose Storage.Step 2 On the Storage pane, choose the VNX data center.Step 3 Click the Data Movers tab.Step 4 In the Data Movers list, choose the server.Step 5 Click View Details.Step 6 Click the DNS Domain tab.Step 7 Click Add.Step 8 In the Add DNS Domain dialog box, complete the following fields:
Cisco UCS Director EMC VNX Management Guide, Release 5.032 OL-32422-01
Managing VNX File StorageDNS Domains
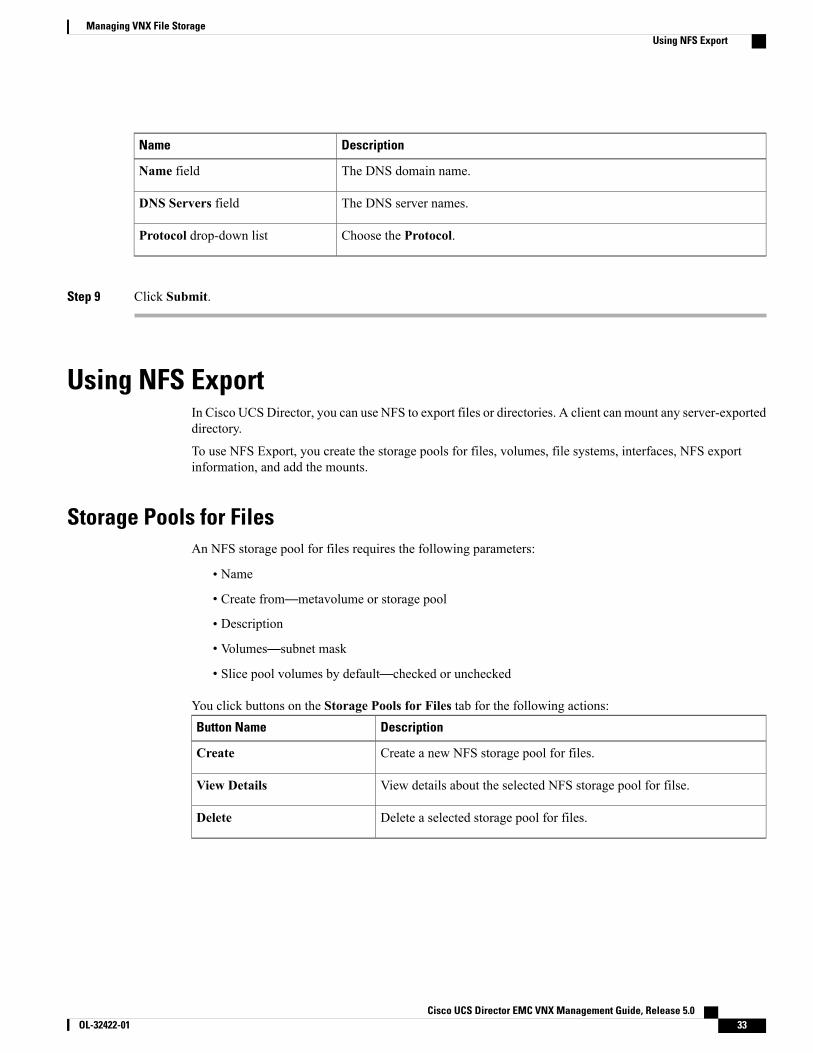
DescriptionName
The DNS domain name.Name field
The DNS server names.DNS Servers field
Choose the Protocol.Protocol drop-down list
Step 9 Click Submit.
Using NFS ExportIn Cisco UCS Director, you can use NFS to export files or directories. A client can mount any server-exporteddirectory.
To use NFS Export, you create the storage pools for files, volumes, file systems, interfaces, NFS exportinformation, and add the mounts.
Storage Pools for FilesAn NFS storage pool for files requires the following parameters:
• Name
• Create from—metavolume or storage pool
• Description
• Volumes—subnet mask
• Slice pool volumes by default—checked or unchecked
You click buttons on the Storage Pools for Files tab for the following actions:DescriptionButton Name
Create a new NFS storage pool for files.Create
View details about the selected NFS storage pool for filse.View Details
Delete a selected storage pool for files.Delete
Cisco UCS Director EMC VNX Management Guide, Release 5.0 OL-32422-01 33
Managing VNX File StorageUsing NFS Export

Creating a Storage Pool for Files
Step 1 Click Physical and choose Storage.Step 2 On the Storage pane, choose the VNX data center.Step 3 Click the Data Movers tab.Step 4 In the Data Movers list, choose the server.Step 5 Click View Details.Step 6 Click the Storage Pools for File tab.Step 7 Click Create.Step 8 In the Create Storage Pool dialog box, complete the following fields:
DescriptionName
The storage pool name.Name field
ChooseMeta Volume or Storage Pool to create from.
If you chose Storage Pool, continue to Step 9.
Create from drop-down list
The description for this storage pool.Description field
The volumes for this storage pool.Volumes drop-down list
Check this checkbox to slice pool volumes by default.Slice Pool Volumes by Defaultcheckbox
Step 9 To create this storage pool from another storage pool, complete the following additional fields:DescriptionName
Choose the Template Pool to create from.Template Pool drop-down list
The minimum pool size (MB).Minimum Pool Size (MB) field
The stripe size (KB).Stripe Size (KB) field
Step 10 Click Submit.
VolumesAn NFS volume requires the following parameters:
Cisco UCS Director EMC VNX Management Guide, Release 5.034 OL-32422-01
Managing VNX File StorageVolumes
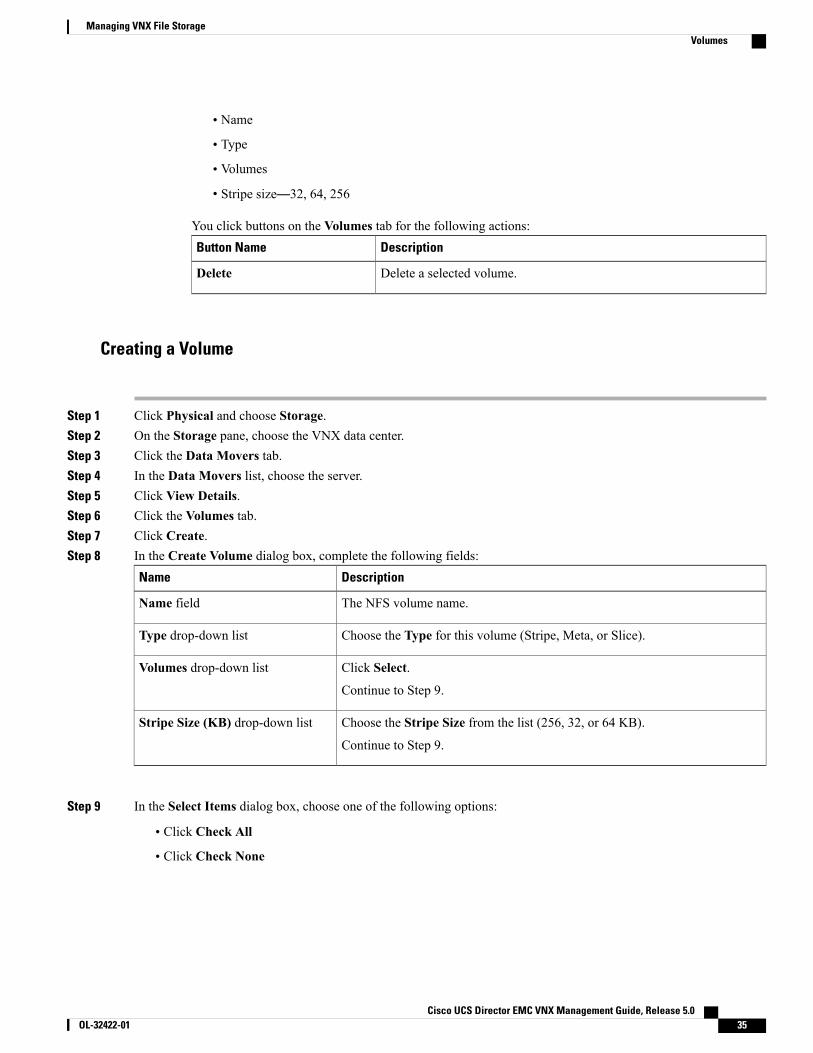
• Name
• Type
• Volumes
• Stripe size—32, 64, 256
You click buttons on the Volumes tab for the following actions:DescriptionButton Name
Delete a selected volume.Delete
Creating a Volume
Step 1 Click Physical and choose Storage.Step 2 On the Storage pane, choose the VNX data center.Step 3 Click the Data Movers tab.Step 4 In the Data Movers list, choose the server.Step 5 Click View Details.Step 6 Click the Volumes tab.Step 7 Click Create.Step 8 In the Create Volume dialog box, complete the following fields:
DescriptionName
The NFS volume name.Name field
Choose the Type for this volume (Stripe, Meta, or Slice).Type drop-down list
Click Select.
Continue to Step 9.
Volumes drop-down list
Choose the Stripe Size from the list (256, 32, or 64 KB).
Continue to Step 9.
Stripe Size (KB) drop-down list
Step 9 In the Select Items dialog box, choose one of the following options:
• Click Check All
• Click Check None
Cisco UCS Director EMC VNX Management Guide, Release 5.0 OL-32422-01 35
Managing VNX File StorageVolumes
• Check individual volume(s) in the list
Step 10 Click Select.Step 11 In the Create Volume dialog box, click Submit.
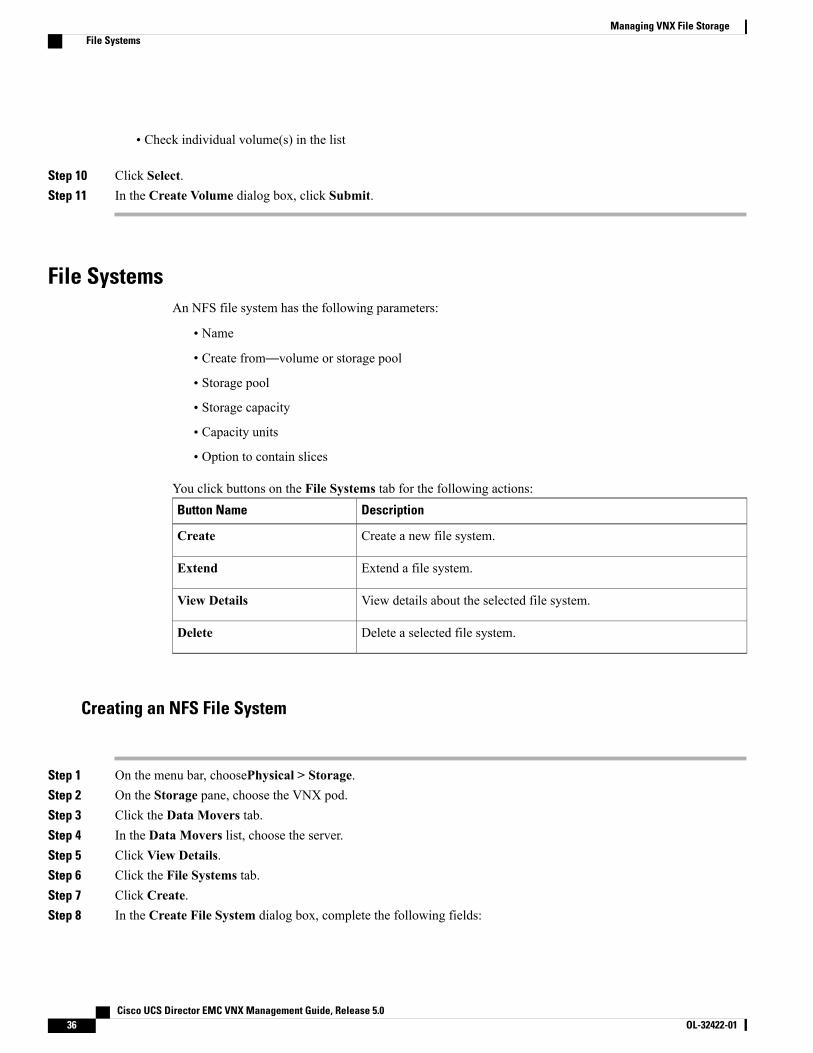
File SystemsAn NFS file system has the following parameters:
• Name
• Create from—volume or storage pool
• Storage pool
• Storage capacity
• Capacity units
• Option to contain slices
You click buttons on the File Systems tab for the following actions:DescriptionButton Name
Create a new file system.Create
Extend a file system.Extend
View details about the selected file system.View Details
Delete a selected file system.Delete
Creating an NFS File System
Step 1 On the menu bar, choosePhysical > Storage.Step 2 On the Storage pane, choose the VNX pod.Step 3 Click the Data Movers tab.Step 4 In the Data Movers list, choose the server.Step 5 Click View Details.Step 6 Click the File Systems tab.Step 7 Click Create.Step 8 In the Create File System dialog box, complete the following fields:
Cisco UCS Director EMC VNX Management Guide, Release 5.036 OL-32422-01
Managing VNX File StorageFile Systems

DescriptionName
The NFS file system name.Name field
Choose either Storage Pool or Volume as the source for the file system.Create from drop-down list
Choose the storage pool for this file system.Storage Pool drop-down list
The storage capacity to allocate for this file system.Storage Capacity field
Choose the capacity units type (GB, MB, or TB).Capacity Units drop-down list
Check this check box to enable the file system to contain slices.Contain Slices check box
Step 9 Click Submit.
What to Do Next
You can mount the file system as a datastore.
Data Mover InterfacesAn NFS data mover interface requires the following parameters:
• Name
• Device name
• Address
• Subnet mask
• MTU
• VLAN ID
You click buttons on the Interfaces tab for the following actions:DescriptionButton Name
Create a data mover interface.Create
View details about the the selected interface.View Details
Delete a selected data mover interface.Delete
Cisco UCS Director EMC VNX Management Guide, Release 5.0 OL-32422-01 37
Managing VNX File StorageData Mover Interfaces
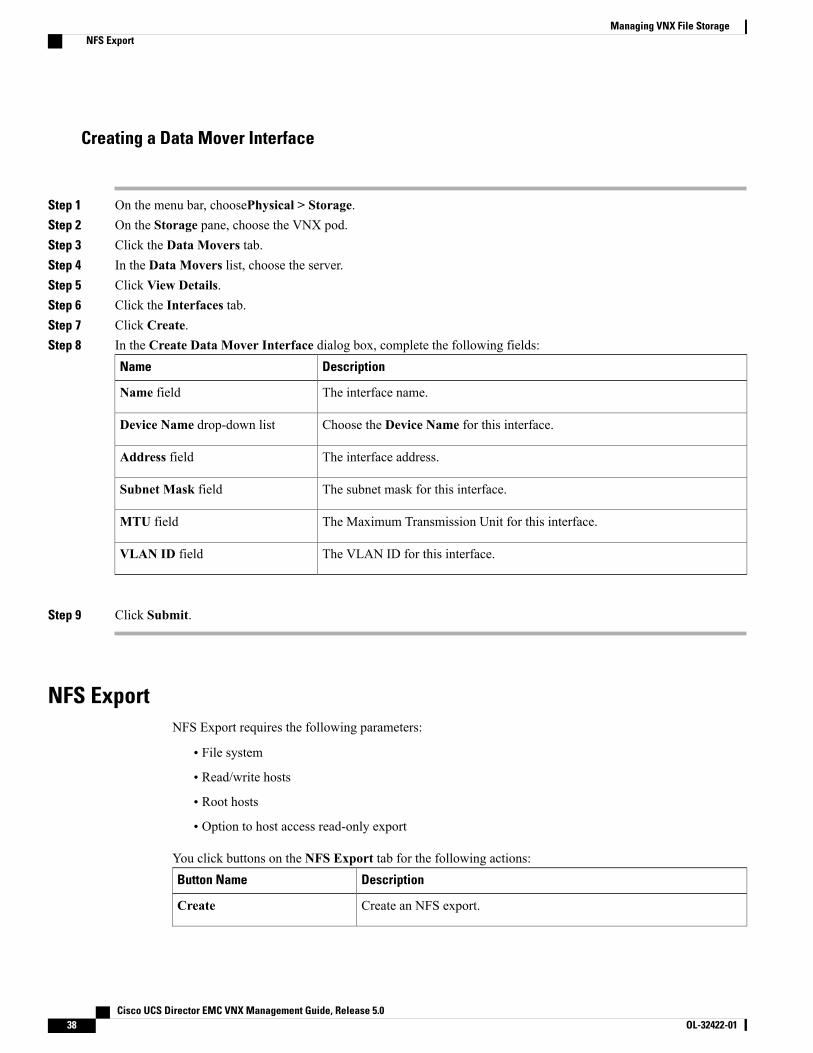
Creating a Data Mover Interface
Step 1 On the menu bar, choosePhysical > Storage.Step 2 On the Storage pane, choose the VNX pod.Step 3 Click the Data Movers tab.Step 4 In the Data Movers list, choose the server.Step 5 Click View Details.Step 6 Click the Interfaces tab.Step 7 Click Create.Step 8 In the Create Data Mover Interface dialog box, complete the following fields:
DescriptionName
The interface name.Name field
Choose the Device Name for this interface.Device Name drop-down list
The interface address.Address field
The subnet mask for this interface.Subnet Mask field
The Maximum Transmission Unit for this interface.MTU field
The VLAN ID for this interface.VLAN ID field
Step 9 Click Submit.
NFS ExportNFS Export requires the following parameters:
• File system
• Read/write hosts
• Root hosts
• Option to host access read-only export
You click buttons on the NFS Export tab for the following actions:DescriptionButton Name
Create an NFS export.Create
Cisco UCS Director EMC VNX Management Guide, Release 5.038 OL-32422-01
Managing VNX File StorageNFS Export

DescriptionButton Name
Edit an NFS export.Edit
View details about the selected NFS export.View Details
Delete a selected NFS export.Delete
Exporting an NFS File System
Step 1 On the menu bar, choosePhysical > Storage.Step 2 On the Storage pane, choose the VNX pod.Step 3 Click the Data Movers tab.Step 4 In the Data Movers list, choose the server.Step 5 Click View Details.Step 6 Click the NFS Exports tab.Step 7 Click Add.Step 8 In the Add NFS Export dialog box, complete the following fields:
DescriptionName
Choose the File Systems type for NFS Export.File Systems drop-down list
The read/write hosts for NFS Export.Read/Write Hosts field
The root hosts for NFS Export.Root Hosts field
Check this check box if you want host access read-only export.Host Access Read-only Exportcheck box
Step 9 Click Submit.
MountsAn NFS mount requires the following parameters:
• Path
• File system name
• Mount server
• Read-only or read/write
Cisco UCS Director EMC VNX Management Guide, Release 5.0 OL-32422-01 39
Managing VNX File StorageMounts
• Access checking policy
• Option to enable virus checking
• Option to enable CIFS oplocks
• Option to enable advanced options
You click buttons on theMounts tab for the following actions:DescriptionButton Name
Delete a selected mount.Delete
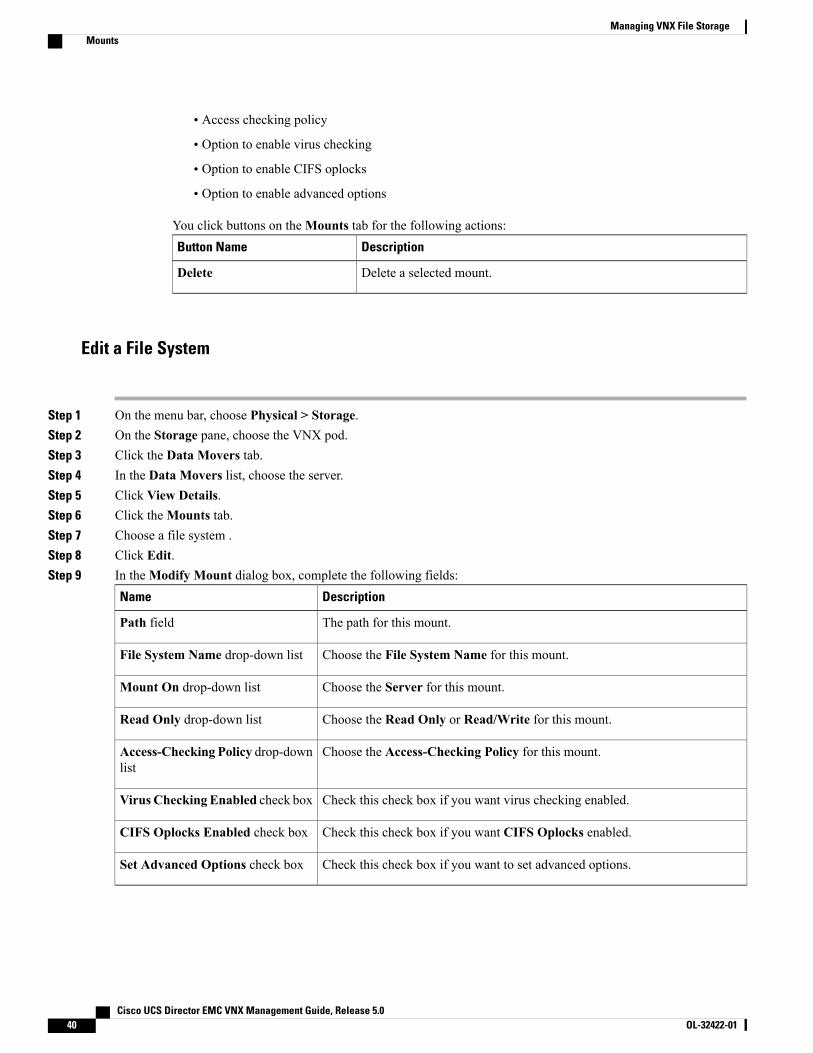
Edit a File System
Step 1 On the menu bar, choose Physical > Storage.Step 2 On the Storage pane, choose the VNX pod.Step 3 Click the Data Movers tab.Step 4 In the Data Movers list, choose the server.Step 5 Click View Details.Step 6 Click theMounts tab.Step 7 Choose a file system .Step 8 Click Edit.Step 9 In theModify Mount dialog box, complete the following fields:
DescriptionName
The path for this mount.Path field
Choose the File System Name for this mount.File System Name drop-down list
Choose the Server for this mount.Mount On drop-down list
Choose the Read Only or Read/Write for this mount.Read Only drop-down list
Choose the Access-Checking Policy for this mount.Access-Checking Policy drop-downlist
Check this check box if you want virus checking enabled.Virus Checking Enabled check box
Check this check box if you want CIFS Oplocks enabled.CIFS Oplocks Enabled check box
Check this check box if you want to set advanced options.Set Advanced Options check box
Cisco UCS Director EMC VNX Management Guide, Release 5.040 OL-32422-01
Managing VNX File StorageMounts

Step 10 Click Submit.
Deleting a File System
Step 1 On the menu bar, choose Physical > Storage.Step 2 On the Storage pane, choose the VNX pod.Step 3 Click the Data Movers tab.Step 4 In the Data Movers list, choose the server.Step 5 Click View Details.Step 6 Click theMounts tab.Step 7 Choose a file system.Step 8 Click Delete.Step 9 Click Delete once again.
Cisco UCS Director EMC VNX Management Guide, Release 5.0 OL-32422-01 41
Managing VNX File StorageMounts

Cisco UCS Director EMC VNX Management Guide, Release 5.042 OL-32422-01
Managing VNX File StorageMounts
C H A P T E R 6Managing VNX Unified Storage
This chapter contains the following sections:
• VNX Unified Storage Management, page 43
• Summary of Steps, page 43
VNX Unified Storage ManagementVNX Unified storage combines VNX Block storage with VNX File storage.
Summary of Steps
Step 1 Add the VNX block account(s).Step 2 Create the pools, groups, hosts, and LUNs needed for block management:
a) Create the storage pools.b) Create the RAID groups.c) Create the host initiators.d) Create the storage groups.e) Create the LUNs and mount them as datastores.f) Add hosts to the storage groups.g) Add LUNs to the storage groups.
Step 3 Review VNX block storage reports.Step 4 Add the VNX file account(s).Step 5 Choose either CIFS or NFS Export.
• For CIFS, create the CIFS servers, CIFS shares, and DNS domains.
• For NFS Export, create the following:
a) Storage pools for files
Cisco UCS Director EMC VNX Management Guide, Release 5.0 OL-32422-01 43

b) Volumesc) File systemsd) Interfacese) NFS export informationf) Mounts
Step 6 Review VNX file storage reports.
What to Do Next
Refer to the previous chapters on managing VNX block storage and VNX file storage for more details.
Cisco UCS Director EMC VNX Management Guide, Release 5.044 OL-32422-01
Managing VNX Unified StorageSummary of Steps