cisco training solutions - fast · pdf filecisco training solutions ... introducing cisco sdm...
TRANSCRIPT
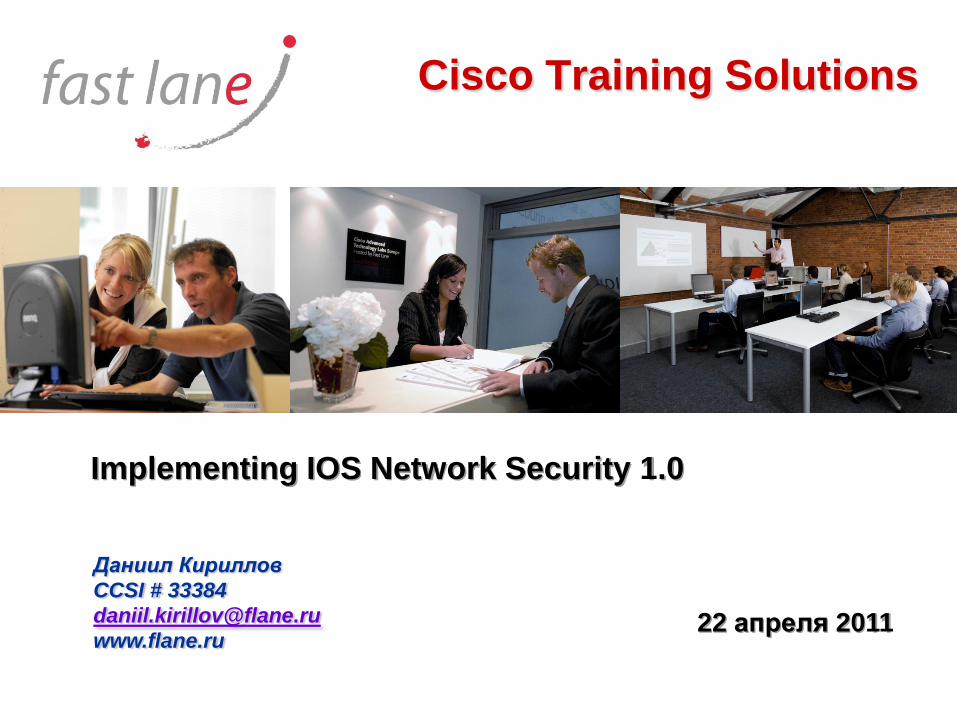
Cisco Training Solutions
Implementing IOS Network Security 1.0
22 апреля 2011
Даниил Кириллов
CCSI # 33384
www.flane.ru
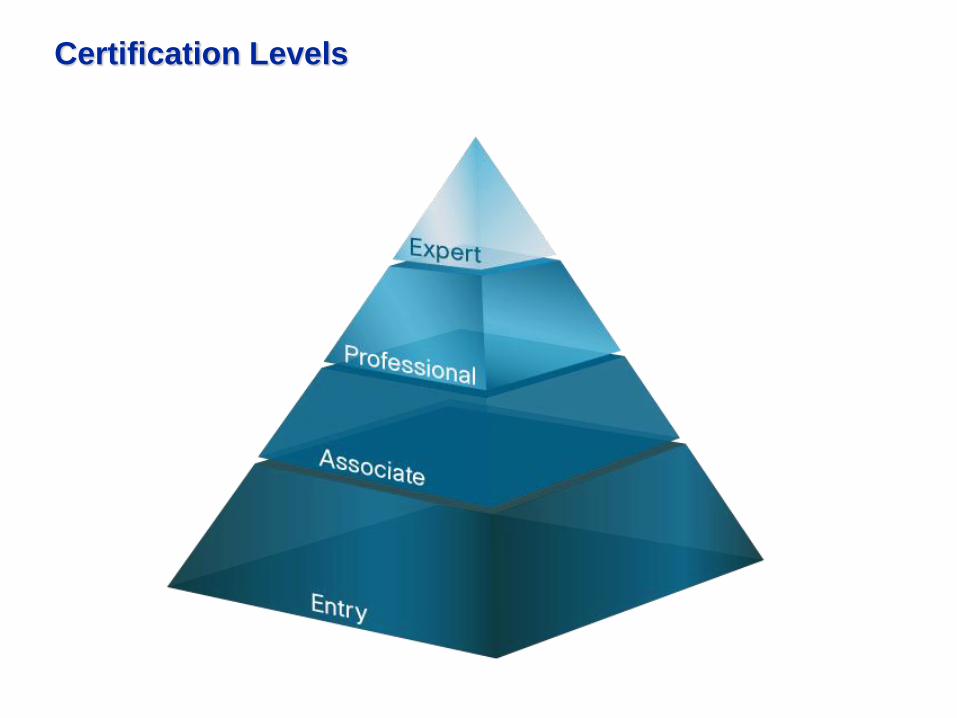
Certification Levels

Certification Areas
Routing & Switching
Storage Networking
Service Provider
Service Provider Operations
Security
Voice
Wireless
Design
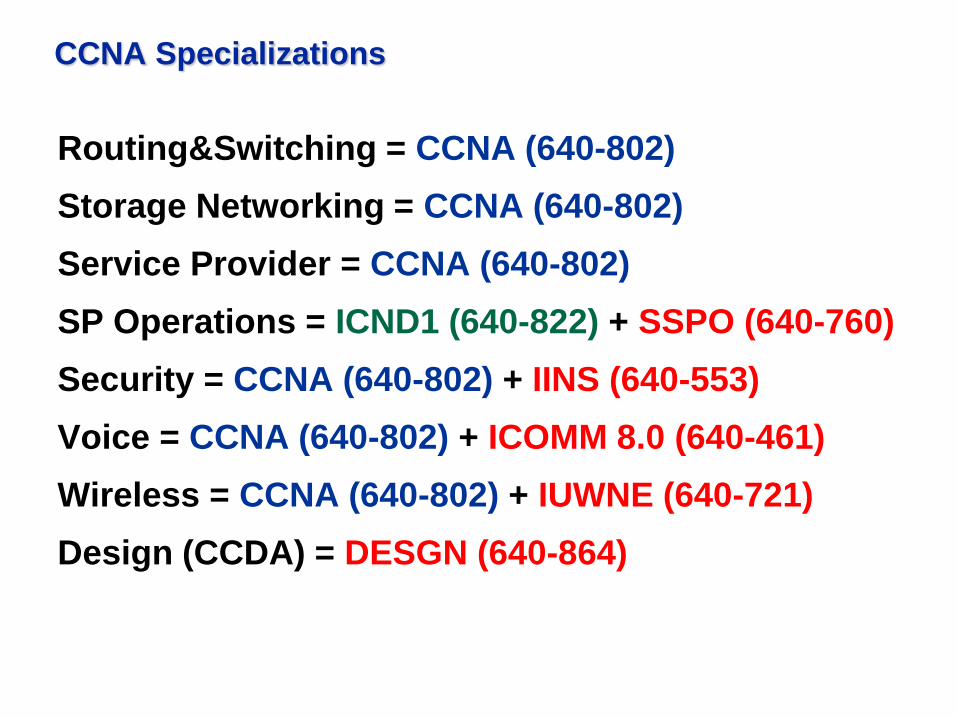
CCNA Specializations
Routing&Switching = CCNA (640-802)
Storage Networking = CCNA (640-802)
Service Provider = CCNA (640-802)
SP Operations = ICND1 (640-822) + SSPO (640-760)
Security = CCNA (640-802) + IINS (640-553)
Voice = CCNA (640-802) + ICOMM 8.0 (640-461)
Wireless = CCNA (640-802) + IUWNE (640-721)
Design (CCDA) = DESGN (640-864)
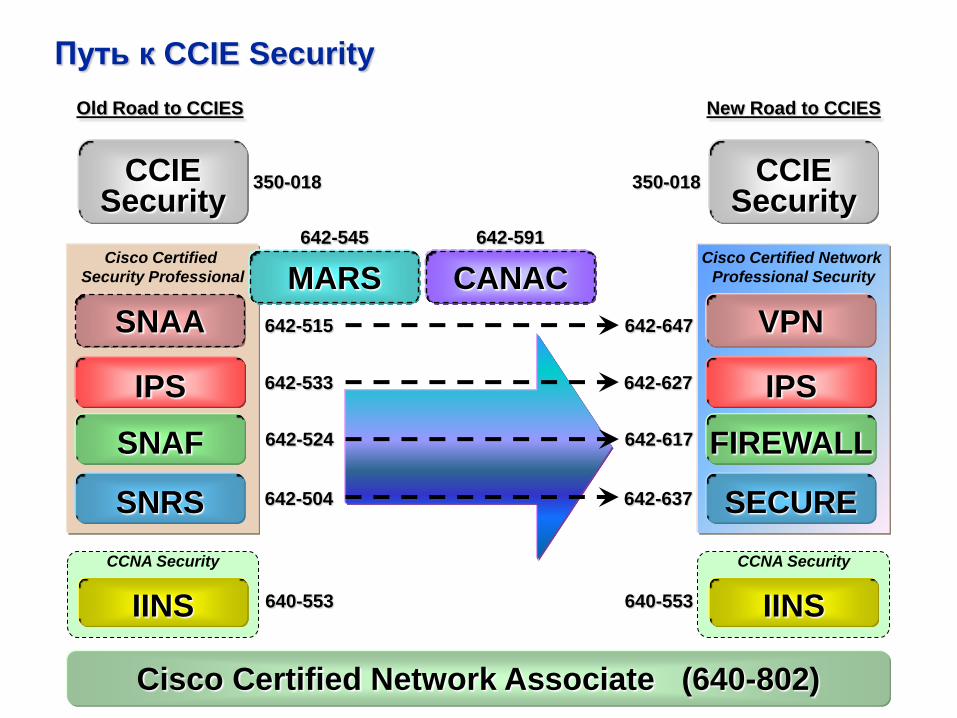
Путь к CCIE Security
Cisco Certified
Security Professional
IPS
SNAF
SNAA
SNRS
Old Road to CCIES
CCNA Security
IINS
CCIESecurity
MARS CANACCisco Certified Network
Professional Security
IPS
FIREWALL
VPN
SECURE
CCNA Security
IINS
CCIESecurity
640-553
642-504
642-524
642-533
642-515
640-553
642-637
642-617
642-627
642-647
642-545 642-591
350-018 350-018
New Road to CCIES
Cisco Certified Network Associate (640-802)

Implementing IOS Network Security
Learner Skills and Knowledge
Knowledge and skills equivalent to those learned in Interconnecting
Cisco Networking Devices Part 1 (ICND1)
Working knowledge of the Windows Operating System
Working knowledge of Cisco IOS networking and concepts
Course Goal
“To understand the necessity of a comprehensive security policy and to
perform basic tasks to secure a small branch type of office network using Cisco
IOS security features available on Cisco routers and switches”
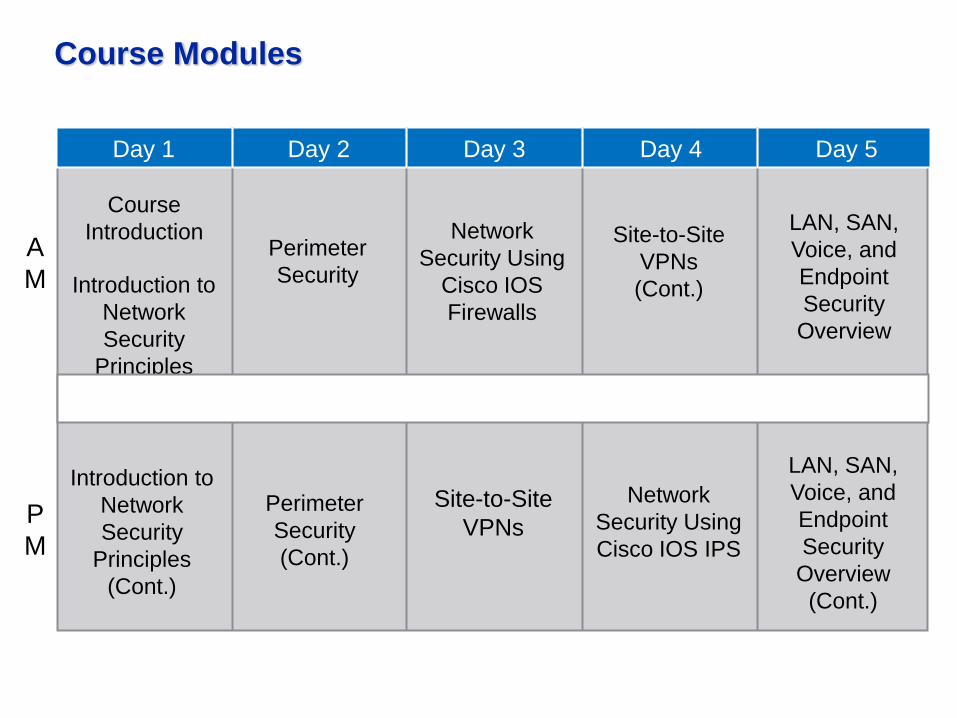
Course Modules
Introduction to
Network
Security
Principles
Course
IntroductionA
M
P
M
Day 1 Day 2 Day 3 Day 4 Day 5
Introduction to
Network
Security
Principles
(Cont.)
Perimeter
Security
(Cont.)
Perimeter
Security
Network
Security Using
Cisco IOS
Firewalls
LAN, SAN,
Voice, and
Endpoint
Security
Overview
Network
Security Using
Cisco IOS IPS
Site-to-Site
VPNs
(Cont.)
Site-to-Site
VPNs
Lunch
LAN, SAN,
Voice, and
Endpoint
Security
Overview
(Cont.)
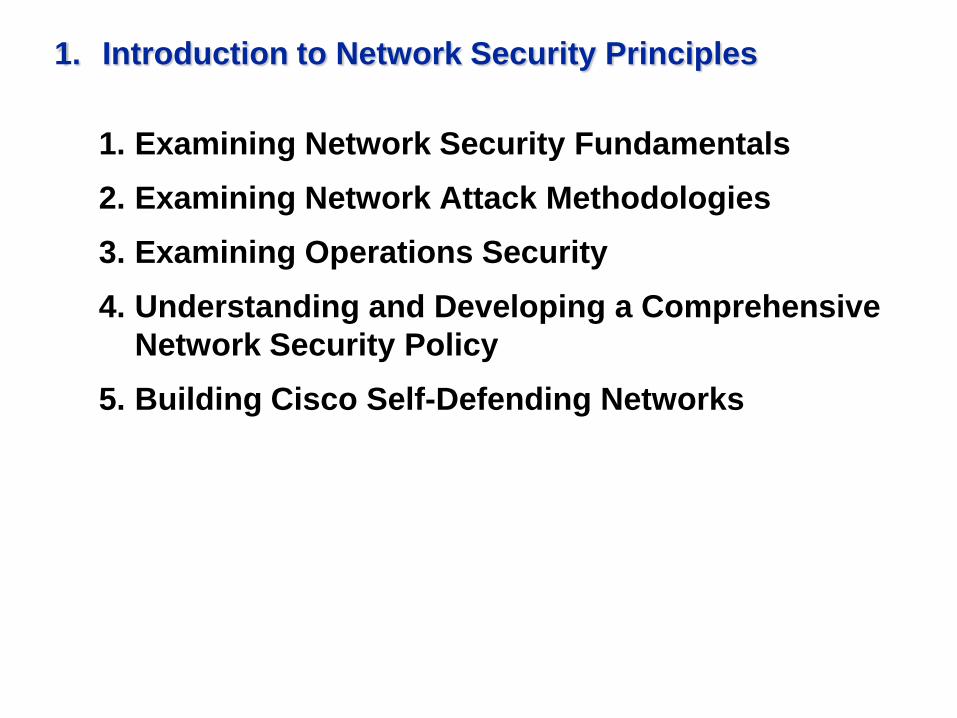
1. Introduction to Network Security Principles
1. Examining Network Security Fundamentals
2. Examining Network Attack Methodologies
3. Examining Operations Security
4. Understanding and Developing a Comprehensive
Network Security Policy
5. Building Cisco Self-Defending Networks

2. Perimeter Security
1. Securing Administrative Access to Cisco Routers
2. Introducing Cisco SDM
3. Configuring AAA on a Cisco Router Using the
Local Database
4. Configuring AAA on a Cisco Router to Use Cisco
Secure ACS
5. Implementing Secure Management and Reporting
6. Locking Down the Router

3. Network Security Using Cisco IOS Firewalls
1. Introducing Firewall Technologies
2. Creating Static Packet Filters Using ACLs
3. Configuring Cisco IOS Zone-Based Policy Firewall

4. Site-to-Site VPNs
1. Examining Cryptographic Services
2. Examining Symmetric Encryption
3. Examining Cryptographic Hashes and Digital
Signatures
4. Examining Asymmetric Encryption and PKI
5. Examining IPsec Fundamentals
6. Building a Site-to-Site IPsec VPN
7. Configuring IPsec on a Site-to-Site VPN Using
Cisco SDM

5. Network Security Using Cisco IOS IPS
1. Introducing IPS Technologies
2. Configuring Cisco IOS IPS Using Cisco SDM
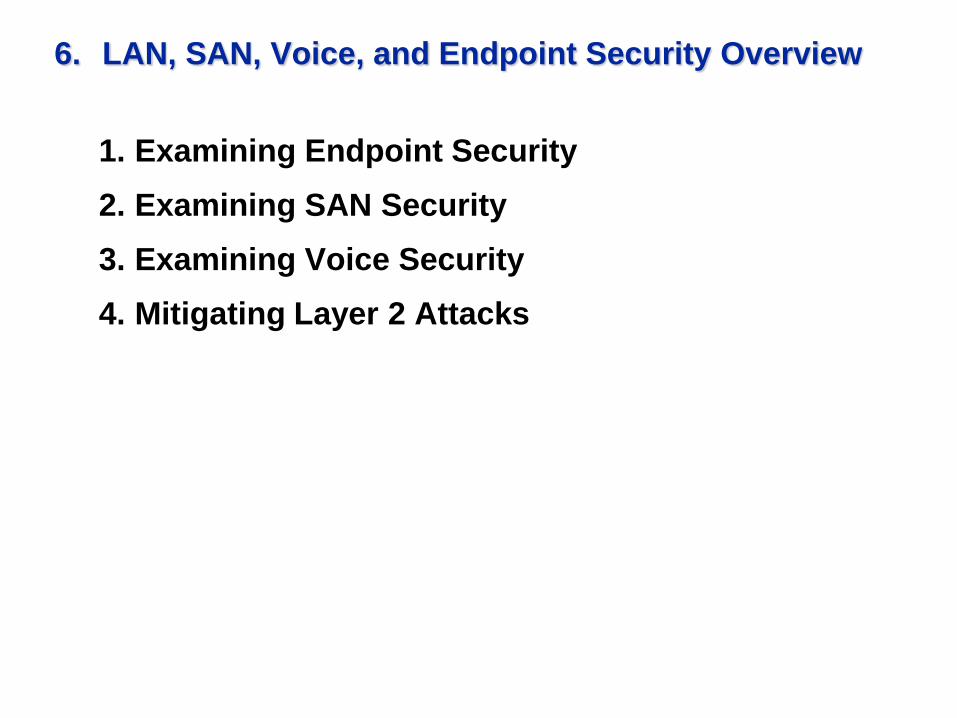
6. LAN, SAN, Voice, and Endpoint Security Overview
1. Examining Endpoint Security
2. Examining SAN Security
3. Examining Voice Security
4. Mitigating Layer 2 Attacks

IINS Lab Topology
.100
192.168.Q.0192.168.P.0
.2
.1
Student PC
.1
.2
.1
.1
Local: 10.0.P.11 Local: 10.0.Q.11
10.0.P.0 10.0.Q.0
RTS RTS
.100
Pods 1–4 Pods 5–8
RBB
Web or FTP
and Cisco
Secure ACS
Web or FTP
and Cisco
Secure ACS
.2.2
Student PC
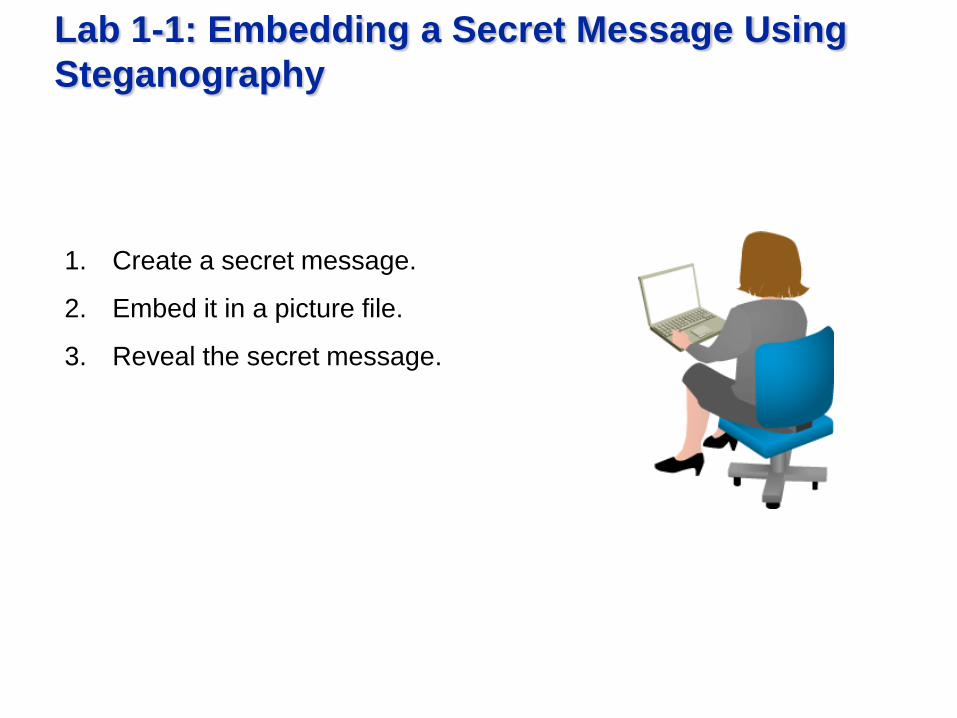
Lab 1-1: Embedding a Secret Message Using
Steganography
1. Create a secret message.
2. Embed it in a picture file.
3. Reveal the secret message.
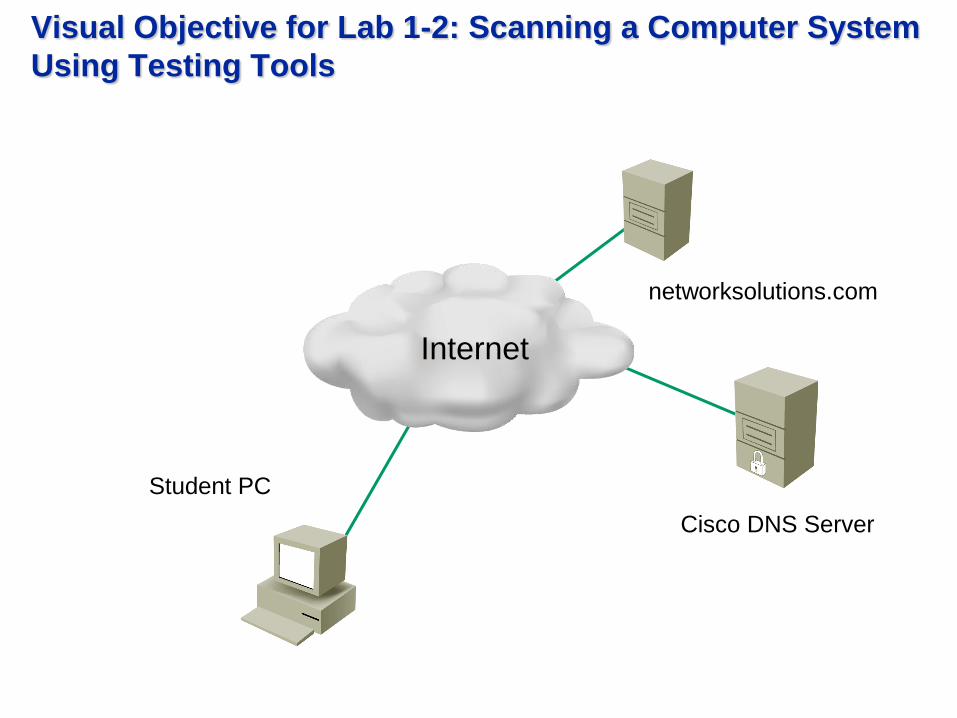
Visual Objective for Lab 1-2: Scanning a Computer System
Using Testing Tools
Student PC
Internet
networksolutions.com
Cisco DNS Server

Lab 1-3: Scanning a Network Using Testing Tools
.100
192.168.Q.0192.168.P.0
.2
.1
Student PC
.1
.2
.1
.1
Local: 10.0.P.11 Local: 10.0.Q.11
10.0.P.0 10.0.Q.0
RTS RTS
.100
Pods 1–4 Pods 5–8
RBB
Web or FTP
and Cisco
Secure ACS
Web or FTP
and Cisco
Secure ACS
.2.2
Student PC
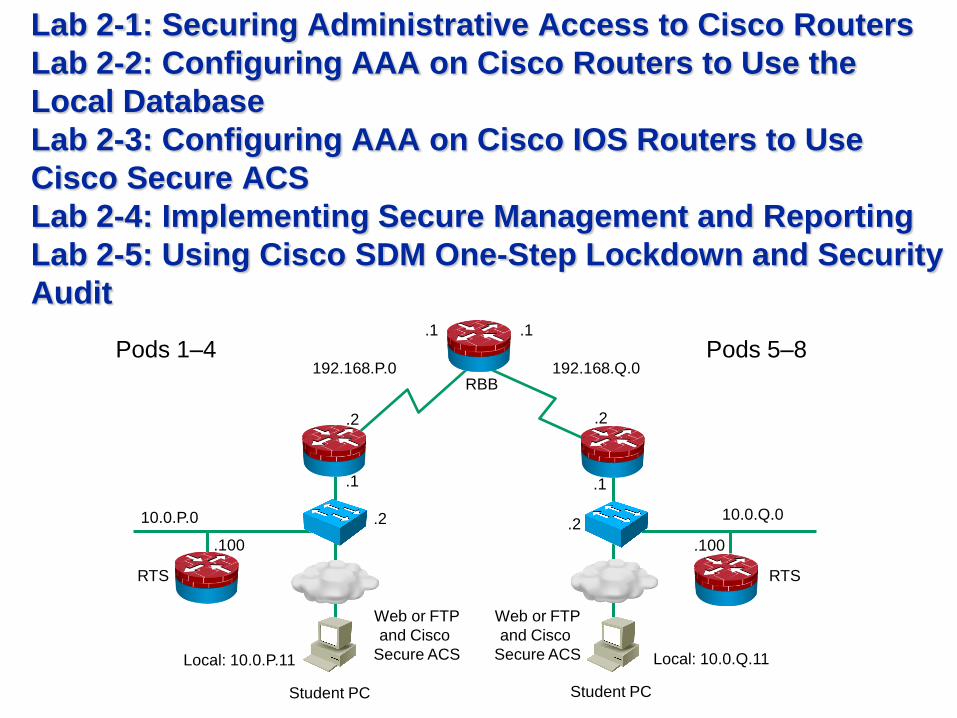
Lab 2-1: Securing Administrative Access to Cisco Routers
Lab 2-2: Configuring AAA on Cisco Routers to Use the
Local Database
Lab 2-3: Configuring AAA on Cisco IOS Routers to Use
Cisco Secure ACS
Lab 2-4: Implementing Secure Management and Reporting
Lab 2-5: Using Cisco SDM One-Step Lockdown and Security
Audit
.100
192.168.Q.0192.168.P.0
.2
.1
Student PC
.1
.2
.1
.1
Local: 10.0.P.11 Local: 10.0.Q.11
10.0.P.0 10.0.Q.0
RTS RTS
.100
Pods 1–4 Pods 5–8
RBB
Web or FTP
and Cisco
Secure ACS
Web or FTP
and Cisco
Secure ACS
.2.2
Student PC

Lab 3-1: Creating Static Packet Filters Using ACLs
Lab 3-2: Configuring a Cisco IOS Zone-Based Policy
Firewall
Permit EIGRP
Permit HTTP to Student PC
Permit EIGRP
Permit HTTP to Student PC
.100
192.168.Q.0192.168.P.0
.2
.1
Student PC
.1
.2
.1
.1
Local: 10.0.P.11 Local: 10.0.Q.11
10.0.P.0 10.0.Q.0
RTS RTS
.100
Pods 1–4 Pods 5–8
RBB
Web or FTP
and Cisco
Secure ACS
Web or FTP
and Cisco
Secure ACS
.2.2
Student PC

Lab 4-1: Configuring a Site-to-Site IPsec VPN
.100
192.168.Q.0192.168.P.0
.2
.1
Student PC
.1
.2
.1
.1
Local: 10.0.P.11 Local: 10.0.Q.11
10.0.P.0 10.0.Q.0
RTS RTS
.100
Pods 1–4 Pods 5–8
RBB
Web or FTP
and Cisco
Secure ACS
Web or FTP
and Cisco
Secure ACS
.2.2
Student PC
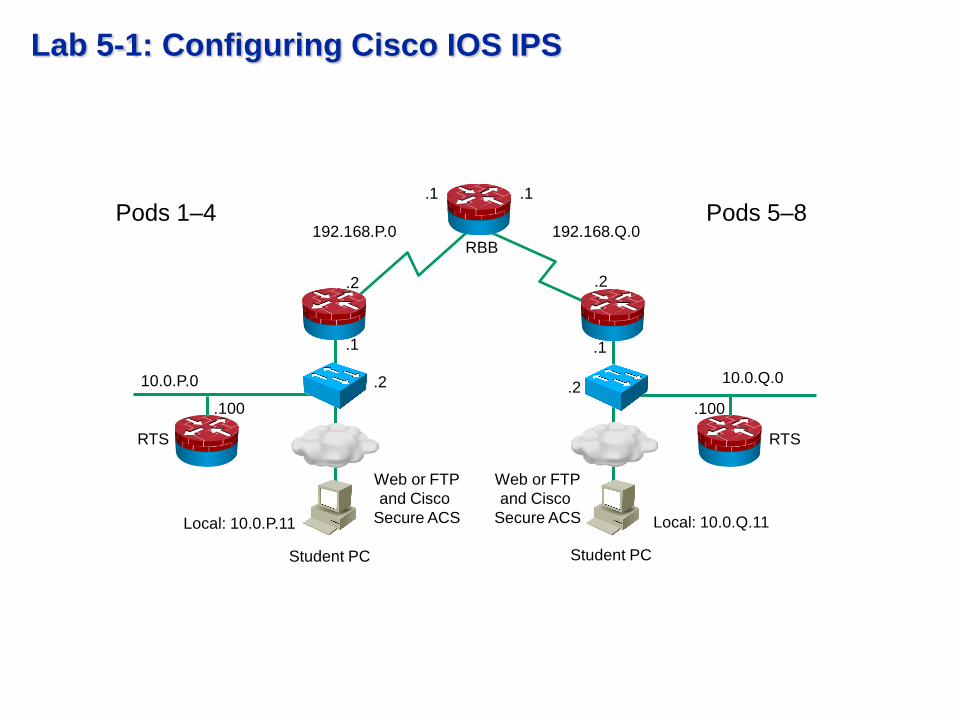
Lab 5-1: Configuring Cisco IOS IPS
.100
192.168.Q.0192.168.P.0
.2
.1
Student PC
.1
.2
.1
.1
Local: 10.0.P.11 Local: 10.0.Q.11
10.0.P.0 10.0.Q.0
RTS RTS
.100
Pods 1–4 Pods 5–8
RBB
Web or FTP
and Cisco
Secure ACS
Web or FTP
and Cisco
Secure ACS
.2.2
Student PC

Lab 6-1: Using Cisco Catalyst Switch Security Features
.100
.1
Student PC
.1
Local: 10.0.P.11 Local: 10.0.Q.11
10.0.P.0 10.0.Q.0
RTS RTS
.100
Pods 1–4 Pods 5–8
Web or FTP
and Cisco
Secure ACS
Web or FTP
and Cisco
Secure ACS
.2.2
Student PC
Core Switch A
Fa0/2
Fa0/4
Fa0/11

Example
Building a Site-to-Site IPsec VPN

Site-to-Site IPsec VPN
IKE Phase 1
IKE Phase 2
IKE SA IKE SA
IPsec SAIPsec SA
1. Host A sends interesting traffic to Host B.
2. Routers A and B negotiate an IKE Phase 1 session.
3. Routers A and B negotiate an IKE Phase 2 session.
4. Information is exchanged via IPsec tunnel.
5. The IPsec tunnel is terminated.
Host A Host B
RouterA RouterB
10.0.2.3
IPsec Tunnel
10.0.1.3

Site-to-Site IPsec Configuration
Step 1: Ensure that ACLs are compatible with IPsec.
Step 2: Create ISAKMP (IKE) policy.
Step 3: Configure IPsec transform set.
Step 4: Create a crypto ACL.
Step 5: Create and apply the crypto map.
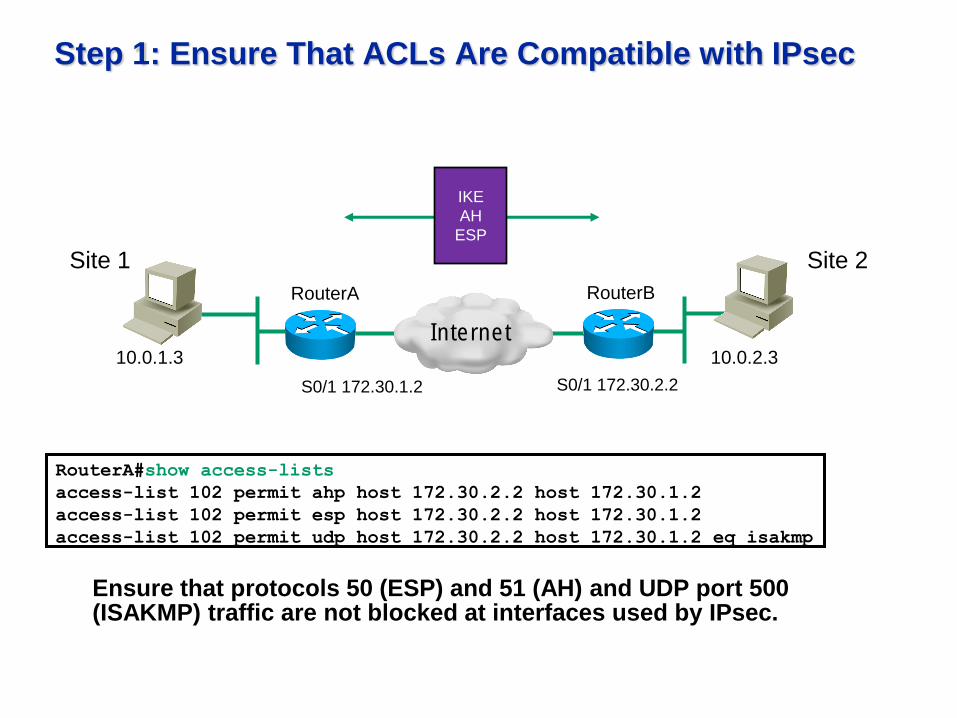
Ensure that protocols 50 (ESP) and 51 (AH) and UDP port 500 (ISAKMP) traffic are not blocked at interfaces used by IPsec.
Step 1: Ensure That ACLs Are Compatible with IPsec
RouterA#show access-lists
access-list 102 permit ahp host 172.30.2.2 host 172.30.1.2
access-list 102 permit esp host 172.30.2.2 host 172.30.1.2
access-list 102 permit udp host 172.30.2.2 host 172.30.1.2 eq isakmp
IKE
AH
ESP
Site 1 Site 2
10.0.1.3 10.0.2.3
RouterA RouterB
Internet
S0/1 172.30.1.2 S0/1 172.30.2.2

Step 2: Create ISAKMP (IKE) Policies
Defines the parameters within the IKE policy
crypto isakmp policy priority
router(config)#
RouterA(config)#crypto isakmp policy 110
RouterA(config–isakmp)#authentication pre-share
RouterA(config–isakmp)#encryption des
RouterA(config–isakmp)#group 1
RouterA(config–isakmp)#hash md5
RouterA(config–isakmp)#lifetime 86400
Site 1 Site 2
172.30.2.2
A B10.0.1.3 10.0.2.3
RouterA RouterB
Internet
Tunnel
Policy 110
DES
MD5
Preshare
86400
DH1

IKE Policy Negotiation
• The first two policies in each router can be successfully negotiated, but the last one cannot.
172.30.2.2
A B10.0.1.3 10.0.2.3
RouterA RouterB
Internet
Host A Host B

Configure PSKs
Assigns a keystring and the peer address or hostname.
The peer IP address or hostname can be used, but you must be consistent between peers.
crypto isakmp key keystring address peer-address
router(config)#
crypto isakmp key keystring hostname hostname
RouterA(config)#crypto isakmp key cisco1234 address 172.30.2.2
router(config)#
172.30.2.2
A B10.0.1.3 10.0.2.3
RouterA RouterB
Internet
Host A Host B
PSK
cisco1234

Site-to-Site IPsec Configuration—
Phase 1
Internet
172.30.1.2 172.30.2.2
RouterA RouterB
10.0.1.0/24 10.0.2.0/24
crypto isakmp policy 1
authentication pre-shared
hash sha
encryption aes 128
group 2
lifetime 86400
crypto isakmp key SECRET address
172.30.1.2
crypto isakmp policy 1
authentication pre-shared
hash sha
encryption aes 128
group 2
lifetime 86400
crypto isakmp key SECRET address
172.30.2.2

Step 3: Configure Transform Sets
A transform set is a combination of IPsec transforms that enact a securitypolicy for traffic.
A transform set can have one AH transform and up to two ESP transforms.
router(config)#
crypto ipsec transform –set transform -set-name
transform1 [transform2 [transform3]]
RouterA(config)#crypto ipsec transform -set mine esp-des
A B10.0.1.3 10.0.2.3
RouterA RouterB
Internet
Site 1 Site 2
mine
esp-des
Tunnel

Transform sets are negotiated during IKE Phase 2.
Host B
10.0.1.3 10.0.2.3
RouterA RouterB
Host A
Transform Set Negotiation
transform-set alpha
esp-3des
tunnel
transform-set beta
esp-des, esp-md5-hmac
tunnel
transform-set golf
esp-3des, esp-sha-hmac
tunnel
transform-set delta
esp-des
tunnel
transform-set echo
esp-des, ah-sha-hmac
tunnel
transform-set foxtrot
esp-3des, esp-sha-hmac
tunnelMatch
Internet

Purpose of Crypto ACLs
– Outbound indicates the data flow to be protected by IPsec.
– Inbound filters out and discards traffic that should have been
protected by IPsec.
Host A
RouterA
Internet
Outbound
Traffic
Inbound
Traffic
Encrypt
Bypass (Plaintext)
Permit
Bypass
Discard (Plaintext)

Step 4: Create Crypto ACLs Using Extended ACLs
– Defines which IP traffic the tunnel will protect
– Permit = Encrypt
– Deny = Do not encrypt
10.0.1.3 10.0.2.3
RouterA RouterB
Host A
Internet
Host B
10.0.1.0 10.0.2.0
router(config)#
access-list access-list number [dynamic dynamic-name [timeout minutes]]
{deny | permit} protocol source source-wildcard destination
destination-wildcard [precedence precedence] [tos tos] [log]
RouterA(config)#access-list 110 permit tcp 10.0.1.0 0.0.0.255
10.0.2.0 0.0.0.255

Configure Symmetric Peer Crypto ACLs
You must configure mirror-image ACLs.
S0/1
Site 1
10.0.1.3 10.0.2.3
RouterA RouterB
Host A
Internet
Host B
S0/1 S0/1
172.30.2.2
Site 2
RouterA(config)# access-list 110 permit tcp
10.0.1.0 0.0.0.255 10.0.2.0 0.0.0.255
RouterB(config)# access-list 101 permit tcp
10.0.2.0 0.0.0.255 10.0.1.0 0.0.0.255
172.30.1.2

Crypto Map Parameters
Crypto maps define the following:
ACL to be used
Remote VPN peers
Transform set to be used
Key management method
SA lifetimes
Site 1
10.0.1.3
RouterA RouterB
10.0.2.3
Site 2
Internet
Encrypted Traffic
Router
Interface
or Subinterface
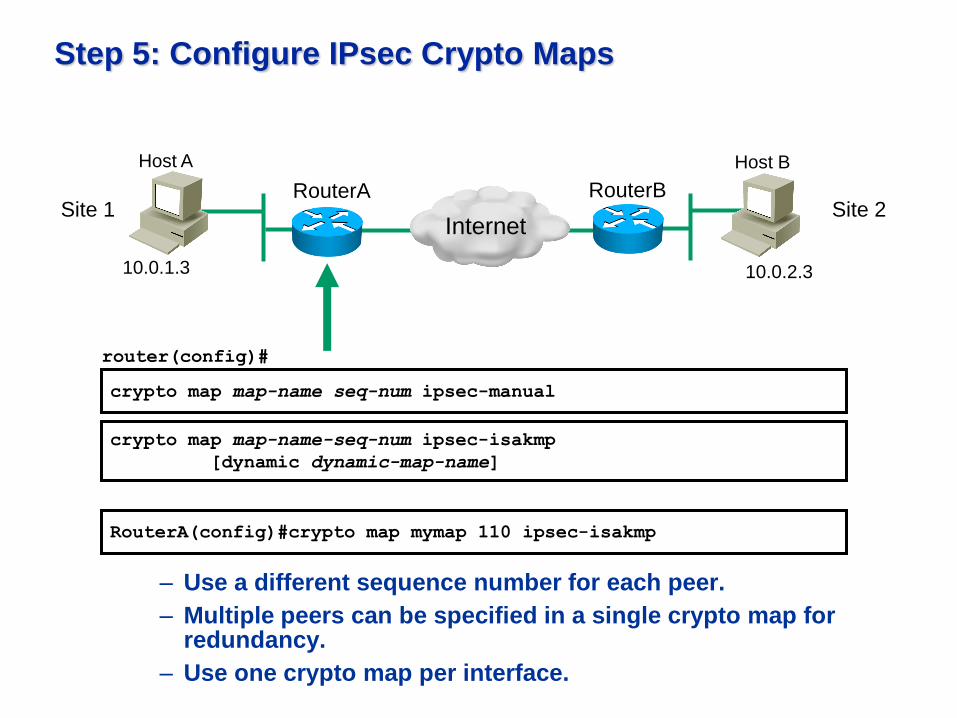
Step 5: Configure IPsec Crypto Maps
– Use a different sequence number for each peer.
– Multiple peers can be specified in a single crypto map for redundancy.
– Use one crypto map per interface.
crypto map map-name seq-num ipsec-manual
crypto map map-name-seq-num ipsec-isakmp
[dynamic dynamic-map-name]
RouterA(config)#crypto map mymap 110 ipsec-isakmp
router(config)#
10.0.1.3 10.0.2.3
RouterA RouterB
Host A
Internet
Host B
Site 1 Site 2

Example: Crypto Map Commands
– Multiple peers can be specified for redundancy.
RouterC
172.30.3.2
RouterA(config)#crypto map mymap 10 ipsec-isakmp
RouterA(config-crypto-map)#match address 110
RouterA(config-crypto-map)#set peer 172.30.2.2 default
RouterA(config-crypto-map)#set peer 172.30.3.2
RouterA(config-crypto-map)#set pfs group1
RouterA(config-crypto-map)#set tranform-set mine
RouterA(config-crypto-map)#set security-association lifetime seconds 86400
10.0.1.3 10.0.2.3
RouterA RouterB
Host A
Internet
Host B
Site 1 Site 2
172.30.2.2

Applying Crypto Maps to Interfaces
– Applies the crypto map to outgoing interface
– Activates the IPsec policy
crypto map map-name
RouterA (config)#interface serial0/1
RouterA (config -if)#crypto map mymap
router(config-if)#
mymap
S0/1
172.30.2.2
S0/1
172.30.1.210.0.1.3 10.0.2.3
RouterA RouterB
Host A
Internet
Host B
Site 1 Site 2

Test and Verify IPsec
show crypto isakmp policy
router#
Displays your configured IKE policies
show crypto ipsec transform-set
router#
Displays your configured transform sets
show crypto map
router#
Displays your configured crypto maps

show crypto isakmp policy Command
show crypto isakmp policy
RouterA#show crypto isakmp policy
Protection suite of priority 110
encryption algorithm: 3DES - Data Encryption Standard (168 bit keys).
hash algorithm: Secure Hash Standard
authentication method: preshared
Diffie-Hellman group: #2 (1024 bit)
lifetime: 86400 seconds, no volume limit
Default protection suite
encryption algorithm: DES - Data Encryption Standard (56 bit keys).
hash algorithm: Secure Hash Standard
authentication method: Rivest-Shamir-Adleman Signature
Diffie-Hellman group: #1 (768 bit)
lifetime: 86400 seconds, no volume limit
router#
Site 1 Site 2
A B
RouterA RouterB
Internet10.0.1.3 10.0.2.3

show crypto ipsec transform-set
Displays the currently defined transform sets
RouterA#show crypto ipsec transform-set
Transform set AES_SHA: { esp-128-aes esp-sha-hmac }
will negotiate = { Tunnel, },
show crypto ipsec transform-set Command
router#
S0/1
172.30.1.2
Site 1 Site 2
S0/1
172.30.2.2
A B
RouterA RouterB
Internet10.0.1.3 10.0.2.3

show crypto map Command
RouterA#show crypto map
Crypto Map "mymap" 10 ipsec-isakmp
Peer = 172.30.2.2
Extended IP access list 110
access-list 102 permit ip host 10.0.1.3 host 10.0.2.3
Current peer: 172.30.2.2
Security association lifetime: 4608000 kilobytes/3600 seconds
PFS (Y/N): N
Transform sets={ mine, }
show crypto map
Displays the currently configured crypto maps
router#
Site 1 Site 2
A B
RouterA RouterB
InternetS0/1
172.30.1.2S0/1
172.30.2.2
10.0.1.3 10.0.2.3
show crypto ipsec sa
Site 1 Site 2
A B10.0.1.3 10.0.2.3
RouterA RouterB
Internet
RouterA#show crypto ipsec sa
Interface: Serial0/1
Crypto map tag: mymap, local addr. 172.30.1.2
local ident (addr/mask/prot/port): (172.30.1.2/255.255.255.255/0/0)
remote ident (addr/mask/prot/port): (172.30.2.2/255.255.255.255/0/0)
current_peer: 172.30.2.2
PERMIT, flacs={origin_is_acl,}
#pkts encaps: 21, #pkts encrypt: 21, #pkts digest 0
#pkts decaps: 21, #pkts decrypt: 21, #pkts verify 0
#send errors 0, #recv errors 0
local crypto endpt.: 172.30.1.2, remote crypto endpt.: 172.30.2.2
path mtu 1500, media mtu 1500
current outbound spi: 8AE1C9C
S0/1
172.30.1.2
S0/1
172.30.2.2

Specialist Programs
Cisco Network Admission Control
Specialist
Cisco IPS Specialist
Cisco VPN
Security Specialist
Cisco ASA
Security Specialist
FIREWALL
Cisco Firewall
Security Specialist
Cisco IOS
Security Specialist
FIREWALL
VPN
SECURE
Implementing IOS Network Security
CANAC
SECURE
VPN
IPS


Fast Lane RCIS IINS Dates
16.05. - 20.05.2011 Санкт-Петербург
14.06. - 17.06.2011 Москва
04.07. - 08.07.2011 Санкт-Петербург
01.08. - 05.08.2011 Москва

Спасибо за внимание!