cisco telepresence touch for c series installation guide...ip address: 192.168.1.128 serial number:...
TRANSCRIPT

A Connecting the touch screen via LAN
The touch screen can be connected to the following codecs via LAN. The codec may be part of a Profile system.
• Codec C20• Codec C40• Codec C60• Codec C90
Check the system information page on your codec to make sure its software version is TC4.1 or later. If not, contact your Cisco representative.
1.Restart the codec before you proceed with the installation.
2.Connect the touch screen cable to the Power adapter.
3.Connect the shielded Ethernet cable between the Power adapter and the LAN (Ethernet) socket.
4.Connect the supplied power cable between the Power adapter and the power socket. Once power is connected, the touch screen start-up procedure begins.
Wait while the touch screen initializes. Continue when the Select codec to pair with window appears. This may take a few minutes.
Note: The touch screen obtains its IP settings automatically from the network (DHCP). In most cases this is preferred and you can continue with the pairing.
If you need a static IP address for your touch screen perform the steps described in the ChangetheIPsettings section, before continuing.
7.5 m
5 m
Power adapter
Power socket
LAN socket (Ethernet)
1.8 m
A list of all codecs that are in Pairing mode is displayed on the touch screen.
5.Click the codec name in the list.
Note: If your codec is not in the list, read about Whattodoifyourcodecisnotlisted below.
6.Review codec details and click Start Pairing to start the pairing process.
7. If required, the touch screen downloads and installs new software from the codec. The touch screen automatically restarts after the software upgrade. This process may take a few minutes.
If your codec is password protected, you will be prompted for an administrator username and password to sign in to the codec.
Continue when the menu and contact list appear on the touch screen.
8.Verify that the touch screen is successfully paired to your codec by checking the codec address displayed in the top banner.
The touch screen is ready to use.
Refresh list
Select codec to pair with
Select codec manually...
IP Settings
System name (Codec type)[email protected]
The touch screen menu and contact list
Available [email protected] 12:00
Product:Cisco TelePresence System Codec
SIP URI:[email protected]
H323 id:[email protected]
Software:TC4.1.0
IP address:192.168.1.128
Serial number:CBA123456789
System name (Codec type)[email protected]
Start Pairing
Back
Thisboxcontains:• Cisco TelePresence Touch with cable (7.5 m / 25 ft)• Power adapter• Power cable (1.8 m / 6 ft) (included when Touch is shipped as a stand-alone unit)• Shielded Ethernet cable (5 m / 16 ft) • Cleaning cloth
CompatibilityThe touch screen is used with the Cisco TelePresence Codec C Series. These codecs are also used in the Cisco TelePresence System Profile series. The touch screen can be installed in two ways:
A.Connecting the touch screen to a codec via LAN (local area network).
B.Connecting the touch screen directly to the codec.
Note: The codec software version must be TC4.1 or later.
SafetyrequirementYou have to use a shielded Ethernet cable (as supplied).
UserdocumentationUser documentation for Cisco TelePresence products, including compliance and safety information, is found on http://www.cisco.com/go/telepresence/docs.
78-19948-01 JANUARY 2011. Copyright © 2010-2011 Cisco Systems, Inc. All rights reserved.
Cisco TelePresence TouchFor C Series
iNstALLAtioN guide
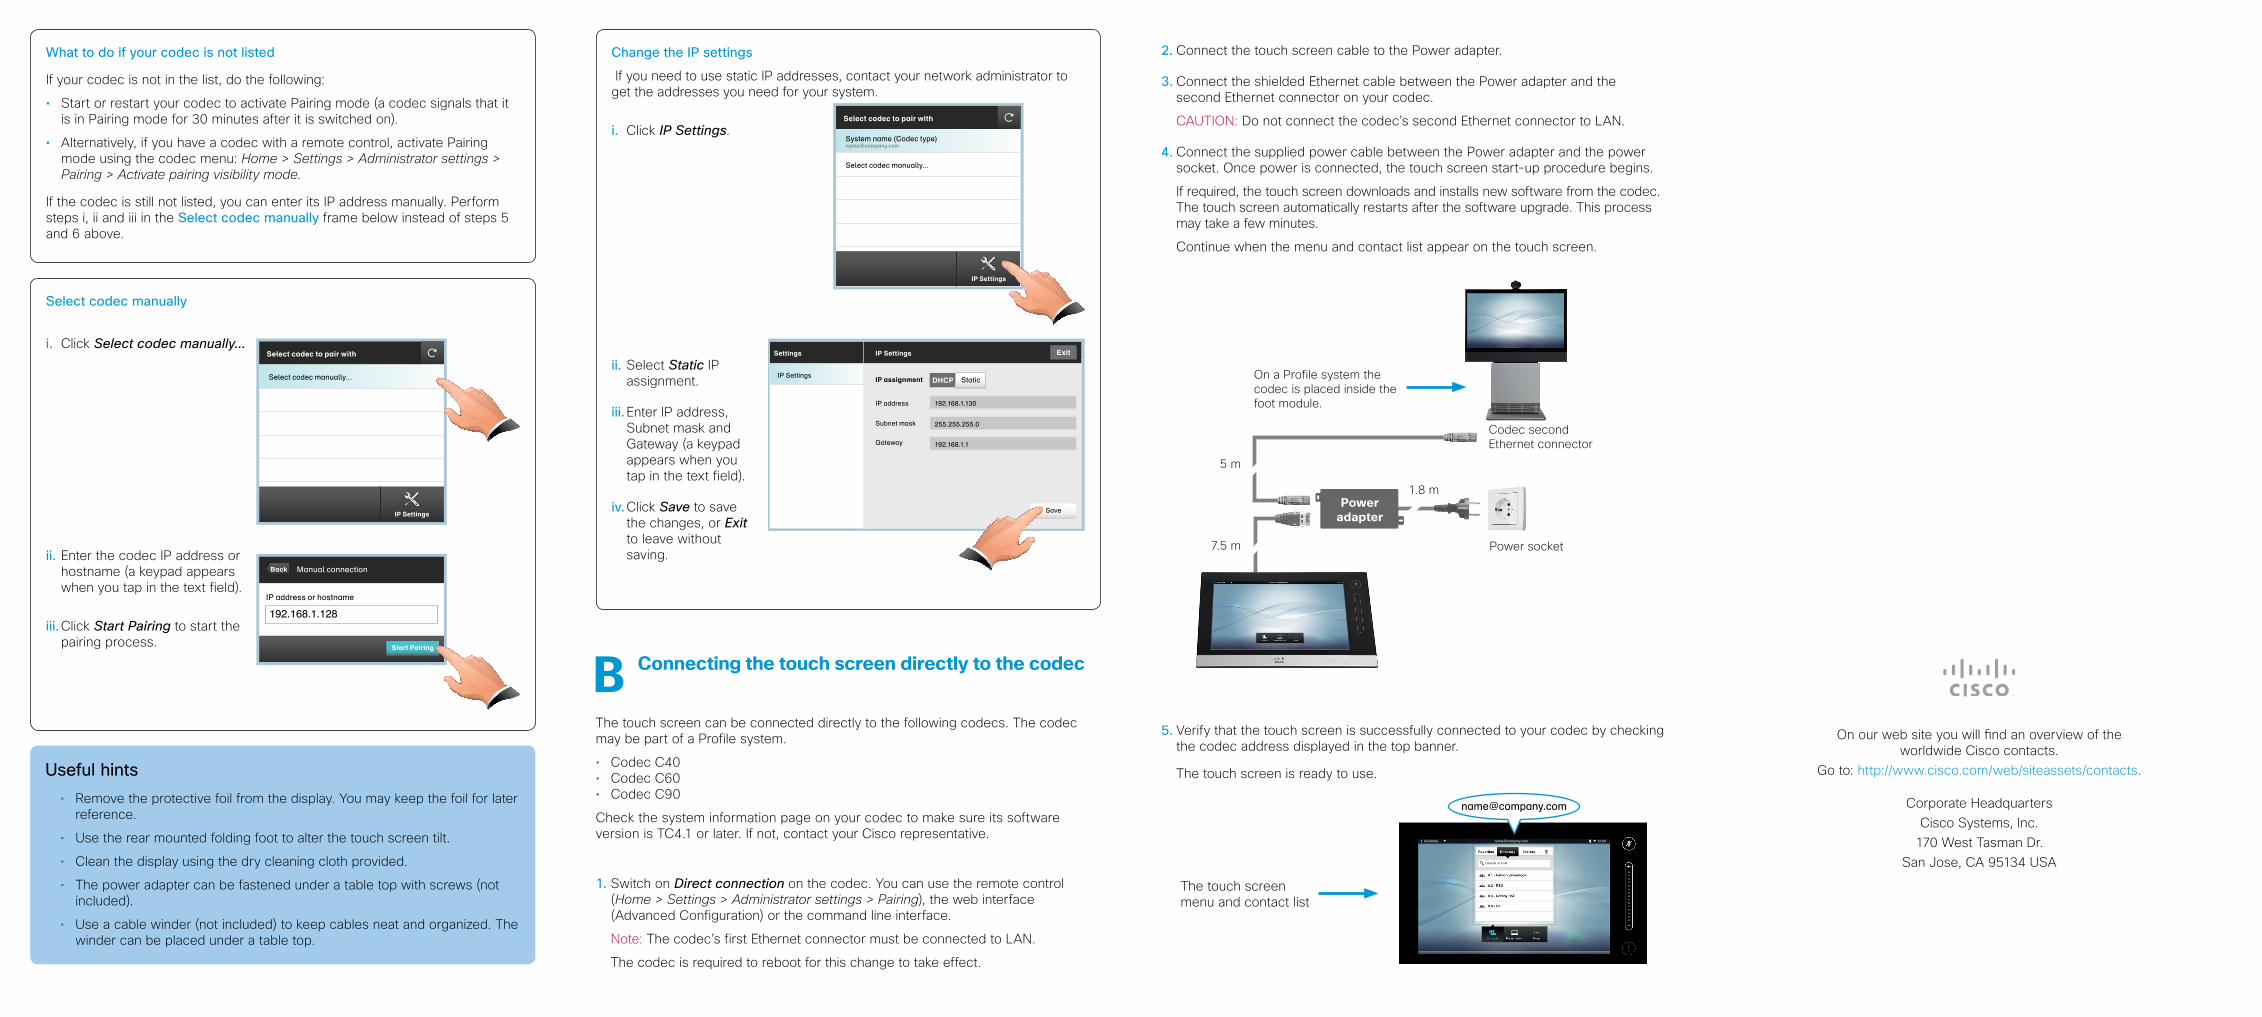
2.Connect the touch screen cable to the Power adapter.
3.Connect the shielded Ethernet cable between the Power adapter and the second Ethernet connector on your codec.
CAUTION: Do not connect the codec’s second Ethernet connector to LAN.
4.Connect the supplied power cable between the Power adapter and the power socket. Once power is connected, the touch screen start-up procedure begins.
If required, the touch screen downloads and installs new software from the codec. The touch screen automatically restarts after the software upgrade. This process may take a few minutes.
Continue when the menu and contact list appear on the touch screen.
7.5 m
5 m
1.8 mPower
adapter
On a Profile system the codec is placed inside the foot module.
Power socket
Codec second Ethernet connector
The touch screen menu and contact list
Available [email protected] 12:00
B Connecting the touch screen directly to the codec
The touch screen can be connected directly to the following codecs. The codec may be part of a Profile system.
• Codec C40• Codec C60• Codec C90
Check the system information page on your codec to make sure its software version is TC4.1 or later. If not, contact your Cisco representative.
1.Switch on Direct connection on the codec. You can use the remote control (Home > Settings > Administrator settings > Pairing), the web interface (Advanced Configuration) or the command line interface.
Note: The codec’s first Ethernet connector must be connected to LAN.
The codec is required to reboot for this change to take effect.
ChangetheIPsettings
If you need to use static IP addresses, contact your network administrator to get the addresses you need for your system.
i. Click IP Settings.
ii.Select Static IP assignment.
iii.Enter IP address, Subnet mask and Gateway (a keypad appears when you tap in the text field).
iv.Click Save to save the changes, or Exit to leave without saving.
Select codec to pair with
Select codec manually...
IP Settings
System name (Codec type)[email protected]
IP SettingsIP assignment
IP address
Subnet mask
Gateway
255.255.255.0
Save
192.168.1.1
192.168.1.130
DHCP Static
Settings IP Settings Exit
On our web site you will find an overview of the worldwide Cisco contacts.
Go to: http://www.cisco.com/web/siteassets/contacts.
Corporate HeadquartersCisco Systems, Inc.
170 West Tasman Dr.San Jose, CA 95134 USA
Selectcodecmanually
i. Click Select codec manually...
ii.Enter the codec IP address or hostname (a keypad appears when you tap in the text field).
iii.Click Start Pairing to start the pairing process.
Usefulhints• Remove the protective foil from the display. You may keep the foil for later
reference.
• Use the rear mounted folding foot to alter the touch screen tilt.
• Clean the display using the dry cleaning cloth provided.
• The power adapter can be fastened under a table top with screws (not included).
• Use a cable winder (not included) to keep cables neat and organized. The winder can be placed under a table top.
IP address or hostname
Manual connection
192.168.1.128
Start Pairing
Back
Select codec to pair with
IP Settings
Select codec manually...
Whattodoifyourcodecisnotlisted
If your codec is not in the list, do the following:
• Start or restart your codec to activate Pairing mode (a codec signals that it is in Pairing mode for 30 minutes after it is switched on).
• Alternatively, if you have a codec with a remote control, activate Pairing mode using the codec menu: Home > Settings > Administrator settings > Pairing > Activate pairing visibility mode.
If the codec is still not listed, you can enter its IP address manually. Perform steps i, ii and iii in the Selectcodecmanually frame below instead of steps 5 and 6 above.
5.Verify that the touch screen is successfully connected to your codec by checking the codec address displayed in the top banner.
The touch screen is ready to use.