cisco telepresence mx and sx series user guide for touch ... · 2. d1534501 user guide cisco...
TRANSCRIPT
1
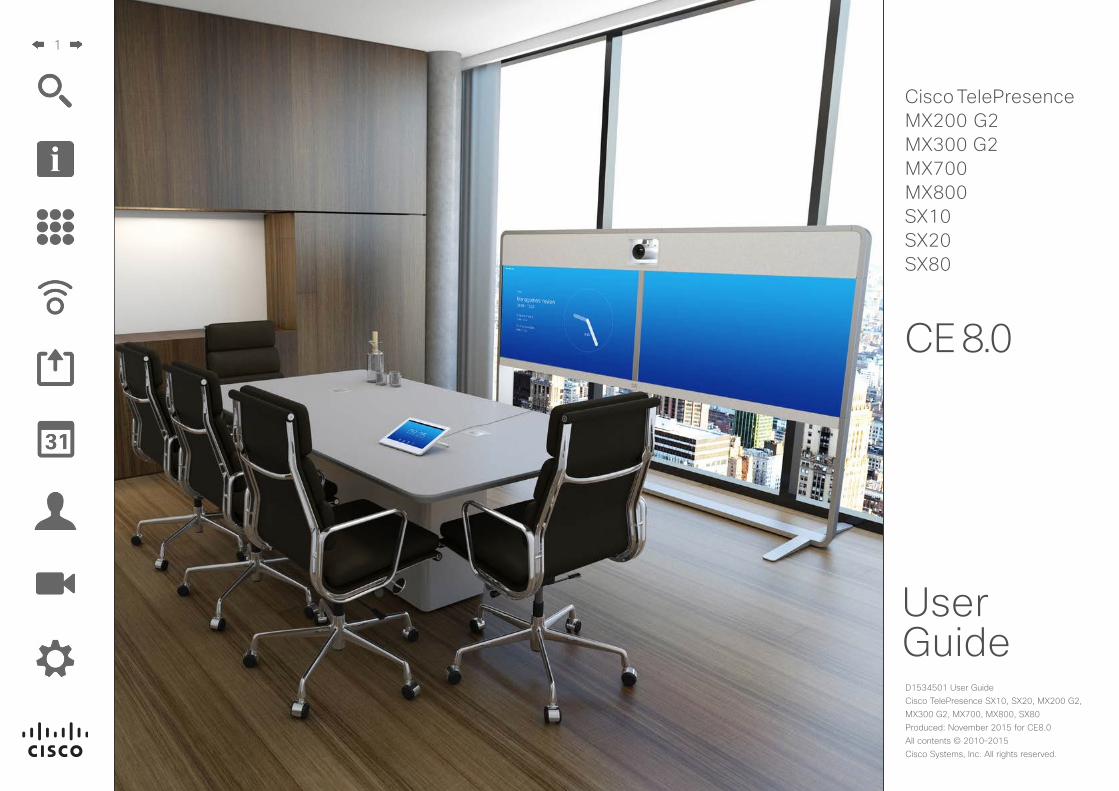
D1534501 User Guide Cisco TelePresence SX10, SX20, MX200 G2, MX300 G2, MX700, MX800, SX80Produced: November 2015 for CE8.0All contents © 2010–2015 Cisco Systems, Inc. All rights reserved.
User Guide
Cisco TelePresence MX200 G2 MX300 G2 MX700 MX800 SX10 SX20 SX80
CE 8.0
2
D1534501 User Guide Cisco TelePresence SX10, SX20, MX200 G2, MX300 G2, MX700, MX800, SX80Produced: November 2015 for CE8.0All contents © 2010–2015 Cisco Systems, Inc. All rights reserved.
What’s in this guideContents
Introduction to Video ConferencingBest Practice ........................................................................ 4Tour the Touch Screen ......................................................... 5Log Onto a System with Your Own Credentials ................... 6
Video CallsPlace Call From Contact List ................................................ 8Edit a Contact List Entry, then Place the Call ....................... 9Place Call Using Name ........................................................10Place Call Using an IP Address ...........................................11Place Call Using Number .....................................................12Receive Call .........................................................................13Receive Call While in Another Call ......................................14Transfer ................................................................................15Consult and Transfer ...........................................................16Disconnect Yourself From Call ............................................17A few words on microphone behavior and privacy .............18Put Call on Hold and Resume a Call on Hold ......................19Change Call Rate ................................................................ 20Enable Do Not Disturb .........................................................21Enable Standby ................................................................... 22View Keypad While in a Call ............................................... 23Add Additional Participants to Existing Call ........................ 24Add Incoming Call to Existing Call ...................................... 25View Meeting Participant List ............................................. 26Manage Conference Call Layout ........................................ 27Lock Speaker ...................................................................... 28Disconnect Participant from Call ........................................ 29
Intelligent ProximityIntelligent Proximity ..............................................................31Activate and Deactivate Intelligent Proximity ...................... 32
Share ContentStart and Stop Presentation in a Call .................................. 34Change Presentation Layout In a Call................................. 35Presentation Outside Calls ................................................. 36
Scheduled MeetingsView Meeting List ............................................................... 38Join Scheduled Meeting ..................................................... 39Parallel Meetings ................................................................ 40
ContactsDirectory ............................................................................. 42Call Recents........................................................................ 43Favorites ............................................................................. 44Add Someone to Favorites, While in a Call ........................ 45
CameraView Camera Settings ........................................................ 47Add Camera Position Preset .............................................. 48Edit Existing Camera Position Preset.................................. 49Speaker Tracking ................................................................ 50Control Own Camera ...........................................................51Manage Selfview ................................................................ 52Resize the Selfview PiP ...................................................... 53Move the Selfview PiP ........................................................ 54Control the Camera of the Other Participant ...................... 55
SettingsGain Access to the Settings ............................................... 57Ringtone & Sound ............................................................... 58Camera Control .................................................................. 59Main Source Selection ....................................................... 60Display .................................................................................61Select Language ................................................................ 62System Information ............................................................. 63Call Status .......................................................................... 64Diagnostic Mode ................................................................. 65Restart System ................................................................... 66Administrator ...................................................................... 67Administrator Settings—Tracking ......................................... 68Administrator Settings—Set Date and Time ........................ 69Administrator Settings—Call Details .................................... 70Administrator Settings—Provisioning Wizard .......................71Administrator Settings—Multipoint Mode ............................ 72Administrator Settings—Pairing ........................................... 73Administrator Settings—IP & VLAN, Codec .........................74Administrator Settings—Network Status Codec ................. 75Administrator Settings—IP & VLAN, Touch.......................... 76Administrator Settings—Network Status Touch .................. 77Administrator Settings—SIP ................................................ 78Administrator Settings—H323 ............................................. 79Administrator Settings—EMC Resilience Mode ................... 80Administrator Settings—Factory Reset ................................ 81
All entries in the table of contents are clickable hyperlinks that will take you to the corresponding article.
To go between chapters, you may also click on any of the icons in the sidebar.
Note! Some of the features described in this user guide are optional and they may therefore not be present on your system.
3
D1534501 User Guide Cisco TelePresence SX10, SX20, MX200 G2, MX300 G2, MX700, MX800, SX80Produced: November 2015 for CE8.0All contents © 2010–2015 Cisco Systems, Inc. All rights reserved.
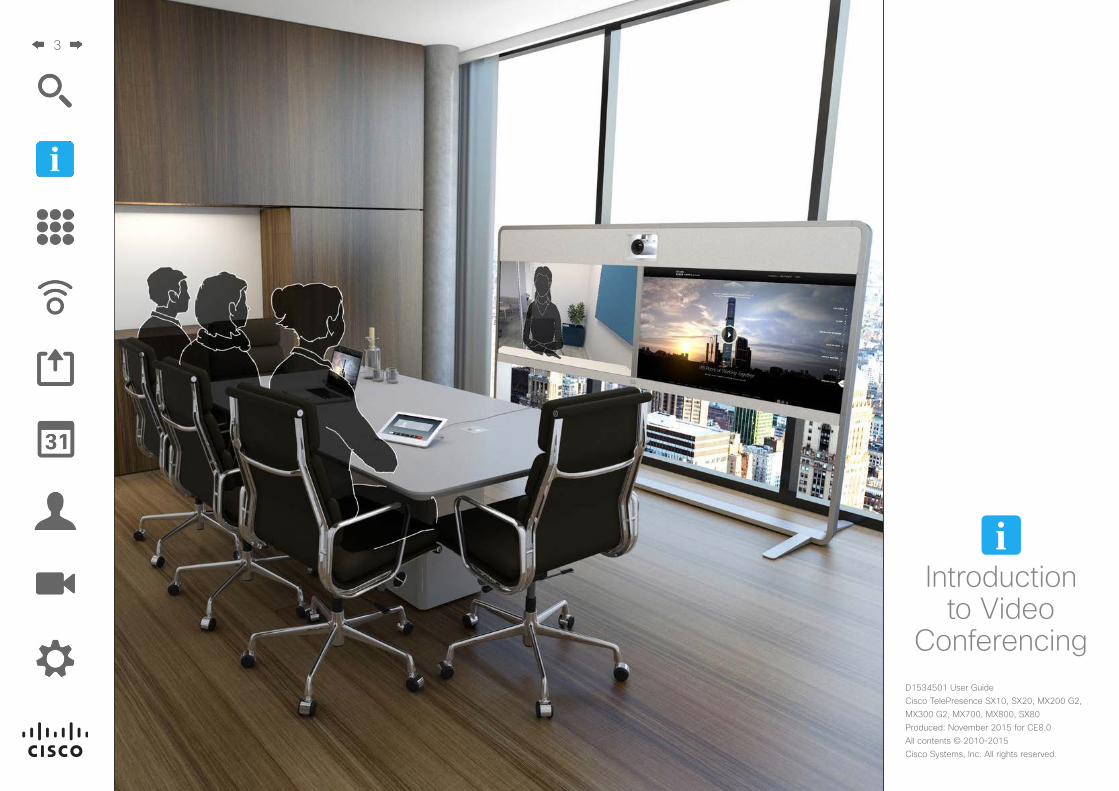
Introduction to Video
Conferencing
i
4
D1534501 User Guide Cisco TelePresence SX10, SX20, MX200 G2, MX300 G2, MX700, MX800, SX80Produced: November 2015 for CE8.0All contents © 2010–2015 Cisco Systems, Inc. All rights reserved.
A successful video conference provides a face-to-face meeting, even if the participants are miles or continents apart. Keep in mind that it still is a meeting—normal etiquette and dress code apply even here.
General
• Consider setting the unit to Automatic Answer.
• Do not forget to rehearse “the noble art of operating a video system” to the extent needed.
In the Meeting Room
• Make sure the microphone is placed at the front of the table to ensure that all speech will be detected. The best position is at least 2 m (6.5’) in front of the system, on a flat surface with at least 0.3 m (1’) of table in front.
• Directive microphones should point away from the video system.
• Make sure that no speaking participant experience obstacles blocking the view to the microphone at all times.
• Microphones should always be placed away from noise sources like computer
and projector fans placed on the table. The noise from such sources is often perceived as surprisingly loud by the remote participants.
• If you use a document or whiteboard camera try to arrange the participants so that the camera is close to the leader of the meeting, or alternatively, close to a designated controller.
• When a whiteboard is used, the meeting will be perceived as better to the remote participants if the whiteboard is visible through the main camera, as well as through a dedicated whiteboard camera. Broadcasting companies normally do this to let viewers see that the presenter actually is in the same room.
• Remember to arrange all the peripherals so that one participant can reach each of them to point, change the display, record or perform other functions during the conference.
• To help ensure the most natural meeting environment, position the camera on the top center of the receiving monitor, if possible. The camera should point directly at the meeting participants to guarantee eye contact with those at the far end. Check this out by means of the Selfview feature of your video system.
The Selfview shows what the remote party can see from your system (the outgoing video).
• If you are going to share content you will normally make use of duo video. That implies the use of two video streams, one showing the presentation and the other showing the presenter—or the group of presenters. Smaller systems may force you to choose between showing the presentation or the presenter.
• For duo video some attention is needed. Duo video is sometimes shown side–by–side with half the screen showing the presentation and the other half showing the presenter. Provide the impression that you seem to look towards the presentation instead of the impression that you sit with your back towards it, when all is viewed on the remote monitor. If in doubt, look straight into the camera to avoid this situation.
Ease of Use
• To help meeting participants dial, add presentations and use other functionality during a call, consider stationing a poster, table tent or other quick-reference guide in the room.
Other Tips
Use Camera Presets
Cisco TelePresence systems let you create predefined zoom and camera pointing directions (pan and tilt). Use these to zoom into the person speaking, if appropriate. Do not forget to zoom out again afterwards.
Loudspeaker Volume
The audio system will use the loudspeakers built into the monitor or the Cisco Digital Natural Audio Module.
For some systems you can set the default volume level by adjusting the volume on the monitor with the monitor remote.
Brightness Control
To adjust brightness, colors or other settings of the monitor, use the monitor’s own remote control. Adjust the monitor to suit the conditions of the conference room. The monitors supplied by Cisco have on-screen menus that are very easy to use. For more information on configuring the monitor as such, see the corresponding user guides and administration manuals.
Best PracticeIntroduction to Video Conferencing
5
D1534501 User Guide Cisco TelePresence SX10, SX20, MX200 G2, MX300 G2, MX700, MX800, SX80Produced: November 2015 for CE8.0All contents © 2010–2015 Cisco Systems, Inc. All rights reserved.
When set to Do Not Disturb, ringtones are muted and call attempts made by others to reach you will appear as missed calls.
You may, however, place calls as much as you like.
As default, there is a 60 minutes timeout on the Do Not Disturb (after which the system will return to normal operation), but this may have been changed to a different setting by your video support team.
Note! Your video system may, or may not, display all the icons shown here. Some of the features described in this user guide are optional in certain markets and they may therefore not be present on your system.
Introduction to Video Conferencing
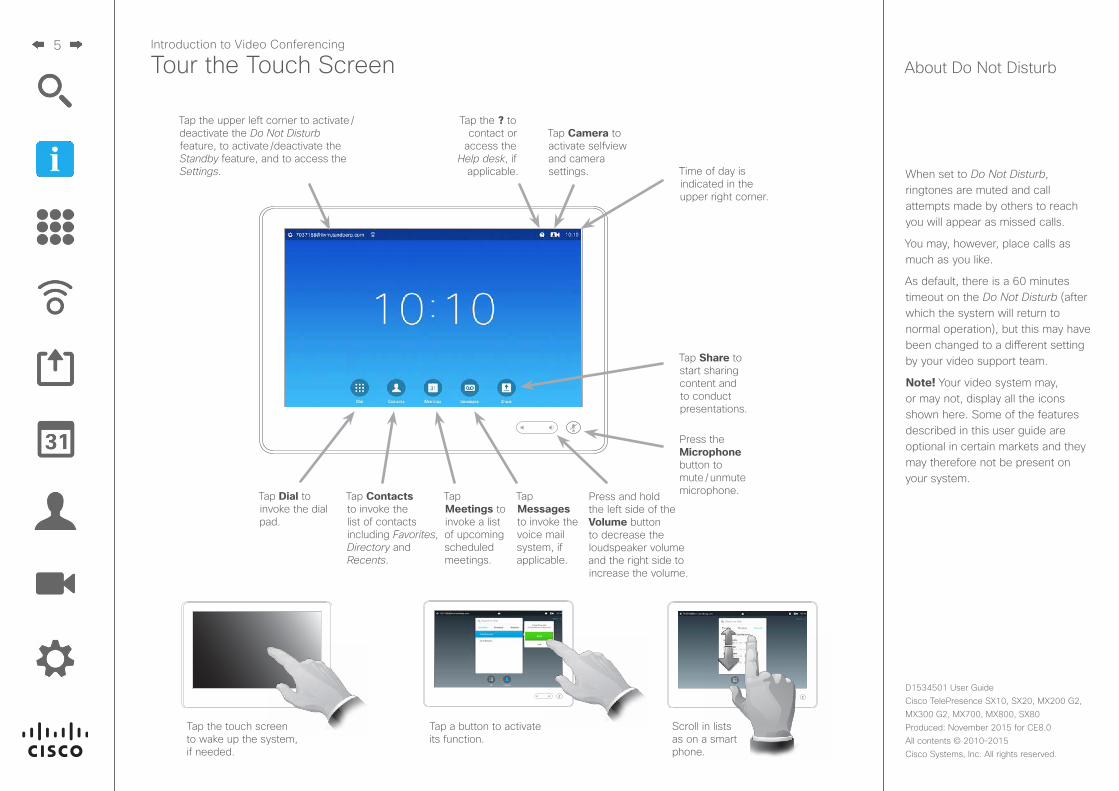
Tour the Touch Screen About Do Not Disturb
Tap Dial to invoke the dial pad.
Tap Contacts to invoke the list of contacts including Favorites, Directory and Recents.
Tap Meetings to invoke a list of upcoming scheduled meetings.
Tap Messages to invoke the voice mail system, if applicable.
Tap Share to start sharing content and to conduct presentations.
Press and hold the left side of the Volume button to decrease the loudspeaker volume and the right side to increase the volume.
Press the Microphone button to mute / unmute microphone.
Tap the touch screen to wake up the system, if needed.
Tap a button to activate its function.
Scroll in lists as on a smart phone.
Time of day is indicated in the upper right corner.
Tap the upper left corner to activate /deactivate the Do Not Disturb feature, to activate /deactivate the Standby feature, and to access the Settings.
Tap the ? to contact or
access the Help desk, if
applicable.
Tap Camera to activate selfview and camera settings.
6
D1534501 User Guide Cisco TelePresence SX10, SX20, MX200 G2, MX300 G2, MX700, MX800, SX80Produced: November 2015 for CE8.0All contents © 2010–2015 Cisco Systems, Inc. All rights reserved.
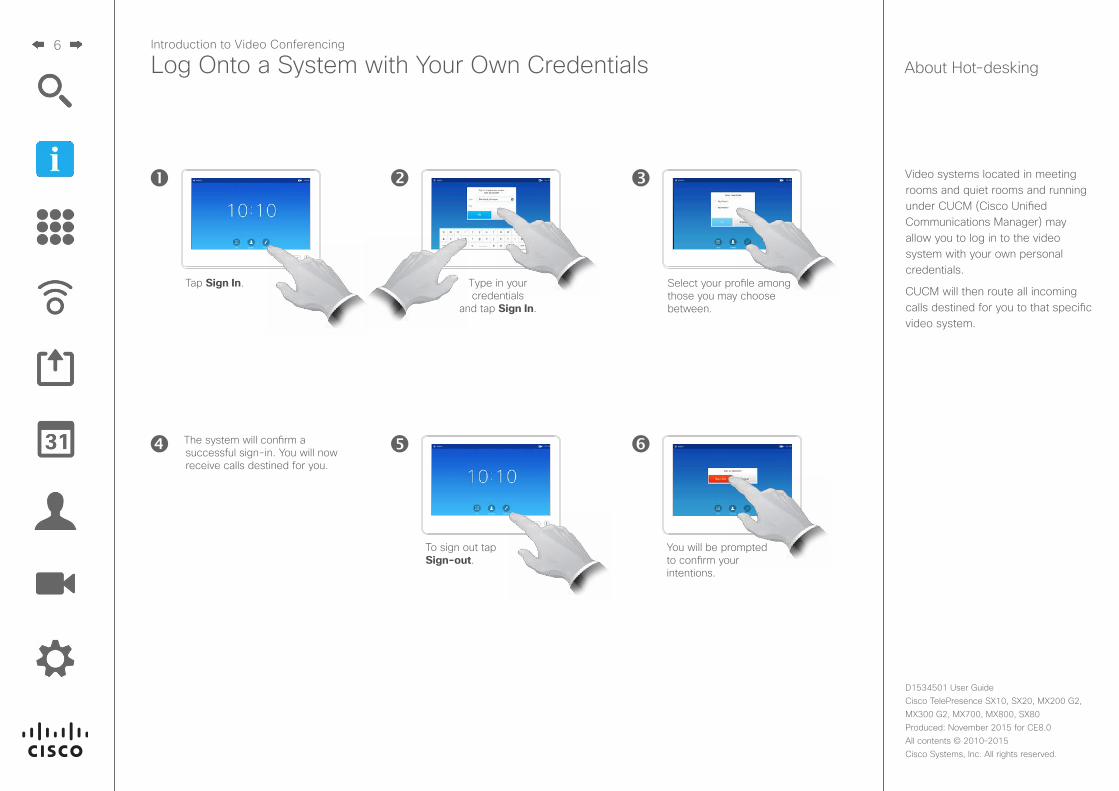
Video systems located in meeting rooms and quiet rooms and running under CUCM (Cisco Unified Communications Manager) may allow you to log in to the video system with your own personal credentials.
CUCM will then route all incoming calls destined for you to that specific video system.
About Hot-deskingLog Onto a System with Your Own CredentialsIntroduction to Video Conferencing
Type in your credentials
and tap Sign In.
Tap Sign In. Select your profile among those you may choose between.
The system will confirm a successful sign-in. You will now receive calls destined for you.
To sign out tap Sign-out.
You will be prompted to confirm your intentions.
7
D1534501 User Guide Cisco TelePresence SX10, SX20, MX200 G2, MX300 G2, MX700, MX800, SX80Produced: November 2015 for CE8.0All contents © 2010–2015 Cisco Systems, Inc. All rights reserved.
Video Calls

8
D1534501 User Guide Cisco TelePresence SX10, SX20, MX200 G2, MX300 G2, MX700, MX800, SX80Produced: November 2015 for CE8.0All contents © 2010–2015 Cisco Systems, Inc. All rights reserved.
Alternatively, tap the Search or Dial field. This will invoke the virtual keyboard.
Tap Contacts. To search for someone in a specific list (Favorites, Directory or Recents), tap that list (a) and then scroll down (b) to locate the entry.
Key in the name, number, or IP address.
Matches will appear as you type.
There is an extended numerical mode
available, which also contains special
characters.
To toggle between the alphanumerical
mode and the extended numerical mode tap the key in the lower left corner of the
keyboard.
When you are ready to place the call, tap the green Call button.
Place Call From Contact ListPlace Call
Your lists of Contacts consist of three parts:
Favorites. These contacts have put there by you. These entries will typically be someone you call frequently or otherwise need to access in a swift and convenient manner from time to time.
Directory will typically be a corporate directory installed on your system by your video support team.
Recents is a list of calls you have placed, received or missed earlier.
You may clear the Recents list for privacy reasons, see “Call Recents” on page 43.
The following options apply:
• You may key in a name, number or an IP address and the system will look in all lists for you.
• You may tap a tab and then scroll through the list or key in a name or number. Your search will then be restricted to that specific list.
• You may add the entry to the list of Favorites; edit aspects of the entry before calling; change the call rate and remove the entry from Recents.
About the Lists of Contacts
9
D1534501 User Guide Cisco TelePresence SX10, SX20, MX200 G2, MX300 G2, MX700, MX800, SX80Produced: November 2015 for CE8.0All contents © 2010–2015 Cisco Systems, Inc. All rights reserved.
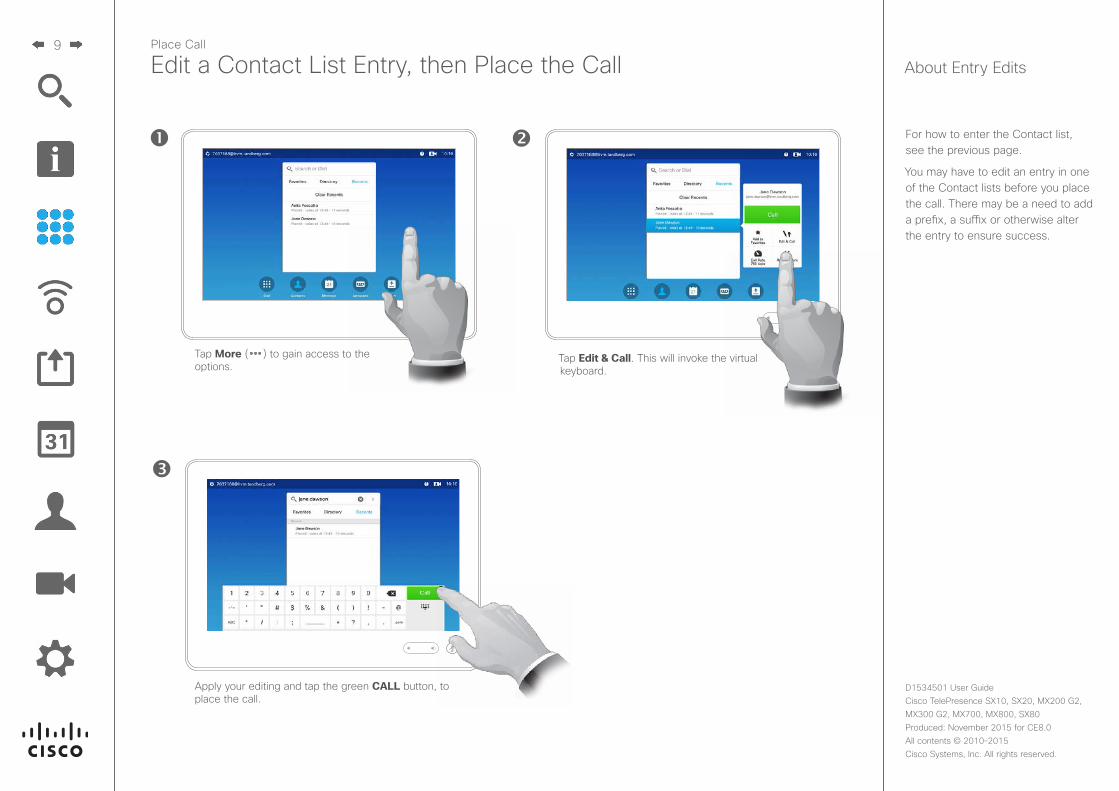
Place Call
Edit a Contact List Entry, then Place the Call
Apply your editing and tap the green CALL button, to place the call.
About Entry Edits
For how to enter the Contact list, see the previous page.
You may have to edit an entry in one of the Contact lists before you place the call. There may be a need to add a prefix, a suffix or otherwise alter the entry to ensure success.
Tap More ( ) to gain access to the options.
Tap Edit & Call. This will invoke the virtual keyboard.
10
D1534501 User Guide Cisco TelePresence SX10, SX20, MX200 G2, MX300 G2, MX700, MX800, SX80Produced: November 2015 for CE8.0All contents © 2010–2015 Cisco Systems, Inc. All rights reserved.
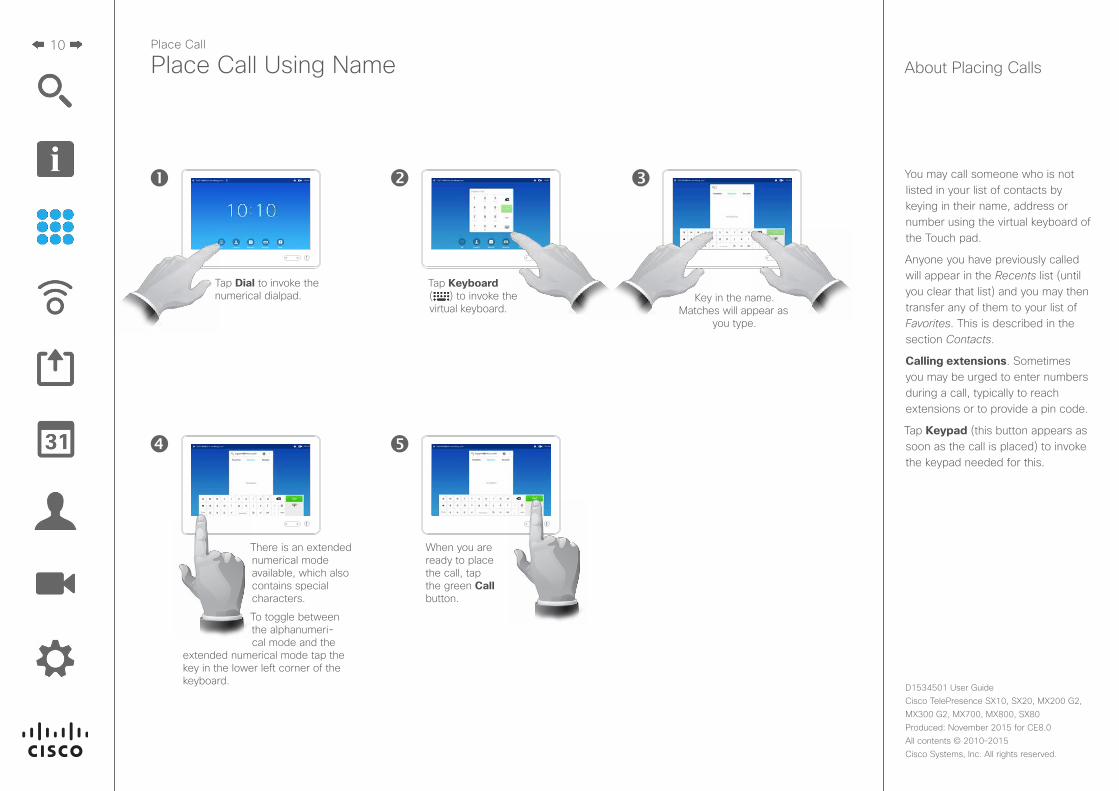
Tap Dial to invoke the numerical dialpad.
Tap Keyboard ( ) to invoke the virtual keyboard.
Key in the name. Matches will appear as
you type.
There is an extended numerical mode available, which also contains special characters.
To toggle between the alphanumeri-cal mode and the
extended numerical mode tap the key in the lower left corner of the keyboard.
When you are ready to place the call, tap the green Call button.
Place Call Using Name About Placing Calls
You may call someone who is not listed in your list of contacts by keying in their name, address or number using the virtual keyboard of the Touch pad.
Anyone you have previously called will appear in the Recents list (until you clear that list) and you may then transfer any of them to your list of Favorites. This is described in the section Contacts.
Calling extensions. Sometimes you may be urged to enter numbers during a call, typically to reach extensions or to provide a pin code.
Tap Keypad (this button appears as soon as the call is placed) to invoke the keypad needed for this.
Place Call
11
D1534501 User Guide Cisco TelePresence SX10, SX20, MX200 G2, MX300 G2, MX700, MX800, SX80Produced: November 2015 for CE8.0All contents © 2010–2015 Cisco Systems, Inc. All rights reserved.
About Placing Calls
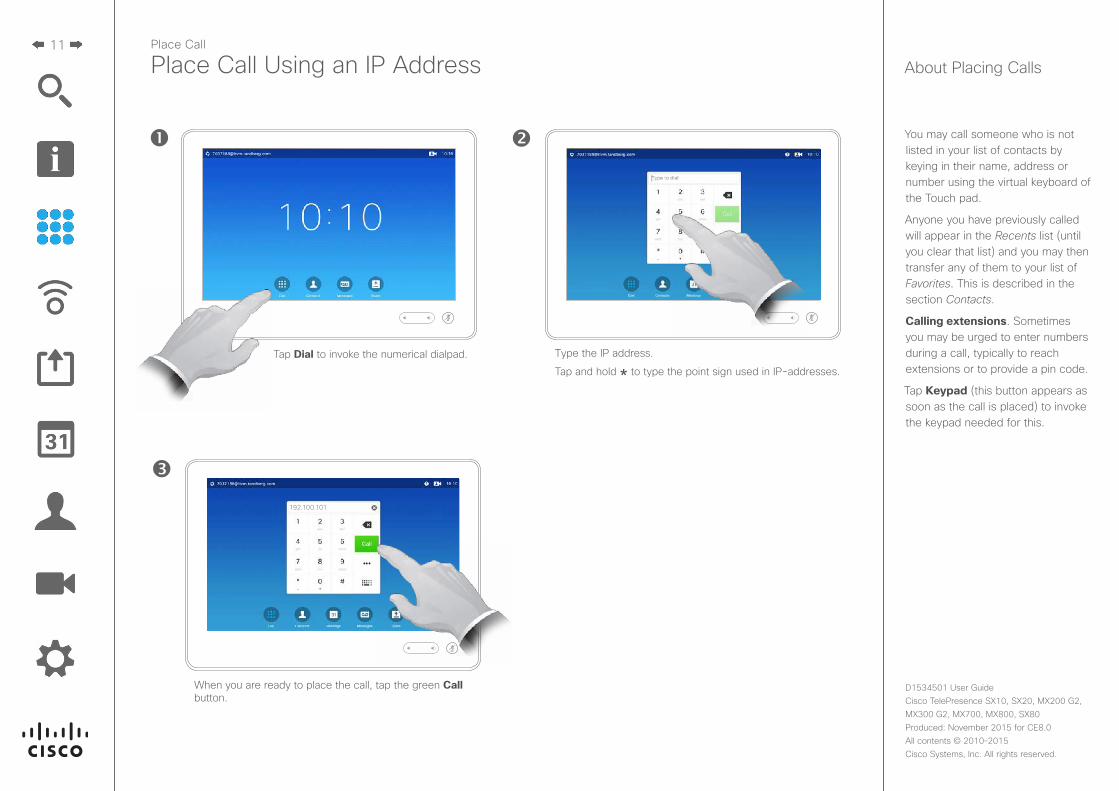
Tap Dial to invoke the numerical dialpad. Type the IP address.
Tap and hold * to type the point sign used in IP-addresses.
When you are ready to place the call, tap the green Call button.
Place Call Using an IP Address
You may call someone who is not listed in your list of contacts by keying in their name, address or number using the virtual keyboard of the Touch pad.
Anyone you have previously called will appear in the Recents list (until you clear that list) and you may then transfer any of them to your list of Favorites. This is described in the section Contacts.
Calling extensions. Sometimes you may be urged to enter numbers during a call, typically to reach extensions or to provide a pin code.
Tap Keypad (this button appears as soon as the call is placed) to invoke the keypad needed for this.
Place Call
192.100.101
12
D1534501 User Guide Cisco TelePresence SX10, SX20, MX200 G2, MX300 G2, MX700, MX800, SX80Produced: November 2015 for CE8.0All contents © 2010–2015 Cisco Systems, Inc. All rights reserved.
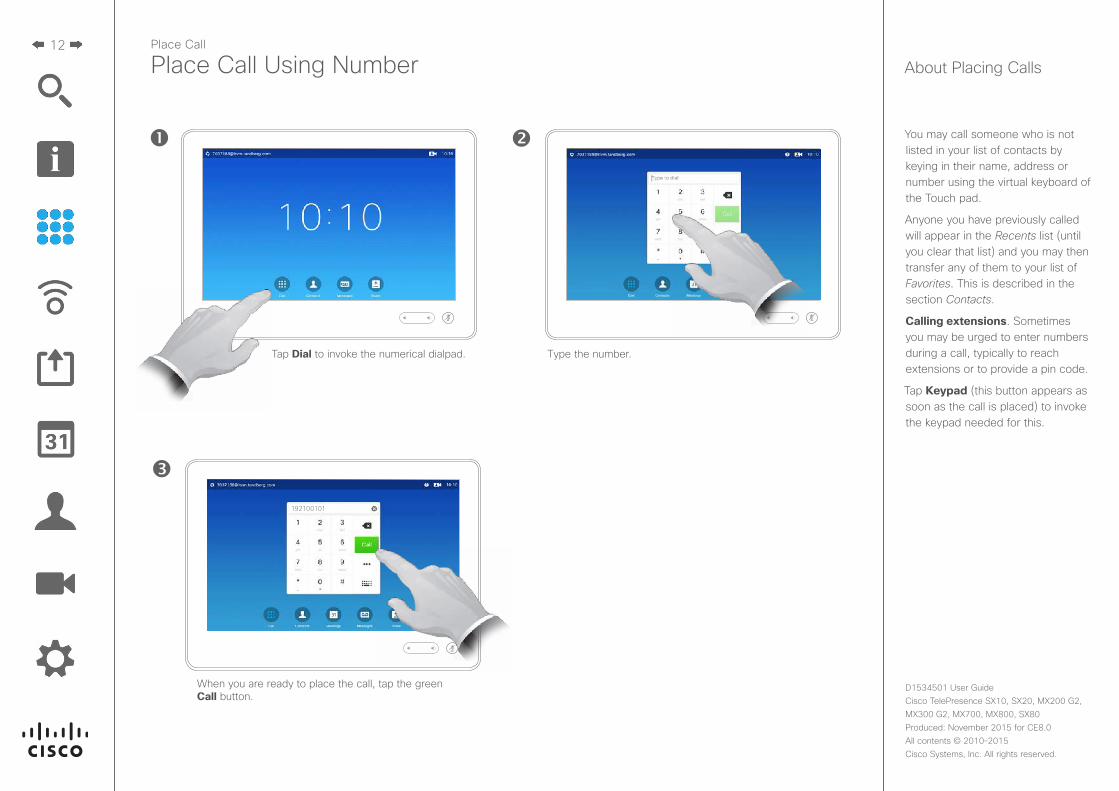
Tap Dial to invoke the numerical dialpad.
Place Call Using Number About Placing Calls
You may call someone who is not listed in your list of contacts by keying in their name, address or number using the virtual keyboard of the Touch pad.
Anyone you have previously called will appear in the Recents list (until you clear that list) and you may then transfer any of them to your list of Favorites. This is described in the section Contacts.
Calling extensions. Sometimes you may be urged to enter numbers during a call, typically to reach extensions or to provide a pin code.
Tap Keypad (this button appears as soon as the call is placed) to invoke the keypad needed for this.
Type the number.
When you are ready to place the call, tap the green Call button.
Place Call
192100101
13
D1534501 User Guide Cisco TelePresence SX10, SX20, MX200 G2, MX300 G2, MX700, MX800, SX80Produced: November 2015 for CE8.0All contents © 2010–2015 Cisco Systems, Inc. All rights reserved.
Receive Call
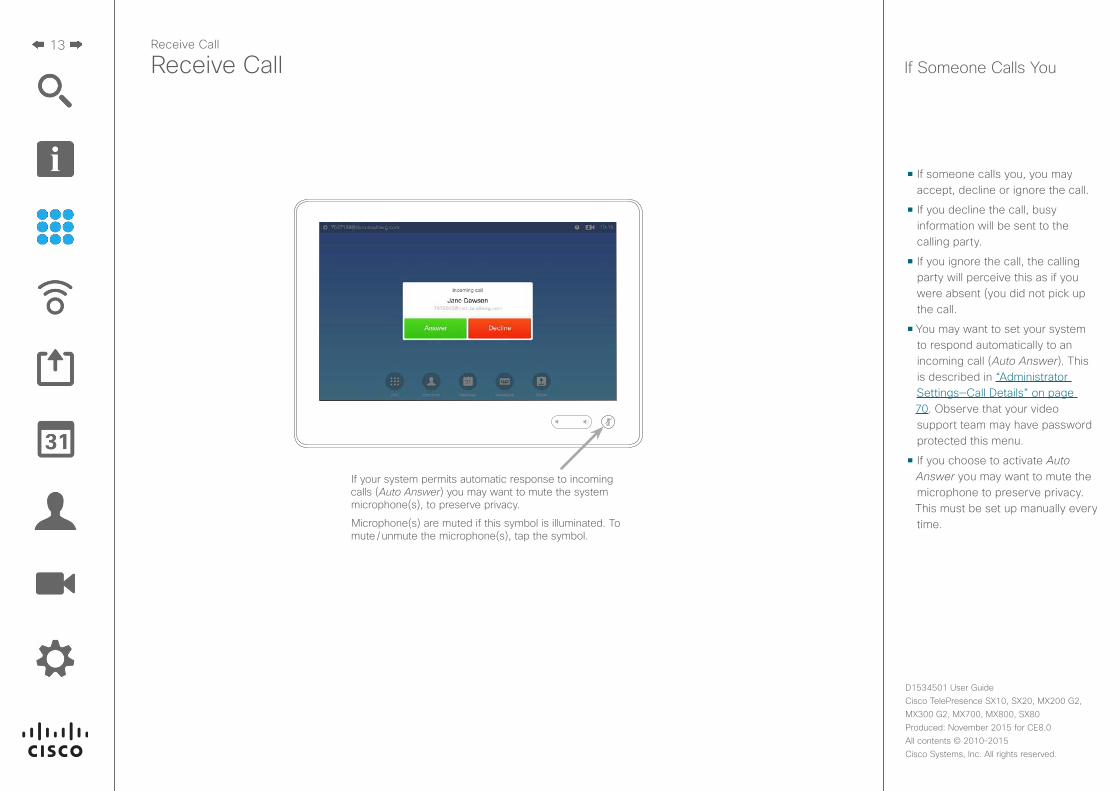
• If someone calls you, you may accept, decline or ignore the call.
• If you decline the call, busy information will be sent to the calling party.
• If you ignore the call, the calling party will perceive this as if you were absent (you did not pick up the call.
• You may want to set your system to respond automatically to an incoming call (Auto Answer). This is described in “Administrator Settings—Call Details” on page 70. Observe that your video support team may have password protected this menu.
• If you choose to activate Auto Answer you may want to mute the microphone to preserve privacy. This must be set up manually every time.
If your system permits automatic response to incoming calls (Auto Answer) you may want to mute the system microphone(s), to preserve privacy.
Microphone(s) are muted if this symbol is illuminated. To mute / unmute the microphone(s), tap the symbol.
If Someone Calls YouReceive Call
14
D1534501 User Guide Cisco TelePresence SX10, SX20, MX200 G2, MX300 G2, MX700, MX800, SX80Produced: November 2015 for CE8.0All contents © 2010–2015 Cisco Systems, Inc. All rights reserved.
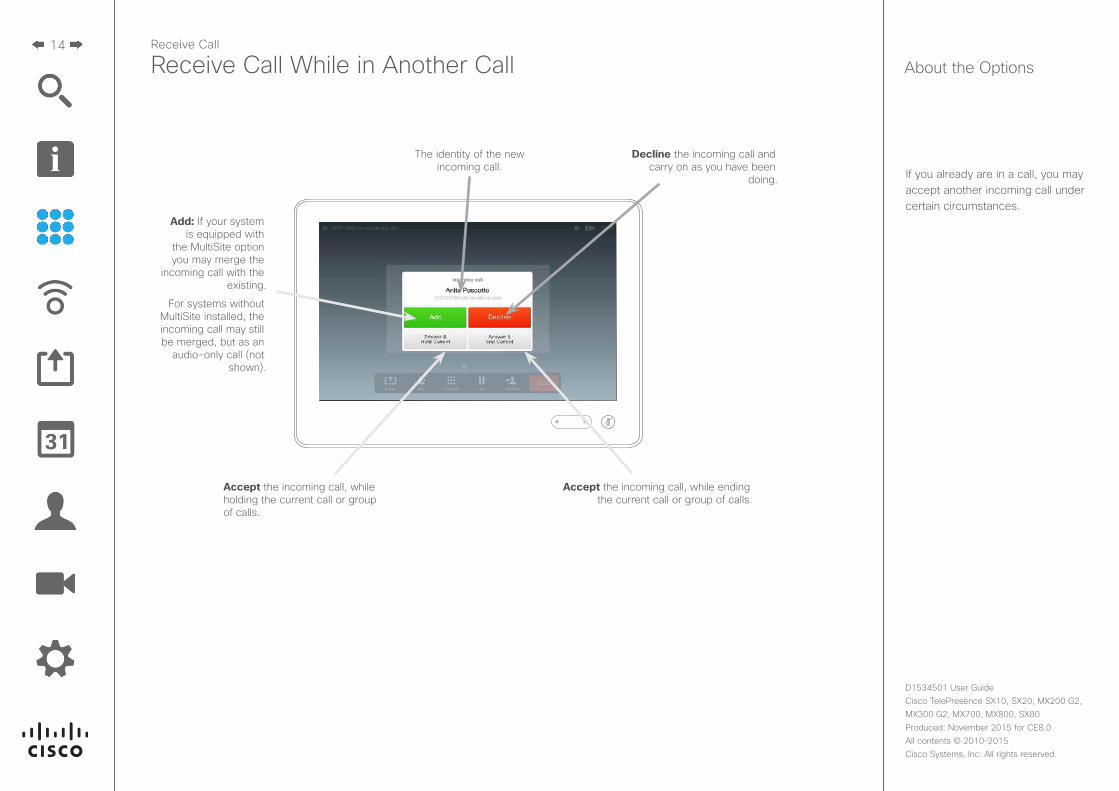
Receive Call While in Another Call
Add: If your system is equipped with
the MultiSite option you may merge the
incoming call with the existing.
For systems without MultiSite installed, the incoming call may still be merged, but as an
audio-only call (not shown).
Decline the incoming call and carry on as you have been
doing.
Accept the incoming call, while ending the current call or group of calls.
Accept the incoming call, while holding the current call or group of calls.
The identity of the new incoming call.
If you already are in a call, you may accept another incoming call under certain circumstances.
About the OptionsReceive Call
15
D1534501 User Guide Cisco TelePresence SX10, SX20, MX200 G2, MX300 G2, MX700, MX800, SX80Produced: November 2015 for CE8.0All contents © 2010–2015 Cisco Systems, Inc. All rights reserved.
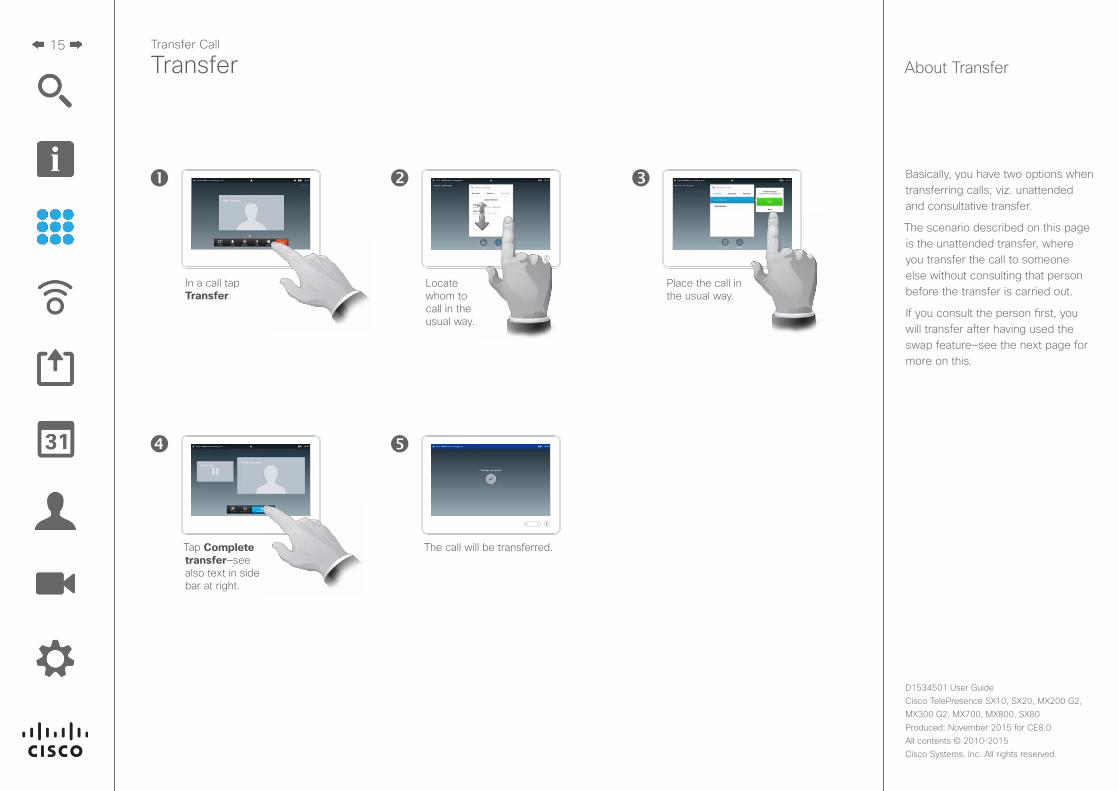
Transfer
Basically, you have two options when transferring calls; viz. unattended and consultative transfer.
The scenario described on this page is the unattended transfer, where you transfer the call to someone else without consulting that person before the transfer is carried out.
If you consult the person first, you will transfer after having used the swap feature—see the next page for more on this.
About Transfer
Place the call in the usual way.
In a call tap Transfer.
Locate whom to call in the usual way.
Tap Complete transfer—see also text in side bar at right.
The call will be transferred.
Transfer Call
16
D1534501 User Guide Cisco TelePresence SX10, SX20, MX200 G2, MX300 G2, MX700, MX800, SX80Produced: November 2015 for CE8.0All contents © 2010–2015 Cisco Systems, Inc. All rights reserved.
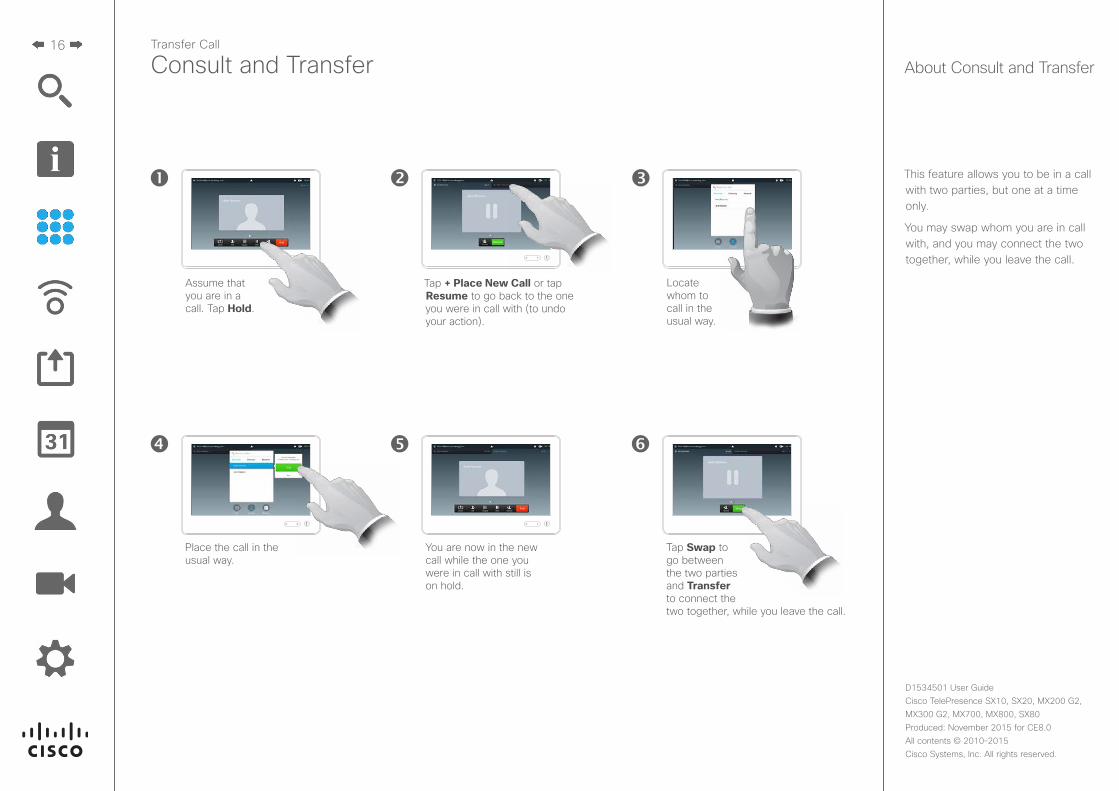
This feature allows you to be in a call with two parties, but one at a time only.
You may swap whom you are in call with, and you may connect the two together, while you leave the call.
About Consult and Transfer
Locate whom to call in the usual way.
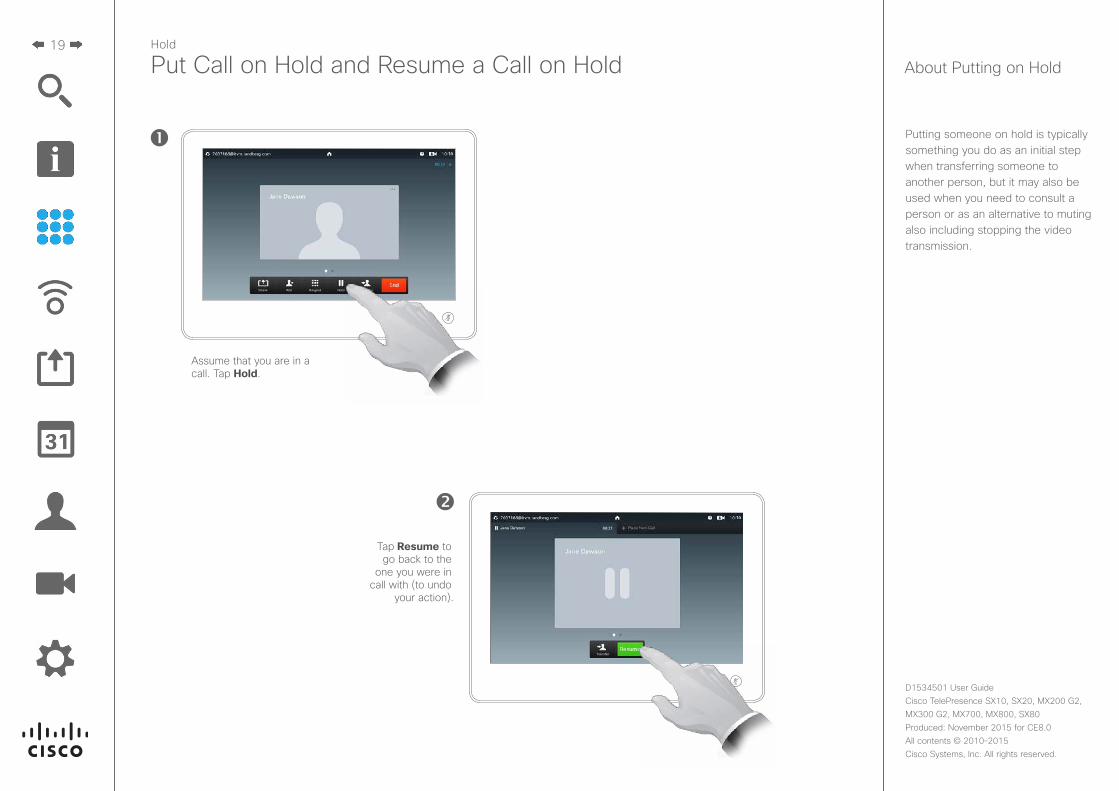
Assume that you are in a call. Tap Hold.
Tap + Place New Call or tap Resume to go back to the one you were in call with (to undo your action).
Place the call in the usual way.
You are now in the new call while the one you were in call with still is on hold.
Tap Swap to go between the two parties and Transfer to connect the two together, while you leave the call.
Consult and TransferTransfer Call
17
D1534501 User Guide Cisco TelePresence SX10, SX20, MX200 G2, MX300 G2, MX700, MX800, SX80Produced: November 2015 for CE8.0All contents © 2010–2015 Cisco Systems, Inc. All rights reserved.
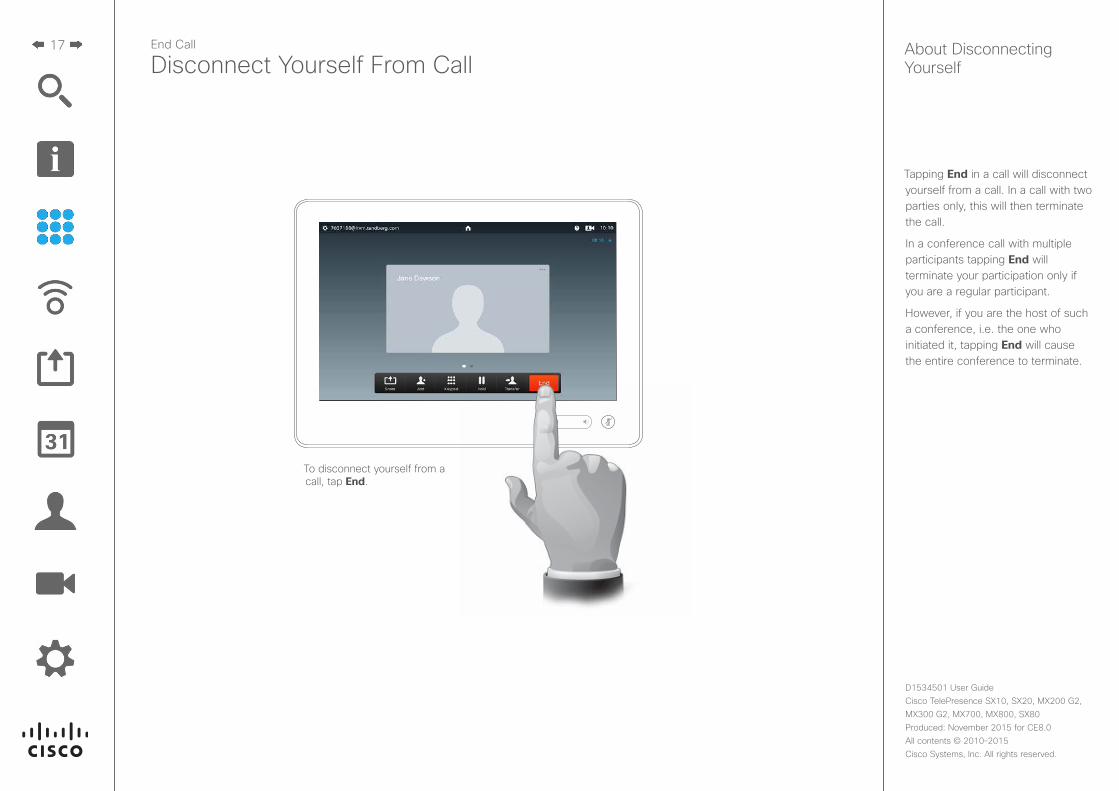
Disconnect Yourself From CallEnd Call
To disconnect yourself from a call, tap End.
Tapping End in a call will disconnect yourself from a call. In a call with two parties only, this will then terminate the call.
In a conference call with multiple participants tapping End will terminate your participation only if you are a regular participant.
However, if you are the host of such a conference, i.e. the one who initiated it, tapping End will cause the entire conference to terminate.
About Disconnecting Yourself
18
D1534501 User Guide Cisco TelePresence SX10, SX20, MX200 G2, MX300 G2, MX700, MX800, SX80Produced: November 2015 for CE8.0All contents © 2010–2015 Cisco Systems, Inc. All rights reserved.
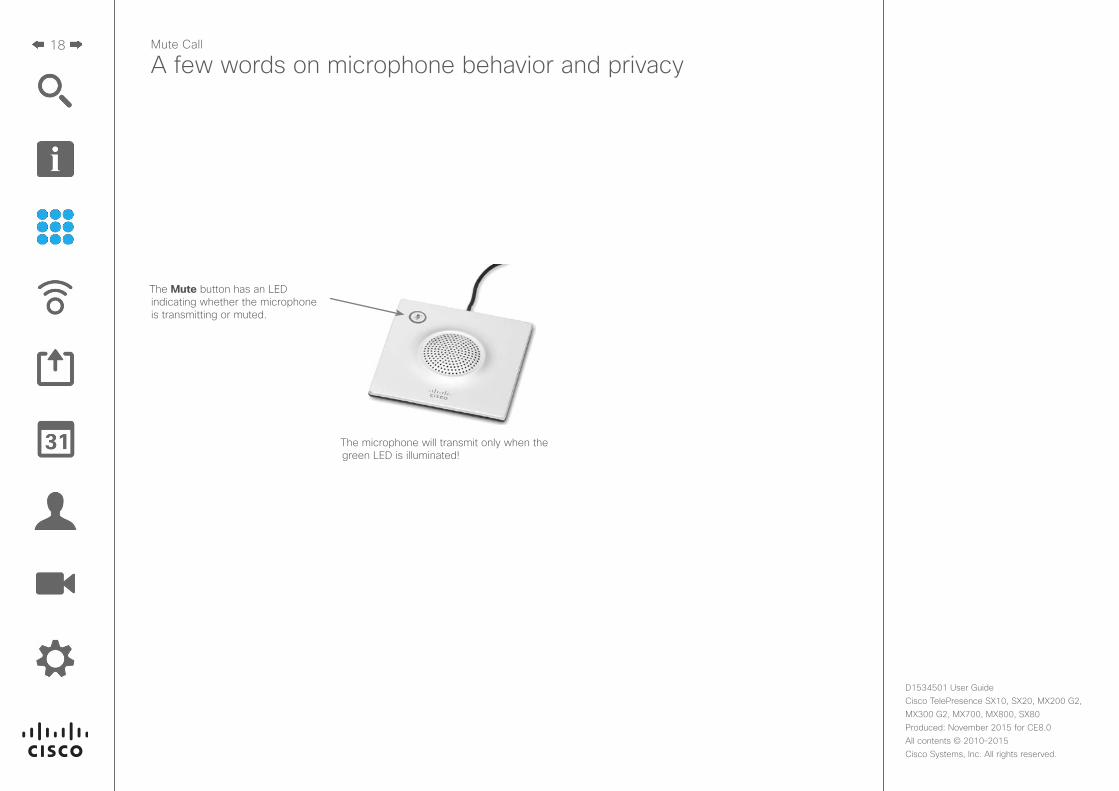
Mute Call
A few words on microphone behavior and privacy
The Mute button has an LED indicating whether the microphone is transmitting or muted.
The microphone will transmit only when the green LED is illuminated!
19
D1534501 User Guide Cisco TelePresence SX10, SX20, MX200 G2, MX300 G2, MX700, MX800, SX80Produced: November 2015 for CE8.0All contents © 2010–2015 Cisco Systems, Inc. All rights reserved.
Hold
Put Call on Hold and Resume a Call on Hold
Assume that you are in a call. Tap Hold.
Tap Resume to go back to the
one you were in call with (to undo
your action).
Putting someone on hold is typically something you do as an initial step when transferring someone to another person, but it may also be used when you need to consult a person or as an alternative to muting also including stopping the video transmission.
About Putting on Hold
20
D1534501 User Guide Cisco TelePresence SX10, SX20, MX200 G2, MX300 G2, MX700, MX800, SX80Produced: November 2015 for CE8.0All contents © 2010–2015 Cisco Systems, Inc. All rights reserved.
Call Rate
Change Call Rate
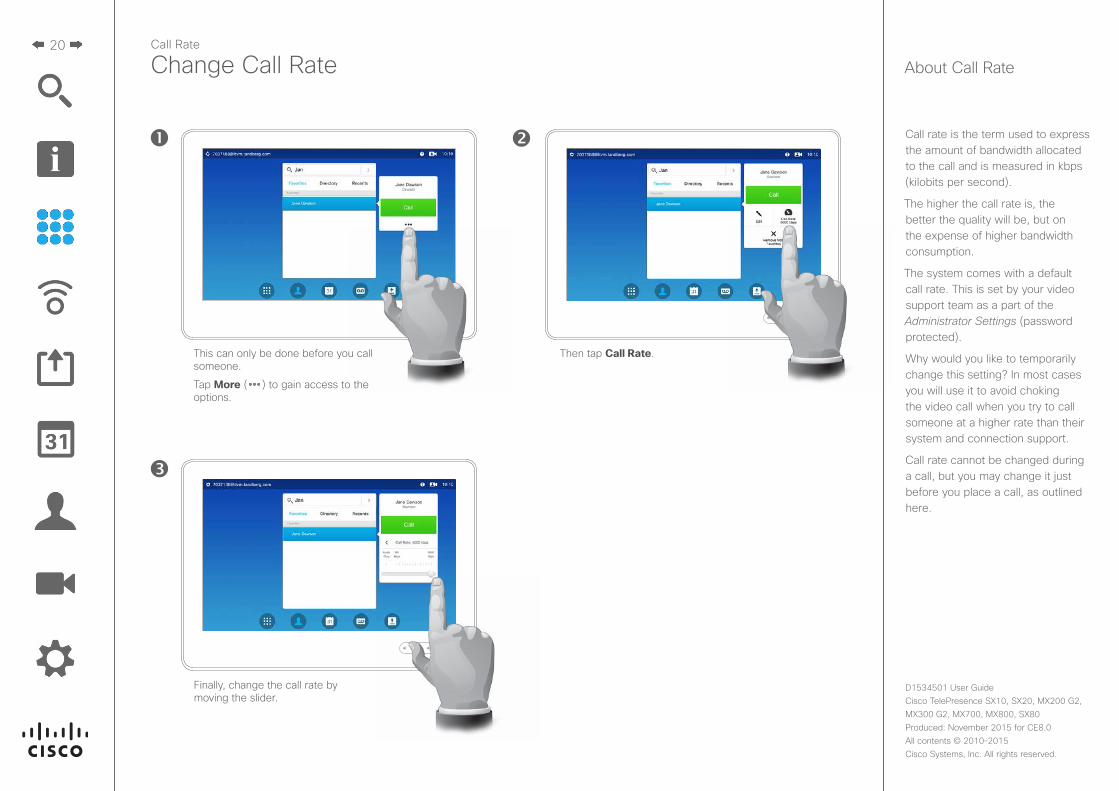
Finally, change the call rate by moving the slider.
This can only be done before you call someone.
Tap More ( ) to gain access to the options.
Then tap Call Rate.
Call rate is the term used to express the amount of bandwidth allocated to the call and is measured in kbps (kilobits per second).
The higher the call rate is, the better the quality will be, but on the expense of higher bandwidth consumption.
The system comes with a default call rate. This is set by your video support team as a part of the Administrator Settings (password protected).
Why would you like to temporarily change this setting? In most cases you will use it to avoid choking the video call when you try to call someone at a higher rate than their system and connection support.
Call rate cannot be changed during a call, but you may change it just before you place a call, as outlined here.
About Call Rate

21
D1534501 User Guide Cisco TelePresence SX10, SX20, MX200 G2, MX300 G2, MX700, MX800, SX80Produced: November 2015 for CE8.0All contents © 2010–2015 Cisco Systems, Inc. All rights reserved.
Availability
Enable Do Not Disturb
Your system can be set to not respond to incoming calls. You may, however, use it to call others as much as you want.
Your video support team may have set a time-out on this feature, after which the system will return to respond to incoming calls as usual. Default time-out setting is 60 minutes.
About Do Not Disturb
Tap Hide to remove the message that appears, telling you that Do not disturb has been activated.
Tap the field in the upper left corner. Tap Do not Disturb, as shown. The feature will now be active.
To deactivate the feature, repeat the procedure.
22
D1534501 User Guide Cisco TelePresence SX10, SX20, MX200 G2, MX300 G2, MX700, MX800, SX80Produced: November 2015 for CE8.0All contents © 2010–2015 Cisco Systems, Inc. All rights reserved.
Availability
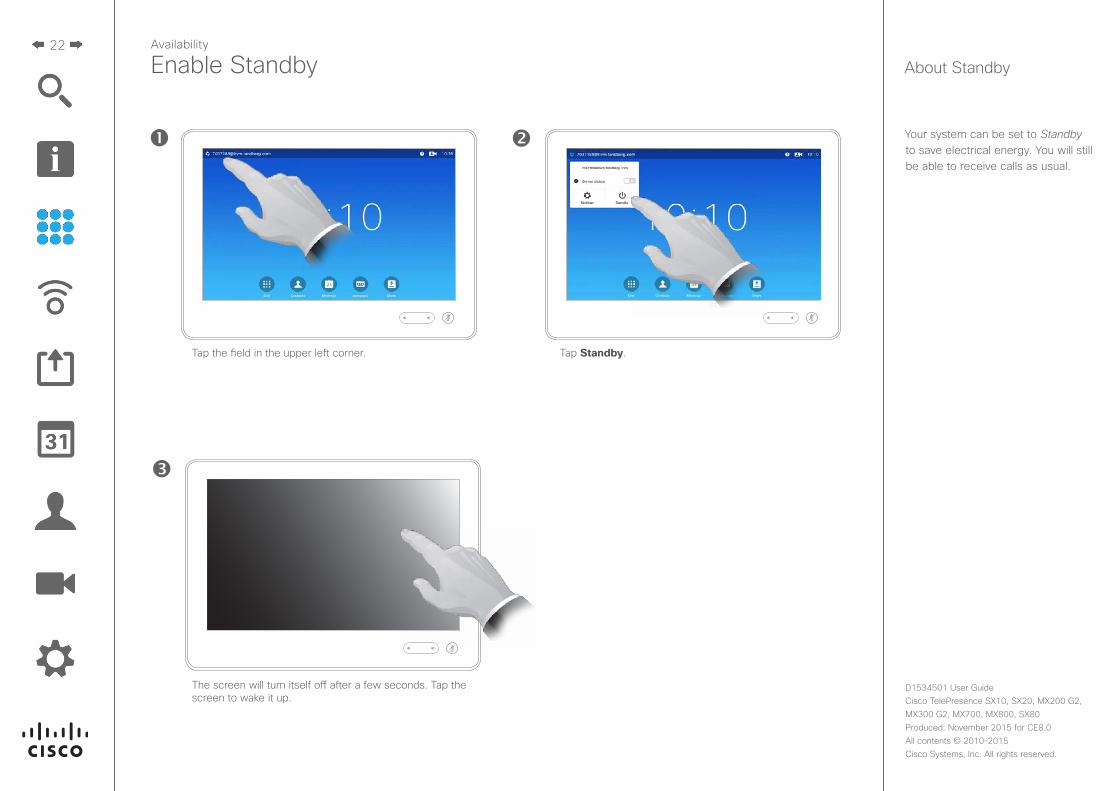
Enable Standby
Your system can be set to Standby to save electrical energy. You will still be able to receive calls as usual.
About Standby
The screen will turn itself off after a few seconds. Tap the screen to wake it up.
Tap the field in the upper left corner. Tap Standby.
23
D1534501 User Guide Cisco TelePresence SX10, SX20, MX200 G2, MX300 G2, MX700, MX800, SX80Produced: November 2015 for CE8.0All contents © 2010–2015 Cisco Systems, Inc. All rights reserved.
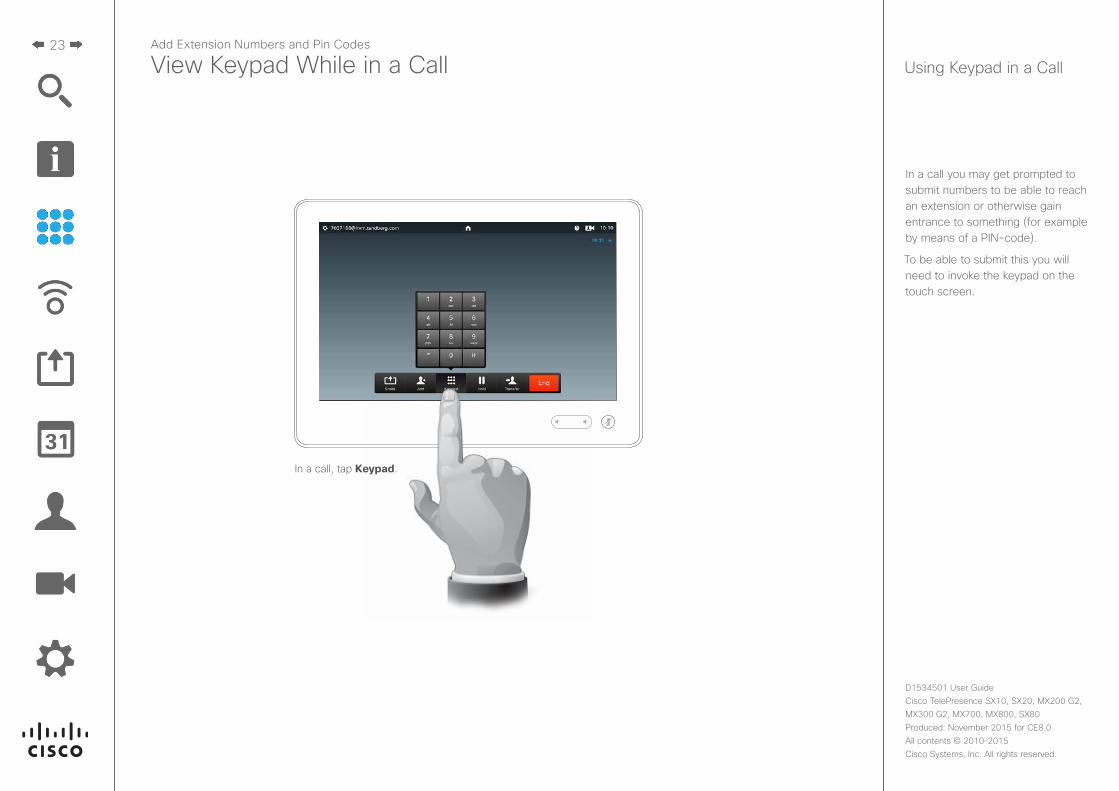
Add Extension Numbers and Pin Codes
View Keypad While in a Call
In a call you may get prompted to submit numbers to be able to reach an extension or otherwise gain entrance to something (for example by means of a PIN-code).
To be able to submit this you will need to invoke the keypad on the touch screen.
Using Keypad in a Call
In a call, tap Keypad.
24
D1534501 User Guide Cisco TelePresence SX10, SX20, MX200 G2, MX300 G2, MX700, MX800, SX80Produced: November 2015 for CE8.0All contents © 2010–2015 Cisco Systems, Inc. All rights reserved.
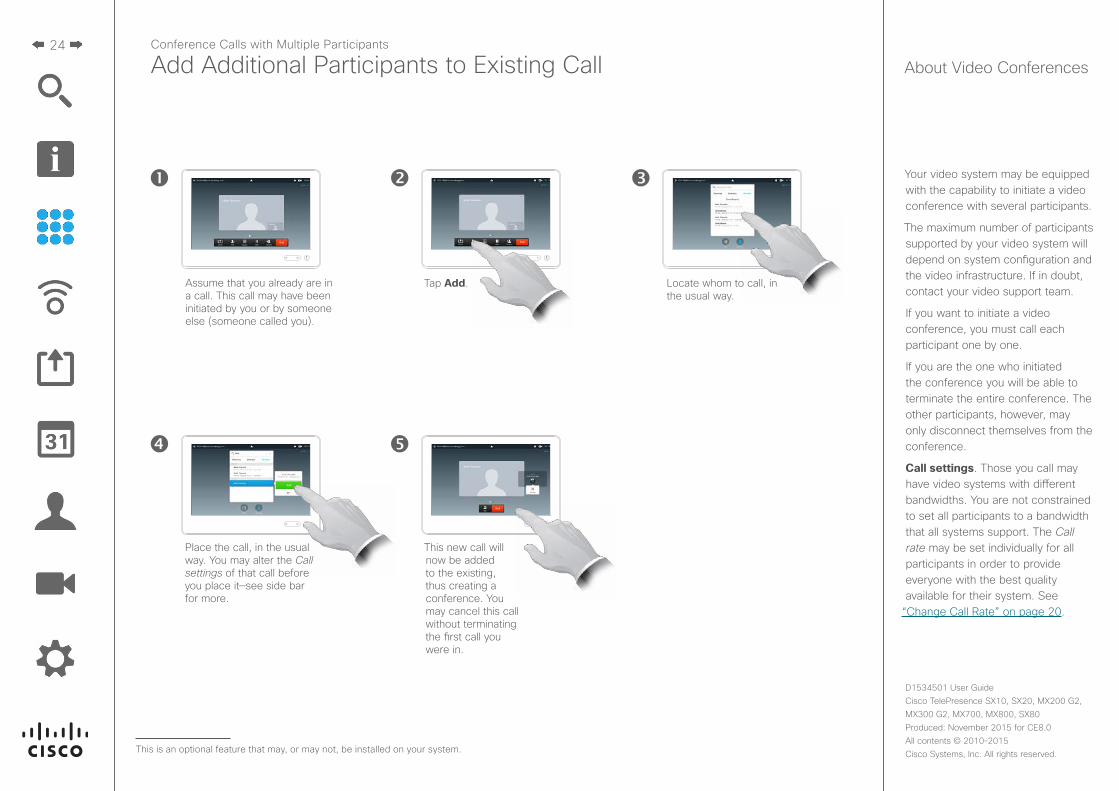
Your video system may be equipped with the capability to initiate a video conference with several participants.
The maximum number of participants supported by your video system will depend on system configuration and the video infrastructure. If in doubt, contact your video support team.
If you want to initiate a video conference, you must call each participant one by one.
If you are the one who initiated the conference you will be able to terminate the entire conference. The other participants, however, may only disconnect themselves from the conference.
Call settings. Those you call may have video systems with different bandwidths. You are not constrained to set all participants to a bandwidth that all systems support. The Call rate may be set individually for all participants in order to provide everyone with the best quality available for their system. See
“Change Call Rate” on page 20.
Conference Calls with Multiple Participants
Add Additional Participants to Existing Call
This is an optional feature that may, or may not, be installed on your system.
About Video Conferences
Locate whom to call, in the usual way.
Assume that you already are in a call. This call may have been initiated by you or by someone else (someone called you).
Tap Add.
Place the call, in the usual way. You may alter the Call settings of that call before you place it—see side bar for more.
This new call will now be added to the existing, thus creating a conference. You may cancel this call without terminating the first call you were in.
25
D1534501 User Guide Cisco TelePresence SX10, SX20, MX200 G2, MX300 G2, MX700, MX800, SX80Produced: November 2015 for CE8.0All contents © 2010–2015 Cisco Systems, Inc. All rights reserved.
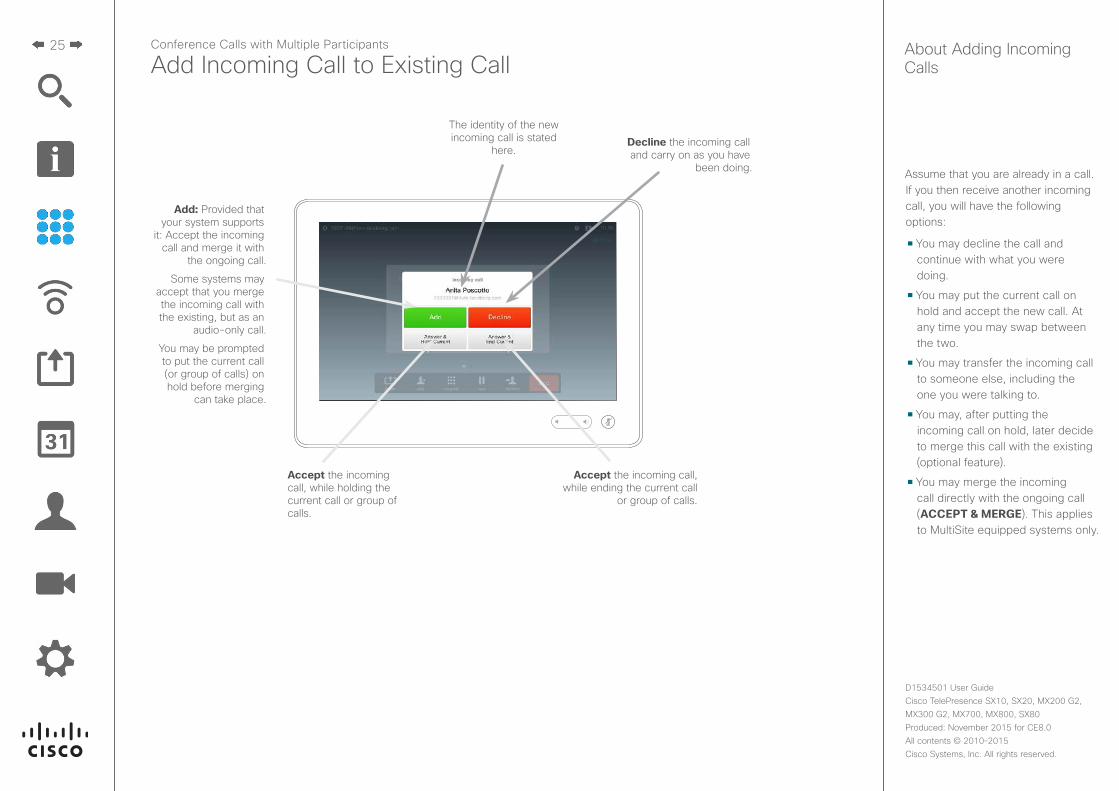
Assume that you are already in a call. If you then receive another incoming call, you will have the following options:
• You may decline the call and continue with what you were doing.
• You may put the current call on hold and accept the new call. At any time you may swap between the two.
• You may transfer the incoming call to someone else, including the one you were talking to.
• You may, after putting the incoming call on hold, later decide to merge this call with the existing (optional feature).
• You may merge the incoming call directly with the ongoing call (ACCEPT & MERGE). This applies to MultiSite equipped systems only.
Add: Provided that your system supports
it: Accept the incoming call and merge it with
the ongoing call.
Some systems may accept that you merge the incoming call with the existing, but as an
audio-only call.
You may be prompted to put the current call (or group of calls) on hold before merging
can take place.
Decline the incoming call and carry on as you have
been doing.
Accept the incoming call, while holding the current call or group of calls.
Accept the incoming call, while ending the current call
or group of calls.
The identity of the new incoming call is stated
here.
About Adding Incoming Calls
Conference Calls with Multiple Participants
Add Incoming Call to Existing Call

26
D1534501 User Guide Cisco TelePresence SX10, SX20, MX200 G2, MX300 G2, MX700, MX800, SX80Produced: November 2015 for CE8.0All contents © 2010–2015 Cisco Systems, Inc. All rights reserved.
This is a convenient way to obtain information about all the participants and their current status.
In addition, you may use the list to disconnect participants from the conference or to grant them certain rights, such as to retain the position as prominent speaker even if someone else starts speaking. These features are outlined on the following pages.
Using Participant ListConference Calls with Multiple Participants
View Meeting Participant List
In a call, swipe your finger horizontally to the left...
...or tap the little dot not shown in white.
The list will show all the participants, who is speaking
for the time being, who is sharing content (if applicable),
as well as who has been put on hold (if applicable).
27
D1534501 User Guide Cisco TelePresence SX10, SX20, MX200 G2, MX300 G2, MX700, MX800, SX80Produced: November 2015 for CE8.0All contents © 2010–2015 Cisco Systems, Inc. All rights reserved.
Conference Calls with Multiple Participants
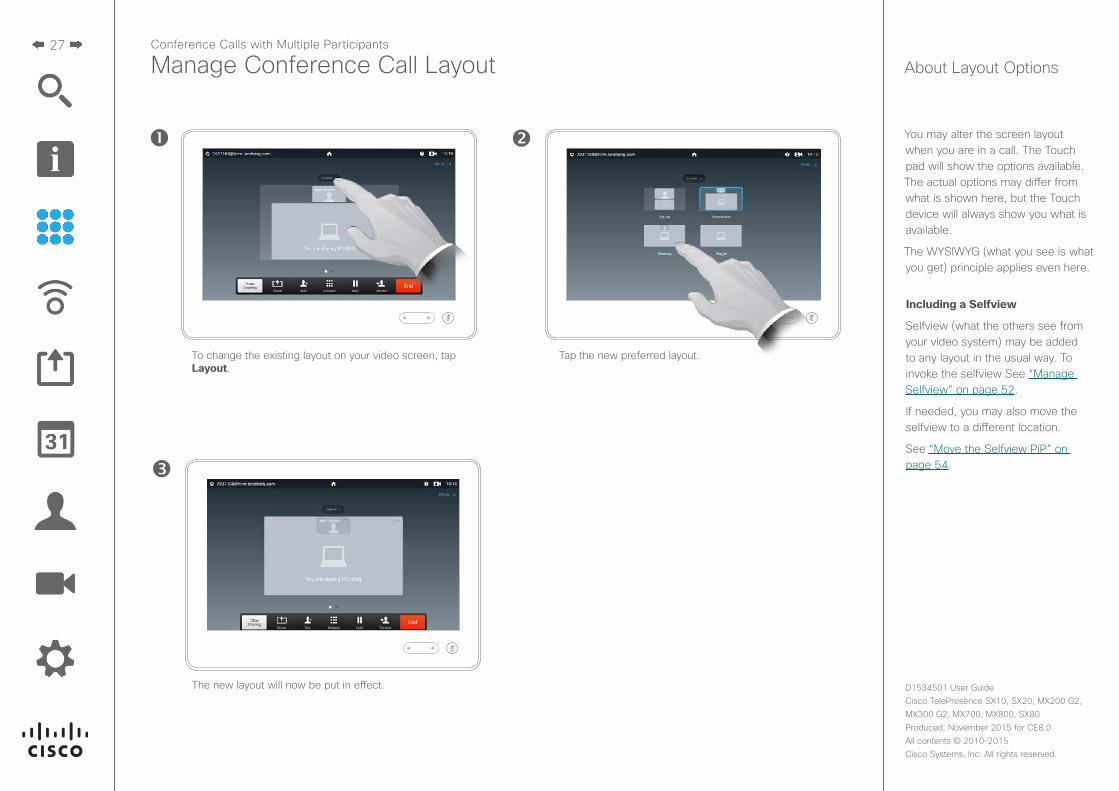
Manage Conference Call Layout
The new layout will now be put in effect.
To change the existing layout on your video screen, tap Layout.
Tap the new preferred layout.
You may alter the screen layout when you are in a call. The Touch pad will show the options available. The actual options may differ from what is shown here, but the Touch device will always show you what is available.
The WYSIWYG (what you see is what you get) principle applies even here.
Including a Selfview
Selfview (what the others see from your video system) may be added to any layout in the usual way. To invoke the selfview See “Manage Selfview” on page 52.
If needed, you may also move the selfview to a different location.
See “Move the Selfview PiP” on page 54.
About Layout Options
28
D1534501 User Guide Cisco TelePresence SX10, SX20, MX200 G2, MX300 G2, MX700, MX800, SX80Produced: November 2015 for CE8.0All contents © 2010–2015 Cisco Systems, Inc. All rights reserved.
Conference Calls with Multiple Participants
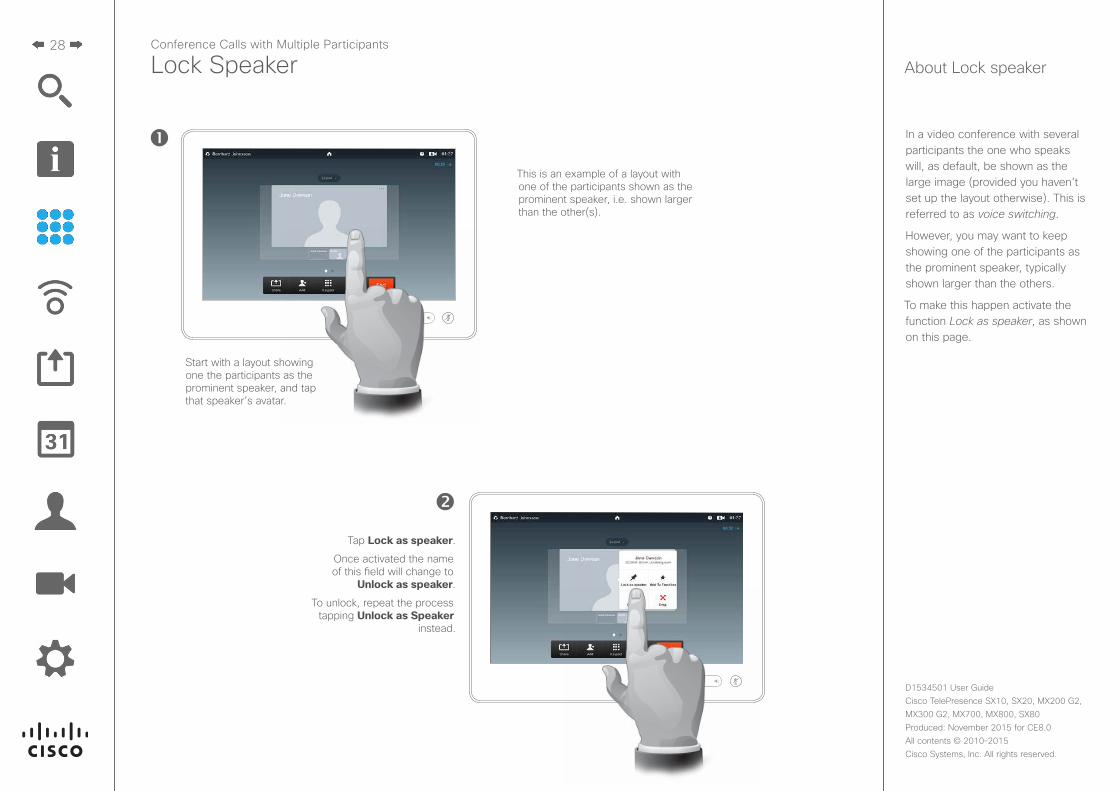
Lock Speaker
Start with a layout showing one the participants as the prominent speaker, and tap that speaker’s avatar.
Tap Lock as speaker.
Once activated the name of this field will change to
Unlock as speaker.
To unlock, repeat the process tapping Unlock as Speaker
instead.
This is an example of a layout with one of the participants shown as the prominent speaker, i.e. shown larger than the other(s).
In a video conference with several participants the one who speaks will, as default, be shown as the large image (provided you haven’t set up the layout otherwise). This is referred to as voice switching.
However, you may want to keep showing one of the participants as the prominent speaker, typically shown larger than the others.
To make this happen activate the function Lock as speaker, as shown on this page.
About Lock speaker
29
D1534501 User Guide Cisco TelePresence SX10, SX20, MX200 G2, MX300 G2, MX700, MX800, SX80Produced: November 2015 for CE8.0All contents © 2010–2015 Cisco Systems, Inc. All rights reserved.
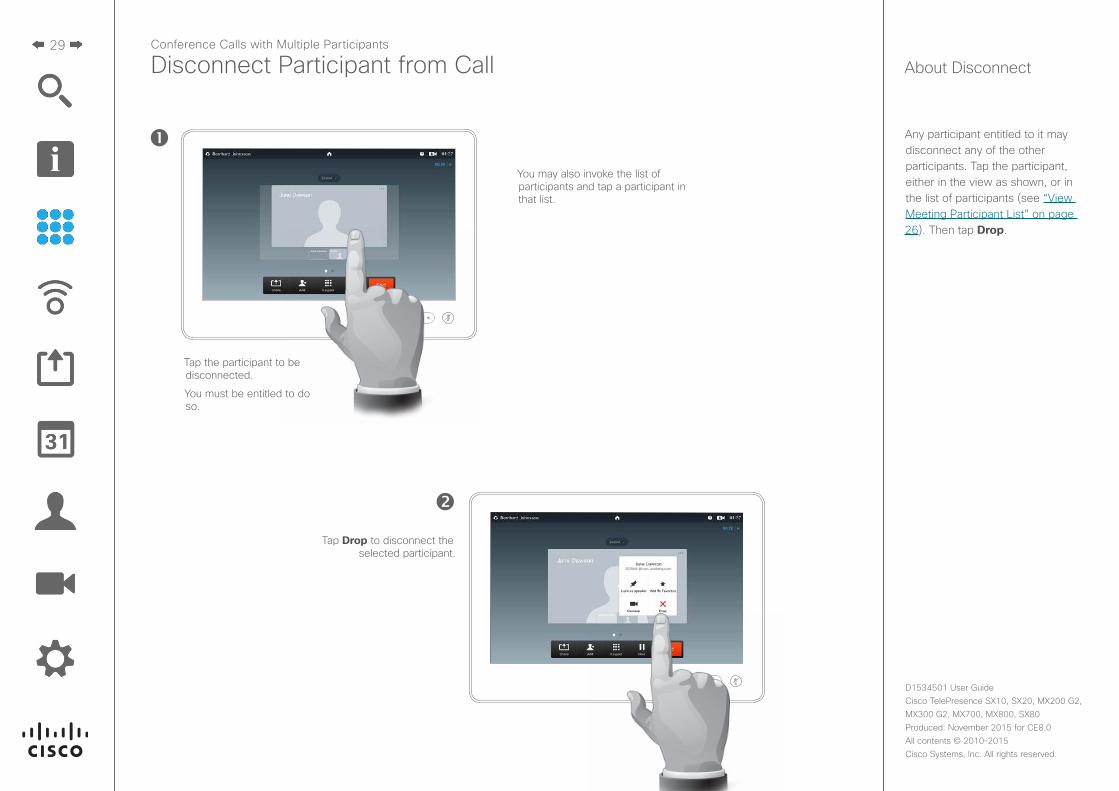
Any participant entitled to it may disconnect any of the other participants. Tap the participant, either in the view as shown, or in the list of participants (see “View Meeting Participant List” on page 26). Then tap Drop.
About DisconnectConference Calls with Multiple Participants
Disconnect Participant from Call
Tap the participant to be disconnected.
You must be entitled to do so.
Tap Drop to disconnect the selected participant.
You may also invoke the list of participants and tap a participant in that list.
30
D1534501 User Guide Cisco TelePresence SX10, SX20, MX200 G2, MX300 G2, MX700, MX800, SX80Produced: November 2015 for CE8.0All contents © 2010–2015 Cisco Systems, Inc. All rights reserved.
Intelligent Proximity
Cisco video endpoints emit ultrasound as part of the Intelligent Proximity feature.
Most people are exposed to ultrasound more or less daily in many environments, including industry, commercial applications and home appliances.
In our systems MX200 / 300 / 700 / 800, the ultrasound sound pressure level is below 75 dB at a distance of 30 cm or more from the loudspeaker.
Even if airborne ultrasound may cause subjective effects for some individuals, it is very unlikely that any effects will occur for levels below 75 dB.
31
D1534501 User Guide Cisco TelePresence SX10, SX20, MX200 G2, MX300 G2, MX700, MX800, SX80Produced: November 2015 for CE8.0All contents © 2010–2015 Cisco Systems, Inc. All rights reserved.
Intelligent ProximityControl Your System Wirelessly
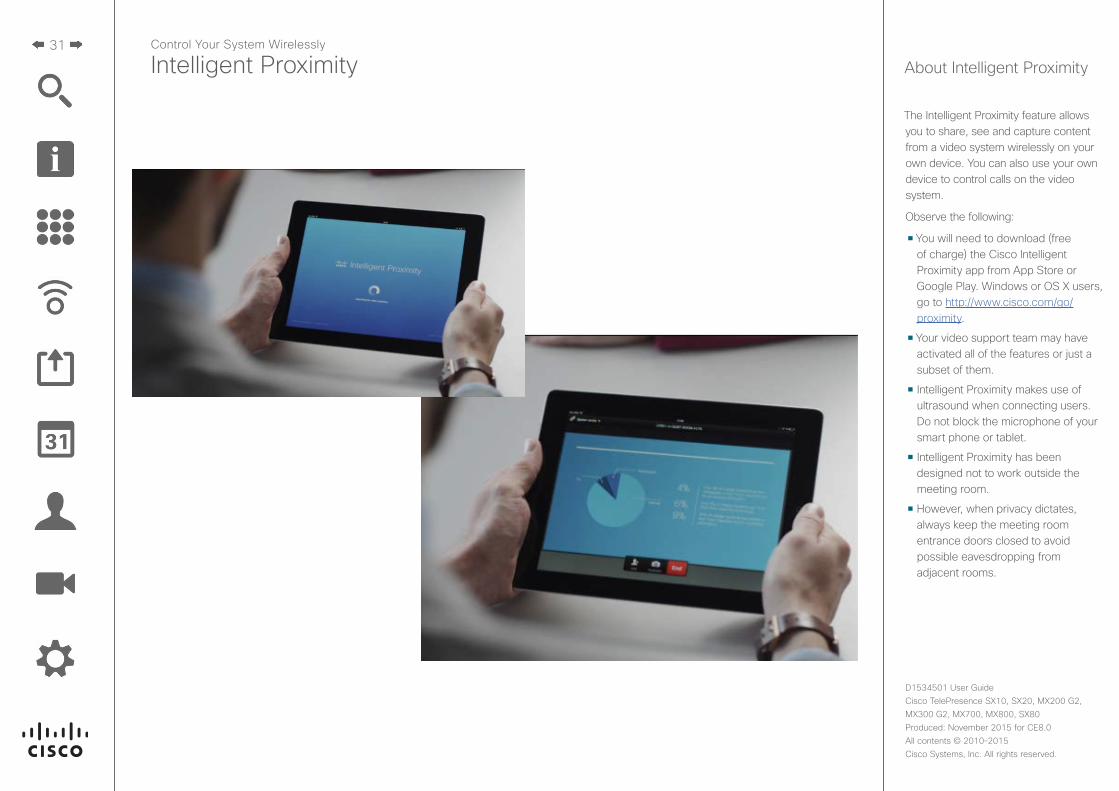
The Intelligent Proximity feature allows you to share, see and capture content from a video system wirelessly on your own device. You can also use your own device to control calls on the video system.
Observe the following:
• You will need to download (free of charge) the Cisco Intelligent Proximity app from App Store or Google Play. Windows or OS X users, go to http://www.cisco.com/go/proximity.
• Your video support team may have activated all of the features or just a subset of them.
• Intelligent Proximity makes use of ultrasound when connecting users. Do not block the microphone of your smart phone or tablet.
• Intelligent Proximity has been designed not to work outside the meeting room.
• However, when privacy dictates, always keep the meeting room entrance doors closed to avoid possible eavesdropping from adjacent rooms.
About Intelligent Proximity
32
D1534501 User Guide Cisco TelePresence SX10, SX20, MX200 G2, MX300 G2, MX700, MX800, SX80Produced: November 2015 for CE8.0All contents © 2010–2015 Cisco Systems, Inc. All rights reserved.
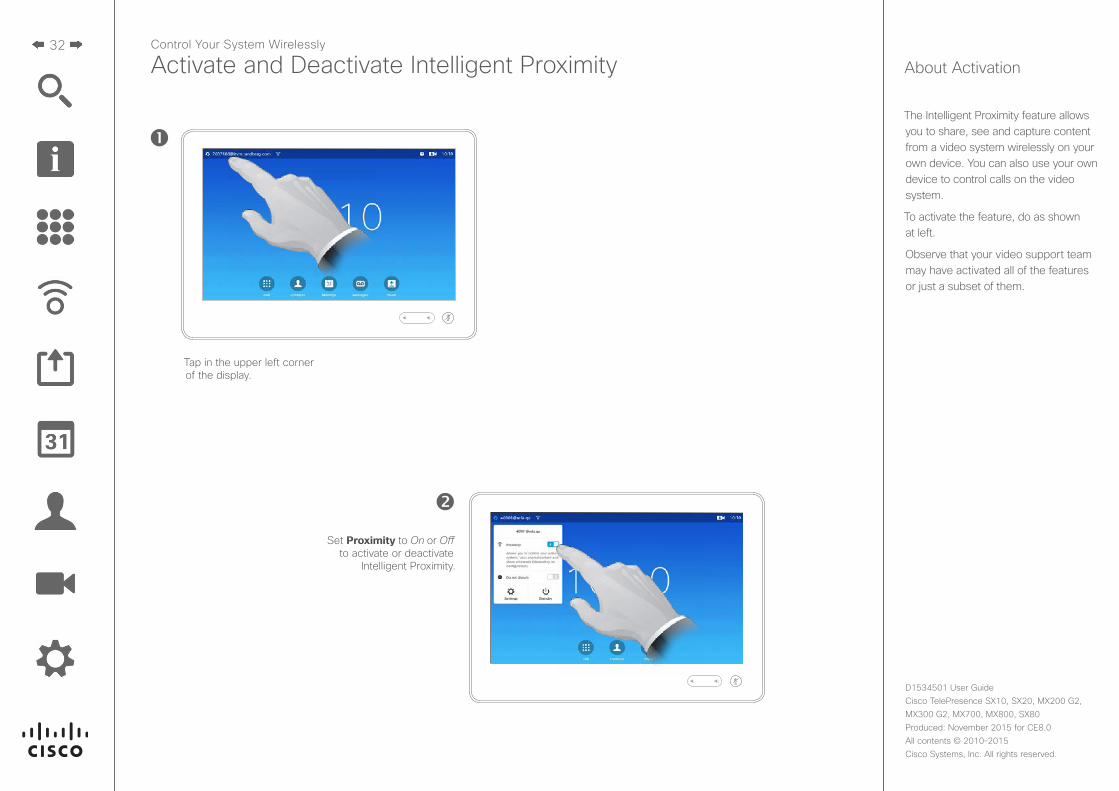
Tap in the upper left corner of the display.
Set Proximity to On or Off to activate or deactivate
Intelligent Proximity.
Activate and Deactivate Intelligent ProximityControl Your System Wirelessly
The Intelligent Proximity feature allows you to share, see and capture content from a video system wirelessly on your own device. You can also use your own device to control calls on the video system.
To activate the feature, do as shown at left.
Observe that your video support team may have activated all of the features or just a subset of them.
About Activation
33
D1534501 User Guide Cisco TelePresence SX10, SX20, MX200 G2, MX300 G2, MX700, MX800, SX80Produced: November 2015 for CE8.0All contents © 2010–2015 Cisco Systems, Inc. All rights reserved.
Share Content
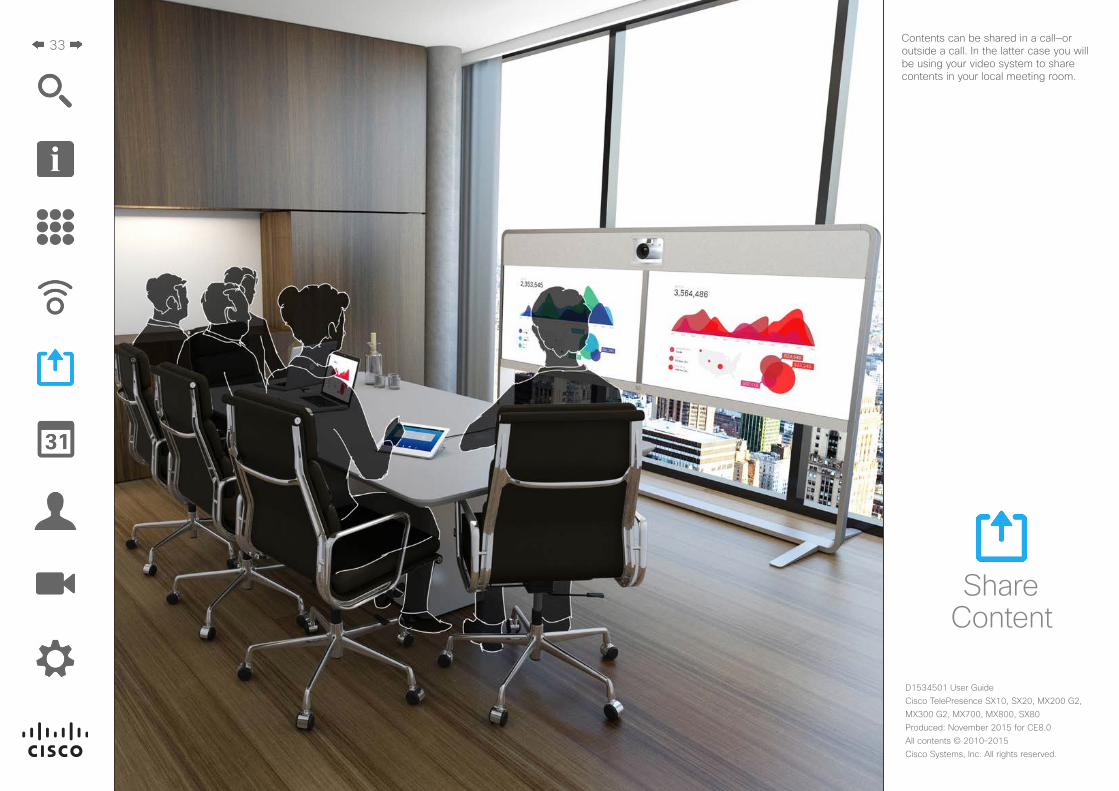
Contents can be shared in a call—or outside a call. In the latter case you will be using your video system to share contents in your local meeting room.
34
D1534501 User Guide Cisco TelePresence SX10, SX20, MX200 G2, MX300 G2, MX700, MX800, SX80Produced: November 2015 for CE8.0All contents © 2010–2015 Cisco Systems, Inc. All rights reserved.
Share content
Start and Stop Presentation in a Call
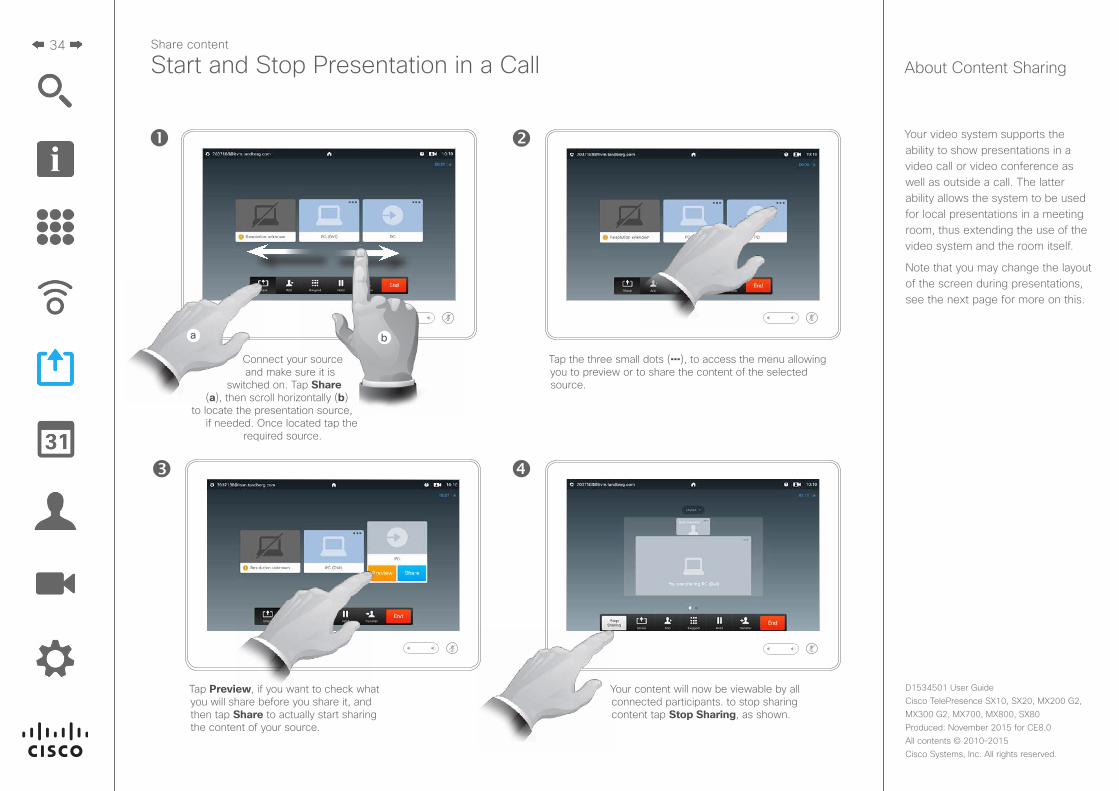
Your video system supports the ability to show presentations in a video call or video conference as well as outside a call. The latter ability allows the system to be used for local presentations in a meeting room, thus extending the use of the video system and the room itself.
Note that you may change the layout of the screen during presentations, see the next page for more on this.
About Content Sharing
Connect your source and make sure it is
switched on. Tap Share (a), then scroll horizontally (b)
to locate the presentation source, if needed. Once located tap the
required source.
Tap the three small dots (...), to access the menu allowing you to preview or to share the content of the selected source.
Tap Preview, if you want to check what you will share before you share it, and then tap Share to actually start sharing the content of your source.
Your content will now be viewable by all connected participants. to stop sharing content tap Stop Sharing, as shown.
35
D1534501 User Guide Cisco TelePresence SX10, SX20, MX200 G2, MX300 G2, MX700, MX800, SX80Produced: November 2015 for CE8.0All contents © 2010–2015 Cisco Systems, Inc. All rights reserved.
Share content
Change Presentation Layout In a Call
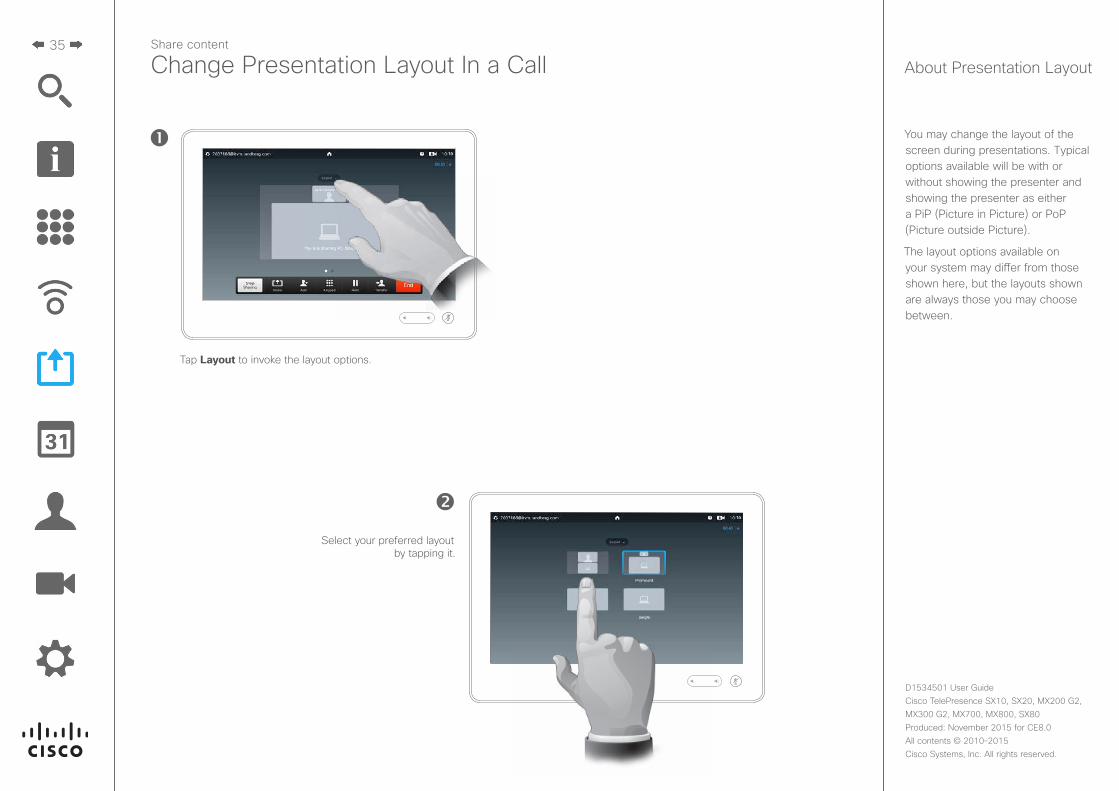
You may change the layout of the screen during presentations. Typical options available will be with or without showing the presenter and showing the presenter as either a PiP (Picture in Picture) or PoP (Picture outside Picture).
The layout options available on your system may differ from those shown here, but the layouts shown are always those you may choose between.
About Presentation Layout
Tap Layout to invoke the layout options.
Select your preferred layout by tapping it.
36
D1534501 User Guide Cisco TelePresence SX10, SX20, MX200 G2, MX300 G2, MX700, MX800, SX80Produced: November 2015 for CE8.0All contents © 2010–2015 Cisco Systems, Inc. All rights reserved.
Share content
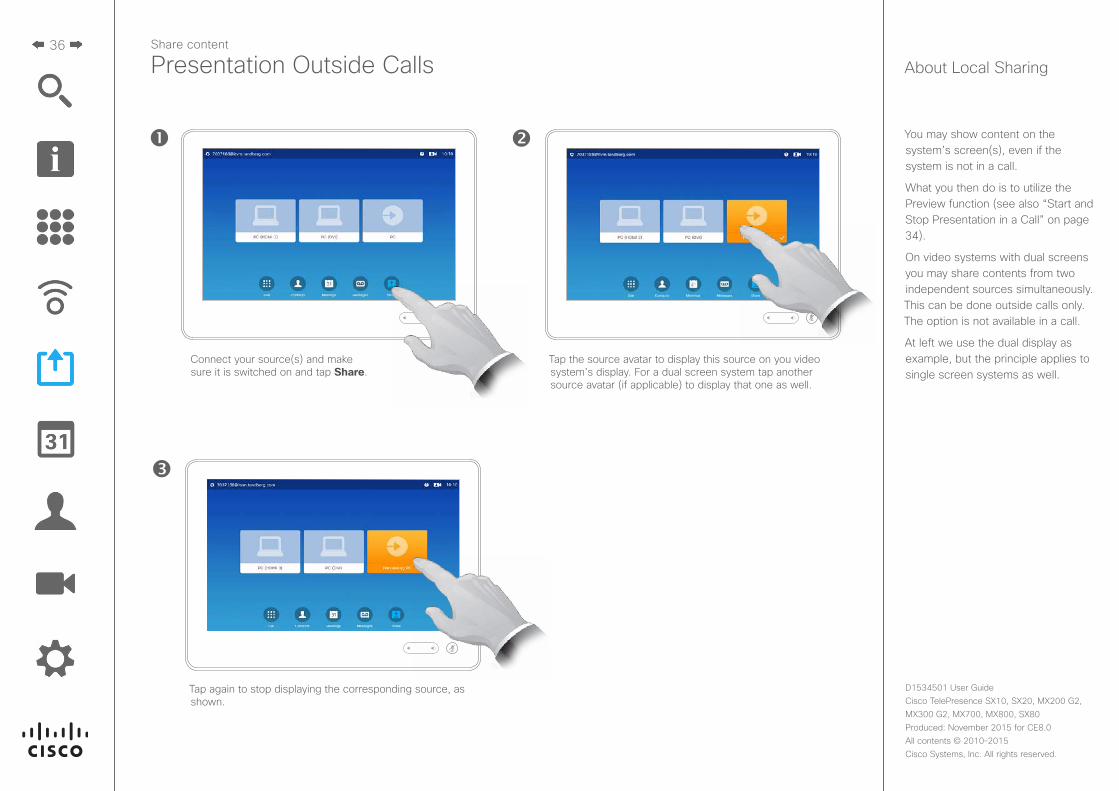
Presentation Outside Calls About Local Sharing
You may show content on the system’s screen(s), even if the system is not in a call.
What you then do is to utilize the Preview function (see also “Start and Stop Presentation in a Call” on page 34).
On video systems with dual screens you may share contents from two independent sources simultaneously. This can be done outside calls only. The option is not available in a call.
At left we use the dual display as example, but the principle applies to single screen systems as well.
Connect your source(s) and make sure it is switched on and tap Share.
Tap the source avatar to display this source on you video system’s display. For a dual screen system tap another source avatar (if applicable) to display that one as well.
Tap again to stop displaying the corresponding source, as shown.
37
D1534501 User Guide Cisco TelePresence SX10, SX20, MX200 G2, MX300 G2, MX700, MX800, SX80Produced: November 2015 for CE8.0All contents © 2010–2015 Cisco Systems, Inc. All rights reserved.
Scheduled Meetings
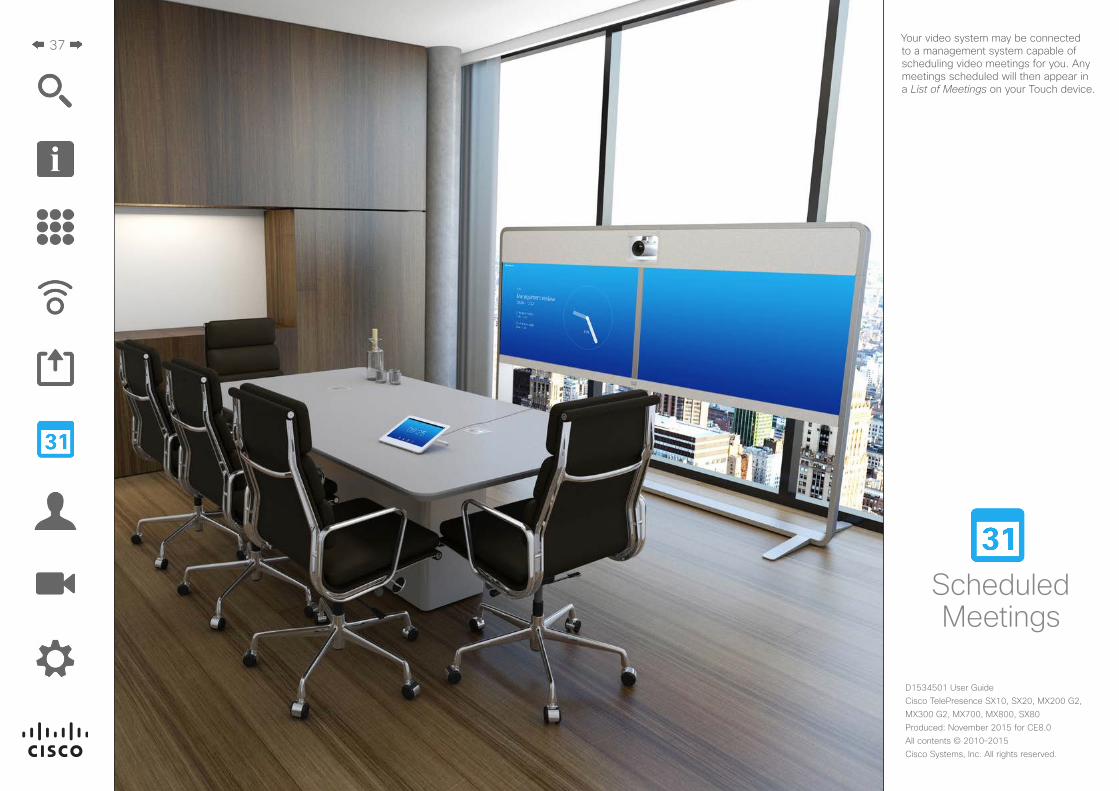
Your video system may be connected to a management system capable of scheduling video meetings for you. Any meetings scheduled will then appear in a List of Meetings on your Touch device.
38
D1534501 User Guide Cisco TelePresence SX10, SX20, MX200 G2, MX300 G2, MX700, MX800, SX80Produced: November 2015 for CE8.0All contents © 2010–2015 Cisco Systems, Inc. All rights reserved.
Scheduled Meetings
View Meeting List
Your video system may be connected to a management system capable of scheduling video meetings. Any meetings scheduled will then appear in a List of Meetings.
The List of Meetings contains a list of upcoming, meetings scheduled to take place during the next 14 days (this setting may have been changed by your video support team). The list is sorted using grouping headers. The main grouping category is by day (e.g.: TODAY, TOMORROW, then WEDNESDAY, JUNE 20, 2014 etc).
If you tap an item in the list then more information will become available.
When a scheduled meeting appears as Private meeting it will contain information about the organizer only. There will be no title, no expandable meeting outline as well as no dial-in information.
Meeting List Basics
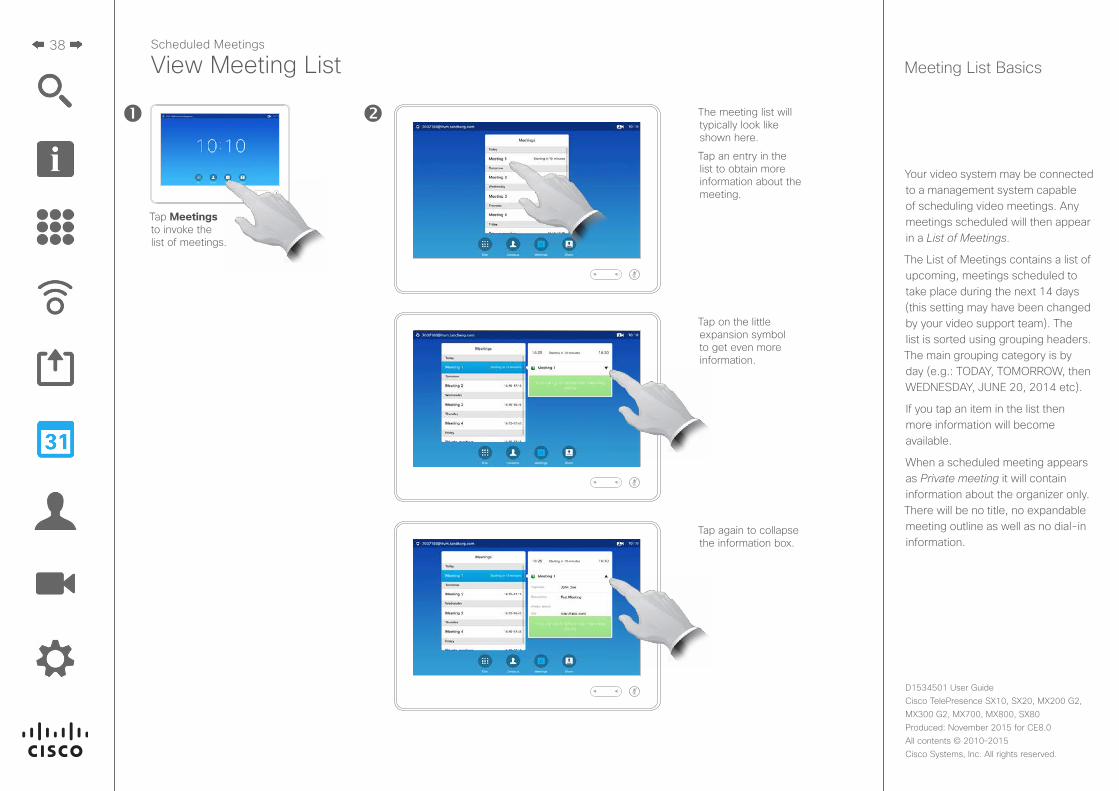
Tap Meetings to invoke the list of meetings.
The meeting list will typically look like shown here.
Tap an entry in the list to obtain more information about the meeting.
Tap on the little expansion symbol to get even more information.
Tap again to collapse the information box.
39
D1534501 User Guide Cisco TelePresence SX10, SX20, MX200 G2, MX300 G2, MX700, MX800, SX80Produced: November 2015 for CE8.0All contents © 2010–2015 Cisco Systems, Inc. All rights reserved.
Scheduled Meetings
Join Scheduled Meeting
On your video system the Meeting Reminder will appear once it is possible to join a meeting. Exactly when that will be depends on the Start time buffer setting. Default buffer setting is 10 minutes, but your video support team may have changed this. It is not possible to join the meeting earlier than the setting dictates.
The meeting reminder contains a time indicator stating when the meeting starts, or alternatively for how long the meeting has been going on (an ongoing meeting is referred to as a Meeting in progress).
The text Starting now will be shown during a time interval spanning from 30 seconds before to 30 seconds after the scheduled start time of the meeting.
About Joining
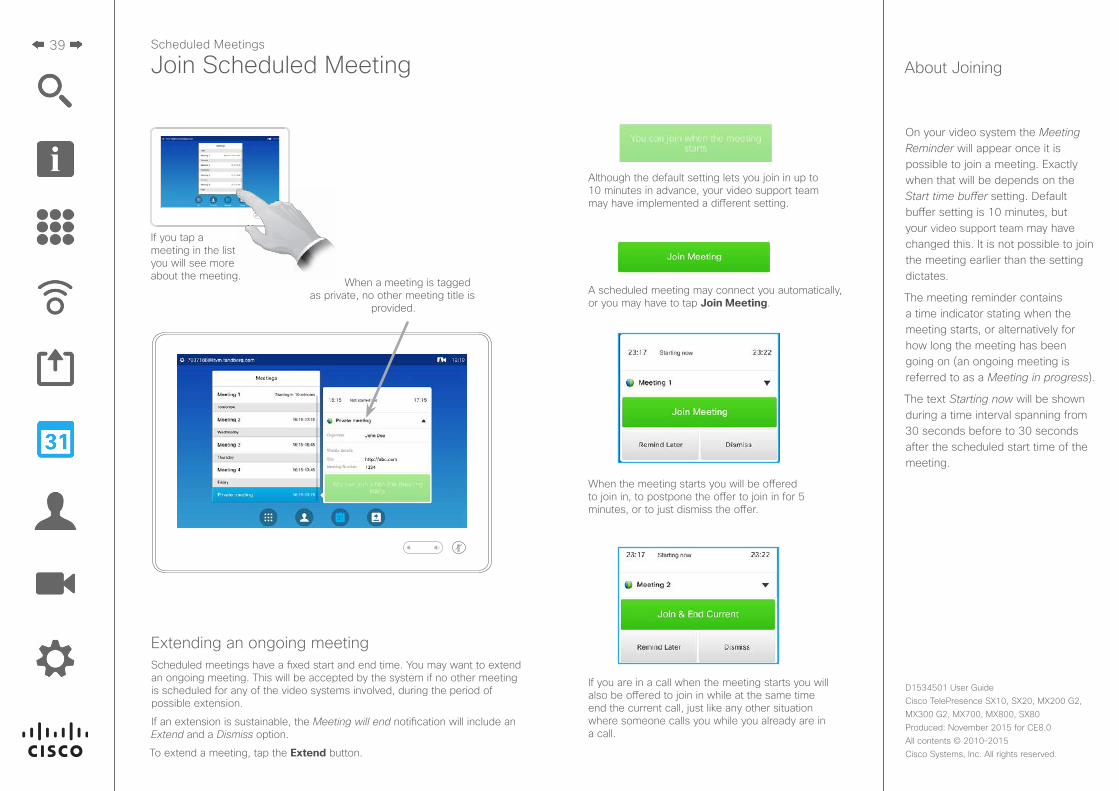
If you tap a meeting in the list you will see more about the meeting.
A scheduled meeting may connect you automatically, or you may have to tap Join Meeting.
When the meeting starts you will be offered to join in, to postpone the offer to join in for 5 minutes, or to just dismiss the offer.
If you are in a call when the meeting starts you will also be offered to join in while at the same time end the current call, just like any other situation where someone calls you while you already are in a call.
Although the default setting lets you join in up to 10 minutes in advance, your video support team may have implemented a different setting.
When a meeting is tagged as private, no other meeting title is
provided.
Extending an ongoing meetingScheduled meetings have a fixed start and end time. You may want to extend an ongoing meeting. This will be accepted by the system if no other meeting is scheduled for any of the video systems involved, during the period of possible extension.
If an extension is sustainable, the Meeting will end notification will include an Extend and a Dismiss option.
To extend a meeting, tap the Extend button.
40
D1534501 User Guide Cisco TelePresence SX10, SX20, MX200 G2, MX300 G2, MX700, MX800, SX80Produced: November 2015 for CE8.0All contents © 2010–2015 Cisco Systems, Inc. All rights reserved.
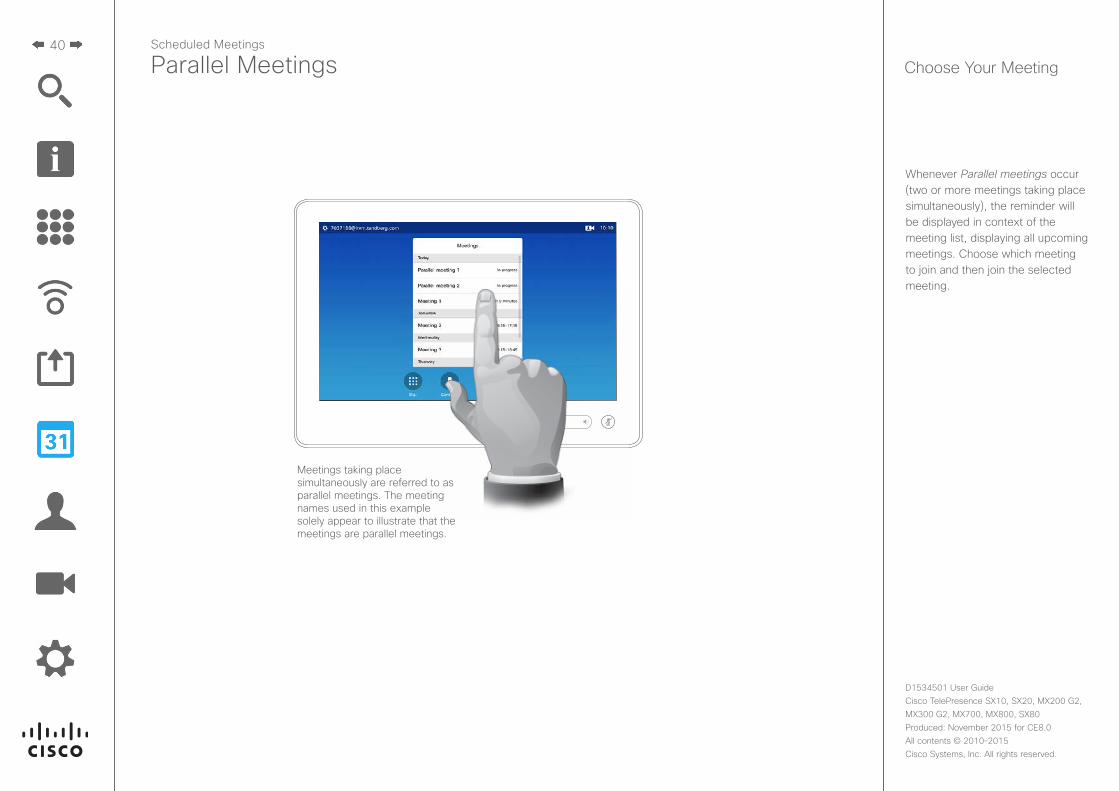
Whenever Parallel meetings occur (two or more meetings taking place simultaneously), the reminder will be displayed in context of the meeting list, displaying all upcoming meetings. Choose which meeting to join and then join the selected meeting.
Parallel MeetingsScheduled Meetings
Choose Your Meeting
Meetings taking place simultaneously are referred to as parallel meetings. The meeting names used in this example solely appear to illustrate that the meetings are parallel meetings.
41
D1534501 User Guide Cisco TelePresence SX10, SX20, MX200 G2, MX300 G2, MX700, MX800, SX80Produced: November 2015 for CE8.0All contents © 2010–2015 Cisco Systems, Inc. All rights reserved.
Contacts
Contacts consists of three parts; a Directory, which typically is your corporate phone book; Recents which is a list of recent calls and finally Favorites, which is your personalized list of people you call frequently or otherwise need to get easy access to.
42
D1534501 User Guide Cisco TelePresence SX10, SX20, MX200 G2, MX300 G2, MX700, MX800, SX80Produced: November 2015 for CE8.0All contents © 2010–2015 Cisco Systems, Inc. All rights reserved.
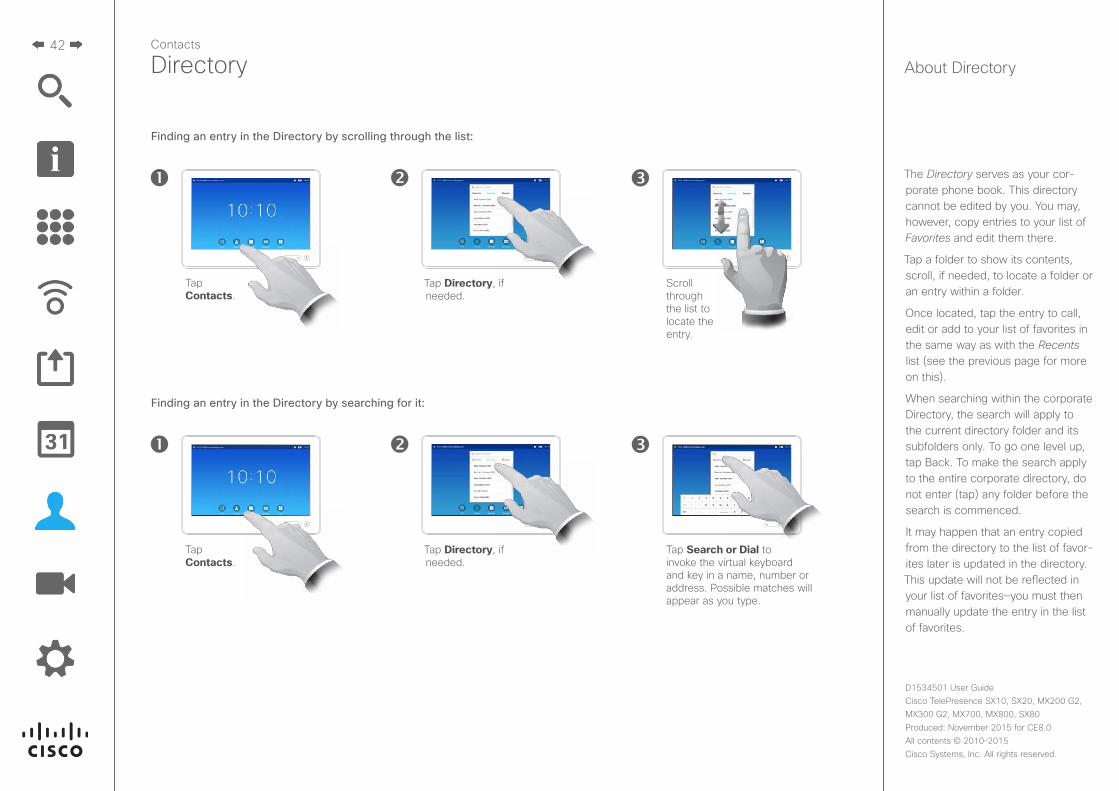
The Directory serves as your cor-porate phone book. This directory cannot be edited by you. You may, however, copy entries to your list of Favorites and edit them there.
Tap a folder to show its contents, scroll, if needed, to locate a folder or an entry within a folder.
Once located, tap the entry to call, edit or add to your list of favorites in the same way as with the Recents list (see the previous page for more on this).
When searching within the corporate Directory, the search will apply to the current directory folder and its subfolders only. To go one level up, tap Back. To make the search apply to the entire corporate directory, do not enter (tap) any folder before the search is commenced.
It may happen that an entry copied from the directory to the list of favor-ites later is updated in the directory. This update will not be reflected in your list of favorites—you must then manually update the entry in the list of favorites.
About DirectoryDirectory
Scroll through the list to locate the entry.
Tap Search or Dial to invoke the virtual keyboard and key in a name, number or address. Possible matches will appear as you type.
Tap Contacts.
Tap Contacts.
Tap Directory, if needed.
Tap Directory, if needed.
Finding an entry in the Directory by scrolling through the list:
Finding an entry in the Directory by searching for it:
Contacts
43
D1534501 User Guide Cisco TelePresence SX10, SX20, MX200 G2, MX300 G2, MX700, MX800, SX80Produced: November 2015 for CE8.0All contents © 2010–2015 Cisco Systems, Inc. All rights reserved.
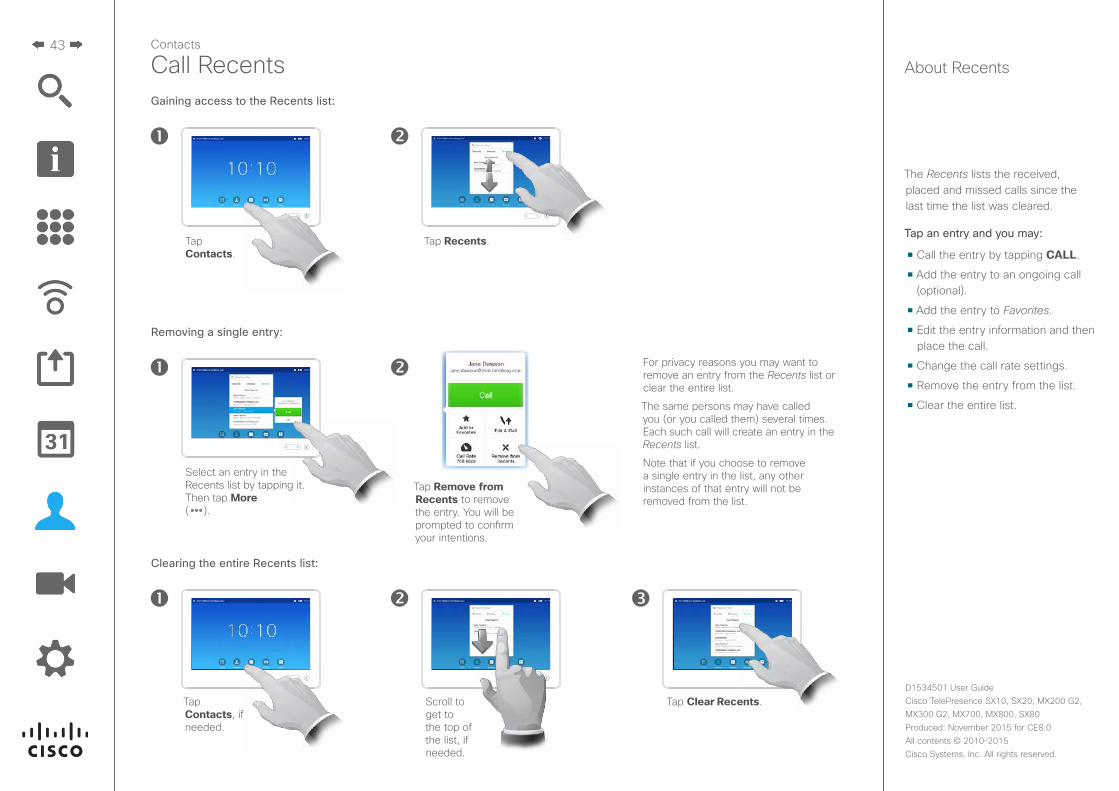
The Recents lists the received, placed and missed calls since the last time the list was cleared.
Tap an entry and you may:
• Call the entry by tapping CALL.
• Add the entry to an ongoing call (optional).
• Add the entry to Favorites.
• Edit the entry information and then place the call.
• Change the call rate settings.
• Remove the entry from the list.
• Clear the entire list.
About RecentsCall Recents
Tap Contacts, if needed.
Scroll to get to the top of the list, if needed.
Tap Clear Recents.
Clearing the entire Recents list:
Select an entry in the Recents list by tapping it. Then tap More ( ).
Removing a single entry:
For privacy reasons you may want to remove an entry from the Recents list or clear the entire list.
The same persons may have called you (or you called them) several times. Each such call will create an entry in the Recents list.
Note that if you choose to remove a single entry in the list, any other instances of that entry will not be removed from the list.
Tap Contacts.
Tap Recents.
Gaining access to the Recents list:
Contacts
Tap Remove from Recents to remove the entry. You will be prompted to confirm your intentions.
44
D1534501 User Guide Cisco TelePresence SX10, SX20, MX200 G2, MX300 G2, MX700, MX800, SX80Produced: November 2015 for CE8.0All contents © 2010–2015 Cisco Systems, Inc. All rights reserved.
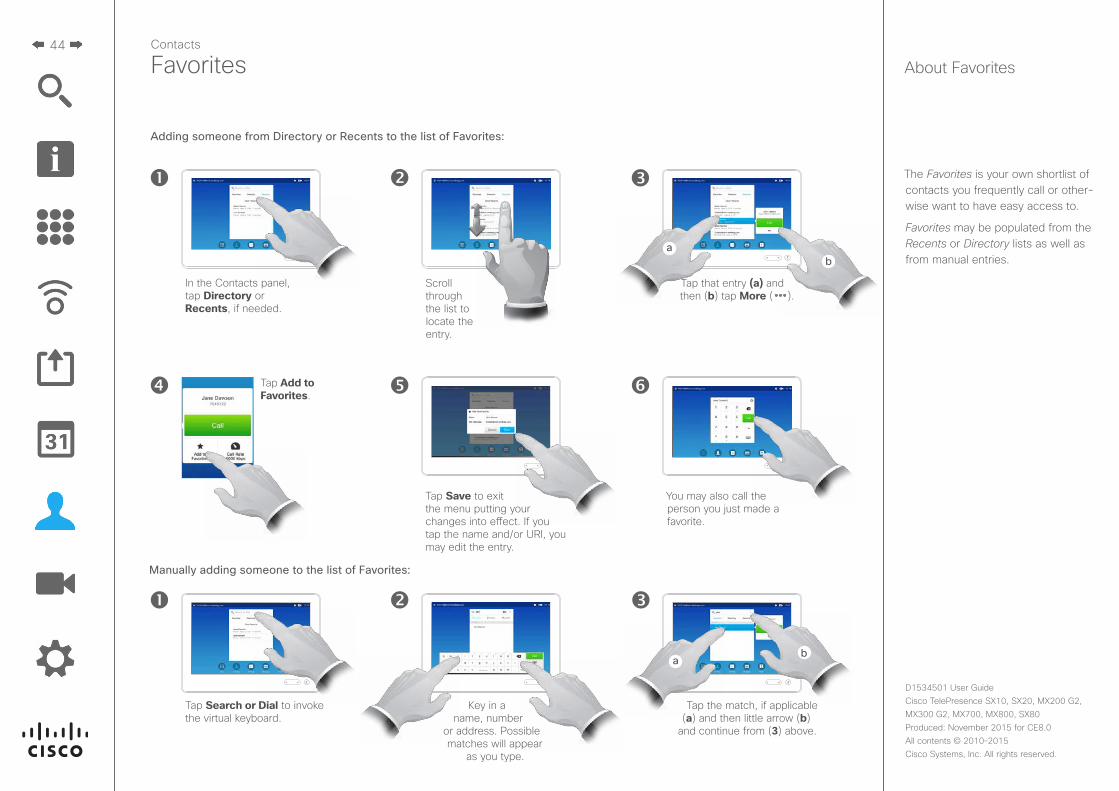
The Favorites is your own shortlist of contacts you frequently call or other-wise want to have easy access to.
Favorites may be populated from the Recents or Directory lists as well as from manual entries.
About FavoritesFavorites
Tap that entry (a) and then (b) tap More ( ).
Tap Search or Dial to invoke the virtual keyboard.
In the Contacts panel, tap Directory or Recents, if needed.
Tap Add to Favorites.
Tap Save to exit the menu putting your changes into effect. If you tap the name and/or URI, you may edit the entry.
Scroll through the list to locate the entry.
Adding someone from Directory or Recents to the list of Favorites:
Manually adding someone to the list of Favorites:
Key in a name, number
or address. Possible matches will appear
as you type.
Tap the match, if applicable (a) and then little arrow (b)
and continue from (3) above.
Contacts
You may also call the person you just made a favorite.
45
D1534501 User Guide Cisco TelePresence SX10, SX20, MX200 G2, MX300 G2, MX700, MX800, SX80Produced: November 2015 for CE8.0All contents © 2010–2015 Cisco Systems, Inc. All rights reserved.
Contacts
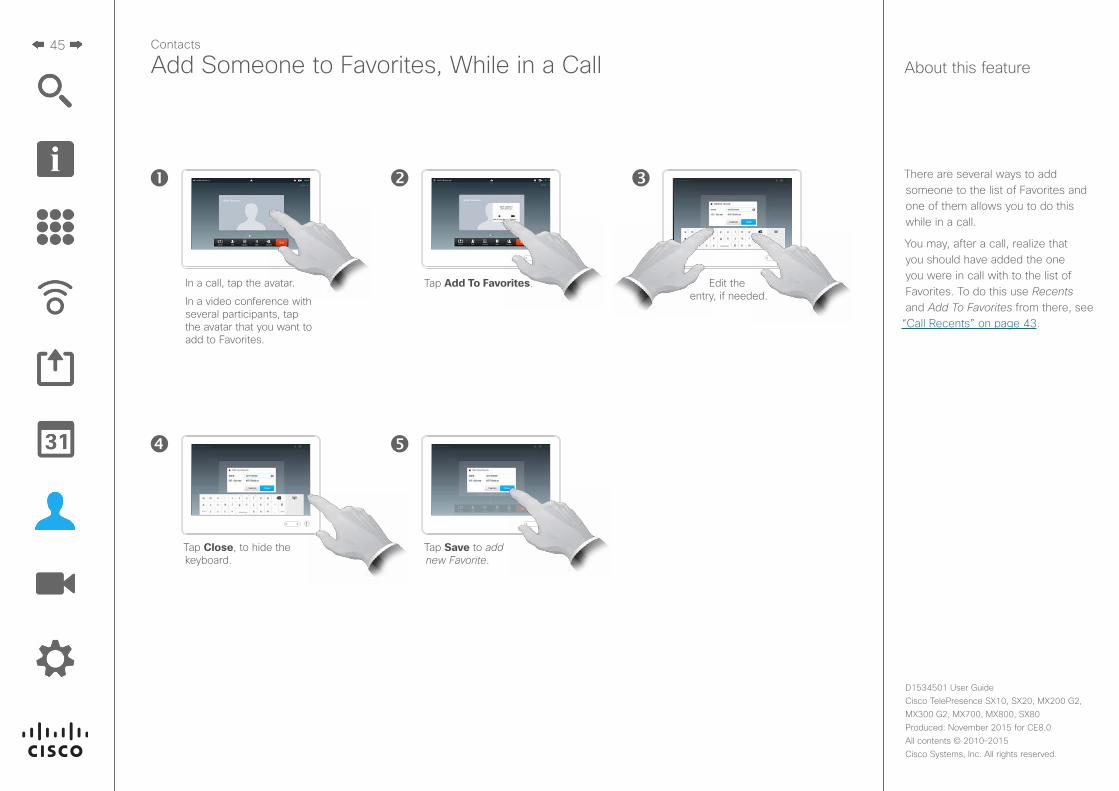
Add Someone to Favorites, While in a Call
There are several ways to add someone to the list of Favorites and one of them allows you to do this while in a call.
You may, after a call, realize that you should have added the one you were in call with to the list of Favorites. To do this use Recents and Add To Favorites from there, see
“Call Recents” on page 43.
About this feature
Edit the entry, if needed.
In a call, tap the avatar.
In a video conference with several participants, tap the avatar that you want to add to Favorites.
Tap Add To Favorites.
Tap Close, to hide the keyboard.
Tap Save to add new Favorite.
46
D1534501 User Guide Cisco TelePresence SX10, SX20, MX200 G2, MX300 G2, MX700, MX800, SX80Produced: November 2015 for CE8.0All contents © 2010–2015 Cisco Systems, Inc. All rights reserved.
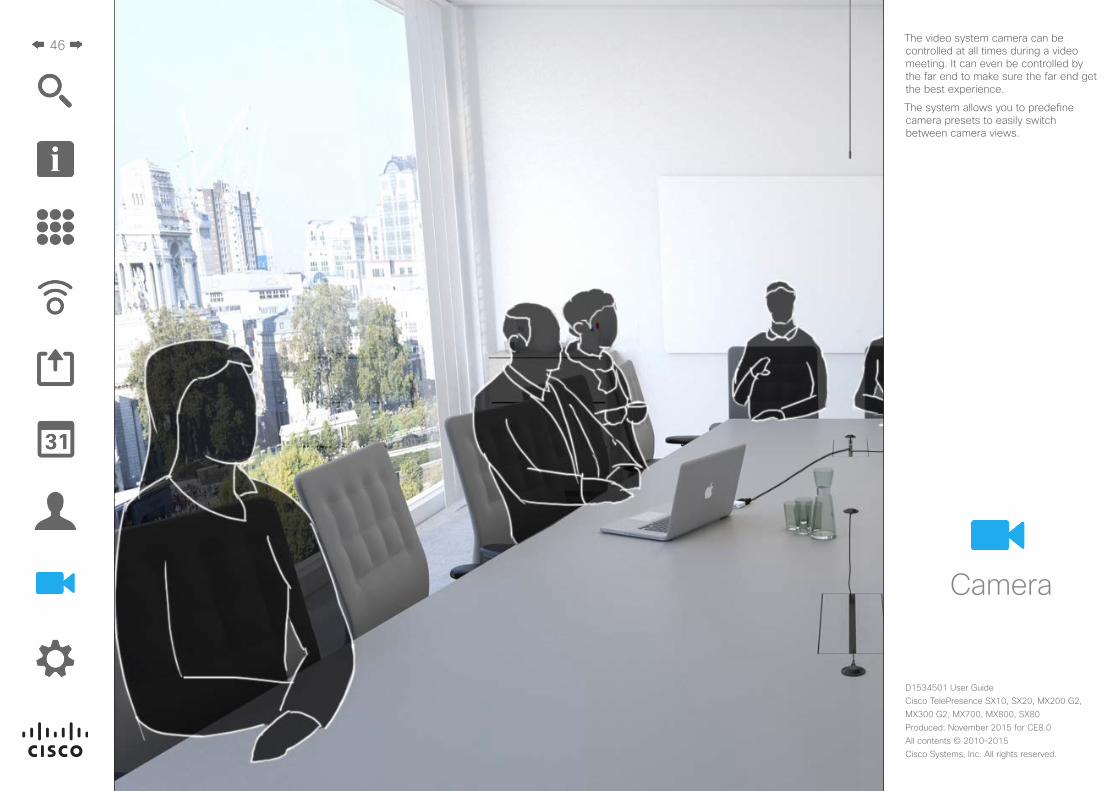
Camera
The video system camera can be controlled at all times during a video meeting. It can even be controlled by the far end to make sure the far end get the best experience.
The system allows you to predefine camera presets to easily switch between camera views.
47
D1534501 User Guide Cisco TelePresence SX10, SX20, MX200 G2, MX300 G2, MX700, MX800, SX80Produced: November 2015 for CE8.0All contents © 2010–2015 Cisco Systems, Inc. All rights reserved.
Camera
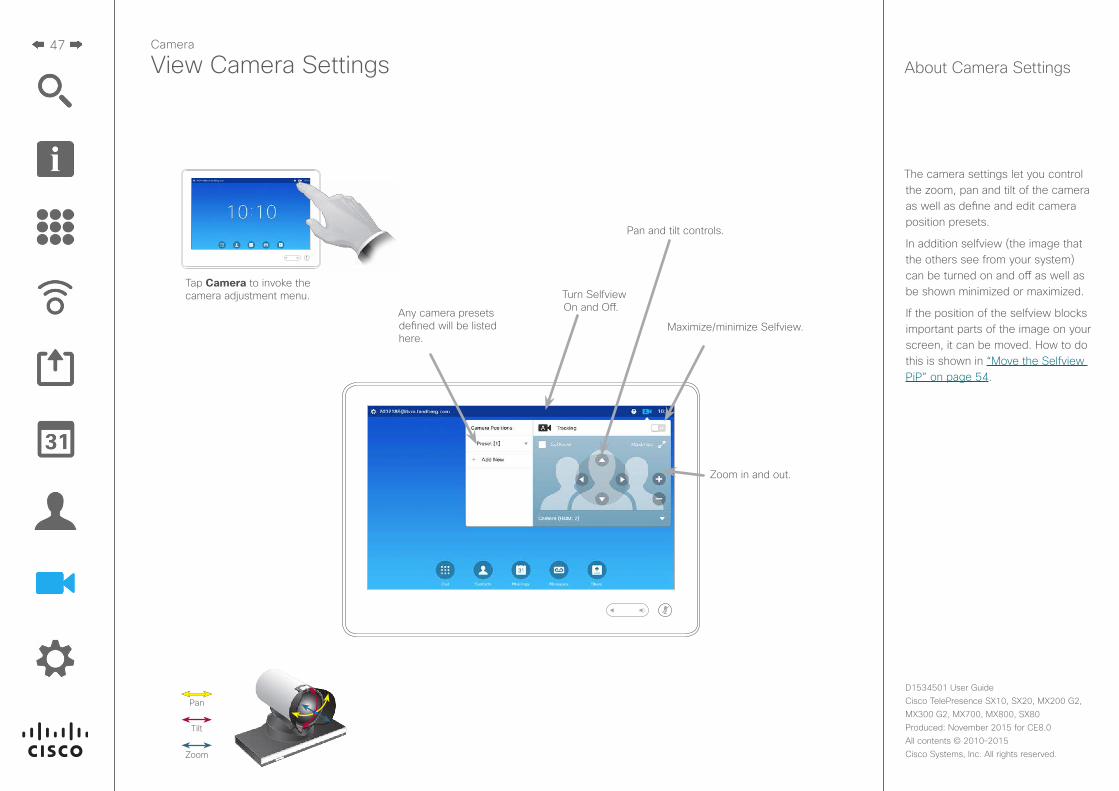
View Camera Settings
Tap Camera to invoke the camera adjustment menu. Turn Selfview
On and Off.
Maximize/minimize Selfview.
Zoom in and out.
Pan and tilt controls.
Any camera presets defined will be listed here.
About Camera Settings
The camera settings let you control the zoom, pan and tilt of the camera as well as define and edit camera position presets.
In addition selfview (the image that the others see from your system) can be turned on and off as well as be shown minimized or maximized.
If the position of the selfview blocks important parts of the image on your screen, it can be moved. How to do this is shown in “Move the Selfview PiP” on page 54.
Pan
Tilt
Zoom
48
D1534501 User Guide Cisco TelePresence SX10, SX20, MX200 G2, MX300 G2, MX700, MX800, SX80Produced: November 2015 for CE8.0All contents © 2010–2015 Cisco Systems, Inc. All rights reserved.
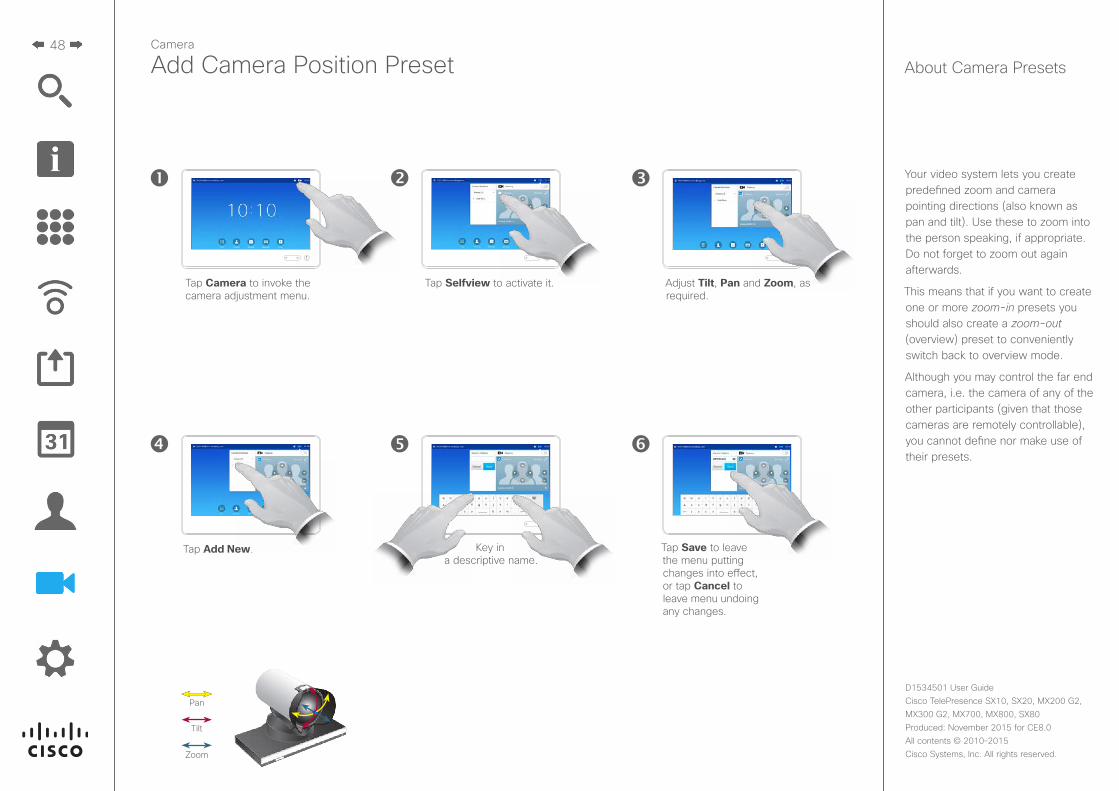
Add Camera Position Preset
Tap Camera to invoke the camera adjustment menu.
Adjust Tilt, Pan and Zoom, as required.
Tap Selfview to activate it.
Tap Add New. Key in a descriptive name.
Tap Save to leave the menu putting changes into effect, or tap Cancel to leave menu undoing any changes.
About Camera Presets
Your video system lets you create predefined zoom and camera pointing directions (also known as pan and tilt). Use these to zoom into the person speaking, if appropriate. Do not forget to zoom out again afterwards.
This means that if you want to create one or more zoom-in presets you should also create a zoom-out (overview) preset to conveniently switch back to overview mode.
Although you may control the far end camera, i.e. the camera of any of the other participants (given that those cameras are remotely controllable), you cannot define nor make use of their presets.
Camera
Pan
Tilt
Zoom
49
D1534501 User Guide Cisco TelePresence SX10, SX20, MX200 G2, MX300 G2, MX700, MX800, SX80Produced: November 2015 for CE8.0All contents © 2010–2015 Cisco Systems, Inc. All rights reserved.
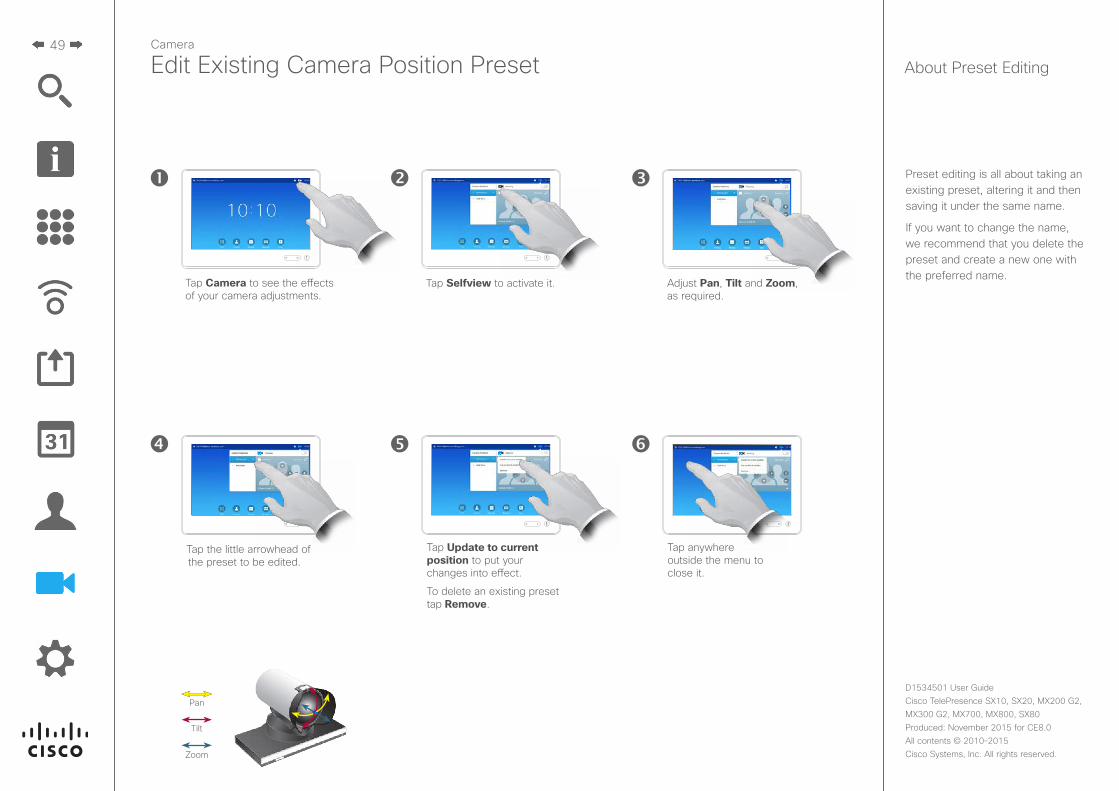
Preset editing is all about taking an existing preset, altering it and then saving it under the same name.
If you want to change the name, we recommend that you delete the preset and create a new one with the preferred name.
Edit Existing Camera Position Preset About Preset Editing
Tap Camera to see the effects of your camera adjustments.
Adjust Pan, Tilt and Zoom, as required.
Tap Selfview to activate it.
Tap the little arrowhead of the preset to be edited.
Tap anywhere outside the menu to close it.
Camera
Tap Update to current position to put your changes into effect.
To delete an existing preset tap Remove.
Pan
Tilt
Zoom

50
D1534501 User Guide Cisco TelePresence SX10, SX20, MX200 G2, MX300 G2, MX700, MX800, SX80Produced: November 2015 for CE8.0All contents © 2010–2015 Cisco Systems, Inc. All rights reserved.
Camera
Speaker Tracking
Systems equipped with a speaker tracking camera system use two cameras working together with a built-in microphone array. The system will track and show the person speaking so that you won’t have to use the Camera Control menu or Camera Presets to zoom in and out.
When speaker tracking has been activated, the camera position presets will still be available. However, if you tap a camera position preset while in speaker tracking mode, one of the cameras will respond accordingly and the speaker tracking will be deactivated.
Activate speaker tracking as shown on this page again, if needed.
Note that speaker tracking will not work if the microphones are muted.
Speaker tracking may be expanded to include the Snap to Whiteboard feature, as discussed in the tip at left.
About Speaker Tracking
To enable Speaker Tracking, tap Camera, in the upper right corner.
Activate the Speaker Tracking feature by tapping the button in the upper right corner of the appearing menu.
Tap anywhere outside the menu to exit.
To deactivate Speaker Tracking, repeat the procedure.
Tip Systems with speaker tracking may include the Snap to Whiteboard feature. This feature must have been activated by your video support team to work.
Snap to Whiteboard will cause the camera to display a predefined whiteboard area as well as a person standing by the whiteboard.
If Snap to Whiteboard has not been activated, the camera will zoom in on the person only and not show the whiteboard.
Snap to Whiteboard will only work if a person is standing by the whiteboard and speaking. This has been implemented by design to make it possible to sit in front of the whiteboard without triggering the snap feature.
51
D1534501 User Guide Cisco TelePresence SX10, SX20, MX200 G2, MX300 G2, MX700, MX800, SX80Produced: November 2015 for CE8.0All contents © 2010–2015 Cisco Systems, Inc. All rights reserved.
Camera
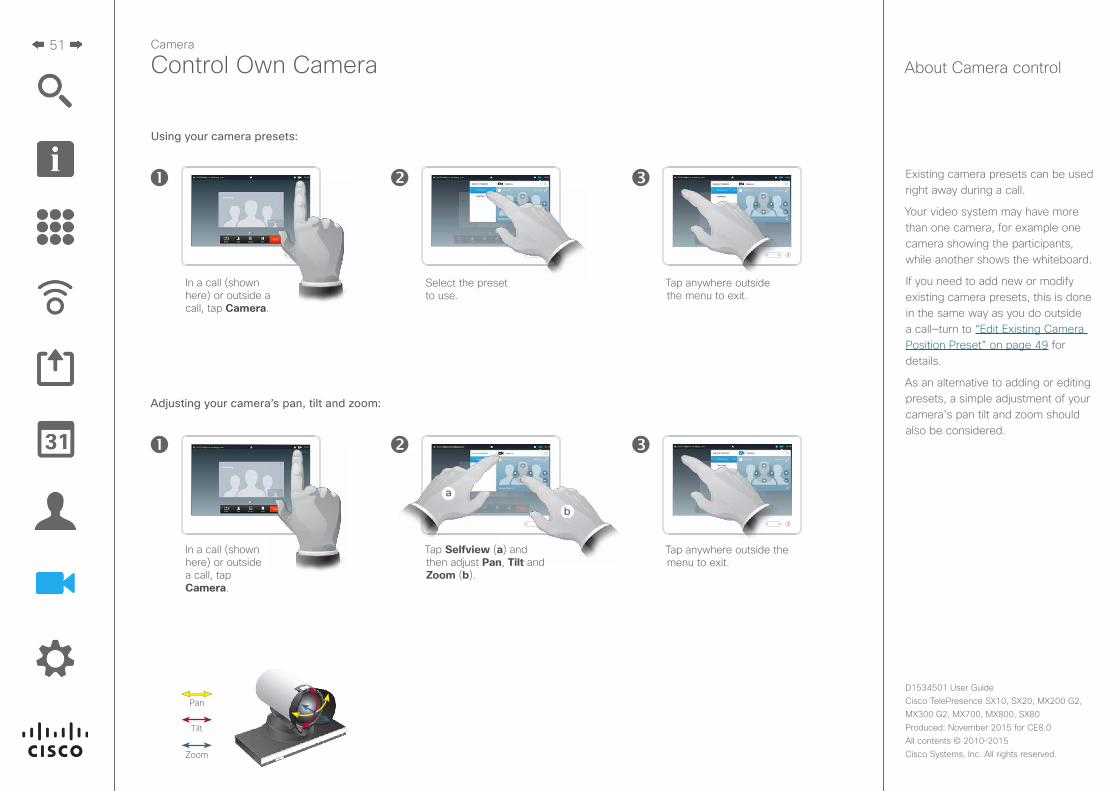
Control Own Camera
Existing camera presets can be used right away during a call.
Your video system may have more than one camera, for example one camera showing the participants, while another shows the whiteboard.
If you need to add new or modify existing camera presets, this is done in the same way as you do outside a call—turn to “Edit Existing Camera Position Preset” on page 49 for details.
As an alternative to adding or editing presets, a simple adjustment of your camera’s pan tilt and zoom should also be considered.
About Camera control
Pan
Tilt
Zoom
In a call (shown here) or outside a call, tap Camera.
Tap anywhere outside the menu to exit.
Tap Selfview (a) and then adjust Pan, Tilt and Zoom (b).
Adjusting your camera’s pan, tilt and zoom:
In a call (shown here) or outside a call, tap Camera.
Select the preset to use.
Tap anywhere outside the menu to exit.
Using your camera presets:
Pos. 1 Pos. 1
52
D1534501 User Guide Cisco TelePresence SX10, SX20, MX200 G2, MX300 G2, MX700, MX800, SX80Produced: November 2015 for CE8.0All contents © 2010–2015 Cisco Systems, Inc. All rights reserved.
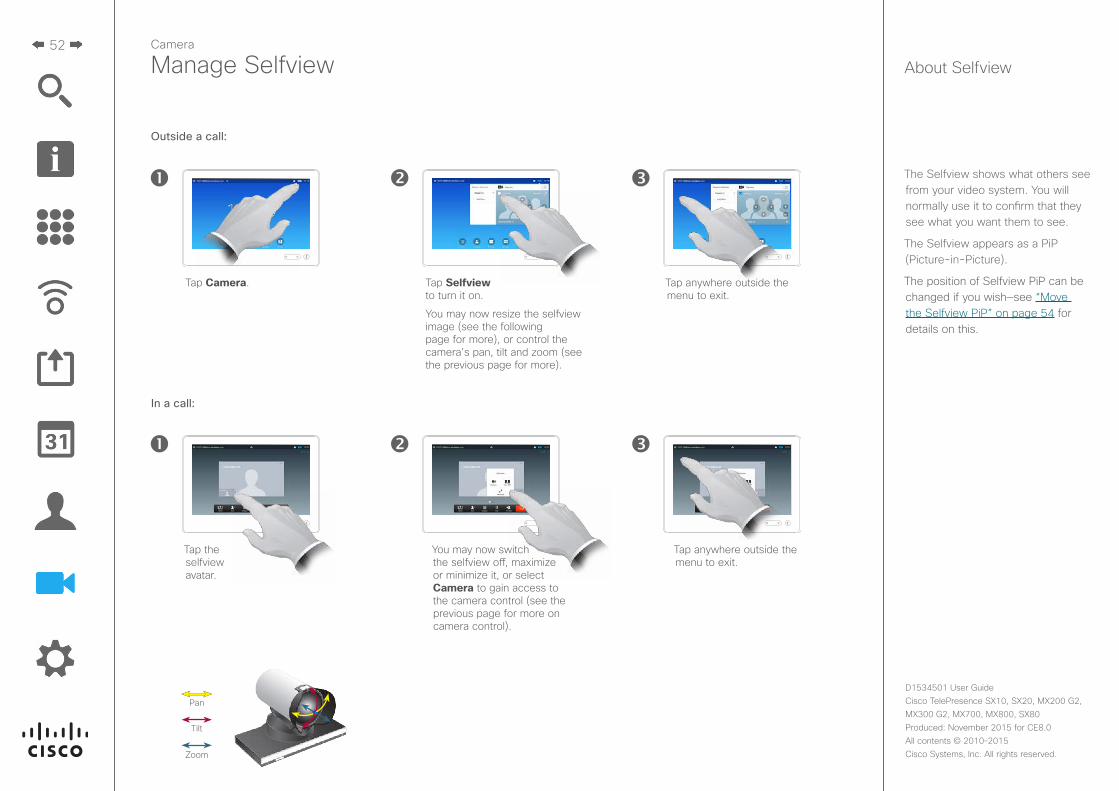
The Selfview shows what others see from your video system. You will normally use it to confirm that they see what you want them to see.
The Selfview appears as a PiP (Picture-in-Picture).
The position of Selfview PiP can be changed if you wish—see “Move the Selfview PiP” on page 54 for details on this.
Camera
Manage Selfview About Selfview
Tap Camera. Tap Selfview to turn it on.
You may now resize the selfview image (see the following page for more), or control the camera’s pan, tilt and zoom (see the previous page for more).
Tap anywhere outside the menu to exit.
Tap the selfview avatar.
In a call:
Outside a call:
You may now switch the selfview off, maximize or minimize it, or select Camera to gain access to the camera control (see the previous page for more on camera control).
Tap anywhere outside the menu to exit.
Pan
Tilt
Zoom
53
D1534501 User Guide Cisco TelePresence SX10, SX20, MX200 G2, MX300 G2, MX700, MX800, SX80Produced: November 2015 for CE8.0All contents © 2010–2015 Cisco Systems, Inc. All rights reserved.
Camera
Resize the Selfview PiP
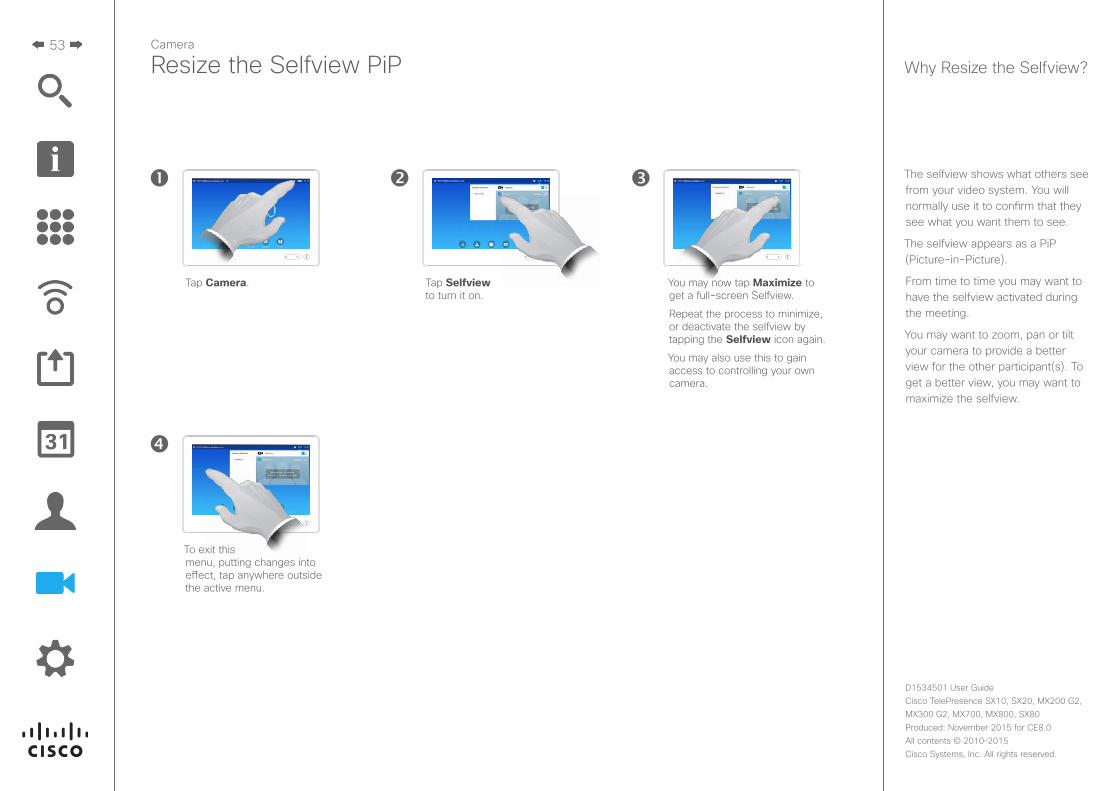
The selfview shows what others see from your video system. You will normally use it to confirm that they see what you want them to see.
The selfview appears as a PiP (Picture-in-Picture).
From time to time you may want to have the selfview activated during the meeting.
You may want to zoom, pan or tilt your camera to provide a better view for the other participant(s). To get a better view, you may want to maximize the selfview.
Why Resize the Selfview?
You may now tap Maximize to get a full-screen Selfview.
Repeat the process to minimize, or deactivate the selfview by tapping the Selfview icon again.
You may also use this to gain access to controlling your own camera.
Tap Camera. Tap Selfview to turn it on.
To exit this menu, putting changes into effect, tap anywhere outside the active menu.
54
D1534501 User Guide Cisco TelePresence SX10, SX20, MX200 G2, MX300 G2, MX700, MX800, SX80Produced: November 2015 for CE8.0All contents © 2010–2015 Cisco Systems, Inc. All rights reserved.
Camera
Move the Selfview PiP
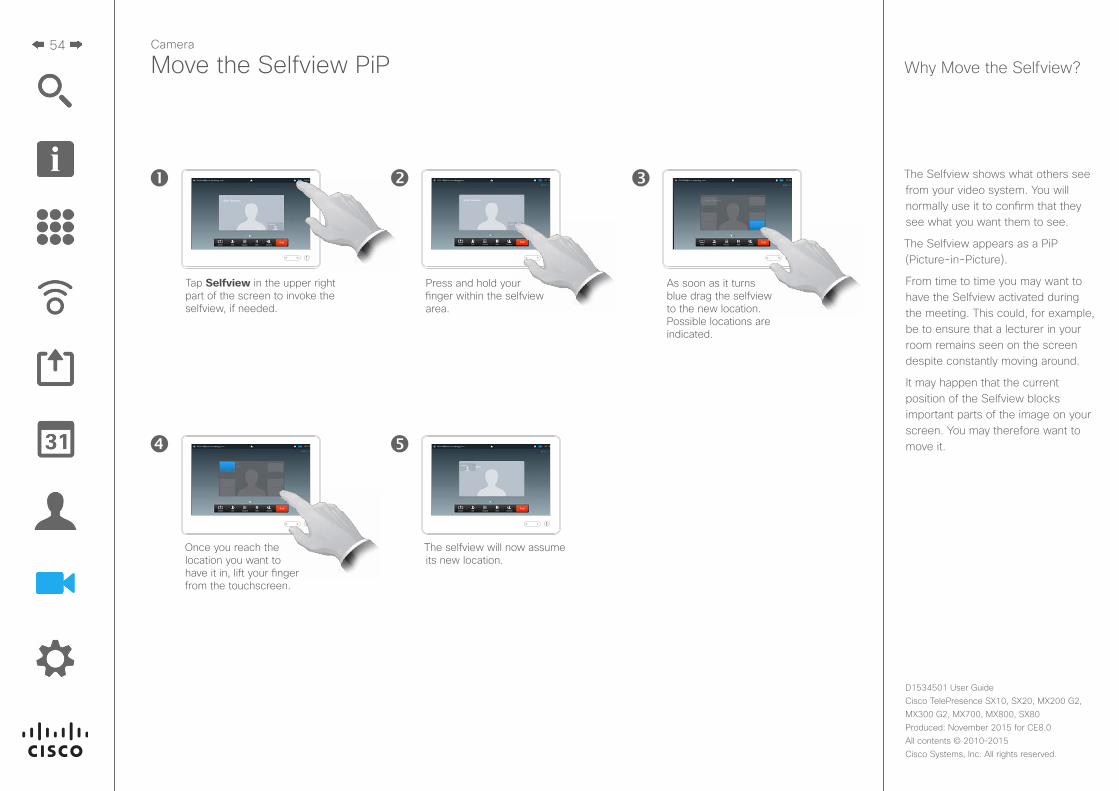
The Selfview shows what others see from your video system. You will normally use it to confirm that they see what you want them to see.
The Selfview appears as a PiP (Picture-in-Picture).
From time to time you may want to have the Selfview activated during the meeting. This could, for example, be to ensure that a lecturer in your room remains seen on the screen despite constantly moving around.
It may happen that the current position of the Selfview blocks important parts of the image on your screen. You may therefore want to move it.
Why Move the Selfview?
As soon as it turns blue drag the selfview to the new location. Possible locations are indicated.
Tap Selfview in the upper right part of the screen to invoke the selfview, if needed.
Press and hold your finger within the selfview area.
Once you reach the location you want to have it in, lift your finger from the touchscreen.
The selfview will now assume its new location.
55
D1534501 User Guide Cisco TelePresence SX10, SX20, MX200 G2, MX300 G2, MX700, MX800, SX80Produced: November 2015 for CE8.0All contents © 2010–2015 Cisco Systems, Inc. All rights reserved.
Camera
Control the Camera of the Other Participant
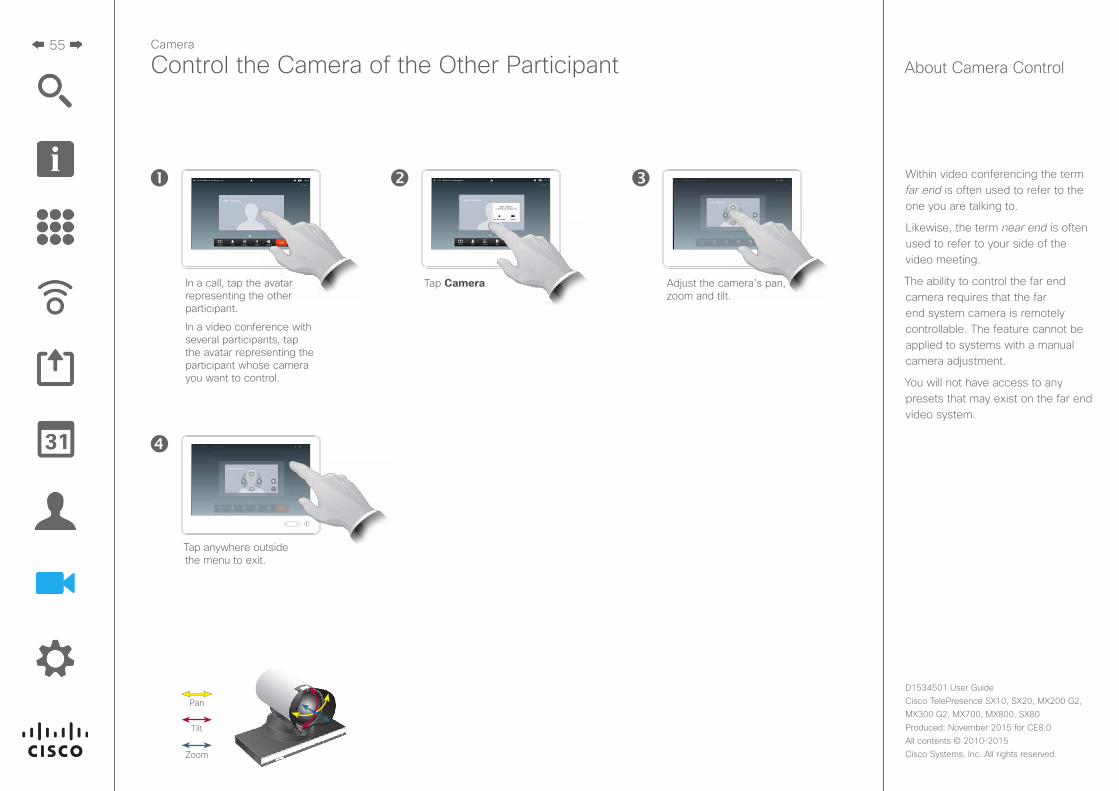
Within video conferencing the term far end is often used to refer to the one you are talking to.
Likewise, the term near end is often used to refer to your side of the video meeting.
The ability to control the far end camera requires that the far end system camera is remotely controllable. The feature cannot be applied to systems with a manual camera adjustment.
You will not have access to any presets that may exist on the far end video system.
About Camera Control
Adjust the camera’s pan, zoom and tilt.
In a call, tap the avatar representing the other participant.
In a video conference with several participants, tap the avatar representing the participant whose camera you want to control.
Tap Camera.
Tap anywhere outside the menu to exit.
Pan
Tilt
Zoom
56
D1534501 User Guide Cisco TelePresence SX10, SX20, MX200 G2, MX300 G2, MX700, MX800, SX80Produced: November 2015 for CE8.0All contents © 2010–2015 Cisco Systems, Inc. All rights reserved.
Settings
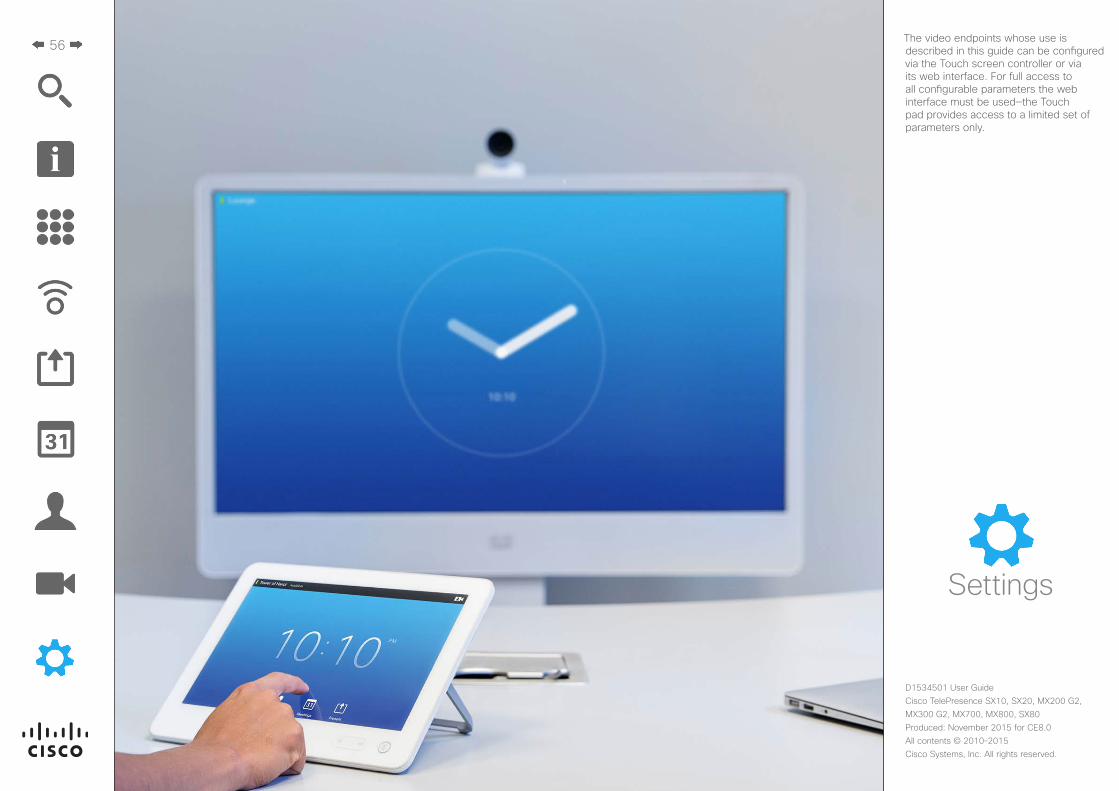
The video endpoints whose use is described in this guide can be configured via the Touch screen controller or via its web interface. For full access to all configurable parameters the web interface must be used—the Touch pad provides access to a limited set of parameters only.
57
D1534501 User Guide Cisco TelePresence SX10, SX20, MX200 G2, MX300 G2, MX700, MX800, SX80Produced: November 2015 for CE8.0All contents © 2010–2015 Cisco Systems, Inc. All rights reserved.
Settings
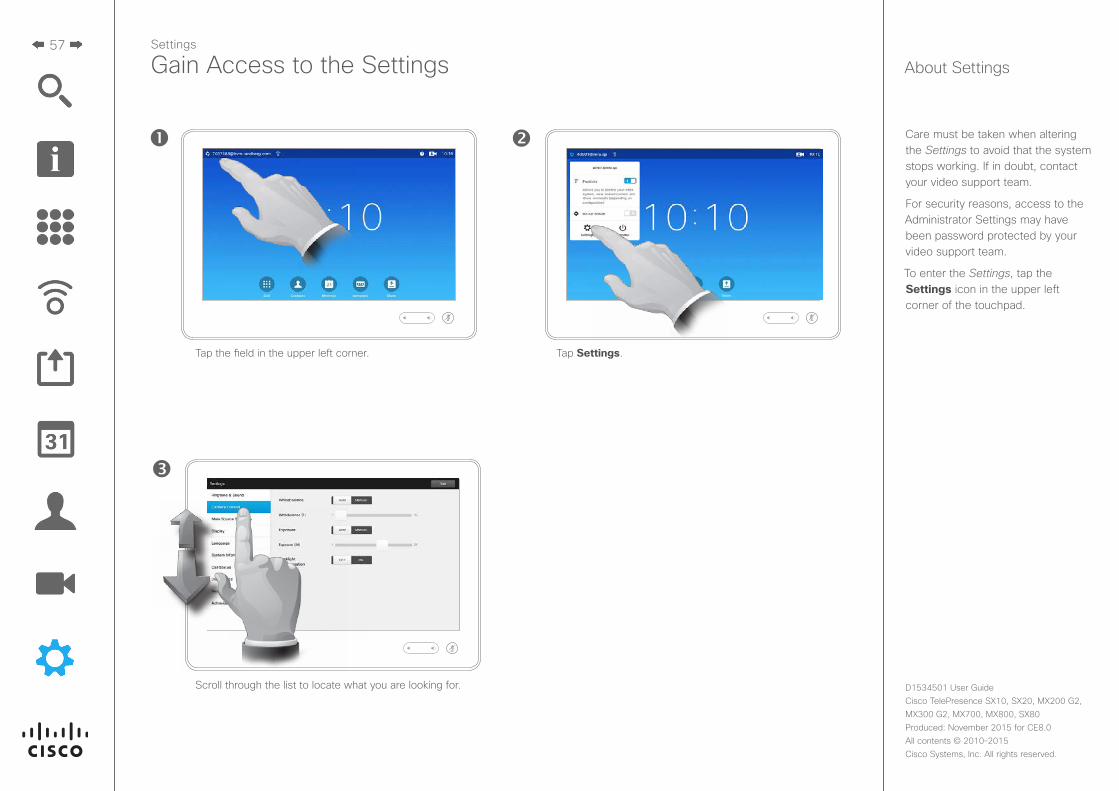
Gain Access to the Settings
Care must be taken when altering the Settings to avoid that the system stops working. If in doubt, contact your video support team.
For security reasons, access to the Administrator Settings may have been password protected by your video support team.
To enter the Settings, tap the Settings icon in the upper left corner of the touchpad.
About Settings
Scroll through the list to locate what you are looking for.
Tap the field in the upper left corner. Tap Settings.
58
D1534501 User Guide Cisco TelePresence SX10, SX20, MX200 G2, MX300 G2, MX700, MX800, SX80Produced: November 2015 for CE8.0All contents © 2010–2015 Cisco Systems, Inc. All rights reserved.
Settings
Ringtone & Sound
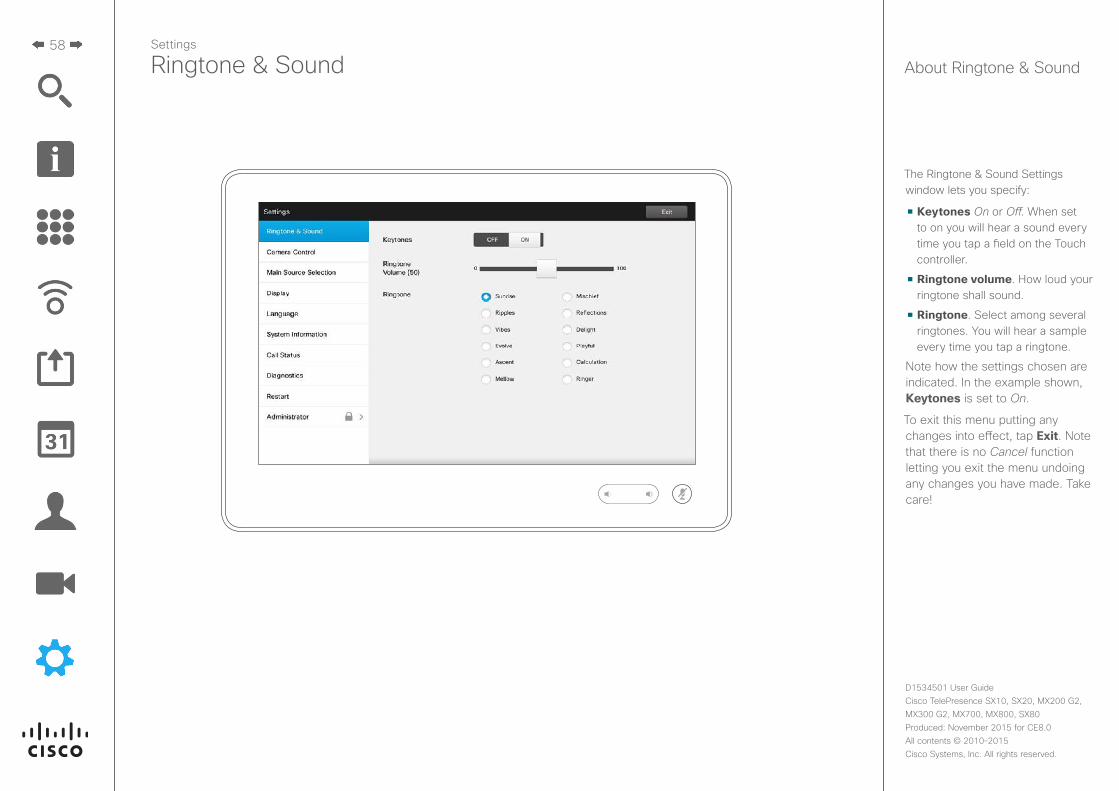
The Ringtone & Sound Settings window lets you specify:
• Keytones On or Off. When set to on you will hear a sound every time you tap a field on the Touch controller.
• Ringtone volume. How loud your ringtone shall sound.
• Ringtone. Select among several ringtones. You will hear a sample every time you tap a ringtone.
Note how the settings chosen are indicated. In the example shown, Keytones is set to On.
To exit this menu putting any changes into effect, tap Exit. Note that there is no Cancel function letting you exit the menu undoing any changes you have made. Take care!
About Ringtone & Sound
59
D1534501 User Guide Cisco TelePresence SX10, SX20, MX200 G2, MX300 G2, MX700, MX800, SX80Produced: November 2015 for CE8.0All contents © 2010–2015 Cisco Systems, Inc. All rights reserved.
Settings
Camera Control
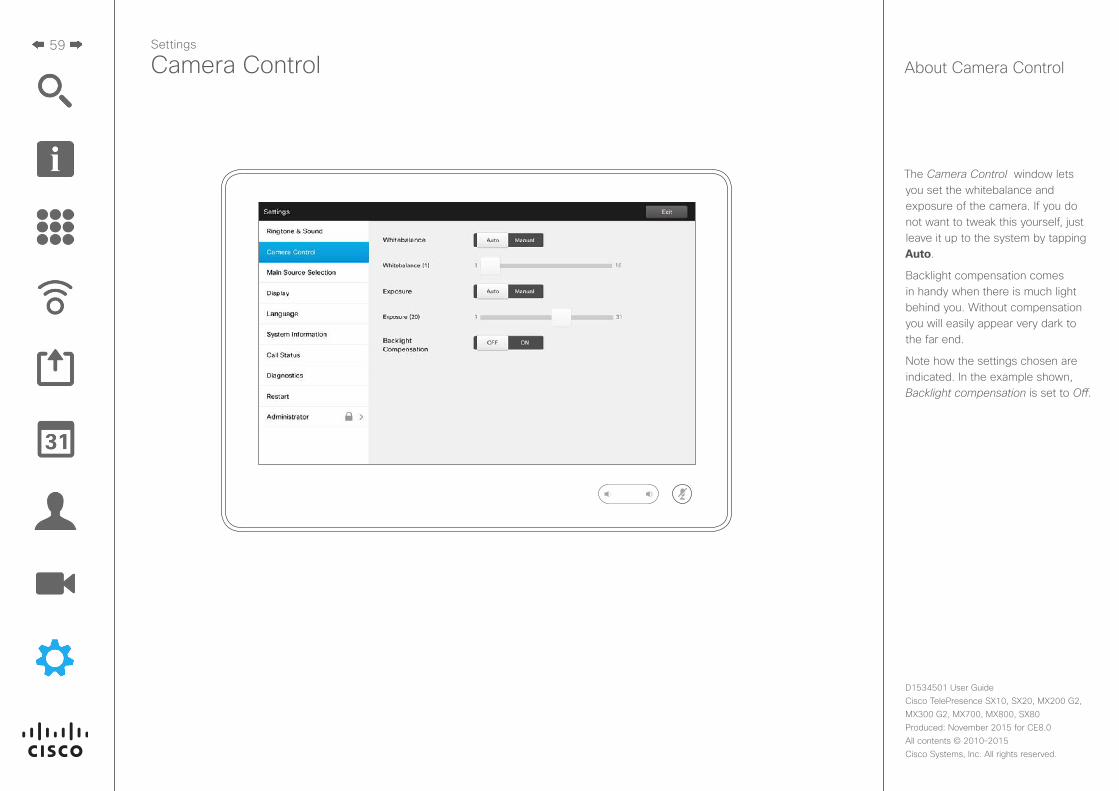
The Camera Control window lets you set the whitebalance and exposure of the camera. If you do not want to tweak this yourself, just leave it up to the system by tapping Auto.
Backlight compensation comes in handy when there is much light behind you. Without compensation you will easily appear very dark to the far end.
Note how the settings chosen are indicated. In the example shown, Backlight compensation is set to Off.
About Camera Control
60
D1534501 User Guide Cisco TelePresence SX10, SX20, MX200 G2, MX300 G2, MX700, MX800, SX80Produced: November 2015 for CE8.0All contents © 2010–2015 Cisco Systems, Inc. All rights reserved.
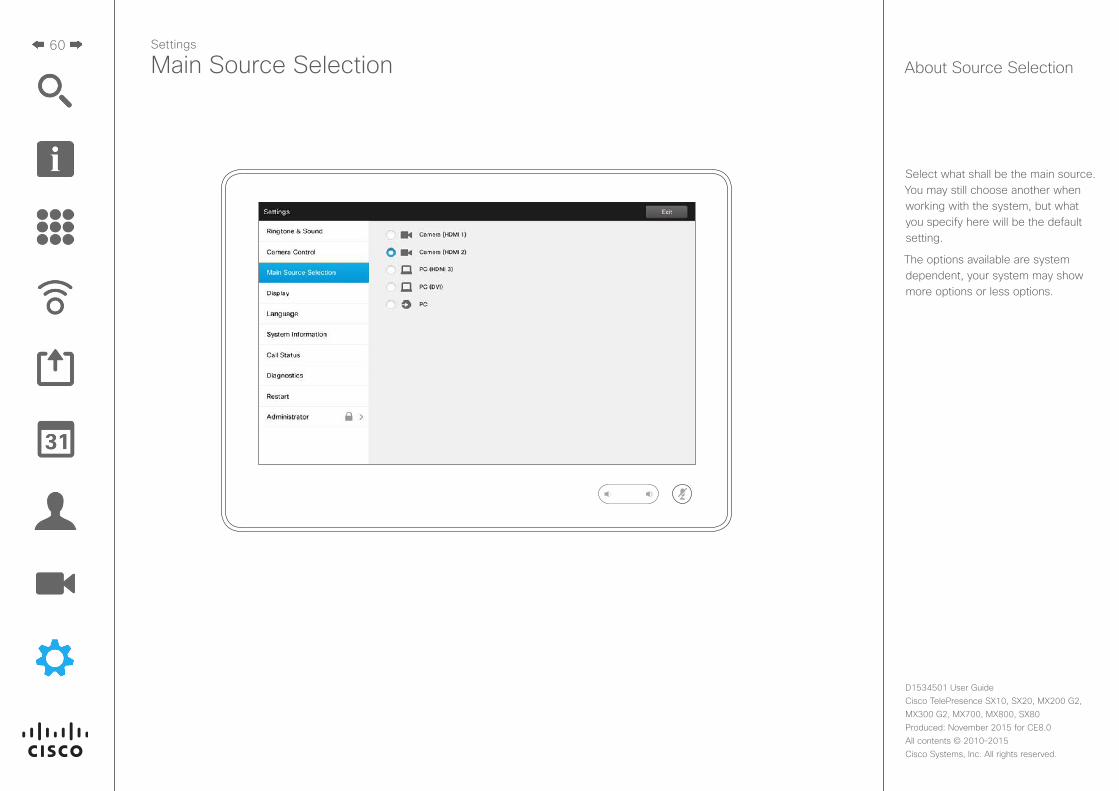
Select what shall be the main source. You may still choose another when working with the system, but what you specify here will be the default setting.
The options available are system dependent, your system may show more options or less options.
Main Source SelectionSettings
About Source Selection
61
D1534501 User Guide Cisco TelePresence SX10, SX20, MX200 G2, MX300 G2, MX700, MX800, SX80Produced: November 2015 for CE8.0All contents © 2010–2015 Cisco Systems, Inc. All rights reserved.
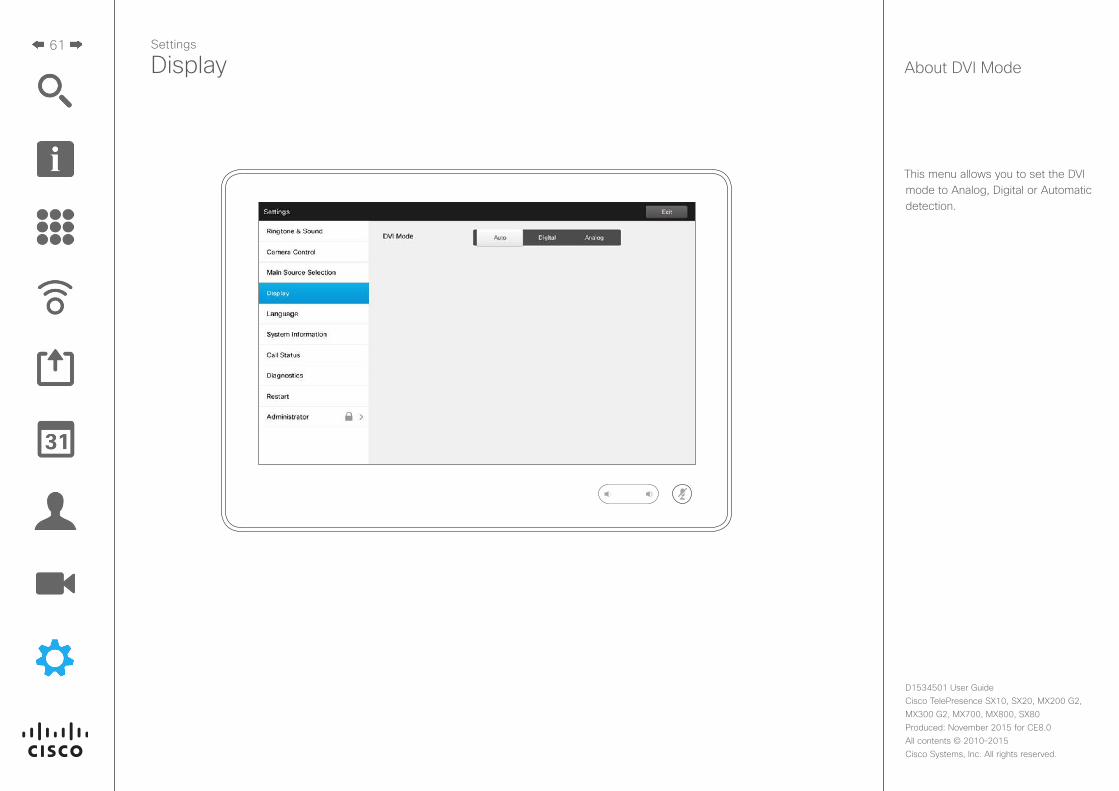
This menu allows you to set the DVI mode to Analog, Digital or Automatic detection.
DisplaySettings
About DVI Mode
62
D1534501 User Guide Cisco TelePresence SX10, SX20, MX200 G2, MX300 G2, MX700, MX800, SX80Produced: November 2015 for CE8.0All contents © 2010–2015 Cisco Systems, Inc. All rights reserved.
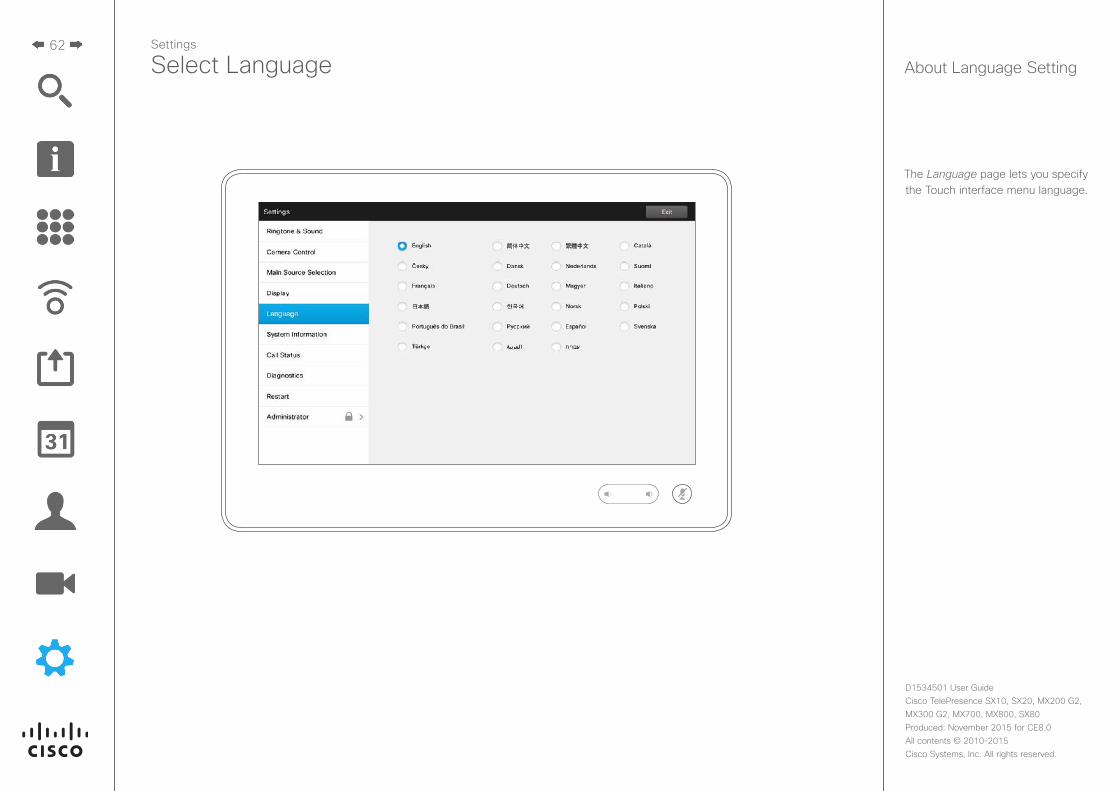
The Language page lets you specify the Touch interface menu language.
Settings
Select Language About Language Setting
63
D1534501 User Guide Cisco TelePresence SX10, SX20, MX200 G2, MX300 G2, MX700, MX800, SX80Produced: November 2015 for CE8.0All contents © 2010–2015 Cisco Systems, Inc. All rights reserved.
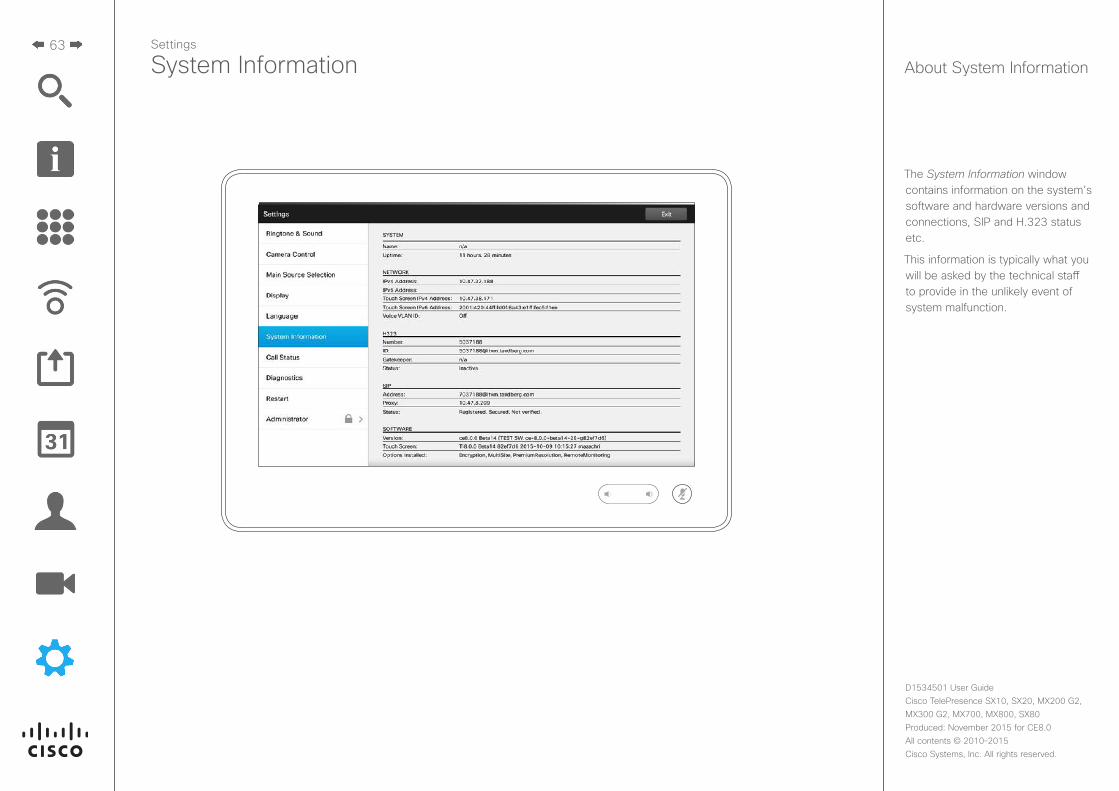
The System Information window contains information on the system’s software and hardware versions and connections, SIP and H.323 status etc.
This information is typically what you will be asked by the technical staff to provide in the unlikely event of system malfunction.
Settings
System Information About System Information
64
D1534501 User Guide Cisco TelePresence SX10, SX20, MX200 G2, MX300 G2, MX700, MX800, SX80Produced: November 2015 for CE8.0All contents © 2010–2015 Cisco Systems, Inc. All rights reserved.
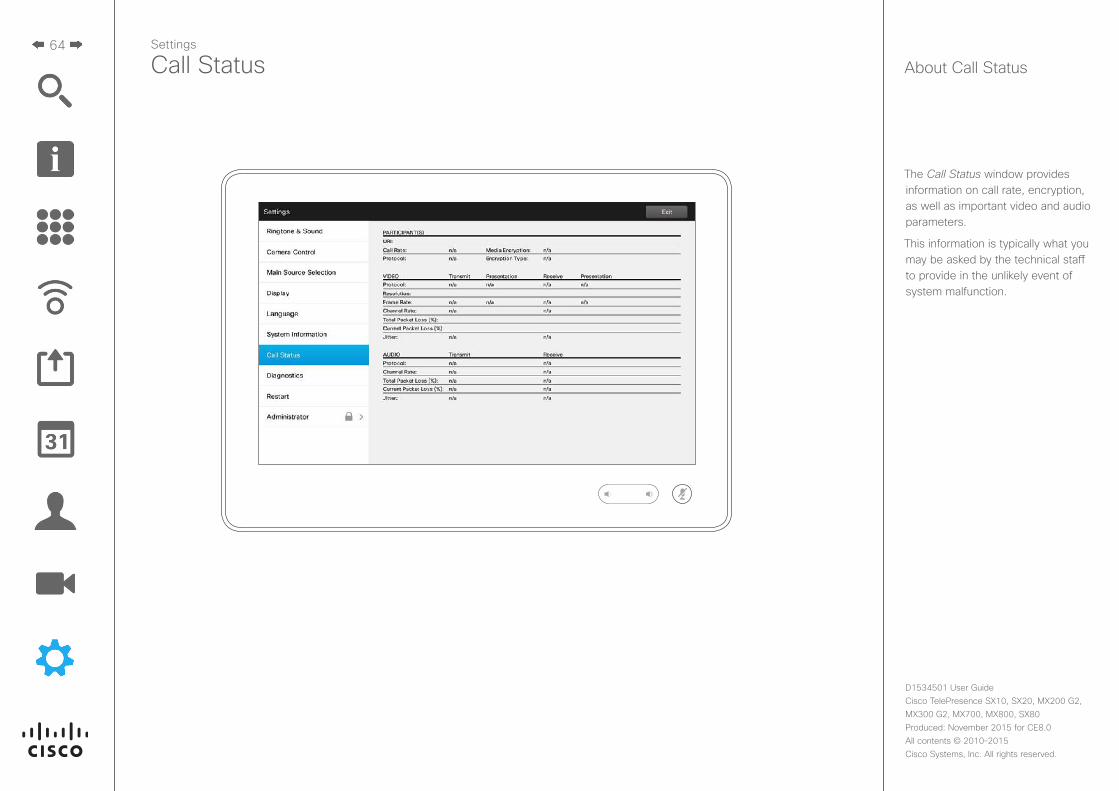
The Call Status window provides information on call rate, encryption, as well as important video and audio parameters.
This information is typically what you may be asked by the technical staff to provide in the unlikely event of system malfunction.
Settings
Call Status About Call Status
65
D1534501 User Guide Cisco TelePresence SX10, SX20, MX200 G2, MX300 G2, MX700, MX800, SX80Produced: November 2015 for CE8.0All contents © 2010–2015 Cisco Systems, Inc. All rights reserved.
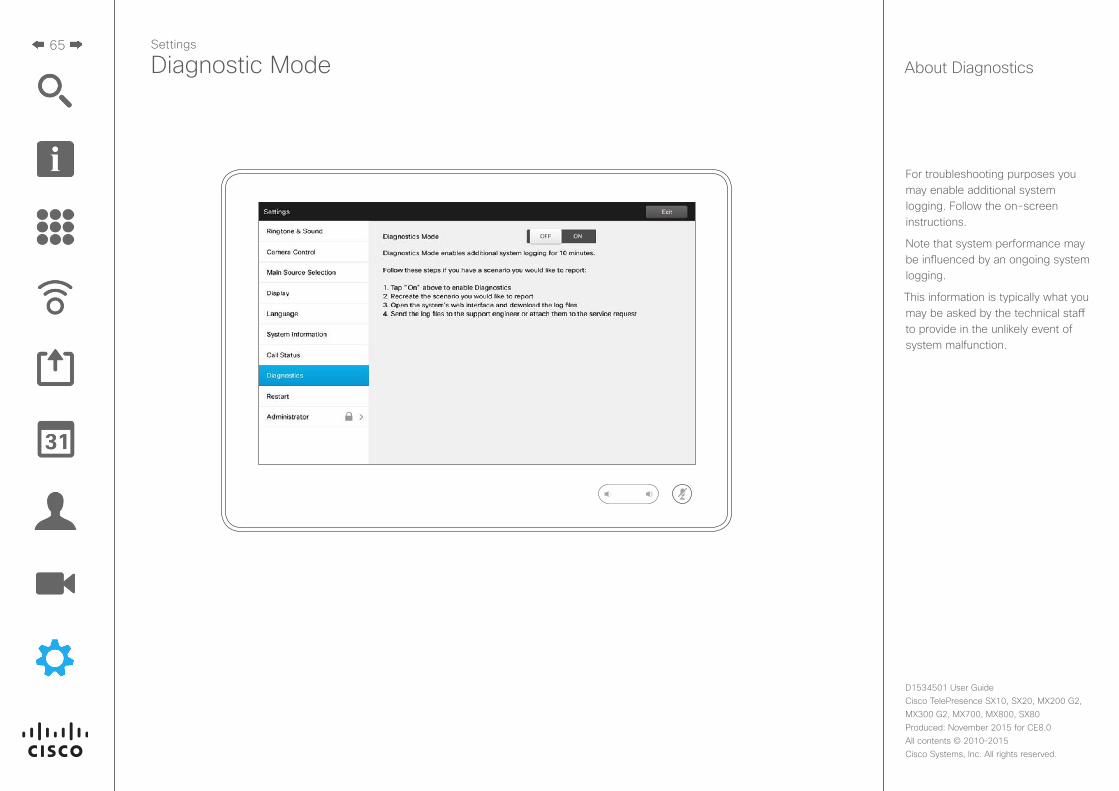
For troubleshooting purposes you may enable additional system logging. Follow the on-screen instructions.
Note that system performance may be influenced by an ongoing system logging.
This information is typically what you may be asked by the technical staff to provide in the unlikely event of system malfunction.
Settings
Diagnostic Mode About Diagnostics
66
D1534501 User Guide Cisco TelePresence SX10, SX20, MX200 G2, MX300 G2, MX700, MX800, SX80Produced: November 2015 for CE8.0All contents © 2010–2015 Cisco Systems, Inc. All rights reserved.
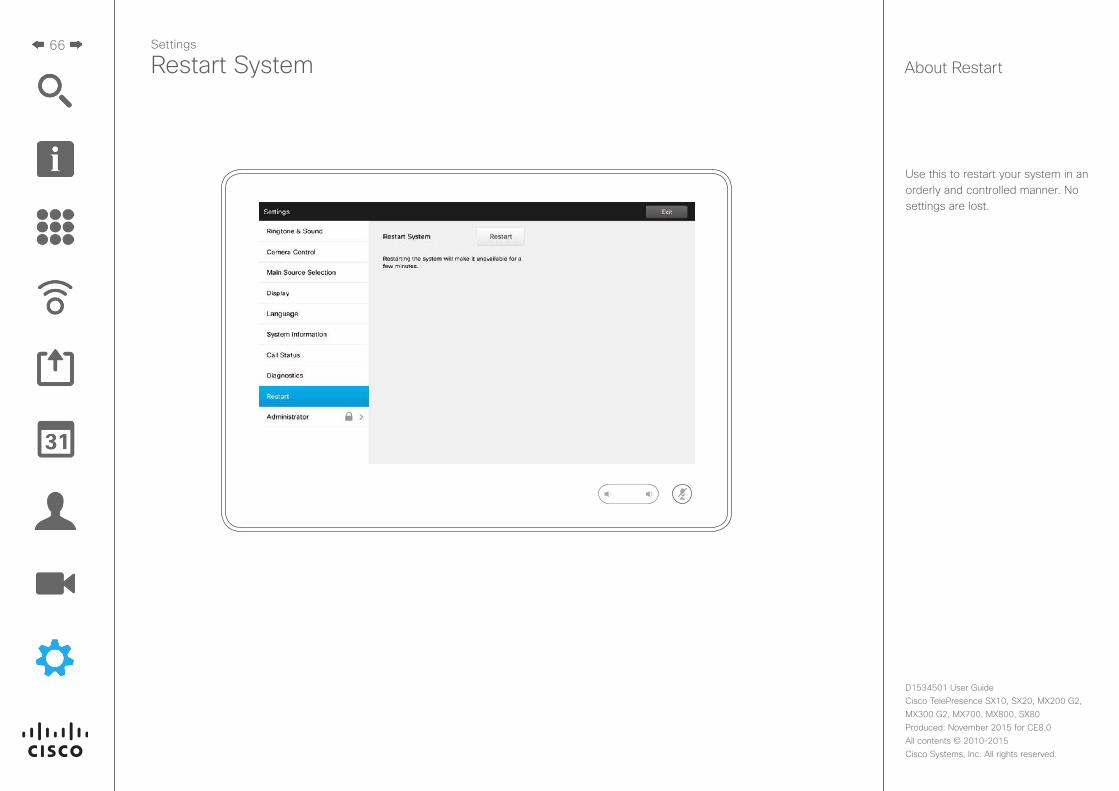
Use this to restart your system in an orderly and controlled manner. No settings are lost.
Settings
Restart System About Restart
67
D1534501 User Guide Cisco TelePresence SX10, SX20, MX200 G2, MX300 G2, MX700, MX800, SX80Produced: November 2015 for CE8.0All contents © 2010–2015 Cisco Systems, Inc. All rights reserved.
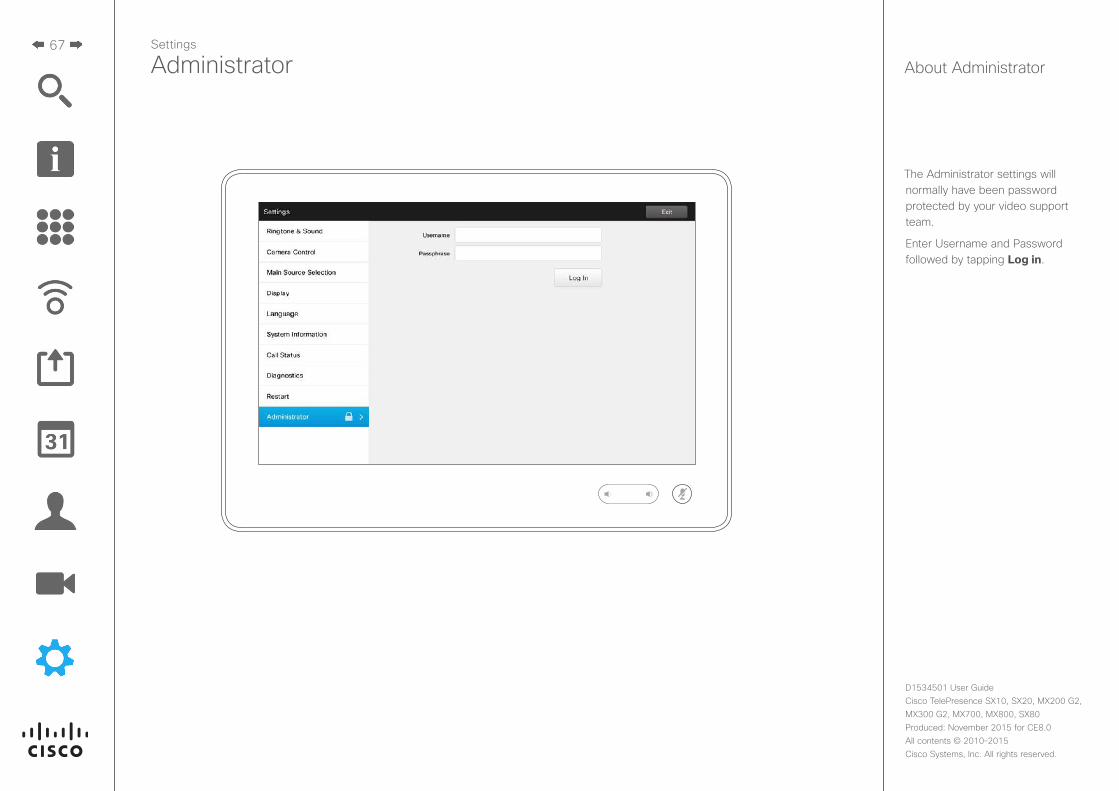
The Administrator settings will normally have been password protected by your video support team.
Enter Username and Password followed by tapping Log in.
Settings
Administrator About Administrator
68
D1534501 User Guide Cisco TelePresence SX10, SX20, MX200 G2, MX300 G2, MX700, MX800, SX80Produced: November 2015 for CE8.0All contents © 2010–2015 Cisco Systems, Inc. All rights reserved.
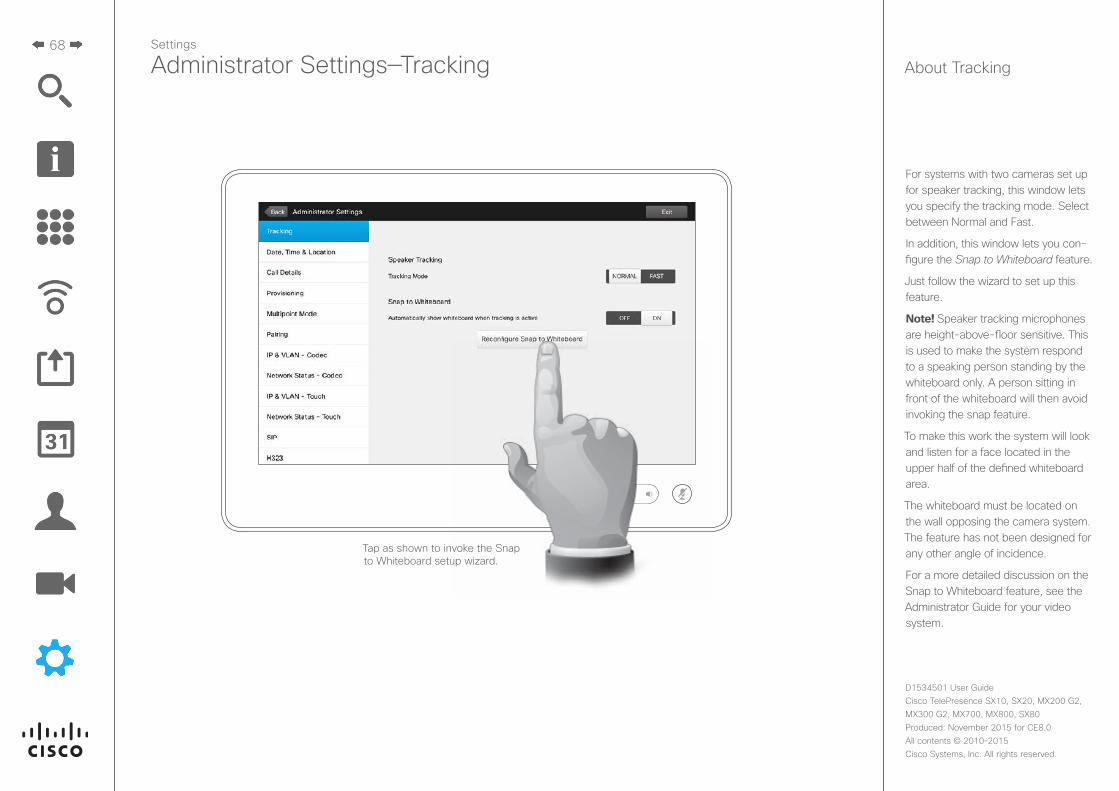
For systems with two cameras set up for speaker tracking, this window lets you specify the tracking mode. Select between Normal and Fast.
In addition, this window lets you con-figure the Snap to Whiteboard feature.
Just follow the wizard to set up this feature.
Note! Speaker tracking microphones are height-above-floor sensitive. This is used to make the system respond to a speaking person standing by the whiteboard only. A person sitting in front of the whiteboard will then avoid invoking the snap feature.
To make this work the system will look and listen for a face located in the upper half of the defined whiteboard area.
The whiteboard must be located on the wall opposing the camera system. The feature has not been designed for any other angle of incidence.
For a more detailed discussion on the Snap to Whiteboard feature, see the Administrator Guide for your video system.
Settings
Administrator Settings—Tracking About Tracking
Tap as shown to invoke the Snap to Whiteboard setup wizard.
69
D1534501 User Guide Cisco TelePresence SX10, SX20, MX200 G2, MX300 G2, MX700, MX800, SX80Produced: November 2015 for CE8.0All contents © 2010–2015 Cisco Systems, Inc. All rights reserved.
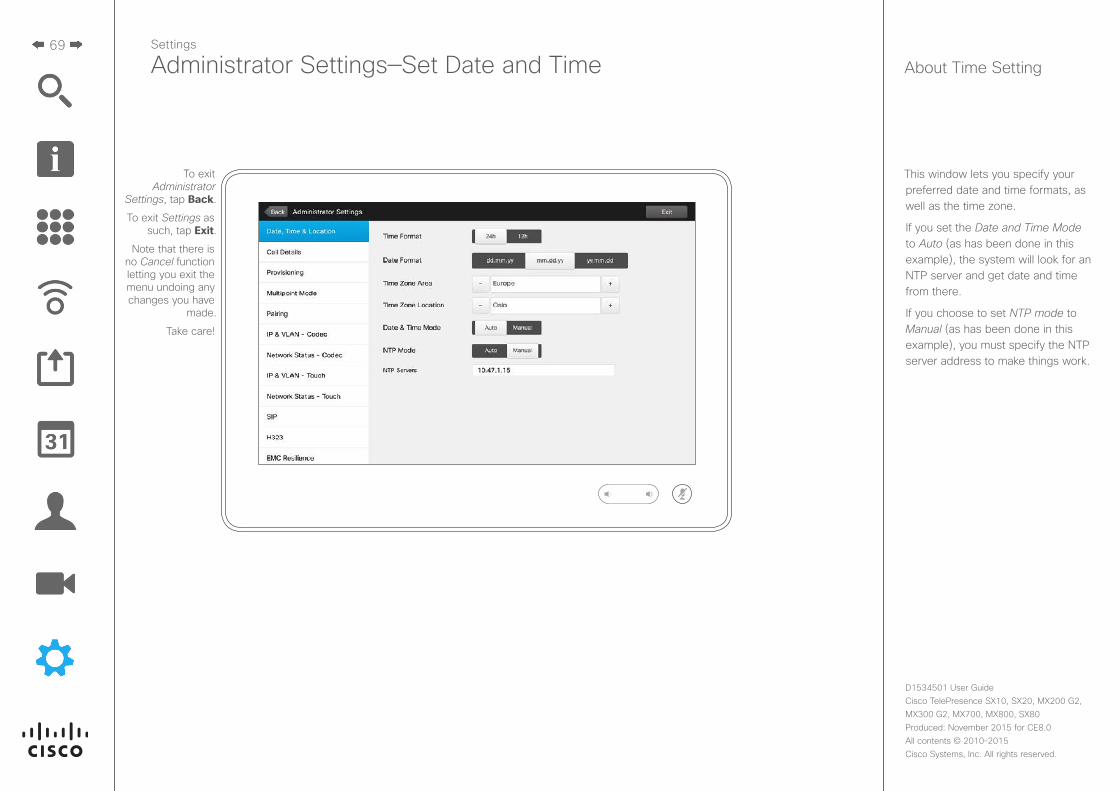
This window lets you specify your preferred date and time formats, as well as the time zone.
If you set the Date and Time Mode to Auto (as has been done in this example), the system will look for an NTP server and get date and time from there.
If you choose to set NTP mode to Manual (as has been done in this example), you must specify the NTP server address to make things work.
Settings
Administrator Settings—Set Date and Time About Time Setting
To exit Administrator
Settings, tap Back.
To exit Settings as such, tap Exit.
Note that there is no Cancel function letting you exit the menu undoing any changes you have
made.
Take care!
70
D1534501 User Guide Cisco TelePresence SX10, SX20, MX200 G2, MX300 G2, MX700, MX800, SX80Produced: November 2015 for CE8.0All contents © 2010–2015 Cisco Systems, Inc. All rights reserved.
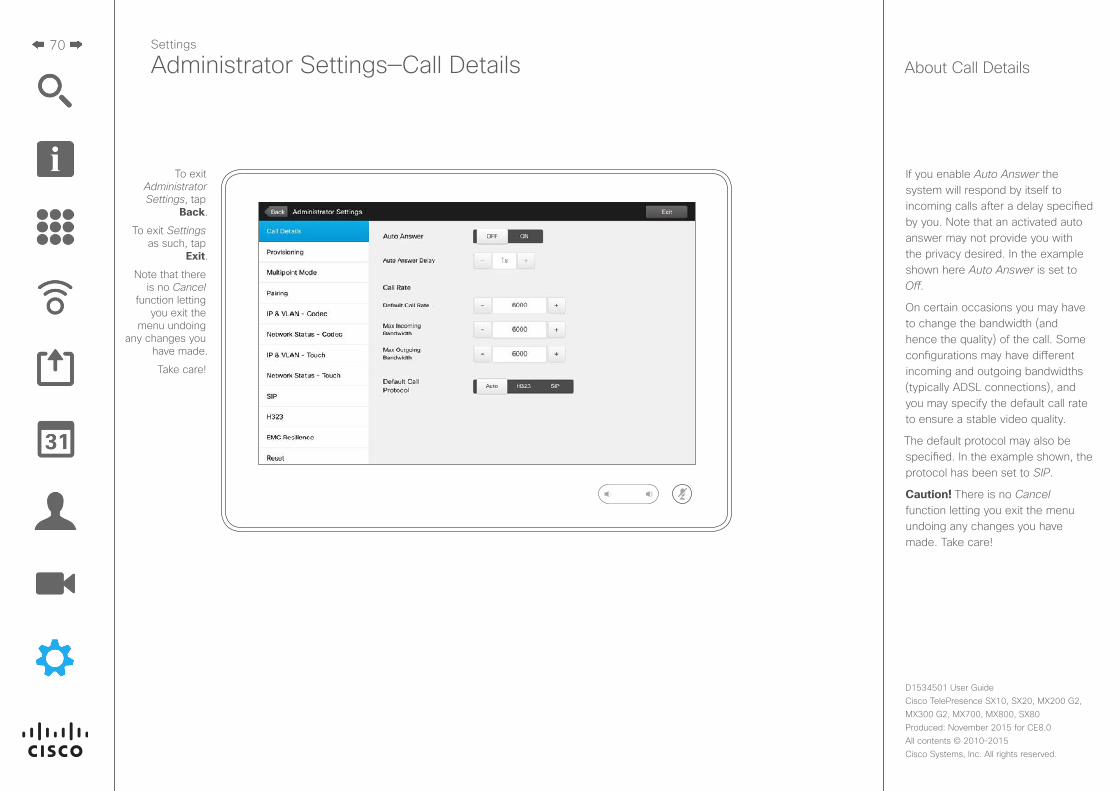
If you enable Auto Answer the system will respond by itself to incoming calls after a delay specified by you. Note that an activated auto answer may not provide you with the privacy desired. In the example shown here Auto Answer is set to Off.
On certain occasions you may have to change the bandwidth (and hence the quality) of the call. Some configurations may have different incoming and outgoing bandwidths (typically ADSL connections), and you may specify the default call rate to ensure a stable video quality.
The default protocol may also be specified. In the example shown, the protocol has been set to SIP.
Caution! There is no Cancel function letting you exit the menu undoing any changes you have made. Take care!
Settings
Administrator Settings—Call Details About Call Details
To exit Administrator Settings, tap
Back.
To exit Settings as such, tap
Exit.
Note that there is no Cancel
function letting you exit the
menu undoing any changes you
have made.
Take care!
71
D1534501 User Guide Cisco TelePresence SX10, SX20, MX200 G2, MX300 G2, MX700, MX800, SX80Produced: November 2015 for CE8.0All contents © 2010–2015 Cisco Systems, Inc. All rights reserved.
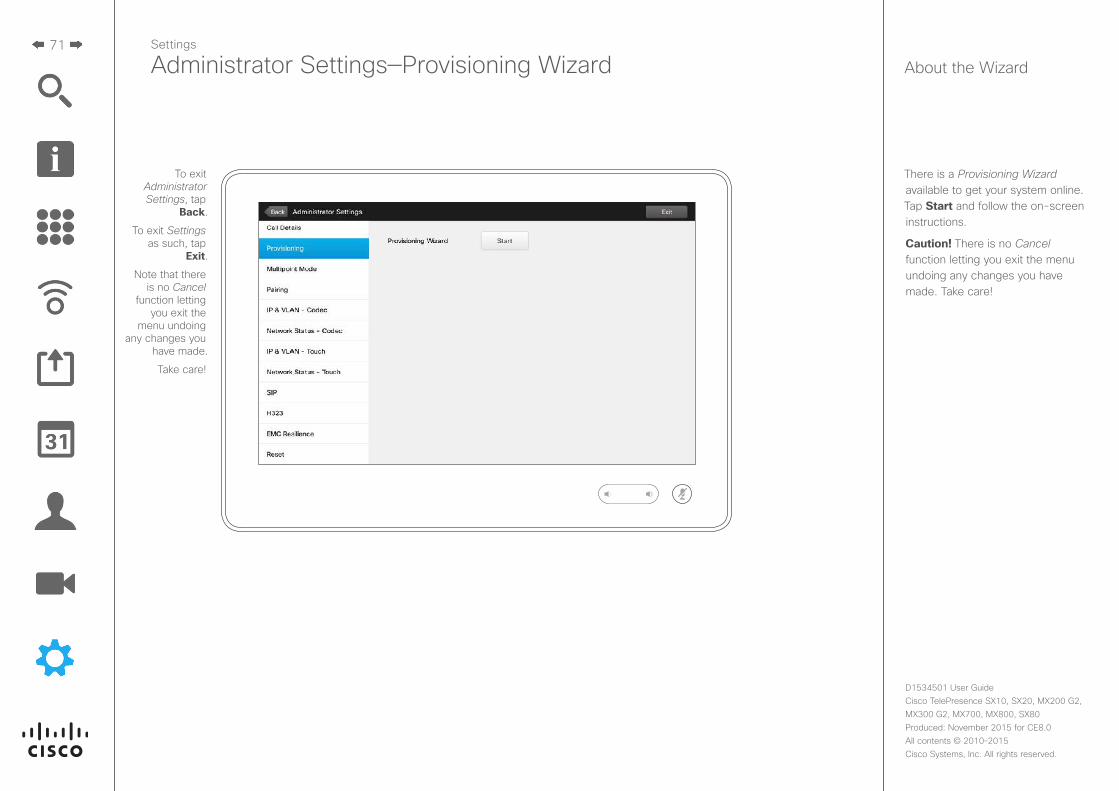
There is a Provisioning Wizard available to get your system online. Tap Start and follow the on-screen instructions.
Caution! There is no Cancel function letting you exit the menu undoing any changes you have made. Take care!
Settings
Administrator Settings—Provisioning Wizard About the Wizard
To exit Administrator Settings, tap
Back.
To exit Settings as such, tap
Exit.
Note that there is no Cancel
function letting you exit the
menu undoing any changes you
have made.
Take care!
72
D1534501 User Guide Cisco TelePresence SX10, SX20, MX200 G2, MX300 G2, MX700, MX800, SX80Produced: November 2015 for CE8.0All contents © 2010–2015 Cisco Systems, Inc. All rights reserved.
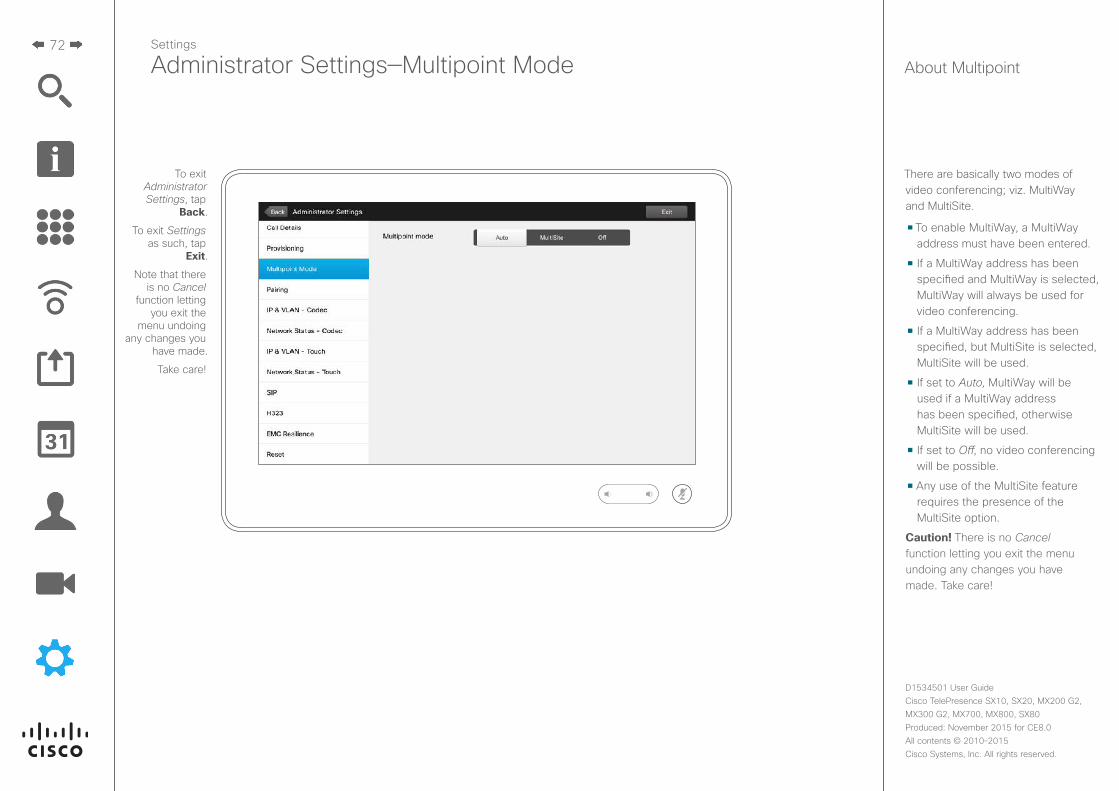
There are basically two modes of video conferencing; viz. MultiWay and MultiSite.
• To enable MultiWay, a MultiWay address must have been entered.
• If a MultiWay address has been specified and MultiWay is selected, MultiWay will always be used for video conferencing.
• If a MultiWay address has been specified, but MultiSite is selected, MultiSite will be used.
• If set to Auto, MultiWay will be used if a MultiWay address has been specified, otherwise MultiSite will be used.
• If set to Off, no video conferencing will be possible.
• Any use of the MultiSite feature requires the presence of the MultiSite option.
Caution! There is no Cancel function letting you exit the menu undoing any changes you have made. Take care!
Settings
Administrator Settings—Multipoint Mode About Multipoint
To exit Administrator Settings, tap
Back.
To exit Settings as such, tap
Exit.
Note that there is no Cancel
function letting you exit the
menu undoing any changes you
have made.
Take care!

73
D1534501 User Guide Cisco TelePresence SX10, SX20, MX200 G2, MX300 G2, MX700, MX800, SX80Produced: November 2015 for CE8.0All contents © 2010–2015 Cisco Systems, Inc. All rights reserved.
This window shows relevant pairing information.
Settings
Administrator Settings—Pairing About Pairing
To exit Administrator Settings, tap
Back.
To exit Settings as such, tap
Exit.
Note that there is no Cancel
function letting you exit the
menu undoing any changes you
have made.
Take care!
74
D1534501 User Guide Cisco TelePresence SX10, SX20, MX200 G2, MX300 G2, MX700, MX800, SX80Produced: November 2015 for CE8.0All contents © 2010–2015 Cisco Systems, Inc. All rights reserved.
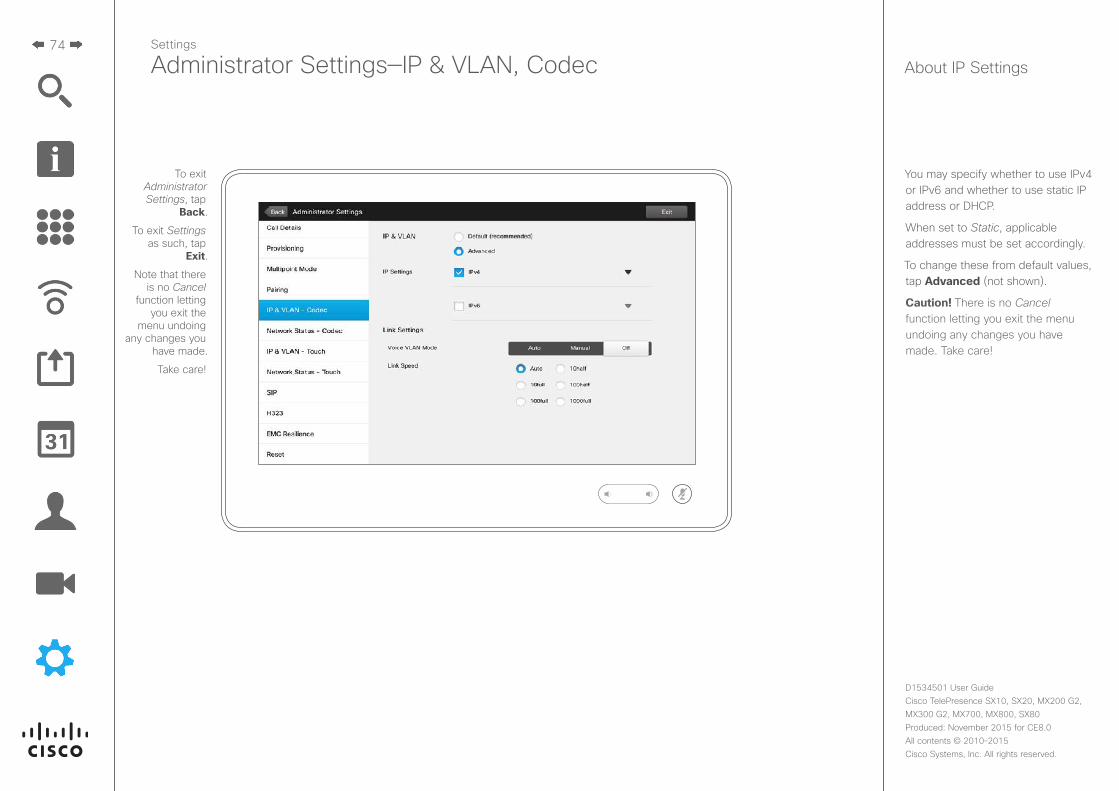
You may specify whether to use IPv4 or IPv6 and whether to use static IP address or DHCP.
When set to Static, applicable addresses must be set accordingly.
To change these from default values, tap Advanced (not shown).
Caution! There is no Cancel function letting you exit the menu undoing any changes you have made. Take care!
Settings
Administrator Settings—IP & VLAN, Codec About IP Settings
To exit Administrator Settings, tap
Back.
To exit Settings as such, tap
Exit.
Note that there is no Cancel
function letting you exit the
menu undoing any changes you
have made.
Take care!
75
D1534501 User Guide Cisco TelePresence SX10, SX20, MX200 G2, MX300 G2, MX700, MX800, SX80Produced: November 2015 for CE8.0All contents © 2010–2015 Cisco Systems, Inc. All rights reserved.
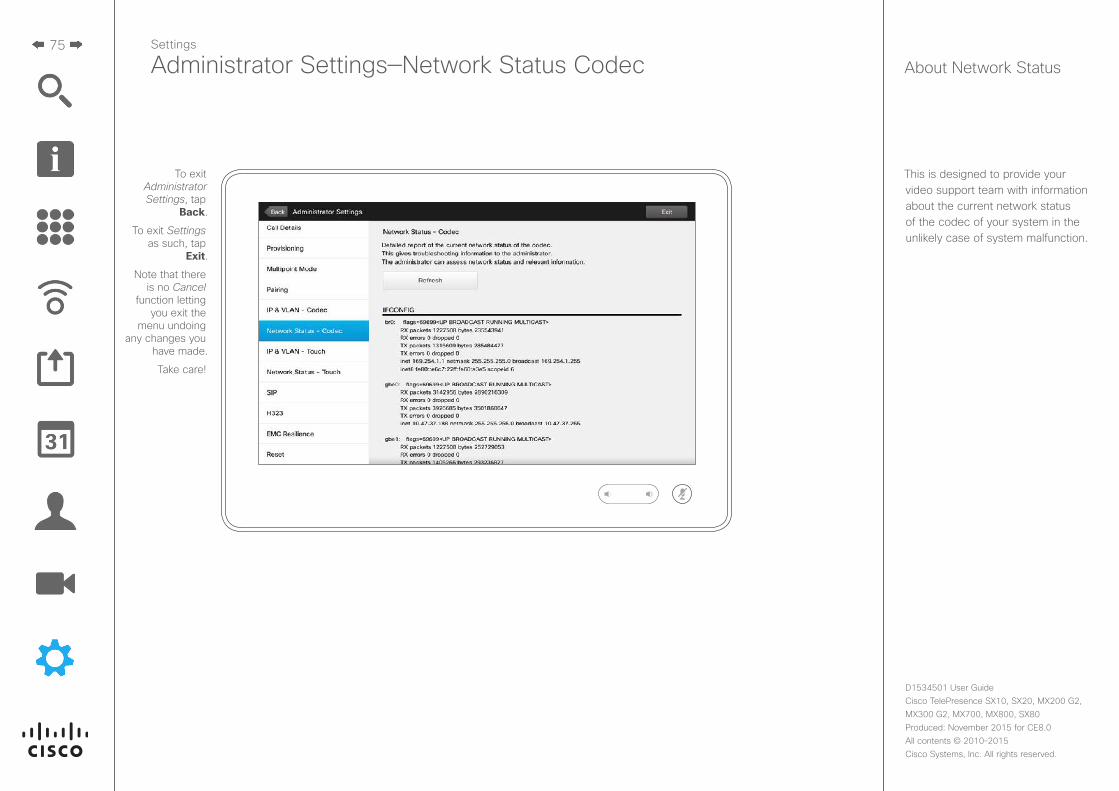
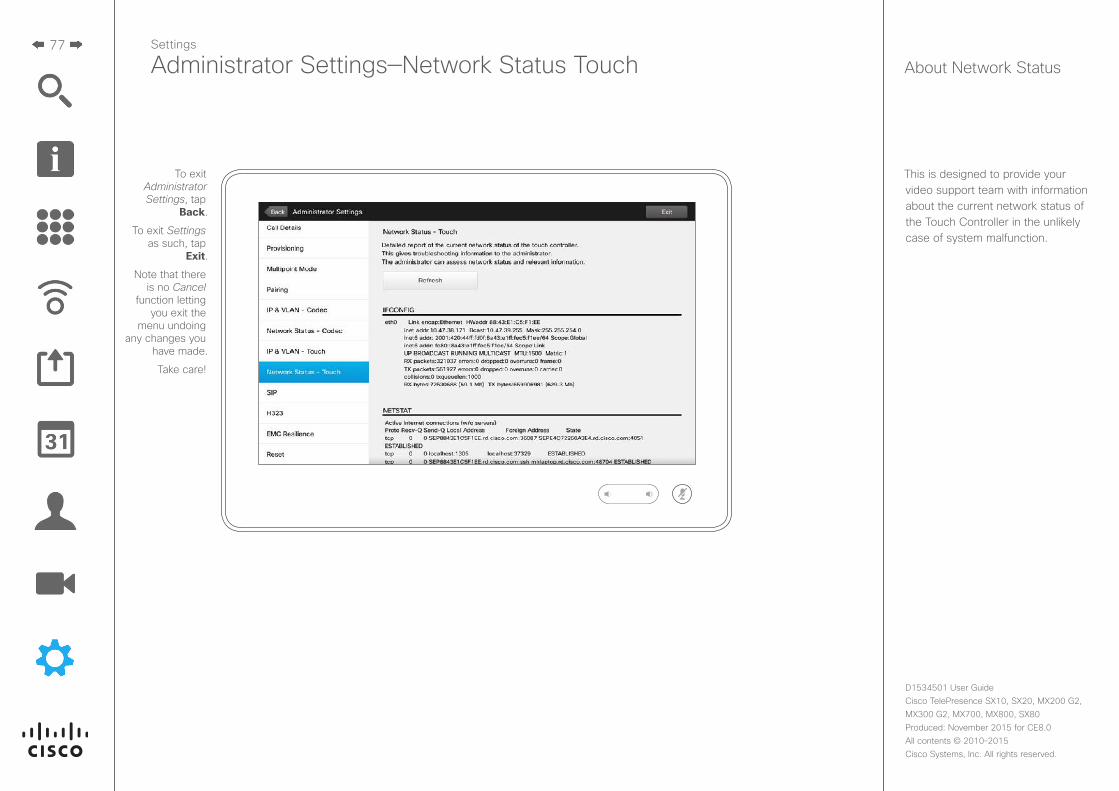
This is designed to provide your video support team with information about the current network status of the codec of your system in the unlikely case of system malfunction.
Settings
Administrator Settings—Network Status Codec About Network Status
To exit Administrator Settings, tap
Back.
To exit Settings as such, tap
Exit.
Note that there is no Cancel
function letting you exit the
menu undoing any changes you
have made.
Take care!
76
D1534501 User Guide Cisco TelePresence SX10, SX20, MX200 G2, MX300 G2, MX700, MX800, SX80Produced: November 2015 for CE8.0All contents © 2010–2015 Cisco Systems, Inc. All rights reserved.
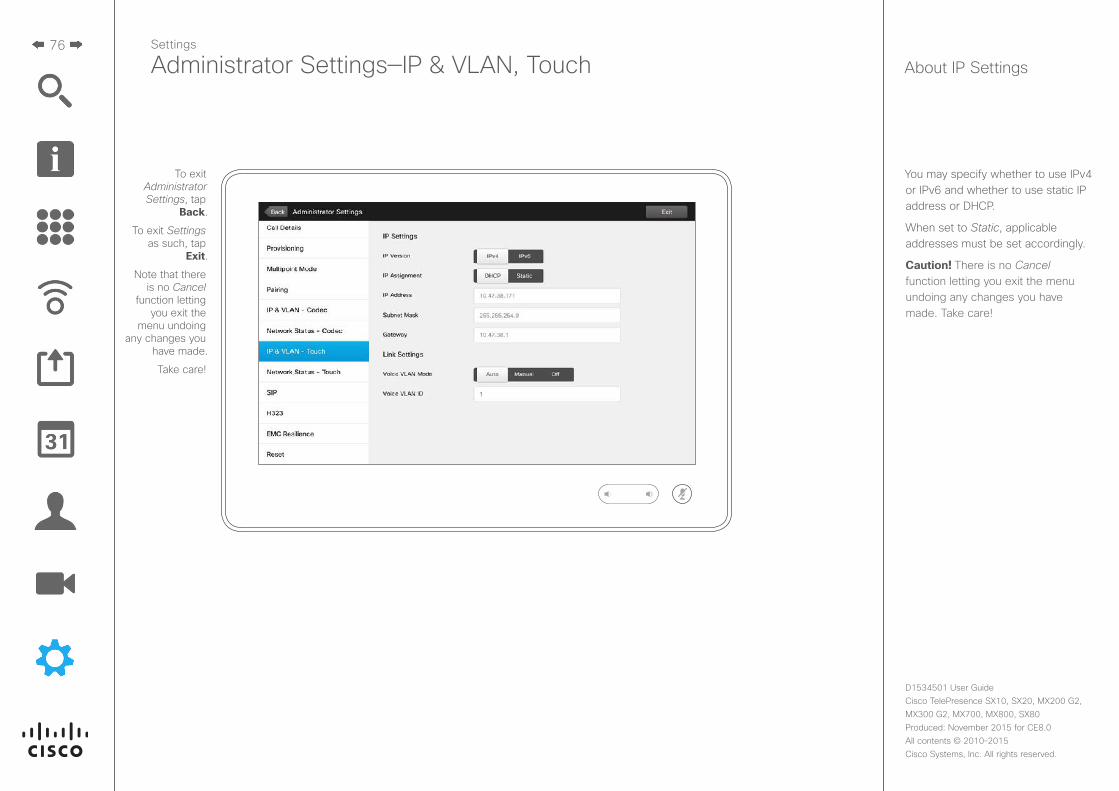
You may specify whether to use IPv4 or IPv6 and whether to use static IP address or DHCP.
When set to Static, applicable addresses must be set accordingly.
Caution! There is no Cancel function letting you exit the menu undoing any changes you have made. Take care!
Settings
Administrator Settings—IP & VLAN, Touch About IP Settings
To exit Administrator Settings, tap
Back.
To exit Settings as such, tap
Exit.
Note that there is no Cancel
function letting you exit the
menu undoing any changes you
have made.
Take care!
77
D1534501 User Guide Cisco TelePresence SX10, SX20, MX200 G2, MX300 G2, MX700, MX800, SX80Produced: November 2015 for CE8.0All contents © 2010–2015 Cisco Systems, Inc. All rights reserved.
This is designed to provide your video support team with information about the current network status of the Touch Controller in the unlikely case of system malfunction.
Settings
Administrator Settings—Network Status Touch About Network Status
To exit Administrator Settings, tap
Back.
To exit Settings as such, tap
Exit.
Note that there is no Cancel
function letting you exit the
menu undoing any changes you
have made.
Take care!
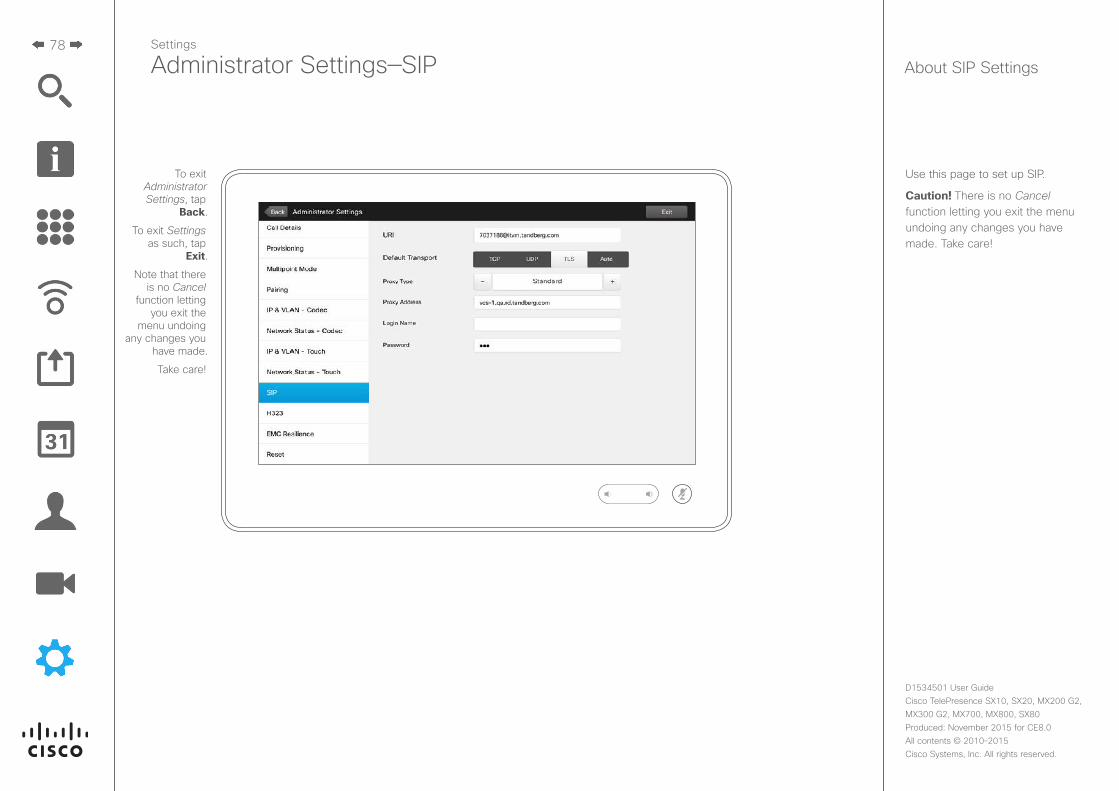
78
D1534501 User Guide Cisco TelePresence SX10, SX20, MX200 G2, MX300 G2, MX700, MX800, SX80Produced: November 2015 for CE8.0All contents © 2010–2015 Cisco Systems, Inc. All rights reserved.
Use this page to set up SIP.
Caution! There is no Cancel function letting you exit the menu undoing any changes you have made. Take care!
Settings
Administrator Settings—SIP About SIP Settings
To exit Administrator Settings, tap
Back.
To exit Settings as such, tap
Exit.
Note that there is no Cancel
function letting you exit the
menu undoing any changes you
have made.
Take care!
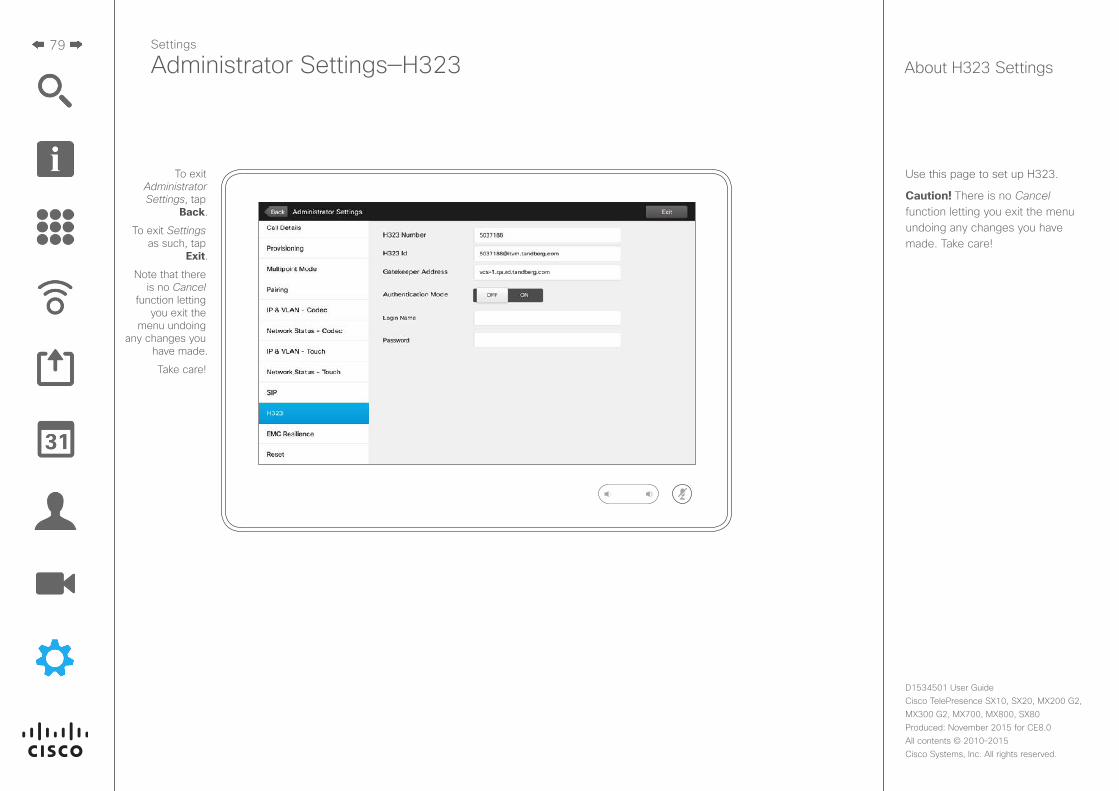
79
D1534501 User Guide Cisco TelePresence SX10, SX20, MX200 G2, MX300 G2, MX700, MX800, SX80Produced: November 2015 for CE8.0All contents © 2010–2015 Cisco Systems, Inc. All rights reserved.
Use this page to set up H323.
Caution! There is no Cancel function letting you exit the menu undoing any changes you have made. Take care!
Settings
Administrator Settings—H323 About H323 Settings
To exit Administrator Settings, tap
Back.
To exit Settings as such, tap
Exit.
Note that there is no Cancel
function letting you exit the
menu undoing any changes you
have made.
Take care!
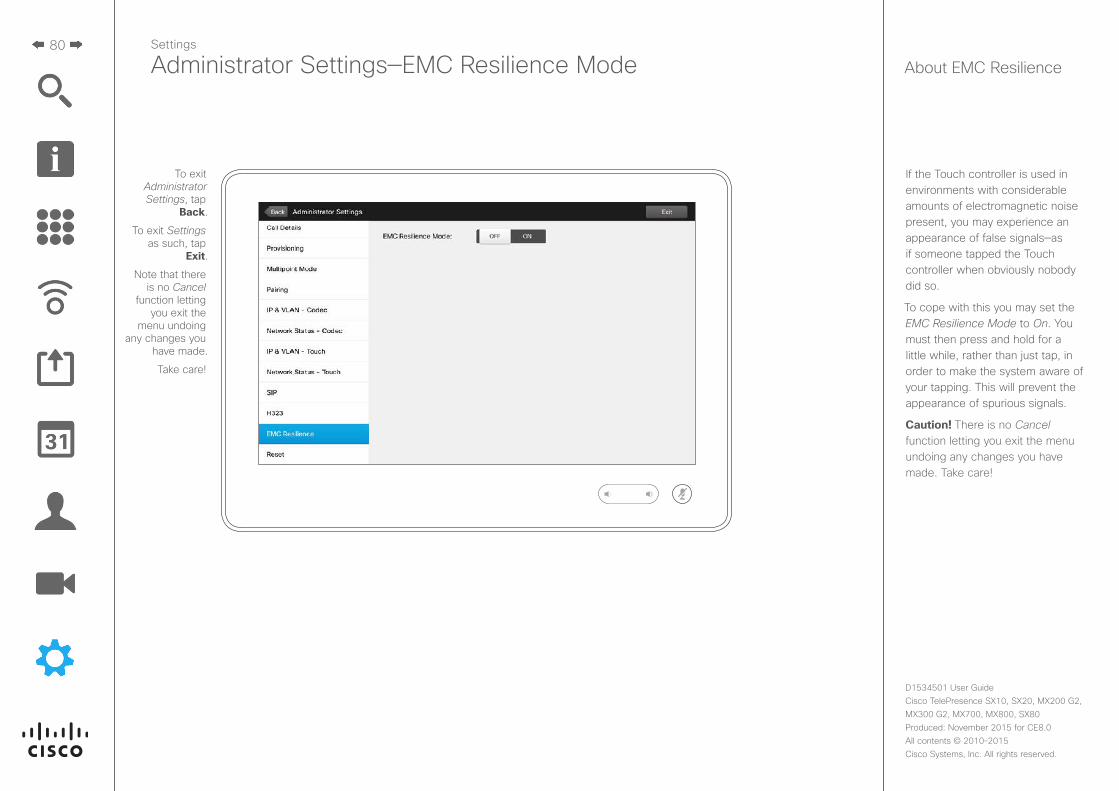
80
D1534501 User Guide Cisco TelePresence SX10, SX20, MX200 G2, MX300 G2, MX700, MX800, SX80Produced: November 2015 for CE8.0All contents © 2010–2015 Cisco Systems, Inc. All rights reserved.
If the Touch controller is used in environments with considerable amounts of electromagnetic noise present, you may experience an appearance of false signals—as if someone tapped the Touch controller when obviously nobody did so.
To cope with this you may set the EMC Resilience Mode to On. You must then press and hold for a little while, rather than just tap, in order to make the system aware of your tapping. This will prevent the appearance of spurious signals.
Caution! There is no Cancel function letting you exit the menu undoing any changes you have made. Take care!
Settings
Administrator Settings—EMC Resilience Mode About EMC Resilience
To exit Administrator Settings, tap
Back.
To exit Settings as such, tap
Exit.
Note that there is no Cancel
function letting you exit the
menu undoing any changes you
have made.
Take care!
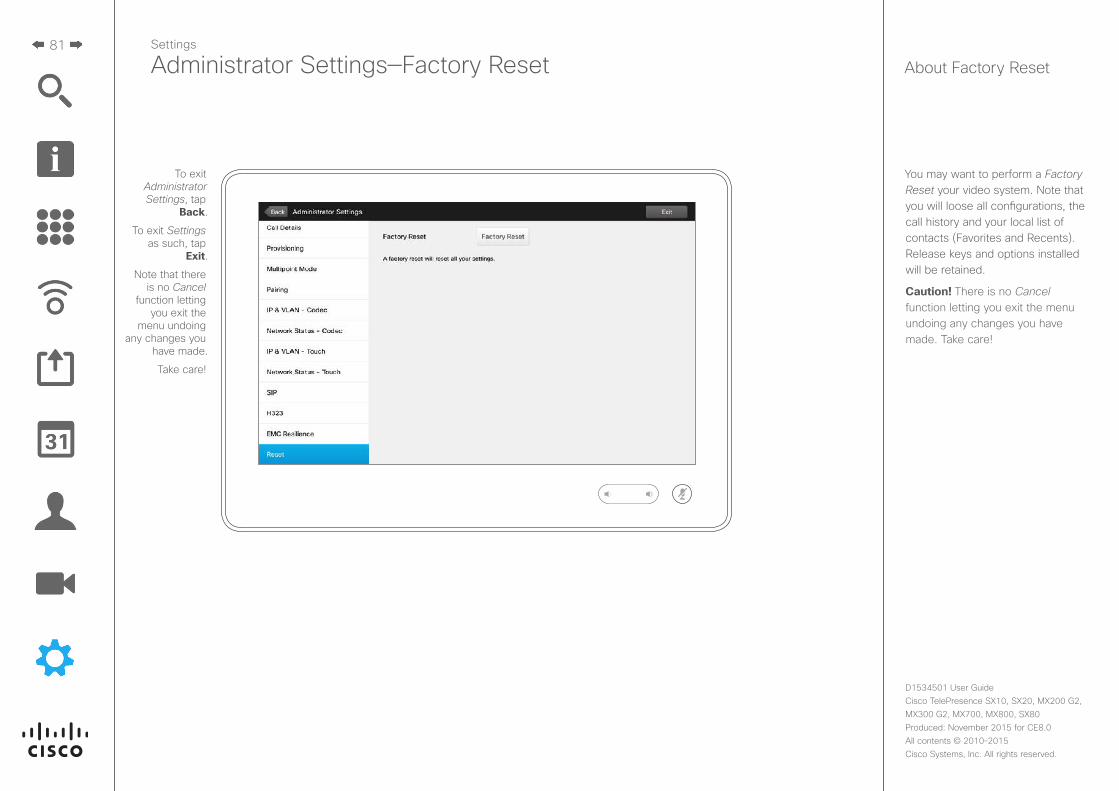
81
D1534501 User Guide Cisco TelePresence SX10, SX20, MX200 G2, MX300 G2, MX700, MX800, SX80Produced: November 2015 for CE8.0All contents © 2010–2015 Cisco Systems, Inc. All rights reserved.
You may want to perform a Factory Reset your video system. Note that you will loose all configurations, the call history and your local list of contacts (Favorites and Recents). Release keys and options installed will be retained.
Caution! There is no Cancel function letting you exit the menu undoing any changes you have made. Take care!
Settings
Administrator Settings—Factory Reset About Factory Reset
To exit Administrator Settings, tap
Back.
To exit Settings as such, tap
Exit.
Note that there is no Cancel
function letting you exit the
menu undoing any changes you
have made.
Take care!
Cisco has more than 200 offices worldwide. Addresses, phone numbers, and fax numbers are listed on the Cisco Website at www.cisco.com/go/offices.
Cisco and the Cisco Logo are trademarks of Cisco Systems, Inc. and/or its affiliates in the U.S. and other countries. A listing of Cisco’s trademarks can be found at www.cisco.com/go/trademarks. Third party trademarks mentioned are the property of their respective owners. The use of the word partner does not imply a partnership relationship between Cisco and any other company. (1005R)
Americas Headquarters Cisco Systems, Inc. San Jose, CA
Asia Pacific Headquarters Cisco Systems (USA) Pte. Ltd. Singapore
Europe Headquarters Cisco Systems International BV Amsterdam, The Netherlands