cisco ip telephony training manual...cisco ip telephony training manual university of wisconsin –...
TRANSCRIPT

Cisco IP Telephony Training Manual University of Wisconsin – Whitewater, iCIT
- 1 - 8945 & 8961 Guide
Placing a call
To place a call on the Cisco IP Telephony (IPT) system you will follow similar dial patterns that are used with your existing Centrex line. For all on-campus calling (Centrex and IPT) you will dial the 4 digit extension. The only difference will be dialing a 9 before any off-campus phone number. You will no longer use an 8 to dial long distance numbers on the STS network. The IPT system knows what numbers should use STS and which ones should not. Reporting a problem
If you experience a problem while on a call or other issues with your phone please contact the campus computer Helpdesk at x4357. SoftKeys
Softkeys dynamically change based on the state your phone is in. These buttons are located on the bottom of the LCD screen. These keys control functionally and features of your phone. To activate press the button below the softkey. If you don’t see a softkey try pressing the “more” key if it is available. If you still can not find the softkey you are looking for it is most likely not a feature you can use in your phones current state. Status Messages
After setting certain options important messages will flash at the bottom of the screen for a few seconds after completion. Forwarding calls to another phone
When the phone is idle a softkey option titled “Forward All” is seen. To forward your phone press the soft-key below and dial the number you wish the phone to be forwarded to. To turn off the forward press the soft-key below “Forward All” again. When the phone is forwarding calls you will see a message flash for a few seconds indicating your line is forwarded.

- 2 - 8945 & 8961 Guide
Transferring a call
While on an incoming call press the “Transfer” button located on the bottom right of your phone. The current caller will be placed on hold. Once a transfer number has been dialed you can press the “Transfer” button at anytime to transfer the caller.
Initiating a conference call (ad-hoc)
An add-hoc conference call can have several participants and provides the same functionality as Centrex three-way calling or a six-way conference. The system is limited to a maximum conference call of 10 users. However, if you are scheduling a conference with more then 3 people it is recommended to use the UWW WebEx service. More information on this service can be found on the iCIT website. There are two methods to creating a conference call. Each method is explained below.
Method One (Conference)
While on a call press the Conference button. You will now hear a dial tone and the existing caller is placed on hold. Dial the number of the person you wish to conference in to the call. When the person picks up press the softkey below the “Conference” option to conference them into the original call or press “EndCall” to not conference them in. To return to the original caller if you did not conference in the new caller press the softkey below “Resume”. This method is the most common method when you want to add an additional caller into a call.
If you want to transfer a caller to another VoIP user’s voicemail directly, dial #8 + user’s 4 digit VoIP number.

- 3 - 8945 & 8961 Guide
Method Two (other callers call you)
While on a call have the other caller call you, answer their call this will place the initial caller on hold. Now press the conference button , use the up or down arrow key to select “highlight” the call that is on hold. Then press the “conference” softkey to add them to the active call. This method is commonly used when two or more people have already called you and you want to add them to a conference call.
Dial-in conference (WebEx)
With the addition of the WebEx service at UWW users are encouraged to use the WebEx service for dial-in meetings. WebEx meetings offer voice, web collaboration, and video for meetings. Users can mix and match WebEx functionality for whatever their needs may be for that conference. Information about WebEx can be found on the iCIT webpage.
Displaying users in a conference call (does not apply to WebEx)
To display the users currently in a conference call press the “View Details” softkey option (may have to press “more” first or if on a video conference you will need to press the “hide video” softkey first). A list of users connected to the conference will be displayed. The * next to a number signifies the conference initiator. If you are the conference initiator you will be see a softkey to “Remove” a user from the conference. To remove a user highlight their number and press the “Remove” softkey. Do Not Disturb (DND)
Do not disturb allows the user to put their phone in DND mode. While in this mode the phone will only beep once, flash the line light, or both when a call comes in. From your user settings webpage you can select how you want your phone to respond when a call comes in. To use this feature press the “DND” softkey on your phone while it is on-hook. You will see a status message that the phone is in DND. To remove DND press the softkey again.

- 4 - 8945 & 8961 Guide
Diverting a call to voicemail (Divert)
If you are at your desk and your phone begins to ring you have the option of immediately diverting the call to your voicemail if you don’t want to answer the phone. To use the feature press the “Divert” softkey when the phone is ringing. The caller will be immediately transferred to your voicemail. Call Park (Park)
Call park will temporarily park a call in the phone system so you can retrieve the call on a different phone. When you pickup a call on a phone you can press the “Park” sofkey option while connected to the caller. The caller will be placed on hold and your phone will display a message of “Call parked at XXXX”. Remember this number as it will be different each time you use park and you will need it to retrieve the call. On the phone you wish to have the call transferred to dial the park number that your phone displayed. Once the number is dialed the call will be transferred.
Checking your voicemail from the phone
If you have voicemail configured on your line you can check it from the phone. You will press the button. When you connect to the voicemail system it will ask you for your password. Further information on how to use the voicemail system is found in the voicemail training manual. Viewing call logs and using the corporate directory
To view your missed calls, received calls, placed calls, and intercom history press the button with a book on it. A menu will be displayed with each of the options as well as a personal and corporate directory option. You can search the corporate directory for users’ phone extensions. The corporate directory contains all staff contacts on campus.
You must have a voicemail account for this feature to work correctly.
A parked call only stays parked for 60 seconds. If it is not retrieved before the 60 second timer the original phone will ring. If the call is not answered the caller will be transferred to voicemail if the line has a voicemail account. Parked calls can be retrieved from any VoIP phone as long as the park number is known.

- 5 - 8945 & 8961 Guide
Accessing speed dial and other user settings
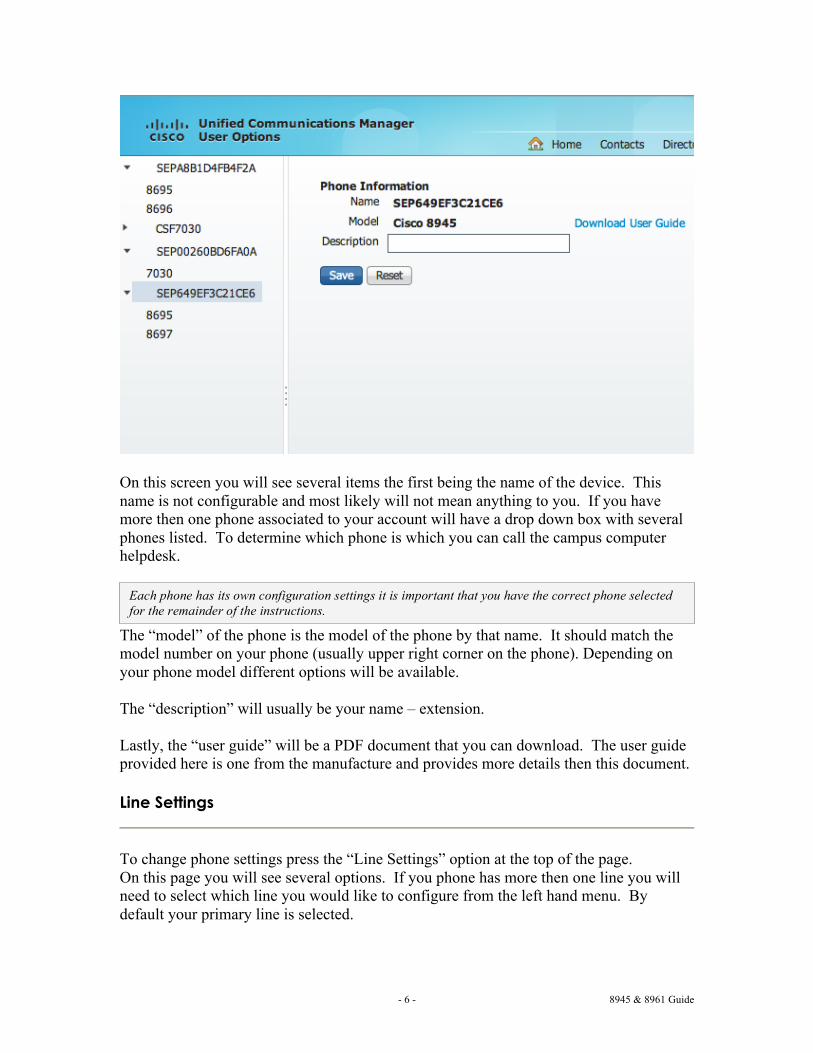
The remainder of this manual discusses the web interface to configure settings on your phone. To change your speed dial numbers and other user settings you will go to a configuration web page for your phone. The address of this page is https://phone.uww.edu/. NOTE: Off Campus users must use a VPN connection to access this site for information on setting up VPN contact the ICIT helpdesk at 472-4357 or [email protected]. You will be prompted for your User ID and Password. Your username and password is your campus Net-ID. For campus users that have a Net-ID that end with digits i.e. smithjr12 this and all voice related systems are case sensitive. This means you will need to enter your username like this “SmithJR12” to access the system. Once you are logged in you will see a screen similar to the one below.
To configure basic phone settings select the “Phone Settings” menu item. It will take you to a page like the one below.
- 6 - 8945 & 8961 Guide
On this screen you will see several items the first being the name of the device. This name is not configurable and most likely will not mean anything to you. If you have more then one phone associated to your account will have a drop down box with several phones listed. To determine which phone is which you can call the campus computer helpdesk.
The “model” of the phone is the model of the phone by that name. It should match the model number on your phone (usually upper right corner on the phone). Depending on your phone model different options will be available. The “description” will usually be your name – extension. Lastly, the “user guide” will be a PDF document that you can download. The user guide provided here is one from the manufacture and provides more details then this document. Line Settings
To change phone settings press the “Line Settings” option at the top of the page. On this page you will see several options. If you phone has more then one line you will need to select which line you would like to configure from the left hand menu. By default your primary line is selected.
Each phone has its own configuration settings it is important that you have the correct phone selected for the remainder of the instructions.

- 7 - 8945 & 8961 Guide
Incoming Call Forwarding
You will see several forwarding options for your phone. By default some items have been selected by the administrator. The “Forward all calls to” option works with the “Forward All” option available on the phone. Generally, you should forward your phone from the actual phone unless you are offsite and forgot to set your “Forward All” variable from the phone.
Message Waiting Lamp
This option allows you to change your message waiting lamp indicator settings. By default the system is set to light and prompt. You shouldn’t need to change this setting unless you don’t like the light/prompt notification of new voicemail.
Audible Message Waiting Indicator
This option will turn on or off a stutter tone when you pick up the receiver to announce you have voicemail. This option is turned off by default on the system. It is not recommended to turn it on.
Add/Update your Contacts (Speed Dials)
Each user has the ability to set speed dials on a per phone basis. Depending on the model of phone and how many lines you have configured on the phone will determine how many speed dial buttons you have available. The remainder of the speed dials not appearing as a button will be referred to as abbreviated dials.
To access your phones speed dials click the “Contacts” menu at the top of the page.
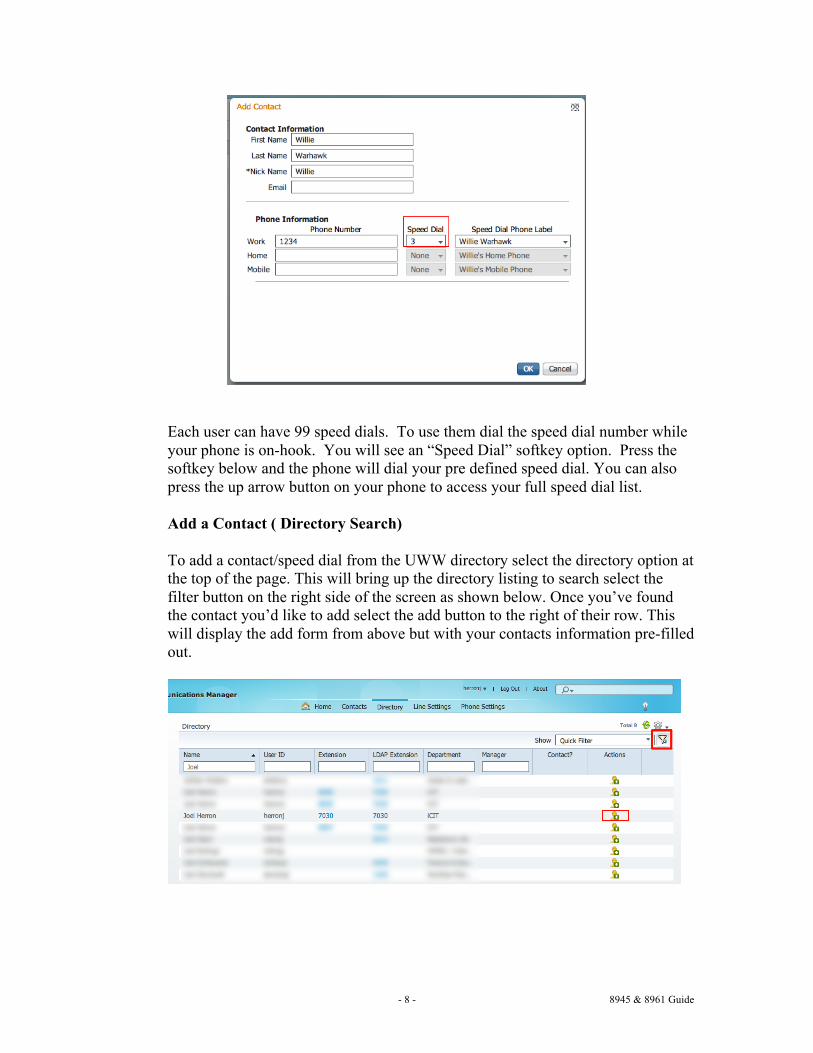
Add a Contact (manual) To add a new contact click on the “add contact” button, in the dialog window that opens fill in the form fields and select save. If you want to make the contact a speed dial make sure you select a speed dial number to attach to your contact as seen below.
Make sure that if you make any changes on this page that you click the “save” button or icon before ending your session. Once you press save your phone may reboot.
- 8 - 8945 & 8961 Guide
Each user can have 99 speed dials. To use them dial the speed dial number while your phone is on-hook. You will see an “Speed Dial” softkey option. Press the softkey below and the phone will dial your pre defined speed dial. You can also press the up arrow button on your phone to access your full speed dial list.
Add a Contact ( Directory Search)
To add a contact/speed dial from the UWW directory select the directory option at the top of the page. This will bring up the directory listing to search select the filter button on the right side of the screen as shown below. Once you’ve found the contact you’d like to add select the add button to the right of their row. This will display the add form from above but with your contacts information pre-filled out.

- 9 - 8945 & 8961 Guide
Phone Pin
If you hover over your Net-ID in the upper right side of the page a menu option will take you to a screen that you can setup or change your PIN number. If you wish to use a “personal address book” you will need to set a PIN because you will need to use it to login to your “personal address book” from the phone. By default your current PIN is blank. Directory
The “directory” menu option will give you access to the phones “corporate directory” from the web. This directory only contains staff members on campus and can not be edited. Personal Address Book
The “personal address book” menu option allows you to add your own phone book entries that can be retrieved from the phones “Personal Address Book” directory option.
You will need to setup a PIN number if you plan on using this service as you will be asked to login from the phone when accessing your personal address book.
You can not program pauses into your speed dial numbers.