cisco email security - how to guide - configure message ... · © 2018 cisco and/or its affiliates....
TRANSCRIPT
© 2018 Cisco and/or its affiliates. All rights reserved.
How-To Configure Message Routing Between Cisco Email Security in the Cloud and Microsoft Office 365
© 2018 Cisco and/or its affiliates. All rights reserved.
Cisco Email Security How–to GuideConfigure Message Routing Between Cisco Email Security in the Cloud and Office 365Cisco Public

© 2018 Cisco and/or its affiliates. All rights reserved.
About This Document 3
ACME’s Migration to the Cloud 3
Cisco Email Security to Office 365 Configuration Summary 6
Routing Inbound Traffic to Cisco Email Security 6
Routing Incoming Traffic from Cisco Email Security to Office 365 8
Troubleshooting Incoming Message Routing 9
Routing Outbound Traffic from Office 365 to Cisco Email Security 15
Troubleshooting Outgoing Message Routing 19
Preventing an Open Relay Through Office 365 20
CLI Troubleshooting Commands 23
Cisco Email Security How–to GuideConfigure Message Routing Between Cisco Email Security in the Cloud and Office 365Cisco Public
© 2018 Cisco and/or its affiliates. All rights reserved.
About This Document Microsoft Exchange has become the standard email system used by midsize to large-scale organizations globally. With the rise of cloud applications, Microsoft has introduced Office 365. This guide explains how Office 365 customers can enhance their email security by integrating with Cisco® Email Security deployed in the cloud.
This document is for Cisco® engineers and customers who will deploy Cisco Email Security Solution AsyncOS 10.0 and greater.
This document covers:
• A brief discussion on why Cisco Email Security is positioned in front of Office 365
• Overview of the Integration Process • Routing Inbound Traffic to Cisco Cloud Email Security • Troubleshooting Inbound Traffic • Routing Outbound Traffic from Office 365 to Cisco Email Security• Troubleshooting Outbound Traffic • Preventing an Open Relay
Prerequisites • Access to the Office 365 EOP admin account • Access to the Cisco Email Security admin account • MX records for Office 365 account • MX records for Cisco Email Security account • Familiarity with the Cisco Email Security User Interface • Access to Cisco Email Security Cluster Command Line Interface
(Support Ticket)
Note on CLI Access: We recommend that you get CLI access, as this will greatly help in troubleshooting. The biggest benefit of using SSH is real time mail logging. When using message tracking on the SMA to troubleshoot live issues, information is not immediately populated. But
in the CLI, we can see mail being processed in real time, which could show any error as they arise. See CLI Troubleshooting Commands on page 23.
ACME’s Migration to the Cloud We have all been witnessed to the cloud evolution. Organizations are increasingly moving their operations and resources off site to provide services that were traditionally housed internally. The migration to online services has provided many benefits. Even small businesses can now have enterprise-class redundancy and disaster recovery without the capital outlay for telecommunication, network, and server resources. Only one vendor to deal with for desktop applications, business file sharing, video, mobile phone administration and enterprise email! Like other on premise resources, companies have seized at the next logical step in moving their mailboxes to the cloud rather than managing a local mail server. However, they also acknowledge that the sending and receiving of banking, trading, sales contracts, and legal documents, over email must continue to be done in a secure fashion, as it was done when all resources were on premise. Long before the days of hosted datacenters, Microsoft did have rudimentary security in their Exchange server, but that proved inadequate. This led to dedicated security vendors, such as IronPort, to create secure email gateways to protect those mail servers. Microsoft primarily focuses on user applications, not security. Fast-forward to the present, Microsoft is still focused on end user applications but marketing them as a SaaS offering. In acknowledging customer apprehension about migrating assets to the cloud, Microsoft offers “just good enough” email security. However, it is wrong to view security as another cloud application. With over 90% of breaches starting with email, it remains the leading attack vector. That harsh reality is often realized by Office 365 customers who lack of protection against phishing and zero-day attacks. As it was in the past, it is still prudent to choose a dedicated security vendor, like Cisco Email Security, as the gateway provider in front of your Office 365 mailboxes. Here in Cisco Security, we make it our business to analyze what malicious actors are doing every minute and updating how all our security products respond to them. Cloud hosting of end user applications is a different business focus.
Cisco Email Security How–to GuideConfigure Message Routing Between Cisco Email Security in the Cloud and Office 365Cisco Public
© 2018 Cisco and/or its affiliates. All rights reserved.
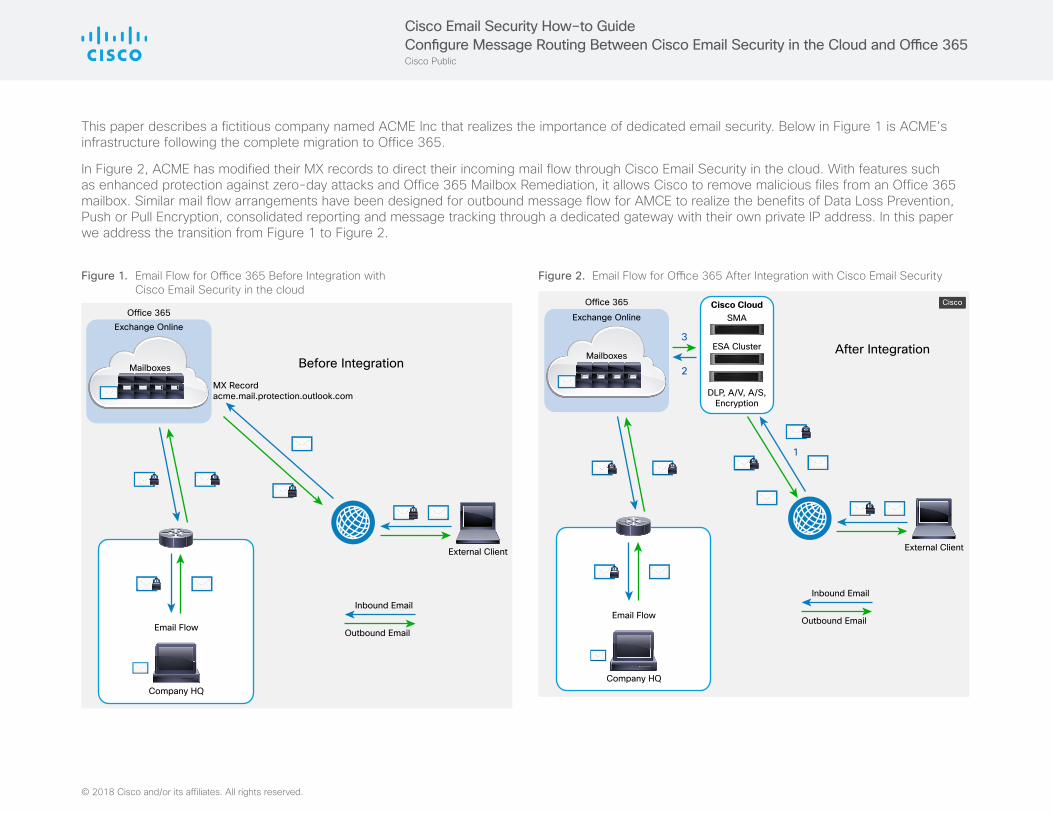
This paper describes a fictitious company named ACME Inc that realizes the importance of dedicated email security. Below in Figure 1 is ACME’s infrastructure following the complete migration to Office 365.
In Figure 2, ACME has modified their MX records to direct their incoming mail flow through Cisco Email Security in the cloud. With features such as enhanced protection against zero-day attacks and Office 365 Mailbox Remediation, it allows Cisco to remove malicious files from an Office 365 mailbox. Similar mail flow arrangements have been designed for outbound message flow for AMCE to realize the benefits of Data Loss Prevention, Push or Pull Encryption, consolidated reporting and message tracking through a dedicated gateway with their own private IP address. In this paper we address the transition from Figure 1 to Figure 2.
Figure 1. EmailFlowforOffice365BeforeIntegrationwith Cisco Email Security in the cloud
Office 365Exchange Online
Email Flow
Inbound Email
External Client
Outbound Email
Company HQ
Before IntegrationMX Recordacme.mail.protection.outlook.com
Mailboxes
Figure 2. EmailFlowforOffice365AfterIntegrationwithCiscoEmailSecurity
Office 365
3
2
1
Exchange Online
Mailboxes
Email Flow
Inbound Email
External Client
Outbound Email
Company HQ
After Integration
Cisco CloudSMA
DLP, A/V, A/S,Encryption
ESA Cluster
Cisco
Cisco Email Security How–to GuideConfigure Message Routing Between Cisco Email Security in the Cloud and Office 365Cisco Public

© 2018 Cisco and/or its affiliates. All rights reserved.
Many Office 365 customers will fall in a hybrid scenario where some of their mailboxes have migrated to Office 365 while others have stayed behind in the on premise Exchange server. Their MX record may have changed to point at Office 365, or it may continue to point to their current exchange server as shown in Figure 3. Where the MX record points does not matter since on premise exchange and Exchange Online will behave as two Exchange servers owned by ACME. They will synchronize and deliver messages between themselves depending on the final destination of a message.
Figure 4 shows Hybrid Cloud after the Integration with Cisco Cloud Email Security (CES). The application in Figure 4 is very similar to Figure 2. In both cases the new MX records will point to the CES cluster. From CES the mail flow is routed to different destinations; in the pure cloud application, it is routed to Exchange Online, in the hybrid application it is routed to the on premise Exchange server. Our point here is that CES is flexible and can be implemented in a variety of scenarios. However, to optimize the ability of CES to filter messages, it should be placed as the first mail hop in the organization. This allows for implementing Sender Base Reputation filtering for blocking messages from known bad senders. The rest of this guide will focus on the pure cloud migration shown as the transition from Figure 1 to Figure 2. However, the techniques can be applied to the other topologies.
Figure 3. HybridEmailFlowforOffice365beforeIntegrationwith Cisco Email Security in the Cloud
Office 365Exchange Online
Dir Synch
MX Recordmail.acme.comEmail Flow
External Client
Company HQ
MicrosoftExchange
Hybrid CloudBefore Integration
Mailboxes
Figure 4. HybridEmailFlowforOffice365afterIntegrationwith Cisco Email Security in the Cloud
Office 365
Exchange Online
MX Recordsesa1.acme-com.c3s2.iphmx.comesa2.acme-com.c3s2.iphmx.com
Mailboxes
External Client
Hybrid CloudAfter Integration
Cisco CloudSMA
DLP, A/V, A/S,Encryption
ESA Cluster
Cisco
Email Flow
Company HQ
MicrosoftExchange
Cisco Email Security How–to GuideConfigure Message Routing Between Cisco Email Security in the Cloud and Office 365Cisco Public

© 2018 Cisco and/or its affiliates. All rights reserved.
Cisco Email Security to Office 365 Configuration Summary Inbound Routing 1. Record the MX record pointing to your Office 365 account:
______________________ 2. Record the MX records for you Cisco Email Security account:
____________ ______________________________ 3. In the Office 365 EOP Admin Center click: Home > Edit a domain. 4. Change the DNS provider’s MX records from the Office 365 address
to those provided by your Cisco Email Security account. 5. In the Cisco Email Security admin account, add the mail domains to
the Recipient Access Table (RAT). 6. In the Cisco Email Security admin account, add an SMTP route that
points to the mail server located in the domain that you defined in the RAT. Note: This mail server’s address may be the original MX record for EOP, or it may be the customer’s on premise server in a hybrid environment. See Figures 2 and 4.
7. In the Office 365 EOP Admin Center navigate to Protection > Connection filter > default policy and create an “IP Allow List”. Here you will enter the IP addresses associated with the public MX records to your Cisco Email Security account.
8. Send a test message to your Office 365 mailbox. 9. Use Message Tracking in Cisco Cisco Email Security and Message
Trace in Office 365 to verify that the message was routed correctly. Outbound Routing 1. In the Office 365 EOP Admin Center, go to: Mail Flow > Connector >
Outbound Connectors > Add. 2. On the “Select your mail flow scenario” page, choose the following:
a. From: Office 365 b. To: Partner Organization
3. On the New connector page (you will be presented with several sub configuration pages). See page 16 Step 4 for the details of creating this connector. At this point the “validate connector” step will fail.
4. Log into your Cisco Email Security account and configure the domain “.protection.outlook.com” in the RELAYLIST of the OutgoingMail listener.
5. In Office 365 EOP admin center, click: “Validate this connector” again. This time it should succeed.
6. In EOP admin center, click: Mail flow > Rules > Add Rule “+” For details on completing this rule, see steps 7 – 12 on pg. 17.
7. Send a test message outbound from an Office 365 mailbox. 8. Use Message Tracking in Cisco Email Security and Message Trace in
Office 365 to verify that the message was routed correctly. Routing Inbound Traffic to Cisco Email Security Figure 5. Cisco Email Security Appliances Hosted in Data Centers
Office 365
Exchange Online
MX Recordsesa1.acme-com.c3s2.iphmx.comesa2.acme-com.c3s2.iphmx.com
Mailboxes
External Client
Hybrid CloudAfter Integration
Cisco CloudSMA
DLP, A/V, A/S,Encryption
ESA Cluster
Cisco
Email Flow
Company HQ
MicrosoftExchange
Following Acme’s migration to the cloud, their MX record pointed to acme.mail.protection.outlook.com, as shown in Figure 1. After integration with Cisco CES their new MX records are esa1.acme-com.c3s2.iphmx.com and esa2.acme-com.c3s2.iphmx.com. These are provided when the customer sets up the Cisco Email Security account for an evaluation or for production mail. They point to the Email Security Appliances hosted in redundant Cisco data centers. See Figure 5. To begin production mail flow, Acme’s IT staff changes the company’s Domain Name System (DNS) MX records from acme.mail.protection.outlook.com to the new records just referenced.
Cisco Email Security How–to GuideConfigure Message Routing Between Cisco Email Security in the Cloud and Office 365Cisco Public

© 2018 Cisco and/or its affiliates. All rights reserved.
Figures 6 and 7 illustrate this below. In less than 24 hours, DNS servers around the Internet will detect this change and begin their forwarding to the CES Appliances for ACME. Incoming messages will be scanned for spam, viruses, malicious file attachments, and malicious URLs. Other email hygiene will also be performed prior to delivery to Office 365.
Note: All of these DNS records are for illustration and not actual customer records.
In Office 365 Admin Center click: Home > Edit a domain as shown in Figure 6.
This change the MX records to those provided for your Cisco Email Security account. In Figure 7, we have changed the MX records for domain: acme.com.
From: acme.mail.protection.outlook.com to esa1.acme-com.c3s2.iphmx.com and esa2.acme-com.c3s2.iphmx.com.
Figure 6. acme-com.mail.protection.outlook.com Figure 7. esa1.acme-com.c3s2.iphmx.com and esa2.acme-com.c3s2.iphmx.com
Important: Note the warning in Figure 7: “One or more of these records haven’t been added correctly yet. step-by-step instructions” (http://go.microsoft.com/fwlink/?LinkId=824601). Following the “step-by-step” instructions will reset the MX records to what originally configured to redirect at the Office 365 account. Doing so will remove the CES cluster from the incoming traffic flow.
Cisco Email Security How–to GuideConfigure Message Routing Between Cisco Email Security in the Cloud and Office 365Cisco Public
© 2018 Cisco and/or its affiliates. All rights reserved.
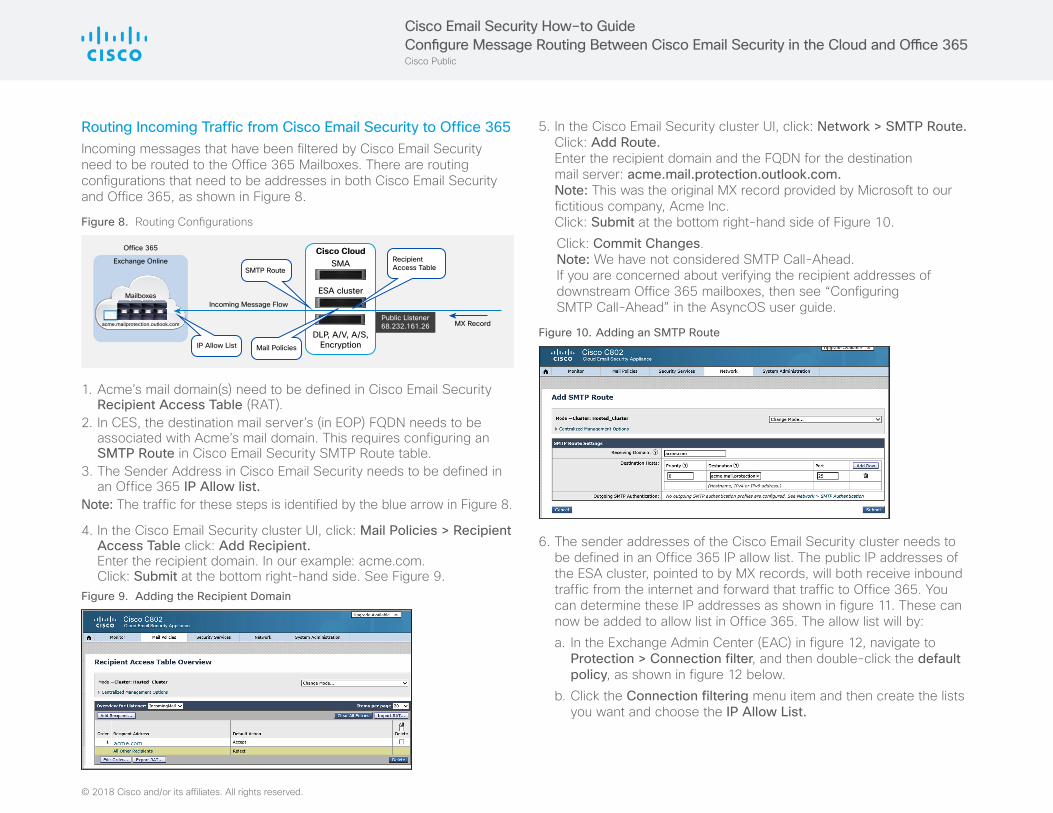
Routing Incoming Traffic from Cisco Email Security to Office 365 Incoming messages that have been filtered by Cisco Email Security need to be routed to the Office 365 Mailboxes. There are routing configurations that need to be addresses in both Cisco Email Security and Office 365, as shown in Figure 8.
Figure 8. RoutingConfigurations
Office 365
Incoming Message Flow
MX RecordPublic Listener68.232.161.26acme.mailprotection.outlook.com
Exchange Online
Mailboxes
Cisco CloudSMA
DLP, A/V, A/S,Encryption
ESA cluster
SMTP RouteRecipientAccess Table
IP Allow List Mail Policies
1. Acme’s mail domain(s) need to be defined in Cisco Email Security Recipient Access Table (RAT).
2. In CES, the destination mail server’s (in EOP) FQDN needs to be associated with Acme’s mail domain. This requires configuring an SMTP Route in Cisco Email Security SMTP Route table.
3. The Sender Address in Cisco Email Security needs to be defined in an Office 365 IP Allow list.
Note: The traffic for these steps is identified by the blue arrow in Figure 8.
4. In the Cisco Email Security cluster UI, click: Mail Policies > Recipient Access Table click: Add Recipient. Enter the recipient domain. In our example: acme.com. Click: Submit at the bottom right-hand side. See Figure 9.
Figure 9. Adding the Recipient Domain
5. In the Cisco Email Security cluster UI, click: Network > SMTP Route. Click: Add Route. Enter the recipient domain and the FQDN for the destination mail server: acme.mail.protection.outlook.com. Note: This was the original MX record provided by Microsoft to our fictitious company, Acme Inc. Click: Submit at the bottom right-hand side of Figure 10.
Click: Commit Changes. Note: We have not considered SMTP Call-Ahead. If you are concerned about verifying the recipient addresses of downstream Office 365 mailboxes, then see “Configuring SMTP Call-Ahead” in the AsyncOS user guide.
Figure 10. Adding an SMTP Route
6. The sender addresses of the Cisco Email Security cluster needs to be defined in an Office 365 IP allow list. The public IP addresses of the ESA cluster, pointed to by MX records, will both receive inbound traffic from the internet and forward that traffic to Office 365. You can determine these IP addresses as shown in figure 11. These can now be added to allow list in Office 365. The allow list will by:a. In the Exchange Admin Center (EAC) in figure 12, navigate to
Protection > Connection filter, and then double-click the default policy, as shown in figure 12 below.
b. Click the Connection filtering menu item and then create the lists you want and choose the IP Allow List.
Cisco Email Security How–to GuideConfigure Message Routing Between Cisco Email Security in the Cloud and Office 365Cisco Public

© 2018 Cisco and/or its affiliates. All rights reserved.
Figure 11. Determining IP Addresses
Figure 12. Choosing the IP Allow List
c. Commit your changes. If the MX records have been updated, then you should be able send an external message through Cisco Email Security and into your Office 365 mailbox.
Note: An alternative to configuring a Connection Filter would be configuring a Connector. The difference with the latter is that you can set TLS restrictions on incoming connections from Cisco Email Security
of TLS preferred or TLS required. With the Connection Filter, you cannot force TLS, since no TLS preference settings are available. But it will accept a TLS connection from Cisco Email Security anyway. For both methods of configuring O365, Anti-spam is disabled, but Anti-Virus (and ATP if licensed) are still available. This is important to consider since there is a low cost Cisco Email Security SKU available that does not include anti-virus.
See: https://technet.microsoft.com/en-us/library/jj937232(v=exchg.150).aspx#BKMK_HostedMailFlowWithThirdPartyCloud.
For Enabling TLS from Cisco Cisco Email Security to Office 365 see: “Working with Destination Controls” in the User Guide.
Troubleshooting Incoming Message Routing Troubleshooting is unnecessary if you have sent and received a test message that has passed though Cisco Email Security and into the Office 365 account.
We would log into the Cisco Email Security solution, telnet to the FQDN of your tenant (what was used as your MX record for O365), and perform a telnet test.
First verify that the SMTP route is correct as shown Figure 13.
Figure 13. Verifying the SMTP Route
Go to MX Toolbox to verify connectivity to your SMTP gateway in the Cisco Email Security account and that port 25 is available: http://mxtoolbox.com/.
Note: Firewall rules typically block telnet from command line on port 25 to email gateways.
Cisco Email Security How–to GuideConfigure Message Routing Between Cisco Email Security in the Cloud and Office 365Cisco Public

© 2018 Cisco and/or its affiliates. All rights reserved.
Figure 14. Verifying Connectivity to the SMTP Gateway
After verifying port 25 access with MX Toolbox, the next step is to verify that message traffic can be routed through the ESA cluster.
An incoming email may be rejected by incorrectly configuring the RAT or a message could be dropped by a malformed policy. You can check these problems by searching for a lost message by using Message Tracking on the SMA, as shown on the right in Figure 15. For example, if this test message was dropped we could find out why by searching on the envelope sender and clicking on “Show Details”. If the same message is re-injected and processed several times without delivery, then the RAT entry does not have a matching SMTP route! Message Tracking requires a few minutes to resolve after sending the test message. Alternatively, you can simulate the processing of message using the Trace Tool as shown below in Figure 16.
Figure 15. Searching for a Lost Message
In ESA cluster UI, Click on: System Administration > Trace.
If you have access to the Cisco Email Security Command Line Interface (CLI), then you can test SMTP connectivity from Cisco Email Security to O365 by telneting on port 25 to the FQDN of your O365 tenant address (what was used as your MX record for O365). Open two Shells to you Cisco Email Security account, then initiate telnet from one while running “tail mail_logs” on the other. This allows you to immediately see any failures. To learn more about telnet on port 25, see: https://technet.microsoft.com/en-us/library/bb123686(v=exchg.160).aspx.
Cisco Email Security How–to GuideConfigure Message Routing Between Cisco Email Security in the Cloud and Office 365Cisco Public

© 2018 Cisco and/or its affiliates. All rights reserved.
Figure 16. Using the trace tool
Also see CLI troubleshooting commands on page 23 of this guide.
If you do not have CLI access, you can use the Cisco Email Security user interface as shown below. Messages received by Cisco Email Security but not delivered to O365 due to SMTP routing issues, will show up in the Delivery Status Report as an “Active Recipient” as shown below. Click: Monitor > Delivery status.
With a malformed SMTP route, or if the receiving host is unreachable, the Host Status field in the delivery status would be Down. In Figure 17, the SMTP route to exchange.alpha.com is in error, but the routes to acme.com and notes.alpha.com are correct. The record for exchange.alpha.com shows “3 Active Recipients”. This means that 3 messages are waiting in the Cisco Email Security delivery queue. The system will either retry to deliver a finite number of times and give up or deliver all of the queued messages when the route is fixed. This delivery failure would also show up in Message Tracking.
Figure 17. Delivery Status Report Interface
Cisco Email Security How–to GuideConfigure Message Routing Between Cisco Email Security in the Cloud and Office 365Cisco Public
© 2018 Cisco and/or its affiliates. All rights reserved.
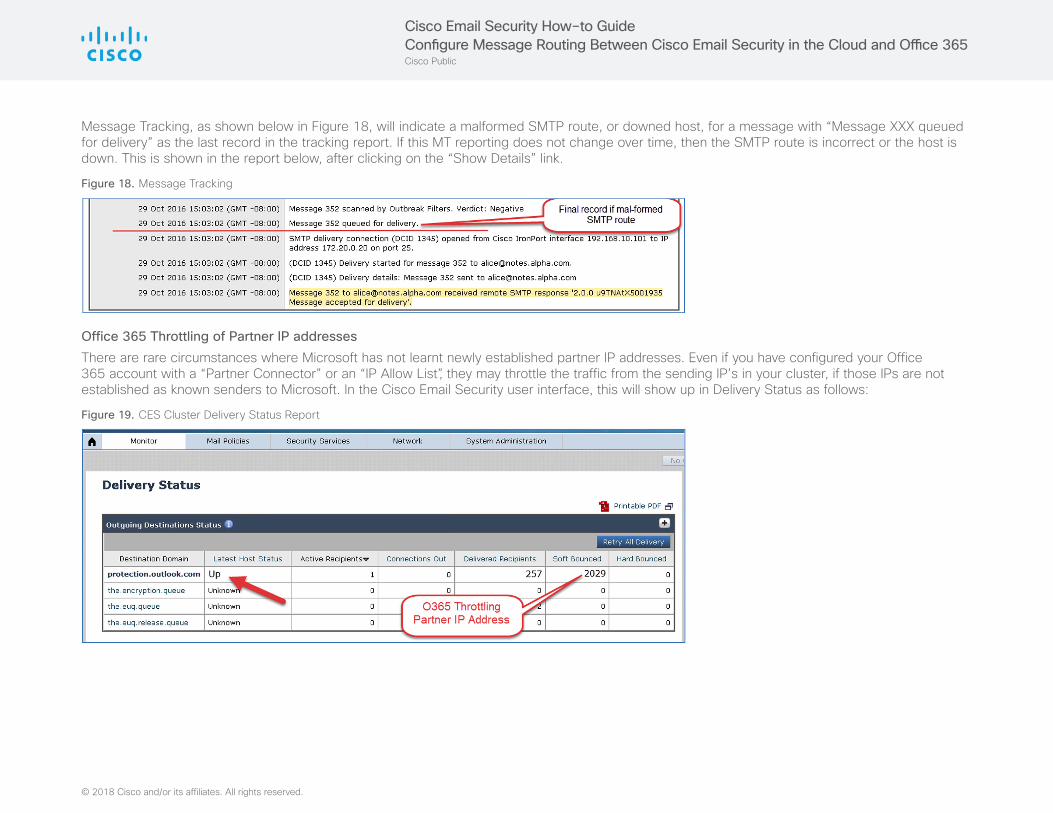
Message Tracking, as shown below in Figure 18, will indicate a malformed SMTP route, or downed host, for a message with “Message XXX queued for delivery” as the last record in the tracking report. If this MT reporting does not change over time, then the SMTP route is incorrect or the host is down. This is shown in the report below, after clicking on the “Show Details” link.
Figure 18. Message Tracking
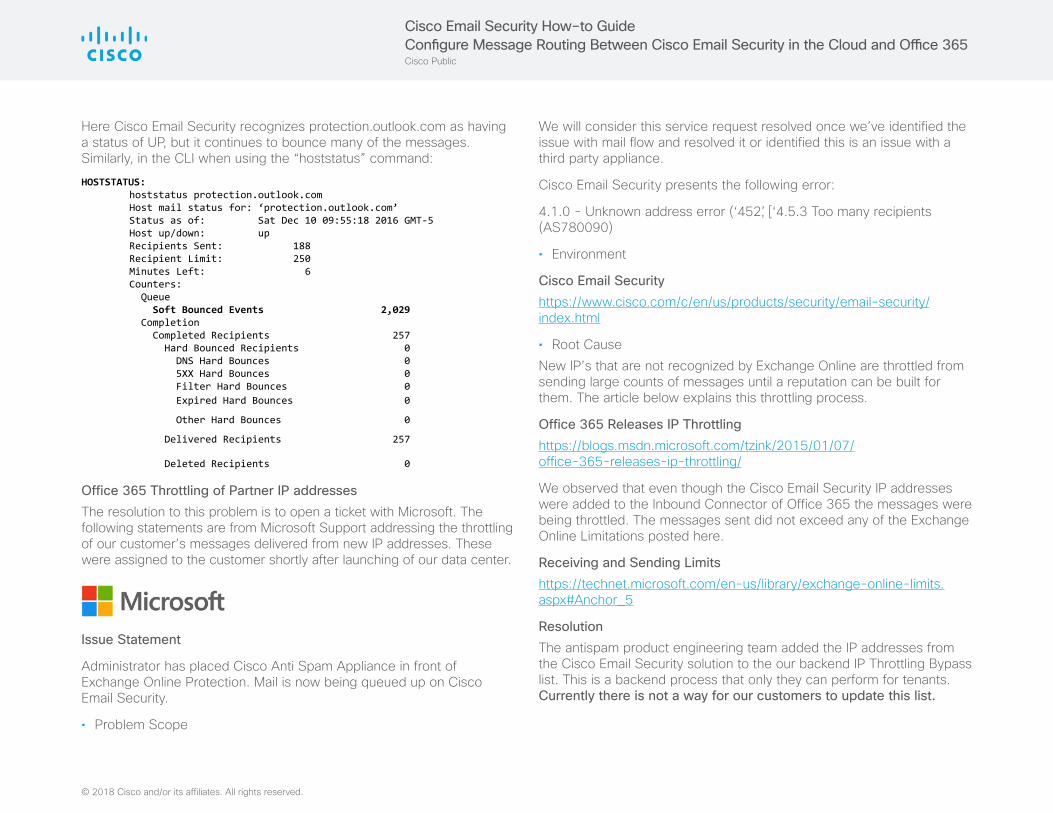
Office 365 Throttling of Partner IP addresses There are rare circumstances where Microsoft has not learnt newly established partner IP addresses. Even if you have configured your Office 365 account with a “Partner Connector” or an “IP Allow List”, they may throttle the traffic from the sending IP’s in your cluster, if those IPs are not established as known senders to Microsoft. In the Cisco Email Security user interface, this will show up in Delivery Status as follows:
Figure 19. CES Cluster Delivery Status Report
Cisco Email Security How–to GuideConfigure Message Routing Between Cisco Email Security in the Cloud and Office 365Cisco Public
© 2018 Cisco and/or its affiliates. All rights reserved.
Here Cisco Email Security recognizes protection.outlook.com as having a status of UP, but it continues to bounce many of the messages. Similarly, in the CLI when using the “hoststatus” command:HOSTSTATUS:
hoststatus protection.outlook.comHost mail status for: ‘protection.outlook.com’Status as of: Sat Dec 10 09:55:18 2016 GMT-5Host up/down: upRecipients Sent: 188Recipient Limit: 250Minutes Left: 6Counters: Queue Soft Bounced Events 2,029 Completion Completed Recipients 257 Hard Bounced Recipients 0 DNS Hard Bounces 0 5XX Hard Bounces 0 Filter Hard Bounces 0 Expired Hard Bounces 0
Other Hard Bounces 0
Delivered Recipients 257
Deleted Recipients 0
Office 365 Throttling of Partner IP addresses The resolution to this problem is to open a ticket with Microsoft. The following statements are from Microsoft Support addressing the throttling of our customer’s messages delivered from new IP addresses. These were assigned to the customer shortly after launching of our data center.
Issue Statement
Administrator has placed Cisco Anti Spam Appliance in front of Exchange Online Protection. Mail is now being queued up on Cisco Email Security.
• Problem Scope
We will consider this service request resolved once we’ve identified the issue with mail flow and resolved it or identified this is an issue with a third party appliance.
Cisco Email Security presents the following error:
4.1.0 - Unknown address error (‘452’, [‘4.5.3 Too many recipients (AS780090)
• Environment
Cisco Email Security https://www.cisco.com/c/en/us/products/security/email-security/ index.html
• Root CauseNew IP’s that are not recognized by Exchange Online are throttled from sending large counts of messages until a reputation can be built for them. The article below explains this throttling process.
Office 365 Releases IP Throttling https://blogs.msdn.microsoft.com/tzink/2015/01/07/office-365-releases-ip-throttling/
We observed that even though the Cisco Email Security IP addresses were added to the Inbound Connector of Office 365 the messages were being throttled. The messages sent did not exceed any of the Exchange Online Limitations posted here.
Receiving and Sending Limits https://technet.microsoft.com/en-us/library/exchange-online-limits.aspx#Anchor_5
Resolution The antispam product engineering team added the IP addresses from the Cisco Email Security solution to the our backend IP Throttling Bypass list. This is a backend process that only they can perform for tenants. Currently there is not a way for our customers to update this list.
Cisco Email Security How–to GuideConfigure Message Routing Between Cisco Email Security in the Cloud and Office 365Cisco Public

© 2018 Cisco and/or its affiliates. All rights reserved.
If a message has been delivered from your Cisco Email Security account to Office 365, but it has not been received in the recipient mailbox, you can determine how it was remediated in Office 365 by using Office 365 Message Trace. In the following example, we have sent a message through Cisco Email Security to an O365 recipient which user does not exist. Since the receiving domain is valid and routing in Cisco Email Security configured correctly the message forwarded successfully to Office 365 but has been dropped. To find out what happened, go to Exchange admin center, as shown in Figure 20 below.
Click: mail flow > message trace. As shown below in Figure 20, we entered the senders address, indicated delivery status as Failed and ran the search. The report indicates why the message was not delivered and that an NDR report was returned.
Figure 20. Exchange Admin Center
Cisco Email Security How–to GuideConfigure Message Routing Between Cisco Email Security in the Cloud and Office 365Cisco Public

© 2018 Cisco and/or its affiliates. All rights reserved.
Routing Outbound Traffic from Office 365 to Cisco Cloud Email Security ACME’s executive staff has made it clear they want email leaving the organization to adhere to various government regulations like the Health Insurance Portability and Accountability Act (HIPAA) and the Sarbanes- Oxley Act. To accomplish this, they route outbound email through the Cisco cloud, where policies are enforced using Cisco DLP modules as well as the integrated Cisco Email Encryption.
To route the email messages from Office 365 mailboxes to Cisco, three requirements must be met, as listed and shown below in Figure 21:
• A secondary private interface must be configured on the customer’s Cisco Email Security account to receive EOP traffic.
• An Outbound Connector must be configured in the EOP system that treats Cisco Email Security as a “smart host”.
• A Transport Rule must be configured in EOP that identifies what outbound traffic is routed to Cisco Email Security.
Figure 21. Enforcing Policies
Office 365
Public Listener68.232.161.126
acme.mailprotection.outlook.com
Exchange Online
Outgoing Message Flow
MailboxesTransport Rule
Connector
Cisco CloudSMA
DLP, A/V, A/S,Encryption
ESA Cluster
Smart Hostob1.acme-com.c3s2.iphmx.com
RELAYLIST.protection.outlook.com
A secondary interface must be configured on the customer’s CES account Standard Cisco Email Security accounts have two ESAVs, each with one interface to accommodate both incoming and outgoing mail flow. However, CES implementations that relay outgoing mail from O365 will require a secondary interface. The reason is that sending outgoing mail flow from one customer in a multitenant environment requires that multiple sending IPs be used. ACME’s O365 account may send on address A on one day and address B on another day. The choice of sending IP address is made by Microsoft and not ACME. This means that the domain “.protection.outlook.com” that all Office 365 IP addresses reside in must be defined in the RELAYLIST of ACME’s CES account. However, this also means in theory that any Office 365 customer could use ACME’s Cisco Email Security relay interface. We avoid this by keeping the 2nd interface private (not advertised in ACME’s MX records). Since this topology is unique to routing outbound from Office 365, a 2nd interface requires a support ticket. Figure 22 below shows how to verify both outbound interfaces for acme.com. Note that this record was not visible when we performed an MX record lookup for acme.com back in Figure 13, which is as it should be.
Figure 22. Verifying Outbound Interfaces
An outbound connector must be configured in the EOP system1. In the EOP Admin Center, select Exchange, then go to Mail Flow and
click Connectors. (See Figure 23.)2. In the Connectors, select Outbound Connectors and then Add.3. On the “Select your mail flow scenario” page, choose the following:
a. From: Office 365b. To: Partner Organization
Cisco Email Security How–to GuideConfigure Message Routing Between Cisco Email Security in the Cloud and Office 365Cisco Public

© 2018 Cisco and/or its affiliates. All rights reserved.
Figure 23. Adding a Connector
4. On the New connector page (you will be presented with several sub configuration pages)
Figure 24. Adding the Route
a. Name: Outbound to Cisco Cloud provide a description,b. Click: Nextc. When do you want to use this connector?
Choose: Only when I have a transport rule set up that redirect’s messages to this connector.
Click: Next
d. How do you want to route email messages? Select: Route email through these smart hosts.
e. Click: Add and add the route pointing to the Secondary interface. In our example: ob1.acme-com.c3s2.iphmx.com
f. Click: Saveg. Click: Nexth. How should Office 365 connect to your partner organization’s
email server? - Always use Transport Layer Security (TLS) to secure the
connection - Any digital certificate, including self-signed certificates
Note: If your Office 365 account has a certificate issued by a trusted authority, then we recommend that option.
i. In the summary page, verify the New Connector Settings and click: Next.
j. Click: Validate this connector.
Reason for Failure: Outgoing Relay has not been configured in Cisco Email Security. Clicking on the Details will provide specifics.
Figure 25. Verifying the Settings
Cisco Email Security How–to GuideConfigure Message Routing Between Cisco Email Security in the Cloud and Office 365Cisco Public
© 2018 Cisco and/or its affiliates. All rights reserved.
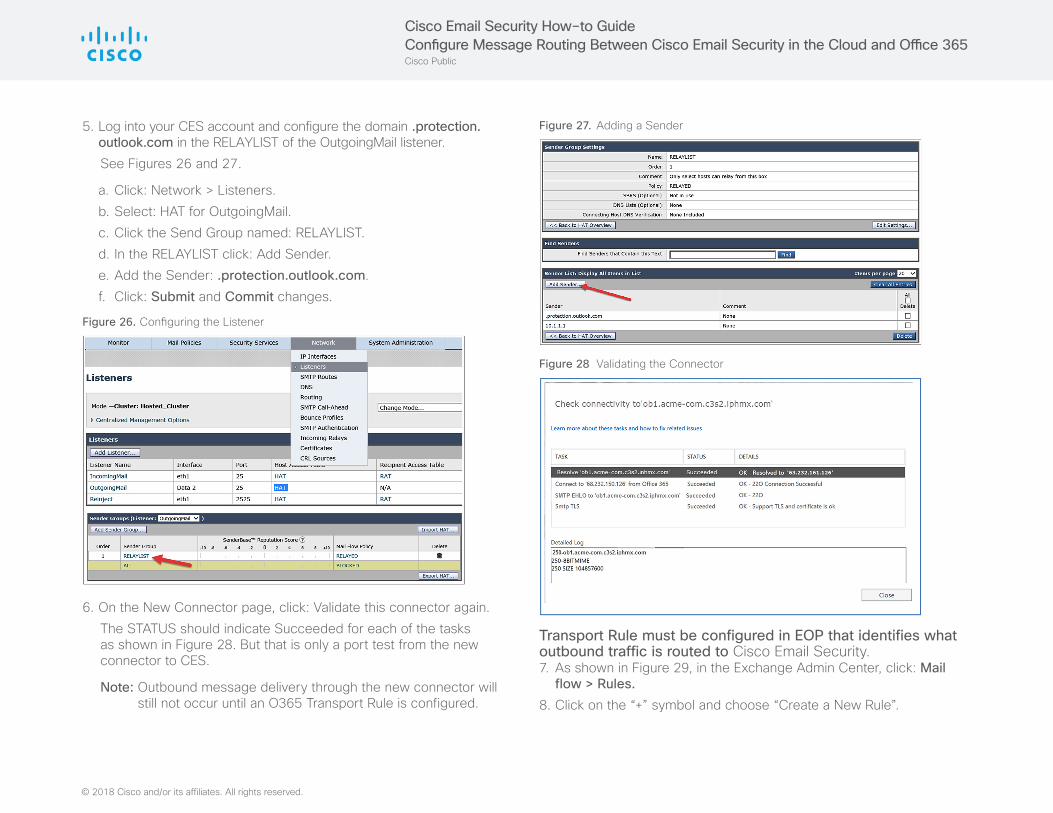
5. Log into your CES account and configure the domain .protection.outlook.com in the RELAYLIST of the OutgoingMail listener.
See Figures 26 and 27.
a. Click: Network > Listeners.b. Select: HAT for OutgoingMail.c. Click the Send Group named: RELAYLIST.d. In the RELAYLIST click: Add Sender.e. Add the Sender: .protection.outlook.com.f. Click: Submit and Commit changes.
Figure 26. ConfiguringtheListener
6. On the New Connector page, click: Validate this connector again. The STATUS should indicate Succeeded for each of the tasks
as shown in Figure 28. But that is only a port test from the new connector to CES.
Note: Outbound message delivery through the new connector will still not occur until an O365 Transport Rule is configured.
Figure 27. Adding a Sender
Figure 28 Validating the Connector
Transport Rule must be configured in EOP that identifies what outbound traffic is routed to Cisco Email Security.7. As shown in Figure 29, in the Exchange Admin Center, click: Mail
flow > Rules.8. Click on the “+” symbol and choose “Create a New Rule”.
Cisco Email Security How–to GuideConfigure Message Routing Between Cisco Email Security in the Cloud and Office 365Cisco Public
© 2018 Cisco and/or its affiliates. All rights reserved.
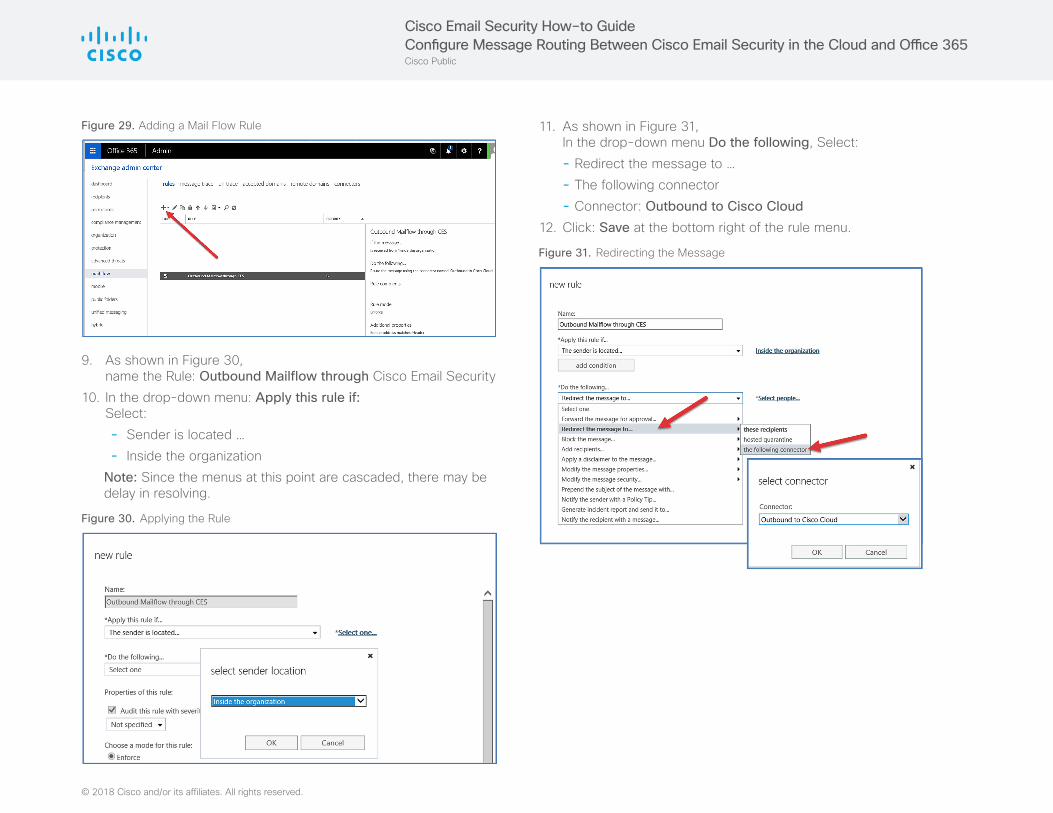
Figure 29. Adding a Mail Flow Rule
9. As shown in Figure 30, name the Rule: Outbound Mailflow through Cisco Email Security
10. In the drop-down menu: Apply this rule if: Select:
- Sender is located … - Inside the organization
Note: Since the menus at this point are cascaded, there may be delay in resolving.
Figure 30. Applying the Rule
11. As shown in Figure 31, In the drop-down menu Do the following, Select: - Redirect the message to … - The following connector - Connector: Outbound to Cisco Cloud
12. Click: Save at the bottom right of the rule menu.
Figure 31. Redirecting the Message
Cisco Email Security How–to GuideConfigure Message Routing Between Cisco Email Security in the Cloud and Office 365Cisco Public

© 2018 Cisco and/or its affiliates. All rights reserved.
Troubleshooting Outgoing Message RoutingSend a test message from an Office 365 account to an external destination. If it gets lost along the path, you can use the tools; Message Trace in Office 365 and Message Tracking in Cisco Email Security to determine where the message was lost. Figures 32 and 33 below are Message Trace and Message Tracking respectively for the same message. Note that CES performs AV check for outbound delivery, but O365 does not.
Figure 32. MicrosoftOffice365MessageTrace
If Office 365 is not able to connect to the Cisco Email Security, then there are two things to be verified:
• Is the domain: .protection.outlook.com defined in the RELAYLIST for the Cisco Email Security listener OutgoingMail? See Figure 27.
• Do the TLS settings between the O365 connector and the ob1.acme-com.c3s2.iphmx.com interface agree? See configuring Outbound Connector on page 15.
If Office 365 is able to connect but the message is dropped in the CES workflow, then that event will show up in Message Tracking, or in the mail logs if you have CLI access. One possible cause would be miss-application of the message filter: BEC_From_O365 discussed later in the section: Preventing an Open Relay Through Office 365.
Figure 33. Cisco CES Message Tracking
Cisco Email Security How–to GuideConfigure Message Routing Between Cisco Email Security in the Cloud and Office 365Cisco Public
© 2018 Cisco and/or its affiliates. All rights reserved.
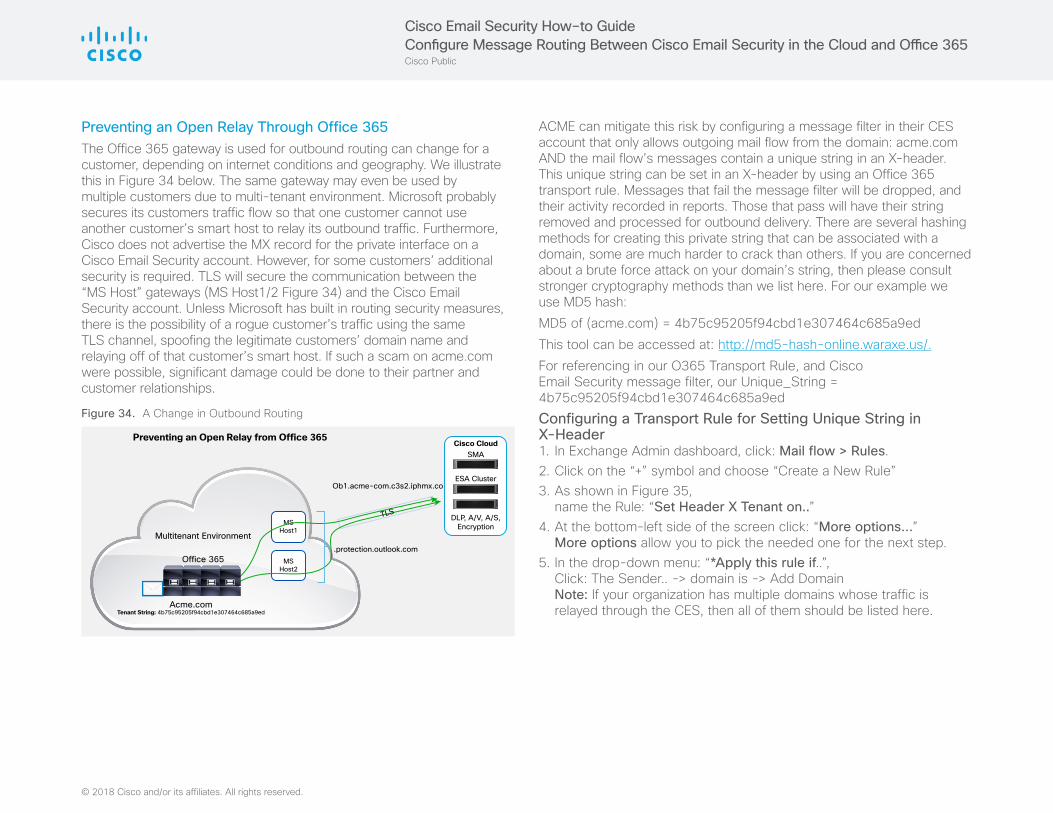
Preventing an Open Relay Through Office 365The Office 365 gateway is used for outbound routing can change for a customer, depending on internet conditions and geography. We illustrate this in Figure 34 below. The same gateway may even be used by multiple customers due to multi-tenant environment. Microsoft probably secures its customers traffic flow so that one customer cannot use another customer’s smart host to relay its outbound traffic. Furthermore, Cisco does not advertise the MX record for the private interface on a Cisco Email Security account. However, for some customers’ additional security is required. TLS will secure the communication between the “MS Host” gateways (MS Host1/2 Figure 34) and the Cisco Email Security account. Unless Microsoft has built in routing security measures, there is the possibility of a rogue customer’s traffic using the same TLS channel, spoofing the legitimate customers’ domain name and relaying off of that customer’s smart host. If such a scam on acme.com were possible, significant damage could be done to their partner and customer relationships.
Figure 34. A Change in Outbound Routing
MSHost1
Cisco CloudSMA
DLP, A/V, A/S,Encryption
ESA Cluster
Acme.comTenant String: 4b75c95205f94cbd1e307464c685a9ed
Office 365
Multitenant Environment
Preventing an Open Relay from Office 365
MSHost2
.protection.outlook.com
Ob1.acme-com.c3s2.iphmx.co
TLS
ACME can mitigate this risk by configuring a message filter in their CES account that only allows outgoing mail flow from the domain: acme.com AND the mail flow’s messages contain a unique string in an X-header. This unique string can be set in an X-header by using an Office 365 transport rule. Messages that fail the message filter will be dropped, and their activity recorded in reports. Those that pass will have their string removed and processed for outbound delivery. There are several hashing methods for creating this private string that can be associated with a domain, some are much harder to crack than others. If you are concerned about a brute force attack on your domain’s string, then please consult stronger cryptography methods than we list here. For our example we use MD5 hash:MD5 of (acme.com) = 4b75c95205f94cbd1e307464c685a9edThis tool can be accessed at: http://md5-hash-online.waraxe.us/.For referencing in our O365 Transport Rule, and Cisco Email Security message filter, our Unique_String = 4b75c95205f94cbd1e307464c685a9edConfiguring a Transport Rule for Setting Unique String in X-Header1. In Exchange Admin dashboard, click: Mail flow > Rules. 2. Click on the “+” symbol and choose “Create a New Rule”3. As shown in Figure 35,
name the Rule: “Set Header X Tenant on..”4. At the bottom-left side of the screen click: “More options…”
More options allow you to pick the needed one for the next step.5. In the drop-down menu: “*Apply this rule if..”,
Click: The Sender.. -> domain is -> Add Domain Note: If your organization has multiple domains whose traffic is relayed through the CES, then all of them should be listed here.
Cisco Email Security How–to GuideConfigure Message Routing Between Cisco Email Security in the Cloud and Office 365Cisco Public

© 2018 Cisco and/or its affiliates. All rights reserved.
Figure 35. Creating a Rule
6. See Figure 36. In the drop-down menu: “*Do the following..”, Click: Modify the message properties.. -> set a message header -> Add Message Header.a. Specify the header name: X-Tenantb. Specify the header value: < Unique_String>
7. Click: Save at the bottom-right hand side of the menu.8. You should wait 10 minutes before seeing any changes to the
outgoing messages. At that time, send a test message to an external mailbox to verify the X-Tenant string is present.
Figure 36. Modifying the Message Properties
9. Using Outlook, you can view an X-header by going to: Message File -> Properties, as shown in Figure 37.
For more information, see: https://blogs.technet.microsoft.com/eopfieldnotes/2014/11/20/easily-tell-which-transport-rules-a-message-triggered/
Figure 37. Viewing the X-Header
Cisco Email Security How–to GuideConfigure Message Routing Between Cisco Email Security in the Cloud and Office 365Cisco Public

© 2018 Cisco and/or its affiliates. All rights reserved.
Configuring a Message Filter in Cisco Email Security to Prevent an Open Relay from Office 365 10. Figure 38 represents a message filter designed to prevent open
relayed traffic. This can be entered to your Cisco Email Security cluster by first:a. Opening an SSH session to the Cisco OPs Server.b. From OPs server, performing SSH to your CES cluster.c. If your O365 account has more than one domain that send through
your CES account, you can modify line 6 of this code as follows:(mail-from != ‘\\@acme\\.com$|\\@acme2\\.com$’)
where “|” is a logical OR. But any list of Office 365 domains described here must be
matched in the transport rule described in Figure 35.
Figure 38. PreventingOpenRelayedTraffic
11. Once BEC_From_O365 is set and active, send outbound test messages to verify its operation. You can simulate failures by changing one character in the X-Tenant string Figure 36. Also verify that the filter has no effect on incoming traffic.
12. To keep the X-Tenant string private, you can use the filter: Remove_Tenant_String in Figure 39.
Figure 39. Keeping the String Private
13. You can track your test activing using Reports on the SMA appliance. Go to: Email -> Monitor -> Message Filters Ours is shown in Figure 40.
Figure 40. Monitoring Activity
Cisco Email Security How–to GuideConfigure Message Routing Between Cisco Email Security in the Cloud and Office 365Cisco Public

CLI Troubleshooting CommandsUse these commands for troubleshooting mail routing issues during Cisco Email Security to Office 365 setup.
© 2018 Cisco and/or its affiliates. All rights reserved. Cisco and the Cisco logo are trademarks or registered trademarks of Cisco and/or its affiliates in the U.S. and other countries. To view a list of Cisco trademarks, go to this URL: https://www.cisco.com/go/trademarks. Third-party trademarks mentioned are the property of their respective owners. The use of the word partner does not imply a partnership relationship between Cisco and any other company. (1110R) C07-738366-02 02/18
grep [-C count] [-e regex] [-i] [-p] [-t] [regex] log_name
The grep command can be used to search for text strings within logs. A combination of whole words and Regular Expressions can be used (ex. grep “Tue Nov 29 17: [1-3].*” mail_logs).
logconfig Configures access to log files.
findevent Find events in mail log files.
tophosts
mail3.example.com>tophosts Sort results by: 1. Active Recipients 2. Connections Out 3. Delivered Recipients 4. Hard Bounced
Recipients 5. Soft Bounced Events [1]> 1
To get immediate information about the email queue and determine if a particular recipient host that CES is delivering to has receiving problems such as a queue buildup. Command returns a list of the top 20 recipient hosts in the queue.
hoststatus Use this command in conjunction with tophosts. Get the status of the given hostname.
showrecipients Use this command, in conjunction with tophosts, will provide you with a list of queued messages from a specific domain.
tlsverify Establish an outbound TLS connection on demand and debug any TLS connection issues concerning a destination domain.
tail Continuously display the end of a log file. The tail command also accepts the name or number of a log to view as a parameter: tail 9 or tail mail_logs.
network SMTPPING Can be used in place of telnet on port 25. Used for verifying SMTP connectivity to a remote mail server or mail gateway.
topin Display the top hosts by number of incoming connections.
nslookup Command can confirm that the appliance is able to reach and resolve hostnames and IP addresses from a working DNS (domain name service) server.
Cisco Email Security How–to GuideConfigure Message Routing Between Cisco Email Security in the Cloud and Office 365Cisco Public