cisco api console user guide · fax: 408 527-0883 cisco api console user guide 2.0 october 3, 2013...
TRANSCRIPT
Cisco API Console User Guide 2.0 October 3, 2013
Americas HeadquartersCisco Systems, Inc.170 West Tasman DriveSan Jose, CA 95134-1706 USAhttp://www.cisco.comTel: 408 526-4000
800 553-NETS (6387)Fax: 408 527-0883
Text Part Number: 78-xxxxx-xx
THE SPECIFICATIONS AND INFORMATION REGARDING THE PRODUCTS IN THIS MANUAL ARE SUBJECT TO CHANGE WITHOUT NOTICE. ALL STATEMENTS, INFORMATION, AND RECOMMENDATIONS IN THIS MANUAL ARE BELIEVED TO BE ACCURATE BUT ARE PRESENTED WITHOUT WARRANTY OF ANY KIND, EXPRESS OR IMPLIED. USERS MUST TAKE FULL RESPONSIBILITY FOR THEIR APPLICATION OF ANY PRODUCTS.
THE SOFTWARE LICENSE AND LIMITED WARRANTY FOR THE ACCOMPANYING PRODUCT ARE SET FORTH IN THE INFORMATION PACKET THAT SHIPPED WITH THE PRODUCT AND ARE INCORPORATED HEREIN BY THIS REFERENCE. IF YOU ARE UNABLE TO LOCATE THE SOFTWARE LICENSE OR LIMITED WARRANTY, CONTACT YOUR CISCO REPRESENTATIVE FOR A COPY.
The Cisco implementation of TCP header compression is an adaptation of a program developed by the University of California, Berkeley (UCB) as part of UCB’s public domain version of the UNIX operating system. All rights reserved. Copyright © 1981, Regents of the University of California.
NOTWITHSTANDING ANY OTHER WARRANTY HEREIN, ALL DOCUMENT FILES AND SOFTWARE OF THESE SUPPLIERS ARE PROVIDED “AS IS” WITH ALL FAULTS. CISCO AND THE ABOVE-NAMED SUPPLIERS DISCLAIM ALL WARRANTIES, EXPRESSED OR IMPLIED, INCLUDING, WITHOUT LIMITATION, THOSE OF MERCHANTABILITY, FITNESS FOR A PARTICULAR PURPOSE AND NONINFRINGEMENT OR ARISING FROM A COURSE OF DEALING, USAGE, OR TRADE PRACTICE.
IN NO EVENT SHALL CISCO OR ITS SUPPLIERS BE LIABLE FOR ANY INDIRECT, SPECIAL, CONSEQUENTIAL, OR INCIDENTAL DAMAGES, INCLUDING, WITHOUT LIMITATION, LOST PROFITS OR LOSS OR DAMAGE TO DATA ARISING OUT OF THE USE OR INABILITY TO USE THIS MANUAL, EVEN IF CISCO OR ITS SUPPLIERS HAVE BEEN ADVISED OF THE POSSIBILITY OF SUCH DAMAGES.
Cisco and the Cisco logo are trademarks or registered trademarks of Cisco and/or its affiliates in the U.S. and other countries. To view a list of Cisco trademarks, go to this URL: www.cisco.com/go/trademarks. Third-party trademarks mentioned are the property of their respective owners. The use of the word partner does not imply a partnership relationship between Cisco and any other company. (1110R)
Any Internet Protocol (IP) addresses and phone numbers used in this document are not intended to be actual addresses and phone numbers. Any examples, command display output, network topology diagrams, and other figures included in the document are shown for illustrative purposes only. Any use of actual IP addresses or phone numbers in illustrative content is unintentional and coincidental.
Cisco API Console User Guide 2.0 © 2013 Cisco Systems, Inc. All rights reserved.

C O N T E N T S
Preface 2About this Document 2
Overview 2
Introduction 1-1
Overview of the API Process 1-1
Perform Onboard Registration 1-3
On Boarding Overview 1-3
Register for a CCO ID 1-4
Cisco Services Access Management (CSAM) 2-1
Delegated Administrator Nomination 2-1
Associating a User to Your Company 2-4
Assigning a Role to a User 2-5
Role Assignment-Show Existing Users 2-6
Role Assignment-Search for Users by Full Name 2-11
Role Assignment-Search by Cisco ID or E-mail 2-12
The API Console 3-1
Accessing the API Console 3-1
Home Page 3-3
Register an Application 3-3
My Applications 3-7
Review API Metrics 3-8
View Reports 3-8
Edit an Application 3-10
Changing the Name and Description 3-10
Changing Grant Types 3-11
Delete an Application 3-12
Add APIs 3-15
Remove APIs from a Registered Application 3-18
My APIs 3-19
Platform Status 3-21
Support 3-21
1Cisco API Console User Guide 2.0

2Cisco API Console User Guide 2.0
Preface--Cisco API Console User Guide
Revised: October 3, 2013
PrefaceThis chapter covers the following topics:
•About this Document
•Overview
About this DocumentThis document provides information about the API Services, and contains information on how to get started using the different services. This document describes the process of registering users, obtaining authorized credentials, and how to use the credentials with the various API service calls. The last section of this document explains how to use the different metric tools that are available on the API console.
OverviewThis guide will explain the steps needed to be taken to on-board to Web APIs provided by Cisco. This guide will cover obtaining a user account, assigning party and role assignments to that user account for a specific company, and using Cisco's API Console for the registration of a client application that will call Cisco's Web APIs.
These instructions are intended from Cisco's Customers or Partners that intend to create client applications from Cisco Provided APIs.

C H A P T E R 1
On-Boarding-CCO-RegistrationRevised: October 3, 2013
IntroductionThis chapter introduces the user to CCO Registration and CSAM, gives an overview of the Delegated Administrator process, and describes following areas:
• Overview of the API Process
• Register for a CCO ID
• On Boarding Overview
• The API Console
Overview of the API ProcessThere are four main steps that allow users to initiate the API service calls and obtain access to the product information noted in the graphic below. The first two steps consist of user and application registration; while the last two steps are related to development and metrics use. These four procedures are outlined in the following graphic:
1-1Cisco API Console User Guide 2.0

Chapter 1 On-Boarding-CCO-Registration Overview of the API Process
The procedures are described below in more detail:
1. Perform Onboard Registration: This is for user registration. This process, also referred to as on-boarding, is where the following actions occur:
– User registers for a CCO ID (or they may use their existing one if already registered) and is nominated by a Cisco Administrator to become a Delegated Administrator (DA).
– The DA associates other CCO ID users to a company and assigns them roles, which gives them access to the API console.
Note Only one DA is assigned by Cisco, however, that DA may assign other users to the role of DA. The DA is responsible for associating users and assigning them service roles.
2. Register a client application with the API Console:
– Creates client credentials (assigns name, description, and chooses OAuth v2.0 grant types requested from their client application).
– Subscribes that client application to 1 or more of the APIs provided by Cisco.
– Registration of a client application creates a “unique client identifier” that will identify your client application to Cisco Token services.
3. Develop Application (Client code developed by the customer or partner):
– Utilizes Cisco's Token services to acquire an OAuth v2.0 access-tokens
– Place API calls to chosen APIs (leveraging the access-token from the previous step).
4. Review API Metrics: This lets the user(s) review various usage and performance metrics that are associated with the API service calls.
1-2Cisco API Console User Guide 2.0

Chapter 1 On-Boarding-CCO-Registration Perform Onboard Registration
Perform Onboard Registration The following section provides information about the following areas:
• Register for a CCO ID
• On Boarding Overview
On Boarding OverviewThis section relates to the “Cisco Services Access Management (CSAM)” section on page 2-1. Cisco Service Access Management (CSAM), which enables partners to self-administer role-based user access to various Cisco Service programs. Self-administration is based upon the concept of Delegated Administration. Access is first granted, by Cisco, to one trusted person at the customer or Partner Company, who then assumes responsibility for assigning access privileges to the rest of the users at their company.
You may already be using some other tool or process to manage CCO IDs for your users; however, CSAM is needed to perform these additional tasks:
• Associating users to a party.
• Assigning that user a role on the API Console.
Note Party is also known as an entitled company.
To assign a Delegated Administrator and have the DA assign other users, the following steps must be completed:
1-3Cisco API Console User Guide 2.0

Chapter 1 On-Boarding-CCO-Registration Perform Onboard Registration
Step 1 Each user must have a Cisco ID (CCO ID). If a partner or customer (end user) does not have a Cisco ID, one can be requested via the “Account” link at the top of the www.cisco.com home page, and then by going to “New User” and clicking on Register Now. See the “Register for a CCO ID” section on page 1-4.
Step 2 Once the proper individual has been identified, a Cisco Administrator nominates that person to take on the role of Delegated Administrator for their company. A nomination e-mail message is automatically sent to that individual; the e-mail contains a link to the CSAM system. See the “Delegated Administrator Nomination” section on page 2-1.
Step 3 The partner accepts the administrator’s DA nomination. See “Delegated Administrator Nomination” section on page 2-1.
Step 4 The Cisco Administrator enables the party for the API service offer.
Step 5 The Delegated Administrator can now associate and assign roles to different end users. See Chapter 2, “Associating a User to Your Company,” and Chapter 2, “Assigning a Role to a User.”
Step 6 Once these above tasks are completed the users are authorized to login into the API console service portal. See the API Console User Guide for more information how to register applications for development.
Register for a CCO IDThe first requirement is to have a valid CCO ID; if the user does not have one they will need to register for a CCO ID by performing the following steps:
Step 1 Navigate to the CSAM home page at URL http://tools.cisco.com/CDCEB; a CCO login window appears.
Step 2 Click Register Now. The Cisco.com Registration window will be displayed.
1-4Cisco API Console User Guide 2.0

Chapter 1 On-Boarding-CCO-Registration Perform Onboard Registration
Figure 1-1 CCO Login Information
Note Ensure that all of the fields marked with an asterisk are completed. These are mandatory fields.
Step 3 In the Contact Information section, the user is given the option of choosing either “Business,” or “Home.” contact information. If the “Home” choice is made, the fields will change to reflect a non-business entry.
Figure 1-2 CCO Contact Information
1-5Cisco API Console User Guide 2.0

Chapter 1 On-Boarding-CCO-Registration Perform Onboard Registration
Step 4 The Security section requires the user select several secret questions with answers, as well as filling in the captcha field. The user can opt into receiving communications and product information by selecting the appropriate checkboxes.
Note The user must select the checkbox advising them that Cisco will store the information provided.
Figure 1-3 CCO Security Section
Step 5 After filling out all the required information, click Submit at the bottom of the window. A registration confirmation window will be displayed.
1-6Cisco API Console User Guide 2.0
Chapter 1 On-Boarding-CCO-Registration Perform Onboard Registration
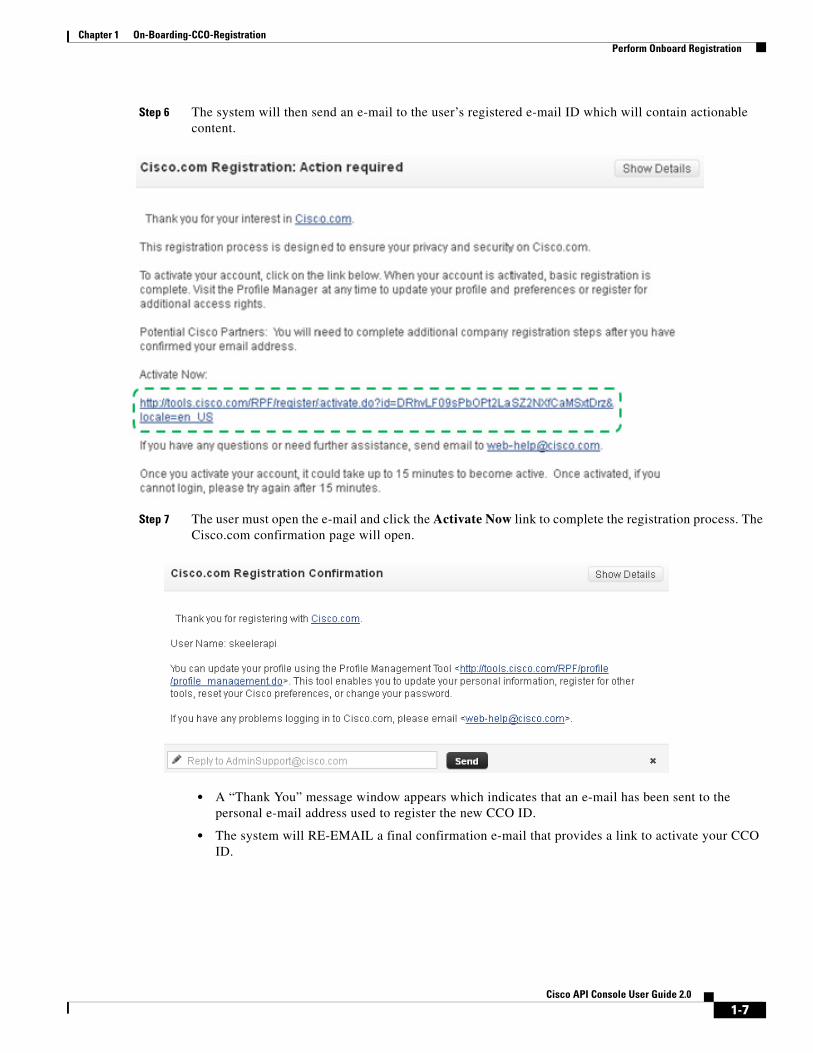
Step 6 The system will then send an e-mail to the user’s registered e-mail ID which will contain actionable content.
Step 7 The user must open the e-mail and click the Activate Now link to complete the registration process. The Cisco.com confirmation page will open.
• A “Thank You” message window appears which indicates that an e-mail has been sent to the personal e-mail address used to register the new CCO ID.
• The system will RE-EMAIL a final confirmation e-mail that provides a link to activate your CCO ID.
1-7Cisco API Console User Guide 2.0

C H A P T E R 2
Cisco Services Access ManagementRevised: October 3, 2013
Cisco Services Access Management (CSAM)Cisco Services Access Management (CSAM) provides for “party-centric” role-based access to new Cisco Smart Services. Rather than requiring a contract administrator to explicitly add a user to each and every contract to which they should be able to get support, party-centric access allows for all users that are associated to the customer or partner “party” to get access to the support services to which their company is authorized. The level of access can be further filtered or controlled through the assignment of specific access roles, allowing for a tailored user experience.
This chapter covers the following areas:
• Delegated Administrator Nomination
• Associating a User to Your Company
• Assigning a Role to a User
• Role Assignment-Show Existing Users
• Role Assignment-Search for Users by Full Name
• Role Assignment-Search by Cisco ID or E-mail
Delegated Administrator NominationOnly one partner is assigned as a Delegated Administrator (DA); that DA will then associate other users and assign them service roles. To become a DA, a Cisco Administrator must nominate the user for that customer/partner company. An e-mail notification is sent to the nominated user’s CCO ID indicating their Cisco Account is now associated with their designated company, and that they have been nominated to become the DA.
A sample nomination e-mail is shown below.
2-1Cisco API Console User Guide 2.0

Chapter 2 Cisco Services Access Management Delegated Administrator Nomination
Step 1 Click the “Cisco Service Access Management” link, which indicates acceptance of the DA nomination.
Step 2 The nominated administrator will then be linked to the CSAM home page at https://tools.cisco.com/CDCEB. After logging in, the DA will be presented with an “End User License Agreement (EULA)” for CSAM.
2-2Cisco API Console User Guide 2.0
2.0
Chapter 2 Cisco Services Access Management Delegated Administrator Nomination
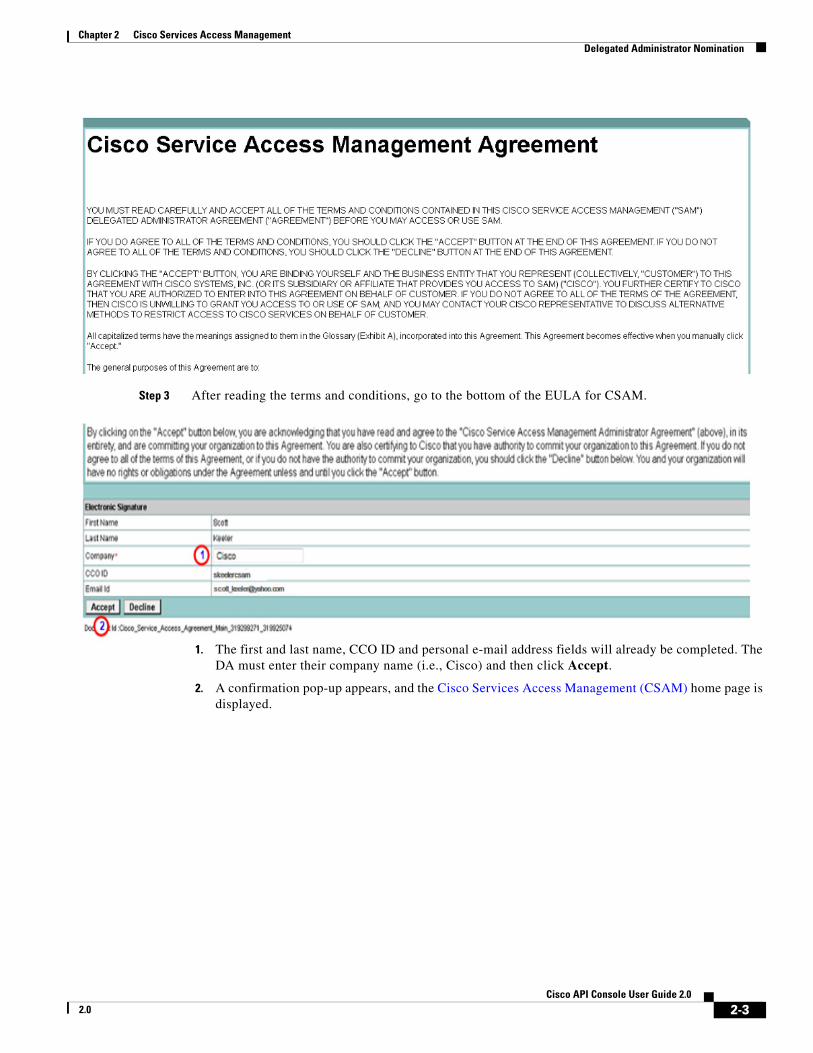
Step 3 After reading the terms and conditions, go to the bottom of the EULA for CSAM.
1. The first and last name, CCO ID and personal e-mail address fields will already be completed. The DA must enter their company name (i.e., Cisco) and then click Accept.
2. A confirmation pop-up appears, and the Cisco Services Access Management (CSAM) home page is displayed.
2-3Cisco API Console User Guide 2.0
2.0

Chapter 2 Cisco Services Access Management Delegated Administrator Nomination
Associating a User to Your CompanyAfter the Cisco Administrator’s nomination has been accepted to become a party DA, the DA can associate and assign roles to users for their company. To associate users do the following:
Step 1 On the CSAM menu choose User-Company Associations > Associate User to My Company. The “Select User for Company Association” page will open:
Step 2 Complete the field with either the user’s Cisco User ID, or E-mail.
2-4Cisco API Console User Guide 2.0
2.0
Chapter 2 Cisco Services Access Management Delegated Administrator Nomination
Warning Do not use both the Cisco ID and E-mail together in this field. If both are entered CSAM will return an error and invalidate the entry.
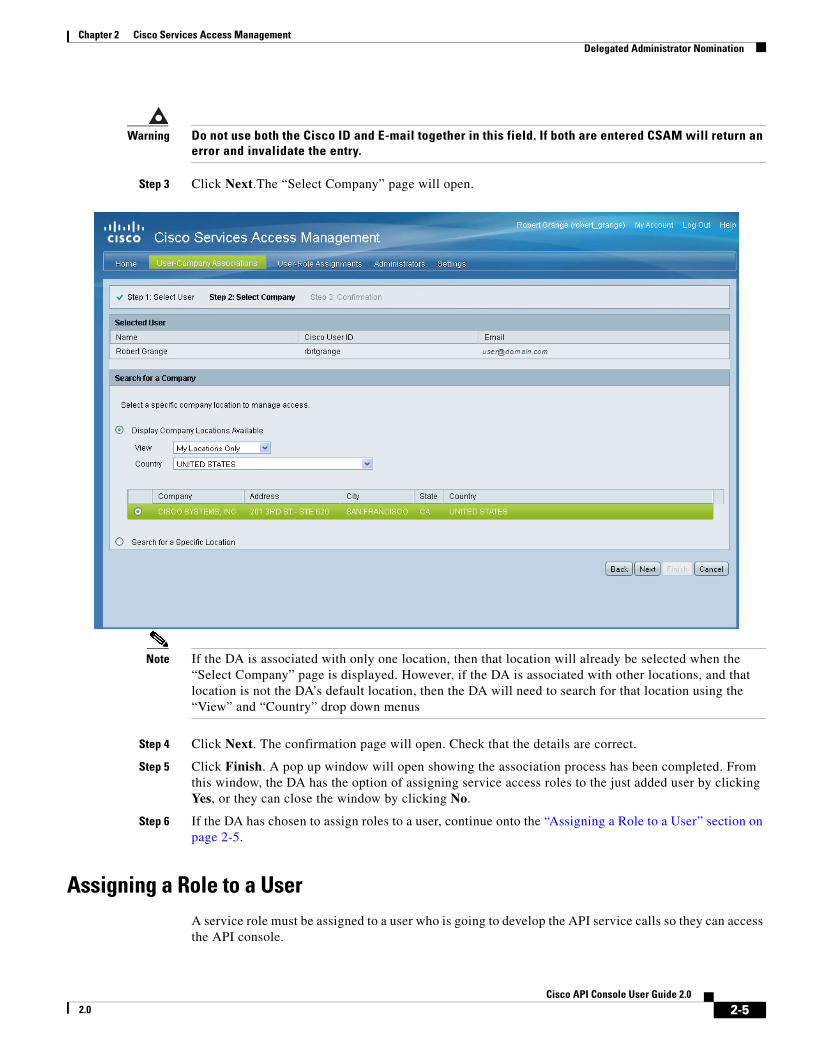
Step 3 Click Next.The “Select Company” page will open.
Note If the DA is associated with only one location, then that location will already be selected when the “Select Company” page is displayed. However, if the DA is associated with other locations, and that location is not the DA’s default location, then the DA will need to search for that location using the “View” and “Country” drop down menus
Step 4 Click Next. The confirmation page will open. Check that the details are correct.
Step 5 Click Finish. A pop up window will open showing the association process has been completed. From this window, the DA has the option of assigning service access roles to the just added user by clicking Yes, or they can close the window by clicking No.
Step 6 If the DA has chosen to assign roles to a user, continue onto the “Assigning a Role to a User” section on page 2-5.
Assigning a Role to a UserA service role must be assigned to a user who is going to develop the API service calls so they can access the API console.
2-5Cisco API Console User Guide 2.0
2.0

Chapter 2 Cisco Services Access Management Delegated Administrator Nomination
Note The Delegated Administrator will need to assign themselves to a user role in order to access The API Console. Delegated administrators are not assigned a user role by default.
To assign a role to a user, proceed to Step 1.
Step 1 On the CSAM menu choose User-Company Associations > Assign Roles to Users. The “Select User” page will open.
Step 2 In the Assign Service Role area, click a radio-button for one of the following options:
– Show Existing Users
– Search for User by Full Name
– Search by Cisco User ID or E-mail
Note If the DA has clicked Yes in Step 5 on page 5 "Associating a User to Your Company," the application will automatically search for the user, and the “Search by Cisco User ID or E-mail” section will be expanded and automatically completed. Simply click “Next.”
Role Assignment-Show Existing Users
The “Show Existing Users” function allows the DA to search for all users currently active in the system in order to assign roles to those users. To assign roles using this function, use the following steps:
2-6Cisco API Console User Guide 2.0
2.0
Chapter 2 Cisco Services Access Management Delegated Administrator Nomination
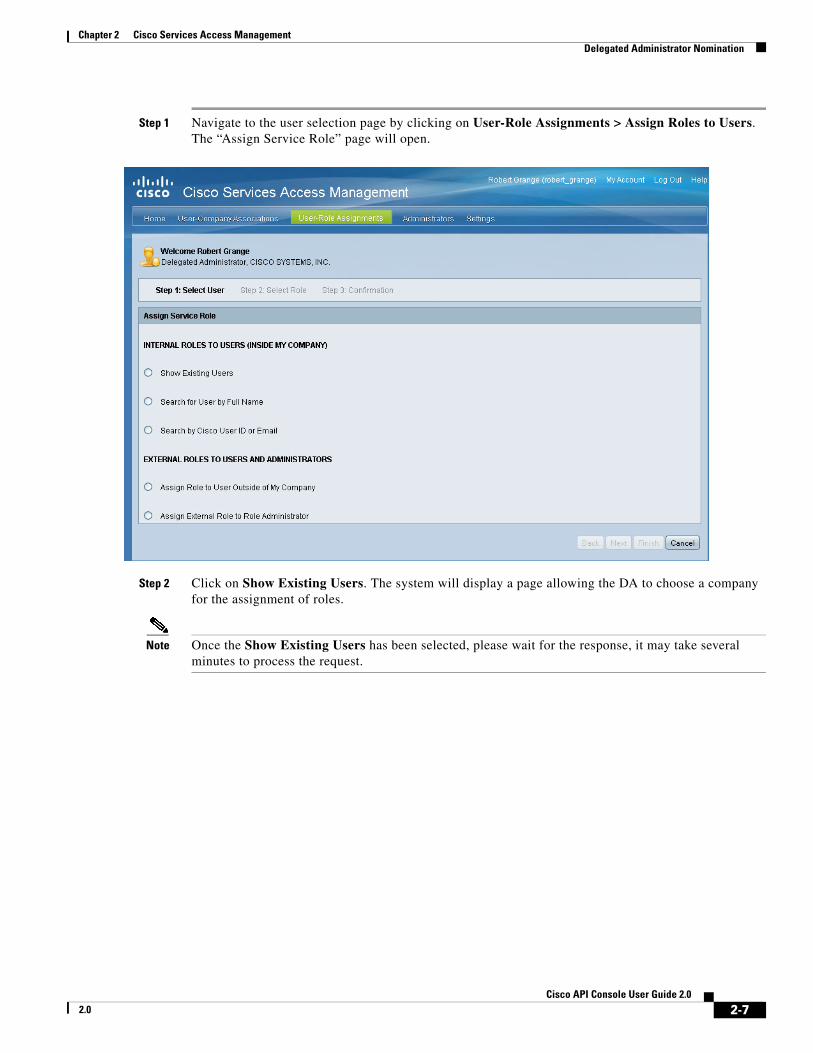
Step 1 Navigate to the user selection page by clicking on User-Role Assignments > Assign Roles to Users. The “Assign Service Role” page will open.
Step 2 Click on Show Existing Users. The system will display a page allowing the DA to choose a company for the assignment of roles.
Note Once the Show Existing Users has been selected, please wait for the response, it may take several minutes to process the request.
2-7Cisco API Console User Guide 2.0
2.0
Chapter 2 Cisco Services Access Management Delegated Administrator Nomination
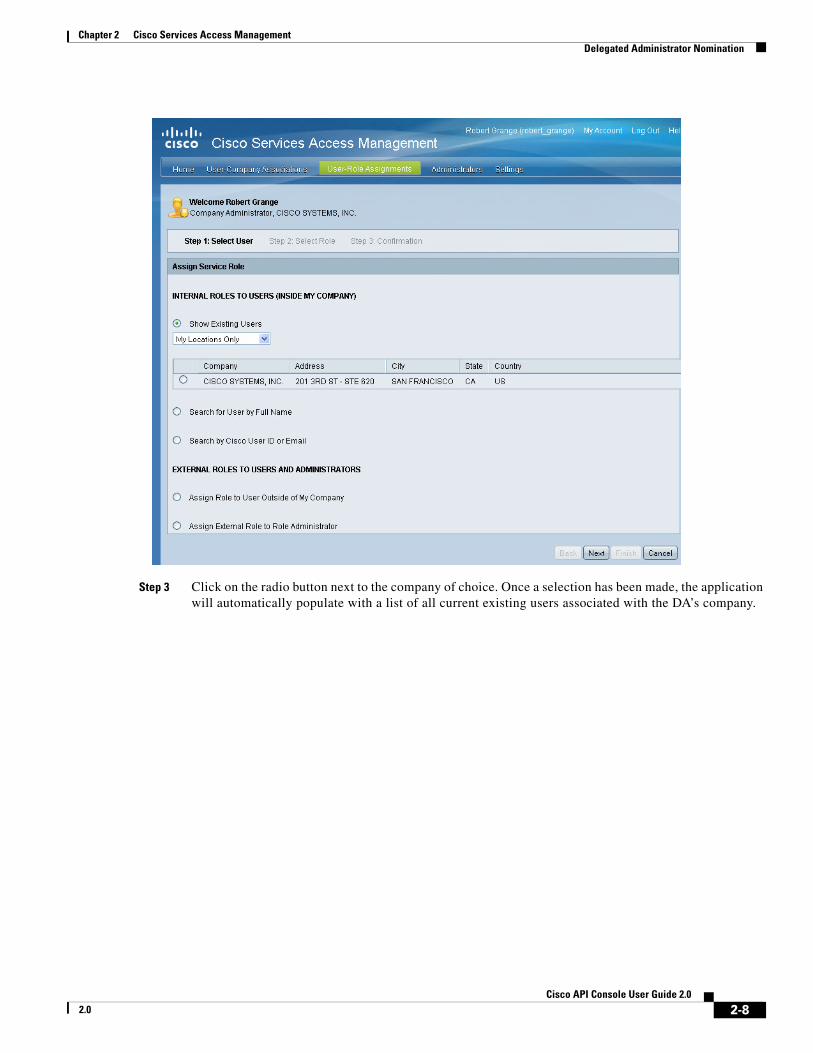
Step 3 Click on the radio button next to the company of choice. Once a selection has been made, the application will automatically populate with a list of all current existing users associated with the DA’s company.
2-8Cisco API Console User Guide 2.0
2.0
Chapter 2 Cisco Services Access Management Delegated Administrator Nomination
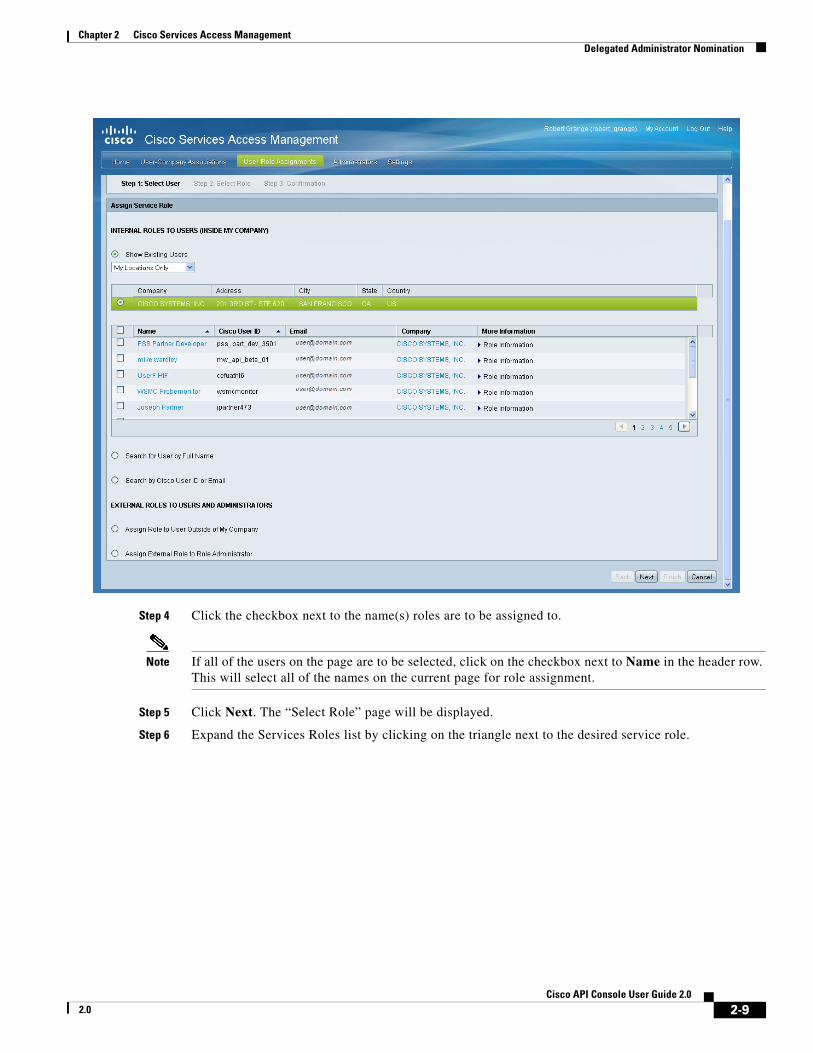
Step 4 Click the checkbox next to the name(s) roles are to be assigned to.
Note If all of the users on the page are to be selected, click on the checkbox next to Name in the header row. This will select all of the names on the current page for role assignment.
Step 5 Click Next. The “Select Role” page will be displayed.
Step 6 Expand the Services Roles list by clicking on the triangle next to the desired service role.
2-9Cisco API Console User Guide 2.0
2.0
Chapter 2 Cisco Services Access Management Delegated Administrator Nomination
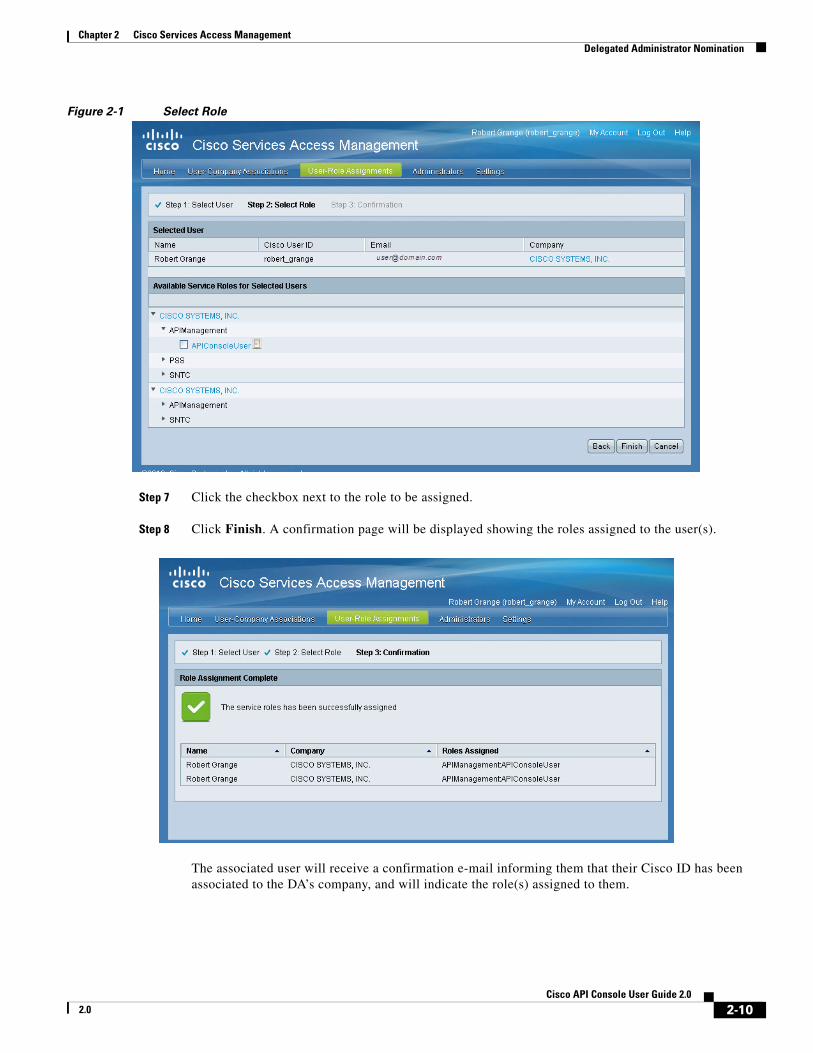
Figure 2-1 Select Role
Step 7 Click the checkbox next to the role to be assigned.
Step 8 Click Finish. A confirmation page will be displayed showing the roles assigned to the user(s).
The associated user will receive a confirmation e-mail informing them that their Cisco ID has been associated to the DA’s company, and will indicate the role(s) assigned to them.
2-10Cisco API Console User Guide 2.0
2.0

Chapter 2 Cisco Services Access Management Delegated Administrator Nomination
Role Assignment-Search for Users by Full Name
When adding user(s) for role assignment, the DA may search by the user’s full name.
Step 1 Navigate to the user selection page by clicking on User-Role Assignments > Assign Roles to Users. The “Assign Service Role” page will open.
Step 2 Click on Search for User by Full Name, CSAM will display the first/last name fields. Complete the first/last name fields.
Step 3 Click Submit. The application will return any known users by their full name. See Figure 2-2 below.
Note It is important to remember that if the DA searches by the user’s full name, that both the first and last name fields must be completed. If not, CSAM will return an error.
Figure 2-2 Search for User by Full Name
Step 4 Check the box next to the user to be assigned a role.
Step 5 Click Next. The user’s name, the CCO ID, and personal e-mail address are added as an entry in the “Selected User” table. Check to ensure this information/user is correct. See Figure 2-1 on page 2-10
2-11Cisco API Console User Guide 2.0
2.0

Chapter 2 Cisco Services Access Management Delegated Administrator Nomination
Step 6 Follow Steps 7-8 on page 2-10 to complete the role assignment.
Role Assignment-Search by Cisco ID or E-mail
A DA may also search for a user by their Cisco ID, or E-mail. To utilize this function, do the following:
Step 1 Navigate to the user selection page by clicking on User-Role Assignments > Assign Roles to Users. The “Assign Service Role” page will open.
Step 2 Click on Search by User ID or E-mail, CSAM will display a single field. Complete the field by using either the Cisco ID, or E-mail associated with the user. Figure 2-3 on page 2-12 shows the field with the user ID.
Warning Do not use both the Cisco ID and E-mail together in this field. If both are entered CSAM will return an error and invalidate the search.
Figure 2-3 Search by Cisco User ID or E-mail
Step 3 Click Submit. If the user is in the database and has been associated with the DA’s company, CSAM will return the user’s information.
2-12Cisco API Console User Guide 2.0
2.0
Chapter 2 Cisco Services Access Management Delegated Administrator Nomination
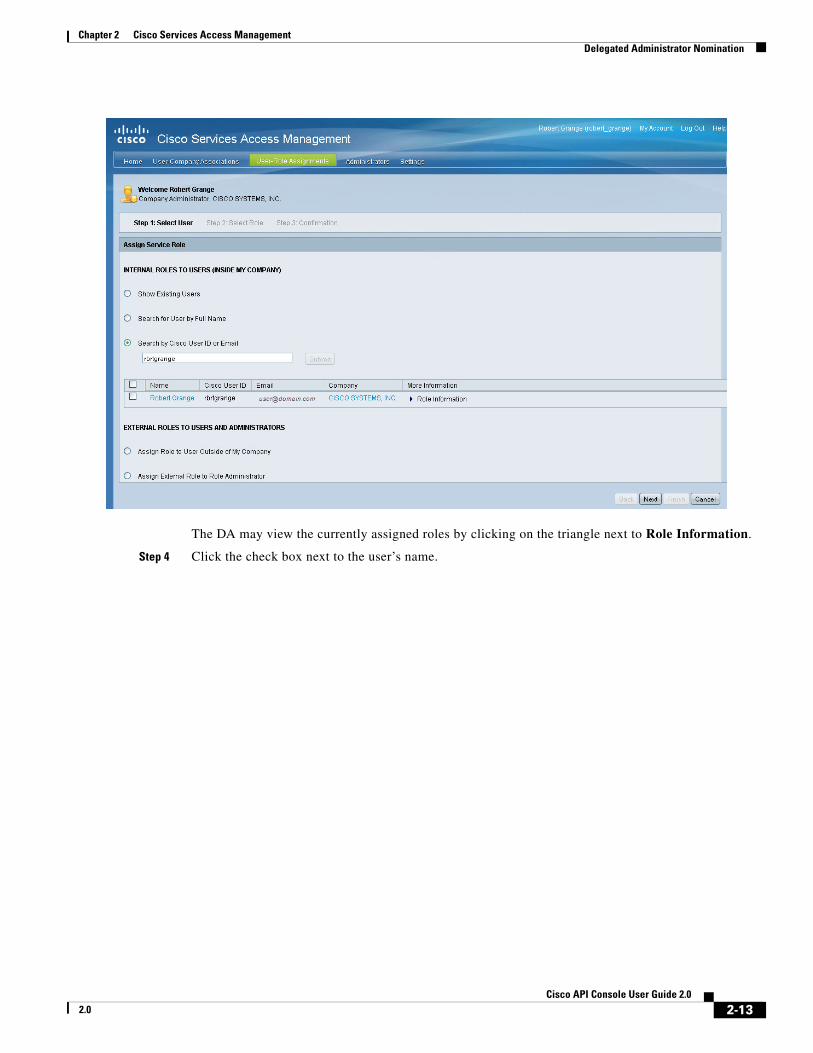
The DA may view the currently assigned roles by clicking on the triangle next to Role Information.
Step 4 Click the check box next to the user’s name.
2-13Cisco API Console User Guide 2.0
2.0

Chapter 2 Cisco Services Access Management Delegated Administrator Nomination
Step 5 Click Next.
Step 6 Follow Steps 6-8 on page 2-10 to complete the role assignment.
2-14Cisco API Console User Guide 2.0
2.0

C H A P T E R 3
API Console UsageRevised: October 3, 2013
The API ConsoleThis chapter relates to usage of the API Console, and assumes the user has completed the steps in the Chapter 1, “On-Boarding-CCO-Registration”, and Chapter 2, “Cisco Services Access Management (CSAM)”.
This chapter covers the following areas:
• Accessing the API Console
• Home Page
• Register an Application
• My Applications
• My APIs
• Support
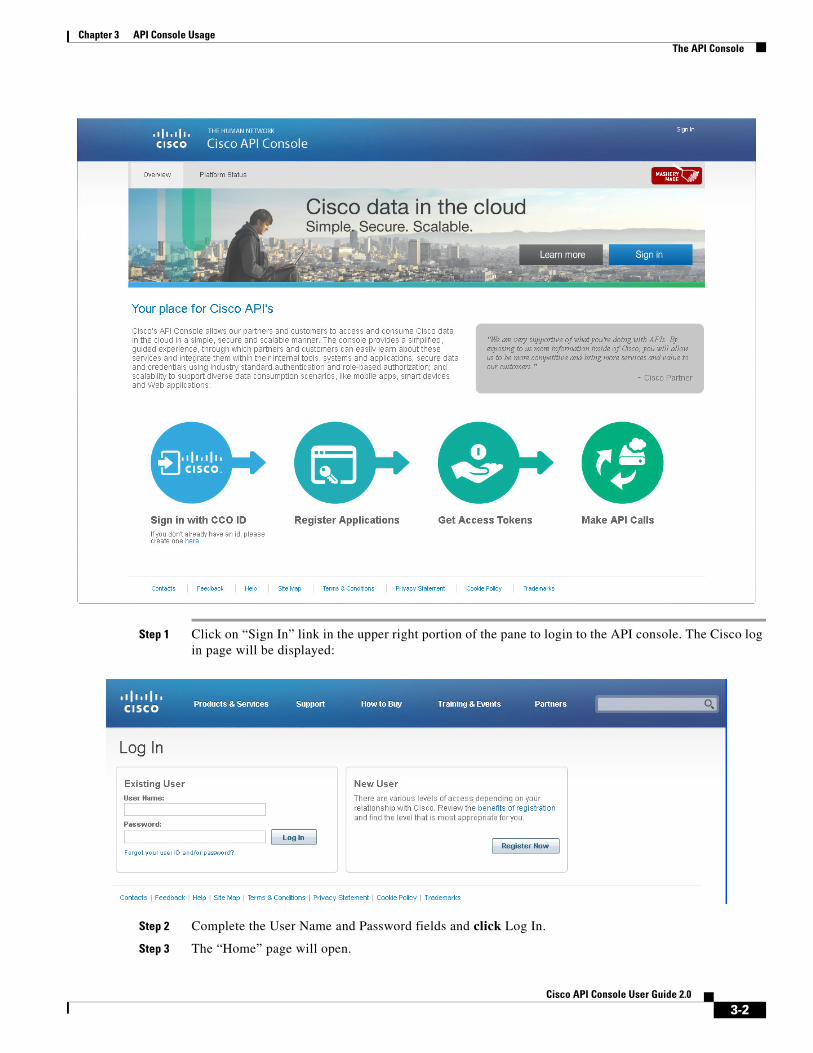
Accessing the API Console In a web browser navigate to https://apiconsole.cisco.com. The API Console home page appears:
3-1Cisco API Console User Guide 2.0
Chapter 3 API Console Usage The API Console
Step 1 Click on “Sign In” link in the upper right portion of the pane to login to the API console. The Cisco log in page will be displayed:
Step 2 Complete the User Name and Password fields and click Log In.
Step 3 The “Home” page will open.
3-2Cisco API Console User Guide 2.0
Chapter 3 API Console Usage The API Console
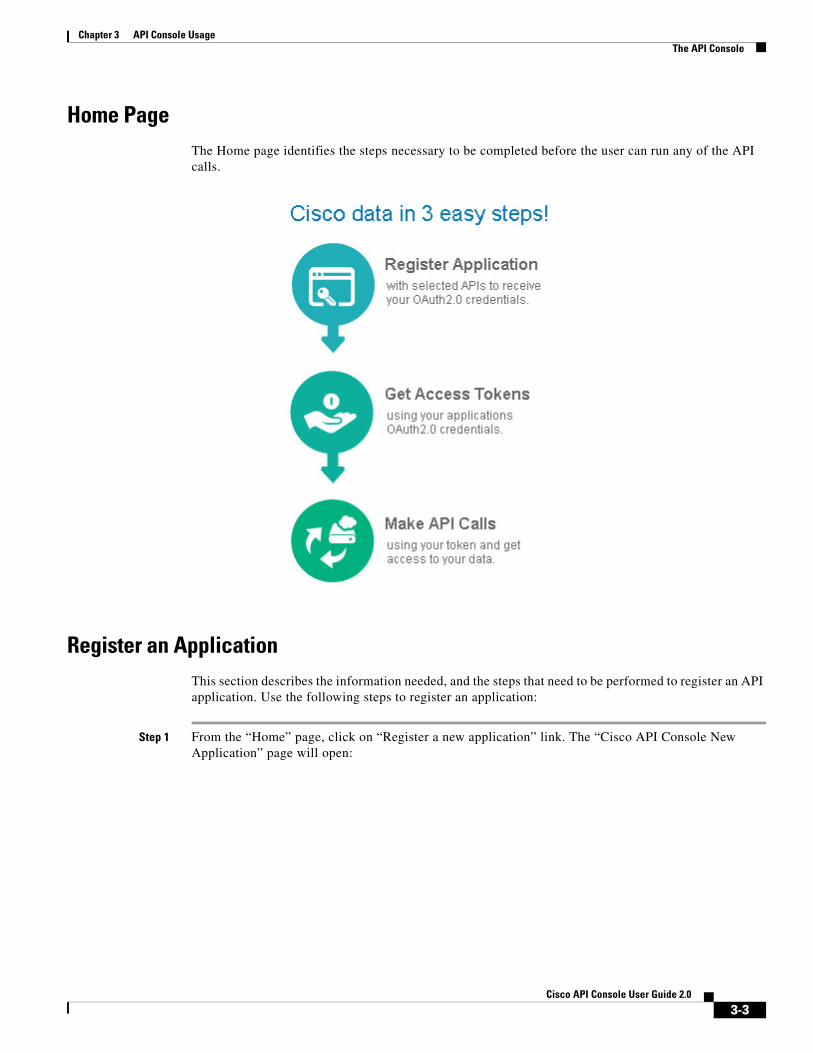
Home PageThe Home page identifies the steps necessary to be completed before the user can run any of the API calls.
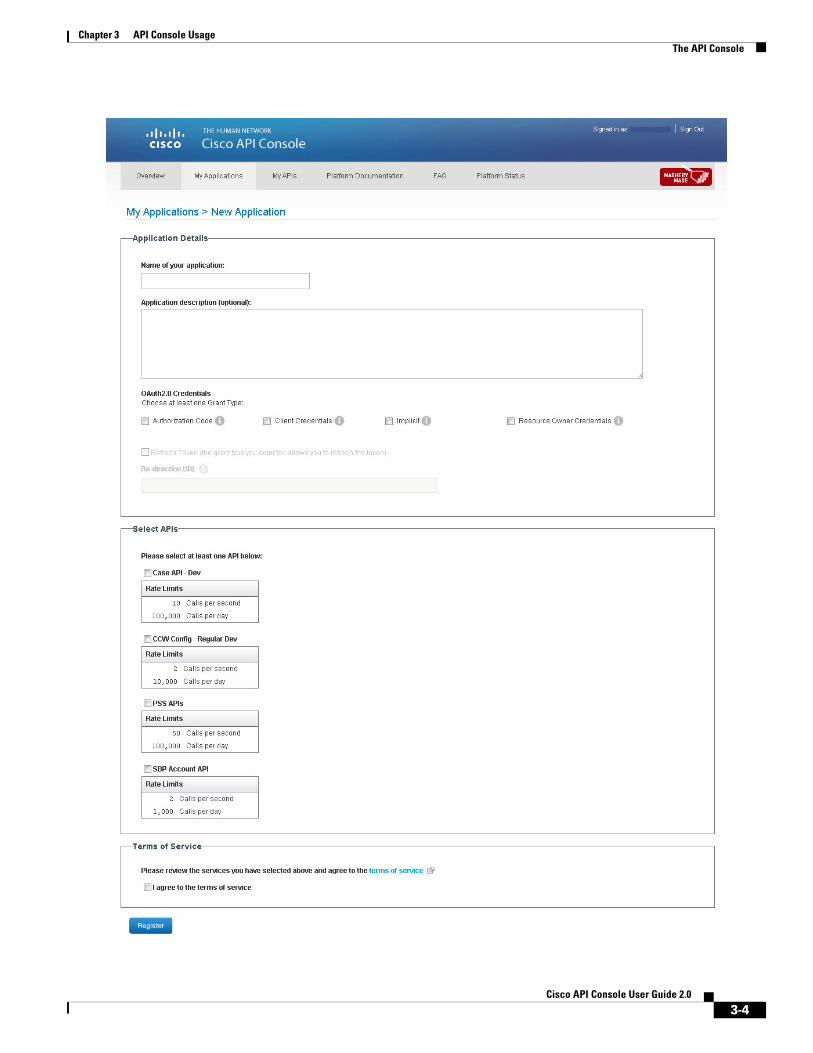
Register an ApplicationThis section describes the information needed, and the steps that need to be performed to register an API application. Use the following steps to register an application:
Step 1 From the “Home” page, click on “Register a new application” link. The “Cisco API Console New Application” page will open:
3-3Cisco API Console User Guide 2.0
Chapter 3 API Console Usage The API Console
3-4Cisco API Console User Guide 2.0

Chapter 3 API Console Usage The API Console
• Required Fields
– Name of your application
• Optional Fields
– Application Description
Step 2 In the “Name of your application” field, fill in the name of the application that is being registered.
Step 3 Select the OAuth2.0 Grant Type (see the Glossary for expanded explanations of the OAuth2.0 Grant Types) to be used with the application. The available choices are:
– Authorization Code
– Client Credentials
– Implicit
– Resource Owner Credentials
– Refresh Token (Token Validation)–Only valid for Authorization Code or Resource Owner Credential grant types.
– Register Callback URL
Note At least one or more OAuth v2.0 Grant type requested from this Client must be selected (checked). If either the Authorization Code or Implicit grant types are chosen, then entering a Redirection URL (where your client is known to execute) is required. The URL must be chosen at the time of registration. If the URL is not chosen, the platform will not allow the API to be registered.
The current recommendation for grant type usage:
• Client Credentials Grant are for a hosted client applications (Machine to Machine) from a trusted environment.
• AuthCode Grant for Web Server application (from a trusted environment).
• Implicit Grant for JavaScript or Native Mobile/Desktop applications.
• Resource Owner Grant is not recommended.
Note One client application rarely utilizes more than one of the above grant types.
Step 4 Select an API to be used with the application.
Step 5 Read the Terms of Service, then check the I agree to the terms of service agreement check box.
Step 6 Click the Register button.
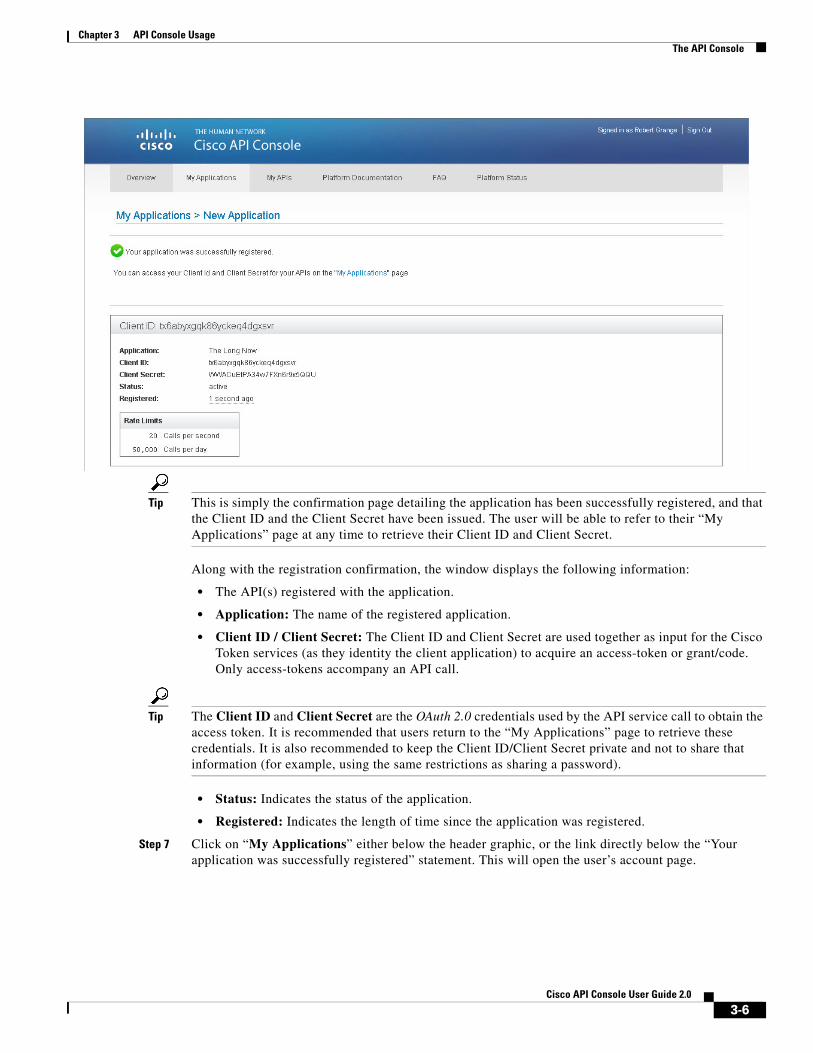
After the application registration is completed the console window displays an “Application Registered” message.
3-5Cisco API Console User Guide 2.0
Chapter 3 API Console Usage The API Console
Tip This is simply the confirmation page detailing the application has been successfully registered, and that the Client ID and the Client Secret have been issued. The user will be able to refer to their “My Applications” page at any time to retrieve their Client ID and Client Secret.
Along with the registration confirmation, the window displays the following information:
• The API(s) registered with the application.
• Application: The name of the registered application.
• Client ID / Client Secret: The Client ID and Client Secret are used together as input for the Cisco Token services (as they identity the client application) to acquire an access-token or grant/code. Only access-tokens accompany an API call.
Tip The Client ID and Client Secret are the OAuth 2.0 credentials used by the API service call to obtain the access token. It is recommended that users return to the “My Applications” page to retrieve these credentials. It is also recommended to keep the Client ID/Client Secret private and not to share that information (for example, using the same restrictions as sharing a password).
• Status: Indicates the status of the application.
• Registered: Indicates the length of time since the application was registered.
Step 7 Click on “My Applications” either below the header graphic, or the link directly below the “Your application was successfully registered” statement. This will open the user’s account page.
3-6Cisco API Console User Guide 2.0

Chapter 3 API Console Usage My Applications
My ApplicationsThe “My Applications” link will open a page displaying information for any currently registered applications (see below). When utilizing the API console, this page contains the Client ID and Client Secret obtained after the completion of the “Register an Application” section on page 3-3.
The console window lists the data by client application (name); each set of APIs associated with the application; the Client ID and Client Secret; and status for each of the client applications integration to a Cisco API. Also provided are Reports, Edit Application, and Manage APIs links. The page allows the user to perform the following tasks:
• Review API Metrics
• View Reports
• Edit an Application
• Add APIs
3-7Cisco API Console User Guide 2.0
Chapter 3 API Console Usage My Applications
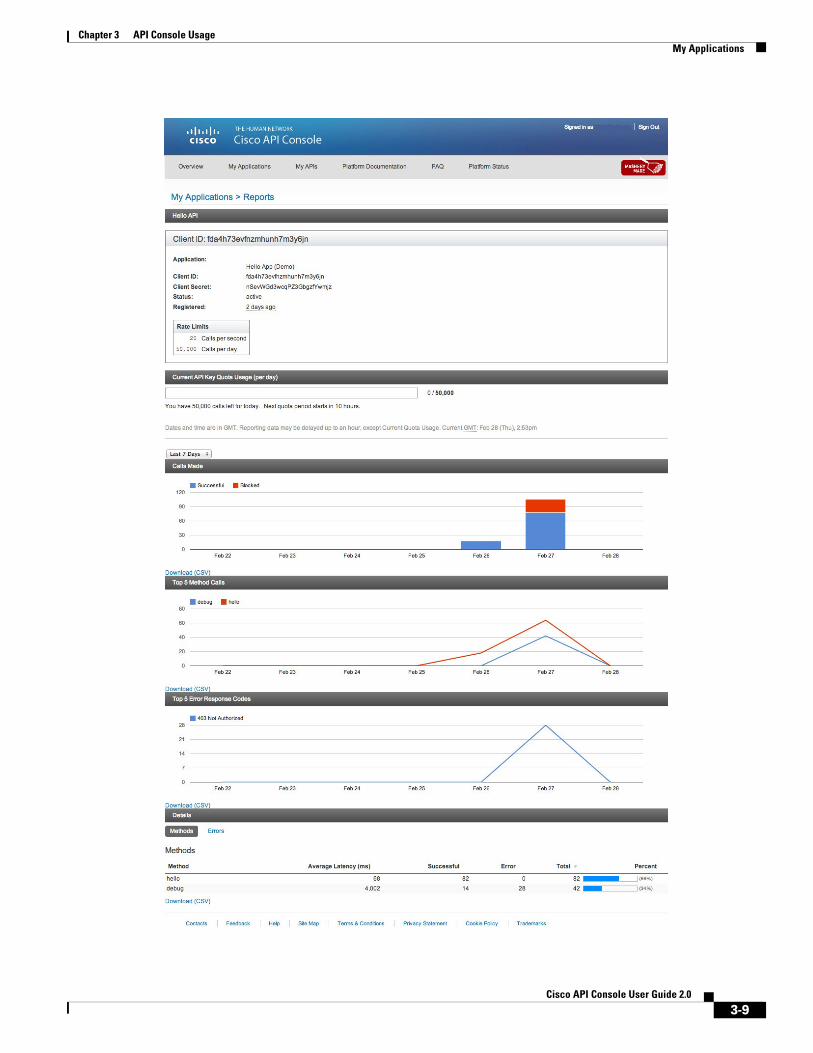
Review API MetricsThe API Console provides usage reporting of all of the API service calls that are made, and lets the user view reports that display different user and performance metrics. The Reports option also lets the user set various time frames to view user and performance metrics.
View ReportsThe Reports console window gives the user the option to specify a time frame to view information about monitored method calls and error codes. The current time frame options are:
• Today
• Last 7 Days
• This Month
• Last Month
To access the metrics information, do the following:
Step 1 Click on “Reports” in the Client ID Pane. The Client ID Activity console window appears and displays the following information:
– Identifies what portion of the allotted daily quota has already been used. Quota usage counters can be delayed up to 20 minutes.
– Lets the user specify a time frame.
– All API Calls – lists all the API service calls that were made.
– Top 5 Method Calls – identifies the five API service calls that were made most often.
– Top 5 Error Response Codes – identifies the five API error response codes that occurred most often.
Note All charts / tables of usage counts can be delayed up to 45 minutes.
– Details has two different categories of information:
– Methods – lists what method calls were used, and identifies when they were used.
– Errors – alerts the user to any errors that occurred when specific API calls were made. This gives the user the ability to investigate and fix any errors they may have encountered.
Step 2 Once the page has been displayed. The user can change the time period using the drop down menu to view the metrics for those time periods. Once a new selection has been made from the drop down window, the page will refresh with the metrics for the chosen time frame.
Note If the user is not on the “My Applications” page, they can access the page by clicking on the “My Applications” link below the header graphic.
3-8Cisco API Console User Guide 2.0
Chapter 3 API Console Usage My Applications
3-9Cisco API Console User Guide 2.0

Chapter 3 API Console Usage Edit an Application
Edit an ApplicationThe “Edit” function allows the user to update information for the chosen application. The user can change the name, description. or add a new grant type to a registered application.
Changing the Name and DescriptionTo edit the name and description information do the following:
Step 1 Navigate to My Applications.
Step 2 Click on “Edit Application” button in the pane for the application that is to be updated. The “Edit Application” page will open.
3-10Cisco API Console User Guide 2.0

Chapter 3 API Console Usage Edit an Application
Step 3 Complete the “Name” and “Application description” fields with the information to be updated.
Step 4 Click “Save.”
Changing Grant TypesThe APIx platform gives the user the flexibility to change grant types for their application. One example where a user might want to change their grant type is where the user has begun by using one grant type, but after time and usage the use case changes, and as such, the original choice of grant type may need to be updated. For more information on Grant Type selection see “Register an Application” section on page 3-3. To change a grant type complete the following steps:
Step 1 Navigate to the “My Applications” page.
Step 2 In the application frame to be edited, click “Edit Application.” The “Edit Application” page will be displayed.
3-11Cisco API Console User Guide 2.0

Chapter 3 API Console Usage Edit an Application
Step 3 Select the OAuth2.0 Grant Type (see the Glossary for expanded explanations of the OAuth2.0 Grant Types) to be used with the application. The available choices are:
– Authorization Code
– Client Credentials
– Implicit
– Resource Owner Credentials
– Refresh Token (Token Validation)–Only valid for Authorization Code or Resource Owner Credential grant types.
– Register Callback URL
Step 4 Click “Save.”
Delete an ApplicationThe user can delete an application depending upon their needs. To delete an application, use the following steps:
Note If the user decides to delete an application, be aware that this will delete all of the files associated with the application, including the Client ID/Client Secret. Once the application has been deleted, the Client ID/Client Secret will no longer be valid and can not be used for another application.
Step 1 Navigate to the “My Applications” page. The page should display all of the applications currently registered with the Platform and all APIs associated with that application.
3-12Cisco API Console User Guide 2.0
Chapter 3 API Console Usage Edit an Application
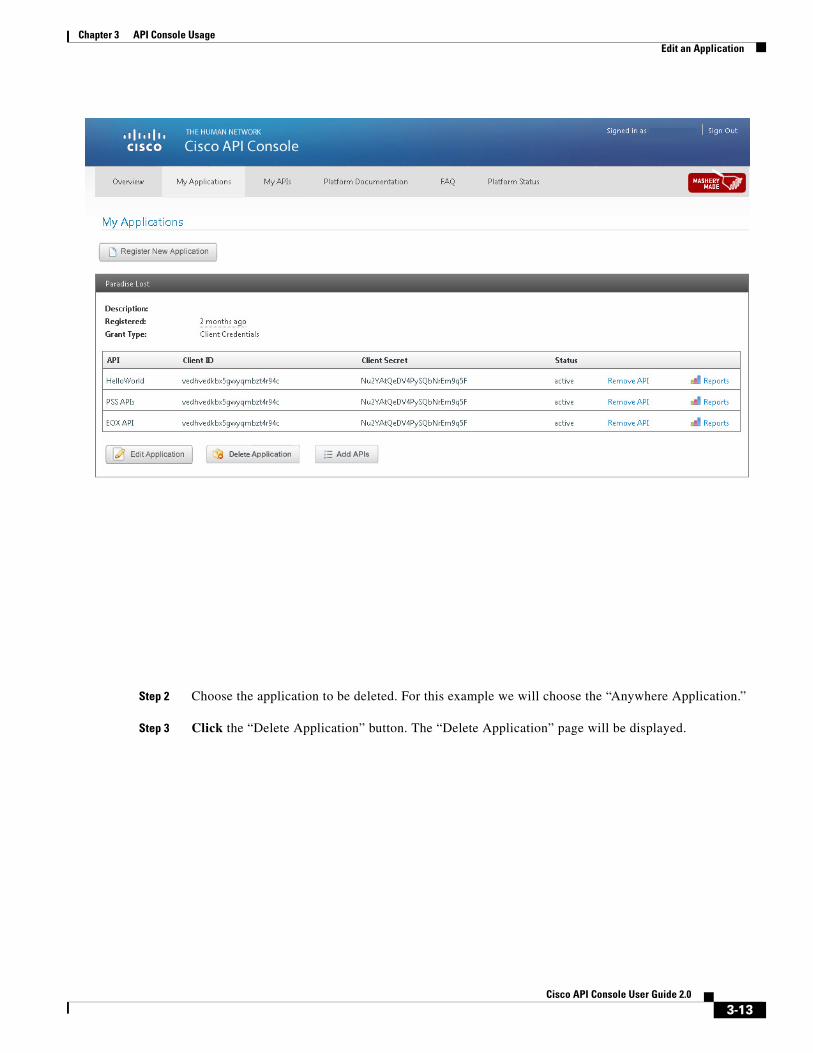
Step 2 Choose the application to be deleted. For this example we will choose the “Anywhere Application.”
Step 3 Click the “Delete Application” button. The “Delete Application” page will be displayed.
3-13Cisco API Console User Guide 2.0

Chapter 3 API Console Usage Edit an Application
Step 4 Click “Delete.” A new window will appear requesting a delete confirmation.
Step 5 Click “OK.” The “My Applications” page will be displayed showing the remaining registered applications (if there are any), or a blank page if there was only one registered application.
3-14Cisco API Console User Guide 2.0

Chapter 3 API Console Usage Add APIs
Add APIsAn application may use different services which will require the addition of different APIs. However, the initial grant type chosen when registering the original application will remain the same. Therefore, if a grant method was chosen for a web based application, then the newly added APIs will only be available for a web based application. As stated above in the “Register an Application” section on page 3-3, if the application is to be used for a different purpose than the original grant type, the user must register a new application for that grant type.To add APIs to an already registered application, do the following:
Step 1 Navigate to My Applications.
Step 2 In the application pane, click “Add APIs.” The “Manage Application APIs” page will open.
3-15Cisco API Console User Guide 2.0

Chapter 3 API Console Usage Add APIs
Step 3 Click the checkboxes for the APIs to be utilized by the application.
3-16Cisco API Console User Guide 2.0

Chapter 3 API Console Usage Add APIs
Step 4 Click the I agree to the terms of service checkbox.
Step 5 Click the Save button. The “New Client IDs Issued” page will open.
Step 6 Click on the “My Applications” link below the “Your Application was successfully registered” statement, or the “My Applications” tabbed link. The “My Applications” page will open displaying the newly added APIs for the application.
3-17Cisco API Console User Guide 2.0

Chapter 3 API Console Usage Add APIs
Remove APIs from a Registered ApplicationThe APIx Platform allows the user the ability to remove specific APIs from any registered application. The following steps will only remove the APIs, if the user requires deletion of the application, follow the steps in the “Delete an Application” section on page 3-12. To remove APIs from a registered application do the following:
Step 1 Navigate to the “My Applications” page. The Page will show all of the currently registered applications.
Step 2 Choose the APIs to be removed from the application. For this example we will remove the “HelloWorld” API from the “Paradise Lost” application.
Step 3 Click on the “Remove API” link to the right of the “Status” column.
3-18Cisco API Console User Guide 2.0

Chapter 3 API Console Usage My APIs
Step 4 The “Delete Client ID” page will be displayed.
Step 5 Click “Delete.” A new window will appear requesting a delete confirmation.
Step 6 Click “OK.” The “My Applications” page will be displayed showing the remaining associated APIs (if there are any), or a registered application frame with no associated APIs.
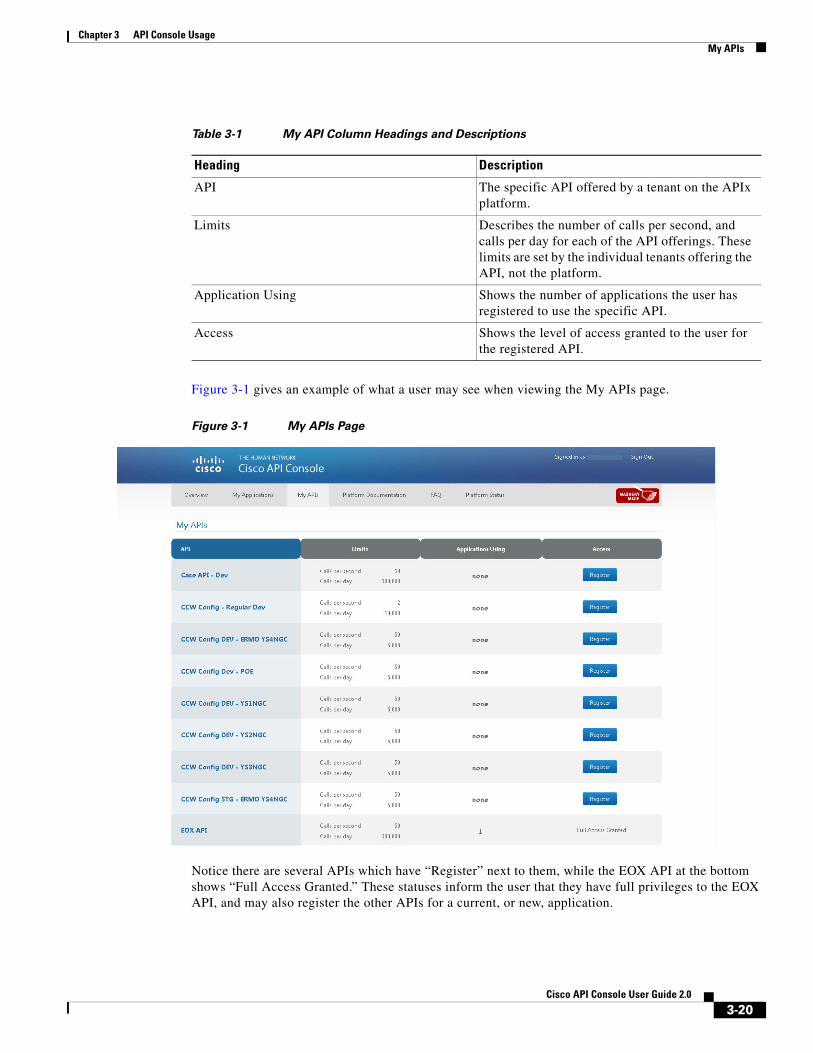
My APIsThe My APIs page displays all of APIs the user is currently registered for, the access level of the APIs, and any other APIs available for registration by the user. The My APIs page is divided into four columns: API, Units, Application Using, and Access.
3-19Cisco API Console User Guide 2.0
Chapter 3 API Console Usage My APIs
Figure 3-1 gives an example of what a user may see when viewing the My APIs page.
Figure 3-1 My APIs Page
Notice there are several APIs which have “Register” next to them, while the EOX API at the bottom shows “Full Access Granted.” These statuses inform the user that they have full privileges to the EOX API, and may also register the other APIs for a current, or new, application.
Table 3-1 My API Column Headings and Descriptions
Heading Description
API The specific API offered by a tenant on the APIx platform.
Limits Describes the number of calls per second, and calls per day for each of the API offerings. These limits are set by the individual tenants offering the API, not the platform.
Application Using Shows the number of applications the user has registered to use the specific API.
Access Shows the level of access granted to the user for the registered API.
3-20Cisco API Console User Guide 2.0
Chapter 3 API Console Usage Platform Status
Platform StatusThe Platform Status page gives the user updates on Alerts, Notifications/Announcements (archived and current), and API Availability Status.
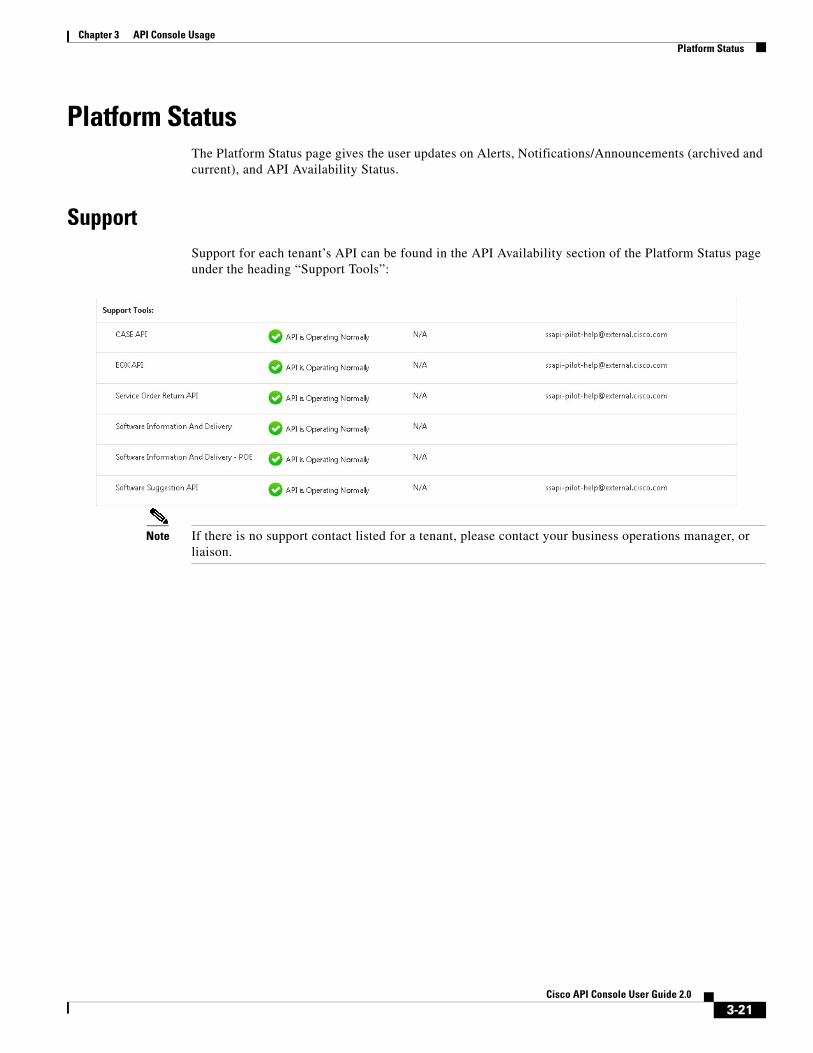
SupportSupport for each tenant’s API can be found in the API Availability section of the Platform Status page under the heading “Support Tools”:
Note If there is no support contact listed for a tenant, please contact your business operations manager, or liaison.
3-21Cisco API Console User Guide 2.0

G L O S S A R Y
Revised: October 3, 2013
A
AAA Stands for authentication, authorization, and accounting. For more information, refer to AAA protocol on the Wikipedia web site.
Authorization Code
Grant Type
The authorization code grant type is used to obtain both access tokens and refresh tokens and is optimized for confidential clients. As a redirection-based flow, the client must be capable of interacting with the resource owner's user-agent (typically a web browser) and capable of receiving incoming requests (via redirection) from the authorization server.
C
Client Credentials
Grant Type
The client can request an access token using only its client credentials (or other supported means of authentication) when the client is requesting access to the protected resources under its control, or those of another resource owner which has been previously arranged with the authorization server (the method of which is beyond the scope of this specification).
The client credentials grant type MUST only be used by confidential clients.
I
Implicit Grant Type The implicit grant type is used to obtain access tokens (it does not support the issuance of refresh tokens) and is optimized for public clients known to operate a particular redirection URI. These clients are typically implemented in a browser using a scripting language such as Java Script.
R
GL-1Cisco API Console User Guide 2.0

Glossary
Refresh Token Refresh tokens are credentials used to obtain access tokens. Refresh tokens are issued to the client by the authorization server and are used to obtain a new access token when the current access token becomes invalid or expires, or to obtain additional access tokens with identical or narrower scope (access tokens may have a shorter lifetime and fewer permissions than authorized by the resource owner). Issuing a refresh token is optional at the discretion of the authorization server. If the authorization server issues a refresh token, it is included when issuing an access token.
A refresh token is a string representing the authorization granted to the client by the resource owner. The string is usually opaque to the client. The token denotes an identifier used to retrieve the authorization information. Unlike access tokens, refresh tokens are intended for use only with authorization servers and are never sent to resource servers.
Resource Owner
Credentials Grant
Type
The resource owner password credentials grant type is suitable in cases where the resource owner has a trust relationship with the client, such as the device operating system or a highly privileged application. The authorization server should take special care when enabling this grant type, and only allow it when other flows are not viable.
The grant type is suitable for clients capable of obtaining the resource owner's credentials (user name and password, typically using an interactive form). It is also used to migrate existing clients using direct authentication schemes such as HTTP Basic or Digest authentication to OAuth by converting the stored credentials to an access token.
GL-2Cisco API Console User Guide 2.0
I N D E X
A
API Process
Overview of API Process 1-1
APIx Platform Procedure
Develop Application 1-2
Perform Onboard Registration 1-2
Review API Metrics 1-2
Application Registration
Optional Fields 3-5
Required Fields 3-5
Assigning a Role to a User 2-5
Associating a User to Your Company 2-4
D
Delegated Administrator 1-2
Delegated Administrator Nomination 2-1
M
My Account 3-7
Application
Delete an Application 3-12
Edit an Application 3-10
Changing Grant Types 3-11
Changing the Name and Description 3-10
Review API Metrics 3-8
View Report 3-8
O
On Boarding Overview 1-3
P
Perform Onboard Registration 1-3
R
Register for a CCO Id 1-4
S
Search
Search by Cisco User ID or E-mail
Figure 2-2 2-12
Search for User by Cisco ID or E-mail 2-12
Search for User by Full Name 2-11
Figure 2-1 2-11
T
The API Console
Accessing the API Console 3-1
Home Page 3-3
Register an Application 3-3
IN-1Cisco API Console User Guide 2.0