choosing the right materials substrates and setting …
TRANSCRIPT

34 CHOOSING THE RIGHT MATERIALS
SUBSTRATES AND SETTING BEDS
All tile requires a flat and stable surface, especially ceramic and stone tile. You
can tile over properly prepared concrete, drywall, and plaster, but other installations call for a substrate (see chart on page 51). Plywood is not suitable for mortared tiles. It pulls water out of mortar, and its faster expansion increases the potential of cracked joints. Here are the common substrates used with ceramic and stone tile.
Drywall Drywall, a core of gypsum compressed between two layers of heavy paper, provides an appropriate substrate for wall installations that won't get wet. Drywall is not suitable in wet areas. It is manufactured in different size sheets (4x8 feet is standard) and thicknesses (Y2 inch is common on walls). In wet areas, remove existing drywall
to the studs and install a waterproofed backerboard or a waterproofing membrane and cement backerboard.
Greenboard Green board is a drywall product whose paper layers are treated for water resistance. It is available in different thicknesses, but Y2 inch and % inch are used on walls. You can install it in locations that will receive infrequent moisture, but it won't stand up to repeated wetting . In any wet location, it's better to use backerboard.
Cement backerboard Cement backerboard is a cement-based material formed in one of two methods. A cement core is sandwiched between layers of fiberglass mesh, or the fibers are impregnated in the core. Cement board is
Drywall, Y4 inch
Greenboard, Yz inch
the most prevalent substrate for both wet and dry installations. It is made in 32- or 36-inch widths, up to 60-inch lengths, and in Y4- and h -inch thicknesses.
Another backerboard made of cement, ground sand, cellulose fiber, and additives does not contain fiberglass mesh. It is lighter than cement board, cuts easily, and includes an imprint to guide fastener placement. It comes in 4x8-foot sheets and %- and Y2- inch thicknesses.
Glass-mat gypsum backerboard Not to be confused with gypsum drywall, this materia l is made of a compressed gypsum core with embedded fiberglass and a water-resistant coating . It is lighter and easier to cut than cement backerboard but not as strong. It is available in 4x8-foot sheets and Y4- and Y2- inch th icknesses.

TYPICAL TILE INSTALLATIONS
Thin set for backerboard
Joists
Isolat ion membrane
Thinset for tile
CERAMIC AND STONE TILE ON SLAB
CH OOSING THE RI GHT MATERIALS / SUBSTRATES AND SETTING BEDS ~
Vinyl, parquet, laminate, cork, or carpet tile
NONMORTARED TILE 0 N CONCRETE SLAB
Vinyl, parquet, laminate, cork, or carpet tile
Sealer or wate rproof membrane
NONMORTARED TILE CERAMIC AN D STONE TILE ON WOOD FRAME FLOO R
Thin set for t il e
ON WOOD FRAME FLOOR
Cement backerboa rd
In a typical tile installation, a plywood subfloor provides a stable foundation and supports the weight of the tile. Cement backerboard laid on the subfloor in a bed of th inset mortar is screwed to the plywood and joists. Ti le is set in a mortar bed and grouted.
Self-leveling compounds
Self-leveling compounds, technica lly not a substrate, are used to level depressions in slabs and subfloors. Most ca ll for only light mixing with water and level themselves when poured. Quick-setting brands allow tiling within hours.
Sel f-leveling compounds work best when applied in th icknesses of less than 1 inch. If using a compound to fill a deeper depress ion, make more than one pour, but check the manufacturer's directions first.
Pour the compound after completing all other repa ir work. Doing so ensures that the compound stays clean and ready for tiling.
Commercially applied gypsum-based compounds are excel lent for leve ling floors on which surface rad iant heating systems have been insta ll ed (pages 82- 88)
Installations over a concrete slab may require an isolation membrane to keep cracks from telegraphing to the tile. Wet locations such as shower enclosures need a waterproof membrane under the backerboard.
___..,. ....
(ji·Hi(\'t PRO TIP
Don't substitute drywall screws
Screws made for backerboard installation are treated with a corrosion-resistant coating and are fo rmed with self-countersinking heads. Drywall screws are not a good substitutetheir heads may snap off and moisture may cause them to rust.
Purchase 1 %-inch fasteners when installing backerboard directly to studs and 2-inch screws when fastening backerboard over Yz-inch drywall.

36 CHOOSING THE RIGHT MATERIALS
MEMBRANES
Wherever a floor exhibits the potential of cracking ti le or allowing water to
penetrate, you need to install a membrane. Isolation and waterproofing membranes are appropriate for hard-bod ied tiles and are also necessary for certain vinyl and laminate instal lations.
Isolation membranes These materials allow substrates to expand and contract without telegraphing the movement to the tile. Two-part membranes, adhesive and mesh or chlorinated polyethylene (CPE), are applied directly to the surface to be ti led. The easiest materi als to use employ a roller-applied adhesive. On old, stable concrete, cover each crac k separately. On new concrete that you suspect will crack with age, apply the membrane to the entire floor.
Waterproofing membranes Use a waterproofing membrane in shower enclosures and any area that wi ll get wet. Felt paper, polyurethane sheets, and twopart products work well. Many products fun ction as both a waterproofing and isolation membrane.
Trowel-applied iso lation membrane
(i(BI(j'il PRO TIP: Use an isolation membrane Sound-control membranes
Seasonal crac k
L:__~
Structural ~~ cra ck ~
Look closely at a slab floor and you may discover that it contains two different types of cracks.
Seasonal cracking occurs when temperature changes cause the material to expand. At a seasonal crack, the concrete moves laterally, leaving the separated surfaces of the material at the same height
Structural cracks, caused by vertical shifts in the slab, leave one edge of the crack at a different height than the other.
Tile
Adhesive
- Concrete sl ab
Isolate seasonal cracks less than Ys-inch wide with a membrane to prevent them from being transmitted to the tile surface Isolation membranes will not keep structural cracks out of your tile surface, however. Fix the cause of a structural crack before setting the tile.
Because different materials expand at different rates, tile applied continuously over slab and wood floors may crack where the two floors join. Use an isolation membrane at these junctures {page 71)
Modern home building methods have reduced the size of the structural members without sacrificing the ir strength. While these practices reduce costs, they also result in th inner walls that transmit sound more easily from room to room.
If your planned tile project contains a wall or floor that separates a noisy area from a quiet one-for example, a family room over or next to an office-ask your suppl ier about a sound-control membrane.
Sound-control membranes come in different forms and are applied in the same fash ion as membranes used for waterproofing and crack isolation. Some products are multipurpose.

ADHESIVES
Adhesives hold the tile in place; they are generally divided into three categories.
Thinset mortar Th inset morta r is the most commonly used adhesive in tile installations. It is almost always the best product for floors and has wide applications in wall tiling installations. It offers great flexibility in placing tiles when wet, and when cured it provides greater strength than organic mastic.
Epoxy thinset Epoxy thin set sets up quickly. Its hard, almost impermeable consistency makes it useful in settings requiring chemical resistance. Th is thinset is more expensive and harder to apply than water-based or latex thin sets.
Organic mastic Organic mastic is made with either a latex or petroleum base and a carrier that evaporates and leaves a bonding agent stuck to the tile. This adhesive is not as strong or flexible as th in set. It is good for flat walls in prime condition. Make sure it's compatible with your materials.
~ THINSET MORTAR Additives and mixing
Although not impervious to water, thinset exh ibits highly water-resistant properties. Thinset mixed with water. however, may crack when cured. To improve its flexibi lity, mix it with a latex additive, fol lowing the manufacturer's directions. (Latex-modified thinset is also ava ilable.) In addition, latex improves the bond strength of the thinset. which is essential with vitreous or impervious tile such as porcelain.
Thinset comes in premixed or mix-ityou rself varieties-a cho ice that comes down to preference and cost
Premixed brands cost more, but mixing your own allows you to adjust the mixture to weather conditions, making it wetter in hot and dry climates or stiffer in cold and humid cond itions. You can also al ter its cons istency to provide optimal adhesion over many kinds of substrates and tiles.
Epoxy thin set
- -=..-:·-,~ '-'• "-;
Mastics for nonmortared tile
When choosing mastics for nonmortared tile, you'll find many all -purpose pressure-sensitive adhesives made from latex. Although these products may work just fine for your installation, many types of nonmortared tile require different mastics for different insta llations.
For example, vinyl tile laid on a basement floor requires a different mastic than the same tile set on plywood. Carpet tile can be laid with a permanent adhes ive or with a "release" mastic, which al lows you to remove damaged units. Adhes ives for cork are formulated specifically for its natural characteristics, and parquet wi ll last longer with a rubber-based or similar adhesive that allows fo r the expansion and contraction of its wood fibers.
I
CHOOSING THE RIGHT MATERIALS 37
Premixed thinset mortar
Ct~~IUC TI LE MASTIC
When working with mastics, stir the mastic if necessary, but do not thin it If it has begun to harden, do not use it Apply only enough to an area you can set within its "open" time (the time it takes the product to skim over) Clean tools and tile immed iately with the proper solvent
SAFETY FIRST Handling adhesives
Thinset and other adhesives conta in caustic ingredients. Solvent-based adhesives are potentially exp losive and harmful when inhaled. Wear gloves and a respirator when mixing all adhesives and keep the area wel l ventilated.
1-

38 CHOOSING THE RIGHT MATERIALS
GROUTS, CAULKS, AND SEALERS
Grouts, caulks, and sealers complete a tile installation. The use of each product
will vary with the kind of ti le insta lled.
Grouts Grout fills the joints between ceramic and stone tiles, but it does more than take up space. It strengthens the entire surface, increases flexibility, helps prevent water damage to the subsurface, and contributes to the design of the installation.
You can buy grout premixed or you can mix your own. Premix offers increased convenience but is slightly weaker. If the powdered grout you purchase does not contain a dry polymer, mix it with a latex additive instead of water for increased flexib ility, strength, color retention, and mildew and stain resistance. Sanded and unsanded grouts come in colors to match any tile .
Caulks Caulks are flexible materials used to fill joints that require maximum flexibilityexpansion joints, those around sinks and plumbing fixtures, and inside corners.
Caulk comes in two kinds of dispensersin tubes for use with a caulk gun or in squeezable tubes. Both sanded and unsanded mixtures are available in many colors. Always use silicone caulk; latex caulk is not as durable and changes color over time.
Sealers Sealers prevent liquid and stains from penetrating tiles and joints.
Penetrating sealers work their way into the surface of the material. Topical sealers remain on the surface of the tile in a thin layer and, depending on the product, can alter the appearance of the surface (page 105).
To seal joints, use an applicator designed specifically for this purpose. Use a mop or sealer applicator to seal the surface of unglazed tiles, a roller or brush for parquet.
Sizing the joints Certain kinds of tile generally look best with grout joints of a specific width. • Glazed tiles: Yls to Ya inch • Porcelain tiles: Ys to %inch • Terra-cotta tiles:% inch • Cement-bodied tiles: Ya to h inch • Granite, marble stone tiles: Y,s inch • Slate tiles: Ya to h inch
Use these dimensions as a guide. You can vary the size to suit the aesthetics of your installation and to make tiles fit evenly across the room, but larger joints are more likely to crack. Irregular tiles such as saltillo and other handmade pavers usually need large joints to make thei r edges look even and aligned with one another.

CHOOSING THE RIGHT MATERIALS / GROUTS, CAULKS AND SEALERS 39
What type of grout to use
Type Description and Uses
Unsanded grout Portland cement and additives. Used for grout joints of YIB inch or less in ceramic, marble, granite, and other stone tile installations.
Sanded grout Portland cement, sand (for strength), and additives. Used for grout joints wider than YIB inch. As the joint width increases, use grout with larger sand particles.
Epoxy grout Epoxy resins and hardeners. Used for high chemical and stain resistance, and in installations exposed to high temperatures. Also used with epoxy thinset to grout mosaics. More difficult to work with than other grouts.
Colored grout Unsanded or sanded grout with color additives. Premixed packages in hundreds of colors. Colors that contrast with the tile emphasize the geometry of the pattern. Grouts similar to the color of the tile will de-emphasize the pattern.
Mortar Portland cement, sand, and additives mixed in proportions suitable for masonry installations. Used to set brick pavers, slate, or rough stone.
Don't forget to use expansion joints
f--- 24' - -_j
\- Control joint
·~
30 '
When tile or a masonry surface covers a large expanse or where any of those materials meet a different material, their expansion will subject them to cracking. These locations require a cushion called an expansion joint.
Expansion joints are filled with a foam backer rod and topped off with caulk. Include the foam strip on your shopping list if you're tiling any of the surfaces or situations shown above.
COVED BASE Drywal
Foam strip ~ I inexpansion ..
1·
)Oin.t
Stud
Sill plate
Coved tile will crack here . without expansion joint Subfloor
Control joints (above left) are separations in sections of a concrete slab. They are built in on the perimeter and every 24 feet within the slab when it's poured. Tile laid on a concrete slab will need an expansion joint over these points. Without the foam backer rod, the movement of the slab will be telegraphed to the tile, causing it to crack.
Also allow for an expansion joint at the perimeter of tiled floors (above center). Leave a
WOOD COUNTERTOP
%-inch gap between the edge tile and the wall or the base of a caved tile base. Fill this gap with foam backer rod and cover it with caulk of the same color as your grout.
Countertop tiles move, too, so allow for an expansion joint where the countertop tiles meet the backsplash (above right).
Fi II the gaps with backer rod to the base of the tile and caulk the tile joint with colored caulk.
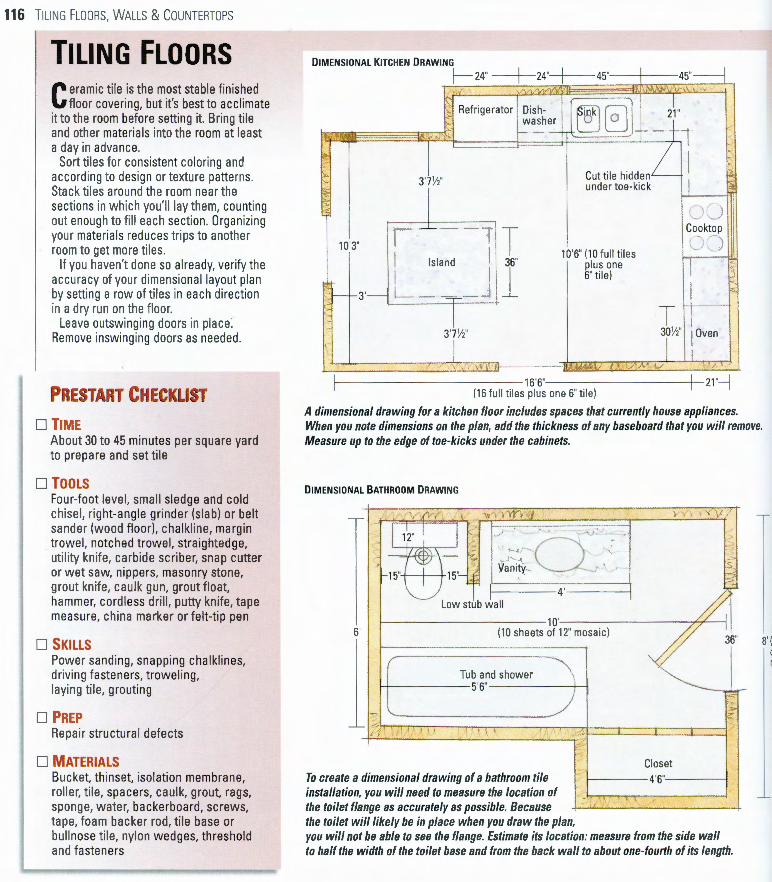
116 TILING FLOORS, WALLS & COUNTERTOPS
TILING FLOORS
Ceramic tile is the most stable finished floor covering, but it's best to acclimate
it to the room before setting it. Bring tile and other materials into the room at least a day in advance.
Sort tiles for consistent coloring and according to design or texture patterns. Stack tiles around the room near the sections in which you'll lay them, counting out enough to fill each section. Organizing your materials reduces trips to another room to get more tiles.
If you haven't done so already, verify the accuracy of your dimensional layout plan by setting a row of tiles in each direction in a dry run on the floor.
Leave outswinging doors in place: Remove inswing ing doors as needed.
PRESTART CHECKLIST
D TIME About 30 to 45 minutes per square yard to prepare and set tile
D TOOLS Four-foot level, small sledge and cold chisel, right-angle grinder (slab) or belt sander (wood floor), chalkline, margin trowel, notched trowel, straightedge, utility knife, carbide scriber, snap cutter or wet saw, nippers, masonry stone, grout knife, caulk gun, grout float, hammer, cordless drill, putty knife, tape measure, china marker or felt-tip pen
D SKILLS Power sanding, snapping chalklines, driving fasteners, troweling, laying tile, grouting
D PREP Repair structural defects
D MATERIALS Bucket, thinset, isolation membrane, roller, tile, spacers, caulk, grout, rags, sponge, water, backerboard, screws, tape, foam backer rod, tile base or bullnose tile, nylon wedges, threshold and fasteners
DIMENSIONAL KITCHEN DRAWING
~24"-+-
3'7W
10'3"
3'
Refrigerator
10'6" (10 ful l tiles plus one 6" tile)
1------------16'6"'----------+-21 "--4 (16 full ti les plus one 6" tile)
A dimensional drawing for a kitchen floor includes spaces that currently house appliances. When you note dimensions on the plan, add the thickness of any baseboard that you will remove. Measure up to the edge of toe-kicks under the cabinets.
DIMENSIONAL BATHROOM DRAWING
- -
6'
' .I \i,"\ ,·-'fY', ~.1 I ,. I ' { J
~~2 .. l \J ~ rl=r.:::r::;_ -= .. --~r--\=. ==~:::::;-_:. ~- _; -=r _ __:_:_:.__-r.,., '\:V ~ v - ~ ~· ~"
1-1 5" I 15''- a nlty- _,
~Low stub w,La-11 - ---4- .--- ----'1 ~-1------ ----- - 10 '- - ---- - -......,..//7-j/'--_ ---1- 11
(10 sheets of 12" mosaic) <:Y ~6 ..
Tub and shower 1-+------5'6"--------'--!
-~ I 'I ' 'I.! '
~~~-----------~---~~.·:·
To create a dimensional drawing of a bathroom tile installation, you will need to measure the location of the toilet flange as accurately as possible. Because
Closet I· 1-----4'6"-----i
the toilet will likely be in place when you draw the plan, you will not be able to see the flange. Estimate its location: measure from the side wall to half the width of the toilet base and from the back wall to about one-fourth of its length.
8' (8

A. Installing backerboard
1 Examine the floor carefully and mark defects-high spots, indentations and
depressions, popped nails, and cracks. Fix all defects that could interfere with the adhesive, backerboard, or tile installation. Install a waterproofing membrane over the fl oor if necessary.
~ fiX ALL DEFECTS Level high and low spots
Work in sections and use a 4-foot level. Place the level on the floor and rotate it within a section, noting and marking defects with a carpenter's pencil.
Although the floor shown here is a wood floor (page 68), the techn iques for fixing defects on a slab are essentially the same
TILING FLOORS, WALLS & COUNTERTOPS / TILING flOORS 117
2 Mark floor joist locations on the walls. Cut the pieces of backerboard so the
edges will be centered on the joists. Starting on a wall away from the door, trowel a section of thin set, lay the board, and fasten with screws. Continue the process, working toward the doorway.
(page 70). First chip out and fi ll major cracks. Then pour self-level ing compound or trowel thinset into depressions and feather the edges level with the floor. Use a belt sander to remove high spots on a wood floor; use a right-ang le grinder with a carb ide abrasive wheel on a slab. Oewax surfaces and clean.
_, .//./
3 Starting again at a wall away from the door, tape each backerboard joint with
2-inch pregummed mesh tape. Use 4-inch tape at the corners if the backerboard goes up the wall. Trowel a thin coat of thin set over the tape.
WHAT IF ... You're tiling a kitchen or bathroom?
In wet areas such as bathroom floors, apply adhesive wi th a ro ller, then the membrane, then trowel on more adhesive (page 69). Working in sections, start on a wa ll away from a door and cover the entire floor. Make sure the adhesive is spread all the way to the edge of the floor.

118 TILING FLOORS, WALLS & COUNTERTOPS / TILING FLOORS
B. Marking layout lines
1 Use the dimensional drawing to guide the placement of layout lines. From the midpoint of the walls or at a distance equal to
several tiles and grout joints, mark the location of the lines where a grout joint will fall. Dry-lay tiles and spacers in both directions to locate the line precisely. Anchor one end of the chalkline or have a helper hold it and snap the lines. Adjust the first pair so they are perpendicular and snap lines in layout grids of a manageable size.
~ lAYOUT LINES How to lay out different room configurations
RECTANGULAR ROOM L-SHAPE ROOM
20 '
2 If you have designed a border or accent pattern on your dimensional drawing, snap layout lines where the field tile ends
and the border begins. Mark lines within the pattern where the tile changes shape or size. If the design is especially complicated, drylay the tiles on a piece of heavy cardboard, trace and cut out the pattern, and use the cardboard as a stencil to lightly spray-paint the pattern on the floor. Tape the stencil down.
DIAGO NAL LAYOUT Original layout lines for establishing central
15 '
~
15' -
10~ Onginall ines adJusted for
30 ' 15 '
~''' '''m
Original lines at midpoints of walls adjusted for square and even borders
square and 15. even borders
The room's configuration also dictates your approach to layout lines and grids. For small square or rectangular rooms, the number of lines will be minimal and you probably won't need a line at the edges to mark the location of cut tiles. In a large room with large handmade pavers (above
20'
10'
left). add lines marking the location of the edge tiles and snap 3-foot grids to help keep it straight. In an L -shape room, position the lines along the longest walls so they fall in both sections. In all cases, snap the first pair of reference lines where a grout line will fall .

TILING FLOORS, WALLS & COUNTERTOPS / TILING FlOORS 119
1 Mix enough thin set for the number of layout grids you will set at one time. Dump mortar in the first grid, spread it to the lines, and
comb it. Lay the first tile in a corner of the grid, twisting it slightly 2 When the mortar has cured (usually overnight). mix enough grout
to cover a section and apply it with a grout float (pages 104- 105). Let the grout set up until a damp sponge won't pull it from the joint, then scrape the excess off the tile surface with the float. Dampsponge the residue from the surface, smoothing out the joints. Damp-sponge again. Let the surface dry. Scrub the haze from the surface with a rag. Grout the next section. Caulk the perimeter joint.
as you embed it. Continue laying tile, inserting spacers as you go. Check each grid with a straightedge to make sure the joints are properly al igned. Clean excess thinset from the joints and surface. Cut tile, for the edges and around obstructions and set it.
(j t.H I (\'1 PRO TIP
Hide the edges
A tile's cut edges look noticeably different from the molded factory edge. You can smooth the edges of cut tile with a masonry stone to make them less conspicuous, but smoothing takes time. Where possible, hide the cut edges of the tile under the cabinet toe-kicks by setting the tile with its factory edge toward the field tile.
~ CUT TILE Working around pipes and flanges
Cutting tile to accommodate pipes and flanges is easier after the field tile has been laid (page 1 03), and you can make more precise cuts.
Set the tile to be cut on the field tile, with the cut edge against the pipe or flange. Make an allowance for the size of the grout joint You can mark the width of the cut by eye or hold a small square against the pipe. Mark the dimensions of the cut with a fe lt-tip pen or ch ina marker. Then mark the tile slightly wider
than these lines, so the cut will allow for any expansion of the pipe.
If the arc of the cut is shallow, you can nibble it out with tile nippers. If not, use a wet saw to cut relief cuts from the edge to the arc. Remove the re lief cuts with tile nippers and snap out the remaining material to the arc. Remove just a little material at a time. Trying to nip out too much may crack the tile.

20 TILI NG FLOORS, WALLS & COUNTERTOPS / TILING fLOORS
D. Adding a tile base
1 Out-of-level floors force you to adjust the base tiles to make their top edges level. You'll make up the difference in the joint at the
floor. Lay the bullnose tile aga inst the wall with spacers. Adjust the tile heights with plastic wedges until the top edges of all tiles are level. Make sure the joint at the floor is as even as possible from one end to the other. Continue the layout on adjacent walls.
2 Remove the tiles and snap a level chalkline at the mark you made. Mark all the walls with chalkl ines in a similar fashion.
Mix up enough thinset to cover the area in which you 'll be working . Back-butter each tile and set it in place.
Mark the wall at the top edge of the final layout.
(j ?.B I !=''• PRO TIP
Wrap the corners
Double-bullnose tile has two rounded edges-one on top and another on the side. It is made especially to provide a smooth way to finish outside corners. The vertical rounded edge covers the square edge of the adjoining tile.
WHAT IF ... Bullnose is not available for your tile?
If bu llnose trim is not available in the style you need, cut trim tile from the same stock you laid on the floor. Determine the he ight of the edg ing you want and cut enough tiles to run the entire length of the wa ll. Cut each
piece of tile only once. Even if you can get more than one piece from a large floor tile, you'll want a factory edge on top. Instal l the cut tile and, if the factory edge is not finished to your liking, grout the top edge.

TILING FLOORS, WALLS & COUNTERTOPS / TILING FLOORS 121
3 Press tile in place, inserting spacers. Use the plastic wedges to keep the top edge in line. About every 3 feet, use a 4-foot level to
make sure the top edge is level. Adjust the tile if necessary by gently pushing or pulling on the wedges. Gently remove excess mortar
4 As a final step, grout the trim tiles and caulk the joints at the floor and top edge. Force grout into the vertical joints with a grout
float. When the grout has partially cured, remove the excess from the joint at the floor with a uti lity knife and from the surface with a damp sponge. Sponge-clean the surface at least twice and wipe off the haze with a clean rag . Caulk the joint at the floor and along the top edge of the trim. Smooth the caulk with a wet finger or sponge.
from the joints with a utility knife and clean the surface. Set and clean corner tiles and let the mortar cure overnight before grouting.
Trimming doors
Lowest--hinge knuckl e
1 Remove the door if necessary. Tap the hinge pin with an Bd nail and pull the pin out with
pliers. You may have to tap out a stubborn pin with a hammer and straight screwdriver inserted under the head of the pin.
Measure the distance from the tiled floor to the bottom of the lowest hinge knuckle on the door jamb.
2 Subtract % inch from your measurement and, using this length, measure from the
top of the lower pin knuckle on the door to the bottom of the door. Use a carpenter's square and straightedge to extend the line across the bottom of the door. Transfer the line to the other side of the door.
3 Score the lines on both sides of the door with a utility knife. Use a straightedge to
keep the knife on line and score deeply with several passes.
Clamp the door securely to a solid worktable and clamp a guide that will keep the saw blade on the cut line. Trim the excess off the door. sand the edges smooth, and rehang the door.