chemseptm - exporting to excel new with release 6.5
TRANSCRIPT

ChemSepTM - Exporting to ExcelNew with Release 6.5 (December 15, 2009)
Harry Kooijman and Ross Taylor
ChemSep has long had the ability to export results to Microsoft Excel; but Version 6.5 takes the ability to export results to Excel to new levels of convenience. Here we describe how to get exactly what you want into Excel from ChemSep.
1. Example 1: Getting Started
2. Example 2: Inserting an Empty Column
3. Example 3: Calculating Columns
4. Example 4: Physical Properties
5. Example 5: Diffusion Coefficients
6. Example 6: Key components
7. Example 7: Design Parameters
8. Example 8: Internals performance parameters
9. Example 9: Conditional calculations
10. Example 10: Text messages
A few notes before we start the tutorial.
1. It is possible to create an unlimited number of different export formats.
2. The file that defines the output format must begin with the word Export and ends with .def and must be saved in the bin folder of ChemSep.
3. The export definition file is case sensitive.
1

Example 1: Getting Started
Here is just a simple exercise to see how easy it is to design your own export format.
1. Open a text editor (e.g. Notepad – whatever you do, don't use Word for this exercise)
2. Type what appears below (including the blank lines)
newsheet:TabNamevar:stage
Svar:TemperatureFTvar:Pressurepsiapnewsheet:Tab2
3. Save the above in a plain text file. The name of the file must begin with the word Export. The rest of the name is up to you (but we suggest that you don't stop with Export). The file extension must be .def.
4. Copy the saved file to the \chemsep\bin folder
5. Start ChemSep and load any sep file.
6. Go to the File menu, select the Export results option and you will see a list that includes the name of the .def file file that you created in steps 2-4 above. In the illustration below you will see the name ExportTest because we created a file called ExportTest.def when we wrote this tutorial.
7. Select the export option that you have created and click on the Save button.
8. If the file name that you chose already exists you will be asked if you wish to overwrite it. You will also be asked the following question:
2

9. Click on yes to see the results of this exercise. The screen shot below shows what we have accomplished.
Now with that image before us we can see how the text file created above serves as the template for the Excel file we see in the screen shot.
The table below summarizes the meaning of each line of our export template. Items shown in bold in column 2 below are instructions and should not be changed.
Line Text Meaning1 newsheet: Instruction to create a new worksheet (tab sheet)2 TabName Name of the worksheet (tab sheet) created by the instruction above3 var: Instruction to populate a new column on the worksheet named on line 24 stage Label that will appear on the top of the column (in row 3; rows 1 and 2 are reserved)5 Line to enter the units to be used in the spreadsheet - empty because "stage" is dimensionless6 S Symbol for the stage index number7 var: Instruction to populate a new column on the worksheet8 Temperature Label that will appear on the top of the column (in row 3)9 F Units for the quantity to be displayed in this column
10 T Symbol for temperature11 var: Instruction to populate a new column on the worksheet12 Pressure Label that will appear on the top of the column (in row 3)13 psia Units for the quantity to be displayed in this column14 p Symbol for the pressure15 newsheet: Instruction to create a new worksheet (tab sheet)16 Tab2 Name of the worksheet (tab sheet)
3

It can be seen that each tab page is created by two lines and each column is characterized by four lines in our template text file. The first line of the block of four is the instruction var:. The second, third and fourth lines are text strings that specify, in order, the label to be written at the top of the column (2 nd row of a block of four), the units to be used (3rd row), and the symbol (4th row) that denotes what ChemSep variable is to be written to the Excel file.
It is now straightforward to add columns with other variables; all we need to know are the variable names. A list of the main stage variables appears below.
Standard ChemSep stage variables:S Stage numberx# Liquid mole fraction for component #xi# Liquid interface mole fraction for component #y# Vapour mole fraction for component #yi# Vapour interface mole fraction for component #K# K-value for component #T Temperature [K]Tb Bubble point temperature [K]TL Liquid temperature [K]Ti Interface temperature [K]TV Vapour temperature [K]Td Dew point temperature [K]p Pressure [Pa]L Liquid flow [kmol/s]V Vapour flow [kmol/s]HL Liquid enthalpy [kJ/kmol]HV Vapour enthalpy [kJ/kmol]SL Liquid entropy [kJ/kmol/K]SV Vapour entropy [kJ/kmol/K]SP Entropy production [kJ/kmol/K]R# Reaction rate for component # [kmol/s]N# Mass transfer rate for component # [kmol/s]C# Conversion for component # [kmol/s] M# Murphree efficiency for component #FE Baur EfficiencyFA Baur Efficiency AngleZ Stage height [m]WF Fraction of weepingFF Fraction of flooding
Exercise: Add columns for the molar flow rates of liquid and gas/vapor.
Exercise: Try changing the units as follows: Temperature (F to C to K), pressure (psia to bar to atm).
4
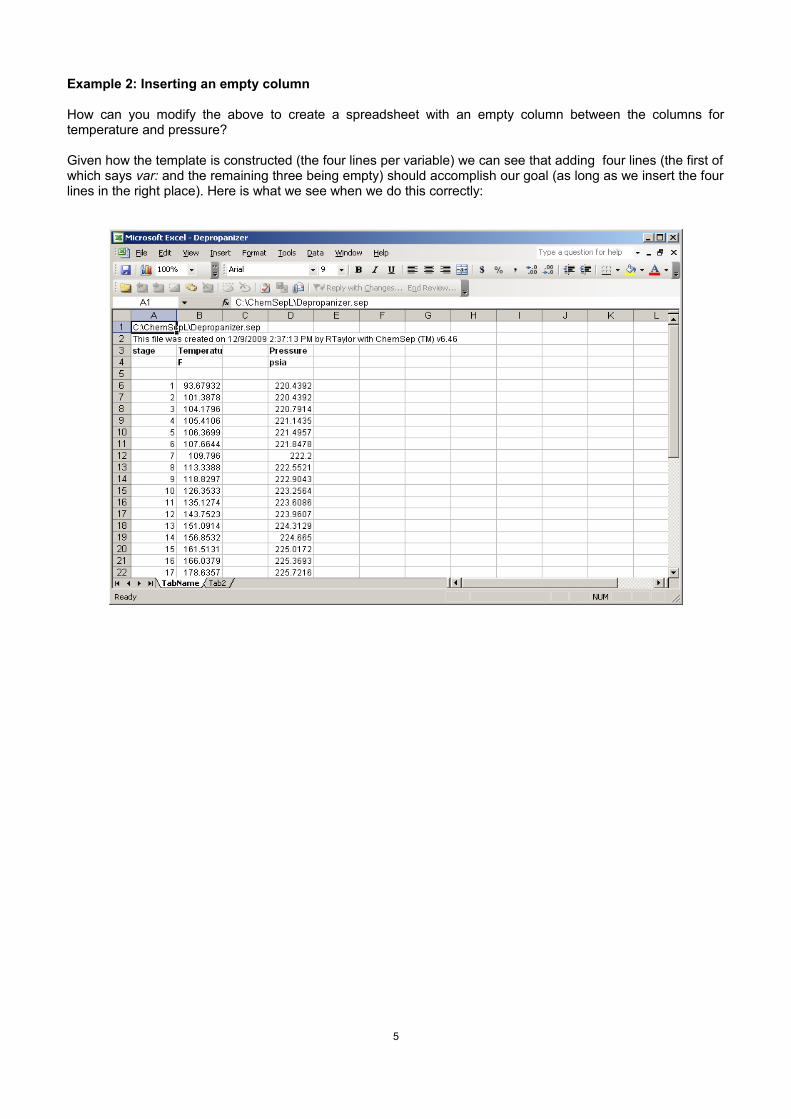
Example 2: Inserting an empty column
How can you modify the above to create a spreadsheet with an empty column between the columns for temperature and pressure?
Given how the template is constructed (the four lines per variable) we can see that adding four lines (the first of which says var: and the remaining three being empty) should accomplish our goal (as long as we insert the four lines in the right place). Here is what we see when we do this correctly:
5

Example 3: Calculating columns
The export mode is much more powerful than simply a means to print out the various things that are calculated during a ChemSep simulation. It is possible to combine quantities to compute something else that is of interest but that is not calculated directly. Mass flow rates are a case in point. ChemSep uses molar flows only while solving problems, very often it is the mass flows that are of more interest to the equipment designer. The mass flow rates can be obtained in Excel using the following additions to the template (again, in the appropriate place of course):
var:Liquid flow ratelb/hL*$MwL
for the liquid phase, and
var:Vapor flow ratelb/hV*$MwV
for the vapor phase.
Here the symbols for the vapor and liquid flow rates are simply multiplied by the molecular weights (symbols $MwL and $MwV). Note: the $ sign does not imply constancy of anything here; it is just part of the symbol we use to denote the molecular weight and the fact that the molecular weight changes along the column is most definitely taken into account.
The illustration below shows our table now that we have added the mass flows (and removed the empty column of the last exercise).
Hint: Remember that all of the variables listed in the tables that appear in this tutorial can be used in calculations to create new quantities.
6

Example 4: Physical Properties
We can also export physical properties as long as we use the proper key words: For example the following sequence:
var:Liquid viscosityPa.s$VisLvar:Liquid densitykg/m3$DsL
after the lines for the mass flow rates added above will give us:
We can now add columns for all of the mixture properties once we know their names; a list (and their SI units) is given below. Note that two not entirely interchangeable names are available for the properties; both names can be used after a simulation using the nonequilibrium, the second is the only option following a simulation with the equilibrium stage model. The name appearing second in this table should normally be enclosed within [].
ChemSep Export Names for Physical Properties
$DsL RHOL Liquid density [kg/m3]
$DsV RHOV Vapor density [kg/m3]
$Sigma SIGMA Surface tension [N/m]
$VisL VISL Liquid viscosity [Pa.s]
$VisV VISV Vapor viscosity [Pa.s]
$MwL MWV Liquid mole weight [kg/kmol]
$MwV MWL Vapor mole weight [kg/kmol]
$CpL CPL Liquid heat capacity [kJ/kmol]
$CpV CPV Vapor heat capacity [kJ/kmol]
$TcL TCL Liquid heat conductivity [J/K/m/s]
$TcV TCV Vapor heat conductivity [J/k/m/s]
7

Example 5: Diffusion Coefficients
Diffusion coefficients must be handled differently because they are properties of a binary pair of compounds:
To illustrate consider the following sequence of lines to be added to our export definition file:
var:Diffusivitym/s2$Dv1,3
Now we see:
where we have added a column that contains the diffusivity between species 1 and 3 in the gas/vapor phase.
Exercise: Add a column for gas/vapor diffusivity for species 2 and 3.
Exercise: Add a column for liquid diffusivity for species 2 and 3 (symbol $DsL).
Example 6: Key Components
The following illustrate how to find the key components. The output of each is a column containing a number of the designated key component that represents its position in the sequence of compounds.
var:Light key
{LKEY}var:Heavy key
{HKEY}The symbols {LKEY} and {HKEY} may be used as subscripts to obtain the diffusivity of the key component pair, as in: $Dv{LKEY},{HKEY}
8

Example 7: Design Parameters
It is often desirable to output various equipment design parameters. We add the following lines to our export template:
var:Diameterm{DS@P1}var:Aream2{DS@P1}^2*3.14/4
Now we see the diameter and the area appear in our spreadsheet.
It pays to spend some time to see how this was done:
Line Text Meaning1 var: Instruction to populate a new column in the worksheet2 Diameter Label that will appear on the top of the column3 m Line to enter the units to be used in the spreadsheet4 {DS@P1} Symbol for the first design parameter (this happens to be the diameter)5 var: Instruction to populate a new column on the worksheet6 Area Label that will appear on the top of the column7 m2 Units for the quantity to be displayed in this column8 {DS@P1}^2*3.14 Calculation of the area using the diameter (see line 4)
The symbol in line 4 is coded as follows: DS means Design Section, @ is a place holder for the column section number, and P1 means the first design parameter (and as noted this happens to be the diameter).
The conclusion we should draw from this exercise is that we can also output other design variables. What we get depends on what type of column internal we happen to have selected. That is: {DS@P4} for a sieve tray column is the liquid flow path length, whereas {DS@P4} for a column filled with some sort of random packing is the specific surface area of the packing. A complete list of the design parameters is given in the table below.
9

Internals Design Parameters in ChemSep
Design parameters – all packing types{DS@P1} Column diameter
{DS@P2} Height (of a stage)
~3 Name of packing
{DS@P4} Specific packing surface
{DS@P5} Void fraction
Design parameters – random packing{DS@P6} Nominal size
{DS@P7} Critical surface tension
{DS@P8} Packing factor
Design parameters – structured packing{DS@P6} Channel base
{DS@P7} Crimp height
{DS@P8} Channel side
{DS@P9} Equivalent diameter
{DS@P10} Channel flow angle
{DS@P11} Packing factor
Design parameters – all trays{DS@P1} Column diameter
{DS@P2} Tray spacing
{DS@P3} Number of passes
{DS@P4} Liquid flow path length
{DS@P5} Active area
{DS@P6} Total hole area
{DS@P7} Downcomer area
{DS@P8} Hole diameter
{DS@P9} Hole pitch
{DS@P10} Weir length
{DS@P11} Weir height
{DS@P12} Weir type (1 = segmental
{DS@P13} Notch depth or Weir diameter
{DS@P14} Serration angle
{DS@P15} Downcomer clearance
{DS@P16} Deck thickness
{DS@P17} Downcomer sloping
{DS@P18} Downcomer length
10

Design model parameters (only if applicable){SM@MTCP#} Mass transfer coefficient parameter number #
{SM@VFP#} Vapor flow model parameter number #
{SM@LFP#} Liquid flow model parameter number #
{SM@PDP#} Pressure drop model parameter number #
{SM@ENTP#} Entrainment model parameter number #
{SM@HLDP#} Holdup model parameter number #
{SM@DSNP#} Design method parameter number #
Example 8: Internals Performance Parameters
In the course of its calculations ChemSep computes many other quantities that can be exported to Excel. Some examples are shown below:
var:Flow parameter
$Flvvar:C-factorm/s$Cs
There are many such possible performance variables. The illustration below shows a few of them:
In the partial screen shot above slope refers to the slope of the equilibrium line (symbol FS) and was obtained using this sequence:
var:Slope
FS
The sequence below gives the HETP and the average HETP
var:HETPft[HETP]
11

var:Ave HETPft{AHETP1}
Note the differences here: [HETP] reports the local (by stage) HETP; {AHETP#} reports the average HETP for column section #.
The other symbols used to create this screen shot appear in the more complete table below.
Column Performance Variables in ChemSep
FS Slope of the equilibrium line
[FFAC] Superficial F-factor [m/s (kg/m3)0.5] (same as $Fs)
{AFFAC#} Average F-factor for column section # [m/s (kg/m3)0.5]
[HETP] HETP [m]
{AHETP#} Average HETP for column section # [m]
[HTU] Height of an overall transfer unit [m]
{AHTU#} Average HTU for column section # [m]
$Atot Interfacial area [m2]
$Avap Vapor interfacial area [m2]
$Aliq Liquid interfacial area [m2]
$tV Vapor residence time [s]
$tL Liquid residence time [s]
$NTUv#,# Vapor Number of Transfer Units for components #,#
$NTUl#,# Liquid Number of Transfer Units for components #,#
$HTCv Vapor Heat Transfer Coefficient [J/K/m2/s]
$HTCl Liquid Heat Transfer Coefficient [J/K/m2/s]
$Ml Liquid mass flow [kg/s]
$Mv Vapor mass flow [kg/s]
$Qv Vapor volumetric flow rate [m3/s]
$Ql Liquid volumetric flow rate [m3/s]
$Uv Vapor velocity [m/s]
$Ul Liquid velocity [m/s]
$Flv Flow parameter
$Vload Vapor loading [m/s]
$Qlw Weir loading [m3/s/m]
$Ud Downcomer liquid velocity [m/s]
$Fs Superficial F-factor [m/s (kg/m3)0.5]
$Csf Capacity factor
$Hwt Wet liquid height [m]
$Hcl Clear liquid height [m]
$Hr Residual liquid height [m]
$Hd Dry pressure drop liquid height [m]
$How Height of liquid over the weir [m]
$Hg Liquid height gradient [m]
$Hf Height of the froth [m]
12

$Hdb Clear downcomer backup height [m]
$PhiL Fractional liquid entrainment
$PhiV Fractional vapour entrainment
$Pd Pressure drop [Pa/m]
$Qmw Minimum wetting rate [m/s]
$Ae Liquid entrainment mass ratio
$Alpha Vapour fraction on the tray
$Eps Liquid fraction on the tray
$Tv Vapour residence time on the tray
$Tl Liquid residence time on the tray
$Uh Hole velocity [m/s]
$Fr Froude hole number
$Wflx Weep flux [m3/s]
$AlphaD Vapour fraction in the downcomer
$TimeD Residence time of liquid in the downcomer
$ff Fraction of flooding
$ffL Fraction of flooding (Leva)
$ffK Fraction of flooding (Kister)
$ffP Fraction of flood (by packed design)
$fMOC Fraction of max. capacity (IMTP packing only)
$WF Fraction of Weeping
$Fp Packing Factor
$KFp Kister method packing Factor
$Cs C-Factor
$Csult Ultimate capacity
$YLevaN GPDC capacity (Leva 1992)
$YKister GPDC capacity (Strigle/Kister&Gill)
$YNorton GPDC capacity (Norton)
$SF System Factor
$jetFF Jet flood fraction
$bkupFF Downcomer backup flood fraction
$dcckFF Downcomer choke flood fraction
$dcvFF Downcomer velcoity flood fraction
$dcrtFF Downcomer residence time flood fraction
$wlFF Weir load flood fraction
$Re Reynolds number (packed columns)
$kV#,# Gas/vapor mass transfer coefficient for components #,#
$kL#,# Liquid mass transfer coefficient for components #,#
$Dia Diameter
$Area Area
$SecHt Section height
$Dp Nominal size of packing
$Ap Specific area of packing
13

Example 9: Conditional Columns
The Flexible Export feature permits some simple conditional tests to be carried out. Here is an example:
var:Diameter < 3m (1 if true)
!a=(3.0);!b=(1);!c=(0);limit1({DS@P1})
The first line is the usual instruction for a new column. The second line is a text string that will appear at the top of the column. The third line is empty because there are no units associated with the result (it is either true – to be indicated by the display of a 1, or not true, in which case we will see a 0).
The fourth line is the “if” test. The partial statement !a=(3.0) assigns to a the cutoff value for the test (3m). The phrase !b=(1) assigns the value to appear if the test result is true, and !c=(0) assigns the value to appear if the test is false. Finally, the test is actually carried out with the logical function limit1.
Here is the result of this when added to our earlier example (which happens to be the depropanizer test case that comes with ChemSep). In this example we can see that the result of the test is true for the rectifying section and not true for the stripping section. We can also confirm that the test has been carried out correctly since the diameter appears in the second last column. Also note that the cells for stages 1 and 30 are empty – as they should be since they represent the condenser and the reboiler respectively.
Here is another example of a conditional column; in this case the test is slightly more sophisticated:
var:Diameter 1:<2.0m 2:<3m 3:else
!a=(2.0);!b=(3);!c=(1);!d=(2);!e=(3);limit2({DS@P1})
Note that this is a three-way test. Can you guess what the outcome will be (Hint: the second line above is a text string).
14

Example 10: Text Messages
Finally, the Flexible Export feature permits printing text strings simply by preceding them with a single opening quote mark. Here is an example:
var:Message
'Hello, this is a message from ChemSep
The result is shown below (after adding this sequence to our export file and inserting an empty column before the message column).
15