checklists of nursing procedures in nurs 317 clinical
TRANSCRIPT

King Saud university NURS 317
College of Nursing CLINICAL APPLICATION FOR ADULT HEALTH NURSING Medical Surgical Department
1
CHECKLISTS OF NURSING PROCEDURES
IN
NURS 317
CLINICAL APPLICATION
For
ADULT HEALTH NURSING
Name of Student ___________________
Student No._______________________
Name Of Teacher __________________
Clinical Area ______________________
DR. IRENE MARIN - ROCO
Course Coordinator

King Saud university NURS 317
College of Nursing CLINICAL APPLICATION FOR ADULT HEALTH NURSING Medical Surgical Department
2
Note: Students are REQUIRED to perform at least five (5) Nursing Procedures within the
semester
CHECKLISTS OF NURSING PROCEDURES
1. Performing General Physical Assessment
2. Teaching a Patient to Use an Incentive Spirometer
3. Administering Medication via metered Dose Inhaler (MDI)
4. Caring For A Patient Receiving Patient Controlled Analgesia
5. Providing Preoperative Patient Care: Hospitalized Patient
6. Providing Preoperative Patient Care: Day of Surgery
7. Providing postoperative Patient Care When Patient Returns to Room
8. Obtaining Capillary Blood Sample for Glucose Testing
9. Obtaining an Electrocardiogram (ECG) Monitoring
10. Administering a Blood Transfusion
11. Changing and Emptying an Ostomy Appliance
12. Employing Seizure Precautions And Seizure Management

King Saud university NURS 317
College of Nursing CLINICAL APPLICATION FOR ADULT HEALTH NURSING Medical Surgical Department
3
TEACHING A PATIENT TO USE AN INCENTIVE SPIROMETER
Name of Student _________________ Date ________________
Student No. _____________________ Name of Teacher _______________
Legend
2 Done Correctly
1 Done with Assistance
0 Not done
Equipment:
Incentive Spirometer
Stethoscope
Folded Blanket Or Pillow For Splinting Of Chest Or Abdominal Incision
PPE
Goal: The patient accurately demonstrates the procedure for using the spirometer.
Procedure
Score Remarks
1. Review chart for any health problems that would affect the patient’s oxygenation status
2. Bring necessary equipment to the bedside stand or overbed table.
3. Perform hand hygiene and put on PPE, if indicated
4. Identify the patient . Close curtains around bed and close the door to the room, if possible.
5. Explain what you are going to do and why you are going to do it to the patient
6. Assist patient to an upright or semi-Fowler’s position, if possible. Remove dentures if they fit poorly.
7. Assess the patient’s level of pain. Administer pain medication, as prescribed, if needed. Wait the appropriate amount of time for the medication to take effect. If patient has recently undergone abdominal or chest surgery, place a pillow or folded blanket over a chest or abdominal incision for splinting
8. Demonstrate how to steady the device with one hand and hold the mouthpiece with the other hand. If the patient cannot use hands, assist the patient with the incentive spirometer.
9. Instruct the patient to exhale normally and then place lips securely around the mouthpiece
10. Instruct patient to inhale slowly and as deeply as possible through the mouthpiece without using nose (if desired, a nose clip may be used).
11. When the patient cannot inhale anymore, the patient should hold his or her breath and count to three. Check position of gauge to

King Saud university NURS 317
College of Nursing CLINICAL APPLICATION FOR ADULT HEALTH NURSING Medical Surgical Department
4
Procedure
Score Remarks
determine progress and level attained. If patient begins to cough, splint an abdominal or chest incision.
12. Instruct the patient to remove lips from mouthpiece and exhale normally. If patient becomes light-headed during the process, tell him or her to stop and take a few normal breaths before resuming incentive spirometry.
13. Encourage patient to perform incentive spirometry 5 to 10 times every 1 to 2 hours, if possible.
14. Clean the mouthpiece with water and shake to dry.
15. Remove PPE, if used. Perform hand hygiene
TOTAL SCORE : 15X2 = 30 pts
Reference: Pamela Lynn and Marilee LeBon. Skill Checklists for Taylor’s Clinical Nursing Skills: A Nursing Process Approach, 3rd edition, by Wolters Kluwer Health | Lippincott Williams & Wilkins. 2011.
SCORING OF PERFORMANCE
Score Level of Performance Marks
24.2- 30 Excellent 5
18.4- 24.1 Very Good 4
12.6- 18.3 Good 3
1.8 12.5 Fair 2
1.0 – 6.7 Poor 1
Evaluator’s Name: _____________________
Signature:____________________________

King Saud university NURS 317
College of Nursing CLINICAL APPLICATION FOR ADULT HEALTH NURSING Medical Surgical Department
5
ADMINISTERING MEDICATION VIA METERED DOSE INHALER (MDI)
Name of Student _________________ Date ________________
Student No. _____________________ Name of Teacher _______________
Legend
2 Done Correctly
1 Done with Assistance
0 Not done
Equipment:
Incentive Spirometer
Stethoscope
Folded Blanket Or Pillow For Splinting Of Chest Or Abdominal Incision
PPE
Medication in an MDI
Spacer or holding chamber
Medication administration record
Goal: The patient receives the medication via an inhaler using the correct technique
Procedure
Score Remarks
1. Gather equipment. Check each medication order against the original order in the medical record, according to facility policy. Clarify any inconsistencies. Check the patient’s chart for allergies.
2. . Know the actions, special nursing considerations, safe dose ranges, purpose of administration, and adverse effects of the medications to be administered. Consider the appropriateness of the medication for this patient
3. Perform hand hygiene
4. Move the medication cart to the outside of the patient’s room or prepare for administration in the medication area
5. Unlock the medication cart or drawer. Enter pass code and scan employee identification, if required
6. . Prepare medications for one patient at a time.
7. Read the CMAR/MAR and select the proper medication from the patient’s medication drawer or unit stock.
8. Compare the label with the CMAR/MAR. Check expiration dates and perform calculations, if necessary. Scan the bar code on the package, if required
9. When all medications for one patient have been prepared, recheck the label with the MAR before taking them to the patient.
10. Lock the medication cart before leaving it.
11. Transport medications to the patient’s bedside carefully, and keep the medications in sight at all times
12. Ensure that the patient receives the medications at the correct time.
13. Perform hand hygiene and put on PPE, if indicated.

King Saud university NURS 317
College of Nursing CLINICAL APPLICATION FOR ADULT HEALTH NURSING Medical Surgical Department
6
Procedure
Score Remarks
14. Identify the patient. Usually, the patient should be identified using two methods. Compare information with the CMAR/ MAR.
a. Check the name and identification number on the patient’s identification band.
b. Ask the patient to state his or her name and birth date, based on facility policy.
c. If the patient cannot identify him- or herself, verify the patient’s identification with a staff member who knows the patient for the second source
15. Complete necessary assessments before administering medications. Check the patient’s allergy bracelet or ask the patient about allergies.
16. Explain what you are going to do and the reason to the patient
17. Scan the patient’s bar code on the identification band, if required
18. Remove the mouthpiece cover from the MDI and the spacer. Attach the MDI to the spacer.
19. Shake the inhaler and spacer well.
20. Have patient place the spacer’s mouthpiece into mouth, grasping securely with teeth and lips. Have patient breathe normally through the spacer
21. Patient should depress the canister, releasing one puff into the spacer, then inhale slowly and deeply through the mouth
22. . Instruct patient to hold his or her breath for 5 to 10 seconds, or as long as possible, and then to exhale slowly through pursed lips.
23. Wait 1 to 5 minutes, as prescribed, before administering the next puff.
24. . After the prescribed amount of puffs has been administered, have patient remove the MDI from the spacer and replace the caps on both.
25. Have the patient gargle and rinse with tap water after using an MDI, as necessary. Clean the MDI according to the manufacturer’s directions
26. Remove gloves and additional PPE, if used. Perform hand hygiene
27. Document the administration of the medication immediately after administration.
28. Evaluate the patient’s response to medication within appropriate time frame. Reassess lung sounds, oxygenation saturation if ordered, and respirations
TOTAL SCORE : 28 X 2 = 56 pts Reference: Pamela Lynn and Marilee LeBon. Skill Checklists for Taylor's Clinical Nursing Skills: A Nursing Process Approach, 3rd edition, by Wolters Kluwer Health | Lippincott Williams & Wilkins. 2011.
SCORING OF PERFORMANCE
Score Level of Performance Marks
45 - 56 Excellent 5
34 – 44 Very Good 4
23 – 33 Good 3
12 – 22 Fair 2
1- 11 Poor 1
Evaluator’s Name: _____________________ Signature:____________________________

King Saud university NURS 317
College of Nursing CLINICAL APPLICATION FOR ADULT HEALTH NURSING Medical Surgical Department
7
CARING FOR A PATIENT RECEIVING PATIENT CONTROLLED ANALGESIA
Name of Student _________________ Date ________________ Student No. _____________________ Name of Teacher _______________ Equipment :
Goal: The patient reports increased comfort and decreased pain; and shows no signs of adverse effects, oversedation, or respiratory depression. Legend
2 Done Correctly
1 Done with Assistance
0 Not done
Procedure
Score Remarks
1. Gather equipment . Check the medication order against the original physician’s order according to agency policy. Clarify any inconsistencies. Check the patient’s chart for allergies
2. Know the actions, special nursing considerations, safe dose ranges, purpose of administration, and adverse effects of the medications to be administered. Consider the appropriateness of the medication for this patient.
3. Prepare the medication syringe or other container, based on facility policy, for administration
4. Perform hand hygiene and put on PPE, if indicated
5. Identify the patient
6. Show the patient the device, and explain its function and the reason for use. Explain the purpose and action of the medication to the patient
7. . Plug the PCA device into the electrical outlet, if necessary. Check status of battery power, if appropriate
8. Close the door to the room or pull the bedside curtain
9. Complete necessary assessments before administering medication. Check allergy bracelet or ask patient about allergies. Assess the patient’s pain, using an appropriate assessment tool and measurement scale.
10. Check the label on the prefilled drug syringe with the medication record and patient identification. Obtain verification of information from a second nurse, according to facility policy. If using a barcode administration system, scan the barcode on the medication label, if required
11. . If using a barcode administration system, scan the patient’s barcode on the identification band, if required
PCA system
Syringe filled with medication
PCA system tubing
Alcohol Swabs

King Saud university NURS 317
College of Nursing CLINICAL APPLICATION FOR ADULT HEALTH NURSING Medical Surgical Department
8
Procedure
Score Remarks
12. Connect tubing to prefilled syringe and place the syringe into the PCA device. Prime the tubing..
13. Set the PCA device to administer the loading dose, if ordered, and then program the device based on the medical order for medication dosage, dose interval, and lockout interval. Obtain verification of information from a second nurse, according to facility policy
14. Put on gloves. Using antimicrobial swab, clean connection port on IV infusion line or other site access, based on route of administration. Connect the PCA tubing to the patient’s IV infusion line or appropriate access site, based on the specific site used. Secure the site per facility policy and procedure. Remove gloves. Initiate the therapy by activating the appropriate button on the pump. Lock the PCA device, per facility policy
15. Remind the patient to press the button each time he or she needs relief from pain
16. Assess the patient’s pain at least every 4 hours or more often, as needed. Monitor vital signs, especially respiratory status, including oxygen saturation at least every 4 hours or more often as needed
17. Assess the patient’s sedation score and end-tidal carbon dioxide level (capnography) at least every 4 hours or more often as needed
18. Assess the infusion site periodically, according to facility policy and nursing judgment. Assess the patient’s use of the medication, noting number of attempts and number of doses delivered. Replace the drug syringe when it is empty.
19. Make sure the patient control (dosing button) is within the patient’s reach
20. Remove gloves and additional PPE, if used. Perform hand hygiene.
TOTAL SCORE : 20 X 2 = 40 pts
Reference: Pamela Lynn and Marilee LeBon. Skill Checklists for Taylor's Clinical Nursing Skills: A Nursing Process Approach, 4rd edition, by Wolters Kluwer Health | Lippincott Williams & Wilkins. 2015.
SCORING OF PERFORMANCE
Score Level of Performance Marks
32.4 – 40 Excellent 5
24.4 – 32.1 Very Good 4
16.6 – 24.3 Good 3
8.8 – 16.5 Fair 2
1.0 - 8.7 Poor 1
Evaluator’s Name: _____________________ Signature:____________________________

King Saud university NURS 317
College of Nursing CLINICAL APPLICATION FOR ADULT HEALTH NURSING Medical Surgical Department
9
PROVIDING PREOPERATIVE PATIENT CARE: HOSPITALIZED PATIENT
Name of Student _________________ Date ________________
Student No. _____________________ Name of Teacher _______________
Equipment:
Goal: The patient proceeds to surgery physically and psychologically prepared.
Legend
2 Done Correctly
1 Done with Assistance
0 Not done
Procedure
Score Remarks
1. Check the patient’s chart for the type of surgery and review the medical orders. Review the nursing database, history, and physical examination. Check that the baseline data are recorded; report those that are abnormal.
2. Check that diagnostic testing has been completed and results are available; identify and report abnormal results
3. Gather the necessary supplies and bring to the bedside stand or overbed table.
4. Perform hand hygiene and put on PPE, if indicated.
5. Identify the patient
6. Close curtains around bed and close the door to the room, if possible. Explain what you are going to do and why you are going to do it to the patient.
7. Explore the psychological needs of the patient related to the surgery as well as the family.
a. Establish the therapeutic relationship, encouraging the patient to verbalize concerns or fears.
b. Use active learning skills, answering questions and clarifying any misinformation.
BP Apparatus
Stethoscope
Thermometer
Pulse Oximeter sensors
IV pump, IV Solution
Graduated compression stockings
Tubes, drains
Vascular access tubings
Incentive spirometer
Small pillow
PPE

King Saud university NURS 317
College of Nursing CLINICAL APPLICATION FOR ADULT HEALTH NURSING Medical Surgical Department
10
Procedure
Score Remarks
c. Use touch, as appropriate, to convey genuine empathy d. Offer to contact spiritual counselor (priest, minister, rabbi) to meet
spiritual needs.
8. Identify learning needs of patient and family. Ensure that the informed consent of the patient for the surgery has been signed, witnessed, and dated.
9. Inquire if the patient has any questions regarding the surgical procedure.
10. Check the patient’s record to determine if an advance directive has been completed. If an advance directive has not been completed, discuss with the patient the possibility of completing it, as appropriate. If patient has had surgery before, ask about this experience
11. . Provide teaching about deep breathing exercises
12. Provide teaching regarding coughing and splinting (providing support to the incision
13. Provide teaching regarding incentive spirometer
14. Provide teaching regarding leg exercises, as appropriate.
15. Assist the patient in putting on antiembolism stockings and demonstrate how the pneumatic compression device operates
16. Provide teaching regarding turning in the bed. a. Instruct the patient to use a pillow or bath blanket to splint where the
incision will be. Ask the patient to raise his or her left knee and reach across to grasp the right side rail of the bed when turning toward his or her right side. If patient is turning to his or her left side, he or she will bend the right knee and grasp the left side rail.
b. When turning the patient onto his or her right side, ask the patient to push with bent left leg and pull on the right side rail. Explain to patient that you will place a pillow behind his/her back to provide support, and that the call bell will be placed within easy reach.
c. Explain to the patient that position change is recommended every 2 hours.
17. Provide teaching about pain management. a. Discuss past experiences with pain and interventions that the patient
has used to reduce pain. b. Discuss the availability of analgesic medication postoperatively. c. Discuss the use of patient controlled analgesia (PCA), as appropriate d. Explore the use of other alternative and nonpharmacologic methods to
reduce pain, such as position change, massage, relaxation/diversion, guided imagery, and meditation.
18. Review equipment that may be used. a. Show the patient various equipment, such as IV pumps, electronic blood pressure cuff, tubes, and surgical drains
19. Provide skin preparation. a. Ask the patient to bathe or shower with the antiseptic solution. Remind the patient to clean the surgical site
20. Provide teaching about and follow dietary/fluid restrictions.

King Saud university NURS 317
College of Nursing CLINICAL APPLICATION FOR ADULT HEALTH NURSING Medical Surgical Department
11
Procedure
Score Remarks
a. Explain to the patient that both food and fluid will be restricted before surgery to ensure that the stomach contains a minimal amount of gastric secretions. This restriction is important to reduce the risk of aspiration.
21. Emphasize to the patient the importance of avoiding food and fluids during the prescribed time period, because failure to adhere may necessitate cancellation of the surgery
22. Provide intestinal preparation, as appropriate. In certain situations, the bowel will need to be prepared by administering enemas or laxatives to evacuate the bowel and to reduce the intestinal bacteria. a. As needed, provide explanation of the purpose of enemas or laxatives
before surgery. If patient will be administering an enema, clarify the steps as needed.
23. Check administration of regularly scheduled medications.
24. Review with the patient routine medications, over-the counter medications, and herbal supplements that are taken regularly.
25. Check the physician’s orders and review with the patient which medications he or she will be permitted to take the day of surgery.
26. Remove PPE, if used. Perform hand hygiene.
TOTAL SCORE : 28X 2 = 56pts
Reference: Pamela Lynn and Marilee LeBon. Skill Checklists for Taylor's Clinical Nursing Skills: A Nursing Process Approach, 4rd edition, by Wolters Kluwer Health | Lippincott Williams & Wilkins. 2015.
SCORING OF PERFORMANCE
Score Level of Performance Marks
45 – 56 Excellent 5
34. – 44.9 Very Good 4
23 – 33.9 Good 3
1.1 22.9 Fair 2
1.00 – 11.9 Poor 1
Evaluator’s Name: _____________________
Signature:____________________________

King Saud university NURS 317
College of Nursing CLINICAL APPLICATION FOR ADULT HEALTH NURSING Medical Surgical Department
12
PROVIDING PREOPERATIVE PATIENT CARE: HOSPITALIZED PATIENT (DAY OF SURGERY)
Name of Student _________________ Date ________________
Student No. _____________________ Name of Teacher _______________
Legend
2 Done Correctly
1 Done with Assistance
0 Not done
Equipment:
Goal: The patient will be prepared physically and psychologically to proceed to surgery.
Procedure
Score Remarks
1. Check the patient’s chart for the type of surgery and review the medical orders. Review the nursing database, history, and physical examination. Check that the baseline data are recorded; report those that are abnormal
2. Gather the necessary supplies and bring to the bedside stand or overbed table
3. Perform hand hygiene and put on PPE, if indicated. 4. Identify the patient
4. Close curtains around bed and close the door to the room, if possible. Explain what you are going to do and why you are going to do it to the patient
5. Check that preoperative consent forms are signed, witnessed, and correct; that advance directives are in the medical record (as applicable); and that the patient’s chart is in order.
6. Check vital signs. Notify primary care provider and surgeon of any pertinent changes (e.g., rise or drop in blood pressure, elevated temperature, cough, symptoms of infection).
7. Provide hygiene and oral care. Assess for loose teeth and caps. Remind patient of food and fluid restrictions before surgery.
BP Apparatus
Stethoscope
Thermometer
Pulse Oximeter sensors
IV pump, IV Solution
Graduated compression stockings
Tubes, drains
Vascular access tubings
Incentive spirometer
Small pillow
PPE
King Saud university NURS 317
College of Nursing CLINICAL APPLICATION FOR ADULT HEALTH NURSING Medical Surgical Department
13
Procedure
Score Remarks
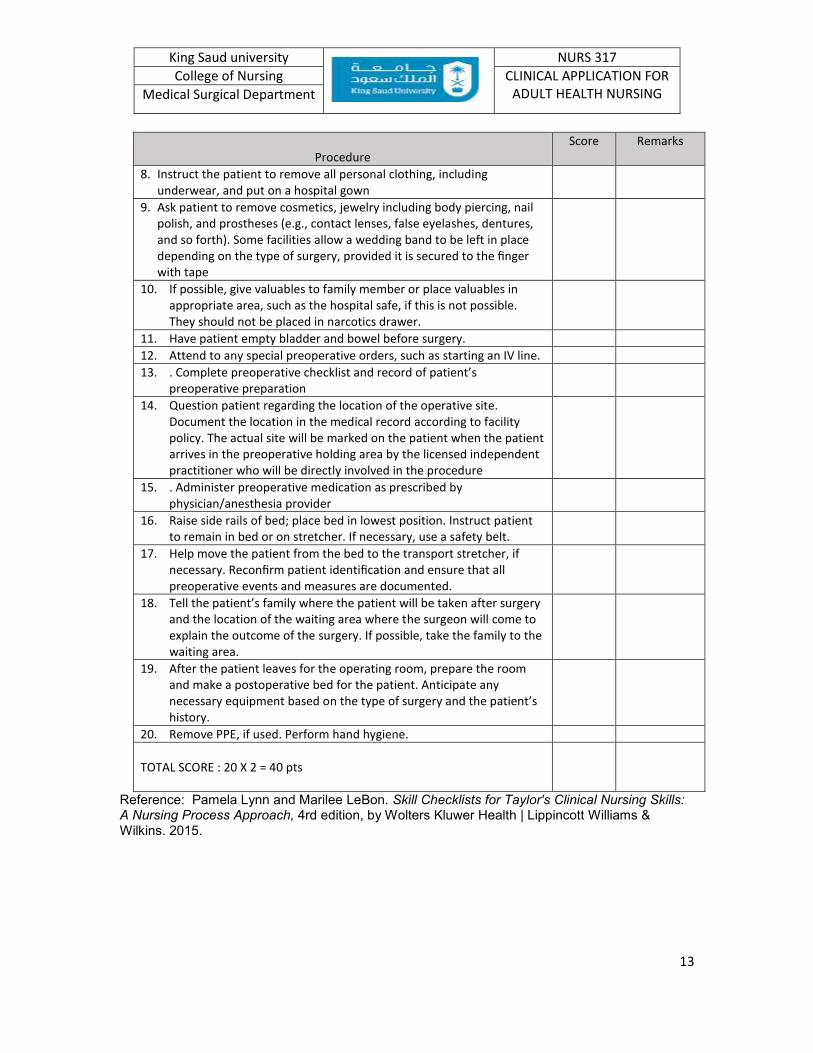
8. Instruct the patient to remove all personal clothing, including underwear, and put on a hospital gown
9. Ask patient to remove cosmetics, jewelry including body piercing, nail polish, and prostheses (e.g., contact lenses, false eyelashes, dentures, and so forth). Some facilities allow a wedding band to be left in place depending on the type of surgery, provided it is secured to the finger with tape
10. If possible, give valuables to family member or place valuables in appropriate area, such as the hospital safe, if this is not possible. They should not be placed in narcotics drawer.
11. Have patient empty bladder and bowel before surgery.
12. Attend to any special preoperative orders, such as starting an IV line.
13. . Complete preoperative checklist and record of patient’s preoperative preparation
14. Question patient regarding the location of the operative site. Document the location in the medical record according to facility policy. The actual site will be marked on the patient when the patient arrives in the preoperative holding area by the licensed independent practitioner who will be directly involved in the procedure
15. . Administer preoperative medication as prescribed by physician/anesthesia provider
16. Raise side rails of bed; place bed in lowest position. Instruct patient to remain in bed or on stretcher. If necessary, use a safety belt.
17. Help move the patient from the bed to the transport stretcher, if necessary. Reconfirm patient identification and ensure that all preoperative events and measures are documented.
18. Tell the patient’s family where the patient will be taken after surgery and the location of the waiting area where the surgeon will come to explain the outcome of the surgery. If possible, take the family to the waiting area.
19. After the patient leaves for the operating room, prepare the room and make a postoperative bed for the patient. Anticipate any necessary equipment based on the type of surgery and the patient’s history.
20. Remove PPE, if used. Perform hand hygiene.
TOTAL SCORE : 20 X 2 = 40 pts
Reference: Pamela Lynn and Marilee LeBon. Skill Checklists for Taylor's Clinical Nursing Skills: A Nursing Process Approach, 4rd edition, by Wolters Kluwer Health | Lippincott Williams & Wilkins. 2015.

King Saud university NURS 317
College of Nursing CLINICAL APPLICATION FOR ADULT HEALTH NURSING Medical Surgical Department
14
SCORING OF PERFORMANCE
Score Level of Performance Marks
32.4 – 40 Excellent 5
24.4 – 32.1 Very Good 4
16.6 – 24.3 Good 3
8.8 – 16.5 Fair 2
1.0 – 8.7 Poor 1
Evaluator’s Name: _____________________ Signature:____________________________

King Saud university NURS 317
College of Nursing CLINICAL APPLICATION FOR ADULT HEALTH NURSING Medical Surgical Department
15
PROVIDING POSTOPERATIVE PATIENT CARE WHEN PATIENT RETURNS TO ROOM
Name of Student _________________ Date ________________
Student No. _____________________ Name of Teacher _______________
Legend
2 Done Correctly
1 Done with Assistance
0 Not done
Equipment:
BP Apparatus
Stethoscope
Thermometer
Pulse Oximeter sensors
IV pump, IV Solution
Graduated compression stockings
Tubes, drains
Vascular access tubings
Incentive spirometer
Small pillow
PPE
Blankets
Goal: The patient will recover from the surgery with postoperative risks minimized by frequent
assessments.
Procedure
Score Remarks
Immediate Care
1. When patient returns from the PACU, obtain a report from the PACU nurse and review the operating room and PACU data
2. Perform hand hygiene and put on PPE, if indicated
3. Identify the patient. Close curtains around bed and close the door to the room, if possible. Explain what you are going to do and why you are going to do it to the patient
4. Place patient in safe position (semi- or high Fowler’s or side-lying). Note level of consciousness
5. Obtain vital signs. Monitor and record vital signs frequently. Assessment order may vary, but usual frequency includes taking vital signs every 15 minutes the first hour, every 30 minutes the next 2 hours, every hour for 4 hours, and finally every 4 hours.

King Saud university NURS 317
College of Nursing CLINICAL APPLICATION FOR ADULT HEALTH NURSING Medical Surgical Department
16
Procedure
Score Remarks
6. Assess the patient’s respiratory status
7. Measure the patient’s oxygen saturation level. 8. Assess the patient’s cardiovascular status
8. Assess the patient’s neurovascular status, based on the type of surgery performed.
9. Provide for warmth, using heated or extra blankets, as necessary. Assess skin color and condition.
10. Check dressings for color, odor, presence of drains, and amount of drainage. Mark the drainage on the dressing by circling the amount, and include the time.
11. Turn the patient to assess visually under the patient for bleeding from the surgical site.
12. Verify that all tubes and drains are patent and equipment is operative; note amount of drainage in collection device. If an indwelling urinary (Foley) catheter is in place, note urinary output
13. Verify and maintain IV infusion at correct rate
14. Assess for pain and relieve it by administering medications ordered by the physician. If the patient has been instructed in use of PCA for pain management, review its use. Check record to verify if analgesic medication was administered in the PACU.
15. . Provide for a safe environment. Keep bed in low position with side rails up, based on facility policy. Have call bell within patient’s reach
16. Remove PPE, if used. Perform hand hygiene.
Ongoing Care
17. Promote optimal respiratory function. a. Assess respiratory rate, depth, quality, color, and capillary refill.
Ask if the patient is experiencing any difficulty breathing. b. Assist with coughing and deep breathing exercises c. Assist with incentive spirometry d. Assist with early ambulation. e. Provide frequent position change. f. Administer oxygen as ordered. g. Monitor pulse oximetry
18. Promote optimal cardiovascular function: a. Assess apical rate, rhythm, and quality and compare with
peripheral pulses, color, and blood pressure. Ask if the patient has any chest pains or shortness of breath.
b. Provide frequent position changes. c. Assist with early ambulation. d. Apply antiembolism stockings or pneumatic compression
devices, if ordered and not in place. If in place, assess for integrity.
e. Provide leg and range-of-motion exercises if not contraindicated
19. Promote optimal neurologic function: a. Assess level of consciousness, motor, and sensation. b. Determine the level of orientation to person, place, and time.

King Saud university NURS 317
College of Nursing CLINICAL APPLICATION FOR ADULT HEALTH NURSING Medical Surgical Department
17
Procedure
Score Remarks
c. Test motor ability by asking the patient to move each extremity. d. Evaluate sensation by asking the patient if he or she can feel
your touch on an extremity.
20. Promote optimal renal and urinary function and fluid and electrolyte status. Assess intake and output, evaluate for urinary retention and monitor serum electrolyte levels. a. Promote voiding by offering bedpan at regular intervals, noting
the frequency, amount, and if any burning or urgency symptoms. b. Monitor urinary catheter drainage if present. c. Measure intake and output.
21. Promote optimal gastrointestinal function and meet nutritional needs: a. Assess abdomen for distention and firmness. Ask if patient feels nauseated, any vomiting, and if passing flatus. b. Auscultate for bowel sounds. c. Assist with diet progression; encourage fluid intake; monitor intake. D. Medicate for nausea and vomiting, as ordered by physician
22. Promote optimal wound healing. a. Assess condition of wound for presence of drains and any drainage. B. Use surgical asepsis for dressing changes. c. Inspect all skin surfaces for beginning signs of pressure ulcer
development and use pressure-relieving supports to minimize potential skin breakdown
23. Promote optimal comfort and relief from pain. a. Assess for pain (location and intensity using scale). b. Provide for rest and comfort; provide extra blankets, as needed,
for warmth. c. Administer pain medications, as needed, or other
nonpharmacologic methods
24. Promote optimal meeting of psychosocial needs: a. Provide emotional support to patient and family, as needed. b. Explain procedures and offer explanations regarding postoperative recovery, as needed, to both patient and family members.
TOTAL SCORE : 24X 2 = 48pts
Reference: Pamela Lynn and Marilee LeBon. Skill Checklists for Taylor’s Clinical Nursing Skills: A Nursing Process Approach, 4rd edition, by Wolters Kluwer Health | Lippincott Williams & Wilkins. 2015.
SCORING OF PERFORMANCE
Score Level of Performance Marks
38.6 – 48 Excellent 5
29.2 – 38.5 Very Good 4
19.8 – 29.1 Good 3
10.4– 19.7 Fair 2
1.0 – 10.3 Poor 1
Evaluator’s Name: _____________________ Signature:____________________________
King Saud university NURS 317
College of Nursing CLINICAL APPLICATION FOR ADULT HEALTH NURSING Medical Surgical Department
18
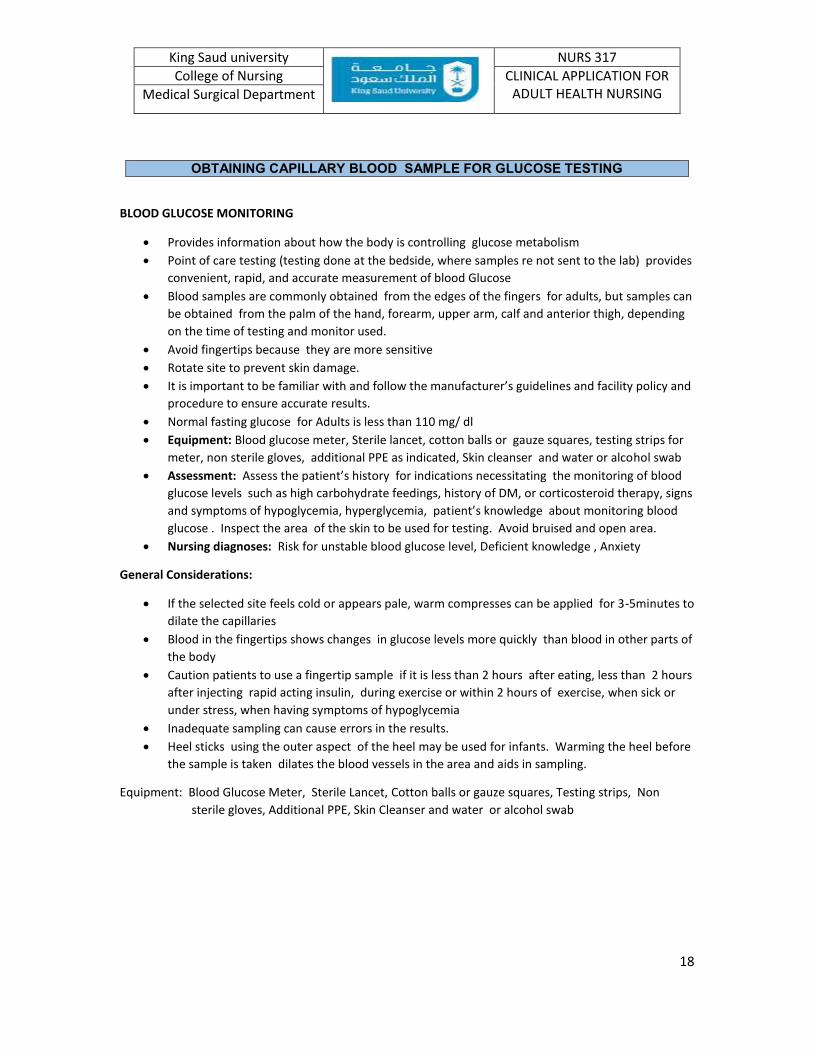
OBTAINING CAPILLARY BLOOD SAMPLE FOR GLUCOSE TESTING
BLOOD GLUCOSE MONITORING
Provides information about how the body is controlling glucose metabolism
Point of care testing (testing done at the bedside, where samples re not sent to the lab) provides
convenient, rapid, and accurate measurement of blood Glucose
Blood samples are commonly obtained from the edges of the fingers for adults, but samples can
be obtained from the palm of the hand, forearm, upper arm, calf and anterior thigh, depending
on the time of testing and monitor used.
Avoid fingertips because they are more sensitive
Rotate site to prevent skin damage.
It is important to be familiar with and follow the manufacturer’s guidelines and facility policy and
procedure to ensure accurate results.
Normal fasting glucose for Adults is less than 110 mg/ dl
Equipment: Blood glucose meter, Sterile lancet, cotton balls or gauze squares, testing strips for
meter, non sterile gloves, additional PPE as indicated, Skin cleanser and water or alcohol swab
Assessment: Assess the patient’s history for indications necessitating the monitoring of blood
glucose levels such as high carbohydrate feedings, history of DM, or corticosteroid therapy, signs
and symptoms of hypoglycemia, hyperglycemia, patient’s knowledge about monitoring blood
glucose . Inspect the area of the skin to be used for testing. Avoid bruised and open area.
Nursing diagnoses: Risk for unstable blood glucose level, Deficient knowledge , Anxiety
General Considerations:
If the selected site feels cold or appears pale, warm compresses can be applied for 3-5minutes to
dilate the capillaries
Blood in the fingertips shows changes in glucose levels more quickly than blood in other parts of
the body
Caution patients to use a fingertip sample if it is less than 2 hours after eating, less than 2 hours
after injecting rapid acting insulin, during exercise or within 2 hours of exercise, when sick or
under stress, when having symptoms of hypoglycemia
Inadequate sampling can cause errors in the results.
Heel sticks using the outer aspect of the heel may be used for infants. Warming the heel before
the sample is taken dilates the blood vessels in the area and aids in sampling.
Equipment: Blood Glucose Meter, Sterile Lancet, Cotton balls or gauze squares, Testing strips, Non
sterile gloves, Additional PPE, Skin Cleanser and water or alcohol swab

King Saud university NURS 317
College of Nursing CLINICAL APPLICATION FOR ADULT HEALTH NURSING Medical Surgical Department
19
OBTAINING CAPILLARY BLOOD SAMPLE FOR GLUCOSE TESTING
Name of Student _________________ Date ________________
Student No. _____________________ Name of Teacher _______________
Goal: The Blood Glucose level is measured accurately without adverse effect
Legend
2 Done Correctly
1 Done with Assistance
0 Not done
Procedure
Score Remarks
1. Check the patient’s medical record or nursing plan of care for monitoring schedule. You may decide that additional testing is indicated based on nursing judgment and the patient’s condition.
2. Gather equipment.
3. Perform hand hygiene and put on PPE, if indicated.
4. Identify the patient. Explain the procedure to the patient and instruct the patient about the need for monitoring blood glucose
5. Close curtains around bed and close the door to the room, if possible.
6. Turn on the monitor.
7. Enter the patient’s identification number, if required, according to facility policy
8. Put on nonsterile gloves.
9. Prepare lancet using aseptic technique
10. Remove test strip from the vial. Recap container immediately. Test strips also come individually wrapped.
11. Check that the code number for the strip matches code number on the monitor screen.
12. Insert the strip into the meter according to directions for that specific device.
13. For adult, massage side of finger toward puncture site.
14. Have the patient wash hands with soap and warm water and dry thoroughly.
15. Alternately, cleanse the skin with an alcohol swab.
16. Allow skin to dry completely.
17. Hold lancet perpendicular to skin and pierce site with lancet.
18. Wipe away first drop of blood with gauze square or cotton ball if recommended by manufacturer of monitor
19. Encourage bleeding by lowering the hand, making use of gravity.
20. Lightly stroke the finger, if necessary, until sufficient amount of blood has formed to cover the sample area on the strip, based on monitor requirements (check instructions for monitor). Take care not to

King Saud university NURS 317
College of Nursing CLINICAL APPLICATION FOR ADULT HEALTH NURSING Medical Surgical Department
20
Procedure
Score Remarks
squeeze the finger, not to squeeze at puncture site, or not to touch puncture site or blood.
21. Gently touch a drop of blood to pad to the test strip without smearing it.
22. Press time button if directed by manufacturer.
23. Apply pressure to puncture site with a cotton ball or dry gauze. Do not use alcohol wipe.
24. Read blood glucose results and document appropriately at bedside.
25. Inform patient of test result.
26. Turn off meter, remove test strip, and dispose of supplies appropriately. Place lancet in sharps container.
27. Remove gloves and any other PPE, if used.
28. Perform hand hygiene.
TOTAL SCORE : 28 X 2 = 56 pts
Reference: Pamela Lynn and Marilee LeBon. Skill Checklists for Taylor's Clinical Nursing Skills: A Nursing Process Approach, 3rd edition, by Wolters Kluwer Health | Lippincott Williams & Wilkins. 2011.
SCORING OF PERFORMANCE
Score Level of Performance Marks
49.8 - 56 Excellent 5
43.7 – 49.7 4.5
37.6 – 43.6 Very Good 4.0
31.5 - 37.5 3.5
25.4 – 31.4 Good 3.0
19.3 – 25.3 - 2.5
13.2 – 19.2 Fair 2.0
7.1 – 13.1 1.5
1.0 – 7.0 Poor 1
Evaluator’s Name: _____________________
Signature:____________________________

King Saud university NURS 317
College of Nursing CLINICAL APPLICATION FOR ADULT HEALTH NURSING Medical Surgical Department
21
OBTAINING AN ELECTROCARDIOGRAM (ECG) MONITORING
Electrocardiography (ECG )
one of the most valuable and frequently used diagnostic tools
measures the heart’s electrical activity through the electric currents created by the impulses
moving through the heart’s conduction system
Electrodes attached to the skin can detect electric currents and transmit them to an instrument
that produces a record of electrical activity called ELECTROCARDIOGRAM
The data are graphed in wave forms
Standard 12 lead ECG –
uses a series of electrodes placed on the extremities and the chest wall to assess the heart from
12 different viewpoints (leads) by attaching ten (10) cables with electrodes to the patients limbs
and chest: Four limb electrodes and six chest electrodes
These electrodes provide views of the heart from the frontal plane as well as the horizontal plane
PURPOSE: to identify Myocardial Ischemia and Infarction , rhythm and conduction disturbances,
chamber enlargement , electrolyte imbalances and drug toxicity
NURSING RESPONSIBILITIES
It is essential that connection or placement of ECG Electrodes / leads is accurate to prevent
misdiagnosis
Reassure client that leads just sense and record and do not transmit any electricity
Instruct the patient to lie still and refrain from speaking to prevent body movement from
creating artifact in the ECG
Equipment:
ECG Machine
ECG Paper
ECG leads
Alcohol swab

King Saud university NURS 317
College of Nursing CLINICAL APPLICATION FOR ADULT HEALTH NURSING Medical Surgical Department
22
OBTAINING AN ELECTROCARDIOGRAM (ECG) MONITORING
Name of Student _________________ Date ________________
Student No. _____________________ Name of Teacher _______________
Goal: A cardiac electrical tracing is obtained without any complications.
Legend
2 Done Correctly
1 Done with Assistance
0 Not done
Procedure Score Remarks
1. Verify the order for an ECG on the patient’s medical record.
2. Gather all equipment and bring to bedside.
3. Perform hand hygiene and put on PPE, if indicated.
4. Identify the patient.
5. Close curtains around bed and close the door to the room, if possible.
6. As you set up the machine to record a 12-lead ECG, explain the procedure to the patient.
7. Tell the patient that the test records the heart’s electrical activity, and it may be repeated at certain intervals.
8. Emphasize that no electrical current will enter his or her body..
9. Tell the patient the test typically takes about 5 minutes
10. Ask the patient about allergies to adhesive, as appropriate.
11. Place the ECG machine close to the patient’s bed, and plug the power cord into the wall outlet.
12. If the bed is adjustable, raise it to a comfortable working height, usually elbow height of the caregiver (VISN 8 Patient Safety Center, 2009).
13. Have the patient lie supine in the center of the bed with the arms at the sides..
14. Raise the head of the bed if necessary to promote comfort
15. Expose the patient’s arms and legs, and drape appropriately.
16. Encourage the patient to relax the arms and legs
17. If the bed is too narrow, place the patient’s hands under the buttocks to prevent muscle tension. Also use this technique if the patient is shivering or trembling..
18. Make sure the feet do not touch the bed’s footboard
19. Select flat, fleshy areas on which to place the electrodes. Avoid muscular and bony areas. If the patient has an amputated limb, choose a site on the stump.

King Saud university NURS 317
College of Nursing CLINICAL APPLICATION FOR ADULT HEALTH NURSING Medical Surgical Department
23
Procedure Score Remarks
20. If an area is excessively hairy, clip the hair. Do not shave hair. Clean excess oil or other substances from the skin with soap and water and dry it completely.
21. Apply the limb lead electrodes. The tip of each lead wire is lettered and color coded for easy identification.
The white or RA lead goes to the right arm
The green or RL lead to the right leg
The red or LL lead to the left leg
The black or LA lead to the left arm.
22. Peel the contact paper off the selfsticking disposable electrode and apply directly to the prepared site, as recommended by the manufacturer.
23. Position disposable electrodes on the legs with the lead connection pointing superiorly.
24. Connect the limb lead wires to the electrodes. Make sure the metal parts of the electrodes are clean and bright.
25. Expose the patient’s chest.
26. Apply the precordial lead electrodes. The tip of each lead wire is lettered and color coded for easy identification. The brown or V1 to V6 leads are applied to the chest
27. Peel the contact paper off the self sticking, disposable electrode and apply directly to the prepared site, as recommended by the manufacturer.
28. Position chest electrodes as follows
• V1: Fourth intercostal space at right sternal border
• V2: Fourth intercostal space at left sternal border
• V3: Halfway between V2 and V4
• V4: Fifth intercostal space at the left midclavicular line
• V5: Fifth intercostal space at anterior axillary line (halfway between V4 and V6)
•V6: Fifth intercostal space at midaxillary line, level with V4
29. Connect the precordial lead wires to the electrodes. Make sure the metal parts of the electrodes are clean and bright.
30. After the application of all the leads, make sure the paper speed selector is set to the standard 25 m/second and that the machine is set to full voltage.
31. If necessary, enter the appropriate patient identification data into the machine.
32. Ask the patient to relax and breathe normally. Instruct the patient to lie still and not to talk while you record the ECG.
33. Press the AUTO button. Observe the tracing quality. The machine will record all 12 leads automatically, recording 3 consecutive leads simultaneously. Some machines have a display screen so you can preview waveforms before the machine records them on paper
34. Adjust waveform, if necessary. If any part of the waveform extends beyond the paper when you record the ECG, adjust the normal standardization to half-standardization and repeat. Note this

King Saud university NURS 317
College of Nursing CLINICAL APPLICATION FOR ADULT HEALTH NURSING Medical Surgical Department
24
Procedure Score Remarks
adjustment on the ECG strip, because this will need to be considered in interpreting the results.
35. When the machine finishes recording the 12-lead ECG, remove the electrodes and clean the patient’s skin, if necessary, with adhesive remover for sticky residue.
36. After disconnecting the lead wires from the electrodes, dispose of the electrodes. Return the patient to a comfortable position. Lower bed height and adjust the head of bed to a comfortable position.
37. Clean ECG machine per facility policy. If not done electronically from data entered into the machine, label the ECG with the patient’s name, date of birth, location, date and time of recording, and other relevant information, such as symptoms that occurred during the recording (Jevon, 2007b).
38. Remove additional PPE, if used. Perform hand hygiene.
TOTAL SCORE : 48 X 2 = 96 pts
Reference: Pamela Lynn and Marilee LeBon. Skill Checklists for Taylor's Clinical Nursing Skills: A Nursing Process Approach, 4th edition, by Wolters Kluwer Health | Lippincott Williams & Wilkins. 2015.
SCORING OF PERFORMANCE
Score Level of Performance Marks
77 - 96 Excellent Performance 5
58 – 76 Very Good 4
39 – 57 Good 3
20 – 38 Fair 2
1 - 19 Poor 1
Evaluator’s Name: _____________________
Signature:____________________________

King Saud university NURS 317
College of Nursing CLINICAL APPLICATION FOR ADULT HEALTH NURSING Medical Surgical Department
25
ADMINISTERING BLOOD TRANSFUSION
BLOOD TRANSFUSION
Infusion of the whole blood or blood component (plasma, RBC, Cryoprecipitate, platelets) into
the patient’s venous circulation
A Blood product Transfusion is given when a patient’s RBC, platelets, or coagulation factors
decrease to levels that compromise a patient’s health
Patient’s Blood must be typed before a patient can receive a blood product to ensure that she
receives compatible blood. Otherwise, a serious and threatening Transfusion reaction may
occur involving clumping and hemolysis of the RBC, and possibly death
The nurse must verify the infusion rate , based on facility policy or medical order
Follow the facility’s policies and guidelines to determine if the transfusion should be
administered by an electronic infusion device or by gravity
Equipment: Blood product, Blood administration set (tubing with inline filter, or add on filter,
and Y for Saline administration), 0.0 Normal Saline for IV infusion, IV Pole, Venous access, if
peripheral site, preferably initiated with a 20 gauge catheter or larger, alcohol or other
disinfectant wipes, clean gloves, additional PPE,as indicated, hypoallergenic tape, second
Registered Nurse (or other licensed practitioner, physician) to verify blood product and patient
information
Assessment : Obtain a baseline assessment of the vital signs ,heart and lung sounds, and urinary
output. Review the most recent laboratory values, CBC. Ask the patient about any previous
transfusion, including the number he or she has had any reactions experienced during a
transfusion . Inspect the IV Insertion site , noting the size of the IV catheter. Blood or blood
components may be transfused via a 14 – 24 gauge peripheral venous access device.
Transfusion for neonate or pediatric patients is usually given using a 22 – 24 gauge peripheral
venous access device.
Nursing Diagnoses: Risk for injury, Excess fluid volume, Ineffective peripheral tissue perfusion
Special Considerations:
Never warm blood in a microwave. Use a Blood warming device, if indicated or ordered
Rapid administration of cold blood can result in cardiac arrhythmias
External compression devices, if used for rapid transfusions, should be equipped with a pressure
gauge, should totally encase the blood bag and should apply uniform pressure against all parts
of the blood container
Equipment : Blood product, Blood administration set, 0.9 Normal saline for IV infusion, IV Pole, Venous
access, Alcohol or other disinfectant wipes, Clean gloves, Additional PPE, Hypoallergenic tape

King Saud university NURS 317
College of Nursing CLINICAL APPLICATION FOR ADULT HEALTH NURSING Medical Surgical Department
26
ADMINISTERING BLOOD TRANSFUSION
Name of Student _________________ Date ________________
Student No. _____________________ Name of Teacher _______________
Goal: The patient receives the correct blood type and remains free of injury due to transfusion
complications and/or reactions.
Legend
2 Done Correctly
1 Done with Assistance
0 Not done
Procedure Score Remarks
1. Verify the medical order for transfusion of a blood product.
2. Verify the completion of informed consent documentation in the medical record.
3. Verify any medical order for pre transfusion medication. If ordered, administer medication at least 30 minutes before initiating transfusion.
4. Gather all equipment and bring to bedside.
5. Perform hand hygiene and put on PPE, if indicated.
6. Identify the patient.
7. Close curtains around bed and close the door to the room, if possible.
8. Explain what you are going to do and why you are going to do it to the patient.
9. Ask the patient about previous experience with transfusion and any reactions. Advise patient to report any chills, itching, rash, or unusual symptoms.
10. Prime blood administration set with the normal saline IV fluid.
11. Put on gloves. If patient does not have a venous access in place, initiate peripheral venous access.
12. Connect the administration set to the venous access device via the extension tubing. Infuse the normal saline per facility policy.
13. Obtain blood product from blood bank according to agency policy. Scan for bar codes on blood products if required.
14. Two nurses compare and validate the following information with the medical record, patient identification band, and the label of the blood product:
• Medical order for transfusion of blood product • Informed consent • Patient identification number • Patient name • Blood group and type • Expiration date

King Saud university NURS 317
College of Nursing CLINICAL APPLICATION FOR ADULT HEALTH NURSING Medical Surgical Department
27
Procedure Score Remarks
• Inspection of blood product for clots
15. Obtain baseline set of vital signs before beginning transfusion.
16. Put on gloves. If using an electronic infusion device, put the device on “hold.”
17. Close the roller clamp closest to the drip chamber on the saline side of the administration set.
18. Close the roller clamp on the administration set below the infusion device.
19. Alternately, if using infusing via gravity, close the roller clamp on the administration set.
20. Close the roller clamp closest to the drip chamber on the blood product side of the administration set.
21. Remove the protective cap from the access port on the blood container.
22. Remove the cap from the access spike on the administration set.
23. Using a pushing and twisting motion, insert the spike into the access port on the blood container, taking care not to contaminate the spike.
24. Hang blood container on the IV pole.
25. Open the roller clamp on the blood side of the administration set.
26. Squeeze drip chamber until the in-line filter is saturated.
27. Remove gloves.
28. Start administration slowly (no more than 25 to 50 mL for the first 15 minutes). Stay with the patient for the first 5 to 15 minutes of transfusion.
29. Open the roller clamp on the administration set below the infusion device.
30. Set the rate of flow and begin the transfusion.
31. Alternately, start the flow of solution by releasing the clamp on the tubing and counting the drops.
32. Adjust until the correct drop rate is achieved.
33. Assess the flow of the blood and function of the infusion device.
34. Inspect the insertion site for signs of infiltration. Observe patient for flushing, dyspnea, itching, hives or rash, or any unusual comments.
35. After the observation period (5 to 15 minutes) increase the infusion rate to the calculated rate to complete the infusion within the prescribed time frame, no more than 4 hours.
36. Reassess vital signs after 15 minutes. Obtain vital signs thereafter according to facility policy and nursing assessment.
37. Maintain the prescribed flow rate as ordered or as deemed appropriate based on the patient’s overall condition, keeping in mind the outer limits for safe administration. Ongoing monitoring is crucial throughout the entire duration of the blood transfusion for early identification of any adverse reactions.
38. During transfusion, assess frequently for transfusion reaction. Stop blood transfusion if you suspect a reaction. Quickly replace the blood tubing with a new administration set primed with normal saline for IV infusion. Initiate an infusion of normal saline for IV at an open

King Saud university NURS 317
College of Nursing CLINICAL APPLICATION FOR ADULT HEALTH NURSING Medical Surgical Department
28
Procedure Score Remarks
rate, usually 40 mL/hour. Obtain vital signs. Notify physician and blood bank.
39. When transfusion is complete, close roller clamp on blood side of the administration set and open the roller clamp on the normal saline side of the administration set.
40. Initiate infusion of normal saline.
41. When all of blood has infused into the patient, clamp the administration set.
42. Obtain vital signs
43. Put on gloves.
44. Cap access site or resume previous IV infusion.
45. Dispose of blood-transfusion equipment or return to blood bank according to facility policy.
46. Remove equipment. Ensure patient’s comfort. Remove gloves. Lower bed, if not in lowest position
47. Remove additional PPE, if used.
48. Perform hand hygiene.
TOTAL SCORE : 48 X 2 = 96 pts
Reference: Pamela Lynn and Marilee LeBon. Skill Checklists for Taylor's Clinical Nursing Skills: A Nursing Process Approach, 3rd edition, by Wolters Kluwer Health | Lippincott Williams & Wilkins. 2011.
SCORING OF PERFORMANCE
Score Level of Performance Marks
85 - 96 Excellent Performance 5
74.5 – 84.9 4.5
64 – 74.4 Very Good 4.0
53.5 – 63.9 3.5
43 – 53.4 Good 3.0
32.5 – 42.9 2.5
22 – 32.4 Fair 2.0
11.5- 21.9 1.5
1.0 – 11.4 Poor 1
Evaluator’s Name: _____________________
Signature:____________________________

King Saud university NURS 317
College of Nursing CLINICAL APPLICATION FOR ADULT HEALTH NURSING Medical Surgical Department
29
CHANGING AND EMPTYING AN OSTOMY APPLIANCE
Ostomy - A term for surgically formed opening from the inside of an organ to the outside
Stoma – the part of Ostomy that is attached to the skin. The intestinal mucosa is brought out to the
abdominal wall
Ileostomy – allows liquid fecal content from the ileum of the small intestines to be eliminated through
the stoma
Colostomy – permits formed feces in the colon from which they originate
Ostomy appliance or pouches are applied to the opening to collect the stool . ; Available in one piece (
barrier backing already attached to the pouch) or two piece ( separate pouch that fastens to
the barrier backing) system.
Equipment:
Basin with warm water, skin cleanser, towel , wash cloth, toilet tissue or paper towel, silicone
based adhesive remover, gauze squares, washcloth , skin protectant such as skin prep, one piece
ostomy appliance, closure clamp, if required for appliance, stoma measuring guide, graduated
container, toilet or bed pan, ostomy belt, disposable gloves, additional PPE as indicated, small
plastic trash bag, water proof disposable pad
Assessment
Assess current ostomy appliance , looking at product style, condition of appliance, and stoma (if
bag is clear) Note length of time the appliance has been in place. Determine the patient’s
knowledge of Ostomy Care . After removing the appliance , assess the stoma and the skin
surrounding the stoma. Assess any abdominal scars if surgery is recent. Assess the amount,
color, consistency and odor of stool from the ostomy.
Nursing Diagnoses:
Risk for impaired skin integrity
Deficient knowledge
Disturbed body Image
Special Consideration
Keep the patient as free of odors as possible.
They should be emptied promptly, usually when they are one third to one half full. If they are
allowed to fill up , they may leak or become detached from the skin
Appliances are usually changed every 3-7 days , although they could be changed more often.
Proper application minimizes the risk for skin breakdown around the stoma. Non drainable
pouches require removal and changing when they are half full.
Drain or empty the pouch when it is one third full .
Inspect the patient’s stoma regularly. Notify physician if bleeding persists or is excessive or if
color changes around the stoma
Keep the skin around the stoma (peristome) clean and dry to prevent irritation

King Saud university NURS 317
College of Nursing CLINICAL APPLICATION FOR ADULT HEALTH NURSING Medical Surgical Department
30
Record intake and output every 4 hours for the first three days after surgery
Patient teaching is one of the most important aspect of Colostomy care. Include the family as
well
Encourage patient to participate in care and to look at the ostomy. Help the patient cope with
emotional depression by listening , explaining, and being available and supportive
Character of Stoma Normal Abnormal
a. Color dark pink to red, and moist
pale stoma may indicate Anemia,
dark or purple blue stoma may reflect compromised circulation or ischemia
b. size of the stoma (usually stabilizes within 6 – 8 weeks .)
Most Stomas protrude 0.5 to 1 inch from the abdominal surface
Increase in normal size
c. Bleeding minimal excessive
d. edema may initially appear swollen and edematous
subsides after 6 weeks
edema persists longer
erosion of skin around the stoma

King Saud university NURS 317
College of Nursing CLINICAL APPLICATION FOR ADULT HEALTH NURSING Medical Surgical Department
31
CHANGING AND EMPTYING AN OSTOMY APPLIANCE
Name of Student _________________ Date ________________
Student No. _____________________ Name of Teacher _______________
Goal: The stoma appliance is applied correctly to the skin to allow stool to drain freely.
Legend
2 Done Correctly
1 Done with Assistance
0 Not done
Procedure
Score Remarks
1. Bring necessary equipment to the bedside stand or overbed table.
2. Perform hand hygiene and put on PPE, if indicated.
3. Identify the patient.
4. Close curtains around bed and close the door to the room, if possible.
5. Explain what you are going to do and why you are going to do it to the patient. Encourage the patient to observe or participate, if possible.
6. Assist patient to a comfortable sitting or lying position in bed or a standing or sitting position in the bathroom.
Emptying an Appliance
7. Put on disposable gloves.
8. Remove clamp and fold end of pouch upward like a cuff
9. Empty contents into bedpan, toilet, or measuring device
10. Wipe the lower 2 inches of the appliance or pouch with toilet tissue.
11. Uncuff edge of appliance or pouch and apply clip or clamp, or secure Velcro closure. Ensure the curve of the clamp follows the curve of the patient’s body.
12. Remove gloves.
13. Assist patient to a comfortable position
14. . If appliance is not to be changed, remove additional PPE, if used.
15. Perform hand hygiene
Changing an Appliance
16. Place a disposable pad on the work surface.
17. Set up the wash basin with warm water and the rest of the supplies.
18. Place a trash bag within reach.
19. . Put on clean gloves
20. Place waterproof pad under the patient at the stoma site.
21. Empty the appliance as described previously

King Saud university NURS 317
College of Nursing CLINICAL APPLICATION FOR ADULT HEALTH NURSING Medical Surgical Department
32
Procedure
Score Remarks
22. Gently remove pouch faceplate from skin by pushing skin from appliance rather than pulling appliance from skin.
23. Start at the top of the appliance, while keeping the abdominal skin taut
24. Apply a silicone-based adhesive remover by spraying or wiping with the remover wipe.
25. Place the appliance in the trash bag, if disposable.
26. If reusable, set aside to wash in lukewarm soap and water and allow to air dry after the new appliance is in place.
27. Use toilet tissue to remove any excess stool from stoma.
28. Cover stoma with gauze pad
29. Clean skin around stoma with mild soap and water or a cleansing agent and a washcloth.
30. . Remove all old adhesive from skin; use an adhesive remover, as necessary. Do not apply lotion to peristomal area
31. Gently pat area dry. Make sure skin around stoma is thoroughly dry.
32. Assess stoma and condition of surrounding skin
33. Apply skin protectant to a 2-inch (5 cm) radius around the stoma, and allow it to dry completely, which takes about 30 seconds.
34. Lift the gauze squares for a moment and measure the stoma opening, using the measurement guide.
35. Replace the gauze. Trace the same-size opening on the back center of the appliance. Cut the opening 1/8 inch larger than the stoma size
36. Remove the backing from the appliance.
37. Quickly remove the gauze squares and ease the appliance over the stoma.
38. Gently press onto the skin while smoothing over the surface.
39. Apply gentle pressure to appliance for approximately 30 seconds
40. Close bottom of appliance or pouch by folding the end upward and using the clamp or clip that comes with the product, or secure Velcro closure. Ensure the curve of the clamp follows the curve of the patient’s body
41. Remove gloves..
42. Assist the patient to a comfortable position.
43. Cover the patient with bed linens.
44. Place the bed in the lowest position
45. Put on clean gloves..
46. Remove or discard equipment and assess patient’s response to procedure
47. Remove gloves and additional PPE, if used.
48. Perform hand hygiene.
TOTAL SCORE : 48 X 2 = 96 pts
Pamela Lynn and Marilee LeBon. Skill Checklists for Taylor's Clinical Nursing Skills: A Nursing Process Approach, 3rd edition, by Wolters Kluwer Health | Lippincott Williams & Wilkins. 2011.

King Saud university NURS 317
College of Nursing CLINICAL APPLICATION FOR ADULT HEALTH NURSING Medical Surgical Department
33
SCORING OF PERFORMANCE
Score Level of Performance Marks
77 - 96 Excellent Performance 5
58 – 76 Very Good 4
39 – 57 Good 3
20 – 38 Fair 2
1.0- 19 Poor 1
Evaluator’s Name: _____________________
Signature:____________________________

King Saud university NURS 317
College of Nursing CLINICAL APPLICATION FOR ADULT HEALTH NURSING Medical Surgical Department
34
EMPLOYING SEIZURE PRECAUTIONS AND SEIZURE MANAGEMENT
Name of Student _________________ Date ________________
Student No. _____________________ Name of Teacher _______________
Legend
2 Done Correctly
1 Done with Assistance
0 Not done
Equipment:
PPE
Portable or Wall suction unit with tubing
Sterile suction catheter with Y port
Sterile disposable container
Sterile gloves
Oral airway
Bedrail padding
Oxygen apparatus
Nasal cannula or mask
Resuscitation bag / ambubag
Goal: The patient remains free from injury related to seizure disorder.
Procedure
Score Remarks
1. Review the medical record and nursing plan of care for conditions that would place the patient at risk for seizures. Review the medical orders and the nursing plan of care for orders for seizure precautions.
Seizure Precautions
2. Gather the necessary supplies and bring to the bedside stand or overbed table
3. Perform hand hygiene and put on PPE, if indicated. 4. Identify the patient
4. . Close curtains around bed and close the door to the room, if possible. Explain what you are going to do and why you are going to do it to the patient
5. Place the bed in the lowest position with two to three side rails elevated. Apply padding to side rails
6. Attach oxygen apparatus to oxygen access in the wall at the head of the bed. Place nasal cannula or mask equipment in a location where it is easily reached if needed

King Saud university NURS 317
College of Nursing CLINICAL APPLICATION FOR ADULT HEALTH NURSING Medical Surgical Department
35
Procedure
Score Remarks
7. Attach suction apparatus to vacuum access in the wall at the head of the bed. Place suction catheter, oral airway, and resuscitation bag in a location where they are easily reached if needed.
8. Remove PPE, if used. Perform hand hygiene
Seizure Management
9. For patients with known seizures, be alert for the occurrence of an aura, if known. If the patient reports experiencing an aura, have the patient lie down.
10. Once a seizure begins, close curtains around bed and close the door to the room, if possible
11. If the patient is seated, ease the patient to the floor.
12. Remove patient’s eyeglasses. Loosen any constricting clothing. Place something flat and soft, such as a folded blanket, under the head. Push aside furniture or other objects in area.
13. If the patient is in bed, remove the pillow and raise side rails.
14. Do not restrain patient. Guide movements, if necessary. Do not try to insert anything in the patient’s mouth or open jaws
15. If possible, place patient on the side with the head flexed forward, head of bed elevated 30 degrees. Begin administration of oxygen, based on facility policy. Clear airway using suction, as appropriate. Provide supervision throughout the seizure.
16. Establish/maintain intravenous access, as necessary. Administer medications, as appropriate, based on medical order and facility policy.
17. After the seizure, place the patient in a side-lying position. Clear airway using suction, as appropriate
18. Monitor vital signs, oxygen saturation, and capillary glucose as appropriate
19. Allow the patient to sleep after the seizure. On awakening, orient and reassure the patient
20. Remove PPE, if used. Perform hand hygiene.
TOTAL SCORE : 20 X 2 = 40 pts
Pamela Lynn and Marilee LeBon. Skill Checklists for Taylor's Clinical Nursing Skills: A Nursing Process Approach, 4rd edition, by Wolters Kluwer Health | Lippincott Williams & Wilkins. 2015.
SCORING OF PERFORMANCE
Score Level of Performance Marks
32.4 – 40 Excellent 5
24.4 – 32.1 Very Good 4
16.6 – 24.3 Good 3
8.8 – 16.5 Fair 2
1.0 - 8.7 Poor 1
Evaluator’s Name: _____________________ Signature:_____________________