cheat sheet page 1/6 - nvidiaimages.nvidia.com/geforce-com/international/pdfs/geforce...ho ea g ag...
TRANSCRIPT

www.geforce.com/garage
CHEAT SHEET
GEFORCE GARAGE ANTEC 900 SERIES
HOW TO DETAIL YOUR RIG WITH AIRBRUSHINGFEATURING RON LEE CHRISTIANSON OF BLUE HORSE STUDIOS
As we demonstrated in How To Prep and Paint Your Case, it’s fairly easy to lay down a flawless coat of color on your chassis using standard “rattlecan” spray paints. But for detail work—and applying smooth gradients in particular—it’s tough to beat the classic airbrush.
Airbrushing is a technique that ought to be included in every professional modder’s repertoire, and you don’t need painting or illustration skills to take advantage of it. With this skill guide and a little patience, you’ll be able to produce crisp lettering, razor-sharp labels, and color gradients that look like they just came out of the printer’s shop. (If they printed on power supplies.)
In this video, Ron Lee Christianson is going to demonstrate how he uses a pre-cut stencil to airbrush a shiny new label on his PSU as a finishing touch on the Antec 900 case we’ve been modding throughout this series (check out our skill guide How To Create Custom Vinyl Decals for tips on creating your own stencils). But, of course, this technique can be applied to any component—including the chassis itself.
Finally, before jumping into your first airbrushing project, give yourself some time to practice your airbrushing technique. Have fun with mixing colors and experimenting with layering (for example, white over green vs. green over white), and practice creating subtle, smooth gradients on scrap materials similar to the ones on your components and chassis.
LEVEL: TECHNICIAN
TIME: 6 HOURS (INCLUDING DRYING TIME) COST: $$$MATERIALS:AIRBRUSH PAINT*
PRE-CUT STENCILS
TRANSFER TAPE
WET-NAPS
PAINTER’S TAPE
WET/DRY SANDPAPER (320 AND 400 GRIT)
PRIMER
*Check out the video for recommendations.
TOOLS:AIRBRUSH
X-ACTO KNIFE
STENCIL APPLICATOR*
FACE MASK
GLOVES
*A bank card wrapped in painter’s tape will do fine.
PAGE1/6
Airbrushing aerosolizes paint, and aerosolized paint can be inhaled, and that’s bad. It’s like smoking paint, and you know what the Surgeon General would have to say about that. So always work in a well-ventilated area and when
the airbrush is on, your face mask should be too.

HOW TO DETAIL YOUR RIG WITH AIRBRUSHING PAGE2/6
www.geforce.com/garage
STEP 3 Prep your stencil.If you used a home stencil cutter like the Silhouette Cameo, you’ll need to use the X-Acto knife to gently peel off the portions of the stencil you’ll be painting through. Be patient: stencils can be easy to damage.
STEP 2Sand and prime.Wet sanding and priming the surfaces first helps your paint adhere. Ron recommends wet sanding with 320 grit sandpaper before applying the first coat of primer, allowing it to dry, then wet sanding that coat with 400 grit sandpaper. (Check out How To Prep and Paint Your Case for wet sanding tips.)
STEP 1 Remove the old labels.Component labels are generally pretty easy to remove. Tough rem-nants can be carefully pried off with the X-Acto knife or a solvent like Goo Gone. Ron suggests using alcohol wipes to eliminate the last of the adhesive.
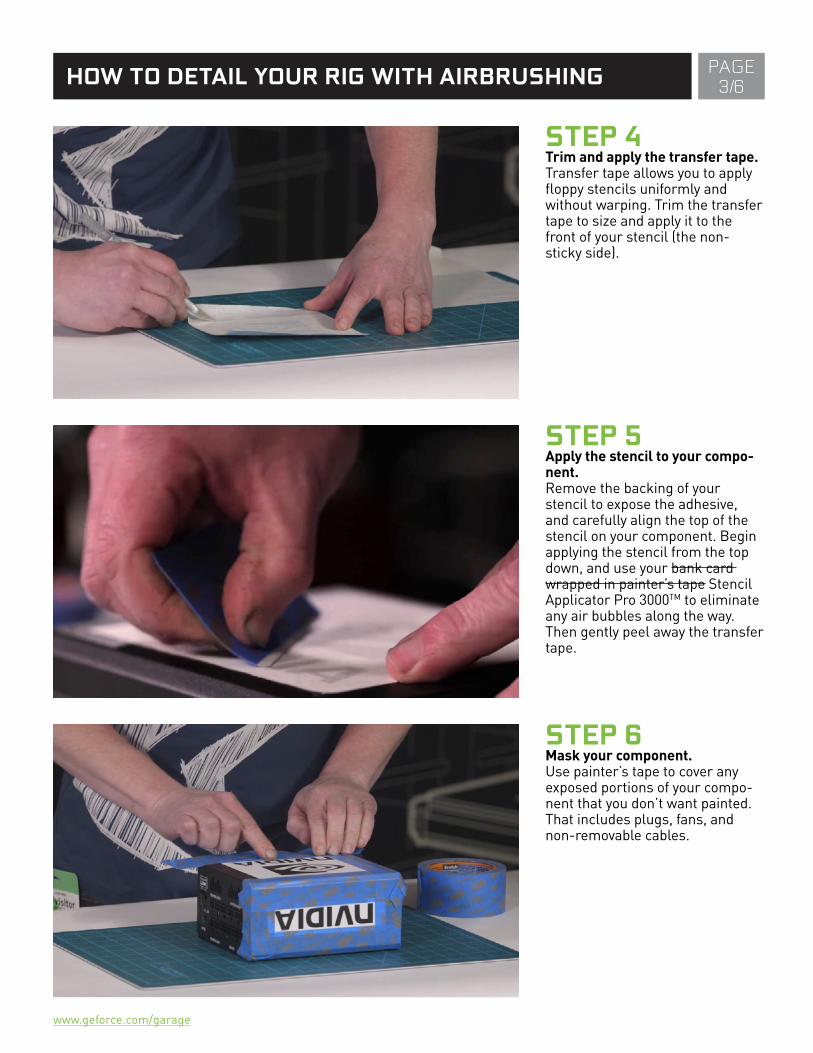
HOW TO DETAIL YOUR RIG WITH AIRBRUSHING PAGE3/6
www.geforce.com/garage
STEP 6 Mask your component. Use painter’s tape to cover any exposed portions of your compo-nent that you don’t want painted. That includes plugs, fans, and non-removable cables.
STEP 5 Apply the stencil to your compo-nent. Remove the backing of your stencil to expose the adhesive, and carefully align the top of the stencil on your component. Begin applying the stencil from the top down, and use your bank card wrapped in painter’s tape Stencil Applicator Pro 3000TM to eliminate any air bubbles along the way. Then gently peel away the transfer tape.
STEP 4 Trim and apply the transfer tape.Transfer tape allows you to apply floppy stencils uniformly and without warping. Trim the transfer tape to size and apply it to the front of your stencil (the non-sticky side).

HOW TO DETAIL YOUR RIG WITH AIRBRUSHING PAGE4/6
www.geforce.com/garage
STEP 9 Start airbrushing!Assuming you’ve familiarized yourself with the airbrushing rig with some practice on scrap, it’s time to apply your first coat. (Ron’s beginning with a white base coat over the entire stencil as a foun-dation for a gradient.) Spray about 12-15 inches from your surface, and apply paint sparingly so that it doesn’t condense into droplets. Remember: You can always add more paint, but it’s mighty tough to take it away.
STEP 8 Prime the airbrush.Drizzle a bit of reducer into the airbrush rig and spray it out before you start working. This lubricates the nozzle, and assures you that dried paint hasn’t clogged the nozzle and turned the airbrush into a paintball gun.
STEP 7 Mix your colors.Airbrush paint is mixed with reducer to make the paint more transparent and to flow more smoothly through the nozzle. The combination of paint and reducer should result in a mixture that’s about the same consistency as skim milk.

HOW TO DETAIL YOUR RIG WITH AIRBRUSHING PAGE5/6
www.geforce.com/garage
STEP 12 Upgrade your gradients.Once he’s finished applying his green coloring and allowed it to dry for a few minutes, Ron goes back over some elements with the white paint to add subtle highlights to the gradient effect.
STEP 11 Apply your gradients.After he’s applied his first green layer and let’s it dry for a few minutes, Ron switches to pro-gressively darker hues and effects a gradient by concentrating the color more on the edges than the center. It’s even more important to apply paint sparingly to gradients so that you don’t end up with harsh color bands and an image that looks like a badly compressed JPG.
STEP 10 Add additional layers (if desired).Next, Ron applies a pearly green coat over the white one. Because airbrushing allows you fine control over the opacity of colors, you can take advantage of layering to produce more subtle color effects than you’d get from just mixing paint before you apply it.

HOW TO DETAIL YOUR RIG WITH AIRBRUSHING PAGE6/6
www.geforce.com/garage
GeForce Garage: Antec 900 Series
SPECIAL THANKS TO:
STEP 14 What does The Dude think?“Man, that airbrushed logo really pulls the rig together.”
STEP 13 Remove the painter’s tape and stencils.Once you’re finished airbrushing and the paint is thoroughly dry, gently peel away the painter’s tape. Do not yank it away like you’re tearing through gift wrap on your birthday; that will lead to sadness and regret. Be even more gentle when removing the stencils.