chasm 4 help · chasm 4 help this help file will help you resolve difficulties you may encounter...
TRANSCRIPT

CHASM 4 HELP This help file will help you resolve difficulties you may encounter when running CHASM 4. The help file is best used with the search facility (press "S" or click "Search"), selecting a keyword and then an associated topic. If you are looking for general information on running CHASM, you can start with the following links: • How to start a simulation • How to use the draw tools • How to parameterise CHASM • How to run a simulation If you are looking for information related to files (opening, saving etc...), you can use these topics: • How to open an existing simulation • How to save the simulation • CHASM 4 file format • Troubleshooting file problems You can also consult a list of scientific publications about CHASM. Use the search system to find other topics. More info about CHASM on http://www.chasm.info Help file written for the build 403-3 of CHASM 4 (chasm403-3).
This manual was created with the free trial version of HelpScribble. This notice will not appear in manuals created with the full version.
CHASM 4 HELP
How to design a simulation • Start CHASM by using the "Windows Start Menu" or by double-clicking on the CHASM4 executable. CHASM will start with its "Main Dialogue Window" (shown below). An explication of all buttons on this window is available from here.
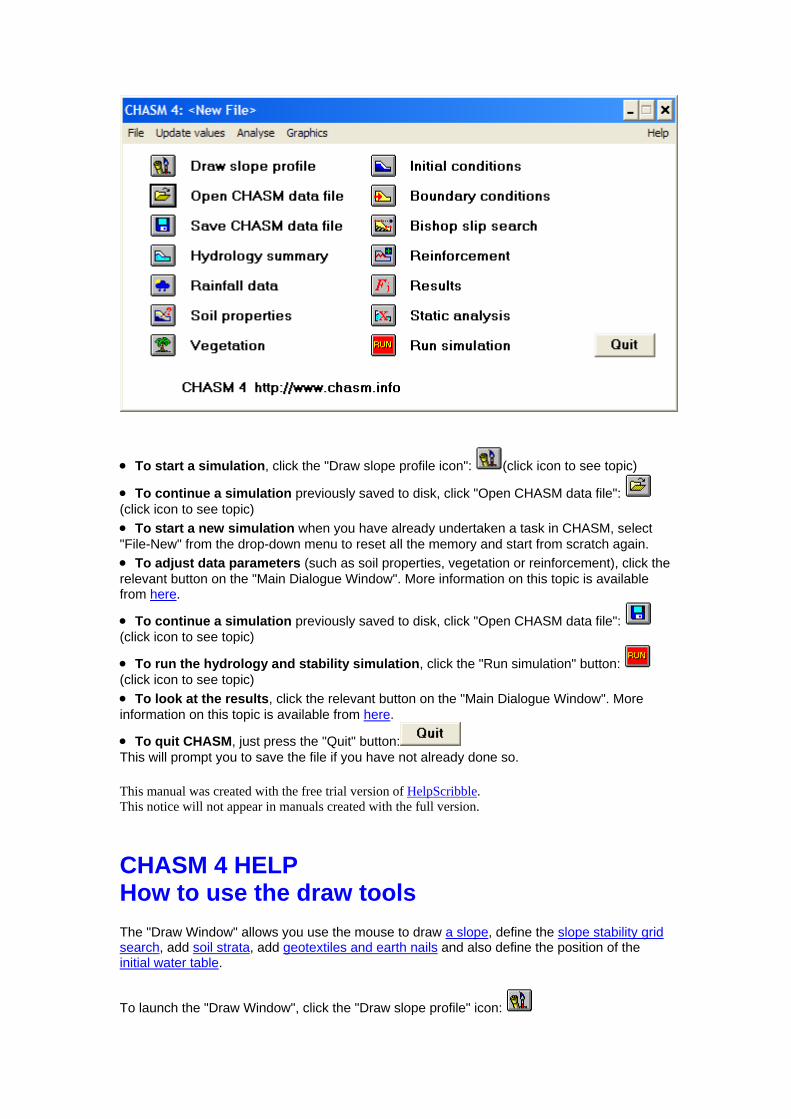
• To start a simulation, click the "Draw slope profile icon": (click icon to see topic)
• To continue a simulation previously saved to disk, click "Open CHASM data file": (click icon to see topic) • To start a new simulation when you have already undertaken a task in CHASM, select "File-New" from the drop-down menu to reset all the memory and start from scratch again. • To adjust data parameters (such as soil properties, vegetation or reinforcement), click the relevant button on the "Main Dialogue Window". More information on this topic is available from here.
• To continue a simulation previously saved to disk, click "Open CHASM data file": (click icon to see topic)
• To run the hydrology and stability simulation, click the "Run simulation" button: (click icon to see topic) • To look at the results, click the relevant button on the "Main Dialogue Window". More information on this topic is available from here.
• To quit CHASM, just press the "Quit" button: This will prompt you to save the file if you have not already done so.
This manual was created with the free trial version of HelpScribble. This notice will not appear in manuals created with the full version.
CHASM 4 HELP
How to use the draw tools The "Draw Window" allows you use the mouse to draw a slope, define the slope stability grid search, add soil strata, add geotextiles and earth nails and also define the position of the initial water table.
To launch the "Draw Window", click the "Draw slope profile" icon:
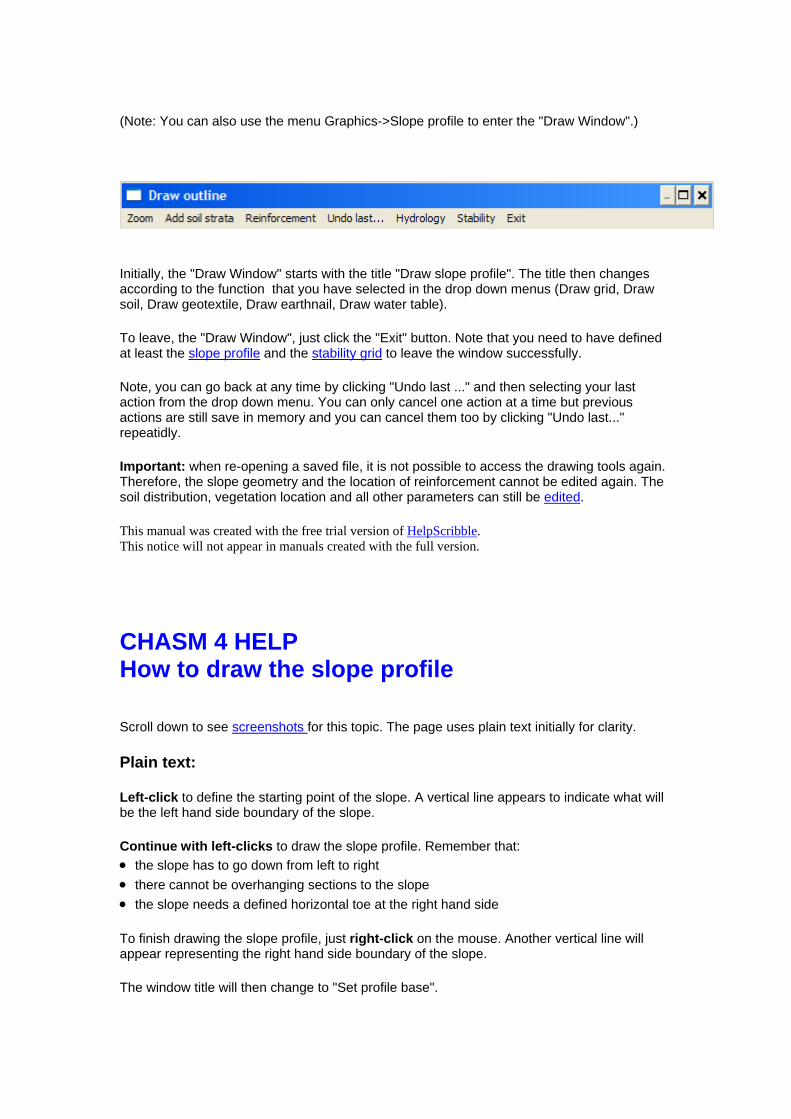
(Note: You can also use the menu Graphics->Slope profile to enter the "Draw Window".)
Initially, the "Draw Window" starts with the title "Draw slope profile". The title then changes according to the function that you have selected in the drop down menus (Draw grid, Draw soil, Draw geotextile, Draw earthnail, Draw water table). To leave, the "Draw Window", just click the "Exit" button. Note that you need to have defined at least the slope profile and the stability grid to leave the window successfully. Note, you can go back at any time by clicking "Undo last ..." and then selecting your last action from the drop down menu. You can only cancel one action at a time but previous actions are still save in memory and you can cancel them too by clicking "Undo last..." repeatidly. Important: when re-opening a saved file, it is not possible to access the drawing tools again. Therefore, the slope geometry and the location of reinforcement cannot be edited again. The soil distribution, vegetation location and all other parameters can still be edited.
This manual was created with the free trial version of HelpScribble. This notice will not appear in manuals created with the full version.
CHASM 4 HELP
How to draw the slope profile Scroll down to see screenshots for this topic. The page uses plain text initially for clarity. Plain text: Left-click to define the starting point of the slope. A vertical line appears to indicate what will be the left hand side boundary of the slope. Continue with left-clicks to draw the slope profile. Remember that: • the slope has to go down from left to right • there cannot be overhanging sections to the slope • the slope needs a defined horizontal toe at the right hand side To finish drawing the slope profile, just right-click on the mouse. Another vertical line will appear representing the right hand side boundary of the slope. The window title will then change to "Set profile base".

To set the base profile, just left-click where you want the slope to end along the y-axis. A horizontal line is then drawn automatically where the mouse is located. The slope profile is now fully defined. To view the finite difference cells which will be used for the hydrology simulation, just click "Hydrology->Draw cells". Cells will then be superimposed on the slope profile. To customise the cells, select "Hydrology->Change cells". You can then adjust the number of columns, the number of cells in the y direction and also the default cell breadth for a three-dimensional analysis. You can then tick "Check dimension of cells" to see the cell width and height generated by CHASM. Commented screenshots: Left-click to define the starting point of the slope. A vertical line appears to indicate what will be the left hand side boundary of the slope.
Continue with left-clicks to draw the slope profile. Remember that: • the slope has to go down from left to right • there cannot be overhanging sections to the slope

• the slope needs a defined horizontal toe at the right hand side To finish drawing the slope profile, just right-click on the mouse. Another vertical line will appear representing the right hand side boundary of the slope. The window title will then change to "Set profile base".
To set the base profile, just left-click where you want the slope to end along the y-axis. A horizontal line is then drawn automatically where the mouse is located. The slope profile is now fully defined.

To view the finite difference cells which will be used for the hydrology simulation, just click "Hydrology->Draw cells". Cells will then be superimposed on the slope profile.
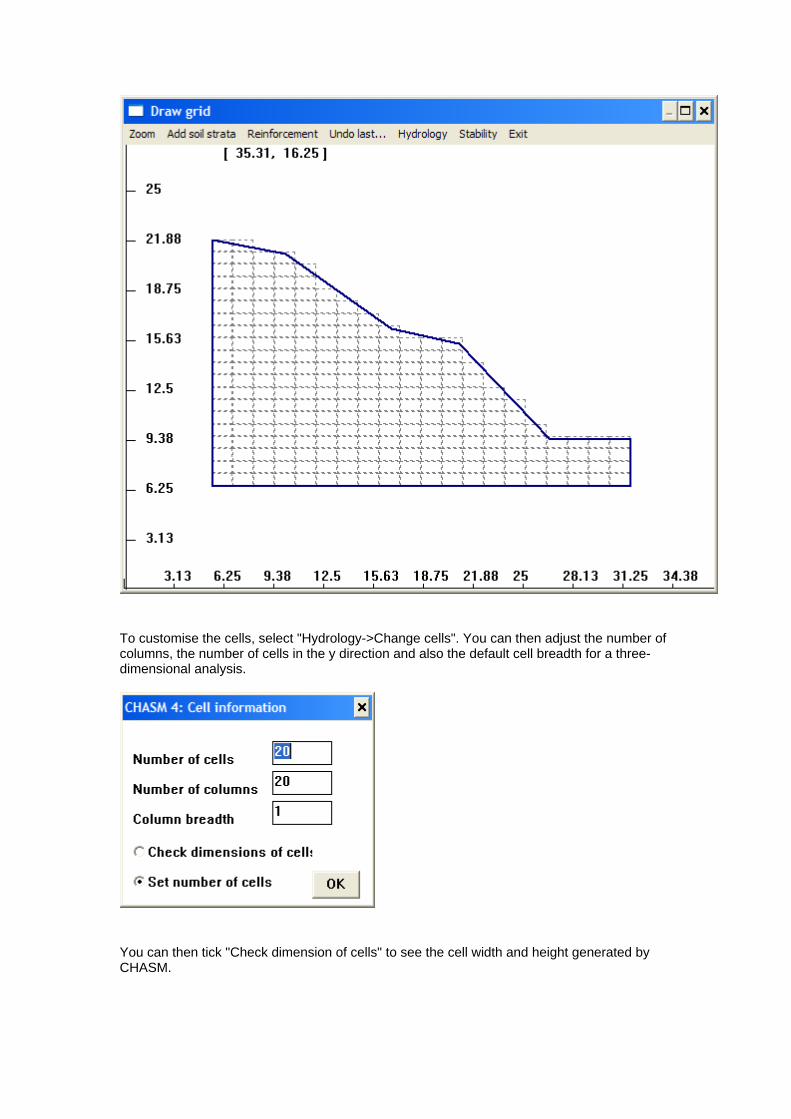
To customise the cells, select "Hydrology->Change cells". You can then adjust the number of columns, the number of cells in the y direction and also the default cell breadth for a three-dimensional analysis.
You can then tick "Check dimension of cells" to see the cell width and height generated by CHASM.

This manual was created with the free trial version of HelpScribble. This notice will not appear in manuals created with the full version.

CHASM 4 HELP
How to parameterise the stability analysis The method employed within CHASM 4 is the Bishop circular stability analysis with an automated search for the critical slip surface. Initially, a slip grid is designed by choosing the necessary X-Y co-ordinates for the start of the grid and the grid increment. The slip circle is then specified in terms of the initial radius and radius increment. The search procedure for the minimum factor of safety is then carried out by successive steps in the slip grid and changes to the radius of the slip circle. To position the search grid for the stability analysis, select "Stability->Slip grid location" from the menu. Now click anywhere abose the slope to position a default grid. (the bottom left point of the grid will then be aligned with the mouse)
To customise the grid, select "Stability->Define grid". A dialogue box will open on which you can adjust the parameters that will be used by the automated Bishop slip search. Note that you can also access this dialogue box at anytime after you have left the "Draw
Window" by clicking the "Bishop slip search" button from the "Main Dialogue Window" or by using the drop down menu "Update values->Slip data".
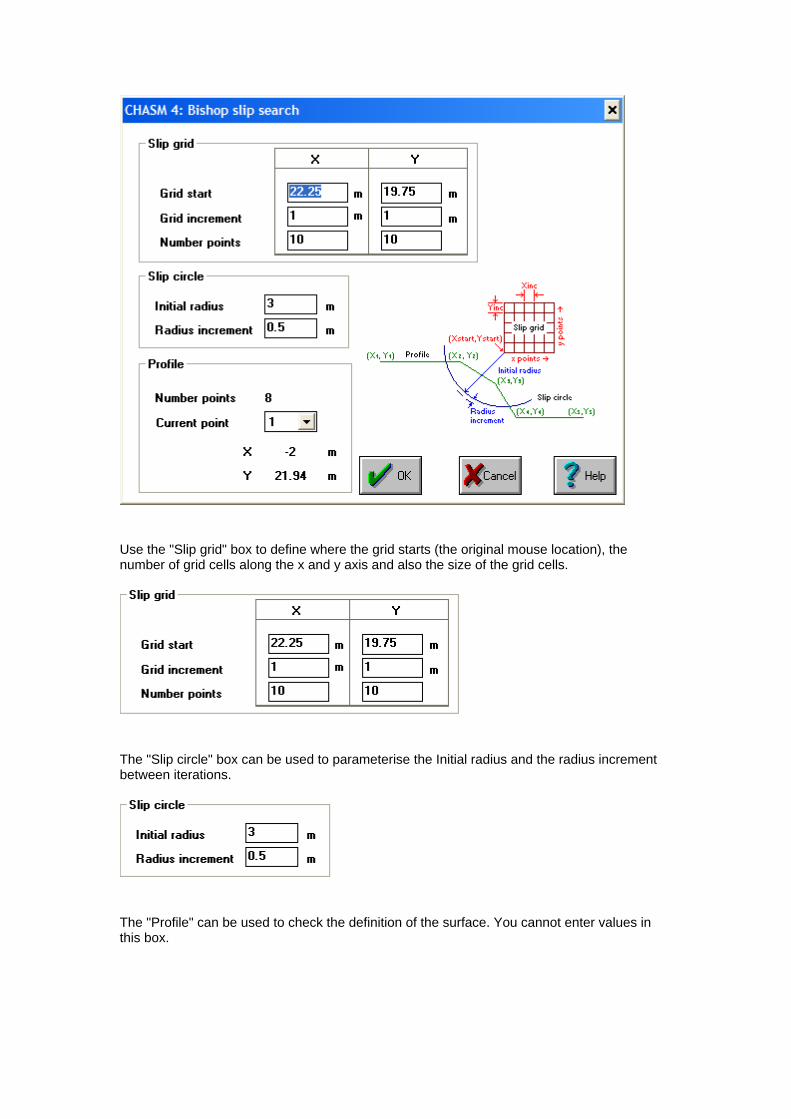
Use the "Slip grid" box to define where the grid starts (the original mouse location), the number of grid cells along the x and y axis and also the size of the grid cells.
The "Slip circle" box can be used to parameterise the Initial radius and the radius increment between iterations.
The "Profile" can be used to check the definition of the surface. You cannot enter values in this box.

This manual was created with the free trial version of HelpScribble. This notice will not appear in manuals created with the full version.

CHASM 4 HELP
How to define the water table Defining the initial water table in the "Draw Window" is very similar to adding soil strata. Select "Hydrology->Water table" from the drop-down menu. Then left-click on the left slope boundary to define the height of the water table on the left hand side and use extra clicks to draw the shape of the water table. When you are close enough to the vertical right hand side boundary of the slope, use a right-click and the water table will be extended horizontally until it hits the right hand slope boundary.
Important, the water table must reach the vertical right hand side of the slope near the toe. The water table must not intersect the surface of the slope.
This manual was created with the free trial version of HelpScribble. This notice will not appear in manuals created with the full version.
CHASM 4 HELP
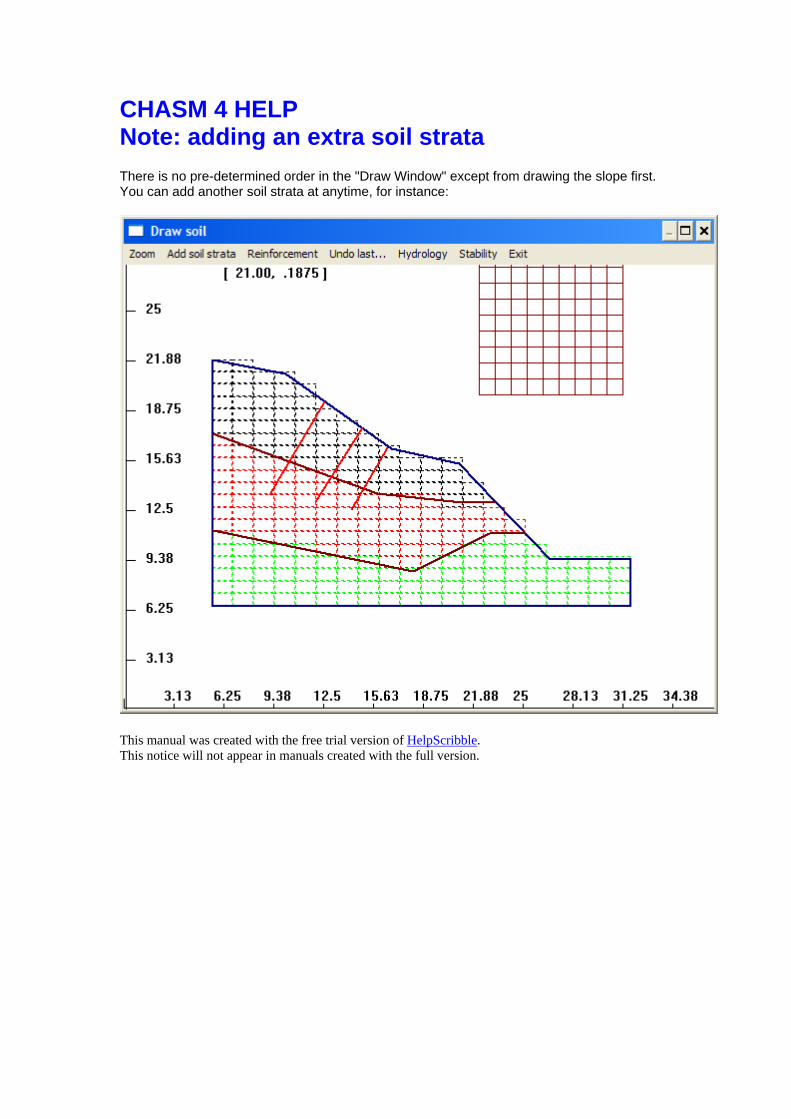
Note: adding an extra soil strata There is no pre-determined order in the "Draw Window" except from drawing the slope first. You can add another soil strata at anytime, for instance:
This manual was created with the free trial version of HelpScribble. This notice will not appear in manuals created with the full version.

CHASM 4 HELP
How to add soil strata Click "Add soil strata" in the top menu and draw the soil interface starting from the left hand side of the slope towards the right hand side. Note that the first click will automatically connect the soil strata to the left hand side boundary of the slope, so click next to the boundary to position the strata precisely.
To finish the strata, use a right-click. This will extend the strata horizontally from the last point towards the left hand side until it intersects the slope (so it is advisable to define a point close to where you want the soil strata to end to avoid errors)

You can then select "Hydrology->Draw cells" from the drop down menu to visualize the soil distribution in the finite difference grid.

Important: • soil strata cannot intersect • soil strata have to start from the vertical left hand side boundary (they cannot start from the slope surface). • soil lenses cannot be defined using the procedure in this window, but they can be incorporated in CHASM 4, see here instead.
This manual was created with the free trial version of HelpScribble. This notice will not appear in manuals created with the full version.

CHASM 4 HELP
How to add slope reinforcement Adding reinforcement in CHASM consists of drawing earth nails or geotextiles and then defining their strength parameters. The parameterisation of the strength properties is done at a later stage outside the "Draw Window". See here for more information. To add an earth nail, select "Reinforcement->Earth nail" from the drop down menu and then click where the earthnail starts near the surface:
Then left-click where the earth nail ends and use a right-click to finish the drawing:

You can then carry on adding earth nails as desired. Use the same technique to draw geotextiles. The geotextiles will be displayed in yellow and the earth nails in red.

This manual was created with the free trial version of HelpScribble. This notice will not appear in manuals created with the full version.

How to define the paramaters required by CHASM From the "Hydology summary" window When a geometry has been defined with the draw tools, CHASM 4 provides another tool called the "Hydrology summary" window from which many aspects of a CHASM simulation can be adjusted. The "Hydrology summary" window can be launched by clicking the relevant
icon: (Click icon to see topic). From the "Main Dialogue" window: The "Main dialogue" window also contains a set of icons that can be used to parameterise directly all aspects of a CHASM simulation. [An explication of all icons on this window is available from here.] The of icons related to the parameterisation of a CHASM simulation are listed below:
Rainfall (Click icon to see topic).
Vegetation (Click icon to see topic).
Boundary Conditions (Click icon to see topic).
Soils (Click icon to see topic).
Initial Conditions (Click icon to see topic).
Bishop Slip search (Click icon to see topic).
Reinforcement (Click icon to see topic). From the drop-down menu: Note that all aspects of the simulation can be adjusted from the drop down menu by selecting "Update values" and then selecting what is to be adjusted.
This manual was created with the free trial version of HelpScribble. This notice will not appear in manuals created with the full version.

CHASM 4 HELP
The "Hydrology summary" window The main aspect of the "Hydrology summary" window is the schematic grid shown on the bottom right. This grid toggled in 3D mode by default (see below) shows the geometry of the slope, the different soil types, the initial water table (red line) and can also be used to check the location of the vegetation (see here).
Slope-wide parameters: The detention capacity and maximum evaporation can be adjusted for the whole slope from the top left hand side frame. The number of soils can also be modified but it can only be increased, i.e. it is not possible to remove completely a soil type. Column specific parameters: The yellow cell initally located at the top of the slope can be moved by clicking anywhere on the grid to get local information about the corresponding column and cell. The initial water table height and top surface suction (link) can be adjusted for each column from the middle left frame. Cell specific parameters: The only cell specific parameter is the soil type allocated to a particular cell. A color is given for each soil type within the grid. The soil type for each cell can be manually adjusted by selecting a cell and then clicking the "Change soil" button. This is a good way to define soil lenses that cannot be drawn in the "Draw window". See here for more information. 2D and 3D views:

The view mode can be toggled between "three-dimensional" and "two-dimensional" by ticking on or off the "3D" box.
The "3D" aspect is not very obvious on the previous picture but the breadth of the slope can be adjusted for each column from the "Hydrology summary" window. For instance we can adjust the breadth to 10m for the first column and visualize the result in real time on the right hand side:
By doing adjusting the breadth of the other columns, we can create patterns of convergence or divergence for the slope. This operation can be simplified greatly by editing manually the CHASM input data file. See here for more information about the format of the data file.
In the rest of this help file, the "2D" view will be used for clarity.
This manual was created with the free trial version of HelpScribble. This notice will not appear in manuals created with the full version.

CHASM 4 HELP
How to define vegetation
To launch the vegetation window, just click from the "Main dialogue" window or
from the "Hydrology summary window". In the top left frame, you can adjust the detention capacity and maximum evaporation for the whole slope. You can also decide to include or not the vegetation in the simulation by choosing between "No vegetation model" and "Using vegetation model". This is a good way of switching the influence of the vegetation on and off with only one click of the mouse:
To add vegetation to a given column, first select the column number:
then the vegetation depth:
and then the vegetation type. There are some predefined types but you can also select a user defined grass or tree type and enter your own values of root tensile strength and root area ratio:

You can then appreciate the influence of the vegetation on both the effective rainfall and the soil strength parameters. For instance, in this case the effective precipitation decreases from 20mm to 9.2mm for the column where the tree has been added and the soil cohesion has been increased by 2kPa for the 4 cells that contain roots.
No vegetation With vegetation
This manual was created with the free trial version of HelpScribble. This notice will not appear in manuals created with the full version.

CHASM 4 HELP
How to visualise vegetation To visualise the vegetation, just click the "Vegetation" box in the "Hydrology summary" window:
This will change the view mode which shows soil types by default and will indicate the position of the vegetation instead. For instance, the above example shows that vegetation has been defined for column 3 with a root depth of 4 cells.
This manual was created with the free trial version of HelpScribble. This notice will not appear in manuals created with the full version.

CHASM 4 HELP
How to parameterise reinforcement
Click " to launch the "Reinforcement" window:
The window is divided into two main frames, the top one for geotextiles and the bottom one for earth nails. The location of the reinforcement cannot be changed and only their strength paramaters can be updated. Select a particular geotextile or earthnail from the drop down menu and then edit: • for geotextiles: the strength in Nm, the factor of safety (>1) and the interaction (0<int<1) • for earth nails: the strength in Nm, the factor of safety (>1) and the lateral friction in kPa. The factor of safety of each reinforcement is an factor that articially decreases the strength value given by the manufacturer. For instance if the strenght of a nail is 100Nm, using a factor of safety of 2 means that only 50Nm will be used for the stability analysis. The interaction for the geotextiles accounts for the potential slipage of the geotextile within the ground. int=1, no slippage. int=0, full slippage. The "Using reinforcement" box on the top left allows to switch on (if ticked) and off (if unticked) the influence of all earth nails and geotextiles with one click of the mouse:

This manual was created with the free trial version of HelpScribble. This notice will not appear in manuals created with the full version.
CHASM 4 HELP
How to parameterise initial conditions
To launch the "Initial conditions" window, just click: A water table has initially been drawn in the "Draw window" and/or modified within the "Hydrology summary" window. Hydrostatic conditions will be used for each cell located below the water table and the top frame can be used to define the pore water pressure distribution used above the water table:
• "Use current data" means that the current pore water pressure distribution will be used.This option is particularly useful to continue a simulation. For instance run a 24 hour rainfall, then modify the rainfall and run an extra 12 hours of rainfall starting from the results of the first 24 hours. • "Imposed pore water pressure" is the default option. CHASM will interpolate between a pore water pressure of 0m at the water table and the surface suction given in the text box, at the slope surface. • "Hydrostatic conditions" can be used to calculate the pore water pressure as a function of height only. Because the suction created at the top of the slope could be large for big slopes, a limiter is used to stop the suction at the value given in the frame.

How to parameterise the geotechnical conditions Because CHASM links hydrology and slope stability analysis, it is important to define the limits of interaction of the hydrological conditions on the stability analysis. The bottom frame in the "Initial conditions" window allows us to do this:
• the first line allows the use of Fredlund's equation for incorporating unsaturated shear strength (Tick "Phi b"). So far the value of the unsaturated friction angle is common to all soils used in the simulation. • the second line allows the user to introduce a limit to which suction will be included in the stability analysis (Tick "Suction limit"). CHASM can develop rather large suctions during prolonged drainage period and using such values in Bishop's equation would unrealistically increase the factor of safety of the slope.
This manual was created with the free trial version of HelpScribble. This notice will not appear in manuals created with the full version.
CHASM 4 HELP
How to parameterise rainfall
To launch the "Rainfall data" window, just click or :

The simulation duration, hydrology time step are adjustable from the left frame. Note: depending on the memory of the computer used to run CHASM, the maximum runtime may be of the order of 200 hours. It is also possible to adjust the rainfall start and end time and, for each hour of the rainfall event, to specify a rainfall rate. A summary of the effective rainfall for a tree and for grass is also given for information. Long events: For long rainfall events, it can be tedious to copy the same value of the rainfall rate for each hour. To simplify this, CHASM has been programmed to copy the rate of the previous hour when the rainfall duration is increased. For instance, if the rainfall event consists of 10mm/hr for 1 hour and then 20mm/hr for 10 hours, just adjust the rainfall rate to 20mm/hr for the first hour:
then extend the storm duration to 10 hours:
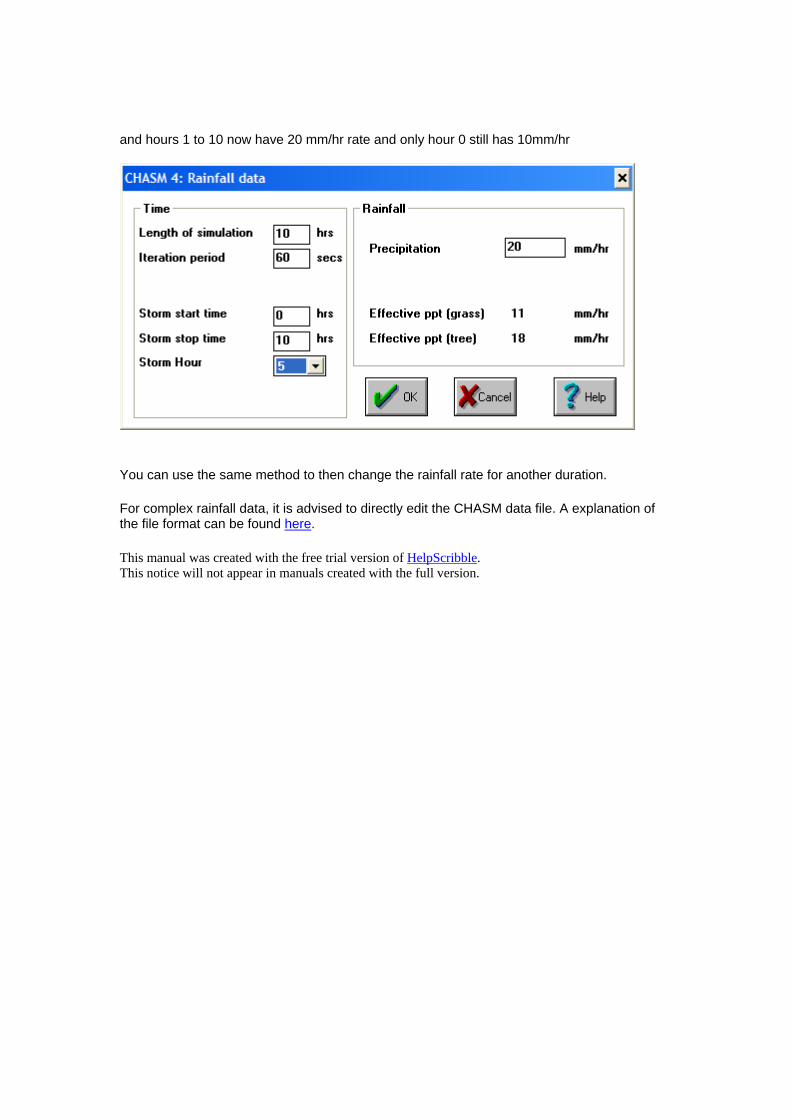
and hours 1 to 10 now have 20 mm/hr rate and only hour 0 still has 10mm/hr
You can use the same method to then change the rainfall rate for another duration. For complex rainfall data, it is advised to directly edit the CHASM data file. A explanation of the file format can be found here.
This manual was created with the free trial version of HelpScribble. This notice will not appear in manuals created with the full version.

CHASM 4 HELP
How to define soil properties
To launch the "Soil properties" window, just click: Then select a soil type in the drop down menu and adjust its hydrological and geotechnical parameters. The updated values are automatically transfered to all cells within the slope.
To describe the behaviour of the soil in unsaturated conditions, a suction moisture curve (SMC) is necessary. To edit this curve, just click the "SMC" icon:
You can then adjust the moisture content value for a given value of suction. Beware that using a wrongly defined SMC can have a very strong impact on the hydrology; make sure the values entered are physically appropriate.
This manual was created with the free trial version of HelpScribble. This notice will not appear in manuals created with the full version.
CHASM 4 HELP
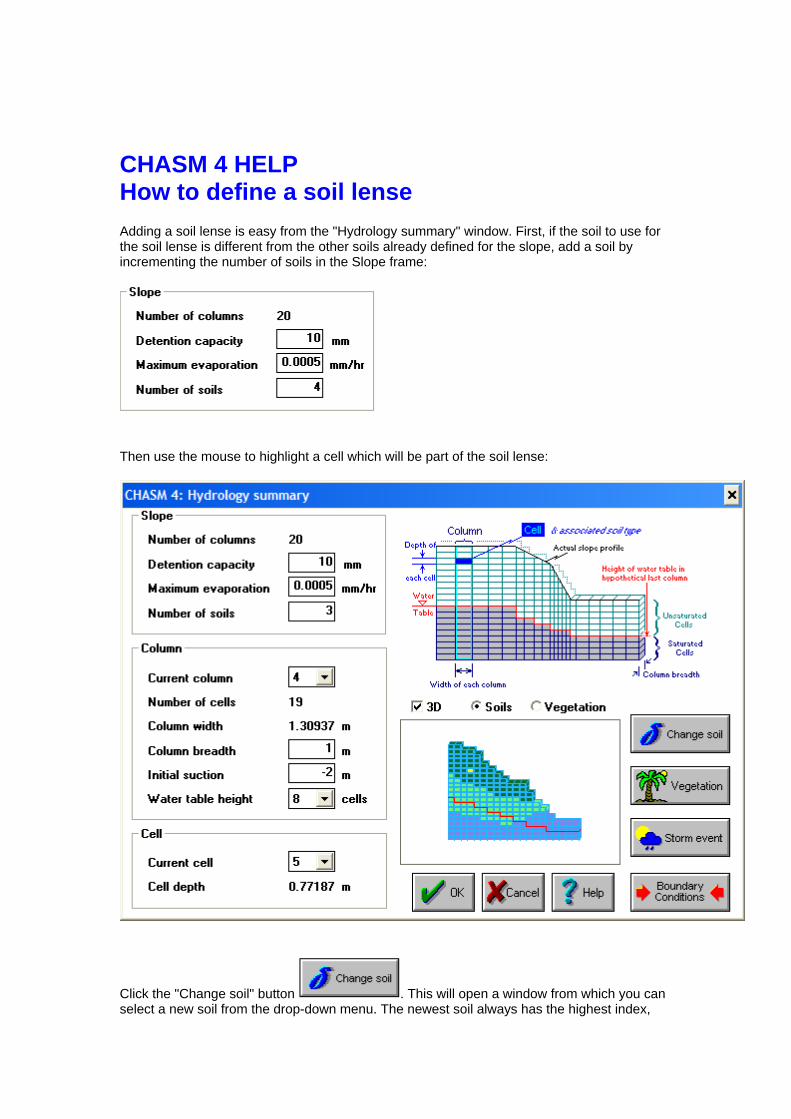
How to define a soil lense Adding a soil lense is easy from the "Hydrology summary" window. First, if the soil to use for the soil lense is different from the other soils already defined for the slope, add a soil by incrementing the number of soils in the Slope frame:
Then use the mouse to highlight a cell which will be part of the soil lense:
Click the "Change soil" button . This will open a window from which you can select a new soil from the drop-down menu. The newest soil always has the highest index,

number 4 in our case. If you highlight another cell, you can check that the soil type has been modified:
Repeat the operation for all the cells that are located within the desired soil lense.
This manual was created with the free trial version of HelpScribble. This notice will not appear in manuals created with the full version.

CHASM 4 HELP
How to add leakage and upslope recharge
To launch the "Boundary Conditions" window, just click or :
The window is separated in two frames: The left hand frame is for the boundary condition at the toe of the slope. It consists of the water table height on the right hand side of the slope and the soil type associated with the right boundary. The right hand frame deals with extra fluxes into the slope such as upslope recharge coming from the left hand side and leakage which can be defined per column:
The leakage value has to be constant for the whole simulation. A tick in the box indicates that 'leakage' is switched on. Parameterisation of rainfall (the top surface boundary condition) is undertaken from the "Rainfall data" window. See here.
This manual was created with the free trial version of HelpScribble. This notice will not appear in manuals created with the full version.

CHASM 4 HELP
How to save the simulation CHASM 4 allows you to save all the information that was entered in CHASM in a data file. However, this data file will not contain simulation results, it will contain only the information necessary to replicate the current simulation.
To same your simulation in a data file, click the "Save CHASM data file" icon at anytime: . Note that you need to have created at least the slope geometry to be able to save any information. If the you started from an existing file, a confirmation will be asked before saving the changes:
If you created a new simulation, a "Save As" dialogue box will open:
Select the drive on which you want to save the file on the bottom right of the box:
Naviguate to the folder where you want to save you simulation on the top right of the box:

By default, only the files with a .chr extension will be show in the top left part of the box:
Write the name of the file you want to save in the top box. For instance, "*.chr" was replaced by "NEWFILE.chr" in our example:
Click OK. The Main Dialogue Window in CHASM will now show the path to your file at the top:
Note that you can also save your simulation in another file at any time by clicking "File->Save As". This is particularly useful when doing small variations of the simulation to test different scenarios.
Important: when re-opening a saved file, it is not possible to access again the drawing tools

anymore. Therefore, the slope geometry and the location of reinforcement cannot be changed anymore. The soil distribution, vegetation location all all other parameters are still editable.
This manual was created with the free trial version of HelpScribble. This notice will not appear in manuals created with the full version.
CHASM 4 HELP
How to open an existing simulation
To open a CHASM data file, click the "Open CHASM data file" button: .
Navigate to the drive and folder where your file is located and select your file from the list:
Note that by default CHASM will only show the files with a .chr extension so it is advisable to save your files with this extension. Click OK. The Main Dialogue Box will now display your file name and path at the top:

Important: when opening a file, it is not possible to access the drawing tools again. Therefore, the slope geometry and the location of reinforcement cannot be edited again. The soil distribution, vegetation location and all other parameters can still be edited.
This manual was created with the free trial version of HelpScribble. This notice will not appear in manuals created with the full version.

CHASM 4 HELP
File format Knowledge of the structure of CHASM 4 input data files may prove helpful when linking to other data sources such as digital elevation models from which the slope profile could be generated. CHASM 4 input data files are simple ASCII file with a default extension .chr [or .CHR]. It is advisable to keep this extension otherwise CHASM 4 might not find the saved file at a later stage. The file used in this example is the file used all throughout this help file. Browse the other section to find out how soils were created, vegetation defined etc ... Note that to make the file more readable, the cells have been created 1m by 1m. Commented file: The original file data is written in a black bold font. Text in blue indicates the signification of the input data. Text in red notes important comments about the structure of the file. Text in green illustrates the input data in plain english.
[Switch to the uncommented file] Simulation duration (hrs); time step (s) 10 60 The simulation will be for ten hours with a time step of 60 seconds. Detention capacity (m); Maximum soil evaporation rate (m/s); Hour of rainfall start; Hour of rainfall end 0.015 5e-07 0 10 For this simulation, the detention capacity is of 0.015m and the maximum soil evaporation of 0.0000005m/s. The rainfall event starts at hour 0 and finishes at hour 10. Hourly rainfall data (m/hr)for each hour of the rainfall event 0.01 0.02 0.02 0.02 0.02 0.02 0.02 0.02 0.02 0.02 0.02 11 hourly rainfall rate are required (from hour 0 to hour 10). A rainfall rate of 0.01m/hr is imposed for the first hour and 0.02 mm/hr after that. Number of soils 4 This simulation will make use of four soil types. (NOTE: in this example, the four soil types will use the same parameters) Ksat(m/s); Saturated moisture content (m3/m3); Sat bulk density (kN/m3); Unsat bulk density (kkN/m3), Cohesion (kPa), friction angle (degrees) 1e-05 0.43 19 18 0 33.0 Number of points on suction-moisture curve 12 Moisture content on suction-moisture curve (-) 0.209 0.218 0.227 0.251 0.267 0.295 0.308 0.324 0.348 0.376 0.4 0.42

Pore water pressure on moisture curve (m) -10 -8 -6 -4 -3 -2 -1.6 -1.2 -0.8 -0.4 -0.2 -0.1 Basically, this means that the soil moisture curve for soil zero is made of 12 points. The first point has a moisture content of 0.209 for a pore water pressure of -10m. The last point a moisture content of 0.42 for a pore pressure of -0.1m. (Please note that the saturated moisture content is 0.43 for pore pressure of 0m and above as defined for the saturated moisture content). The definition of the remaining three soils (soils 1, 2 and 3) follows: 1e-05 0.43 19 18 0 33.0 12 0.209 0.218 0.227 0.251 0.267 0.295 0.308 0.324 0.348 0.376 0.4 0.42 -10 -8 -6 -4 -3 -2 -1.6 -1.2 -0.8 -0.4 -0.2 -0.1 1e-05 0.43 19 18 0 33.0 12 0.209 0.218 0.227 0.251 0.267 0.295 0.308 0.324 0.348 0.376 0.4 0.42 -10 -8 -6 -4 -3 -2 -1.6 -1.2 -0.8 -0.4 -0.2 -0.1 1e-05 0.43 19 18 0 33.0 12 0.209 0.218 0.227 0.251 0.267 0.295 0.308 0.324 0.348 0.376 0.4 0.42 -10 -8 -6 -4 -3 -2 -1.6 -1.2 -0.8 -0.4 -0.2 -0.1 Number of columns in the slope profile 20 (NOTE: the following 2 lines of data are required for EACH column) Number of cells in column; Height of water table; Column width; Column depth; Initial surface suction (Note: Column width along x axis; Column depth along z-axis) 20 9 1.0 1 -1 The first column contains 20 cells. The water table is located 9 cells from the bottom. The column depth (along z-axis) is 1m and the initial surface suction is 1m at the top of the column. Couple Cell height/ Soil type starting from the top cell in the column and repeated for each of the declared number of cells in the column. For instance, 1.0 0 1.0 0 1.0 0 1.0 0 1.0 0 1.0 0 1.0 1 1.0 1 1.0 1 1.0 1 1.0 1 1.0 1 1.0 1 1.0 1 1.0 2 1.0 2 1.0 2 1.0 2 1.0 2 1.0 2 This reads from left to right as: - top cell as a height of 1m and contains soil numkber 0 - bottom cell has a height of 1m and contains soil number 2 (NOTE: soils are numbered from 0. For instance if 4 soils have been defined, the first soil is number 0 and the last is number 3) (NOTE: the above 2 lines have completed the entry for the first column; this pattern of data entry is now repeated for the remaining columns - 19 in this case) 20 8 1.309375 1 -1 1.0 0 1.0 0 1.0 0 1.0 0 1.0 0 1.0 0 1.0 0 1.0 1 1.0 1 1.0 1 1.0 1 1.0 1 1.0 1 1.0 1 1.0 2 1.0 2 1.0 2 1.0 2 1.0 2 1.0 2 19 8 1.309375 1 -1 1.0 0 1.0 0 1.0 0 1.0 0 1.0 3 1.0 0 1.0 0 1.0 1 1.0 1 1.0 1 1.0 1 1.0 1 1.0 1 1.0 1 1.0 2 1.0 2 1.0

2 1.0 2 1.0 2 19 8 1.309375 1 -1 1.0 0 1.0 0 1.0 0 1.0 3 1.0 3 1.0 0 1.0 0 1.0 1 1.0 1 1.0 1 1.0 1 1.0 1 1.0 1 1.0 1 1.0 2 1.0 2 1.0 2 1.0 2 1.0 2 18 7 1.309375 1 -1 1.0 0 1.0 0 1.0 0 1.0 3 1.0 0 1.0 0 1.0 0 1.0 1 1.0 1 1.0 1 1.0 1 1.0 1 1.0 1 1.0 2 1.0 2 1.0 2 1.0 2 1.0 2 16 7 1.309375 1 -1 (NOTE: note the soil lense of soil number 3 in the above 3 records) 1.0 0 1.0 0 1.0 0 1.0 0 1.0 0 1.0 1 1.0 1 1.0 1 1.0 1 1.0 1 1.0 1 1.0 1 1.0 2 1.0 2 1.0 2 1.0 2 15 6 1.309375 1 -1 1.0 0 1.0 0 1.0 0 1.0 0 1.0 0 1.0 1 1.0 1 1.0 1 1.0 1 1.0 1 1.0 1 1.0 2 1.0 2 1.0 2 1.0 2 14 6 1.309375 1 -1 1.0 0 1.0 0 1.0 0 1.0 0 1.0 0 1.0 1 1.0 1 1.0 1 1.0 1 1.0 1 1.0 2 1.0 2 1.0 2 1.0 2 13 5 1.309375 1 -1 1.0 0 1.0 0 1.0 0 1.0 0 1.0 1 1.0 1 1.0 1 1.0 1 1.0 1 1.0 1 1.0 2 1.0 2 1.0 2 12 5 1.309375 1 -1 1.0 0 1.0 0 1.0 0 1.0 1 1.0 1 1.0 1 1.0 1 1.0 1 1.0 1 1.0 2 1.0 2 1.0 2 12 4 1.309375 1 -1 1.0 0 1.0 0 1.0 0 1.0 1 1.0 1 1.0 1 1.0 1 1.0 1 1.0 2 1.0 2 1.0 2 1.0 2 12 4 1.309375 1 -1 1.0 0 1.0 0 1.0 0 1.0 0 1.0 1 1.0 1 1.0 1 1.0 1 1.0 2 1.0 2 1.0 2 1.0 2 10 3 1.309375 1 -1 1.0 0 1.0 0 1.0 1 1.0 1 1.0 1 1.0 2 1.0 2 1.0 2 1.0 2 1.0 2 8 3 1.309375 1 -1 1.0 1 1.0 1 1.0 2 1.0 2 1.0 2 1.0 2 1.0 2 1.0 2 7 3 1.309375 1 -1 1.0 1 1.0 2 1.0 2 1.0 2 1.0 2 1.0 2 1.0 2 5 2 1.309375 1 -1 1.0 2 1.0 2 1.0 2 1.0 2 1.0 2 4 2 1.309375 1 -1 1.0 2 1.0 2 1.0 2 1.0 2 4 2 1.309375 1 -1 1.0 2 1.0 2 1.0 2 1.0 2 4 2 1.309375 1 -1 1.0 2 1.0 2 1.0 2 1.0 2 4 2 1.309375 1 -1 1.0 2 1.0 2 1.0 2 1.0 2 (NOTE: by tilting your head by 90 degrees clockwise, you can "see" the structure of the slope on the above entries. This can be useful for tracking geometrical errors, although the slope is inverted. The bottom cells are on the left) Soil type for the boundary condition at the toe of the slope; Water table height in cells for boundary conditions 2 2 Soil number 2 will be used to calculate the boundary condition at the toe of the slope. the water table height imposed on the right hand side is of 2 cells. Type of stability analysis (NOTE: only Bishop is available on the commercial windows version) Bishop Definition of the grid: xstart; ystart; x increment; y increment; initial radius; radius increment Xstart-Ystart being the bottom left point of the grid 16.6875 13.25 1 1 10 10 3 0.5

Number of points that define the slope surface 6 List x-y of the points on the surface 0 15.4375 4.5625 14.5625 11.1875 9.875 15.4375 8.9375 21.125 2.9375 26.1875 2.9375 The surface of the slope is made of 6 points of coordinates (0;15.4375) to (26.1875;2.9375) Reinforcement section: REINFORCEMENT Eartnails section: EARTHNAIL number of earth nails number 3 random text (no spaces) text Inclination (degrees) ; Length (m) ; Xstart (m); Ystart (m); lateral friction (kPa) ; strength (Nm) and FOS for each nail 59.400024 6.752893 7 12.8125 0.5 100 2 57.578932 5.479008 9.375 11.1875 0.5 100 2 59.858617 4.480862 10.9375 9.9375 0.5 100 2 Three earth nails are defined, the first one starts from the location (X=7;Y=12.81) with a length of 6.75 m and an inclination of 59 degrees. Its lateral friction is 0.5 kPa, its strength 100 Nm and its design factor of safety 2. NOTE: had there been geotextiles, a very similar section would exist before the EARTHNAIL block with the following syntax: GEOTEXTILE number 2 text 25.820992 6.457191 8.1875 10.5 0.5 100 2 11.604762 7.146076 20.625 3 0.5 100 2 where the last three parameters for each geotextile are the interaction (-), strength (Nm) and FOS NOTE: the reinforcement section is written regardless of whether reinforcement is switched on or off within CHASM as long as some reinforcement has been drawn in the "Draw" window. Leakage section: LEAKAGE 0=no, 1=yes 1 Column; Leakage value per column (m/hr) 1 0 2 0 3 0.02 4 0 5 0 6 0 7 0 8 0

9 0 10 0 11 0 12 0 13 0 14 0 15 0 16 0 17 0 18 0 19 0 20 0 Leakage will be used and we find a leakage point of 0.02 m/hr at the top of column 3. This could account for a pipe or a leaky drain. Initial conditions section: INITIAL_CONDITIONS Type of initial conditions; top pressure condition Type 1: use current values -> top pressure condition ignored Type 2: imposed surface suction -> surface suction Type 3: hydrostatic -> maximum suction at the top 2 -1 An imposed surface suction of -1m will be used for the initial conditions. The initial pore pressure distribution will be hydrostatic below the drawn water table and interpolated between 0m at the water table and -1m at the surface for the unsaturated zone. Upslope recharge section: UPSLOPE_RECHARGE Value of upslope recharge in m/s 0 There is no upslope recharge. (NOTE: the 0 above is for 0 m/s this is NOT an integer flag [0 or 1] for switching on or off the recharge. So basically, upslope recharge is always on and a value of 0 m/s is used when upslope recharge is not to be used.) Fredlund's Phi b section: PHI_B 0=no, 1=yes; phi_b friction angle in degrees 0 15 Fredlund's equation will NOT be used. Default value of Phi b ("unsaturated friction angle") is 15 degrees. Cut off value for the pressure in the Bishop equation: MAXIMUM_HEAD 0=no, 1=yes ; Value of maximum suction 1 -2 A suction limiter of -2m will be used in Bishop's equation, all suction values below -2m will be replaced by -2m in the Bishop equation. Vegetation section: VEGETATION 0=no, 1=yes 1 Tensile strength (kPa) and root area ratio (-) for custom grass 0 0 Tensile strength (kPa) and root area ratio (-) for custom tree 0 0 Column number; vegetation depth; vegetation type (see note below); tensile strength (kPa); root area ratio; increased conductivity (m/s); tree(2) or grass (1)

1 0 0 30 0.06 6e-06 2 2 0 0 30 0.06 6e-06 2 3 4 2 37 0.06 6e-06 2 On column 3, some vegetation of type 2 (Birch) of depth 4 cells is defined The characteristics of the vegetation are: tensile strength: 37kPa, root area ratio 0.06, increase soil conductivity 6e-6 m/s and birch is a tree ... 4 0 0 30 0.06 6e-06 2 5 0 0 30 0.06 6e-06 2 6 0 0 30 0.06 6e-06 2 7 0 0 30 0.06 6e-06 2 8 0 0 30 0.06 6e-06 2 9 0 0 30 0.06 6e-06 2 10 0 0 30 0.06 6e-06 2 11 0 0 30 0.06 6e-06 2 12 0 0 30 0.06 6e-06 2 13 0 0 30 0.06 6e-06 2 14 0 0 30 0.06 6e-06 2 15 0 0 30 0.06 6e-06 2 16 0 0 30 0.06 6e-06 2 17 0 0 30 0.06 6e-06 2 18 0 0 30 0.06 6e-06 2 19 0 0 30 0.06 6e-06 2 20 0 0 30 0.06 6e-06 2 (NOTE: the list of vegetation types is: Accacia (0), Alfafa (1), Birch (2), Bare soil (3), Couch grass (4) Radiata pine (5), User defined grass (6), User defined tree (7), Vetiver cropped (8) and Vetiver uncropped (9)) (NOTE: by default, CHASM defined vegetation of type 0 (Accacia) for each column with a depth of 0 cells as illustrated above.) Signal to mark the end of the file: End_of_data (NOTE: This "End_of_data" statement is required. If not, CHASM 4 will NOT work)
This manual was created with the free trial version of HelpScribble. This notice will not appear in manuals created with the full version.

CHASM 4 HELP
Uncommented file format Knowledge of the structure of CHASM 4 input data files may prove helpful when linking to other data sources such as digital elevation models from which the slope profile could be generated. CHASM 4 input data files are simple ASCII file with a default extension .chr [or .CHR]. It is advisable to keep this extension otherwise CHASM 4 might not find the saved file at a later stage. The file used in this example is the file used all throughout this help file. Browse the other section to find out how soils were created, vegetation defined etc ... Note that to make the file more readable, the cells have been created 1m by 1m. Uncommented file: [Switch to the commented file] 10 60 0.015 5e-07 0 10 0.01 0.02 0.02 0.02 0.02 0.02 0.02 0.02 0.02 0.02 0.02 4 1e-05 0.43 19 18 0 33.0 12 0.209 0.218 0.227 0.251 0.267 0.295 0.308 0.324 0.348 0.376 0.4 0.42 -10 -8 -6 -4 -3 -2 -1.6 -1.2 -0.8 -0.4 -0.2 -0.1 1e-05 0.43 19 18 0 33.0 12 0.209 0.218 0.227 0.251 0.267 0.295 0.308 0.324 0.348 0.376 0.4 0.42 -10 -8 -6 -4 -3 -2 -1.6 -1.2 -0.8 -0.4 -0.2 -0.1 1e-05 0.43 19 18 0 33.0 12 0.209 0.218 0.227 0.251 0.267 0.295 0.308 0.324 0.348 0.376 0.4 0.42 -10 -8 -6 -4 -3 -2 -1.6 -1.2 -0.8 -0.4 -0.2 -0.1 1e-05 0.43 19 18 0 33.0 12 0.209 0.218 0.227 0.251 0.267 0.295 0.308 0.324 0.348 0.376 0.4 0.42 -10 -8 -6 -4 -3 -2 -1.6 -1.2 -0.8 -0.4 -0.2 -0.1 20 20 9 1.0 1 -1 1.0 0 1.0 0 1.0 0 1.0 0 1.0 0 1.0 0 1.0 1 1.0 1 1.0 1 1.0 1 1.0 1 1.0 1 1.0 1 1.0 1 1.0 2 1.0 2 1.0 2 1.0 2 1.0 2 1.0 2 20 8 1.309375 1 -1 1.0 0 1.0 0 1.0 0 1.0 0 1.0 0 1.0 0 1.0 0 1.0 1 1.0 1 1.0 1 1.0 1 1.0 1 1.0 1 1.0 1 1.0 2 1.0 2 1.0 2 1.0 2 1.0 2 1.0 2 19 8 1.309375 1 -1 1.0 0 1.0 0 1.0 0 1.0 0 1.0 3 1.0 0 1.0 0 1.0 1 1.0 1 1.0 1 1.0 1 1.0 1 1.0 1 1.0 1 1.0 2 1.0 2 1.0 2 1.0 2 1.0 2 19 8 1.309375 1 -1 1.0 0 1.0 0 1.0 0 1.0 3 1.0 3 1.0 0 1.0 0 1.0 1 1.0 1 1.0 1 1.0 1 1.0 1 1.0 1 1.0 1 1.0 2 1.0 2 1.0 2 1.0 2 1.0 2 18 7 1.309375 1 -1 1.0 0 1.0 0 1.0 0 1.0 3 1.0 0 1.0 0 1.0 0 1.0 1 1.0 1 1.0 1 1.0 1 1.0 1 1.0 1 1.0 2 1.0 2 1.0 2 1.0 2 1.0 2

16 7 1.309375 1 -1 1.0 0 1.0 0 1.0 0 1.0 0 1.0 0 1.0 1 1.0 1 1.0 1 1.0 1 1.0 1 1.0 1 1.0 1 1.0 2 1.0 2 1.0 2 1.0 2 15 6 1.309375 1 -1 1.0 0 1.0 0 1.0 0 1.0 0 1.0 0 1.0 1 1.0 1 1.0 1 1.0 1 1.0 1 1.0 1 1.0 2 1.0 2 1.0 2 1.0 2 14 6 1.309375 1 -1 1.0 0 1.0 0 1.0 0 1.0 0 1.0 0 1.0 1 1.0 1 1.0 1 1.0 1 1.0 1 1.0 2 1.0 2 1.0 2 1.0 2 13 5 1.309375 1 -1 1.0 0 1.0 0 1.0 0 1.0 0 1.0 1 1.0 1 1.0 1 1.0 1 1.0 1 1.0 1 1.0 2 1.0 2 1.0 2 12 5 1.309375 1 -1 1.0 0 1.0 0 1.0 0 1.0 1 1.0 1 1.0 1 1.0 1 1.0 1 1.0 1 1.0 2 1.0 2 1.0 2 12 4 1.309375 1 -1 1.0 0 1.0 0 1.0 0 1.0 1 1.0 1 1.0 1 1.0 1 1.0 1 1.0 2 1.0 2 1.0 2 1.0 2 12 4 1.309375 1 -1 1.0 0 1.0 0 1.0 0 1.0 0 1.0 1 1.0 1 1.0 1 1.0 1 1.0 2 1.0 2 1.0 2 1.0 2 10 3 1.309375 1 -1 1.0 0 1.0 0 1.0 1 1.0 1 1.0 1 1.0 2 1.0 2 1.0 2 1.0 2 1.0 2 8 3 1.309375 1 -1 1.0 1 1.0 1 1.0 2 1.0 2 1.0 2 1.0 2 1.0 2 1.0 2 7 3 1.309375 1 -1 1.0 1 1.0 2 1.0 2 1.0 2 1.0 2 1.0 2 1.0 2 5 2 1.309375 1 -1 1.0 2 1.0 2 1.0 2 1.0 2 1.0 2 4 2 1.309375 1 -1 1.0 2 1.0 2 1.0 2 1.0 2 4 2 1.309375 1 -1 1.0 2 1.0 2 1.0 2 1.0 2 4 2 1.309375 1 -1 1.0 2 1.0 2 1.0 2 1.0 2 4 2 1.309375 1 -1 1.0 2 1.0 2 1.0 2 1.0 2 2 2 Bishop 16.6875 13.25 1 1 10 10 3 0.5 6 0 15.4375 4.5625 14.5625 11.1875 9.875 15.4375 8.9375 21.125 2.9375 26.1875 2.9375 REINFORCEMENT EARTHNAIL number 3 text 59.400024 6.752893 7 12.8125 0.5 100 2 57.578932 5.479008 9.375 11.1875 0.5 100 2 59.858617 4.480862 10.9375 9.9375 0.5 100 2 LEAKAGE 1 1 0 2 0 3 0.02 4 0 5 0 6 0 7 0 8 0 9 0 10 0 11 0

12 0 13 0 14 0 15 0 16 0 17 0 18 0 19 0 20 0 INITIAL_CONDITIONS 2 -1 UPSLOPE_RECHARGE 0 PHI_B 0 15 MAXIMUM_HEAD 1 -2 VEGETATION 1 0 0 0 0 1 0 0 30 0.06 6e-06 2 2 0 0 30 0.06 6e-06 2 3 4 2 37 0.06 6e-06 2 4 0 0 30 0.06 6e-06 2 5 0 0 30 0.06 6e-06 2 6 0 0 30 0.06 6e-06 2 7 0 0 30 0.06 6e-06 2 8 0 0 30 0.06 6e-06 2 9 0 0 30 0.06 6e-06 2 10 0 0 30 0.06 6e-06 2 11 0 0 30 0.06 6e-06 2 12 0 0 30 0.06 6e-06 2 13 0 0 30 0.06 6e-06 2 14 0 0 30 0.06 6e-06 2 15 0 0 30 0.06 6e-06 2 16 0 0 30 0.06 6e-06 2 17 0 0 30 0.06 6e-06 2 18 0 0 30 0.06 6e-06 2 19 0 0 30 0.06 6e-06 2 20 0 0 30 0.06 6e-06 2 End_of_data
This manual was created with the free trial version of HelpScribble. This notice will not appear in manuals created with the full version.

CHASM 4 HELP
Troubleshooting file related problems I cannot find my file! The default file extension for CHASM 4 is .chr (or .CHR). It is advisable to keep this extension otherwise CHASM 4 might not find the saved file at a later stage. The default folder is C:\Program Files\CHASM4\Data Files\ on Windows XP. It is possible that CHASM might not find this folder in which case you will have to navigate to it. CHASM 4 is a 16 bit application compatible with older versions of Microsoft Windows. Therefore, filenames cannot have more than 8 characters [plus the extension]. The directory and file names might also be truncated and capitalised, for instance "Program Files" will be displayed as "PROGRA~1". A typical example would be here:
which actually represents the actual location: D:\JP\My Documents\Work\chasm help\CONV.CHR This is merely a cosmetic problem but can lead to confusion when trying to locate files. It is therefore recommended to keep file names and directory names to less than 8 characters. How can I configure Microsoft Windows to use CHASM 4 by default with CHASM data files? It is easy to configure Microsoft Windows XP to use CHASM on .CHR file: • Right-click on a .CHR file in the Windows Explorer • Select "Open With" and the "Choose program..." • Naviguate to CHASM 4 and tick the box "Always the selected program to open this kind of file" • Click OK Now a double-click on a CHASM data file will open CHASM 4 with the file preloaded automatically. Similar techniques can be employed on other versions of Microsoft Windows. Can I use drag and drop with CHASM 4? Yes, drag and drop can be used. If CHASM 4 is running, you can just drop a CHR file onto it to load it automatically. If CHASM 4 is not running and you have a "desktop shortcut" or a "quicklaunch icon" for CHASM 4, you can drop CHASM data file onto them which will then launch CHASM 4 with the data file preloaded.
This manual was created with the free trial version of HelpScribble. This notice will not appear in manuals created with the full version.

CHASM 4 HELP
Output window When you run a CHASM simulation, an "Output" window opens to allow you to check the hourly values of factor of safety, mass of landslide, runout and also the slip surface location as they are calculated. Note that when a simulation is running, access to all functions of CHASM is removed and you have to wait for "End of simulation" to appear in the "Output" window before you can use the "Main dialogue" box again.
You can leave this window open and run another simulation. To close the "Output" window, just select "File->Exit" from the drop-down menu:

Note that from the "File" menu, you can also save the content of the window into a file. If you add the extension ".txt" to the filename you wish to use (for example test.txt), you can then open the file with a basic text editor and paste the results of the simulation into a report:
This manual was created with the free trial version of HelpScribble. This notice will not appear in manuals created with the full version.

CHASM 4 HELP
Runout results Landslide travel distance is of importance in a number of applications relating to slope design and maintenance. This is a complex area of research requiring detailed rheology and material parameterisation that is rarely if ever available. Nonetheless it is highly relevant to include some estimation methodology within CHASM™ to provide some indication of likely landslide impact a s far as runout distance and depth is concerned.
Use the Previous and Next buttons to navigate the hours of simulation and find out the distance travelled by the landslide and the associated confidence bounds. Note that when the factor of safety of the slope is already below 1, the runout is essentially meaningless. Note also that being based on an empirical relationship, the runout can be negative. Explanation of the runout calculation in CHASM: Finlay et al. (1999) used data from the Geotechnical Engineering Office in Hong Kong to carry out an empirical analysis of the landslides recorded. 1100 landslides were included, out of a possible 3000, which had occurred between 1984 and 1993 in man-modified slopes of weathered granite and other volcanics. Most of these landslides had volumes of less than 1000m3 and debris ran out onto a near horizontal surface below the slope. Multiple regression models based on slope geometry were developed for the prediction of landslide travel across horizontal surfaces at the base of slopes using the geometry of a failure in a cut slope, and it is this empirical model that is used in CHASM™. The required independent variables are tan A (slope angle), D (depth to slip surface) and H (height of landslide). The dependent variables are log L and H4 (depth of debris at base of slope) for cut slopes. Three equations are given for each dependent variable - lower confidence interval (95%), mean predicted value, and upper confidence limit (95%).CHASM 4 returns the landslide runout distance, R, for each hour of the simulation runtime.

Reference: Finley, P.J., Mostyn, G.R. and Fell, R. 1999. Landslide Risk Assessment: prediction of travel distance. Canadian Geotechnical Journal, 36: 556-562
This manual was created with the free trial version of HelpScribble. This notice will not appear in manuals created with the full version.
Slip surface Use the drop-down menu "Graphics->Cross-section" to visualise the critical slip surface at each hour of the simulation.
The window displays the factor of safety, the mass and runout of the slip surface (meaningless if FOS>1) and also the coordinates of the centre and radius of the circle that generated the critical slip surface. Click the "Previous" and Next" buttons to naviguate through time. Note that for "Hour 0" (the initial time), is not displayed in this window as the factor of safety is calculated only after one hour.
This manual was created with the free trial version of HelpScribble. This notice will not appear in manuals created with the full version.

CHASM 4 HELP
Visualising hydrology output Use the drop-down menu "Graphics->Hydrology" to visualise the pore water pressure and moisture content at each hour of the simulation.
Shades of blue represent saturation (dark blue for saturated and light blue for unsaturated). The red line represent the actual water table. Click anywhere on the slope to get cell information (pore pressure and moisture content) and use the "Previous" and Next" buttons to navigate through time. Note that for "Hour 0" (the initial time), it is not possible to get moisture content and factor of safety since these outputs are initially calculated after the first hour of the simulation:

This manual was created with the free trial version of HelpScribble. This notice will not appear in manuals created with the full version.
CHASM 4 HELP
Seismicity results Parameterising seismicity is both difficult and complex. CHASM 4 uses an empirical guide-line method reported by Charalambus 2003 to estimate the horizontal seismic acceleration required to induce instability:

Use the Previous and Next buttons to navigate the hours of simulation to determine the acceleration required to induce instability (In the case of a static analysis, only 1 hour is available). Note that when the factor of safety of the slope is already below 1, this acceleration will be negative and essentially meaningless. Attention: Local calibration is required in the use of the resultant acceleration to convert it to a Richter scale trigger. The calibration will vary according to location. For example, one such calibration in Europe is exemplified by the following : Planning Zone Acceleration g Richter Scale Value 1 0.12 4 2 0.16 4.5 3 0.24 5 4 0.36 6.5 Reference: Charalambus, S 2003 Methodology development for the stability evaluation of natural and man-made slopes against static and seismic loads in a GIS environment. Technical University of Athens, Greece
This manual was created with the free trial version of HelpScribble. This notice will not appear in manuals created with the full version.

CHASM 4 HELP
Main dialogue window All functions of CHASM can be accessed from the main dialogue using either buttons (see the list below) or the drop-down menu. This page is merely a summary of the role of each button as well as a reminder as the drop-down menu entry associated to it.
List of buttons: Click on any button to get topic help. Dro-down menu entry written in bold after the description.
launch the "Draw" window. This is the first button because it is traditionnaly the way to start a CHASM simulation. Using the draw tool, you can create the soil geometry, create soil strata, add slope reinforcement, position the slip search grid and draw the initial water table. Use Graphics->Slope profile in the drop-down menu.
is used to open an existing simulation. CHASM allows you to save your configuration so that you can re-open it at a later stage to refine your analysis. Use File->Open... in the drop-down menu.
is used to save the current data. Use File->Save or File->Save as... in the drop-down menu.
launches the "Hydrology summary" window. From this window you can parameterise more in detail the simulation, control the geometry and water table, define a third dimension and draw soil lenses. Use Update values->Hydrology in the drop-down menu.
launches the "Rainfall data" window. This is the place to define the time step and simulation duration as well as defining in detail the evolution of the rainfall rate throughout the simulation. Use Update values->Storm in the drop-down menu.

lauches the "Soil properties" window. FRom this window, you can define which parameters are used per soil type. Such parameters include conductivity, saturated moisture content, cohesion and friction angle. Use Update values->Soil data in the drop-down menu.
launches the "Vegetation" window. It allows you to add some vegetation at the top of each column, define its depth and choose a vegetation type which will have an effect on the effective rainfall, the soil conductivity and its cohesion. Use Update values->Vegetation in the drop-down menu.
launches the "Initial conditions" window. This is the place to define the start state of the simulation and also to parameterise some important geotechnical factors such as the Fredlund's unsaturated friction angle. Use Update values->Initial conditions in the drop-down menu.
launches the "Boundary conditions" window. From there, you can define upslope recharge and also add an extra leakage term at the top of any column. Use Update values->Boundary conditions in the drop-down menu.
launches the "Bishop slip search" window. This is the place to define in detail the slip search grid that will be used in the stability analysis. Parameters to modify include grid position and spacing as well as radius increment. Use Update values->Slip data in the drop-down menu.
launches the reinforcement window from where you can control the characteristics of the slope reinforcement that might have been added through the draw tools. It allows parameterisation of both earth nails and geotextiles. Use Update values->Reinforcement in the drop-down menu.
allows you to check the critical slip surface location at each hour of the simulation. Use Graphics->Cross-section in the drop-down menu.
starts a static simulation. The grid search will be done but the hydrology will be kept constant. Use Analyse->Static analysis... in the drop-down menu.
starts a dynamic simulation using all the defined parameters. Use Analyse>Run Model in the drop-down menu.
This manual was created with the free trial version of HelpScribble. This notice will not appear in manuals created with the full version.

CHASM 4 HELP
How to run a simulation and visualise results Dynamic analysis
When all parameters have been defined, just click the run button ( ) to start the simulation. This will launch an "Outpout window" from which you can see the factor of safety computed each hour. When the simulation is finished, you can check other types of output such as the location of the critical slip surface, pore water pressure distribution, runout estimation and seismicity (click to see topic). Static analysis
You can also click the "Static analysis" button ( ) to start the simulation without the hydrology. This will then launch a window similar to the "Initial conditions" window from which you can choose what hydrological regime and what geotechnical conditions are to be used during the static analysis: • "Use current data" means that the current pore water pressure distribution will be used.This option is particularly useful to continue a simulation. For instance run a 24hr rainfall, then run static analysis on the last hour of the simulation for different values of soil cohesion. • "Imposed pore water pressure" is the default option. It will interpolate between a pore water pressure of 0m at the water table and the surface suction given in the text box. • "Hydrostatic conditions" can be used to calculate the pore water pressure as a function of height only. Because the suction created at the top of the slope could be large for big slopes, a limiter is used to stop the suction at the value given in the frame. • Fredlund's equation can be used for calculating the friction angles in the unsaturated zone (Tick "Phi b"). So far the value of the unsaturated friction angle is common to all soils used in the simulation. • A suction limiter can be introduced to control how much suction will be included in the stability analysis (Tick "Suction limit"). CHASM can develop rather large suctions during prolonged drainage period and introducing the whole value in Bishop's equation would unrealistically increase the factor of safety of the slope. After you click OK, an "Output" window will open, from which you can see the factor of safety computed each 24hr. When the simulation is finished, you can check other types of output such as the location of the critical slip surface, pore water pressure distribution, runout estimation and seismicity (click to see topic). The difference with the dynamic analysis is that only one time step will be available in all the output windows.
This manual was created with the free trial version of HelpScribble. This notice will not appear in manuals created with the full version.

CHASM 4 HELP
Publications It is important that these papers, technical reports and books are consulted so that users can thereby assess whether the analytical procedures adopted for the model development are relevant and appropriate for any potential application for which it is proposed that CHASM software be utilised. Papers of relevance to CHASM Anderson, M.G., Hartshorne, J. and Lloyd, D.M. (1998) Predicting rainfall-induced slope instability: a discussion. Proc. Inst. Civ. Eng. Geotechnical Engineering , 119, 211-218 Anderson, M.G., Lloyd, D.M., Park, A., Hartshorne, J., Hargraves, S. and Othman, A. (1996) Establishing new design dynamic modelling criteria for tropical cut slopes. Proc. 7 International Conference Landslides, Trondheim, 1067-1072 Anderson, M.G., Lloyd, D.M. and Othman, A. (1994) Using a combined slope hydrology/slope stability model for cut slope design in the Tropics. Malaysian J. Tropical Geog. 25, 1-10 Collison, A.J.C. and Anderson, M.G. (1996) Using a combined slope hydrology/slope stability model to identify suitable conditions for landslide prevention by vegetation in the humid tropics. Earth Surface Processes and Landforms 21, 737-747 Collison, A.J.C., Anderson, M.G. and Lloyd, D.M. (1995) Impact of vegetation on slope stability in a humid tropical environment: a modelling approach. Proc. Inst. Civil Eng. Water Maritime and Energy, 112, 168-175 (paper awarded by the Institute of Civil Engineers Trevithick Premium Triennial award for a research paper to the Institution in 1996) Anderson, M.G., Lloyd, D.M., Park, A., Harris, M.B., Jamaluddin, A., Collison, A.J.C. and Anderson, E.A. (1994) Extending the role of slope hydrology-stability assessments in the Tropics: towards cost-effective management of mountainous roads in Malaysia. Malaysian Roads Conference, IKRAM. 3, 43, 1-26 Anderson, M.G., Othman, A. and Lloyd, D.M. (1994) Using a combined slope hydrology/slope stability model for cutslope design in the Tropics. Malaysian Road Conference, IKRAM, 1, 4, 1-19 Anderson, M.G. (1992) A statistical approach to cut slope instability problems in peninsular Malaysia. In D.H. Bell (ed) Landslides, Balkema, Rotterdam, 1379-1385 Anderson, M.G. and Lloyd, D.M. (1991) Using a combined slope hydrology-stability model to develop cut slope design charts. Proc. Inst. Civ. Engineers 91, 705-718 Anderson, M.G. (1990) Developing hydrological stability models for cut slope design in the Tropics - a discussion. Int. Soc. for Soil Mechan. & Foundtns. Geomechanics in Tropical Soils, 2, 571-572 Anderson, M.G. and Shen, J. (1988)

Monitoring and modelling infiltration through a soil cement cover. Proc. Int. Conf. on Infiltration Development and Application, Honolulu, 178-187 Anderson, M.G., Kemp, M.J. and Lloyd, D.M. (1988) Applications of soil water finite difference models to slope stability problems. Vth International Symp. on Landslides, Lausanne, 1, 525-530 Anderson, M.G., Kemp, M.J. and Lloyd, D.M. (1988) Refinement of hydrological factors for the design of cut slopes in the Tropics. Int. Soc. for Soil Mechan. & Foundtns., Geomechanics in Tropical Soils, 233-240 Anderson, M.G. and Howes, S. (1985) Development and application of a combined soil water slope stability model. Quaterly Journal Engineering Geology 18, 225-236 Technical Reports and Manuals Anderson, M.G., Kemp, M.J. and Lloyd, D.M. (1997) Hydrological Design Manual for Slope Stability in the Tropics. Transport Research Laboratory. Overseas Road Note 14 58pp Anderson, M.G. (1990) A feasibility study on mathematical modelling of slope hydrology and stability. Geotechnical Control Office, Hong Kong CE 23/90 109pp Anderson, M.G. (1983) The prediction of soil suction for slopes in Hong Kong. Geotechnical Control Office, Hong Kong, CE 3/81, 244pp Books related to general modelling issues & slope stability processes Anderson, M.G. and Brooks, S.M. (eds) (1996) Advances in Hillslope Processes, Vols 1 & 2, Wiley, Chichester Anderson, M.G. and Richards, K.S. (1987) Slope Stability: Geotechnical Engineering and Geomorphology, Wiley, Chichester Glade, T., Anderson, M. G. & Crozier, M. 2005 Landslide Hazard and Risk, Wiley, Chichester
This manual was created with the free trial version of HelpScribble. This notice will not appear in manuals created with the full version.