charles sturt universitycsusap.csu.edu.au/~hjelinek/discri documents/discri st… · web viewif...
TRANSCRIPT

Charles Sturt UniversityStudent Diabetes Complications
Screening Initiative
STUDENT INFORMATION
1

Academic Educators:
AProf Paul Tinley; BSc(Hons), PhDMs Harriet Farquhar; NDipPod, BSc, GradCertDr Megan Smith; BAppSc(Physiotherapy), PhD
Academic and Clinical Advisors:
Prof Patrick Ball; BSc, MSc, PhDDr Alan Luckie; MBChB, FRANZCODr Doug Oxbrow; MBBSDr Jianxiong Wang; BSc, MEd, PhDDr Lexin Wang; BMEd, MMed, PhD, ASCEPTMs Clare Wilding; BAppSc OT, MAppScDr Jenny Wilkinson; BSc(Hons), GradDipFET, PhD
Technical Support:
Ms Cherryl Kolbe; ADLT, DDIAEMs Bev deJong; BSc(Hons)
Project Coordinator:
Dr Herbert Jelinek; BSc(Hons); Grad Dip(Neurosci); GradCertTeach&Learn; PhD
2
Contents
Page
Background to Project 4
Diabetes and Cardiovascular Disease: Relationship to this Project 4Health impacts of diabetes and its complications
5Diabetic retinopathy
5Cardiovascular disease
5Foot complications
6
Quality of life and health care 7Impact of early intervention on quality of life for people with diabetes complications
7
Assessment intervention strategies in rural/regional areas 8Strategies in assessment of complications of diabetes 9
Eye Screening9
Heart assessment9
Foot assessment10
Research and student education 11References 12Standard Operating Procedures (SOP) 15
Venipuncture Technique Using the Multisample Vacutainer Sytem16
Blood Collection by Finger Prick19
Manual Blood Pressure Measurement20
Follow-up procedures when an abnormal test or emergency response occurs22
Body Mass Index (BMI)24
Ankle Brachial Index (ABPI)25
Foot Health Assessment27
Use of Tiptherm ™29
Autonomic Nervous System Function Tests (Ewing Battery)30
3-lead Electrocardiogram (ECG)32
12-lead Electrocardiogram (ECG)34
Urine testing using Combur-Test 39Retinal Photography using the Canon CR-DGi Non-Mydreatic retinal camera 40
3
Emergency Procedures 45Cedar floor plan 46Emergency response 47Hypoglycaemia emergency response 48Fainting emergency response 49
Student screening documents 50
Diabetes complications screening forms 51
Diabetes screening – Participant phone recall instructions65
Appendices 66
4
Background to the Project
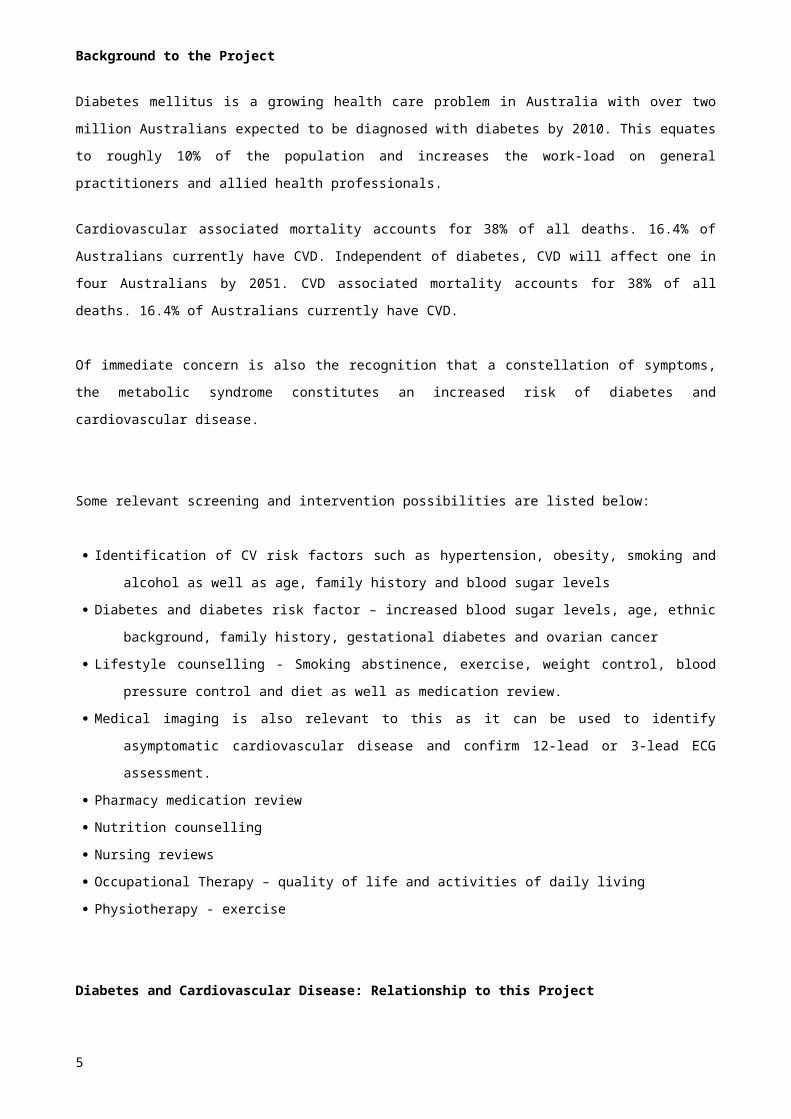
Diabetes mellitus is a growing health care problem in Australia with over two million Australians expected to
be diagnosed with diabetes by 2010. This equates to roughly 10% of the population and increases the work-
load on general practitioners and allied health professionals.
Cardiovascular associated mortality accounts for 38% of all deaths. 16.4% of Australians currently have
CVD. Independent of diabetes, CVD will affect one in four Australians by 2051. CVD associated mortality
accounts for 38% of all deaths. 16.4% of Australians currently have CVD.
Of immediate concern is also the recognition that a constellation of symptoms, the metabolic syndrome
constitutes an increased risk of diabetes and cardiovascular disease.
Some relevant screening and intervention possibilities are listed below:
Identification of CV risk factors such as hypertension, obesity, smoking and alcohol as well as age, family
history and blood sugar levels
Diabetes and diabetes risk factor – increased blood sugar levels, age, ethnic background, family history,
gestational diabetes and ovarian cancer
Lifestyle counselling - Smoking abstinence, exercise, weight control, blood pressure control and diet as
well as medication review.
Medical imaging is also relevant to this as it can be used to identify asymptomatic cardiovascular disease
and confirm 12-lead or 3-lead ECG assessment.
Pharmacy medication review
Nutrition counselling
Nursing reviews
Occupational Therapy – quality of life and activities of daily living
Physiotherapy - exercise
Diabetes and Cardiovascular Disease: Relationship to this Project
Given the increased incidence of diabetes nationally and internationally over the last 2 decades, a vast
amount of literature in the area has been generated. The review below addresses the literature sets relating to
this project namely: health impacts of diabetes and its complications; assessment intervention strategies in
rural/regional areas; and, the experience of people and their families living with diabetes in rural regional
communities.
5

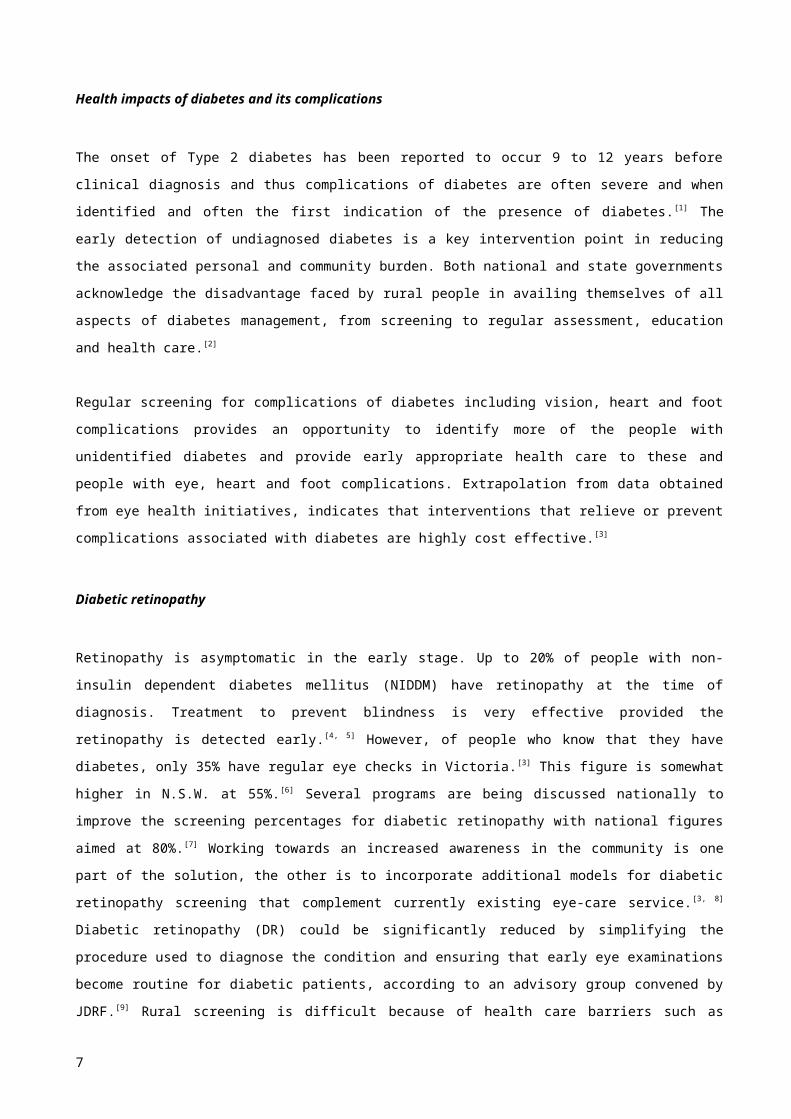
Health impacts of diabetes and its complications
The onset of Type 2 diabetes has been reported to occur 9 to 12 years before clinical diagnosis and thus
complications of diabetes are often severe and when identified and often the first indication of the presence of
diabetes.[1] The early detection of undiagnosed diabetes is a key intervention point in reducing the associated
personal and community burden. Both national and state governments acknowledge the disadvantage faced
by rural people in availing themselves of all aspects of diabetes management, from screening to regular
assessment, education and health care.[2]
Regular screening for complications of diabetes including vision, heart and foot complications provides an
opportunity to identify more of the people with unidentified diabetes and provide early appropriate health care
to these and people with eye, heart and foot complications. Extrapolation from data obtained from eye health
initiatives, indicates that interventions that relieve or prevent complications associated with diabetes are highly
cost effective.[3]
Diabetic retinopathy
Retinopathy is asymptomatic in the early stage. Up to 20% of people with non-insulin dependent diabetes
mellitus (NIDDM) have retinopathy at the time of diagnosis. Treatment to prevent blindness is very effective
provided the retinopathy is detected early.[4, 5] However, of people who know that they have diabetes, only
35% have regular eye checks in Victoria.[3] This figure is somewhat higher in N.S.W. at 55%. [6] Several
programs are being discussed nationally to improve the screening percentages for diabetic retinopathy with
national figures aimed at 80%.[7] Working towards an increased awareness in the community is one part of the
solution, the other is to incorporate additional models for diabetic retinopathy screening that complement
currently existing eye-care service.[3, 8] Diabetic retinopathy (DR) could be significantly reduced by simplifying
the procedure used to diagnose the condition and ensuring that early eye examinations become routine for
diabetic patients, according to an advisory group convened by JDRF.[9] Rural screening is difficult because of
health care barriers such as geographical isolation, the cost of visits to specialists and the lack of
ophthalmologists available. [10-12]
Cardiovascular disease
Cardiovascular disease, affecting the larger blood vessels is a major complication of diabetes. People with
diabetes are two to four times more likely to develop cardiovascular disease and their prognosis is not as
good. Diseases of the circulatory system such as coronary heart disease and stroke were listed as the
underlying cause of death in 55.7% of deaths in 2000 where diabetes was an associated cause. [13] In addition
some form of nervous system damage that affects the function of the heart and blood vessels, occurs in up to
60-70% of people with diabetes.[14] Regular screening and early recognition of nervous system damage
affecting cardiac function in people with diabetes allows better treatment intervention and reduces the number
of deaths associated with diabetes related cardiovascular disease.[15]
6
Foot complications
In the Western world diabetic foot problems have been reported as the most common complications of
diabetes. Diabetic foot problems are associated with nerve damage (diabetic neuropathy) and poor circulation
(peripheral vascular disease) in the lower limbs. [16] These factors increase the risk of foot ulcers, infection and
lead ultimately to lower extremity amputation. Among people with diabetes, 19.4% were found to be at risk for
foot ulcers and 2.1% reported absence of limbs. Peripheral neuropathy and peripheral vascular disease were
reported in 24.2% and 12.6% respectively. Regular monitoring of the feet for early signs of diabetic
neuropathy, peripheral vascular disease and foot deformities reduces the risk of serious foot ulcers and
amputation. An important adjunct to reducing the percentage of amputations is to have appropriate
assessment methods for recognising vascular disease.[17, 18]
7
Quality of life and health care
Few studies have assessed the influence of social environment on health, but increasing attention. [19] For
effective health care public health workers involved in diabetes prevention and control in all communities
including ethnic and Aboriginal and Torres Strait Islander communities. Health care professionals need to
listen and engage with people articulating their experiences of health and illness within the social, political,
economic, as well as biological context of their lives. [19] Communities within which public health workers are
now working are often not stable, connected and demographically as well as culturally similar populations
living within a traceable geographical location. This insight becomes especially important for communities with
increased incidence of diabetes and risk behaviour. Assessing individuals in diverse communities effectively
increases the quality of life of individuals and the overall health of the community.
Impact of early intervention on quality of life for people with diabetes complications
Quality of life is a term used in a number of disciplines, and definitions and conceptualizations vary from utility
of health states to life satisfaction and from possession of socially desirable characteristics to positive affect.
In order to address the quality of life issues associated with the disproportionately high rates of diabetes and
poor medical service provision in rural and remote regions of Australia, alternative models of primary health
care have to be considered.[5] There is considerable variation in diabetes management in different primary
care settings even in the same hospital.[20] The main difference was in consistent and appropriate screening
for risk factors and complications in people attending the clinics. Screening for diabetes has the potential to be
an effective intervention, especially if patients have intensive treatment of their newly diagnosed diabetes. In a
recent study the effectiveness of a home-based cardiac rehabilitation program in improving health outcomes
and rehabilitation access for special-needs patients has shown that significant positive changes for measures
of quality of life, knowledge of angina, and exercise tolerance. Additionally, higher levels of participation and
completion were also noted.[21]
Outcomes research is used increasingly for assessing the health outcome benefits of new therapeutic
programs and interventions. Therefore measures of quality of life have to consider gains in health outcomes
and programs in diabetes.[22] To achieve uniform care for all people with diabetes a on-stop assessment unit
that makes the primary health care team accessible to all, provides effective management of risks for diabetic
patients by advice, education, and therapeutic modification is the starting point to address quality of life issues
associated with diabetes.
8
Assessment intervention strategies in rural/regional areas
Complications associated with diabetes remain often undetected for quite some time especially in rural
regions, but in a twist are often health problems that alert health care providers to the presence of diabetes. [23]
Government agencies as well as specialist groups such as the Australian Diabetes Association advocate that
routine screening of persons at risk of diabetes allows earlier detection of the disease and better health
outcomes. Diabetes is a disease that is amenable to screening as the disease is common, serious, and has a
long asymptomatic phase. In addition acceptable tests exist for identification of the disease and treatment
must matter during the asymptomatic phase (World Health Organisation Guidelines). The Australian Diabetes
Association recommends screening after 45 years of age and to be repeated every 3 years. However if
hypertension, cardiovascular disease, increased lipid levels, physical inactivity, gestational diabetes and
obesity are present, earlier and more frequent screening is required. This is also the case if the person is of
pacific island or indigenous origin. At a recent primary telemedicine conference, Balsbaugh has reported that
universal screening is feasible and cost effective, it delays complications and younger patients have a longer
time to benefit from early identification.[24]
9

Strategies in assessment of complications of diabetes
Vision loss, cardiovascular disease and foot amputations are the most often occurring outcomes of diabetes.
Damage to the eye associated with diabetes (diabetic retinopathy) is the commonest cause of blindness in the
working age population in developed countries. Yet 98% of people with vision loss can be treated effectively
provided the pathology is detected early. Cardiovascular complications associated with diabetes and on it’s
own is the commonest cause of death in the population.[23] Early detection of blood vessel changes associated
with retinopathy, cardiovascular disease and foot complications is important for timely treatment to prevent or
delay the occurrence of these complications and improve the quality of life for individuals with diabetes. [11, 25]
Regular health screening that includes eye, heart and foot assessment has the potential to reduce the high
costs on the health care system and reduces the disparity in health care between rural and urban
communities by providing timely feedback to those at risk.[26]
Eye Screening
Automating the assessment changes in the retina can be carried out using mathematical techniques such as
developed by our team and others.[27-29] These mathematical techniques can be applied to the estimation of
blood vessel diameter changes and quantify the appearance of microaneurysms and haemorrhages as well
as new vessel growth in the advanced stages of diabetes. Identification of the number of microaneurysms is
positively correlated with diabetes. [30, 31] Of interest has been the correlation between blood vessel diameter
changes in the eye that is not only associated with diabetes but is also an early indicator for cardiovascular
disease and stroke.[11]
Heart assessment
Electrocardiology is still regarded as the most commonly used procedure for the assessment of cardiac
function and identification of heart disease, utilized by numerous health care practitioners including community
health nurses. We have investigated the efficacy of 3-lead ECG assessment in community health with good
outcomes suggesting a cost benefit and improvement in health care. [32] We have also developed an ECG
classification protocol for community screening using 12-lead ECG that optimizes referrals to general practice
by reducing the number incorrectly referred through community screening.[33]
ECG interpretation, although mostly automated is usually carried out by a specialist, be that a cardiac nurse,
general practitioner or cardiologist. The Charles Sturt Diabetes Complications Screening Programme has
investigated the possibility of primary health care providers assessing heart function using an automated ECG
assessment tool that differs to the traditional method by evaluating the heart rate variability obtained using a
3-lead recording. Our recording and interpretation tool adds two important features to heart assessment. 1) it
allows primary health care providers to record ECGs (placing 3-lead ECGs is less complex compared to
placing a 12-lead ECG and less invasive in community health settings) and 2) identify asymptomatic changes
in heart function associated with diabetes.[34] Our method is based on observations that many cardiac
anomalies, including diabetic autonomic neuropathy, change the heart rate variability before any overt ECG
anomalies are detectable.[35, 36] However, whereas cardiologists with current methods can not pick up
preclinical cardiac anomalies our method has the potential to do this.[37] In addition relatively short 3-lead ECG
10
recordings can be used in evidence based health care and accountability for primary health care practice with
lead II recordings showing a similar efficacy in identifying at risk individuals as 12-lead ECG recordings. [38]
Foot assessment
Regular monitoring of the feet for early signs of diabetic neuropathy, peripheral vascular disease and foot
deformities are essential.[13] Measurement of sensory impairment using monofilament tests to identify
peripheral neuropathy, ankle-brachial index to identify peripheral vascular disease and observation of skin
lesions and range of motion changes at the ankles are direct and simple yet reduce the risk of serious foot
ulcers and amputation.[39] These measures provide an indicator for further assessment if required by
specialists using more sophisticated assessment procedures.[40] Charles Sturt University has been assessing
foot health as part of its Allied Health Clinic and this knowledge can be incorporated into the mobile
assessment unit. [17]
11
Research and student educationTo address rurality and the associated health care barriers as well as experiential learning opportunities and
research, Dr Herbert Jelinek in collaboration with AProf Tinley and Mr Warner as well as other academics
has established a diabetes complications screening programme. This programme aims to provide health
information and health education to participants but also adds to our knowledge of rural health and provides
an opportunity for students for experiential learning.
12
References
13

Standard Operating Procedures (SOP)
14

Standard Operating Procedure (SOP)
Venipuncture Technique Using the Multisample Vacutainer System
SOP No:....................................Version: 1.0..................................Date: 3 April 2006
Dept/Div/School: School of Community Health
Supervisor/Manager: Cherryl Kolbe
Other Contacts: Bev deJong
RISKS/HAZARDS: Venipuncture is a procedure where there is this potential for direct contact between the skin (usually finger or thumb) of the blood collector and a sharp surgical instrument such as a needle.
It is essential that realistic assessments are made of the likelihood and severity of any injuries arising from venipuncture. Both physical and psychological risks must be assessed.
a) Ethical issues Subjects should not feel they have been abused as a result of
venipuncture. This could include excessive pain or discomfort and embarrassment or humiliation.
b) Physical Risks Patient experiencing nausea, light-headedness, dizziness,
fainting Needle stick injury
PROTECTIVE & EMERGENCY EQUIPMENT
Disposable gloves Gown & protective eyewear if appropriate There must be a First Aid / CPR trained person available in case of an
emergency. Emergency procedures must be in place – refer to Physiology
Laboratory “Guidelines for Medical Emergencies”
CONTROL MEASURES Inform the patient of the possibility of discomfort or embarrassment. Have the patient lying down with the head slightly raised on a pillow. Have available the following first aid measures:
first aid kit first aid officer emergency phone numbers near the most accessible phone
Only suitably qualified and experienced staff may perform venipuncture
Those performing venipuncture must comply with the following Physiology Laboratory Guidelines:
Venipuncture Medical Emergencies Infection Control
15

EQUIPMENT................... Clinically clean table outside laboratory area Tourniquet Appropriate vacutainer tubes (per person), labelled.
2 x 7ml EDTA tubes (purple top) 1 x 10ml tube with 100L preservative heparin 1 x 7ml plain tube (orange top)
5ml plain tubes for Hcy (one per person) 21g multiple sample needle or 21g winged infusion device Plastic sleeve to hold specimen tubes Isopropyl alcohol (70%) swabs Cotton wool balls Adhesive plaster or bandaids Disposable gloves Laboratory coat Sharps container Eye protection if deemed necessary by risk assessment
JOB STEPS Ensure all equipment is within easy reach and accessible. Select tube or tubes appropriate for samples desired. (see note at
end). Label the tubes. Tubes that contain additives should be gently tapped to dislodge any
additive, which may be trapped around the stopper. Open needle package, but do not remove needle shield. Thread
needle onto holder. Select site for venipuncture. Put on the disposable gloves Apply tourniquet. Prepare venipuncture site with an appropriate
antiseptic. (isopropyl alcohol swab) DO NOT PALPATATE VENIPUNCTURE SITE AFTER CLEANSING. Place patient's arm in a downward position. Remove needle shield. Insert the needle into the vein ensuring the bevel of the needle is
uppermost.
Push tube onto holder, puncturing the diaphragm of the stopper.
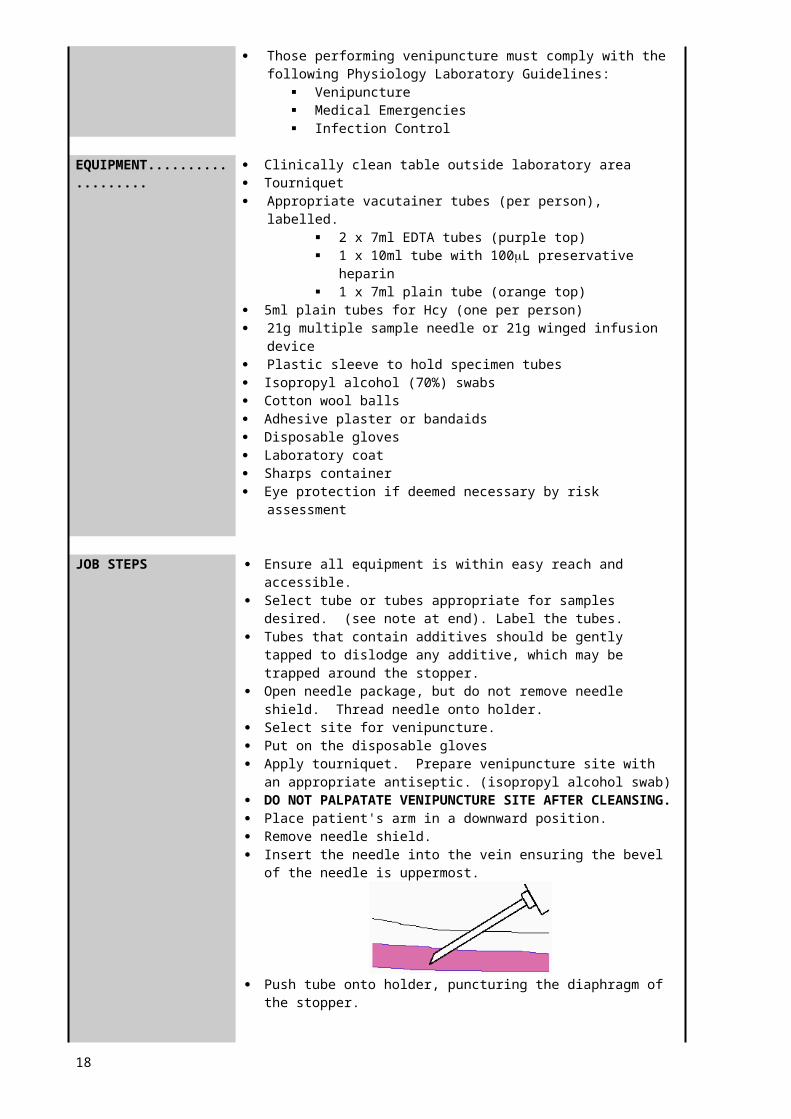
If no blood flows into tube or ceases to flow before an adequate sample is collected, the following steps are suggested to complete satisfactory collection:
Change the position of the needle. Move it forward (it may not be in the lumen)
16

or move it backward (it may have penetrated too far)
Adjust the angle (the bevel may be against the vein wall)
When first tube is full and blood flow ceases, remove it from the holder.
While each successive tube is filling, invert the previous tube containing additives 8-10 times. DO NOT SHAKE. Vigorous mixing can cause haemolysis.
Release the tourniquet after inserting the last tube. When the last tube has been removed (gold to tube), gently cover the needle tip with a cotton wool ball and remove the needle from the vein. Ask the patient to apply pressure to the puncture site until bleeding stops.
After the venipuncture, dispose of the holder and the needle into an approved sharps container.
Transfer the contents of the gold top vacutainer tube to the tube containing the preservative free heparin and invert gently to mix.
Check the patient’s arm and cover the site with a bandaid. Do not allow the patient to leave until the bleeding has stopped.
If breakage of a tube containing a collected sample should occur, avoid all contact with the exposed skin and follow proper procedures for the clean up and disposal of infectious waste.
WHEN YOU FINISH Discard gloves and wash hands.
Appendix A: Sample tubes for collection
17
Standard Operating Procedure (SOP)
Blood Collection by Finger Prick
SOP No: ...................................….Version: ………1.0……………..Date: March 2001
Laboratory Manager: Cherryl Kolbe Ext. 16995
Other Contacts: Bev deJong Technical Officer Ext. 16995
HAZARDS: Lancet stick
PROTECTIVE EQUIPMENT &
Disposable gloves Face mask and/or protective eye if required
EMERGENCY First aid kit availableEQUIPMENT
BEFORE YOU START Wash hands in warm soapy water Rinse well and dry completely
NEVER.........................
JOB STEPS If using an alcohol wipe, let the finger dry completely before testing
Warming fingers can increase blood flow Prepare the lancet device according to the manufacturers
instructions Put on disposable gloves Prick the finger to obtain the blood sample Cover the wound with a cotton ball held in place by the patient Dispose of the lancet in an approved sharps container Remove the cotton ball and apply a spot band
WHEN YOU FINISH If reading falls outside range recommended by Australian guidelines, the test is repeated the following week under overnight fasting condition
Remove gloves Wash hands in warm soapy water Rinse well and dry completely
Appendix B: Blood glucose level interpretation
18
Standard Operating Procedure (SOP)
Manual Blood Pressure Measurement
SOP No: ...................................….Version: ………1.0……………..Date: May 2006
Laboratory Manager: Cherryl Kolbe Ext. 16995
Other Contacts: Bev deJong Technical Officer Ext. 16995
HAZARDS: Over-inflation of the cuff may cause minor discomfort Crease in cuff may cause discomfort and slow blood flow
PROTECTIVE EQUIPMENT &
nil
EMERGENCY First aid kit availableEQUIPMENT
BEFORE YOU START Wash hands in warm soapy water Rinse well and dry completely Have the participant assume a relaxed supine position for 5
minutes prior to taking a resting BP measurement. The arm should be at the level of the heart with the palm up for Brachial measurement , legs should be in a near horizontal position knees slightly flexed for Ankle measurement
Observe and question participant for contraindications for taking BP (i.e. lymphedema) and signs and symptoms of BP alterations: high (headache, flushing of face, nosebleed, fatigue in older adults) and low BP (dizziness; mental confusion; restlessness; pale, dusky or cyanotic skin; cool, mottled skin over extremities)
NEVER.........................
JOB STEPS Explain the procedure to the participant Select appropriately sized cuff Expose the extremity fully by removing any constrictive
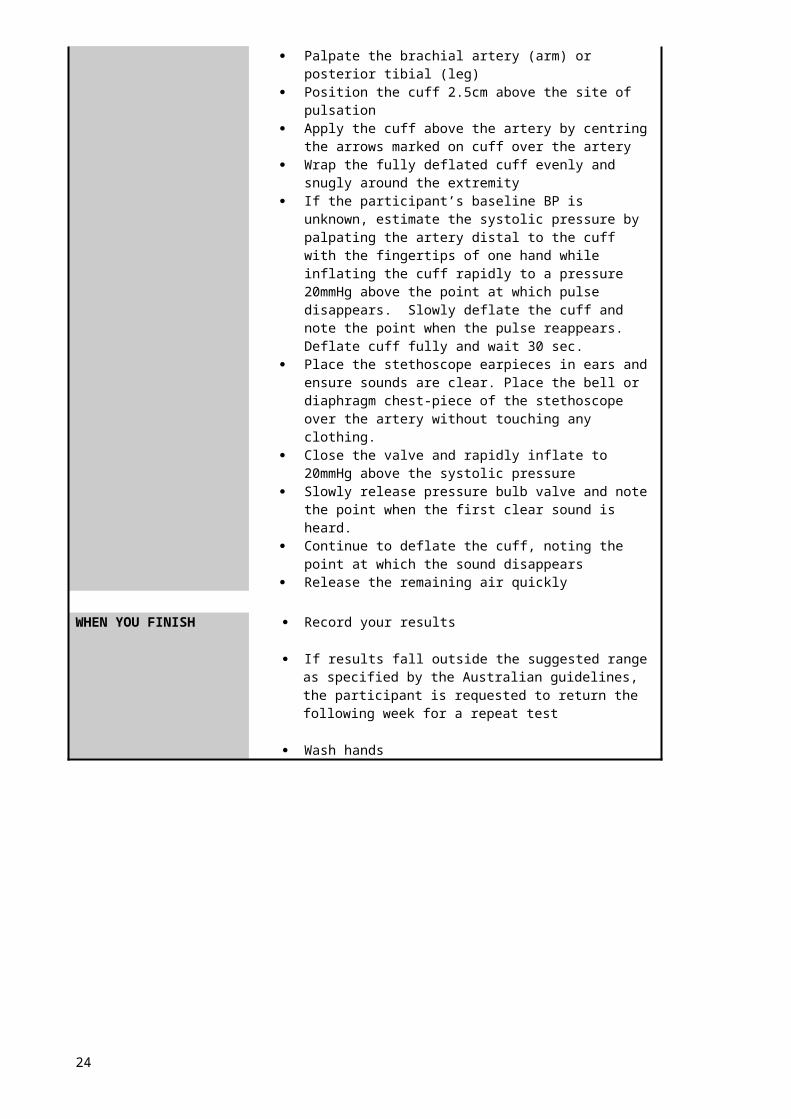
clothing Palpate the brachial artery (arm) or posterior tibial (leg) Position the cuff 2.5cm above the site of pulsation Apply the cuff above the artery by centring the arrows
marked on cuff over the artery Wrap the fully deflated cuff evenly and snugly around the
extremity If the participant’s baseline BP is unknown, estimate the
systolic pressure by palpating the artery distal to the cuff with the fingertips of one hand while inflating the cuff rapidly to a pressure 20mmHg above the point at which pulse disappears. Slowly deflate the cuff and note the point when the pulse reappears. Deflate cuff fully and wait 30 sec.
Place the stethoscope earpieces in ears and ensure sounds are clear. Place the bell or diaphragm chest-piece of the stethoscope over the artery without touching any clothing.
19

Close the valve and rapidly inflate to 20mmHg above the systolic pressure
Slowly release pressure bulb valve and note the point when the first clear sound is heard.
Continue to deflate the cuff, noting the point at which the sound disappears
Release the remaining air quickly
WHEN YOU FINISH Record your results
If results fall outside the suggested range as specified by the Australian guidelines, the participant is requested to return the following week for a repeat test
Wash hands
20

Standard Operating Procedure(SOP)
Follow-up procedures when an abnormal test or emergency response occurs
SOP No: ...................................….Version: ………1.0……………..Date: July 2006
Laboratory Manager: Cherryl Kolbe Ext. 16995
Other Contacts: Bev deJong Technical Officer Ext. 16995
HAZARDS: Emotional trauma for participants receiving abnormal test results
Emotional trauma for students involved in obtaining abnormal test results for participants
Emotional trauma for students involved in accident or emergency event
PROTECTIVE EQUIPMENT &
nil
EMERGENCY nilEQUIPMENT
BEFORE YOU START Ensure that clinical educator is available and programme manager is informed before providing feedback to participant
Collect all relevant information such as current and past results if available for participant
For participant and student ensure appropriate environment is available and the feedback can take place in confidentiality
Ensure that relevant phone numbers for student council, ambulance and other health service providers is available
NEVER......................... Not attend to a participant and provide appropriate feedback if abnormal test result is recorded
Not attend to a student who conveyed a negative test result or involved in accident or emergency event
JOB STEPS FOR PARTICIPANTS Explain the procedure to the participant Relate the findings in the context of current health practice
and in context of participants overall clinical history Ensure that participant understands meaning of abnormal
result and the action that is advised by clinical educator Assess psychological profile of participant and use clinical
judgement to provide appropriate feedback and council Ensure that participant has support at home, if referral is
not immediate Ensure if necessary that a covering letter for the general
practitioner or hospital is provided to participant if required Determine whether participant would like to have support if
presenting alone if the participant is required to seek advise immediately from GP or hospital
FOR STUDENTS Move student to comfortable environment away from
incident Obtain necessary information of incident. This may be
recording abnormal result or accident such as a fall or emergency situation such as heart attack, hypoglycaemic
21

event or fainting Review students psychological profile Provide appropriate council and determine whether further
intervention by student counselling office is required If an emergency event occurred and most students have
experienced this , a group debriefing session is also instigated
WHEN YOU FINISH Record outcomes
Ensure that incident reports have been filled out if emergency event occurred
22
Standard Operating Procedure (SOP)
Body Mass Index (BMI)
SOP No: ...................................….Version: ………1.0……………..Date: May 2006
Laboratory Manager: Cherryl Kolbe Ext. 16995
Other Contacts: Bev deJong Technical Officer Ext. 16995
A measure of body weight relative to height. BMI can be used to determine if people are at a healthy weight, overweight, or obese.HAZARDS: nil
PROTECTIVE EQUIPMENT &
nil
EMERGENCY First aid kit availableEQUIPMENT
BEFORE YOU START Wash hands in warm soapy water Rinse well and dry completely
NEVER.........................
JOB STEPS Greet the participant & explain what you are going to do Ask the participant to remove their shoes and any heavy items
from their pockets Record weight in kg using bathroom scales Record height in meters using the stature meter Record waist circumference in cms - do not approach the
participant from the front
WHEN YOU FINISH Calculate Body Mass Index (BMI) as follows:
Weight (kg) _________
Height2 (m)
Appendix C: What is Waist Circumference?
23
Standard Operating Procedure (SOP)
Ankle Brachial Index (ABPI)
SOP No: ...................................….Version: ………1.0……………..Date: June 2006
Laboratory Manager: Cherryl Kolbe Ext. 16995
Other Contacts: Bev deJong Technical Officer Ext. 16858
HAZARDS: Stepping down from plinth
PROTECTIVE EQUIPMENT &
nil
EMERGENCY First aid kit availableEQUIPMENT
BEFORE YOU START Wash hands in warm soapy water Rinse well and dry completely
NEVER.........................
JOB STEPS Doppler
Technique
Automated digital Blood Pressure
Measure highest systolic reading in both arms Record first Doppler sound as cuff is deflated Record at the radial pulse
Measure systolic readings in both legs Cuff applied to calf Record first Doppler sound as cuff is deflated Use Doppler ultrasound device Record dorsalis pedis (DP) pressure Record posterior tibial (PT) pressure Use PT for each leg when calculating ABPI.
Apply digital cuff of correct size and record brachial BP for each arm
Apply cuff to ankle (leg slightly flexed at knee) ensuring that the cuff lies firmly and flat against the skin, ensure tubing is not bent and that the arrow is aligned with the posterior tibial artery. Record BP for each legA cushion may be used to support the lower leg
WHEN YOU FINISH Calculations Ratio of each ankle to brachial systolic blood pressure Divide each ankle systolic pressure by corresponding systolic
brachial pressure Interpretation Ankle-Brachial ratio > 1.3: Possible calcification of blood vesselAnkle-Brachial ratio >0.95: 1.1. Normal Ankle-Brachial ratio <0.95: Peripheral Vascular Disease Ankle-Brachial ratio <0.6: Intermittent Claudication Ankle-Brachial ratio <0.5: Multi-level disease Ankle-Brachial ratio <0.26: Resting ischemic pain Ankle-Brachial ratio <0.2: Gangrenous extremity
24
False Negative Test: Diabetes Mellitus Vessels in diabetics are poorly compressible Results in falsely elevated ankle pressure
For elevated ankle SBP indicating calcification use the ruler adjustment and measure again.Management Segmental Arterial Pressure indicated for ratio < 0.9 Consider angiography or Magnetic resonance angiography
If test result falls outside range specified by Australian guidelines the test is repeated the following week
25
Standard Operating Procedure (SOP)
Foot Health Assessment
SOP No: ...................................….Version: ………1.0……………..Date: June 2006
Laboratory Manager: Cherryl Kolbe Ext. 16995Other Contacts: Bev deJong Technical Officer Ext. 16858
HAZARDS: Inadvertently being kicked with hyperactive knee reflex
PROTECTIVE EQUIPMENT &
Disposable gloves
EMERGENCY nilEQUIPMENT
BEFORE YOU START cleanse equipment with alcohol wipes
NEVER.........................
JOB STEPS
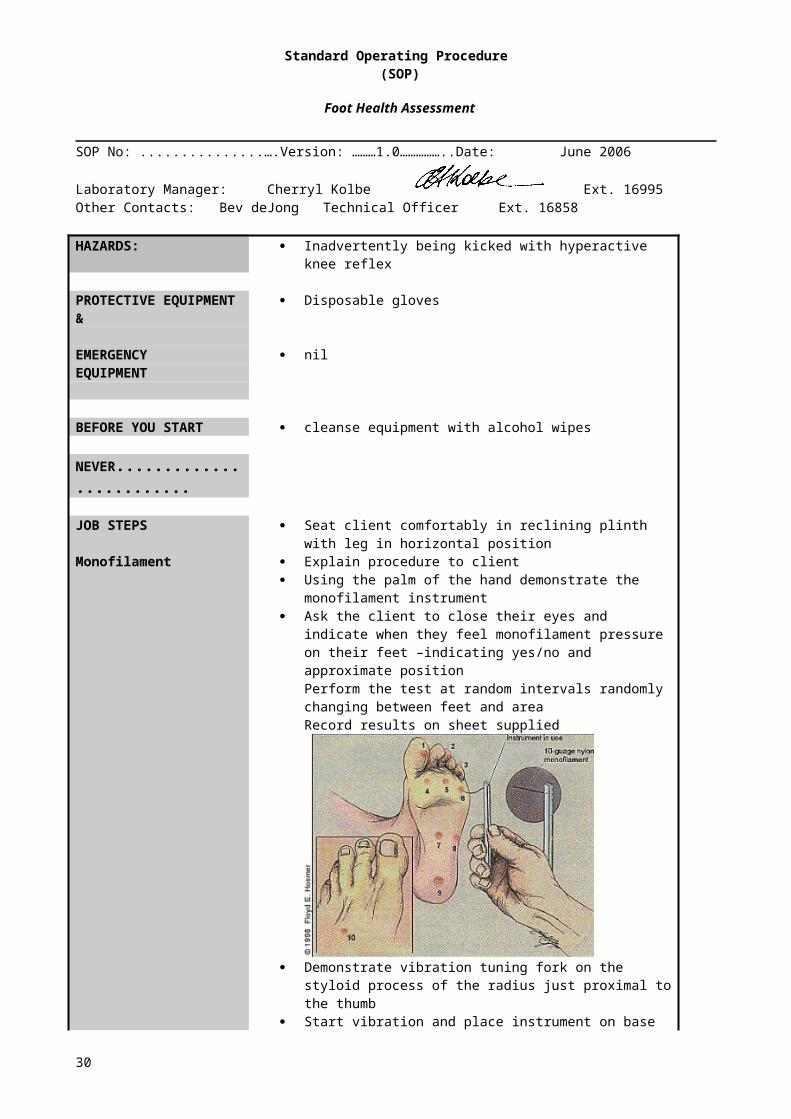
Monofilament
Vibration sensation
Seat client comfortably in reclining plinth with leg in horizontal position
Explain procedure to client Using the palm of the hand demonstrate the monofilament
instrument Ask the client to close their eyes and indicate when they feel
monofilament pressure on their feet –indicating yes/no and approximate positionPerform the test at random intervals randomly changing between feet and areaRecord results on sheet supplied
Demonstrate vibration tuning fork on the styloid process of the radius just proximal to the thumb
Start vibration and place instrument on base of first metatarsal of foot and ask client to indicate when vibration ceases. Note level of indicator triangle. >6 is regarded as normal
If abnormal vibration sensation is experienced repeat test upon the medial malleolus of the tibia; then again at the medial epicondyle of the femur.
Repeat tests on other limb Record results
Ask client to hang legs over side of plinthKnee Reflex.
Palpate patella tendon Test knee reflex by gentle but firm hit to patella tendon. Be
sure to position yourself so as to avoid being kicked.
26
Reflexes
Muscle strength
If no response reflex can be enhanced by asking client to perform a Jendrassik’s manoeuvre ( hook the flexed fingers of the two hands together and forcibly try to pull them apart) observe level of vigour of knee extension.
Ankle Reflex. Ask client to stand with one knee resting on a chair Test ankle reflex by gentle but firm hit to the Achilles tendon,
observe level of plantar (downward) movement.
Muscle Testing. Test muscle strength by feeling resistance as client presses
against your hands Place hands on lateral surface of lower legs and ask client to
press out. Place hands on dorsal surface of lower legs and ask client to
lift legs up. Place hands on medial surface of lower legs and ask client to
adduct legs Place hands on ventral surface of feet and ask client to extend
feet down Record results
WHEN YOU FINISH Wash hands, cleanse lower region of plinth
27
Standard Operating Procedure (SOP)
Use of Tiptherm ™
SOP No: ...................................….Version: ……………………..Date: 28 June 2006…………..
Laboratory Manager: C. Kolbe Ext. 16995
Other Contacts: B. de Jong Technical Officer 16885
HAZARDS: No known hazards
PROTECTIVE EQUIPMENT &
Nil
EMERGENCY First aid kit availableEQUIPMENT
BEFORE YOU START Wash hands in warm soapy water Rinse well and dry completely
NEVER.........................
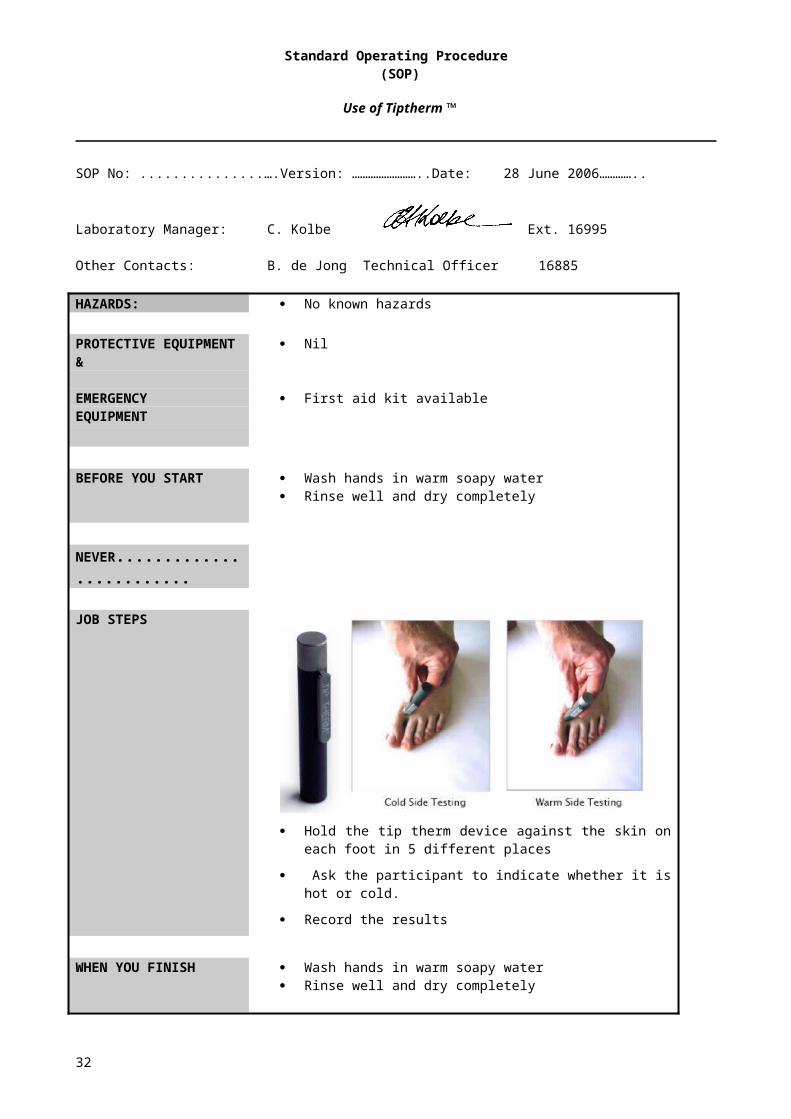
JOB STEPS
Hold the tip therm device against the skin on each foot in 5
different places
Ask the participant to indicate whether it is hot or cold.
Record the results
WHEN YOU FINISH Wash hands in warm soapy water Rinse well and dry completely
28

(SOP)
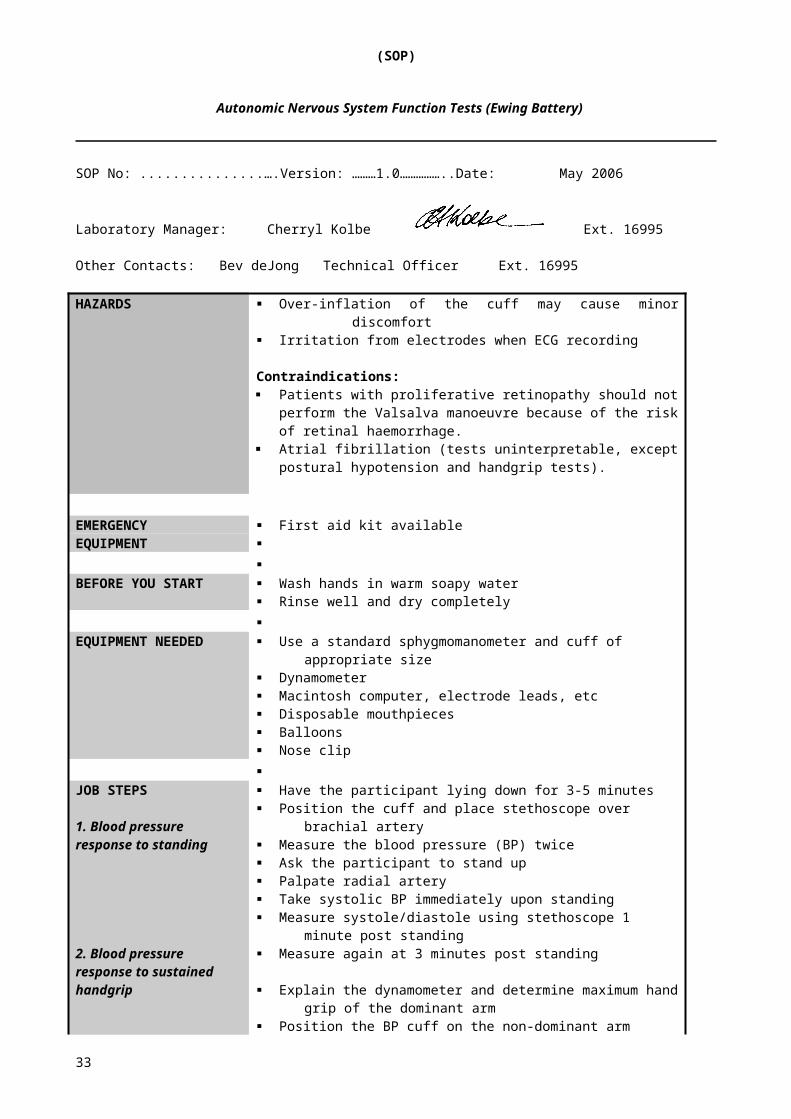
Autonomic Nervous System Function Tests (Ewing Battery)
SOP No: ...................................….Version: ………1.0……………..Date: May 2006
Laboratory Manager: Cherryl Kolbe Ext. 16995
Other Contacts: Bev deJong Technical Officer Ext. 16995
HAZARDS Over-inflation of the cuff may cause minor discomfort Irritation from electrodes when ECG recording
Contraindications: Patients with proliferative retinopathy should not perform the
Valsalva manoeuvre because of the risk of retinal haemorrhage. Atrial fibrillation (tests uninterpretable, except postural hypotension
and handgrip tests).
EMERGENCY First aid kit availableEQUIPMENT
BEFORE YOU START Wash hands in warm soapy water
Rinse well and dry completely
EQUIPMENT NEEDED Use a standard sphygmomanometer and cuff of appropriate size Dynamometer Macintosh computer, electrode leads, etc Disposable mouthpieces Balloons Nose clip
JOB STEPS
1. Blood pressure response to standing
2. Blood pressure response to sustained handgrip
Have the participant lying down for 3-5 minutes Position the cuff and place stethoscope over brachial artery Measure the blood pressure (BP) twice Ask the participant to stand up Palpate radial artery Take systolic BP immediately upon standing Measure systole/diastole using stethoscope 1 minute post standing Measure again at 3 minutes post standing
Explain the dynamometer and determine maximum hand grip of the dominant arm
Position the BP cuff on the non-dominant arm Measure BP at rest Ask the participant to squeeze the dynamometer (30% maximum
voluntary contraction) Record time and BP at 1 minute intervals up to 5 minutes Note: If the participant cannot hold for the full 5 minutes allow them
to release their grip and record this on the sheet. Measure of response: This is the difference between the resting
diastolic BP and maximal diastolic BP
29
3. Heart rate deep breathing
4. Heart rate response to standing up
5. Heart rate response to lying
6. Valsalva manoeuvre
Attach electrode leads as per 3 lead ECG SOP Allow the participant to rest seated quietly for 3 minutes Start ECG at beginning of first cycle and continue throughout test
insert marker (double clicking start button) to indicate phases Record heart rate whilst performing 5 deep breathing cycles 5
sec deep inspiration and 5 second deep expiration.
Note: All participants are to have a practice session before recording commences. The maximum and minium heart rate for each breathing cycle is measured and the mean of three successive breathing cycles is taken to give the maximum-minimum heart rate.
Measure heart rate as standing from lying position. Take 30:15 interval.
Measure heart rate as lying from standing position. Take 30:15 interval.
Attach Pulse oximeter and check O2 saturation Attach electrode leads as per 3 lead ECG SOP # If O2 saturation < 95%. HR<60 and/or patient has a CVD or
respiratory condition advise clinical supervisor before continuing with this test.
Participant sits quietly wearing nose clip for 2-3mins Start ECG at beginning of first cycle and continue throughout test
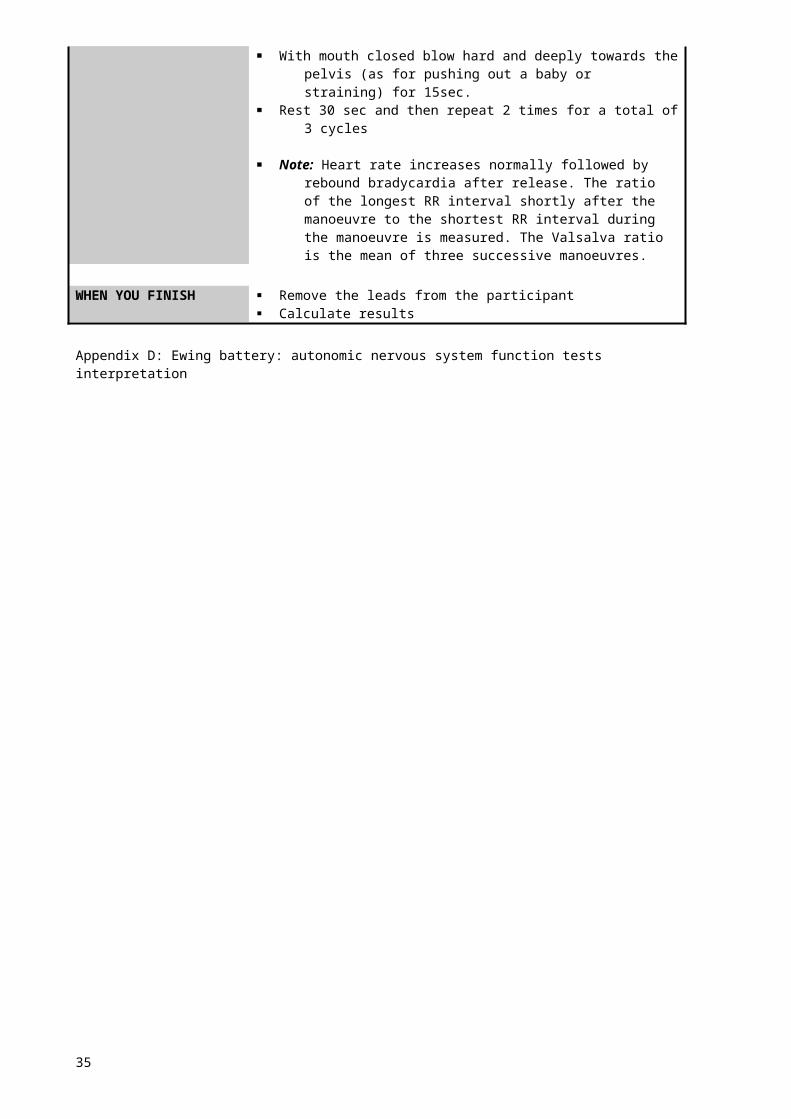
insert marker (double clicking start button) to indicate phases With mouth closed blow hard and deeply towards the pelvis (as for
pushing out a baby or straining) for 15sec. Rest 30 sec and then repeat 2 times for a total of 3 cycles
Note: Heart rate increases normally followed by rebound bradycardia after release. The ratio of the longest RR interval shortly after the manoeuvre to the shortest RR interval during the manoeuvre is measured. The Valsalva ratio is the mean of three successive manoeuvres.
WHEN YOU FINISH Remove the leads from the participant Calculate results
Appendix D: Ewing battery: autonomic nervous system function tests interpretation
30
Standard Operating Procedure
(SOP)
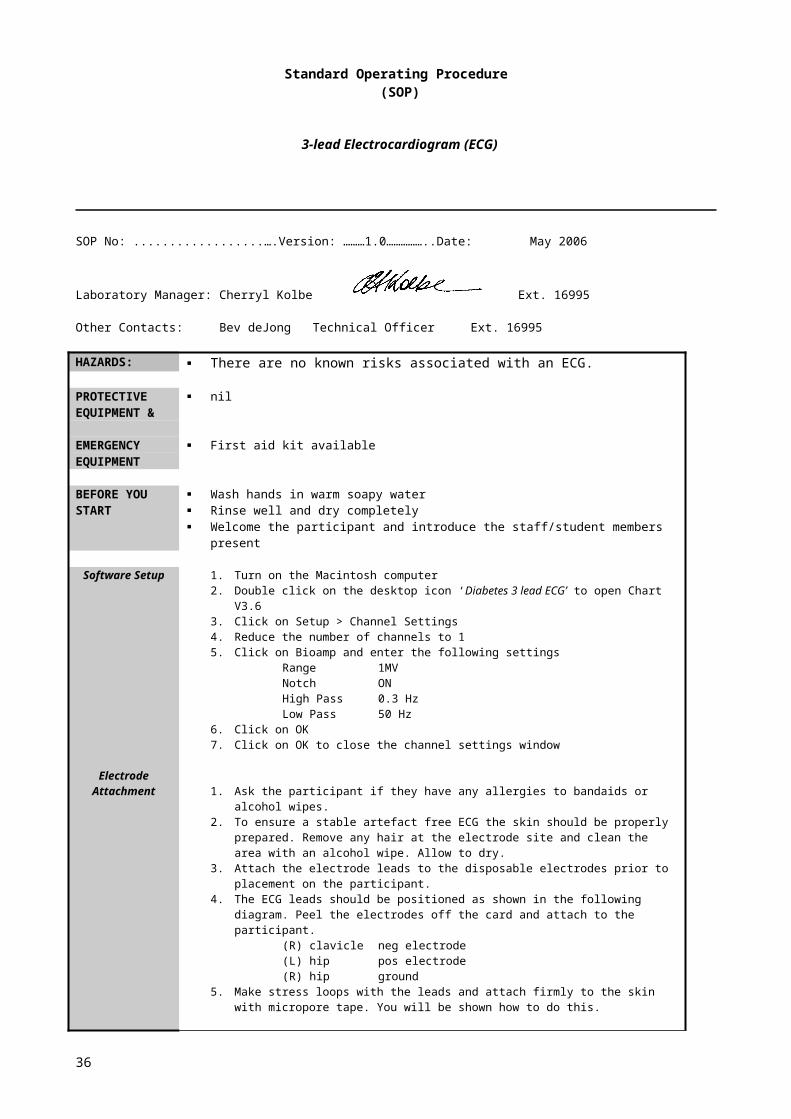
3-lead Electrocardiogram (ECG)
SOP No: .........................................….Version: ………1.0……………..Date: May 2006
Laboratory Manager: Cherryl Kolbe Ext. 16995
Other Contacts: Bev deJong Technical Officer Ext. 16995
HAZARDS: There are no known risks associated with an ECG.
PROTECTIVE EQUIPMENT &
nil
EMERGENCY First aid kit availableEQUIPMENT
BEFORE YOU START
Wash hands in warm soapy water Rinse well and dry completely Welcome the participant and introduce the staff/student members present
Software Setup
Electrode Attachment
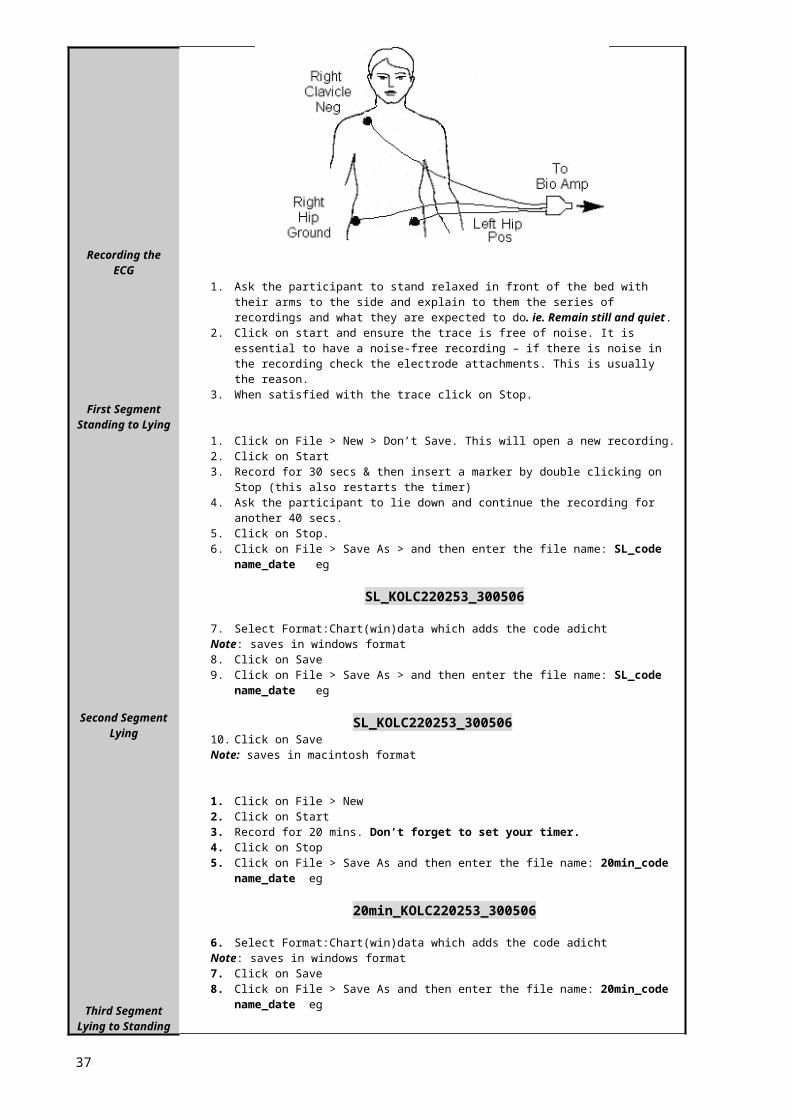
1. Turn on the Macintosh computer2. Double click on the desktop icon ‘Diabetes 3 lead ECG’ to open Chart V3.63. Click on Setup > Channel Settings4. Reduce the number of channels to 15. Click on Bioamp and enter the following settings
Range 1MVNotch ONHigh Pass 0.3 HzLow Pass 50 Hz
6. Click on OK7. Click on OK to close the channel settings window
1. Ask the participant if they have any allergies to bandaids or alcohol wipes.2. To ensure a stable artefact free ECG the skin should be properly prepared. Remove any
hair at the electrode site and clean the area with an alcohol wipe. Allow to dry.3. Attach the electrode leads to the disposable electrodes prior to placement on the
participant.4. The ECG leads should be positioned as shown in the following diagram. Peel the
electrodes off the card and attach to the participant.(R) clavicle neg electrode(L) hip pos electrode(R) hip ground
5. Make stress loops with the leads and attach firmly to the skin with micropore tape. You will be shown how to do this.
31
Recording the ECG
First SegmentStanding to Lying
Second SegmentLying
Third SegmentLying to Standing
New Recording
1. Ask the participant to stand relaxed in front of the bed with their arms to the side and explain to them the series of recordings and what they are expected to do. ie. Remain still and quiet.
2. Click on start and ensure the trace is free of noise. It is essential to have a noise-free recording – if there is noise in the recording check the electrode attachments. This is usually the reason.
3. When satisfied with the trace click on Stop.
1. Click on File > New > Don’t Save. This will open a new recording.2. Click on Start3. Record for 30 secs & then insert a marker by double clicking on Stop (this also restarts
the timer)4. Ask the participant to lie down and continue the recording for another 40 secs.5. Click on Stop.6. Click on File > Save As > and then enter the file name: SL_code name_date eg
SL_KOLC220253_300506
7. Select Format:Chart(win)data which adds the code adichtNote: saves in windows format8. Click on Save9. Click on File > Save As > and then enter the file name: SL_code name_date eg
SL_KOLC220253_30050610. Click on SaveNote: saves in macintosh format
1. Click on File > New 2. Click on Start3. Record for 20 mins. Don’t forget to set your timer.4. Click on Stop5. Click on File > Save As and then enter the file name: 20min_code name_date eg
20min_KOLC220253_300506
6. Select Format:Chart(win)data which adds the code adichtNote: saves in windows format7. Click on Save8. Click on File > Save As and then enter the file name: 20min_code name_date eg
20min_KOLC220253_3005069. Click on SaveNote: saves in macintosh format
1. Click on File > New2. Click on Start3. Record for 30 secs, then insert a marker as before4. Ask the participant to stand (ensure they aren’t light headed on standing)5. Continue the recording for another 40 secs6. Click on Stop.7. Click on File > Save As > and then enter the file name: LS_code name_date eg
LS_KOLC220253_300506
8. Click on Save9. Select Format:Chart(win)data which adds the code adichtNote: saves in windows format10. Click on Save11. Click on File > Save As > and then enter the file name: LS_code name_date eg
LS_KOLC220253_30050612. Click on SaveNote: saves in macintosh format
1. Click on File > New2. Now you are ready for the next participant3. Remove the electrode leads and disposable electrodes from the participant and check
that all the adhesive is removed
32
WHEN YOU FINISH
Wash hands
Now you are ready for the next participant
33
Standard Operating Procedure (SOP)
12-lead Electrocardiogram (ECG)
SOP No: .........................................….Version: ………1.0……………..Date: May 2006
Laboratory Manager: Cherryl Kolbe Ext. 16995
Other Contacts: Bev deJong Technical Officer Ext. 16995
HAZARDS: nil
PROTECTIVE EQUIPMENT &
nil
EMERGENCY First aid kit availableEQUIPMENT
BEFORE YOU START
Wash hands in warm soapy water Rinse well and dry completely Welcome the participant and introduce the staff/student members present
JOB STEPS Give the participant a brief outline of the procedure 12 lead ECG to test the heart describing the electrode placement to them Explain that ECG measures “the electrical wiring” (most people will relate to
pacemaker) of the heart, emphasise that the process does not apply any electrical stimulation.
Enquire if the participant has previously undergone a 12 lead ECG recording Ask the participant if they have a sensitivity to bandaids or adhesive plaster – record on
sheet Ask the participant to remove their undergarments and replace their outer shirt leaving it
untucked and unbuttoned at the front. They may then lie down. Ensure that the area is enclosed for privacy
Note: Students should leave the room while the participant is undressing.
To ensure a stable artefact free ECG the skin should be properly prepared. Using a disposable razor remove any hair at the electrode site and clean the area with an alcohol wipe. Allow to dry.
Ask permission to feel along the ribs prior to electrode placement
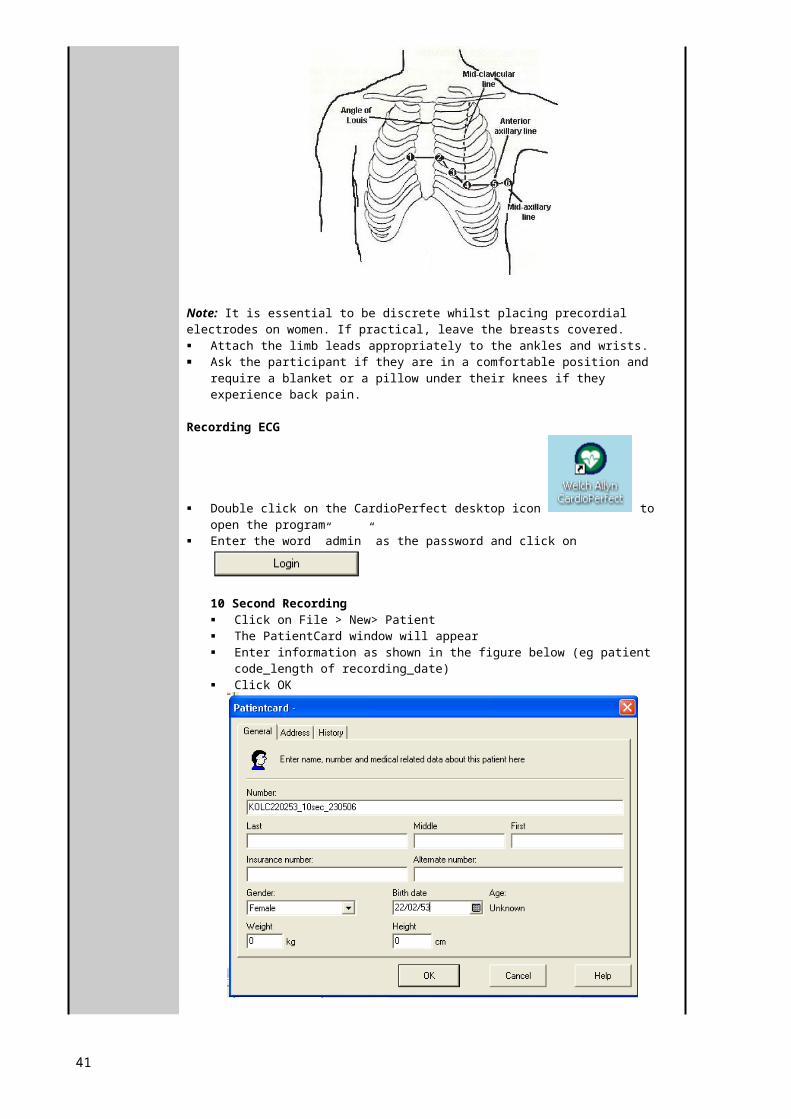
Electrode Placement: Apply the precordial electrodes as outlined below:
V1: In the fourth intercostal space at the right sternal border. V2: in the fourth intercostal space at the left sternal border. V3: mid-way between V2 and V4. V4: in the fifth Intercostal space in the mid-clavicular line. V5: in the left anterior axillary line at the level of V4. V6: In the left mid-axillary line at the level of V4.(Directly under the midpoint of the armpit)
34
Note: It is essential to be discrete whilst placing precordial electrodes on women. If practical, leave the breasts covered. Attach the limb leads appropriately to the ankles and wrists. Ask the participant if they are in a comfortable position and require a blanket or a pillow
under their knees if they experience back pain.
Recording ECG
Double click on the CardioPerfect desktop icon to open the program
Enter the word ”admin” as the password and click on
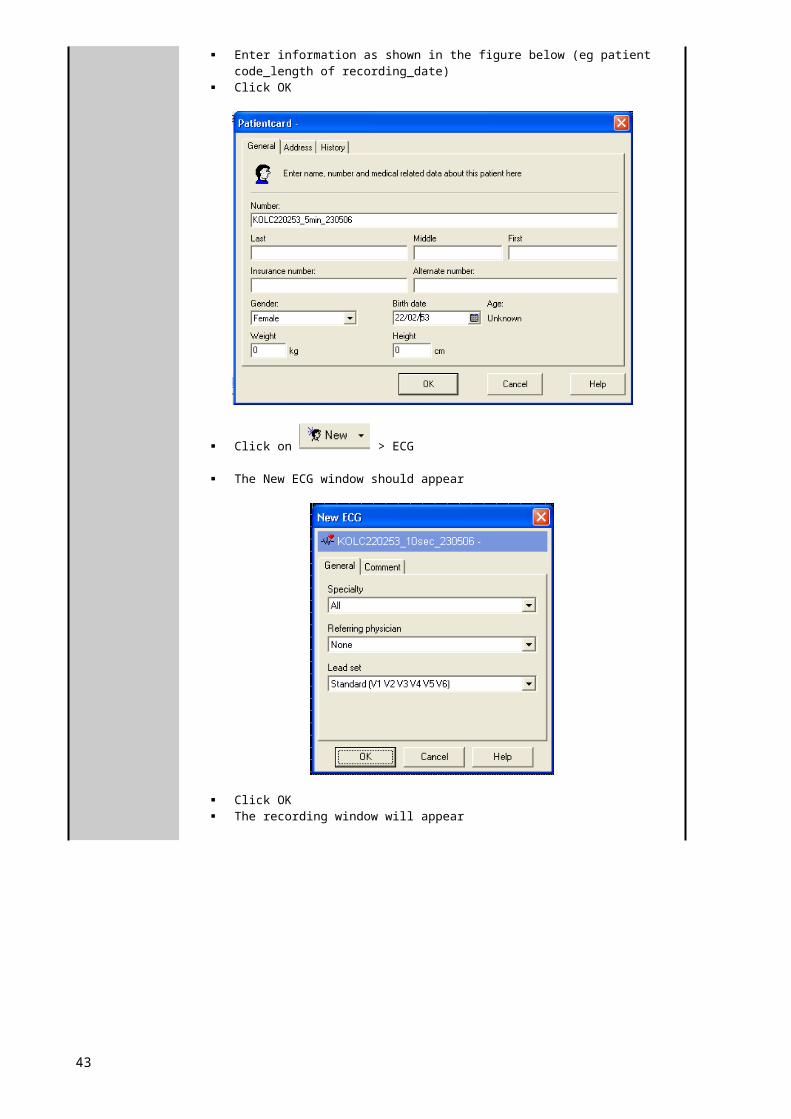
10 Second Recording Click on File > New> Patient The PatientCard window will appear Enter information as shown in the figure below (eg patient code_length of
recording_date) Click OK
Click on > ECG
The New ECG window should appear
35
Click OK The recording window will appear
When the trace has stabilised, click on Turn off the recording device when prompted The recording will automatically be saved
5 Minute Recording Click on File > New> Patient The PatientCard window will appear Enter information as shown in the figure below (eg patient code_length of
recording_date) Click OK
Click on > ECG
36
The New ECG window should appear
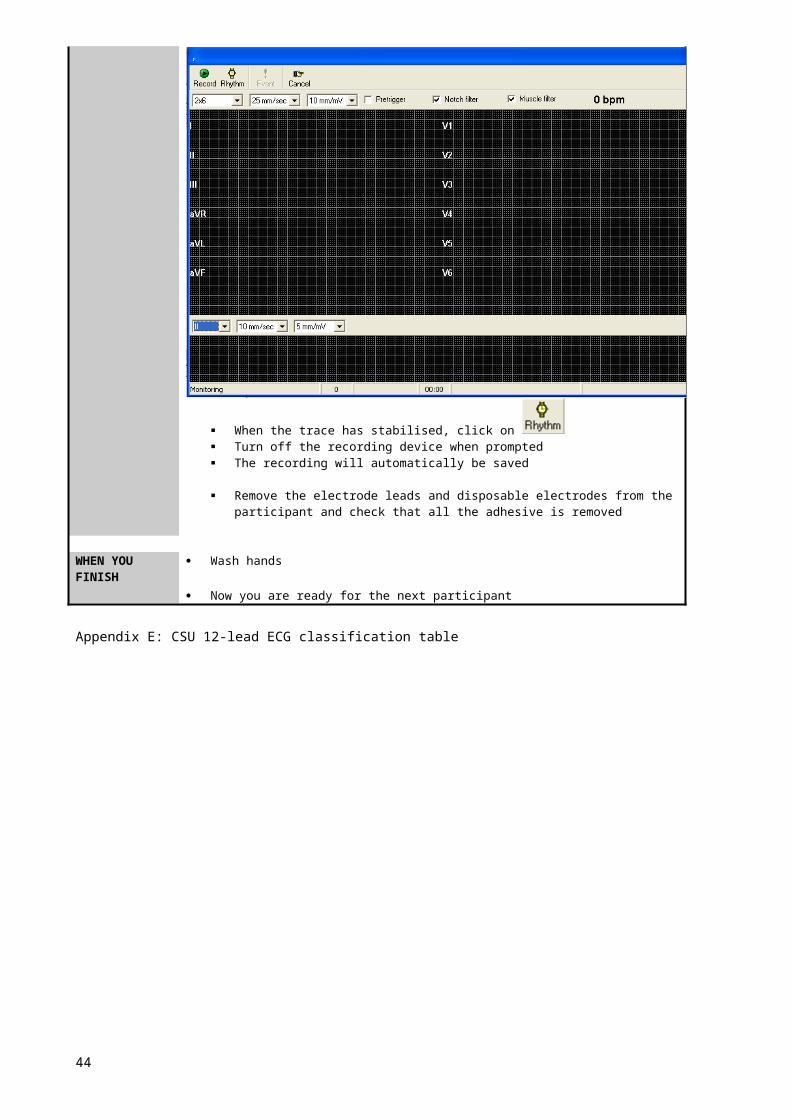
Click OK The recording window will appear
When the trace has stabilised, click on Turn off the recording device when prompted The recording will automatically be saved
Remove the electrode leads and disposable electrodes from the participant and check that all the adhesive is removed
WHEN YOU FINISH
Wash hands
Now you are ready for the next participant
Appendix E: CSU 12-lead ECG classification table
37
Standard Operating Procedure (SOP)
Urine Testing using Combur-Test D
SOP No: ...................................….Version: ………1.0……………..Date: July 2006
Laboratory Manager: Cherryl Kolbe Ext. 16995Other Contacts: Bev deJong Technical Officer Ext. 16995HAZARDS: Nil
PROTECTIVE EQUIPMENT &
Disposable gloves Face mask and/or protective eye if required
EMERGENCY First aid kit availableEQUIPMENT
BEFORE YOU START Wash hands in warm soapy water Rinse well and dry completely put on glove/s
NEVER......................... Treat urine samples without glove on
JOB STEPSSample collection
Testing procedure
Advise the patient they are required to provide a urine sample. Supply the participant with an appropriately labelled yellow top
urine container and paper bag/towel. Direct the participant to the toilet & ask them to bring back the
urine container inside the paper bag/towel and place it in the esky provided.
Perform the urine test as soon as possible or within 2 hours of sample collection. If immediate testing is not possible, store the urine at 40C.
Urine samples must have reached room temperature at testing time
Mix the urine sample thoroughly before testing Do not touch the test zones on the strip with fingers
Put on a pair of disposable gloves Take a test strip out of the container. Close the container immediately after removal of the strip. Briefly (not more than 1 second) dip the test strip into the urine
making sure that all test areas are moistened. Do not bend test strips during dipping.
Wipe the edge of the strip against the rim of the vessel to remove excess urine.
Briefly (not more than 1 second) dab the long edge and then the back of the test strip on an absorbent surface (e.g. paper towel).
To visually read the test strip, wait one minute and then compare the reaction colors with the colors on the bottle.
Note: Compare the blood test area with both colour scales as separate colour scales are given for erythrocytes and haemoglobin.
Any color changes appearing only along the edges of the test areas, or developing after more than 1 minute, do not have any diagnostic significance.
WHEN YOU FINISH Urine should be discarded into the toilet and the empty containers discarded into a biohazard bag and placed in the biohazard bin.
Remove disposable gloves and discard into biohazard container
Wash hands in warm soapy water Rinse well and dry completely
38

SOP No: ................................... Version: .................................. Date: 27 March 2007
Written by: C. Kolbe
Dept/Div/School: School of Community Health
Supervisor/Manager:
Other Contacts: Bev deJong
Contraindications: Epilepsy Lens transplant
Protective / emergency equipment:
First aid kit available
Before you start: Check the objective lens before taking an image as any stains or scratches on it will appear as white spots.
Sudden heating of the room in cold area will cause condensation to form on the lenses. In this case wait until condensation disappears before performing photography.
Always ....................... Ask the participant if they have: Epilepsy Had a lens transplant
Job steps: Non-mydreatic retinal camera set-up
Power-up
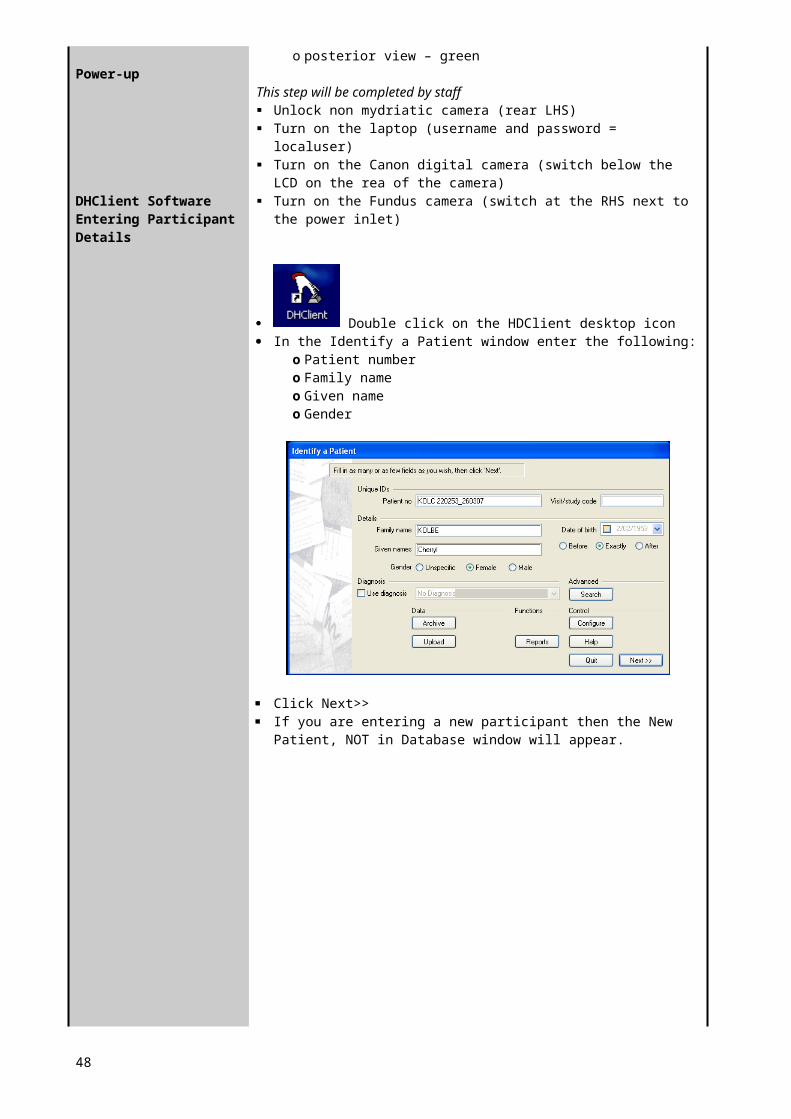
DHClient Software Entering Participant Details
This step will be completed by staff Dioptic compensator - =/- 10 refractive error - if can’t focus Small pupil – on or off – leave on Infra red filter – stays IN! Lamp - only adjusts contrast of monitor Flashing light – participant focal point:
o anterior view – orangeo posterior view – green
This step will be completed by staff Unlock non mydriatic camera (rear LHS) Turn on the laptop (username and password = localuser) Turn on the Canon digital camera (switch below the LCD on the rea of
the camera) Turn on the Fundus camera (switch at the RHS next to the power inlet)
39
TASK: Retinal Photography using the Canon CR-DGi Non-Mydreatic retinal camera
STANDARDOPERATINGPROCEDURE
Double click on the HDClient desktop icon In the Identify a Patient window enter the following:
o Patient numbero Family nameo Given nameo Gender
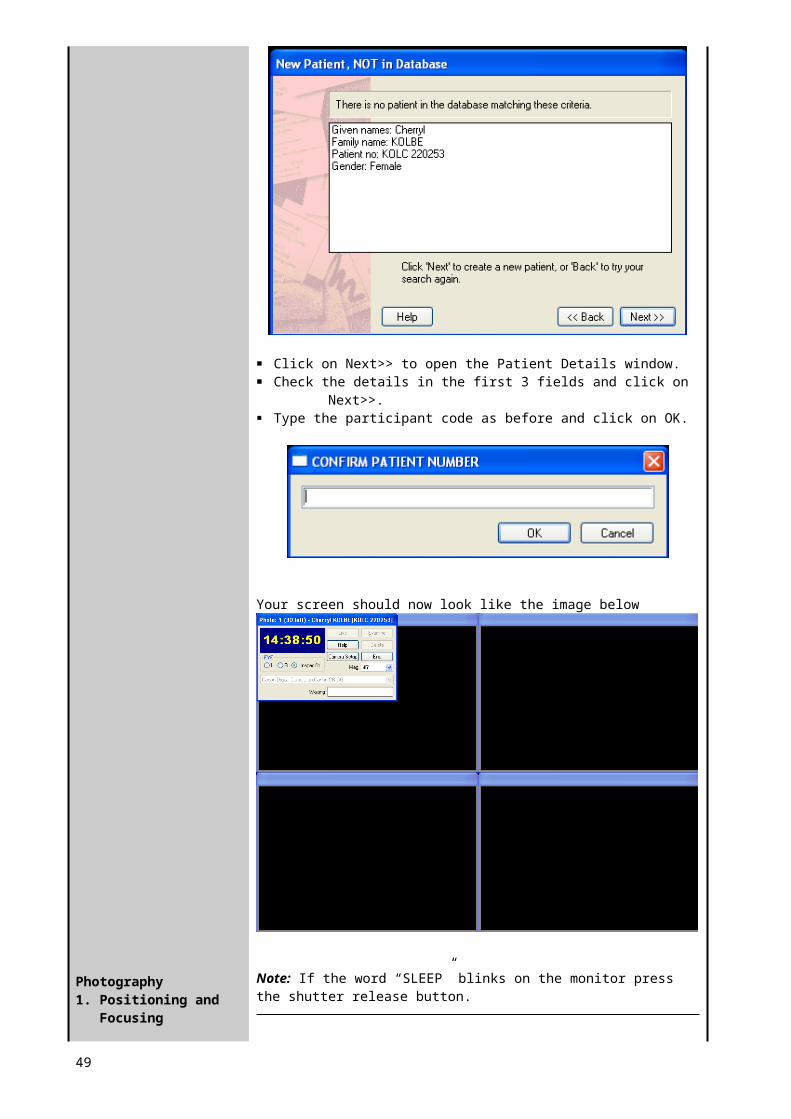
Click Next>> If you are entering a new participant then the New Patient, NOT in
Database window will appear.
Click on Next>> to open the Patient Details window. Check the details in the first 3 fields and click on Next>>. Type the participant code as before and click on OK.
40
Photography1. Positioning and
Focusing
Your screen should now look like the image below
Note: If the word “SLEEP” blinks on the monitor press the shutter release button.
Note: You will be taking two photographs of each eye.
Photo 1 = optic disc is located centrally Photo 2 = optic disc is located in a lateral position approx 1cm from the field perimeter
Ask the participant to remove any spectacles or contact lenses and have them sit down and place their face against the chin rest and forehead rests.
Adjust the height of the chin rest by turning the chin rest height adjustment ring so that the eye is aligned with the height adjustment mark on the face rest pole.
Slide the operation lever to the side of the eye to be photographed.
To position the pupil turn the height adjustment ring and incline the operation lever [R] or [L] so that the eye front is displayed almost at the center of the monitor.
Adjust the height of the chin rest by turning the chin rest height adjustment ring as required.
Note: Hold the operation lever and slide the stage if you need to move the unit more.
41
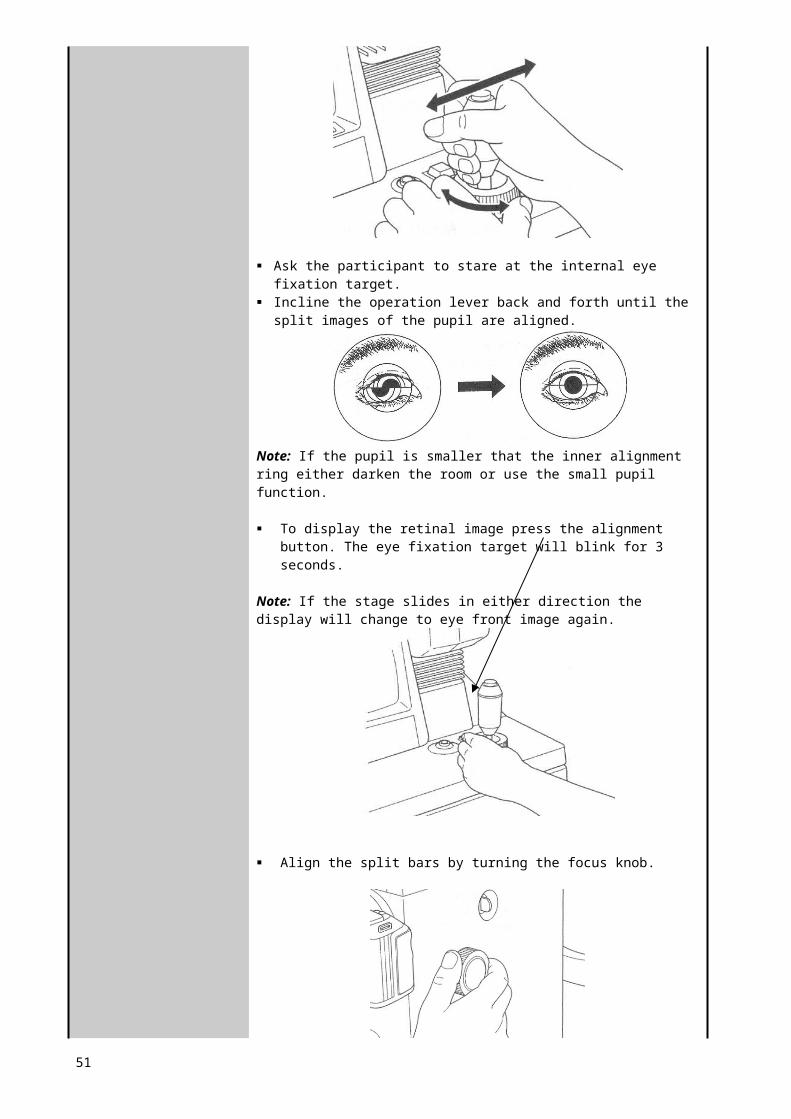
Ask the participant to stare at the internal eye fixation target. Incline the operation lever back and forth until the split images of the
pupil are aligned.
Note: If the pupil is smaller that the inner alignment ring either darken the room or use the small pupil function.
To display the retinal image press the alignment button. The eye fixation target will blink for 3 seconds.
Note: If the stage slides in either direction the display will change to eye front image again.
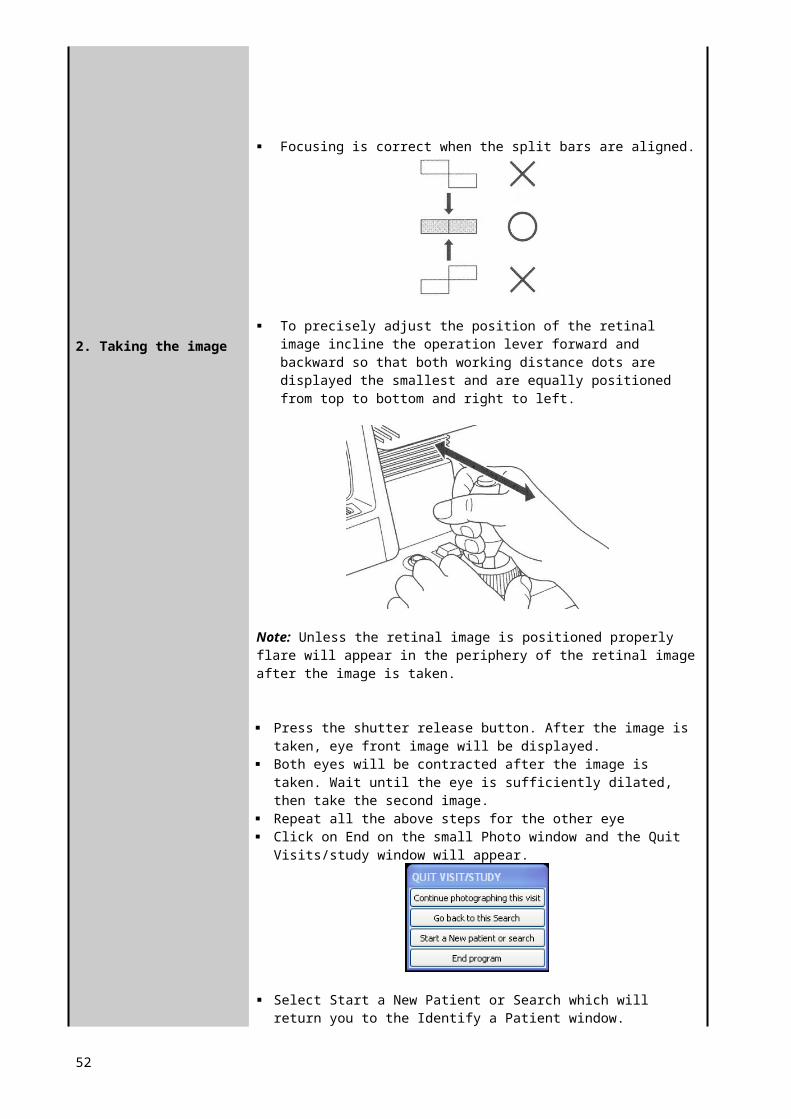
Align the split bars by turning the focus knob.
Focusing is correct when the split bars are aligned.
42
2. Taking the image
To precisely adjust the position of the retinal image incline the operation lever forward and backward so that both working distance dots are displayed the smallest and are equally positioned from top to bottom and right to left.
Note: Unless the retinal image is positioned properly flare will appear in the periphery of the retinal image after the image is taken.
Press the shutter release button. After the image is taken, eye front image will be displayed.
Both eyes will be contracted after the image is taken. Wait until the eye is sufficiently dilated, then take the second image.
Repeat all the above steps for the other eye Click on End on the small Photo window and the Quit Visits/study
window will appear.
Select Start a New Patient or Search which will return you to the Identify a Patient window.
When you finish: Wipe the chin and forehead rests with an ISOWIPE bacterial wipe. Turn OFF the power of the instrument. Place the lens cap over the objective and place the dust cover over the
instrument. Dust will appear on the image when the objective lens is dusty.
Be sure to attach the dust caps on the mounts of retinal camera and digital camera when the digital camera is detached from the retinal camera.
Appendix F: Diabetic retinopathy chart
43
Emergency Procedures
44

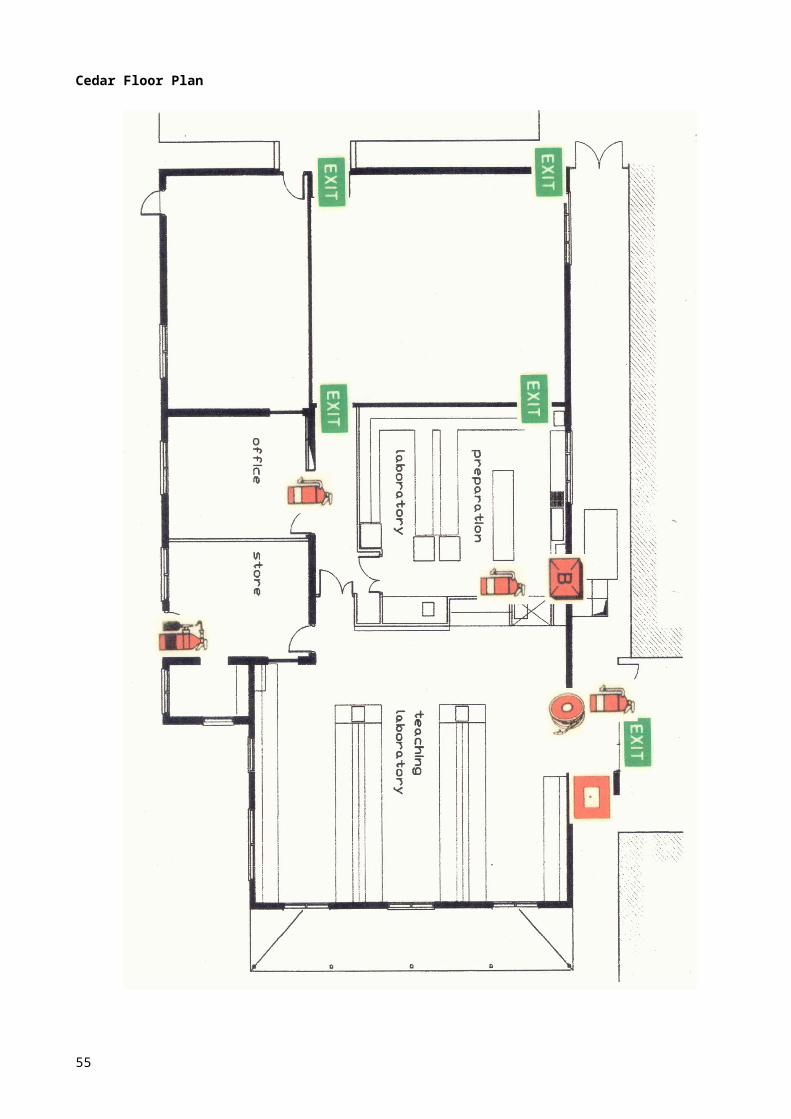
Cedar Floor Plan
45
Standard Operating Procedure (SOP)
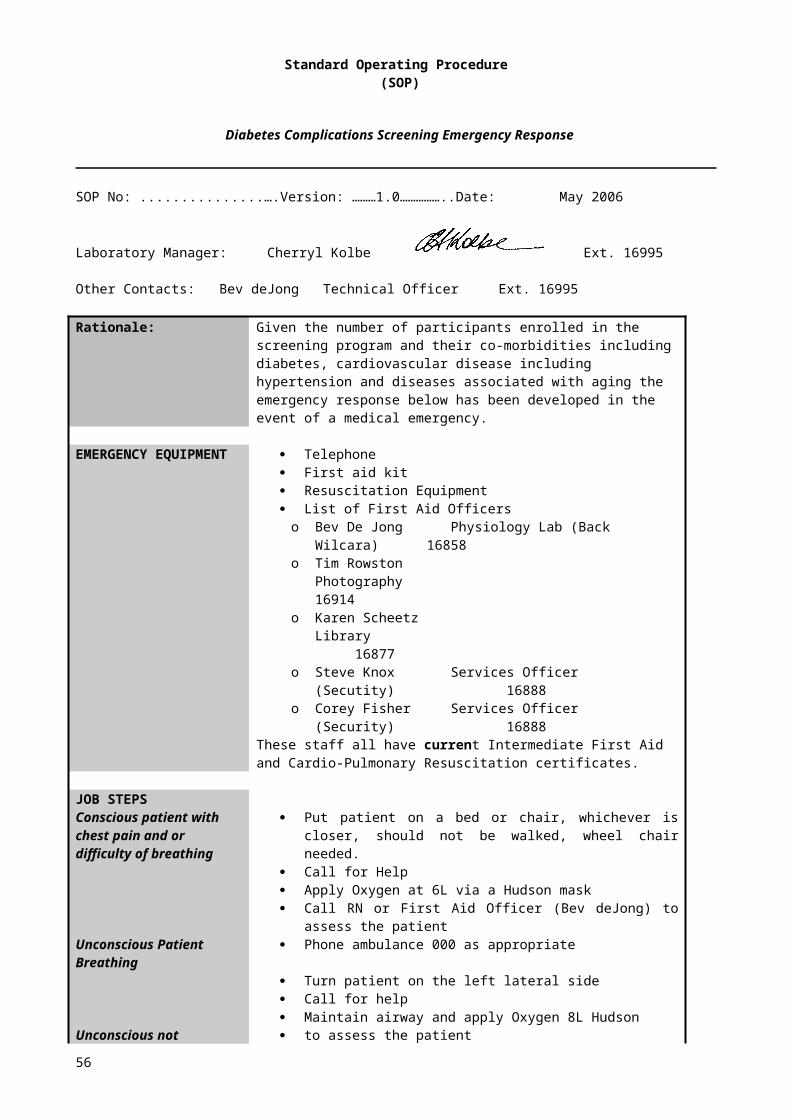
Diabetes Complications Screening Emergency Response
SOP No: ...................................….Version: ………1.0……………..Date: May 2006
Laboratory Manager: Cherryl Kolbe Ext. 16995
Other Contacts: Bev deJong Technical Officer Ext. 16995
Rationale: Given the number of participants enrolled in the screening program and their co-morbidities including diabetes, cardiovascular disease including hypertension and diseases associated with aging the emergency response below has been developed in the event of a medical emergency.
EMERGENCY EQUIPMENT
Telephone First aid kit Resuscitation Equipment List of First Aid Officerso Bev De Jong Physiology Lab (Back Wilcara) 16858o Tim Rowston Photography 16914o Karen Scheetz Library 16877o Steve Knox Services Officer (Secutity) 16888o Corey Fisher Services Officer (Security) 16888
These staff all have current Intermediate First Aid and Cardio-Pulmonary Resuscitation certificates.
JOB STEPS Conscious patient with chest pain and or difficulty of breathing
Unconscious Patient Breathing
Unconscious not breathing
Put patient on a bed or chair, whichever is closer, should not be walked, wheel chair needed.
Call for Help Apply Oxygen at 6L via a Hudson mask Call RN or First Aid Officer (Bev deJong) to assess the patient Phone ambulance 000 as appropriate
Turn patient on the left lateral side Call for help Maintain airway and apply Oxygen 8L Hudson to assess the patient Call ambulance DRABC (Check for Danger, Response, Airways, Breathing and
Circulation) Call ambulance 000 Call RN or First Aid Officer (Bev deJong) Perform CPR as appropriate
Note: In service will be provided by Paul Warner to communicate this procedure to staff and students involved in the Diabetes Complications Screening program.
WHEN YOU FINISH Make sure an accident/Incident report is completed
46
Standard Operating Procedure (SOP)
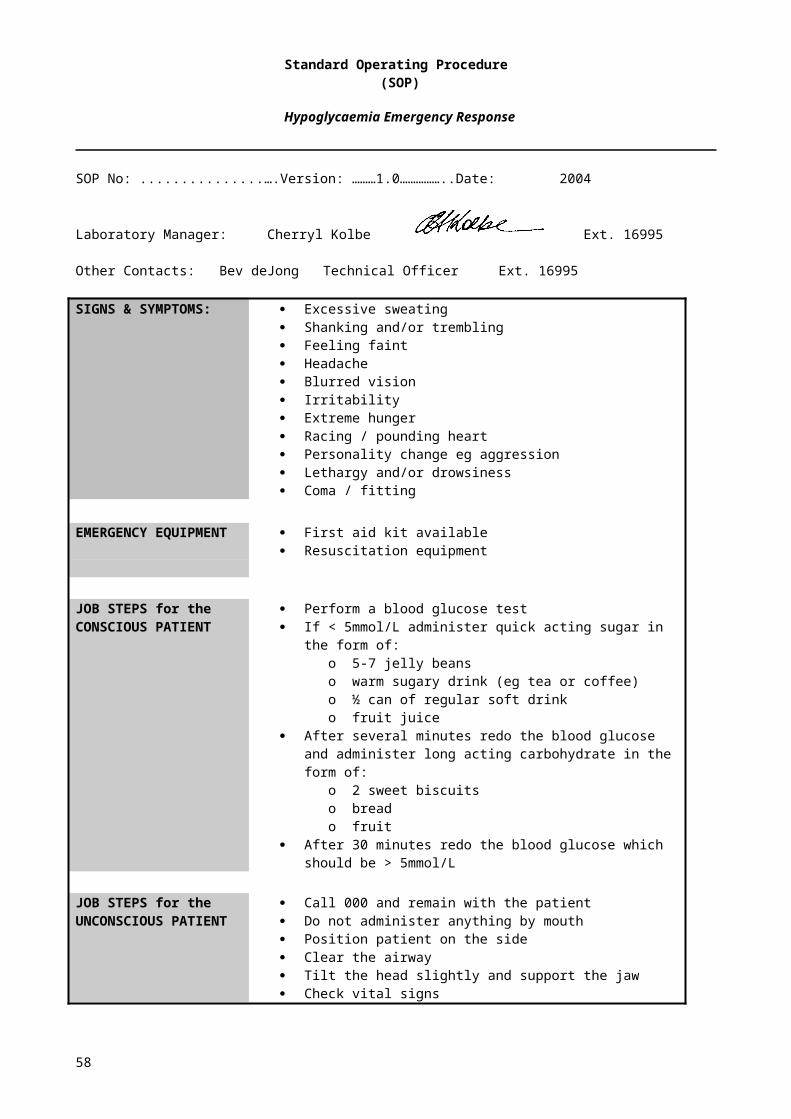
Hypoglycaemia Emergency Response
SOP No: ...................................….Version: ………1.0……………..Date: 2004
Laboratory Manager: Cherryl Kolbe Ext. 16995
Other Contacts: Bev deJong Technical Officer Ext. 16995
SIGNS & SYMPTOMS: Excessive sweating Shanking and/or trembling Feeling faint Headache Blurred vision Irritability Extreme hunger Racing / pounding heart Personality change eg aggression Lethargy and/or drowsiness Coma / fitting
EMERGENCY EQUIPMENT
First aid kit available Resuscitation equipment
JOB STEPS for theCONSCIOUS PATIENT
Perform a blood glucose test If < 5mmol/L administer quick acting sugar in the form of:
o 5-7 jelly beanso warm sugary drink (eg tea or coffee)o ½ can of regular soft drinko fruit juice
After several minutes redo the blood glucose and administer long acting carbohydrate in the form of:
o 2 sweet biscuitso breado fruit
After 30 minutes redo the blood glucose which should be > 5mmol/L
JOB STEPS for theUNCONSCIOUS PATIENT
Call 000 and remain with the patient Do not administer anything by mouth Position patient on the side Clear the airway Tilt the head slightly and support the jaw Check vital signs
47
Standard Operating Procedure (SOP)
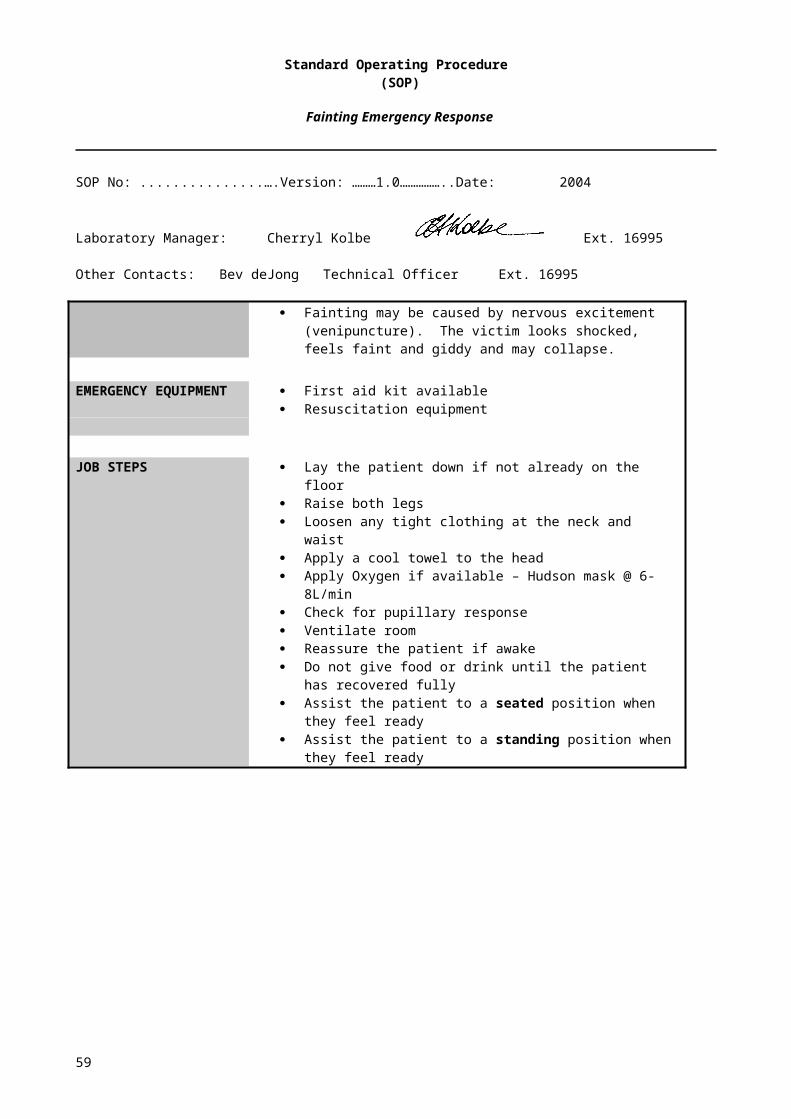
Fainting Emergency Response
SOP No: ...................................….Version: ………1.0……………..Date: 2004
Laboratory Manager: Cherryl Kolbe Ext. 16995
Other Contacts: Bev deJong Technical Officer Ext. 16995
Fainting may be caused by nervous excitement (venipuncture). The victim looks shocked, feels faint and giddy and may collapse.
EMERGENCY EQUIPMENT
First aid kit available Resuscitation equipment
JOB STEPS Lay the patient down if not already on the floor Raise both legs Loosen any tight clothing at the neck and waist Apply a cool towel to the head Apply Oxygen if available – Hudson mask @ 6-8L/min Check for pupillary response Ventilate room Reassure the patient if awake Do not give food or drink until the patient has recovered fully Assist the patient to a seated position when they feel ready Assist the patient to a standing position when they feel ready
48
Student screening documents
49

Diabetes Complications Screening Forms
50
Charles Sturt UniversitySchool of Community Health
PO Box 789Albury NSW 2640
Tel (02) 6051 6000
Diabetes Screening Complications Research Initiative (DiSCRi)Participant Information sheet
Chief Investigator Clinical Educator Clinical Educator Clinical Educator
Dr Herbert Jelinek Dr Paul Tinley Megan Smith Harriet Farquhar
02 6051 6946 02 6051 6934 02 6051 6738 02 6051 6933
[email protected] [email protected] [email protected] [email protected]
You are invited to participate in a research project on complications associated with diabetes (such as heart disease, eye and foot disease) that also provides clinical experience for undergraduate students. The main purpose of this research is to determine whether regular screening is of benefit to the rural community. In particular we aim to establish the value of specific screening procedures in the early detection of complications that may be associated with diabetes. An additional goal of this research project is to give students valuable experience in the implementation of standardised tests in a screening program
As this research project includes both research and educational components it is coordinated by a team of academics with specific skills in these areas. Students from the School of Community Health, under the supervision of academics, will be involved as part of their course work requirements. Postgraduate students may also be involved if this research project relates to their higher degree research and they have ethics permission to do so.
What does your participation involve?If you agree to participate in this research you will be asked to undertake a series of screening tests that will take approximately 2½ hours to complete. These tests are often used in the screening of people with diabetes and include: questionnaires; echocardiograms (ECGs); blood pressure; blood oxygen levels; blood tests; urine samples; foot health test; and autonomic nervous system function tests. Each test is detailed below.1. Questionnaires: involve questions about your general medical history and medications,
use of alternative medication and foot health as well as quality of life. 2. Echocardiograms (ECGs) and Blood pressure:
a. Blood pressure will be recorded whilst lying and standing. b. A 12-lead ECG recording will be taken whilst you lie still for 5 minutes. c. A 20 minute 3-lead recording – this will start with you in standing and continue
during the movement from standing to lying, and for 20 minutes lying still. The test will finish by recording whilst you move from lying to standing again. ECG recording involves attaching sensors to your skin. It may be necessary to clean a small area of skin, with an alcohol swab and/or shaving, to ensure the sensors are attached properly.
The main risk with the ECG recording is temporary dizziness when you move from lying to standing, similar to getting out of bed too quickly. In order to prevent any problems you will be monitored and assisted throughout and following the recording.
3. Blood oxygen levels: Whilst undergoing ECG recording we will also record your oxygen saturation in the blood. This involves putting your finger in a sleeve that senses the level of oxygen in your blood.
4. Blood tests: a. 20 ml of blood will be collected via venipuncture to test for: markers of oxidative
stress; markers of glucose; and markers of inflammation( d-dimer . homocysteyne)b. a finger prick test for Blood Glucose Levels (BGL)c. We ask that you give your consent for us to access blood test results relevant to
diabetes from your doctor and the pathology laboratory. 5. Urine sample: you will be asked to provide a urine sample which will be tested using a dip
stick.
51
6. foot health test: a. your ability to detect touch on your feet will be assessed
b. Ankle brachial index – is a test similar to having your blood pressure taken, but in this case the cuff is placed around your calf.
c. Pulse pressure test - involves placement of a small Velcro band around the index finger and big toe whilst we record the changes in blood flow. The band does not exert any pressure on your finger or toe.
NB: these will not be undertaken if you have foot ulcers or other signs of peripheral vascular disease.
7. Autonomic Nervous System Function Tests: a. blood pressure response to a sustained handgrip (30% maximal), b. heart rate monitoring (by ECG) whilst deep breathing and whilst breathing out
forcefully five times (the Valsalva manoeuvre). NB: you will be asked not to participate in this test if you have a known heart or respiratory problem.
8. Weight and height measurements: to calculate your body mass index9. Girth measurement
If you have reported that you are diabetic or that you have a family history of diabetes and that you have additional risks associated with diabetes (such as high blood pressure or are overweight) we will ask you to participate in an eye test. This test involves taking a photo of the retina of each eye. The flash may momentarily blind you and you may see a blue halo. This disappears within 10 minutes from the photo being taken. The photograph is then assessed by an ophthalmologist at the Albury Eye Clinic and you will be informed if there is any abnormality detected. There is no recorded risk associated with this procedure however if you have a cataract or other eye disease please inform the technician taking photographs.
Tests will not be done if they have recently been carried out and the result is available.
Test resultsTest results will be explained to you at the end of your session. It is important to note that some deviations from standard results do not indicate that there is a problem. However, you will be advised to seek the advice of your doctor if any result deviates from normal. We will give you a copy of your results and a letter to take with you to your consultation with your doctor.
What will we do with your test results?Confidentiality of your results is important to us. Therefore, all test results will be stored such that your identity is protected, i.e., data will not have identifying information included and a code will be used to identify your data.
The data from this research project will be used by research students and researchers involved in this research project to evaluate how useful these tests are in the screening of people with and without diabetes. Any publications that arise from this research project will maintain your confidentiality. Whilst a small section of an ECG or pulse wave recording may be published we will ensure that you cannot be identified from this section of ECG. The data collected in this research project may be used in future research with other researchers. Future researchers will only have access to material that has had all identifying material removed.
It is important to note that these screening tests are conducted as part of a research project and should not be considered in any way to constitute provision of health care. Feedback provided to you consists of data collected as part of the research project and is not a clinical diagnosis. Whilst you will be informed of your test results and given information regarding deviation of these results from normal levels, no health advice can be given to you by the researchers. Whenever test results deviate from normal participants will be asked to seek health advice from their doctor.
Your participation in this research project is entirely voluntary. You are free to withdraw your consent and withdraw from the research project at any time you wish.
52

NOTE: Charles Sturt University’s Ethics in Human Research Committee has approved this project. If you have any complaints or reservations about the ethical conduct of this project, you may contact the Committee through the Executive Officer:
The Executive OfficerEthics in Human Research CommitteeAcademic SecretariatCharles Sturt UniversityPrivate Mail Bag 29Bathurst NSW 2795
Tel: (02) 6338 4628Fax: (02) 6338 4194
Any issues you raise will be treated in confidence and investigated fully and you will be informed of the outcome.
53

Charles Sturt University School of Community HealthPO Box 789Albury NSW 2640
Participant Consent Form
Chief Investigator Clinical Educator Clinical Educator Clinical Educator
Dr Herbert Jelinek Dr Paul Tinley Megan Smith Harriet Farquhar
02 6051 6946 02 6051 6934 02 6051 6738 02 6051 6933
[email protected] [email protected] [email protected] [email protected]
1. I, ……………………….……………………consent to my participation in the research project titled Diabetes Complications Screening Research.
2. I understand that I am free to withdraw my participation in the research at any time3. The purpose of the research has been explained to me and I have read and understood the information
sheet.4. I understand that students will be involved in the data collection.5. I understand that any information or personal details gathered in the course of this research about me are
confidential and that neither my name nor any other identifying information will be used or published without my written permission.
6. I understand that any data gathered in the course of this research may be published and/or used in subsequent research projects.
7. I understand that the feedback provided to me consist of data collected as part of the research project and is not a clinical diagnosis.
Name of Participant: ……………………………………… Name of Witness:
Signature of Participant: ………………………………………. Signature of witness:
………………………….
Date: ……………………………………....... Date:
…………………………
Contact address: …………………………………………
…………………………………………
Home Phone: …………………………………………
Work Phone: …………………………………………
Mobile: …………………………………………
Email: …………………………………………
I consent to the researchers requesting from my general practitioner or pathology laboratory, pathology results relevant to diabetes.
General Practitioner: Name…………………………………….
Address…………………………………
…………………………………
Phone no………………………………..
54
Charles Sturt University School of Community HealthPO Box 789Albury NSW 2640
Diabetes Complications Screening Research Clinical History
Male Female Age ……………….(yrs) DOB…………………………….
Have you been diagnosed with diabetes? Yes No
Type I Type 2
Length of time since diagnosis …………… (yrs) Do you take insulin? Yes No
Type of insulin:………………………………………dosage: …………………………………………………………..
Type of insulin:………………………………………dosage: …………………………………………………………..
Have you been diagnosed with the following?Cardiovascular disease no. of yrs………………… High Blood Pressure no. of yrs…………………
Have you been diagnosed with or experienced any of the following? angina kidney problems ulcers on the legs/feet
heart failure bladder problems general pain in feet
atrial fibrillation epilepsy numbness in feet
heart attack reflux loss of sensation in feet
stroke increased sweating tingling sensation in feet
chest pain glaucoma (eyes) cold sensation in feet
pain in (L) arm retinopathy (eyes) burning sensation in feet
dizzinessAfter having eaten a meal do you suffer from any of the following? nausea vomiting bloating abdominal pain palpitations
other cardiac symptoms
please specify: ………………………………………………………………………………………………………..
Other medical information:……………………………………………………………………………………
What are your current medications? (Please include all diabetic and other medications including dosage)
………………………………………………………………………………………………………………………………………………
………………………………………………………………………………………………………………………………………………
Have you had any changes to your medication or commenced any Yes No
new medication in the last month?
Changes: ………………………………………………………………………………………………………………….
Have you been admitted to hospital since your last screening? Yes No
Reason: …………………………………………………………………………………………………………………....
Lifestyle Questions:
Do you smoke more than 5 cigarettes per day Yes No
Do you consume more than 2-3 glasses of alcohol per day Yes No
Are you currently taking medication for High Blood Pressure? Yes No
Do you have a family history of diabetes Yes No
Do you have a family history of cardiovascular disease? Yes No
Are you currently following a weight loss diet? Yes No
How many hours of exercise would you do in a typical week?
Duration (hrs): none 1 2 3 4 5 6 7 8 9 10 10+
Intensity: low moderate high
55
Clinician Enquiries
1. Have you been involved in our screening before? Yes No
2. If yes, were you advised to follow up any results with Yes Noyour GP or other health care professional?
What were you advised to follow up?..............................................................................................
How did you follow this up?.............................................................................................................
What was the outcome?……………………………………………………………………………………
3. How long ago did you last visit your:
a. General Practitioner …………………(months)
b. Physician (Cardiologist, Endocrinologist, Neurologist) …………………(months)
c. Ophthalmologist …………………(months)
d. Podiatrist …………………(months)
e. Diabetes Educator or Community Health Centre …………………(months)
4. If you have diabetes or cardiovascular disease, how often did you see the following clinicians regarding these
conditions?
a. General Practitioner …………………
b. Physician (Cardiologist, Endocrinologist, Neurologist) …………………
c. Ophthalmologist …………………
d. Podiatrist …………………
e. Diabetes Educator/Community Health Centre …………………
5. If you have diabetes, does your GP test for the following during a:
Diabetes related consultation? Regardless of the nature of your visit?
Eye Yes No Yes No
Listen to the heart sounds Yes No Yes No
Foot Yes No Yes No
Blood Pressure Yes No Yes No
6. If you have cardiovascular disease (CVD), does your GP test for the following during a:
CVD related consultation? Regardless of the nature of your visit?
Eye Yes No Yes No
Listen to the heart sounds Yes No Yes No
Foot Yes No Yes No
Blood Pressure Yes No Yes No
7. If you DO NOT have diabetes or cardiovascular disease, does your GP test for the following during your visit?
Eye Yes No
Listen to the heart sounds Yes No
Foot Yes No
Blood Pressure Yes No
If after completing this part of the questionnaire you have any concerns please let the researcher know and you will be provided with options for seeking further information. 56

Urinalysis
Observation Test
Test Result Normal
Colour (eg pale, medium or dark) Straw yellow
Transparency (eg clear or cloudy) Clear
Odour (describe – note if pungent)
Dip StickNote: Each dipstick must remain in contact with the urine for ONE minute
Test Result Normal Range
pH 5 - 9
Protein Negative
Glucose Normal
Ketones Negative
Blood Negative
Haemoglobin Negative
57
Monofilament [L] Foot
Could you feel if the skin on your [L] foot was being damaged?
Yes No Don’t know
58
Carville Score [L] Foot = _______ out of 10
Note: Neuropathy if get 4 or more incorrect.[L] Foot table
1 2 3 4 5 6 7 8 9 10
Monofilament [R] Foot
Could you feel if the skin on your [R] foot was being damaged?
Yes No Don’t know
Carville Score [R] Foot = _______ out of 10
Note: Neuropathy if get 4 or more incorrect.
[R] Foot table
1 2 3 4 5 6 7 8 9 10
59

Diabetes Complications Screening Research Autonomic nervous system (ANS) function tests
Score: Normal = 0 Borderline = ½ Abnormal = 1 no CAN 0 - 0.5 / early CAN (1.0 - 2.5) / definitive and severe (3.0 - 5.0)
Deep Breathing (DB)Test
Deep breath in for 5secs out for 5 secs, repeat 6 times
Take average of first three cycles
Signed…………………………………
Measurements for DB
Shortest inspire Longest expire MAX-MINCycle 1 ……………… ……………... …………..
Cycle 2 ……………… …………… …………..
Cycle 3 ……………… ……………… ……………
Average (MAX-MIN)………..
Classification ……………………………………….. Normal : ≥ 15 Border: 11 to 14 Abnormal: ≤10 (HR)
Valsalva Test
Hold Breath and push down into abdomen for 15 secs, rest 30 sec repeat three times.tick or n/a [ ] NO HEART, BLOOD PRESSURE OR
RESPIRATORY PROBLEMS[ ] HEART RATE (> 60 bpm)[ ] OXYGEN SATURATION TEST OK (must be >95%)
Signed…………………………………
Measurement for Valsalva
Longest after shortest during ratio L/SCycle 1 …………… ………………. ……….
Cycle 2 ……………. ………………. ……….
Cycle 3 ……………. ………………. ……….
Average ratio…………
Classification:………………………………………..
Normal : ≥1.21 Border: 1.11 - 1.20 Abnormal: ≤1.10
Hand Grip (HG)Test
AUTOMATED BP MONITOR
pO2 %………….. MAX HG ……………
30% MAX HG ……………
Signed…………………………………
Result: Highest DBP – baseline DBP ……………..
Classification ……………………………………….
Normal: ≥ 16 Border: 11 to 15 Abnormal: ≤10
Measurements for HG
Time (mins) BP
0 (resting)
1
2
3
4
5
BP change on standing)
Resting BP (av lying) ………………Palpated SBP ………………1 min post standing ………………3 min post standing ………………Resting minus 1min standing SBP ………………
Classification…………………………………………
Normal : ≤ 10 Border: 11 to 29 Abnormal: ≥ 30
HRV change on lying and standing
HR interval at 15th and 30th beat post lyingRatio 30:15 ……………
Classification……………………………………………
HR interval at 15th and 30th beat post standingRatio 30:15 ……………
Classification……………………………………………
Normal : ≥ 1.04 Border: 1.01 to 1.03 Abnormal: ≤1.00
Outcome: Normal: no anomalies Early: one of HRV abnormal or 2 borderline Definite: 2 or more abnormal Severe: 2 or more HRV abnormal plus 1 or both BP abnormal or both borderline.
60

Charles Sturt University School of Community HealthPO Box 789Albury NSW 2640Tel (02) 6051 6000
Participants research results
To: General Practitioner Re: CSU diabetes complications screening research resultsParticipant Name: Participant Code:
The Diabetes Complications Screening Research Project at Charles Sturt University involves the public in a research project that aims to determine how best to implement alternative health care models in community health and identify novel risk indicators for early identification of disease and disease prevention. Tests are carried out by CSU investigators and students. All results are obtained with optimum care, however the results are not intended to take the place of a regular review by your general practitioner and do not constitute a clinical assessment/diagnosis, which the research participant may be seeking from their general practitioner.
Body Mass Index (BMI) and waist circumference measurementsThe body mass index (BMI) is a risk factor for cardiovascular disease and diabetes. It is considered normal if the score is below 25. Overweight is associated with a value between 25 and 29.9, whereas obese is a value greater than 30. Waist circumference measurements regarded as normal are less than 80/94cm female/male whilst measurements above 90/102cm female/male are regarded as indicative of substantially increased risk to health.
BMI Result: …….….……..kg/m2
Waist circumference …….….……..cm
Comments:
Blood Glucose
Normal values for fasting are levels below 7 mmol/l and for non-fasting (having something to eat within two hours) below 11 mmol/l. A pre-diabetes condition is associated if fasting Blood Glucose levels are greater than 5.5mmol/L but below 7mmol/L.
Early morning fasting glucose reading (if applicable) ……….……
Screening reading …….….……..mmol/L
Time since last meal ………………hr
Comments:
Ankle-Brachial-Index (ABPI)The ABPI is a measure that compares the blood pressure in the arm with that in the leg. As such it is an indicator of how well blood moves down into the feet.
Result of ABPI:
Right side:
Left side:
The normal range for ABPI is between 0.9 and 1.3.
Comments:
61
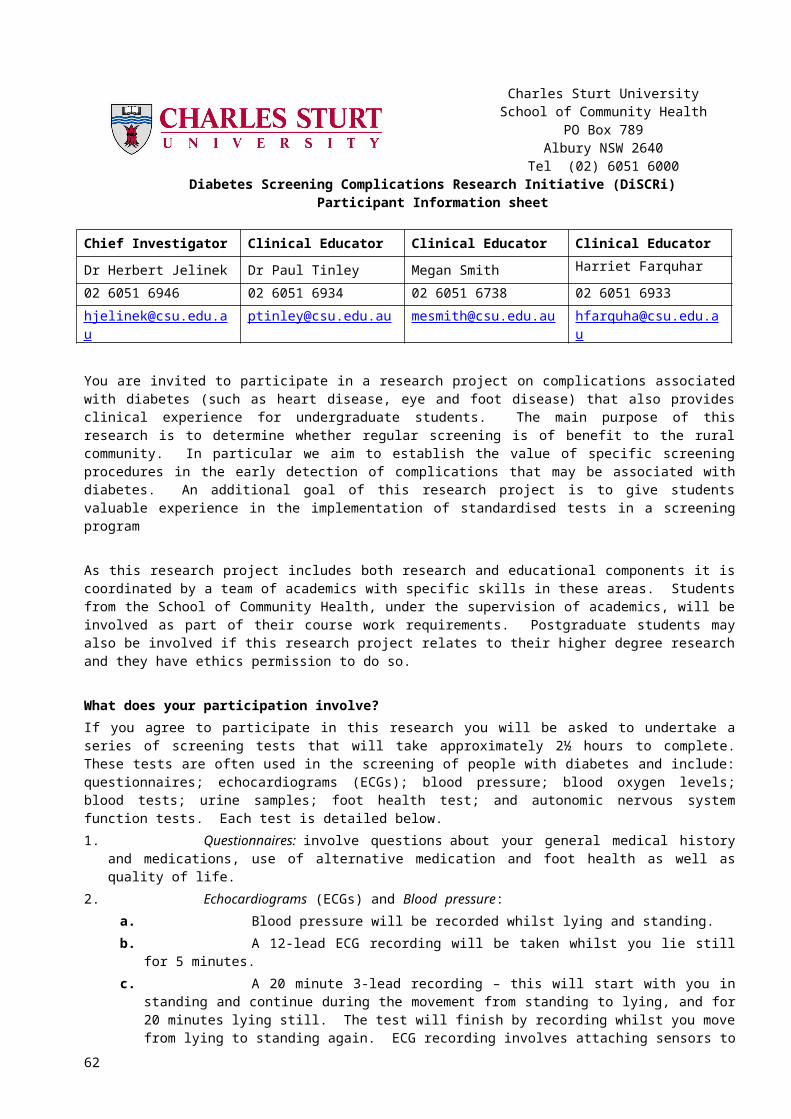
Peripheral NeuropathyWe also tested for how well the sensory nervous system functions in the foot. Clinical significance is considered when bilateral changes are evident or 2 or more of the tests show changes indicative of decreased function.
Monofilament:
Vibration:
Reflexes:
Muscle tone:
Comments:
Autonomic Nervous System Assessment:
Heart rate variability lying to standing: (Normal : ≥1.04 Border: 1.01 to 1.03 Abnormal: ≤1.00)
Valsalva (ratio): (Normal : ≥1.21 Border: 1.11 - 1.20 Abnormal: ≤1.10)Deep breathing (HR): (Normal : ≥15 Border: 11 to 14 Abnormal: ≤1)BP Lying to Standing (systolic mmHg): (Normal : ≤10 Border: 11 to 29 Abnormal: ≥ 30)Handgrip test (mmHg): (Normal: ≥16 Border: 11 to 15 Abnormal: ≤10)
The measures are based on those recommend by Ewing and known as the Ewing battery. Comments:
Cardiovascular Assessment Assessment of your ECG has indicated: see interpretation on ECG trace
…………………………………………………………………………………………………...
………………………………………………………………………………………………… Blood Pressure: …………………mmHg
Note: It is not uncommon for healthy people to show some anomaly to normal sinus rhythm on their ECG trace due to aging or because they are sports active, slim or large.
If any of your results are abnormal with respect to Australian guidelines, we recommend that you visit your general practitioner for a check up.
We would also appreciate if you could write us a letter letting us know of what you thought of the diabetes screening research you attended and any further outcomes from follow-up with your general practitioner.
If you have any further questions or comments you can contact Herbert Jelinek on 02 60516946 With thanks from the Diabetes Complications Screening Research..
Herbert Jelinek. PhD Clinical EducatorCoordinator Name:Diabetes Complications Screening & Research Signature:
Participant interviewed by:
Name:
Signature:
62
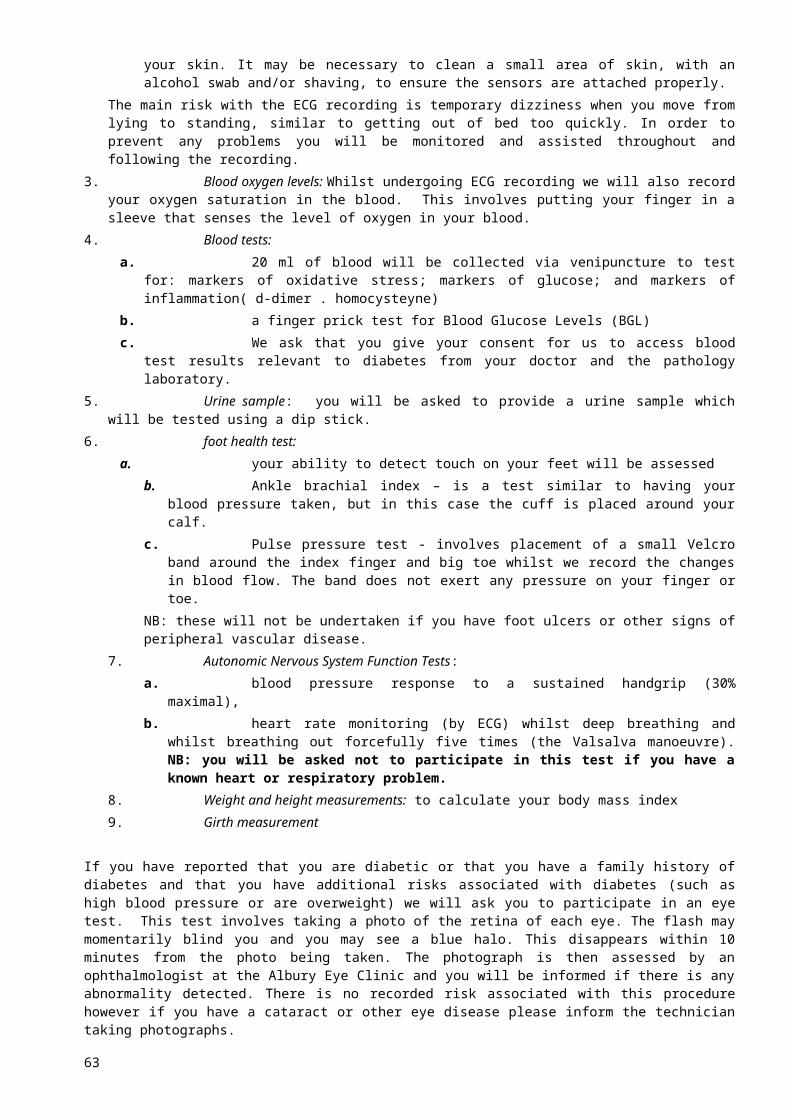
Screening Stations
Station 1 Consent form completed
SWPS Pathology Dorevitch Pathology
Urine sample collected
Waist circumference……………………………….…cm
Height ……………….. (cm) Weight ………………..(kg)
BMI (kg/m2) = ………………………………………….
Signed:
Station 2: Blood collection
Non diabetes Type 1 Type 2
Early morning glucose:………………..….……..mmol/L
Time since last meal:……………………….…..(hrs)
Screening glucose test:……………………..….mmol/L
Blood taken for biochemistry: Yes No
Signed:
Station 3: Neuropathy(please circle)
Left Right
Monofilament P A R P A R
Muscle P A R P A R
Vibration P A R P A R
Reflex – ankle P A R P A R
Reflex – knee P A R P A R P=present A=absent R=reduced
Signed:
Station 4: ABPI
Automated BP Doppler
SBP DBP
(L) Arm(L) ABPI
Average ABPI
(L) Leg
(R) ABPI(R) Arm
(R) Leg Signed:
Station 5: ANS / 3 Lead ECGSkin sensitivity: Yes No
Dizziness on rising: Yes No
ANS test completed:
LS/SL Yes No
DB Yes No
VA Yes No
Hand grip Yes No
Signed:
Station 6: Eye Photography
Contraindications - epilepsy: Yes No
Date of last eye test:…………………………………………
Eye conditions: Yes No
Please specify:………………………………………………..
………………………………………………………………….
………………………………………………………………….
Signed:
Station 7: 12 Lead ECGSkin sensitivity: Yes No
Dizziness on rising: Yes No
Previous heart problem: Yes No
Chest Pain: Yes No
10 sec recording completed
5 min recording completed
Signed:
Station 8: Lying to Standing Blood PressureDizziness on rising: Yes No
SBP DBPLying 1 ………………/…….……..….
Lying 2 ………………/………...…….
Standing palpated systolic ………...……/………...…….
Standing 1 (1 min) ………………/………...…….
Standing 2 (3 mins) ………………/………...…….
Signed
For GP consideration: Not Required Recommended ImmediateECG Blood Pressure Podiatry Diabetes EYE BMI
63
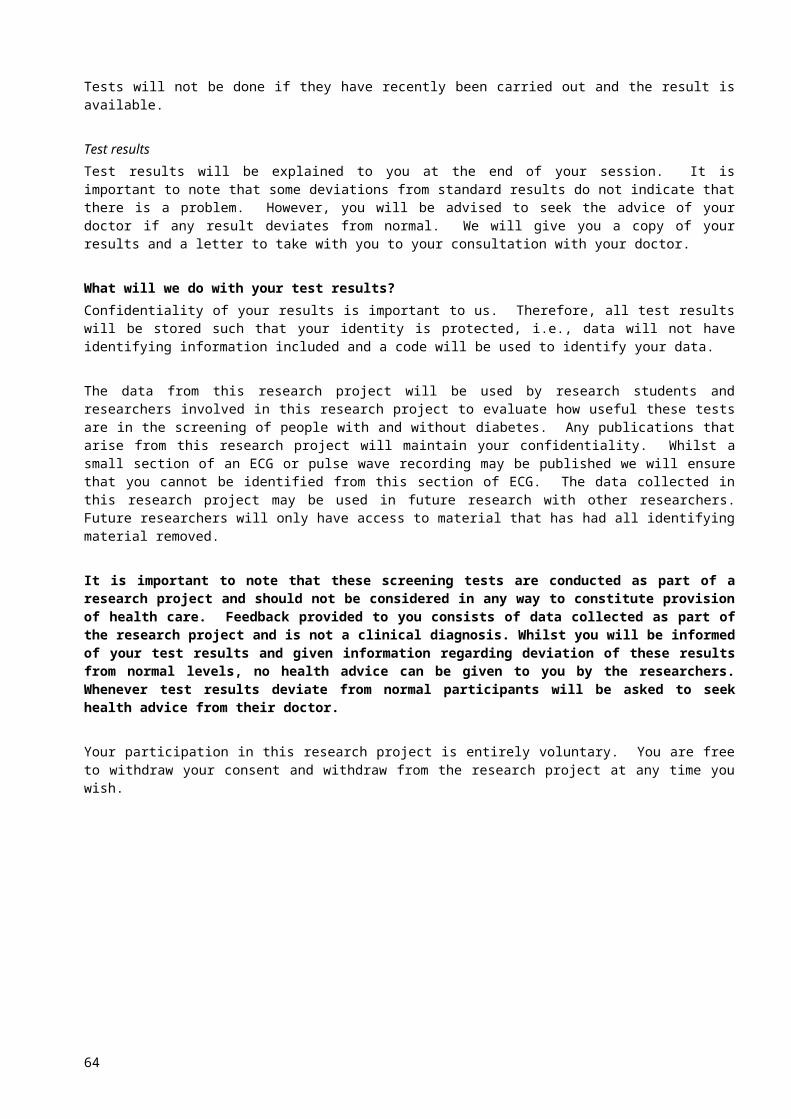
Diabetes screening – Participant phone recall instructions
1. Introduce yourself.eg your name and what course you’re studying
2. Explain the nature of the phone call.eg Ringing with regard to the Diabetes Screening programme which you’ve been participating in.
3. Ask if they would like to continue in the screening.
If they are, offer them a choice of booking times. If none of the times are suitable then place them on a waiting list for next time.
If they don’t wish to continue with the screenings, thank them for their participation in the past and tell them their name will be taken off the list.
4. Give a brief outline if required (For participants continuing with the screening and wish to know tests to be carried out)
Bloods: ~15ml for biochemistry and a finger prick for a blood glucoseECG: 12-lead heart check like they do in hospitals – electrodes on the chestAutonomic nervous system: (automatic part of nervous system)
3-lead ECG where we record segments lying down and standing up -electrodes on collar bone and hipsHand grip test while we take blood pressures every minute for 5 minutesTests in which we ask you to breath deeply while we run a 3-lead ECG to measure your heart rate
Foot health tests – sensation, reflex, vibration and muscle strengthBlood pressures in arms and legsRetinal Eye Photographs: of the back of the eyes to check for small haemorrhagesQuestionnaires
5. Ask if the participant has diabetes and note this on the booking sheet.
6. Check their date of birth and participant code Note: the participant code consists of the first 3 letters of their second name followed by the initial of the first
name and DOB eg Cherryl Kolbe DOB 220253 = KOLC220253
Instructions for attending participants
If non-diabetes: Fast for 2 hours prior to appointment time Drink lots of water Wear a front opening cotton shirt (for the ECG’s) Bring a written list of medications and the name / address of GP
Diabetes: DO NOT fast Bring your early morning fasting glucose reading Drink lots of water Wear a front opening cotton shirt (for the ECG’s) Bring a written list of medications and the name / address of GP
The tests will be run in the Cedars Building at 601 Olive Street (next to the child care centre, 3 buildings up from Wilson Street)
Come in front doors and down the hallway to the desk
You may like to bring a snack with you as the tests will take about 2 to 3 hours.
Phone number - cancellation or queries: Bev 60516858 or Cherryl 60516995
64
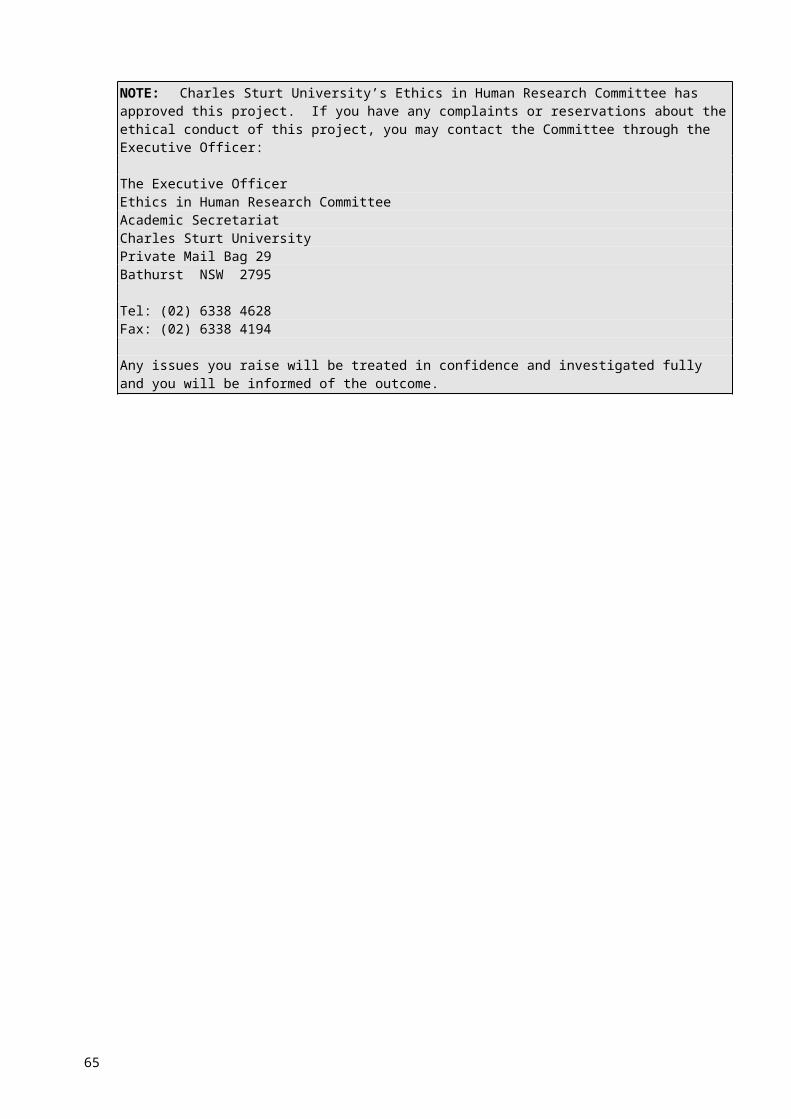
Appendices
65
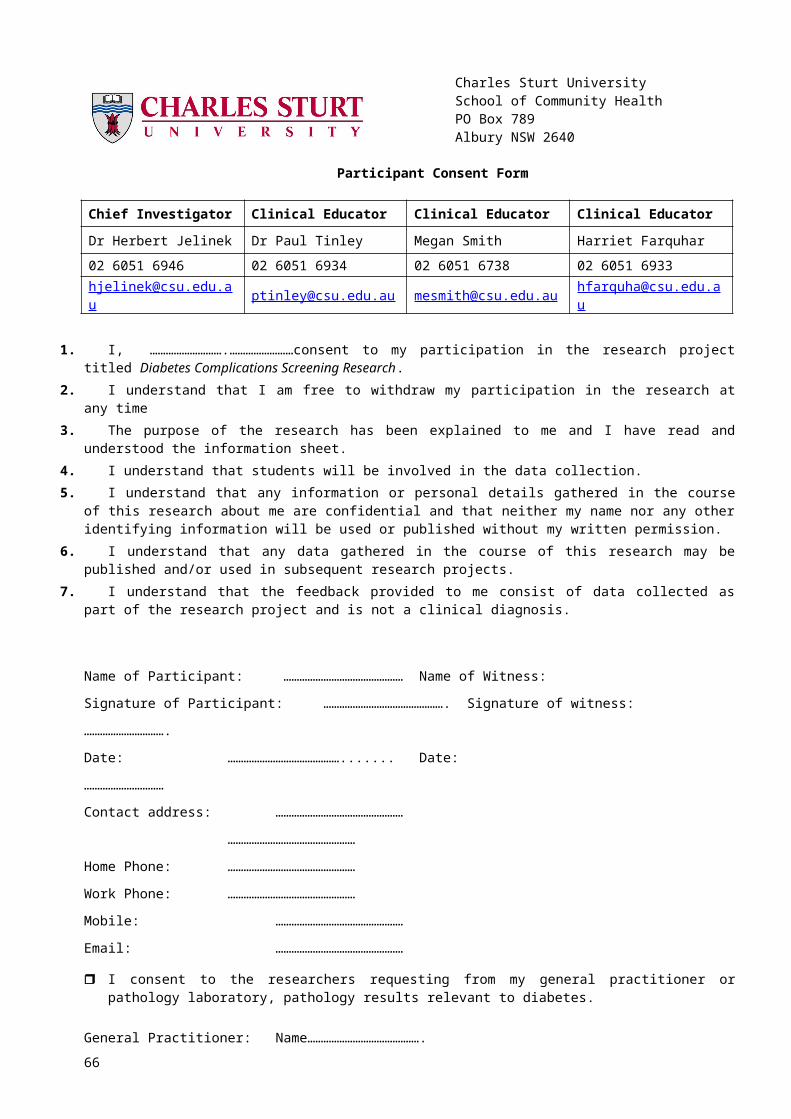
Appendix A: Sample tubes for collection
Tube Test Volume of whole blood Requirement Storage
EDTA Homocysteine 8ml Plasma -800C
EDTA MetHb, viscosity 8ml Whole blood Room temp
Preservative free Heparin
GSH, MDA4ml
RBC hemolysate -40CD-dimer, cholesterol profile Plasma -200C
2 x 7ml EDTA tubes (purple top)
1 x 7ml plain tube (orange top)
1 x 10ml tube with 100L preservative free heparin
Collect the two EDTA tubes first and the plain tube last. As soon as the plain tube is collected transfer the blood to the tube containing the preservative free heparin. Invert well to mix. Place this tube and a 7ml EDTA tube in a rack and keep on ice until collected by biochemist.
Centrifuge one 7ml EDTA tube. Collect plasma, label and store at -800C.
66

Appendix B: Blood glucose level interpretation
Fasting Plasma Glucose.
Note: Results for fasting plasma glucose (FPG) test by finger prick maybe between 12% & 15% lower compared to plasma venous samples.
The fasting plasma glucose (FPG) test is the standard test for diabetes. It is a simple blood test taken after eight
hours of fasting. In general, results indicate the following:
FPG levels are considered normal up to 5.5mmol/L.
Levels between 5.6mmol/L to 6.9mmol/L indicate FPG or prediabetes as suggested by the International
Diabetes Institute. They are only slightly above normal but are considered to be risk factors for type 2 diabetes
and its complications.
Diabetes is diagnosed when FPG levels are 7.0mmol/L on two different days. Or a sugar test at anytime is
above 11mmol/L.
The FPG test is not always reliable, so a repeat test is recommended if the initial test suggests the presence of
diabetes, or if the test is normal in people who have symptoms or risk factors for diabetes. For example, people
who take the test in the afternoon and show normal results may actually have abnormal levels that would be
revealed if they are tested in the morning.
Ref: Australian Diabetes Society
67
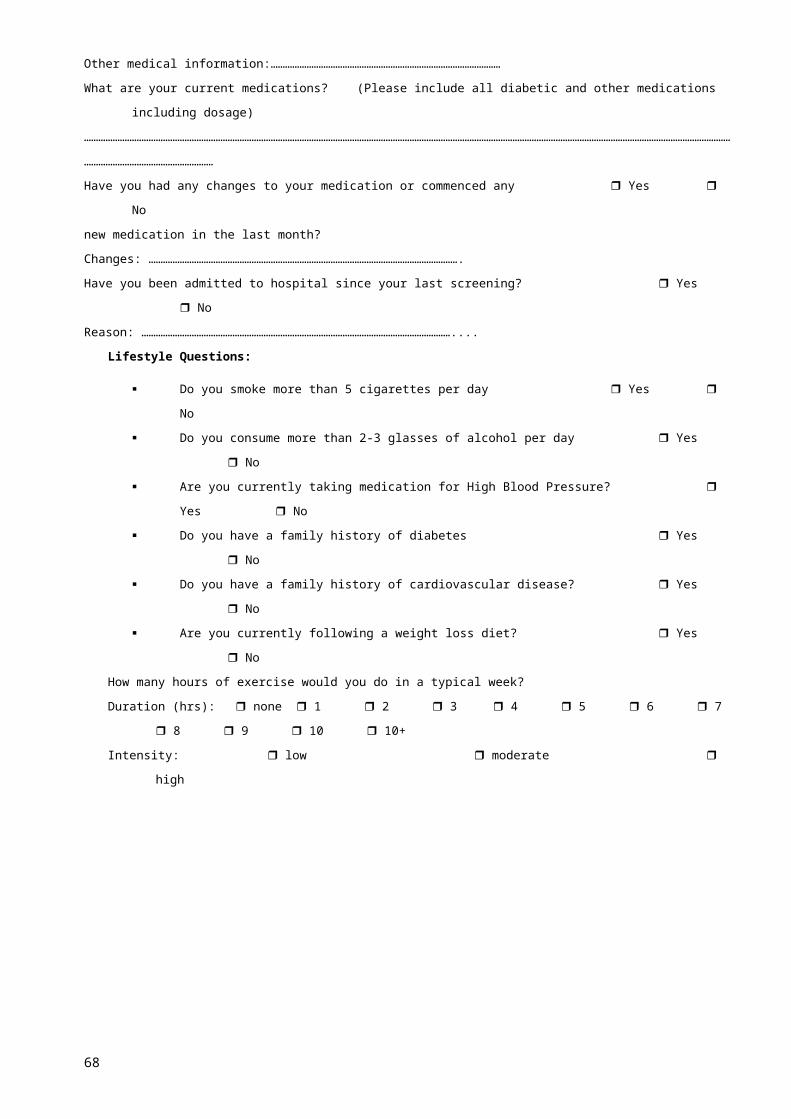
Appendix C:
What is Waist Circumference?
According to the National Institutes of Health, a high Waist Circumference (WC) is associated with an increased
risk for type 2 diabetes, dyslipidemia, hypertension and cardiovascular disease when the BMI is between 25
and 34.9. (A BMI greater than 25 is considered overweight and a BMI greater than 30 is considered obese.)
Waist Circumference can be useful for those people categorized as normal or overweight in terms of BMI. (For
example, an athlete with increased muscle mass may have a BMI greater than 25 - making him or her
overweight on the BMI scale - but a Waist Circumference measurement would most likely indicate that he or
she is, in fact, not overweight). Changes in Waist Circumference over time can indicated an increase or
decrease in abdominal fat. Increased abdominal fat is associated with an increased risk of heart disease.
To determine your Waist Circumference, locate the upper hip bone and place a measuring tape around the
abdomen (ensuring that the tape measure is horizontal). The tape measure should be snug but should not
cause compressions on the skin.
68

Appendix D: Ewing battery: autonomic nervous system function tests interpretation
Blood pressure response to standingUsing standard sphygmomanometer measure BP whilst lying down twice and take average and then when
standing (1 min and 3 post standing). A difference (fall) of 30mmHg systolic and/or a 15mmHg fall diastolic
indicates postural hypotension. Consider whether participant is on antihypertension medication!
Blood pressure response to sustained handgripExplain instrument and determine maximum hand grip. Measure resting blood pressure. Handgrip is
maintained at 30% maximum voluntary contraction up to a maximum of five minutes and BP recorded each
minute. The difference between the highest and resting diastolic blood pressure is the measure of
response.
Heart rate deep breathing.Patient has 3 min quite rest then heart rate is recorded whilst performing 5 cycles of deep breathing (5 sec
inspiration and 5 second expiration). All patients need to have a training session before commencement of
recording. The maximum and minium heart rate for each breathing cycle is measured and the mean of the
successive breathing cycles are taken to give the maximum-minimum heart rate.
NOTE you can also calculate the ratio: Expiration/inspiration (E/I) R-R ratio was calculated as the average
of the quotient between the longest R-R intervals during expiration and shortest R-R intervals during
inspiration (E/I) ratio).
Heart rate response to standing up.Measure heart rate as standing from lying position Take 30:15 interval. The 30th and 15th beat is determined
from the time the participant stands. In some cases there is noise at the beginning of this phase in the ECG.
Therefore take the time interval of the first clear beat divide this into the time interval between standing and
the first clear beat. This provides information of how many beats were missed. Then count starting from the
first clear beat to the 15th and 30th beat. Take the ratio
Heart rate response to lying.Same as above just measure as patient lying down.
Valsalva manoeuvrePatient sits quietly and then blows into mouthpiece at 40mmHg or holds breath whilst pushing into pelvic
cavity for 15sec. Rest 30 sec and then repeats three times. Heart rate increases normally followed by
rebound bradycardia after release. The ratio of the longest RR interval shortly after the manoeuvre to the
shortest RR interval during the manoeuvre is measured. The Valsalva ratio is the mean of three successive
manoeuvres.
69
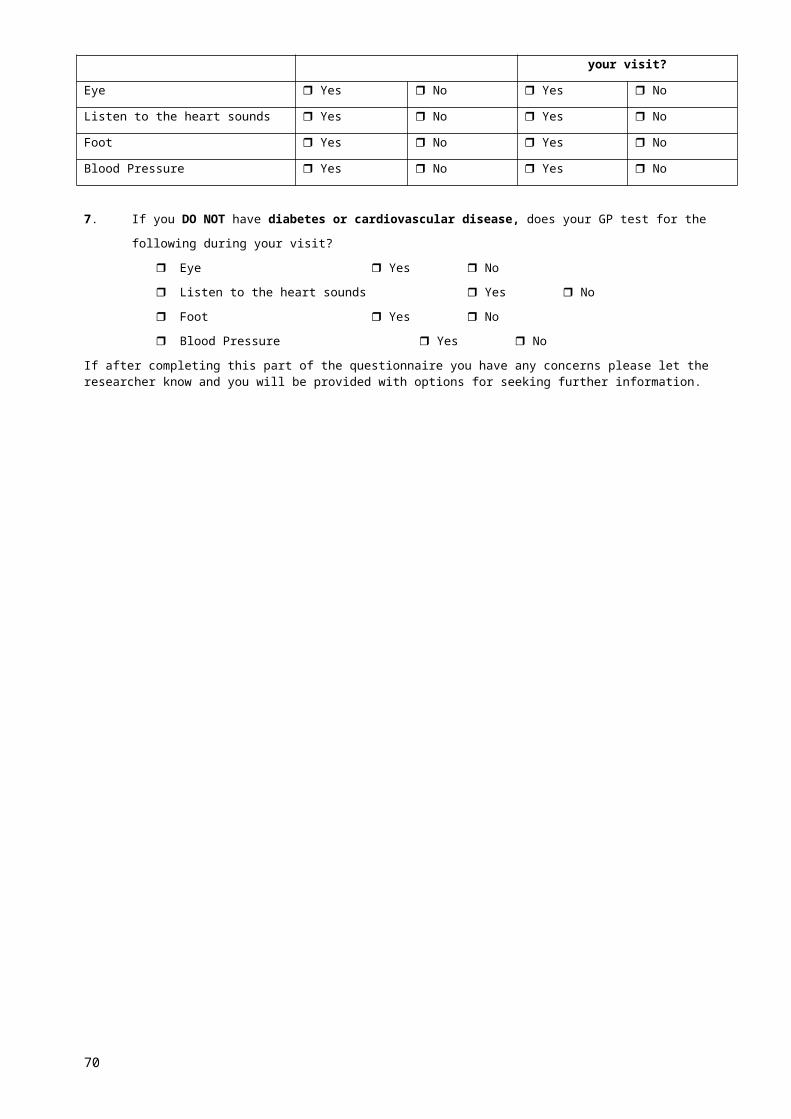
For Valsalva
Normal Borderline Abnormal
≥1.21 1.11 - 1.20 ≤1.10
For deep breathing (AV MAX-MIN)
Normal Borderline Abnormal
≥ 15 11 to 14 ≤10
For BP change lying to standing
Normal Borderline Abnormal
≤ 10mmHg 11 to 29mmHg ≥ 30 mmHg
For handgrip
Normal Borderline Abnormal
≥ 16mmHg 11 to 15mmHg ≤10 mmHg
For HRV lying to standing (30:15 ratio)
Normal Borderline Abnormal
≥ 1.04 1.01 to 1.03 ≤1.00
EWING 1985Normal (N): all tests normal or one borderline
Early involvement (E): one of the three heart rate tests abnormal or two borderline
Definite involvement (D): two or more of the heart rate tests abnormal
Severe involvement (S): two or more of the heart rate tests abnormal plus one or both of the blood
pressure tests abnormal, or both borderline
Atypical pattern (A): any other combination of abnormal tests
70

Appendix E: CSU 12-lead ECG classification table
CSU 12 - lead ECG classification for referral to physiciansClass 2a - show GP next
visitClass 2b - recommended
visit GP soonClass 3 - immediate
referraln = not referrred
Class 1a Class 1b Class 2a Class 2b (if known 2bn) Class 3 (if known 3n)
Sinus rhythmLVH (left ventricular
hypertrophy)* I° HB (PR>200)
Q waves in > 1 lead (Q 1/4 or more of QRS
height) AF
Sinus arrhythmia
Notched or enlarged P wave (P mitrale/ P
pulmonale)Extensive inverted T
waves VF
Slow rhythm (50>HR<60) Peaked T wavesProlonged QT interval
(QTc>0.5 PR) 2° HB type 2
Conduction delay of atrial
or ventricular origin PVC & PAC (> 6/min) Bigeminy or trigeminy Atrial flutter
LAD or RAD (Left or Right
axis deviation) AV node re-entry PR<120 Multifocal PVC or PAC
Paroxysmal supraventricular
tachycardia
Q waves (<2) indicating
old infarctRBBB (right bundle
branch block) 2° HB type 1 VT
Minor T wave changeLAFB (Left anterior
fascicular block) ST elevation in > 2 leadscomplete atrioventricular
block (3° HB)
occasional PVC/PACRAFB (right anterior
fascicular block)Tachycardia
(100>HR<120) Tachycardia (HR>120)
long QTc > 440 ST depression with LVH Bradycardia HR < 50
LBBB (left bundle branch
block)ST elevation in more than
2 leads
LVH Cornell criteria Add value for aVL & V3; A value > 25 is pathologically significant
LVH Sokolow criteria Add largest peak/decline of: V1 or V2 with V5 or V6. A value >35 is pathologically significant

Appendix F: Diabetic retinopathy chart

FIGURE 1. MINIMAL NON-PROLIFERATIVE DIABETIC RETINOPATHY (NPDR) -- FEW SCATTERED MICROANEURYSMS (m) ONLY, THE REMAINDER OF THE FUNDUS IS NORMAL.
Diabetic Retinopathy ChartExerts from: http://www.eyesondiabetes.org.au/article/9
Prepared by the Diabetic Retinopathy Working Party of the NHMRC in conjunction with the Australian Diabetes Society Retinopathy Sub-Committee.Material derived from NHMRC "Clinical Practice Guidelines for the Management of Diabetic Retinopathy".
FIGURE 2. MILD NON-PROLIFERATIVE DIABETIC RETINOPATHY -- MICROANEURYSMS (m) AND DOT HAEMORRHAGES (h). ALSO DEMONSTRATES MACULAR OEDEMA WITH A SMALL AMOUNT OF LIPID EXUDATE (e) -- NOT CLINICALLY SIGNIFICANT.
FIGURES 3. MODERATE NON-PROLIFERATIVE DIABETIC RETINOPATHY -- COTTON WOOL SPOTS (w) RETINAL HAEMORRHAGES (h) AND MICROANEURYSMS (m)
FIGURE 4. SEVERE NON-PROLIFERATIVE DIABETIC RETINOPATHY -- INTRARETINAL MICROVASCULAR ABNORMALITIES OR IRMA (i) VENOUS BEADING (b) OR VENOUS CALIBER CHANGES, WIDESPREAD RETINAL ISCHAEMIA AND COTTON WOOL SPOTS (w) --BEGINNING OF NEW VESSEL ON OPTIC DISC.
FIGURE 6. HIGH-RISK PROLIFERATIVE DIABETIC RETINOPATHY -- LARGE FROND OF DISC NEW VESSEL (v) AND PRE RETINAL HAEMORRHAGE (h).
Classification, Clinical Signs and Referral Recommendation
Minimal NPDR (fig 1)Isolated Microaneurysms only (m).
Referral may not be needed. Review annually with dilated fundus exam.
Mild NPDR (fig 2)Microaneurysms (m) + retinal haemorrhages (h) Routine
referral to an ophthalmologist.Review with ophthalmologist at least annually.
Moderate NPDR (fig 3)Haemorrhages and microaneurysms (h,m) in at least 1
quadrant + cotton wool spots (w) or venous beading in 1 quadrant only.
Refer to an ophthalmologist as soon as possibleSevere NPDR (fig 4)One of the following:
Intraretinal microvascular abnormalities (IRMA) (i) in 1 or morequadrants
Venous beading (b) in 2 or more quantum Haemorrhages/microaneurysms (h,m) in all 4 quadrants.
Severe NPDR (fig 6)New vessels near disk or elsewhere (v
Pre-retinal haemorrhages (h)Other signs as in NPDR