chapter32 oil spill identification
TRANSCRIPT

Volume 3 Chapter 32 Oil Spill Identification
_______________________________________________________________________________________
3/32/13 1/33
Guidelines for the Exchange of Oil Samples/Results between countries, and on Oil Spill Identification
Preliminary remark
Oil spill identification is conducted by experienced and specialised laboratories in order to determine whether a relationship exists between spilled oil samples and suspected source samples. A table of laboratories participating in the annual ring tests organised by Bonn-OSINet is available on the Bonn-OSINet section of the Bonn Agreement website.
In the case of “mystery” oil spills, i.e. where there is no suspected source, chemical investigations can be of great help in identifying possible sources.
The ensuing expert’s report can then be used in criminal and civil proceedings to help identify or confirm the responsible party. Chemical analytical results are thus used to attach responsibilities, assess penalties, and help recover cleanup costs incurred during an incident.
The Guidelines for the Exchange of Oil Samples/Results between countries, and on Oil Spill identification consists of two parts:
Part 1 - Oil sampling for the purpose of source identification and Part 2 - Analytical method and reporting
Part 1 describes oil sampling and should be at hand when an oil spill is observed. Therefore chapter 32 of the Counter Pollution Manual describes sampling in detail and is freely available on the Bonn Agreement website.
Part 2 deals with the analytical method that should be used by the laboratory. Therefore Chapter 32 of the Counter Pollution Manual does not describe the method but refers to CEN/TR 15522-2:2012.
Part 1 is approved by the network of experts on oil spill identification within the Bonn Agreement (Bonn-OSINET).
Relationship with deliverables of the European Committee for Standardization (CEN):
The techniques of sampling for oil spill identification given in these guidelines are also reflected in CEN/TR 15522-1:2006: “Oil Spill Identification – Waterborne petroleum and petroleum products - Part 1: Sampling”.
A joint analytical methodology (Part 2) has been produced by Bonn-OSINET. This methodology has been approved by CEN and is available through national standardisation bodies:
CEN/TR 15522-2:2012 “Oil spill identification - Waterborne petroleum and petroleum products - Part 2: Analytical methodology and interpretation of results based on GC-FID and GC-MS low resolution analyses”.

Volume 3 Chapter 32 Oil Spill Identification
_______________________________________________________________________________________
3/32/13 2/33
Contents Part 1 – Oil sampling for the purpose of source identification .................................................................. 4
Introduction ............................................................................................................................................. 4 1 Background ................................................................................................................................... 4 2 Training ......................................................................................................................................... 4 3 General remarks ............................................................................................................................ 4 4 Oil spill sampling .......................................................................................................................... 5
Thick waterborne layers, oil globules and tar balls....................................................................... 5 Use of a sample bottle directly .......................................................................................................... 5 Polyethylene cornet or conical Teflon® bag ...................................................................................... 5 Clean bucket with small holes .......................................................................................................... 6
Sampling of thin oil films (sheens) ............................................................................................... 6 Taking oil samples on beaches and from oiled animals ................................................................ 7 Use of sampling buoy from an airplane ........................................................................................ 7 Use of helicopter sampling device ................................................................................................ 8
5 Investigations and oil sampling on board vessels ....................................................................... 10 Introduction ................................................................................................................................. 10 General advice and directions for safety routines ....................................................................... 10
During loading ................................................................................................................................ 11 After loading ................................................................................................................................... 11 Miscellaneous ................................................................................................................................. 11
Sampling techniques ................................................................................................................... 11 Checklist for sampling in cargo oil systems ............................................................................... 12 Piping system of an oil tanker ..................................................................................................... 14 Sampling in machinery spaces .................................................................................................... 15 Basic oil handling systems .......................................................................................................... 16 Taking soundings of ullage and oil-water interface levels .......................................................... 18
6 Handling samples ........................................................................................................................ 19 Sample custody and documentation ............................................................................................ 19 Important documentation for the taking and shipping of oil samples ......................................... 20 Filling and labelling of sample bottles ........................................................................................ 20 Packing of samples ..................................................................................................................... 20 Shipping of oil samples ............................................................................................................... 21 Examples of sampling kits .......................................................................................................... 21 Oil sampling flow diagram ......................................................................................................... 25
ANNEX 1: Request for analysis ........................................................................................................... 25 ANNEX 2: Checklists for oil sampling ................................................................................................. 27
General ........................................................................................................................................ 27 Collection of samples from the water surface ............................................................................. 27 Collection of samples from beaches ........................................................................................... 28 Obtaining samples from oiled animals ........................................................................................ 28
ANNEX 3: Oil sampling organization .................................................................................................. 29 1 Background ....................................................................................................................... 29 2 Training ............................................................................................................................ 29 3 Purpose of sampling ......................................................................................................... 29
General ............................................................................................................................................ 29 Occupational safety ......................................................................................................................... 29 Penal liability of the polluter ........................................................................................................... 29 Economic liability of the polluter ................................................................................................... 29 Spill response planning ................................................................................................................... 30 Short term environmental protection .............................................................................................. 30 Long term environmental protection ............................................................................................... 30 Information service ......................................................................................................................... 30 Disposal .......................................................................................................................................... 30
Volume 3 Chapter 32 Oil Spill Identification
_______________________________________________________________________________________
3/32/13 3/33
Summary of purpose and types of samples ..................................................................................... 30 Responsibilities during sampling .................................................................................................... 32 The duties of the Sampling Co-ordinator ........................................................................................ 32
4 Handling of spill information ........................................................................................... 33

Volume 3 Chapter 32 Oil Spill Identification
_______________________________________________________________________________________
3/32/13 4/33
Part 1 – Oil sampling for the purpose of source identification
Introduction Forensic investigations may form part of a whole chain of activities undertaken to gather information about a given oil spill. Sampling is the first step in the process of obtaining information about the spill. Information about the physical and chemical properties as well as behaviour will facilitate decision-making during response to the oil spill. The many different purposes of sampling, and how sampling activities can be organised, are described in Annex 3.
The oil sampling activities described in this manual are limited to forensic investigations.
1 Background
1.1 This manual is intended to aid the sample taking person in the proper procedures involved in oil sampling for source identification. If the sampling is not done in a proper way the results of the analysis will not be as accurate as they could otherwise be.
1.2 Samples can be taken from the water surface, suspected polluter or the shore line. Oil spill sampling of released oil is described in Section 3. Oil sampling on board vessels is described in Section 4.
1.3 Handling of samples and documentation of samples is described in Section 5. At the end of the document sampling kits are presented, and oil spill sampling is summarized in the form of a sampling checklist.
2 Training 2.1 All personnel involved in sampling need to be trained to ensure that the sampling is performed in a correct way. This is also something that will be questioned by lawyers in the legal process following an oil spill. When samples are taken at a suspected polluter it is important that the sampler has been working on board ships. This will ensure that he/she has knowledge and experience of the piping systems in machinery spaces and cargo systems.
2.2 Training should be ongoing to make sure the level of competence is maintained over time.
3 General remarks
3.1 All spills encountered and all potential sources of spills should be sampled. It is important to take samples from both spill and source even when it is clear where the spill originates from. From the outset, the type of sampling equipment and routines described in this document should be used.
3.2 Sampling procedures which are connected to liability investigations must be performed with great care and accuracy concerning spills as well as suspected sources. Every action should be taken to prevent a deterioration in the samples’ value as evidence.
3.3 Even if an oil spill has scattered, and only a thin sheen remains, every possible effort should be made to take at least a small sample. No sample volume is too small to be shipped to the laboratory. The laboratory can often analyse very small oil samples – for example, water samples that seemingly consist of pure water or sample pads that do not show any visible traces of oil.
3.4 If any part of the oil spill differs in any respect from other parts, take extra samples to check if more than one spill has occurred in the area.
3.5 If the spill response operation continues for more than one day, samples should be taken every day to make it possible to determine the degree of weathering of the oil as well as possible contamination by other oils.

Volume 3 Chapter 32 Oil Spill Identification
_______________________________________________________________________________________
3/32/13 5/33
3.6 If an oil sample is suspected of containing contaminants, take blank samples, if possible, of the contaminant. Surface waters in harbours and estuaries may contain traces of various petroleum products. When spills in such waters are sampled, it is therefore also important to provide the laboratory with blank samples of the water.
3.7 Samples and sampling equipment should be handled and stored so that the samples cannot be manipulated, mixed up, or be contaminated by other substances. Samples should be handled as legal evidence and should be kept in a “chain of custody” until identification and possible legal procedures have been completed. Therefore, always use the sealable and individually numbered safety bags described later in this document.
3.8 A bottle containing a sample should not be placed in the sampling kit containing the clean equipment. Reusable sampling equipment should always be very carefully cleaned, and put into clean plastic bags, before restoring it to the sampling kit case. Used sample bottles must not be used again - not even after careful washing.
3.9 Make notes of all relevant information about samples and sample sites. Use a digital camera or a video camera to record observations which are considered important to the investigation.
3.10 The samples should be sent as soon as possible to the laboratory. Quick handling of samples is important. If the transmission is delayed, the samples should be kept at a temperature of less than +4°C (but not be frozen).
3.11 Used equipment should be replaced as soon as possible so that the sampling kit case is always fit for use, and so that new samples can always be quickly packed and sent away.
4 Oil spill sampling Thick waterborne layers, oil globules and tar balls
4.1 Focus the sampling on thick parts of the spill. If the spill is large, it is important to take samples in several positions within the spill to get a representative sample selection. Use of a sample bottle directly
4.2 Globules, balls and thick parts can often be sampled directly with a sample bottle. Fill the bottle with as many balls as possible or skim oil from the surface by repeated sweeps with the bottle. Remove the water which has entered the bottle. One method of doing this is to close the lid and hold the bottle upside down for a minute to let the oil float upwards to the bottom of the bottle so that the water can be drained by careful opening of the lid. Then continue to skim oil and try to get the bottle approximately three-quarters full of de-watered oil (i.e. 50-70 ml). Further techniques to concentrate the oil into the sampling bottle: Polyethylene cornet or conical Teflon® bag Floating brown oil layers or tar balls on the water surface can often be sampled by a polyethylene cornet. The cornet should have a wide hem into which a metal ring can be threaded. First cut off the tip of the cornet as shown in the picture. A holder is fitted onto the ring and by means of this holder the device can be fastened to a boathook or the like. Polyethylene
cornet
Metal ring
Holder

Volume 3 Chapter 32 Oil Spill Identification
_______________________________________________________________________________________
3/32/13 6/33
The assembled device is swept through the spill so as to skim as much oil as possible.
The water in the cornet is slowly let out and the drainage is stopped when the last drop of water has escaped. Then the oil in the cornet is filled into a 100 ml wide-neck sample bottle. The same procedure is then repeated once or several times until the bottle is approximately three-quarters full of de-watered oil. N.B. Do not fill the bottle to a higher level than up to 2 cm below the lower edge of the lid.
Clean bucket with small holes
4.3 One useful refinement of the skimming technique involves the use of a bucket with small holes in the bottom allowing much of the water to drain away from the oil. After drainage of water, the skimming technique may be repeated several times to increase the amount of oil in the bucket. Finally, the oil may be transferred to the sample container by means of a stainless-steel or Teflon® scraper used to scrape the sides of the bucket. Sampling of thin oil films (sheens) 4.4 A special Teflon® pad can be used if the oil film on the water surface is very thin (“rainbow sheen”, “blue sheen”, “silvery sheen”). The use of a Teflon® pad can dramatically increase the amount of oil sampled. The pad material should be Teflon® (or a similar inert polyfluoropolymer) because other materials interfere with the subsequent analytical processes in the chemical laboratory. A practical arrangement for handling a pad is shown in the figures to the right. Great care must be taken during sampling to avoid contamination of the sheen by traces of oil from the sampling vessel or from other sources. The pad should be swept in the spill preferably until it is coloured by the oil. However, it should be emphasized that the pad may have absorbed a sufficient amount of oil even if the pad has no sign of brown colour.
rod and line
clothes peg
Teflon® pad

Volume 3 Chapter 32 Oil Spill Identification
_______________________________________________________________________________________
3/32/13 7/33
After a sufficient number of sweeps the Teflon® pad is carefully put into a sample bottle. The peg can be used to push the pad into the bottle. Another clean wooden peg of any kind can, if necessary, be used to assist in the procedure. It is important to avoid contact with any item that might contain traces of strange oils.
Teflon® pad on watersurface
Taking oil samples on beaches and from oiled animals
4.5 Take samples in every continuous oil slick. In the case of a spill which is scattered over a long coastline many samples should be taken to enable a mapping of the oil distribution on the shores.
4.6 The oil should be scraped off oiled items and transferred into sample bottles. Avoid, if possible, contamination in the bottles by sand, grass and other debris. In exceptional cases when it is difficult to obtain clean oil samples, it is acceptable to place small oiled items (pebbles, small pieces of wood, etc.) in the bottles.
4.7 Any remaining traces on the shore from earlier oil spills must be carefully avoided during sampling a specific new spill. Take extra samples if there is any suspicion of more than one oil spill in the area (differing colour, consistency, etc.). Always take blank samples in instances of hesitation. This is especially important when oil samples are scraped from creosote-impregnated wood.
4.8 Never take whole animal samples, body tissues, etc. which may become rotten during shipment. Try to cut off small parts of oiled feathers, fur, etc. Put the material directly into a sample bottle. Use of sampling buoy from an airplane
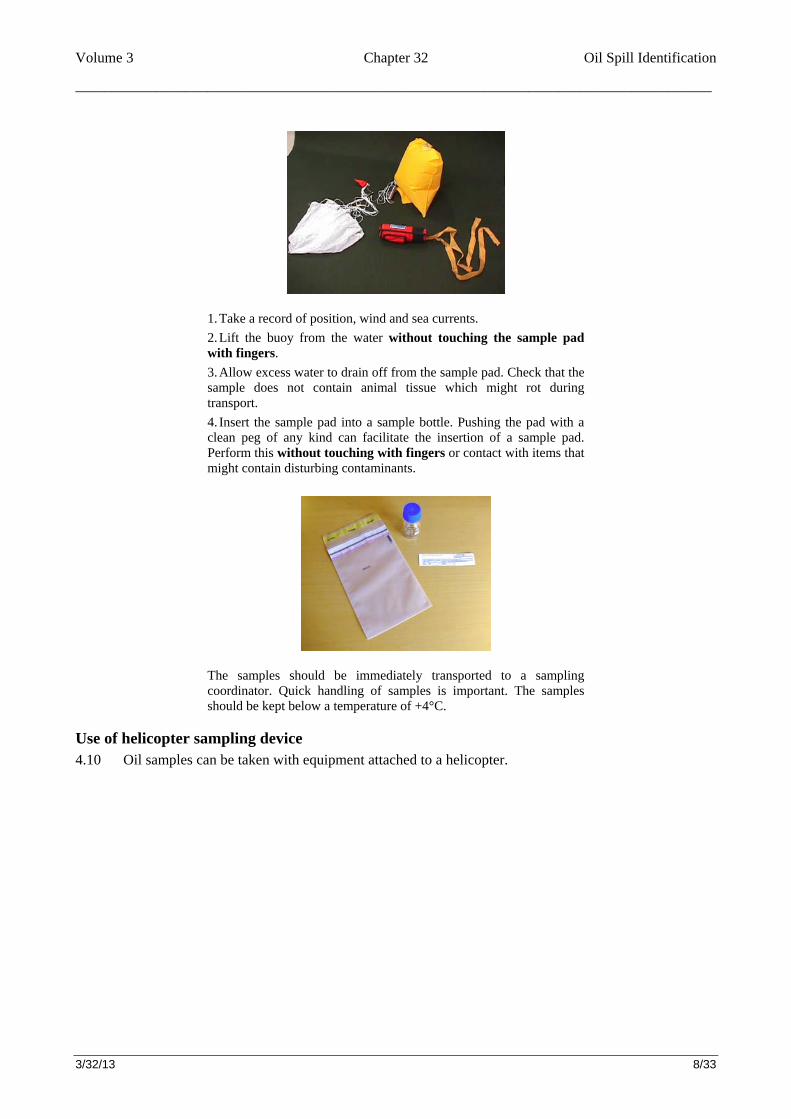
4.9 It is possible to drop a sampling buoy into an oil spill from an air craft. Attached to the buoy there is a Teflon® pad. Below are instructions on how such a sampling buoy should be handled when recovered from the surface of the sea.
Volume 3 Chapter 32 Oil Spill Identification
_______________________________________________________________________________________
3/32/13 8/33
1. Take a record of position, wind and sea currents.
2. Lift the buoy from the water without touching the sample pad with fingers.
3. Allow excess water to drain off from the sample pad. Check that the sample does not contain animal tissue which might rot during transport.
4. Insert the sample pad into a sample bottle. Pushing the pad with a clean peg of any kind can facilitate the insertion of a sample pad. Perform this without touching with fingers or contact with items that might contain disturbing contaminants.
The samples should be immediately transported to a sampling coordinator. Quick handling of samples is important. The samples should be kept below a temperature of +4°C.
Use of helicopter sampling device 4.10 Oil samples can be taken with equipment attached to a helicopter.

Volume 3 Chapter 32 Oil Spill Identification
_______________________________________________________________________________________
3/32/13 9/33
4.11 The figure below shows the helicopter sampling device.
4.12 Due to the buoyancy of the 3 empty bottles, initially the apparatus floats horizontally on the water surface, so that water and surface layer film can flow into the sampling bottle (4). After filling, this bottle sinks down and thereby directs the opening upwards, so that water can no longer flow into or out of the bottle.
4.13 Under adverse conditions (rough seas, thin oil films) a small stripe of a Teflon®-net may be attached to the sampler (kept in place by two plastic screws). When the sampler is lowered to the sea surface, this Teflon® net is thus laid upon the oil film. After sampling, the Teflon® net is put into the glass bottle.

Volume 3 Chapter 32 Oil Spill Identification
_______________________________________________________________________________________
3/32/13 10/33
As can be seen in the right-hand picture above, enough oil for the following trace analysis is sampled in this way (right-hand picture, sample on the left: sample taken without Teflon® net, no visible oil ; sample on the right: “clean water” taken beside the oil film).
4.14 This sampling device may also be used from bigger ships or from bridges in harbours.
5 Investigations and oil sampling on board vessels
Introduction
5.1 Samples must be taken on board ships observing appropriate caution in accordance with current safety regulations. During sampling on board ships the recommendations below in paragraphs 5.4 – 5.10 “General advice and directions for safety routines” should be followed carefully.
5.2 It is often difficult to obtain relevant oil samples on board suspected sources. Yet, it must be emphasized that it is of the utmost importance for an oil spill investigation that suspected sources of the spill are traced as far as possible and that reference samples are taken. Sometimes during sampling on board a vessel it is necessary to get assistance by the crew under control. However, it is quite wrong to accept unknown samples which are handed over by representatives from the ship or the shipping company.
5.3 Use a digital camera or a video camera to record observations which are judged to be valuable for the investigation. General advice and directions for safety routines
5.4 Directions must be obtained from the ship's officers about how sampling should be performed in the light of the safety regulations current on board the ship. Sampling in tanks and spaces within the ship’s Hazardous Areas should preferably be carried out by the ship’s own crew. Sampling performed by the ship’s crew should be strictly supervised by the personnel responsible for the sampling in order to avoid manipulation.
5.5 If the ship has its own sampling equipment, this should be used if possible. If this is not possible, sampling should be performed by means of external equipment only after approval by the ship’s officers or by a ship-surveyor.
5.6 When samples are taken in tanks containing volatile petroleum products the following advice should be observed:
a. Filter masks with a combination filter should be brought and used whenever necessary.
b. The sampler should stand neither on the windward nor the leeward side of the hatch. A side wind gives the smallest risk of breathing gas.
c. Only one hatch should be opened at a time.
d. Avoid breathing petroleum gases, especially if they come from sour crude (smell of rotten eggs).

Volume 3 Chapter 32 Oil Spill Identification
_______________________________________________________________________________________
3/32/13 11/33
e. One person should perform the sampling and another should supervise the sampler (safety guard). The latter should watch the sampler’s condition in order to ensure that he/she is removed to a safe place if he/she is affected by petroleum gases (intoxication symptoms).
f. Only explosion-proof equipment (marked EEx) should be used.
g. The sampler should not have loose items in his/her pockets that could fall into the tank.
5.7 The following safety directions are based on the “International Safety Guide for Oil Tankers & Terminals“ (ISGOTT):
During loading
5.8 Equipment made of metal for sampling and ullage-sounding must not be brought into the tank, or be left in the tank, during loading or within 30 minutes after loading has stopped. Examples of such equipment are steel measuring tapes and steel measuring sticks. Non-conducting equipment without metal parts may generally be used at any time. Cords, however, used for lowering equipment into tanks must be made of natural fibres (not synthetic materials).
After loading
5.9 Equipment made of metal for sampling and ullage-sounding can be used 30 minutes after loading has stopped. However, it is important that the equipment is firmly grounded to the ship’s hull before it is brought into the tank. The equipment must remain grounded until after it has been removed from the tank.
Miscellaneous
5.10 Taking soundings and samples by means of pipes which are designed for this purpose is allowed at any time.
Sampling techniques
5.11 The following guidance is given on the taking of samples.
It may be difficult to obtain oil samples from tanks on board ships without
opening manhole covers or drawing off pipes or pumps. However, it is often possible to use sounding pipes with a sample collector and glass
tubes according to the adjacent figure. It is used with a steel measuring tape equipped with a carbine hook and a ground wire.
A clean, unused 10 ml glass tube is put into the sample collector which is hooked onto a steel measuring tape which must be grounded before starting the sampling. The oil sample is collected through a sounding
pipe and transferred to a 100 ml sample bottle. The glass tube is discarded and the sample collector must be thoroughly cleaned!

Volume 3 Chapter 32 Oil Spill Identification
_______________________________________________________________________________________
3/32/13 12/33
The bottom of the sample collector has the shape of a cone, which makes it lie down horizontally on the bottom of a tank. This makes it possible to get samples even from very shallow oil layers in a tank. The sample collector and the steel measuring tape are reused and must therefore be cleaned off properly after usage. This is done by wiping them off with a cloth. Very small amounts of oil which cannot be wiped off will not contaminate the sample as long as the sample is proportionally much larger.
Sample collector with steel measuring tape.
Left The steel measuring tape must always be grounded to the ship’s hull when oil samples are collected through a sounding pipe. Right The sample collector can also be used for taking samples from other places with difficult access in the machinery room.
If the oil sample is very small a Teflon® pad can be used. The pad is dipped into the sample and then absorbs a sufficient amount of oil. The whole pad is sent for analysis. The pad is made of Teflon® because other materials might contaminate the sample and disturb the succeeding analysis. The Teflon® pad is very easy to use. However, the pad is much more sensitive to contaminations than the sample collector as the amount of oil in the pad is usually very small. The pad should therefore be used only when necessary and must be handled carefully so that it is not contaminated by other oils than the sample oil. The Teflon® pad may well be attached to a cord and lowered down into machinery spaces which are difficult to reach.
Teflon® pad.
Checklist for sampling in cargo oil systems
5.12 The following is a checklist for sampling in cargo oil systems:
a. Find out the ship’s category according to the MARPOL convention (COW, SBT, CBT or standard ballasted tanker below 40,000 tdw). Make a copy of the IOPP certificate.
b. Note the ship’s state of loading (cargo/ballast) and make a copy of the Bill of Lading for the current (latest) cargo voyage.
c. Check the Oil Record Book concerning the whole cycle loading-unloading-ballasting-tank washing. Check that it is signed by the Master. Make a copy of the pages which may be of current interest.

Volume 3 Chapter 32 Oil Spill Identification
_______________________________________________________________________________________
3/32/13 13/33
d. If possible, get hold of a copy of a drawing of the ship’s piping system for loading and ballasting.
e. Check the printouts from the oil-content meter and make a copy of the printout for the current voyage.
f. Verify current state of ballast (or loading) and check ballasted tanks as well as tanks ballasted during earlier part of voyage.
g. Check the ship’s status in the cargo/ballast cycle, i.e. whether the ship carries departure ballast or arrival ballast, whether tank cleaning has been performed and whether collecting tanks (slop tanks) have been emptied.
h. Document all oil samples carefully by means of sample bottle labels. Take samples of all oil types which the ship has carried recently and of all oil mixtures which may have been created on board the ship. Take samples of oil residues from all possible sites.
i Observe the following:
i. The ship’s own reference oil samples
ii. Slop tanks (also oil-water interface levels, slop volume and water volume)
iii. Tanks which contain or have contained oily ballast
iv. Pump room keel
v. Stripping pumps
vi. Overboard piping (both sides)
vii. Ballast discharge piping (both sides)
viii. Cargo manifolds on deck
j. Check the records of the Oil Discharge Monitoring System. Oil tankers have a Oil Discharge Monitoring System (ODMS). The ODM is fitted with a recording device to provide a continuous record of the discharge in litres per nautical mile and the total quantity discharged or the oil content and rate of discharge.
k. Note other observations that may be of value for making a judgement about possible discharges. Take photos of sample sites and other places that may be of value for the investigation.

Volume 3 Chapter 32 Oil Spill Identification
_______________________________________________________________________________________
3/32/13 14/33
Piping system of an oil tanker
Legend for the above figure
1. Cargo oil pump, usual centrifugal type, 2-4 pcs 2. Pump mudbox, often combined with a vacuum tank for pump evacuation 3. Cargo oil piping in cargo tanks with branchings and connections to the cargo tanks 4. Pump riser to deck and piping on deck 5. Manifold with land connections
Volume 3 Chapter 32 Oil Spill Identification
_______________________________________________________________________________________
3/32/13 15/33
6. Pump shunts that allow loading through the piping system (these are sometimes arranged directly from the deck pipes to the bottom pipes, so called “drop lines”)
7. Cross-over at the pumps’ pressure side, simultaneous connection overboard (sometimes separate pipes)
8. Pipe at the pumps’ suction side with connection to sea valves 9. Discharge overboard from the pumps’ connection pipe at the pressure side 10. Ballast pump pipe from the pumps pressure side to sea valve. (This is an earlier alternative to
discharge according to 9, and in such case arranged at both sides. The alternative according to 9 is required on new ships. Arrangements according to both 9 and 10 do not exist at the same time.)
11. Sea inlet, usually from both sides 12. Return pipe from overboard connection to slop tank 13. Shunt for drainage of cargo pipes to the suction side of the system 14. Stripping pump, usually plunger type, 1-3 pcs 15. Stripping ejector, 1-3 pcs, sometimes none 16. Suction pipe from the pump room keel 17. Stripping pump’s direct suction from slop tanks 18. Stripping suction pipe from the cargo oil piping 19. Stripping system’s connection pipe at the pressure side with overboard pipe 20. Stripping system’s overboard outlet (may be combined with 9) 21. Stripping pump’s pipe for drainage to land 22. Feeding to the tank washing system
Sampling in machinery spaces
5.13 The following is a checklist for sampling in machinery spaces:
a. Check whether the ship has IOPP certificate, and note whether the ship is certified for 100 ppm or 15 ppm separator standard. Note also whether the ship is exempted from any requirement regarding equipment. Make a copy of the certificate.
b. Study the Oil Record Book for the engine room and copy the pages for the last 30 days
c. Figures in the engine log book should be in agreement with the figures in the oil record book.
d. Check all levels and contents, and take samples of the following:
i. Bilge sump
ii. Bilge water tank (note down a remark if it does not exist)
iii. Waste oil tank (may be more than one)
iv. Repletion tank connected to oil fuel tanks
v. Separator sludge tanks
vi. Empty bunker tanks used for ballast water
e. Take samples also from:
i. Fuel day tanks
ii. Bilge water separator outlet
iii. Sludge pump outlet
5.14 In addition, the sampler should be aware that oil from the engine room may have been discharged by the emergency bilge pump. This is usually done by an ejector driven by the fire pump or a sea water pump which can also be used as a bilge pump. If there is any suspicion of this:
a. Examine the bilge water separator. Check the liquid in the plug cock and (if there is any suspicion) insist that the filtering unit is opened.
b. Examine the tank top for sludge.

Volume 3 Chapter 32 Oil Spill Identification
_______________________________________________________________________________________
3/32/13 16/33
c. Make notes of the types of cleaning agents used in the engine room as well as the stated consumption of them.
d. If the ship is larger than 10,000 GT and has a 15 ppm separator, the oil content meter and its printout should be examined. Make a copy of the printout for the current time.
e. Make notes of other observations that are relevant for making a judgement about possible discharges. Take photos of sampling sites and other places which may be relevant for the investigation.
Basic oil handling systems 5.15 The following diagram shows the basic oil handling system of a well-equipped modern ship, a common ship and ships smaller than 400 GT:

Volume 3 Chapter 32 Oil Spill Identification
_______________________________________________________________________________________
3/32/13 17/33

Volume 3 Chapter 32 Oil Spill Identification
_______________________________________________________________________________________
3/32/13 18/33
Legend for the above figure
1. Bilge water tank
2. Waste oil tank
3. Sludge tank
4. Bilge water pump/feed water pump to bilge water separator
5. Bilge water separator, 100 ppm or 15 ppm standard
6. Sampling tap in separator outlet
7. Monitoring instrument for high oil content in separator outlet (compulsory on some occasions only)
8. three-way valve for returned cleaned bilge water
9. Overboard pipe from bilge water separator
10. Automatic drainage of oil from bilge water separator
11. Oil sump under drainage sites
12. Transfer pump for sludge and oil residues to deck. This pump can also be used for transferring bilge water from bilge sumps to bilge water tank
13. Transfer pipe for bilge water from bilge sumps to bilge water tank
14. Suction pipes from tanks for transfer to deck
15. International land connection on deck
16. Centrifugal separators for fuel oil and lubrication oil
17. Suction pipe from bilge sumps
18. Main bilge pump which may be used in emergency situations only, and for draining bilge water from the keel to bilge water tank
19. Overboard pipe from main bilge water pump (should be locked in closed position, however not compulsory)
20. Overboard pipe from sludge transfer pump (improper arrangement but not forbidden)
21. Collection tank for all types of dirty water
22. Transfer pipe for dirty water to collection tank
Taking soundings of ullage and oil-water interface levels
5.16 In some investigations there is a need to calculate the oil volume in a tank where water has penetrated. This can be done by gauging or sounding the tank’s ullage and oil-water interface level (see the figure below).
5.17 Ullage and interface gauging is done in cargo and bunker tanks. Taking soundings is the most common method for ballast and fresh water tanks, cofferdams, etc. Whether a given tank gauge figure is an ullage or a sounding value can be checked in the ship’s tank tables.
5.18 All gauging must be performed according to the safety advice and directions given in paragraphs 5.4 – 5.10 above.
5.19 Gauging should preferably be carried out by the ship’s own crew using the ship’s own equipment, under supervision of the personnel responsible for the operation.
5.20 Taking soundings of interface level and ullage is normally done by means of a steel measuring tape equipped with a ground wire. The steel measuring tape must be grounded by way of connecting the grounding wire to the ship’s hull. Before a sounding pipe or a manhole is opened, it is important to check

Volume 3 Chapter 32 Oil Spill Identification
_______________________________________________________________________________________
3/32/13 19/33
that the cable clamp is safely contacted to the hull, if necessary by scraping off paint, rust, etc. There is no risk of sparks from static electricity if the steel tape is electrically connected to the ship’s hull.
5.21 What is called “water-finding paste” may well be used on a normal steel measuring tape to sound the oil-water interface level. The tape is coated with this paste which turns red upon contact with water. The interface level can then be read on the tape. Alternatively the steel tape can be chalked with ordinary blackboard chalk. On some occasions the contrast between oil and water on the steel tape will be better with chalk than with water-finding paste.
5.22 The level of the oil-water interface level can also be established by a special oil-water interface meter which may consist of a steel measuring tape with a probe in one end and a handle, with an indicator, in the other end. The indicator gives a response for the conductivity of the medium into which the probe is immersed. When the probe is immersed only in the oil, the conductivity is rather low, but when the probe reaches the water interface the conductivity increases considerably. At this point, the probe’s (and thus the interface’s) distance from the handle can be read on the steel tape.
6 Handling samples
Sample custody and documentation Samples and sampling equipment should be handled and stored so that the samples cannot be manipulated, mixed up, or otherwise be contaminated by strange oils. Samples should be handled as legal evidence and should be kept in a “chain of custody” until identification and possible legal procedure has been completed. Therefore, always use approved sealable and individually numbered safety bags with three detachable adhesive number labels with identical number (the same as on the bag). Each safety bag number is unique for one specific sample. The number is the identification of the sample. One of the detachable number labels shall be affixed onto the glass sample bottle. The next number label shall be placed on the outer plastic jar and the third label on the Letter of Request (described below). A sample label (see below) shall be affixed to each sample bottle.

Volume 3 Chapter 32 Oil Spill Identification
_______________________________________________________________________________________
3/32/13 20/33
(Space for a number label Sampling date. from an individually numbered safety bag) Judged date for spill:
Sampling site:
Spill Ref. sample (e.g. from a ship) Suspected source:
TEMP. oC Water: Air : Spill information (volume, extension, judged oil type etc.)
SAMP-LER
Name: Field unit:
Phone: Alt. phone:
Important documentation for the taking and shipping of oil samples
A Letter of Request with a specification of the request and information on enclosed samples (Appendix 1). Necessary information in the Letter of Request and/or in the sample bottle label is the following:
- District, sampler, unit
- Date and position (or sampling site on board vessel) of sampling
- Spill’s volume/appearance, oil type
- Suspected source
Sample labels shall be affixed onto all sample bottles.
Number labels from individually numbered safety bags shall be affixed onto all sample bottles.
Filling and labelling of sample bottles
1.
2.
As sample containers use 100 - 250 ml thick-walled wide-neck borosilicate glass bottles. A suitable inner neck diameter is 30 mm. The lid tightening should be of high quality. Use a new (unused) sample bottle for each sampling site.
If possible, avoid getting water into the bottle. One method to remove water from the bottle is to close the lid and hold bottle upside down for a minute. Then let the oil float upwards to the bottom of the bottle so that the water can be drained by opening the lid carefully.
3. Do not fill the bottle to a higher level than to 2 cm below the lower edge of the lid. If the bottle is completely filled of cold oil it may later leak when the oil volume increases at room temperature.
4. Check that the bottle lid gasket is undamaged and that the lid fits tightly. Carefully wipe excess oil and water from the outside of the bottle.
5. Affix a filled-in sample label onto each bottle.
Packing of samples
1. An oil sample must be packed appropriately before it can be shipped to a laboratory for analysis. The sample is usually in either of the following forms:
Free oil
Sample pad containing oil

Volume 3 Chapter 32 Oil Spill Identification
_______________________________________________________________________________________
3/32/13 21/33
Oiled item (feather, piece of wood, stone, etc)
2. Allow excess water to drain off from the sample. Check that the sample does not contain animal tissue which might rot during transport. Insert the sample into a sample bottle. The insertion of a sample pad can be facilitated by pushing the pad with the used clothes peg or a clean peg of any kind. Perform this without touching with fingers or contact with items that might contain disturbing contaminants.
3. Affix a sample label onto the sample bottle and a number label from an individually numbered safety bag.
4. Insert the bottle into a safety bag and seal the bag according to the bag’s instruction.
5. Put the bottle package into a 600 ml plastic jar which is used as an outer container. Affix the second number label onto the outside of this jar (keep the third number label for the Letter of Request).
6. The samples should be immediately sent to the Sample Co-ordinator. A quick handling of samples is important. If the transmittal is delayed the samples should be kept under a temperature of less than +4°C. The Sample Co-ordinator watches the continued shipping of the samples.
7. The plastic jar (with its content of a sample bottle in a sealed safety bag) should be placed in a cardboard box, before shipment, as shown in the figure to the right. If prescribed in local regulations the whole packaging must be approved and the cardboard box must wear an inscription which shows this approval (see the example under the cardboard box).
Shipping of oil samples
The Sample Co-ordinator collects all samples and fills in a Letter of Request which is sent to the laboratory together with the samples.
The Sample Co-ordinator should also call in special personnel if required from an Industrial Laboratory for conducting physical analyses. The purpose is to take samples on board a ship to investigate if an oil is persistent according to the specifications of the International Oil Pollution Compensation Funds. The Sample Co-ordinator judges if it is more appropriate for the local samplers to perform this work. In this case the Sample Co-ordinator acquires special sample containers from the Industrial Laboratory.
Oil samples are to be considered as dangerous goods when they are shipped. However, if contained and packaged as described above, they can normally be shipped as “limited quantities” which means simpler shipping requirements than for normal dangerous goods. Local regulations should always be followed.
Examples of sampling kits
Case with equipment for sampling of oil spills No.
Metal ring (for polyethylene cornet) 1
Holder for metal ring 1
Polyethylene cornet 20
Teflon® pad (20x30 cm) for thin oil films 15

Volume 3 Chapter 32 Oil Spill Identification
_______________________________________________________________________________________
3/32/13 22/33
Peg (for Teflon® pad) 20
Line (for rod and peg) coil
Rod (for Teflon® pad) (perhaps not enough room in the case for this rod) 1
Sample bottle, 100 ml thick-walled borosilicate glass 10
Sample label 50
Safety bag (20x30 cm), approved, sealable, individually numbered 50
Wiping cloth (or paper) package
Disposable gloves package
Sampling peg (for scraping small samples of oil) 50
Plastic bag (for filled sample bottles, garbage etc.) 20
Laminated oil sampling flow diagram (cf. Annex3, Section 5) 1
Laminated instruction ”Oil spill sampling” (cf. Appendix 1) 1
Laminated equipment list 1

Volume 3 Chapter 32 Oil Spill Identification
_______________________________________________________________________________________
3/32/13 23/33
Case with equipment for sampling on board ships No.
Sample collector of brass for sounding pipes (to be hooked on the steel measuring tape)
1
Steel measuring tape 1
Brass weight (to be hooked on the steel measuring tape) 1
Ground wire (to be hooked on the steel measuring tape) 1
Water finding paste tube
Blackboard chalks (for chalking steel measuring tapes) package
Glass tube 10 ml (with lid) for sample collector 10
Teflon® pad (20x30 cm) for thin oil films 15
Line coil
Sample bottle, 100 ml thick-walled borosilicate glass 20
Sample label 50
Safety bag (20x30 cm), approved, sealable, individually numbered 50
Writing-pad (with cover and pen) 1
Wiping cloth (or paper) package
Disposable gloves package
Sampling peg (for scraping small samples of oil) 50
Plastic bag (for filled sample bottles, garbage etc.) 20
Earplugs 30x2
Laminated oil sampling flow diagram (cf. Annex3, Section 5) 1
Laminated equipment list 1
Volume 3 Chapter 32 Oil Spill Identification
_______________________________________________________________________________________
3/32/13 24/33
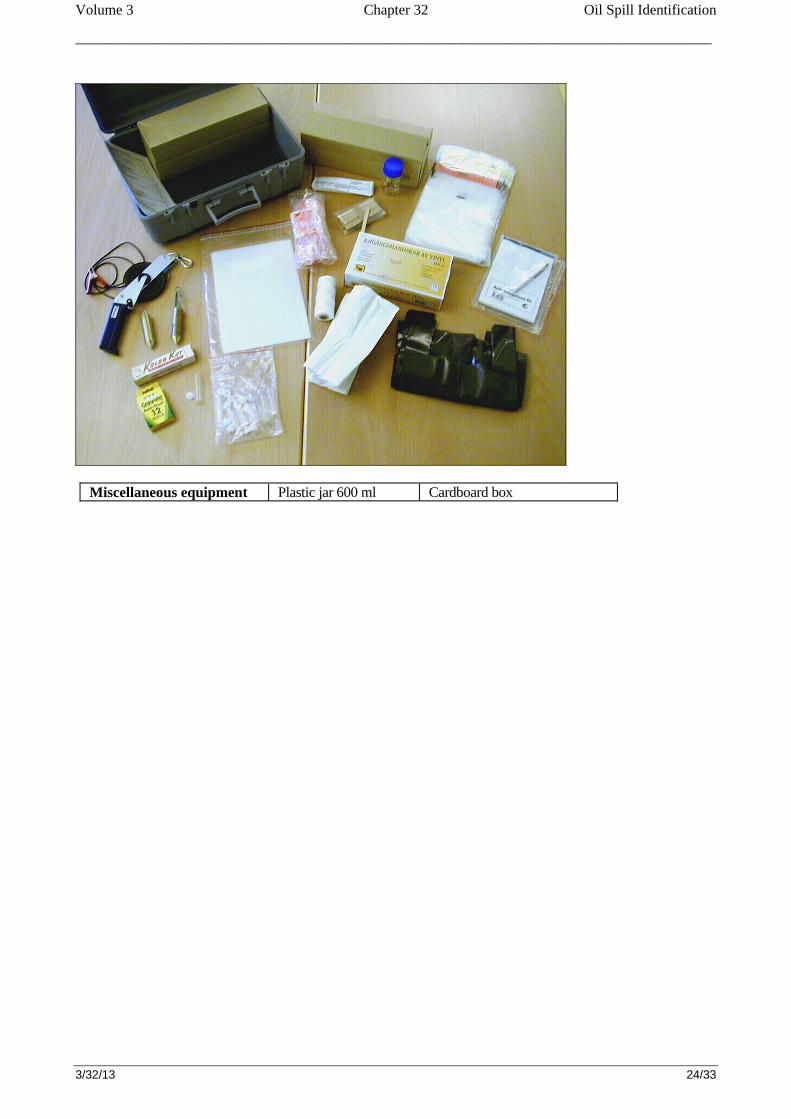
Miscellaneous equipment Plastic jar 600 ml Cardboard box

Volume 3 Chapter 32 Oil Spill Identification
_______________________________________________________________________________________
3/32/13 25/33
Oil sampling flow diagram The sampling flow chart below highlights important observations in the sampling procedure and shows the order of the steps that should be taken.
Affix to the bottle a SAMPLE LABEL as well as a NUMBER LABEL from an individually numbered safety bag 20x30 cm
Insert the bottle into the safety bag and seal this according to issued instruction. Put the sealed unit into a 600 ml plastic jar.
Affix also a NUMBER LABEL from the safety bag onto the plastic jar.
The Sampling Coordinator fills in a form "Request for Analysis" and affixes onto it NUMBER LABELS from the matching safety bags. The Coordinator
dispatches samples and completed form to the laboratory.
Ship samples to the district's Sampling Coordinator who checks if any reference samples have been taken from possible suspected sources.
The Sampling Coordinator also takes care of all other typesof necessary sampling.
Is there any suspected source?
Yes
Samples from spills or suspected sources(Free oil; Sampling pad with absorbed oil; Small item fouled by oil)
Insert sample into a 100 ml sample bottle[do not fill the bottle to a higher level than up to 2 cm below the lower edge of the lid]
The Sampling Coordinator stores samples in
refrigerators for 6 months
No
Other samples
1. Always try to take samples of oil spills! This applies also to thin oil films and minor beach contaminations.
2. Take reference samples of suspected sources (urgent!)- take photos of sampling sites
- make copies of important documents
3. Take care of other
types of sampling (occupational safety,
"persistency", spill response planning,
etc.)
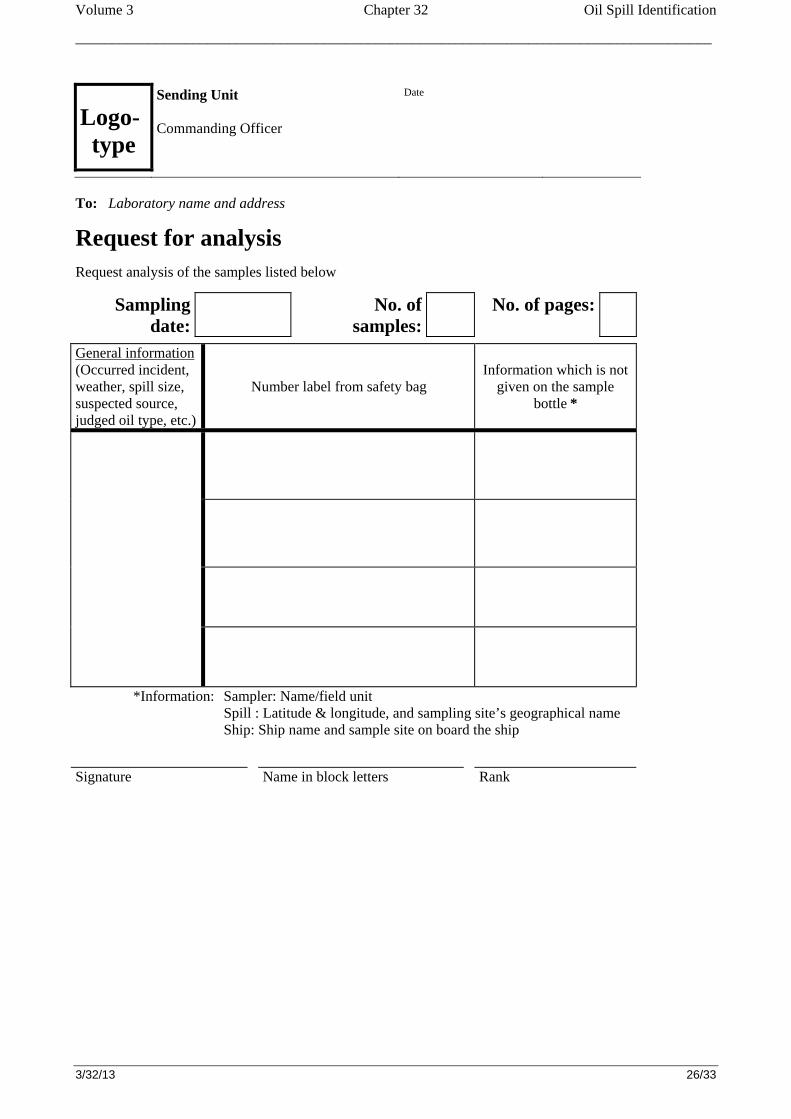
ANNEX 1: Request for analysis
Volume 3 Chapter 32 Oil Spill Identification
_______________________________________________________________________________________
3/32/13 26/33
Logo- type
Sending Unit Commanding Officer
Date
To: Laboratory name and address
Request for analysis
Request analysis of the samples listed below
Sampling date:
No. of samples:
No. of pages:
General information (Occurred incident, weather, spill size, suspected source, judged oil type, etc.)
Number label from safety bag
Information which is not
given on the sample bottle *
*Information: Sampler: Name/field unit Spill : Latitude & longitude, and sampling site’s geographical name Ship: Ship name and sample site on board the ship
Signature Name in block letters Rank

Volume 3 Chapter 32 Oil Spill Identification
_______________________________________________________________________________________
3/32/13 27/33
ANNEX 2: Checklists for oil sampling General 1. Samples should be taken with sampling devices and containers of glass, Teflon® or stainless steel.
Use disposable devices if possible and make sure they are used only once. 6 2. Preferably, at least 1 ml of oil should be sampled but no sample should be considered
too small. If possible, a larger sample volume is recommended for additional analyses (100 ml). 3. If contamination of the sample is suspected, take blind samples from the possible contamination. 4. To permit cross-checking, three parallel samples should be taken from some of the localities. In
larger spills, one sample per locality should be sufficient. 5. The sampling container should be properly labelled with all relevant information before sealing of
the safety bag. 6. A sampling log book with all relevant information from the samples and the sampling environment
should be kept. 7. The samples should be taken and handled under the supervision of authorized personnel. A chain of
custody should be maintained until the identification process is concluded by the relevant authority. 8. If stored, all oil samples should be kept under lock and key in darkness at a maximum temperature of
+4°C (but not be frozen). 9. Oil samples should be taken to an authorized laboratory without unnecessary delay. 10. Packing and transport should be carried out in such a way that damage to the samples is avoided.
Sorbent material should be used. 11. National regulations for transport of flammable materials should be followed. 13. Samples should be handled as legal evidence. Collection of samples from the water surface 1. Try to concentrate the oil fraction in the sample container by skimming the oil from the water. A
conical Teflon® bag or polyethylene cornet or a clean bucket with small holes can be used to concentrate the oil into the container.
2. Do not fill the container completely. Allow for thermal expansion of the sample. 3. If possible, sample oil from the thickest part of the slick. 4. In highly contaminated waters, e.g. harbours, take blind samples. 5. If a combat action against a waterborne oil spill lasts for several days, take oil samples every day for
documentation of weathering and possible additional spills from other sources. 23. 6. If other suspicious slicks occur, i.e. their appearance differs, or if slicks are observed
a long distance away from the expected site, also take samples here for identification of other possible sources.

Volume 3 Chapter 32 Oil Spill Identification
_______________________________________________________________________________________
3/32/13 28/33
Collection of samples from beaches 1. Take samples from the geographical edges of the polluted area to document the range of the spill. 2. Take samples from different localities within the polluted area to document the spill distribution. 3. Old tar balls, earlier oil spills, creosote from pier logs, etc. can contaminate the sample. Take blind
samples if contamination is suspected. 4. Take samples for identification of other possible sources whenever anything unusual or suspicious
(colour, texture, etc.) is observed in the polluted area. 5. When seaweed, small pieces of wood or debris are contaminated by oil, the complete specimen can
be placed in the sampling container. Obtaining samples from oiled animals 1. Contaminated feathers and fur may be cut off and placed in the sample container. 2. Dead, oiled birds or other animals may be collected in plastic bags, labelled and frozen before
sending to a laboratory. 3. Before sending any animals, make contact with the relevant authority to make proper arrangements
for transport and storage. 4. Samples with large amounts of organic materials should be frozen to avoid biological
decomposition.

Volume 3 Chapter 32 Oil Spill Identification
_______________________________________________________________________________________
3/32/13 29/33
ANNEX 3: Oil sampling organization 1 Background
1.1 A whole chain of activities leads to the information to be presented about a certain spill. Sampling is the first step in the process of obtaining information about the spill. If the sampling is not done in a proper way the results of the analysis will not be as accurate as possible.
1.2 Samples can be taken from the water surface, suspected polluter or the shore line. It is important to take samples as often as possible. One reason is that the personnel will keep up their know-how. Another reason is that even if there is no suspected polluter when an oil spill is observed one might be identified at a later stage.
1.3 This document presents the purpose of sampling and how sampling activities can be organised. 2 Training
2.1 All personnel involved in sampling need to be trained to assure the sampling is performed in a correct way. This is also something that will be questioned by lawyers in the legal process following an oil spill. When samples are taken at a suspected polluter it is important that the sampler has been working on board ships. This will make sure he/she will have the knowledge and experience of the piping systems in machinery spaces and cargo systems.
2.2 Training should be ongoing to ensure that the level of competence is maintained over time.
3 Purpose of sampling General
3.1 Sampling and subsequent analysis shall answer questions regarding the spills’ origin as well as their properties and effects. To accomplish this, samples should be taken for several different purposes, which are dealt with in this section.
3.2 Some spills may involve contacts and co-ordination with other countries regarding sampling and analysis. On some occasions, the International Oil Pollution Compensation Funds in London needs supplementary information. Occasionally, foreign agencies should be contacted to exchange samples, analysis results, examination reports, etc.
Occupational safety
3.3 When necessary, the spill should be examined (analysed) to establish whether there are any health risks for the response personnel. The substance may be flammable and cause fire and/or explosion, or may be toxic and cause danger to health if inhaled or exposed to skin.
Penal liability of the polluter
3.4 The responsible polluter should, if possible, be identified and be charged for the spill. This can be done by comparing chemical analyses of samples from the spill with samples from suspected sources. If identity is established between the spill and a suspected source, this can help to identify the polluter.
Economic liability of the polluter
3.5 The results of sampling have often been used as a basis for compensation claims against the polluter. These claims may concern costs associated with response and cleanup measures, or damage to property, fishery, recreational areas, etc. Above all, it is important to tie the suspected polluter to the damage in order to confirm the claims. Supplementary analyses are sometimes needed to show if the oil has such properties (“is persistent”) so that compensation can be obtained from the International Oil Pollution Compensation Funds in London.

Volume 3 Chapter 32 Oil Spill Identification
_______________________________________________________________________________________
3/32/13 30/33
Spill response planning
3.6 On some occasions, special analyses can give important support information for the planning of response and cleanup work. It is important to study chemical and physical property data of the substance when selecting equipment and methods as well as safety routines for the response operation.
Short term environmental protection
3.7 The substance’s acute deleterious effects on the environment may vary considerably depending on its properties. Extremely viscous oils have lower tendency to smear beaches, plants and animals. Medium viscous oils create high risk for smearing. Low viscous oils give low risk for smearing, but dissolve greater amounts of dangerous components into the water body. Besides the substance itself it may also be necessary to sample and analyse the water column, sediment, organisms, etc.
Long term environmental protection
3.8 Certain substances may cause long-term deleterious effects on the environment, and some species may be knocked out, or the environment be polluted for a long time. Assessment should be made to judge how the environment can be restored. It may be necessary to sample and analyse the substance itself, as well as water, sediment, organisms, etc.
Information service
3.9 Many, and sometimes tricky, questions are asked about the substance’s properties and effects, especially when facing a large or hazardous spillage. In such cases it is important to give rapid and correct information in order to reduce public concern and the spread of rumours. Sampling and analysis can thereby provide the basis for information to be given and for the choice of information channels. When informing the public, and those who are directly affected by the spill, it is important to account for certain data, for example:
a. the spill’s origin and extension
b. the substance’s properties and spread in the environment
c. effects on human and environment
d. consequences for various parties and bodies
e. ongoing work regarding response, cleanup and disposal.
Disposal
3.10 The selection of techniques for the subsequent disposal is based on the spill’s volume and its properties. For instance, certain disposal plants cannot process oils with a water content which is too high. Others cannot process oils which contain too much debris. Certain oils may contain toxic (for example chloroorganic) compounds. Such impurities may put heavy demands on the disposal process technique. On such occasions, a special examination is needed to establish the oil’s properties and impurities. Summary of purpose and types of samples
3.11 The table below summarises the various purposes of sampling, and types of samples that may be necessary to take during major spills of oil and hazardous materials at sea. The table also states by whom the various types of samples should be taken.

Volume 3 Chapter 32 Oil Spill Identification
_______________________________________________________________________________________
3/32/13 31/33
PURPOSE SAMPLES (examples) SAMPLER (examples) SAMPLE USER (examples)
1. Occupational safety
Air samples taken with trace gas detection devices
Coastguard Municipality
Response Commander
2. Penal liability of polluter
Several samples (0.1-100 ml), taken with the Coastguard oil sampling kit, both from spills and suspected sources
Coastguard
Shipping Administration Police Municipality
Coastguard
Police
Prosecutor
3. Economic liability of polluter
Samples according to 2; Also extra samples (at least 100 ml) for examination of ”persistency”;
Biological samples
Coastguard Municipality Local Government
Insurance Company
International Oil Pollution Compensation Funds
Central Government
Rescue Services Agency
4. Spill response planning
Samples according to 2; Also extra samples (at least 100 ml) for examination of viscosity, density, etc.
Coastguard Municipality
Coastguard
Municipality
Local Government
5. Short-term environmental protection
Samples from spill, water body, sediment, organisms, etc., for chemical-biological analyses
Local Government Municipality
Municipality
Local Government
Environmental Protection Agency
Fisheries Management Agency
6. Long-term environmental protection
Samples according to 5 Municipality
Local Government
Environmental Protection Agency
Fisheries Management Agency
Municipality
Local Government
Environmental Protection Agency
Fisheries Management Agency
7. Information service
Samples according to 2; Also extra samples (at least 100 ml) for special analyses
Coastguard
Municipality
Local Government
Environmental Protection Agency
Board of Fisheries
Authorities
Mass Media
Public
Fishermen
Scientists
8. Disposal Sample (1 litre) for examination of water content, debris, etc., that can effect the disposal process
Coastguard
Municipality
Local Government
Municipality
Transport Business
Disposal and Recycling Plants

Volume 3 Chapter 32 Oil Spill Identification
_______________________________________________________________________________________
3/32/13 32/33
Responsibilities during sampling
3.12 Spills of oil and hazardous materials occur every day in the marine environment as well as in the inland aquatic environment. Although most of the spills are very small, they still often require sampling to get a chance of linking them to the responsible polluters and assessing the damage to environment. It is therefore important to trace all conceivable polluters as soon as possible. There is a great need for co-ordination as the sampling activities for spills and suspected sources may go on simultaneously at different places. This work may be performed by a permanent Sampling Co-ordinator within the environmental response organisation. This Co-ordinator should be subordinated to the District Chief of the Environmental Response Organisation. During the Organisation’s everyday work the Sampling Co-ordinator keeps record of spill samples from various sites and initiates sampling on board suspected sources when overlooked by the field officers.
3.13 The sampling activities may increase considerably during more significant accidents involving spills of oil and hazardous materials. Many different samples are taken for several different purposes. Many authorities and institutions may be involved in the sampling activities and a confusing situation may arise where different bodies work, perhaps without being aware of each other. On such occasions, it is crucial to co-ordinate the activities to avoid duplication of work, as well as to avoid missing chances of important sampling. Such co-ordination could also promote prevention of public concern and the spread of rumours that often occur during major and hazardous spill accidents. In this situation, the Environmental Response Commander should appoint an ad hoc Sampling Co-ordinator to be responsible for the overall co-ordination of all sampling work during the course of the response operation.
3.14 Whenever there is co-operation in a major spill accident between two or more different national response services, an agreement should be settled on a joint ad hoc Sampling Co-ordinator. The Sampling Co-ordinator should be responsible for the overall co-ordination of all sampling on land and at sea during the run of the response operation. When the accident response phase is finished, and the long-term cleanup work has started, the responsibility for sampling is normally handed over to the local Municipality. However, it is convenient that the original ad hoc Sampling Co-ordinator maintains the duty for sampling concerning the polluter’s penal and economic liabilities.
3.15 The contact network for the Sampling Co-ordinator and other bodies is shown in the chart below.
SamplingCoordinator
District Chiefor
Response Commander
Board of Fisheries
Coast Guard
EnvironmentalProtection Agency
Local Governments
Maritime Administration
Meteorological andHydrological Institute
Municipalities
Police/Prosecutor
Rescue Services Agency
Other Countries
Laboratories
The duties of the Sampling Co-ordinator
3.16 The sampling coordinator, following the above tables, should:
a. Establish a plan for documentation of the sampling work.

Volume 3 Chapter 32 Oil Spill Identification
_______________________________________________________________________________________
3/32/13 33/33
b. Make arrangements for appropriate sampling if health risks are liable to occur.
c. Make sure that necessary samples are taken concerning extent and accuracy both of spill, contaminated items and suspected sources.
d. Judge whether the oil has such properties (“is persistent”) that compensation can be obtained from the International Oil Pollution Compensation Funds in London. In such a case, provide for appropriate sampling and analysis.
e. Judge whether special examinations of the spill are needed to facilitate spill response measures.
f. Judge whether short-term and/or long-term environmental impact may be expected. In such a case, contact appropriate agencies according to the table in Section 3.10.
g, Judge whether special examinations and analyses are needed when providing for general and specific needs for information.
h. Contact responsible bodies for transport and disposal. Check what special information is needed in this context and make arrangements for relevant analyses.
4 Handling of spill information 4.1 A whole chain of activities lead to the information to be presented about the spill. This chain consists of:
a. Sampling
b. Sample keeping and transmittal
c. Identification, labelling, documentation
d. Chemical, physical and biological analyses
e. Judgement of the analysis results
f. Presentation of the analysis results
4.2 Each step must be taken with care and accuracy. This is a prerequisite for compilation of an information report which is as comprehensive, clear and effective as the circumstances allow. Examples of points to be observed during sampling and the subsequent handling of samples are:
a. Several samples must be taken from spills which cover large areas or which are divided between several locations.
b. Use as much disposable equipment as possible to minimize the potential of contamination.
c. Sampling from a source which is suspected of being responsible must be performed very carefully, so that the suspected polluter can be tied to the spill with certainty, or cleared of responsibility.
d. All samples must be labelled so that they unmistakably refer to the correct sampling points.
e. Sample containers must be labelled, sealed and kept in such a way that any suspicion of confusion or manipulation can be excluded.
f. All sampling documentation, as well as other evidence, must be available throughout the investigation, but must also be protected from loss, confusion or manipulation.
g. Records must be kept continuously and contemporaneously of all transmissions between officials of samples, other evidence and documentation.
4.3 The Sampling Co-ordinator is responsible for transmission of samples to the appointed laboratories.
4.4 It is recommended that laboratories which will be used for the analysis are contacted prior to any oil spill to make sure templates for request for analysis (Appendix 2) are available and to establish channels for contact in case quick analyses are necessary.
4.5 It is important that a complete chain of custody is maintained. The samples should be kept under control from the initial sampling until the legal process is finalized.