chapter 11media.techtarget.com/digitalguide/images/misc/hardenwinc11.pdf · hardening windows...
TRANSCRIPT
Chapter 11Harden Communications
■ Protect LAN Communications
■ Protect WAN Communications
■ Protect Web Communications with SSL
365
Hard / Hardening Windows Systems / Bragg / 225354-1 / Chapter 11
P:\010Comp\Hard\354-1\ch11.vpSaturday, April 17, 2004 3:03:47 PM
Color profile: Generic CMYK printer profileComposite Default screen

HARDENING WINDOWS SYSTEMS
Hard / Hardening Windows Systems / Bragg / 225354-1 / Chapter 11
hree basic security processes can be used to harden network communications:authentication, integrity, and encryption. Computer authentication is essentialin order to ensure that data is actually coming from and going to appropriate
computers. If a communication can spoof its origination, or if a destination can bespoofed, then there is no way to know if the information is correct, and no way toavoid sending confidential information where it should not go. Integrity ensuresthat the data has not changed during transport. If integrity is not guaranteed, thenan attacker might successfully change data. Encryption protects data by making themessage useless to any but those possessing the key. While not every protocoldesigned for communications security does all three, the best protection for datacommunications will.
An additional security mechanism, message signing, can guarantee that a specificmessage came from the computer identified as the source of the message. As part of thenegotiation process, the client and server are authenticated. If authentication fails, thecommunication does not proceed. If authentication is successful, each packet sent issigned by the source. Without message signing, session hijacking can occur. Sessionhijacking is an attack where communications are intercepted and modified en route.
Protect LAN CommunicationsCommunications between computers on the LAN can be secured using either SMBmessage signing or IPSec. While IPSec is a more secure protocol, it is not as easilyimplemented, nor available for all versions of Windows. SMB message signing can beconfigured for Windows NT 4.0 (post service pack 3) as well as Windows XP, WindowsServer 2003, and Windows 2000. Windows 95/98 computers running the DirectoryServices client can also be configured to do SMB message signing. Windows 9x,Windows ME, and Windows NT 4.0 cannot use IPSec in transport mode.
NOTE An update for Windows 9x, Windows ME, and Windows NT 4.0 allows these OSs toparticipate in L2TP/IPSec VPNs. This is different, however, than IPSec in transport mode.
Use SMB Message Signing and Session Security for NTLMServer Message Block (SMB) is the protocol used for file sharing and other communicationsbetween Windows computers. It is the basis for NetBIOS communications. SMB signingguarantees the origination of the communication. It is enabled by default on WindowsServer 2003 computers but must be configured on the other Windows OSs. Onceconfigured, SMB signing is negotiated during the connection request and systemsthat cannot use SMB signing may not be able to communicate with those that can.Two different types of configuration can be configured. First, and most effective, isto configure both server and client to always require SMB signing. Alternatively,signing can be established by mutual agreement.
P:\010Comp\Hard\354-1\ch11.vpSaturday, April 17, 2004 3:03:47 PM
Color profile: Generic CMYK printer profileComposite Default screen

NTLM Session security allows encryption (confidentiality) and integrity to beconfigured.
Configure Message Signing Using Group PolicyTo configure SMB message signing in Windows Server 2003, Windows XP, andWindows 2000, use the following Group Policy options:
■ Microsoft Network client: Digitally sign communications (always)■ Microsoft Network client: Digitally sign communications (if server agrees)■ Microsoft Network server: Digitally sign communications (always)■ Microsoft Network server: Digitally sign communications (if client agrees)
Configure Message Signing Using Registry EntriesTo configure client-side SMB message signing in Windows NT 4.0 post service pack 3,and in Windows 95/98 computers running the Directory Services client, add the REG_DWORD registry value RequireSecuritySignature or EnableSecuritySignature and setthe value to 1. To disable SMB signing, set the value to 0. The value location is theregistry path
HKEY_LOCAL_MACHINE\SYSTEM\ CurrentControlSet\Services\
LanmanWorkstation\Parameters\RequireSecuritySignature
To configure server-side SMB message signing for Windows NT 4.0 post servicepack 3, configure the value at the registry path
HKEY_LOCAL_MACHINE\SYSTEM\CurrentControlSet\Services\LanmanServer\
Parameters\RequireSecuritySignature
Windows NT 4.0 must be restarted for the configuration to be enabled.
Chapter 11: Harden Communications
Hard / Hardening Windows Systems / Bragg / 225354-1 / Chapter 11
When SMB signing is required, legacy operating systems and some legacyprograms will not be able to communicate. There may also be compatibilityissues between later versions of Windows. For example, the KB article 823659indicates that the secure channel of a trust between Windows NT 4.0 andWindows Server 2003 cannot be reset, that copying files between Windows XPand Windows Server 2003 will be much slower, and that you will not be able tomap a network drive from the client.
HEADS UP!
P:\010Comp\Hard\354-1\ch11.vpSaturday, April 17, 2004 3:03:47 PM
Color profile: Generic CMYK printer profileComposite Default screen
Configure NTLM Session SecurityTwo Group Policy Security Options control NTLM Session security settings:
■ Network Security: Minimum session Security for NTLM SSP-based (includingsecure RPC) clients
■ Network Security: Minimum session Security for NTLM SSP-based (includingsecure RPC) servers
For each, four options are available:
■ Require message integrity■ Require message confidentiality■ Require NTLMv2 session security■ Require 128-bit encryption
Use IPSec PoliciesIPSec is a security protocol built in to the Windows TCP/IP stack of Windows XP,Windows Server 2003, and Windows 2000. An IPSec policy can be configured andassigned that will protect communications by providing mutual computerauthentication, encryption, integrity, protection from replay attacks, and messageorigination authentication. It is also widely used as a security protocol in VPNs. Its usein Windows-based VPNs is discussed in the later section “Use L2TP/IPSec VPNs.”
Here are three major uses for IPSec in Windows LANs:
■ To provide encryption of communications between two computers■ To manage connections on the basis of IP address and protocol used■ To prevent connections to network resources from rogue computers
IPSec policies are created using Group Policy. A policy can be developed andassigned to a single computer at a time using the local group policy, or configuredin a GPO linked to an OU or entire domain and thus implemented on any numberof computers.
IPSec is a complex protocol, and to thoroughly understand and troubleshoot IPSecis beyond the scope of this book. A few simple facts, however, will allow you to writeand use the simple policies outlined here. These facts are easier to understand byfollowing the policy steps, but these are their basics:
■ A policy is composed of rules, filters, and filter actions.■ Rules are composed of settings and a list of filters.■ Filters specify source and destination IP addresses and protocols.■ Filter actions determine what happens if a rule’s filter is matched.
HARDENING WINDOWS SYSTEMS
Hard / Hardening Windows Systems / Bragg / 225354-1 / Chapter 11
P:\010Comp\Hard\354-1\ch11.vpSaturday, April 17, 2004 3:03:48 PM
Color profile: Generic CMYK printer profileComposite Default screen
Chapter 11: Harden Communications
Hard / Hardening Windows Systems / Bragg / 225354-1 / Chapter 11
■ Possible filter actions are: Block, Permit, and Negotiate. Rules are often referredto by their filter action.
■ Each rule can have only one filter action; however, a policy may be composedof one or more rules.
■ In order for Allow and Negotiate policies to work, each computer involvedmust have an IPSec policy assigned.
■ IPSec policies are not in effect until the policy is assigned.■ Policies may be scripted, or the IPSec Policy Wizard can be used.■ Three methods of authentication are available. Kerberos (only in Windows
domains), certificates (all computers must have certificates and must be ableto validate them), preshared key (the weakest, but good for testing).
Use IPSec for ConfidentialityTo protect communications between two computers, use an IPSec negotiation policy.The following steps outline how to build a policy that encrypts communicationbetween computer A with an IP address of 192.168.7.55 and computer B, which hasan IP address of 192.168.7.155.
1. Add the IP Security Policy Management snap-in to an MMC console oncomputer A.
2. Right-click the IP Security Policies on Local Computer container, as shownhere, and select Create an IP Security Policy.
3. Click Next on the Welcome page.
4. Enter the name Encrypt1 for the policy and click Next.
5. Uncheck Activate the Default Response Rule.
6. Click Next; then click Finish.
It is possible to create an IPSec policy that can so successfully shut downcommunications that recovery of the computer system may be a difficult chore.To prevent complications, always test an IPSec policy in a test environment andalways start by implementing the policy on one test computer at a time, thenmoving to a test domain.
HEADS UP!
P:\010Comp\Hard\354-1\ch11.vpSaturday, April 17, 2004 3:03:48 PM
Color profile: Generic CMYK printer profileComposite Default screen
HARDENING WINDOWS SYSTEMS
Hard / Hardening Windows Systems / Bragg / 225354-1 / Chapter 11
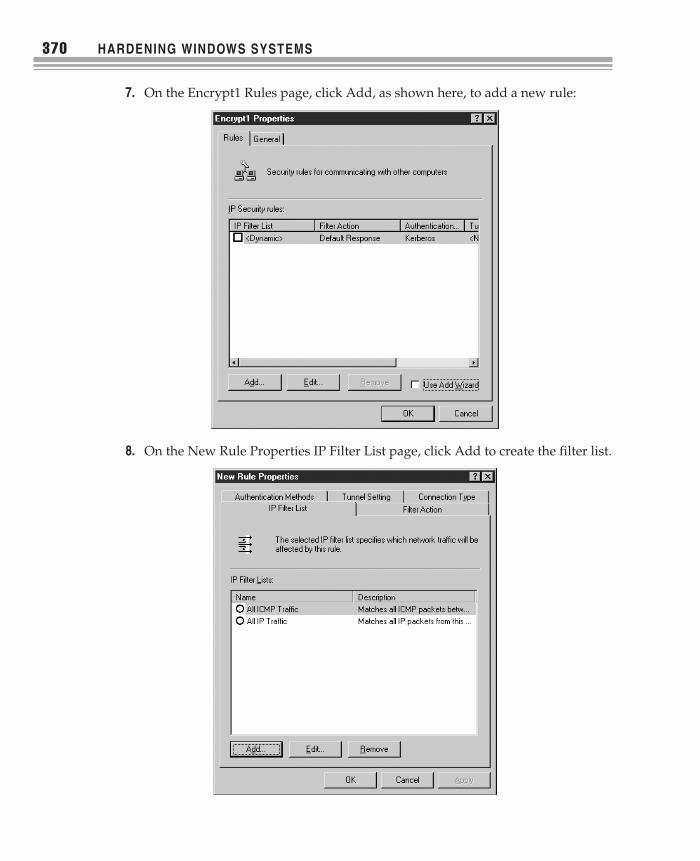
7. On the Encrypt1 Rules page, click Add, as shown here, to add a new rule:
8. On the New Rule Properties IP Filter List page, click Add to create the filter list.
P:\010Comp\Hard\354-1\ch11.vpSaturday, April 17, 2004 3:03:48 PM
Color profile: Generic CMYK printer profileComposite Default screen

9. Enter Encrypt to name the filter list.
10. Uncheck the Use Add Wizard box and click Add to add a filter.
11. In the Source address drop-down list box, select A Specific IP Address.
12. Enter the IP address of computer B, 192.168.7.155.
13. In the Destination address drop-down list box, select My IP address,as shown here:
14. Click OK to close the IP Filter Properties list page and click OK to close the IPFilter List page.
15. In the IP Filter List tab, select the Encrypt entry (the list you just created), asshown in the following illustration, and then click the Filter Action tab.
Chapter 11: Harden Communications
Hard / Hardening Windows Systems / Bragg / 225354-1 / Chapter 11
P:\010Comp\Hard\354-1\ch11.vpSaturday, April 17, 2004 3:03:48 PM
Color profile: Generic CMYK printer profileComposite Default screen

HARDENING WINDOWS SYSTEMS
Hard / Hardening Windows Systems / Bragg / 225354-1 / Chapter 11
16. Click to deselect the Use Add Wizard button and click Add to add a filter action.
17. On the New Filter Action Properties page, select Negotiate Security.
18. Click Add to add a security method. The default selection, Integrity andEncryption, is acceptable. By default, 3DES and SHA1 are selected. Click OK.
19. Click Accept Unsecured Communication, But Always Respond Using IPSec,as shown here:
P:\010Comp\Hard\354-1\ch11.vpSaturday, April 17, 2004 3:03:49 PM
Color profile: Generic CMYK printer profileComposite Default screen

20. Select the General page and enter Negotiate for the Filter Action name; thenclick OK.
21. Select Negotiate on the Filter Action page.
22. Select the Authentication Methods page and click Add.
23. Select Use This String (Preshared Key). Enter a long, complex key and thenclick OK.
24. Select Kerberos in the Authentication Method Preference Order box and clickRemove. Click OK to respond to the pop-up. Note in the following illustrationthat the shared key is partially visible in the interface.
25. Click Close twice to exit the policy.
26. Export the policy and import it on computer B, or re-create the policy oncomputer B and in both cases change the Source address to that of computer A.
27. On computer A, in the IPSec console, right-click the policy, and select Assignto assign the policy. Until you assign the policy, it is not in effect.
28. Repeat on computer B. (Don’t forget to change the IP address you entered instep 11.)
Chapter 11: Harden Communications
Hard / Hardening Windows Systems / Bragg / 225354-1 / Chapter 11
P:\010Comp\Hard\354-1\ch11.vpSaturday, April 17, 2004 3:03:49 PM
Color profile: Generic CMYK printer profileComposite Default screen
Use IPSec to Manage ConnectionsIn the preceding example, a policy was created that requires all communicationsbetween computer A and computer B to be encrypted. It also is a policy that managesconnections. Although communications with other computers are unaffected, thepolicy does restrict communications between computer A and computer B.
IPSec policies can do more than control whether or not two computers mustencrypt information sent between them. Polices can manage connections in other ways:
■ Block all communications from a specific IP address, or range of IP addresses.■ Block all communications over a specific protocol/port.■ Permit communications from a specific IP address or a range of IP addresses.■ Permit communications over a specific protocol/port.■ Negotiate communication in terms of these items as well as in terms of the
ability of a computer to use specified encryption, authentication, and integritychoices.
To use IPSec policies for these features, create a policy using the preceding stepsbut use the following adjustments.
When adding filters (see step 7) instead of using the IP address information described,use the destination and source IP address information required. In Windows Server 2003,in addition to naming a specific IP address or a specific IP subnet, you may select DNS,DHCP, WINS, or default gateway information. (The computer’s TCP/IP configurationinformation will be used to supply the IP address of the servers from which IP addresseswill be used.) Choices in Windows 2000 are more limited.
When adding filters, after managing IP address information, select the Protocol tabon the IP Filter Properties page. Use the Select a Protocol Type drop-down box to selecta protocol. Use the Set the IP Protocol Port buttons and text box to set specific boxes.Figure 11-1 shows the configuration to filter on the Telnet protocol.
■ Make as many filters as you want, but remember that only one filter actioncan be selected per rule. If you need to write a policy that blocks all telnetcommunications to a server but allows an encrypted telnet session from aspecific computer, you will need two rules.
■ Use the Filter Action page to select the filter action for the rule, or to add afilter action. The Permit filter action is present, for example, but the Block filteraction is not.
Use IPSec to Prevent Connections from Rogue ComputersIf an IPSec policy requires certificate authentication, and certificate distribution iscontrolled, then rogue computers can be prevented from connecting to networkresources. This type of policy does not specify encryption or integrity. Instead, itsimply requires that each computer authenticate using a certificate. If you implement
HARDENING WINDOWS SYSTEMS
Hard / Hardening Windows Systems / Bragg / 225354-1 / Chapter 11
P:\010Comp\Hard\354-1\ch11.vpSaturday, April 17, 2004 3:03:49 PM
Color profile: Generic CMYK printer profileComposite Default screen

a Windows Enterprise Certification Authority and configure automatic certificateenrollment for computers, all computers joined in the domain will have the certificate.Rogue computers, those computers brought from home by employees or brought alongby contractors, vendors, and visitors, will not be able to authenticate to protectedresource computers on your network.
To protect computers, create a domain IPSec policy that requires certificates forauthentication but does not require anything else.
1. Right-click the IP Security Policies on Local Computer container and selectCreate an IP Security Policy.
2. Click Next on the Welcome page.
3. Enter a name for the policy and click Next.
4. Uncheck Activate the Default Response Rule.
5. Click Next; then click Finish.
6. Click Add to add a filter, and then select the Protocol page. Select All IP Traffic.Examine this filter list by clicking the Edit button. Note that it matches all
Chapter 11: Harden Communications
Hard / Hardening Windows Systems / Bragg / 225354-1 / Chapter 11
Figure 11-1. Use the IP Filter property pages to identify specific protocols.
P:\010Comp\Hard\354-1\ch11.vpSaturday, April 17, 2004 3:03:50 PM
Color profile: Generic CMYK printer profileComposite Default screen

traffic with the exception of broadcast, multicast, Kerberos, RSVP, andISAKMP. You can write a more specific rule to block all traffic if you wish.Click Close to close the page.
7. On the New Rule Properties, select Authentication Methods.
8. Click Add.
9. On the Authentication Method page, select Use a Certificate from ThisCertification Authority (CA).
10. Use the Browse button to select a copy of the CA certificate. (The Browsebutton defaults to the Enterprise Trust certificate store of the local computer;you must make sure that a copy of the appropriate CA certificate is in the storeof each computer.) Click OK.
11. Select the Filter Action page.
12. Click Add to add a new filter action.
13. Select Negotiate Security.
14. Click Add to create a Security Method.
15. Select Custom, and then select Settings.
16. Click to deselect Data Integrity and Encryption (ESP) and select Data andAddress Integrity Without Encryption (AH) as shown in the followingillustration. Then click OK.
17. Select the General page and enter a name, Authentication for the new Filteraction. Then click OK.
HARDENING WINDOWS SYSTEMS
Hard / Hardening Windows Systems / Bragg / 225354-1 / Chapter 11
P:\010Comp\Hard\354-1\ch11.vpSaturday, April 17, 2004 3:03:50 PM
Color profile: Generic CMYK printer profileComposite Default screen

18. Select Authentication and click Close; then click OK to close the policy.
19. Assign the policy to all domain computers after testing.
Protect IPSec-Protected Computers During StartupWhen IPSec is used to protect communications, there is a brief period of time duringcomputer startup when network connections are possible and yet IPSec is not enforced.This is the point after which the TCP/IP driver and the IPSec driver have started, butthe IPSec Policy Agent service has not yet started and applied the local- or domain-configured IPSec policy. To protect computers during this critical time, you can set thecomputer startup mode to block and set a persistent IPSec policy. Persistent policiesare in effect whether or not IPSec policies managed by the IPSec Policy Agent are.
Set Computer Startup State To set the computer startup state to block, use the followingnetsh command:
netsh ipsec dynamic set config bootexemptions value=tcp:0:3389:inbound
In some cases, you may want to be able to manage the computer (for recovery, forexample) by using the Remote Desktop for Administration. You can set this capabilityby using this command. You must then create a persistent policy that will negotiate theconnection between the computer and the administration station.
Set Persistent Policy To set a persistent policy, you must use the netsh command. It isnot possible to do so using the GUI. A persistent policy is in effect as soon as the IPSecdriver starts. You can use such a policy to block all communications, then, in yourIPSec policy, Allow the communications required for the specific computer. Creatinga persistent policy consists of two steps. First, create an IPSec policy using netsh andassign it. Next, set the policy to be persistent.
A full discussion and tutorial on using netsh to create IPSec policies is beyond thescope of this book. Commands for assigning and making the policy persistent follow.
NOTE Information on using the netsh ipsec command can be found in “Netsh Commands forInternet Protocol Security” at www.microsoft.com/resources/documentation/WindowsServ/2003/standard/proddocs/en-us/Default.asp?url=/resources/documentation/WindowsServ/2003/standard/proddocs/en-us/netsh_ipsec.asp.
To assign a policy named blockall:
set policy name=blockall assign=yes
Make the policy persistent:
set store location=persistent
Chapter 11: Harden Communications
Hard / Hardening Windows Systems / Bragg / 225354-1 / Chapter 11
P:\010Comp\Hard\354-1\ch11.vpSaturday, April 17, 2004 3:03:50 PM
Color profile: Generic CMYK printer profileComposite Default screen
HARDENING WINDOWS SYSTEMS
Hard / Hardening Windows Systems / Bragg / 225354-1 / Chapter 11
Protect WAN CommunicationsIn addition to local area communications, secure remote communications from othernetworks. Connections with other networks can be secured in a number of ways, butto secure the data as it travels between networks requires additional devices andprotocols. Four technologies are currently in use:
■ Dial-up access servers have a long history. Many of the legacy systems provideweak authentication and do not encrypt data in flight; however, reliable,securable dial-up access can be implemented using Microsoft tools.
■ Virtual private networks (VPNs) are designed to provide tunneled, encrypted,and authenticated communication channels either client-to-server or gateway-to-gateway. Two protocols, PPTP and L2TP/IPSec, are used in Microsoft VPNs.
■ The Secure Sockets Layer (SSL) has long been a methodology for authenticationand securing communications between client computers and web servers; it isnow commonly used as a portal to entire networks.
■ Remote access rules can be applied to secure wireless networks. Even thoughwireless networks are often established as additional internal networks, anintruder could access them from outside the building because no physicalaccess is required to connect to the network. Therefore, wireless networksshould be thought about and secured according to remote access rules.
Hardening remote communications consists of hardening servers, clients, devices,and communications streams.
Harden the Remote Access ServerIn addition to configuring secure remote access, harden the remote access server.
Harden InstallationFollow standard precautions during installation, including performing the installationoffline and applying all service packs and hotfixes before adding the server to thenetwork. Provide two network interfaces and provide secure configuration beforeconnecting to the network.
Harden External Network InterfaceThe external network interface of the remote access server should provide only thebasic connectivity required for the service. Two basic areas need configuration.
First, the external network interface should be configured to
■ Remove File and Printer Sharing for Microsoft Networks by clicking todeselect it from the General Properties page of the connection.
P:\010Comp\Hard\354-1\ch11.vpSaturday, April 17, 2004 3:03:50 PM
Color profile: Generic CMYK printer profileComposite Default screen

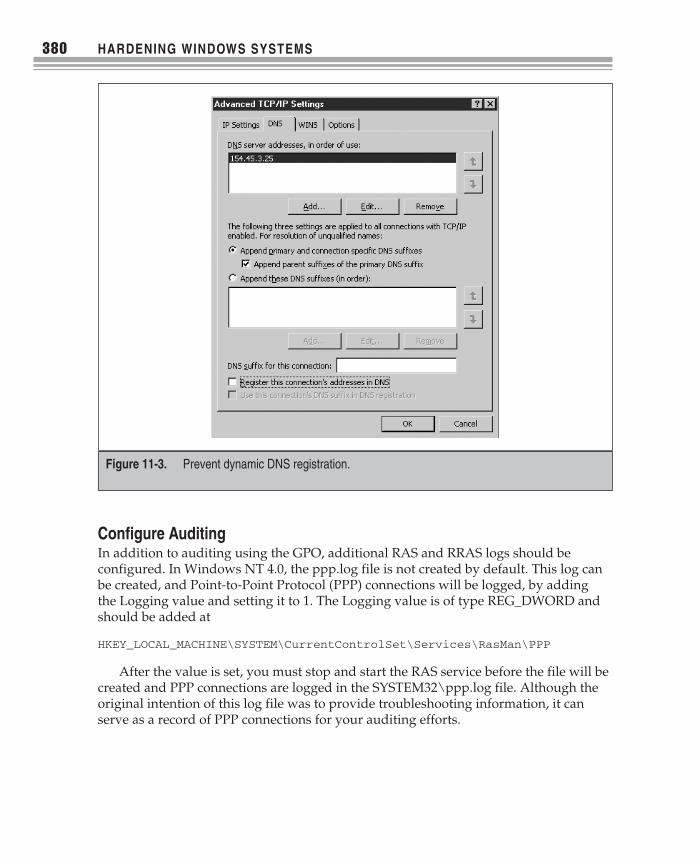
■ Disable NetBIOS over TCP/IP from the TCP/IP Advanced Properties, WINStab as shown in Figure 11-2.
■ Prevent attempts to dynamically register the network IP address in DNS fromthe TCP/IP Advanced Properties, DNS tab as shown in Figure 11-3. Attemptsto dynamically register the network IP of this interface in an ISP’s DNS maynot be welcome. In addition, connections from external hosts should beconfigured on these clients. There is no reason to be resolving the Internetaddress of the remote access server.
Second, the network interface should be firewalled, and as an extra precaution, theWindows 2000 and Windows Server 2003 RRAS server can be configured to filter allpackets on the external interface that are not necessary for remote access. See the latersection “Harden Windows Server 2000 and Windows Server 2003 RRAS Configuration.”
Restrict ServicesNever run additional services on the RRAS server. If the Windows security baselinetemplates (see Chapter 8) are in use, place RRAS servers in their own OU and configurea GPO and link it to the OU. Enable the RRAS service and/or IAS service as appropriatefor servers in the OU.
Chapter 11: Harden Communications
Hard / Hardening Windows Systems / Bragg / 225354-1 / Chapter 11
Figure 11-2. Disable NetBIOS over TCP/IP on the external network interface.
P:\010Comp\Hard\354-1\ch11.vpSaturday, April 17, 2004 3:03:51 PM
Color profile: Generic CMYK printer profileComposite Default screen
Configure AuditingIn addition to auditing using the GPO, additional RAS and RRAS logs should beconfigured. In Windows NT 4.0, the ppp.log file is not created by default. This log canbe created, and Point-to-Point Protocol (PPP) connections will be logged, by addingthe Logging value and setting it to 1. The Logging value is of type REG_DWORD andshould be added at
HKEY_LOCAL_MACHINE\SYSTEM\CurrentControlSet\Services\RasMan\PPP
After the value is set, you must stop and start the RAS service before the file will becreated and PPP connections are logged in the SYSTEM32\ppp.log file. Although theoriginal intention of this log file was to provide troubleshooting information, it canserve as a record of PPP connections for your auditing efforts.
HARDENING WINDOWS SYSTEMS
Hard / Hardening Windows Systems / Bragg / 225354-1 / Chapter 11
Figure 11-3. Prevent dynamic DNS registration.
P:\010Comp\Hard\354-1\ch11.vpSaturday, April 17, 2004 3:03:51 PM
Color profile: Generic CMYK printer profileComposite Default screen
Chapter 11: Harden Communications
Hard / Hardening Windows Systems / Bragg / 225354-1 / Chapter 11
Harden NT 4.0 Remote Access Server ConfigurationWindows NT 4.0 provides a basic dial-up Remote Access Service (RAS), and as an add-on, the Routing and Remote Access Service (RRAS). Dial-up access can be secured usingMS_CHAPv2 authentication and data encryption, but these choices must be configured.Weaker authentication protocols and lack of encrypted communications were originallyprovided to ensure the ability to service connections from legacy clients.
Harden Access Port UsageUse only the required COM port access. In many cases, this means that the RAS servershould be configured only to receive calls. If the RAS server is configured for dial-back,however, configure the server for both incoming and outgoing calls.
1. Open the Network interface by right-clicking Network Neighborhood andselecting Properties.
2. Select the Services tab, select Remote Access Service, and then click Properties.
3. From the Remote Access Setup dialog box, click Configure.
4. Select the Dial Out and Receive Calls radio button as shown here:
Harden Network ConfigurationRAS network configuration can be secured by limiting the protocols to those used, andby requiring encryption.
1. From the Remote Access Setup dialog box, click Network.
2. Set the dial-out protocols.
3. Set the Server settings to restrict access from clients. If clients must be runningIPX, for example, select only this protocol. Clients attempting to connect usinganother protocol will be unsuccessful. Select only those protocols your networkrequires. In this example, only TCP/IP has been selected.
4. Click the Configure button next to the protocol.
5. If clients need access only to specific data and that data can be available onthe RAS server, then click This Computer Only in the Allow Remote TCP/IPClients to Access box as shown in the following illustration. This will prevent
P:\010Comp\Hard\354-1\ch11.vpSaturday, April 17, 2004 3:03:51 PM
Color profile: Generic CMYK printer profileComposite Default screen

HARDENING WINDOWS SYSTEMS
Hard / Hardening Windows Systems / Bragg / 225354-1 / Chapter 11
clients from accessing other network resources. The RAS server will not act asa portal to the rest of the network.
6. Click OK.
7. Select Require Data Encryption, as shown in the following illustration. MS-CHAP must be used for authentication to enable data encryption. Table 11-1provides information on how to select other authentication protocols.
8. Click OK, and then click Continue.
P:\010Comp\Hard\354-1\ch11.vpSaturday, April 17, 2004 3:03:51 PM
Color profile: Generic CMYK printer profileComposite Default screen

Chapter 11: Harden Communications
Hard / Hardening Windows Systems / Bragg / 225354-1 / Chapter 11
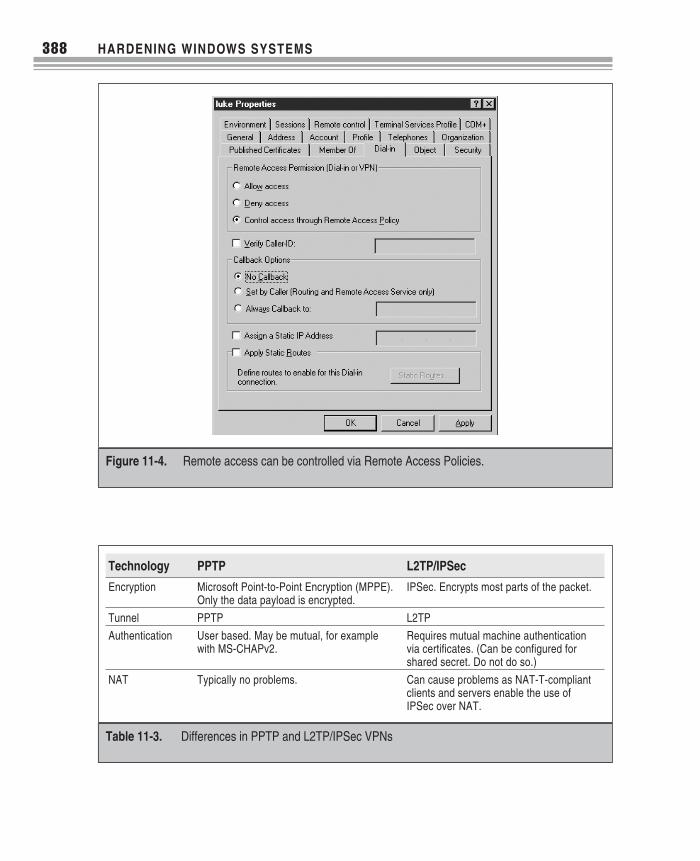
Harden Client AccessThe first step in hardening client access is to provide permission to only those users whoshould have remote access. The second is by requiring callback where possible. Whencallback is configured, the server terminates the successful client initial connection anddials the specified phone number. This ensures that the connection can be made onlywith a designated location. When users always work from the same location, callback canbe an effective security measure as long as physical access to the phone line is restrictedto the authorized user. When users travel and must use dial-up remote access, callbackcannot provide this. Remote access is configured by visiting the user account propertypages in User Manager or by using the Remote Access Admin tool.
1. Open Remote Access Admin via Start | Programs | Administrative Tool.
2. From the Users menu, select Permissions.
3. Select the user account from the Users box.
4. Select Grant Dialin Permission to User.
5. If users work from an established phone line (the same phone number all ofthe time), select Preset To and enter the phone number, as shown here:
Network Configuration SelectionAuthentication ProtocolsAccepted Discussion
Allow Any Authentication IncludingClear Text
MS-CHAP, SPAP, PAP Not an acceptable selection.
Require Encrypted Authentication MS-CHAP, SPAP Passwords must be encrypted.
Require Microsoft EncryptedAuthentication
MS-CHAP, MS-CHAPv2 If you require data encryption, you must useMS-CHAP, or MS-CHAPv2. You cannot useSPAP or PAP. Configure clients to use MS-CHAPv2 for the most secure connection.
Table 11-1. Authentication Choices for Windows NT 4.0 RAS
P:\010Comp\Hard\354-1\ch11.vpSaturday, April 17, 2004 3:03:52 PM
Color profile: Generic CMYK printer profileComposite Default screen

6. Configure additional users.
7. Click OK to close the dialog box and then click Exit from the Server menu.
Harden Windows Server 2000 and Windows Server 2003RRAS ConfigurationWhile Routing and Remote Access Services can be installed on Windows NT 4.0, Irecommend avoiding the use of RRAS on Windows NT 4.0. Instead, use Windows 2000or Windows Server 2003, which provide additional security and manageability. If youmust use RRAS on Windows NT, adapt the recommendations given for Windows 2000and Windows Server 2003 RRAS to Window NT 4.0.
RRAS provides dial-up and VPN remote access. In addition to client-to-server VPNs,RRAS provides gateway-to-gateway VPN services. Network Address Translation (NAT),packet filters, and Remote Access Policies add additional configuration features. Sincethe versions are so similar, Windows Server 2003 is used for the examples in thefollowing configuration settings. Differences with Windows 2000 will be noted.
Secure External Network Configuration with Packet FiltersWindows Server 2003 packet filters can be configured to secure the external networkinterface, permitting only VPN traffic access. To do so during RRAS setup, select theexternal network interface on the VPN Connection page and then select EnableSecurity On the Selected Interface By. . . as shown here:
HARDENING WINDOWS SYSTEMS
Hard / Hardening Windows Systems / Bragg / 225354-1 / Chapter 11
P:\010Comp\Hard\354-1\ch11.vpSaturday, April 17, 2004 3:03:52 PM
Color profile: Generic CMYK printer profileComposite Default screen
To manage connections after setup, use Remote Access Policies and set Input Filtersas discussed in the later section “Use Remote Access Policies.”
Harden AuthenticationAuthentication is configured from the Server Security property page. Currently thebest solution is to require smart card authentication. If that is not immediately possible,then restrict the authentication methods possible.
1. Right-click the server in the Routing and Remote Access console and selectProperties.
2. Select the Security tab.
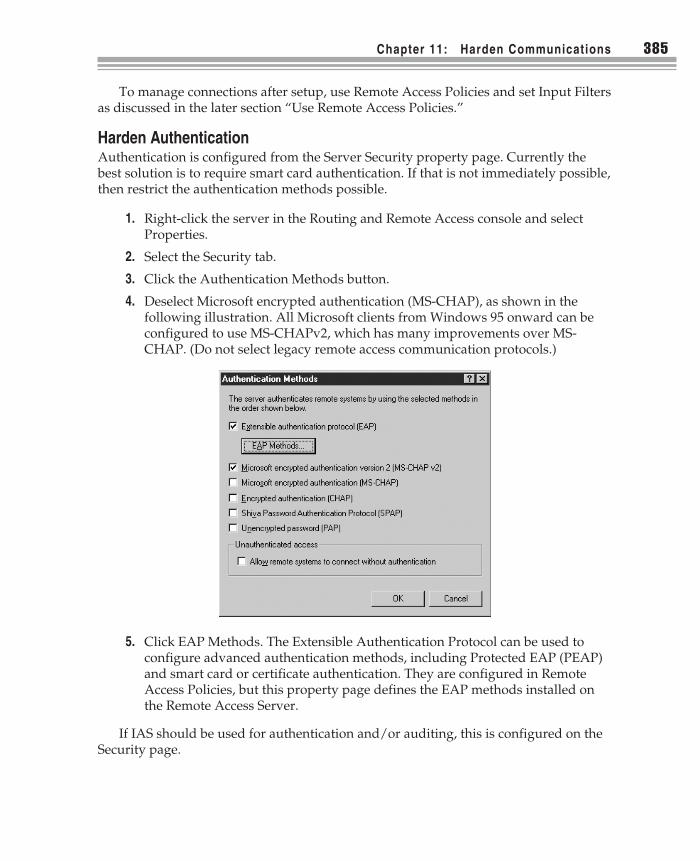
3. Click the Authentication Methods button.
4. Deselect Microsoft encrypted authentication (MS-CHAP), as shown in thefollowing illustration. All Microsoft clients from Windows 95 onward can beconfigured to use MS-CHAPv2, which has many improvements over MS-CHAP. (Do not select legacy remote access communication protocols.)
5. Click EAP Methods. The Extensible Authentication Protocol can be used toconfigure advanced authentication methods, including Protected EAP (PEAP)and smart card or certificate authentication. They are configured in RemoteAccess Policies, but this property page defines the EAP methods installed onthe Remote Access Server.
If IAS should be used for authentication and/or auditing, this is configured on theSecurity page.
Chapter 11: Harden Communications
Hard / Hardening Windows Systems / Bragg / 225354-1 / Chapter 11
P:\010Comp\Hard\354-1\ch11.vpSaturday, April 17, 2004 3:03:52 PM
Color profile: Generic CMYK printer profileComposite Default screen
HARDENING WINDOWS SYSTEMS
Hard / Hardening Windows Systems / Bragg / 225354-1 / Chapter 11
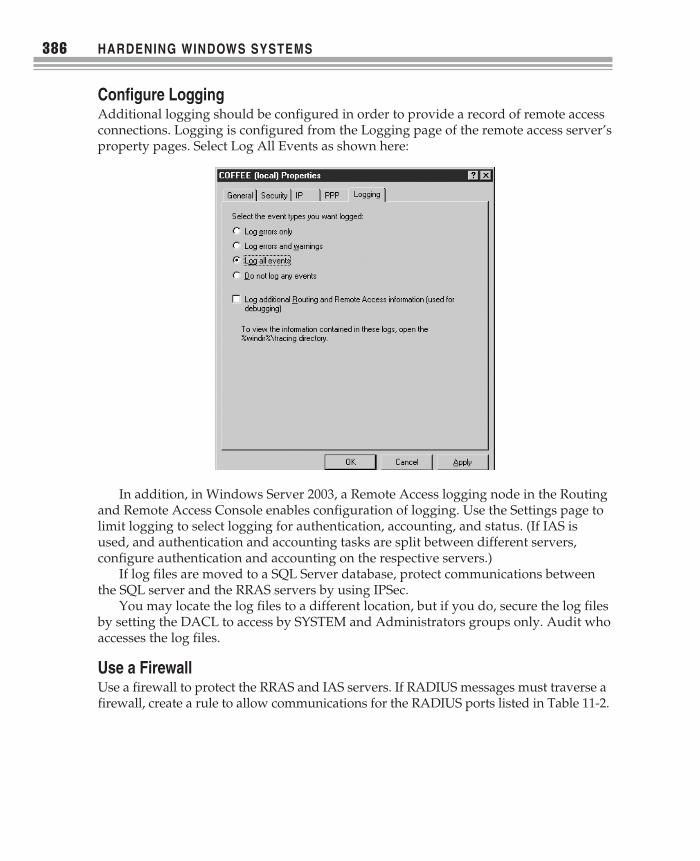
Configure LoggingAdditional logging should be configured in order to provide a record of remote accessconnections. Logging is configured from the Logging page of the remote access server’sproperty pages. Select Log All Events as shown here:
In addition, in Windows Server 2003, a Remote Access logging node in the Routingand Remote Access Console enables configuration of logging. Use the Settings page tolimit logging to select logging for authentication, accounting, and status. (If IAS isused, and authentication and accounting tasks are split between different servers,configure authentication and accounting on the respective servers.)
If log files are moved to a SQL Server database, protect communications betweenthe SQL server and the RRAS servers by using IPSec.
You may locate the log files to a different location, but if you do, secure the log filesby setting the DACL to access by SYSTEM and Administrators groups only. Audit whoaccesses the log files.
Use a FirewallUse a firewall to protect the RRAS and IAS servers. If RADIUS messages must traverse afirewall, create a rule to allow communications for the RADIUS ports listed in Table 11-2.
P:\010Comp\Hard\354-1\ch11.vpSaturday, April 17, 2004 3:03:52 PM
Color profile: Generic CMYK printer profileComposite Default screen

Chapter 11: Harden Communications
Hard / Hardening Windows Systems / Bragg / 225354-1 / Chapter 11
Configure Client AccessAs in Windows NT 4.0, accounts in Windows 2000 and Windows Server 2003 are deniedremote access by default. Users must be configured for remote access. If Windows 2000domains are in native mode, or Windows Server 2003 domains are at least at Windows2000 functional level, access permission may be configured using Remote Access Policies.Otherwise, access is configured similar to that for Windows NT 4.0 domains.
For each user account, remote access is configured from the Dial-in tab of the useraccount properties as shown in Figure 11-4.
Use L2TP/IPSec VPNsWhere dial-up access is required, require the use of VPNs and do not allow plaindial-up connections. VPNs are a better choice for security. Two VPN types can beconfigured. Where possible, use L2TP/IPSec. PPTP is considered to be a less secureVPN protocol than L2TP/IPSec; however, it can provide secure communications ifcorrectly configured. In general, though, L2TP/IPSec is simply a better choice.Important differences in these technologies are listed in Table 11-3.
RADIUS Ports Authentication Messages Accounting Messages
Standard UDP 1812 UDP 1813
Alternative UDP 1645 UDP 1646
Table 11-2. RADIUS Ports
Each user account is configured to Deny access, Allow access, or rely on RemoteAccess policies. When Remote Access policies are used, connections and attemptsto connect are a result of a combination of account dial-in properties and remoteaccess policy constraints. However, if an IAS profile constraint is configured toignore user dial-in properties, then account dial-in properties are not considered.A user may be configured in account properties to Deny remote access, and yet itmay be possible for that account to connect. To evaluate remote access, you mustevaluate each remote access policy in addition to user settings.
HEADS UP!
P:\010Comp\Hard\354-1\ch11.vpSaturday, April 17, 2004 3:03:53 PM
Color profile: Generic CMYK printer profileComposite Default screen
HARDENING WINDOWS SYSTEMS
Hard / Hardening Windows Systems / Bragg / 225354-1 / Chapter 11
Figure 11-4. Remote access can be controlled via Remote Access Policies.
Technology PPTP L2TP/IPSec
Encryption Microsoft Point-to-Point Encryption (MPPE).Only the data payload is encrypted.
IPSec. Encrypts most parts of the packet.
Tunnel PPTP L2TP
Authentication User based. May be mutual, for examplewith MS-CHAPv2.
Requires mutual machine authenticationvia certificates. (Can be configured forshared secret. Do not do so.)
NAT Typically no problems. Can cause problems as NAT-T-compliantclients and servers enable the use ofIPSec over NAT.
Table 11-3. Differences in PPTP and L2TP/IPSec VPNs
P:\010Comp\Hard\354-1\ch11.vpSaturday, April 17, 2004 3:03:53 PM
Color profile: Generic CMYK printer profileComposite Default screen
When VPN access is configured during setup, both PPTP and L2TP/IPSec portsare configured on the RRAS server. No configuration is possible directly on the ports.Settings on clients determine which protocol is used; however, if you can restrict VPNaccess to one or the other, you may delete the other type of communication port.
NOTE The L2TP/IPSec standard as originally written is incompatible with NAT because IPSec-encrypted packets including a checksum calculated over the IPSec source address. Since NATmodifies the source address, packets are considered to be corrupt or modified and dropped whenreceived. NAT-Traversal, or NAT-T, uses UDP to encapsulate the IPSec packet, and therefore thepacket can pass through the NAT server without a modification that will cause problems for IPSec.The NAT server must implement NAT-T. The Windows Server 2003 implementation of Internet KeyExchange (IKE), a component of IPSec, can detect NAT-T and use UDP-ESP encapsulation.
Use Remote Access PoliciesWhen remote access policies are used, user accounts in Windows Server 2003 and/orWindows 2000 domains are configured to Control Access Through Remote AccessPolicy. However, the default remote access policy is configured to deny all remoteaccess requests. Do not delete the default remote access policy.
Remote access policies are used to provide remote access configuration. The beautyof remote access policies is that many policies can be created, each specifically designedfor a group of clients, a time of day, or some physical device requirement. This allowsfor many models of remote access control. While it is not the most desirable response,you can create a weak policy for use with legacy clients, while retaining more secureauthentication and encryption for others. The weakest connections do not have todictate security for the entire organization. Hardening remote access connections canbe accomplished by setting up proper remote access policies. The following list ofhardening steps is presented during a walkthrough of remote access policy creationfor connections by the custom-created Auditors group. When IAS is used to centralizeRRAS, additional settings can be configured. Techniques for hardening connectionsaccording to policy conditions are listed in Table 11-4. A policy condition is checkedwhen a connection attempt is made. If the properties of a connection match the policycondition in a remote access policy, then the remote access policy is applied.
Chapter 11: Harden Communications
Hard / Hardening Windows Systems / Bragg / 225354-1 / Chapter 11
Condition Recommendation
Authentication Type Create policies that deny connections based on the use of legacyauthentication types.
Called Station-ID Combine with user groups and/or times of day and deny access to specificnumbers. Identify restraints for allowed connections to a specific number.
Calling Station–ID Create policy profile restrictions according to the specific location.
Table 11-4. Policy Conditions
P:\010Comp\Hard\354-1\ch11.vpSaturday, April 17, 2004 3:03:53 PM
Color profile: Generic CMYK printer profileComposite Default screen

HARDENING WINDOWS SYSTEMS
Hard / Hardening Windows Systems / Bragg / 225354-1 / Chapter 11
To use remote access policies:
1. Right-click the Remote Access Policy node of the Routing and Remote Accessconsole and select New Remote Access Policy. Then click Next.
2. Select Set Up a Custom Policy, enter a name for the new policy, and thenclick Next.
3. Click Add to add a policy condition. Select Windows-Groups and click Add.
4. Click Add and enter or browse to and select the Auditors group.
5. Click Grant Remote Access Permissions; then click Next.
6. Click the Edit Profile button to open the Dial-in Profile property pages,as shown here:
Condition Recommendation
Day and Time restrictions Deny or allow access according to the time of day.
Tunnel type Deny or allow access depending on the protocol; specifically, prevent accessvia PPTP to force use of L2TP/IPSec.
Windows Groups Deny or allow access by Windows user group.
Service Type Deny connections according to the service requested; for example, preventthe use of telnet through this remote access server.
Table 11-4. Policy Conditions (continued)
P:\010Comp\Hard\354-1\ch11.vpSaturday, April 17, 2004 3:03:54 PM
Color profile: Generic CMYK printer profileComposite Default screen

7. Restrict connection type to VPN by selecting Allow Access Only ThroughThese Media (NAS Port Type) and then selecting Virtual, as shown here:
8. Harden authentication. Click the Authentication tab; then click EAP Methods.
9. Click Add and select Smart Card or Other Certificate, and then click OK.
10. Click all other checked authentication methods to deselect them.
11. Require Strong Encryption. Select the Authentication tab.
12. Click to deselect Basic Encryption, click to deselect Strong Encryption, and clickto deselect No Encryption.
13. Click OK. Then click Next and then Finish.
Harden Remote Access ClientsClient hardening should be done as a matter of installation and upkeep. Of criticalimportance on remote access clients is the use of a personal firewall and updatedantiviral product. In addition, harden authentication, policy use, and encryption on theclient. Client configuration can be centralized using Group Policy and for Windows NT4.0, by creating profiles using the Connection Manager Administration Kit (CMAK).Like IEAK, CMAK is simply a way to create a standard user remote access profile anddistribute it from a central location. The profile can be installed as part of an IEAKPackage. A version is available for Windows 2000, Windows XP, and WindowsServer 2003.
Chapter 11: Harden Communications
Hard / Hardening Windows Systems / Bragg / 225354-1 / Chapter 11
P:\010Comp\Hard\354-1\ch11.vpSaturday, April 17, 2004 3:03:54 PM
Color profile: Generic CMYK printer profileComposite Default screen
HARDENING WINDOWS SYSTEMS
Hard / Hardening Windows Systems / Bragg / 225354-1 / Chapter 11
Use IAS to Centralize Authentication,Accounting, and AuthorizationThe Internet Authentication Service is the Microsoft implementation of RADIUS. WhenIAS is added to a network, it can provide centralized authentication, authorization, andauditing for remote access. Remote access policies are configured on the IAS server andmanage policy for all RRAS servers configured to use the IAS server. (If remote accesspolicies exist on the RRAS server, only the IAS remote access policies will be used.)
Harden the IAS server as you would the RRAS server. In addition, hardenauthentication and communications between RRAS and IAS servers.
Harden RADIUS/RRAS AuthenticationWhen IAS is used for authentication, a shared secret must be configured on the RRASand IAS servers and is used to authenticate connections between them. Use a longshared secret (22 characters or more) composed of a random sequence of letters,numbers, and punctuation and change it often. Use a different shared secret for eachRADIUS client and RADIUS server pair, and for each RADIUS proxy and RADIUSserver pair. (This will not be possible if you specify RRAS servers by IP address range.)
Provide RADIUS Message Authentication and IntegrityUse the Message Authenticator Attribute to protect IAS from spoofed IP addresses.RRAS servers are identified in the IAS properties and used to determine which RRASservers can connect to IAS. When the Message Authenticator Attribute is used, an MD5hash of the RADIUS message is made using the shared secret as a key. The IAS servercan therefore determine that the message came from an RRAS server with knowledgeof the shared secret, not just a server with one of the approved IP addresses. This alsoguarantees the integrity of the message.
The RADIUS Message Authenticator Attribute is configured on the property pageof the RADIUS client in the RADIUS Clients node of the Internet AuthenticationServices console, as shown in Figure 11-5.
Use IPSec to Secure RADIUS MessagesUse IPSec to secure the entire RADIUS message. Create an IPSec policy that secures allcommunication between the RRAS and IAS servers.
Secure Wireless AccessWireless access points (WAPs, or sometimes simply APs) should be considered theequivalent of remote access servers when a policy for their use is designed. Whilemany steps can be taken to make wireless networks more secure without theseadvanced techniques, these techniques can markedly improve wireless security. Ageneral discussion of hardening the normal wireless network is described in HardeningNetwork Infrastructure by Wes Noonan (McGraw-Hill/Osborne, 2004), a companionbook in this series.
P:\010Comp\Hard\354-1\ch11.vpSaturday, April 17, 2004 3:03:54 PM
Color profile: Generic CMYK printer profileComposite Default screen

Chapter 11: Harden Communications
Hard / Hardening Windows Systems / Bragg / 225354-1 / Chapter 11
The measures described in the sections that follow should be used to securewireless access using Windows RRAS.
Require APs to Be Sanctioned by ITA wireless security policy should dictate that APs are to be implemented only by ITand should specify enforcement consequences for setting up a rogue AP. Rogue APsshould be disabled, and where security policy dictates, the employee who installs themshould be terminated.
Require WPA and/or 802.1x AuthenticationThe initial wireless APs did not provide for real authentication. Instead, the networkidentification of the network is typically all that is required. The identification, or SSID,can easily be discovered and provides no security at all. An alternative to this “opensystem” authentication mode, a shared key can be provided to clients and required forconnection. To provide real authentication, and to resolve other security protocol issues,the new Wi-Fi Protected Access (WPA) standard, based on the upcoming 802.11i standard,is available. Unfortunately, device and software modifications are required to use WPA.You can implement 802.1x authentication, Protected EAP (PEAP) authentication,Temporal Key Integrity (TKIP) for key exchange methodologies, and Michael for
Figure 11-5. Insist on the use of the Message Authenticator Attribute.
P:\010Comp\Hard\354-1\ch11.vpSaturday, April 17, 2004 3:03:54 PM
Color profile: Generic CMYK printer profileComposite Default screen

integrity, all of which are parts of the standard, using IAS. You must add an upgradeto Windows XP Professional in order to use the new protocols. Windows 2000 IAS willalso require an upgrade. You can find 802.1x client software for Windows 2000 and,with a support agreement, for Windows 98, Windows ME, and Windows NT 4.0.
When 802.1x authentication is added, a client requests a connection to the wirelessaccess point, which acts as a RADIUS client. IAS can use Active Directory or its ownaccount database for authentication and remote access policies to allow, deny, andrestrict connections. Encryption keys can be automatically issued to authorized clientsand changed frequently without client intervention.
To configure 802.1x authentication on IAS:
1. Establish the wireless access point as a RADIUS client in the IAS interface.
2. Configure the wireless AP according to its manufacturer’s instructions.
3. Create a Remote Access Policy for wireless clients.
4. Use the Wireless-Other or Wireless 802.11 NAS-Port type Policy condition.
5. Select the Wireless-Other or Wireless 802.11 media in the Allow Access OnlyThrough These Media portion of the Dial-in Constraints.
6. Edit the Remote Access profile, and on the Advanced page click Add, selectTermination-Action, as shown here, and then click Add.
HARDENING WINDOWS SYSTEMS
Hard / Hardening Windows Systems / Bragg / 225354-1 / Chapter 11
P:\010Comp\Hard\354-1\ch11.vpSaturday, April 17, 2004 3:03:55 PM
Color profile: Generic CMYK printer profileComposite Default screen

Chapter 11: Harden Communications
Hard / Hardening Windows Systems / Bragg / 225354-1 / Chapter 11
7. On the Enumerate Attribute Information dialog, change the Attribute Value toRADIUS-Request as shown in the following illustration. Then click OK. Thisprevents disconnection when XP clients re-authenticate.
8. Create a Connection Request Policy. Remote Access Policies restrict andmanage connections from clients. Connection Request Policies manageRADIUS client. Use the policy to restrict wireless AP to time of day, days ofweek. Connection Request Policies are created by right-clicking the ConnectionRequest Policies node in IAS. The policy is similar to a Remote Access Policy.
Configure 802.1x client authentication using Group Policy:
1. Open the GPO for editing and right-click Computer Configuration. Then chooseWindows Settings | Security Settings | Wireless Network (IEEE 802.11) Policies.
2. Select Create Wireless Network Policy, and then click Next.
3. On the General tab, in the Networks to Access, select Access Point (Infrastructure)Networks only. This will prevent connections to ad hoc networks, or to client-to-client wireless networks.
4. Select Use Windows to Configure Wireless Networks Settings for Clients.This sets a preference for Windows configuration over a third-party wirelessconnection that may be installed on the client computer.
P:\010Comp\Hard\354-1\ch11.vpSaturday, April 17, 2004 3:03:55 PM
Color profile: Generic CMYK printer profileComposite Default screen

5. Leave cleared: Automatically Connect to Non-Preferred Networks, as shown inthe following illustration. (You do not want clients to connect to unknown andunapproved networks without user knowledge.)
6. Select the Preferred Networks tab and select Add to define and configure802.1xconfiguration. Restricting accessible networks protects clients frominadvertent connections to rogue networks.
7. Enter the SSID of the network.
8. Select the IEEE 802.1x tab.
9. Select and configure the EAP type. Choices are Smart Card or Other Certificate,or Protected EAP (PEAP).
10. Click the Settings button.
11. Select the trusted root certificate for the server in the Trusted Root CertificationAuthority box.
12. Select the authentication method in the Select Authentication drop-down box.In this example, as shown in the following illustration, Secured Password(EAP-MSCHAP v2) is selected. This method encrypts the authenticationcredentials, thus protecting them from a network-based attack. By default,Windows credentials of the logged-on user are used; however, the Configure
HARDENING WINDOWS SYSTEMS
Hard / Hardening Windows Systems / Bragg / 225354-1 / Chapter 11
P:\010Comp\Hard\354-1\ch11.vpSaturday, April 17, 2004 3:03:55 PM
Color profile: Generic CMYK printer profileComposite Default screen
Chapter 11: Harden Communications
Hard / Hardening Windows Systems / Bragg / 225354-1 / Chapter 11
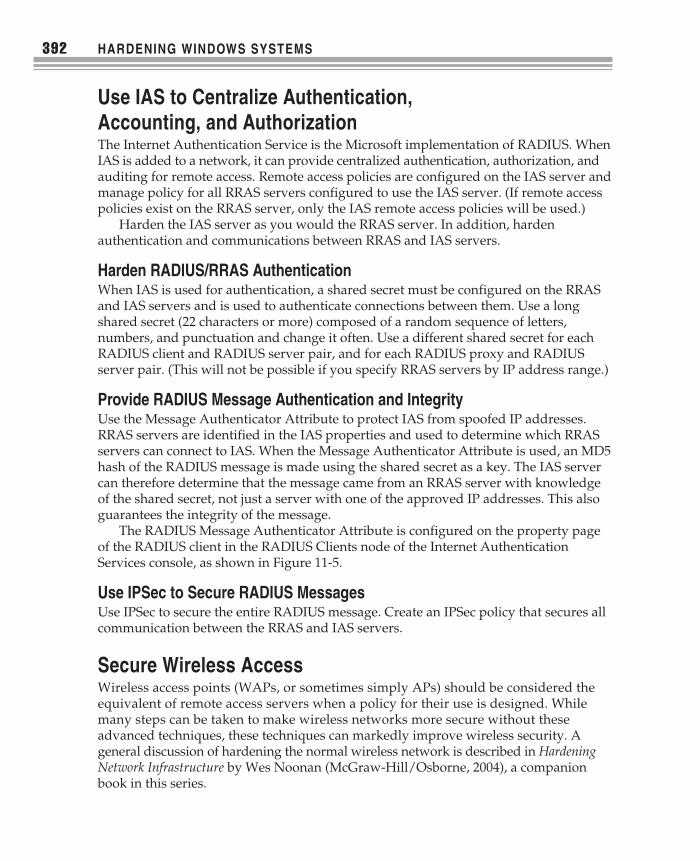
button can be used to prevent that, and a dialog for entering a different user IDand password is provided.
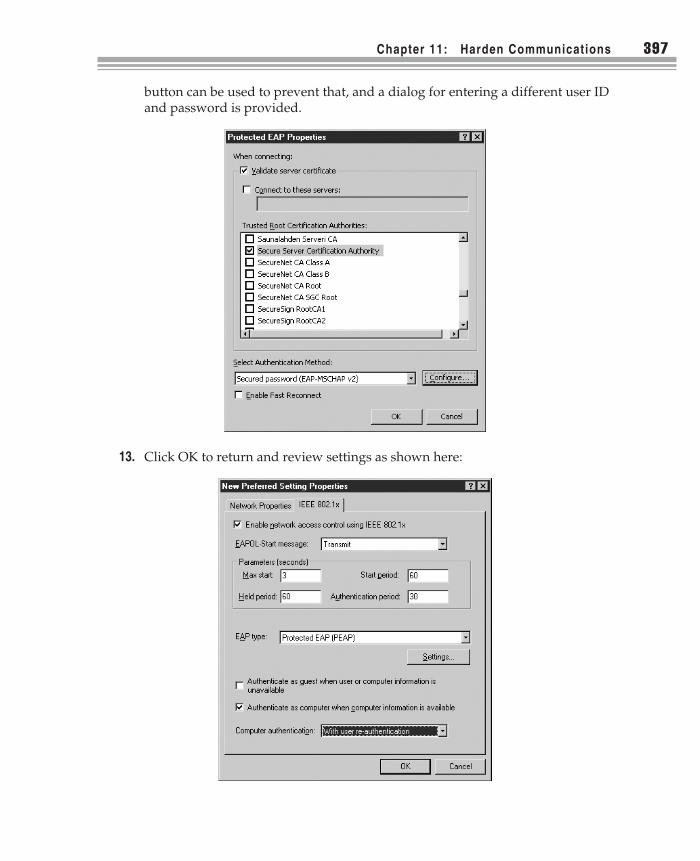
13. Click OK to return and review settings as shown here:
P:\010Comp\Hard\354-1\ch11.vpSaturday, April 17, 2004 3:03:55 PM
Color profile: Generic CMYK printer profileComposite Default screen
Use VPNsA VPN can be established with the remote access server placed on the networkbetween the AP and the network. Clients connect to the AP in the normal manner, butaccess to the rest of the network must be established through a VPN connection. Thisprovides authentication, authorization, and confidentiality between the wireless clientand the rest of the network.
Protect Web Communications with SSLUsing SSL to protect web-based communications requires the use of certificates.Certificates are used to provide server authentication, proving the web server’s identityto the client browser or application. They are also used for secure exchange of securekeys to be used for encrypting communications between client and server. This is thebasis for the secure exchange of data for e-commerce and other sensitive webcommunications.
Client authentication can also be required and is discussed in Chapter 12.Server-side use of SSL is configured in this way:
1. Use the IIS Administration tools to create a certificate request.
2. Forward the request to a public or private certification authority (CA)
3. Install the returned certificate on the web server.
4. Configure site requirements for SSL authentication.
HARDENING WINDOWS SYSTEMS
Hard / Hardening Windows Systems / Bragg / 225354-1 / Chapter 11
P:\010Comp\Hard\354-1\ch11.vpSaturday, April 17, 2004 3:03:56 PM
Color profile: Generic CMYK printer profileComposite Default screen