chapter using job navi. func. image capture guide list · 103 5 using job navi. func. image capture...
TRANSCRIPT

Chapter5Using JOB Navi. Func. Image Capture Guide List
JOB Navi. Func. ImageCapture Guide List ................ 102
Role of Guide List ....................... 102Creating a Guide List .................102Using the Guide List ...................103
Using the Image CaptureGuide List on Excel ............... 104
Creating a Guide List .................104Recording Images Using theGuide List ...................................106Pasting the Recorded Imagesto the Table ................................107
Using the Image CaptureGuide List on Word ............... 110
Creating a Guide List .................110Recording Images Using theGuide List ...................................112Pasting the Recorded Imagesinto a Document ......................... 112
Setting the Image CaptureGuide List on the Browser ... 114
Displaying the Guide Lists .......... 114Creating a New Guide List ......... 116Editing the Guide List ................. 118Deleting a Guide List .................. 122Saving the Guide List on the PC 123Transferring the Guide ListSaved in the PC to theCamera ...................................... 124
Setting the Image CaptureGuide List Independentlyon the Camera ....................... 126
Rearranging the Image List ........ 126Deleting a Guide List .................. 127

102
JOB Navi. Func. Image Capture Guide ListFirst of all, it is necessary to explain what a JOB Navi. Image Capture GuideList is.
Role of Guide List
The JOB Navi. Func. Image Capture Guide List (hereafter referred to as GuideList) function enables you to record images while checking the Guide List (a listof images to be recorded) prepared in advance to ensure no images areforgotten.
For example, imagine that you have been given the job of “Going to a motorshow and taking photos of several cars”. You have to take 4 photos of eachcar: diagonally, and from the front, rear and side.When taking photos normally at such times, it often happens that there are slipsof memory or forgetfulness, such as “Did I take this car from the side?” or “HaveI already taken this car from the back?” The Guide List is useful for solving suchproblems.
In the case of these examples, before leaving for the motor show, prepare thefollowing list.
List Name : Motor ShowImage Title : Diagonally
FrontRearSide
By this means, you only need to proceed with recording according to the GuideList displayed on the LCD monitor at the motor show. This prevents forgettingto take important pictures.
Creating a Guide List
There are two ways of creating a Guide List which are explained below in order.
Note • The camera can only change the order of the image in the Guide Listcreated by connecting with a PC.
103
5
Usin
g JO
B N
avi. Fu
nc. Im
age C
aptu
re Gu
ide L
ist
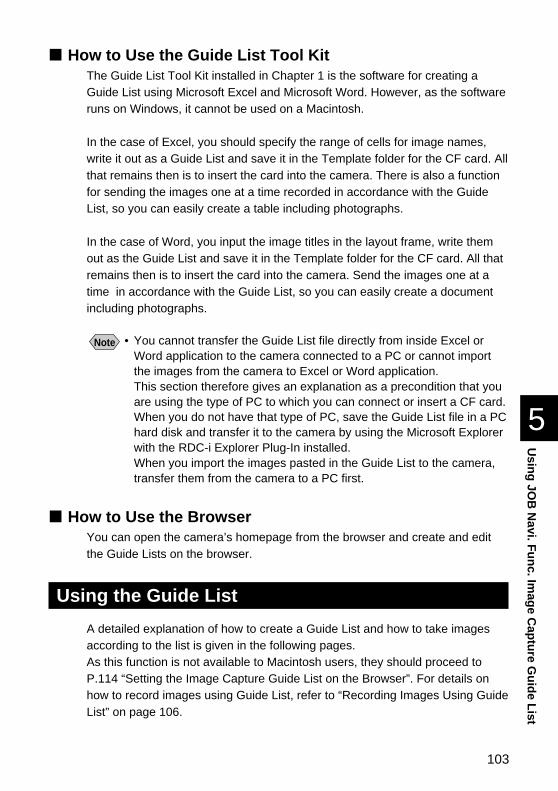
■ How to Use the Guide List Tool KitThe Guide List Tool Kit installed in Chapter 1 is the software for creating aGuide List using Microsoft Excel and Microsoft Word. However, as the softwareruns on Windows, it cannot be used on a Macintosh.
In the case of Excel, you should specify the range of cells for image names,write it out as a Guide List and save it in the Template folder for the CF card. Allthat remains then is to insert the card into the camera. There is also a functionfor sending the images one at a time recorded in accordance with the GuideList, so you can easily create a table including photographs.
In the case of Word, you input the image titles in the layout frame, write themout as the Guide List and save it in the Template folder for the CF card. All thatremains then is to insert the card into the camera. Send the images one at atime in accordance with the Guide List, so you can easily create a documentincluding photographs.
Note • You cannot transfer the Guide List file directly from inside Excel orWord application to the camera connected to a PC or cannot importthe images from the camera to Excel or Word application.This section therefore gives an explanation as a precondition that youare using the type of PC to which you can connect or insert a CF card.When you do not have that type of PC, save the Guide List file in a PChard disk and transfer it to the camera by using the Microsoft Explorerwith the RDC-i Explorer Plug-In installed.When you import the images pasted in the Guide List to the camera,transfer them from the camera to a PC first.
■ How to Use the BrowserYou can open the camera’s homepage from the browser and create and editthe Guide Lists on the browser.
Using the Guide List
A detailed explanation of how to create a Guide List and how to take imagesaccording to the list is given in the following pages.As this function is not available to Macintosh users, they should proceed toP.114 “Setting the Image Capture Guide List on the Browser”. For details onhow to record images using Guide List, refer to “Recording Images Using GuideList” on page 106.

104
Using the Image Capture Guide List on ExcelThis section explains the series of operations involved in creating an ImageCapture Guide List (hereafter referred to as Guide List) based on an Excel tableand transferring it to the camera, recording images according to the list andincorporating the recorded images in a table.
ImportantNote • The Guide List Tool Kit can only be used on PCs running Windows. It
cannot be used on a Macintosh.• An explanation of how to install the Guide List Tool Kit is given in
Chapter 1.• If you are using Excel 2000, select [Tool] → [Macro] → [Security] in
advance and set the [Security Level] to [Medium].
Note • You can also edit a sample template and create an original Exceldocument. For details, refer to [Readme] (in the [Excel template] folderin the [My Document] folder).
• If the Guide List Tool Kit was installed with no changes made to thestandard settings, an [Excel template] folder containing sampledocuments can be created in the [My Document] folder.
• Use the sample template files in the folder by renaming the file name.
Creating a Guide List
This function enables you to create a Guide List file from sample Exceltemplates.
A Insert the CF card which you have formatted with the camera.
B Start Microsoft Excel and open [Sample1.xlt].If standard installation has been performed, [Sample1.xlt] is in the [ExcelTemplate] folder in the [My Document] folder.The message confirming that the documents contain macro will be displayed.

105
5
Usin
g JO
B N
avi. Fu
nc. Im
age C
aptu
re Gu
ide L
ist
CClick on [Enable Macros].The document will be displayed. Check that the following 4 buttons have beenadded to the toolbar.
DClick on [Create Image Capture Guide File].
The window for specifying the scope of the image titles will be displayed.
E Select the scope of the image titles in the Guide List (C13~C22 inthis sample) and click on [OK].
The dialog box for specifying the location of the Guide List file, Guide List titleand Guide List file name will be displayed.
F Select the location of the Guide List file and specify an appropriateGuide List title and Guide List file name, and then click on [OK].
The Guide List file has now been created and stored on the disk.
G Exit the Microsoft Excel and remove the card.
Additional Buttons (from left)[Create Image Capture Guide File][Update Image Title][Paste All Images][Paste Selected Images]

106
Recording Images Using the Guide List
This function enables you to record images according to the Guide Listtransferred to the camera.
Note • You cannot change the storage memory when the image menu isdisplayed.
• For information on the display when you shoot using the ImageCapture Guide List, see “Image Capture Guide List Display” (P.128).
A Insert the card saving the Guide List to the camera.
B Turn the camera power on and set the mode dial to [ ].
C Choose the CF card having the Guide List with the button.
D Press the J button.
E Select [ADD] and press the button.The screen for adding the Guide List will bedisplayed.
F Choose the Guide List (Shotlist) youwant to add and then press theENTER button.The display will return to the JOB Navi.screen.
G Choose the desired Guide List andthen press the button.
H Choose the desired image title (ItemNo.1) and then press the ENTERbutton.
Note • You can change the recordingsettings of the image quality mode,exposure compensation, whitebalance, etc.
107
5
Usin
g JO
B N
avi. Fu
nc. Im
age C
aptu
re Gu
ide L
ist
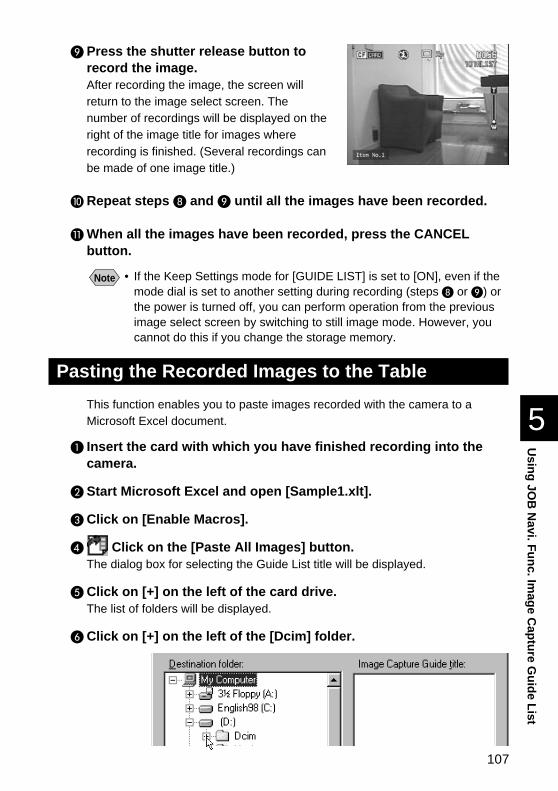
I Press the shutter release button torecord the image.After recording the image, the screen willreturn to the image select screen. Thenumber of recordings will be displayed on theright of the image title for images whererecording is finished. (Several recordings canbe made of one image title.)
JRepeat steps H and I until all the images have been recorded.
KWhen all the images have been recorded, press the CANCELbutton.
Note • If the Keep Settings mode for [GUIDE LIST] is set to [ON], even if themode dial is set to another setting during recording (steps H or I) orthe power is turned off, you can perform operation from the previousimage select screen by switching to still image mode. However, youcannot do this if you change the storage memory.
Pasting the Recorded Images to the Table
This function enables you to paste images recorded with the camera to aMicrosoft Excel document.
A Insert the card with which you have finished recording into thecamera.
B Start Microsoft Excel and open [Sample1.xlt].
CClick on [Enable Macros].
D Click on the [Paste All Images] button.The dialog box for selecting the Guide List title will be displayed.
EClick on [+] on the left of the card drive.The list of folders will be displayed.
FClick on [+] on the left of the [Dcim] folder.

108
G Select the [xxxrlist] folder.When you record images using the Guide List, a [(no.) rlist] folder is created foreach series of recordings (for example, [101rlist], [102rlist]). The folder with thehighest number is the newest folder. Select the newest folder.
H Select the Guide List and then click on [OK].
I Select the first cell in which a camera image will be pasted (E13 inthis sample) and click on [OK].
The image has now been pasted in the document.
Note • If several images are recorded for one frame, the window for selectingan image will be displayed. Follow the instructions and select animage.
The window for specifying theposition for pasting the imagewill be displayed.

109
5
Usin
g JO
B N
avi. Fu
nc. Im
age C
aptu
re Gu
ide L
ist
■ Other FunctionsThe [Update image title] and [Paste Selected Images] functions are used asfollows.
● Update image titleAfter the Guide List created on Excel has been sent to the camera, if the image list ischanged (changing the order of the titles) by camera operation (operating the cameraindependently), the image list in the PC and the image list in the camera will no longermatch. The [Update image title] function pastes the image list altered with the camerain one go into the Excel table so that the lists match.
A Click on the [Update Iimage Title] button.
B Select the Guide List to be incorporated and click on [OK].
C Select the first cell in which an image is to be pasted and click on[OK].The image list in the camera is written in order from top to bottom with thespecified cell at the head.
● Paste selected imagesThe [Paste selected images] function pastes only the specified images in the GuideList from the camera.
AClick on the [Paste Selected Images] button.
B Select the Guide List and click on [OK].
C Select the cell in which the title of the image to be pasted isdisplayed and click on [OK].
D Select the cell in which the image is to be pasted and click on[OK].

110
Using the Image Capture Guide List on WordThis section explains the series of operations, using sample templates, forcreating an Image Capture Guide List (hereafter referred to as Guide List)based on Word, transferring it to the camera, recording images according to thelist and incorporating the recorded images in a document.
ImportantNote • The Guide List Tool Kit can only be used on PCs running Windows. It
cannot be used on a Macintosh.• Instructions for installing the Guide List are given in Chapter 1.• If you are using Word 2000, select [Tool] → [Macro] → [Security] in
advance and set the [Security Level] to [Medium].
Note • You can create an original Word document by editing the sampletemplates. For further details, refer to the [Readme] file (in the [WordTemplates] folder in [My Documents]).
• If the Guide List Tool Kit has been installed without any changes to thestandard settings, a [Word Templates] folder containing sampledocuments will be created in the [My Documents] folder.
• Use the sample template files in the folder by renaming the file name.
Creating a Guide List
This function enables you to create a Guide List file from sample Wordtemplates.
A Insert the CF card which you have formatted with the camera.
B Start up Microsoft Word and open [Sample1.dot].If you have performed standard installation, [Sample1.dot] will be in the [WordTemplates] folder in [My Documents].The message confirming that the document contains macro will be displayed.

111
5
Usin
g JO
B N
avi. Fu
nc. Im
age C
aptu
re Gu
ide L
ist
CClick on [Enable Macros].The document will be displayed. Check that the following 3 buttons have beenadded to the tool bar.
DClick on the [Create Image Capture Guide File] button.The dialog box for specifying the location of the Guide List file, the Guide Listtitle and Guide List file name will be displayed.
E Select the location of the Guide List file, specify an appropriateGuide List title and file title (maximum 8 characters), and click on[OK].
Each [LAYOUT FRAME] title created in the document has now beenincorporated in the Guide List as an image title, and the Guide List has beensaved on the disk as a Guide List file.
F Exit the Microsoft Word and remove the card.
Additional Buttons (from left)[Create Image Capture Guide File][Paste All Images At Once][Paste Selected Images]

112
Recording Images Using the Guide List
This operation is the same as in “Recording Images Using the Guide List” forExcel (P.106).When you have finished recording images, connect the camera and the PConce more.
Pasting the Recorded Images into a Document
This function enables you to paste images recorded with the camera into aMicrosoft Word document.
A Insert the card with which you have finished recording.
B Start up Microsoft Word and open [Sample1.dot].
C Click on [Enable Macros].
D Click on the [Paste All Images At Once] button.
E Click on [+] on the left of [Card].The list of folders will be displayed.
F Click on [+] on the left of the [Dcim] folder.
G Select [xxxrlist] folder.When a Guide List is created and images are recorded, an xxxrlist folder (e.g.101rlist, 102rlist) is created for each series of images ([(no.) RLIST] may bedisplayed according to the set-up for Windows). The folder with the highestnumber is the newest folder. Select the newest folder.

113
5
Usin
g JO
B N
avi. Fu
nc. Im
age C
aptu
re Gu
ide L
ist
H Select a Guide Listand click [OK].An image is pasted intoeach layout frame in thedocument .
Note • If several images are recorded for 1 frame, the window for selecting animage will be displayed. Follow the instructions and select an image.
■ Other FunctionsThe [Paste Selected Images] function is for pasting only the specified image inthe list from the specified folder in the PC.
AUse the mouse to select the layout frame in which you wish topaste an image.
BClick on the [Paste Selected Images] button.
C Select a Guide List and click [OK].The list of image title will be displayed.
D Select the image title to be pasted and click on [OK].The selected image will be pasted into the document.

114
Setting the Image Capture Guide List on the BrowserThis section explains how to create an Image Capture Guide List (hereafterreferred to as Guide List) on the browser, and how to transfer a Guide Listsaved as a file to the camera.
Note • Instructions on how to record images using the Guide List are given in“Recording Images Using the Guide List” (P.106).
Displaying the Guide Lists
This function enables you to display the JOB Navi. Image Capture Guide Listsin the camera media.All the various Guide List settings start from this screen.
A Check that the camera is properly connected to the PC, that thecamera and the PC are turned on, and that the camera mode dial isset to [ ].
B Start up the browser from the PC, input the IP address and displaythe camera’s homepage.
See • P.28 “Opening the Camera’s Homepage on the Browser”
C Click on [JOB Navi.].
The Guide Lists recorded in the camera will be displayed.

115
5
Usin
g JO
B N
avi. Fu
nc. Im
age C
aptu
re Gu
ide L
ist
DCheck that [GUIDE LIST] on the left of the screen has beenselected.If [HTML TEMPLATE] has been selected, click on [GUIDE LIST].
E If you wish to change the storage memory, click on [IN] or [CFCARD].The Guide Lists recorded in the selected storage memory will be displayed.
The [Guide List] for images already recorded can also be displayed in additionto the [Guide List Setup File] in the [TEMPLATE] folder.
The various functions which can be started from this screen, such as editing theGuide List, are explained in order in the following pages.
Select storagememory

116
Creating a New Guide List
This function enables you to create a new Guide List.
A Display the Guide Lists and select the storage memory in whichyou wish to add a new Guide List.The Guide Lists currently stored in that particular storage memory will bedisplayed.
See • P.114 “Displaying the Guide Lists”
B Click on [NEW LIST].
The screen for setting images in a new Guide List will be displayed.
CMove the mouse pointer to the area on the right of [NEW LISTTITLE], click on the area and input the new list title using thekeyboard.Specify the list title within 16 characters.
117
5
Usin
g JO
B N
avi. Fu
nc. Im
age C
aptu
re Gu
ide L
ist
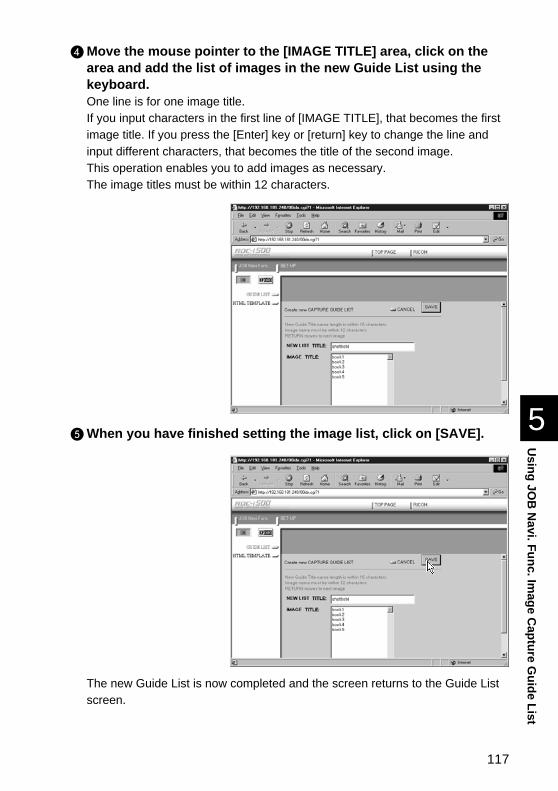
DMove the mouse pointer to the [IMAGE TITLE] area, click on thearea and add the list of images in the new Guide List using thekeyboard.One line is for one image title.If you input characters in the first line of [IMAGE TITLE], that becomes the firstimage title. If you press the [Enter] key or [return] key to change the line andinput different characters, that becomes the title of the second image.This operation enables you to add images as necessary.The image titles must be within 12 characters.
EWhen you have finished setting the image list, click on [SAVE].
The new Guide List is now completed and the screen returns to the Guide Listscreen.

118
Editing the Guide List
This function enables you to edit the images (image titles and number ofimages) in the Guide List.
A Display the Guide List containing the list you wish to edit.
See • P.114 “Displaying the Guide Lists”
B Click on the title of the list you wish to edit.
The titles of the images that have been set in the list will be displayed.
The following editing operations can be performed from this screen.

119
5
Usin
g JO
B N
avi. Fu
nc. Im
age C
aptu
re Gu
ide L
ist
■ Adding an Image
AClick on [ADD IMAGE TITLE] on the image title screen.
The screen for editing the image titles will be displayed.
BMove the mouse pointer to the [NEW IMAGE TITLE] area, click onthe area and add the image title using the keyboard.Use one line for one image title.

120
CWhen you have finished adding image titles, click on [SAVE].
The screen will return to the image title screen. If you then click on [OK], thescreen will return to the screen showing the Guide Lists.
■ Editing an Image Title
A Click on the image title that you wish to edit on the image titlescreen.
The screen for editing the image titles will be displayed.B Edit the image title displayed using the keyboard.

121
5
Usin
g JO
B N
avi. Fu
nc. Im
age C
aptu
re Gu
ide L
ist
CWhen you have finished editing, click on [UPDATE].
The screen will return to the image title screen. If you then click on [CANCEL],the screen will return to the screen showing the Guide Lists.
■ Deleting an Image Title
ImportantNote • DELETE will automatically delete the image recorded under that title
as well.
AClick on [DELETE] for the image title you wish to delete from theimage list.
The confirmation screen will be displayed. The image title will be displayedwhen you click on [OK].

122
Deleting a Guide List
This function enables you to delete a Guide List.
A Display the Guide List containing the list you wish to delete.
See • P.114 “Displaying the Guide Lists”
B Click on [DELETE] for the list you wish to delete.
The confirmation screen will be displayed. The list will be delete when you clickon [OK].

123
5
Usin
g JO
B N
avi. Fu
nc. Im
age C
aptu
re Gu
ide L
ist
Saving the Guide List on the PC
This function enables you to save the Guide List on the hard disk, etc. of thePC.
Note • Use this function in the following cases:• When you want to make a backup file of important Guide Lists.• When you want joint possession of the same Guide List, like the
templates (in this case, save the Guide List first, then connectanother camera and send the saved Guide List to this camera).
ADisplay the Guide List containing the list you want to save.
See • P.114 “Displaying the Guide Lists”
BClick [DOWNLOAD] for the list you want to save.
The dialog box for specifying the location and file name will be displayed.
C Specify the location and file name and then click on [SAVE].The image will be saved in the PC.
Note • The file name extension [.lst] isautomatically attached to theend of the file name.
• When sending and receivingdata with the camera,depending on the browsersettings, the following screenmay be displayed. In this case,select [Save this program todisk].

124
Transferring the Guide List Saved in the PC to the Camera
This function enables you to download the Guide List file saved on the PC harddisk, etc., and transfer it to the camera media.
A Display the Guide Lists and select the media to which the list is tobe sent.The Guide Lists currently in the media are displayed.
See • P.114 “Displaying the Guide Lists”
B Click on [Browse...].
The dialog box for selecting the Guide List file will be displayed.
C Specify the location of the file to be downloaded, select the fileand click [OPEN].The selected file will be displayed on the screen.

125
5
Usin
g JO
B N
avi. Fu
nc. Im
age C
aptu
re Gu
ide L
ist
DClick on [Transfer].
The selected Guide List will be transferred to the camera media.When the transfer is completed, the Guide Lists including this list will bedisplayed.

126
Setting the Image Capture Guide List Independently on the CameraYou can rearrange the image order and delete the Image Capture Guide List onthe camera.
Note • Instructions for recording images using the Guide List are given in“Recording Images Using the Guide List” (P.106).
Rearranging the Image List
You can rearrange the images of the Guide List stored in the camera storagememory.
A Set the mode dial to [ ].
B Press the button and select the storage memory containingthe Guide List.
C Press the J button.
D Select the name of the desired GuideList and press the button.
E Choose the desired image title youwant to move and press theFUNCTION button.The mark will be displayed to the right ofthe Image Title.
F Press or to move the imageupwards or downwards in the GuideList.

127
5
Usin
g JO
B N
avi. Fu
nc. Im
age C
aptu
re Gu
ide L
ist
Deleting a Guide List
A Set the mode dial to [ ].
B Press the button and select the storage memory containingthe Guide List.
C Press the J button.
DChoose the desired Guide List youwant to delete and press the buton.
EWhen the confirmation message isdisplayed, press the shutter releasebutton.Deleting the Guide List will be complete.
G Press the FUNCTION button again.Changing the order is complete.

128
Tips Image Capture Guide List DisplayThe following display is used when you shoot using the ImageCapture Guide List. Use this Guide List prepared in advance toensure no images are forgotten.
A greenmark (�) isdisplayed forthe GuideListincludingmore thanone image
A greenrectangle (�)for therecordedimages
Upper number (9in this case)indicates that ofthe image to berecorded andlower number (1in this case)indicates that ofthe recordedimages.
Image lastrecorded in theselected GuideList is displayed.