chapter at a glance - home - thali · 2018-05-31 · chapter at a glance get get started with visio...
TRANSCRIPT

Chapter at a glance
GetGet started with Visio 2013, page 13
ManageManage the shapes window, page 39
UnderstandUnderstand tool tabs and add-in tabs, page 32
ZoomPan and zoom in Visio, page 45

A visual orientation to a visual product
IN THIS CHAPTER, YOU WILL LEARN HOW TO
Identify the editions and features of Visio 2013.
Get started with Visio 2013.
Explore, minimize, and restore the Visio ribbon.
Understand tool tabs and add-in tabs.
Understand shapes, masters, stencils, and templates.
Explore the drawing window and manage the Shapes window.
Pan and zoom in Visio.
Microsoft Visio is the premier application for creating business diagrams of all types, ranging from flowcharts, network diagrams, and organization charts, to floor plans and brainstorming diagrams. Even though this book contains dozens of examples and sample diagrams, it can only scratch the surface of the hundreds of types of diagrams you can cre-ate with Visio.
Microsoft Visio 2013 continues the use of the fluent user interface (UI), otherwise known as the ribbon, that was introduced with Visio 2010. Regardless of what you might think of the ribbon in other Microsoft Office applications, it feels right at home in Visio, primarily because the goal of a ribbon-style interface is a visual presentation of a related group of functions, and Visio is, first and foremost, a visual product.
In this chapter, you will learn that there are three editions of Visio 2013, and will discover what’s new in the 2013 release of the product. You will launch Visio and explore the Backstage view and will then explore the tabs on the Visio ribbon. You will compare the permanent tabs on the ribbon with tool tabs sets and add-in tabs. You will learn about stencils, templates, masters, and shapes and how to manage the various windows that comprise the Visio user interface. Finally, you will learn how to pan and zoom the diagram in the drawing window.
1
3
PRACTICE FILES You don’t need any practice files to complete the exercises in this chapter.
Identifying the editions of Visio 2013Visio 2013 is available in three editions. The first two editions utilize the traditional desktop software purchase and installation model and mirror the two editions that were offered in most prior Visio releases. The third edition is part of the Office 365 suite of subscription-based applications.
Visio Standard 2013 Visio Standard is the starter edition of Visio. It provides signi -cant capability for creating business diagrams and includes 26 templates for creating diagrams in six categories.
Visio Professional 2013 Visio Professional expands on the Standard edition by offering more than four dozen additional templates for a total of 76 across eight categories. In addition, Visio Pro includes the ability to link diagrams to a wide variety of data sources, and includes a diagram validation capability that is especially well-suited for the expanded set of business process diagrams it supports.
This new edition of Visio 2013 provides the identical fea-tures and templates as Visio Professional 2013. The key differences in this edition are in packaging and delivery, because it is part of Microsoft Of ce 365. Of ce 365 is a cloud-based subscription service. Instead of purchasing Visio Pro for Of ce 365, you pay a monthly subscription and can install the software on up to ve computers run-ning Windows 7 or Windows 8. Each time you install, you automatically receive the latest updates.
Identifying new features of Visio 2013If you have used any previous version of Visio, you will find a rich set of new features de-scribed in the sections that follow. Even if you’ve never used Visio, it will still be worth read-ing through the features described here in order to learn more about the capabilities of the software.
4 Chapter 1 A visual orientation to a visual product

If you are upgrading from Visio 2010Visio 2010 introduced the ribbon user interface and a long list of new features. Visio 2013 continues the momentum with another long list of enhancements and new capabilities.
TIP The data-connected sample diagrams that were included with Visio 2010 and Visio 2007 are no longer included with Visio 2013. In addition, the database reverse engineering add-in is no longer packaged with Visio 2013.
Updated, modern shapes Hundreds of shapes have been completely redesigned for Visio 2013 to make your diagrams look fresh and modern, and to accommodate Visio 2013 themes. The new shapes are included with the stencils used in many fam-iliar templates, enhancing the appearance of Basic Network, Organization Chart, Timeline, Work ow, and SharePoint Work ow diagrams, among others.
Professional appearance Visio 2013 themes have been dramatically enhanced, making it easier than ever to produce eye-catching yet professional-looking dia-grams. In addition, themes have been supplemented with pre-designed visual variants that let you add your personal touch. Further, you can apply effects like re ection, glow, and bevel to provide additional emphasis.
Integration with the cloud The Open, Save, and Save As pages in the Visio 2013 Backstage view provide easy access to your SkyDrive account, as well as to Microsoft SharePoint and SharePoint Online sites.
Improved integration with SharePoint Publishing Visio diagrams to SharePoint is easier than ever because SharePoint 2013 can open Visio les directly. Diagrams pub-lished to SharePoint can be viewed using almost any web browser.
Collaboration (commenting) Multiple people can read and add comments to a Visio diagram using either Visio or a web browser when diagrams are stored in SharePoint or SharePoint Online.
Change shape With Visio 2013, you can replace one shape with another, and the new shape will retain the connections, text, and data from the original shape.
Duplicate page You can create a duplicate copy of any Visio page with two clicks.
Enhanced template and shape search It’s easier in Visio 2013 to locate the right template to begin a new diagram or to nd exactly the right shape to enhance your diagram. Search results are sorted and ltered more effectively and duplicate results are eliminated.
1
Identifying new features of Visio 2013 5

Organization charts with photos The Organization Chart wizard has been en-hanced in Visio 2013 to provide bulk import of photographs.
Improved Mini Toolbar The Mini Toolbar that appears when you right-click either the drawing page or a shape has been revamped, further streamlining many actions and reducing mouse movement. The Drawing Tools, Connector Tool, Change Shape, Shape Styles, and alignment features have been added to the Mini Toolbar.
Enhanced touch support Visio 2013 recognizes a greater array of gestures and touch for easier use on tablets and computers with touch screens.
All previous versions of Visio stored drawings in a proprietary le format. Visio 2013 oins other members of the Microsoft Of ce family in using the Open Packaging Convention, an ML-based format. The new .vsdx le format makes the contents of Visio drawings more accessible to other applications for a variety of purposes, including integration with SharePoint as described previously and following.
The following features are available only in the Professional edition of Visio 2013.
Collaboration (coauthoring) Multiple authors can edit the same Visio 2013 document simultaneously when the document is stored on SkyDrive, SharePoint, or SharePoint Online in Of ce 365.
Visio 2013 supports the Microsoft .NET Framework 4 work ows that are supported in SharePoint 2013. In addition, Microsoft SharePoint Designer 2013 can open and manipulate Visio 2013 les directly. Consequently, you can use Visio’s visual work ow design features to create work ows in both Visio and SharePoint Designer, and then execute them with SharePoint Work ow.
Updated BPMN and UML templates The Business Process Model and Notation (BPMN) template now conforms to version 2.0 of that standard, and the Uni ed Modeling Language (UML) templates conform to UML version 2.4.
SEE ALSO The Visio product team wrote a series of blog posts describing the new features in Visio 2013. Refer to blogs.office.com/b/visio/archive/2013/03/19/recapping-posts-on-the-new-visio.aspx for a summary.
If you are upgrading from Visio 2007Visio 2010 was the most significant upgrade to the capabilities of Visio in years. If you are upgrading from Visio 2007, you will benefit from the following features in addition to ev-erything listed in the previous section.
6 Chapter 1 A visual orientation to a visual product

New user interface Visio 2010 is the rst version of the product to incorporate the ribbon user interface (UI) and the Backstage view. In addition, the Shapes window presents stencils more logically and can be minimized so it occupies less screen real estate.
Enhanced user experience Live Preview is a tremendous addition to Visio 2010, because it enables you to view potential changes in color, ll pattern, font size, shape type, data graphics, and more, before you commit to the change. Visio 2010 also reduces required mouse movement with features like AutoConnect and QuickShapes (refer to next bullet), and the Mini Toolbar.
Diagramming support Multiple features whose names begin with Auto or Quick suggest that creating and organizing Visio 2010 diagrams is even easier, and it’s true. AutoConnect and QuickShapes add new connectors and shapes; AutoAdd and AutoDelete simplify adding and removing shapes on the page; AutoSize expands and contracts Visio page dimensions. In addition, the Add page button creates new pages with a single click, and enhanced copy/paste enables you to control where shapes will be pasted. Finally, the enhanced Dynamic Grid provides excellent visual feedback when placing or moving shapes, dramatically reducing the need to nudge and reposi-tion shapes after they are on the page.
Structured diagrams Visio 2010 introduces a new type of shape called a container that provides more than just a visual grouping for a set of shapes. Shapes in a con-tainer know they are contained, and the container knows the members that reside within it. Consequently, when you move, copy, or delete a container, all of the mem-bers go with it. However, unlike a group shape, the member shapes are accessible with a single click just as if the container were not there.
In most containers, you can place member shapes wherever you’d like. However, a list is a special type of container that maintains members in ordered sequence. Each list member knows exactly where it resides within the list.
The third structured diagram element is a new type of callout. The purpose of a call-out is still the same—to add annotations to shapes on the page—but both the call-out and the target shape are aware of each other, which dramatically improves shape behavior.
Not only do containers, lists, and callouts enable users to make more effective dia-grams more easily, they also provide significant opportunities to Visio developers for building location-aware shapes and for writing code that takes advantage of diagram structure.
1
Identifying new features of Visio 2013 7

Enhanced appearance Visio 2010 themes and effects add a new professional ap-pearance to your diagrams. The themes gallery, with Live Preview, lets you sample more than two dozen coordinated sets of colors, fonts, patterns, and effects before choosing the one that is just right for your diagram.
Improved CAD support Visio 2010 supports import, conversion, and export of newer le types from Autodesk’s AutoCAD software.
Save as PDF or XPS The software to save diagrams in Portable Document Format (PDF) or ML Paper Speci cation ( PS) format is now bundled with Visio.
The following features are available only in the Professional or Premium editions of Visio 2010.
Dynamic web diagrams Previous versions of Visio have allowed you to save a Visio drawing as a set of webpages but with one key limitation: if the diagram changed, you needed to republish the website. Visio 2010, in conjunction with Visio Services on SharePoint 2010, introduces the ability to create dynamic websites from data-connected diagrams. Now, many changes to the diagram, or to the data behind the diagram, appear automatically for anyone viewing your diagram with a web browser.
Business process Several new features add to your ability to create business process diagrams in Visio 2010: a BPMN template that conforms to the 1.2 version of the BPMN standard; a feature that automatically creates subprocess pages for owcharts and BPMN diagrams; and a new interchange le type that lets you create SharePoint Work ow diagrams in Visio and export them to SharePoint Designer (you can also import SharePoint Work ow diagrams into Visio to view graphical representations of the work ows).
Diagram validation You can ensure that your diagrams meet a minimum set of prede ned conditions before you publish or distribute them using diagram valida-tion rules. Four Visio 2010 templates—Basic Flowchart, Cross Functional Flowchart, Microsoft SharePoint Work ow, and BPMN—include prede ned validation rule sets. You can edit the existing rule sets or create your own.
If you are upgrading from Visio 2003Visio 2007 Professional introduced an important set of data-related enhancements that significantly improved your ability to create data-rich diagrams and to visualize that data creatively and effectively.
Themes Visio 2007 introduces themes—a fast way to add style and a professionally designed look to your diagrams.
8 Chapter 1 A visual orientation to a visual product

AutoConnect You no longer need to return to the stencil every time you want to add a shape to the page. When you click one of the four AutoConnect arrows that appear when you point to an existing shape on the drawing page, Visio adds a con-nector and a copy of the currently selected master shape in the stencil.
Save as PDF or XPS After downloading a free, add-in available from Microsoft, you can save Visio diagrams in either PDF or XPS format.
Sample diagrams Visio 2007 includes ve sample diagrams in the new Getting Started category on the startup screen. In the Professional edition, the diagrams are connected to data in Excel workbooks that are also included with Visio.
The following features are available only in the Professional edition of Visio 2007.
Data linking A new linking wizard dramatically simpli es the task of linking shapes on the drawing page to data that resides in Microsoft Excel, Access, SQL Server, SharePoint lists, or almost any ODBC or OLEDB-compatible database. No program-ming is required to establish connections or to refresh a diagram when the underlying data changes.
Data graphics You can use Visio 2007 data graphics to visualize data by displaying text or a graphic that is based on the data inside the shape.
PivotDiagrams You can build tree-structured data views using the new Pivot-Diagram template.
ITIL and Value Stream mapping New templates enable you to create two impor-tant types of diagrams: Information Technology Infrastructure Library (ITIL) process maps and Value Stream maps.
Working with the ribbonThe Office ribbon is a dynamic user interface element; its appearance changes if the width of the window in which it is being viewed changes. As a result, a button might be large or small, it might or might not have a label, or it might even be an entry in a list.
For example, when sufficient horizontal space is available, the buttons on the Home tab are spread out, and the available commands in each group are visible.
1
Working with the ribbon 9

If you decrease the horizontal space available to the ribbon, small button labels disappear and groups of buttons might hide under one button that represents the entire group.
Compare the arrangement of buttons in the Font and Paragraph groups in the preceding and following graphics, for example. Also, in the following graphic, notice that the captions for the rightmost buttons in the Arrange group have disappeared, and that the Arrange group has been collapsed to a single button. Collapsed buttons and groups retain all of their functions, as the submenu beneath the Arrange button demonstrates.
When the ribbon becomes too narrow to display all of the groups, a scroll arrow appears at its right end. Clicking the scroll arrow displays additional groups.
The width of the ribbon depends on three factors:
Program window width Maximizing the program window provides the most space for the ribbon. To maximize the window, click the Maximize button, drag the borders of a nonmaximized window, or drag the window to the top of the screen.
10 Chapter 1 A visual orientation to a visual product

Screen resolution Screen resolution is the size of your screen display expressed as pixels wide × pixels high. Your screen resolution options are dependent on the display adapter installed in your computer, and on your monitor. Common screen resolutions range from 800 × 600 to 2560 × 1600. The greater the number of pixels wide (the
rst number), the greater the number of buttons that can be shown on the ribbon.
To change your screen resolution:
a. Display the Screen Resolution control panel item in one of the following ways:
Right-click the Windows desktop, and then click Screen Resolution.
Type screen resolution in Windows 8 Search, and then click Adjust screen reso-lution in the Settings results.
Open the Display control panel item, and then click Adjust resolution.
b. On the Screen Resolution page, click the Resolution arrow, click or drag to select the screen resolution you want, and then click Apply or OK.
1
Working with the ribbon 11

If you change the screen magni cation setting in Windows, text and user interface elements are larger and therefore more legible, but fewer elements t on the screen. You can set the magni cation from 100 to 500 percent.
You can change the screen magnification from the Display page of the Appearance and Personalization control panel item. You can display the Display page directly from Control Panel or by using one of the following methods:
Right-click the Windows desktop, click Personalize, and then in the lower-left corner of the Personalization window, click Display.
Type display in Windows 8 Search, and then click Display in the Settings results.
To change the screen magnification to 125 or 150 percent, click that option on the Display page. To select another magnification, click the Custom sizing options link and then, in the Custom sizing options dialog box, click the magnification you want in the drop-down list or drag the ruler to change the magnification even more.
12 Chapter 1 A visual orientation to a visual product

After you click OK in the Custom sizing options dialog box, the custom magnification is shown on the Display page along with any warnings about possible problems with selecting that magnification. Click Apply on the Display page to apply the selected magnification.
Adapting exercise stepsThe Visio ribbon consists of multiple tabs, each of which contains a set of related functions. The function buttons on any one tab are organized into named groups. Consequently, the instructions in the book that guide you to a specific function or button will include three parts. For example:
On the Home tab, in the Tools group, click the Pointer Tool button.
The screen shots shown in this book were captured at a screen resolution of 1024 × 768, at 100% magnification. If your settings are different, the ribbon on your screen might not look the same as the one shown in this book, but you can easily adapt the steps to locate the command.
For example, if a button appears differently on your screen than it does in this book, start by clicking the specified tab, and then locate the specified group. If a group has been collapsed into a group list or under a group button, click the list or button to display the group’s commands. If you can’t immediately identify the button you want, point to likely candidates to display their names in ScreenTips.
Instructions in this book are based on traditional keyboard and mouse input methods. If you’re using Visio on a touch-enabled device, you might be taking action by tap-ping with your finger or with a stylus. If so, substitute a tapping action any time you’re instructed to click a user interface element. Also note that when you’re instructed to type information in Visio, you can do so by typing on a keyboard, tapping in the entry field under discussion to display and use the onscreen keyboard, or even speaking aloud, depending on your computer setup and your personal preferences.
Getting started with Visio 2013When you start Visio 2013, it presents a startup page that is new to this version of Visio and is common to both the Standard and Professional editions of Visio 2013.
1
Getting started with Visio 2013 13

Key sections of the start page are described in the following list.
In the narrower left column is a list of recently opened diagrams. Clicking any dia-gram name opens it again.
If you want to open a diagram that is not on the Recent list, click the Open Other Drawings button at the bottom of the list and Visio will take you to the Open page that is described in the next section.
In the wider right column is a collection of thumbnails representing recently used or recommended templates.
Above the template thumbnails are four important ways to nd Visio templates.
You can type any words into the Search for online templates box and Visio will present templates that match your keywords.
You can click any word in the Suggested searches list to initiate an online search for matching templates.
14 Chapter 1 A visual orientation to a visual product

Featured is the default selection for the template thumbnails that appear in the main part of the page (refer to the preceding graphic). The presentation of thumb-nails is dynamic; the templates you use most frequently will rise to the top.
Clicking Categories presents a set of template categories that are the same as the categories in previous versions of Visio: Business, Flowchart, General, Maps and Floor Plans, Network, and Schedule. The Professional edition also includes Engineering, and Software and Database categories.
At the end of the template categories list is an additional entry called New from ex-isting. Clicking this thumbnail enables you to select any existing Visio diagram. Visio will then open a copy of the diagram as a new document and will leave the original untouched.
IMPORTANT Clicking a suggested search term will not produce the same result as selecting a template category of the same name. For example, clicking the Flowchart search term will yield some of the same templates that you will nd in the template category named Flowchart, however, it will also return several—or several hundred—additional templates, both for Visio and for other programs in the Of ce suite. If you would like to locate Visio 2013 templates using a method that is most like what you are familiar with from a previous version of Visio, click Categories and then select the desired template category.
SEE ALSO Microsoft has published a series of quick-start guides for the programs in the Office family at office.microsoft.com/en-us/support/office-2013-quick-start-guides-HA103673669.aspx.
Exploring the Backstage viewThe Backstage view is the central location for managing files and setting the options that control how Visio 2013 operates. You access the Backstage view by clicking the File tab at the top left of the Visio window.
Of the 11 pages in the Backstage view, only four—New, Open, Account, and Options—are available if you do not have a diagram open. The remaining seven appear when you open a diagram.
TIP If you are in the Backstage view and have a diagram open, you can return to the diagram by clicking the left-pointing arrow in the upper-left corner of the Visio window. If you don’t have a diagram open, clicking the arrow will return you to the start screen.
The pages in the Backstage view are described in the following sections.
1
Getting started with Visio 2013 15

InfoWhen you have a diagram open and click the File tab, Visio presents the Info page.
The center section of the page includes four command buttons.
You will learn more about the Remove Personal Information button in Chapter 8, “Printing, reusing, and sharing diagrams.”
You can click the Reduce File Size button if document size is a major consideration.
The Check Compatibility button checks the current diagram for features that are not compatible with previous versions of Visio.
You will learn about the SharePoint publishing settings behind the Set Publish Options and Check Data Connections button in Chapter 13, “Collaborating on and publishing diagrams.”
The right side of the page provides information about the open document, along with a Properties list that you can use to view and set additional document properties. You will use the Properties list in several places in this book, including Chapter 7, “Adding and using hyperlinks,” and Chapter 8.
16 Chapter 1 A visual orientation to a visual product

SEE ALSO If you open a file from a previous version of Visio, it will open in compatibility mode, and an additional button, labeled Convert, will appear at the top of the Info page. Refer to “The Visio 2013 file formats” in the Appendix for more information about working with files from previous versions of Visio.
NewThe New page provides access to both built-in templates and online templates. You access built-in templates by clicking a diagram thumbnail in the lower part of the page. You can either type your own search terms or use the predefined search terms at the top of the page to locate templates from Office.com.
The preceding graphic displays Featured diagrams, while the following graphic shows the template Categories for Visio Standard. Be sure to read about the difference between featured templates and template categories at the beginning of the “Getting started with Visio 2013” section.
1
Getting started with Visio 2013 17

Clicking any template category displays thumbnails for the diagrams in that category.
18 Chapter 1 A visual orientation to a visual product

If you click once on a diagram thumbnail, Visio displays information about that template, as shown in the following graphic. If you double-click a diagram thumbnail, Visio launches a new diagram.
TIP When you create a new diagram, Visio names it Drawingn, where n is a sequence num-ber that is incremented for each new drawing created within one Visio session. Closing and restarting Visio always resets the sequence number to 1.
Visio templates are provided in two different sets of measurement units.
Metric Metric drawings are sized using International Standards Organization (ISO) speci ed paper sizes; the default size is usually A4. Metric templates also include other ISO drawing and paper sizes. All measurements are in millimeters or other met-ric measurement units.
US Units Diagrams created with US Units use the 8.5-by-11-inch, letter-sized paper that is common in the United States and parts of Canada and Mexico. Templates cre-ated for US Units also include additional drawing and paper sizes that are common in those countries. The default measurement units are inches and feet.
Depending on your system configuration, you might be offered a choice between the two, as shown in the preceding graphic.
1
Getting started with Visio 2013 19

OpenThe Open page provides access to previously stored Visio diagrams.
TIP If you are familiar with the Backstage view in Visio 2010, you will notice that there is no longer a separate Recent page in the Visio 2013 Backstage view; Recent drawings are available on the Open page instead.
One of the first things you’ll notice on the Visio 2013 Open page is that the buttons in the center column make it is just as easy to access diagrams stored on SharePoint or SkyDrive as it is to open documents on your computer. Simply click any of the location buttons in the center column to display a list of recently used folders along with a Browse button for that location. The page that results from clicking the button for the Visio Step By Step SharePoint Online site is shown in the following graphic.
20 Chapter 1 A visual orientation to a visual product
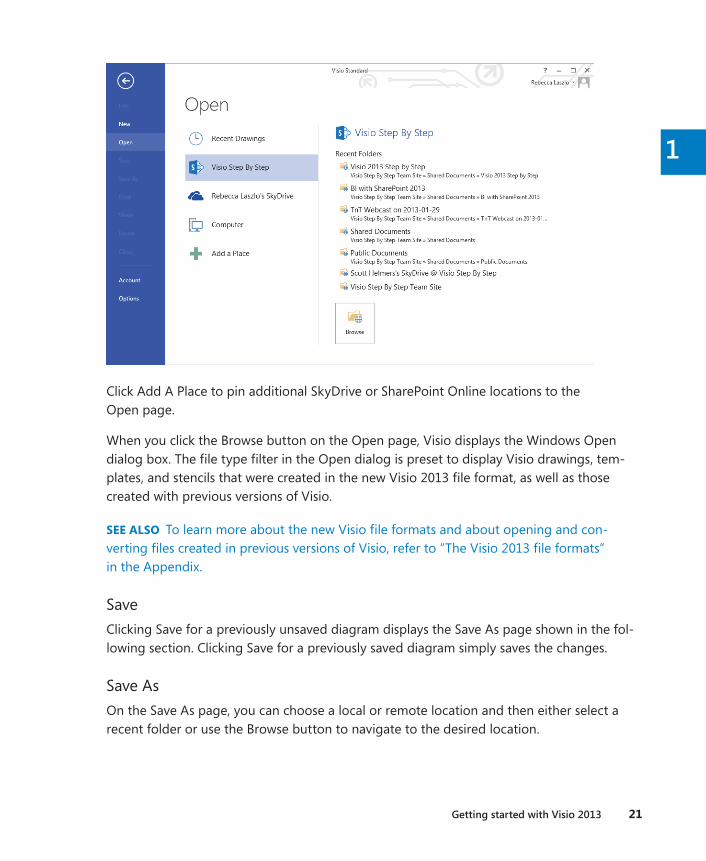
Click Add A Place to pin additional SkyDrive or SharePoint Online locations to the Open page.
When you click the Browse button on the Open page, Visio displays the Windows Open dialog box. The file type filter in the Open dialog is preset to display Visio drawings, tem-plates, and stencils that were created in the new Visio 2013 file format, as well as those created with previous versions of Visio.
SEE ALSO To learn more about the new Visio file formats and about opening and con-verting files created in previous versions of Visio, refer to “The Visio 2013 file formats” in the Appendix.
SaveClicking Save for a previously unsaved diagram displays the Save As page shown in the fol-lowing section. Clicking Save for a previously saved diagram simply saves the changes.
Save AsOn the Save As page, you can choose a local or remote location and then either select a recent folder or use the Browse button to navigate to the desired location.
1
Getting started with Visio 2013 21

PrintThe Print page provides a print preview and printing options. You will learn about print options in Chapter 8.
22 Chapter 1 A visual orientation to a visual product

ShareThe Share page offers two techniques for sharing your Visio drawing.
You can click Invite People to publicize your diagram via email or social media. The first step is to click the Save To Cloud button to store your diagram to either SkyDrive or SharePoint. After the save operation completes, Visio provides an email form and several buttons you can use to share links to your diagram.
You can click the Email button to share your diagram using any of the options listed on the right side of the following graphic.
1
Getting started with Visio 2013 23

ExportThe Export page enables you to create a PDF or XPS document as well as to save in a wide variety of other file formats. You will learn about exporting to other file formats in Chapter 8, “Printing, reusing, and sharing diagrams,” and Chapter 12, “Creating and validat-ing process diagrams.”
24 Chapter 1 A visual orientation to a visual product

CloseThere is no Close page—clicking Close simply closes the active diagram.
AccountThe Account page summarizes information about the Microsoft Account (formerly known as Live ID) that you have linked to Visio. Links in the Account column enable you to change your Microsoft Account details and to switch to another Microsoft Account if you have more than one. The same column provides drop-down lists you can use to alter the Office Background and Office Theme used for Visio and all other Office applications.
Clicking the About Visio button in the right-hand column displays version information and your product ID. The upper portion of the About Microsoft Visio dialog box is shown in the following graphic.
TIP The About Microsoft Visio dialog box does not indicate whether you are running the Standard or Professional edition of Visio. However, that information is displayed in the title bar of the Visio window as shown in the preceding graphic.
1
Getting started with Visio 2013 25

OptionsThe Options button opens a dialog box that contains dozens of settings you can use to cus-tomize the operation of Visio. Many people use Visio 2013 without ever needing to change any of these options, but it’s a good idea to examine the option categories for potential future use.
General Type your user name and initials as well as set various global options, including Live Preview and the Visio window color scheme.
Set autocorrect, spelling, and grammar options.
Save Set the default Visio save format (Visio Document; Visio Macro-Enabled Document; Visio 2003-2010 Document) and the document management check out/check in options.
Language Set editing, display, help, and ScreenTip language parameters.
26 Chapter 1 A visual orientation to a visual product

Advanced Set dozens of options in ve categories: Editing, Display, Save/Open, Shape Search, and General.
Customize Ribbon Add/rearrange commands on built-in ribbon tabs; create new tabs and commands.
Quick Access Toolbar Add/remove command buttons on the Quick Access Toolbar.
Add-ins View and add/delete Visio add-ins.
Trust Center View and edit macro settings and other trust-related options.
Exploring the Visio ribbonEarlier in this chapter, the graphics in “Working with the ribbon” demonstrated how the appearance of the ribbon can change depending on the width of the Visio window.
In this exercise, the width of the ribbon will remain constant at 1024 pixels and you will explore each of the Visio tabs.
IMPORTANT Most of the screen shots in this book feature the Professional edition ribbon. Consequently, there might be tabs, buttons, or options in the screen shots that don’t apply if you are using the Standard edition. In general, you can ignore any buttons or tabs that do not appear on your computer screen. Where necessary, the text will distinguish those exercises or functions that can only be performed with a speci c Visio 2013 edition.
SET UP If Visio is already running, click File, and then click New. If Visio is not running, start it. On either the New or startup page, double-click the Basic Diagram thumbnail.
1 Click the Home tab if it is not already selected.
The Home tab is just what it sounds like: a place where you will spend a consider-able amount of time. The Home tab contains the largest number of buttons by far, because the Visio team at Microsoft tried to fit as many of the most frequently used functions as possible onto this tab. You’ll find sets of related buttons organized into groups called Clipboard, Font, Paragraph, Tools, Shape Styles, Arrange, and Editing.
You will use buttons on this tab in most of the exercises in this book.
1
Exploring the Visio ribbon 27

TIP Many of the groups on the Visio tabs include a small arrow in the lower-right corner of the group (refer to the Font, Paragraph, and Shape Styles groups above). The arrow button, known as the dialog box launcher, opens a dialog box that provides detailed control over multiple functions related to that group. In many cases, the dialog box that opens will look familiar to experienced Visio users, because it is the same one that was used in previous Visio versions.
2 Click the Insert tab to access the Pages, Illustrations, Diagram Parts, Links, and Text groups. Many of the functions available on this tab mirror the items on the Insert menu in Visio 2007 and earlier.
You will use buttons on this tab in multiple chapters including Chapter 3, “Adding so-phistication to your drawings,” and Chapter 11, “Adding structure to your diagrams.”
TIP Ribbon buttons that display a downward-pointing arrow behave in one of two ways. When you point to some buttons, like the Container button on the left in the following graphic, the entire button is illuminated. Clicking this type of button always presents a set of options related to the button title. When you point to other buttons, like the Text Box button in the following graphic on the right, only half of the button is illuminated. Clicking the half without the arrow performs the default action for the button. Clicking the half with the arrow presents a menu of options.
3 Click the Design tab to change Page Setup, select Themes or Variants, create or edit page Backgrounds, and change page Layout.
You will use buttons on this tab in various exercises, including those in Chapter 3, “Adding sophistication to your drawings,” and Chapter 5, “Adding style, color, and themes.”
28 Chapter 1 A visual orientation to a visual product
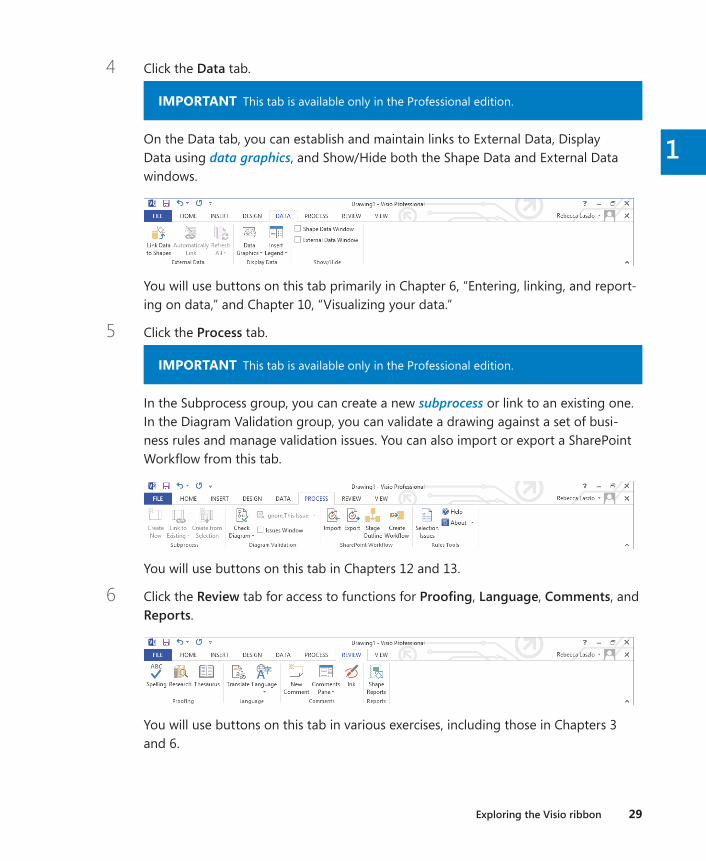
4 Click the Data tab.
IMPORTANT This tab is available only in the Professional edition.
On the Data tab, you can establish and maintain links to External Data, Display Data using data graphics, and Show/Hide both the Shape Data and External Data windows.
You will use buttons on this tab primarily in Chapter 6, “Entering, linking, and report-ing on data,” and Chapter 10, “Visualizing your data.”
5 Click the Process tab.
IMPORTANT This tab is available only in the Professional edition.
In the Subprocess group, you can create a new subprocess or link to an existing one. In the Diagram Validation group, you can validate a drawing against a set of busi-ness rules and manage validation issues. You can also import or export a SharePoint Workflow from this tab.
You will use buttons on this tab in Chapters 12 and 13.
6 Click the Review tab for access to functions for , Language, Comments, and Reports.
You will use buttons on this tab in various exercises, including those in Chapters 3 and 6.
1
Exploring the Visio ribbon 29

7 Click the View tab.
As the name suggests, most of the buttons on this tab affect which Visio features are visible on the screen:
The lone button in the Views group sets Visio into full-screen display mode.
KEYBOARD SHORTCUT Press F5 to enter or exit full-screen view mode.
The Show group controls which drawing aids and task panes are visible.
Use the Zoom buttons to change the magni cation level in the drawing window.
The Visual Aids group enables and disables various on-screen drawings aids.
Use the Window buttons to arrange or select among multiple windows when you have more than one drawing open.
The Macros group provides access to the Visio macro programming window and to a list of pre-programmed add-ons that enhance the capabilities of Visio.
You will use buttons on this tab in exercises later in this chapter and throughout the rest of the book.
CLEAN UP Close the Drawing1 drawing. It is not necessary to save your changes.
TIP The buttons and controls on all ribbon tabs display pop-up tooltip text when you point to them. If you are unsure of the function of any button, just point to the button to view the tooltip.
SEE ALSO If you are familiar with versions of Visio prior to Visio 2010 and would like help shifting from toolbars and menus to the ribbon, Microsoft has created an interactive guide to the ribbon for each product in the Office suite. When you click a toolbar or menu item in the guide, it will display the appropriate ribbon button. You can find the Visio guide at office.microsoft.com/en-us/visio-help/learn-where-menu-and-toolbar-commands-are-in-office-2010-and-related-products-HA101794130.aspx. Although this guide was created for Visio 2010, the Visio 2013 ribbon is sufficiently similar that you will still find the guide to be helpful.
30 Chapter 1 A visual orientation to a visual product

Where are the keyboard shortcuts?If you are accustomed to using keyboard shortcuts, you’ll be happy to know that they still exist in Visio 2013. Most shortcuts are the same as in previous versions of Visio, although some were changed to make them consistent with other applications in the Office suite.
The keyboard shortcut letters appear when you press the Alt key. The following graphic shows the shortcut letter associated with each tab on the Visio 2013 ribbon. Notice, too, that each button on the Quick Access Toolbar has been assigned a short-cut number based on its position within the Quick Access Toolbar.
Pressing the letter or number for any displayed shortcut key opens the relevant tab and displays the shortcut keys for that tab. For example, pressing the N key when in the view shown in the previous graphic displays the Insert tab and the shortcut letters shown in the following graphic.
TIP Previous versions of Visio used the capital letter I as the shortcut key for the Insert menu. Visio 2013 uses the keyboard shortcut N to be consistent with other Office applications.
1
Exploring the Visio ribbon 31

Understanding tool tabs and add-in tabsAll of the ribbon tabs shown in the preceding sections are visible 100 percent of the time as you run Visio. However, there are two types of tabs that only appear when necessary.
A Tool tab set only appears in a particular drawing context, usually when a specific type of shape is selected on the drawing page. Tool tab sets usually appear to the right of the View tab and are not activated automatically, that is, you must click the tab to view its contents. A tool tab set includes a colored header and may contain one or more tool tabs under the header. Here are examples of two tool tab sets:
Picture Tools This tool tab set appears whenever you insert or select a graphic on a Visio drawing page. The green Picture Tools header contains a Format tool tab, which includes buttons to crop, rotate, and otherwise modify a picture.
Container Tools This tool tab set appears whenever you insert or select a Visio con-tainer. The orange Container Tools header contains a Format tool tab, which includes buttons to size and style containers, and to control container membership. You will learn about containers in Chapter 11.
32 Chapter 1 A visual orientation to a visual product

Add-in tabs are associated with software that adds capabilities to Visio. Some add-ins are packaged with Visio by Microsoft; others are sold by third-party software vendors.
Unlike tool tabs, add-in tabs look and behave exactly like permanent Visio tabs with one primary exception: they appear when an add-in application is active and disappear when it is not. Here are two examples:
Org Chart This add-in is included with Visio and is activated whenever you create or edit a drawing that uses either of the Visio organization chart templates. You will learn about organization charts in Chapter 4.
TaskMap This third-party add-in provides easy-to-use process mapping, analysis, and improvement functions that can be used with any edition of Visio.
SEE ALSO For more information about the TaskMap add-in, go to www.taskmap.com.
1
Understanding tool tabs and add-in tabs 33

Minimizing and restoring the Visio ribbonBecause the ribbon takes a reasonable amount of space at the top of the Visio window, you may want to minimize it if you need more space for the drawing page. The key to doing so is a very small up arrow located in the lower-right corner of the ribbon.
Clicking this button minimizes the ribbon as shown in the following graphic. To temporarily display a tab when it’s minimized, click the tab name.
To restore the ribbon to normal operation after it has been minimized, click the pushpin located in the lower-right corner of the ribbon.
34 Chapter 1 A visual orientation to a visual product

Understanding shapes, masters, stencils, and templates
Before you explore the rest of Visio, it’s helpful to understand a number of commonly used terms:
Master An object in a Visio stencil. The vast majority of people who create diagrams with Visio use the masters that ship with Visio or that they download from the Inter-net. You can create new masters; however, the techniques for doing so are outside the scope of this book.
Stencil A collection of masters.
Shape An object on a Visio drawing page. Often you create shapes by dragging a master from a stencil to the drawing page; however, you can also create shapes in other ways. (You will learn more about shapes in Chapter 2, “Creating a new diagram,” and throughout this book.)
A shape can be very simple: a line, a polygon, an image. A shape can also be a so-phisticated object that changes appearance or behavior as data values change, as its position on the page changes, or as properties of another shape change—the pos-sibilities are endless.
Template A Visio document that includes one or more drawing pages with preset di-mensions and measurement units. A template may also include one or more stencils; it may include background pages and designs; its pages may contain shapes or text. A template may also include special software that only operates in that template.
Workspace A collection of Visio windows and window settings. At minimum, the workspace consists of the drawing window and the zoom settings for the pages in the drawing; frequently, it also includes a Shapes window containing one or more stencils. The workspace can also include the Shape Data, Size & Position, or Pan & Zoom windows. Unless you have changed the default action, Visio saves the on-screen workspace whenever you save the document. As a result, when you next open the same document, the same collection of windows is restored.
TIP Despite the distinction made in this list between a master and a shape, you will find that many people refer to an object in a stencil as a shape. Indeed, when you think about it, the window that displays stencils is called the Shapes window! Consequently, unless the distinction is important in a specific context, the text in this book will refer to shapes in a stencil and to shapes on the drawing page.
1
Understanding shapes, masters, stencils, and templates 35

Exploring the drawing windowWhen you start Visio, two windows normally appear below the ribbon.
The Shapes window on the left contains one or more stencils, each represented by a header bar containing the name of the stencil. Depending on the number of open stencils in the Shapes window, a scroll bar might appear at the right of the headers. You will investigate the Shapes window in the next section of this chapter.
TIP The width of the Shapes window is adjustable, so the one on your system may be wider or narrower than the one that appears in the preceding graphic.
36 Chapter 1 A visual orientation to a visual product

The larger window on the right is called the drawing window because it contains the drawing page. The drawing window is bounded on the top and left by rulers that display inches, millimeters, or whatever units you have selected (or your template has selected) for measuring page dimensions.
TIP All previous versions of Visio displayed the grid on the drawing page by default. However, in Visio 2013, the opposite is true. To make the grid visible, click Grid in the Show group on the View tab.
At the lower left of the drawing window is a set of page controls.
A Page name tabs display the name of each page and the active page name is dis-played in a different color. Click any tab to change to that page. Right-click any page name tab to access page management functions including the new Duplicate Page function.
B Click the All button to display a list of all pages in the diagram. The name of the active page is highlighted in the list.
C Click the Insert Page button to add a new page.
Below the Shapes and drawing windows is a status bar that contains a variety of indica-tors, buttons, and controls. The buttons and indicators on the left end of the status bar are context sensitive, so they will show different information depending on the state of the drawing.
1
Exploring the drawing window 37

If nothing is selected on the drawing page, the left end of the status bar looks like the fol-lowing graphic.
A The Page Number button shows which page is active and displays the total num-ber of pages in the current drawing; click this button to open the Page dialog box.
B The Language area displays the language of the current drawing; the drawing lan-guage is normally derived from Windows or Visio language settings.
C Click the Macros button to start the macro recorder.
If you have selected a shape on the drawing page, the left end of the status bar looks like the following graphic instead.
A Same as previous A.
B Same as previous B.
C Same as previous C.
D This area contains three buttons. The Width and Height buttons display the di-mensions of the selected shape and the Angle button displays its angle of rotation; click any of the three buttons to open the Size & Position window.
The right end of the status bar contains a variety of useful buttons and controls.
A Click the Presentation Mode button to view the active diagram in full-screen pre-sentation mode.
B Move the Zoom slider to zoom in or out.
C The Zoom Level button displays the current zoom percentage; click it to open the Zoom dialog box.
38 Chapter 1 A visual orientation to a visual product

D Click the Fit Page To Current Window button to resize the drawing page so the entire page is visible in the drawing window.
E Click the Switch Windows button to switch to another Visio window.
TIP Most other Office applications require the use of a button on the View tab of the ribbon to switch among multiple open windows. The Visio development team had the foresight to include the Switch Windows button (E) on the status bar where it is much more convenient.
If you right-click anywhere in the status bar, the Customize Status Bar menu appears. You can click any of the options in the Customize Status Bar menu to toggle the display of a button or control.
Managing the shapes windowThe upper part of the Shapes window contains a list of stencil titles and the lower part dis-plays the shapes from the currently selected stencil.
In this exercise, you will learn various ways to manipulate the Shapes window so it appears in the most useful size and position when you are working on a drawing.
1
Managing the shapes window 39

SET UP If Visio is already running, click File, and then click New. If Visio is not running, start it. On either the New or startup page, click Categories, click Maps and Floor Plans, and then double-click the Office Layout thumbnail. Save the new drawing as Exploring Visio 2013.
IMPORTANT One of the user interface changes in Visio 2013 is that window boundaries have been designed to fade into the background so they don’t interfere visually with the content of the drawing. Consequently, the appearance of some parts of the Shapes window is less obvious than in previous versions of Visio. In particular, the boundary of the Shapes window is not visible. The only way to know where it is located is to move the pointer slowly across it until the pointer changes to a window resize tool.
1 Change the width of the Shapes window by dragging the window boundary left or right. The pointer changes to a double-headed arrow as the window border is dragged to a wider or narrower view. (In the following graphic, the pointer is located to the right of the Search tab.)
40 Chapter 1 A visual orientation to a visual product

2 Minimize the Shapes window by clicking the Minimize the Shapes window arrow shown in the preceding graphic. Even though the descriptions are now hidden, all of the masters in the stencil are still accessible when the Shapes window is minimized. Consequently, this view is useful when you need more space for the drawing window and the icons depicting the masters in the stencil are very recognizable.
3 Return the Shapes window to its former size by clicking the Expand the Shapes window arrow highlighted in the preceding graphic.
4 To hide the Shapes window entirely, on the View tab, in the Show group, click the Task Panes button, and then click Shapes.
TIP The various subwindows that can be opened or closed within the Visio window are sometimes referred to as task panes.
1
Managing the shapes window 41

TIP The Shapes window can be reopened by clicking the same button you used to close it.
5 On the View tab, in the Show group, click Task Panes, and then click Shapes. If the window does not already show two columns of shapes, adjust the width so it does. The Walls, Doors and Windows title bar is highlighted, indicating that this is the ac-tive stencil. However, the Of ce Layout template includes several additional stencils.
6 In the Shapes window, click .
TIP When you click the title bar of any stencil, the title bars remain stationary, and the stencil always opens in the same place, below all title bars. This is a significant improvement in behavior over versions of Visio prior to Visio 2010.
You are not restricted to using just the stencils that open in a particular template, as you will discover in the following steps.
42 Chapter 1 A visual orientation to a visual product

IMPORTANT If there is a suf cient number of masters in a stencil to require scroll bars, the scroll bars are only visible if the pointer is inside the stencil portion of the Shapes window. The downside of this visual technique is that you don’t necessarily know there are more shapes available (refer to the following graphic on the leftw) unless you move the pointer into the stencil portion of the Shapes window (following graphic on the right).
7 In the Shapes window, click More Shapes, and then point to General. (Do not click any stencils in the General group yet.) A y-out menu containing stencil names appears. In the following graphic, the collection of stencils in the General group is visible.
1
Managing the shapes window 43

8 With the cascading menus open from step 7, click Basic Shapes. Visio opens the Basic Shapes stencil. In a behavior change from Visio 2010, a check mark appears to the left of the stencil you selected, but the y-out menus remain open, allowing you to select additional stencils from the same or another stencil family.
9 Click anywhere in the Visio window to close the cascading menus.
Although it isn’t actually necessary in this exercise, it’s helpful to know how to close stencils you no longer need, so that’s what you will do in the remaining step.
10 Right-click Basic Shapes, and then click Close.
TIP Although you didn’t use it in this exercise, be sure to notice the Search tab at the top of the Shapes window. The enhanced shape search function in Visio 2013 yields more targeted results with fewer duplicate results.
CLEAN UP Leave the Exploring Visio 2013 drawing open if you are continuing with the next exercise. If not, there is no need to save changes.
44 Chapter 1 A visual orientation to a visual product
Panning and zooming in VisioAs you work with more detailed Visio diagrams, you will find that you frequently need to zoom in and out and pan—move left-right and up-down—within the drawing window. Both can be accomplished using a variety of techniques, some of which rely on your mouse, some that use a special Pan & Zoom window, and others that use keyboard shortcuts.
In this exercise, you will learn several techniques to pan and zoom your diagram, beginning with keyboard shortcuts and ending with the Pan & Zoom window.
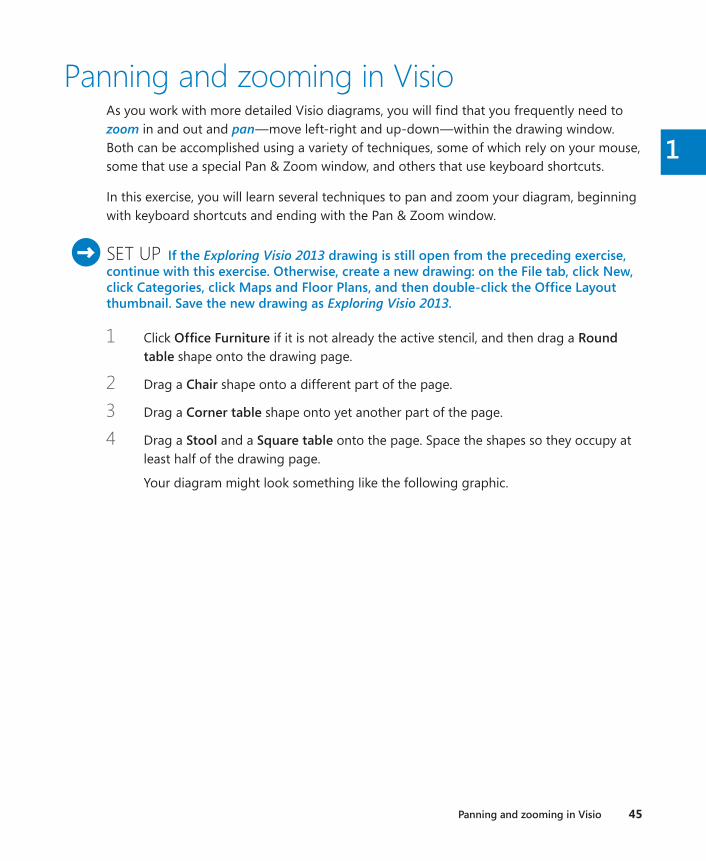
SET UP If the Exploring Visio 2013 drawing is still open from the preceding exercise, continue with this exercise. Otherwise, create a new drawing: on the File tab, click New, click Categories, click Maps and Floor Plans, and then double-click the Office Layout thumbnail. Save the new drawing as Exploring Visio 2013.
1 Click if it is not already the active stencil, and then drag a Round table shape onto the drawing page.
2 Drag a Chair shape onto a different part of the page.
3 Drag a Corner table shape onto yet another part of the page.
4 Drag a Stool and a Square table onto the page. Space the shapes so they occupy at least half of the drawing page.
Your diagram might look something like the following graphic.
1
Panning and zooming in Visio 45

5 Hold down the Ctrl+Shift keys (the cursor will change to a magnifying glass with a plus sign), and then drag a rectangle around two of the shapes on the drawing page.
IMPORTANT You must press Ctrl+Shift before you click for this zoom technique to work.
46 Chapter 1 A visual orientation to a visual product

6 Release the mouse button and the keyboard keys. Visio sets the view in the drawing window to just the rectangle you outlined with the mouse.
7 Press Ctrl+Shift+W to return to a view of the whole drawing page.
TIP Ctrl+Shift+W is an incredibly useful keyboard shortcut to remember because you will frequently zoom in to part of a drawing and then want to return to full page view. To help remember this shortcut, just remember that W is the first letter of whole page.
IMPORTANT In Visio 2007 and earlier, the keyboard shortcut to view the whole page was Ctrl+W. If you’ve upgraded from one of those versions of the software, it may take a bit of retraining to get accustomed to using Ctrl+Shift+W instead. To make matters worse, in Visio 2013, Ctrl+W closes the active document. (You will receive a warning if the document has unsaved changes.)
1
Panning and zooming in Visio 47

8 Hold down the Ctrl key and rotate the mouse wheel. Visio zooms in or out as you rotate the mouse wheel.
IMPORTANT You can only perform this step if your mouse has a wheel.
TIP Sometimes you may want to zoom in on a specific shape. Visio provides an option setting that makes this very easy to do. On the File tab, click Options, and then click Advanced. In the Editing Options section of the Visio Options dialog box, click Center Selection On Zoom. Now when you select a shape and press the Ctrl key while rotating the mouse wheel, Visio automatically zooms in and out on the selected shape.
9 Press Ctrl+Shift+W to return to a view of the whole drawing page.
10 On the View tab, in the Show group, click the Task Panes button, and then click Pan & Zoom. The Pan & Zoom window opens. You can drag it to position it wherever you’d like.
TIP You can also open the Pan & Zoom window by clicking the Pan & Zoom button on the right end of the status bar. (Refer to “Exploring the drawing window” earlier in this chapter for information about the Visio status bar.)
48 Chapter 1 A visual orientation to a visual product

11 Click in the Pan & Zoom window, and then drag the cursor to create a rectangle that surrounds any two of the shapes. A blue rectangle appears in the Pan & Zoom win-dow and the drawing window shows only the selected portion of the page.
1
Panning and zooming in Visio 49

12 In the Pan & Zoom window, click in the interior of the blue rectangle, and then drag into another part of the miniature drawing page. The drawing window now shows the newly selected area of the drawing page.
With the Pan & Zoom window open, you can:
Continue to move the blue rectangle to reposition what appears in the drawing window.
Drag the edges or the corners of the blue rectangle to resize it and change the zoom level.
Drag the slider control on the right edge of the Pan & Zoom window to change the zoom level.
For many drawings, the Pan & Zoom window isn’t necessary and may even be in the way. However, it is extremely helpful when your drawing page is very large, as it may be if you are working on diagrams such as engineering drawings, floor plans, or office layouts.
CLEAN UP Close the Pan & Zoom window. Save changes and close the drawing.
50 Chapter 1 A visual orientation to a visual product

TIP If you have a mouse with a wheel button, you can move the drawing page up and down in the drawing window by rotating the mouse wheel. You can reposition the drawing page to the left and right by holding down the Shift key while rotating the mouse wheel.
You can also move the drawing page using the arrow keys on your keyboard. Be sure that no shapes are selected before pressing the arrow keys, however, or you will move the se-lected shape(s) instead of moving the page.
Key points Visio Professional contains templates, stencils, ribbon tabs, and functions that are not
included in Visio Standard. A key focus for the additional features in Visio Professional is linking to data sources and then visualizing that data using text callouts and icons. Professional features also enhance diagram collaboration, and enable documenting and managing business processes.
Visio 2013 is the second version of Visio to employ the Of ce uent user interface, commonly known as the ribbon. The Visio ribbon is well-designed and easy to use, in large part because the goal of the ribbon is to present sets of related functions visually, and Visio is a visual product.
Tool tab sets and add-in tabs provide unique features and are only visible when they are relevant and can be used. Most ribbon tabs are visible all of the time.
The Backstage view provides le management and option settings for Visio 2013.
The drawing window and the Shapes window are the primary windows you will use to create and manipulate Visio diagrams.
Visio provides a variety of keyboard shortcuts, mouse techniques, and specialized subwindows for panning and zooming within a diagram.
1
Key points 51