chapter 4 client upload module
TRANSCRIPT

EXTENDED SERVICE OPTIONS CLIENT UPLOAD MODULE
Copyright 2011 The Computer Manager, Inc. 4 - 1
CHAPTER 4
CLIENT UPLOAD MODULE
4.0 CLIENT UPLOAD OVERVIEW
The Client Upload Module automates the loading of debtors and accountsinto Debt$Net®. Your client provides you with a file of debtor/accountinformation. The Client Upload Module reads the file and creates debtorand account records in Debt$Net®. To upload a file you define a filelayout and then process the file to be uploaded. These steps correspondto “Build Client Upload” and “Run Client Upload” described in thefollowing paragraphs. The Client Upload Module can handle any numberof clients. Simply define a new file layout for each client you need toprocess.
Your client may create the upload file using the supplied Client InputModule. If your client uses the Client Input Module, the file layout ispre-defined for you.
4.1 INSTALLATION AND SETUP
4.1.1 Hardware Requirements
The Client Upload Module is designed to run on any computer currentlyrunning Debt$Net®. Depending on how your client transmits data to you(for example, on a diskette, through FPT or via email) you may requireadditional hardware (for example, a modem or a disk drive).
4.1.2 Installation
The first step to install this ESO is to have all user’s log out of theDebt$Net® system. You must have exclusive access to Debt$Net® sothat the new menu options will install correctly. To install the ClientUpload Module, select “Install ESO’s” from the ESO’s Menu (“ESO’s”)(Figure 4-1). Debt$Net® will then prompt you for the source directory forthe Client Upload ESO install file (Figure 4-2).

CLIENT UPLOAD MODULE EXTENDED SERVICE OPTIONS
4 - 2 Copyright 2010 The Computer Manager, Inc.
Figure 4-1. Install Eso’s Menu Option.
Figure 4-2. ESO Source Directory Prompt.
The default source directory for installing Client Upload will be A:\. Ifthis is incorrect (e.g., you have downloaded the install file to some otherdirectory) right click to bring up the Select Directory Form. The defaultdirectory on this form is the directory where Debt$Net® is currentlyinstalled. If the displayed location is still incorrect, specify a new locationusing the “Drive” drop down list at the bottom of the form. Afterselecting the correct drive, select the correct directory, then click the“Select” button to begin installation (Figure 4-3).

EXTENDED SERVICE OPTIONS CLIENT UPLOAD MODULE
Copyright 2011 The Computer Manager, Inc. 4 - 3
Figure 4-3. Select Directory Form.
After the ESO installs, Debt$Net® displays a message confirminginstallation. After selecting “OK,” exit and re-enter Debt$Net® tocomplete the installation process.
The Client Upload Module installation program enables a new ClientUpload Menu option on the Debt$Net® ESO’s Menu (Figure 4-4). “Build Client Upload” lets you define or build an upload while “RunClient Upload” reads the file and creates the debtor/account informationin Debt$Net®.
Figure 4-4. Client Upload Menu.

CLIENT UPLOAD MODULE EXTENDED SERVICE OPTIONS
4 - 4 Copyright 2011 The Computer Manager, Inc.
4.2 CLIENT UPLOAD FILE STRUCTURES
To build a client upload, Debt$Net® must be able to locate and identifyinformation in the client upload file, such as the location of the debtornames. Before we examine the process to build the upload we need tolook at the structure of a typical client file.
4.2.1 Files
Ideally, a client upload file contains a list of information (for example,debtors/accounts) stored as a unit. Each line in the list is called a recordand holds all of the debtor/account information associated with onedebtor. Each record is subdivided into sections called fields. A field holdsa particular type of information (such as the debtor name), and theplacement of the field (the position and size of the field) is the same ineach record. This means the debtor name always begins in the same spotin the record and is always the same length. To build a client upload youspecify the starting position and size of each field in the record. Forexample, the debtor name starts six characters from the beginning of theline and is twenty-six character long. The client should provide you witha layout containing this information.
4.2.2 Sample File
0101 Schmidtley, Jonathan Marc 221 Elder Street0102 Hurly, Jane Hillary 2245 Main Blvd
| Field |
As indicated in the example above, each line contains a record and eachpiece of information (in this case, the debtor name) is contained in a field.The starting position of the Debtor Name field is 6 (six characters in fromthe beginning of the line), and the field length is 26 characters.
A description of the placement and size of fields within a record is calleda file layout. You must obtain a file and a file layout from your client.Once you obtain this information you can begin to setup an upload.

EXTENDED SERVICE OPTIONS CLIENT UPLOAD MODULE
Copyright 2011 The Computer Manager, Inc. 4 - 5
4.3 BUILDING A CLIENT UPLOAD
Select “Build Client Upload” from the Client Upload Menu option underthe ESO’s Menu to begin the build process (Figure 4-4). Enter the clientnumber for the client for which you are building the upload (Figure 4-5).Select the “Current” button for a list of clients with existing uploads or“Clients” for a list of all clients. After entering the client number, selectthe “Finish” button.
Figure 4-5. Entering Client Number.
If you select a client who doesn’t have a Client Upload Build on file (aclient not listed under the “Current” button) Debt$Net® displays aprompt asking to select where the data file originated.
DOS Client Input would be used if theclient inputs data in the original Dosbased client input program. ClientInput should be selected if your clientuses the windows based Client Inpututility. You have two options forforward file a prior to version 6.9 anda 6.9 option. Clone existing definitionis to be used when you want to copythe definition from another client thatprovides the same data layout, if youchoose this option you will be given alist of clients to select a definitions toclone from. Portfolio File is use withthe Data mapping Service and finally None of the above would be usedif you want to start a new build from scratch and the client has notprovided the file in any of the above options.

CLIENT UPLOAD MODULE EXTENDED SERVICE OPTIONS
4 - 6 Copyright 2011 The Computer Manager, Inc.
After making your selections, the Pre-Process Options Form displays(Figure 4-6). Use this window to enter preliminary information about theupload such as the name of the sample file to use and the size of a recordin the file.
Figure 4-6. Pre-Process Options Form.
Enter the path and name and extension of the file to process in the fieldlabeled, “The File to Process is.” To browse through your system andselect the file, right click to display a directory selection form.
If you answered “Yes” to any of the three message box questionsdiscussed earlier, Debt$Net® automatically enters the applicableinformation into the rest of the form. If you need to make changes youmay do so and then select the “Finish” button. If you answered “No” toall three questions fill out the form according to the directions below.
Enter the size of each record (number of characters and spaces) in thefield labeled, “The Record Length is.” If you do not know the size of therecord, entering a number you are sure is larger than the largest recordmay work.

EXTENDED SERVICE OPTIONS CLIENT UPLOAD MODULE
Copyright 2011 The Computer Manager, Inc. 4 - 7
e NOTE: The maximum record size is 8,191 characters.
The fields labeled, “The Pre-Process defined is” and “The Post-Processis” allow you to specify a program to use to alter the file (for example, byextracting transaction or notes data into another file) before (pre) or after(post) uploading it into Debt$Net®. Pre- and Post-processing programsare written by programmers. If you anticipate needing one of theseprograms and you do not have programming knowledge, please contactThe Computer Manager, Inc. for assistance. If you have a pre- or post-processing program to use, enter the name in the appropriate field. If yourclient created the file using the Client Input Module, or if the file matchesthe Debt$Net® default layout, you do not need to enter anything in thesefields.
Debt$Net® can match new accounts to your existing debtors if the debtorassigned to the new account shares at least two matching fields with theexisting debtor. Debt$Net® provides space for you to specify up to fourfields for Debt$Net® to consider when attempting to make a match.Although Debt$Net® only requires that two criteria match to make amatch, you may specify up to four criteria for more matches. Forexample, if you instruct Debt$Net® to match debtor name and phonenumber, Debt$Net® considers only these two criteria. However, if youspecify that Debt$Net® should match name, phone number, socialsecurity number and an additional Debt$Net® debtor file field (forexample, spouse name), Debt$Net® will match debtors that match on theon the name and either phone, social or spouse.
If you would like Debt$Net® to include an additional field whenattempting to match existing and new debtors, enter the appropriateDebt$Net® debtor file field name into the “Additional Field” field. Ifyou do not know the name of the debtor file field, contact Debt$Net®Technical Support for assistance.
e NOTE: Because Debt$Net® requires at least two matching propertiesbefore matching a new account to an existing debtor, if you leave the“Secondary Match,” “Third,” and “Additional Field” fields blank,Debt$Net® makes no matches and all debtors in the client upload fileenter Debt$Net® as new debtors.
The bottom of the Pre-Process Options Window lists three additionaloptions. “Match on Full Name?” corresponds with the “Name” (N)

CLIENT UPLOAD MODULE EXTENDED SERVICE OPTIONS
4 - 8 Copyright 2011 The Computer Manager, Inc.
matching criteria. Flag this field to require that the entire contents of thedebtor name field (rather than only the first twelve characters) match anexisting debtor before considering the two debtors the same person.Checking this box will match on all forty (40) characters available for adebtor name.
If you would like to recognize a debtor match on a partial character set(less than 40) enter the number of characters in the next field. Enter anynumber between 1 and 40 to match debtor name characters. If zero (0) isentered, Debt$Net® will default to a 12 character match. This matchsetting will only apply if Name is the Primary match criteria.
Flag the field labeled “Capture New Address?” to instruct Debt$Net® tocapture new address information when matching debtors. Thisinformation saves in Debt$Net® as an extended reference unless you alsoflag the next field.
Flag the “Update Debtor File” field to update current debtor addressinformation in Debt$Net® with any new information, when Debt$Net®locates matching debtors. The old information saves as an extendedreference.
When you finish entering your information, select the “Finish” button,to display the Client Upload Screen (Figure 4-7).
4.3.1 Client Upload Screen
If your client created the upload file using the Client Input Module, if theclient is a Debt$Net® forwarding client, or if you cloned another clientupload, you may select “Save” when the Client Upload Screen displaysto complete the build process, as the field definitions are alreadycompleted. If you wish, you may change any field definition.

EXTENDED SERVICE OPTIONS CLIENT UPLOAD MODULE
Copyright 2011 The Computer Manager, Inc. 4 - 9
Figure 4-6. Client Upload Screen.
To define a client upload, you need to indicate where to locateinformation from the client upload file, as well as where to load that datainto Debt$Net®. The Client Upload Screen allows you to define eachfield of the upload by specifying field placements within each record ofthe client upload file, one field at a time.
The Client Upload Screen is divided into four boxes. The large box onthe left side of the screen titled “Input Data Field” lets you define a field(see the following section “Defining a Field” for more information). Thesmall box on the top right side of the screen labeled “Debt$Net® DataField” describes the nature of the Debt$Net® field you are going to load.It displays the Debt$Net® database field name, type of data stored in thatfield (TP C=character, N=numeric, M=memo, L=logical, D=date), thesize of the field (LEN), and the number of decimal places (DEC) if thefield is numeric. The “Input File” box displays the name of the input fileand the number of characters and spaces in the record. The scrolling liston the bottom right titled “Debt$Net® Field Selection” contains a list ofDebt$Net™ debtor/account fields you may define.

CLIENT UPLOAD MODULE EXTENDED SERVICE OPTIONS
4 - 10 Copyright 2011 The Computer Manager, Inc.
4.3.2 Defining a Field
From the Client Upload Screen, we will define the debtor’s name to showa typical scenario for defining fields. Locate the position and size of thedebtor name in your client’s file layout.
1. Choose a Debt$Net field to define:
In the “Debt$Net® Field Selection” box, use the scrolling list ofDebt$Net® fields to highlight the “Debtor Name” field in the list. The“Debt$Net® Data Field” description box (upper right) displays“DBTRNAM” under the “Field” prompt. Selecting the field tellsDebt$Net® that this is the field we will define.
2. Build the definition for the Debt$Net™ field:
After you select a Debt$Net® field, move to the “Variable” field of the“Input Data Field” box. Decide on a label for the variable and enter itinto the “Variable” field. Variable labels may contain up to ten charactersand may not contain spaces or special characters. The label should alsobe different than the Debt$Net® field label. For example, the variablelabel for the debtor’s name cannot be “DBTRNAM.” Since we arebuilding a definition for a variable corresponding to the Debt$Net®Debtor Name field, we might label this variable “DEBTORNAME.” Ifyou are using a Debt$Net® default layout or cloning another upload,Debt$Net® automatically enters this information for you.
After labeling the variable, enter the size of the field (in this case, thedebtor name) in the client upload file in the “Size” field. The size is thenumber of characters and spaces the field takes up.
In the “Offset” field, enter the number of characters from the beginningof the record to the start of the field, in this case, the debtor name. Thenumber entered in the “Offset” field should indicate the position wherethe field starts. For example, in the record example presented at thebeginning of Section 4.2.2, the debtor’s name starts on position six (sixspaces in), so the offset would be six.
e NOTE: When the cursor is in any of the fields in the “Input Data FieldBox”, right clicking will display a help message for that field.

EXTENDED SERVICE OPTIONS CLIENT UPLOAD MODULE
Copyright 2011 The Computer Manager, Inc. 4 - 11
3. Review extracted sample data:
The “Output Data” field now displays the data extracted from the samplefile for the field you just defined. This is data from the file for the sizeand offset chosen. If it appears that Debt$Net® is not capturing the entirefield, or that Debt$Net® is capturing too much of the field, adjust the“Size” and “Offset” until the data looks right. If the sample data matchesDebt$Net® conventions, you are done defining the field. However, if thefield requires modification (for example, if the debtor names lists as firstname/last name, instead of last, first) you need to use the “ConversionExpression” field to adjust the output to meet Debt$Net® conventions.
4. Enter the conversion expression to adjust data output:
The “Conversion Expression” field lets you convert the client upload datato match Debt$Net® conventions. Examples of data that may requireconversion are social security numbers displayed without dashes, datesformatted year, day, month, or debtor names formatted first name/lastname. You can also right click in the conversion expression field to opena conversion expression help screen.
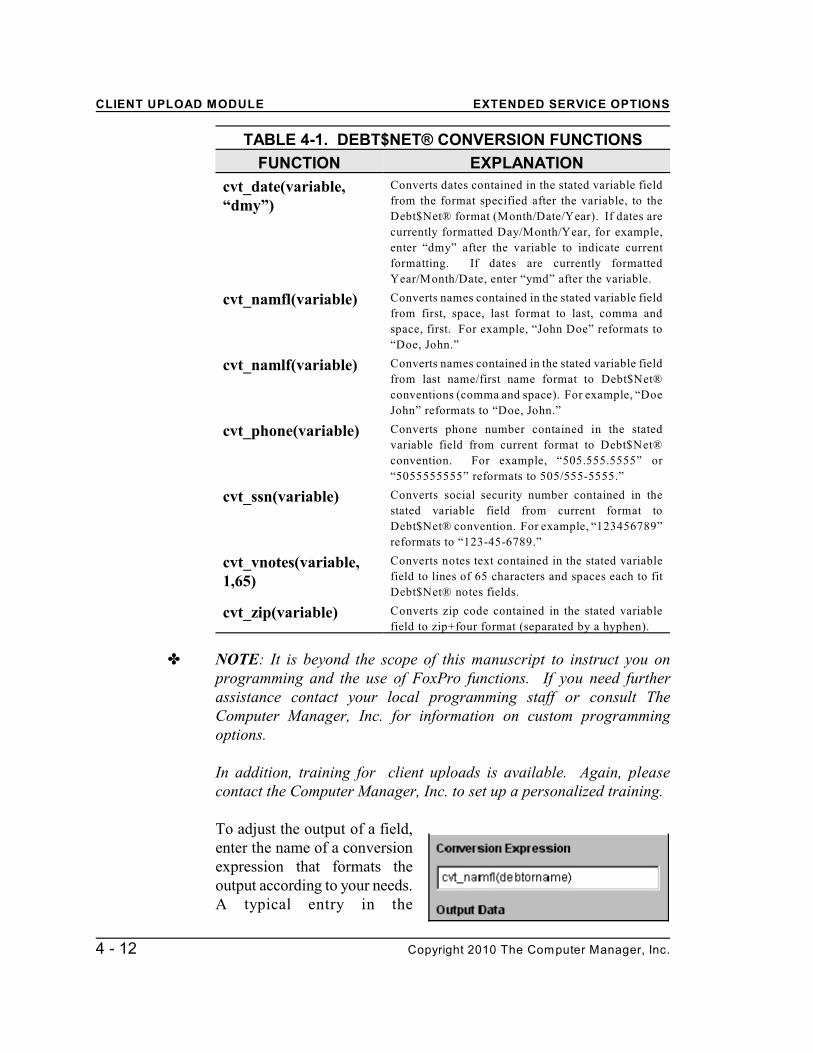
Conversion expressions are programs Debt$Net® runs to reformat thedata. Conversion expressions consist of all FoxPro standard functions aswell as special conversion functions provided by Debt$Net®. Table 4-1contains a partial list of Debt$Net® conversion functions. Conversionfunctions beyond the scope of this table may require programming. Ifyou do not have programming knowledge, contact your localprogramming staff or The Computer Manager, Inc. for assistance.
TABLE 4-1. DEBT$NET® CONVERSION FUNCTIONS
FUNCTION EXPLANATION
cvt_csz(variable, “C”) Extracts city information from city/state/zip code
string contained in the stated variable field.
cvt_csz(variable, “S”) Extracts state information from city/state/zip code
string contained in the stated variable field.
cvt_csz(variable, “Z”) Extracts zip code information from city/state/zip
code string contained in the stated variable field.
CLIENT UPLOAD MODULE EXTENDED SERVICE OPTIONS
TABLE 4-1. DEBT$NET® CONVERSION FUNCTIONS
FUNCTION EXPLANATION
4 - 12 Copyright 2010 The Computer Manager, Inc.
cvt_date(variable,“dmy”)
Converts dates contained in the stated variable field
from the format specified after the variable, to the
Debt$Net® format (Month/Date/Year). If dates are
currently formatted Day/Month/Year, for example,
enter “dmy” after the variable to indicate current
formatting. If dates are currently formatted
Year/Month/Date, enter “ymd” after the variable.
cvt_namfl(variable) Converts names contained in the stated variable field
from first, space, last format to last, comma and
space, first. For example, “John Doe” reformats to
“Doe, John.”
cvt_namlf(variable) Converts names contained in the stated variable field
from last name/first name format to Debt$Net®
conventions (comma and space). For example, “Doe
John” reformats to “Doe, John.”
cvt_phone(variable) Converts phone number contained in the stated
variable field from current format to Debt$Net®
convention. For example, “505.555.5555” or
“5055555555” reformats to 505/555-5555.”
cvt_ssn(variable) Converts social security number contained in the
stated variable field from current format to
Debt$Net® convention. For example, “123456789”
reformats to “123-45-6789.”
cvt_vnotes(variable,1,65)
Converts notes text contained in the stated variable
field to lines of 65 characters and spaces each to fit
Debt$Net® notes fields.
cvt_zip(variable) Converts zip code contained in the stated variable
field to zip+four format (separated by a hyphen).
e NOTE: It is beyond the scope of this manuscript to instruct you onprogramming and the use of FoxPro functions. If you need furtherassistance contact your local programming staff or consult TheComputer Manager, Inc. for information on custom programmingoptions.
In addition, training for client uploads is available. Again, pleasecontact the Computer Manager, Inc. to set up a personalized training.
To adjust the output of a field,enter the name of a conversionexpression that formats theoutput according to your needs.A typical entry in the
EXTENDED SERVICE OPTIONS CLIENT UPLOAD MODULE
Copyright 2011 The Computer Manager, Inc. 4 - 13
“Conversion Expression” field consists of a function name (such ascvt_namfl), left parenthesis, variable label, and right parenthesis.Example: cvt_namfl(debtorname).
In programming terms, we are entering a function that passes“debtorname” as a parameter to be used for conversion.
When you enter a conversion function, the output immediately displaysin the “Output Data” area. This lets you observe whether you entered thefunction correctly. If the “Output Data” field displays correctly, you aredone defining the field.
e NOTE: Since most fields will not require special handling, define all“easy” fields first, then seek assistance for the ones you cannot handlefrom Debt$Net® Technical Support.
Repeat the field definition process for all data fields from the clientupload file you wish to load into Debt$Net®. Select “Save” whenfinished.
e NOTE: Many client upload files contain information not pertinent toyour operation. Skip loading that information by not defining it.Debt$Net® simply ignores information not defined.
4.3.3 Testing
To test your client upload, select “Run Client Upload” from the ESO’sMenu to display the Client Upload Build Form (Figure 4-5). Enter theclient number in the field labeled “Enter Client Number This Upload isFor,” or select the “Current” button to select from the list of clients withupload builds on file. After selecting the client, click “Finish” to displaythe Input File Selection Form (Figure 4-8). Enter the file name (if locatedin the Debt$Net® directory, otherwise enter the full path and file name)and select “OK” to display the Upload Options Form (Figure 4-9). Flagthe field labeled “Do You Want to Review Upload Data Before Addingto Debt$Net® Files?” and select “Finish” to test the upload. Debt$Net®displays the Upload Browse Form (Figure 4-10), allowing you to scrollthrough the debtor/account information to check field formatting.

CLIENT UPLOAD MODULE EXTENDED SERVICE OPTIONS
4 - 14 Copyright 2010 The Computer Manager, Inc.
When on this form a user can tab through each record to preview or rightclick on the debtor name to preview one entire record, then click on the“Close” button in the upper left to return to the Preview Screen. The“Quit” button should be selected to exit out of the Preview Screenwithout completing the upload process. The “Finish” button should notbe selected unless all of the data is correct. Changes to the client uploadbuild may be required to correctly get data to appear into the rightDebt$Net® field, as seen on the Preview Screen.
e NOTE: Clicking on the “Finish” button will complete the client uploadinto Debt$Net®. If data was not completely correct, the uploaded debtorsand accounts can be manually deleted as well as activity numbersmanually adjusted. Another option is to contact The Computer Manager,Inc. for assistance in removing accounts and correcting activitynumbers.
At this point you have the option to load the data into Debt$Net® byclicking the “Finish” button or abandon the operation by selecting“Quit.” You should abandon the operation. Refer to paragraphs belowfor information on running the actual upload.
4.4 RUN CLIENT UPLOAD
Running a client upload loads the information from the client upload fileinto Debt$Net®. Selecting “Run Client Upload” from the Client UploadSubmenu displays the Input File Selection Form (Figure 4-8). Enter thename of the file to upload if the file is located in the Debt$Net®directory. If the file is located elsewhere, enter the full path and file name.If you previously ran an upload for this client, that file path and/or namedisplays by default. Select “OK” when finished.
Figure 4-8. Input File Selection Form.

EXTENDED SERVICE OPTIONS CLIENT UPLOAD MODULE
Copyright 2011 The Computer Manager, Inc. 4 - 15
Selecting “Continue” displays the Upload Options Form (Figure 4-9).Here you specify whether to print an audit trail report of all data uploadedto Debt$Net®. You also may indicate whether you want to review theupload data prior to updating the Debt$Net® files (it is highlyrecommended that you flag this field). Finally, you may enter a uniqueupload batch number to assign to each account loaded. As the uploadprocesses, Debt$Net® displays the number of debtors loaded intoDebt$Net®.
Figure 4-9. Upload Options Form.
If you flag the field “Do You Want to Review Upload Data BeforeAdding to Debt$Net® Files?,” the Upload Browse Form displays uponselecting the “Finish” button (Figure 4-10). This form allows you toreview the upload data on the screen before completing the uploadprocess. This is the only way to know if there is a problem with thefile upload. If the data does not look correct, select the “Quit” buttonand begin again. If the data appears correct, select the “Finish” buttonto complete the process.
If an upload is interrupted for any reason, you may be in a situation wheresome of the accounts have been loaded, and some have not. Do not runthe upload again, as it will create duplicate account data. Instead, checkthe “Restart Last Upload” box. Checking this box allows you to re-runyour last upload and pick up adding account where the upload processstopped.

CLIENT UPLOAD MODULE EXTENDED SERVICE OPTIONS
4 - 16 Copyright 2010 The Computer Manager, Inc.
Figure 4-10. Upload Browse Form.
4.4.1 Errors
If there are errors in the client upload definition, a window displays anda report prints listing the types of errors discovered. You must correct allerrors prior to loading debtors and accounts into Debt$Net®.
e NOTE: Before uploading a client file for the first time you should backup your Debt$Net® files. If a catastrophe occurs, you have the option torestore from backup.
4.5 DATA LAYOUT FOR CLIENT UPLOAD
The Client Upload ESO can use the following layout with no definitionmodifications. This is the same format the Client Input System uses.Any deviation from this layout may require additional assistance fromThe Computer Manager, Inc.
Please see the Client Upload Data Layout on the following page.

EXTENDED SERVICE OPTIONS CLIENT UPLOAD MODULE
Copyright 2011 The Computer Manager, Inc. 4 - 17
CLIENT UPLOAD DATA LAYOUT
DATA FIELD SIZE TYPE DEC START STATUS EXAMPLE
Debtor Name 26 C 0 1 Req. Presley, Elvis
Debtor Address 1 26 C 0 27 Rec. 123 Graceland Dr
Debtor Address 2 26 C 0 53 Opt
City 20 C 0 79 Rec. Memphis
State 2 C 0 99 Rec. TN
Zip 10 C 0 101 Rec. 20156-9200
Soc. Sec. # 11 C 0 111 Rec. 109-69-9126
Home Phone 12 C 0 122 Rec. 615/987-6543
Employer 20 C 0 134 Rec. Columbia Records
Work Phone 12 C 0 154 Opt. 615/798-3654
Birth Date 8 D 0 166 Opt. 19420615
Spouse Name 20 C 0 174 Opt. Presley, Priscilla
Spouse SSN 11 C 0 194 Opt. 901-96-6912
Spouse WorkPhone
12 C 0 205 Opt. 615/878-4364
Debtor Remarks 26 C 0 217 Opt. He’s a hound dog!
Client AccountNo.
16 C 0 243 Opt. L-6178-A-435
Guarantor/Patient 26 C 0 259 Opt. Jackson, LisaMarie
Total Outstanding 9 N 2 285 Req. 1500.00 (rightjustified)
Date Incurred 8 C 0 294 Req. 09/15/93
Filler (spaces) 9 302
Brief Comment 16 C 0 311 Opt. Acct’s not dead !
Note: The next 4 fields are for NSF checks, pad with spaces if not used.
Check Number 5 C 0 327 Opt. 12345
Check Date 8 D 0 332 Opt. 19930915
Bank AccountNumber
16 C 0 340 Opt. 1234567890-12345
Bank Name 26 C 0 356 Opt. Memphis Federal
Original Client 26 C 0 382 Opt. Blue Swade, Inc.
Mail ReturnedY/N
1 C 0 408 Opt. N

CLIENT UPLOAD MODULE EXTENDED SERVICE OPTIONS
CLIENT UPLOAD DATA LAYOUT
DATA FIELD SIZE TYPE DEC START STATUS EXAMPLE
4 - 18 Copyright 2010 The Computer Manager, Inc.
Account Memos 650 M 0 409 Opt. Free FormCommands
4.6 MAINTAIN CLIENT CROSS-REFERENCES
Some clients may upload files with data for multiple clients. This mayhappen when a client has been setup in Debt$Net® several times tomanage multiple locations, different types of accounts, or other reasonswhich support their business operations. Within the client upload datafile, a field identifies the actual client. In order to accurately upload thesefiles into Debt$Net®, client cross-references must be created to identifythe primary client (the one sending the data file), as well as the actualclient (where the data is to be loaded).
To create client cross-references, select “Maintain Client CrossReference” from the Client Upload Menu. The client cross referencescrolling list will display (Figure 4-11). The hit the “Add” button todefine the client cross reference data (Figure 4-12).
Figure 4-11. Client Cross Reference Scrolling List.

EXTENDED SERVICE OPTIONS CLIENT UPLOAD MODULE
Copyright 2011 The Computer Manager, Inc. 4 - 19
Figure 4-12. Client Cross Reference Definition Form.
In the field “Definition Client No:” enter the number of the primary client(i.e., the one that is sending the file). In the field “Selection CriteriaValue:”, enter the alphanumeric character string that identifies theindividual “sub client.” Debt$Net® will match on this field to identifywhere the data is to be loaded. In the field “Returned Client No:”, enterthe client number of the actual client for the data. Hit the “Save” buttonand another blank cross reference definition form will display.
e NOTE: Since data for the primary client will also be contained in theupload file, be sure to define the selection criteria value for data destinedfor this client’s accounts. In this case, the “Definition Client No:” willmatch the “Returned Client No:”
Because the purpose of this function is to allow a single file upload tocontain information for multiple clients, for each primary client, therewill be two or more sub-clients defined. Therefore, the client crossreference definition form will continue to display each time you close theform using the “Save” button. When all cross-references for this clienthave been defined, hit the “Quit” button. Debt$Net® will then return tothe cross reference scrolling list (Figure 4-11).

CLIENT UPLOAD MODULE EXTENDED SERVICE OPTIONS
4 - 20 Copyright 2010 The Computer Manager, Inc.
Figure 4-12. Client Cross Reference List.
e In the build under the client number field you would use the following expressionwhich tells Debt$Net® to use the Cross Reference Table:CLGETCL(V_CLNT,X), where X is the variable used in defining the locationwhere the information the cross reference table will use to determine which clientto load the debt under.
4.7 REORGANIZE CLIENT UPLOAD FILES
Periodically, you may need to reorganize the Client Upload system files. Youmay be directed to do this by The Computer Manager, Inc.’s Technical Supportdepartment, or other error messages in Debt$Net®. As with other filereorganizations in Debt$Net®, you must be the only one logged in at the time.To reorganize client upload files, select “Reorganize Client Upload Files” fromthe Client Upload ESO submenu. The files will be reorganized, followed by amessage that the reorganizationis complete.