chapter 3 ore on ariables and building simple …suraj.lums.edu.pk/~cs101a07/lectures/vb-ch3.pdf ·...
TRANSCRIPT

Chapter 3
MORE ON VARIABLES AND BUILDING SIMPLE
PROGRAMS USING VISUAL BASIC 6
Aziz Jafri, Tariq Jadoon This chapter is based on the content of the lectures delivered by Tariq Jadoon on Thu 13 Sept 2007
In the last lecture we learnt how to draw lines, boxes, circles, ellipses and arcs. We also learnt about variables and the assignment statement. The RND function was also introduced. In this lecture we will delve in a little more depth regarding the RND function and will also see what are Labels, Command Buttons and Text Boxes as well as learn about the scope of variables.
MORE ON RANDOM NUMBERS In the last chapter we introduced the RND statement and said that each time the computer executes this statement in Visual Basic we get a uniformly distributed number between 0 and 1. Thus, if you recall, the simple program:
Private Sub Form_Click()
X = RND ‘Assign a random value to X ~ (0, 1)
Form1.Caption = X ‘Change the caption on the title bar End Sub
This will result in 0 ≤ X < 1. Clicking on the Form each time we rerun the program will always result in the following sequence of numbers: 0.7055475
0.533424
0.5795186
0.2895625
0.301948
… Although these numbers appear to be random, one always gets them in the same sequence. These numbers are in fact pseudo-random or false random numbers. Pseudo random numbers are generated according to definite algorithm and the results depend on the initial conditions or seed. Thus, if the seed is not changed, one would always get the same sequence. The Randomize command changes the seed to a random value (based on the number of milliseconds that have elapsed since midnight) and this results in a new sequence of random numbers. It is sufficient to perform this step once at the beginning of the Visual Basic program, e.g. in the Form_Load event.

Private Sub Form_Load()
Randomize ‘Assign a random seed to the Pseudo Random Number Generator
End Sub
Clicking on the Form if you rerun the program (i.e. click on End and then click Start again) will always result in a different sequence of numbers: 0.7279169
0.8725659
0.3433431
0.6543391
0.2388682 … 0.3640863
0.4015576
0.443868
0.2902644
0.5185923
Etc. Note that now each time you run the program you get a different sequence of random numbers contrary to what was happening formerly. You could also place the Randomize command in the Form_Click() event but this would be an overkill in the sense that you would be getting the initial value of a different sequence on each click whereas if the Randomize command is in the Form_Load() event you get values of the same sequence on each click. Please note that the seed is not the first value of any sequence in fact it is used to compute the first value.
Key Concept: Generating Random Numbers in a Particular Range In order to generate random numbers uniformly distributed in a range (A, B). One could use the
statement:
X = A + (B - A) * RND ‘Assign a random value to X ~ (A, B)
BREAKPOINTS
Breakpoints allow you to stop the execution of the program midstream, providing the developer a window into what’s happening along the way as programs are being executed. Code stops execution and the developer can examine the contents of a variable by moving the mouse over a variable name similarly one can choose to single step, i.e. execute one instruction at a time or resume executing the program, amongst other options. In order to place a break-point, click on the margin of the code window. The line on which you click results in the computer breaking from the run mode to the debug or break mode when that particular line of code is encountered during execution. Similarly, you can remove the breakpoint

by clicking again at the same place again. Thus, clicking results in the break-point toggling. In Fig. 3.1 we’ve placed a breakpoint on the third line of code. Note that on placing a breakpoint you get a big maroon dot on the margin and the entire line appears highlighted.
Fig: 3.1: Placing a Break point in the [design] mode
Now when you run the program, clicking on the Form fires the Form_Click event and while executing this block of code, on hitting the breakpoint the program control immediately moves from the [run] mode to the [break] mode and the following window appears:
Fig: 3.2: Viewing a Break-point in the [break] mode
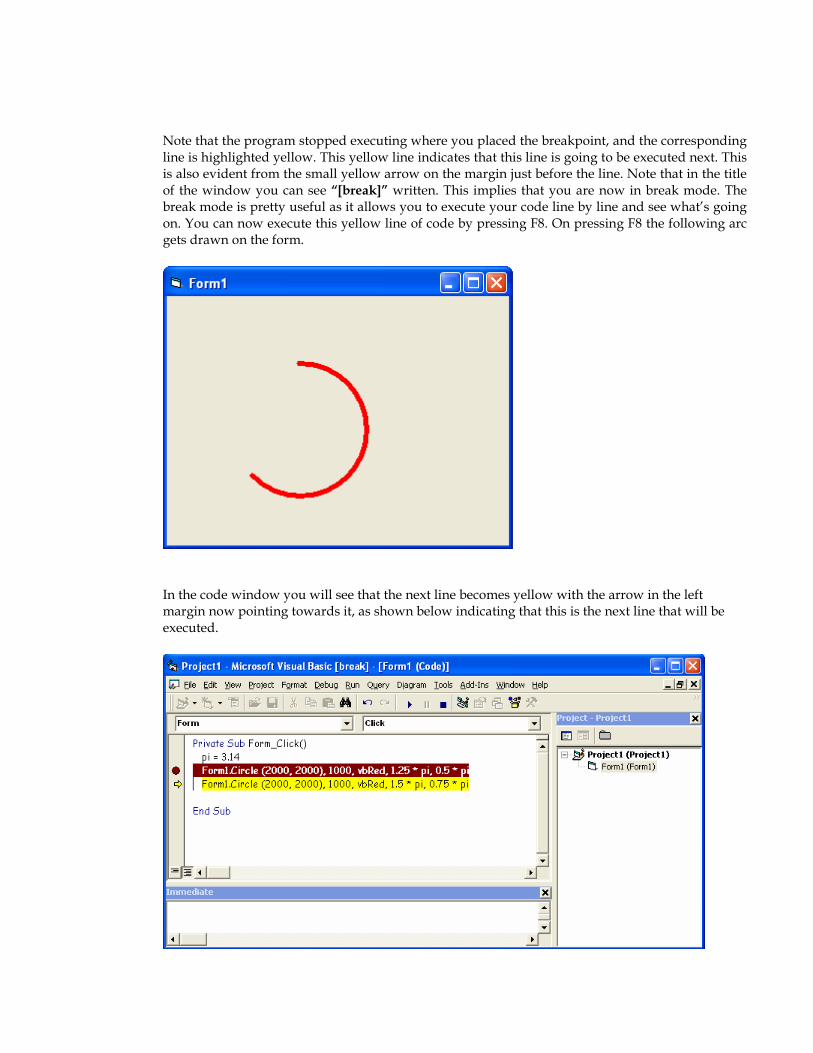
Note that the program stopped executing where you placed the breakpoint, and the corresponding line is highlighted yellow. This yellow line indicates that this line is going to be executed next. This is also evident from the small yellow arrow on the margin just before the line. Note that in the title of the window you can see “[break]” written. This implies that you are now in break mode. The break mode is pretty useful as it allows you to execute your code line by line and see what’s going on. You can now execute this yellow line of code by pressing F8. On pressing F8 the following arc gets drawn on the form.
In the code window you will see that the next line becomes yellow with the arrow in the left margin now pointing towards it, as shown below indicating that this is the next line that will be executed.

So when you press F8 this line will of code will be executed. Hence by pressing F8 repeatedly you can go through your whole code line by line, seeing what is happening on the way. Thus pressing F8 again will result in the following figure to appear on the form.
Hence we have executed our code in a step by step fashion. Had we not used the breakpoint the figure above would have appeared as soon as we had executed the Form_Click event. Note that
after a program stops at a breakpoint if you press the button the program will resume execution till the end of the current subroutine or till the next breakpoint whichever the case may be. So for example if you have the following lines of code
pressing the button after the program stops on the first breakpoint would cause it to then stop at the second breakpoint that is after making the red line. You could not control the execution of

code that makes the red line, whereas had you pressed F8 after the program stopped at the first breakpoint you would be able to draw each line with each subsequent press of the F8 key.
LABELS, COMMAND BUTTONS AND TEXT BOXES Label, command button and text box controls are present of the tool box as shown below
We shall look at each of them in turn.
LABELS Labels are used for writing text that the user can not edit. Double click on the label control in the toolbox. This places a label on the form as shown below. The label can be stretched to any desired size as well as can be moved to any desired location.

Associated with the label are many properties such as name, font, caption, left, top, etc. All these properties can be seen in the properties window provided the label is selected. The name property means what you are going to call the label. For example in the above figure the label has the name Label1. You can change the name of the label by entering a new name in the properties window where it says name. The caption property tells you what text the label is going to display and by using the font property you can set the font of the text that is going to be displayed. To change the color of the text you can use the ForeColor property. For example if I change the font size to 18, the ForeColor to blue and I write “VB IS EASY!!” where it says caption, this is what my form should look like in the design mode.

The caption property can also be set in the code. Suppose, initially we leave the caption property blank and we write the following lines of code
Now, when you click on the form the text “VB IS EASY!!” should appear wherever you placed the label on
the form. .
Other properties such as Left and Top can be used to position the label on the form. The Left property tells the
distance from the left margin whereas the Top property tells the distance from the top edge. Thus, the
following code will move the label 1500 twips from the left margin and 3000 twips from the top edge when
you click on the form.
Of course, you can also set the value of these properties from the properties window.
COMMAND BUTTONS
Private Sub Form_Click()
Label1.caption=”VB IS EASY!!”
End Sub
Private Sub Form_Click()
Label1.left=1500
Label1.Top=3000
End Sub

Command buttons are buttons, that when clicked tell the computer to perform some action. The name, caption, font, top and left properties are associated in the same way as they were with the label. The most important event is however the click event. Let me demonstrate with a simple example. Place a command button and a label on a form. Recall you can place these by double clicking on the respective control in the toolbox. Change the caption of the command button to Press or you may change it to any thing you want. Make the caption of the label blank. Recall all this is done in the properties window. Make sure you have the corresponding control selected when changing its property. Also you can change the font of the command button and label. I have set the font size as 18 for both. Now, type in the following code:
So, now when you execute the program and click on the command button you should get “VB IS EASY!!” written as shown below.
EXERCISE Develop interesting programs using the Top and Left properties. For example, you could make a program that moves the command button in random directions when clicked.
Private Sub Command1_Click()
Label1.Caption = "VB IS EASY!!"
End Sub

TEXT BOXES Sometimes you want the user to enter information. Here is when text boxes come into play. They allow users to enter information which can then be used for any computation. Synonymous to the caption property, the text box uses the Text property to identify whatever is written in the textbox. Double click on the textbox control to place a text box on the form. By default VB names it as Text1. Also note that the textbox displays Text1. This can also be seen in the Text property in the properties window. Let’s make a simple program to demonstrate the use of the Text property. The program will take the temperature in degrees centigrade from the user and convert it to temperature in Fahrenheit. Place three labels, once command button and a text box on the form. Resize them, change their caption and font so you have something that looks like this.
Now type in the following code
Note that in the Form_load() event we have kept Text1.Text=””. This means that when the form loads nothing should be written in the text box. You could have also gone and done this in the
Private Sub Command1_Click()
c = Text1.Text ‘ Variable c is equal to whatever is in the text box
f = 1.8 * c + 32 ‘ Conversion formula
Label3.Caption = f ‘ Display result
End Sub
Private Sub Form_Load()
Text1.Text = ""
End Sub

properties window by making the Text field blank but I have done this in the code just for demonstration purposes. Now execute the program and enter “37” in the textbox. When you press convert the equivalent temperature in Fahrenheit is displayed as shown below.
DECLARATION OF VARIABLES & THE CONCEPT OF SCOPE AND LIFETIME Variables are declared by the Dim (short for dimension) statement. For example if you want to declare a variable X you would write:
Dim X ‘ Declaring a variable by the name of X
Variables can have either global scope or local scope. A local variable is a variable that is declared within a block of code such as a Subroutine (Sub) and is useable within that Sub. As soon as we encounter the statement End Sub, the local variable and its contents are destroyed. This means that a local variable has a limited scope and lifetime, i.e. the Sub. If we want to create a counter that counts how many times one clicks on a command button. Declaring a local variable within the Command_Click event would not be useful because as soon as we get to End Sub, the contents of this variable would be destroyed. Global Variables are declared in the General Declarations section of the Form and are accessible from all Subroutines and events. The following example illustrates a counter. Initially, the value of the counter is equal to zero and then each time you click the variable is incremented by one. This is shown in the following code.

Notice that the variable X is being used in both the Form_Load() event and in the Command1_Click() event. It is declared as a global variable. Global variables are declared in the General Declarations area. The variable X is set to zero when the form loads. Now each time the command button is pressed the variable X is incremented by one which is displayed by making the caption of the command button equal to X. Now consider the following program:
Dim X ‘ X is a global variable
Private Sub Command1_Click()
Dim Y ‘ Y is a local variable
Y = Y + 1
Command1.Caption = Y
End Sub
Y is a local variable and although it appears to be a counter, clicking on the Command Button will not result in a Form’s caption to increment as the variable is re-declared on each click and its contents are destroyed each time one executes End Sub.
EXERCISE Try creating a program with an up-down counter as shown in the Figure. Each time you click on the Up button the label is incremented by one while each time you click on the down button the label is decremented by one.
Dim X ‘ X is a global variable
Private Sub Command1_Click()
Dim Y ‘ Y is a local variable
X = X+ 1
Command1.Caption = X
End Sub
Private Sub Form_Load()
X = 0
End Sub