chapter 2 websphere portal server v6: architecture ... · websphere portal server: ... until you...
TRANSCRIPT
DRAFT DRAFT DRAFT
WebSphere Portal Server: Step By Step www.WebSphereMentor.com
UNDER REVIEW USE AT YOUR OWN RISK
Author: Rama Turaga Page 1 Courtesy to: Owen Cline
Chapter 2
WebSphere Portal Server V6: Architecture,
Installation, Configuration, Verification and
Management on a Stand-alone Node
Introduction
As explained in chapter 1 of this series, WebSphere Portal Server is a J2EE application
that runs on top of WebSphere Application Server. WebSphere Portal Server will provide
a runtime environment for IBM specific portlets. Portlets run inside a portlet container
just like servlets runs inside an application server. A portal is a Web site that provides
users with a single point of access to Web-based applications. Using the WebSphere
Portal Server you can assemble the portlets and manage secure B2B (business to
business), B2C (business to consumer) and B2E (business to employees) portals. Entry to
each application on a portal page will be through a portlet. You individually develop
portlets and assemble them together to create a customized web pages (or portal pages).
WebSphere Portal can deliver Web content to various browsers, mobile devices and
desktops.
The latest release of the WebSphere Portal Server at the time of writing this document is
V6. WebSphere Portal Server V6 (WP V6) runs on top of WebSphere Application Server
ND V6.0.2.9 (WAS V6) software. So, you can imagine that WebSphere Portal has set of
programs that run in the WebSphere Application Server JVM just like any other J2EE
application (but the way you deploy and manage IBM portlet applications are different
from J2EE applications). If you are a WebSphere Portal architect or an administrator,
having a good knowledge of WAS V6 will help you quickly understand many
configuration scenarios and help you solve the problems quickly. In this document, you
will see how to install WP V6 on a stand-alone node (un-managed node) and understand
the WP V6 default architecture and the configuration.
You can optionally choose to install business process functionality during the WP V6
installation if you want. Also all the code required to enable WebSphere Content
Management (WCM) features will be installed during the WP V6 installation by default.
However, you need to enable WCM feature by running a configuration task if you want
to use that feature.

DRAFT DRAFT DRAFT
WebSphere Portal Server: Step By Step www.WebSphereMentor.com
UNDER REVIEW USE AT YOUR OWN RISK
Author: Rama Turaga Page 2 Courtesy to: Owen Cline
As shown in the illustration above WP V6 will store portal configuration data in the
Cloudscape database (wpsdb) by default under various schemas during the installation.
You will know more about what is stored in each schema in a later part of this chapter. In
later chapters we will see why and how to migrate portal configuration data to DB2 and
Tivoli Directory Servers from a Cloudscape database.
You can access the default portal page at port 10038 (http://portal-host:10038/wps/portal)
and the admin console at port 10027 (http://portal-host:10027/ibm/console) and 10039
(https://portal-host:10039/ibm/console) immediately after the installation.
Let us install WP V6 and understand various artifacts that are created during the
installation. A good understanding of this basic configuration will help you understand
the steps while performing the tasks to migrate configuration from a Cloudscape to DB2
and Tivoli Directory Server.
<Begin note> Please refer to
http://publib.boulder.ibm.com/infocenter/wpdoc/v6r0/index.jsp?topic=/com.ibm.wp.ent.d
oc/wpf/inst_req.html and make sure that your system meets recommended requirements.
Even though we will start with installing WeSphere Portal Server V6 initially, we will
extend this configuration to use DB2, Tivoli Directory Server (LDAP), HTTP Server,
WebSphere Plug-in and Tivoli Access Manager (TAM) in later chapters. We recommend
you to have at least a Pentium 4 at 1.4 GHZ, 4GB of RAM and 30GB of disk space or
higher. If you want to configure vertical clustering on this machine then you will need a
bigger configuration then the recommended configuration. We assume you have loaded
all the products in the local machine and are performing all of the steps locally (as these
documents are targeted for novice to intermediate audience. In the final part, we will talk
about variations and clustering. <End note>

DRAFT DRAFT DRAFT
WebSphere Portal Server: Step By Step www.WebSphereMentor.com
UNDER REVIEW USE AT YOUR OWN RISK
Author: Rama Turaga Page 3 Courtesy to: Owen Cline
Install WebSphere Portal Server V6
Step 1: If you have not already done so, please go through chapters -1, 3, 4 and 7
from the printed version of the book to get a good understanding on the WAS V6
architecture, installation, configuration, verification, management and administration
tasks.
• Temporarily turn off any firewall program that may conflict with the
installation process. Make sure that computer settings do not lock the hard
disk after a certain period of inactivity on Windows systems, as the Portal
installation will take a few hours depending on the size of the system and
components you are installing (installing business process functionality for
example will take much more time).
Step 2: Download WP V6 images from the IBM Passport Advantage site (or
Extreme Leverage site if you work for IBM). Expand the zip files in a temporary
directory <IMAGES-ROOT> (c:\wasv6-installs\portalv6 in our example) and invoke the
installation program (install.bat on the Windows operating system) by double clicking on
the installation program (name varies depending on the operating system). Click on OK
after selecting the language of your choice.
If you have the product images on a CD or DVD, mount the media and navigate
to the installation program (install.bat) and double click on it.
Step 3: On the Welcome screen click Next.
Step 4: Select the radio button to accept the license agreement and click Next.
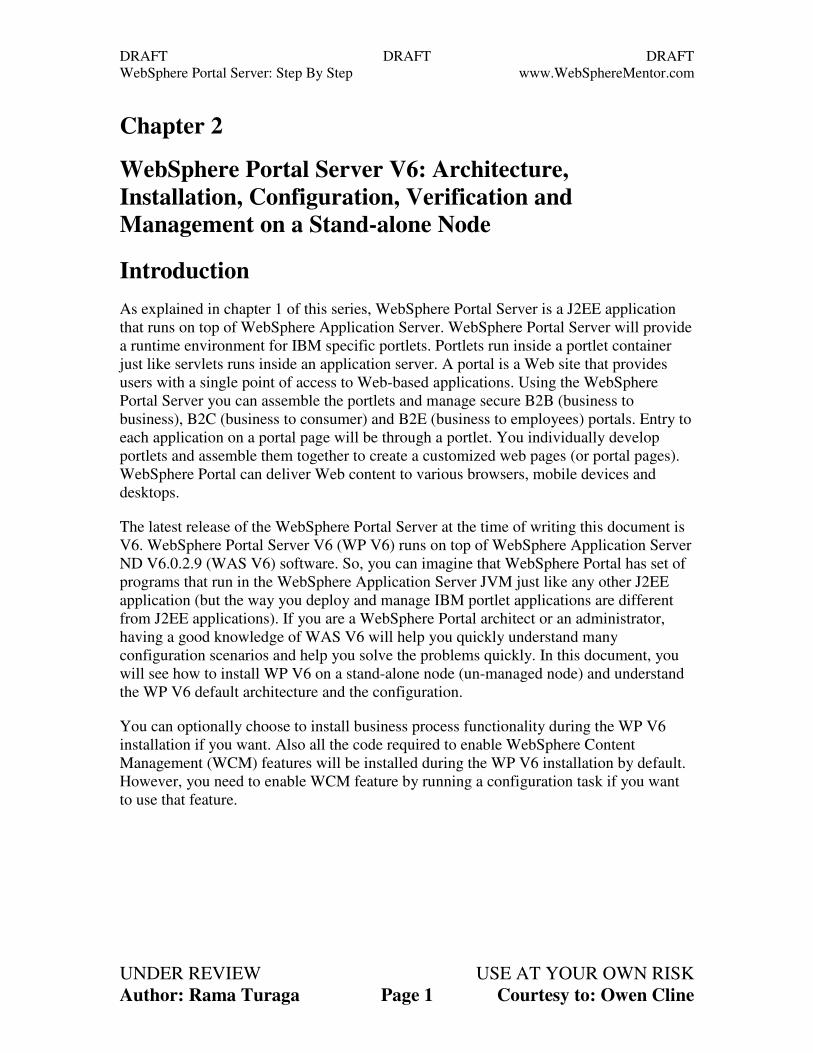
Step 5: Select Typical as the installation type. You will select the Custom
installation type when you install Portal Server on top of an existing WebSphere
Application Server V6 product.
DRAFT DRAFT DRAFT
WebSphere Portal Server: Step By Step www.WebSphereMentor.com
UNDER REVIEW USE AT YOUR OWN RISK
Author: Rama Turaga Page 4 Courtesy to: Owen Cline
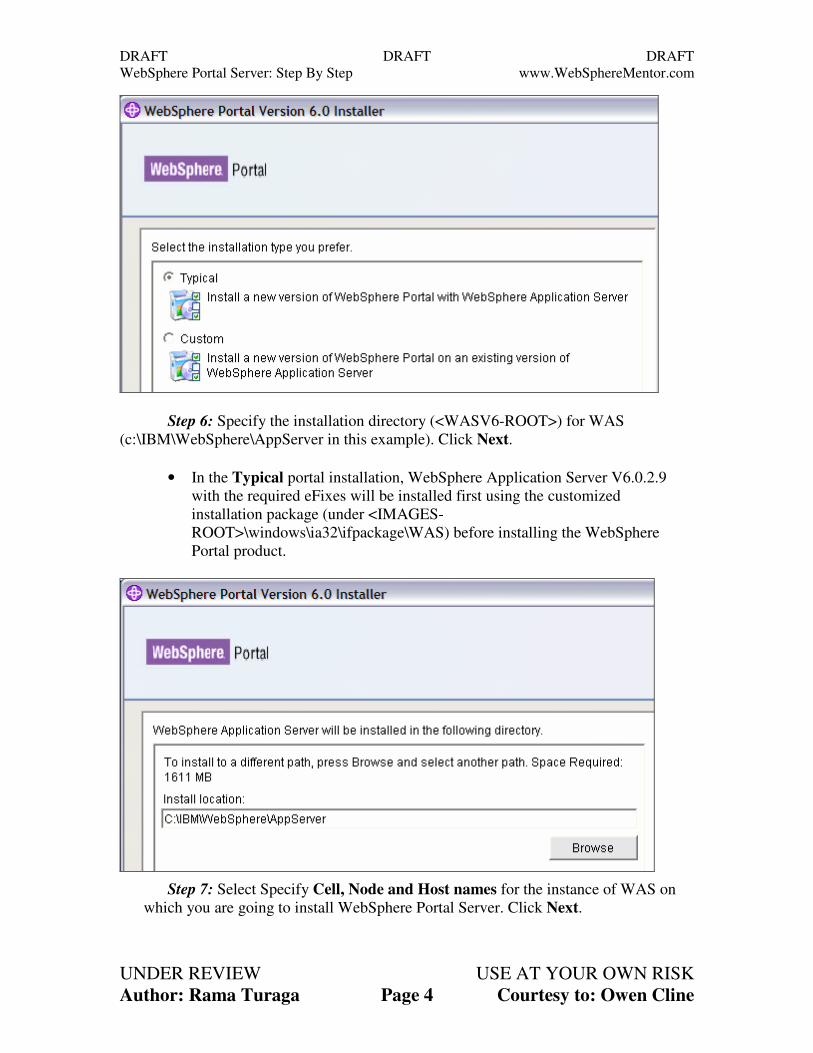
Step 6: Specify the installation directory (<WASV6-ROOT>) for WAS
(c:\IBM\WebSphere\AppServer in this example). Click Next.
• In the Typical portal installation, WebSphere Application Server V6.0.2.9
with the required eFixes will be installed first using the customized
installation package (under <IMAGES-
ROOT>\windows\ia32\ifpackage\WAS) before installing the WebSphere
Portal product.
Step 7: Select Specify Cell, Node and Host names for the instance of WAS on
which you are going to install WebSphere Portal Server. Click Next.

DRAFT DRAFT DRAFT
WebSphere Portal Server: Step By Step www.WebSphereMentor.com
UNDER REVIEW USE AT YOUR OWN RISK
Author: Rama Turaga Page 5 Courtesy to: Owen Cline
• Make sure you provide short names for Cell and Node names on Windows
machines because of its 256 character limitation.
• Refer to chapter 3 in the printed version of the book for a complete discussion
about this page.
Step 8: Provide administrative user-id and password for WAS. We used
wpsbind/wpsbind as our user name and password in our example. Click Next.
• You can use any id you feel like, but the only reason we used
wpsbind/wpsbind in our sample configuration is because the
PortalUsers.ldif file that comes with the product uses wpsbind by default.
You will use PortalUsers.ldif when you configure WMM (WebSphere
Member Manager) with an LDAP server for authentication in later chapters.
• In this default portal configuration, the user information is stored in
Cloudscape database and used to authenticate WAS administrative user, until
you complete the migration task to use LDAP server.
Step 9: Select Yes if you want to install the business process component installed
on WP server. Otherwise, select No. Click Next.

DRAFT DRAFT DRAFT
WebSphere Portal Server: Step By Step www.WebSphereMentor.com
UNDER REVIEW USE AT YOUR OWN RISK
Author: Rama Turaga Page 6 Courtesy to: Owen Cline
• Remember though that you cannot federate this node to the Deployment
Manager cell to make it a managed node or part of a cluster if you choose to
install the business process component now. If you are installing for
educational or demo purposes and do not intend to do the clustering lab, feel
free to install it.
• In case you want to install the business process support for production
environments and want to convert it as cluster environment then the high level
steps to use are as follows (we will have a detailed discussion on this topic
when we talk about clustering in later chapters):
1. Install WAS V6.0.2.9.x and WPS V6.0.1.x product binaries on
Deployment Manager and portal nodes (do not install portal server at
this stage)
2. Create a process server augmented Deployment Manager profile on
dmgr-host.
3. Create a process server augmented custom profile on portal-host1
(primary node) and federate that node to the Deployment Manager
cell on dmgr-host.
• Install the WebSphere Portal server on this managed node by
selecting the Custom type (instead of Typical in step 5) and
identify this node as primary node during the installation.
4. Create a WebSphere Portal cluster using the portal server on the
primary node as the first cluster member.
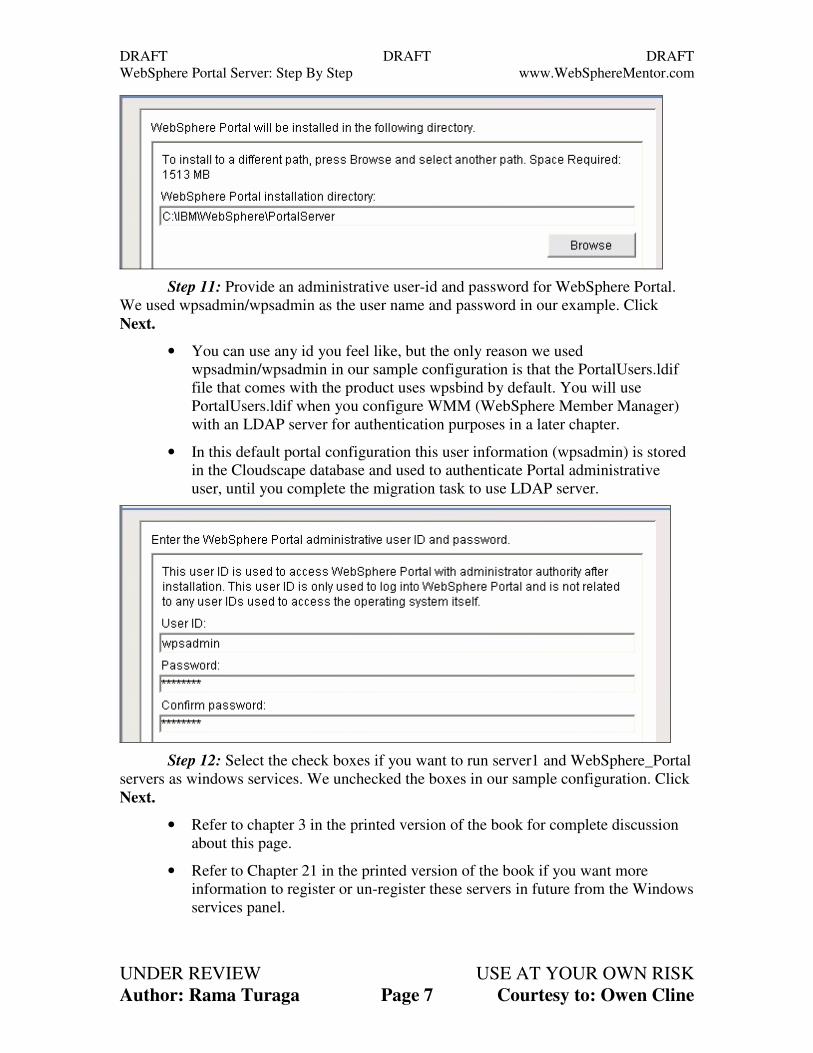
Step 10: Specify the installation directory or accept the default (<WPV6-ROOT>)
for WebSphere Portal (c:\IBM\WebSphere\Portal in this example). Click Next.
DRAFT DRAFT DRAFT
WebSphere Portal Server: Step By Step www.WebSphereMentor.com
UNDER REVIEW USE AT YOUR OWN RISK
Author: Rama Turaga Page 7 Courtesy to: Owen Cline
Step 11: Provide an administrative user-id and password for WebSphere Portal.
We used wpsadmin/wpsadmin as the user name and password in our example. Click
Next.
• You can use any id you feel like, but the only reason we used
wpsadmin/wpsadmin in our sample configuration is that the PortalUsers.ldif
file that comes with the product uses wpsbind by default. You will use
PortalUsers.ldif when you configure WMM (WebSphere Member Manager)
with an LDAP server for authentication purposes in a later chapter.
• In this default portal configuration this user information (wpsadmin) is stored
in the Cloudscape database and used to authenticate Portal administrative
user, until you complete the migration task to use LDAP server.
Step 12: Select the check boxes if you want to run server1 and WebSphere_Portal
servers as windows services. We unchecked the boxes in our sample configuration. Click
Next.
• Refer to chapter 3 in the printed version of the book for complete discussion
about this page.
• Refer to Chapter 21 in the printed version of the book if you want more
information to register or un-register these servers in future from the Windows
services panel.

DRAFT DRAFT DRAFT
WebSphere Portal Server: Step By Step www.WebSphereMentor.com
UNDER REVIEW USE AT YOUR OWN RISK
Author: Rama Turaga Page 8 Courtesy to: Owen Cline
Step 13: Verify the summary screen and click Next to start installing the product.
• The installation program now installs the following
o WAS V6.0.2.9.x under <WASV6-ROOT>
(c:\IBM\WebSphere\AppServer in our case).
o WebSphere Portal V6 under <WPV6-ROOT> (c:\IBM\WebSphere\Portal
in our case) and
o Profile (wp_profile) under <WP-PROFILE-ROOT>
(c:\IBM\WebSphere\profiles\wp_profile)
� After the installation, you can see the creation of two application
servers: (1) default server (server1) and (2) WebSphere Portal
Server (WebSphere_Portal) under this wp_profile.
� In WP V6, you no longer have to use server1 for administrative
purposes as WebSphere Portal is also installed with system
applications (adminconsole and FileTransfer EARs). As discussed
in the Introduction section, the admin console application is
available at ports 10027 (http) and 10039 (https) by default on
WebSphere_Portal.
• Occasionally, you may have to get connected to server1.
Some of the reasons are: (1) when you cannot start
WebSphere_Portal server and it needs configuration
changes through the admin console on server1 or (2) to run
wsadmin scripts.
� If you have worked with WAS V6 ND before, you will quickly
realize that WP V6 does not use the default profile location of
WAS V6 ND that was in the <WASV6-ROOT>\profiles directory
for creating wp_profile. Instead, it creates this profile outside of
the product binaries directory (or installation directory).

DRAFT DRAFT DRAFT
WebSphere Portal Server: Step By Step www.WebSphereMentor.com
UNDER REVIEW USE AT YOUR OWN RISK
Author: Rama Turaga Page 9 Courtesy to: Owen Cline
• The installation program will now log the entries in the wpinstalllog.txt for a
brief period under the TMP directory during the initial phase of installation.
• Then the installation program will log the progress in the log.txt under the
TMP directory during the next phase. At this time, you can click on Open
button to view the log entries.
• Be patient, the Portal installation will take a few hours depending on the size
of the system and components you are installing.
Step 14: On the successful installation screen, select the check box for Launch
First Steps and click on Finish.
DRAFT DRAFT DRAFT
WebSphere Portal Server: Step By Step www.WebSphereMentor.com
UNDER REVIEW USE AT YOUR OWN RISK
Author: Rama Turaga Page 10 Courtesy to: Owen Cline
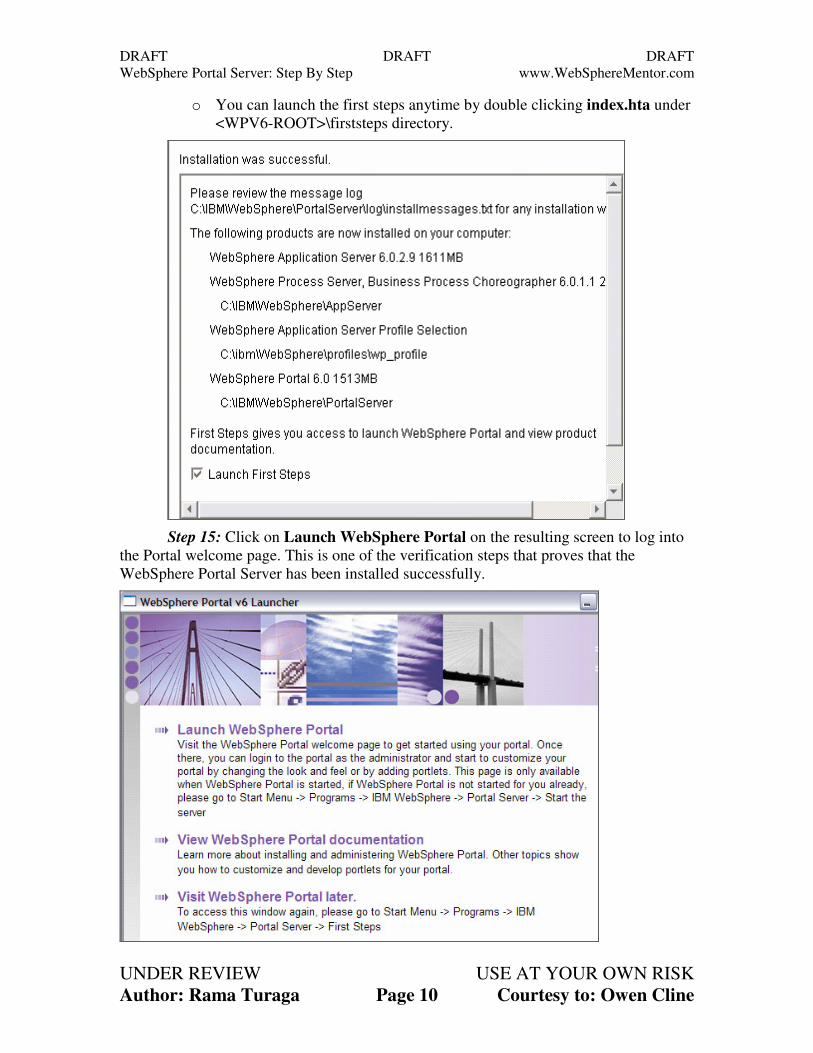
o You can launch the first steps anytime by double clicking index.hta under
<WPV6-ROOT>\firststeps directory.
Step 15: Click on Launch WebSphere Portal on the resulting screen to log into
the Portal welcome page. This is one of the verification steps that proves that the
WebSphere Portal Server has been installed successfully.

DRAFT DRAFT DRAFT
WebSphere Portal Server: Step By Step www.WebSphereMentor.com
UNDER REVIEW USE AT YOUR OWN RISK
Author: Rama Turaga Page 11 Courtesy to: Owen Cline
Step 16: Enter wpsadmin as the userid and password and click on Login to log
into the WebSphere Portal welcome page. Remember that the userid and password were
the portal administrator userid and password you provided during the installation.
• You can invoke the portal home page any time from a browser using the
URL http://portal-host:10038/wps/portal
Step 17: Navigate around the page if you like and click on Logout (at top right
corner of the page) to verify other parts of the artifacts. We will be working more on this
page in the coming chapters.

DRAFT DRAFT DRAFT
WebSphere Portal Server: Step By Step www.WebSphereMentor.com
UNDER REVIEW USE AT YOUR OWN RISK
Author: Rama Turaga Page 12 Courtesy to: Owen Cline
Step 18: Connect to the admin console running on the Portal server from a
browser using the URL http://portal-host:10027/ibm/console (because if administrative
security is enabled during the installation, the URL will automatically be switched to
https at port# 10039) • Enter wpsbind as userid and password and click on Login to log into the
admin console. Remember that userid and password were the WAS
administrator userid and password you provided during the installation.
DRAFT DRAFT DRAFT
WebSphere Portal Server: Step By Step www.WebSphereMentor.com
UNDER REVIEW USE AT YOUR OWN RISK
Author: Rama Turaga Page 13 Courtesy to: Owen Cline
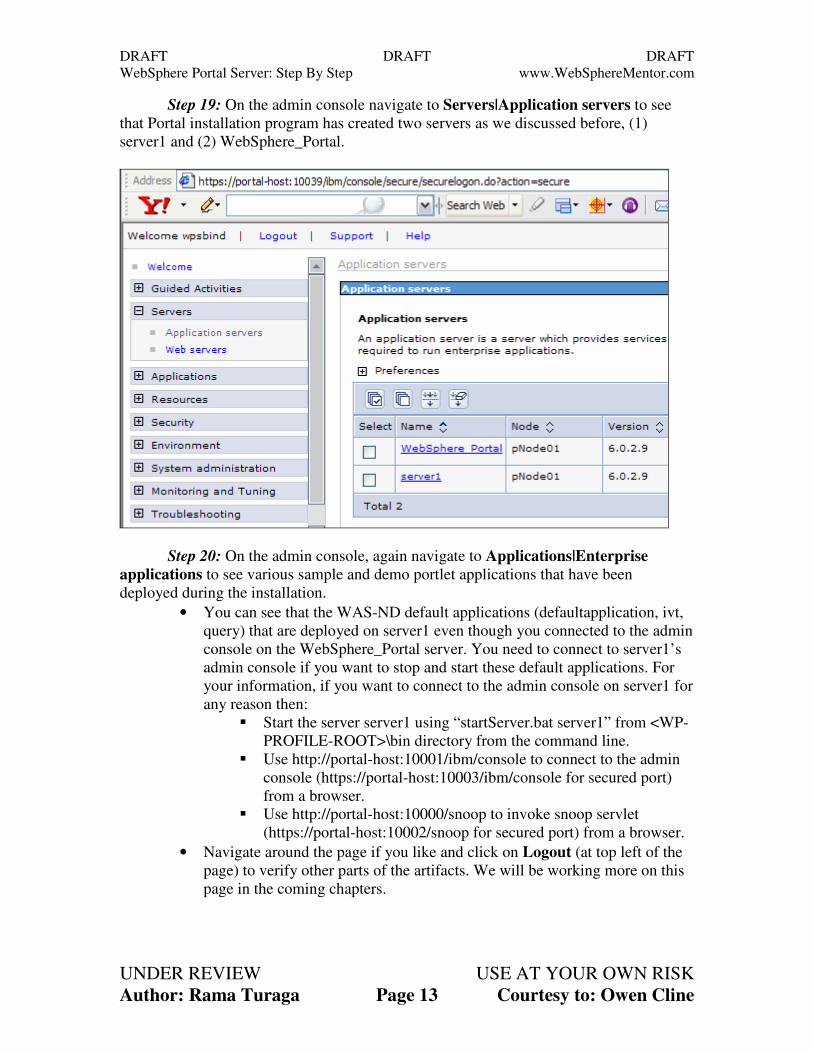
Step 19: On the admin console navigate to Servers|Application servers to see
that Portal installation program has created two servers as we discussed before, (1)
server1 and (2) WebSphere_Portal.
Step 20: On the admin console, again navigate to Applications|Enterprise
applications to see various sample and demo portlet applications that have been
deployed during the installation.
• You can see that the WAS-ND default applications (defaultapplication, ivt,
query) that are deployed on server1 even though you connected to the admin
console on the WebSphere_Portal server. You need to connect to server1’s
admin console if you want to stop and start these default applications. For
your information, if you want to connect to the admin console on server1 for
any reason then:
� Start the server server1 using “startServer.bat server1” from <WP-
PROFILE-ROOT>\bin directory from the command line.
� Use http://portal-host:10001/ibm/console to connect to the admin
console (https://portal-host:10003/ibm/console for secured port)
from a browser.
� Use http://portal-host:10000/snoop to invoke snoop servlet
(https://portal-host:10002/snoop for secured port) from a browser.
• Navigate around the page if you like and click on Logout (at top left of the
page) to verify other parts of the artifacts. We will be working more on this
page in the coming chapters.
DRAFT DRAFT DRAFT
WebSphere Portal Server: Step By Step www.WebSphereMentor.com
UNDER REVIEW USE AT YOUR OWN RISK
Author: Rama Turaga Page 14 Courtesy to: Owen Cline
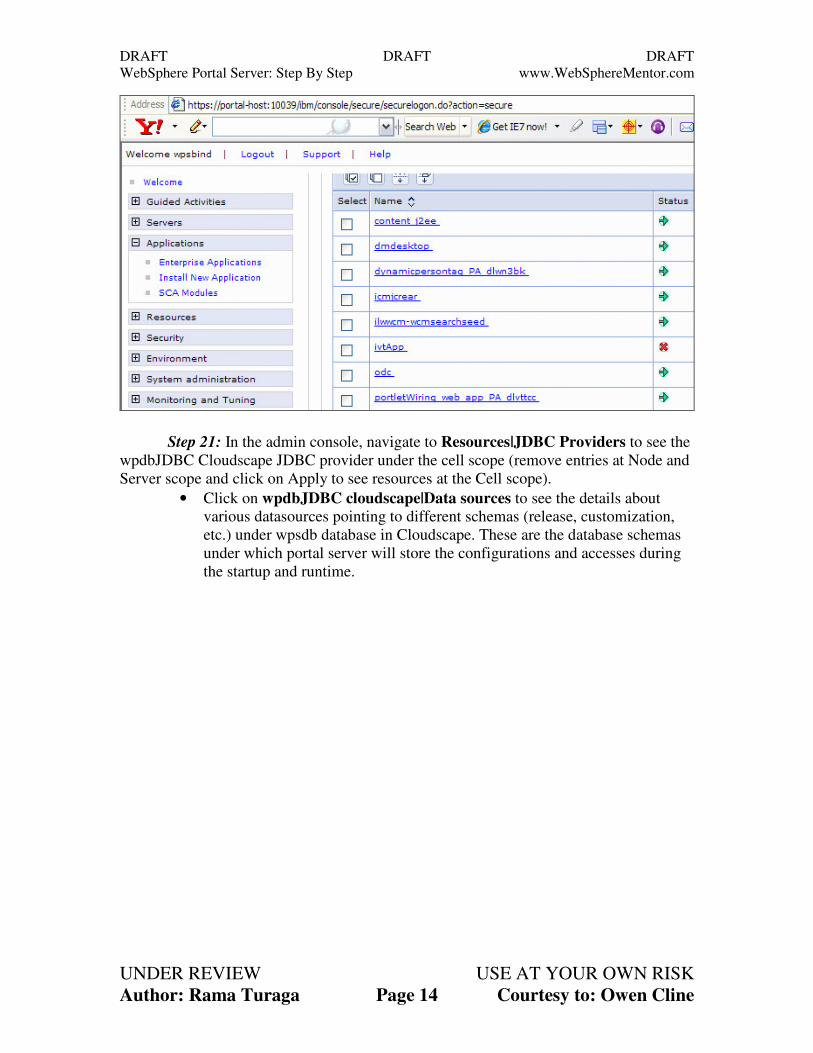
Step 21: In the admin console, navigate to Resources|JDBC Providers to see the
wpdbJDBC Cloudscape JDBC provider under the cell scope (remove entries at Node and
Server scope and click on Apply to see resources at the Cell scope).
• Click on wpdbJDBC cloudscape|Data sources to see the details about
various datasources pointing to different schemas (release, customization,
etc.) under wpsdb database in Cloudscape. These are the database schemas
under which portal server will store the configurations and accesses during
the startup and runtime.

DRAFT DRAFT DRAFT
WebSphere Portal Server: Step By Step www.WebSphereMentor.com
UNDER REVIEW USE AT YOUR OWN RISK
Author: Rama Turaga Page 15 Courtesy to: Owen Cline
Step 22: On the operating system, navigate to the directory where you installed
WAS, Portal software and the profile (c:\IBM\WebSphere in this case). You will find
• WebSphere Application Server related artifacts under
c:IBM\WebSphere\AppServer (<WASV6-ROOT>).
• programs related to WebSphere Portal under
c:\IBM\WebSphere|PortalServer (<WPV6-ROOT>).
• artifacts related to the profile (wp_profile) under
c:\IBM\WebSphere\profiles\wp_profile (<WP-PROFILE-ROOT>).
Step 23: Navigate to the <WP_PROFILE-
ROOT>\config\cells\cellName\nodes\nodeName\servers to find that the portal

DRAFT DRAFT DRAFT
WebSphere Portal Server: Step By Step www.WebSphereMentor.com
UNDER REVIEW USE AT YOUR OWN RISK
Author: Rama Turaga Page 16 Courtesy to: Owen Cline
installation program has created two servers: (1) server1 and (2) WebSphere_Portal under
the profile wp_profile. You will be working with the WebSphere_Portal server and
deploying portlets to where your Portal Server is running. Server server1 is like a
WebSphere ND server running the sample and default J2EE applications with no portlets
running.
Logging
The logging architecture of WP V6 is quite similar to WAS ND V6 with some variations.
If you are familiar with WAS ND V6 logging, you will not have any problem finding the
portal related log files.
Logging during the installation
The log files during the portal installation are distributed across three different places
(apart from the TMP directory we discussed during the installation steps).
Step 1: Navigate to <WASV6-ROOT>\logs directory to find the log files that
were generated during the WAS ND V6.0.2.9 (and WPS) product binaries installation
and profile creation. Refer to chapter 3 in the printed version of the book for more
information. Log file log.txt is one of the important log files you need to verify under this
directory.
Step 2: Navigate to <WPV6-ROOT>\log directory to find the log files that were
generated during the Web Sphere Portal server configuration (this includes the logging
during the Cloudscape database configuration). Log file wpinstalllog.txt is one of the
important log files you need to verify under this directory after the installation. You can
also see the log files that are generated during the WebSphere_Portal server runtime as
you will see later.

DRAFT DRAFT DRAFT
WebSphere Portal Server: Step By Step www.WebSphereMentor.com
UNDER REVIEW USE AT YOUR OWN RISK
Author: Rama Turaga Page 17 Courtesy to: Owen Cline
Step 3: Navigate to <WP-PROFILE-ROOT>\logs directory to find the log files
that were generated during the deployment of sample applications that were deployed on
server1 during the installation. You can also see the log files that are generated during the
application servers (server1 and WebSphere_Portal) runtime as you will learn later.
Logging during the server runtime
Step 1: The log files during the Portal Server runtime (SystemOut, SystemErr,
native_stdout and native_stderr.log) will be written under <WPV6-ROOT>\log directory.
Navigate to the directory to find these log files.
• The log files during the start and stop of WebSphere_Portal (startServer,
stopServer and pid) will be written under <WP-PROFILE-
ROOT>\logs\WebSphere_Portal directory. Navigate to the directory to find
these log files.
• By using the above steps to verify the presence of the Portal server log files,
you should have realized that these log files have been distributed across
two directories unlike a regular WAS ND application server (server1 for
example).
Step 2: If you ever work with server1 and want to view it’s log files then you can
find all the logs during startup, stop and runtime under <WP-PROFILE-
ROOT>\logs\server1 directory similar to server1 in a WAS V6 ND environment. Refer to
Chapter-3 in the printed version of the book for more information about logging.

DRAFT DRAFT DRAFT
WebSphere Portal Server: Step By Step www.WebSphereMentor.com
UNDER REVIEW USE AT YOUR OWN RISK
Author: Rama Turaga Page 18 Courtesy to: Owen Cline
Understanding the Portal Server Configuration
So far, you have seen and hopefully understood how to install and verify the WebSphere
Portal server. Now you will see how the Portal server’s configuration data is stored in the
default Cloudscape database and in files in the file system. If you want to configure and
maintain your portal server in a production environment then you need to have a
complete understanding of this configuration so pay close attention to this information.
As shown in the illustration above, the WebSphere Portal server will store most of the
configuration data in the Cloudscape database. The name of the database is wpsdb by
default. Different parts of the configuration are stored in different schemas in the wpsdb
database. The remaining part of the configuration (DB connections and Deployment
Descriptors for example) will be stored as property files in the file system.
DRAFT DRAFT DRAFT
WebSphere Portal Server: Step By Step www.WebSphereMentor.com
UNDER REVIEW USE AT YOUR OWN RISK
Author: Rama Turaga Page 19 Courtesy to: Owen Cline
What follows is a brief description of the important schema names and the type of
information that is stored in the wpsdb database schemas:
• Release, Likeminds, Feedback: These schemas store data of Pages, Portlets, Portlet
instances, Themes, Templates, Personalization rules and Policies. This data is not
modified during the portal runtime.
• Customization: This schema stores information specific to users (for example
PortletData).
• Community, Jcr: These schemas store data of shared documents and resources. This
data will be modified during runtime.
• wmm: This schema stores user registry data used to authenticate users.
Having the portal configuration in the Cloudscape database is fine for education and
demonstration purposes. However, this configuration data does not scale as user volume
increases and does not support portal cluster configuration data or multiple realms. You
need to move this configuration to a robust RDBMS (like DB2, Oracle, Sybase, MS SQL
Server or Informix for example) in production environments. You also need to move user
registry data from the Cloudscape database (stored in the wmm schema) to an LDAP
server (like IBM Tivoli Directory Server for example) in production environments.
Before re-configuring the portal configuration data, you need to understand a few
important property files that play a big role while running the configuration tasks later.
Immediately after the portal installation, these property files refer to the Cloudscape
database by default. To learn more about these property files and values stored inside
them, perform the following steps.
Step 1: Locate the wpconfig, wpconfig_dbdomain and wpconfig_dbtype property
files under <WPV6-ROOT>\config directory. These files point to portal configuration
data stored in the wpsdb database in Cloudscape plus other configuration data. You need
to work with these files a lot when you want to transfer data to a production quality
database and LDAP server. If you can make printouts of these files, start reviewing the
comments explaining each parameter.
• Make sure that you take a backup copy of these files before opening and
viewing them.
• Also, pay attention to two more important files under this directory
(WPSConfig.bat and wpconfig.xml). You will use WPSConfig.bat file to
run portal configuration tasks. You will work with this program when you
do database and LDAP migration tasks.
DRAFT DRAFT DRAFT
WebSphere Portal Server: Step By Step www.WebSphereMentor.com
UNDER REVIEW USE AT YOUR OWN RISK
Author: Rama Turaga Page 20 Courtesy to: Owen Cline
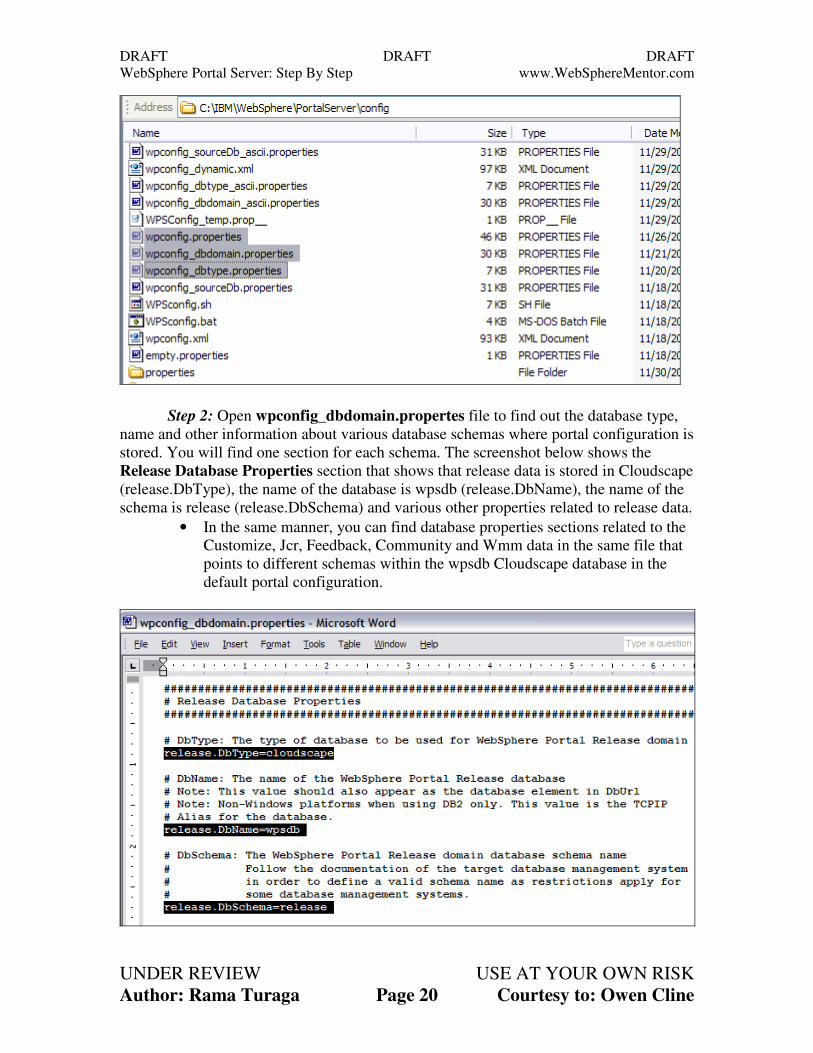
Step 2: Open wpconfig_dbdomain.propertes file to find out the database type,
name and other information about various database schemas where portal configuration is
stored. You will find one section for each schema. The screenshot below shows the
Release Database Properties section that shows that release data is stored in Cloudscape
(release.DbType), the name of the database is wpsdb (release.DbName), the name of the
schema is release (release.DbSchema) and various other properties related to release data.
• In the same manner, you can find database properties sections related to the
Customize, Jcr, Feedback, Community and Wmm data in the same file that
points to different schemas within the wpsdb Cloudscape database in the
default portal configuration.

DRAFT DRAFT DRAFT
WebSphere Portal Server: Step By Step www.WebSphereMentor.com
UNDER REVIEW USE AT YOUR OWN RISK
Author: Rama Turaga Page 21 Courtesy to: Owen Cline
Step 3: Open the wpconfig_dbtype.propertes file to find out the database driver
information for various databases. You will find one section for each database type. The
screenshot below shows the Cloudscape Properties section that shows the Dbdriver and
DbLibrary JdbcProviderName.
• In the same manner, you can find properties sections related to various other
supported database drivers. But, the portal configuration needs information
about DbType that has been defined in the wpconfig_dbdomain.properties
file which is Cloudscape right now. It will ignore information on other
databases drivers unless the DbType matches to that database.
• You will learn about DbSafeMode parameter when you do the portal
horizontal clustering later.
Step 4: Now open wpconfig.propertes file to find configuration parameters about
everything (except the database information) like information on WAS, Portal, LDAP,
Java, security (WAS and Portal administrative user-ids and passwords) and various other
things. You will find different sections for each component.
• You will also find information about Lotus Quickplace, Sametime, Tivoli
Access Manager (TAM) and various other things. You need to run the portal
configuration script (WPSConfig) to configure those components. Simply
having that information in these property files does not mean these
components are configured.

DRAFT DRAFT DRAFT
WebSphere Portal Server: Step By Step www.WebSphereMentor.com
UNDER REVIEW USE AT YOUR OWN RISK
Author: Rama Turaga Page 22 Courtesy to: Owen Cline
After going through the above steps you should have gotten an idea about what to do to
modify the portal configuration. For example to migrate configuration data from
Cloudscape to DB2 database, you need to modify parameters in the wpconfig_dbdomain
and wpconfig_dbtype property files pointing to DB2 database and schemas and then run
a portal configuration command with the task name (“WPSConfig.bat database-transfer”
command from <WPV6-ROOT>\config directory). You will perform these tasks step by
step in the next chapter. Before that if you want to see how you can create new users and
create a customized portal page by placing the sample portlets and performing some
frequently used administrative tasks then refer to Chapter 8 (WP V6: Work with the
Portal server) when it is made available online. Instructions in Chapters 8 and 9 can be
performed after completing the basic portal server installation (at the end of this chapter)
or at heend of any other chapter. But if you create new pages and other resources before
data migration to DB2 and LDAP server then the migration task will run for longer time.
So it is advisable to perform steps on chapter 8 and 9 till you complete chapter 5.

DRAFT DRAFT DRAFT
WebSphere Portal Server: Step By Step www.WebSphereMentor.com
UNDER REVIEW USE AT YOUR OWN RISK
Author: Rama Turaga Page 23 Courtesy to: Owen Cline
Apply Fix Pack
Applying fixpacks and ifixes for portal server may be a two step process. You may have
to apply fixes at both WAS and WP products as WP V6 runs on top of WAS V6.0.2.x.
You need to provide the location of WP V6 installation directory <WPV6-ROOT> and
the portal fixpack file (PAK file) at the time of applying portal server fixes through the
portal update wizard (portalupdatewizard.bat) and, location of the WAS V6.0.2.x
installation directory <WASV6-ROOT> and WAS fixpack file (PAK file) at the time of
applying application server fixes through WAS update wizard (updatewizard.bat).
Otherwise applying fixpack for portal server is similar to applying fix pack for WAS.
Refer to chapter 19 (Installing Product Updates) in the printed version of the book (and
documentation provided in the portal fixpack zip file) to get more information on
applying fixpacks in WAS V6 (and WP V6) environments. IBM released fix pack 1 for
WP V6 at the time of reviewing ths chapter. You can download the fixpack at
https://www14.software.ibm.com/webapp/iwm/web/reg/download.do?source=swgwp-
fixpacks&S_PKG=6001.
Silent Installation Overview
So far you have seen how to install WP V6 using the Graphical User Interface (GUI)
screen. You can also install the portal server from a command line just like you do for
WAS-ND V6. You can automate the installation process by providing the options in
reponsefile.txt during the silent install. The silent installation procedure for portal server
(WP V6) is similar to WAS-ND V6 procedure as WP V6 is based on WAS V6. The only
difference is that in WP V6 you need to provide extra information (portal installation
directory etc.) that are specific to the portal server apart from WAS ND V6 information.
Refer to chapter 3 and 7 of printed version of the book to get complete understanding of
the silent installation.
A sample response file is given in the root directory of the WP V6 images or CDs just
like in WAS ND V6. You can customize the response file to your environment using the
sample responsefile as a template. Run the following command from the command line
providing the responsefile as an input to silently install the portal server.
>install.bat -options “path-to-the-responsefile”