chapter 2 – types of worksteps
TRANSCRIPT

USER MANUAL
Newgen Software Technologies Ltd
A-6, Satsang Vihar Marg, Qutab Institutional Area
New Delhi - 110067, INDIA
Tel: 91-11-40770100, 26964733, 26963571
Fax: +91-11-26856936
E-mail: [email protected]
Mar – 2020
iBPS
PROCESS DESIGNER
TYPES of WORKSTEPS

Types of Worksteps Page 1
TABLE OF CONTENTS
About Types of Worksteps User Manual ........................................................................................................ 5
1 Types of Worksteps ............................................................................................................................... 6
2 Task Templates ...................................................................................................................................... 8
2.1 NewTask ......................................................................................................................................... 9
2.1.1 Task Tab ............................................................................................................................... 10 2.1.2 Data Tab ............................................................................................................................... 11 2.1.3 Options Tab .......................................................................................................................... 17 2.1.4 Escalation Rule(s) ................................................................................................................. 18
2.2 Process Task .................................................................................................................................. 20
2.2.1 Task Tab ............................................................................................................................... 22 2.2.2 Data Tab ............................................................................................................................... 24 2.2.3 Forward Mapping Tab .......................................................................................................... 24 2.2.4 Reverse Mapping Tab ........................................................................................................... 24
3 Start Events ......................................................................................................................................... 25
3.1 Start Event .................................................................................................................................... 26
3.1.1 Process Tab .......................................................................................................................... 27 3.1.2 Data Tab ............................................................................................................................... 27 3.1.3 Registration Tab ................................................................................................................... 28 3.1.4 Basic Details Tab ................................................................................................................... 30 3.1.5 Workdesk Tab ...................................................................................................................... 31 3.1.5.1 To Do List ......................................................................................................................... 32
3.1.5.2 Actions .............................................................................................................................. 32
3.1.5.3 Exception(s) ...................................................................................................................... 37
3.1.5.4 Documents ........................................................................................................................ 38
3.1.5.5 Scan .................................................................................................................................. 39
3.1.5.6 Mobile Configurations ....................................................................................................... 41
3.1.5.7 SAP GUI Adapter .............................................................................................................. 42
3.1.6 Attachments Tab .................................................................................................................. 43 3.1.7 Requirements Tab ................................................................................................................ 43
3.2 Conditional Start ........................................................................................................................... 44
4 Activities .............................................................................................................................................. 46
4.1 Subprocess .................................................................................................................................... 47

Types of Worksteps Page 2
4.1.1 Basic Details Tab ................................................................................................................... 49 4.1.2 Forward Mapping Tab .......................................................................................................... 49 4.1.3 Reverse Mapping Tab ........................................................................................................... 52
4.2 Workdesk ...................................................................................................................................... 53
4.2.1 Basic Details Tab ................................................................................................................... 54 4.2.2 Data Tab ............................................................................................................................... 55 4.2.3 Options Tab .......................................................................................................................... 55 4.2.4 Entry Settings Tab ................................................................................................................. 57
4.3 Robot Workdesk ........................................................................................................................... 66
4.4 Case Workdesk.............................................................................................................................. 67
4.4.1 Basic Details Tab ................................................................................................................... 69 4.4.2 Task Tab ............................................................................................................................... 70 4.4.2.1 Associate User(s) ............................................................................................................... 71
4.4.2.2 Data Mapping .................................................................................................................... 71
4.4.2.3 Manage Rule(s) ................................................................................................................. 72
4.4.2.4 Manage Right(s) ................................................................................................................ 76
4.5 Receive ......................................................................................................................................... 77
4.5.1 Receive Tab .......................................................................................................................... 78
4.6 Reply ............................................................................................................................................. 78
4.6.1 Output Variables Tab ............................................................................................................ 79
4.7 Email ............................................................................................................................................. 79
4.7.1 Send Tab .............................................................................................................................. 79
4.8 Export ........................................................................................................................................... 81
4.8.1 Basic Details Tab ................................................................................................................... 83 4.8.2 Export Tab ............................................................................................................................ 84
4.9 Query ............................................................................................................................................ 86
4.9.1 Basic Details Tab ................................................................................................................... 88 4.9.2 Data Tab ............................................................................................................................... 88 4.9.3 Workdesk Tab ...................................................................................................................... 89 4.9.4 Search Variables Tab ............................................................................................................ 92 4.9.5 Search Results Tab ................................................................................................................ 92
4.10 Web Service .............................................................................................................................. 93

Types of Worksteps Page 3
4.10.1 Basic Details Tab ................................................................................................................... 94 4.10.2 WebService Tab .................................................................................................................... 97
4.11 Business Rule .......................................................................................................................... 103
4.11.1 Business Rule Tab ............................................................................................................... 103
4.12 DMS Adapter ........................................................................................................................... 105
4.12.1 Entry Settings Tab ............................................................................................................... 106
4.13 OMSAdapter ........................................................................................................................... 112
4.13.1 Template Tab ..................................................................................................................... 113 5 Intermediate Events .......................................................................................................................... 119
5.1 Event........................................................................................................................................... 120
5.1.1 Message Tab ...................................................................................................................... 121
5.2 JMS Producer .............................................................................................................................. 122
5.2.1 Process Tab ........................................................................................................................ 124 5.2.2 Entry Settings Tab ............................................................................................................... 124 5.2.3 JMS Producer Tab ............................................................................................................... 126
5.3 JMS Consumer ............................................................................................................................ 128
5.3.1 JMS Consumer Tab ............................................................................................................. 130
5.4 Timer Event ................................................................................................................................. 131
5.4.1 Basic Details Tab ................................................................................................................. 132 5.4.2 Workdesk Tab .................................................................................................................... 133 5.4.3 Entry Settings Tab ............................................................................................................... 134 5.4.4 Options Tab ........................................................................................................................ 138 5.4.5 Reminder Tab ..................................................................................................................... 140 5.4.6 Data Tab ............................................................................................................................. 142
6 Gateways ........................................................................................................................................... 143
6.1 Inclusive Distribute...................................................................................................................... 144
6.1.1 Distribute Tab ..................................................................................................................... 145
6.2 Parallel Distribute........................................................................................................................ 148
6.2.1 Distribute Tab ..................................................................................................................... 149
6.3 Inclusive Collect .......................................................................................................................... 154

Types of Worksteps Page 4
6.3.1.1 Basic Details Tab ............................................................................................................. 155
6.3.2 Collect Tab ......................................................................................................................... 156
6.4 Parallel Collect ............................................................................................................................ 157
6.4.1 Collect Tab ......................................................................................................................... 158
6.5 Data Based Exclusive ................................................................................................................... 160
6.5.1 Routing Criteria Tab ............................................................................................................ 162 7 End Events ......................................................................................................................................... 166
7.1 End Event .................................................................................................................................... 167
7.1.1 Entry Settings Tab ............................................................................................................... 168
7.2 Terminate Event .......................................................................................................................... 174
7.3 Message End ............................................................................................................................... 176
7.3.1 Initiate Workstep Tab ......................................................................................................... 177 8 Artifacts ............................................................................................................................................. 178
8.1 Text Annotation .......................................................................................................................... 179
8.2 Group Box ................................................................................................................................... 180
8.3 Data Object ................................................................................................................................. 181
8.4 Message ...................................................................................................................................... 183
9 Swim Lanes ........................................................................................................................................ 185
9.1 Rename Swimlane ....................................................................................................................... 186
9.2 Queue Management ................................................................................................................... 188
9.2.1 Delete Swimlane................................................................................................................. 189 10 Constraints on Object Deletion .......................................................................................................... 190
11 List of Abbreviations .......................................................................................................................... 193

Types of Worksteps Page 5
About Types of Worksteps User Manual Types of Worksteps User Manual provide a detailed description about the various objects available
for defining a process. The chapters of this manual are:
Chapter 1: Types of Worksteps This chapter gives an overview of different types of Worksteps.
Chapter 2: Task Templates This chapter discusses about how to define ad-hoc tasks within a process.
Chapter 3: Start Events This chapter discusses about how to add an entry point that can initiate
transaction of a workflow.
Chapter 4: Activities This chapter discusses about how to define various human and system activities to
configure a workflow.
Chapter 5: Intermediate Events This chapter discusses about how to add events that can integrate calls and
exchange data with external systems.
Chapter 6: Gateways This chapter discusses about how to build a workflow routing logic and distribute
transaction.
Chapter 7: End Events This chapter discusses about how to define end events to complete the
transaction.
Chapter 8: Artifacts This chapter discusses about how to add annotations to the designed workflow
and improve readability.
Chapter 9: Swim Lanes This chapter discusses about partitioning a set of activities from other activities.
Chapter 10: Constraints on Object
Deletion
This chapter discusses about the situations in which the deletion of activities are
not allowed.
Chapter 11: List of Abbreviations This chapter contains an alphabetical list of technical words with explanations.

Types of Worksteps Page 6
Chapter
1
1 Types of Worksteps
This chapter consists of:
• Types of Worksteps Overview

Types of Worksteps Page 7
Types of Worksteps
For defining a process, the iBPS application provides a user-friendly graphical interface known as
Process Designer. A process consists of various types of worksteps on which workitems are
processed either manually or by the system, depending on the type of a workitem. After a workitem
is processed, it flows to the next workstep in the process.
Designing area of the Process Modeler is divided into TaskLane and SwimLane.
• TaskLane allows you to define ad-hoc activities for a process. These tasks can be made optional
or mandatory. Many tasks can be associated with a single workdesk.
• SwimLane is a graphical container for partitioning a set of activities from other activities.
NOTE:
SwimLane can be renamed, whereas TaskLane cannot be renamed. TaskLane will be standard as it is only lane available
in system.
This chapter includes the detailed description about the various objects available for defining a
process:
1. Task Templates
2. Start Event
3. Activities
4. Intermediate Events
5. Gateways
6. End Events
7. Artifacts
8. Swim Lanes

Types of Worksteps Page 8
Chapter
2
2 Task Templates
This chapter consists of:
• New Task
• Process Task

Types of Worksteps Page 9
2.1 NewTask NewTask allows you to create ad-hoc tasks within a process. A task may or may not be dependent
on another task within the process and can be executed any time as and when required.
To define properties for NewTask:
1. From the Tool Box, under Task Templates, click NewTask, as shown in the following figure:
Figure 2.1
2. Drag and drop it in the work area. Now, double-click it to open the NewTask workstep
properties. You can also open properties by performing a right-click on the NewTask and then
selecting the Properties option.
Figure 2.2

Types of Worksteps Page 10
3. The NewTask workstep properties pop up box appears.
Figure 2.3
4. It has four tabs (placed at the bottom of the properties page):
• Task
• Data
• Options
• Escalation Rule(s)
2.1.1 Task Tab Task tab allows you to specify and change the description of the task and set other details such as
the Repeatable, Cost, Description, Instructions, Notify by Email, Task Advisor, Goal and Turnaround
Time.
Task tab contains the following fields:
• Name: Displays task name in read-only mode.
• Description: Allows you to specify a description of the task.
• Goal: Allows you to set goal of the task.
• Instructions: Allows you to specify instructions to complete the task.
• Repeatable: If checked, the task can be used again and again by other users also. If unchecked,
the task will be used only once.

Types of Worksteps Page 11
• Notify By Email: Allows you to send notification through an email.
• Turnaround Time: Allows you to enter TAT (Turnaround Time) in days, hours and minutes either
using working days or calendar days.
• Cost ($): Allows you to specify cost to complete this task.
• Task Advisor: Allows you to appoint task advisors. To select a Task Advisor:
➢ Click on button. Select User window pops-up.
➢ Click on the desired user name to select it. The selected user appears in the textbox.
➢ Click on / (Add/Remove) buttons to add/remove Task Advisors.
2.1.2 Data Tab Data tab allows you to create Task Data and define its variables using Forms. It contains the
following sections:
• Select Form Type
• Variable Definition
The Data tab is shown below:
Figure 2.4

Types of Worksteps Page 12
• Select Form Type: It allows you to select a form type for your task. Depending on your
requirement, you can select one form type from the following three options:
➢ Default HTML Form: To design form using the Default HTML Form
➢ NGForm: To design form using iBPS Form Builder
➢ IForm: To design form using iBPS iForm Builder
NOTE:
Forms designed using iForm Builder are viewable in all devices.
To Add Variable Definition: 1. Enter Variable Name.
2. Select Variable Type (data type). It can be a Text, Integer, Date, Long or Float.
3. Enter Display Name. It is disabled for NGForm and IForm
4. Select Control Type. It can be a TextBox, TextArea or Combo.
5. Click on (Add). The variable gets added in the list, as shown in the following figure.
Figure 2.5
To Delete a Variable:
Types of Worksteps Page 13
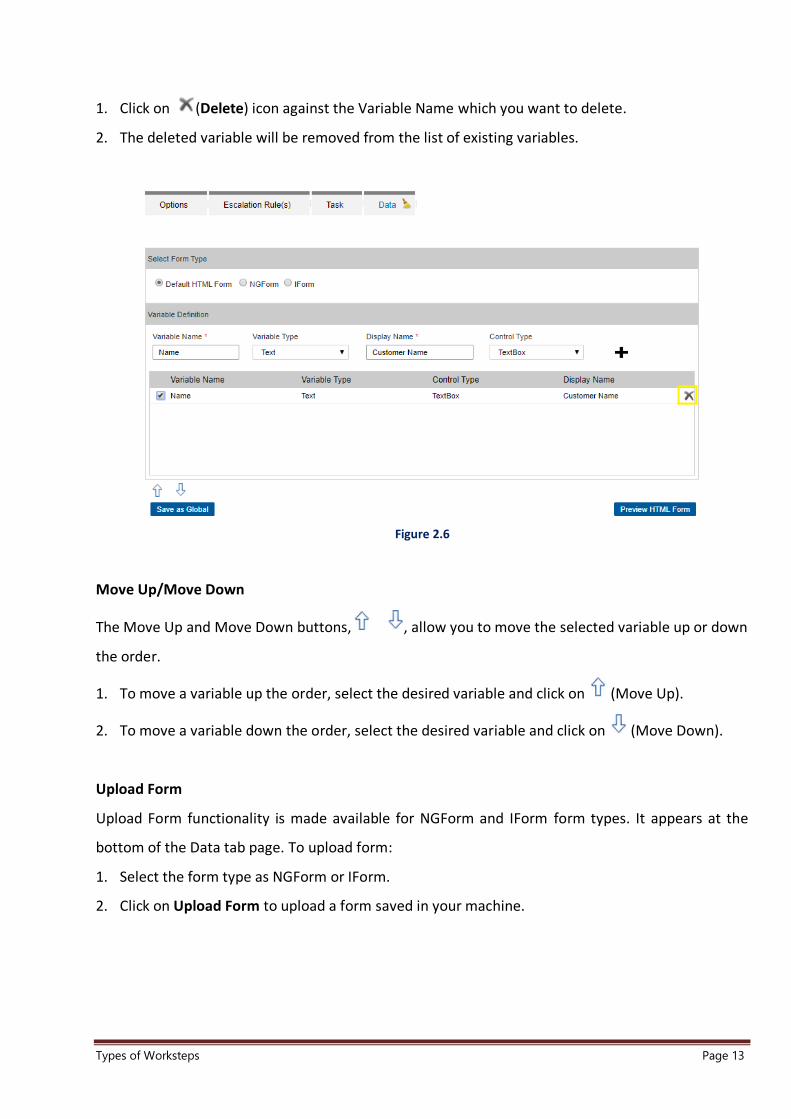
1. Click on (Delete) icon against the Variable Name which you want to delete.
2. The deleted variable will be removed from the list of existing variables.
Figure 2.6
Move Up/Move Down
The Move Up and Move Down buttons, , allow you to move the selected variable up or down
the order.
1. To move a variable up the order, select the desired variable and click on (Move Up).
2. To move a variable down the order, select the desired variable and click on (Move Down).
Upload Form
Upload Form functionality is made available for NGForm and IForm form types. It appears at the
bottom of the Data tab page. To upload form:
1. Select the form type as NGForm or IForm.
2. Click on Upload Form to upload a form saved in your machine.

Types of Worksteps Page 14
Figure 2.7
3. Upload Form dialog box appears.
Figure 2.8
4. Click on Choose File button to select the form for uploading.
NOTE:
For NGForm, .ngf type form is allowed to be uploaded. For IForm, .xml type form is allowed to be uploaded.
5. Dialog box to select the form appears.

Types of Worksteps Page 15
6. Select the desired form (NGForm/IForm) and click on Ok. The uploaded form appears in
FormBuilder.
NOTE:
Refer to Form Builder and iForm Builder user manuals to learn about the two form types.
Add/Edit Form Add/Edit Form functionality is used to design a new NGForm/IForm or edit the existing form. It
appears at the bottom of the Data tab page.
To Add/Edit Form:
1. Click on Add/Edit Form button.
Figure 2.9
2. The FormBuilder screen appears. If there is any associated NGForm/IForm form, then that form
appears in edit mode. If there is no associated NGForm/IForm form, then a blank page appears,
allowing you design a new form.
Save as Global:
Save as Global button allows you to save the defined Data as a global template. This means that if it
is saved as global, then this data definition will be made available across the cabinet. Thus, it can be
used by any user for any process.

Types of Worksteps Page 16
Figure 2.10
To Save as Global: 1. Click on Save as Global after defining the Variable Definition.
2. The system asks for template name.
Figure 2.11
3. Enter the Template Name and click Add.
4. The newly added Global Template (Template1 below) gets added in Task Templates of Tool Box.

Types of Worksteps Page 17
Figure 2.12
NOTE:
Global Template can also created by going to Tools->Global Task Template. All the global templates are modified from
Global Task Template screen. Refer to Interface of Process Modeler, section Global Task Template, user guide.
2.1.3 Options Tab Options tab allows you to define expiry time of any task. To define expiry time:
1. Click on Options tab. The selected tab appears.
Figure 2.13
2. Never Expires option is selected by default.
3. Select Expires After option to define expiry time.

Types of Worksteps Page 18
4. Select date after which the task will expire. The Expires After option lists all the Date type
variables in the process.
5. To enter the expiry period, select the Date + (plus) / - (minus) the number of days, hours,
minutes, seconds, and Working/Calendar day after which the task will expire.
For example: The expiry date can be specified as 12 days after the Entry Date Time. User can
enter a fixed value for Days, Hours, Minutes, and Seconds by selecting <constant> option, or
simply selecting a defined constant from the list, which is expected to have a valid integer value
at run-time.
6. Specify Action.
i. Revoke is selected by default. Keep is selected if you wish to revoke the task from the one,
to whom the task was assigned.
ii. Select Reassign to reassign the task to someone else.
• Enter a fixed person for Reassign by selecting <constant> option, or simply select a
person from the combo box.
7. Select Trigger to invoke trigger on expiry. List of available triggers is displayed in dropdown list.
2.1.4 Escalation Rule(s) Escalation Rule(s) tab allows you to define escalation rules for any task. It is useful in case the task
has not been completed within a specified time.
To Define Escalation Rules:
1. Click on Escalation Rule(s) tab. The selected tab appears.

Types of Worksteps Page 19
Figure 2.14
The existing rules appear listed in the page, if there is any.
2. Click on Add to add escalation rules. Escalation Rule dialog box appears.
Figure 2.15
3. Specify the time period after which the Escalation will be invoked.
• Select the Date + (plus) the number of days, hours, minutes, seconds, and Calendar Type
(Working/Calendar day) after which the task will be escalated.
• Enter a fixed value for Date, Days, Hours, Minutes, and Seconds by selecting <constant>
option or select options from the respective combo boxes. It lists all the Date type variables
in the process.

Types of Worksteps Page 20
4. Click on Configure Mail Template to define a mail template, using which an email will be sent to
the Supervisor or the Team Leader for the escalated task. Refer to Mail Trigger (ESCALATE TO
WITH TRIGGER) to learn how to configure mail template.
Figure 2.16
5. Click on Ok to save the defined Escalation Rule.
The rule gets listed in Escalation Rule(s) tab.
2.2 Process Task Process Task tab allows you to initiate and link another process as a child process to the main
process/case.
At run time a case manager may require to further initiate independent processes and link them to
the main process/case for processing information through a different flow. In such a situation, the
Process Task will enable the case manager to initiate sub processes as independent or dependent
processes to the case. It will allow user to exchange data/documents between the child process and
the main process.

Types of Worksteps Page 21
To Define Properties for Process Task:
1. From the Tool Box, under Task Templates, click ProcessTask.
Figure 2.17
2. Drag and drop it in the work area. Now, double-click it to open the ProcessTask properties. You
can also open properties by performing a right-click on the ProcessTask and then selecting the
Properties option.
Figure 2.18

Types of Worksteps Page 22
3. The ProcessTask properties are displayed just below the designing area.
The following three tabs are placed at the bottom of the properties area:
• Task • Forward Mapping • Reverse Mapping
Figure 2.19
2.2.1 Task Tab Task tab allows you to specify the subtype of ProcessTask, provide the description and set other
details such as the Repeatable, Cost, Description, Instructions, Notify by Email, Task Advisor, Goal
and Turnaround Time.
Task tab contains the following fields:
1. Name: It contains the process task name (un-editable).
2. Type: This dropdown list contains the subtypes of process task.
• Asynchronous: Asynchronous type is used to initiate a sub-process in asynchronous mode
i.e. the completion of the initiated child process will have no dependency on the case. The
case can be completed even if the child workitem is not completed.

Types of Worksteps Page 23
• Synchronous: Synchronous type is used to initiate a sub-process in synchronous mode i.e.
the completion of the initiated child process will have an impact on the case and the case
cannot be completed till the initiated child workitem gets completed.
• User Monitored Synchronous: User monitored Synchronous type allows the case manager
to initiate the task and assign it to a case worker/participant as a normal task. The task
worker will work on the task and if required can initiate the sub-process based on need basis
from the task itself. Once the child process gets completed the information will get
synchronized back at the task level and then the task worker can process that information
and complete the underlying task. The completion of the initiated child process will have an
impact on the case and the case cannot be completed till the initiated child workitem gets
completed.
NOTE:
On selecting User monitored Synchronous task, Data tab appears. It is used to define form and variables. The Data tab
is unavailable for Asynchronous and Synchronous types.
Figure 2.20
3. Description: Allows you to specify a description of the task.
4. Goal: Allows you to set goal of the task.
5. Instructions: Allows you to specify instructions to complete the task.

Types of Worksteps Page 24
6. Repeatable: If checked, the task can be used again and again by other users also. If unchecked,
the task will be used only once.
7. Notify By Email: Allows you to send notification through an email.
8. Turnaround Time: Allows you to enter TAT (Turnaround Time) in days, hours and minutes either
using working days or calendar days.
9. Cost ($): Allows you to specify cost to complete this task.
10. Task Advisor: Allows you to appoint a single or multiple task advisors. To select a Task Advisor:
• Click on button. Select User window pops-up.
• Click on the desired user name to select it. The name of the selected user appears in the
textbox.
• Click on (Add) button to add more Task Advisors.
• Click on (Remove) against the desired task advisor to remove it.
Figure 2.21
2.2.2 Data Tab Data tab is enabled on selecting User monitored Synchronous task (available in Task Tab of
ProcessTask). The process designer will be able to define task variables and define form. Also, the
task variables will be available for forward and reverse mapping.
Refer to Data Tab (of NewTask) to define data properties.
2.2.3 Forward Mapping Tab Refer to Forward Mapping to learn about defining Forward Mapping properties.
2.2.4 Reverse Mapping Tab Refer to Reverse Mapping to learn about defining Reverse Mapping properties.

Types of Worksteps Page 25
Chapter
3
3 Start Events
This chapter consists of:
• Start Event
• Conditional Start

Types of Worksteps Page 26
3.1 Start Event Each process has an entry point that can be referred to as a Start Event. It consists of only outgoing
links and no incoming links. It is added by default whenever a new process is created in the Process
Tree.
To define the properties for the Start Event workstep:
1. From the Tool Box, under Start Events, drag Start Event workstep
Figure 3.1
2. Start Event Workstep Properties pop up box appears. Registration tab opens by default.
Figure 3.2

Types of Worksteps Page 27
3. It has seven tabs: Process, Activity, Workdesk, Registration, Data, Requirements and
Attachments.
3.1.1 Process Tab Process tab allows the user to enter and change the description of the step and set other details
such as the description, version, cost, owner, consultant and system.
Process Tab contains following fields:
1. Process: Displays process name in read only mode.
2. Description: Allows user to enter process description.
3. Version: Displays version number of process in read only mode.
4. Creator: Displays name of the user who have created the process.
5. Cost (US$): Allows user to enter cost.
6. Owner: Allows user to enter owner name.
7. Consultant: Allows user to enter consultant name.
8. System: Allows user to enter system.
9. Provider: Allows user to enter provider name.
10. Consumer: Allows user to enter consumer name.
11. Calendar: Allows user to add calendar.
12. Form Viewer Application: This dropdown contains three options Applet Viewer, HTML Form
Viewer and OCX Viewer.
13. Turnaround Time: Allows users to enter TAT (Turnaround Time) in days, hours and minutes
either using working days or calendar days.
3.1.2 Data Tab Data Tab allows user to give rights to read/modify the variables. It includes entire queue, complex
and external variables (if external database is associated) defined for the process. Click Data to view
the Data Tab.

Types of Worksteps Page 28
Figure 3.3
Data Tab contains following fields: 1. Variables: Displays the entire queue, complex and external variables (if external database is
associated) defined for the process.
2. Read: Checkbox used to give rights to read variables.
3. Modify: Checkbox used to give rights to modify variables.
NOTE:
1. If the variables are not associated with ‘Read’ permission, system does not display variables on the Start Event
workstep while executing the process.
2. If the variables are not associated with ‘Modify’ permissions, they are appeared on the Start Event workstep as
read-only while executing the process.
NOTE:
Only those variables that have been associated with Read/Modify permissions on a workstep are available at the time of
ToDo List definitions. Similarly these are available in Form Builder for association with Form Fields.
3.1.3 Registration Tab Registration tab allows user to define workitem id created for process. Each workitem in the process
has a unique identification.

Types of Worksteps Page 29
Figure 3.4
NOTE:
User should check Create WebService check box if process is imported from old environment where webservice tags
were not available.
Registration Tab contains following fields:
1. Prefix: Allows user to enter starting character sequence for workitem id.
2. Starting Sequence No.: Allows user to enter starting sequence number for workitem id which
adds after prefix.
3. Suffix: Allows user to enter end character sequence for workitem id.
4. Registration Length: Specifies the length of the workitem id string.
5. Threshold Count: Specifies the number of times any process loop can run. Once the loop
reaches Threshold Count, the workitem moves to the subsequent workitem.
6. Create WebService: Select this checkbox to create webservice whenever the process starts.
The generated workitem id should be <<Prefix>>-<<Starting Sequence No>>-<<Suffix>>.
Limitations for defining the Registration Sequence:
1. The value of the starting sequence number must lie between 1 to + 2147483647.
2. Only 20 characters are allowed for both prefix and suffix.
3. Registration length cannot have value less then (number of character in prefix) + (no of
character in suffix) + 12.

Types of Worksteps Page 30
NOTE:
Registration Sequence of variant process should be less than or equal to Registration Sequence of Base Process. The
combination of prefix and suffix should also be unique across all the registered processes (including all variants) in a
cabinet.
3.1.4 Basic Details Tab This tab allows the user to define the type of workitem.
Figure 3.5
This tab contains following fields:
1. Activity: Displays the name of the Activity in read only mode.
2. Milestone: Displays the name of the Milestone in read only mode.
3. SwimLane: Displays the name of the swimlane in which the workitem is placed.
4. Queue: Displays the name of the queue to which the workitem belongs.
5. Mobile Enabled: Allows user to use the activity on mobile.
6. Form Name: Allows user to select Form Name (created through Form List).
7. Target Workstep: Allows user to set activity as Target Workstep.
8. Calendar: Allows user to add calendar.
9. Cost (US$): Allows user to add cost.
10. Set As Default: Allows user to set selected activity as default i.e. selected activity as starting
step.

Types of Worksteps Page 31
11. Description: Allows user to enter description of the activity.
12. Custom Validation: Allows user to add custom validation on activity.
13. Owner: Allows user to enter owner name.
14. Consultant: Allows user to enter consultant name.
15. System: Allows user to enter system name.
16. Provider: Allows user to enter provider name.
17. Consumer: Allows user to enter consumer name.
3.1.5 Workdesk Tab Workdesk Tab allows user to display To Do List, Actions, Exception(s), Document and Scan along
with selected activity. The configuration of the Workdesk tab facilitates the run-time display of the
Workdesk for the users working on workitems of this step, i.e. if user wishes to view only the
Document, then only this tool need to be configured in their respective tabs for this step.
To work with the Work desk:
1. Select Workdesk tab from Start Event workitem.
2. Click Workdesk to view the Workdesk tab.
Figure 3.6

Types of Worksteps Page 32
Workdesk Tab contains following fields:
1. To Do List
2. Actions
3. Exception(s)
4. Document
5. Scan
3.1.5.1 To Do List To associate To Do List:
1. Check ToDo List option to associate a To Do list.
2. Select To do Item which has to be associated with the workstep from the Defined List.
NOTE:
In case no items are defined in the process, click on Define button.
3. Click Add to associate the To Do Item.
To remove an associated To Do Item:
1. Select the required To Do Item from the To Do Item list.
2. Click Delete.
To Make To Do Item Read Only:
1. Select checkbox against ReadOnly and associate it.
2. System displays To Do Item in read only mode while executing the process.
NOTE:
System does not allow user to make To Do Item mandatory and read only simultaneously.
3.1.5.2 Actions To define an action for current workstep:
1. Click Actions to view the Action tab.
2. Check Action checkbox to associate an Action item.
3. To add the action, click Add.

Types of Worksteps Page 33
Figure 3.7
4. Add Action definition dialog box appears.
Figure 3.8
Steps to define an Action:
• Definition: Allows user to enter name of the action.
• Condition: Allows user to apply conditions.
• Condition List: Displays the list of applied conditions.

Types of Worksteps Page 34
• Operation: Allows user to define operation.
• Operation List: Displays the list of applied operations.
5. Enter the action Name. This name will appear as the Icon caption for the Action in Specify the
condition for the Action. It can be Always, incase unconditional actions need to be configured.
6. Select if, and then define the condition. For example, if the application has an approval of some
authorized person then the priority should be increased for the application. For this, you can
define that if variable ‘Approved’ = ‘Y’, then increase priority.
7. List of all variables (queue, system and external data) is available for entering the LHS of the
condition. However, in the RHS list, all the Constants defined in the process are also included.
The operators are <, >, =>. =<. !=, Not Null, Null. In case, text variable is selected then Like and
Not Like is also added. The Logical operators can be And, OR.
8. To modify the condition, select it, make changes and click Modify.
9. To delete the condition, select it and click Delete.
10. There are following operations, which can be performed as Action- Set, Raise, Clear, Increase
Priority, Decrease Priority, Trigger, Submit and Release.
The following table explains the meaning of each of the operation types provided in Operations List.
Operation Functionality Details
Set To set a variable (external, system
modifiable or queue) to a
constant, value of a variable,
result of an expression, or a fixed
value.
All the modifiable system variables, external data and queue
variables will appear in Field combo box. Value combo box
again includes all the constants, all system variables, external
data and queue variables. Operators can be +, -, * or \
Raise To raise an exception Only the exceptions that have been associated with the
workstep with Raise rights will be available in the Exceptions
Selection list.
Response To respond to the raised
exception.
Only the exceptions that have been associated with the
workstep with Response rights will be available in the
Exception section list.
Clear To raise an exception Only the exceptions that have been associated with the
workstep with Clear rights will be available in the Exceptions
Selection list.

Types of Worksteps Page 35
Increase Priority To Increment the Priority of the
workitem
Priority cannot be increased beyond ‘Very High’. Thus if the
priority of a workitem is already ‘Very High’ then this Action
will not have any effect.
Decrease Priority To Decrement the Priority of the
workitem
Priority cannot be decreased beyond ‘Low’. Thus if the priority
of a workitem is already ‘Low’ then this Action will not have
any effect.
Trigger To fire a Trigger defined in the
process
All triggers defined in the process will be available in the
selection list.
Submit To submit the workitem or mark
the workitem as ‘Done’
When this action is fired, user will be prompted to save all
changes made to the workitem, and the workitem will be
marked as DONE.
Release To save and release/close the
workitem
When this action is fired, user will be prompted to save all
changes made to the workitem, and the workitem will be
closed.
NOTE:
Respond and Clear operations are not displayed in Start Event properties.
11. From Type drop-down list, select the operation and click Add. The operation is added.
12. To modify the operation, select the operation, make changes and click Modify.
13. To delete the operation, select it and click Delete.
14. Click Ok to save the Action, else click Cancel.
15. The Action is added on the workstep after clicking Ok.
Duration data type fields in actions
You can use the duration type of variables to define actions. In the Action Definition dialog box,
under the Condition section:
1. Click the If radio button.
2. From the left drop-down list, select duration variable that you have already defined.
3. From the second drop-down list, select the operator.
4. Click Ok. The Action Definition dialog box appears.
5. Under the Condition section, click Add. The Action Definition dialog box appears.

Types of Worksteps Page 36
6. After defining the action condition, you can define the SET operation of the duration
variable. In the Action Definition dialog box, under the Operation section:
i. From the Type drop-down list, select SET.
ii. From the Field drop-down list, select the duration variable.
iii. From the Value drop-down list, select <constant>. Notice that an ellipsis button appears
next to this field and the Value drop-down list changes into a text box.
iv. Click ellipsis button next to Value text box. Define Duration dialog box appears.
v. In the Year(s), Month(s), Day(s), Hour(s), Minute(s), and Second(s) fields, enter the
duration of the field.
vi. Click Ok.
vii. From the Operator drop-down list, select an operator.
viii. From the second Value drop-down list, select <constant>. Notice that an ellipsis button
appears next to this field and Value dropdown list changes into a textbox.
ix. Click ellipsis button next to this Value textbox. Define Duration dialog box appears.
x. In the Year(s), Month(s), Day(s), Hour(s), Minute(s), and Second(s) fields, enter the
duration of the field.
xi. Click OK.
xii. In the Action Definition dialog box, under the Operations section, click Add.
Mod Operator Support
Mod operator is provided in action and rule definition. Mod operator can only be used with
operands containing integer or long type variables. In the Add Action definition screen, under the
Operation section, when you select SET from the Type drop-down list, then from the Operator drop-
down list, you can select the Mod (%) operator.
When you click the Add button, then this operation is added to the operation list after comparing
the compatibility of operands.

Types of Worksteps Page 37
3.1.5.3 Exception(s) To view the exception:
1. Click Exception(s), the Exceptions Tab is displayed.
2. Check Exception option, to associate Exceptions.
Figure 3.9
3. Select the required exception from the Exceptions list.
NOTE:
Respond and Clear operations are not displayed in Start Event properties.
4. Click View check box and then select Raise, Clear or Respond option for the exception.
Depending on the option selected, the exception will be available to the user for Introduction
workstep.
View: To view the available exceptions.
Raise: To raise a new exception.
Respond: To respond to the available exceptions.
Clear: To clear the exceptions.
5. Click Add to associate the exception with the current workstep.
6. The selected exception is added in Associated Exceptions list.
7. To define a new exception, click Define.
8. Exception screen appears.

Types of Worksteps Page 38
Figure 3.10
9. Enter Exception Name.
10. Enter the Description for the exception.
11. Click Add to add the exception. The exception is added in the available Exception(s) list.
12. Click on Ok to save the definition and return back to Exception tab of Workdesk screen.
To disassociate an associated exception with current workstep, select the exception from the
Associated Exception(s) list and click Delete.
3.1.5.4 Documents To view the Document tab:
1. Click Document. The Document tab is displayed.

Types of Worksteps Page 39
Figure 3.11
2. Select the Document check box to include the document type Tool in the step. All Document
Types defined in the process are displayed.
3. Select View/Modify rights against Document Types which have to be made viewable/editable on
the Introduction workstep.
NOTE:
For Case Summary Document, the user will have View rights on all activities as it is system generated.
4. Click Define to define the document type. The Document Definition screen appears.
NOTE:
Refer to Documents section of Interface of Process Modeler document to learn more about defining document.
3.1.5.5 Scan This tool allows Document Types to be associated with worksteps with ‘Addition’ permissions, i.e.
Document of that type will be allowed to be added/scanned/imported into the workitem at this
step.
To view Scan tab:
1. Click Scan, the Scan tab is displayed.

Types of Worksteps Page 40
Figure 3.12
2. Select the Scan Tool check box.
3. The defined document types are displayed.
4. Select the document, which has to be given addition rights at this workstep.
5. There is an option to perform Scan Action while adding the document in workitem at this
workstep.
6. To set the Scan Action, click Scan Action button. This option is only available for the document
on which ‘Addition rights’ are provided.
7. Scan Action definition screen appears.
NOTE:
Scan Actions are a set of actions that are triggered on addition of a document of that type to the workitem. They are
used for setting variables to specific fixed values, constants or values of other variables.
8. Select the variable from Set combo box for setting it with any value. Value combo box includes
all the variables and <constant>, which can be selected to enter a fixed value.
9. Click Add to add the action. The action is displayed in the Scan Actions List.
10. To modify the Scan action, select it, make changes and then click Modify.
11. To delete the action, select it and click Delete.
12. Click Ok to save the changes made, else click Cancel.
13. The defined Scan Action is added against the selected document.

Types of Worksteps Page 41
3.1.5.6 Mobile Configurations Mobile configuration settings are used to display limited workstep properties on a mobile.
Steps to add Mobile Configurations:
1. Go to Tools → Include Window.
Figure 3.13
2. Select checkbox against Mobile and click on Ok button.
Figure 3.14
3. Select checkbox against Mobile Enabled in Basic Details Tab.

Types of Worksteps Page 42
Figure 3.14
4. Go to Workdesk Tab and click on Mobile Tab.
5. Select Mobile checkbox. The added To Do List items are displayed.
6. Mobile Tab displays the set of selected options from ToDo List, Documents, Exceptions and
Variable.
3.1.5.7 SAP GUI Adapter SAP tab is available for all Workdesk type worksteps. The functions registered in SAP Tab of Catalog
Definition can be used in SAP Adapter.
NOTE:
SAP tab appears only when SAP GUI Adapter is included in Include Window. Refer to Include Window section of
Interface of Process Modeler for more details.

Types of Worksteps Page 43
3.1.6 Attachments Tab This tab allows attaching documents to a process.
To add an attachment to a process:
1. Click on Attachments tab.
2. Click on (Add Document). Add Attachment dialog box appears.
Figure 3.15
3. Click on Choose File button to select the document for attaching.
4. Browse for the attachment and select the document to be attached.
5. Click Ok to add the attachment.
6. A message appears for successful document addition.
NOTE:
The supported file formats are doc, xls, docx and zip.
3.1.7 Requirements Tab Requirements can be specified with its name and description that we need to set on a particular
workstep.

Types of Worksteps Page 44
Figure 3.16
3.2 Conditional Start To define the properties for the Conditional Start workstep:
From the Tool Box, under Start Events, click the Conditional Start workstep, as shown in the
following figure:
Figure 3.17
Place it on the work area. Now, double-click it to open the Conditional Start workstep properties.
Registration tab appears by default.

Types of Worksteps Page 45
Figure 3.18
Conditional Start Workstep Properties dialog box appears.
It has seven tabs: Process, Activity, Workdesk, Registration, Data, Requirements and Attachments.
Condition – This textbox in Basic Details tab is used to enter the condition appearing along side
Owner, consultant etc. System starts the process as the condition becomes true while executing the
process.
NOTE:
Process, Activity, Workdesk, Registration, Data, Requirements and Attachments tab are same to the Start Event
workstep.

Types of Worksteps Page 46
Chapter
4
4 Activities
This chapter consists of:
• Subprocess
• Workdesk
• Robot Workdesk
• Case Workdesk
• Receive
• Reply
• Export
• Query
• SAP Adapter
• Web Service
• Business Rule
• DMS Adapter
• OMS Adapter

Types of Worksteps Page 47
4.1 Subprocess Complex business processes can be broken into simpler processes and these simple processes can
be linked together to form the main process. This feature of easy designing and linking of business
processes together is facilitated by the ‘Independent Sub Process’ workstep. This feature allows the
workitem to be automatically initiated for processing in a sub process, until which it remains
suspended in the main process, and after its completion in the sub-process, it resumes it processing
in the parent process. There is a provision of transferring data and documents from the main
process into a sub-process and vice-versa. However, to take advantage of this transfer of data and
documents, user will have to forward mapping between the variables of the parent process and the
included sub-process, and likewise, also define the Reverse mapping between the two processes.
Forward Mapping implies that the Data of the selected variables (of the current process) is to be
passed to the corresponding mapped variables of the Independent Sub Process. Forward mapping
can also be defined for document types, implying that the documents belonging to the selected
types in the parent process are to be passed into the sub processes as the mapped types.
Reverse Mapping implies that the Data of the selected variables (of the Sub process) is to be
reflected back in the corresponding mapped variables of the Parent Process. Reverse mapping of
document types can also be defined.
To define an independent sub-process within a process:
1. Select the Independent Subprocess workstep from the Tool Box under Activities workstep.
2. Place it on the work area.

Types of Worksteps Page 48
Figure 4.1
3. Now double-click it to invoke Independent Subprocess Workstep Properties. Sub Process
Workstep Properties dialog box appears.
Figure 4.2

Types of Worksteps Page 49
It has the following tabs: Activity, Forward Mapping, Reverse Mapping, Requirements and
Attachments.
4.1.1 Basic Details Tab To view the Basic Details tab:
1. Click Basic Details, the Tab is displayed.
2. Enter the Description for the Independent SubProcess workstep.
3. The Turn Around Time is set in DD-HH-MM format; the total time taken to complete that
particular activity.
4. Set the calendar type.
5. Select the Target Workstep after the completion of the sub-process. The workitem will move to
the specified target workstep after the sub-process workitem completes.
Figure 4.3
4.1.2 Forward Mapping Tab Forward mapping facilitates the transfer of data and documents from the workitem in the parent
process to the corresponding workitem in the sub process.

Types of Worksteps Page 50
To map the Variables and Document Types from parent process to sub-process:
1. Click Forward Mapping, the Forward Mapping tab is displayed.
Figure 4.4
2. All the variables in the selected sub-process are displayed on the LHS.
3. Select the required sub-process variables and map them with the current process variables. This
mapping implies that at run-time, when the workitem reaches this step, a new workitem will be
initiated in the selected sub-process, and the values of the variables for the workitem in the
parent process will be transferred into the mapped variables of the workitem in the sub-process.
NOTE:
Only variables of the same data type in the sub-process and parent process can be mapped with each other.
4. Similarly map the document types for the Sub-Process and Parent Process, such that the
documents of the selected document types of the parent process will be transferred to the
workitem in the sub-process, and will be recognized as the mapped sub-process types in it.
5. Click Save changes.
Map Complex Variables with Process’s Table
1. Create a process and select complex types from Options -> Complex Types.
2. Add complex type.

Types of Worksteps Page 51
Figure 4.5
3. Go to Options->Queue Variables and add user-defined variable of the added complex type.
4. Select the complex type variable and click on Define Mapping button.
5. System displays all tables defined for current process and default “WFINSTRUMENTTABLE” table
in Table dropdown.
6. Add Sub process and select its properties. Go to Forward Mapping tab.
7. Click on (Map Data). All mapped variables and documents of the selected registered process
appear.
8. Select Registered Process Name from the list and select checkbox against Sub Process
Variable(s).
9. Select Current Process Variable(s).
10. Now select Queue Variables through Options -> Queue Variables.
11. Add user defined variable of complex type.
12. Select the complex type variable and click on Define Mapping button.
13. Define Mapping screen appears. (Refer Interface of Process Designer Manual for more details on
Complex Types).
14. Click on Table System displays all tables defined for current process, default
“WFINSTRUMENTTABLE” table and tables defined for the process included in subprocess
workstep in Table dropdown.
15. Click on Ok button.

Types of Worksteps Page 52
4.1.3 Reverse Mapping Tab Reverse Mapping facilitates the transfer back of data and documents from the workitem in the sub
process to the corresponding workitem in the parent process.
To map the Variables and Document Types from sub process to parent process:
1. Click Reverse Mapping, the Reverse Mapping tab is displayed.
Figure 4.6
2. All the variables in the current parent process are displayed on the LHS.
3. Select the required parent process variables and map them with the corresponding sub process
variables. This mapping implies that at run-time, when the sub-process workitem is completed in
the sub-process, the values of the variables for the workitem in the sub process will be
transferred into the mapped variables of the workitem in the parent process.
NOTE:
Only variables of the same data type in the sub-process and parent process can be mapped with each other.

Types of Worksteps Page 53
4. Similarly map the document types for the Sub-Process and Parent Process, such that the
documents of the selected document types of the sub-process will be transferred to the
workitem in the parent process.
5. Click OK to exit the properties of the SubProcess workstep.
NOTE : The sub process workstep supports complex data types mapping.
4.2 Workdesk The Standard Workdesk workstep allows user to explicitly login to his desktop to perform the
intended operation. These worksteps can also be termed as Manual worksteps.
To define the properties of Standard Workdesk workstep:
1. Select the Workdesk workstep from the ToolBox under Activities.
NOTE:
Requirements and Attachments are similar to the Start Event workstep.
Figure 4.7

Types of Worksteps Page 54
2. Place it on the work area. Now double-click it to invoke the Workdesk Workstep Properties.
3. The Workdesk Workstep Properties dialog box appears.
Figure 4.8
4.2.1 Basic Details Tab To view/define the activity properties:
1. Click Basic Details tab.
• Activity contains the name of this workstep activity.
• Milestone contains the name of the workstep milestone.
• Swimlane specifies the name of the swimlane the current workstep is placed in.
• Queue specifies the name of the queue.
2. Select Target Workstep to set activity as Target Workstep.
3. Calendar: It is used to add calendar.
• Click to load Calendar List
• Click to view Calendar
4. Select Form Enabled checkbox to use a form on this workstep.
5. Select Mobile Enabled checkbox to use the activity on mobile.
6. Select Form Name checkbox to select Form Name (created through Form List).
7. Provide Custom Validation on activity.
8. Specify Cost in US$.
9. Enter Description of the activity i.e. what the workstep is intended to do. The description makes
it easier for users to understand the role of this workstep in the process.

Types of Worksteps Page 55
10. Select Owner name.
11. Select Consultant name.
12. Enter System name.
13. Enter Provider name.
14. Enter Consumer name.
4.2.2 Data Tab To view the data tab:
1. Click Data. Data Tab appears.
Figure 4.9
2. It includes all the queue variables defined for the process.
3. Check Read and Modify checkboxes for making the variables readable and modifiable at the
workstep.
4.2.3 Options Tab To view the Options tab:
1. Click Options, the Options tab appears.
2. iBPS ensures timely execution of workitems on a workstep, by means of expiry intervals that can
be set for a User step.
3. For setting the expiry on the workstep, select Expires After option.
4. Select date after which the workitems will expire on that workstep, and get routed to the ‘Target
Workstep’. The Expires After option lists all the Date type variables in the process.
5. To enter the expiry period, select the Date + (plus)/-(minus) the no. of days, hours, minutes,
seconds, and Working/Calendar day after which the workitems will expire. For example, the
expiry date can be specified as 12 days after the Entry Date Time. User can enter a fixed value

Types of Worksteps Page 56
for Days, Hours, Minutes, and Seconds by selecting <constant> option, or simply selecting a
defined constant from the list, which is expected to have a valid integer value at run-time.
Figure 4.10
6. After the workitems are expired, they can be routed to another workstep. Select the workstep
from the Route To combo box.
7. Select Trigger option to invoke trigger on expiry. List of available triggers is displayed.
8. Enter the Turn Around Time for the workitems on the workstep. Turn Around time enter the
time in which workitem should be processed at this workstep. If the workitems are not
completed within that amount of time then they will be displayed as Delayed in the Process
Manager.
NOTE:
Turn Around time on a workstep is simply used to highlight all delayed workitems at run-time. It does not route the
workitems out of that workstep, like incase of expiry, where workitems are routed to another workstep.
9. The Turnaround time can be specified as Days, Hours, Minutes, Seconds, or as their
combination. You can also enter the day as Working or Calendar.
10. Duration data type fields in expiry. You can select duration variable under Expiry section.

Types of Worksteps Page 57
Figure 4.11
You can set values for the Day(s), Hour(s), Min(s), and Sec(s) fields for the duration variable.
Figure 4.12
4.2.4 Entry Settings Tab To set the entry criteria for Standard Workstep:
1. Click Entry Settings, the Entry Settings tab appears.
2. Click Add to add the entry settings.

Types of Worksteps Page 58
Figure 4.13
3. Rule Definition dialog box appears.
Figure 4.14
4. Enter the Rule Condition.

Types of Worksteps Page 59
Operation Functionality Details
Set To set a variable (external,
system modifiable or queue)
to a constant, value of a
variable, result of an
expression, or a fixed value.
All the modifiable system variables, external data and
queue variables will appear in Field combo box. Value
combo box again includes all the constants, all system
variables, external data and queue variables. Operator list
consists of +, -, * or \
Increase Priority To Increment the Priority of
the workitem
Priority cannot be increased beyond ‘Very High’. Thus if
the priority of a workitem is already ‘Very High’ then this
operation will not have any effect.
Decrease Priority To Decrement the Priority of
the workitem
Priority cannot be decreased beyond ‘Low’. Thus if the
priority of a workitem is already ‘Low’ then this operation
will not have any effect.
Trigger To fire a Trigger defined in
the process
All triggers defined in the process will be available in the
selection list.
Commit To mark the current step as
the ‘Save Stage’.
iBPS provides means to Rollback workitems. Hence if any
Rollback operation is encountered in the Process, then
the workitem comes to the last ‘Save Stage’.
Assigned To It facilitates the fixed
assignment of the workitem
to a specific User or a Role.
Variable list displays all text type system, external data
and queue variables. User may select any variable, which
will contain the name of the User at run-time, or can
enter a fixed user name, by selecting the<constant>
option. The list also contains an entry named ROLE, which
may be selected to enter the Role name in the text box
provided for the same. In-order to discretely enter the
role within a group; user can enter the group name
followed by a dot, followed by the role name.
<GroupName>.<RoleName>
Set Parent Data It allows setting the data in
the parent workitem, in case
the workitem is distributed
All the modifiable system variables, external data and
queue variables will appear in Field combo box. Value
combo box again includes all the constants, all system
variables, external data and queue variables. Operator list
consists of +, -, * or \
Types of Worksteps Page 60
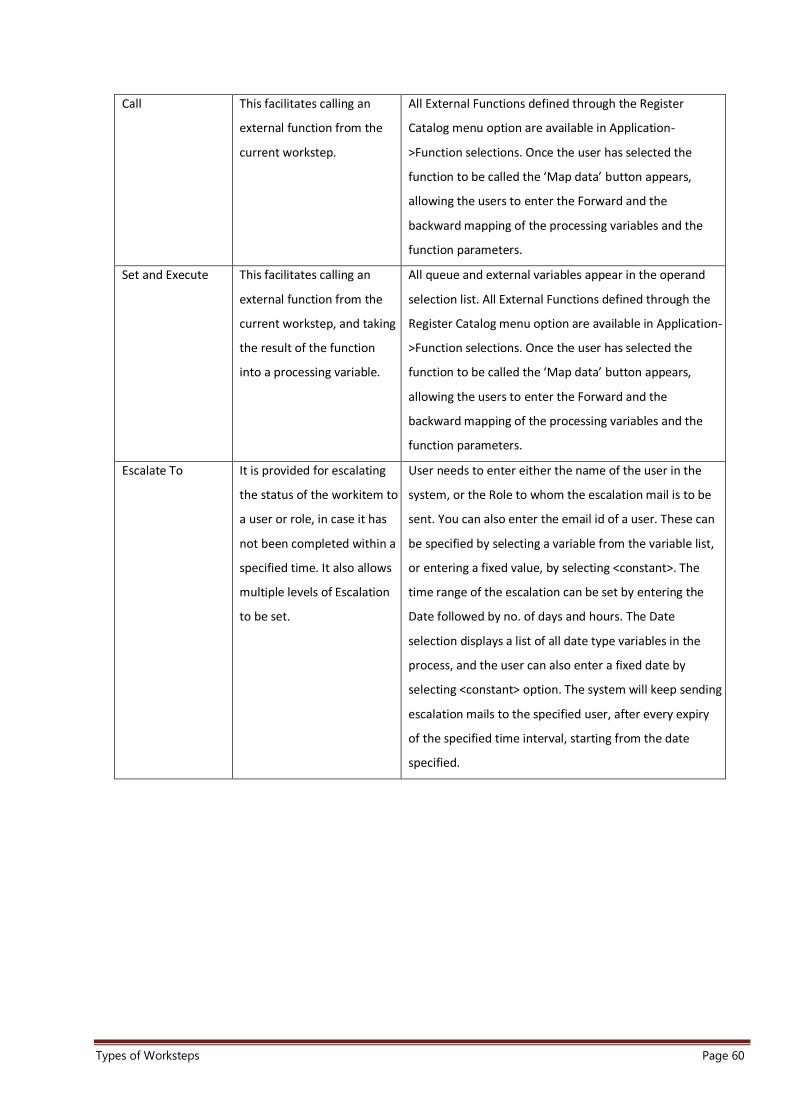
Call This facilitates calling an
external function from the
current workstep.
All External Functions defined through the Register
Catalog menu option are available in Application-
>Function selections. Once the user has selected the
function to be called the ‘Map data’ button appears,
allowing the users to enter the Forward and the
backward mapping of the processing variables and the
function parameters.
Set and Execute This facilitates calling an
external function from the
current workstep, and taking
the result of the function
into a processing variable.
All queue and external variables appear in the operand
selection list. All External Functions defined through the
Register Catalog menu option are available in Application-
>Function selections. Once the user has selected the
function to be called the ‘Map data’ button appears,
allowing the users to enter the Forward and the
backward mapping of the processing variables and the
function parameters.
Escalate To It is provided for escalating
the status of the workitem to
a user or role, in case it has
not been completed within a
specified time. It also allows
multiple levels of Escalation
to be set.
User needs to enter either the name of the user in the
system, or the Role to whom the escalation mail is to be
sent. You can also enter the email id of a user. These can
be specified by selecting a variable from the variable list,
or entering a fixed value, by selecting <constant>. The
time range of the escalation can be set by entering the
Date followed by no. of days and hours. The Date
selection displays a list of all date type variables in the
process, and the user can also enter a fixed date by
selecting <constant> option. The system will keep sending
escalation mails to the specified user, after every expiry
of the specified time interval, starting from the date
specified.

Types of Worksteps Page 61
Escalate To With
Trigger
It is provided to build in
escalation, by associating a
Mail Trigger with expiry,
such that a
notification/escalation email
can be triggered to the
supervisor or other
participants, whenever
expiry takes place in the
process.
When a workitem has not been completed within the
specified time, email messages are sent to the Supervisor
or the Team leader. Escalate To With Trigger operation
allows you to draft a complete mail for escalating the
workitem status rather than using a pre-defined email
template.
Refer to To associate escalation with mail trigger.
NOTE:
WFEscalateWorkItem procedure needs to be scheduled manually for Escalate To and Escalate To With Trigger
operations to work.
5. Click Add to add the condition.
6. To modify the condition, select it, make the changes and then click Modify.
7. To delete the condition, select it and then click Delete.
8. Enter the Operation for the condition. It can be - Set, Increase Priority, Decrease Priority, Trigger,
Assigned TO, Call, Set & Execute, Commit, Set Parent Data, and Escalate To.
Defining Escalation Rules 1. Select the option ESCALATE TO from the Type drop-down list. On selecting this option, the Rule
Definition screen appears as shown:
2. From the Variable/Email drop-down list, enter the email address of person (or group) to whom
the escalation mail should be sent.
3. From the Date drop-down list, enter the date after which the workitem should be escalated. You
can select the date value from one of the System, Queue, and External date type variables given
in the drop down box.
4. In case, you want to enter the number of days, hours, minutes, and seconds after the specified
date, you can use the Days, Hours, Minutes, and Sec(s) drop-down lists respectively.
5. You can also enter the Working/Calendar day.
6. After entering the values, click Add button to add the specified operation to the Operation List.

Types of Worksteps Page 62
7. Click Ok to save and apply the rule to the current workstep.
8. Escalation can also be applied on the basis of Roles. Role based escalation allows you to
associate the escalation mails with the specified roles instead of one or two specific individuals.
To Associate Escalation Rule with a Role:
1. Select the ROLE option from the Variable/Email drop down box while entering the operation
type, as shown in the following figure:
Figure 4.15
2. On selecting ROLE option, a new textbox, RoleName appears in the Rule Definition dialog box.
3. Enter the values in the RoleName, Date, Days, Hours, Minutes, Sec(s), and Working/Calendar.
4. Click Add button to add the Operation type to the Operation List.

Types of Worksteps Page 63
Figure 4.16
5. This is how escalation can be set for a workstep.
6. To modify the operation, select it, make the changes and then click Modify.
7. To delete the operation, select it and then click Delete.
8. Click Ok to save the changes, else click Cancel.
9. You can shift the order of the rule execution in upward direction by clicking on in the Entry
Settings tab of the workstep. You can shift the order of the rule execution in downward
direction by clicking on in the Entry Settings tab of the workstep.
NOTE:
Activity, Requirements and Attachments are similar to the Start Event workstep.

Types of Worksteps Page 64
To Associate Escalation with Mail Trigger (ESCALATE TO WITH TRIGGER)
1. Select the option ESCALATE TO WITH TRIGGER from the Type drop-down list. Rule Definition
screen appears.
Figure 4.17
2. Click on Email. Mail trigger screen appears.
3. Here you can draft the escalation mail to be triggered.

Types of Worksteps Page 65
Figure 4.18
4. Specify From, To and Subject fields as these are mandatory fields. Remaining fields can be
specified as required.
NOTE:
Select <Constant> to type the fields manually.
5. Click on Add.
6. From the Date drop-down list, enter the date after which the workitem should be escalated. You
can select the date value from one of the System, Queue, and External date type variables given
in the drop down box.
7. In case, you want to enter the number of days, hours, minutes, and seconds after the specified
date, you can use the Days, Hours, Minutes, and Sec(s) drop-down lists respectively.
8. You can also enter the Working/Calendar day.
9. After entering the values, click the Add button to add the specified operation to the Operation
List.
10. Click Ok to save and apply the rule to the selected workstep workstep.

Types of Worksteps Page 66
4.3 Robot Workdesk Robot Workdesk workstep allows the user to integrate the process with Newgen’s new RPA (Robotic
Process Automation) solution framework and automate tasks using recorded scripts.
To define the properties of Robot Workdesk workstep:
1. Select Robot Workdesk workstep from the ToolBox under Activities.
Figure 4.19
2. Place it on the work area by using drag and drop.
3. Double-click it or perform a right-click and select Properties to invoke Robot Workdesk workstep
properties.
4. Robot Workdesk properties appear just below the work area.

Types of Worksteps Page 67
Figure 4.20
5. Robot Workdesk properties are comprised of tabs listed below. Click on the respective links to
learn about them.
• Basic Details
• Workdesk
• Entry Settings
• Options
• Data
• Requirements
• Attachments
4.4 Case Workdesk Case Workdesk workstep allows the process designer to associate tasks with the step so that when
the process comes to this step, the associated tasks can be performed by the user.
To define the properties of Case Workdesk workstep:
1. Select Case Workdesk from the Tool Box under Activities.
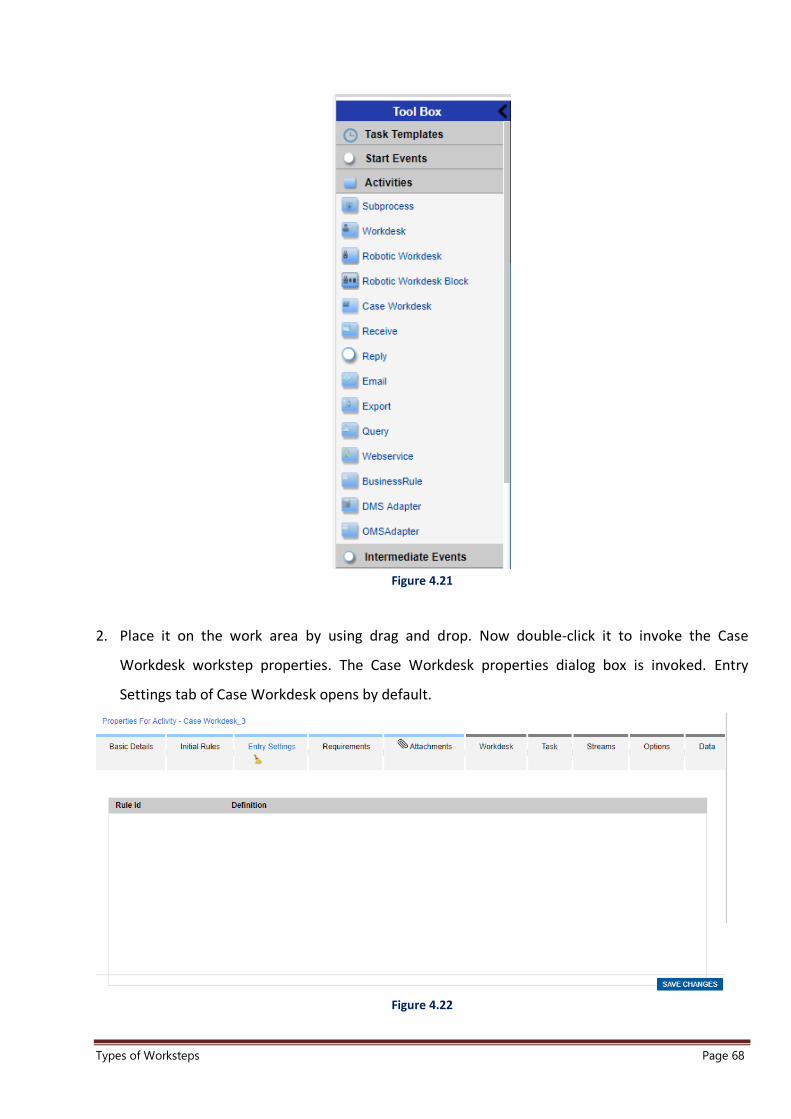
Types of Worksteps Page 68
Figure 4.21
2. Place it on the work area by using drag and drop. Now double-click it to invoke the Case
Workdesk workstep properties. The Case Workdesk properties dialog box is invoked. Entry
Settings tab of Case Workdesk opens by default.
Figure 4.22

Types of Worksteps Page 69
3. Case Workdesk has the following tabs: Activity, Workdesk, Task, Entry Settings, Options, Data,
Requirements and Attachments.
NOTE:
Workdesk, Entry Settings, Options, Data, Requirements and Attachments are same to Workdesk tabs.
4.4.1 Basic Details Tab To view/define the activity properties:
1. Click Basic Details tab. (Most options to be configured here are in common with the Workdesk
workstep).
• Activity contains the name of the activity.
• Activity Type contains the type of activity.
• Milestone contains the name of the activity milestone.
2. Select MobileEnabled checkbox to use the activity on mobile.
3. Select Generate Summary Document checkbox to enable auto-generation of case summary
document. The document, containing case details, is generated once the case workdesk is
marked as complete and the work item is routed to the next step.
• Mapped Document Type textbox is used for naming the document to be generated and is
enabled on selecting Generate Summary Document checkbox. By default, the document is
named in the format: Case Summary – Activity Name. It can be re-named if required.
4. Select Form Name checkbox to select Form Name (created through Form List).
5. Select Target Workstep to set activity as Target Workstep.
6. Calendar: It is used to add calendar.
• Click to load Calendar List
• Click to define a new Calendar
• Click to view Calendar
7. Specify Cost in US$.
8. Enter Description of the activity.
9. Provide Custom Validation on activity.
10. Select Owner, Consultant, System, Provider and Consumer names.

Types of Worksteps Page 70
Figure 4.23
4.4.2 Task Tab Task is used to define properties for associating tasks with a Case Workdesk.
To view and work with Task tab:
1. Click Task to view Task tab. Task tab appears.
Figure 4.24
2. The Task List section contains those tasks which are not associated with the Case Workdesk. The
associated tasks are displayed in the right hand side of the page.
To Associate a Task with Case Workdesk:
1. Select the required Task from the Task List.
2. Click on (Add).

Types of Worksteps Page 71
3. The selected Task moves to the Associated Tasks section.
To Remove an Associated Task:
1. Select an Associated Task from the Associated Task list.
2. Click on .
3. The selected Task gets deleted from Associated Task list and moves to Task List section.
4.4.2.1 Associate User(s) Using this option, the process designer can select a specific user/group that will have rights to work
on tasks at runtime.
To Associate User(s):
1. Click on ( Associate User(s)) against the required task.
2. Associate User(s)/Group(s) dialog box appears.
3. Select Group/User option from the dropdown list.
4. Click on to view and select the desired Group/User.
5. Click on Ok to confirm the selection.
6. The selected Group/User appears in the textbox.
7. Click on Add to add the Group/User. The dialog box is updated with Group/User list.
• To Remove any Group/User:
➢ Select the checkbox against the desired Group/User.
➢ Click on Remove button.
8. Click Ok to save and close the dialog box.
4.4.2.2 Data Mapping Data Mapping allows you to map task variables with the process variables. It implies that the data of
the selected task variables is to be passed to the corresponding mapped variables of the process.
NOTE:
If it is required to map a text-type Task variable with a text-type Process variable, then make sure that the text-type Task
variable should not contain values of length greater than 255 characters.

Types of Worksteps Page 72
In case, it is required that the text-type Task variable may contain values of length greater than 255 characters, then
map it with an External variable of sufficient length.
To Perform Variable Mapping:
1. Click on (Mapping) against the required task.
Figure 4.25
2. Variable Mapping screen appears.
3. Select a process variable from Process Variable(s) dropdown against the Task Variable.
4. Check the ReadOnly checkbox if you want the mapped variables to be read only.
NOTE:
On enabling ReadOnly, the user will be able to type at runtime but the same will not be saved to the database.
5. Click Ok to save the mapping.
4.4.2.3 Manage Rule(s) This is used define rules to set pre-conditions to enable the initiation of a task. System starts the
task as the pre-conditions are met while executing the process.
To Define Rules:

Types of Worksteps Page 73
1. Click on (Manage Rule(s)) against the required associated task.
2. Define Rules screen appears.
Figure 4.26
3. Set the following task properties as per the requirement:
i. Default State : Waiting: Select this checkbox to set the default task status as waiting. On
selecting the textbox, you can write reason for setting default state as waiting.
ii. Make Mandatory: Select this checkbox to make the task as mandatory. Once a task is made
mandatory, it becomes compulsory to complete this task to move to next step.
iii. Allow Reassignment: Select this checkbox to enable task reassignment. Once enabled, the
end user to whom the task is assigned will be able to reassign the task to some other user.
iv. Can Be Declined: On selecting this checkbox, the user to whom the task is assigned, will be
able to decline it.
v. Needs Approval: On selecting this checkbox, the user can send the task for approval (if
required) to a user or case manager. Once the approver approves the task only then the task
will be marked completed otherwise it will be sent back to the task worker for re-work.
4. Click Add button to define rules. Rule Definition dialog box appears.

Types of Worksteps Page 74
Figure 4.27
To Set Condition
i. Select the condition; it can be Always (for entering unconditional rules) or If (for entering
conditional rules).
ii. Select ‘If’ and then select the Condition Type as Data, Document or Task.
• If Condition Type is Data:
➢ Select a variable from Select Variable dropdown list.
➢ Select an operator from Select Operator dropdown list. The type of operators in the
Operator dropdown list depends on the selected variable.
➢ Select a value from Select Value dropdown list.
➢ You can combine multiple conditions by selecting AND or OR.
➢ Click on Add. The added condition appears in Condition List.
• If Condition Type is Document:
➢ Select a Document Type from the dropdown.
➢ You can combine multiple conditions by selecting AND or OR.
➢ Click on Add. The added condition appears in Condition List.

Types of Worksteps Page 75
• If Condition Type is Task:
➢ Select a Task from the dropdown.
➢ Select Task Status from the dropdown.
➢ You can combine multiple conditions by selecting AND or OR.
➢ Click on Add. The added condition appears in Condition List.
To Set Operation: The operation is performed on meeting the above conditions.
i. Set Value: It allows the end user to set the value for a case variable.
• Select the desired Field from the associated dropdown list.
• Select Value from the associated combo box. A value can be typed by selecting
<Constant>.
• Select an Operator.
• Select Value from the associated combo box. A value can be typed by selecting
<Constant>.
• Select the desired Calendar Type.
• Click on Add. The added operation appears in Operation List.
ii. Set State: Ready: In set state, the user can make the state of process as ready for initiation.
• Click on Add. The added operation appears in Operation List.
iii. Make Mandatory: This allows the user to make the task as mandatory based on the set
condition.
• Click on Add. The added operation appears in Operation List.
iv. Make Optional: This allows the user to make the task as optional based on the set condition.
• Click on Add. The added operation appears in Operation List.
v. Auto Initiate: It allows the user to initiate the task automatically and assign it to a particular
user. The user name can be defined using process/case variables, process constants, queue
variables and static usernames based on the business requirement.
• Select Auto Initiate from Type dropdown list.
• Select a user type from Assign To dropdown list. It can be:
➢ Constant: Enter a fixed user name by selecting <constant>.
➢ CaseManager: Select it to assign the auto initiated task to the Case Manager.
➢ PreferredUser: On selecting this option, the user can be selected at runtime.

Types of Worksteps Page 76
• Click on Add. The added operation appears in Operation List.
To Modify Condition/Operation:
a. Select the desired Condition/Operation from Condition/Operation list.
b. Make the modification as required.
c. Click on Modify.
To Modify Condition/Operation:
a. Select the desired Condition/Operation from Condition/Operation list.
b. Click on Delete.
5. After defining the rule for Condition and Operation, click on Ok to save and close Rule Definition
screen. The defined rule appears in Define Rule screen.
6. Move Up/Move Down: The Move Up and Move Down buttons, , allow you to move the
selected rule up or down the order.
i. To move a rule up the order, select the desired rule and click on (Move Up).
ii. To move a rule down the order, select the desired rule and click on (Move Down).
7. Click on Ok to save pre-condition rule definition.
4.4.2.4 Manage Right(s) Manage Right(s) allows you to grant/cease Read/Modify permissions on ToDo lists, Documents,
Exceptions and Forms. If Read/Modify permissions are not given then the end user working on Case
Workdesk will not be able to view or modify the items while executing the process.
NOTE:
For Form Builder specific tasks user has to make field read only while designing.
To Manage Right(s):
1. Click on (Manage Right(s)) against the required task.
2. Property Association screen appears. (For more details on Property Association, refer Interface
of Process Modeler manual).

Types of Worksteps Page 77
Figure 4.28
3. Property Association screen has four tabs: ToDo, Document, Exception and Form. Only those
tabs will appear here which are associated with the Case Workdesk.
4. Click on ToDo tab to grant/revoke Modify/Read Only permissions on ToDo Lists.
NOTE:
The Modify/Read Only checkbox is disabled for ToDo items which are not linked with any workstep.
5. Click on Document tab to grant/revoke Add/View/Modify permissions on Documents.
6. Click on Exception tab to grant/revoke View/Raise/Respond/Clear permissions on Exceptions.
7. Click on Form tab to grant/revoke Modify/Read Only permissions on Forms.
8. Click on Ok to save property association.
4.5 Receive Receive Workstep is used to receive a request from external service in the form of a message.
Select the Receive workstep from the Tool Box under Activities workstep. Place it on the work area.
Now double click it to view and define its properties.

Types of Worksteps Page 78
4.5.1 Receive Tab To view Receive Tab, click on Receive Tab.
Figure 4.29
Reply Immediate – If user selects “Reply Immediate”, system executes workstep without waiting
for reply.
Reply After Completion – If user selects “Reply After Completion”, system waits for reply before
going to execute workstep.
4.6 Reply Reply workstep is used in conjunction with Receive workstep. It is used to send a response to a
request previously accepted through an inbound message (receive) activity. These responses are
only meaningful for request-response interactions.
To use Reply:
1. Select Reply workstep from the Tool Box under Activities workstep.
2. Place it in the work area. Now double click it to invoke Reply Workstep Properties.
3. Select variable.
4. Save the process.
All the variables are shown in read only mode while executing the process.

Types of Worksteps Page 79
4.6.1 Output Variables Tab Output Variables Tab is used to display all queue, complex and external variables (if external
database is associated) defined for a process.
To view the Output Variable tab:
1. Click Output Variable, the tab is displayed.
2. Select the variables that are required in the output.
Figure 4.30
NOTE:
Process, Activity, Requirements, and Attachments tab are similar to the Start Event workstep.
4.7 Email Email Workstep is used to print, fax or email documents.
To use Email:
Select the Email workstep from the Tool Box under Activities workstep.
Place it on the work area. Now double click it to invoke the Email Workstep Properties.
4.7.1 Send Tab To view the Send Tab:
1. In the Email Workstep properties screen, select Send Tab.

Types of Worksteps Page 80
Figure 4.31
Figure 4.32

Types of Worksteps Page 81
Figure 4.33
4.8 Export Export Workstep is used to export the workitem from process into the CSV file.
To view the Export workstep properties:
1. Select the Export icon from the Tool Box under Activities.

Types of Worksteps Page 82
Figure 4.34
2. Place it on the work area. Double-click it to invoke the Export Workstep Properties dialog box:
Figure 4.35

Types of Worksteps Page 83
The Export workstep has Process, Activity, Export, Requirements and Attachments tabs. The
Process, Requirements and Attachments tabs are already discussed in earlier sections. Activity and
Export tabs are discussed below.
4.8.1 Basic Details Tab To view the Basic Details tab of the Export workstep:
1. Click Basic Details, the tab is displayed.
Figure 4.36
2. Enter the Name and Description for the workstep.
3. Select the Target Workstep on which the workitem should be routed after this workstep.
Figure 4.37

Types of Worksteps Page 84
4.8.2 Export Tab The Export tab of the Export workstep allows you to map the fields of Online and Offline tables with
the workflow variables.
To view the Export tab of the Export workstep:
1. Click Export, the Export tab is displayed.
Figure 4.38
2. Select the required table from the External Data Table combo box and click Map Data to display
the Mapping screen.
3. In this screen, you can map the workflow variables with the variables of the selected table.
4. The Field Name combo box contains fields of the selected table. Select the field that you want to
add in the CSV file.
NOTE:
The Field Name combo box contains only those fields of the selected table on which user have the rights to map them
with the workflow variables.
5. The following fields are not allowed to be mapped by the user:

Types of Worksteps Page 85
• ExportDataId
• ProcessDefId
• ActivityId
• ProcessInstanceId
• ExportFiledatetime
• WorkitemId
• EntryDateTime
• ExportedDateTime
• LockedByName
• LockedTime
• LockStatus
• Status
• Exportfilename
6. If Data radio button is selected then the Mapped Field combo box contains the corresponding
existing workflow variables compatible with the field selected in the Field Name combo box. In
addition to the workflow variables, user can also enter a constant in the combo box for data
mapping, by selecting the <constant> option.
7. If Document radio button is selected, the Mapped Field combo box contains the corresponding
existing documents, which are compatible with the field selected in the Field Name combo box.
8. The fields can be associated either with the documents or with the variables. User can map the
fields with either workflow variables or enter any <constant> value. Map the selected field with
the required data variable or document.
9. You can alter the size of the field by entering a value in the Size text box.
10. To generate CSV file with the values of the selected fields displayed in quotes, click the Quotes
check box.
11. The Date Format combo box appears enabled when a date type field is selected from the Field
Name combo box.
12. The Date Format combo box contains various date formats, any of which you can associate with
the selected field.
13. The Size, Quotes, and Date Format options remain deactivated incase Document radio button is
selected.
14. Click Add. The mapped field gets removed from Field Name and added in the Mapped Fields list,
as shown. Similarly, you can add other fields.
15. Selecting the field in the Mapped Fields list displays its corresponding properties specified by the
user in the respective options. Modify and Delete buttons also appear enabled. You can click
Modify to change the properties and Delete to delete the field from the Mapped Fields list. The
field deleted by the user is added to the Field Name combo box again.
16. Click and buttons for changing the display order of the fields.
17. On the basis of mapping, user can provide information related to CSV file.
Types of Worksteps Page 86
18. Select the CSV that needs to be Generated check box.
19. It is mandatory to provide a name for CSV file in the CSV File Name textbox. A name to the CSV
file can be provided using fields of the selected table. The Field Name combo box contains all the
fields of the selected table. Select field(s) from the Field Name combo box and click Add to add
the selected field(s) in the CSV File Name textbox.
20. Select the Generate Header check box to display the column names of the table in the CSV file.
21. Select the Order By check box and enter the field, by the value of which you want to sort or filter
the results.
22. Enter the duration of moving the generated CSV file to the destination, from the File Move
combo box. The available options are: Daily, Weekly, and Monthly.
23. The File Type combo box is used to enter the format in which values are displayed in the CSV file.
The available options are: Comma Separated and Fixed Length. Incase Comma Separated is
selected; the values of the columns in the CSV file are separated by commas without considering
the size of the value specified by the user. Incase Fixed Length is selected; the values are
displayed according to their size specified by the user leaving empty spaces for the characters of
the value limiting the size and trimming the characters for the value exceeding the size.
24. Enter the number of records after which a new CSV file should be generated for the same table,
in the Record No. textbox. For e.g., if you enter 20 in the textbox, then the CSV file will contain
20 records and a new file will be generated for the next set of records (if any).
4.9 Query The Query workstep is a dangling workstep in a business process, which has no incoming or
outgoing links. It serves the primary purpose of defining a view for the workitems when they are
opened for the purpose of status tracking, from the Query WorkDesk.
Users of the system can search for workitems from the Process, using the search option available.
Now whenever a user tries to open a searched workitem, which is lying in a queue of which he is not
a member, or which has been completed or discarded in the process, then the workitem opens in
the Query Workdesk settings defined on the Query Workstep, of which the currently logged in user
is a member. Thus, the query workstep helps in setting constraints on the search operations,
preventing the user to view the confidential data that may be associated with a workitem.

Types of Worksteps Page 87
To view the properties of the Query workstep:
1. Select the Query workstep from the Tool Box under Activities.
Figure 4.39
2. Place it on the work area. Double-click it to invoke Query Workstep Properties.
Figure 4.40

Types of Worksteps Page 88
3. Query workstep has the following tabs: Process, Activity, Workdesk, Search Variables, Search
Results, Data, Requirements and Attachments. Some of these have already been discussed in the
previous workitems.
4.9.1 Basic Details Tab The Basic Details tab allows the user to enter the name and description for the workstep.
To view the Basic Details tab:
1. Click Basic Details, the Tab is displayed.
2. Enter the Name and Description for the Query workstep.
Figure 4.41
NOTE:
Process, Requirements and Attachments tabs are same to that of Start Event workstep.
4.9.2 Data Tab To view the Data tab:
1. Click Data to display the Data tab.

Types of Worksteps Page 89
Figure 4.42
2. It includes all the queue, complex type and external variables defined for the process.
3. Check Read check box for making variables readable at the workstep. If user selects checkbox
against Read option, system displays the checkboxes against Modify option in read only mode.
4. Modify checkboxes are not enabled while viewing variables.
NOTE:
Read and modify operations cannot be applied simultaneously in Data Tab. On the Query Workstep, the ‘Read’
permissions on the variables simply restrict these variables to be read only for all workitems being opened in the Query
Workdesk.
4.9.3 Workdesk Tab On clicking the WorkDesk tab, the following screen appears:
Figure 4.43

Types of Worksteps Page 90
The WorkDesk is similar to that in any other workstep with an exception that most of the properties
in the WorkDesk tab are disabled on this step. Action and Scan Tool are disabled on this step, thus
preventing the user from associating these with the workstep. However, the user can associate To
Do Lists, Exceptions, Forms and Document Tools with the workstep.
To Do List can be associated with the Query step with view only access permissions. Thus the end
user working on the query Workdesk will be able to only view the To Do List. The To Do List tab is
shown in the following figure:
Figure 4.44
Exceptions can be associated with the Query step with view only access permissions. Thus, the end
user working on the query Workdesk will be able to only view the exception history of the
associated exceptions, without being able to raise, respond or clear them. The Exceptions tab is
shown in the following figure:

Types of Worksteps Page 91
Figure 4.45
Document Types can be associated with the Query step with view only access permissions. Thus the
end user working on the query Workdesk will be able to only view the documents belonging to the
associated types. The Document tab is shown in the following figure:
Figure 4.46
Forms can be associated with the query step, to facilitate the display of data associated with the
workitem. However, only those variables, which have been granted, read access permissions on this
step will be available for form designing and display.
To view the Data tab:
Click Define, the Document Types Definition dialog box opens up.
Choose the document to de displayed from Available Document Types.
Click Add to Add a new document type.

Types of Worksteps Page 92
Click Delete to delete a document.
Click Rule to view the Rule Definition.
4.9.4 Search Variables Tab To search the variables:
Click Search Variables, the Search Variables Tab is displayed.
Figure 4.47
Check the variables names for searching.
4.9.5 Search Results Tab To view the Search Result tab:
Click Search Results, the Search Results Tab is displayed.

Types of Worksteps Page 93
Figure 4.48
4.10 Web Service Webservice workstep enables you to invoke an external webservice in the current workflow
process. Using this workstep, you can invoke a web method of an existing webservice in the current
workstep.
When the workitem comes on this workstep, the webservice will be invoked for all workitems either
synchronously or asynchronously.
NOTE:
Server restart is required for weblogic 12.2.1.3 or jboss 7.0/7.1 whenever a process containing
WebService Workstep is registered".
Webservice workstep enables you to invoke an external webservice in the current workflow
process. Using this workstep, you can invoke a web method of an existing webservice in the
current workstep.

Types of Worksteps Page 94
To view the Webservice workstep properties:
1. Select the Webservice icon from the ToolBox under Tasks.
2. Place it on the work area. Right click on the Workstep and double-click on properties to
invoke the Webservice Workstep Properties dialog box:
Figure 4.49
Webservice workstep has the following tabs: Process, Activity, Entry Settings, WebService, Data,
Requirements and Attachments.
NOTE:
In iBPS, only one cabinet level WebService queue is created. Right click on the Workstep and double-click on Queue
Management to invoke the Queue Management dialog box. In this dialog box, WebService queue information is
available.
4.10.1 Basic Details Tab
To view the Basic Details tab:
1. Click Basic Details, the Basic Details tab is displayed.
2. Enter the Name and Description for the workstep.

Types of Worksteps Page 95
3. Select the Type for the step. It can be WebService, Response Consumer JMS, Response
Consumer SOAP, and Request Consumer SOAP.
Figure 4.50
4. The Turnaround Time is set in DD-HH-MM format; the total time taken to complete that
particular activity.
5. Select the Calendar that you want to associate with this workstep.
6. Select the Target Workstep on which the workitem should be routed after this workstep.
7. Pick Workstep.
8. When you open the Webservice workstep, the following screen is displayed:

Types of Worksteps Page 96
Figure 4.51
9. When you select Request Consumer SOAP from the Type drop-down list, Webservice tab is
replaced by RequestConsumerSOAP tab in the screen.
Figure 4.52
10. The Request Consumer SOAP tab contains all the variables, which have search rights provided
under default introduction in the process. When you register a process, search rights on

Types of Worksteps Page 97
variables provided in the pick workstep (Request Consumer SOAP) are used to create a Web
service.
Figure 4.53
11. The Web Service Location text box contains the location of the Web service, which is created at
the time of registering the process by the server. Therefore, when you open the registered
route, the location is displayed in this text box.
12. The Response Consumer SOAP and Response Consumer JMS Webservice worksteps are used as
a target when asynchronous Web service is created.
4.10.2 WebService Tab To view the WebService tab:
1. Click WebService in WebService Workstep Properties dialog box to display the WebService tab.
Figure 4.54
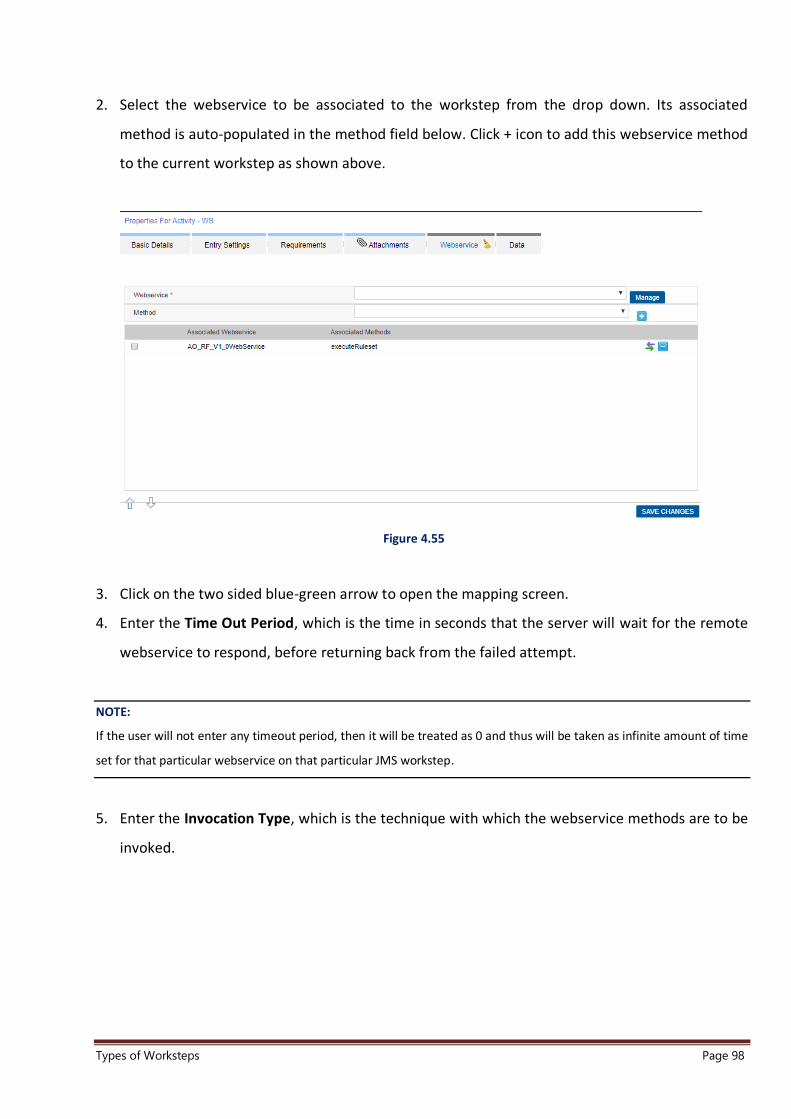
Types of Worksteps Page 98
2. Select the webservice to be associated to the workstep from the drop down. Its associated
method is auto-populated in the method field below. Click + icon to add this webservice method
to the current workstep as shown above.
Figure 4.55
3. Click on the two sided blue-green arrow to open the mapping screen.
4. Enter the Time Out Period, which is the time in seconds that the server will wait for the remote
webservice to respond, before returning back from the failed attempt.
NOTE:
If the user will not enter any timeout period, then it will be treated as 0 and thus will be taken as infinite amount of time
set for that particular webservice on that particular JMS workstep.
5. Enter the Invocation Type, which is the technique with which the webservice methods are to be
invoked.

Types of Worksteps Page 99
Figure 4.56
The following are the three different modes of invoking a Webservice:
• Fire and Forget: In this type of invocation, the server will simply invoke the Webservice and
continue the workitem further in the process. It will not wait for any Status or response from the
Webservice.
• Synchronous: In this type of invocation, the server will invoke the Web method of the
Webservice in synchronous manner. In this technique, the server will block the step, until the
Web method executes successfully and a response is received. Then only will the workitem be
processed further in the process.
• Asynchronous: In this type of invocation, the server invokes the specified Web method of the
Webservice in an asynchronous manner. In this technique, the server will not wait for the
response and continue processing the workitem routing it further in the process. Only when the
Webservice response is received will the workitem be updated. When the Asynchronous option
is selected, user will be prompted to select the JMS/SOAP Subscriber Workstep. All the
worksteps that have been configured as the Message Consumer Worksteps in the current
process will fill up in the JMS/SOAP Subscriber Workstep list.
NOTE:

Types of Worksteps Page 100
In case asynchronous mode of invocation is selected and the web service invoked returns some values, which may be
required for setting the values of process variables, the Webservice Consumer workstep must follow the Webservice
workstep in the process. When the Webservice is called synchronously, the calling thread is blocked. As a result, the
workitem will not be routed for further processing until the Webservice provides some response. While in asynchronous
call, the workitem does not wait for the invoked Webservice response to come for continuing with its further tasks.
6. Select the Registered Services from the list of all webservices that have been registered in the
current process using the Register Catalog menu option.
7. Select the Registered Method corresponding to the selected Webservice. On selecting the web
method, the Map Data button is displayed.
8. Click the Register button to open the Catalog Definition screen for registering web-services in
the current process.
9. Click Map Data to map the process variables with the various parameters of the web method.
Clicking this button displays the various process variables in the Forward Mapping and Reverse
Mapping tabs. Only those queue and external data variables, which have the Read access
permissions on the workstep, will be available in Forward Mapping tab. The variables with the
Modify access rights are displayed in the Reverse Mapping tab.
Forward Mapping Tab: This tab enables the user to map the input parameters of a Web method
with the workflow process variables. Thus all the input parameters of the web method are displayed
on the LHS, along with the workflow process variables in the selection lists on the RHS. To map the
variables, the user can check the web method parameter and select the process variable in the
corresponding selection list. This mapping ensures that at run-time the values of the selected
process variables will be passed to the corresponding mapped web method parameters.
NOTE:
String type Webservice Input Parameter can only be mapped with String Type Current Process Variable of equal or more
character length. String type current process variable of lesser character length, won’t be visible for mapping.

Types of Worksteps Page 101
Figure 4.57
Reverse Mapping Tab: This tab enables the user to map the output parameters of a Web method
with the workflow process variables. Thus, all the workflow process variables are displayed on the
LHS, along with output parameters of the web method in the selection lists on the RHS. To map the
variables, the user can check the process variable and select the web method parameter in the
corresponding selection list. This mapping ensures that at run-time the values of the output
parameters returned by the Web methods will be set in the corresponding mapped process
variables.

Types of Worksteps Page 102
Figure 4.58
Click OK to save the settings and exit the JMS Workstep property screen.
NOTE:
Process, Requirements, Data and Entry Settings tabs are similar to the Start Event.

Types of Worksteps Page 103
4.11 Business Rule The Business Rule workstep allows user to define business rule for the activities.
To define the properties of Business Rule workstep:
Select the Business Rule workstep from the Tool Box under Activities.
NOTE:
Server restart is required for weblogic 12.2.1.3 or jboss 7.0/7.1 whenever a process containing
Business Rule Workstep is registered".
4.11.1 Business Rule Tab To access Business Rule Tab:
1. Select the Business Rule Tab.
2. System displays all rule sets deployed on the selected cabinet.
3. Select checkbox against Rule Set Name.
4. System displays all versions of the Rule Set.
5. Click on icon.
6. System associates the selected Rule Set with the process.
Figure 4.59

Types of Worksteps Page 104
7. Click on icon.
8. System displays Define Mapping Window with Forward Mapping and Reverse Mapping tabs.
Figure 4.60
9. Select checkbox against parameters and map with current process variables.
10. Click on Reverse Mapping Tab.
Figure 4.61

Types of Worksteps Page 105
11. Select checkbox against current process variables and select business rule output parameters.
12. Click on Ok button.
4.12 DMS Adapter The DMS Adapter workstep allows the user to archive the workitem data and document in the
underlying Document management System.
To define the properties of DMS Adapter workstep:
1. Select the DMS Adapter workstep from the ToolBox under Activities.
Figure 4.62
2. Place it on the work area. Now double-click it to invoke DMS Adapter Workstep Properties.
3. The DMS Adapter Workstep Properties dialog box is invoked.

Types of Worksteps Page 106
Figure 4.63
4. It has the following tabs: Process, Activity, Entry Settings, Archive, Data, Requirements and
Attachments.
NOTE:
The Process, Requirements, Entry Settings, Data and Attachments tab are similar to Send workstep.
4.12.1 Entry Settings Tab To view the Entry Settings tab:
1. Click Entry Settings, the Entry Settings tab is displayed.
2. Click Add to add the entry settings. The Rule Definition dialog box is invoked.
3. Enter the Rule Condition.
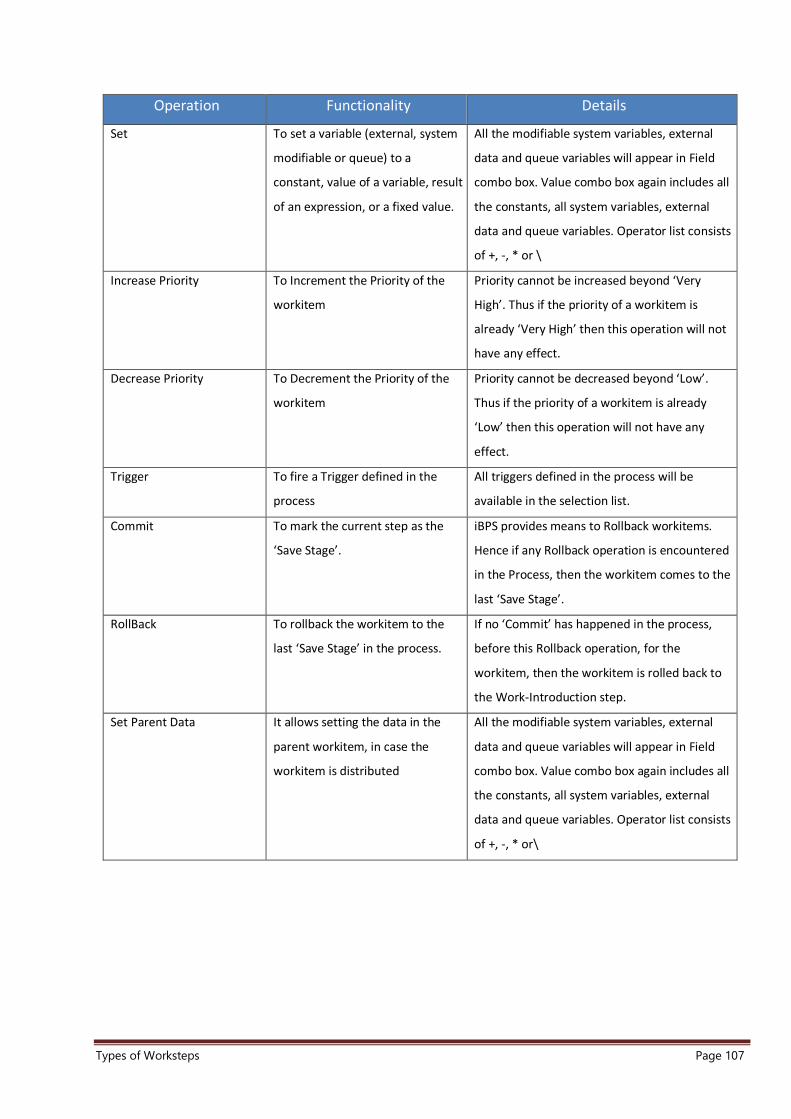
Types of Worksteps Page 107
Operation Functionality Details
Set To set a variable (external, system
modifiable or queue) to a
constant, value of a variable, result
of an expression, or a fixed value.
All the modifiable system variables, external
data and queue variables will appear in Field
combo box. Value combo box again includes all
the constants, all system variables, external
data and queue variables. Operator list consists
of +, -, * or \
Increase Priority To Increment the Priority of the
workitem
Priority cannot be increased beyond ‘Very
High’. Thus if the priority of a workitem is
already ‘Very High’ then this operation will not
have any effect.
Decrease Priority To Decrement the Priority of the
workitem
Priority cannot be decreased beyond ‘Low’.
Thus if the priority of a workitem is already
‘Low’ then this operation will not have any
effect.
Trigger To fire a Trigger defined in the
process
All triggers defined in the process will be
available in the selection list.
Commit To mark the current step as the
‘Save Stage’.
iBPS provides means to Rollback workitems.
Hence if any Rollback operation is encountered
in the Process, then the workitem comes to the
last ‘Save Stage’.
RollBack To rollback the workitem to the
last ‘Save Stage’ in the process.
If no ‘Commit’ has happened in the process,
before this Rollback operation, for the
workitem, then the workitem is rolled back to
the Work-Introduction step.
Set Parent Data It allows setting the data in the
parent workitem, in case the
workitem is distributed
All the modifiable system variables, external
data and queue variables will appear in Field
combo box. Value combo box again includes all
the constants, all system variables, external
data and queue variables. Operator list consists
of +, -, * or\

Types of Worksteps Page 108
Call This facilitates calling an external
function from the current
workstep.
All External Functions defined through the
Register Catalog menu option are available in
Application->Function selections. Once the user
has selected the function to be called the ‘Map
data’ button appears, allowing the users to
enter the Forward and the backward mapping
of the processing variables and the function
parameters.
Set and Execute This facilitates calling an external
function from the current
workstep, and taking the result of
the function into a processing
variable.
All queue and external variables appear in the
operand selection list. All External Functions
defined through the Register Catalog menu
option are available in Application->Function
selections. Once the user has selected the
function to be called the ‘Map data’ button
appears, allowing the users to enter the
Forward and the backward mapping of the
processing variables and the function
parameters.
4. Click Add to add the condition.
5. To modify the condition, select it, make the changes and then click Modify.
6. To delete the condition, select it and then click Delete.
7. Enter the Operation for the condition. It can be - Set, Increase Priority, Decrease Priority, Trigger,
Assigned To, Call, Set & Execute, Commit, Set Parent Data, and Escalate To.
Archive Tab
For archiving the workitems the user has to connect to the cabinet of the DMS on which the
workitems have to be saved. The folder name has to be specified in which the workitems along with
their data has to be saved. Then there is an option to map the workitem process variables with the
data class fields. With this configuration, the workitems coming to this step will get archived in the
specified Folder Path in the cabinet of the DMS. Also their corresponding data values will be stored
in the fields of the associated Data Class, which will then be applied to the archive workitem. You
can also associate different data classes with the individual archived documents of the workitem.

Types of Worksteps Page 109
To view the archive tab: 1. Click on Archive in the DMS Adapter Workstep Properties dialog box. The Archive tab appears.
Figure 4.64
2. Select the Server Type from the dropdown list.
3. Enter IP Address and Port Id on which the workflow server is running for that cabinet.
4. Click on (Fetch Cabinet List) to automatically fetch the list of cabinets.
5. Enter the User Name and Password for the Cabinet.
6. Click Connect for the connection.
7. After successful connection, the button changes to Disconnect.
8. Enter the Folder Name in which the user has to save the documents. You can enter the entire
path in the folder hierarchy of the cabinet. An archival folder name can comprise of literals,
string as well as combination of process variable names. For example, the path can be specified
as ProcessArchive\<&ProcessName &>\<&EntryDateTime&>.
9. Select the Delete Workitem Audit checkbox, if user wants to delete the complete Audit Trail
related with the DMS Adapter, whenever it is deleted.
10. Select the data class, which has to be associated with the workitem folder in which the
documents will be archived. However, the check of data class is not mandatory. Archive from
the Associate Data Class combo box.

Types of Worksteps Page 110
11. Click Map Data, to map the data class fields with the variables in the process.
12. The Field Mapping dialog box is invoked.
13. The data class fields are displayed. Now, select the Process variables whose values have to be
stored in the corresponding data class fields.
NOTE:
String type Associated Class Field can only be mapped with String Type Process Variable of equal or less character
length. String type current process variable of more character length, won’t be visible for mapping.
14. Click Ok to map the variables, else click Cancel.
15. Select Documents, which have to be archived, select the data class, which has to be associated
with each document. As the Data Class is selected the Map Data button is displayed to provide
the mapping of the Document Data Class fields with the process variables. It is not necessary to
associate a data class with the document types.
NOTE:
By default, two additional document types namely Audit Trail and Conversation are displayed in the Document Types
List, to facilitate the archival of the complete audit-trail/history of the workitem. Conversation Document Type
facilitates the archival of all conversations that are recorded for that workitem. Checking conversation will facilitate the
archival of all Conversation type of documents (if any) in the workitem.
Complex data type support in DMS Adapter
Complex data types are supported in the DMS Adaptor workstep.

Types of Worksteps Page 111
Figure 4.65
When you click Map Data, the Field Mapping dialog box appears. In this dialog box, you can use
complex type variables for mapping.

Types of Worksteps Page 112
4.13 OMSAdapter O2MS Adaptor enables process designer to connect with Newgen’s CCM (Customer Communication
Management) suite for generating on-demand personalized communication and deliver consistent
communications across multiple channels.
To view the properties of OMSAdapter:
1. Select the OMSAdapter workstep from the ToolBox under Tasks.
2. Place it on the work area.
3. Double-click it to invoke the OMS Adapter Workstep Properties dialog box.
4. OMS Adapter Workstep has following tabs:
• Activity
• Entry Settings
• Template
• Data
• Requirements
• Attachments
NOTE:
The Activity, Requirements, Entry Settings, Data and Attachments tab are similar to Send workstep.
Figure 4.66
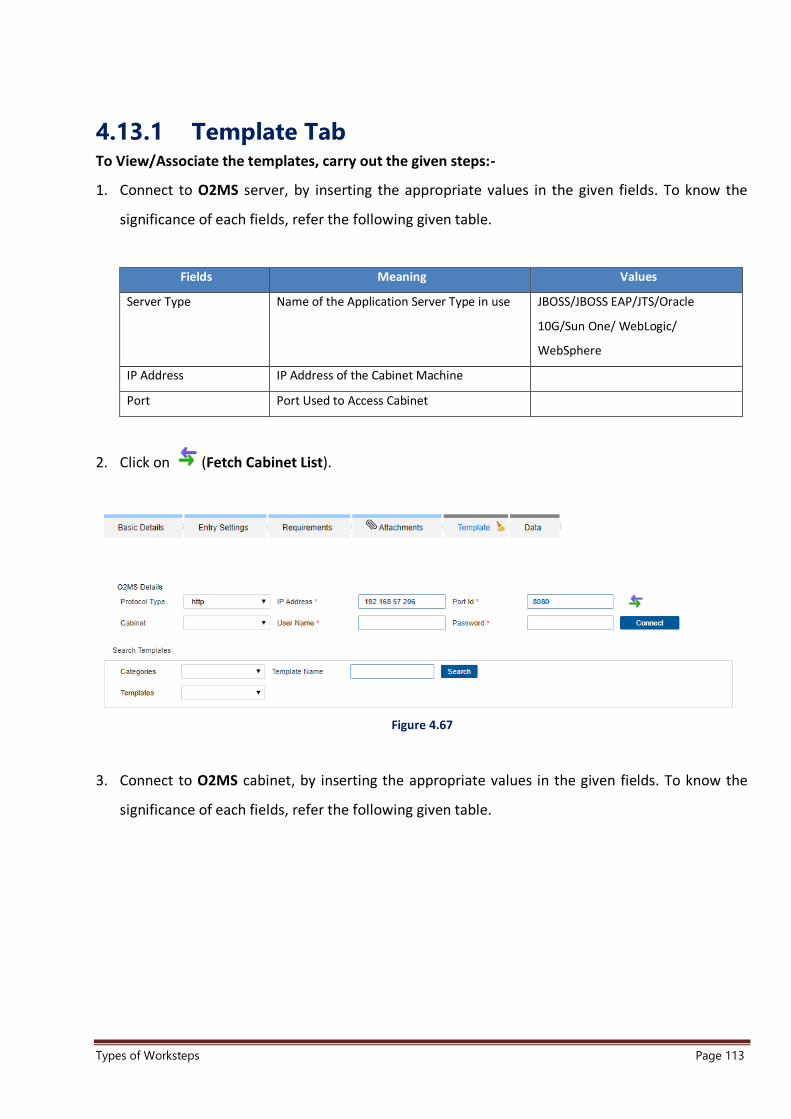
Types of Worksteps Page 113
4.13.1 Template Tab To View/Associate the templates, carry out the given steps:-
1. Connect to O2MS server, by inserting the appropriate values in the given fields. To know the
significance of each fields, refer the following given table.
Fields Meaning Values
Server Type Name of the Application Server Type in use JBOSS/JBOSS EAP/JTS/Oracle
10G/Sun One/ WebLogic/
WebSphere
IP Address IP Address of the Cabinet Machine
Port Port Used to Access Cabinet
2. Click on (Fetch Cabinet List).
Figure 4.67
3. Connect to O2MS cabinet, by inserting the appropriate values in the given fields. To know the
significance of each fields, refer the following given table.

Types of Worksteps Page 114
Fields Meaning
Cabinet Name of O2MS Cabinet
UserName Name of respective Cabinet UserName
Password Name of respective Cabinet Password
4. Select Cabinet from the dropdown list.
5. Enter User Name and Password.
6. Click on Connect.
7. To Search Templates, carry out following steps:-
8. From the Categories drop down section, select the appropriate category.
NOTE:
Either user can search under a specific category or the search can span across categories by selecting All Option in drop
down.
9. Enter keywords to search the template matching the keywords.
10. Click on Search button.
Figure 4.68
11. Templates matching the keywords get listed down in the dropdown list corresponding to
Templates.
NOTE:
After searched Templates are visible in the Templates list, 3 buttons appears. The functions of these buttons are as
follows:-
(Properties): Click on this button to view the properties of the selected template.
(Download): Click on this button to download the template.
(Associate): Click on this button to associate the template

Types of Worksteps Page 115
Figure 4.69
12. To view the Template properties, follow the given steps:-
i. Select the required template, from the template drop down list.
ii. Click on (Properties) button.
iii. The template Properties dialog box appears with the following fields.
Figure 4.70
iv. Click Ok to close the dialog box.
13. To download the Template, follow the given steps:-
i. Select the required template, from the template drop down list.
ii. Click on (Download) button.
iii. The PDF version of the Template is downloaded.
14. To associate the Template, follow the given steps:-
i. Select the required template, from the template drop down list.
ii. Click on (Associate) button.
iii. The selected template is associated and appears in Associated Templates section.
Figure 4.71
To perform various functions on the associated tab:-
1. Select the required Template from the Associated Templates section. The list of associated
Templates appears in the Associated Templates section.

Types of Worksteps Page 116
NOTE:
After searched Templates are visible in the Templates list, 3 buttons appears. The functions of these buttons are as
follows:-
(Properties): Click on this button to view the properties of the selected template.
(Download): Click on this button to download the template.
(Mapping): Click on this button to map the Template with the Template Variable.
(Remove): Click on this button to remove any particular Associated Template.
2. To view template properties, follow the given steps:-
i. Select the required template, from the template list.
ii. Click on (properties) button.
iii. The template Properties dialog box appears.
Figure 4.72
iv. Click Ok to close the box.
3. To download template, follow the given steps:-
i. Select the required template, from the template drop down list.
ii. Click on (Download) button.
iii. The PDF version of the Template is downloaded.
4. To map the Template with the Template Variable, follow the given steps:-
i. Select the required template, from the template drop down list.
ii. Click on (Mapping) button.
iii. Define Mapping screen appears.

Types of Worksteps Page 117
Figure 4.73
5. Increase or decrease the Time Out, by clicking on (Increase) or (Decrease) button.
6. Select the checkbox in front of the to-be-mapped Template Variables.
7. Click on the Current Process Variable(s) drop down button, present in front of the selected
Template Variable.
8. From the Current Process Variable(s) drop down list, select the required variable.
9. Template Variables Type should be similar to Current Process Variable(s) Type. However,
names of XSD and Process Var Types differ from each other. In the below given table, the XSD
Type and their counterparts in Process Var Type is given. Please refer the following table to
create the variable of similar type.
XSD Type Process Var Type
String Text
Int Integer
Boolean Boolean
Token Text
NormalizedString Text
Date ShortDate
Time Time
DateTime Date
Duration Duration
Decimal Float

Types of Worksteps Page 118
10. From the Current Process Document(s), select the required Process Document.
11. Click Ok to save the changes made.
12. Click Cancel to close the dialog box, without saving any made changes.
13. To Delete template, follow the given steps:-
i. Select the required template, from the template drop down list.
ii. Click on (Remove) button.
iii. The Template is removed from the Associated Templates list.

Types of Worksteps Page 119
Chapter
5
5 Intermediate Events
This chapter consists of:
• Event
• JMS Producer
• JMS Consumer
• Timer Event

Types of Worksteps Page 120
5.1 Event Event workstep is used to re-initiate a process whenever it receives a message from any external
source.
To set the Intermediate Event workstep properties:
1. Select the Event workstep from the Tool Box.
Figure 5.1
2. Place it on the work area. Now double-click it to invoke the Intermediate Event Workstep
Properties dialog box.

Types of Worksteps Page 121
Figure 5.2
It has the following tabs: Process, Activity, Message, Data, Requirements and Attachments.
5.1.1 Message Tab To view the Message tab of the Event workstep:
1. Click Message. The Message tab is displayed.
Figure 5.3

Types of Worksteps Page 122
2. This tab contains all the variables, which have search rights provided under default
introduction in the process.
3. The Web Service Location text box contains the location of the Web service, which is created
at the time of registering the process by the server. Therefore, when you open the registered
route, the location is displayed in this text box.
4. Select the Process Variables check box and then select the check boxes of the variables that
you want to make searchable in the Web service.
5.2 JMS Producer The JMS Producer workstep allows the integration of a business process with any external
application that exposes functionality in the form of a Web-Service, or JMS Message. It enables any
external client to publish the required message to the destinations in order to perform operations
like creating, saving and completing workitems in business processes. The Webservices functionality
enables the worksteps to invoke the methods of the remotely deployed Webservices.
Message Producer: This workstep is mainly used to exchange the workitem data with an External
Applications, via JMS messages. Message Producer workstep will publish a message containing XML
to a particular JMS Destination. After publishing the XML, the workitem will move further in the
process, while the External application will subscribe to that particular destination on the
Application Server and will carry out the required operations in their system, as specified in the
message XML.
To define the properties for the JMS Producer workstep:
Select the JMS workstep from the ToolBox under Intermediate Events.

Types of Worksteps Page 123
Figure 5.4
Place it on the work area. Now double-click it to invoke the JMS Producer Workstep Properties.
Figure 5.5
JMS Workstep has the following tabs: Process, Activity, Entry Settings, JMS Producer, Data,
Requirements, and Attachments.

Types of Worksteps Page 124
5.2.1 Process Tab To view the Process tab:
1. Click Process, the Process tab is displayed.
2. Enter the Name and Description for the workstep.
3. Select the Calendar that you want to associate with this workstep.
5.2.2 Entry Settings Tab This tab is used to set the entry criteria for JMS Producer type of workstep.
To set the entry criteria for JMS Producer Workstep (These settings are similar to other worksteps
discussed earlier):
1. Click Entry Settings, the Entry Settings Tab is displayed.
2. Click Add to add the entry settings.
3. The Rule Definition dialog box appears.
4. Enter the Rule Condition.
Table: Operation Details
Operation Functionality Details
Set To set a variable (external,
system modifiable or queue) to
a constant, value of a variable,
result of an expression, or a
fixed value.
All the modifiable system variables, external
data and queue variables will appear in Field
combo box. Value combo box again includes all
the constants, all system variables, external data
and queue variables. Operator list consists of +, -
, * or \
Increase Priority To Increment the Priority of the
workitem
Priority cannot be increased beyond ‘Very High’.
Thus if the priority of a workitem is already ‘Very
High’ then this operation will not have any
effect.
Decrease Priority To Decrement the Priority of
the workitem
Priority cannot be decreased beyond ‘Low’. Thus
if the priority of a workitem is already ‘Low’ then
this operation will not have any effect.
Trigger To fire a Trigger defined in the
process
All triggers defined in the process will be
available in the selection list.

Types of Worksteps Page 125
Commit To mark the current step as the
‘Save Stage’.
iBPS provides means to Rollback workitems.
Hence if any Rollback operation is encountered
in the Process, then the workitem comes to the
last ‘Save Stage’.
Set Parent Data It allows setting the data in the
parent workitem, in case the
workitem is distributed
All the modifiable system variables, external
data and queue variables will appear in Field
combo box. Value combo box again includes all
the constants, all system variables, external data
and queue variables. Operator list consists of +, -
, * or \
Call This facilitates calling an
external function from the
current workstep.
All External Functions defined through the
Register Catalog menu option are available in
Application->Function selections. Once the user
has selected the function to be called the ‘Map
data’ button appears, allowing the users to enter
the Forward and the backward mapping of the
processing variables and the function
parameters.
Set and Execute This facilitates calling an
external function from the
current workstep, and taking
the result of the function into a
processing variable.
All queue and external variables appear in the
operand selection list. All External Functions
defined through the Register Catalog menu
option are available in Application->Function
selections. Once the user has selected the
function to be called the ‘Map data’ button
appears, allowing the users to enter the Forward
and the backward mapping of the processing
variables and the function parameters.
5. Click Add to add the condition.
6. To modify the condition, select it, make the changes and then click Modify.
7. To delete the condition, select it and then click Delete.
8. Enter the Operation for the condition. It can be - Set, Increase Priority, Decrease Priority, Trigger,
Commit, Call, Set and Execute, and Set Parent Data.
9. Click Add button, to add the Operation type to the Operation list.
10. To modify the operation, select it, make the changes and then click Modify.
11. To delete the operation, select it and then click Delete.

Types of Worksteps Page 126
12. Click Ok to save the changes, else click Cancel.
13. The rule added for Entry Settings appears as shown:
14. You can increase the order of the rule execution by clicking in the Entry Settings tab.
15. You can decrease the order of the rule execution by clicking in the Entry Settings tab.
5.2.3 JMS Producer Tab It is used to configure the exchange of workitem data with External Applications, via JMS messages.
To view the JMS Producer tab:
1. Click JMS Producer. The JMS Producer tab appears.
Figure 5.6
2. Enter the IP Address of the Application Server where destinations are defined.
3. Enter the Port Id for the Application Server on which the destination names (or message queues)
are present.
4. Enter the Type of the Application Server, whether WebSphere, WebLogic, JBoss, etc.
5. Select the required Destination Type.
6. Enter the Destination Name in the text box. If Destination Type is selected as Topic, then enter
the Topic type Destination Names. If Destination Type is selected as Queue, then enter the
Queue Type Destination Name in the text box.

Types of Worksteps Page 127
NOTE:
In the Topic type, clients address messages to a topic. The Application Server takes care of distributing the messages
arriving from a topic’s multiple publishers to its multiple subscribers. Topics retain messages only as long as it takes to
distribute them to current subscribers. While in the queue type, each message is addressed to a specific queue, and
receiving clients extract messages from the queue(s) established to hold their messages. Queues retain all messages
sent to them until the messages are consumed or until the messages expire.
7. Enter the variables that will form a part of the JMS Producer. All the queue variables and the
external data variables that have been given the read access permissions on this workstep, along
with all system variables, will be available in the Message list.
8. Select the required variable and click Add to add the variable to the Message. All the variables
added in the message, will be replaced by their actual values at run-time, in the XML to be sent
to the specified JMS Destination.
Figure 5.7
9. This configures the JMS Producer workstep as the JMS Producer step.

Types of Worksteps Page 128
Complex data type support in JMS Producer The JMS Producer workstep supports the use of complex data types. This data type can be selected
from among the fields available in the drop down in the above screenshot. This complex type should
be defined in the process for it to be available for selection.
5.3 JMS Consumer The JMS workstep allows the integration of a business process with any external application that
exposes functionality in the form of a Web-Service, or JMS Message. It enables any external client to
publish the required message to the destinations in order to perform operations like creating, saving
and completing workitems in business processes. The Webservices functionality enables the
worksteps to invoke the methods of the remotely deployed Webservices.
JMS Consumer: This workstep type is an opposite of the JMS Producer workstep. The JMS Consumer
workstep will consume the JMS messages published by external applications. MDBs (Message
Driven Beans) will be deployed on an Application Server, which will consume the messages from the
destination and carry out operations like Create, Save, Done & SaveAndDone on the workitems in
the process.

Types of Worksteps Page 129
To define the properties for the JMS workstep:
1. Select the JMS Consumer workstep from the ToolBox under Intermediate Events.
Figure 5.8
2. Place it on the work area. Now double-click it to invoke the JMS Consumer Workstep Properties.
Figure 5.9
3. JMS Consumer has the following tabs: Process, Activity, Entry Settings, Options, JMS Consumer,
Requirements and Attachments.

Types of Worksteps Page 130
NOTE:
Process, Requirements, Activity, Entry Settings and Attachments are similar to the JMS Producer Tab.
5.3.1 JMS Consumer Tab This tab is used to configure the exchange of workitem data with External Applications, via JMS
messages.
To view the JMS Consumer tab:
Click JMS Consumer. The JMS Consumer tab is displayed:
Figure 5.6
Click on Import XML button, system displays following screen:
Figure 5.10

Types of Worksteps Page 131
5.4 Timer Event The workitems can be set on hold for a particular duration of time, in process, during which they will
not be accessible to any user of the system for processing. The Timer workstep has been defined for
the purpose of holding workitems for a specified time period. After the expiration of the hold period
the workitems are released back into the process.
To set the Timer workstep properties:
1. Select the Timer Event workstep from the Tool Box under Intermediate Events.
Figure 5.11
2. Place it on the work area. Now double-click it to invoke the Timer Event Workstep Properties
dialog box.

Types of Worksteps Page 132
Figure 5.12
3. It has the following tabs: Process, Activity, Entry Settings, Requirements and Attachments.
5.4.1 Basic Details Tab To view the Basic Details tab:
1. Click Basic Details, the tab is displayed.
2. Enter the Name and Description for the Timer workstep.
3. Select the Calendar that you want to associate with the Hold workstep.
4. Duration data type fields in Timer workstep.
5. You can enter duration data type fields in the Hold workstep and set values for the Day(s),
Hour(s), Min(s), and Sec(s) fields.

Types of Worksteps Page 133
Figure 5.13
NOTE:
Process, Requirements and Attachments are similar to the Start Event workstep.
5.4.2 Workdesk Tab Workdesk Tab allows user to display Document and Scan along with selected activity. The
configuration of the Workdesk tab facilitates the run-time display of the Workdesk for the users
working on workitems of this step i.e. if user wishes to view only the Document, then only this tool
need to be configured in their respective tabs for this step.
Refer Documents and Scan.

Types of Worksteps Page 134
Figure 5.14
5.4.3 Entry Settings Tab To set the entry criteria for timer workstep:
1. Click Entry Settings, the Entry Settings Tab is displayed.
Figure 5.15

Types of Worksteps Page 135
2. Click Add to add the entry settings for exit.
3. The Rule Definition dialog box appears.
Figure 5.16
4. Enter the Rule Condition.
5. Click Add to add the condition.
6. To modify the condition, select it, make the changes and then click Modify.
7. To delete the condition, select it and then click Delete.
8. Enter the Operation for the condition. It can be - Set, Increase Priority, Decrease Priority,
Trigger, Commit, Call, Set & Execute and Set Parent Data.
Operation Functionality Details
Set To set a variable (external,
system modifiable or queue)
to a constant, value of a
variable, result of an
expression, or a fixed value.
All the modifiable system variables, external
data and queue variables will appear in Field
combo box. Value combo box again includes all
the constants, all system variables, external
data and queue variables. Operator list consists
of +, -, * or \

Types of Worksteps Page 136
Increase Priority To Increment the Priority of
the workitem
Priority cannot be increased beyond ‘Very
High’. Thus if the priority of a workitem is
already ‘Very High’ then this operation will not
have any effect.
Decrease Priority To Decrement the Priority of
the workitem
Priority cannot be decreased beyond ‘Low’.
Thus if the priority of a workitem is already
‘Low’ then this operation will not have any
effect.
Trigger To fire a Trigger defined in the
process
All triggers defined in the process will be
available in the selection list.
Commit To mark the current step as
the ‘Save Stage’.
iBPS provides means to Rollback workitems.
Hence if any Rollback operation is encountered
in the Process, then the workitem comes to the
last ‘Save Stage’.
Set Parent Data It allows setting the data in the
parent workitem, in case the
workitem is distributed
All the modifiable system variables, external
data and queue variables will appear in Field
combo box. Value combo box again includes all
the constants, all system variables, external
data and queue variables. Operator list consists
of +, -, * or \
Call This facilitates calling an
external function from the
current workstep.
All External Functions defined through the
Register Catalog menu option are available in
Application->Function selections. Once the user
has selected the function to be called the ‘Map
data’ button appears, allowing the users to
enter the Forward and the backward mapping
of the processing variables and the function
parameters.

Types of Worksteps Page 137
Set and Execute This facilitates calling an
external function from the
current workstep, and taking
the result of the function into a
processing variable.
All queue and external variables appear in the
operand selection list. All External Functions
defined through the Register Catalog menu
option are available in Application->Function
selections. Once the user has selected the
function to be called the ‘Map data’ button
appears, allowing the users to enter the
Forward and the backward mapping of the
processing variables and the function
parameters.
9. To modify the operation, select it, make the changes and then click Modify.
10. To delete the operation, select it and then click Delete.
11. Click Ok to save the rule definition.
Figure 5.17
12. The defined entry settings rule for exit is added in Entry Settings tab.

Types of Worksteps Page 138
Figure 5.18
13. You can increase the order of the rule execution by clicking on .
14. You can decrease the order of the rule execution by clicking on button.
5.4.4 Options Tab To define Hold-Until and Manual Unhold settings, click the Option tab:
1. Enter Hold Until time period. This is the time period for which the workitem will be held on this
step. User can define the time period as some Date Type variable plus some constant no. of days
and hours. For example, if the workitems are to be held for 1 day after the entry in this step,
then the time period can be defined as Expiry Date Time + 1 day. No. of days, hours, minutes,
and seconds can either be specified as fixed values by selecting the <constant> option or
selecting a Constant defined in the process. There is also a provision of 0 day and 0 hour.
2. After Expiry of the specified time interval, the workitems on hold worksteps are moved further
in the process. The workitem will move to the step selected in the Target Workstep selection.
This can be defined by On Expiry (Route to) option.
3. To fire a trigger defined in the process select the Trigger checkbox. All triggers defined in the
process will be available in the selection list.

Types of Worksteps Page 139
Figure 5.19
4. Manual Unhold option enables user to un-hold the on-hold workitem before the defined TAT.
5. For a case of manual un-hold, set an activity as target workstep from Target Activity option.
6. To fire a trigger in the manual unhold; check-in the Trigger checkbox and select the required
trigger activity.
Figure 5.20
7. In the Event option, user can define an event to un-hold the on-hold workitem, also it is possible
to set trigger and the target activity for the defined event.
Figure 5.21

Types of Worksteps Page 140
5.4.5 Reminder Tab To set the reminder criteria for timer workstep:
1. Click Reminder tab, the reminder tab is displayed.
2. Click Add button to add reminder.
Figure 5.22
3. The Rule Definition screen appears.
4. Select Rule Condition.
5. Click on Add button.
6. The defined rule condition appears in Condition List textbox.

Types of Worksteps Page 141
Figure 5.23
7. In order to define Operations settings, click the Email button.
8. Mail Trigger screen pops-up. Enter the required details in the mail trigger screen (as done for
Escalate to Mail Trigger).
9. Click Add to proceed.
Figure 5.24

Types of Worksteps Page 142
10. Define the Frequency of the reminder in the Frequency textbox.
11. Enter the Date, Days, Hours, Minutes and Seconds to execute the reminder.
12. Click Add button.
13. The defined reminder with its frequency appears in the Operation List textbox.
14. Click Ok to save the reminder.
5.4.6 Data Tab To specify data tab properties:
Click Data tab, the data tab is displayed. Refer Data Tab.
Figure 5.25

Types of Worksteps Page 143
Chapter
6
6 Gateways
This chapter consists of:
• Inclusive Distribute
• Parallel Distribute
• Inclusive Collect
• Parallel Collect
• Data Based Exclusive

Types of Worksteps Page 144
6.1 Inclusive Distribute The Inclusive distribute workstep allows workitem to be created and distributed to collect workstep
such that the users on those steps can process the item according to rule specified on distribute
workstep.
To view the properties of the Inclusive Distribute workstep:
Select the Inclusive Distribute workstep from the Tool Box under Gateways.
Figure 6.1
Place it on the work area. Now double-click it to invoke the Inclusive Distribute Workstep
Properties.
The Inclusive Distribute Workstep Properties dialog box appears.

Types of Worksteps Page 145
Figure 6.2
It has the following tabs - Process, Activity, Distribute, Requirements and Attachments.
6.1.1 Distribute Tab To set the entry criteria for end event:
1. Click Distribute, the Distribute Tab appears.
Figure 6.3

Types of Worksteps Page 146
2. Click Add to set the condition for distribution of the process, Rule Definition dialog box appears.
Figure 6.4
Operation Functionality Details
Set To set a variable (external,
system modifiable or queue) to a
constant, value of a variable,
result of an expression, or a fixed
value.
All the modifiable system variables, external data and
queue variables will appear in Field combo box. Value
combo box again includes all the constants, all
system variables, external data and queue variables.
Operator list consists of +, -, * or \
Distribute To This is available in the
Distribution Criteria for a
Distribute Type Workstep. It is
used to set the worksteps to
which the workitems are to be
distributed to from a distribute
workstep.
The workstep selection lists all the worksteps in the
process, which can have incoming links.
Increase Priority To Increment the Priority of the
workitem
Priority cannot be increased beyond ‘Very High’. Thus
if the priority of a workitem is already ‘Very High’
then this operation will not have any effect.
Decrease Priority To Decrement the Priority of the
workitem
Priority cannot be decreased beyond ‘Low’. Thus if
the priority of a workitem is already ‘Low’ then this
operation will not have any effect.

Types of Worksteps Page 147
Operation Functionality Details
Trigger To fire a Trigger defined in the
process
All triggers defined in the process will be available in
the selection list.
Commit To mark the current step as the
‘Save Stage’.
iBPS provides means to Rollback workitems. Hence if
any Rollback operation is encountered in the Process,
then the workitem comes to the last ‘Save Stage’.
RollBack To rollback the workitem to the
last ‘Save Stage’ in the process.
If no ‘Commit’ has happened in the process, before
this Rollback operation, for the workitem, then the
workitem is rolled back to the Work-Introduction
step.
Set Parent Data It allows setting the data in the
parent workitem, in case the
workitem is distributed
All the modifiable system variables, external data and
queue variables will appear in Field combo box. Value
combo box again includes all the constants, all
system variables, external data and queue variables.
Operator list consists of +, -, * or \
Call This facilitates calling an external
function from the current
workstep.
All External Functions defined through the Register
Catalog menu option are available in Application-
>Function selections. Once the user has selected the
function to be called the ‘Map data’ button appears,
allowing the users to enter the Forward and the
backward mapping of the processing variables and
the function parameters.
Set and Execute This facilitates calling an external
function from the current
workstep, and taking the result
of the function into a processing
variable.
All queue and external variables appear in the
operand selection list. All External Functions defined
through the Register Catalog menu option are
available in Application->Function selections. Once
the user has selected the function to be called the
‘Map data’ button appears, allowing the users to
enter the Forward and the backward mapping of the
processing variables and the function parameters.
3. Click Modify to change the rule.
4. Click Delete to remove a particular set condition.
NOTE:
Activity, Requirements and Attachments are similar to the End Event workstep.

Types of Worksteps Page 148
Figure 6.5
6.2 Parallel Distribute The Parallel Distribute workstep allows multiple workitems to be created and distributed to multiple
worksteps such that the users on those steps can process the item simultaneously in parallel.
To view the properties of the Parallel Distribute workstep:
1. Select the Parallel Distribute workstep from the Tool Box under Gateways.
Figure 6.6

Types of Worksteps Page 149
2. Place it on the work area. Now double-click it to invoke the Parallel Distribute Workstep
Properties.
3. The Parallel Distribute Workstep Properties dialog box appears.
Figure 6.7
4. It has the following tabs - Process, Activity, Distribute, Requirements and Attachments.
6.2.1 Distribute Tab To view the distribute tab:
1. Click Distribute, the Distribute tab is displayed.

Types of Worksteps Page 150
Figure 6.8
2. This tab displays all the Distribute To rules or the Distribute criteria that has been defined on the
step to facilitate conditional distribution.
3. Click Add button in the distribution criteria window. Rule Definition dialog box appears.
Figure 6.9

Types of Worksteps Page 151
4. Enter the Rule Condition.
Operation Functionality Details
Set To set a variable (external, system modifiable or
queue) to a constant, value of a variable, result of an
expression, or a fixed value.
All the modifiable system variables,
external data and queue variables will
appear in Field combo box. Value combo
box again includes all the constants, all
system variables, external data and queue
variables. Operator list consists of +, -, * or
\
Distribute To This is available in the Distribution Criteria for a
Distribute Type Workstep. It is used to set the
worksteps to which the workitems are to be
distributed to from a distribute workstep.
The workstep selection lists all the
worksteps in the process, which can have
incoming links.
Increase Priority To Increment the Priority of the workitem Priority cannot be increased beyond ‘Very
High’. Thus if the priority of a workitem is
already ‘Very High’ then this operation will
not have any effect.
Decrease Priority To Decrement the Priority of the workitem Priority cannot be decreased beyond ‘Low’.
Thus if the priority of a workitem is already
‘Low’ then this operation will not have any
effect.
Trigger To fire a Trigger defined in the process All triggers defined in the process will be
available in the selection list.
Commit To mark the current step as the ‘Save Stage’. iBPS provides means to Rollback
workitems. Hence if any Rollback operation
is encountered in the Process, then the
workitem comes to the last ‘Save Stage’.
RollBack To rollback the workitem to the last ‘Save Stage’ in
the process.
If no ‘Commit’ has happened in the
process, before this Rollback operation, for
the workitem, then the workitem is rolled
back to the Work-Introduction step.

Types of Worksteps Page 152
Set Parent Data It allows setting the data in the parent workitem, in
case the workitem is distributed
All the modifiable system variables,
external data and queue variables will
appear in Field combo box. Value combo
box again includes all the constants, all
system variables, external data and queue
variables. Operator list consists of +, -, * or
\
Call This facilitates calling an external function from the
current workstep.
All External Functions defined through the
Register Catalog menu option are available
in Application->Function selections. Once
the user has selected the function to be
called the ‘Map data’ button appears,
allowing the users to enter the Forward
and the backward mapping of the
processing variables and the function
parameters.
Set and Execute This facilitates calling an external function from the
current workstep, and taking the result of the
function into a processing variable.
All queue and external variables appear in
the operand selection list. All External
Functions defined through the Register
Catalog menu option are available in
Application->Function selections. Once the
user has selected the function to be called
the ‘Map data’ button appears, allowing
the users to enter the Forward and the
backward mapping of the processing
variables and the function parameters.
5. Click Add to add the condition.
6. To modify the condition, select it, make the changes and then click Modify.
7. To delete the condition, select it and then click Delete.
8. Enter the Operation for the condition. It can be: Set, Distribute To, Increase Priority, Decrease
Priority, Trigger, Commit, Rollback, Call, Set & Execute and Set Parent Data. To modify the
operation, select it, make the changes and then click Modify.
9. To delete the operation, select it and then click Delete.
10. Click Ok to save the changes, else click Cancel.

Types of Worksteps Page 153
11. You can increase the order of the rule execution by clicking on .
12. You can decrease the order of the rule execution by clicking on .
NOTE: All multiple instance of the workitem created through the Distribute step maintain their own copy of the Queue
Variables. So any change in value of variables in the distributed instance will not be reflected back into the main parent
instance (main workitem that has been split to form distributed instances). In order to reflect the changes into the main
parent instance, a rule of type ‘Set Parent Data’ needs to be defined before the instance reaches the Collect Step.
Multiple Distribute Support
1. Under the Operation section, from the Type drop-down list, when you select DISTRIBUTE TO,
the following screen appears:
2. The Workstep Name drop-down list contains the name of the worksteps in which the workitem
needs to be distributed.
3. The Set Child Data field contains two drop-down lists. The first drop-down list contains the
primitive type Queue variables and the other drop-down list contains the Primitive Array type
variable.
Figure 6.11

Types of Worksteps Page 154
4. Depending on the array size, the number of workitems will be routed to worksteps defined in
the condition.
5. You can define the condition either only with the workstep name or with the “Set Child Data”
condition. This implies that “Set Child Data” is not compulsory.
6. If in “Set Child Data”, the data in the two drop-down lists are not of the same type then type
mismatch error occurs.
7. On clicking the Ok button in the Rule Definition screen, the condition is displayed in the
following screen:
8. The specified condition can be modified by clicking the Modify button or can be deleted by
clicking the Delete button.
6.3 Inclusive Collect Corresponding to every Inclusive Distribute in the Process, there has to be an Inclusive Collect step
to collect all the distributed instances back together and merge them back into a single instance for
further routing in the process.
Figure 6.12
To view the Inclusive Collect workstep properties:

Types of Worksteps Page 155
1. Select the Inclusive Collect workstep from the Tool Box under Gateways.
2. Place it on the work area. Double-click it to invoke the Inclusive Collection Workstep Properties.
Figure 6.13
3. It has the following tabs: Activity, Collect, Requirements and Attachments.
NOTE:
Make only one of those Workdesks as primary in Inclusive Collective which is associated with its Inclusive Distribute.
6.3.1.1 Basic Details Tab The Basic Details Tab allows defining the type of workitem.
To work with this Tab:
1. Select Basic Details tab from Inclusive Collect workitem.
2. By default, any Inclusive Collect workitem introduced on the Gateway workstep will have the
default name. The name can be changed in the Activity box.
3. Enter the description of the activity in the Description Tab.

Types of Worksteps Page 156
Figure 6.14
4. Set the Activity Type as Inclusive Collect from the drop-down menu
5. Set the Turnaround Time in DD-HH-MM and set the calendar type.
6. Select Target Workstep.
6.3.2 Collect Tab The Collect Tab allows defining the type of workitem.
To work with the Collect Tab:
1. Select Collect tab from Inclusive Collect workitem.
2. Set the Collection Criteria.

Types of Worksteps Page 157
Figure 6.15
NOTE : One can also set the number of instances to wait for based on variable values and not just
constants. This gives more flexibility to the process deigner to accommodate more use-cases while
designing the process from real-life scenarios where there might be a dependency on such variable
values.
6.4 Parallel Collect
Corresponding to every Parallel Distribute in the Process, there has to be a Collect step to collect all
the distributed instances back together and merge them back into a single instance for further
routing in the process.
To view the collection workstep properties:
1. Select the Parallel Collect workstep from the Tool Box under Gateways.

Types of Worksteps Page 158
Figure 6.16
2. Place it on the work area. Now double-click it to invoke the Parallel Collect Workstep Properties.
3. The Parallel Collect Workstep Properties dialog box appears.
Figure 6.17
4. It has the following tabs: Process, Activity, Collect, Requirements and Attachments.
6.4.1 Collect Tab To view the collect tab:
1. Click Collect, the Collect tab is displayed.

Types of Worksteps Page 159
Figure 6.18
2. One instance of the distributed workitems can be defined as the ‘Primary Instance’, based on
which the Collection Criteria may be defined. This primary instance can be defined by selecting
one of the worksteps from which the instances are arriving into the collect step as ‘Primary
Workstep’. Thus, the instance of the workitem arriving from that step will be treated as the
Primary Instance at the time of Collection. Select the Primary Workstep.
NOTE:
Only the worksteps that have an outgoing link to the Collect Workstep will be available in the ‘Primary Workstep’
selection list.
3. From the Distribute Workstep drop-down list, select the workstep from which workitems arrive
at the Collect workstep.
4. The Collection Criteria may be specified by any of the following three options:
5. Wait for only Primary option indicates that the Collect workstep will keep collecting the
instances of the workitem until the Primary Instance arrives. After the arrival of the primary
instance, it will merge all the instances collected till then, and that merged workitem will
proceed further in the process, while all other un-collected instances will be aborted.
6. Wait for Primary + Number of instances option indicates the Collect workstep will keep
collecting the instances of the workitem until the Primary Instance arrives. It will then continue
collection until a total of those many instances (other than the primary), as specified in the ‘No.
Of Instances’ have been collected. It will then merge all the instances collected, and that merged
workitem will proceed further in the process. While all other un-collected instances (if any) will
be aborted. User can enter the No Of Instances, by entering a fixed value, by selecting the
Types of Worksteps Page 160
<constant> option, or select a variable or a constant (which is expected to hold an integer value
at run time) from the option list.
7. Wait for Number of Instances indicates that the Collect workstep will keep collecting instances
until a total of those many instances, as specified in the ‘No Of Instances’ have been collected. It
will then merge all the instances collected, and that merged workitem will proceed further in the
process. While all other un-collected instances (if any) will be aborted. User can enter the No Of
Instances, by entering a fixed value, by selecting the <constant> option, or select a variable or a
constant (which is expected to hold an integer value at run time) from the option list.
NOTE:
The Primary Workstep selection is valid only in case of Wait for only Primary and Wait for Primary + Number of instances
options selected in the Collection Criteria.
8. Click Ok to save the changes made and exit from the Collect Workstep Properties dialog box.
6.5 Data Based Exclusive This step is used as an “OR” step in the process, from where the workitems will take alternate paths
depending on their data and the Routing Criteria defined on this step.
To view the properties of Data Based Exclusive Workstep:
1. Select the Data Based Exclusive workstep from the Tool Box under Gateways.
2. Place it on the work area. Now double click it to invoke the Data Based Exclusive Workstep
Properties.

Types of Worksteps Page 161
Figure 6.19
3. The Data Based Exclusive Workstep Properties dialog box appears.
Figure 6.20

Types of Worksteps Page 162
4. It has the following tabs: Process, Activity, Routing Criteria, Requirements and Attachments.
6.5.1 Routing Criteria Tab Routing Criteria is a set of rules based on which a workitem at a Data Based Exclusive workstep is
routed to other worksteps in the process. There may be situations where based on some conditions
or value of any variable or state of the process, etc., some operations have to be executed and the
workitems are to be routed on alternate paths in a process. This definition of rules that govern the
routing sequence of workitems is facilitated by the Data Based Exclusive Workstep.
To view the routing criteria:
1. Click Routing Criteria option, the Routing Criteria tab is displayed.
Figure 6.21
2. The Routing Criteria tab displays all the defined rules along with a default rule ‘OTHERWISE
ROUTE TO PreviousStage’
3. This default rule is defined for all decision types of worksteps to ensure that if none of the other
defined rules are satisfied then the workitem is to be routed to the previous stage. You cannot

Types of Worksteps Page 163
delete default rule. However, it can be modified to enter the target workstep to which the
workitem is to be routed to incase all other rules fail.
4. Click Add to add the routing criteria. The Rule Definition dialog box is invoked.
Figure 6.22
5. Enter the Rule Condition.
Operation Functionality Details
Set To set a variable (external, system
modifiable or queue) to a
constant, value of a variable, result
of an expression, or a fixed value.
All the modifiable system variables, external data and
queue variables will appear in Field combo box. Value
combo box again includes all the constants, all system
variables, external data and queue variables. Operator list
consists of +, -, * or \
Increase Priority To Increment the Priority of the
workitem
Priority cannot be increased beyond ‘Very High’. Thus if
the priority of a workitem is already ‘Very High’ then this
operation will not have any effect.
Decrease Priority To Decrement the Priority of the
workitem
Priority cannot be decreased beyond ‘Low’. Thus if the
priority of a workitem is already ‘Low’ then this operation
will not have any effect.

Types of Worksteps Page 164
Trigger To fire a Trigger defined in the
process
All triggers defined in the process will be available in the
selection list.
ReInitiate To re-initiate the workitem back in
the process
This action takes the workitem back to the Work-
Introduction Step, initiating it back into the process.
Commit To mark the current step as the
‘Save Stage’.
iBPS provides means to Rollback workitems. Hence if any
Rollback operation is encountered in the Process, then the
workitem comes to the last ‘Save Stage’.
RollBack To rollback the workitem to the
last ‘Save Stage’ in the process.
If no ‘Commit’ has happened in the process, before this
Rollback operation, for the workitem, then the workitem
is rolled back to the Work-Introduction step.
Set Parent Data It allows setting the data in the
parent workitem, in case the
workitem is distributed
All the modifiable system variables, external data and
queue variables will appear in Field combo box. Value
combo box again includes all the constants, all system
variables, external data and queue variables. Operator list
consists of +, -, * or \
Call This facilitates calling an external
function from the current
workstep.
All External Functions defined through the Register
Catalog menu option are available in Application-
>Function selections. Once the user has selected the
function to be called the ‘Map data’ button appears,
allowing the users to enter the Forward and the backward
mapping of the processing variables and the function
parameters.
Set and Execute This facilitates calling an external
function from the current
workstep, and taking the result of
the function into a processing
variable.
All queue and external variables appear in the operand
selection list. All External Functions defined through the
Register Catalog menu option are available in Application-
>Function selections. Once the user has selected the
function to be called the ‘Map data’ button appears,
allowing the users to enter the Forward and the backward
mapping of the processing variables and the function
parameters.
6. Click Add to add the condition.
7. To modify the condition, select it, make the changes and then click Modify.
8. To delete the condition, select it and then click Delete.
9. Enter Operation for the condition. It can be - Set, Route To, Increase Priority, Decrease Priority,
Trigger, ReInitiate Commit, Rollback, Call, Set & Execute and Set Parent Data.

Types of Worksteps Page 165
10. To modify the operation, select it, make the changes and then click Modify.
11. To delete the operation, select it and then click Delete.
12. Click OK to save the changes, else click Cancel.
13. The criteria are displayed in the Routing Criteria tab.
Figure 6.23
14. You can increase the order of the rule execution by clicking on .
15. You can decrease the order of the rule execution by clicking on .
16. Click OK to save and exit from the Decision Workstep Properties dialog box.
NOTE:
If a Boolean variable is used in condition while defining a rule and its value is defined as null, value of that variable will
be treated as false while performing rule execution.

Types of Worksteps Page 166
Chapter
7
7 End Events
This chapter consists of:
• End Event
• Terminate Event
• Message End

Types of Worksteps Page 167
7.1 End Event iBPS provides a feature of linking two separate processes via the End Event workstep, such that the
completion of a workitem in one process automatically creates and initiates a workitem in the
process that has been linked to the End Event step of that process. Also, the workitem data in terms
of variable data and documents can be passed them from parent process into the linked child-
process.
The End Event workstep indicates the successful completion of a workitem in the process.
There can be multiple exits for the process.
To define the properties for the End Event workstep:
1. Select the End Event workstep from the Tool Box.
Figure 7.1
2. Place it on the work area. Now double click it to invoke the End Events Workstep Properties.
3. The End Event Workstep Properties dialog box appears.

Types of Worksteps Page 168
Figure 7.2
4. End Event workstep has the following tabs: Process, Activity, Workdesk, Entry Settings, Data,
Requirements and Attachments.
NOTE:
In case, ‘Custom’ type is selected then WorkDesk tab is changed to Custom.
7.1.1 Entry Settings Tab These are the set of rules that will be triggered for every workitem entering this step. These are
used for setting data variables, sending mail notifications/letters, etc.
To set the entry criteria for end event:
1. Click Entry Settings, the Entry Settings Tab appears.

Types of Worksteps Page 169
Figure 7.3
2. Click Add to add the entry settings for end events. Rule Definition dialog box appears.
Figure 7.4
3. Select the condition; it can be Always (for entering unconditional rules) or If (for entering
conditional rules).

Types of Worksteps Page 170
4. Select ‘If’ and then enter the condition. Selecting Field, Operator, Value and Logical Operator can
enter the condition. For example, the If condition is set like this- If Final Approval variable = “Y”,
then commit the transaction.
5. The Field list consists of all system defined, user defined and external data variables.
6. Operator list consists of mathematical operators like <, <=, =, !=, >=,> , NULL, NOT NULL, LIKE and
NOT LIKE. LIKE and NOT LIKE operators are visible only if text type variable is selected in the
Field.
7. Value list consists of all constants, system defined, user defined and external data variables
along with an entry <constant>. Clicking the <constant> enables the user to enter fixed values.
8. Logical Operator list consists of two entries, AND and OR, to enter the logical ANDing or ORing of
two or more rule conditions. The logical operator is not applicable while entering the first rule
condition in the rule condition list
9. Click Add to add the condition.
10. To modify the condition, select it, make the changes and then click Modify.
11. To delete the condition, select it and then click Delete.
12. Enter the Operation for the condition. It can be- Set, Increase Priority, Decrease Priority, Trigger,
Assigned To Call, Set & Execute and Commit.
13. The following table explains the meaning of each of the operation types provided at Rule
Definition Dialog box at various steps.
Operation Functionality Details
Set To set a variable (external, system
modifiable or queue) to a constant,
value of a variable, result of an
expression, or a fixed value.
All the modifiable system variables, external data and
queue variables will appear in Field combo box. Value
combo box again includes all the constants, all system
variables, external data and queue variables. Operator
list consists of +, -, * or \
Increase Priority To Increment the Priority of the
workitem
Priority cannot be increased beyond ‘Very High’. Thus if
the priority of a workitem is already ‘Very High’ then this
operation will not have any effect.
Decrease Priority To Decrement the Priority of the
workitem
Priority cannot be decreased beyond ‘Low’. Thus if the
priority of a workitem is already ‘Low’ then this
operation will not have any effect.

Types of Worksteps Page 171
Trigger To fire a Trigger defined in the
process
All triggers defined in the process will be available in the
selection list.
Commit To mark the current step as the ‘Save
Stage’.
iBPS provides means to Rollback workitems. Hence if
any Rollback operation is encountered in the Process,
then the workitem comes to the last ‘Save Stage’.
Set Parental Data It allows setting the data in the
parent workitem, in case the
workitem is distributed
All the modifiable system variables, external data and
queue variables will appear in Field combo box. Value
combo box again includes all the constants, all system
variables, external data and queue variables. Operator
list consists of +, -, * or \
Call This facilitates calling an external
function from the current workstep.
All External Functions defined through the Register
Catalog menu option are available in Application-
>Function selections. Once the user has selected the
function to be called the ‘Map data’ button appears,
allowing the users to enter the Forward and the
backward mapping of the processing variables and the
function parameters.
Set and Execute This facilitates calling an external
function from the current workstep,
and taking the result of the function
into a processing variable.
All queue and external variables appear in the operand
selection list. All External Functions defined through the
Register Catalog menu option are available in
Application->Function selections. Once the user has
selected the function to be called the ‘Map data’ button
appears, allowing the users to enter the Forward and
the backward mapping of the processing variables and
the function parameters.
NOTE:
As stated previously, this chart lists all the possible Operation Types that are available in various Rule Definition
Interfaces. However please note that not all of these are available in each interface. For Example, in the Rule Definition
for Entry settings for an End Event step, only Set, Increase Priority, Decrease Priority, Trigger, Call, Set Parental Data, Set
& Execute and Commit operation types are available.
14. To modify the operation, select it, make the changes and then click Modify.
15. To delete the operation, select it and then click Delete.
16. Rules are always executed in a sequence. You can move up the order of the rule execution by
clicking on .

Types of Worksteps Page 172
17. You can move down the order of the rule execution by clicking on button.
18. Click OK to save the changes, else click Cancel.
19. Duration data type fields in rules
Similar to using the duration type variables to define actions, you can use the duration type
variables to define rules. In the Rule Definition dialog box, under the Condition section:
1. Click the If radio button.
2. From the left drop-down list, select the duration variable that you have already defined.
Figure 7.5
3. From the second drop-down list, select the operator.
4. From the third drop-down list, select <constant>. Notice that an ellipsis button appears next to
this field.
5. Click the ellipsis button next to the text box. The Define Duration dialog box appears.
6. In the Year(s), Month(s), Day(s), Hour(s), Minute(s), and Second(s) fields, enter the duration of
the field.
7. Click Ok. The Rule Definition dialog box appears, as shown:

Types of Worksteps Page 173
Figure 7.6
8. Under the Condition section, click Add. The Rule Definition dialog box appears.
Figure 7.7

Types of Worksteps Page 174
9. After defining the rule condition, you can define the SET operation of the duration variable. In
the Rule Definition dialog box, under the Operations section:
10. From the Type drop-down list, select SET.
11. From the Field drop-down list, select the duration variable.
12. From the Value drop-down list, select <constant>. Notice that an ellipsis button appears next to
this field and the Value drop-down list changes into a text box.
13. Click Ok.
14. In the Action Definition dialog box, under the Operations section, click Add.
15. If you select the ESCALATE TO operation from the Type drop-down list, you can enter duration
up to seconds.
Mod operator support
You can use the Mod operator in rule definition.
In the Rule Definition screen, under the Operations section, when you select SET from the Type
drop-down list, and then from the Operator drop-down list, you can select the Mod (%) operator.
7.2 Terminate Event You can discard the workitems in a process by routing them to the Terminate Event workstep.
To view the properties of Terminate Event workstep:
1. Select the Terminate Event workstep from the ToolBox under End Events.
2. Place it on the work area.

Types of Worksteps Page 175
Figure 7.8
3. Now double click it to invoke the Terminate Event Workstep Properties. The Terminate Event
Workstep Properties dialog box appears.
Figure 7.9
4. It has the following tabs: Process, Activity, Workdesk, Entry Settings, Data, Requirements and
Attachments.

Types of Worksteps Page 176
NOTE:
In case, ‘Custom’ type is selected then Work desk tab is changed to Custom.
7.3 Message End To define the properties for the Message End workstep:
1. Select the Message End workstep from the ToolBox.
2. Place it on the work area. Now double-click it to invoke the Message End Workstep Properties.
Figure 7.10
3. The Message End Workstep Properties dialog box is invoked.

Types of Worksteps Page 177
Figure 7.11
4. Message End workstep has the following tabs: Process, Activity, Workdesk, Entry Settings,
Initiate Workstep, Data, Requirements and Attachments.
NOTE:
In case, ‘Custom’ type is selected then WorkDesk tab is changed to Custom.
7.3.1 Initiate Workstep Tab The Initiate Workstep Tab in Message End workstep is available for the Variable and Document
Mapping.
To Initiate Workstep Tab:
1. Select Process Name tab displays the entire Local and Registered projects in the cabinet.
2. Select the project name and click on the mapping button. This displays all the variables and
documents associated with the project.
3. Variable Mapping displays the names of all queue variables. Selecting a variable name
4. Selecting the Document Mapping
NOTE:
Process, Requirements, Activity, Data, Workdesk, EntrySettings and Attachments are similar to the Start Event workstep.

Types of Worksteps Page 178
Chapter
8
8 Artifacts
This chapter consists of:
• Text Annotation
• Group Box
• Data Object
• Message

Types of Worksteps Page 179
8.1 Text Annotation Text annotation is one of the standard artifacts in BPMN 2.0. It is used to write extra information
and explanations about elements in a process, but it does not affect its execution.
To define Text Annotation workstep:
1. From the Tool Box, under Artifacts, select the Text Annotation icon.
Figure 8.1
2. Place it on the work area.
Figure 8.2
3. Edit Enter Comments text.

Types of Worksteps Page 180
Figure 8.3
4. Link it with any activity.
5. Click on Save button.
8.2 Group Box Group Box is used to define set of activities for same individual user/group of users and activities
within it are executed at the same time.
To define Group Box workstep:
1. From the Tool Box, under Artifacts, select the Group Box icon.
Figure 8.4
2. Place it on the work area.
3. Add Objects like Start Event and Workdesk in Group Box.

Types of Worksteps Page 181
Figure 8.5
4. Click on Save button.
NOTE:
Only Start Events, Database Exclusive, Workdesk, Case WorkDesk, Webservice, Query type of activities and artifacts are
allowed to add in GroupBox.
A Group Box cannot be overlapped between two swimlanes.
8.3 Data Object Data Object is used to store the information related to the object’s documents etc. and does not
have an impact on process execution.
To define Data Object workstep:
1. From the Tool Box, under Artifacts, select the Data Object icon.
Figure 8.6

Types of Worksteps Page 182
2. Place it on the work area.
Figure 8.7
3. Rename Data Object.
4. Link it with any activity.
Figure 8.8
5. Click on Save button.

Types of Worksteps Page 183
8.4 Message A Message represents the content of a communication between two Participants and does not have
an impact on process execution.
To define Message workstep:
1. From the Tool Box, under Tasks, select the Message icon.
Figure 8.9
2. Place it on the work area.
Figure 8.10
3. Rename Message Text if needed.

Types of Worksteps Page 184
4. Link Message with Receive Workstep.
NOTE:
Message is only associated with Receive Workstep.
Figure 8.11
5. Click on Save button.

Types of Worksteps Page 185
Chapter
9
9 Swim Lanes
This chapter consists of:
• Add Swim Lane
• Rename Swim Lane
• Queue Management

Types of Worksteps Page 186
Swim Lanes
A Swimlane is a graphical container for partitioning a set of activities from other activities.
To define a new swimlane:
From the Tool Box, click Swim Lanes, as shown in the following figure:
Figure 9.1
9.1 Rename Swimlane To rename a swimlane:
1. Right-click in the empty area of the swimlane which has to be renamed.
2. Select Rename.
Figure 9.2
3. Rename the swimlane.

Types of Worksteps Page 187
Figure 9.3

Types of Worksteps Page 188
9.2 Queue Management For Queue Management:
1. Right-click on swimlane and select Queue Management.
Figure 9.4
2. Queue Property dialog box appears.
Figure 9.5
3. Modify the Queue Name and Description
4. Choose the Queue Type as FIFO or WIP.
5. Assign Group to a queue by clicking on Group tab.

Types of Worksteps Page 189
6. Select the required Group.
7. Enter Filter description and click Add.
8. The Group and the Filter get displayed in the Query Preview.
9. Choose the group to modify or delete it and click Modify/Delete.
10. Click Ok to save the changes, else click Cancel.
9.2.1 Delete Swimlane To delete a swimlane:
1. Right-click on swimlane and select Delete.
2. The swimlane is deleted.
NOTE:
Swimlane with default activity cannot be deleted.

Types of Worksteps Page 190
Chapter
10
10 Constraints on Object Deletion
This chapter consists of:
• Constraints on Object Deletion

Types of Worksteps Page 191
Constraints on Object Deletion
User is not allowed to delete activities in following situations:
1. If activity is Default activity.
2. If Milestone is added with single activity.
3. If there is an association among objects which are going to delete.
NOTE:
Please note that before renaming and deleting any object, user has to ensure that there should be no association of the
object (which is going to be deleted/renamed) with any other object.
For example, delete Workdesk_29 which is linked to StartEvent_28.
Figure 10.1
System displays Object Dependencies validation message with below details:
1. Object Name: Displays Object Name.
2. Type: Displays type of the Object.
3. Association(s): Displays the object names which are associated with the selected Object.
In the below screenshot, StartEvent_28 (Activity) means association is present with StartEvent_28.

Types of Worksteps Page 192
Figure 10.2
If user still wants to delete/rename object, first he has to remove the dependencies associated with
the listed object.

Types of Worksteps Page 193
Chapter
10
11 List of Abbreviations
This chapter consists of:
• Types of Worksteps Overview

Types of Worksteps Page 194
List of Abbreviations
BPMN: Business Process Model and Notation
CSV: Comma Separated Values
DMS: Document Management System
FIFO: First In First Out
GUI: Graphical User Interface
HTTP: Hyper Text Transfer Protocol
iBPS: Intelligent Business Process Suite
IP: Internet Protocol
JMS: Java Message Service
LHS: Left Hand Side
RHS: Right Hand Side
SAP: Systems, Applications and Products
SOAP: Simple Object Access Protocol
TAT: Turn Around Time
WIP: Work In Progress
XML: Extensible Markup Language