chapter 2 setting up interactive modelsdownloads2.esri.com/esripress/images/195/sample.pdf ·...
TRANSCRIPT

Section1:Learning model basics
Chapter 2
Setting up interactive models

64 Section 1: Learning model basics
One of the more powerful capabilities that you can add to a model is the ability to interact with the user. Models can prompt the user for input and output values or to set parameters for any of the model’s processes. By giving a model the capacity to accept input, you can make it much more flexible, thus giving the user the ability to adapt it to a variety of situations.

Setting up interactive models 65
2
1Defining model parameters
Opening the properties of a tool and setting all its parameters is a quick way to add all the data required to put a model in the Ready to Run state. Models created this way can be run against the selected features, but if you run the model a second time, the output will overwrite the existing files. For example, a table created by the Copy Rows command at the end of a model process will always have the same name and will replace the existing file each time the model is run. Without defined parameters, a model would require no interac-tion from a user running it from the Catalog window or an ArcGIS toolbar. The only way to change any of the values used in the model’s processes would be to edit the model in the model window and change the parameters of one of the processes in the window itself.
Withnomodelparameters,themodeldoesnotacceptuserinput.
Being able to prompt the user for the value of a variable is something all programming languages do, and the ArcGIS ModelBuilder application has a feature built in to give its variables this behavior. This is achieved by making a variable a model parameter. Any of the data, values, or output variables, shown as ovals in the model, can be made into a model parameter by right-clicking the variable, and then clicking Model Parameter. The variable is then tagged with a P in the diagram to show that it is a parameter, and when the model is run from the Catalog window or from an ArcGIS toolbar, a parameter input screen prompts the user for information before it continues.
Theoutputvariableissetasamodelparameter.
66 Section 1: Learning model basics
Exercise2a D
efiningmodel
parameters
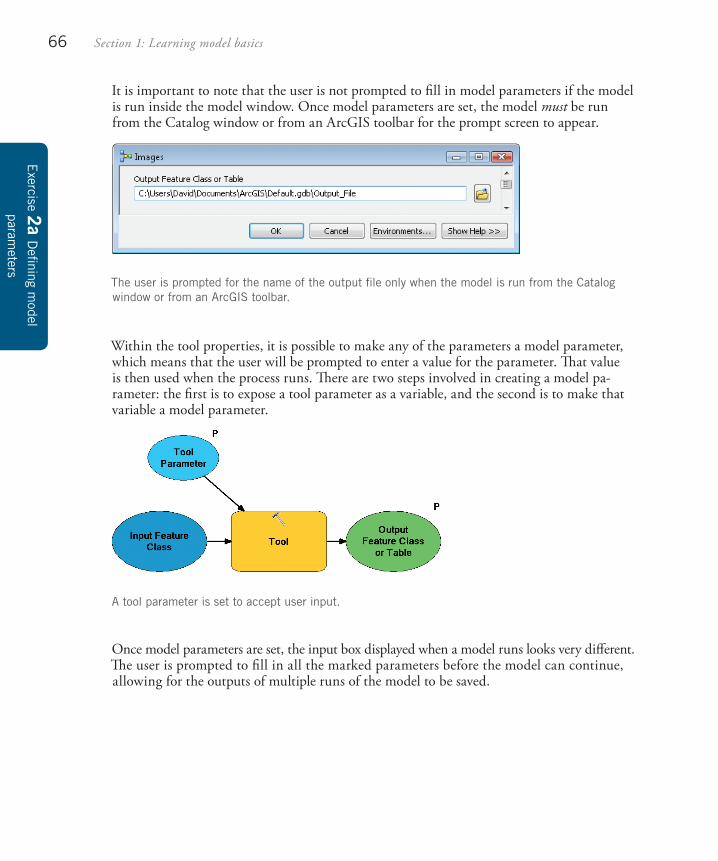
It is important to note that the user is not prompted to fill in model parameters if the model is run inside the model window. Once model parameters are set, the model must be run from the Catalog window or from an ArcGIS toolbar for the prompt screen to appear.
TheuserispromptedforthenameoftheoutputfileonlywhenthemodelisrunfromtheCatalogwindoworfromanArcGIStoolbar.
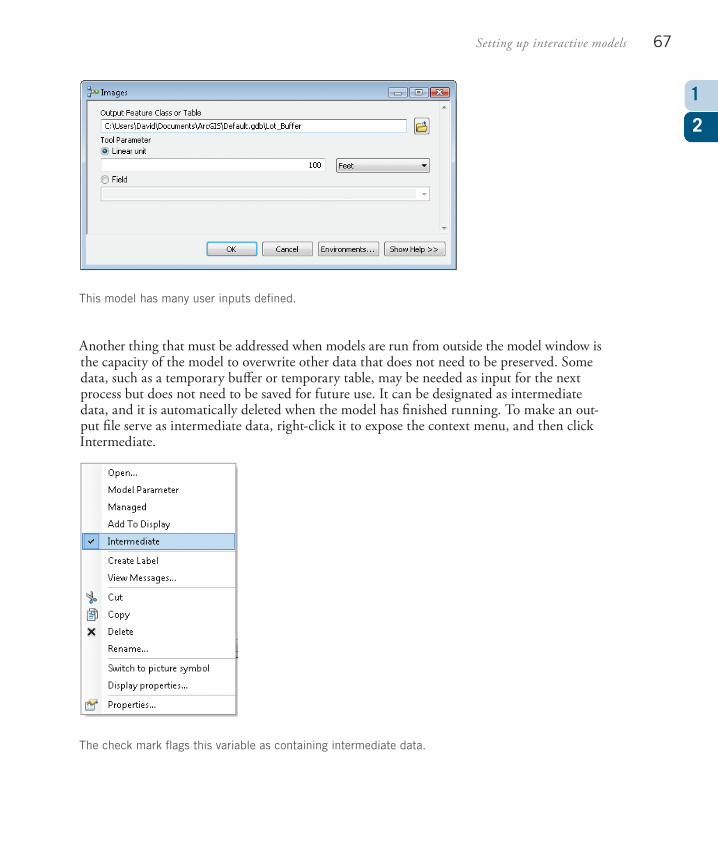
Within the tool properties, it is possible to make any of the parameters a model parameter, which means that the user will be prompted to enter a value for the parameter. That value is then used when the process runs. There are two steps involved in creating a model pa-rameter: the first is to expose a tool parameter as a variable, and the second is to make that variable a model parameter.
Atoolparameterissettoacceptuserinput.
Once model parameters are set, the input box displayed when a model runs looks very different. The user is prompted to fill in all the marked parameters before the model can continue, allowing for the outputs of multiple runs of the model to be saved.
Setting up interactive models 67
2
1
Thismodelhasmanyuserinputsdefined.
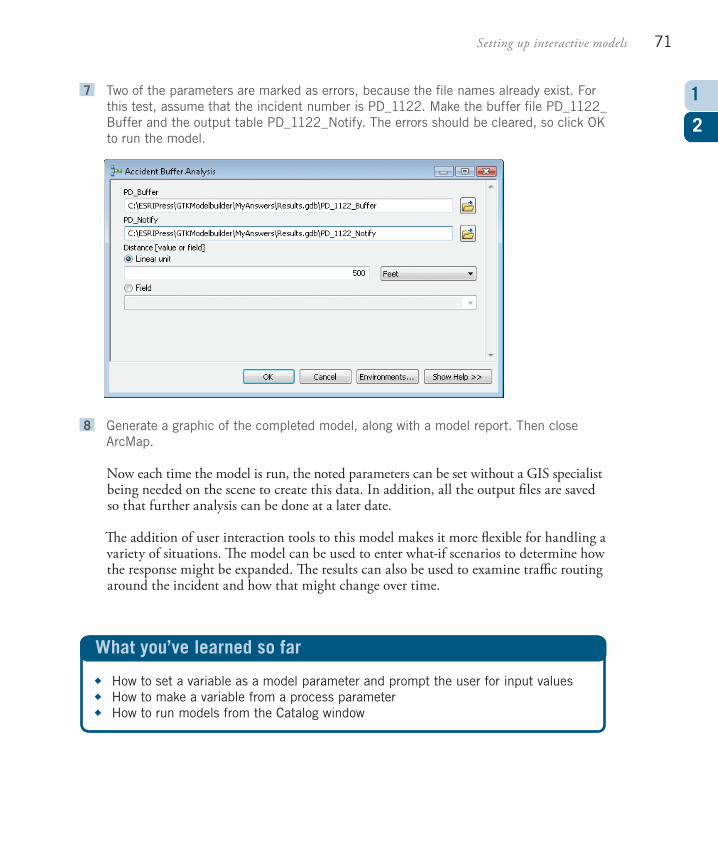
Another thing that must be addressed when models are run from outside the model window is the capacity of the model to overwrite other data that does not need to be preserved. Some data, such as a temporary buffer or temporary table, may be needed as input for the next process but does not need to be saved for future use. It can be designated as intermediate data, and it is automatically deleted when the model has finished running. To make an out-put file serve as intermediate data, right-click it to expose the context menu, and then click Intermediate.
Thecheckmarkflagsthisvariableascontainingintermediatedata.

68 Section 1: Learning model basics
Exercise2a D
efiningmodel
parameters
Intermediate data does not persist past the completion of the model, but no data that is set as a model parameter can be flagged as intermediate. It must be saved to the disk when the model runs.
The model that you built for the police department accomplishes the prescribed task, but because the buffer distance and output file names must be defined during the editing pro-cess in the model window, it is difficult to use in the field. In the following exercise, there are no trained GIS operators on the scene to edit the parameters, and without this being done, the model will overwrite the results each time it is run. The patrol sergeant also tells you that most accidents get a 500-foot buffer, but if it is a freeway accident, or if there is a chemical spill involved, he may want to increase the size of the buffer. It would also be desirable to save the buffer for later verification after the sergeant returns to the office.
In the exercise, you’ll change the model so that the user enters a name for the buffer that is created and a name for the final output table, and sets the buffer distance.
Before you begin the exercise, examine the steps needed to complete the task:
• Set two model variables as model parameters.• Make the buffer distance value a variable and set it as a model parameter.
Exercise 2a 1 StartArcMapandopenEX02A.mxd.Youmaycontinueworkingwiththemodelyou
createdinchapter1orcopytheChapter2atoolboxintheSampleModelsfoldertoyourMyAnswersfolder.StarteditingtheAccidentBufferAnalysismodel.

Setting up interactive models 69
2
1 2 Right-clicktheoutputvariablePD_Notify,andthenclickModelParameter.APisaddednexttotheovaltoshowthatitisnowamodelparameter.
3 Repeattheprocess,makingthevariablePD_Bufferamodelparameteraswell.
4 Nowyouwillmakethebufferdistanceamodelparameter.Thefirststepistomakethetoolparameteravariable.Right-clicktheBuffertool,andthenclickMakeVariable>FromParameter>Distance.

70 Section 1: Learning model basics
Exercise2a D
efiningmodel
parameters
5 Anewlight-bluevaluevariableovalisaddedandconnectedtotheBuffertool.Clickitoncesothatitistheonlyselectedobject,andthendragitabovetheBuffertool.Finally,right-clickthenewvariable,andthenclickModelParameter.APisdrawnnexttoit.
You may need to resize the distance variable to see its entire label and use the Full Extent tool to see the entire model diagram.
6 Savethemodelandclosethemodelwindow.Nowdouble-clickthemodelintheCatalogwindowtorunitandnoticetheinputboxesthatarepresented.Thesecorrespondtotheparametersyouset.
Setting up interactive models 71
2
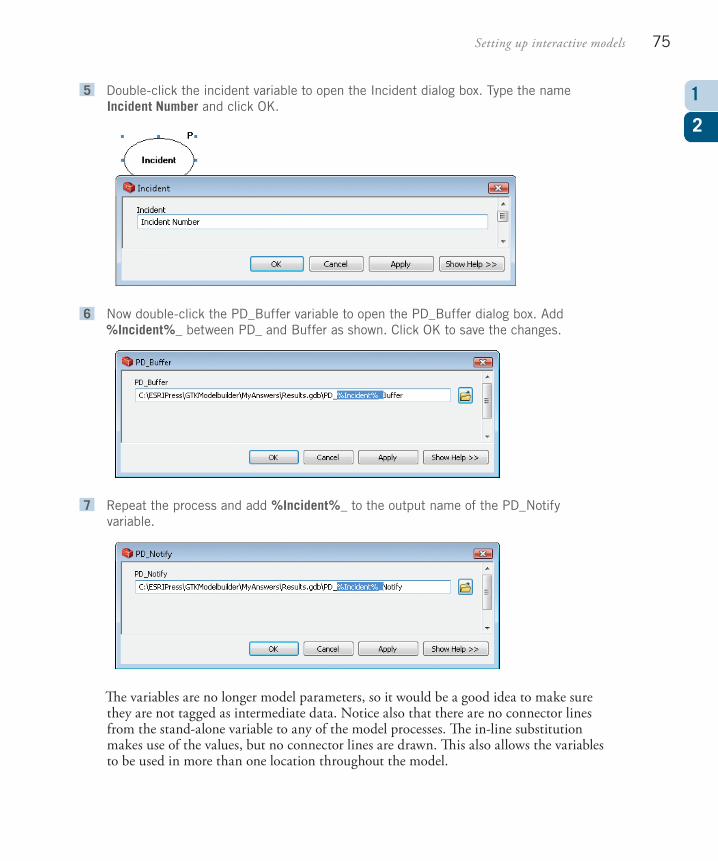
1 7 Twooftheparametersaremarkedaserrors,becausethefilenamesalreadyexist.Forthistest,assumethattheincidentnumberisPD_1122.MakethebufferfilePD_1122_BufferandtheoutputtablePD_1122_Notify.Theerrorsshouldbecleared,soclickOKtorunthemodel.
8 Generateagraphicofthecompletedmodel,alongwithamodelreport.ThencloseArcMap.
Now each time the model is run, the noted parameters can be set without a GIS specialist being needed on the scene to create this data. In addition, all the output files are saved so that further analysis can be done at a later date.
The addition of user interaction tools to this model makes it more flexible for handling a variety of situations. The model can be used to enter what-if scenarios to determine how the response might be expanded. The results can also be used to examine traffic routing around the incident and how that might change over time.
What you’ve learned so far
Howtosetavariableasamodelparameterandprompttheuserforinputvalues
Howtomakeavariablefromaprocessparameter
HowtorunmodelsfromtheCatalogwindow

72 Section 1: Learning model basics
Exercise2b E
stablishingstand-alone
variablesandin-linevariablesubstitution
Establishing stand-alone variables and in-line variable substitution
The parameters of a process in a model can all be set as variables, whether they are standard data variables that hold the input and output features or value variables that hold param-eters for the tools. These variables can also be set as model parameters so that the user is prompted to enter them before running the model. In addition to these variable types, there are stand-alone variables that are not derived from a model process. These variables can be any one of more than 110 data types, from feature classes to cartographic representations to sets of x,y coordinates.
Modelscanusevariablesfromalargevarietyofdatatypes.
After these stand-alone variables are created, they can also be set as model parameters. With the large variety of data types that can be used in variables, almost any degree of complexity can be added to your model. In addition, these variables can be used in any process within the model just by connecting them and specifying which parameter they will fill.
Some stand-alone variables, such as strings, Boolean values, or folders, may represent part of the value that is required for a parameter. For instance, the folder location string might need to be attached to the front of another value to create the entire output file name for a process. The value of the variable can be placed in the parameter input box by using variable substitution. This involves adding the variable name as a value bracketed by percent signs.

Setting up interactive models 73
2
1
Thestring%FeatureClassName%isavariablewhosevaluewillbeusedasthefilename.
The modifications made to the accident notification model let you set the names of the buffer feature class and the table of results, but the only real change from the default name was the addition of the incident number. If you were to set up a stand-alone variable to accept the incident number, you could substitute it in the parameter input box for both files and reduce the number of entries the user must make.
Before you begin the exercise, examine the steps needed to complete the task:
• Create a stand-alone variable and rename it.• Make the new variable a model parameter.• Use variable substitution to make the new variable part of the output file name.
Exercise 2b 1 OpenEX02B.mxdinArcMap.Youmaycontinueusingthemodelyoucompletedin
exercise2aorcopytheChapter2btoolboxfromtheSampleModelsfoldertoyourMyAnswersfolder.StarteditingtheAccidentBufferAnalysismodel.CleartheModelParameteroptionsforthePD_BufferandPD_Notifyvariablesbyclearingthosecheckboxes.

74 Section 1: Learning model basics
Exercise2b E
stablishingstand-alone
variablesandin-linevariablesubstitution
2 OntheModelBuildermenubar,clickInsert>CreateVariable.
3 IntheCreateVariabledialogbox,firstnotethecheckboxforMultivalue.Thisfeatureallowsthevariabletoholdmultiplevalues.Itisinvestigatedinalatersection.Fornow,scrolldownandhighlightString.ThenclickOK.
4 Right-clickthenewstringvariableandmakeitamodelparameter.Thenright-clickitagainandclickRename.ChangeitsnametoIncidentandclickOK.
Setting up interactive models 75
2
1 5 Double-clicktheincidentvariabletoopentheIncidentdialogbox.TypethenameIncident NumberandclickOK.
6 Nowdouble-clickthePD_BuffervariabletoopenthePD_Bufferdialogbox.Add%Incident%_betweenPD_andBufferasshown.ClickOKtosavethechanges.
7 Repeattheprocessandadd%Incident%_totheoutputnameofthePD_Notifyvariable.
The variables are no longer model parameters, so it would be a good idea to make sure they are not tagged as intermediate data. Notice also that there are no connector lines from the stand-alone variable to any of the model processes. The in-line substitution makes use of the values, but no connector lines are drawn. This also allows the variables to be used in more than one location throughout the model.
76 Section 1: Learning model basics
Exercise2b E
stablishingstand-alone
variablesandin-linevariablesubstitution
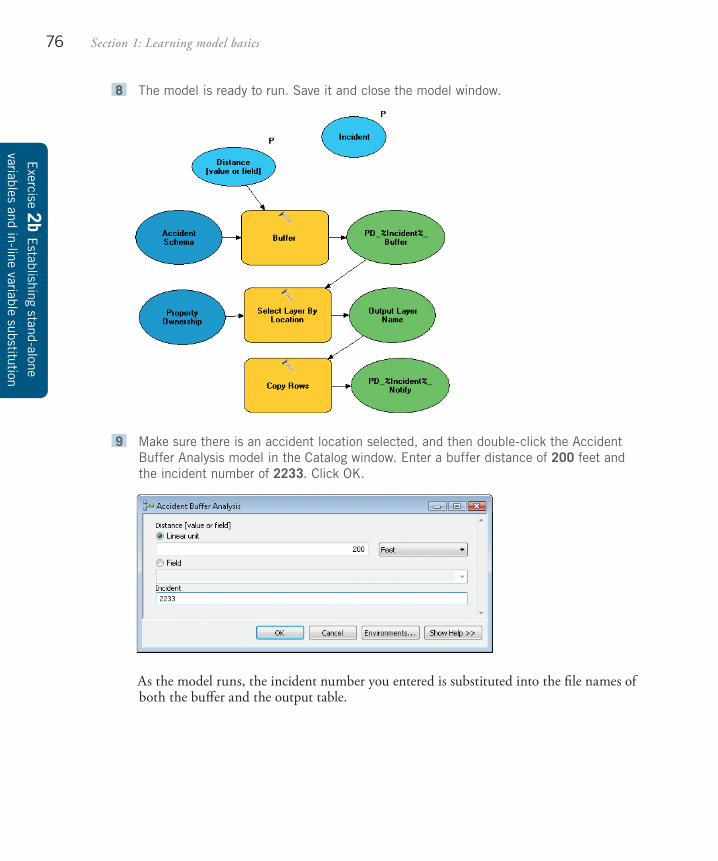
8 Themodelisreadytorun.Saveitandclosethemodelwindow.
9 Makesurethereisanaccidentlocationselected,andthendouble-clicktheAccidentBufferAnalysismodelintheCatalogwindow.Enterabufferdistanceof200feetandtheincidentnumberof2233.ClickOK.
As the model runs, the incident number you entered is substituted into the file names of both the buffer and the output table.

Setting up interactive models 77
2
1 10 AddthePD_2233_Notifytabletoyourtableofcontentsandopenittoviewtherecords.Whenyouhaveexaminedtheresults,closeArcMap.
What you’ve learned so far
Howtocreateastand-alonevariableandsetitsdatatype
Howtomakeastand-alonevariableamodelparameter
Howtousevariablesubstitutiontoplaceuserinputinapathorfilename

78 Section 1: Learning model basics
Exercise2c S
electingfeatures
interactively
Selecting features interactively
The previous model required that a feature be selected before running the model, because there is not an interactive selection tool in ModelBuilder. This process puts a burden on the user that they must understand what preparation is needed before running the model. The Selection tools used in ModelBuilder always require that existing features be selected either by their relationship to other existing features or through a query. A simple Select Features interactive tool is not available in ModelBuilder.
There is, however, a technique that can be used to select features using a temporary feature set created when the model is run. This involves creating a stand-alone variable with a data type of Feature Set, and then using a generic point, line, or polygon feature class as a tem-plate for the features. Once the model is run, the user is given a tool to draw these temporary features, which can then be used with a Select By Location process to select existing features from other layers. This type of interaction with the user helps to make the tools easier to understand and use without a lot of GIS knowledge or training.
Afeaturesetvariablecanbeusedtointeractivelyselectfeatures.
The output is a set of selected features from the input feature class that can be connected to another process.
One interesting aspect of the feature set selection is that the attributes of the feature class that is used as a template are picked up by the feature set. When users input feature loca-tions on the map, they can also enter attribute values. These values might be a text field that can be used for a query or a numeric field that can be used for a calculation. Any domains constructed and applied to the fields in the template file are copied and are active in the feature set. When the data variable is connected to a tool, the attribute values can be used as input and the existing domains are honored.
Setting up interactive models 79
2
1
Thefeaturesetinheritsattributesfromthetemplatefile.
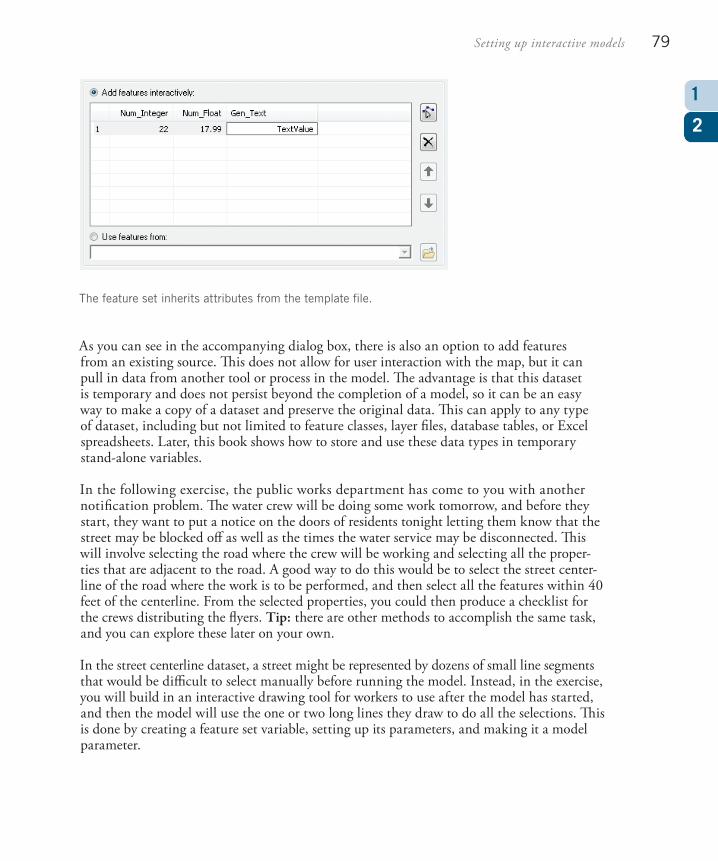
As you can see in the accompanying dialog box, there is also an option to add features from an existing source. This does not allow for user interaction with the map, but it can pull in data from another tool or process in the model. The advantage is that this dataset is temporary and does not persist beyond the completion of a model, so it can be an easy way to make a copy of a dataset and preserve the original data. This can apply to any type of dataset, including but not limited to feature classes, layer files, database tables, or Excel spreadsheets. Later, this book shows how to store and use these data types in temporary stand-alone variables.
In the following exercise, the public works department has come to you with another notification problem. The water crew will be doing some work tomorrow, and before they start, they want to put a notice on the doors of residents tonight letting them know that the street may be blocked off as well as the times the water service may be disconnected. This will involve selecting the road where the crew will be working and selecting all the proper-ties that are adjacent to the road. A good way to do this would be to select the street center-line of the road where the work is to be performed, and then select all the features within 40 feet of the centerline. From the selected properties, you could then produce a checklist for the crews distributing the flyers. Tip: there are other methods to accomplish the same task, and you can explore these later on your own.
In the street centerline dataset, a street might be represented by dozens of small line segments that would be difficult to select manually before running the model. Instead, in the exercise, you will build in an interactive drawing tool for workers to use after the model has started, and then the model will use the one or two long lines they draw to do all the selections. This is done by creating a feature set variable, setting up its parameters, and making it a model parameter.

80 Section 1: Learning model basics
Exercise2c S
electingfeatures
interactively
Before you begin the exercise, examine the steps needed to complete the task:
• Create a new model and name it.• Create a stand-alone variable.• Use a template file to set the new variable’s symbology and data structure.• Add the Select Layer By Location tool.• Use the Connect tool and manual input to set the tool’s parameters.• Make the input data variable a model parameter.• Add another Select Layer By Location tool and set its parameters.• Add the Copy Rows tool and set its parameters.• Set the output variable as a model parameter.• Test the model and examine the results.
Exercise 2c 1 StartArcMapandopenEX02C.mxd.
2 CopytheChapter2ctoolboxfromtheSampleModelstoolboxtoyourMyAnswersfolder.CreateanewmodelinthistoolboxandnameitPublicWorksNotify,withalabelanddescriptionasshown.Leavethecheckboxtostorerelativepathnamesselected.
3 OntheModelBuildermenubar,clickInsert>CreateVariable.SetthedatatypetoFeatureSet.

Setting up interactive models 81
2
1
4 Right-clickthenewdatavariable,andthenclickProperties.ThenclicktheDataTypetab.Thedatatypehasalreadybeenset,butyouwilladdatemplatefilethataddspredefinedattributesandsymbology.

82 Section 1: Learning model basics
Exercise2c S
electingfeatures
interactively
5 ClicktheBrowsebuttonnexttothe“Importschemaandsymbologyfrom”inputboxandnavigatetotheDatafolder.SelectthefileGenericLineFC.lyr.ClickAddandthenOKtoconfirmthesetting.
6 Next,findtheSelectLayerByLocationtoolintheSearchwindowanddragitontothemodelcanvas.ConnecttheFeatureSetvariabletoitfortheselectingfeatures.
7 ThetoolisstillintheNotReadytoRunstate.OpenitandsettheinputfeaturelayertoStreet_Centerlines.Toensurethatthestreetcenterlinefeaturesareselectedbasedonthelinesdrawnfreehand,setthesearchdistanceto50feet.ClickOK.

Setting up interactive models 83
2
1 8 Finally,right-clicktheFeatureSetvariableandmakeitamodelparameter.Renameandresizethevariablesifyoulikeandarrangethemonthemodelcanvassothattheycanallbeseen.Savethemodel.
The first process is completed. The result will be a selected set of street centerlines. The next step is to use these selected centerlines to select the adjacent properties. Since no record needs to be kept of the buffer, it will be easier to use a search distance in the Select Layer By Location tool.
9 DraganotherinstanceoftheSelectLayerByLocationtoolontothemodelcanvas.SettheinputfeaturelayertoPropertyOwnership,theresultsofthefirstselectionfortheselectingfeatures,andthesearchdistanceto40feet.ClickOK.

84 Section 1: Learning model basics
Exercise2c S
electingfeatures
interactively
10 RenametheoutputvariableProperty Ownership Selection.ThenextprocessisnowconfiguredandintheReadytoRunstate.
The final step is to use the Copy Rows tool as in earlier exercises to fill in a table with the selected records.
11 FindtheCopyRowstoolanddragitontotheModelBuildercanvas.ConnectthePropertyOwnershipSelectionvariabletoitandsetthenameoftheoutputtableasamodelparameter.WheneverythingisintheReadytoRunstate,savethemodelandclosethemodelwindow.
To test the model, you can use Kimble Drive. The procedure is to run the model, and then use the interactive Add Feature tool to draw a line down the middle of Kimble Drive. Then type a name for the output table, and the model should do the rest.

Setting up interactive models 85
2
1 12 Double-clickthePublicWorksNotifymodelintheCatalogwindow.InthePublicWorksNotifydialogbox,clicktheAddFeaturebutton .
13 Inthemaparea,drawalinedownthemiddleofKimbleDrive,double-clickingthelastpointtosavetheline.Noticethatitisdrawnwithapresetsymbolthatwasextractedfromthesymbologylayerfiletemplate.
14 IntheOutputTabletextbox,navigatetoyourResultsgeodatabaseandnamethetableKimble.ClickOK.
86 Section 1: Learning model basics
Exercise2c S
electingfeatures
interactively
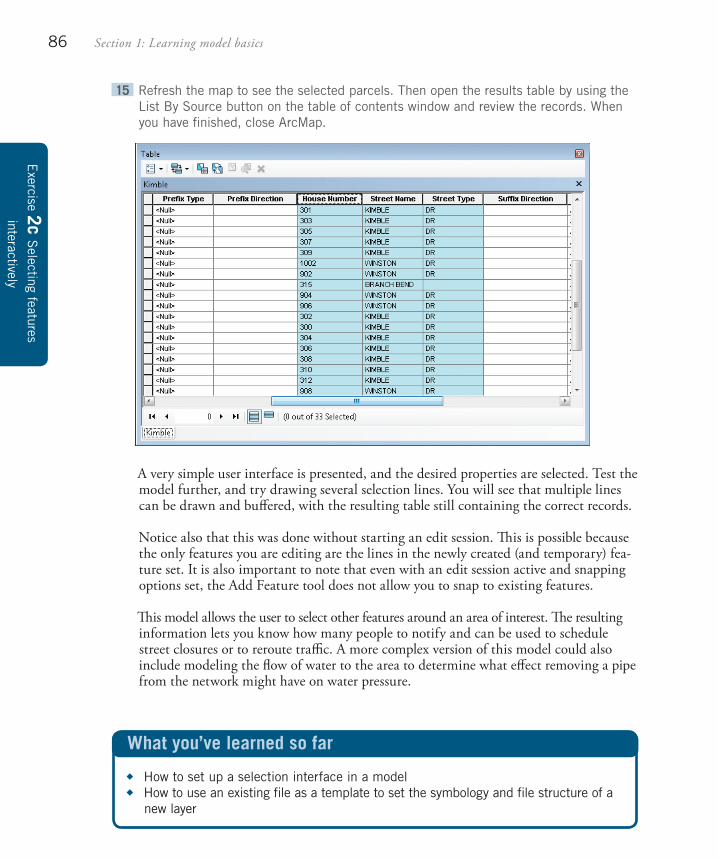
15 Refreshthemaptoseetheselectedparcels.ThenopentheresultstablebyusingtheListBySourcebuttononthetableofcontentswindowandreviewtherecords.Whenyouhavefinished,closeArcMap.
A very simple user interface is presented, and the desired properties are selected. Test the model further, and try drawing several selection lines. You will see that multiple lines can be drawn and buffered, with the resulting table still containing the correct records.
Notice also that this was done without starting an edit session. This is possible because the only features you are editing are the lines in the newly created (and temporary) fea-ture set. It is also important to note that even with an edit session active and snapping options set, the Add Feature tool does not allow you to snap to existing features.
This model allows the user to select other features around an area of interest. The resulting information lets you know how many people to notify and can be used to schedule street closures or to reroute traffic. A more complex version of this model could also include modeling the flow of water to the area to determine what effect removing a pipe from the network might have on water pressure.
What you’ve learned so far
Howtosetupaselectioninterfaceinamodel
Howtouseanexistingfileasatemplatetosetthesymbologyandfilestructureofanewlayer

Setting up interactive models 87
2
1Using attributes in feature set selections
The Feature Set tool proved to be useful in exercise 2c, but it has another option that can ex-tend its capabilities. The interface for selecting features also allows for the entry of attribute data. While the interface is temporary and is not saved once the model has finished running, it can be used while the model is active. Also, if a template file is used to control the symbol-ogy of the features in an output dataset, the attributes and their defaults and domains are inherited for use by the features. The dataset may be transferred to other permanent output files or used as part of the input parameters for one of the model’s processes.
In the following exercise, the water crews have used this model to do their notifications, and now the public works director has asked if it can be modified for use by the road crews as well. Tomorrow, a road crew will be operating some heavy equipment repaving a street in another subdivision and wants to put notices on the doors of residents letting them know of a possible increase in noise during the day. They want to post flyers on the street being repaved, as well as on all the streets one block over in each direction. For this, you could use the interactive model to select the street centerlines, and then use buffers to select all the property within 400 feet, and from that, produce the checklist — the same process as before, except for the buffer size.
Making the buffer size a model parameter would let you change the buffer from 40 feet to 400 feet, depending on the job. You’d have to run the model twice, and you would produce two tables. A way to do this with a single run of the model would be to have the user enter a distance into one of the variables in the feature that they draw, and then use that value in the Buffer tool to produce two selection areas of different sizes.
In this model, you will need to construct buffers rather than use a search distance on the Select Layer By Location tool so that the attribute value can be used to size them. The search distance option on the Select Layer By Location tool only allows for a single distance, which would not work in this instance. You’ll also be using a different LYR file for the input schema for the feature set.
Before you begin the exercise, examine the steps needed to complete the task:
• Create a new model and name it.• Create a stand-alone variable and set the new variable’s parameters.• Make the new variable a model parameter.• Add the Buffer tool.• Use the Connect tool and manual input to set the tool’s parameters.• Add the Select Layer By Location tool and set its parameters.• Add the Copy Rows tool and set its parameters.• Set the output variable as a model parameter.• Test the model and examine the results.
88 Section 1: Learning model basics
Exercise2d U
singattributesin
featuresetselections
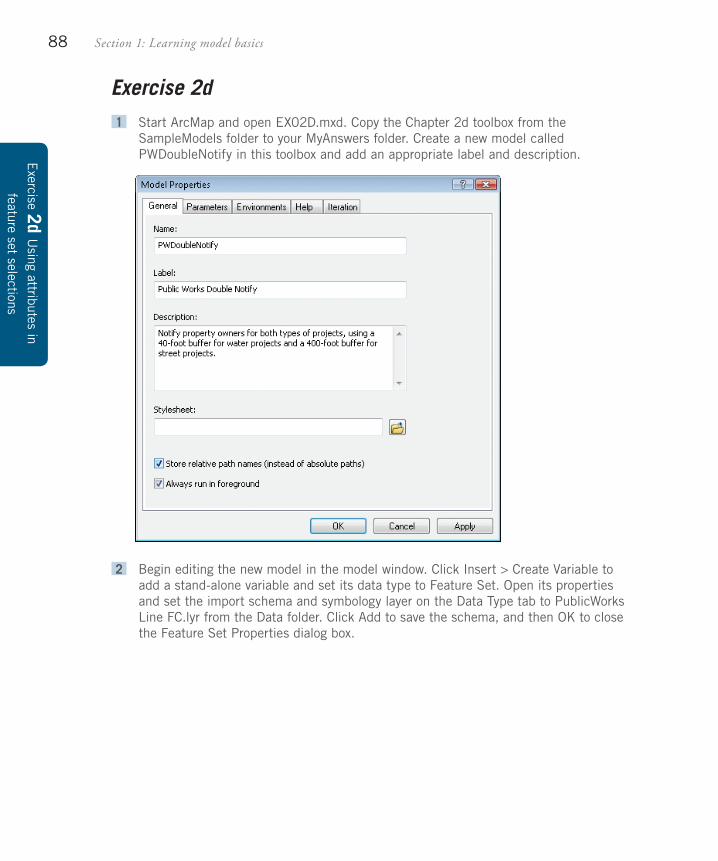
Exercise 2d 1 StartArcMapandopenEX02D.mxd.CopytheChapter2dtoolboxfromthe
SampleModelsfoldertoyourMyAnswersfolder.CreateanewmodelcalledPWDoubleNotifyinthistoolboxandaddanappropriatelabelanddescription.
2 Begineditingthenewmodelinthemodelwindow.ClickInsert>CreateVariabletoaddastand-alonevariableandsetitsdatatypetoFeatureSet.OpenitspropertiesandsettheimportschemaandsymbologylayerontheDataTypetabtoPublicWorksLineFC.lyrfromtheDatafolder.ClickAddtosavetheschema,andthenOKtoclosetheFeatureSetPropertiesdialogbox.

Setting up interactive models 89
2
1
3 Right-clickthenewvariableandmakeitamodelparameter.Savethemodel.

90 Section 1: Learning model basics
Exercise2d U
singattributesin
featuresetselections
4 FindtheBuffertoolanddragitontothemodelcanvas.ConnectthefeaturesettotheBuffertoolastheinputfeatures.NoticethatthetoolisstillintheNotReadytoRunstate.
5 Double-clicktheBuffertooltoaccesstheBufferdialogbox.SettheoutputfeatureclasstoC:\ESRIPress\GTKModelbuilder\MyAnswers\Results.gdb\PW_Buffer.
6 Underthedistancesetting,selectField,andthenselectNum_Integer.ClickOKtosavetheseparametersandclosethedialogbox.
The field Num_Integer has a coded values domain that will restrict its values to 40 or 400, which the feature set inherited from the template file. It also has symbology de-signed for these two values. If more buffer values are desired at a later date, they can be added to the field’s domain and new symbology can be set for them.
7 Thenextprocessissetupthesamewayasinthepreviousexercise.DragtheSelectLayerByLocationtoolontothemodelcanvasandusethePropertyOwnershiplayerastheinputfeaturelayerandthePW_Bufferlayerfortheselectingfeatures.Notethatthereisnosearchdistance,asthatwashandledbytheBuffertool.

Setting up interactive models 91
2
1
8 Finally,dragtheCopyRowstoolontothemodelcanvas.UsetheoutputoftheSelectLayerByLocationtoolastheinputlayer,andmaketheoutputamodelparameter.Changethevariablenamesorsizesasnecessaryandarrangethemodelsothatalltheelementscanbeseen.Savethemodelandclosethemodelwindow.
The only thing that remains is to test the model. For the test, mark Erica Lane and Amy Way as being repaved (a 400-foot buffer) and Carol Way as having water repairs done (a 40-foot buffer).

92 Section 1: Learning model basics
Exercise2d U
singattributesin
featuresetselections
9 Double-clickthePublicWorksDoubleNotifymodeltorunit.Asinthelastexercise,drawalinealongthecenterofEricaLane,double-clickingittoendthefeature.InthePublicWorksDoubleNotifydialogbox,clickthecellunderNum_Integerandselect400feet.Noticethechangeintheline’ssymbology.
10 Next,drawalinealongthecenterofCarolWayandsetthevalueforNum_Integerto40feet.Again,notethechangeintheline’ssymbology.

Setting up interactive models 93
2
1 11 Finally,drawalinealongthecenterofAmyWayandsettheNum_Integervalueto400feet.ChangethenameoftheoutputtabletoPW_TuesdayinyourResultsgeodatabaseandclickOKtofinishrunningthemodel.
12 Whenthemodelhascompleteditsrun,openthetablePW_Tuesdaytoseetheresults.Whenyouhavefinishedexaminingthetable,closeitandexitArcMap.
By adding the capability to define the needed buffers, you have given the model much more functionality. The streets and properties produced in the output list are valu-able information that could be used to determine an overall plan of action for several months’ worth of work. This could help determine street closures in advance and allow for a more comprehensive approach to keeping vital detour routes open.

94 Section 1: Learning model basics
Exercise2d U
singattributesin
featuresetselections
What you’ve learned so far
Howtocreatenewfeaturesinamodelandusethemforadditionalselections
Howtoacceptattributeinformationfromuserinput
Symbolizing outputWhen using a stand-alone variable to accept input from the user, the user could provide a file as an input schema that controls the fields and symbology of the variable. As features are drawn, the fields would be populated and the symbols set.
It is possible to use a similar process to control the symbology of the output variables in a model as well. This is done by first creating the desired symbology in ArcMap. The symbolo-gy can be a simple set of unique features or a more detailed classification based on a numeric value. Once the symbology is set, a layer file can be created to store the settings. Remember that a layer file (.lyr) stores symbol settings but does not store any data. When the symbology layer file is specified as the template for the model’s output, the settings are used to symbolize the output features.
The Output Feature Class Properties dialog box for the output variable includes a tab for layer symbology. The premade layer file is selected and stored for use when the output data is created.
Thesymbologyfromanotherlayerisimportedintotheoutputfile.

Setting up interactive models 95
2
1Any of the variables used in a model have this option. By using premade symbology, a lot of time can be saved in creating the output map. This technique is used in a later exercise.
You learned in this chapter that any variable or tool parameter can be set as a model parameter, which presents a prompt to the user for input when running the model. In one exercise, you learned that stand-alone variables can be created and used in in-line variable substitution, and even used to control interaction with the map. Finally, you learned how to control the symbology of not only the input variables, but also the output variables. Later, this book shows how to control the wording of prompts for the model parameters and how you can supply context-sensitive Help for your new tools.