chapter 2 installing skirts,treads, and risers - bayer built parts... · chapter 2 installing...
TRANSCRIPT

TM
Quality and Tradition in Every Step
Chapter 2
Installing Skirts, Treads, and Risers
In this chapter:
Installing Mitered Skirts
Making and Using a Riser Jig
Installing the Wall Skirt
Installing Risers
Adding a Bullnose Starting Step
Installing the Bullnose Riser
Installing the Bullnose Tread
Installing Treads
Installing False End Tread Caps and Risers
Chapter 2: Things to Remember
TM
Quality and Tradition in Every Step
29

TM
Quality and Tradition in Every Step
Installing Skirts, Treads, and Risers
Once the basic design and layout of the staircase have been established, you can proceed with
adding the skirts, treads, and risers to the stairs. The treads and risers are the basic elements of the
stair that make up its walking surface. Important considerations to take into account when
installing treads and risers are safety and comfort. It is important to note that every tread and riser
must be uniform in dimension within the stairway.
The skirt is basically a piece of trim used to cover the structural section of the stairs. Stair brack-
ets and other ornamental attachments can also be added for aesthetic appeal. A skirt board is
installed to the finished wall (sheet rock, paneling, etc.) once the open side of the stair has been
finished.
This chapter will illustrate the principles of installing the skirts, treads and risers to the foundation
of your staircase.
Installing Mitered Skirts
The first step when installing the mitered skirt is to determine the size of the skirt necessary for
the application. The fundamental measurements include the length and the width. You must make
sure to select a piece of material that is long enough to cover the total run of the staircase. The
width should be at least 9-1/2-inches wide.
A second consideration is the thickness of the skirt board. Thickness is a variable that is based on
aesthetical purposes and not for structural stability. The thickness may vary from 1/4-to
2-inches, depending on preference and cost.
The following steps describe the process:
1. Lay the skirt along the top of the stringer parallel with the stringer resting on the points.
2. Measure the width of the skirt on the plumb.
3. Measure up from the floor at the bottom of the stringer. Take this distance, less 1-inch, and
scribe a line level with the floor at this point. Please note Fig. 2-1 here.
4. Cut the bottom of the skirt off on this line and make any necessary cuts or notches as to allow
the top of the skirt to rest 1-inch above the points of the stringers.
5. Tack the skirt into place with small finish nails.
6. Mark the wall and the skirt so that the skirt can be taken down, cut, and put back into exactly the
same position. Please note Fig. 2-2 here.
30

TM
Quality and Tradition in Every Step
31
Fig. 2-1 Determining width of skirt.
Measure up from the floor the width of the skirt on the plumb.
Subtract 1" and mark line parallel (level) to floor and cut
Measure width of skirton the plumb
Stringer
Upper floor joist
Second floor or landing
Mark and cuttop of skirt
Fig. 2-2 Marking wall skirt in place (index points on wall and skirt).
Skirt is one inch on the plumb
above stringer
Second floor or landing
Upper floor joist
Skirtboard
Stringer
Mark line and index points
on wall
Nail
Nail
+
Nail+
+
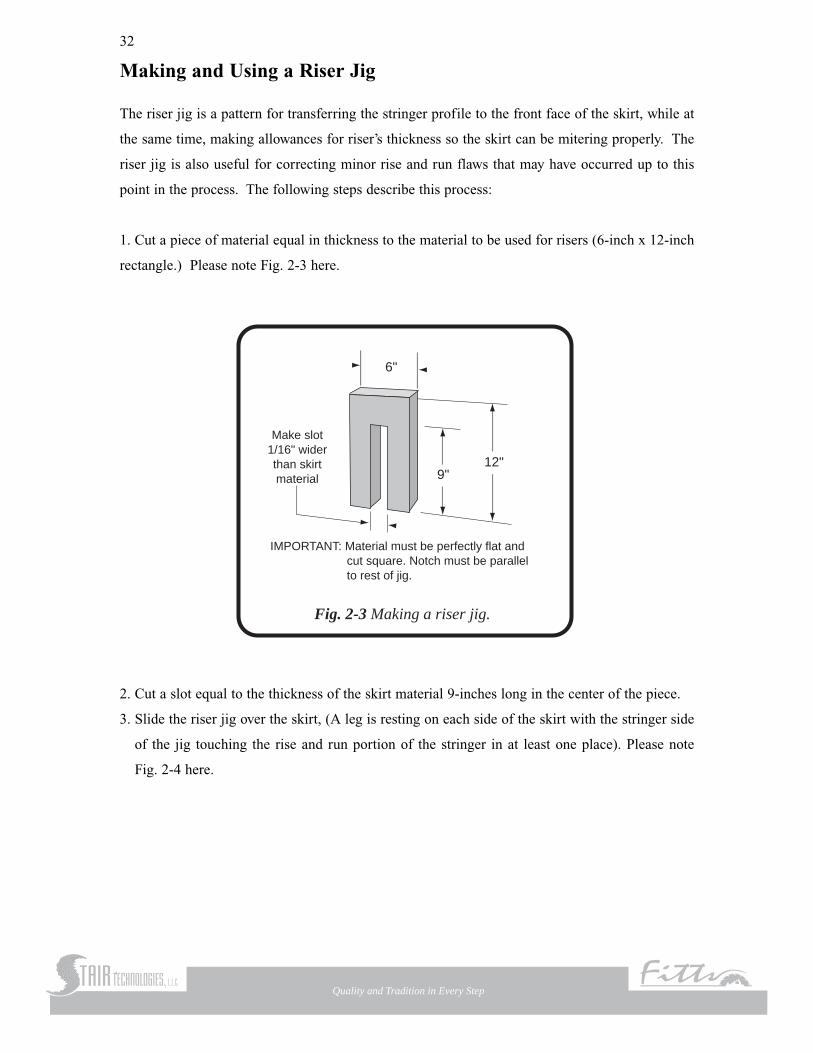
Making and Using a Riser Jig
The riser jig is a pattern for transferring the stringer profile to the front face of the skirt, while at
the same time, making allowances for riser’s thickness so the skirt can be mitering properly. The
riser jig is also useful for correcting minor rise and run flaws that may have occurred up to this
point in the process. The following steps describe this process:
1. Cut a piece of material equal in thickness to the material to be used for risers (6-inch x 12-inch
rectangle.) Please note Fig. 2-3 here.
32
TM
Quality and Tradition in Every Step
Fig. 2-3 Making a riser jig.
9"
6"
12"
IMPORTANT: Material must be perfectly flat and cut square. Notch must be parallel to rest of jig.
Make slot1/16" widerthan skirtmaterial
2. Cut a slot equal to the thickness of the skirt material 9-inches long in the center of the piece.
3. Slide the riser jig over the skirt, (A leg is resting on each side of the skirt with the stringer side
of the jig touching the rise and run portion of the stringer in at least one place). Please note
Fig. 2-4 here.

4. Plumb the riser jig with a torpedo level.
5. Scribe a line on the front side of the jig for a 45 degree riser cut.
6. Scribe a line at the bottom of the riser jig to indicate length of the cut and the location of the
run cut.
7. Repeat this process for all risers.
8. Using a two-foot level, scribe a line level with the floor on the bottom mark made by the riser
jig. Each horizontal line (Run Cut) should connect two vertical lines. (Riser cut). Note: If a bull
nose-starting step is used on the first step, make a square cut on the first rise of the skirt.
33
TM
Quality and Tradition in Every Step
Fig. 2-4 Using the riser jig
st
ri
ng
er
Stringer
Skirt is one inch on the plumb
above stringer
Mark skirt for 45°miter cut line
for riser
Riser jig
Riser jig
2 ft. level
Torpedo level
Second floor or landing
Upper floor joist
Skirt
Skirtboard
VIEW A
VIEW ARiser orunit rise
Unit run
Nail+
Nail+
Nail+
Mark for square cutline for run

TM
Quality and Tradition in Every Step
34
9. Remove the skirt and using a miter saw, cut all of the vertical lines at 45 degrees. Please note
Figure 2-5 here.
*(Do not cut beyond the horizontal run line)
10. Square cut all horizontal lines.
11. Using the reference marks, set the skirt back into place. Check the alignment at this point.
Please note Fig. 2-6 here.
12. Attach skirt to the stringer with finish nails.
Installing Wall Skirt
The following steps describe this process:
1. Lay the skirt along the points of the stringer, butting the board against the wall. Tack the skirt
board into place.
2. Using a two-foot level, scribe a line plumb with each riser. Please note Fig. 2-7 here.
TM
Quality and Tradition in Every Step
Fig. 2-7 Measuring and cutting the wall skirt.
Miter riser cuton skirt
Mark run cuts on wall skirt
Wall skirt
3. Level across each tread and scribe a line on the skirt.
4. Square cut the lines on the skirt. Then, make any necessary notches to allow the skirt to rest on
the stringers.

TM
Quality and Tradition in Every Step
35
*(Mark first riser on skirt using back side of riser jig for bullnose starting step).
**45° miter cut if riser is used on first rise.
**(Mark riser using front side of riser jig for 45° miter cut).
*90° square cut if bullnose starting stepis used on first rise.
Stringer
Stringer
Stringer
Stringer
Torpedolevel
Torpedolevel
Skirt
Riser jig
Riser jig
Skirt
Skirt
Skirt
Fig. 2-5 Cutting the skirt for Starting Step or Riser.
45° vertical miter cut
for riser
Index marks
90° horizontalsquare cut forall tread cuts
Fig. 2-6 Attaching skirt to stringer
Sk
ir
t
Second floor or landing
Upper floor joist
TM
Quality and Tradition in Every Step

5. Place the wall skirt onto the stringer and nail it against the wall or sheet rock. Please note Fig.
2-8 here.
Note: Sometimes the inside stringer is placed 1-1/2-inches from the wall to allow for the skirt,
sheet rock, etc. to be slipped behind the stringer. If you are using this method of installation,
mark and cut the top and bottom end of the wall skirt. Then slide the skirt behind the inside
stringer, and position it an equal distance above the stringer and finish nail into studs, and
behind the sheet-rock. Please note Fig. 2-9 here.
36
TM
Quality and Tradition in Every Step
Fig. 2-8 Installing the wall skirt.
Wall skir
t
Fig. 2 -9 Shimming inside stringer
Stringer
Sheet Rock
Skirt
Tread
2 x
4 W
all
2 x 4 used to shim stringer 11/2" away from wall
11/2"

Installing Risers
Risers may be constructed out of a variety of species of wood. The determination is usually based
on certain variables: whether the stair will be carpeted, whether the risers will be painted, or
whether the risers will be stained. All risers should be nailed and glued securely to the stringer so
to strengthen the stair and eliminate the possibility of creaks.
The following steps describe this process:
1. Cut a piece of material the height of the rise and 2-inches longer than the width of the stair.
2. Lay the riser across the stringers with the end flush against the wall skirt.
3. Scribe the riser to fit the wall skirt and cut.
4. Place the riser back onto the stringers and scribe a line even with the long point of the mitered
skirt. Please note Fig. 2-10.
37
TM
Quality and Tradition in Every Step
5. Make a square cut on this line at a 45-degree miter.
6. Place a small amount of wood glue on all areas where the riser is going to come in contact
with the skirts. Use construction adhesive where the riser meets the stringers.
Wa
ll
Fig. 2-10 Cutting and installing risers.
StringerSheet rock
Stringer
Skirt
Skirt
View from above
Scribe end of riser to fit against skirt and make square cut.
Mark riser for lengthand make 45° miter cut.

7. Set the riser in place and nail it to the skirts and stringers.
Note: Special attention should be given to the two mitered edges, which should form a sharp
corner.
8. If necessary, shim the “wall side” of the riser to make it plumb.
9. Add blocking to the frame of the stair for the newel posts.
Adding a Bullnose Starting Step
The bullnose tread is a starting tread with riser that may have one or both ends rounded to a semi-
circle. The bullnose end(s) will protrude beyond the face of the stair stringer. Also called a round
end tread, the bullnose tread is larger and more decorative than a standard tread.
Installing the Bullnose Riser
The following steps describe this process:
1. Lay pre-bent bullnose riser in place.
2. Measure distance from the curved end of the riser to skirt. Please note Fig. 2-11 here.
38
TM
Quality and Tradition in Every Step
*Measure distance A
Fig. 2-11 Measuring Bullnose Riser for rough cut.
Wa
ll
StringerStringer
Skirt Skirt
Riser
Cut Distance A minus 1/2" off this end. Bull nose riser
Kicker plate or thrust block
3. Subtract 1/2-inch from this distance; measure and scribe a line on the opposite end of the bull-
nose riser.
4. Rough cut riser at this point.
5. Slide riser back into place.

6. Place a 3/4-inch scribe block between the curved end of the bullnose riser and the skirt.
Please note Fig. 2-12 here.
39
TM
Quality and Tradition in Every Step
Wa
ll
Fig. 2-12 Measuring bullnose tread for finish cut using scribe block.
StringerStringer
SkirtSkirt
Slide 3/4"scribe block between riserand skirt
Using 3/4" scribe block, scribe a line on riser to fit the skirt and cut.
Riser
Bullnose riser
VIEW AA
Kicker plate or thrust block
7. Scribe the other end of the riser with the scribe block to fit the wall.
8. Make finish cut on riser.
9. Rip riser down to the necessary width to achieve proper height of your first riser.
10. Add blocking to attach bullnose riser to skirt. Please note Fig. 2-13 here.
SkirtBullnose Riser
Attach 2 x 4 blocking to side of skirt—attach Bullnose Riser to Block
VIEW AAFig. 2-13
11. Attach riser to framing using a quality construction adhesive and nails (or screws). The framing
usually consists of a 2 x 4 kicker plate or thrust block.

Installing the Bullnose Tread
The tread used with the bullnose is rounded (pre-made) in order to fit a pre-bent riser. (They are
typically purchased as a set from your local stair parts distributor.)
The following steps describe this process:
1. Lay tread in place.
2. Measure distance from the offset to skirt. Please note Fig. 2-14 here.
40
TM
Quality and Tradition in Every Step
Fig. 2-14 Measuring bullnose tread for rough cut.
Wa
ll
StringerStringer
Skirt Skirt
RiserMeasure distance A
Cut Distance A minus 1/2" off this end.
Kicker plate or thrust block
B u l l n o s e t r e a d
3. Subtract 1/2-inch from this distance; measure and scribe a line on the square end of the tread.
Make a cut along the scribed line.
4. Place a 3/4-inch thick spacer between the offset and the mitered skirt. Please note Fig. 2-15 here.
5. Slide the spacer out, taking special care not to move the tread.
6. Using the same spacer, scribe a line on the other end of the tread to match the wall skirt. Please
note Fig. 2-15 again.

7. Cut the bullnose tread to length following line scribed on wall skirt end. When cutting the tread,
leave the width of the pencil line to allow for a tight fit.
8. Place construction adhesives on stringers, skirts, upper riser, and lower riser (everywhere the
tread will come in contact).
9. Set the tread in place and push tight against all surfaces.
10. Nail the tread into stringers and into the front riser.
11. Reach around the back of the upper riser and nail riser to tread.
12. Trim bottom tread and riser with appropriate trim (cove and/or base shoe molding).
41
TM
Quality and Tradition in Every Step
Wa
ll
Fig. 2-15 Measuring bullnose tread for finish cut using scribe block.
StringerStringer
SkirtSkirt Slide 3/4"scribe block between tread and skirt
Using 3/4" scribe block, scribe a line on tread to fit the skirt and cut.
Riser
B u l l n o s e t r e a d
Kicker plate or thrust block

Installing Treads
The following steps describe this process:
1. Rip the tread to proper width. This is usually the run of the stair plus 1-1/4 -inches.
2. Measure distance from the offset to the skirt. Please note Fig. 2-16 here.
42
TM
Quality and Tradition in Every Step
Wa
ll
Fig. 2-16 Measuring tread for rough cut.
StringerStringer
Measuredistance A
Riser
Skirt SkirtSheetrock
VIEW FROM ABOVE
Cut distance A minus 1/2" off this end
T r e a d
3. Subtract 1/2-inch from this distance; measure and scribe a line on the opposite end of the tread
and cut.
4. Lay the tread in place.
5. Place a spacer that is 3/4-inch thick between the tread return and the mitered skirt. Please note
Fig 2-17 here.
Wa
ll
Fig. 2-17 Measuring tread using scribe block for finish cut.
StringerStringer
Slide 3/4" scribe blockbetween tread and skirt
SkirtSkirt
Sheetrock
VIEW FROM ABOVE
Using 3/4" scribe block, scribe a line on tread to fit the skirt and cut.
T r e a d
Riser

TM
Quality and Tradition in Every Step
43
6. Slide the spacer out, being careful not to move the tread.
7. Using the same spacer, scribe a line on the other end of the tread to match the wall
skirt. Please note Fig. 2-17 again.
8. Cut the tread to length following the line scribed on wall skirt end. When cutting the tread, leave
the width of the pencil line to allow for a tight fit.
9. Place construction adhesive on stringers, skirts, upper riser, and lower riser where tread will
come in contact.
10. Set tread into place and push tightly against all surfaces.
11. Nail the tread into stringers and into the front riser. Please note Fig. 2-18 here.
12. Reach around the back of the upper riser and nail riser to tread.
13. Trim bottom of tread with appropriate molding. (This is usually cove molding.)
Fig. 2-18
Tread (glue and nail)
Riser
Cove Mould
ST
RI
NG
ER

Installing False End Tread Caps and Risers
False tread caps are used on a carpeted staircase. The rough tread and riser must be in place before
the false tread caps and risers can be installed.
1. Install mitered skirt. This was described in the earlier steps. Remember that false risers are 1/2-
inch thick, so the riser jig should be made from 1/2-inch material.
*Please review Fig. 2-3 here.
2. Notch the nosing of rough tread for the false riser. Note: Remember to allow for adding skirt
when notching treads. Please note Fig. 2-19 here.
3. Place false riser in position against the notched rough riser and rough tread. Scribe a line where
the top of false riser meets the top of next tread. This is done to establish the height of the false
riser.
44
TM
Quality and Tradition in Every Step
Fig 2-19 Installing mitered false riser.
Rough TreadsRough Risers
False Riser1/2" thick Mitered skirt 3/4" hick
Rough TreadRough TreadRough Riser
Rough Riser
Skirt with mitered
riser3/4" thick
False RiserCaps-1/2" thick

4. Cut the false riser to the correct height and make a mitered end cut to connect to skirt.
5. Nail and wood glue the false riser to the mitered skirt. Apply construction adhesive between the
false riser and the framing, and then nail securely in place. Make sure the riser is plumb and
square with the skirt. Shim if necessary.
6. After all the false risers are attached, lay the false tread cap on corner of the first step. Mark and
cut to match width of false riser.
7. Slide a scribe block between the first riser and underneath the front of the false tread cap
between the nose, cove, and the first riser.
8. Holding the tread cap in place, slide the block out and place it on top of the false tread cap
against the second riser.
9. Scribe a line at the second riser and cut the end off leaving the line.
Note: Do not cut into the nose and cove of the false tread cap, as this will damage the visible
portion of the false tread cap.
10. Make a square cut on the end of the “tail” portion of the false tread cap molding leaving it as
long as possible. Please note Fig. 2-20 here.
45
TM
Quality and Tradition in Every Step

12. Cut another 45-degree angle in the reverse direction on the false end tread molding. Please
note Fig. 2-22 here. Do not cut through the 1/2-inch tread panel when mitering the molding.
This is accomplished by placing a spacer between the tread and the fence of the saw. Please
note Fig. 2-23 here. This is done to position the false end cap in front of the center of the blade.
11. Cut off a 45-degree angle wedge from the tail for the return. Please note Fig. 2-21 here.
46
TM
Quality and Tradition in Every Step
Fig. 2-23

13. Place a bed of construction adhesive on the area of the rough framing where the false tread cap
will be installed.
14. Lay the false tread cap in place and level it in all directions.
15. Nail the false tread cap in place. Put the nails through the nose and cove into the skirt and riser.
Note: Do not nail through the top of the false tread caps as this may cause the tread to split.
16. Wood glue the return into place.
47
TM
Quality and Tradition in Every Step

Chapter 2: Things to Remember
1. Always consult your local building codes before building a stair.
2. Riser jig should be tight to framing (in at least one spot) and plumb before marking.
3. The riser jig must be same thickness as riser material.
4. All connecting surfaces should be bonded with a high quality wood glue and/or construction
adhesive.
5. Add backing or blocking to all areas where newel posts will be attached.
6. Make all of the necessary adjustments to the first and last rise to allow for finished floor thick-
ness.
7. Make sure that all treads are level and all risers plumb.
8. Securely fasten all bullnose treads to the floor and stair structure.
9. Before continuing, check all finished rise and run dimensions to verify compliance with local
building codes.
48
TM
Quality and Tradition in Every Step