chapter 19 -- record buckets - in.gov indiana cataloging training manual chapter 19 –record...
TRANSCRIPT
Evergreen Indiana Cataloging Training Manual Chapter 19 –Record Buckets
Last Updated: 11/3/2009 Version 1.6.0
19.1
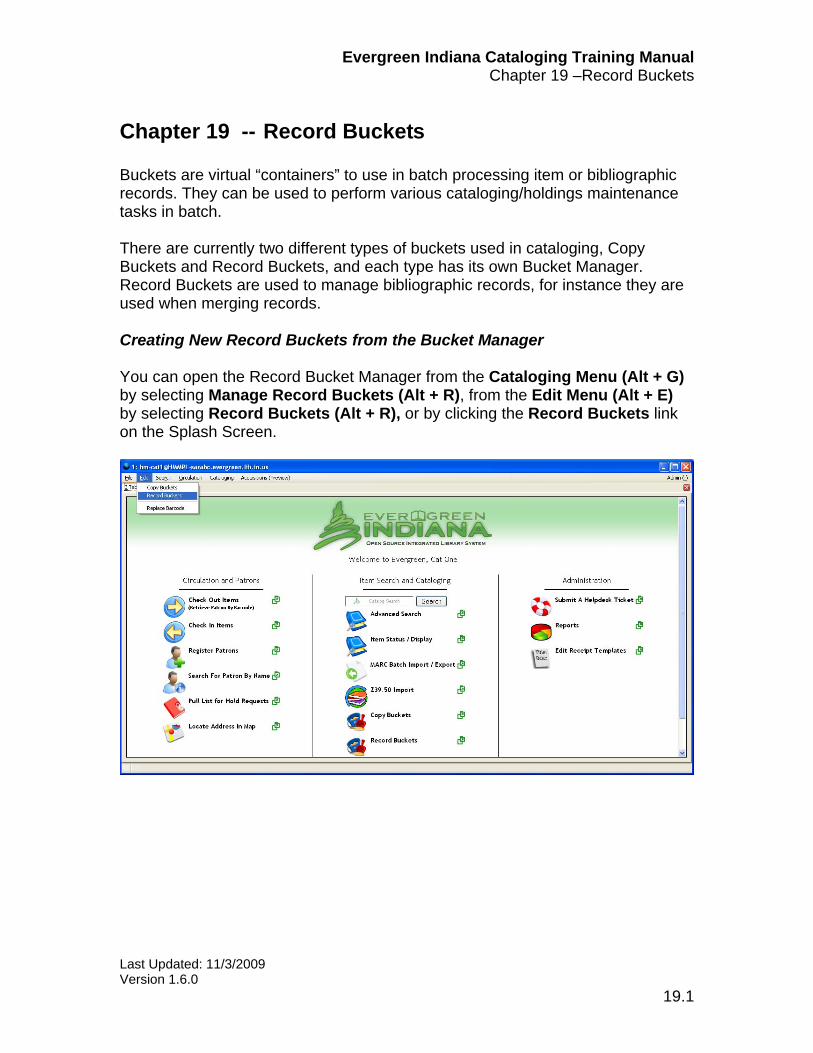
Chapter 19 -- Record Buckets Buckets are virtual “containers” to use in batch processing item or bibliographic records. They can be used to perform various cataloging/holdings maintenance tasks in batch. There are currently two different types of buckets used in cataloging, Copy Buckets and Record Buckets, and each type has its own Bucket Manager. Record Buckets are used to manage bibliographic records, for instance they are used when merging records. Creating New Record Buckets from the Bucket Manager You can open the Record Bucket Manager from the Cataloging Menu (Alt + G) by selecting Manage Record Buckets (Alt + R), from the Edit Menu (Alt + E) by selecting Record Buckets (Alt + R), or by clicking the Record Buckets link on the Splash Screen.
Evergreen Indiana Cataloging Training Manual Chapter 19 –Record Buckets
Last Updated: 11/3/2009 Version 1.6.0
19.2
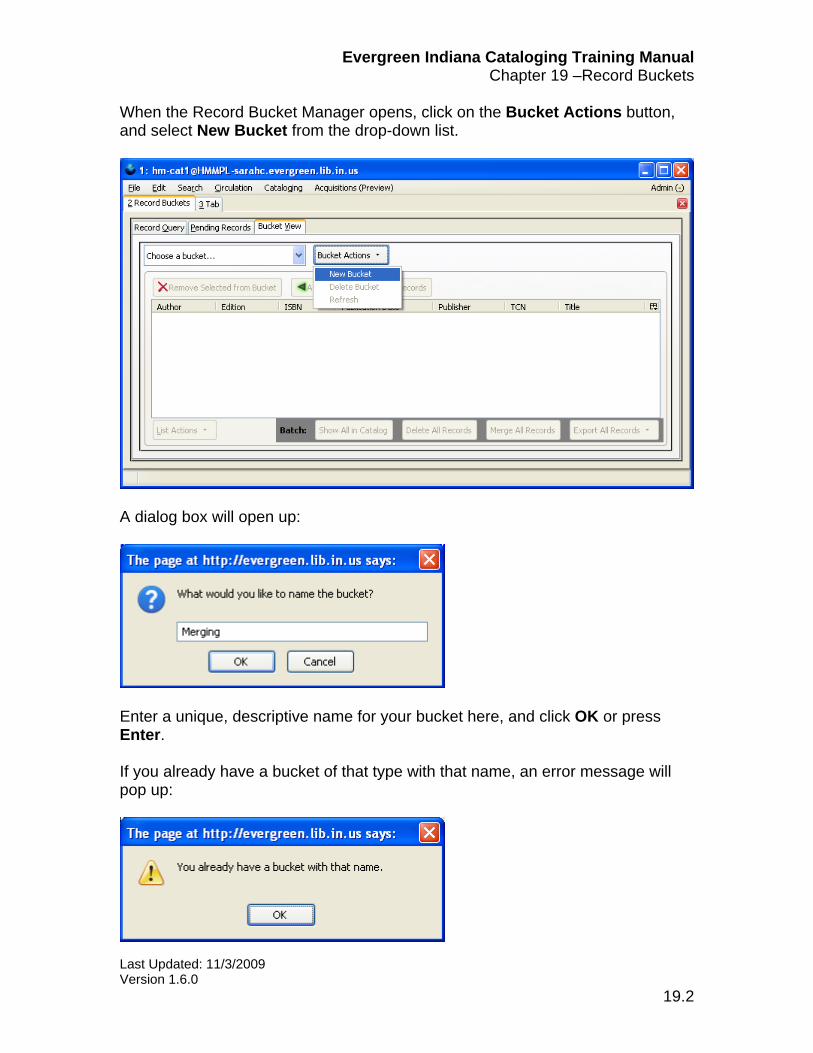
When the Record Bucket Manager opens, click on the Bucket Actions button, and select New Bucket from the drop-down list.
A dialog box will open up:
Enter a unique, descriptive name for your bucket here, and click OK or press Enter. If you already have a bucket of that type with that name, an error message will pop up:
Evergreen Indiana Cataloging Training Manual Chapter 19 –Record Buckets
Last Updated: 11/3/2009 Version 1.6.0
19.3
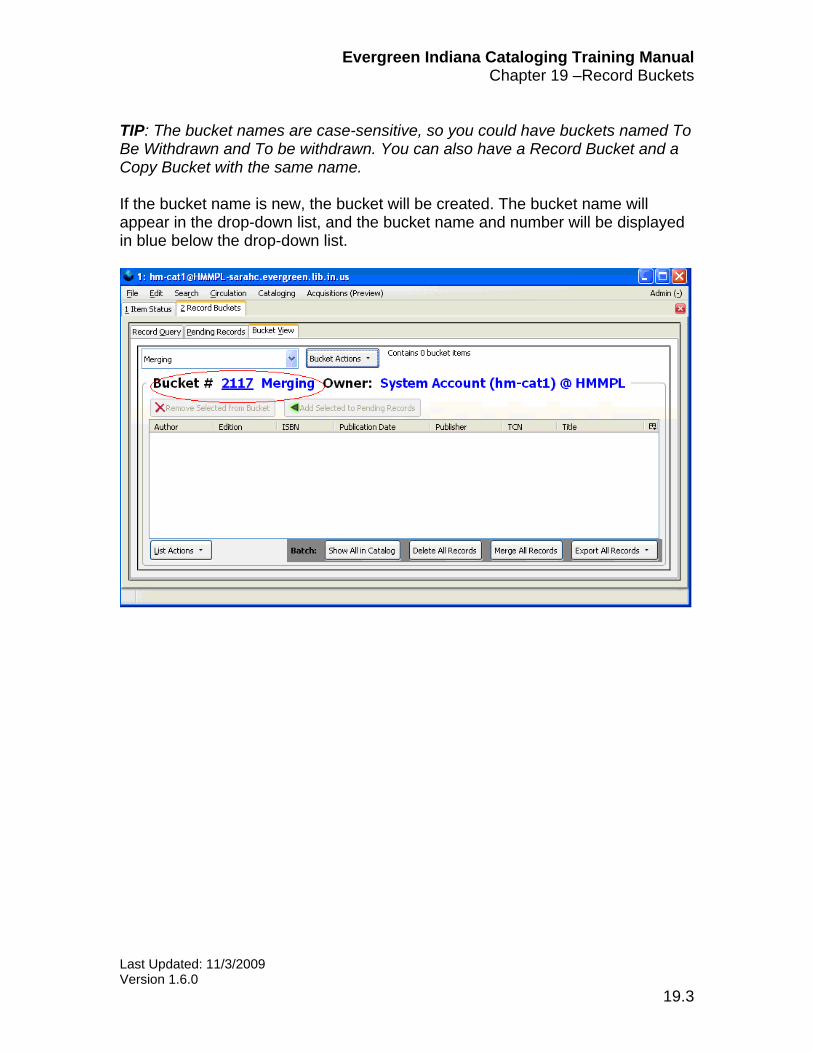
TIP: The bucket names are case-sensitive, so you could have buckets named To Be Withdrawn and To be withdrawn. You can also have a Record Bucket and a Copy Bucket with the same name. If the bucket name is new, the bucket will be created. The bucket name will appear in the drop-down list, and the bucket name and number will be displayed in blue below the drop-down list.
Evergreen Indiana Cataloging Training Manual Chapter 19 –Record Buckets
Last Updated: 11/3/2009 Version 1.6.0
19.4
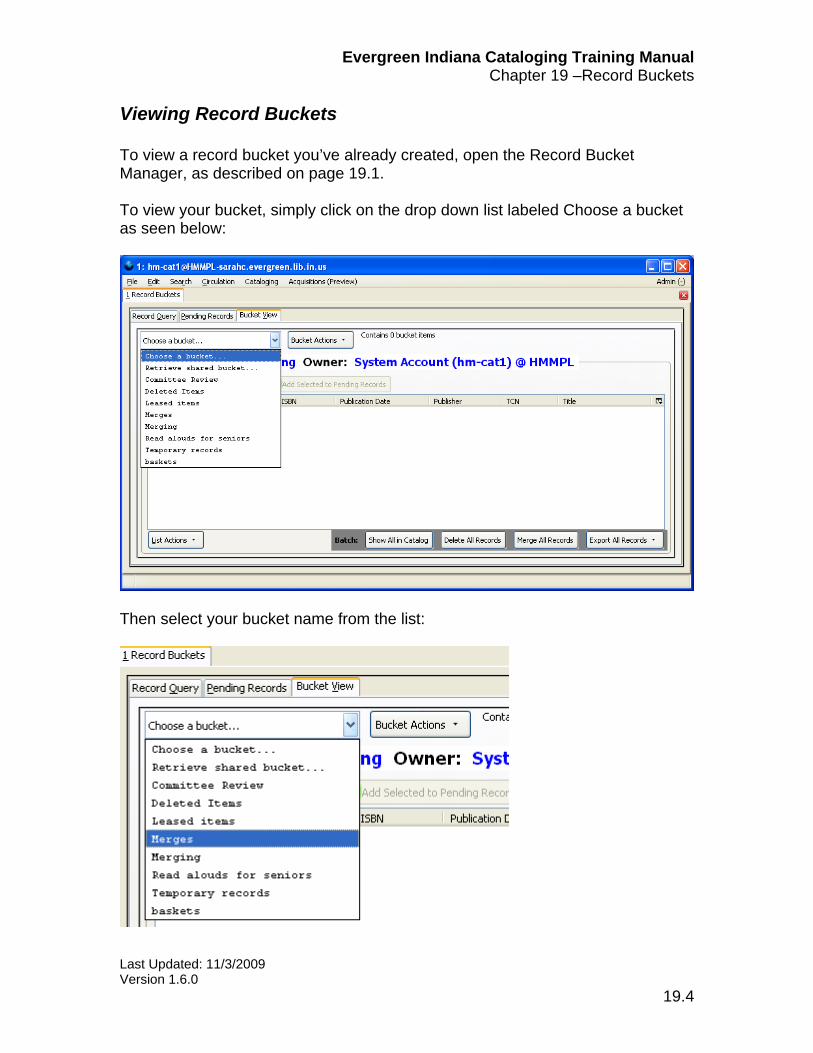
Viewing Record Buckets To view a record bucket you’ve already created, open the Record Bucket Manager, as described on page 19.1. To view your bucket, simply click on the drop down list labeled Choose a bucket as seen below:
Then select your bucket name from the list:
Evergreen Indiana Cataloging Training Manual Chapter 19 –Record Buckets
Last Updated: 11/3/2009 Version 1.6.0
19.5
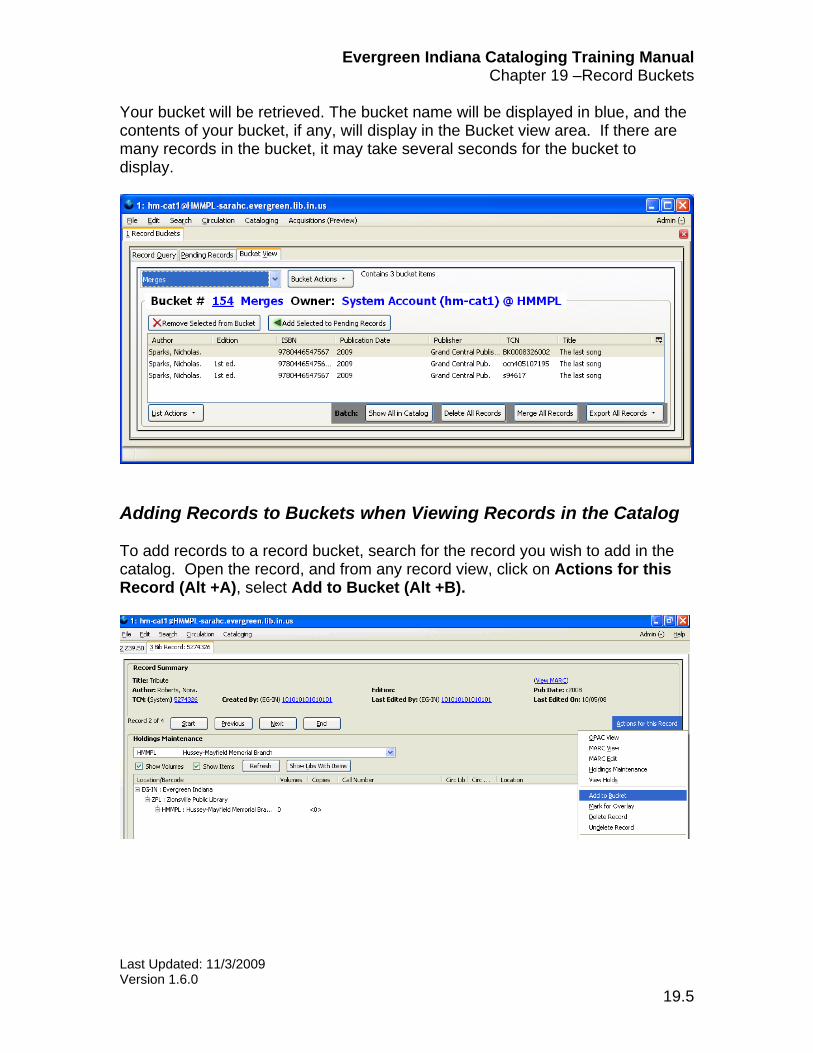
Your bucket will be retrieved. The bucket name will be displayed in blue, and the contents of your bucket, if any, will display in the Bucket view area. If there are many records in the bucket, it may take several seconds for the bucket to display.
Adding Records to Buckets when Viewing Records in the Catalog To add records to a record bucket, search for the record you wish to add in the catalog. Open the record, and from any record view, click on Actions for this Record (Alt +A), select Add to Bucket (Alt +B).
Evergreen Indiana Cataloging Training Manual Chapter 19 –Record Buckets
Last Updated: 11/3/2009 Version 1.6.0
19.6
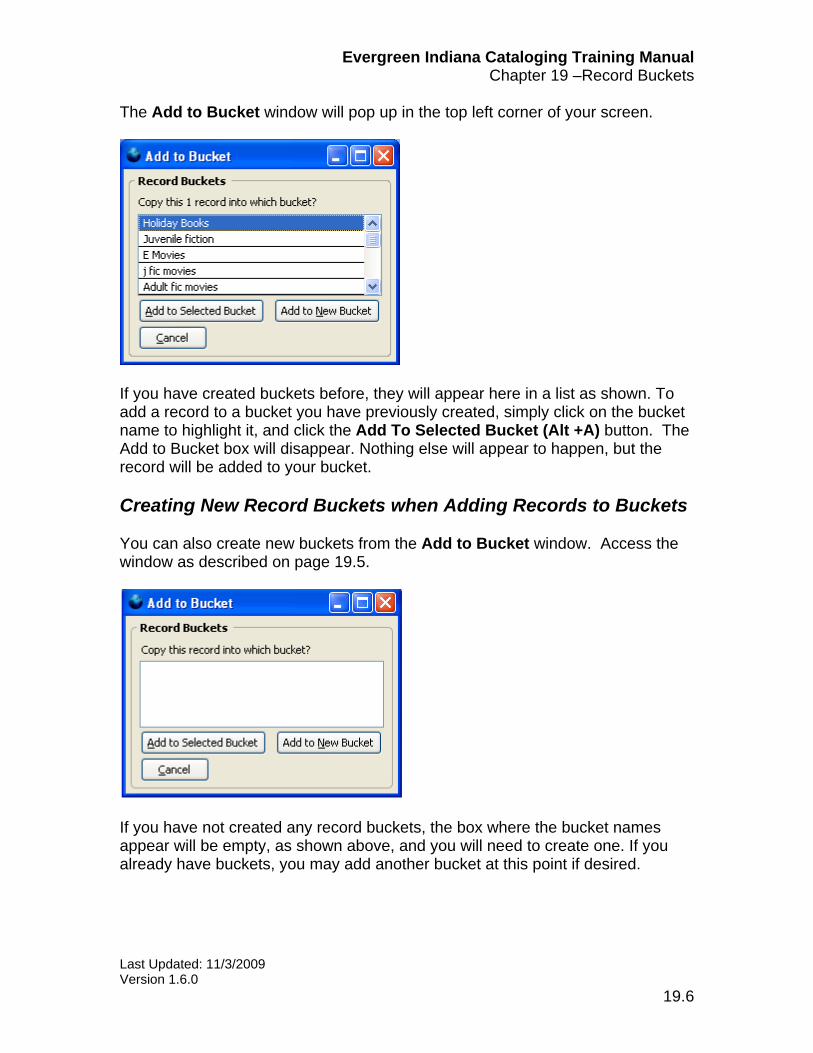
The Add to Bucket window will pop up in the top left corner of your screen.
If you have created buckets before, they will appear here in a list as shown. To add a record to a bucket you have previously created, simply click on the bucket name to highlight it, and click the Add To Selected Bucket (Alt +A) button. The Add to Bucket box will disappear. Nothing else will appear to happen, but the record will be added to your bucket. Creating New Record Buckets when Adding Records to Buckets You can also create new buckets from the Add to Bucket window. Access the window as described on page 19.5.
If you have not created any record buckets, the box where the bucket names appear will be empty, as shown above, and you will need to create one. If you already have buckets, you may add another bucket at this point if desired.
Evergreen Indiana Cataloging Training Manual Chapter 19 –Record Buckets
Last Updated: 11/3/2009 Version 1.6.0
19.7
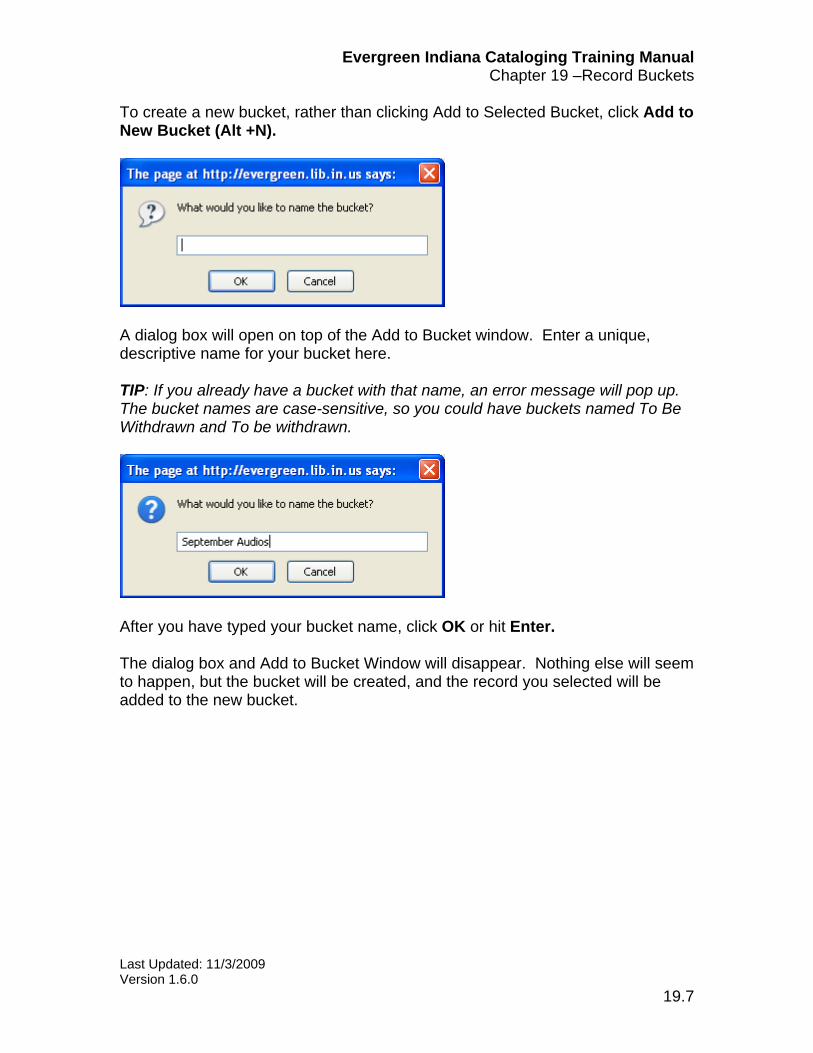
To create a new bucket, rather than clicking Add to Selected Bucket, click Add to New Bucket (Alt +N).
A dialog box will open on top of the Add to Bucket window. Enter a unique, descriptive name for your bucket here. TIP: If you already have a bucket with that name, an error message will pop up. The bucket names are case-sensitive, so you could have buckets named To Be Withdrawn and To be withdrawn.
After you have typed your bucket name, click OK or hit Enter. The dialog box and Add to Bucket Window will disappear. Nothing else will seem to happen, but the bucket will be created, and the record you selected will be added to the new bucket.
Evergreen Indiana Cataloging Training Manual Chapter 19 –Record Buckets
Last Updated: 11/3/2009 Version 1.6.0
19.8
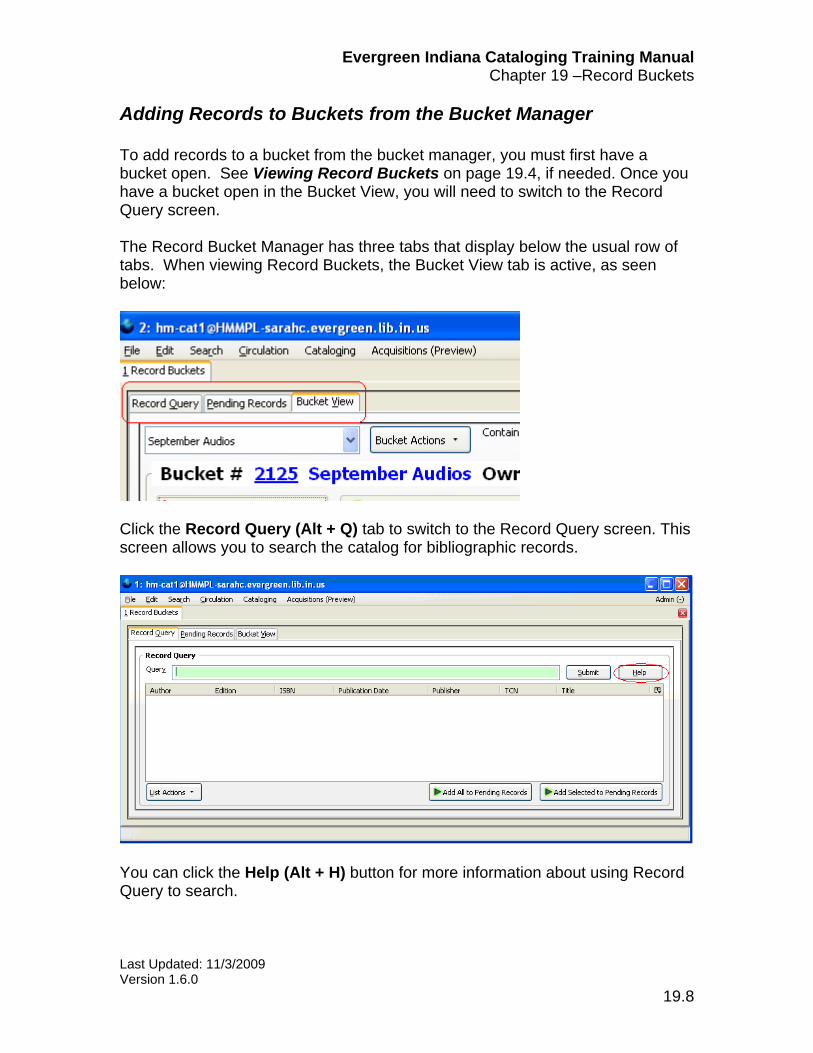
Adding Records to Buckets from the Bucket Manager To add records to a bucket from the bucket manager, you must first have a bucket open. See Viewing Record Buckets on page 19.4, if needed. Once you have a bucket open in the Bucket View, you will need to switch to the Record Query screen. The Record Bucket Manager has three tabs that display below the usual row of tabs. When viewing Record Buckets, the Bucket View tab is active, as seen below:
Click the Record Query (Alt + Q) tab to switch to the Record Query screen. This screen allows you to search the catalog for bibliographic records.
You can click the Help (Alt + H) button for more information about using Record Query to search.
Evergreen Indiana Cataloging Training Manual Chapter 19 –Record Buckets
Last Updated: 11/3/2009 Version 1.6.0
19.9
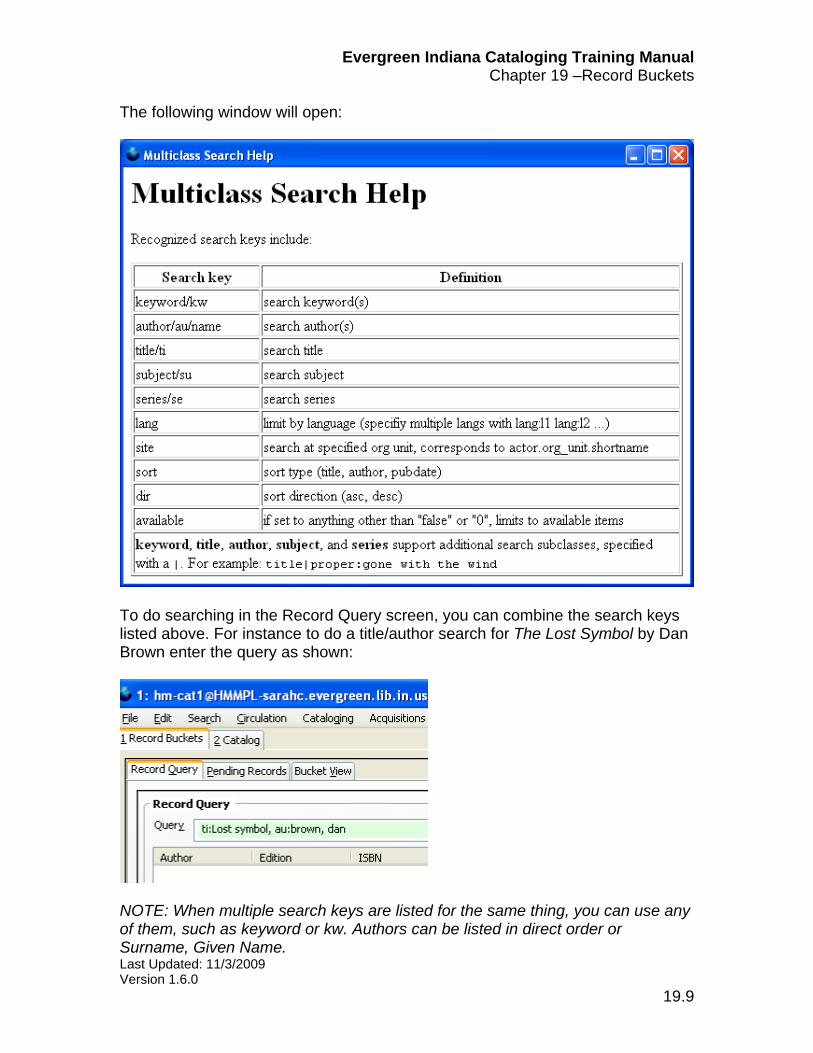
The following window will open:
To do searching in the Record Query screen, you can combine the search keys listed above. For instance to do a title/author search for The Lost Symbol by Dan Brown enter the query as shown:
NOTE: When multiple search keys are listed for the same thing, you can use any of them, such as keyword or kw. Authors can be listed in direct order or Surname, Given Name.
Evergreen Indiana Cataloging Training Manual Chapter 19 –Record Buckets
Last Updated: 11/3/2009 Version 1.6.0
19.10
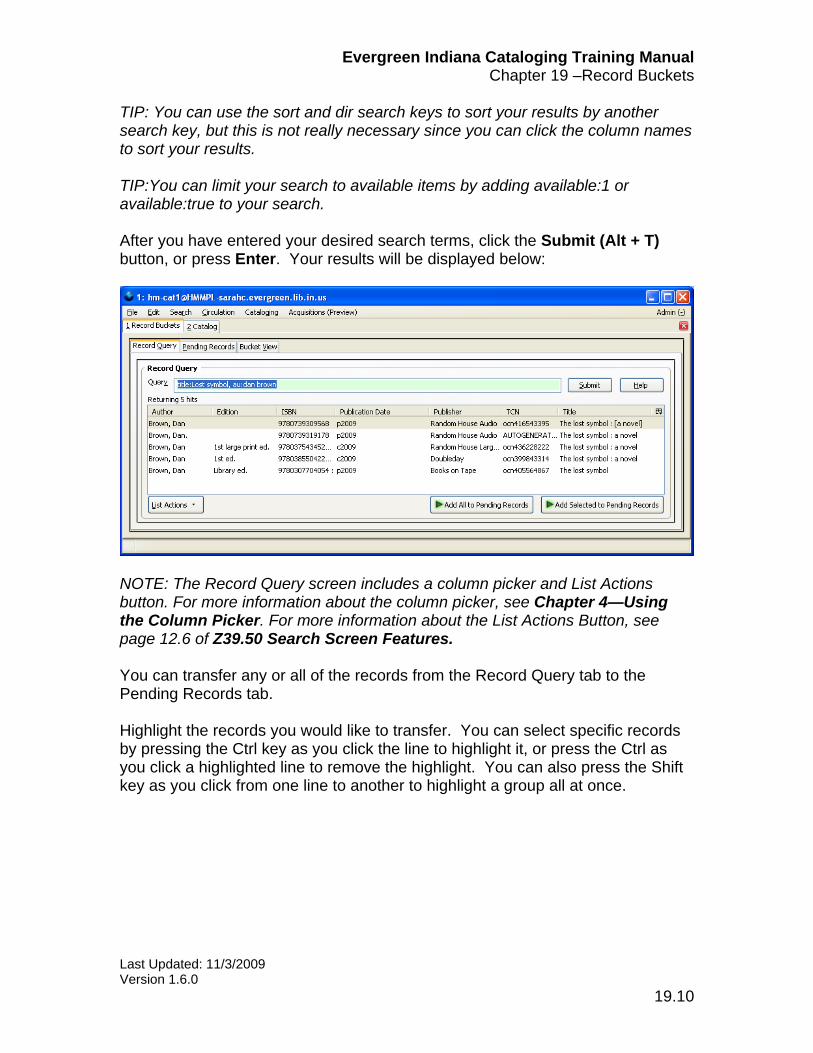
TIP: You can use the sort and dir search keys to sort your results by another search key, but this is not really necessary since you can click the column names to sort your results. TIP:You can limit your search to available items by adding available:1 or available:true to your search. After you have entered your desired search terms, click the Submit (Alt + T) button, or press Enter. Your results will be displayed below:
NOTE: The Record Query screen includes a column picker and List Actions button. For more information about the column picker, see Chapter 4—Using the Column Picker. For more information about the List Actions Button, see page 12.6 of Z39.50 Search Screen Features. You can transfer any or all of the records from the Record Query tab to the Pending Records tab. Highlight the records you would like to transfer. You can select specific records by pressing the Ctrl key as you click the line to highlight it, or press the Ctrl as you click a highlighted line to remove the highlight. You can also press the Shift key as you click from one line to another to highlight a group all at once.
Evergreen Indiana Cataloging Training Manual Chapter 19 –Record Buckets
Last Updated: 11/3/2009 Version 1.6.0
19.11
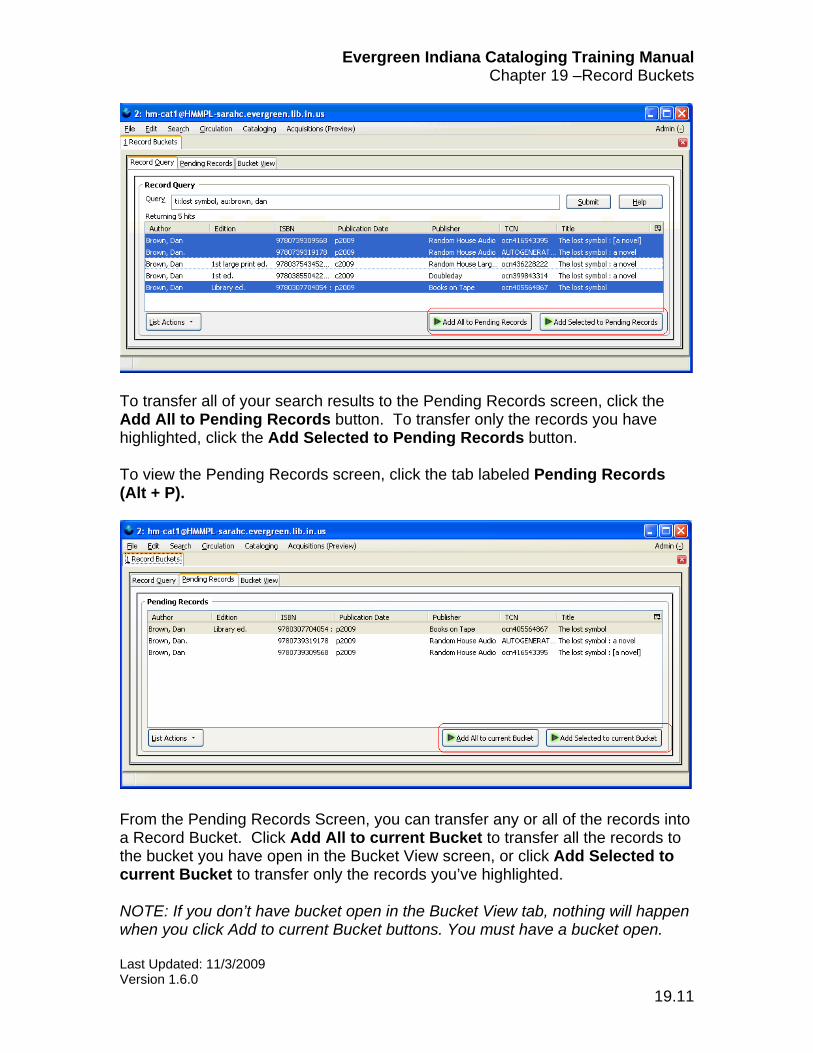
To transfer all of your search results to the Pending Records screen, click the Add All to Pending Records button. To transfer only the records you have highlighted, click the Add Selected to Pending Records button. To view the Pending Records screen, click the tab labeled Pending Records (Alt + P).
From the Pending Records Screen, you can transfer any or all of the records into a Record Bucket. Click Add All to current Bucket to transfer all the records to the bucket you have open in the Bucket View screen, or click Add Selected to current Bucket to transfer only the records you’ve highlighted. NOTE: If you don’t have bucket open in the Bucket View tab, nothing will happen when you click Add to current Bucket buttons. You must have a bucket open.
Evergreen Indiana Cataloging Training Manual Chapter 19 –Record Buckets
Last Updated: 11/3/2009 Version 1.6.0
19.12
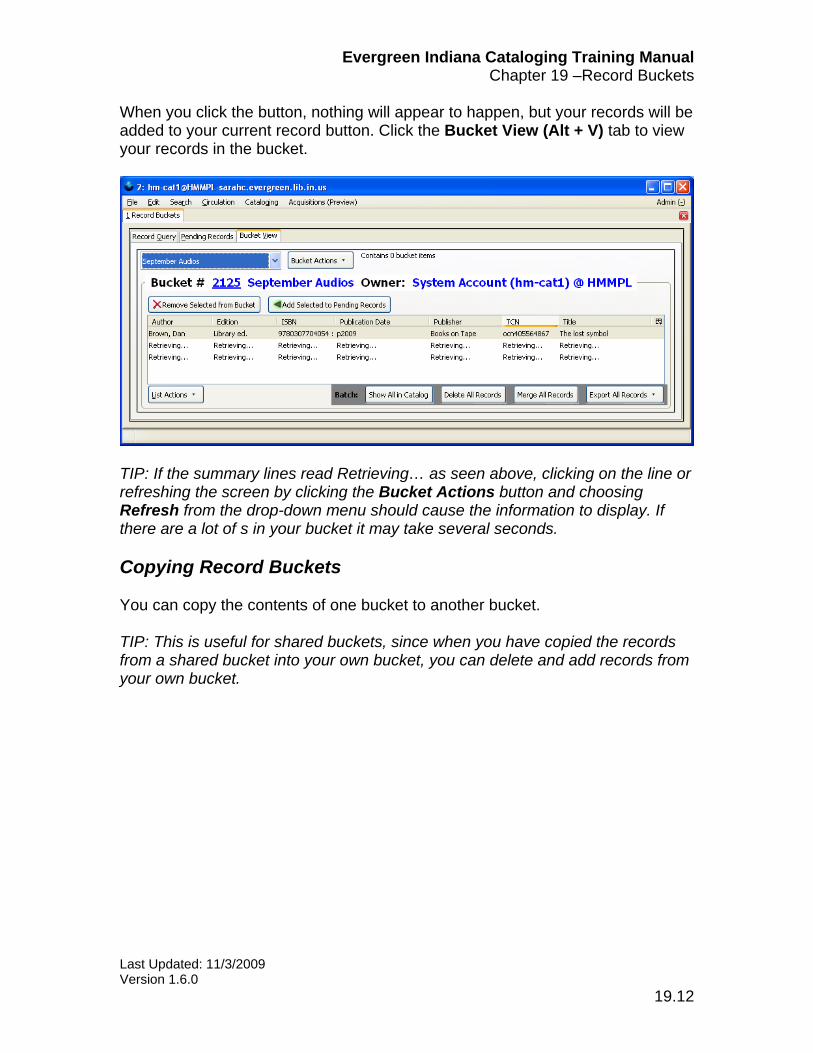
When you click the button, nothing will appear to happen, but your records will be added to your current record button. Click the Bucket View (Alt + V) tab to view your records in the bucket.
TIP: If the summary lines read Retrieving… as seen above, clicking on the line or refreshing the screen by clicking the Bucket Actions button and choosing Refresh from the drop-down menu should cause the information to display. If there are a lot of s in your bucket it may take several seconds. Copying Record Buckets You can copy the contents of one bucket to another bucket. TIP: This is useful for shared buckets, since when you have copied the records from a shared bucket into your own bucket, you can delete and add records from your own bucket.
Evergreen Indiana Cataloging Training Manual Chapter 19 –Record Buckets
Last Updated: 11/3/2009 Version 1.6.0
19.13
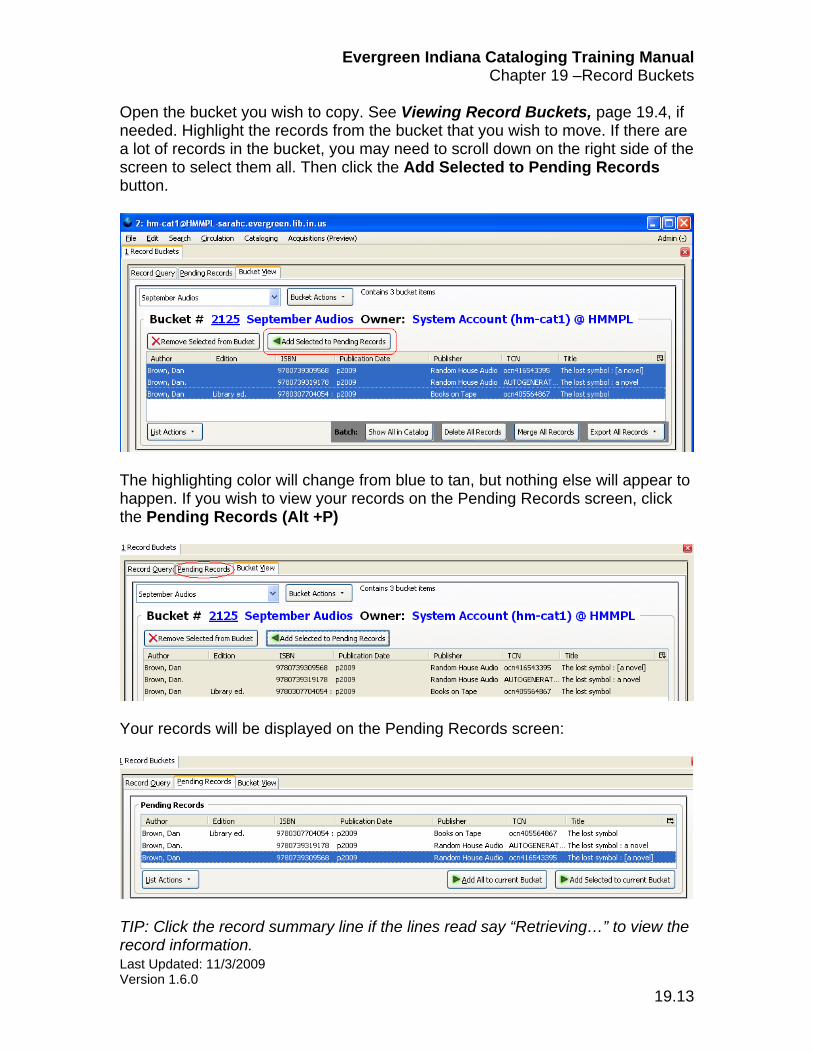
Open the bucket you wish to copy. See Viewing Record Buckets, page 19.4, if needed. Highlight the records from the bucket that you wish to move. If there are a lot of records in the bucket, you may need to scroll down on the right side of the screen to select them all. Then click the Add Selected to Pending Records button.
The highlighting color will change from blue to tan, but nothing else will appear to happen. If you wish to view your records on the Pending Records screen, click the Pending Records (Alt +P)
Your records will be displayed on the Pending Records screen:
TIP: Click the record summary line if the lines read say “Retrieving…” to view the record information.
Evergreen Indiana Cataloging Training Manual Chapter 19 –Record Buckets
Last Updated: 11/3/2009 Version 1.6.0
19.14
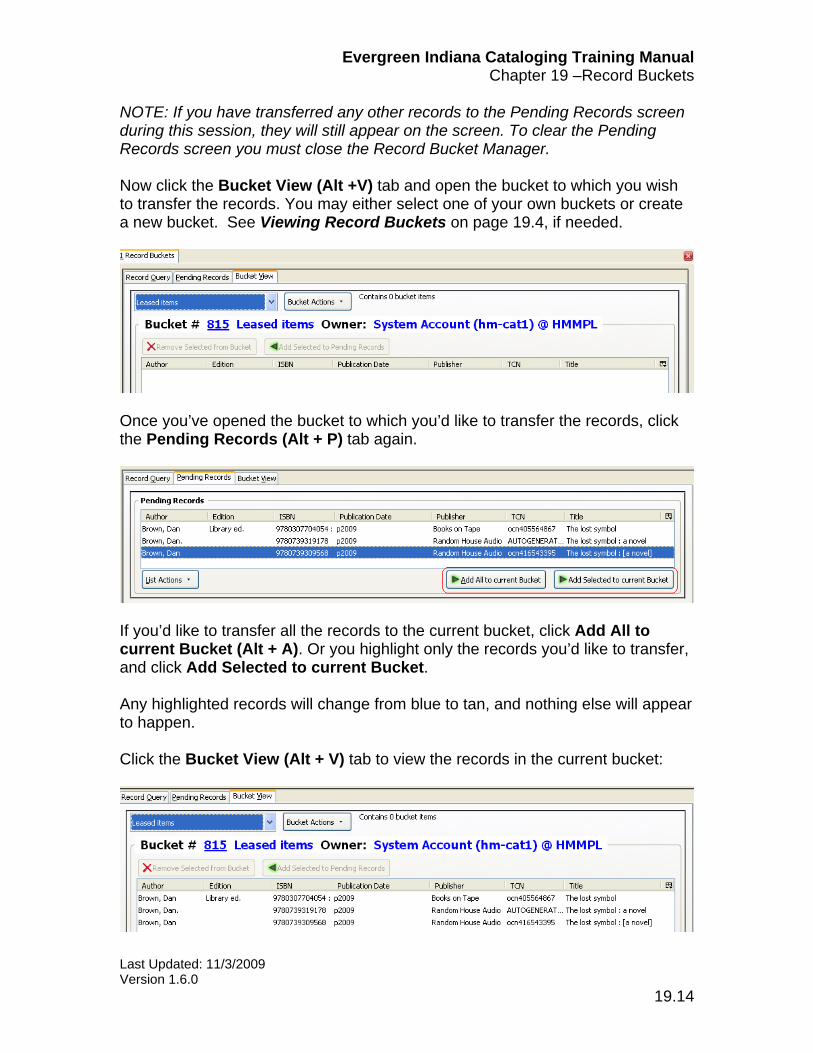
NOTE: If you have transferred any other records to the Pending Records screen during this session, they will still appear on the screen. To clear the Pending Records screen you must close the Record Bucket Manager. Now click the Bucket View (Alt +V) tab and open the bucket to which you wish to transfer the records. You may either select one of your own buckets or create a new bucket. See Viewing Record Buckets on page 19.4, if needed.
Once you’ve opened the bucket to which you’d like to transfer the records, click the Pending Records (Alt + P) tab again.
If you’d like to transfer all the records to the current bucket, click Add All to current Bucket (Alt + A). Or you highlight only the records you’d like to transfer, and click Add Selected to current Bucket. Any highlighted records will change from blue to tan, and nothing else will appear to happen. Click the Bucket View (Alt + V) tab to view the records in the current bucket:
Evergreen Indiana Cataloging Training Manual Chapter 19 –Record Buckets
Last Updated: 11/3/2009 Version 1.6.0
19.15
You have now copied the records to your bucket. These records have not been removed from the original bucket, and they will remain in the Pending area until you close the Record Bucket Manager. NOTE: The message line at the top of the screen reads Contains 0 bucket items. If you refresh by Clicking the Bucket Actions (Alt + A) button and selecting Refresh, it will display the correct number of records. TIP: If you have copied the bucket of another user, you may wish to notify them that you have done so. The user may wish to delete the original bucket or its contents, and he or she may need to know when you copied the bucket so that you can be notified if they make further changes to the original bucket contents. Merging Records The merge function allows you to eliminate duplicate bibliographic records. You select the best record and the holdings and any patron holds from the other records are transferred to the lead record selected. The merged records which were not selected as the lead are deleted from the catalog. When merging records, take care to ensure that the records do indeed match. Please use the same criteria for matching records to be merged that you would use to catalog an item. If there is any question as to whether or not the records should be merged, do not merge them. It is much easier to merge records than to unmerge them. Once the records are merged, it would be difficult to determine which items belonged on which record if they were merged in error. In cases of doubt, it may be necessary to have the items in hand in order to compare them to each other and to the records. To merge records, you must add each matching record to be merged to the same record bucket. See Adding Records to Buckets when Viewing Records in the Catalog on page 19.5 and Adding Records to Buckets from the Bucket Manager on page 19.8 for more information on adding records to buckets. TIP: When merging many records into one, adding records to buckets from the bucket manager will allow you to highlight and add a lot of records to your bucket at once, rather than searching and viewing each record individually in the catalog. For instance, you could do a title search and then sort by publisher or ISBN, and transfer the regular print version to a bucket to merge. Then you can transfer large print or audio and merge those.
Evergreen Indiana Cataloging Training Manual Chapter 19 –Record Buckets
Last Updated: 11/3/2009 Version 1.6.0
19.16
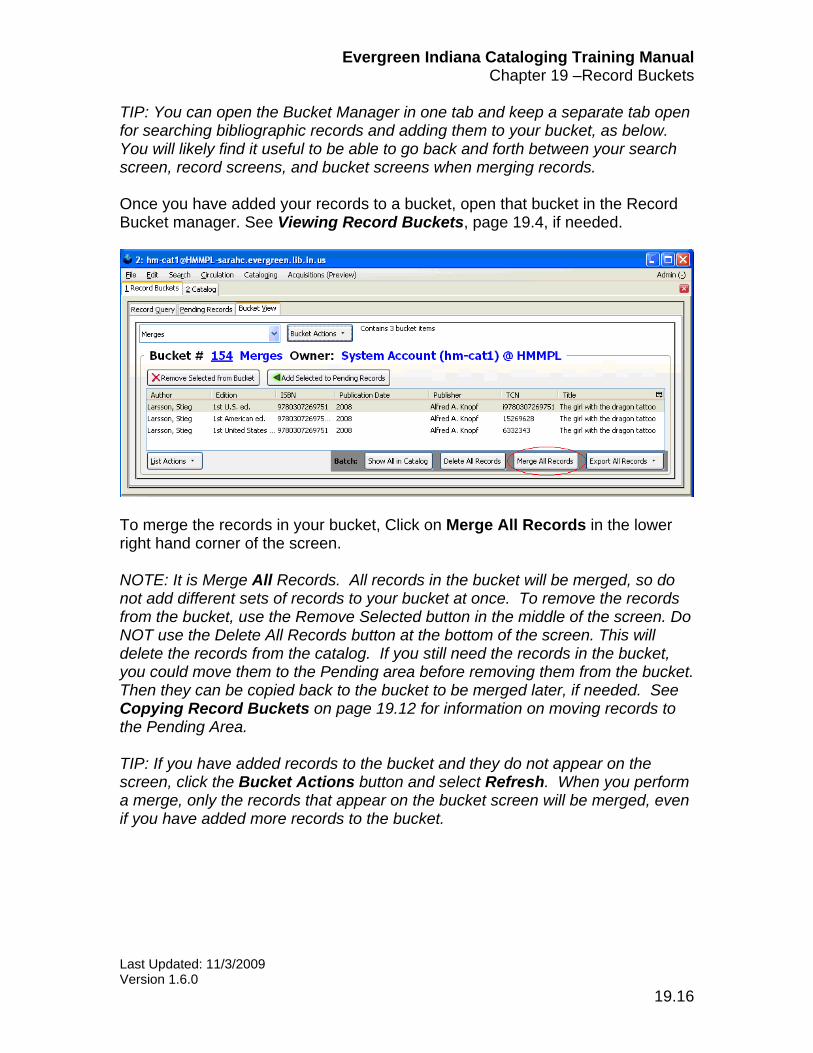
TIP: You can open the Bucket Manager in one tab and keep a separate tab open for searching bibliographic records and adding them to your bucket, as below. You will likely find it useful to be able to go back and forth between your search screen, record screens, and bucket screens when merging records. Once you have added your records to a bucket, open that bucket in the Record Bucket manager. See Viewing Record Buckets, page 19.4, if needed.
To merge the records in your bucket, Click on Merge All Records in the lower right hand corner of the screen. NOTE: It is Merge All Records. All records in the bucket will be merged, so do not add different sets of records to your bucket at once. To remove the records from the bucket, use the Remove Selected button in the middle of the screen. Do NOT use the Delete All Records button at the bottom of the screen. This will delete the records from the catalog. If you still need the records in the bucket, you could move them to the Pending area before removing them from the bucket. Then they can be copied back to the bucket to be merged later, if needed. See Copying Record Buckets on page 19.12 for information on moving records to the Pending Area. TIP: If you have added records to the bucket and they do not appear on the screen, click the Bucket Actions button and select Refresh. When you perform a merge, only the records that appear on the bucket screen will be merged, even if you have added more records to the bucket.
Evergreen Indiana Cataloging Training Manual Chapter 19 –Record Buckets
Last Updated: 11/3/2009 Version 1.6.0
19.17
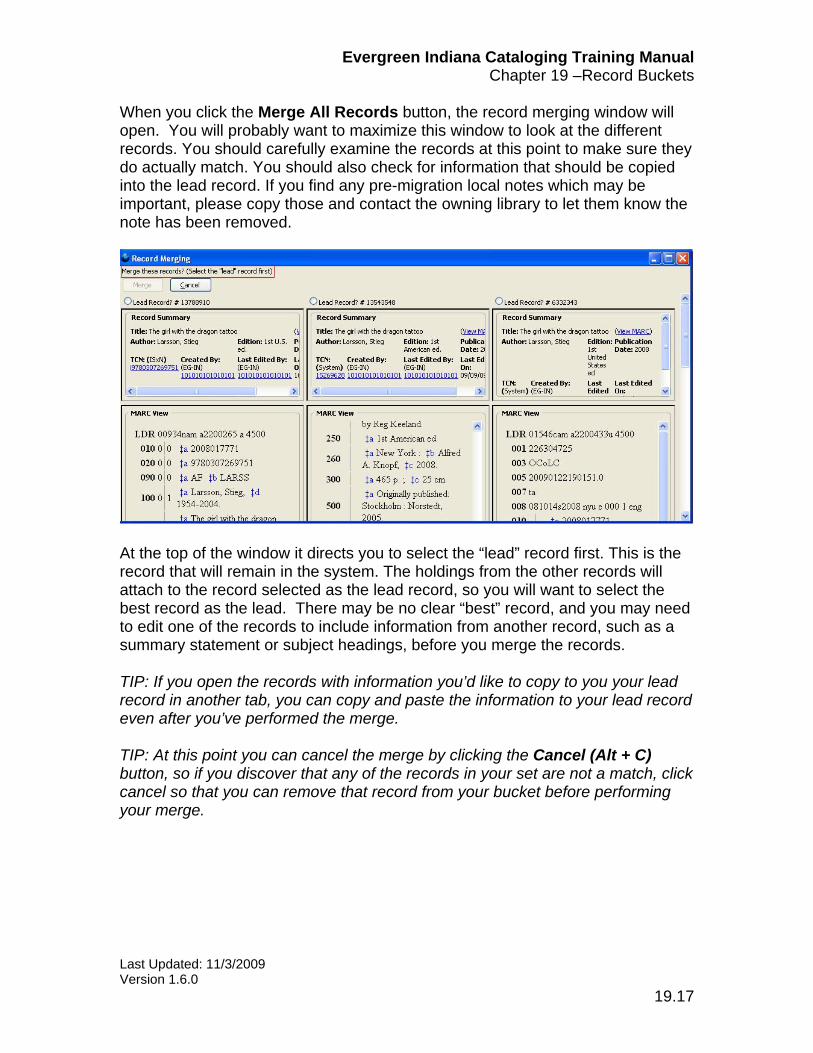
When you click the Merge All Records button, the record merging window will open. You will probably want to maximize this window to look at the different records. You should carefully examine the records at this point to make sure they do actually match. You should also check for information that should be copied into the lead record. If you find any pre-migration local notes which may be important, please copy those and contact the owning library to let them know the note has been removed.
At the top of the window it directs you to select the “lead” record first. This is the record that will remain in the system. The holdings from the other records will attach to the record selected as the lead record, so you will want to select the best record as the lead. There may be no clear “best” record, and you may need to edit one of the records to include information from another record, such as a summary statement or subject headings, before you merge the records. TIP: If you open the records with information you’d like to copy to you your lead record in another tab, you can copy and paste the information to your lead record even after you’ve performed the merge. TIP: At this point you can cancel the merge by clicking the Cancel (Alt + C) button, so if you discover that any of the records in your set are not a match, click cancel so that you can remove that record from your bucket before performing your merge.
Evergreen Indiana Cataloging Training Manual Chapter 19 –Record Buckets
Last Updated: 11/3/2009 Version 1.6.0
19.18
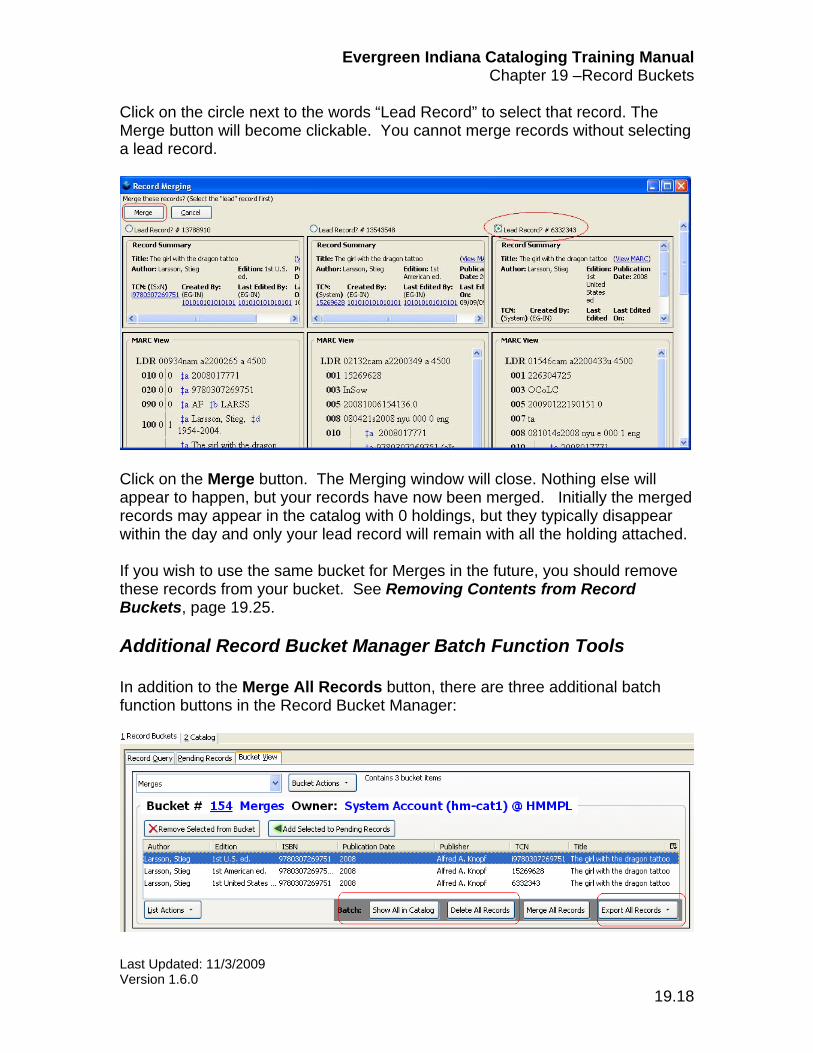
Click on the circle next to the words “Lead Record” to select that record. The Merge button will become clickable. You cannot merge records without selecting a lead record.
Click on the Merge button. The Merging window will close. Nothing else will appear to happen, but your records have now been merged. Initially the merged records may appear in the catalog with 0 holdings, but they typically disappear within the day and only your lead record will remain with all the holding attached. If you wish to use the same bucket for Merges in the future, you should remove these records from your bucket. See Removing Contents from Record Buckets, page 19.25. Additional Record Bucket Manager Batch Function Tools In addition to the Merge All Records button, there are three additional batch function buttons in the Record Bucket Manager:
Evergreen Indiana Cataloging Training Manual Chapter 19 –Record Buckets
Last Updated: 11/3/2009 Version 1.6.0
19.19
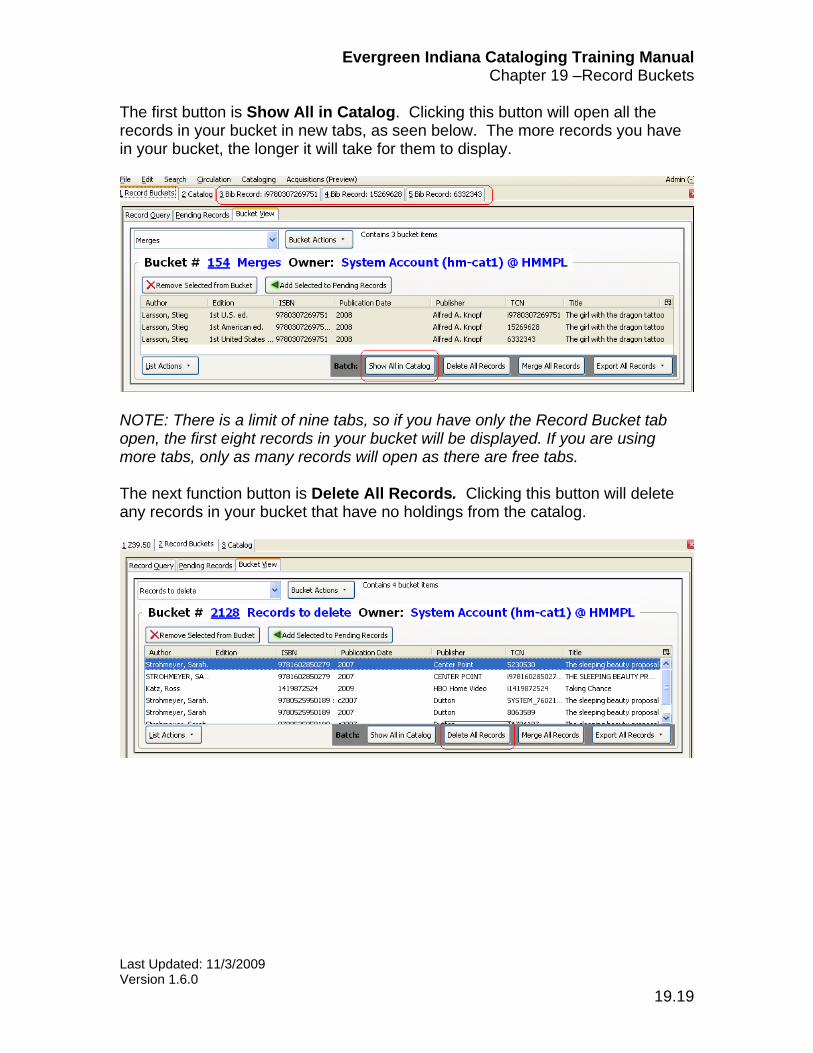
The first button is Show All in Catalog. Clicking this button will open all the records in your bucket in new tabs, as seen below. The more records you have in your bucket, the longer it will take for them to display.
NOTE: There is a limit of nine tabs, so if you have only the Record Bucket tab open, the first eight records in your bucket will be displayed. If you are using more tabs, only as many records will open as there are free tabs. The next function button is Delete All Records. Clicking this button will delete any records in your bucket that have no holdings from the catalog.
Evergreen Indiana Cataloging Training Manual Chapter 19 –Record Buckets
Last Updated: 11/3/2009 Version 1.6.0
19.20
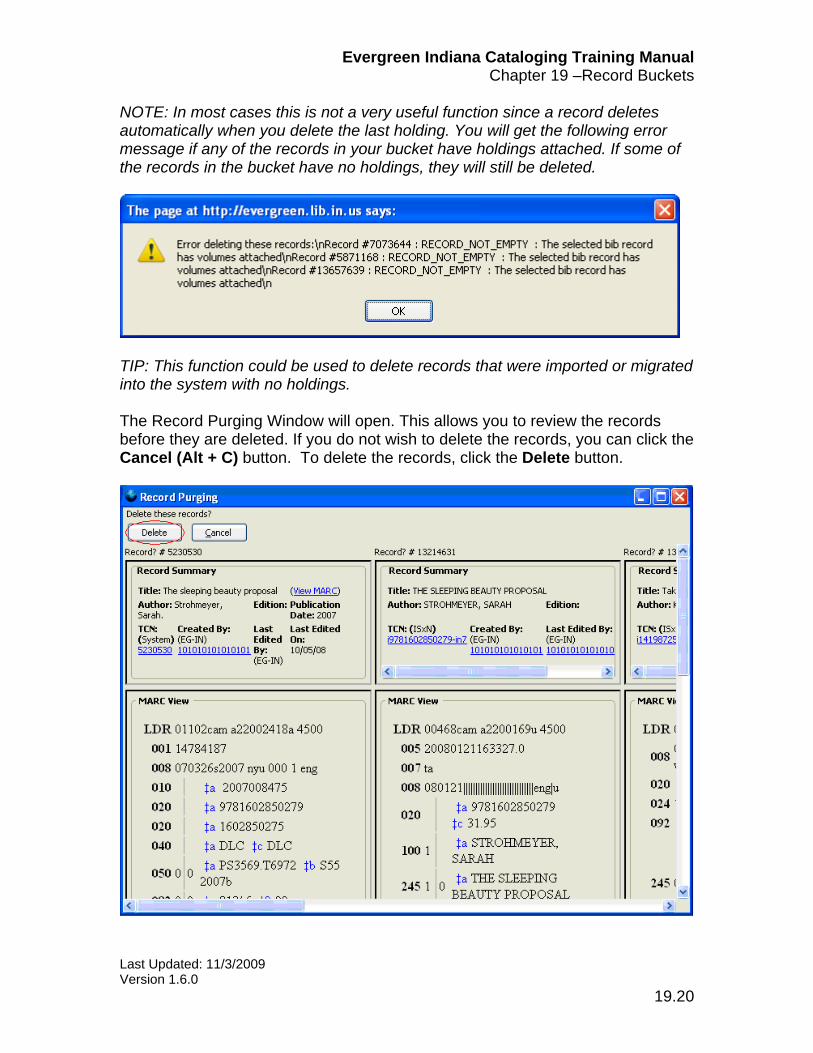
NOTE: In most cases this is not a very useful function since a record deletes automatically when you delete the last holding. You will get the following error message if any of the records in your bucket have holdings attached. If some of the records in the bucket have no holdings, they will still be deleted.
TIP: This function could be used to delete records that were imported or migrated into the system with no holdings. The Record Purging Window will open. This allows you to review the records before they are deleted. If you do not wish to delete the records, you can click the Cancel (Alt + C) button. To delete the records, click the Delete button.

Evergreen Indiana Cataloging Training Manual Chapter 19 –Record Buckets
Last Updated: 11/3/2009 Version 1.6.0
19.21
The Record Purging window will close. Nothing else will appear to happen, but the records will be deleted. If you click the Delete All Records button again, the Record Summaries will indicate the records are deleted:
The final button is the Export All Records button. This button allows you Export the records in your bucket to a file on your computer. You can export them in a few different formats.
Select the format you’d like to use to export the records, in this case MARC21.
Evergreen Indiana Cataloging Training Manual Chapter 19 –Record Buckets
Last Updated: 11/3/2009 Version 1.6.0
19.22
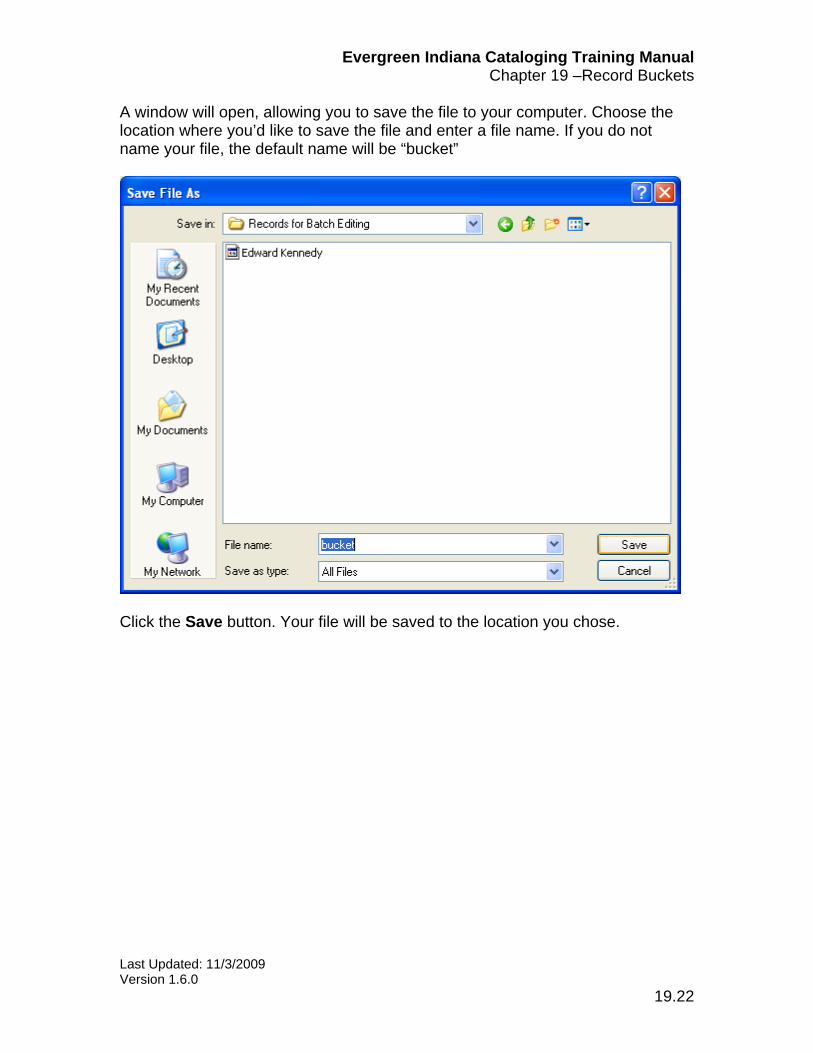
A window will open, allowing you to save the file to your computer. Choose the location where you’d like to save the file and enter a file name. If you do not name your file, the default name will be “bucket”
Click the Save button. Your file will be saved to the location you chose.
Evergreen Indiana Cataloging Training Manual Chapter 19 –Record Buckets
Last Updated: 11/3/2009 Version 1.6.0
19.23
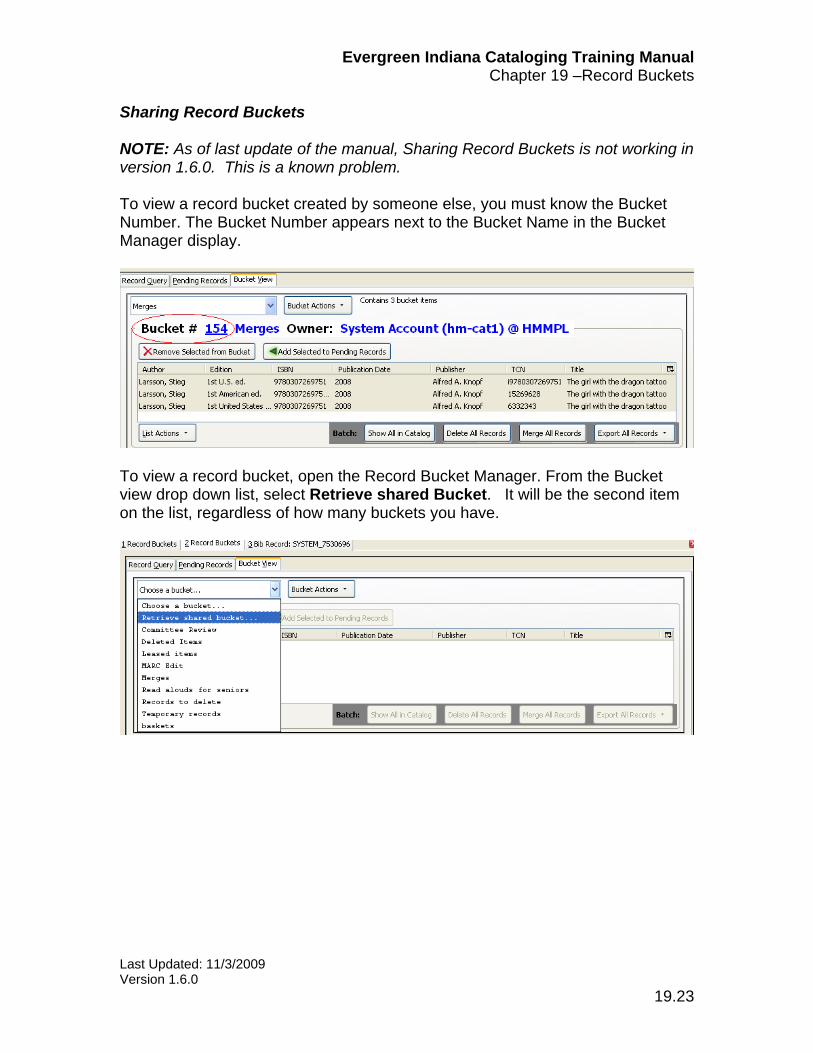
Sharing Record Buckets NOTE: As of last update of the manual, Sharing Record Buckets is not working in version 1.6.0. This is a known problem. To view a record bucket created by someone else, you must know the Bucket Number. The Bucket Number appears next to the Bucket Name in the Bucket Manager display.
To view a record bucket, open the Record Bucket Manager. From the Bucket view drop down list, select Retrieve shared Bucket. It will be the second item on the list, regardless of how many buckets you have.

Evergreen Indiana Cataloging Training Manual Chapter 19 –Record Buckets
Last Updated: 11/3/2009 Version 1.6.0
19.24
A dialog box will pop up, asking you to enter the Bucket Number:
Type the Bucket Number of the bucket you wish to view in the box, and click OK or press Enter. The Bucket Name and Number will be displayed, and the contents will appear in the window:
You can perform actions from the toolbar at the bottom of the screen, but you cannot remove or add records to a bucket created by another user.
Evergreen Indiana Cataloging Training Manual Chapter 19 –Record Buckets
Last Updated: 11/3/2009 Version 1.6.0
19.25
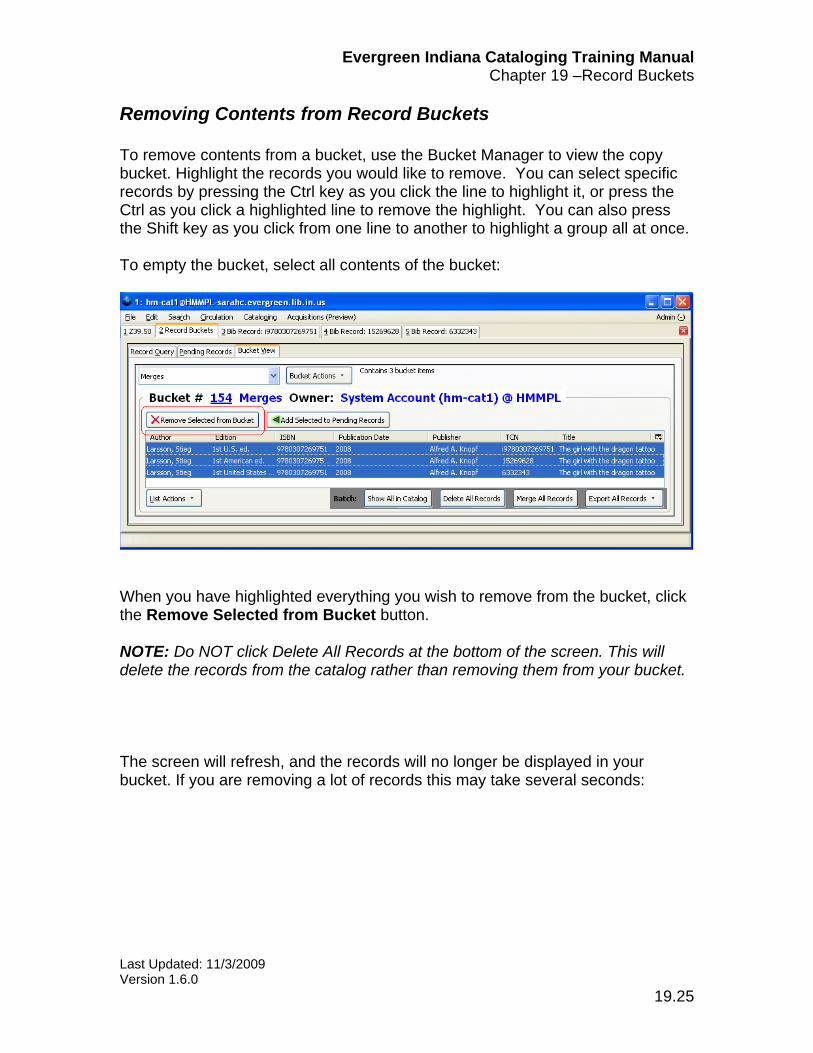
Removing Contents from Record Buckets To remove contents from a bucket, use the Bucket Manager to view the copy bucket. Highlight the records you would like to remove. You can select specific records by pressing the Ctrl key as you click the line to highlight it, or press the Ctrl as you click a highlighted line to remove the highlight. You can also press the Shift key as you click from one line to another to highlight a group all at once. To empty the bucket, select all contents of the bucket:
When you have highlighted everything you wish to remove from the bucket, click the Remove Selected from Bucket button. NOTE: Do NOT click Delete All Records at the bottom of the screen. This will delete the records from the catalog rather than removing them from your bucket. The screen will refresh, and the records will no longer be displayed in your bucket. If you are removing a lot of records this may take several seconds:
Evergreen Indiana Cataloging Training Manual Chapter 19 –Record Buckets
Last Updated: 11/3/2009 Version 1.6.0
19.26
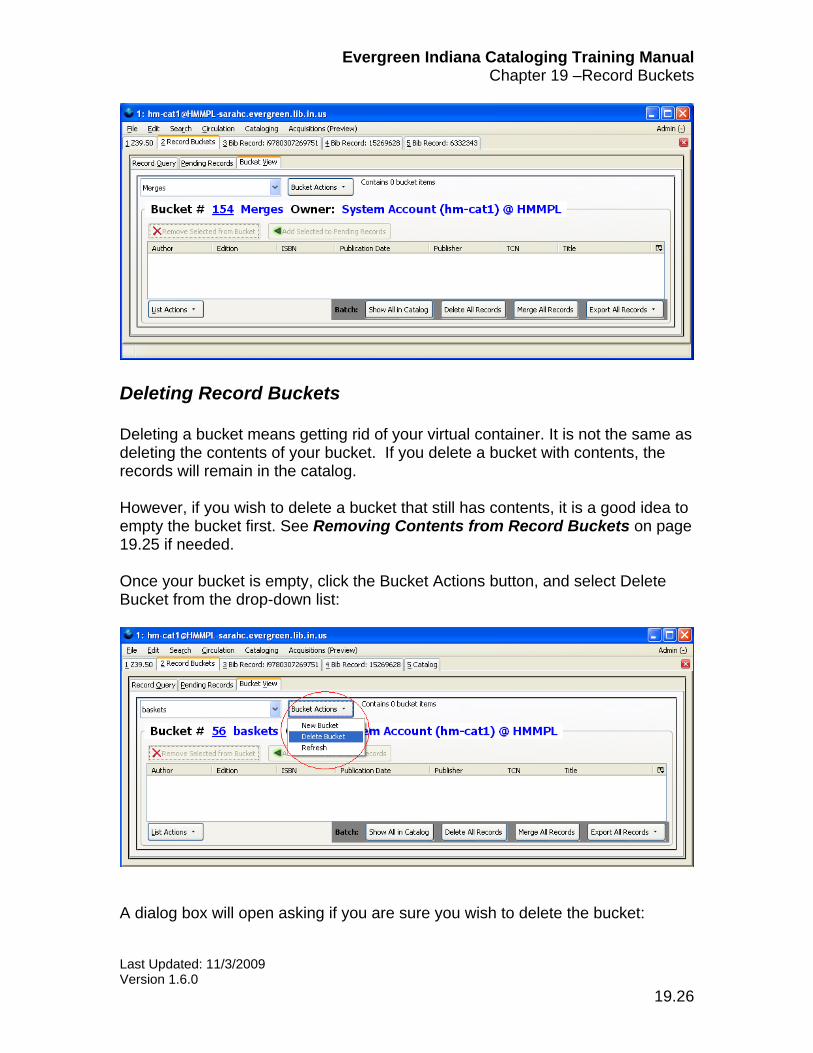
Deleting Record Buckets Deleting a bucket means getting rid of your virtual container. It is not the same as deleting the contents of your bucket. If you delete a bucket with contents, the records will remain in the catalog. However, if you wish to delete a bucket that still has contents, it is a good idea to empty the bucket first. See Removing Contents from Record Buckets on page 19.25 if needed. Once your bucket is empty, click the Bucket Actions button, and select Delete Bucket from the drop-down list:
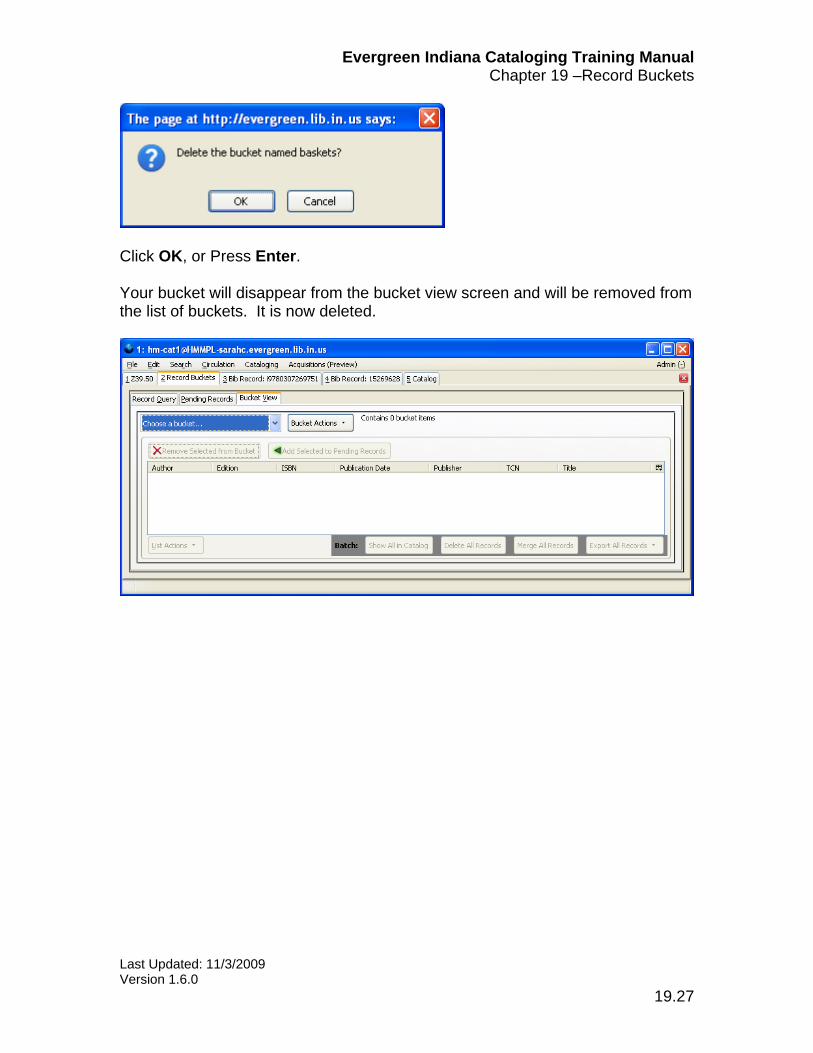
A dialog box will open asking if you are sure you wish to delete the bucket:
Evergreen Indiana Cataloging Training Manual Chapter 19 –Record Buckets
Last Updated: 11/3/2009 Version 1.6.0
19.27
Click OK, or Press Enter. Your bucket will disappear from the bucket view screen and will be removed from the list of buckets. It is now deleted.

Evergreen Indiana Cataloging Training Manual Chapter 19 –Record Buckets
Last Updated: 11/3/2009 Version 1.6.0
19.28
Intentionally blank for double sided copies.