chapter 1. prepare to develop spreadsheets - acoba.com.au · web viewtherefore, the footrest may...
TRANSCRIPT

BSBITU402
Develop and Use Complex Spreadsheets
Learner Guide
Lear
ner
Gui
de

TABLE OF CONTENTSThis is an interactive table of contents. If you are viewing this document in Acrobat, clicking on a heading will transfer you to that page. If you have this document open in Word, you will need to hold down the Control key while clicking for this to work.
Learner Guide..........................................................................................................................................5
Chapter 1. Prepare to develop spreadsheets...........................................................................................12
1.1. Organise Personal Work Environment in Accordance with Ergonomic Requirements......................................................................12
1.2. Analyse Task and Determine Specifications for Spreadsheets......20
1.3. Identify Organisational and Task Requirements in Relation to Data Entry, Storage, Output, Reporting, and Presentation Requirements. . .23
1.4. Apply Work Organisation Strategies and Energy and Resource Conservation Techniques to Plan Work Activities.................................26
1.5 Compliance......................................................................................31Chapter 2. Develop a linked spreadsheet solution.................................................................................46
2.1. Utilise Spreadsheet Design Software Functions and Formulae to Meet Identified Requirements...............................................................46
2.2. Link Spreadsheets in Accordance with Software Procedures........61
2.3. Format Cells and Use Data Attributes Assigned with Relative and/or Absolute Cell References, in Accordance with the Task Specifications.........................................................................................64
2.4. Test Formulae to Confirm Output Meets Task Requirements.......75Chapter 3. Automate and standardise spreadsheet operation................................................................76
3.1. Evaluate Tasks to Identify Those Where Automation Would Increase Efficiency................................................................................76
3.2. Create, Use and Edit Macros to Fulfil the Requirements of the Task and Automate Spreadsheet Operation..................................................77
3.3. Develop, Edit and use Templates to Ensure Consistency of Design and Layout for Forms and Reports, in Accordance with Organisational Requirements.........................................................................................88
Chapter 4. Use spreadsheets..................................................................................................................91
4.1. Enter, Check and Amend Data in Accordance with Organisational and Task Requirements.........................................................................91
BSBITU402 Learner Guide Version No. 1.0Page 2 Australian College of Business and Accounting
4.2. Import and Export Data between Compatible Spreadsheets and Adjust Host Documents, in Accordance with Software and System Procedures...........................................................................................100
4.3. Use Manuals, User Documentation and Online Help to Overcome Problems with Spreadsheet Design and Production...........................104
4.4. Preview, Adjust, and Print Spreadsheet in Accordance with Organisational and Task Requirements..............................................108
4.5. Name and Store Spreadsheet in Accordance with Organisational Requirements and Exit the Application Without Data Loss or Damage.............................................................................................................113
Chapter 5. Represent numerical data in graphic form.........................................................................114
5.1. Determine Style of Graph to Meet Specified Requirements and Manipulate Spreadsheet Data if Necessary to Suit Graph Requirements.............................................................................................................114
5.2. Create Graphs with Labels and Titles from Numerical Data Contained in a Spreadsheet File.........................................................118
5.3. Save, View and Print Graph within Designated Time Lines.........126Answers to Activities...........................................................................................................................127
BSBITU402 Learner Guide Version No. 1.0Page 3 Australian College of Business and Accounting

LEARNER GUIDEDescription
BSBITU402 - Develop and Use Complex SpreadsheetsThis unit describes the skills and knowledge required to use spreadsheet software to complete business tasks and produce complex documents.
It applies to individuals employed in a range of work environments that require skills in creation of complex spreadsheets to store and retrieve data. They may work as individuals providing administrative support within an enterprise, or may be independently responsible for designing and working with spreadsheets relevant to their own work roles.
CHAPTER 1. PREPARE TO DEVELOP SPREADSHEETS1.1. Organise Personal Work Environment in Accordance with Ergonomic Requirements
ErgonomicsMany organisations have policies and procedures for organisational requirements regarding ergonomics.
Some students may not be familiar with the term ergonomics. Dictionary.com defines ergonomics as “the study of the relationship between workers and their environment, [especially] the equipment they use”.
Essentially, ergonomics is the process of designing or arranging work environments and equipment so that they fit the people who use them. In the context of developing and using complex spreadsheets, it relates to how you set up and use your workstation and its components.
Workplace Health and Safety RequirementsUnder the Work Health and Safety Act 2011, workers must take reasonable care of their own health and safety and that they do not adversely affect the health and safety of other persons. Workers should comply with any reasonable instruction and cooperate with any reasonable policy or procedure relating to health and safety at the workplace.
Section 2 of the Managing the Work Environment and Facilities Code of Practice 2011 provides guidelines for meeting these obligations within
BSBITU402 Learner Guide Version No. 1.0Page 4 Australian College of Business and Accounting

the context of managing your personal work environment and ergonomic requirements.
Australian Standard AS 3590Further guidelines can be found in AS3590 Screen Based Workstations, Parts 1 and 2. Part 1 covers information related to visual display units (screens) and part 2 covers workstation furniture.
SCOPE. This Standard specifies performance requirements for visual display units (VDUs) incorporating cathode-ray tubes. The Standard does not apply to CAD units or to test equipment. This Standard sets out guidelines for the evaluation, design, setting-up, and selection of furniture for desk-top, screen-based workstations in offices. The guidelines focus on the selection of furniture and equipment that will suit particular screen-based tasks and encourage appropriate posture in screen-based equipment (SBE) operators. This Standard does not apply to special cases, such as schools, where the height of counters, for example, might vary from those given. The Standard does not include requirements for wheelchair access.
Workstation Height and LayoutAdjust the height of the work surface and/or the height of the chair so that the work surface allows your elbows to be bent at 90º, forearms parallel with the floor, wrist straight, shoulders relaxed.
Place all controls and task materials in a 90º arc in front of the body, within a comfortable reach of both hands so that there is no unnecessary twisting of any part of the body.
BSBITU402 Learner Guide Version No. 1.0Page 5 Australian College of Business and Accounting

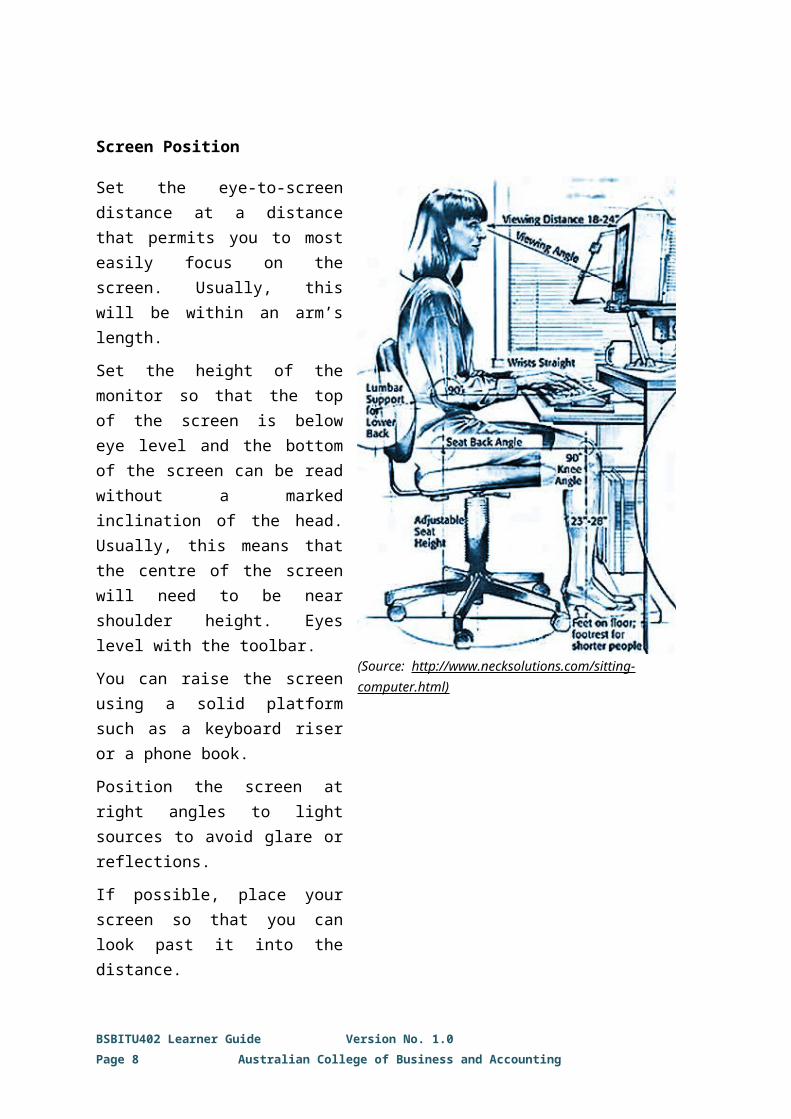
Screen Position
Set the eye-to-screen distance at a distance that permits you to most easily focus on the screen. Usually, this will be within an arm’s length.
Set the height of the monitor so that the top of the screen is below eye level and the bottom of the screen can be read without a marked inclination of the head. Usually, this means that the centre of the screen will need to be near shoulder height. Eyes level with the toolbar.
You can raise the screen using a solid platform such as a keyboard riser or a phone book.
Position the screen at right angles to light sources to avoid glare or reflections.
If possible, place your screen so that you can look past it into the distance.
People who wear bifocal or multifocal lenses will need to find a balance between where they see out of their lenses to avoid too much neck flexion.
(Source: http://www.necksolutions.com/sitting-computer.html)
Chair Height, Seat, and Back AdjustmentAdjust the seat tilt so that you are comfortable when working on the keyboard. Usually, this will be close to horizontal, but some people prefer the seat tilted slightly forwards.
BSBITU402 Learner Guide Version No. 1.0Page 6 Australian College of Business and Accounting

Adjust the backrest so that it supports the lower back when you are sitting upright.
Your knees should be bent at a comfortable angle and greater than 90 degrees of flexion. If this places an uncomfortable strain on the leg muscles or if the feet do not reach the floor, then a footrest should be used.
FootrestThe footrest height must allow your knees to be bent at 90 degrees. Therefore, the footrest may need to be height adjustable.
Keyboard and Mouse PositionPlace the keyboard in a position that allows the forearms to be close to the horizontal and the wrists to be straight. That is, with the hand in line with the forearm. If this causes the elbows to be held far out from the side of the body, then re-check the work surface height.
Some people prefer to have their wrists supported on a wrist desk or the desk. Be careful your wrist is not extended or bent in an up position.
A well-designed mouse should not cause undue pressure on the wrist and forearm muscles. A large bulky mouse may keep the wrist continuously bent at an uncomfortable angle.
Pressure can be reduced by releasing the mouse at frequent intervals, or by selecting a slim-line, low-profile mouse. Keep the mouse as close as possible to the keyboard, with elbow bent and close to the body.
Laptop/Notebook ComputersLaptops are increasingly being used to work away from the office or replace desktop computers at ‘permanent’ workstations. Wherever possible, all of the principles applying to workstations should be applied to working with laptops.
When using a laptop rather than a desktop computer at the workstation, it is important to use a docking station with a peripheral keyboard and mouse.
When working with laptops, it is also particularly important to avoid awkward body postures and ensure that frequent short breaks are taken to minimise the onset of fatigue.
BSBITU402 Learner Guide Version No. 1.0Page 7 Australian College of Business and Accounting
Document HolderPlace this close to the monitor screen in the position that causes the least twisting or inclination of the head. Most people prefer the document holder to be between the keyboard and the monitor.
There are many different types of document holders available.
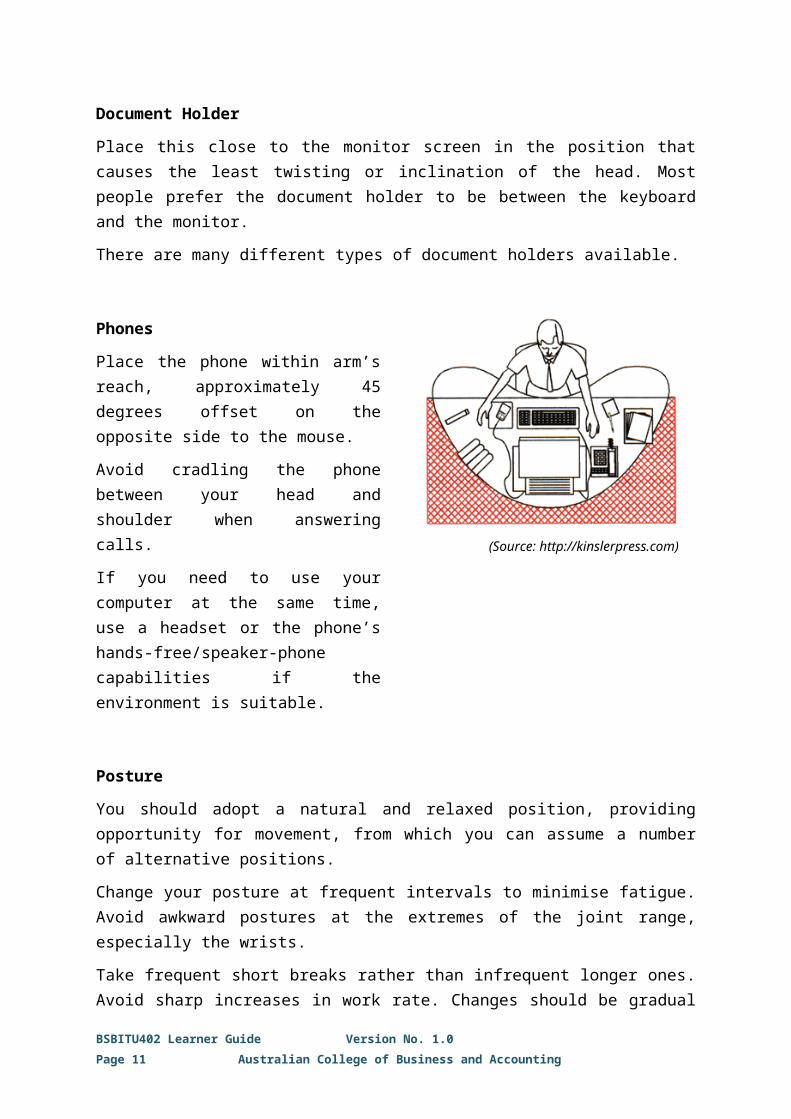
PhonesPlace the phone within arm’s reach, approximately 45 degrees offset on the opposite side to the mouse.
Avoid cradling the phone between your head and shoulder when answering calls.
If you need to use your computer at the same time, use a headset or the phone’s hands-free/speaker-phone capabilities if the environment is suitable.
(Source: http://kinslerpress.com)
PostureYou should adopt a natural and relaxed position, providing opportunity for movement, from which you can assume a number of alternative positions.
Change your posture at frequent intervals to minimise fatigue. Avoid awkward postures at the extremes of the joint range, especially the wrists.
Take frequent short breaks rather than infrequent longer ones. Avoid sharp increases in work rate. Changes should be gradual enough to ensure that the workload does not result in excessive fatigue.
Keyboard TechniqueIt is important to learn a correct typing technique. ‘Hunt and peck’ typists are particularly at risk of Occupational Overuse Syndrome (OOS), formerly known as repetitive stress injury, due to their tendency to:
BSBITU402 Learner Guide Version No. 1.0Page 8 Australian College of Business and Accounting

Only use one or two fingers, which increases the risk of overloading the finger tendons.
Constantly looking from screen to keyboard and back to screen, which increases the risk of straining neck muscles.
Adopt a tense posture in their wrists and fingers which increases the risk of tendon damage.
The efficiency and speed of modern computers make it possible for a skilled operator to type extremely quickly. This capability, reinforced by workload pressures, means the potential exists for operators to key at speeds which increase the risk of OOS.
10,000 - 12,000 keystrokes per hour is considered an acceptable standard.
After prolonged absences from work, the overall duration of periods of keyboard work should be increased gradually, if conditions permit.
Length of Time on the KeyboardThe maintenance of a fixed posture for long periods is tiring and increases the likelihood of muscular aches and pains. In addition, long periods of repetitive movement and sustained visual attention can also give rise to fatigue-related complaints.
It is recommended that operators avoid spending more than five (5) hours a day on keyboard duties and not longer than 50 minutes per hour without a postural/stretching break.
Employees newly engaged in keyboard work, and staff returning from an absence of two (2) or more weeks, need a period of adjustment. The adjustment may be achieved through reduced work rates or provision of alternate duties with gradual re-introduction to keyboard work.
Noise MinimisationIn an office environment, the most common effects of noise are the interference of speech communication, annoyance, and distraction. Consistent or high-level noise can also cause stress, fatigue, and hearing damage.
The recommended decibel range for office work is 55 to 65 dBA. To minimise noise and keep it within the acceptable guidelines you should consider the following:
BSBITU402 Learner Guide Version No. 1.0Page 9 Australian College of Business and Accounting

LightingPlace the monitor to the side of the light source/s, not directly underneath. Try to site desks between rows of lights. If the lighting is fluorescent strip lighting, the sides of the desks should be parallel with the lights.
Try not to put the screen near a window. If it is unavoidable, ensure that neither the screen nor the operator faces the window.
If the monitor is well away from windows, there are no other sources of bright light, and prolonged desk-work is the norm, use a low-level service light of 300 lux. If there are strongly contrasting light levels, then a moderate level of lighting of 400 - 500 lux may be desirable.
Glare and ReflectionIt is important to detect the presence of glare and reflection.
To determine whether there is glare from overhead lights while seated, the worker should hold an object, such as a book, above the eyes at
BSBITU402 Learner Guide Version No. 1.0Page 10 Australian College of Business and Accounting
General noise may be reduced by floor carpeting and by locating office areas away
from sources of external noise.
Hard surfaces, such as glass walls or white boards, will act to increase the reflection of
noise.
Some office machines have high noise levels. Supervisors should ensure their location,
patterns and proximity to staff are such as to prevent
problems.
Position fabric partitions to reduce noise from
conversations, foot traffic and equipment, like copiers and
printers.
Be considerate to others working in the area, and conduct meetings and
conversations in appropriate areas.
Telephone or other conversations can be
distracting in open plan offices. Sound absorbing
barriers may be considered if such noise is a problem.
eyebrow level and establish whether the screen image becomes clearer in the absence of overhead glare.
To detect whether there are reflections from the desk surface, the worker should hold the book above the surface and assess the change in the reflected glare from the screen.
Task OrganisationThe way tasks are organised, and the order in which they are undertaken is also an ergonomic concern. It is important that tasks are varied so that the worker regularly changes between different types of movement to provide needed breaks for their mind and body, which may otherwise become overloaded.
It is not the change of task that is important here but the change of movement and posture. When organising work tasks, consider the following:
BSBITU402 Learner Guide Version No. 1.0Page 11 Australian College of Business and Accounting
Reduce reflections and glare by:
Tilting the screen (top part forwards) so that the reflections are directed below eye level.Purchasing an LCD screen.Covering the screen with a light diffusing surface or anti-glare scree.Using a negative contrast screen (dark characters on light background), which will reduce the influence of these reflections.
Reduce eye discomfort by:
Turning the screen brightness down to a comfortable level.Looking away into the distance in order to rest the eyes for a short while every ten minutes or so.Changing the text and background colours. Recommended are black characters on white or yellow background, or yellow on black, white on black, white on blue and green on white. Avoid red and green and yellow on white.

Activity 1:
Consider the workspace you are currently using while studying this unit of competency:
a) Are the layout and your use of that workspace currently in line with the information presented in this section?
b) What changes could you make in order to better organise your workspace in line with the ergonomic requirements outlined above?
a)
b)
To view the answers to this activity, click here.
BSBITU402 Learner Guide Version No. 1.0Page 12 Australian College of Business and Accounting
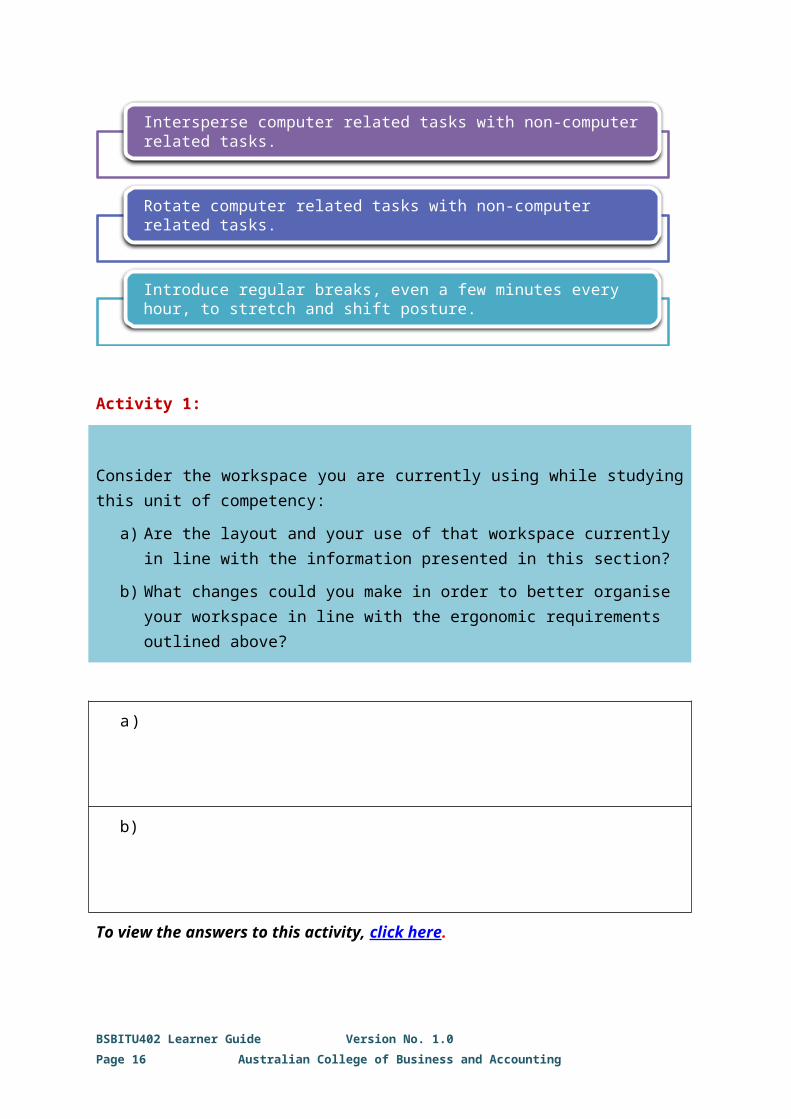
Intersperse computer related tasks with non-computer related tasks.
Rotate computer related tasks with non-computer related tasks.
Introduce regular breaks, even a few minutes every hour, to stretch and shift posture.

1.2. Analyse Task and Determine Specifications for Spreadsheets
Task AnalysisThe first step in completing any task is understanding what is required, and developing spreadsheets is no different.
Any task, no matter how simple or complex, can be broken down into a series of requirements. Once you understand those requirements, you can develop a plan outlining what you need to do to complete the task.
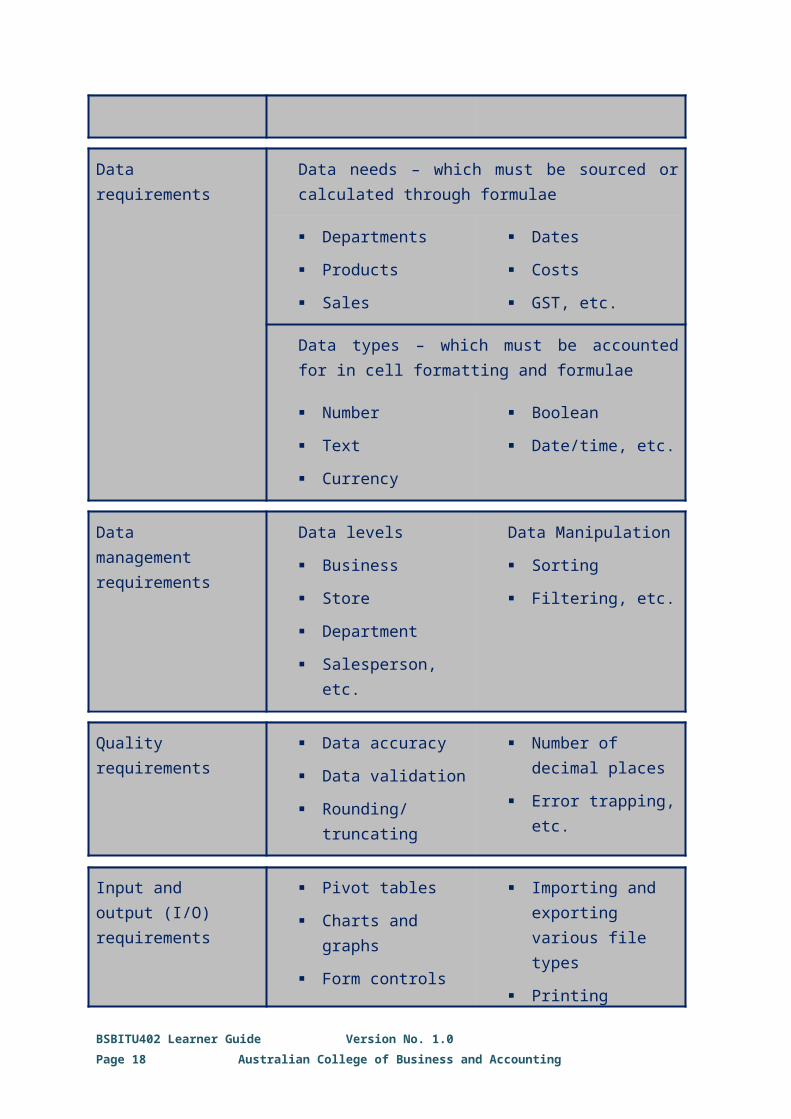
The plan for developing a spreadsheet can be broken down into the following requirements:
These requirements can be further broken down, for example:
Formatting and layout requirements
Themes
Colours
Fonts.
Cell formatting
Header/footer, etc.
Data requirements
Data needs – which must be sourced or calculated through formulae
BSBITU402 Learner Guide Version No. 1.0Page 13 Australian College of Business and Accounting
Formatting and layout
requirementsData
requirementsData
management requirements
Quality requirements
Input and output (I/O)
requirementsLinking
requirements
Automation requirements
Security requirements

Departments
Products
Sales
Dates
Costs
GST, etc.
Data types – which must be accounted for in cell formatting and formulae
Number
Text
Currency
Boolean
Date/time, etc.
Data management requirements
Data levels
Business
Store
Department
Salesperson, etc.
Data Manipulation
Sorting
Filtering, etc.
Quality requirements
Data accuracy
Data validation
Rounding/truncating
Number of decimal places
Error trapping, etc.
Input and output (I/O) requirements
Pivot tables
Charts and graphs
Form controls
Importing and exporting various file types
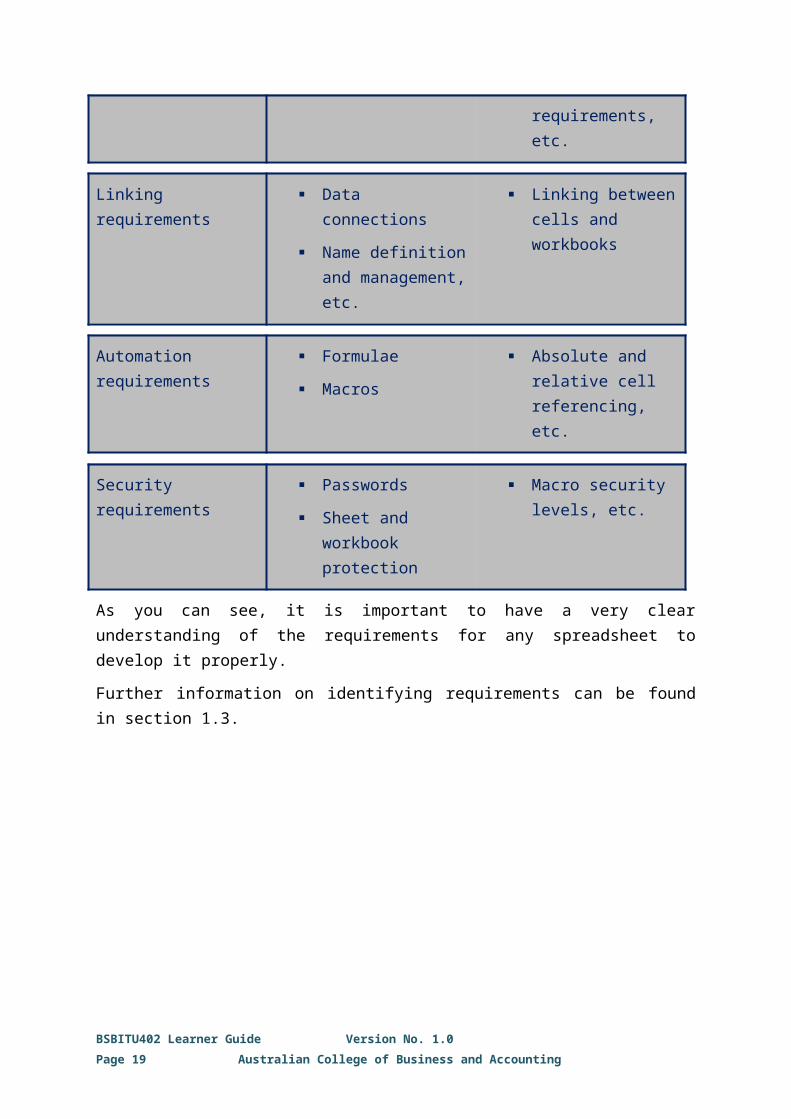
Printing requirements, etc.
Linking requirements
Data connections
Name definition and management, etc.
Linking between cells and workbooks
Automation requirements
Formulae
Macros
Absolute and relative cell referencing, etc.
Security Passwords Macro security
BSBITU402 Learner Guide Version No. 1.0Page 14 Australian College of Business and Accounting

requirements Sheet and workbook protection
levels, etc.
As you can see, it is important to have a very clear understanding of the requirements for any spreadsheet to develop it properly.
Further information on identifying requirements can be found in section 1.3.
BSBITU402 Learner Guide Version No. 1.0Page 15 Australian College of Business and Accounting
1.3. Identify Organisational and Task Requirements in Relation to Data Entry, Storage, Output, Reporting, and Presentation Requirements
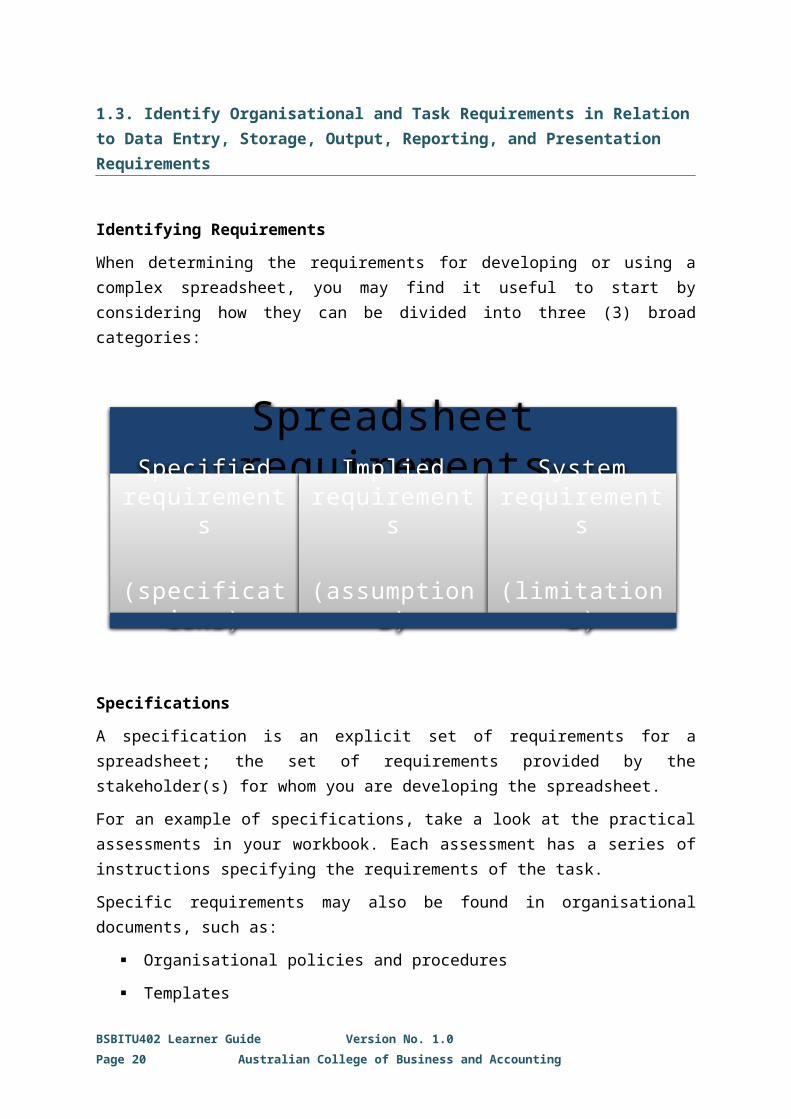
Identifying RequirementsWhen determining the requirements for developing or using a complex spreadsheet, you may find it useful to start by considering how they can be divided into three (3) broad categories:
SpecificationsA specification is an explicit set of requirements for a spreadsheet; the set of requirements provided by the stakeholder(s) for whom you are developing the spreadsheet.
For an example of specifications, take a look at the practical assessments in your workbook. Each assessment has a series of instructions specifying the requirements of the task.
Specific requirements may also be found in organisational documents, such as:
Organisational policies and procedures
Templates
Style guides
It is important for you to understand all the specifications provided by your stakeholders. If any of the specifications are unclear, you should ask questions to clarify meaning.
BSBITU402 Learner Guide Version No. 1.0Page 16 Australian College of Business and Accounting
Spreadsheet requirements
Specified requirements
(specifications)
Implied requirements
(assumptions)
System requirements (limitations)

BSBITU402 Learner Guide Version No. 1.0Page 17 Australian College of Business and Accounting
AssumptionsPeople rarely consider all of the requirements for developing a complex spreadsheet prior to development; often some requirements are overlooked.
Sometimes these requirements are overlooked due to the complexity of the spreadsheet, but often it is because the assumption is made that the detail need not be specified.
Certain requirements are often implied by the stakeholders in the specification but are not detailed. This can often result in the developer producing a spreadsheet that fails to meet the stakeholders’ expectations.
An example of this could be a stakeholder who asks you to produce a chart to graphically show sales figures for the past 12 months. You produce a column-chart to display the data; however, the stakeholder was expecting a line-chart.
It is important to check all assumptions with the stakeholder. You cannot be certain of producing the expected results without clarifying any implied requirements or expectations.
LimitationsEvery system has its inherent limitations that you are required to work within. In the context of spreadsheet development, these system requirements or limitations include the following:
Spreadsheet applications – Different spreadsheet applications do things differently and may not always be compatible with each other. Examples include:
o Microsoft Office Excel,
o Open Office Calc, and
o Mac Numbers
Spreadsheet versions – As with different spreadsheet applications, different versions of the same application often do things differently and may not be compatible with each other. Often, later versions are backwards compatible with older versions, but this is not always the case. Examples include:
o Microsoft Office Excel 2010,
o Microsoft Office Excel 2007, and
BSBITU402 Learner Guide Version No. 1.0Page 18 Australian College of Business and Accounting
o Microsoft Office Excel 2003
BSBITU402 Learner Guide Version No. 1.0Page 19 Australian College of Business and Accounting
File types – You may need to use specific file types to import or export data between different applications or versions. It is common to lose some level of utility, such as formatting information or macros when using file types other than those regularly used by your application. Examples include:
o .csv,
o .pdf,
o .ods, and
o .numbers
Fonts – Not all fonts are installed on all computers, and installation may involve additional licensing costs.
Time frames – Many spreadsheet development tasks will need to be completed within specified time frames.
It is important to identify these limitations before starting a project so that you can work effectively within them.
BSBITU402 Learner Guide Version No. 1.0Page 20 Australian College of Business and Accounting

1.4. Apply Work Organisation Strategies and Energy and Resource Conservation Techniques to Plan Work Activities
Work Organisation StrategiesWork organisation strategies are designed to manage work patterns within the work environment to best meet business objectives, and include the following considerations:
Within the context of this unit of study, these strategies primarily involve the following:
Planning ahead to avoid peaks, and rushed job.
Delegating fairly to all staff, not just the best workers.
Considering the total workload of the individual.
Clearly defining each person’s workload.
Implementing systems of prioritisation, e.g. work request forms, waiting lists.
Using relief staff.
Applying strict tests to the use of ‘urgent’ labels.
Discouraging ‘endless’ drafts.
BSBITU402 Learner Guide Version No. 1.0Page 21 Australian College of Business and Accounting
Productivity Quality Costs
Personnel CommunicationWorkplace Health and
Safety
Environment

Encouraging people to have realistic expectations.
Supporting people when others impose unrealistic expectations.
Teaching keyboard skills.
Teaching people how to be assertive, and how to prioritise.
Regular exercise breaks.
Mix repetitive duties with alternate activities, and rest periods.
Energy and Resource Conservation TechniquesUtilising effective energy and resource conservation techniques not only benefits the environment but also has an impact on your bottom line by reducing costs.
The major areas of energy usage in office buildings include the following:
Power-saving OptionsMaking effective use of the power-saving options of office equipment may require an energy usage audit to identify opportunities for saving power, as well as the possibility of some initial investment in energy-efficient equipment. However, it will likely result in significant energy savings over time.
BSBITU402 Learner Guide Version No. 1.0Page 22 Australian College of Business and Accounting
Air conditioning, ventilation, and heating
Lighting
Office equipment, computers, printers, information systems, etc.
Hot water (hand basins and showers)
Elevators
Cooking equipment (in kitchens and canteens)

Once you know what levels of power are being consumed, and preferably by which individual pieces or equipment or groups of equipment, then you can set a benchmark to work toward.
Saving energy is largely a matter of being aware of how and where energy is used and questioning whether the same result can be achieved using less.
Begin with areas where energy savings can be identified and achieved cost-effectively, using techniques as simple as turning off equipment when it is not needed.
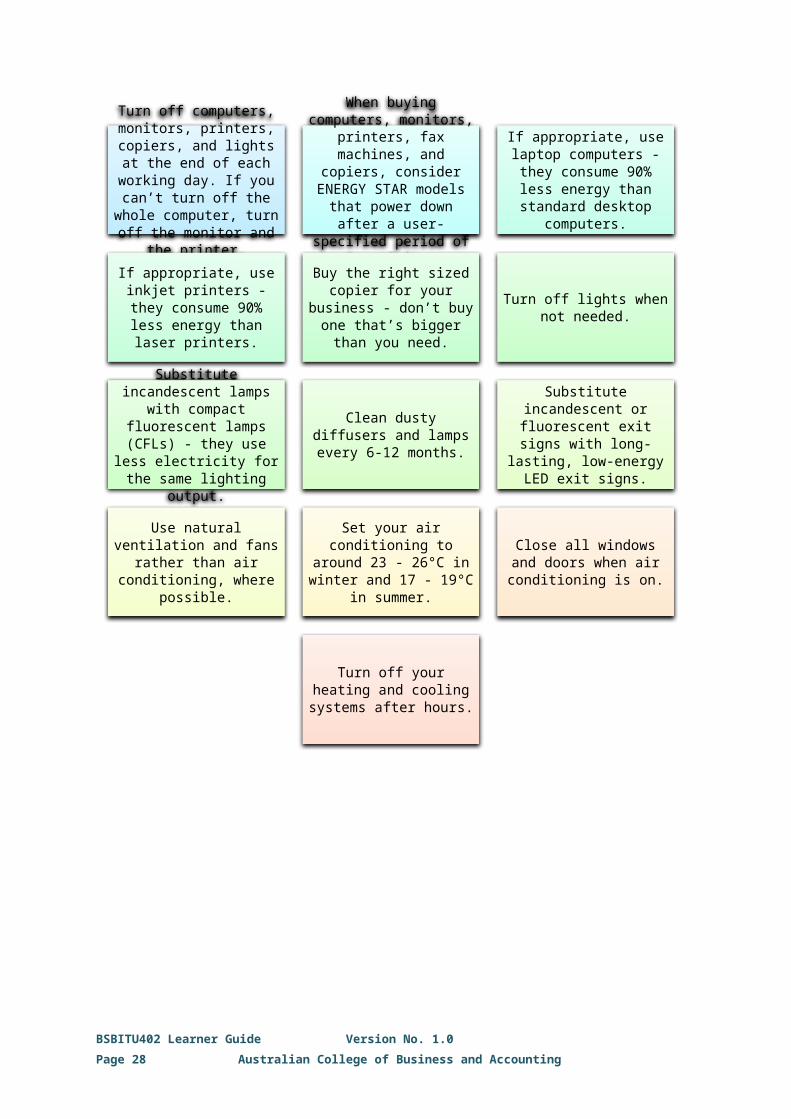
Consider the following power saving options:
BSBITU402 Learner Guide Version No. 1.0Page 23 Australian College of Business and Accounting
Turn off computers, monitors, printers, copiers,
and lights at the end of each working day. If you can’t turn off the whole computer, turn off the
monitor and the printer.
When buying computers, monitors, printers, fax
machines, and copiers, consider ENERGY STAR models that power down
after a user-specified period of inactivity.
If appropriate, use laptop computers - they consume
90% less energy than standard desktop
computers.
If appropriate, use inkjet printers - they consume
90% less energy than laser printers.
Buy the right sized copier for your business - don’t
buy one that’s bigger than you need.
Turn off lights when not needed.
Substitute incandescent lamps with compact
fluorescent lamps (CFLs) - they use less electricity for the same lighting output.
Clean dusty diffusers and lamps every 6-12 months.
Substitute incandescent or fluorescent exit signs with long-lasting, low-energy
LED exit signs.
Use natural ventilation and fans rather than air conditioning, where
possible.
Set your air conditioning to around 23 - 26°C in winter and 17 - 19°C in summer.
Close all windows and doors when air conditioning
is on.
Turn off your heating and cooling systems after
hours.

BSBITU402 Learner Guide Version No. 1.0Page 24 Australian College of Business and Accounting

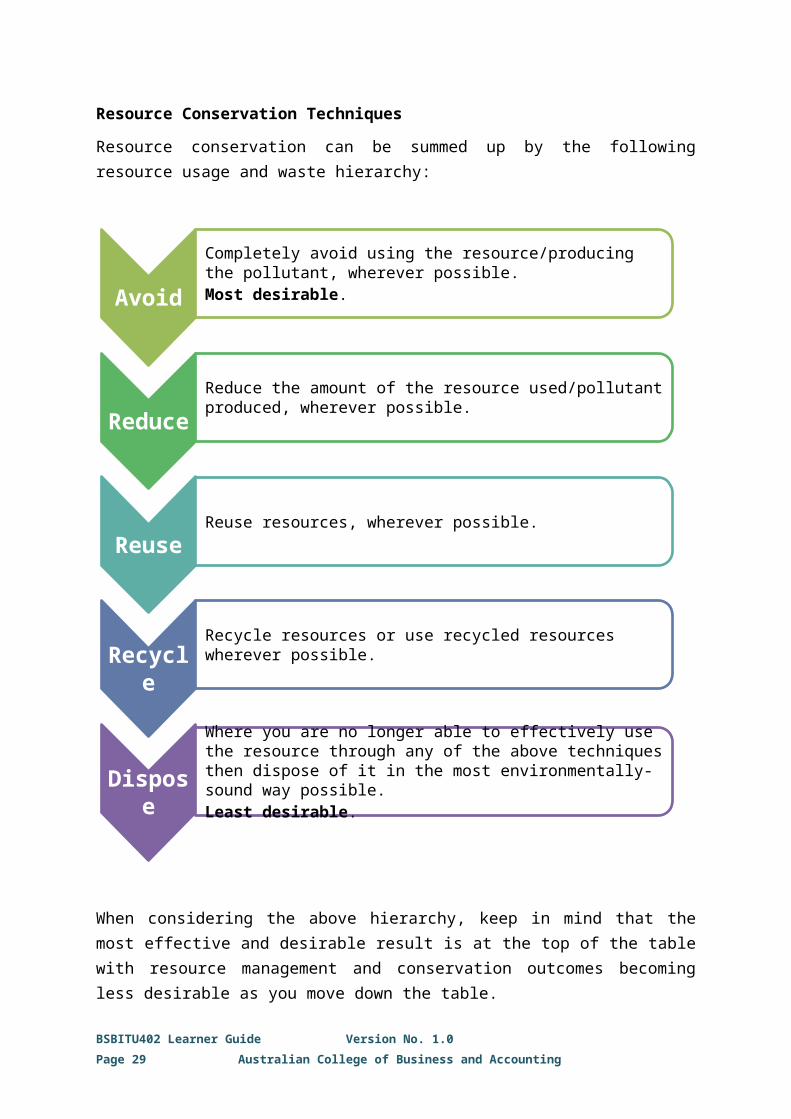
Resource Conservation TechniquesResource conservation can be summed up by the following resource usage and waste hierarchy:
When considering the above hierarchy, keep in mind that the most effective and desirable result is at the top of the table with resource management and conservation outcomes becoming less desirable as you move down the table.
BSBITU402 Learner Guide Version No. 1.0Page 25 Australian College of Business and Accounting
Avoid
Completely avoid using the resource/producing the pollutant, wherever possible. Most desirable.
ReduceReduce the amount of the resource used/pollutant produced, wherever possible.
ReuseReuse resources, wherever possible.
RecycleRecycle resources or use recycled resources wherever possible.
Dispose
Where you are no longer able to effectively use the resource through any of the above techniques then dispose of it in the most environmentally-sound way possible.Least desirable.

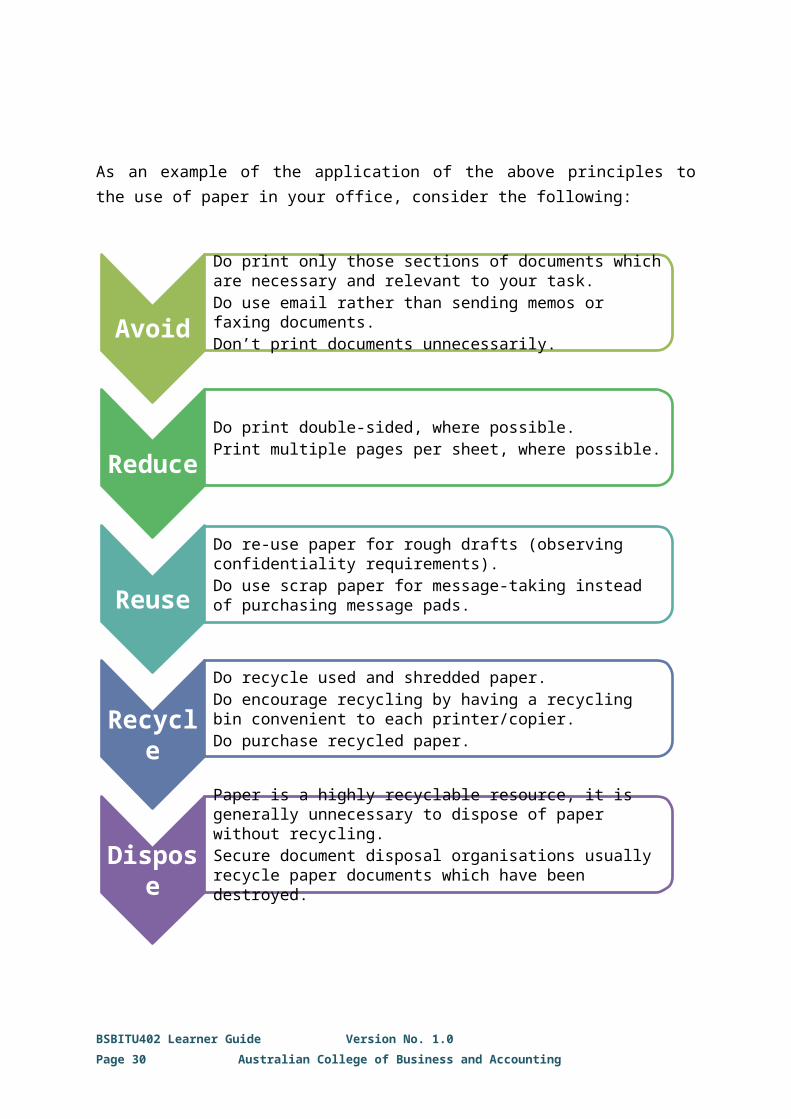
As an example of the application of the above principles to the use of paper in your office, consider the following:
BSBITU402 Learner Guide Version No. 1.0Page 26 Australian College of Business and Accounting
Avoid
Do print only those sections of documents which are necessary and relevant to your task.Do use email rather than sending memos or faxing documents.Don’t print documents unnecessarily.
ReduceDo print double-sided, where possible.Print multiple pages per sheet, where possible.
Reuse
Do re-use paper for rough drafts (observing confidentiality requirements).Do use scrap paper for message-taking instead of purchasing message pads.
Recycle
Do recycle used and shredded paper.Do encourage recycling by having a recycling bin convenient to each printer/copier.Do purchase recycled paper.
Dispose
Paper is a highly recyclable resource, it is generally unnecessary to dispose of paper without recycling. Secure document disposal organisations usually recycle paper documents which have been destroyed.

1.5 Compliance
Regardless of the nature of the business or where it operates, all businesses have rules and regulations to which they and their staff are expected to comply.
Ethical PrinciplesThe term ethics is defined by Dictionary.com as “that branch of philosophy dealing with values relating to human conduct, with respect to the rightness and wrongness of certain actions and to the goodness and badness of the motives and ends of such actions”.
Many aspects of ethical principles are represented in Commonwealth as well as State and Territory legislation. However, there is no single code of ethics which applies to all workplaces in Australia and which covers all facets of ethical principles.
In general, workplace legislation, codes of practice, standards, and policies and procedures are largely written with the relevant ethical principles of that industry or business in mind.
Along with broad sweeping legislation, such as anti-discrimination legislation, privacy legislation, and workplace health and safety legislation, which impact all businesses across Australia, many industries have specific legislation, codes and standards to address ethical concerns relevant to that industry.
As a worker, you are expected to understand how your role fits within the organisation, and what your obligations are within the overall compliance framework of your organisation so that you can contribute effectively to that organisation’s compliance commitments.
Compliance ConsiderationsIn general, compliance obligations can be considered to fall into two (2) categories:
BSBITU402 Learner Guide Version No. 1.0Page 27 Australian College of Business and Accounting
Regulatory ComplianceIn the modern Australian business environment, there are numerous legislative/regulatory requirements organisations are required to comply with.
These regulatory obligations exist to cover many areas relevant to business operations, such as privacy legislation, workplace health and safety legislation, etc. and come in several forms.
Forms of regulatory obligations can include the following:
Acts
Regulations
Mandatory codes of practice
Mandatory industry/quality standards
Legislation, Codes of Practice and StandardsBefore we begin, it is worthwhile to discuss the nature of legislation and codes of practice.
BSBITU402 Learner Guide Version No. 1.0Page 28 Australian College of Business and Accounting
Compliance with relevant legislated obligations which apply to the organisation and its operations.
Regulatory compliance
Guide how decisions are made and how the work is done in that organisation.
Organisational policies and procedures
Legislation
Legislation (or statutory law) is a law that has been enacted by a legislature or governing body.
In Australia, legislation can be enacted by either the Federal government (Commonwealth legislation) or by a State or Territory government (State/Territory legislation).
For the most part, the Federal legislation and the State and Territory legislation cover much the same things, however, there are some differences between them. Also, there are circumstances where only the Federal legislation or only the State or Territory legislation would apply.
There are two (2) types of legislation in Australia: Acts and Regulations:
1. Acts are the primary instrument of the legislature and lay down the fundamental requirements and specifications of that law.
An example of an act is the Work Health and Safety Act 2011. This is a Commonwealth Act that has been replicated by all States and Territories in Australia, with the exceptions of Victoria and Western Australia.
2. Regulations are supporting documents which set down rules for the monitoring and enforcement of an Act, often defining enforceable obligations people have under the Act.
BSBITU402 Learner Guide Version No. 1.0Page 29 Australian College of Business and Accounting
Legislation
Standards Codes of Practice
The WHS Regulation explains the duties of particular groups of people and lays out monitoring and enforcement requirements under the WHS Act.
Both Acts and Regulations are law and are thus mandatory and enforceable.
Codes of PracticeCodes of practice are written to address specific ethical concerns relevant to the workplace and come in many forms. They generally describe a minimum standard of protection for consumers in a particular industry.
Codes of practice can also provide advice on how to meet regulatory requirements. For the most part, codes are not legally enforceable, but they can be used in courts as evidence that legal requirements have or have not been met.
An example of a code of practice is the National Code of Practice for the Prevention of Musculoskeletal Disorders from Performing Manual Tasks at Work (2007).
Mandatory Codes of PracticeIt is possible for codes of practice to be specifically mandated by an Act or Regulation, in this case, the specific code becomes mandatory under that Regulation.
An example of a mandatory code of practice is the Code of Practice for the Management and Control of Asbestos in Workplaces [NOHSC:2018 (2005)], which is mandated under the WHS Regulation.
Codes of practice may be mandated under both Federal and State and Territory legislation.
Voluntary Codes of PracticeOther codes of practice are voluntary and are a form of industry self-regulation, and are usually developed by industry groups or associations, sometimes in partnership with government agencies or “watchdogs”. Businesses volunteer to adhere to the standards set down by the code of practice by signing up to the code. Once signed up to the code, sanctions
BSBITU402 Learner Guide Version No. 1.0Page 30 Australian College of Business and Accounting

may be imposed on businesses that breach the code, which may include the following:
Having to pay a fine
Being expelled from the industry association
Having to advertise that they have breached the code and explain what they are going to do to resolve a complaint
An example of a voluntary industry code of practice is the Scanning Code of Practice: a voluntary code designed to protect you from errors in checkout systems, which has most major Australian supermarkets as signatories. Signatories of the Scanning Code of Practice are required to ensure their checkout systems accurately price items. Under the code, if the price displayed at the checkout or on the customer receipt is higher than the shelf price, the customer is entitled to receive that item free of charge.
StandardsStandards Australia states that “standards are published documents setting out specifications and procedures designed to ensure products, services and systems are safe, reliable and consistently perform the way they were intended to. They establish a common language which defines quality and safety criteria”.
Standards Australia is the independent body responsible for developing Australian Standards® consistent with international standards.
An example of an Australian standard is AS 3806-2006 Compliance Programs, which guides organisations on how to manage their compliance obligations.
Mandatory StandardsStandards are similar to codes of practice in that they provide guidance on how to meet accepted requirements and are not generally enforceable. Like codes of practice, however, standards can also be mandated under legislation, in this case, the specific standard becomes mandatory.
An example of a mandatory standard is AS/NZS 1841:1997 Portable Fire Extinguishers, which is mandated under the Trade Practices Act.
BSBITU402 Learner Guide Version No. 1.0Page 31 Australian College of Business and Accounting

International StandardsThe International Organisation for Standardisation (ISO) is the international body for developing international standards.
An example of an international standard is ISO 31000: 2009 - International Risk Management Standard.
Anti-discrimination and Equal Employment Opportunity LegislationSince 1975, the Commonwealth government and State and Territory governments have introduced anti-discrimination legislation to help protect people from harassment and discrimination based upon a personal characteristic they may have.
Relevant federal anti-discrimination legislation you should be aware of include: :
BSBITU402 Learner Guide Version No. 1.0Page 32 Australian College of Business and Accounting
Acts Regulations
Codes of PracticeMandatoryVoluntary
StandardsMandatoryVoluntary
Ethical Concern

Australian Human Rights Commission Act 1986
Age Discrimination Act 2004 (Cth)
Disability Discrimination Act 1992
Equal Employment Opportunity (Commonwealth Authorities) Act 1987
Racial Discrimination Act 1975,
Sex Discrimination Act 1984
State and Territory legislation is relevant based on the State or Territory in which your workplace is operating. The following table shows relevant anti-discrimination legislation based on each State and Territory:
State or Territory Appropriate Legislation
Australian Capital Territory
Australian Capital Territory Discrimination Act 1991 (ACT)
Human Rights Act 2004
Human Rights Commission Act 2005
New South Wales New South Wales Anti-Discrimination Act 1977 (NSW)
Northern Territory Northern Territory Anti-Discrimination Act 1996 (NT)
Queensland Queensland Anti-Discrimination Act 1991 (QLD)
South Australia South Australia Equal Opportunity Act 1984 (SA)
Tasmania Tasmania Anti-Discrimination Act 1998 (TAS)
VictoriaCharter of Human Rights and Responsibilities Act 2006 Racial and Religious Tolerance Act 2001
Victoria Equal Opportunity Act 1995 (VIC)
Western Australia Western Australia Equal Opportunity Act 1984 (WA)
Key Provisions
BSBITU402 Learner Guide Version No. 1.0Page 33 Australian College of Business and Accounting

The key provision of anti-discrimination legislation is that under Federal and State legislation it is unlawful to discriminate (treat a person or group of people unfavourably) due to:
Race, colour, national, or ethnic origin
Gender, pregnancy, or marital status
Age
Disability
Religion
Sexual preference
Trade union activity
Any other characteristic specified under anti-discrimination or human rights legislation
All workplaces in Australia are subject to anti-discrimination legislation, as are workplaces in many other parts of the world. As such, it is important for all workers to be aware of and comply with anti-discrimination legislation which applies to them.
Further information regarding this legislation can be found at the National Anti-Discrimination Information Gateway.
Privacy Laws
Privacy legislation has been enacted at both the Commonwealth and State and Territory level to protect the personal information and privacy concerns of Australians.
Relevant federal privacy legislation you should be aware of include:
Privacy Act 1988
Privacy Regulations 2006
State and Territory legislation is relevant based on the state or territory in which your workplace is operating. The following table shows relevant privacy legislation based on each State and Territory:
State or Territory Appropriate Legislation
BSBITU402 Learner Guide Version No. 1.0Page 34 Australian College of Business and Accounting

Australian Capital Territory Health Records (Privacy and Access) Act 1997
New South WalesPrivacy and Personal Information Protection Act 1998
Health Records and Information Privacy Act 2002
Northern Territory Information Act 2002
Queensland Information Privacy Act 2009
South Australia No State legislation applicable
Tasmania Personal Information Protection Act 2004
VictoriaInformation Privacy Act 2000
Health Records Act 2000
Western Australia No State legislation applicable
Key ProvisionsThe 13 Australian Privacy Principles (APPs) replaced the National Privacy Principles (NPPs) for organisations from 12 March 2014. The APPs are found in the Privacy Amendment (Enhancing Privacy Protection) Act 2012 (Cth).
APP 1 – open and transparent management of personal information
APP 1 requires organisations to have ongoing practices and policies in place to ensure that they manage personal information in an open and transparent way.
APP 1 introduced more prescriptive requirements for privacy policies than the requirements in NPP 5.1. An organisation must have an APP privacy policy that contains specified information, including the kinds of personal information it collects, how an individual may complain about a breach of the APPs, and whether the organisation is likely to disclose information to overseas recipients. An organisation needs to take reasonable steps to make its APP privacy policy available free of charge and in an appropriate form.
BSBITU402 Learner Guide Version No. 1.0Page 35 Australian College of Business and Accounting

APP 1 also introduced a positive obligation for organisations to implement practices, procedures and systems that will ensure compliance with the APPs and any registered APP codes.
APP 2 – anonymity and pseudonymity APP 2 sets out a new requirement that an organisation provides
individuals with the option of dealing with it using a pseudonym. This obligation is in addition to the existing requirement that organisations provide individuals with the option of dealing with them anonymously.
Both requirements are subject to certain limited exceptions, including where it is impracticable for the organisation to deal with an individual who has not identified themselves, or where the law or a court/tribunal order requires or authorises the organisation to deal with individuals who have identified themselves.
APP 3 – collection of solicited personal information APP 3 outlines when and how an organisation may collect personal
and sensitive information that it solicits from an individual or another entity.
An organisation must not collect personal information (other than sensitive information) unless the information is reasonably necessary for one or more of the organisation’s functions or activities.
APP 3 clarifies that, unless an exception applies, sensitive information must only be collected with an individual’s consent if the collection is also reasonably necessary for one or more of the organisation’s functions or activities.
An organisation must only collect personal information from the individual unless it is unreasonable or impracticable to do so.
APP 4 – dealing with unsolicited personal information APP 4 created new obligations about the receipt of personal
information which is not solicited.
Where an organisation receives unsolicited personal information, it must determine whether it would have been permitted to collect the information under APP 3. If so, APPs 5 to 13 will apply to that information.
BSBITU402 Learner Guide Version No. 1.0Page 36 Australian College of Business and Accounting

If the information could not have been collected under APP 3, and the information is not contained in a Commonwealth record, the organisation must destroy or de-identify that information as soon as practicable, but only if it is lawful and reasonable to do so.
APP 5 – notification of the collection of personal information APP 5 specifies certain matters about which an organisation must
generally make an individual aware, at the time, or as soon as practicable after, the organisation collects their personal information.
In addition to the matters listed in NPP 1.3, APP 5 requires organisations to notify individuals about the access, correction and complaints processes in their APP privacy policies, and also the location of any likely overseas recipients of individuals’ information.
APP 6 – use and disclosure of personal information APP 6 outlines the circumstances in which an organisation may use
or disclose the personal information that it holds about an individual.
APP 6 generally reflects the NPP 2 use and disclosure obligations. In addition, APP 6 introduced a limited number of new exceptions to the general requirement that an organisation only uses or discloses personal information for the purpose for which the information was collected. These exceptions include where the use or disclosure is reasonably necessary:
o to assist in locating a missing person.
o to establish, exercise or defend a legal or equitable claim.
o for the purposes of a confidential alternative dispute resolution.
APP 7 – direct marketing The use and disclosure of personal information for direct marketing
is now addressed in a discrete privacy principle (rather than as an exception in NPP 2).
Generally, organisations may only use or disclose personal information for direct marketing purposes where the individual has either consented to their personal information being used for direct marketing or has a reasonable expectation that their personal
BSBITU402 Learner Guide Version No. 1.0Page 37 Australian College of Business and Accounting

information will be used for this purpose, and conditions relating to opt-out mechanisms are met.
APP 7.5 permits contracted service providers for Commonwealth contracts to use or disclose personal information for the purpose of direct marketing if certain conditions are met.
APP 8 – cross-border disclosures APP 8 and a new s 16C introduced an accountability approach to
organisations’ cross-border disclosures of personal information.
Before an organisation discloses personal information to an overseas recipient, the organisation must take reasonable steps to ensure that the overseas recipient does not breach the APPs (other than APP 1) in relation to that information. In some circumstances an act done, or a practice engaged in, by the overseas recipient that would breach the APPs, is taken to be a breach of the APPs by the organisation. There are a number of exceptions to these requirements.
APP 9 – adoption, use or disclosure of government related identifiers
APP 9 prohibits an organisation from adopting, using or disclosing a government related identifier unless an exception applies. APP 9 generally retains the same exceptions as NPP 7, with some additions and amendments.
APP 10 – quality of personal information Under APP 10, an organisation must take reasonable steps to
ensure the personal information it collects is accurate, up-to-date and complete (as required by NPP 3).
In relation to use and disclosure, the quality requirements differ from NPP 3. For uses and disclosures, the personal information must be relevant, as well as accurate, up-to-date and complete, having regard to the purpose of the use or disclosure.
BSBITU402 Learner Guide Version No. 1.0Page 38 Australian College of Business and Accounting

APP 11 – security of personal information APP 11 requires an organisation to take reasonable steps to protect
the personal information it holds from interference, in addition to misuse and loss, and unauthorised access, modification and disclosure (as required by NPP 4.1).
Like NPP 4.2, APP 11 requires an organisation to take reasonable steps to destroy or de-identify personal information if the organisation no longer needs it for any authorised purpose. Under APP 11 there are two (2) exceptions to this requirement:
o the personal information is contained in a Commonwealth record, or
o the organisation is required by or under an Australian law or a court/tribunal order to retain the information.
APP 12 – access to personal information The APPs separate the access and correction requirements into two
(2) separate principles.
Like NPP 6, APP 12 requires an organisation to give an individual access to the personal information that it holds about that individual unless an exception applies. The exceptions are substantially similar to the exceptions in NPP 6.
There is a new requirement for organisations to respond to requests for access within a reasonable period. In addition, organisations must give access in the manner requested by the individual if it is reasonable to do so. If an organisation decides not to give an individual access, it must generally provide written reasons for the refusal and the mechanisms available to complain about the refusal.
If an organisation charges an individual for giving access to the individual’s personal information, the charge must not be excessive, and must not apply to the making of the request.
APP 13 – correction of personal information APP 13 introduced some new obligations in relation to for
correcting personal information, which differs from those in NPP 6. The APPs removed the NPP 6 requirement for an individual to establish that their personal information is inaccurate, incomplete or is not up-to-date and should be corrected.
BSBITU402 Learner Guide Version No. 1.0Page 39 Australian College of Business and Accounting

APP 13 now requires an organisation to take reasonable steps to correct personal information to ensure that, having regard to a purpose for which it is held, it is accurate, up-to-date, complete, relevant and not misleading, if either:
o the organisation is satisfied that it needs to be corrected, or
o an individual requests that their personal information be corrected.
Organisations generally need to notify other APP entities that have been provided with the personal information of any correction, if that notification is requested by the individual.
APP 13 contains similar provisions to NPP 6 in relation to associating a statement with the personal information if the organisation refuses to correct the information and the individual requests a statement to be associated.
An organisation must also respond to a correction request or a request to associate a statement with the individual within a reasonable period after the request is made and must not charge the individual for making the request, for correcting the personal information, or for associating the statement with the personal information.
When refusing an individual’s correction request, an organisation must generally provide the individual with written reasons for the refusal and notify them of available complaint mechanisms.
* This is a summary only and NOT a full statement of obligations.
Further information regarding this legislation and the NPPs can be found at the Office of the Australian Information Commissioner website.
Workplace Health and Safety legislation
Workplace health and safety legislation has been enacted at both the Commonwealth and State and Territory level to protect the workplace health and safety concerns of workers in Australia.
Relevant federal WHS legislation you should be aware of includes
Work Health and Safety Act 2011
Work Health and Safety Regulations 2011
BSBITU402 Learner Guide Version No. 1.0Page 40 Australian College of Business and Accounting

State and Territory legislation is relevant based on the State or Territory in which your workplace is operating. The following table shows relevant WHS legislation based on each State and Territory:
BSBITU402 Learner Guide Version No. 1.0Page 41 Australian College of Business and Accounting

State or Territory Appropriate Legislation
Australian Capital Territory
Work Health and Safety Act 2011
Work Health and Safety Regulations 2011
New South WalesWork Health and Safety Act 2011
Work Health and Safety Regulations 2011
Northern TerritoryWork Health and Safety Act 2011
Work Health and Safety Regulations 2011
QueenslandWork Health and Safety Act 2011
Work Health and Safety Regulations 2011
South AustraliaWork Health and Safety Act 2011
Work Health and Safety Regulations 2011
TasmaniaWork Health and Safety Act 2011
Work Health and Safety Regulations 2011
VictoriaOccupational Health and Safety Act 2004
Occupational Health and Safety Regulations 2007
Western AustraliaOccupational Safety and Health Act 1984
Occupational Safety and Health Regulations 1996
WHS Harmonisation ReformUnder recent harmonisation reform of WHS legislation, it has been identified that, although there are many similarities between the laws of different States and Territories, there are also some differences that can cause confusion. It has been determined that Australian workers should be entitled to the same work health and safety standards regardless of the jurisdiction in which they operate.
In response, the Commonwealth and each State and Territory government have agreed to harmonise their work health and safety laws, including Regulations and codes of practice, so they are similar in each jurisdiction.
As of January 2013, all States and Territories, aside from Victoria and Western Australia, have enacted new WHS legislation in line with national harmonisation reforms.
BSBITU402 Learner Guide Version No. 1.0Page 42 Australian College of Business and Accounting
BSBITU402 Learner Guide Version No. 1.0Page 43 Australian College of Business and Accounting

Key Provisions Protecting workers and other persons against harm to their health,
safety, and welfare through the elimination or minimisation of risks arising from work.
Providing for fair and effective workplace representation, consultation, co-operation, and issue resolution in relation to work health and safety.
Encouraging unions and employer organisations to take a constructive role in promoting improvements in work health and safety practices, and assisting persons conducting businesses or undertakings and workers to achieve a healthier and safer working environment.
Promoting the provision of advice, information, education and training in relation to work health and safety.
Securing compliance with this Act through effective and appropriate compliance and enforcement measures.
Ensuring appropriate scrutiny and review of actions taken by persons exercising powers and performing functions under this Act.
Providing a framework for continuous improvement and progressively higher standards of work health and safety.
Maintaining and strengthening the national harmonisation of laws relating to work health and safety, and to facilitate a consistent national approach to work health and safety in this jurisdiction.
Workers and other persons should be given the highest level of protection against harm to their health, safety and welfare from hazards and risks arising from work as are reasonably practicable.
Further information regarding this legislation can be found at the Safe Work Australia website.
Organisational Policies and ProceduresDue to the compliance requirements of the above legislative concerns, most organisations produce policy and procedures documenting their processes to comply with those obligations.
These policy and procedures are designed to provide workers in that organisation with appropriate guidelines on how to meet their compliance obligations within the organisation.
BSBITU402 Learner Guide Version No. 1.0Page 44 Australian College of Business and Accounting

It is important for all workers to be aware of and comply with the relevant organisational policies and procedures of their organisation.
BSBITU402 Learner Guide Version No. 1.0Page 45 Australian College of Business and Accounting
CHAPTER 2. DEVELOP A LINKED SPREADSHEET SOLUTION2.1. Utilise Spreadsheet Design Software Functions and Formulae to Meet Identified Requirements
Spreadsheet Design SoftwareThe spreadsheet design software covered in this course will be Microsoft Office Excel. Excel is arguably the most common spreadsheet application on the market and is often considered to be an industry standard.
We shall be using Excel 2007 as there are still many businesses using MS Office 2007, and there are few significant differences between Excel 2007 and 2010.
Learning ResourcesAs you work through this learner guide, you will develop overall competency in using the Microsoft Office Excel software functions and formulae.
Along the way, you will have various activities to complete, and be referred to a number of video tutorials to support your learning process.
Formulae and FunctionsOne of the things that makes Excel such a powerful tool, is the ability to set formulae and functions to perform calculations automatically.
So, what are formulae and functions?
The Microsoft Office glossary defines a “Formula” as the following:
BSBITU402 Learner Guide Version No. 1.0Page 46 Australian College of Business and Accounting
A sequence of values, cell references, names, functions, or operators in a cell that together produce a new value. A formula always begins with an equal sign (=).
It defines a “Function” as the following:
A prewritten formula that takes a value or values, performs an operation and returns a value or values. Use functions to simplify and shorten formulas on a worksheet, especially those that perform lengthy or complex calculations.
FormulaeEssentially a formula is an equation that calculates a new value from existing values.
Formulae can be as simple as basic addition (e.g. “=A1+B1”) or can be a complex combination of operators, references, and functions.
All formulae begin with an equal sign (=) and then make use of cell references combined with operators and functions to make up the formula.
BSBITU402 Learner Guide Version No. 1.0Page 47 Australian College of Business and Accounting
FormulaeFunctions

OperatorsOperators specify the type of calculation that you want to perform on the elements of a formula.
There are four (4) types of operators in Excel:
Arithmetic operators Meaning Example
^ (caret) Exponentiation 3^2 (32)
% (percent sign) Percent 20%
* (asterisk) Multiplication 3*3
/ (forward slash) Division 3/3
+ (plus sign) Addition 3+3
- (minus sign) Subtraction
Negation
3-1
-1
Comparison operators Meaning Example
= (equal sign) Equal to A1=B1
> (greater than sign) Greater than A1>B1
< (less than sign) Less than A1<B1
>= (greater than or equal to sign)
Greater than or equal to
A1>=B1
<= (less than or equal to sign)
Less than or equal to A1<=B1
<> (not equal to sign) Not equal to A1<>B1
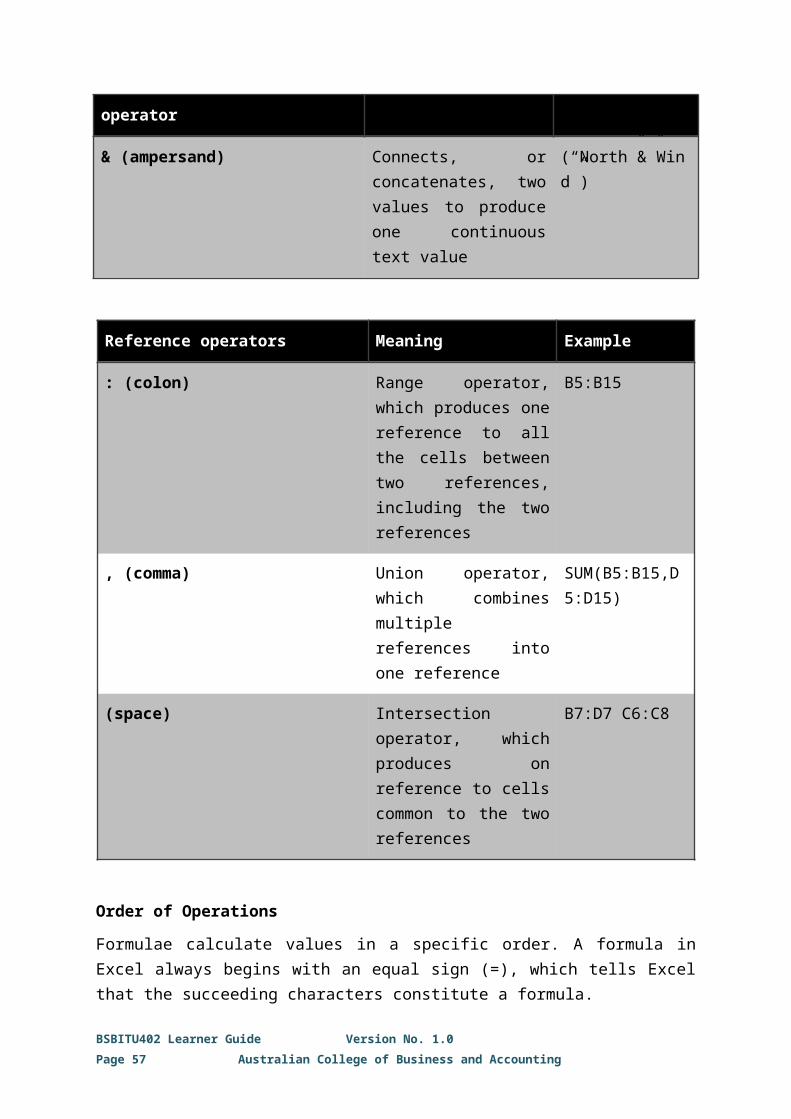
Text concatenation operator Meaning Example
& (ampersand) Connects, or concatenates, two values to produce
(“North”&”Wind”)
BSBITU402 Learner Guide Version No. 1.0Page 48 Australian College of Business and Accounting

one continuous text value
Reference operators Meaning Example
: (colon) Range operator, which produces one reference to all the cells between two references, including the two references
B5:B15
, (comma) Union operator, which combines multiple references into one reference
SUM(B5:B15,D5:D15)
(space) Intersection operator, which produces on reference to cells common to the two references
B7:D7 C6:C8
Order of OperationsFormulae calculate values in a specific order. A formula in Excel always begins with an equal sign (=), which tells Excel that the succeeding characters constitute a formula.
Following the equal sign are the elements to be calculated (the operands), which are separated by calculation operators. Excel calculates the formula from left to right, according to a specific order for each operator in the formula.
If you combine several operators in a single formula, Excel performs the operations in the order shown in the table below. If a formula contains operators with the same precedence, for example, if a formula contains both a multiplication and division operator, Excel evaluates the operators from left to right.
BSBITU402 Learner Guide Version No. 1.0Page 49 Australian College of Business and Accounting

Description Operators
1. Reference operators : (colon)
(single space)
, (comma)
2. Negation (as in –1) –
3. Percent %
4. Exponentiation ^
5. Multiplication and division * and /
6. Addition and subtraction + and –
7. Connects two strings of text (concatenation)
&
8. Comparison =< ><=>=<>
BSBITU402 Learner Guide Version No. 1.0Page 50 Australian College of Business and Accounting

Changing the Order of OperationsTo change the order in which Excel calculates the formula, enclose the part of the formula you want to be calculated first in parentheses.
For example, the formula “=6+7*8” produces 62 because multiplication is calculated before addition. The formula multiplies 7 by 8 and then adds 6 to the result.
By changing the formula to “=(6+7)*8” it produces 104 because the calculation in parentheses is performed first. The formula adds 6 and 7 and then multiplies the result by 8.
FunctionsIn essence, a function is a preset formula in a spreadsheet that is designed to act as a shortcut for common formulae.
Because they are a type of formula, all functions begin with an equal sign (=) followed by the function’s “arguments” contained within parentheses.
Function Syntax
=SUM(A2:A15,B2:B15,C16)
Arguments are the values that a function uses to perform operations or calculations. The type of argument a function uses is specific to the function. Common arguments that are used within functions include numbers, text, cell references, and names.
ExampleThe most commonly used function is SUM, so let’s take a look at the Excel Help page for SUM.
BSBITU402 Learner Guide Version No. 1.0Page 51 Australian College of Business and Accounting
Equal sign Arguments separated by commas
Function Name
Argumentsenclosed in parentheses

BSBITU402 Learner Guide Version No. 1.0Page 52 Australian College of Business and Accounting
So, the SUM function adds all of the values referenced within the argument, and within the argument, you can reference the following:
A range of cells (e.g. B5:B15)
Individual cell references (e.g. A12)
An array (e.g. B5:C15)
A constant
A formula
The result of another function
For example, “=SUM(B13:B22)” uses the reference operator: to reference a range containing all of the cells between B13 and B22 (inclusive) and adds all of those values together to produce the result.
This is also a good example to show how functions act as shortcuts when using common formulae.
Without the SUM function, you would be required to use the much more cumbersome formula “=B13+B14+B15+B16+B17+B18+B19+B20+B21+B22”.
Entering FunctionsTo enter a function, you can simply type the function and its argument directly into the cell, e.g. click in the cell and type “=SUM(B13:B22)”.
Alternatively, you can use the “Function Library” on the Formulas tab of the Excel Ribbon as shown below:
BSBITU402 Learner Guide Version No. 1.0Page 53 Australian College of Business and Accounting

Activity 2:
Familiarise yourself with the functions available in Excel either by perusing the list of functions in the Excel Help pages or by perusing the functions in the Function Library in the Formulas tab of the Excel Ribbon.
To view the answers to this activity, click here.
Types of FunctionsExcel recognises over 300 different functions, which are too many to list here. However, you can find them all in the Excel Help documentation, along with a description, their syntax, and one or more examples of their use.
Excel’s functions are grouped in the following categories:
We have already taken a look at the SUM function; we will now take a look at some of the other most commonly used functions.
Date and Time FunctionsExcel stores all dates as integers and all times as decimal fractions. With this system, Excel can add, subtract, or compare dates and times just like any other numbers, and all dates are manipulated by using this system.
BSBITU402 Learner Guide Version No. 1.0Page 54 Australian College of Business and Accounting
Cube Date & Time Engineering Financial
Information Logical Lookup & Reference Math & Trig
Statistical Text

In this system, the serial number 1 represents 1/1/1900 12:00:00 a.m. Times are stored as decimal numbers between .0 and .99999, where .0 is 00:00:00 and .99999 is 23:59:59.
The date integers and time decimal fractions can be combined to create numbers that have a decimal and an integer portion. For example, the number 32331.06 represents the date and time 7/7/1988 1:26:24 a.m.
All calculations, comparisons and sorting done by Excel for dates and times are carried out using the date and time serial number.
Excel includes many built-in date and time functions to help you perform complex date and time calculations.
Common Date & Time Functions
Function Description Syntax
DATE Returns the sequential serial number that represents a particular date.
DATE(year, month, day)
NOW Returns the serial number of the current date and time.
NOW()
* This function has no arguments
TIME Returns the decimal number for a particular time.
TIME(hour,minute,second)
TODAY Returns the serial number of the current date.
TODAY()
* This function has no arguments
NETWORKDAYS
Returns the number of whole workdays between two dates.
NETWORKDAYS(start_date, end_date,holidays)
Financial Functions Excel includes a broad range of financial functions which are useful for performing financial analyses, such as the following:
Interest rates
Current values of investment
Future values of investments,
BSBITU402 Learner Guide Version No. 1.0Page 55 Australian College of Business and Accounting

Term durations for loans and investments
Impact of increasing/decreasing payments on a loan
BSBITU402 Learner Guide Version No. 1.0Page 56 Australian College of Business and Accounting
Common Financial Functions
Function Description Syntax
IPMT Returns the interest payment for an investment for a given period.
IPMT(rate,per,nper,pv,fv,type)
NPER Returns the number of periods for an investment.
NPER(rate, pmt, pv, fv, type)
PMT Returns the periodic payment for an annuity.
PMT(rate,nper,pv,fv,type)
PPMT Returns the payment on the principal for an investment for a given period.
PPMT(rate,per,nper,pv,fv,type)
RATE Returns the interest rate per period of an annuity.
RATE(nper,pmt,pv,fv,type,guess)
Logical FunctionsExcel includes a number of logical functions that make use of the comparison operators to introduce a decision-making process to your spreadsheets, allowing Excel to do one thing or another based upon the data it is referencing.
All of the logical functions return either a TRUE or FALSE result when the functions are evaluated.
The IF function allows you to produce one output for the TRUE result or a different output for a FALSE result, which allows for decision-making processes in Excel.
By nesting logical functions, i.e. using further logical functions within the arguments of other logical functions, you gain the ability to implement more complex decision-making processes.
Excel 2007 allows for up to 64 levels of nesting in functions (earlier versions of Excel only allow for up to 7 levels of nesting).
Keep in mind that as the level of nesting increases, so does the complexity of your formula. A complex formula with multiple levels of nesting can be quite difficult to understand if you need to come back to it later to make a change.
BSBITU402 Learner Guide Version No. 1.0Page 57 Australian College of Business and Accounting

Common Logical Functions
Function Description Syntax
AND Returns TRUE if all of its arguments are TRUE.
AND(logical1, [logical2], ...)
FALSE Returns the logical value FALSE. FALSE( )
* This function has no arguments
IF Specifies a logical test to perform. IF(logical, value_if_true, [value_if_false])
IFERROR Returns a value you specify if a formula evaluates to an error; otherwise, returns the formula result.
IFERROR(value,value_if_error)
NOT Reverses the logic of its argument.
NOT(logical)
OR Returns TRUE if any argument is TRUE.
OR(logical1,logical2,...)
TRUE Returns the logical value TRUE. TRUE( )
* This function has no arguments
Lookup and Reference FunctionsMicrosoft Office Excel has a number of functions to help you work with arrays of data. They include functions that return the location of a given address or value, and functions to look up given values.
These functions can greatly simplify the process of finding specific entries within a large data table.
Often complex nested logical functions can be simplified by using the appropriate lookup and reference function.
Common Lookup and Reference Functions
Function Description Syntax
CHOOSE Chooses a value from a list of values.
CHOOSE(index_num,value1,value2,...)
BSBITU402 Learner Guide Version No. 1.0Page 58 Australian College of Business and Accounting

LOOKUP Looks up values in a vector or array.
LOOKUP(lookup_value, lookup_vector, result_vector)
or
LOOKUP(lookup_value, array)
ROWS Returns the number of rows in a reference.
ROWS(array)
VLOOKUP Looks in the first column of an array and moves across the row to return the value of a cell.
VLOOKUP(lookup_value, table_array, col_index_num, [range_lookup])
Math and Trig FunctionsExcel also has numerous mathematical functions for carrying out common mathematical calculations, including basic arithmetic, conditional sums and products, and trigonometric calculations.
The math and trig functions also provide a number of tools for working with numeric values, such as rounding or truncating, identifying the sign or generating a random numeric value within defined parameters.
Common Math and Trig Functions
Function Description Syntax
ABS Returns the absolute value of a number.
ABS(number)
COS Returns the cosine of a number. COS(number)
INT Rounds a number down to the nearest integer.
INT(number)
PI Returns the value of pi. PI( )
* This function has no arguments
POWER Returns the result of a number raised to a power.
POWER(number,power)
RAND Returns a random number between 0 and 1.
RAND( )
* This function has no arguments
ROUND Rounds a number to a specified ROUND(number, num_digits)
BSBITU402 Learner Guide Version No. 1.0Page 59 Australian College of Business and Accounting

number of digits.
SIGN Returns the sign of a number. SIGN(number)
SIN Returns the sine of the given angle.
SIN(number)
SUM Adds its arguments. SUM(number1, [number2], [number3], [number4], ...)
SUMIF Adds the cells specified by a given criteria.
SUMIF(range, criteria, [sum_range])
TAN Returns the tangent of a number. TAN(number)
TRUNC Truncates a number to an integer. TRUNC(number,num_digits)
Statistical Functions Excel has many statistical functions that can be used to analyse data in a variety of different ways.
These functions can be used to find common statistical operations, such as finding the average value or ranking data by its largest and smallest values, as well as more complex operations, such as standard deviation.
Common Statistical Functions
Function Description Syntax
AVERAGE Returns the average of its arguments.
AVERAGE(number1, [number2],...)
COUNT Counts how many numbers are in the list of arguments.
COUNT(value1, [value2],...)
COUNTA Counts how many values are in the list of arguments.
COUNTA(value1, [value2], ...)
MAX Returns the maximum value in a list of arguments.
MAX(number1,number2,...)
MIN Returns the minimum value in a list of arguments.
MIN(number1,number2,...)
STDEV Estimates standard deviation STDEV(number1,number2,...)
BSBITU402 Learner Guide Version No. 1.0Page 60 Australian College of Business and Accounting

based on a sample.
Text Functions Excel includes a number of very useful functions to assist you with working with, and manipulating, strings of text-based data.
Many of these tools allow you to extract, insert and join parts of the text entry within a cell.
Common Text Functions
Function Description Syntax
CONCATENATE Joins several text items into one text item.
CONCATENATE(text1, [text2], ...)
FIND Finds one text value within another (case-sensitive).
FIND(find_text,within_text,start_num)
LEFT Returns the leftmost characters from a text value.
LEFT(text,num_chars)
LEN Returns the number of characters in a text string.
LEN(text)
MID Returns a specific number of characters from a text string starting at the position you specify.
MID(text,start_num,num_chars)
RIGHT Returns the rightmost characters from a text value.
RIGHT(text,num_chars)
TEXT Formats a number and converts it to text.
TEXT(value, format_text)
Showing Formulae and FunctionsWhen you look at a spreadsheet in Excel, the cells generally display the value produced by any formulae they contain.
Sometimes it is useful to be able to see the formulae in the spreadsheet. This can be done quickly and easily by using the “Show Formulas” option in Excel.
BSBITU402 Learner Guide Version No. 1.0Page 61 Australian College of Business and Accounting

Simply click the “Show Formulas” button in the “Formula Auditing” group on the Formulas tab.
You can see in the screenshot that “Show Formulas” also has a hotkey associated with it (Ctrl + `). Where ` is the grave accent key, which is located next to the number 1 key on the top left corner of the keyboard and looks like a backwards apostrophe.
Activity 3:
Go to the Bureau of Meteorology website and locate the weather observations for your local area.
a) Using that data, create a spreadsheet showing the temperature and apparent temperature for the previous five (5) hours.
b) Create another column that uses a formula to calculate the difference between the temperature and the apparent temperature.
c) Use functions to calculate the average for the temperature and apparent temperature over the 5-hour period.
d) Use functions to determine the maximums and minimums for temperature and apparent temperature over the 5 hours.
To view the answers to this activity, click here.
2.2. Link Spreadsheets in Accordance with Software Procedures
Linking SpreadsheetsWhen developing spreadsheets, you will often find yourself using the same data across multiple worksheets or even across multiple workbooks. In these situations, it can be valuable to link these worksheets and workbooks together using the tools provided in your spreadsheet software.
BSBITU402 Learner Guide Version No. 1.0Page 62 Australian College of Business and Accounting

Multiple WorksheetsIn Excel, it is easy to create, format, and edit multiple worksheets at the same time.
To select multiple worksheets, you have several options which are the same as for selecting multiple cells within a worksheet:
To select a continuous range of worksheets, left-click on the first worksheet tab then hold down the [Shift] key and left-click on the last worksheet tab in the selection, this will highlight both tabs selected, as well as all of the tabs in between.
To select specific worksheets, [Ctrl] left-click on each worksheet tab you wish to have in your selection.
To deselect specific worksheets that are currently selected, [Ctrl] left-click on the worksheet tab you wish to deselect.
Once you have selected multiple worksheets, any formatting changes, data or formulae you enter into one of the selected worksheets will be entered into all of the other selected worksheets at the same time.
Linking CellsExcel allows you to easily link cells so that any changes to the source cell will automatically be applied to the linked cells.
The simplest way to link a destination cell so that it will always reference a particular source cell is to reference the source cell in a formula.
The example below shows worksheets from a spreadsheet containing some sales data for Awesome Landscapes.
BSBITU402 Learner Guide Version No. 1.0Page 63 Australian College of Business and Accounting
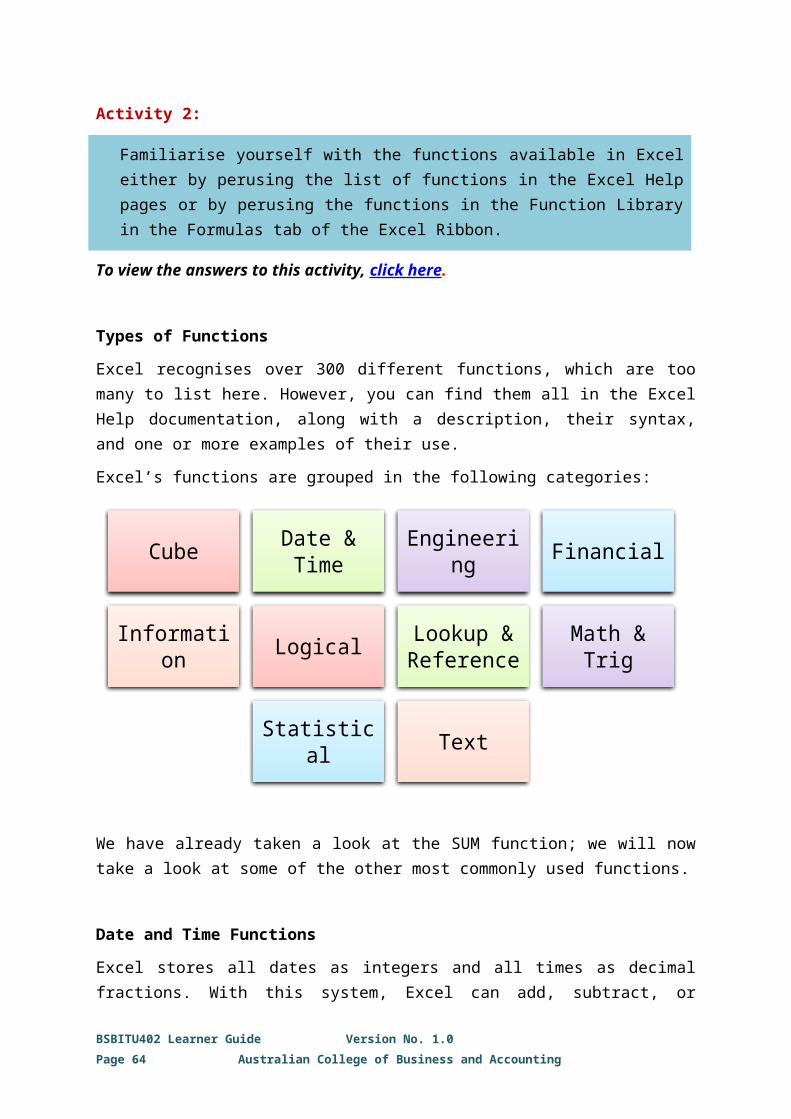
The first worksheet contains the sales data for January, the second for February, and the third for March of 2012.
For the Jan worksheet, the following formulae were used:
B5=SUM(B6:B8)
B9=SUM(B10:B12)
B13=SUM(B14:B16)
B17=SUM(B5,B9,B13)
C5 =B5 (all the way to) ...
C17=B17
For the Feb worksheet, the same formulae were used for calculating the sales:
B5=SUM(B6:B8)
B9=SUM(B10:B12)
B13=SUM(B14:B16)
B17=SUM(B5,B9,B13)
But for the Quarterly Totals, we generated a running total by adding the February sales to the January sales totals. This was done by referencing the sales values in the cells from the April worksheet within the formulae.
C5=B5+Jan!C5 (all the way to)...
C17=B17+Jan!C17
Notice the cell reference Jan!C5 this tells Excel to refer to cell C5 in the Jan worksheet.
BSBITU402 Learner Guide Version No. 1.0Page 64 Australian College of Business and Accounting
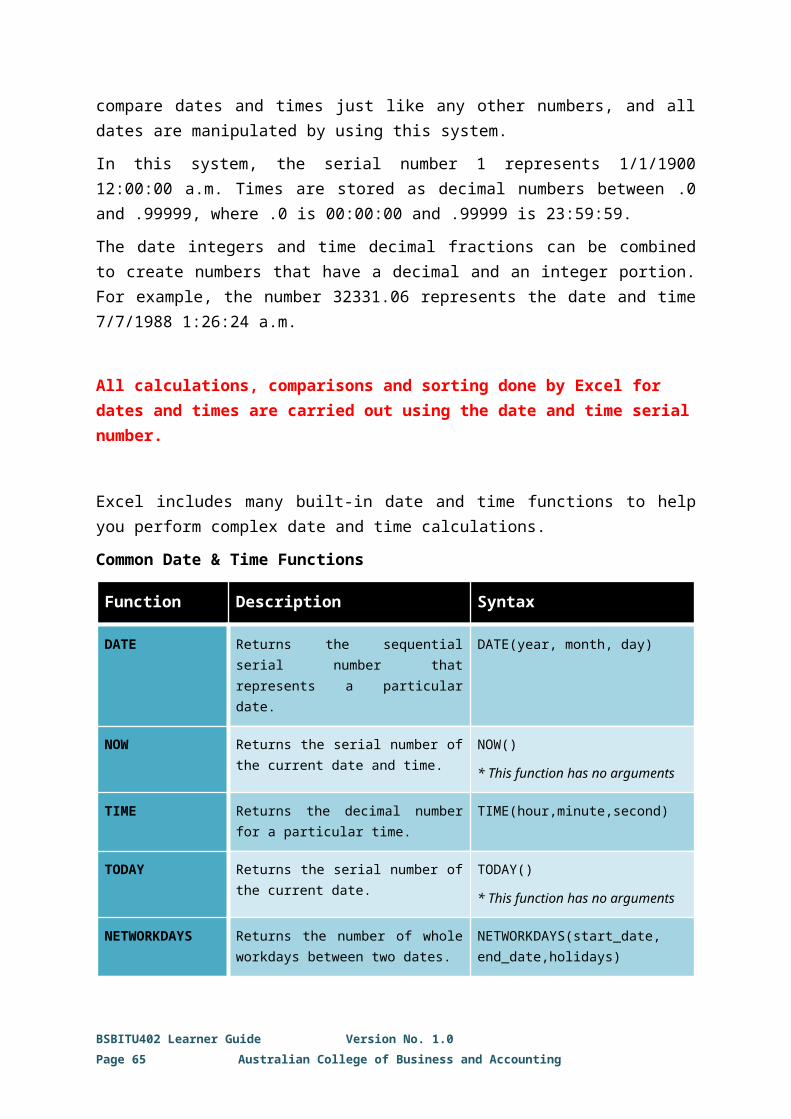
For the March worksheet example, we turned “Show Formulas” on so that you can clearly see the formulae.
Again, notice that the Sales formulae don’t change, but this time the running Quarterly Total added the March sales figures to the previous running totals from February.
(Incidentally, also notice the value 41090 in cell A3, this is the date serial number that represents the 30th of June 2012)
Linking to Cells in a Different WorkbookExcel allows you to not only link to cells in different worksheets within the same workbook but also to cells contained within different workbooks.
For example, say we wished to add a cell that calculates the difference between Gross Sales in 2012 and 2011.
Assuming that the Annual Gross Sales figure is always contained in the N17 cell of the financial year summary tab, we could use the following formula:
“=N17-’[Awesome sales monthly figures 2011.xlsx]2010-2011 Summary’!N17”
The [Awesome sales monthly figures 2011.xlsx] tells Excel to link the cell to a different workbook called ‘Awesome sales monthly figures 2011.xlsx’.
BSBITU402 Learner Guide Version No. 1.0Page 65 Australian College of Business and Accounting
2.3. Format Cells and Use Data Attributes Assigned with Relative and/or Absolute Cell References, in Accordance with the Task Specifications
Formatting CellsWhen developing spreadsheets, it is often necessary to use multiple formats and formatting techniques across different cells.
Microsoft Office Excel has a number of tools that are useful for formatting cells. One of the most useful is the “Format Cells” dialogue box, which can be opened by right-clicking on a cell and selecting the Format Cells option from the drop-down menu.
This dialogue box can also be opened from a number of different places in Excel where you have options to change some of the cell formatting, e.g. using the CTRL-SHIFT-F hotkey will open the Format Cells dialogue box to the Font tab.
The Format Cells dialogue box has six (6) tabs that give you complete control over the cell format.
Number TabEach cell has a Number format (often referred to as a data type) that describes the type of data expected to populate that cell.
By selecting the appropriate Number format, you will ensure that the data displays in an appropriate format on the worksheet.
Many of the Number format categories have further options available for selection in the Type window.
BSBITU402 Learner Guide Version No. 1.0Page 66 Australian College of Business and Accounting

A good example of how this works is how Excel manages data in the Date format. As discussed earlier, Excel records the data for all dates as a date serial number, but formats the data based on the Date format you have chosen.
As you can see, the way Excel displays data in the worksheet varies depending on the format chosen. However, regardless of the format chosen, the actual data recorded by Excel for the date 1st January 2013, would be the serial number 41275.
Activity 4:
a) Open Excel and enter the date 1st January 2013 into a cell.
b) Now open the “Format Cells” dialogue box by right-clicking on the cell and selecting the Format Cells option from the drop-down menu.
c) Select the Date format. In the right-hand side of the dialogue box, you will see a “Type:” window where you can choose from a number of different date display styles.
d) Try selecting different Date format types, and you will see the example in the Sample window change to display the Date type you have selected.
e) When you have finished, change the Number category to various other categories listed.
f) What did you notice?
To view the answers to this activity, click here.
BSBITU402 Learner Guide Version No. 1.0Page 67 Australian College of Business and Accounting

BSBITU402 Learner Guide Version No. 1.0Page 68 Australian College of Business and Accounting
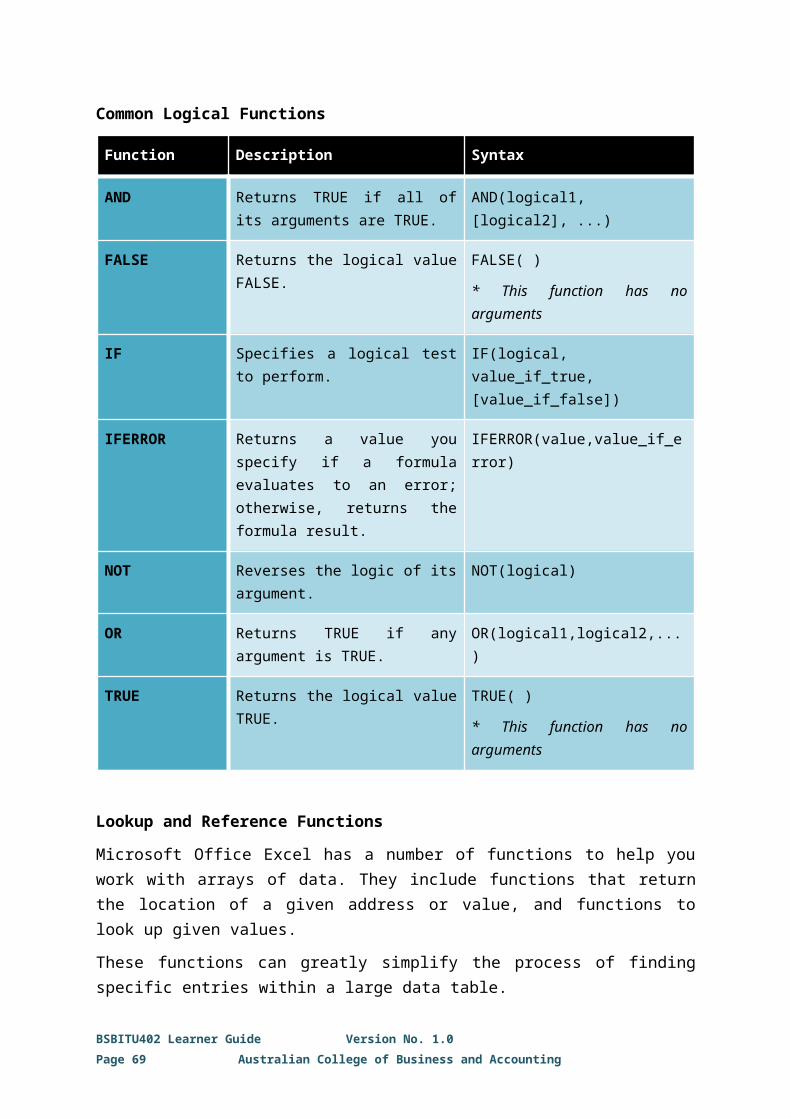
Custom Cell FormatsYou can also use the Number tab to design custom formats. This allows you to use formatting codes to express your data in formats not specifically built into Excel.
This is a very powerful tool and gives you a great deal of control over the way Excel displays your data. While the full utility of this option is beyond the scope of this course, we will provide you with a simple example along with some tables showing the formatting codes available.
Imagine you are developing a spreadsheet that records weight loss/gain over a period of time, and you wish your data to display numbers to 2 decimal places, followed by the “kg” unit.
E.g. a data entry of 3.12 would be displayed as “3.12 kg”. This is easy to do as demonstrated by the screenshot.
The 0.00 tells the format that it is a number to be displayed to 2 decimal places.
The “kg” tells the format to display the text “kg” after the number.
BSBITU402 Learner Guide Version No. 1.0Page 69 Australian College of Business and Accounting

Formatting CodesThere are many different formatting codes that can be used within sections of a custom format. These codes are shown in the tables below (sourced from Microsoft):
Number Code Description
General General number format.
0 (zero) Digit placeholder. This code pads the value with zeros to fill the format.
# Digit placeholder. This code does not display extra zeros.
? Digit placeholder. This code leaves a space for insignificant zeros but does not display them.
. (period) Decimal number.
% Percentage. Microsoft Excel multiplies by 100 and adds the % character.
, (comma) Thousands separator. A comma followed by a placeholder scales the number by a thousand.
E+ E- e+ e- Scientific notation.
Text Code Description
$ - + / ( ) : space These characters are displayed in the number. To display any other character, enclose the character in quotation marks or precede it with a backslash.
\character This code displays the character you specify.
Note: Typing !, ^, &, ‘, ~, {, }, =, <, or > automatically places a backslash in front of the character.
"text" This code displays text.
* This code repeats the next character in the format to fill the column width.
Note: Only one asterisk per section of a format is allowed.
BSBITU402 Learner Guide Version No. 1.0Page 70 Australian College of Business and Accounting

_ (underscore) This code skips the width of the next character. This code is commonly used as "_)" (without the quotation marks) to leave space for a closing parenthesis in a positive number format when the negative number format includes parentheses. This allows the values to line up at the decimal point.
@ Text placeholder.
Date Code Description
m Month as a number without leading zeros (1-12)
mm Month as a number with leading zeros (01-12)
mmm Month as an abbreviation (Jan - Dec)
mmmm Unabbreviated Month (January - December)
d Day without leading zeros (1-31)
dd Day with leading zeros (01-31)
ddd Weekday as an abbreviation (Sun - Sat)
dddd Unabbreviated weekday (Sunday - Saturday)
yy Year as a two-digit number (for example, 96)
yyyy Year as a four-digit number (for example, 1996)
BSBITU402 Learner Guide Version No. 1.0Page 71 Australian College of Business and Accounting
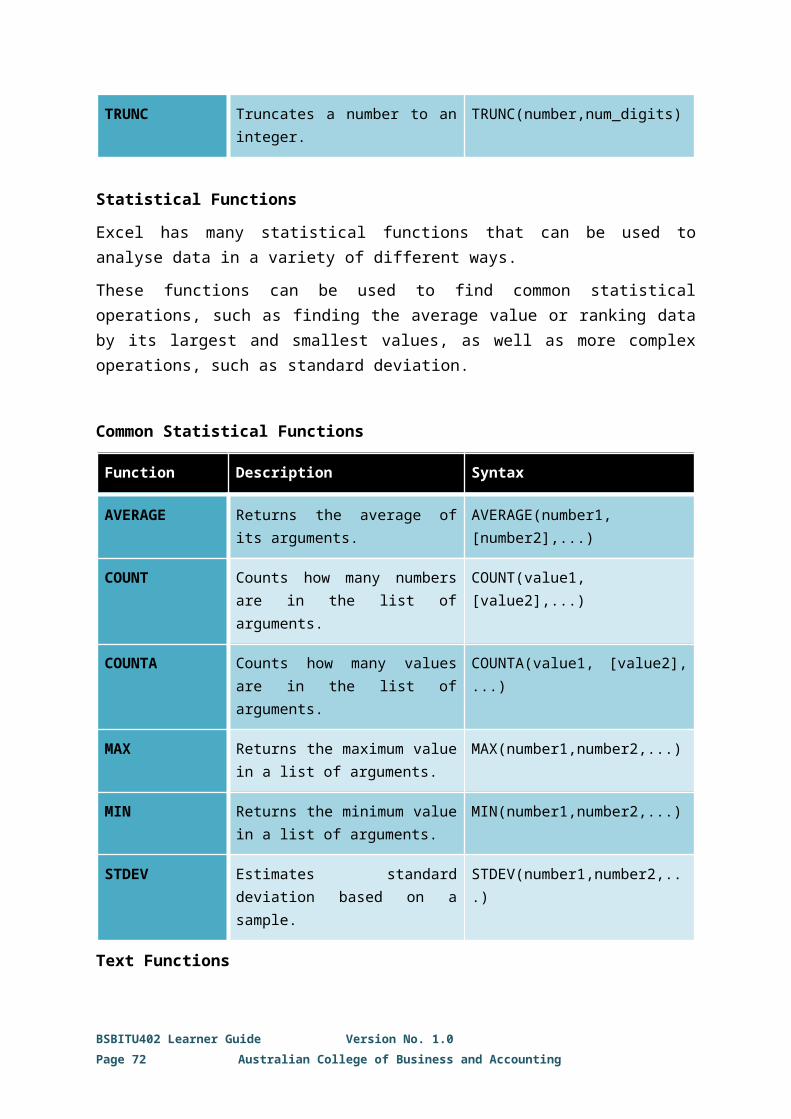
Time Code Description
h Hours as a number without leading zeros (0-23)
hh Hours as a number with leading zeros (00-23)
m Minutes as a number without leading zeros (0-59)
mm Minutes as a number with leading zeros (00-59)
s Seconds as a number without leading zeros (0-59)
ss Seconds as a number with leading zeros (00-59)
AM/PM am/pm Time-based on the twelve-hour clock
Miscellaneous Code Description
[BLACK], [BLUE], [CYAN], [GREEN], [MAGENTA], [RED], [WHITE], [YELLOW], [COLOUR n]
These codes display the characters in the specified colours.
Note: n is a value from 1 to 56 and refers to the nth colour in the colour palette.
[Condition value] Condition may be <, >, =, >=, <=, <> and value may be any number.
Note: A number format may contain up to two conditions.
(Source: Microsoft)
Alignment TabThis tab allows you to control how the cell format is aligned. You have control over
Horizontal alignment – left, centred or right of the cell
Vertical alignment – top, centred or bottom of the cell
Indentation
Orientation – horizontal, vertical or at a specified angle
Wrap text toggle on/off
Shrink text to fit the cell toggle on/off
Merge cells together toggle on/off
BSBITU402 Learner Guide Version No. 1.0Page 72 Australian College of Business and Accounting
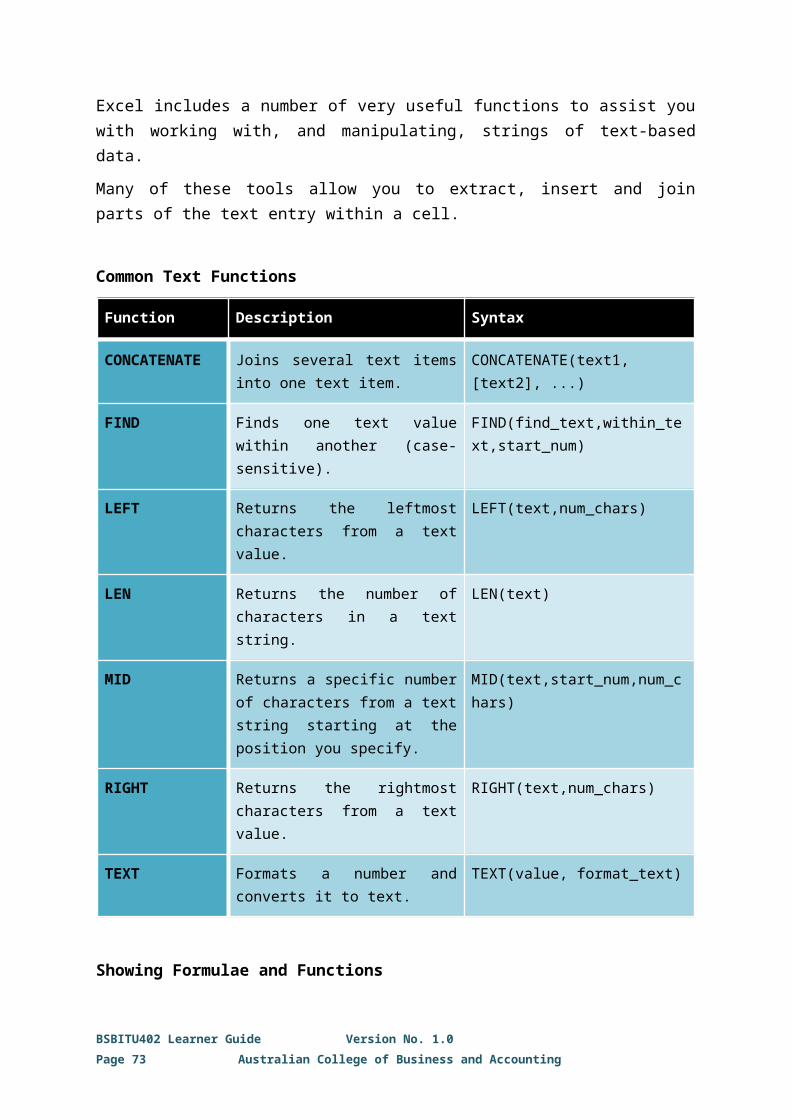
Text direction – right-to-left, left-to-right or context-dependent
Font TabThis tab allows you to control the font settings for the cell. You have the following options:
Font
Font style
Font size
Underline
Colour
Strikethrough
Superscript
Subscript
Normal font – selecting the normal font check box resets the font, font style, size, and effects to the normal (default) style
Border TabThis tab gives you complete control over the borders around and between cells in your selection.
You have the following options:
Line style
Line colour
Top, bottom, left, right, diagonal, horizontal and vertical, borders
Fill tabThis tab allows you to set the fill properties of the cells selected.
You have the following options:
Fill colours
Fill effects
Fill pattern colours
Fill pattern styles
Protection Tab
BSBITU402 Learner Guide Version No. 1.0Page 73 Australian College of Business and Accounting
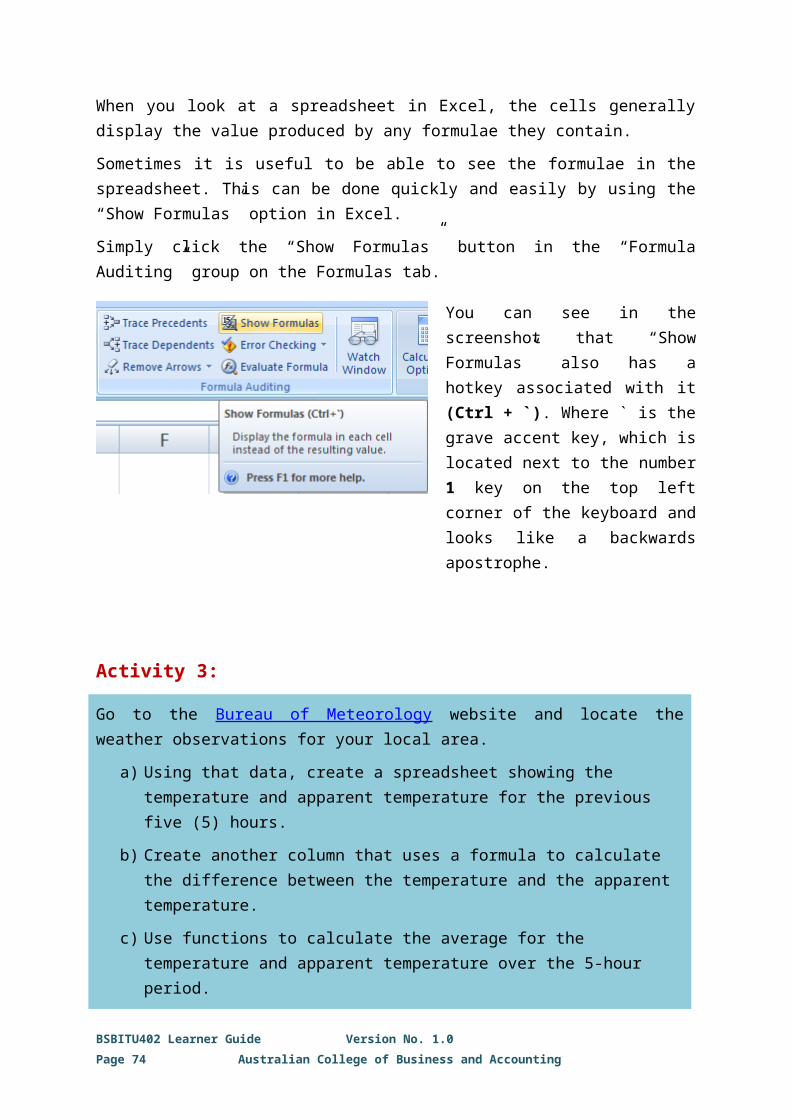
The protection tab gives you options to protect or hide cells in conjunction with the worksheet protection options available in Excel.
Cell AttributesCells are considered to have a number of properties called attributes. These attributes can be changed individually or copied from one cell to another. Cell attributes include the following:
Copying Cell AttributesYou can use the “Format Painter” on the Clipboard section of the Ribbon to copy cell formatting attributes from one cell to another.
Clicking on the Format Painter button copies the cell attributes of the selected cell and allows you to paste the attributes into a selection of cells you click in or click-and-drag the mouse pointer across.
You can also double-click the Format Painter button to toggle the Format Painter on so that it will paste the cell attributes into any cells you select until you either click the Format Painter button again or hit the [Escape] key.
While the Format Painter is useful, the “Paste Special” tool provides additional utility.
BSBITU402 Learner Guide Version No. 1.0Page 74 Australian College of Business and Accounting
Formulas – formula contained within a
cell, but not the calculated value of
the formula.
Values – the value of a cell but not any
formulas used to calculate that value.
Formats – cell formats as
discussed above.
Comments – any comments linked to
the cells.
Validation – any validation attributed linked to the cells.
Anytime you have the contents of a cell (or selection of cells) copied to the clipboard, you can right-click on a selection of other cells and select Paste Special.
This opens the Paste Special dialogue box which gives you the option to copy some or all of the copied cells’ attributes to the selected cells.
By repeating this process, as necessary, you can copy all of the attributes you wish to, while not copying any of the attributes you don’t want.
This tool is valuable for copying the calculated value from a cell containing a formula without copying the formula itself.
Absolute and Relative Cell ReferencingAs shown in the formulae and functions sections, when developing spreadsheets, it is often useful to reference the data in one cell of the spreadsheet in order to use it as part of a formula in another cell. This can be done in two ways, absolute cell referencing, or relative cell referencing.
Relative Cell Referencing This is the default form of cell referencing in Excel. When you copy a relative cell reference and paste it into a different cell, the referenced cell location changes relative to the location of the cell that is referencing it in relation to the original reference.
For example, if you reference cells A1 and B1 in cell C1 using the formula C1=A1+B1, and then copy the (relatively referenced) formula from C1 down to C3, you will get the result C2=A2+B2 and C3=A3+B3).
BSBITU402 Learner Guide Version No. 1.0Page 75 Australian College of Business and Accounting

This relative referencing has shifted relative to where it was copied from and where it was copied to. As you shifted one row down when copying it, the referenced cells A1 and B1 were shifted down one row as well, so that the new formula in C2 referenced cells A2 and B2, this then continued as you shifted down another row to c3.
The same thing happens if you copy across a row, the relative referencing tracks the relative position of the cells.
Absolute Cell Referencing Absolute cell referencing is different. It is used when you want the cell reference to stay fixed on a specific cell, row or column, regardless of where it is copied to.
Absolute referencing is specified by using a $ symbol when referencing another cell. If we were to take another look at the example above using absolute referencing (by changing the formula to be C1=$A$1+$B$1), we would get a different result (see below).
This time, the cell references would not shift as you copied the formula to different cells, they would be fixed on cells A1 and B1 specifically, due to the use of the $ signs in the formula.
Thus, the result would be C2=$A$1+$B$1.
You have three (3) options when using absolute cell referencing: you can use absolute row referencing, absolute column referencing, or absolute row and column referencing.
$A1 is absolutely referencing column A but relatively referencing row 1
A$1 is relatively referencing column A but absolutely referencing row 1
$A$1 is absolutely referencing both column A and row 1
BSBITU402 Learner Guide Version No. 1.0Page 76 Australian College of Business and Accounting
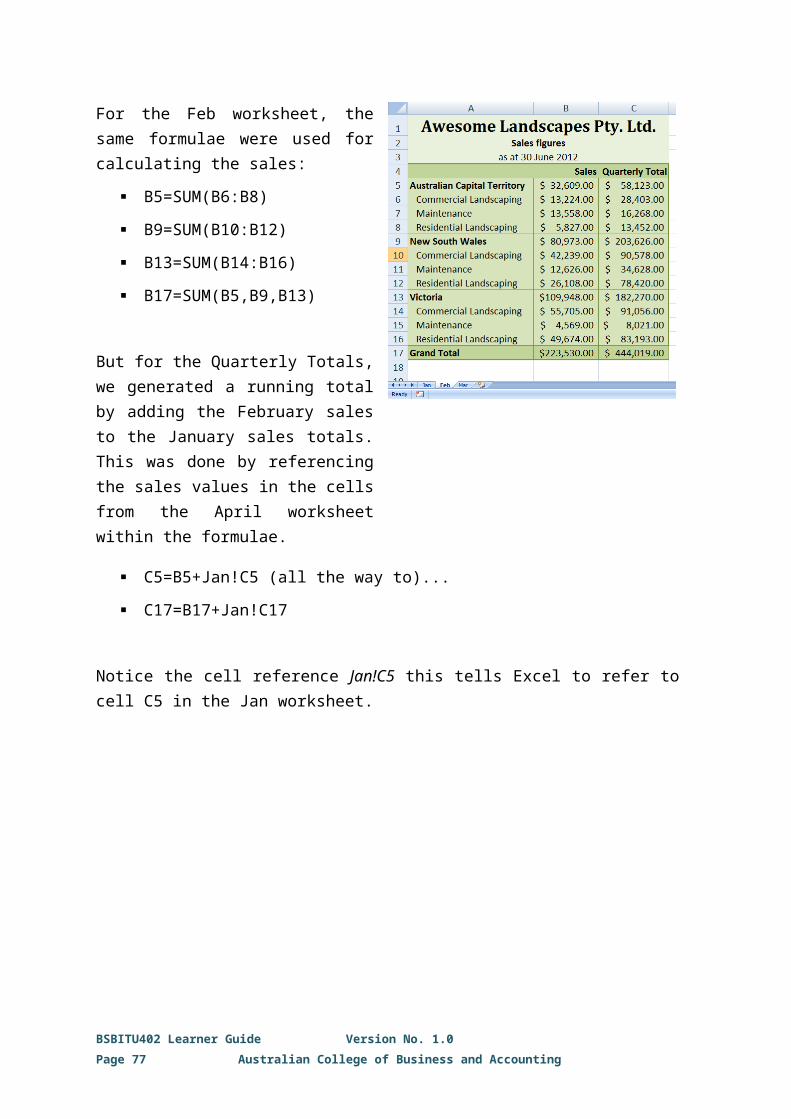
When using a partial absolute reference, the absolutely referenced row or column stays fixed but the relatively referenced row or column shifts relative to where it is copied from and to.
BSBITU402 Learner Guide Version No. 1.0Page 77 Australian College of Business and Accounting
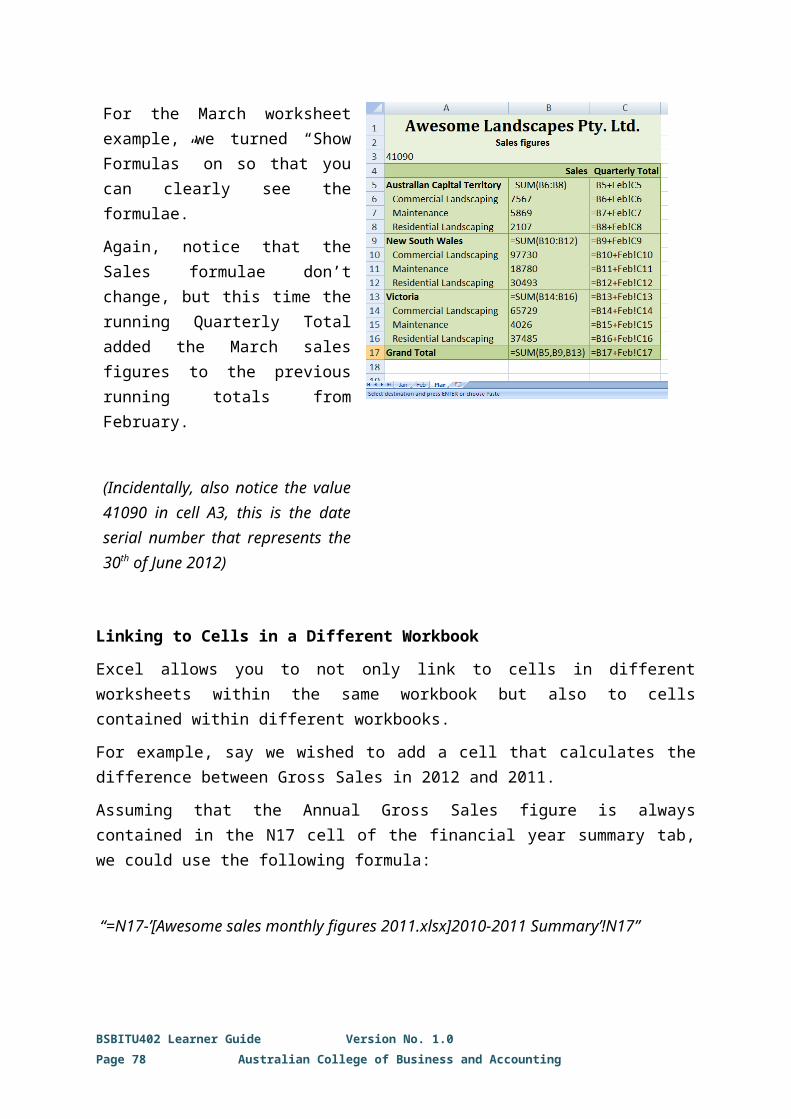
Activity 5:
Open Excel and enter the following data:
Now try the following exercises:
a) Enter the following formula into B2 = A2*B1.
Copy the formula from B2 to all of the other cells and consider the resulting values.
b) Change the formula in B2 = $A2*B$1.
Copy the formula from B2 to all of the other cells and consider the resulting values.
c) Change the formula in B2 = $A$2*$B$1.
Copy the formula from B2 to all of the other cells and consider the resulting values.
d) What did you notice?
There are four (4) possible absolute and relative referencing options for each referenced cell, which gives us 16 possibilities for the above formula (4x4=16). However, we have only looked at three (3) of them.
Take the time to test the other possible referencing combinations and observe the results.
To view the answers to this activity, click here.
BSBITU402 Learner Guide Version No. 1.0Page 78 Australian College of Business and Accounting

2.4. Test Formulae to Confirm Output Meets Task Requirements
Quality ManagementAs with any document, errors can be made in entering formulae, either through typos or through incorrectly applying the wrong formula.
Because of the automated nature of spreadsheets, it is very easy for these errors to destroy the quality of your data if unchecked.
Think back to how different the outputs were in Activity 5 when simply changing the position of the $ while designating the absolute referencing in a formula. Imagine what will happen to your data if you make such a simple error when entering a formula.
This is an example of the GIGO principle (Garbage In, Garbage Out), which basically states that your output data quality is only as good as the data coming in and the formulae that data is put through.
It is important to test each formula you incorporate into a spreadsheet to confirm that the data output from the formula meets the expected output and the task requirements.
BSBITU402 Learner Guide Version No. 1.0Page 79 Australian College of Business and Accounting

CHAPTER 3. AUTOMATE AND STANDARDISE SPREADSHEET OPERATION
3.1. Evaluate Tasks to Identify Those Where Automation Would Increase Efficiency
Spreadsheet AutomationAutomation is the primary feature of spreadsheets that makes them so much more powerful than the simple accounting worksheets and tables from which they evolved.
There are two (2) primary types of spreadsheet automation: programming-based automation, and non-programming-based automation.
Programming Based AutomationBoth macros and add-ins in Excel are based on the Microsoft Visual Basic (VB) programming language.
It is not necessary to use VB to create simple macros, however, a competent programmer can use VB to create macros much more complex than can be produced using the macro recorder in Excel. Macros will be covered in more detail in section 3.2.
MS Excel Help defines add-ins as “installed functionality that adds custom commands and new features to Microsoft Office system programs. Add-ins can be for various types of new or updated features that increase your productivity”.
Add-ins are software modules designed to work with and “plug into” Excel. They can be purchased from software companies, or downloaded
BSBITU402 Learner Guide Version No. 1.0Page 80 Australian College of Business and Accounting
Programming based automation
MacrosAdd-ins
Non-programming-based automation
FunctionsFormulae Linking spreadsheetsTemplates
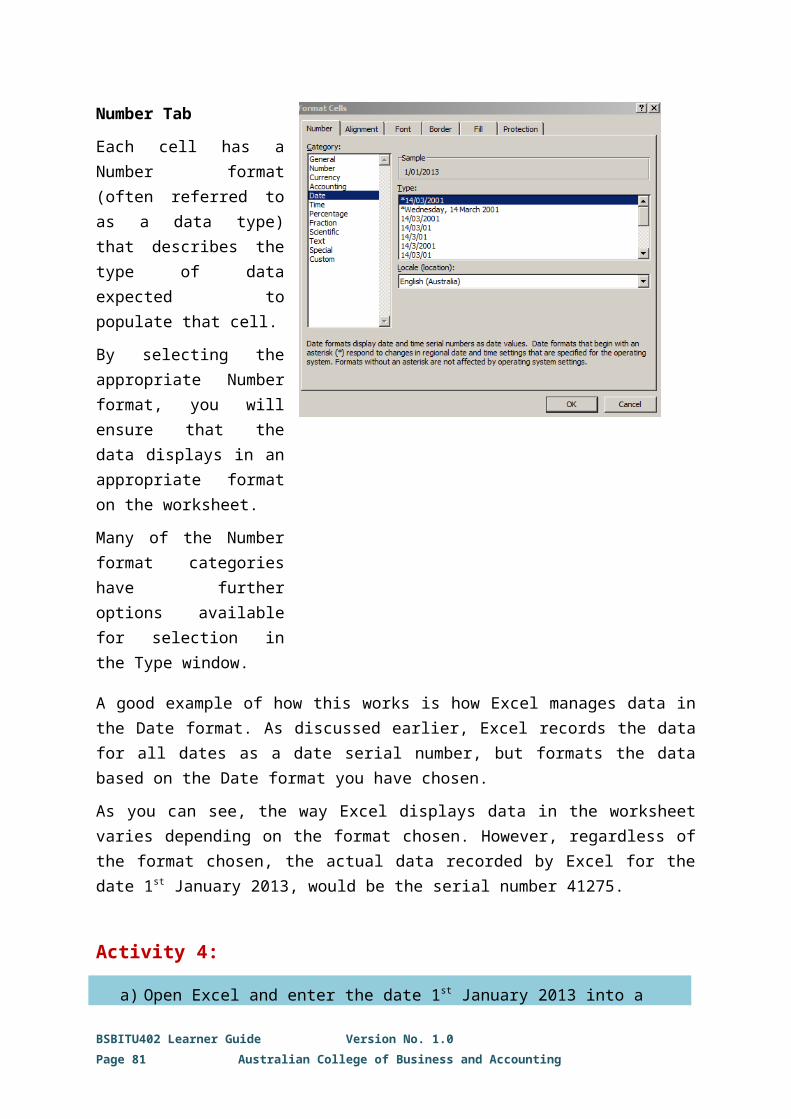
from the Internet, and installed so that they are available for use in Excel.
Add-ins can be managed by clicking the Microsoft Office button , clicking Excel Options, and then clicking Add-Ins.
Non-programming-based AutomationFunctions, formula and linking spreadsheets have already been covered in sections 2.1 and 2.2 of the Learner Guide.
Templates will be covered in more detail in section 3.3.
3.2. Create, Use and Edit Macros to Fulfil the Requirements of the Task and Automate Spreadsheet Operation
MacrosIn Excel, a macro is a series of instructions that can be triggered by a keyboard shortcut, toolbar button, or a clickable button placed in a spreadsheet.
They are primarily used for repetitive tasks that can take significant time to perform manually but can be completed by a macro at the click of a button.
Macros can be created quickly in Excel by using the Record Macro feature. They can also be created and edited using Visual Basic Editor.
While knowledge of Microsoft Visual Basic can enable you to create very powerful macros, knowledge of VB is not necessary for the creation and editing of basic macros.
Due to the nature of macros, running a macro produces changes to your document which cannot be undone using the Undo facilities in Excel.
Developer TabMacros are best managed from the “Developer” tab on the Ribbon.
By default, Excel has the Developer tab hidden. To display the tab, you must change the options settings by taking the following steps:
BSBITU402 Learner Guide Version No. 1.0Page 81 Australian College of Business and Accounting
1. Click the Microsoft Office button.
2. Click Excel Options at the bottom right of the dialogue box.
3. Check the “Show Developer tab in the Ribbon” checkbox in the Popular tab of Excel Options.
Excel should now have the developer tab available in the Ribbon.
Macros can also be accessed from the “View” tab in the Ribbon but, as you can see, more options are available from the Developer tab.
Recording a MacroThe simplest way to create a macro is to use the “Record Macro” button to record your mouse clicks and keystrokes. This enables you to record a series of commands. When you run the macro, it plays those exact commands back in the same order, causing Excel to behave just as if you had entered the commands yourself.
BSBITU402 Learner Guide Version No. 1.0Page 82 Australian College of Business and Accounting

As the macro recorder records everything you do, it is important to plan out your macro, so as not to record unnecessary steps.
ExampleLet’s say that you need to regularly format a lot of different spreadsheets in much the same way. You can record a macro once and then just run the macro every time you need to create a similar worksheet.
All you need to do is take the following steps:
1. Open a new workbook.
2. Click on Record Macro under the “Developer” tab in the Ribbon.
3. In the Record Macro dialogue box, type a name for the macro in the Macro name box.
Macro names must start with a letter, and can include letters, numbers, and underscore characters, but can’t include spaces.
Descriptions are useful to help you keep track of what each macro does. Sometimes it is useful to also put the creation date in the description.
BSBITU402 Learner Guide Version No. 1.0Page 83 Australian College of Business and Accounting

Click Ok, you don’t need to change the other boxes at this stage.
4. Format the cells as per the specification, fonts, text, colours, borders, etc.
5. When you are done, click on the “Stop Recording” button.
You now have a macro that can be used to perform all of the mouse clicks and keystrokes it took to format that page.
Running a MacroTo run the macro, click on the “View Macros” button.
This will bring up the Macro list box. Then simply select your macro in the list and click “Run”.
Notice that the macro will always run from exactly the same place. By default, macros use absolute cell referencing.
BSBITU402 Learner Guide Version No. 1.0Page 84 Australian College of Business and Accounting

Activity 6:
Imagine that your workplace uses Excel to track accounts receivable. Every week you and your co-workers each submit a report in which your manager expects to see overdue amounts formatted in the following way:
a) the numbers are bold and red, and
b) the cells have red borders.
Record a macro to apply these formats to a cell.
To view the answers to this activity, click here.
Assigning MacrosYou can also assign macros so that they can be run by using the following:
Shortcut KeysThe simplest way to assign a macro is to a shortcut key. When you are creating the macro, and the Record Macro dialogue box comes up, just enter the [Ctrl]-Key you wish to assign the macro to into the “Shortcut key” section of the dialogue box.
Quick Access ToolbarAssigning a macro to the Quick Access Toolbar is almost as easy, simply take the following steps:
BSBITU402 Learner Guide Version No. 1.0Page 85 Australian College of Business and Accounting
Shortcut key [Ctrl]-key
Quick Access Toolbar button Form control button

1. Click the Microsoft Office Button and then click the Excel Options button.
2. Click the “Customize” tab.
3. Click “Macros” in the “Choose commands” from drop-down list box.
4. Select the macro and click the “Add” button.
5. Click the macro name in the list box on the right and then click the “Modify” button.
6. Select an icon to use for the button.
7. Click on OK (twice) to add the icon to your Quick Access Toolbar.
Form Control ButtonAssigning a macro to a Form Control button is just as easy, simply take the following steps:
BSBITU402 Learner Guide Version No. 1.0Page 86 Australian College of Business and Accounting
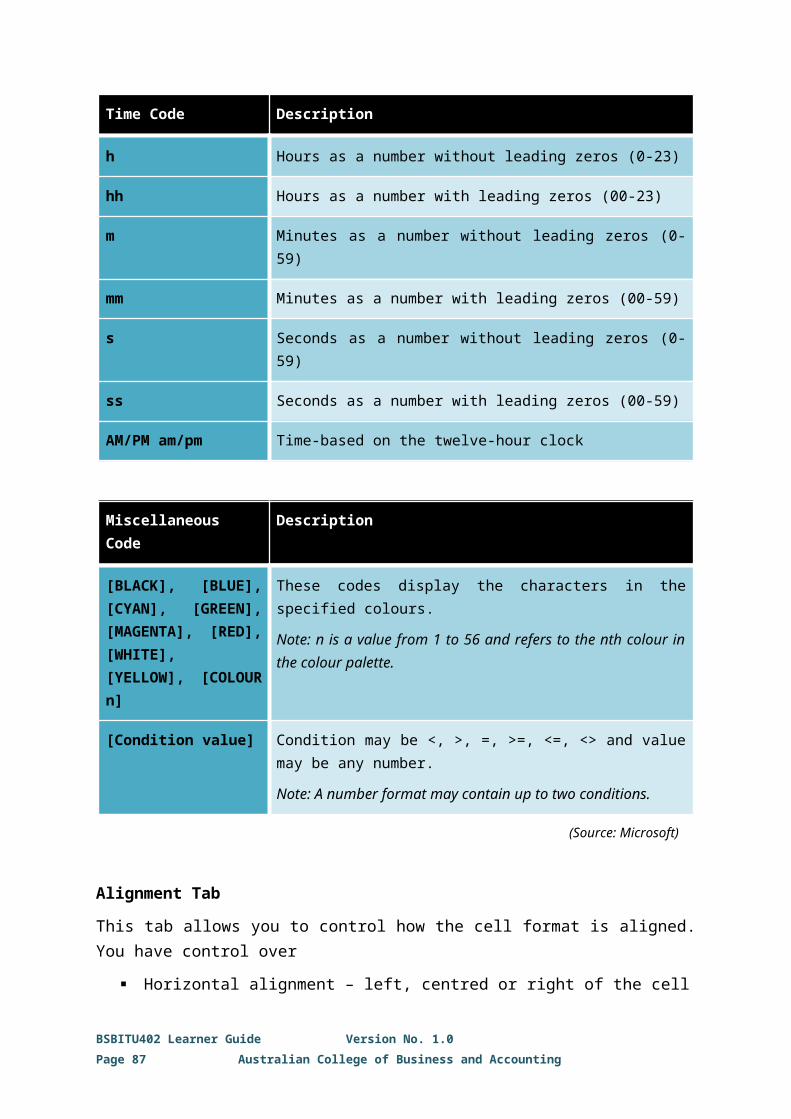
1. On the Developer tab, in the Controls group, click “Insert”, and then, under Form Controls, click Button (Form Control).
2. Click the worksheet location where you want the upper-left corner of the button to appear and drag out to where you want the bottom-right corner to be.
3. Assign the macro to the button.
4. Edit the text to name the button appropriately.
To specify the control properties of the button, right-click the button then click Format Control.
Activity 7:
One common task people need to do in Excel is to print out a specific section of a workbook. While this is straightforward, there are a few steps you need to remember to complete the task:
1. Select the section of the workbook you want to print.
2. Click on the Office button.
3. Click on Print.
4. Click on the Selection button.
5. Click OK.
Consider how useful it would be to have a button on your Quick Access Toolbar to do this for you in just 2 steps:
1. Select the section of the workbook you want to print.
2. Click on Print Selection button.
Use what you have learned so far to complete the following:
a) Create a macro called Print Selection that does this for you.
BSBITU402 Learner Guide Version No. 1.0Page 87 Australian College of Business and Accounting

b) Place that macro on your Quick Access Toolbar.
c) Change the icon for the macro to .
To view the answers to this activity, click here.
Saving MacrosWhen you record macros, the default setting to store it is “Just this Workbook”. For security reasons, standard files are not macro-enabled in Microsoft Office. To save a file so that it is macro-enabled, you have to specifically “Save As” an excel macro-enabled workbook (.xlsm file extension).
Opening Macro-Enabled WorkbooksEven though a .xlsm file is saved as a macro-enabled workbook, when you open the file you will still receive a security warning requiring you to click on an “Enable Content” button before the macros will be enabled.
Editing MacrosIf your macro is not working exactly how you would like it to, you have the option of either deleting it and recording it again or editing it.
Macros are effectively computer programs written in Visual Basic (VB) programming language. When you record a macro, Excel produces a series of instructions in VB which will reproduce the actions it recorded.
Exporting and Importing MacrosMacros can be exported and imported into Excel using the Visual Basic Editor (VBE).
Macros are saved by the VBE using the .bas file extension.
Visual Basic EditorMacros can be edited using the Microsoft Visual Basic Editor (VBE) built into Excel.
Even with little knowledge of Visual Basic, the parts of the VB code which make up the macro are usually not difficult to understand. Consequently, it is possible to make simple edits to macros using the VBE.
BSBITU402 Learner Guide Version No. 1.0Page 88 Australian College of Business and Accounting

To open the macro in the Visual Basic Editor, click on the “View Macros” button in the Code group of the Developer tab on the Ribbon, select the macro and click on Edit.
ExampleWe could take a look at the AwesomeLandscapesFormat macro we produced earlier, but it is probably a little more complex than we want to look at right now.
Instead, let’s take a look at a much simpler macro called AwesomeLandscapesHeading.
This macro formats the selected cell to have the same attributes we gave
cell A1 in the AwesomeLandscapesFormat example, i.e. Cambria 18 bold.
Opening the macro in the VBE we get the following:
BSBITU402 Learner Guide Version No. 1.0Page 89 Australian College of Business and Accounting
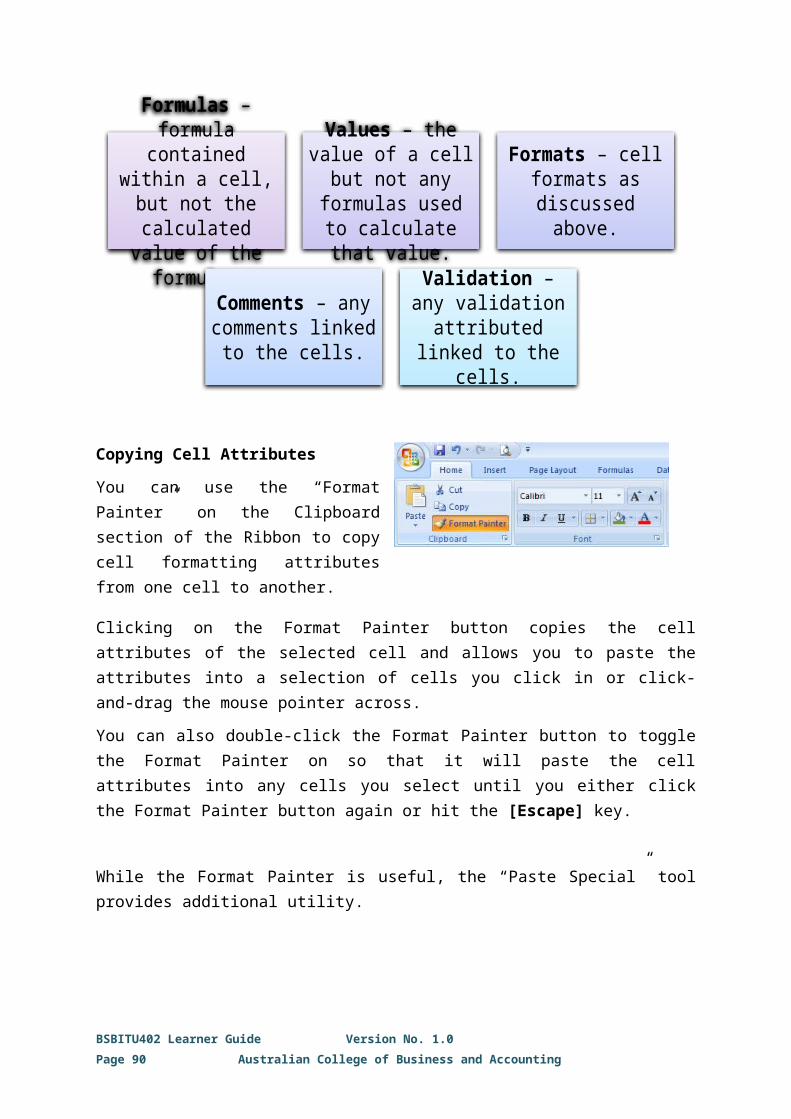
So, what does this all mean? Let’s break it down...
Sub AwesomeLandscapesHeading()
• The Sub-command simply tells Visual Basic that this is the beginning of the macro, in this case, it’s the beginning of a macro called AwesomeLandscapeHeading.
• Macros always start with a Sub command.
• The () at the end is because there is no "argument" for the Sub-command. This is similar to the Now() function in Excel that we looked at earlier.
‘
‘ AwesomeLandscapesHeading Macro
‘
‘
• The apostrophe at the start of a line tells Visual Basic to ignore the line.
• This is what is called a “comment”; it allows for you to place comments or notes into the macro for people who may be editing it later.
With Selection.Font
• The With command tells Visual Basic that we want to do a number of tasks related to the same thing.
BSBITU402 Learner Guide Version No. 1.0Page 90 Australian College of Business and Accounting

• Everything that comes between the With and the End With is to do with the same thing, in this case, selection of fonts.
.Name = "Cambria"
.Size = 18
.Strikethrough = False
.Superscript = False
.Subscript = False
.OutlineFont = False
.Shadow = False
.Underline = xlUnderlineStyleNone
.ThemeColor = xlThemeColorLight1
.TintAndShade = 0
.ThemeFont = xlThemeFontMajor
.Bold = True
• Each of these lines sets one of the font settings.
• Notice how a macro to set the font to Cambria, size 18 and bold has the following:
.Name = “Cambria”
.Size = 18
.Bold = True
End With
• Tells Visual Basic that it is finished with the tasks for the preceding With command.
End Sub
• The End Sub-command tells Visual Basic that the macro is finished.
• Macros always end with an End Sub-command.
Once we break it down, the macro starts to make sense. Even with little or no knowledge of Visual Basic, it is easy to see which parts of the macro set the font style, the font size, and whether it is bold or not.
We can now start to see how we can edit this macro in the Visual Basic Editor to make some changes to what the macro does.
Examine the following edits required to make changes to the standard font style for this heading:
BSBITU402 Learner Guide Version No. 1.0Page 91 Australian College of Business and Accounting
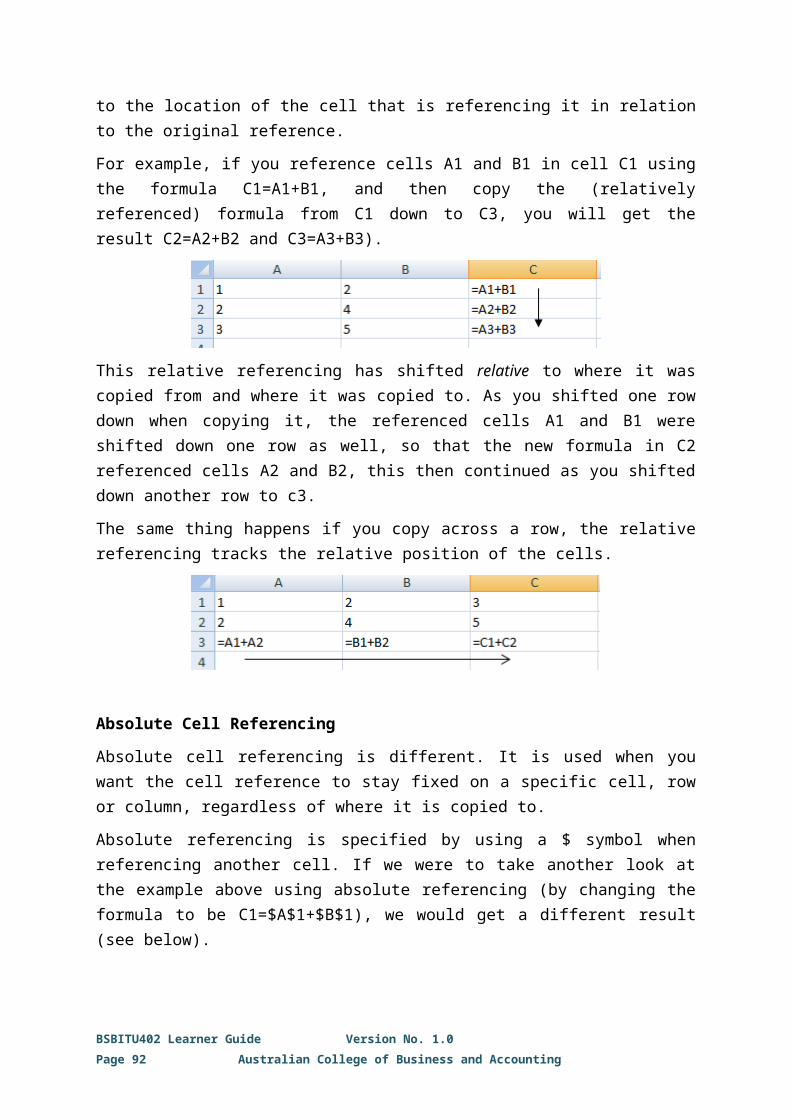
Cambria to Arial – we simply change .Name = “Cambria” to .Name = “Arial”
Font size to 24 – .Size = 18 becomes .Size = 24
No longer bold – .Bold = True is now .Bold = False
Making changes to a number of other settings is equally easy. Settings such as strikethrough, superscript, subscript, outline and shadow are easily changed: True = on, False = off.
Some other settings are not quite so easy though and it’s harder to guess what to do, for example
.Underline = xlUnderlineStyleNone
.ThemeColor = xlThemeColorLight1
.TintAndShade = 0
.ThemeFont = xlThemeFontMajor
However, there are ways we can find out what to do with these settings:
We can always record another macro using the Excel settings to make these changes and then look at the macro in the VBE to see what the settings are in Visual Basic. Then we can copy these settings into another macro, whenever we like.
We could look it up on the Internet. A simple Google search tells us that I can set the font to be underscored by using .Underline = xlUnderlineStyleSingle.
You don’t need to be an expert in Visual Basic to do basic macro editing.
BSBITU402 Learner Guide Version No. 1.0Page 92 Australian College of Business and Accounting
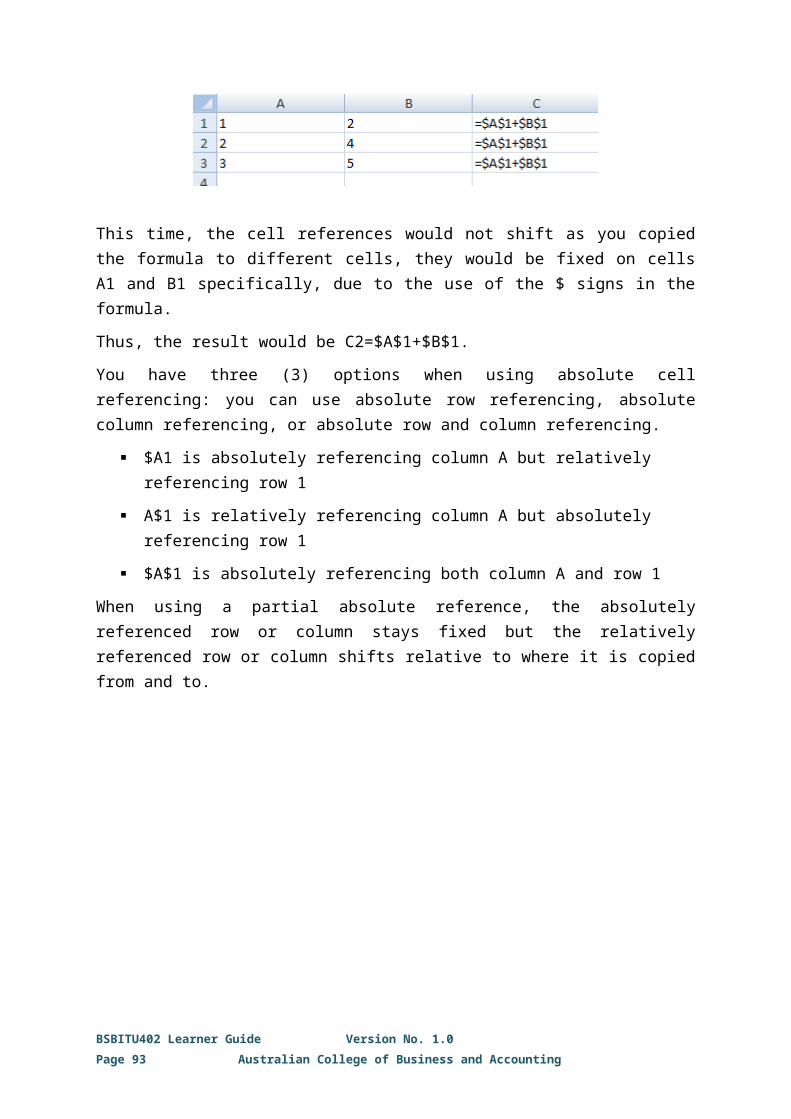
Activity 8:
Open a new workbook and record a macro to set the header and footer to the following:
a) Set the Left Header to show your name.
b) Set the Centre Header to &[File] (automatically links to the Workbook Name).
c) Set the Right Header to &[Tab] (automatically links to the Worksheet Name).
d) Set the Centre Footer to Page &[Page] of &[Pages] (automatically shows current page number of total number of page #).
Now open the macro in the VBE. What changes do you think you could easily make this macro?
To view the answers to this activity, click here.
BSBITU402 Learner Guide Version No. 1.0Page 93 Australian College of Business and Accounting

3.3. Develop, Edit and use Templates to Ensure Consistency of Design and Layout for Forms and Reports, in Accordance with Organisational Requirements
TemplatesWhenever you are going to regularly use numerous spreadsheets with very similar layout or structure you may find it valuable to create a template.
A template is a workbook that you create and use as the basis for creating other similar workbooks. You can create templates for both workbooks and worksheets.
You may notice that when you open a new workbook in Excel, it is called Book#, where the # is a digit which indicates how many workbooks you currently have open. The worksheets are also called Sheet#. This is because the default template for workbooks is called Book.xlt, and the default template for worksheets is called Sheet.xlt.
In effect, a template is a completed workbook without any variable data.
Creating a TemplateCreating a template is easy, you simply take the following steps:
1. Create the workbook.
2. Complete all of the formatting for the workbook.
3. Include all of the formulae you intend to use in the workbook.
4. Include all of the static data (i.e. any data which never changes).
5. Save it as a template.
For example, let’s take another look at the Awesome Landscaping sales figures spreadsheet we looked at back in Section 2.2.
Awesome Landscapes needs to complete a new worksheet for this spreadsheet every month, but each sheet is much the same as all of the others.
BSBITU402 Learner Guide Version No. 1.0Page 94 Australian College of Business and Accounting

This makes it a perfect candidate for creating a template:
1. Create the workbook
2. Format the workbook
3. Enter the formulae to calculate sales totals.
4. Add the static data: States, Products, etc.
5. Save the Workbook as a template by selecting Excel Template (*.xltx) in the Save as type drop-down menu.
Or as an Excel Macro-Enabled Template (*.xltm) in the case of templates which contain macros.
This saves the workbook with the .xltx file extension, which designates it as an Excel Template file, and places it in the Templates folder, which makes it available for future use as a template.
Using a Template
BSBITU402 Learner Guide Version No. 1.0Page 95 Australian College of Business and Accounting
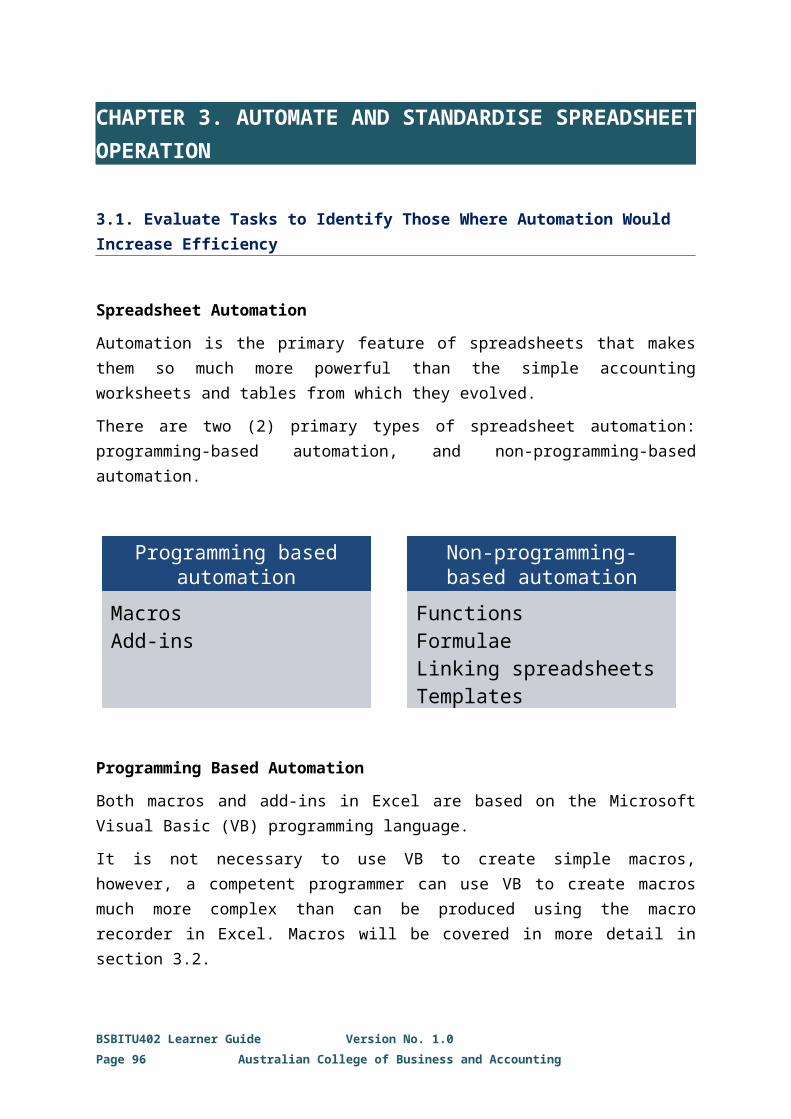
To use a template, take the following steps:
1. Click on the Office Button and select “New”.
2. Select “My Templates”.
3. Select the template you wish to use and hit OK.
4. Enter your data.
5. Save the spreadsheet as a normal Excel workbook.
Creating a Template from an Existing WorkbookIf you already have completed workbooks that would work well as a template, you can easily turn them into templates by taking the following steps:
1. Open the workbook.
2. Select the data and hit [Delete], this will delete the data but leave any formulae intact.
3. Save as a template.
BSBITU402 Learner Guide Version No. 1.0Page 96 Australian College of Business and Accounting

CHAPTER 4. USE SPREADSHEETS
4.1. Enter, Check and Amend Data in Accordance with Organisational and Task Requirements
Data EntryWhile valuable tools, spreadsheets aren’t actually useful until they are populated with data.
There are two (2) ways to enter data into Excel:
1. Manual data entry, and
2. importing data from another source.
Manual Data Entry
Remember the GIGO principle. Due to the automated nature of spreadsheets, it is very easy for these errors to destroy the quality of your data if unchecked.
There are two (2) methods for checking your data:
1. Validation, and
2. verification.
BSBITU402 Learner Guide Version No. 1.0Page 97 Australian College of Business and Accounting
You enter the data accurately.
You check the data to confirm the accuracy and
validity of the data.
Data entered is consistent with appropriate
organisational and task requirements.
You work within appropriate WHS and ergonomic
guidelines.
Ensure
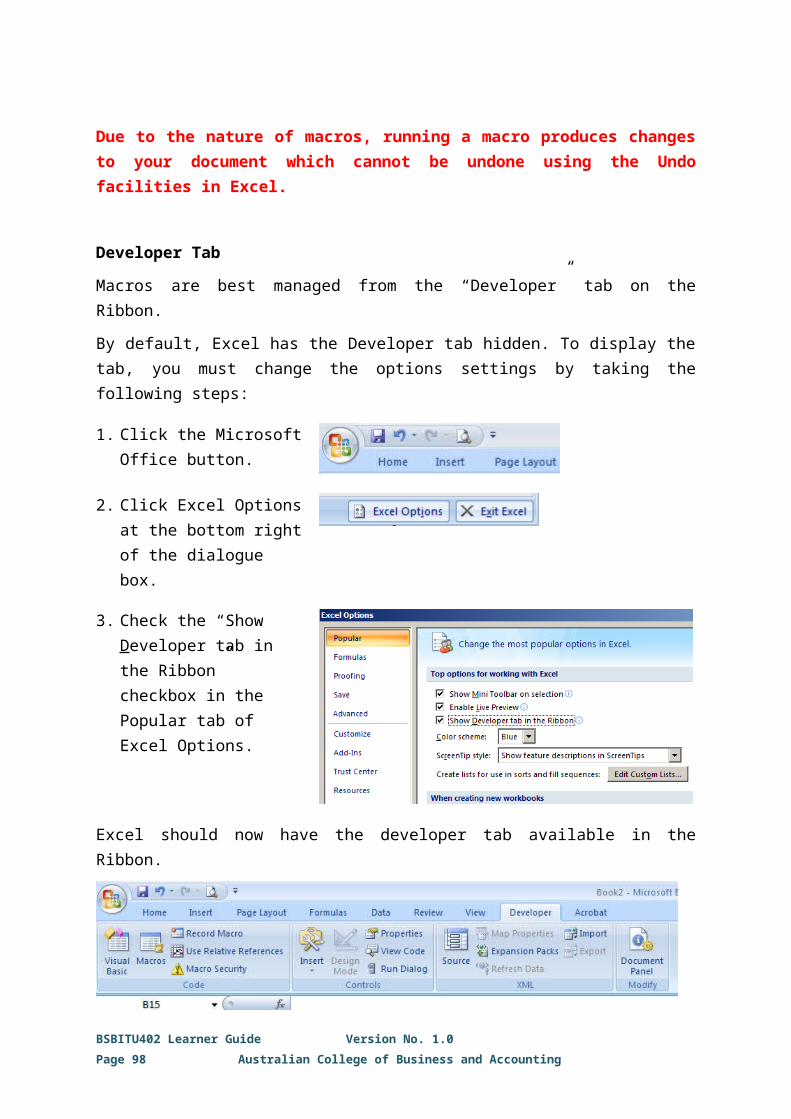
BSBITU402 Learner Guide Version No. 1.0Page 98 Australian College of Business and Accounting

Data ValidationValidation is the process of checking the data to ensure that it meets certain requirements (is valid), but does not, however, ensure that the data is accurate. Validation generally makes use of the following checks, although this list is not exhaustive:
Excel can automatically manage much of the data validation process for you.
BSBITU402 Learner Guide Version No. 1.0Page 99 Australian College of Business and Accounting
Check to ensure that only certain allowed characters are entered in a field.
Allowed character check
Check to ensure that the correct number of characters have been entered.
Field length check
Check to ensure that an input will not produce a logical error such as a divide by zero error.
Logic check
Check to ensure that all fields have been populated and do not move on unless they have.
Presence check
Check to ensure that all the data falls within an accepted range of values.
Range check
Check to ensure that there are no spelling or grammatical errors.
Spelling and grammar check
Check to ensure that the data entered is consistent with data in a valid list of entries which is stored in a database.
Table look up check
Check to ensure the correct type of data (numeric, text, date, etc.) has been entered into the field.
Type check
Check to ensure that the value is unique and has not been entered more than once.
Uniqueness check
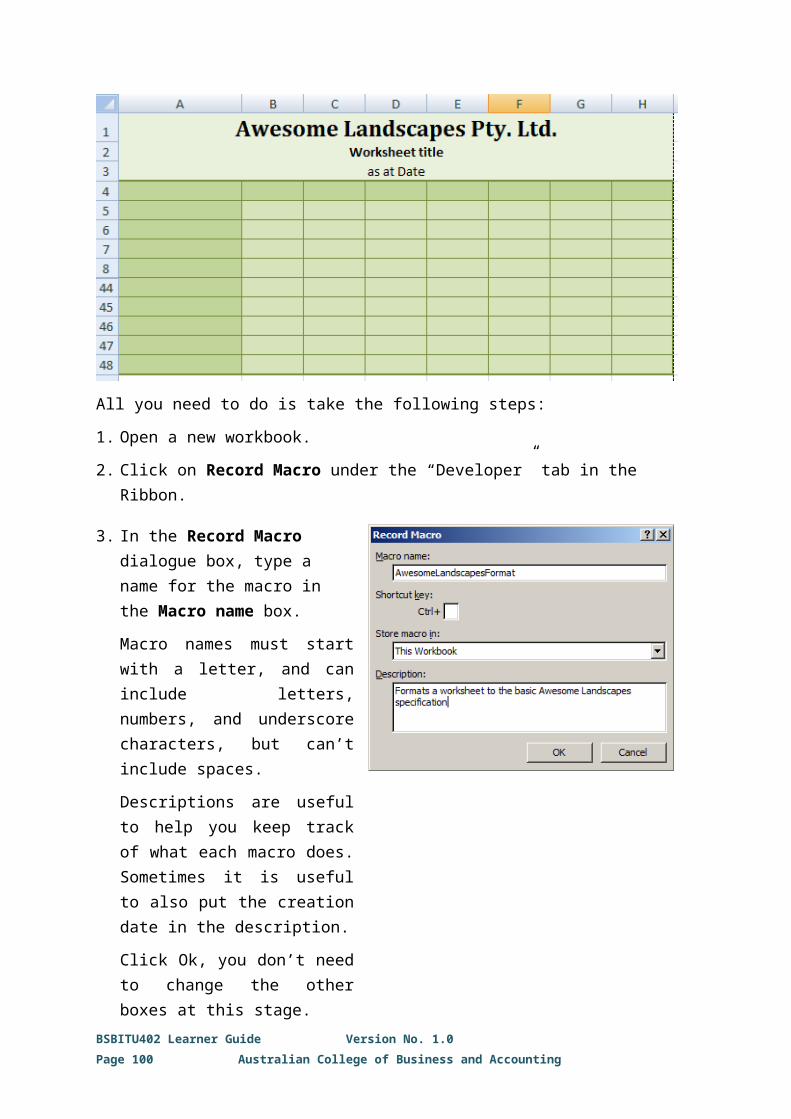
Validating Data in ExcelData validation is an Excel feature that you can use to define restrictions on what data can or should be entered into a cell. This allows you to configure data validation to prevent users from entering data that is not valid.
If you prefer, you can allow users to enter invalid data but warn them when they attempt to type it in the cell.
You can also provide messages to define what input you expect for the cell, and instructions to help users correct any errors.
You can find these tools within the “Data Tools” group of the Data tab on the Ribbon.
Clicking on the “Data Validation” button displays the Data Validation dialogue box.
This dialogue box has three (3) tabs:
1. Settings
2. Input Message
3. Error Alert
Data Validation SettingsThe “Settings” tab allows you to designate validation criteria to which data must conform in order to be accepted as a valid entry for the cell.
BSBITU402 Learner Guide Version No. 1.0Page 100 Australian College of Business and Accounting

Validation setting Description
Any value No validation at all.
This is the default validation setting in Excel, any entry is considered to be valid, and nothing is considered to be invalid.
Whole number Requires the entry to be an integer.
Allows you to set further restrictions on what range of integers are valid, and includes the following:
o Value between X and Y (>X and <Y),
o Value is not between X and Y (<X and >Y),
o Value = X,
o Value <> X,
o Value > X,
o Value < X,
o Value < X,
o Value >= X, and
o Value <= X.
Non-numeric entries are invalid.
Non-integer entries are invalid.
Integer entries which do not fall within the specified range are invalid.
E.g. Only integers between 0 and 100 are valid.
Decimal Similar to Whole number but decimal entries are valid also.
Allows you to set the same range restrictions as Whole number above.
Non-numeric entries are invalid.
Numeric entries which fall outside of the specified range are invalid.
BSBITU402 Learner Guide Version No. 1.0Page 101 Australian College of Business and Accounting

E.g. Any numeric value between 0 and 100 is valid.
List Allows you to define a list of valid entries.
Any entry which is not on the specified list is invalid.
Allows the cell to have a drop-down menu from which you can select one of the items from the list.
E.g. Only entries from the list (Apples, Oranges, Pears and Bananas) are valid.
Date Requires the entry to be a date/time serial number.
Allows you to set the same range restrictions as Whole number above.
Non-date/time entries are invalid.
Date/time entries which fall outside of the specified range are invalid.
Can include specific timeframes within that date by specifying the time components within the serial number.
E.g. Must between 9:00 am and 5:00 pm on 5/5/2013.
Time Requires the entry to be a date/time serial number.
Allows you to set the same range restrictions as Whole number above.
Non-date/time entries are invalid.
BSBITU402 Learner Guide Version No. 1.0Page 102 Australian College of Business and Accounting
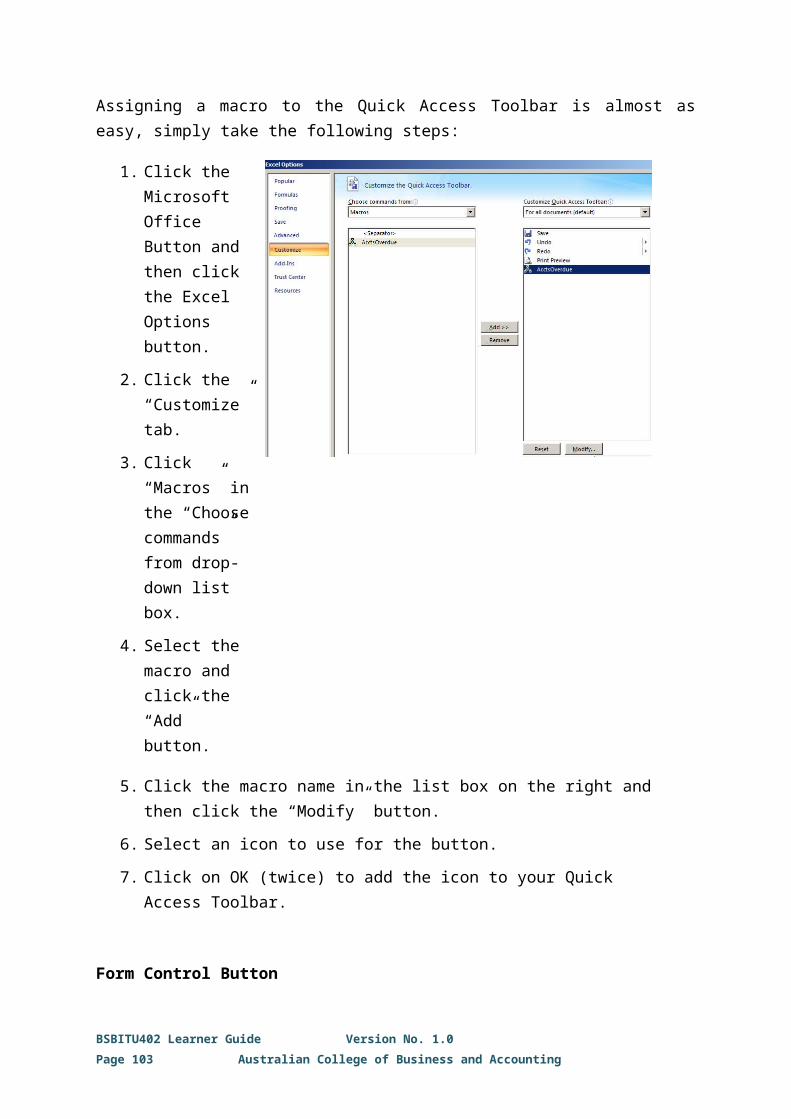
Date/time entries which fall outside of the specified range are invalid.
Only considers the time component of the date/time serial number when checking the validation. Any date with a valid time will do.
E.g. Must be between 9:00 am and 5:00 pm on any date.
Text length Requires the entry to have a number of text characters which fall within a specified range.
Allows you to set the same range restrictions on the number of characters as Whole number above.
Considers the number of digits for numeric values.
Decimal points, commas, $, etc. all count as a character for validation purposes.
Any entry with a number of characters which falls inside the specified range is valid. Otherwise, it is invalid.
E.g. Entry must have exactly 3 characters.
Custom Allows you to enter a logical formula to determine validity.
Entries for which the formula is TRUE are valid.
Entries for which the formula is FALSE are invalid.
E.g. Entry must be a date/time serial number which is between 9:00 am to 5:00 pm, Monday to Friday and not on a public holiday.
Displaying a Validation Message When a Cell is SelectedYou can use tools in the “Input Message” tab within the Data Validation dialogue box to display a message whenever a user selects a cell.
BSBITU402 Learner Guide Version No. 1.0Page 103 Australian College of Business and Accounting

For example:
Displaying an Error Alert When Invalid Data is EnteredThe “Error Alert” tab of the Data Validation dialogue box can be used to generate an alert message whenever a user enters invalid data.
For example:
In the drop-down menu, you have three (3) options to choose the style of the error alert each style produces a slightly different alert:
BSBITU402 Learner Guide Version No. 1.0Page 104 Australian College of Business and Accounting

Stop – Prevents users from entering invalid data in a cell.
Users can click on one of the two (2) options:
Retry to re-enter valid data, or
Cancel to remove the invalid entry.
Warning – Will warn users that the data they have
entered is invalid, without preventing them from entering it.
Users can click on one of the three (3) options:
Yes, to accept the invalid entry,
No, to edit the invalid entry, or
Cancel, to remove the invalid entry.
Information – Will inform users that the data they
entered is invalid, without preventing them from entering it.
Users can click:
OK, to accept the invalid value, or
Cancel, to reject it.
BSBITU402 Learner Guide Version No. 1.0Page 105 Australian College of Business and Accounting

BSBITU402 Learner Guide Version No. 1.0Page 106 Australian College of Business and Accounting
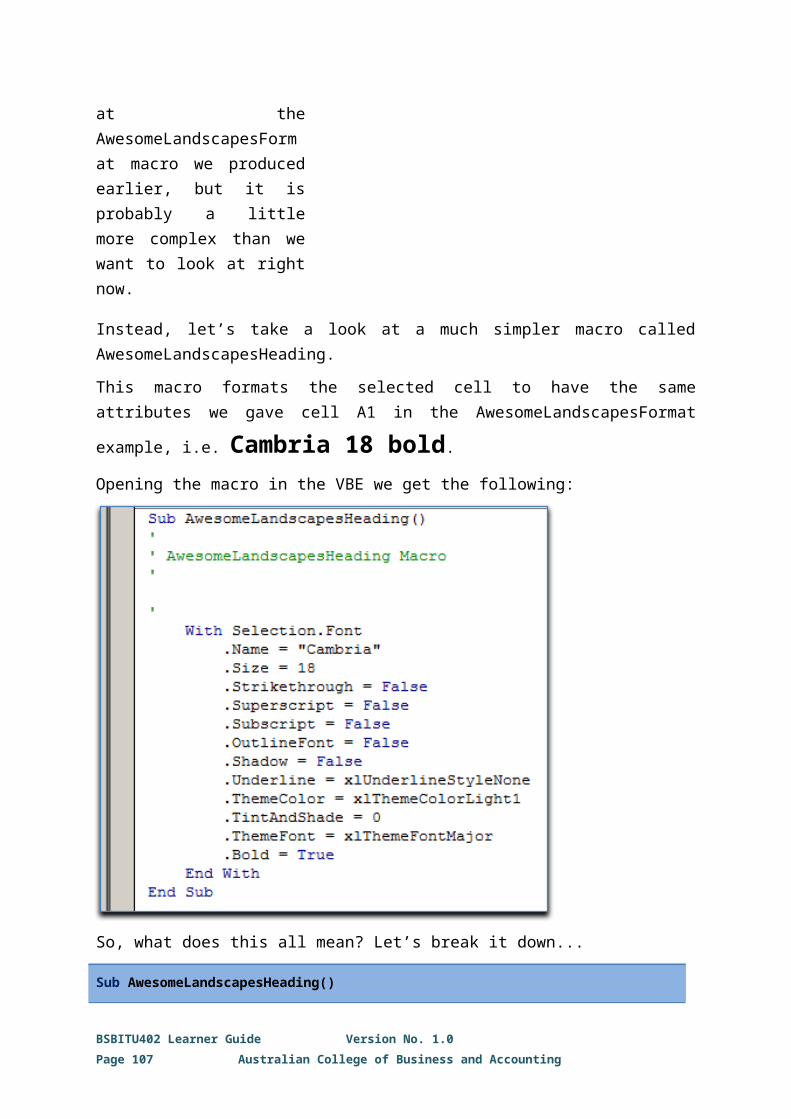
Identifying Invalid EntriesThe error alerts only notify you when invalid data is being entered; Excel does not automatically notify you of existing invalid data.
However, Excel’s data validation has an option that allows you to easily identify which cells currently have invalid data within them.
Simply go to the Data Validation drop-down menu and select “Circle Invalid Data”. This will highlight any cells with existing invalid data with a red circle.
Once you have identified the invalid data, you can either correct the invalid data, in which case the circle will disappear immediately, or you can select “Clear Validation Circles” to hide the circles again.
Data VerificationData verification is the process of checking that the data entered is accurate but does not check the validity of the data. Data verification primarily makes use of the following methods:
It is important to check both your data validity and accuracy to ensure the integrity of your data output.
BSBITU402 Learner Guide Version No. 1.0Page 107 Australian College of Business and Accounting
Where the data is entered twice and each record is compared to the other, if both entries are the same then it is assumed the entry is accurate.
Double entry
Where the data entered is checked against the data in the original document to identify errors.
Proof reading

4.2. Import and Export Data between Compatible Spreadsheets and Adjust Host Documents, in Accordance with Software and System Procedures
Importing and Exporting DataThe other means of entering data into your spreadsheet is through importing the data from another source.
Delimited Text DataBecause many different spreadsheet applications have different file formats, it is often useful to import and export data using simple text documents.
These documents contain what is called raw data with no formatting information. The data entries are separated by a specific character called a delimiter. Common delimiters include separating data entries by using a
Comma
Tab
Space
To import delimited text data, take the following steps:
1. Go to the “Get External Text” group on the Data tab on the Ribbon and select “From Text”.
BSBITU402 Learner Guide Version No. 1.0Page 108 Australian College of Business and Accounting
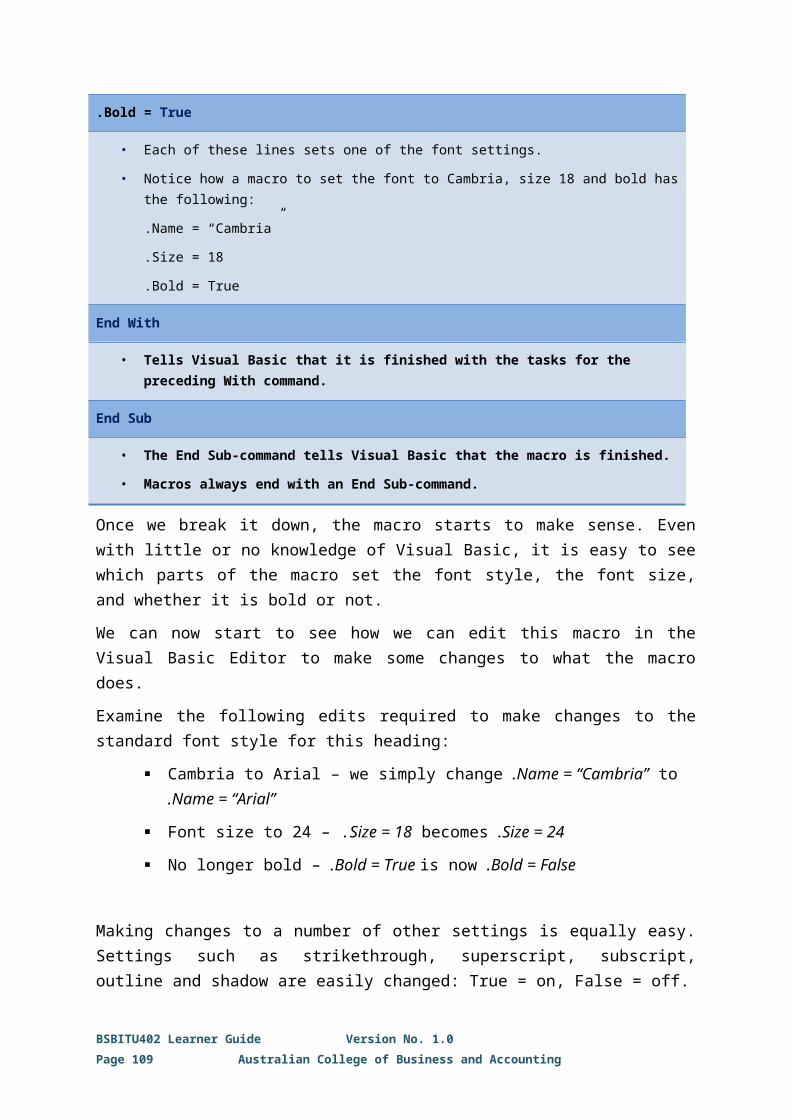
This will open the Import Text File browser.
2. Use the browser to locate and select the text file and click Import.
This will open the Text Import Wizard.
3. Select “Delimited” (this is the default selection).
4. Enter the row in the data file you wish to start importing the data from, i.e. what row in the file does the data start?)
In our example, the data starts in row 1.
In most instances, the File Origin drop-down can be left as the default.
6. Click “Next” to go to step 2 of the Text Import Wizard.
7. Select the checkbox for the type of delimiter character being used.
In most instances, the “Treat consecutive delimiters as one” checkbox and the “Text qualifier” drop-down can be left as the default.
BSBITU402 Learner Guide Version No. 1.0Page 109 Australian College of Business and Accounting

8. Click Next to go to step 3 of the Text Import Wizard.
9. Select appropriate data formats for each column in the file.
10. Click Finish.
11. The final step is to select where you wish to put the data you are importing into your workbook.
Select the appropriate worksheet, and starting cell then click OK.
Importing data from an external text file automatically links that data to the source file. Any changes to the data source will also be updated in the Excel worksheet.
If you do not specifically wish the data to remain linked to the source file, it is usually better to remove the link. Click on the “Connections” button in the Connections group on the Data tab on the Ribbon, select the appropriate data connection, and click “Remove”.
BSBITU402 Learner Guide Version No. 1.0Page 110 Australian College of Business and Accounting

Importing Data from Other SourcesYou can use much the same process to import data from sources other than delimited text files. Excel has the capacity to also import data from the following:
MS Access,
a webpage,
an SQL server, and
an XML file.
Exporting DataData can also be exported from spreadsheet applications using different file formats to allow you to work more effectively with stakeholders using different software applications.
When exporting spreadsheet data using different file formats, use “Save As” rather than the normal save feature in Excel, then select an appropriate file type using the drop-down menu, just like we did for saving as a template.
Useful file formats you can export to include the following:
.xls – for use in Excel 97-2003,
.txt – for tab-delimited text,
.CSV – for comma delimited text,
.prn – for space delimited text, and
.ods – for OpenDocument Spreadsheet (Open Office Calc).
Exporting to PDFIt is often useful to export data as a .pdf file, unfortunately, this is not one of the standard “Save As” options available in Excel. This means that additional software is required to enable you to export data as a .pdf using Excel.
One of the easiest ways to do this is to install a third-party application that emulates a printer, thus allowing you to print to a .pdf file.
Numerous third-party applications that will do this are available to download and use free of charge. Some examples include the following:
CutePDF Writer,
Free PDF Printer, andBSBITU402 Learner Guide Version No. 1.0Page 111 Australian College of Business and Accounting

PDFCreator.
BSBITU402 Learner Guide Version No. 1.0Page 112 Australian College of Business and Accounting

4.3. Use Manuals, User Documentation and Online Help to Overcome Problems with Spreadsheet Design and Production
User SupportThe scope of spreadsheet applications has become more and more complex over the years, and it is now accepted that even experts in an application cannot be expected just to know everything there is to know about the use of the application.
For this reason, it is important to become familiar with user documentation, manuals, and online help options for an application, in order to overcome the inevitable problems you will encounter when designing complex spreadsheets.
Fortunately, there are numerous resources readily available to support you through this process.
User DocumentationCommercial software packages like spreadsheet applications have user documentation (or manuals) that can assist you in becoming familiar with the features of that application.
User documentation usually covers the most common features and tools within an application and generally provides guidance on the syntax of their use.
This user documentation may be provided with the software package or may be available to download from the support page of the software company’s website.
Online HelpIt is also common for commercial software packages to have online help functions, which can be used to search for solutions for problems using keywords.
Microsoft Office Excel, for example, has an online help function that can be accessed by clicking on the icon or through hitting the F1 key.
BSBITU402 Learner Guide Version No. 1.0Page 113 Australian College of Business and Accounting
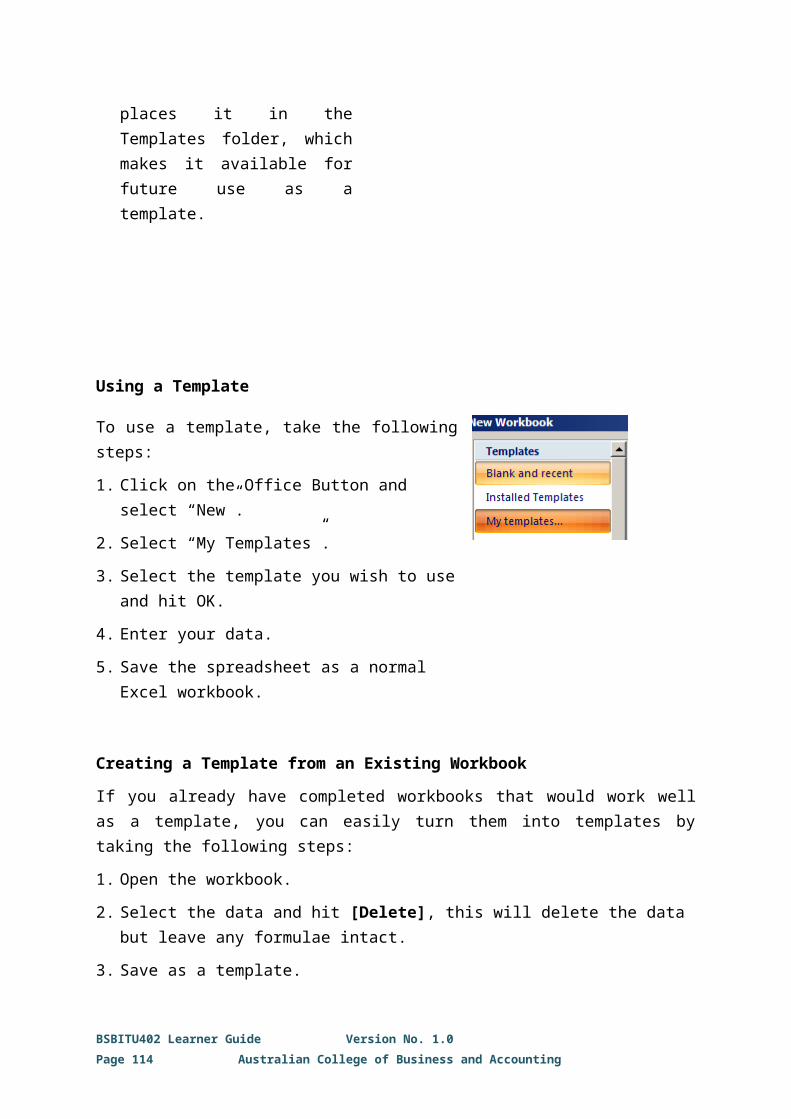
Activity 9:
In section three, we listed a number of different statistical functions (including the COUNT and COUNTA functions) but did not cover all of the statistical functions available in Excel.
Use the online help function to examine the COUNTIF function and work through the examples the online help provides.
a) How valuable was this to you?
b) Do you believe you are now able to use COUNTIF effectively in a spreadsheet as a result of using this help function?
c) Can you think of an example where the COUNTIF function might be useful to you in a spreadsheet?
a)
b)
BSBITU402 Learner Guide Version No. 1.0Page 114 Australian College of Business and Accounting

c)
To view the answers to this activity, click here.
Third-Party ResourcesThird-party resources have long been available to support users of software, and, with the advent of the Internet, these resources are more readily available than ever before.
These resources can range from commercially available training courses and user guides to online forums and how-to videos posted by users, which visually walk you through a process step by step.
BSBITU402 Learner Guide Version No. 1.0Page 115 Australian College of Business and Accounting

Activity 10:
In activity 9, you used the online help function of Excel to learn about the COUNTIF function.
Not everybody finds the online help easy and effective to use. Particular types of help are more effective for some people than others.
In this activity, you will use online third-party resources to learn about the COUNTIF function and compare how effective different support styles are for you.
a) Type COUNTIF into a search engine and see what you find.
b) Try looking at different results, forum responses, videos, step by step examples, etc.
c) How valuable were the different types of results for you?
d) What type of support was most effective for you?
BSBITU402 Learner Guide Version No. 1.0Page 116 Australian College of Business and Accounting

a)
b)
c)
d)
To view the answers to this activity, click here.
4.4. Preview, Adjust, and Print Spreadsheet in Accordance with Organisational and Task Requirements
BSBITU402 Learner Guide Version No. 1.0Page 117 Australian College of Business and Accounting

PrintingIt is often valuable to print out hard copies of your spreadsheets, however, when printing, it is important to ensure that the printout displays the data effectively and readable.
Page setup
The Page Setup group on the Page Layout tab of the Ribbon has numerous tools to help you layout your page effectively and readable.
Some of these options can be adjusted using the Page Setup dialogue box, others cannot.
Let’s look at the page setup options available:
Page Setup Dialogue BoxThe Page Setup dialogue box has four (4) tabs:
Page
Margin
Header/Footer
Sheet
BSBITU402 Learner Guide Version No. 1.0Page 118 Australian College of Business and Accounting

Page TabThe Page tab allows you to set the following:
Page orientation
Scaling
Paper size
Print quality
Which page to start printing from
Margins TabThe Margins tab allows you to set and adjust the margins for your worksheets. You have the option of selecting one of three standard margin settings or setting custom margins. This is done on the Margins tab of the Page Setup dialogue box.
When setting custom margins, you can set the following margin options:
Header margin
Top margin
Bottom margin
Left margin
Right Margin
Footer margin
Centre vertically on the page
Centre horizontally on the page
BSBITU402 Learner Guide Version No. 1.0Page 119 Australian College of Business and Accounting
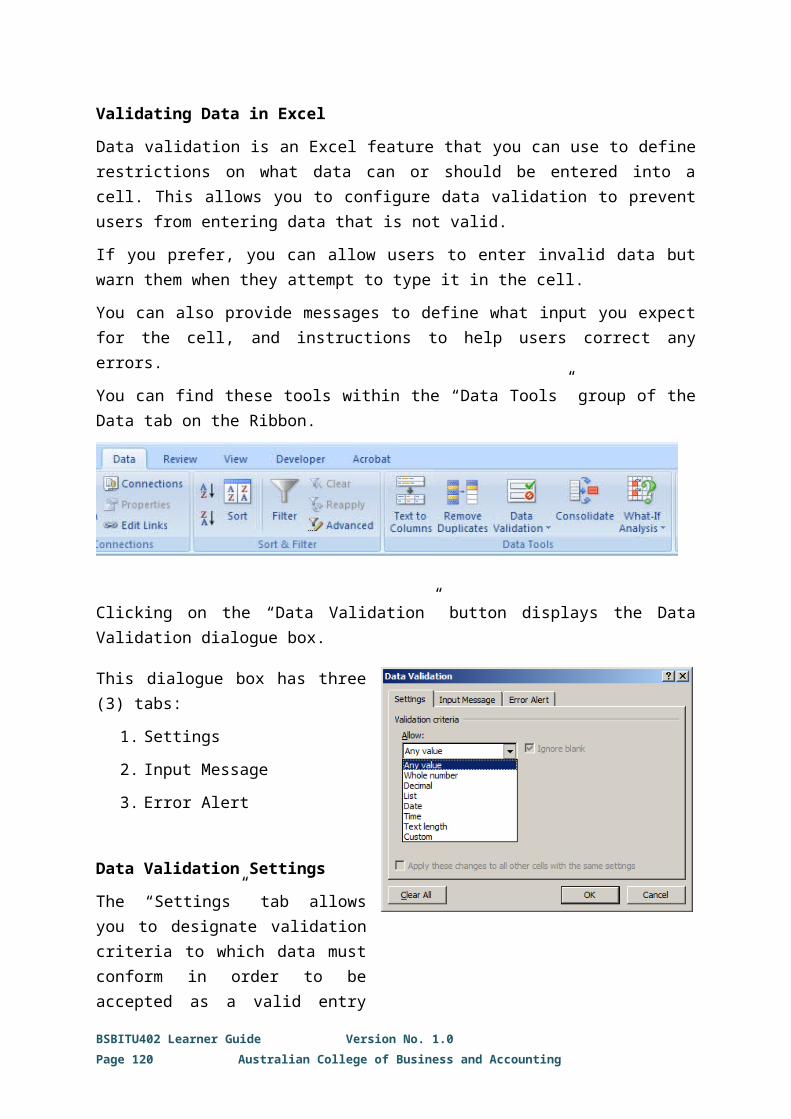
Header/Footer TabThe Header/Footer tab allows you to set and adjust the Headers and Footers for your worksheets.
You also have the option of a different header or footers depending on whether it is an odd or even page.
You can further set your header/footer to scale with the document size and/or choose to align with the page margins or not.
BreaksBreaks allow you to insert and remove page breaks, giving you control over what parts of your spreadsheet print on what pages.
BackgroundAllows you to set an image to display as the background of the worksheet.
BSBITU402 Learner Guide Version No. 1.0Page 120 Australian College of Business and Accounting
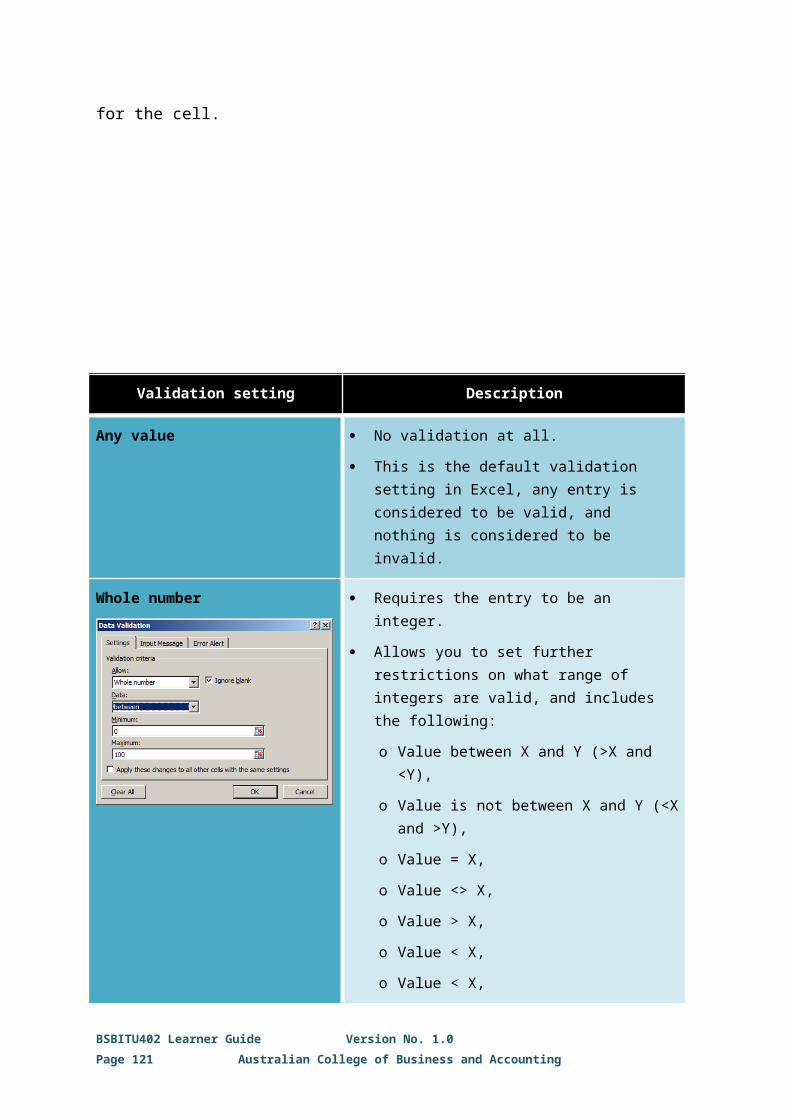
Sheet TabThis tab allows you to set the following:
Print AreaAllows you to set or clear the print area, i.e. the area on the worksheet you wish to print.
Simply select the cells you wish printed.
Print Titles
Allows you to specify rows and columns of the worksheet to be repeated on each printed page.
Print PreviewBefore printing, it is important to review what the printed pages will look like, this can be done using the Print Preview feature.
Activating the Print Preview feature can be done from a number of different places in Excel; there is a Print Preview button on each tab of the Page Setup dialogue box, you can also select it from the Office Button menu – Office > Print > Print Preview.
One of the most useful ways to select Print Preview, however, is to set it up as a custom button on your Quick Access Toolbar by taking the following steps:
BSBITU402 Learner Guide Version No. 1.0Page 121 Australian College of Business and Accounting

1. Click the Office Button and then click the Excel Options button.
2. Click the Customise tab.
3. Click Popular Commands in the Choose Commands From drop-down list box.
4. Scroll down to select Print Preview and click the Add button.
5. Click OK to add the icon to your Quick Access Toolbar.
Page Break PreviewThe Page Break Preview feature is extremely useful for viewing where the page breaks are in your worksheets. You can access this feature by clicking on the “Page Break Preview” button in the Workbook Views group on the View tab of your Ribbon.
Using the Page Break Preview allows you to see easily, and quickly adjust, your page breaks by clicking and dragging.
BSBITU402 Learner Guide Version No. 1.0Page 122 Australian College of Business and Accounting

4.5. Name and Store Spreadsheet in Accordance with Organisational Requirements and Exit the Application Without Data Loss or Damage
SavingWhen saving a file, you can save it to a folder on your hard disk drive, a network location, disk, DVD, CD, the desktop, flash drive, or another storage location.
You must identify the target location in the “Save in” list, otherwise, the saving process is the same, regardless of what location you choose.
It is important that when you name your files and save them, you do so using naming conventions and storage locations consistent with your organisation’s policies and procedures.
In order to avoid losing data due to an unexpected power failure or a software crash, it is important to save your work periodically. Most commercial spreadsheet applications have an Autosave feature do this automatically.
If you do experience an unexpected system failure, you can simply load the most recent saved version, or use the auto recovery feature of your spreadsheet application.
BSBITU402 Learner Guide Version No. 1.0Page 123 Australian College of Business and Accounting

CHAPTER 5. REPRESENT NUMERICAL DATA IN GRAPHIC FORM
5.1. Determine Style of Graph to Meet Specified Requirements and Manipulate Spreadsheet Data if Necessary to Suit Graph Requirements
Charts and GraphsOne of the most valuable features of spreadsheet applications is their ability to quickly and effectively produce charts which graphically represent the data to allow data analysis at a glance.
Different types of charts represent the data in different ways, and some can be more effective than others for specific purposes.
In general, the people who will be analysing the data will know which types of charts are most effective for the presentation of the data for their purposes.
If the type of chart is not specified and you are uncertain of how to present a particular set of data, you should simply ask which type of chart to produce.
Some types of charts may require data to be in a particular form before it can be applied to the chart. This information is available in the support documentation for your application.
The different types of graphs/charts which can be produced include the following:
ColumnUseful for showing data changes over a period of time or for illustrating comparisons among items.
BSBITU402 Learner Guide Version No. 1.0Page 124 Australian College of Business and Accounting

LineUseful for showing the relationship between two values.
Ideal for showing trends in data at equal intervals.
PieData that is arranged in a single column or row on a worksheet can be plotted in a pie chart.
Useful for showing the percentage relationship of components which add together to make a whole.
BarUseful for illustrating comparisons among individual items.
Use when:
the axis labels are long, and
the values that are shown are durations.
AreaUseful for emphasising the magnitude of change over time, and for drawing attention to the total value across a trend.
BSBITU402 Learner Guide Version No. 1.0Page 125 Australian College of Business and Accounting

ScatterUseful for showing the relationships among the numeric values in several data series, or for plotting two groups of numbers as one series of xy coordinates.
StockUseful for illustrating the frequent fluctuation of data over time.
Often used for stock prices and scientific data, such as fluctuation of daily or annual temperatures.
You must organise your data in the correct order to create stock charts.
SurfaceUseful when you want to find optimum combinations between two sets of data.
As in a topographic map, colours and patterns indicate areas that are in the same range of values.
You can use a surface chart when both categories and data series are numeric values.
BSBITU402 Learner Guide Version No. 1.0Page 126 Australian College of Business and Accounting

DoughnutData that is arranged in columns or rows only on a worksheet can be plotted in a doughnut chart.
Like a pie chart, a doughnut chart is useful for showing the relationship of parts to a whole, but it can contain more than one data series.
BubbleData that is arranged in columns on a worksheet so that x values are listed in the first column, and corresponding y values and bubble size values are listed in adjacent columns can be plotted in a bubble chart.
RadarData that is arranged in columns or rows on a worksheet can be plotted in a radar chart. Radar charts compare the aggregate values of several data series.
(Source: Microsoft Excel Help)
BSBITU402 Learner Guide Version No. 1.0Page 127 Australian College of Business and Accounting

5.2. Create Graphs with Labels and Titles from Numerical Data Contained in a Spreadsheet File
Creating Charts and GraphsCreating charts and graphs in Excel is easy and the process is much the same, regardless of the type of chart, however, you may need to organise your data in specific ways for some charts (e.g. stock charts).
In general, the process to create a chart is as follows:
BSBITU402 Learner Guide Version No. 1.0Page 128 Australian College of Business and Accounting

BSBITU402 Learner Guide Version No. 1.0Page 129 Australian College of Business and Accounting
Insert chart
Click the "Insert" tab on the our Ribbon.
In the Charts group, select the type of chart which will best display the data for the required purpose.
Add Data
Select the required data range and insert it into the chart.
Remember, some chart types will require the data to be organised in specific ways.
Format chart
Format the chart layout to best display the data for the required purpose.
Add any additional information to the chart such as axis labels, a legend, data labels, trend lines, etc.
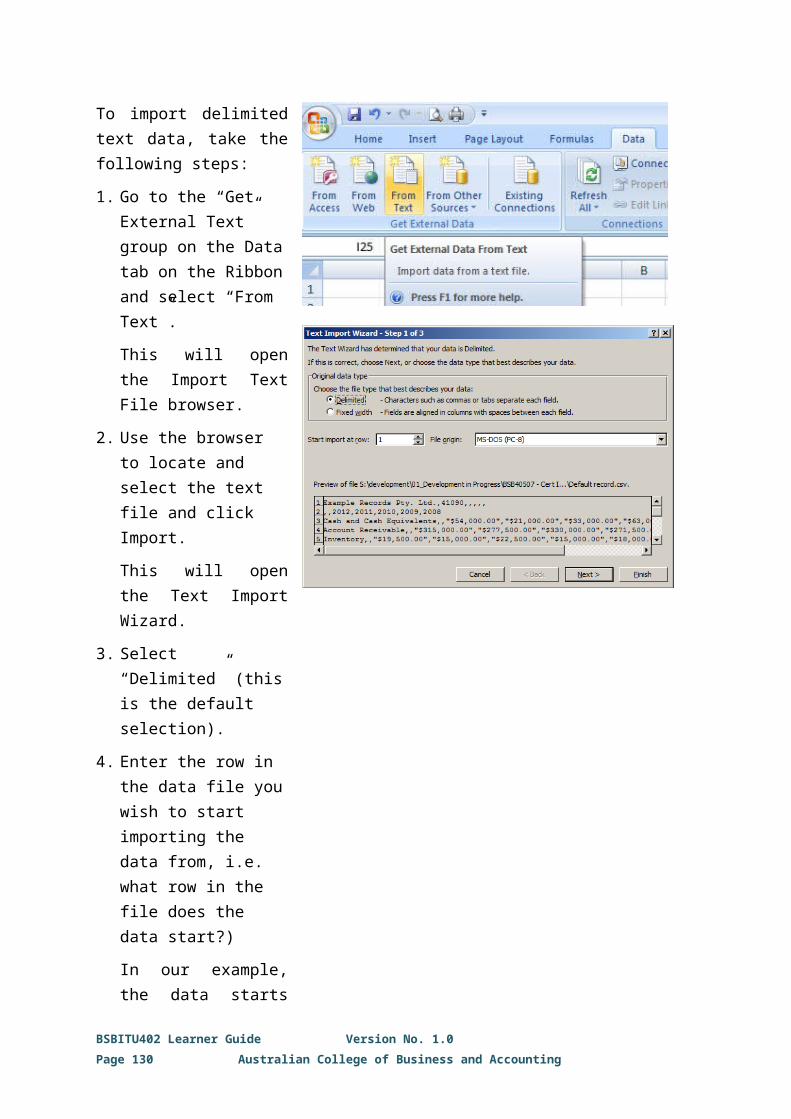
ExampleWe will create a column chart from the following sales data for Awesome Landscapes.
1. Go to the Insert tab on the Ribbon.
2. Click on the “Column” button in the Charts group and select the “2-D Clustered Column” chart.
This brings up an empty chart along with the Design tab of Chart Tools on the Ribbon.
These tools help you to format your charts.
3. Click on “Select Data” on the Ribbon, select the range “A4:D16” and click OK.
Note how the range is linked as =Sheet1!$A$4:$D$16.
BSBITU402 Learner Guide Version No. 1.0Page 130 Australian College of Business and Accounting
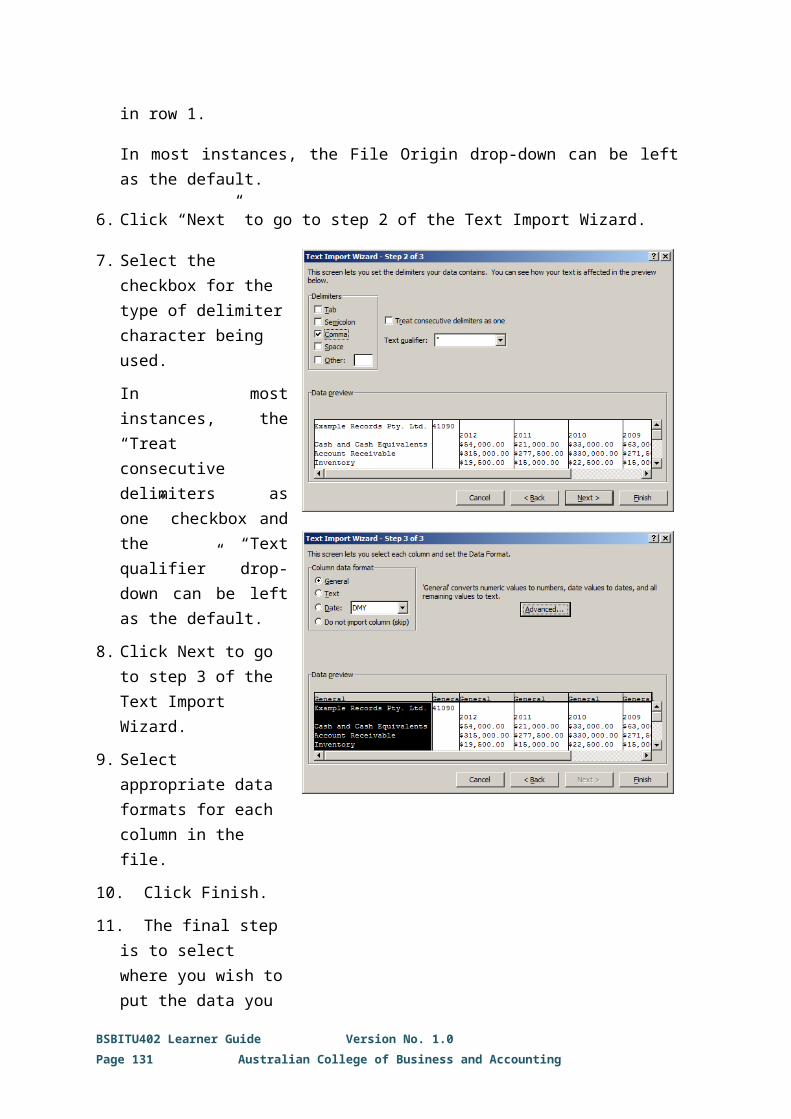
Design TabUsing the Design tab of Chart tools, you have the option to:
Change the type of chart
Save as a template
Switch row/column data – by default Excel shows row data across the X-axis and column data along the Y-axis
Select from the standardised chart layouts and styles
Move the chart
Layout TabThe Layout tab gives you further options regarding the layout of your charts.
You can:
Insert pictures, shapes, and text boxes
Add chart titles, axis titles, a legend, data labels, and data tables
Format axes and gridlines
Format the chart background
Add analysis tools such as trend lines
Format TabThe format tab allows you to further customise your charts. You can adjust
Shape styles, colours, and effects
BSBITU402 Learner Guide Version No. 1.0Page 131 Australian College of Business and Accounting

WordArt
Arrangement
Scaling
Using the Chart Tools, we can make the following changes to our chart:
4. Select default Layout 3.
5. Add a chart title above the chart.
6. Format Chart Area – Gradient fill, Preset Colours Moss, Linear Diagonal 45.
And we have created a chart in 6 easy steps in under a minute.
Creating a Pie ChartSimilarly, we can quickly create a pie chart displaying the breakdown of sales figures between the three products by taking the following steps:
1. Insert 2-D Pie chart.
2. Select data =Sheet1!$A$17:$D$17.
3. Edit Axis Labels =Sheet1!$B$4:$D$4.
4. Select Layout 2.
5. Move Legend to the right.
6. Add Title.
7. Format the area fill.
BSBITU402 Learner Guide Version No. 1.0Page 132 Australian College of Business and Accounting
Pivot TablesPivot tables are another way to quickly and easily summarise large amounts of data.
We can create a pivot table from the data below by taking the following steps:
1. Go to the “Insert” tab on the Ribbon and click on “Pivot Table”.
2. Select the range of data - in this case, we’re selecting A2:E20.
3. Select where you want the Pivot Table to go in your workbook.
This will open the Pivot Table task pane.
We create the Pivot Table by placing fields of data into the Column Labels, Row Labels, and Sum Data sections.
BSBITU402 Learner Guide Version No. 1.0Page 133 Australian College of Business and Accounting
4. The sections in which you add fields determines the layout of the pivot table. Selecting Product then Month places these into the Row Labels section.
5. Selecting Orders places it into the Sum Values section.
This produces the following pivot table:
We can now start to manipulate the fields to better suit our purpose.
If we drag the Month field up to the Column Labels section of the pivot table task pane, we get the following table, which summarises the number of orders placed for each product in each month:
Similarly, we can create a pivot table which summarises the number of sales made by each salesperson per month, simply by changing the fields around.
BSBITU402 Learner Guide Version No. 1.0Page 134 Australian College of Business and Accounting

Or show sales by product simply by replacing the Month field with the Product field.
Or view the number of orders each salesperson received for each product.
BSBITU402 Learner Guide Version No. 1.0Page 135 Australian College of Business and Accounting

We can even view the sales for each salesperson by product per month.
BSBITU402 Learner Guide Version No. 1.0Page 136 Australian College of Business and Accounting

As you can see, pivot tables can be a very valuable tool.
5.3. Save, View and Print Graph within Designated Time Lines
Saving Viewing and Printing Charts and GraphsThe process of saving, viewing, and printing charts and graphs are, for the most part, similar to saving, viewing, or printing any other part of a spreadsheet.
Charts and graphs are generally produced in a spreadsheet application as an object that can be interacted with. You can, for example, select a chart and copy/paste it into another document as easily as you could with a word or an image.
Multiple charts can be selected at the same time and manipulated together as a group.
BSBITU402 Learner Guide Version No. 1.0Page 137 Australian College of Business and Accounting
Pivot tables are designed for:Querying large amounts of data in many user-friendly ways.Subtotaling and aggregating numeric data, summarising data by categories and subcategories, and creating custom calculations and formulas.Expanding and collapsing levels of data to focus your results, and drilling down to details from the summary data for areas of interest.Moving rows to columns or columns to rows (or "pivoting") to see different summaries of the source data. Filtering, sorting, grouping, and conditionally formatting the most useful and interesting subset of data to enable you to focus on the information that you want.Presenting concise, attractive, and annotated online or printed reports.
ANSWERS TO ACTIVITIESActivity 1:
Consider the workspace you are currently using while studying this unit of competency:
a) Are the layout and your use of that workspace currently in line with the information presented in this section?
b) What changes could you make in order to better organise your workspace in line with the ergonomic requirements outlined above?
Answers to Activity 1: a) Yes, it is. The parameters of my workplace are in accordance with
the information presented in this section. They conform to the ergonomics requirements.
b) b.1 A plant or two in the office could improve employee productivity and happiness.
b.2 Fix temperature issues.
b.3 Playing soothing background music might contribute to better performance.
Activity 2:
Familiarise yourself with the functions available in Excel either by perusing the list of functions in the Excel Help pages or by perusing the functions in the “Function Library” in the Formulas tab of the Excel Ribbon.
BSBITU402 Learner Guide Version No. 1.0Page 138 Australian College of Business and Accounting
Answers to Activity 2:

Read the descriptions and skim through the examples provided.
BSBITU402 Learner Guide Version No. 1.0Page 140 Australian College of Business and Accounting
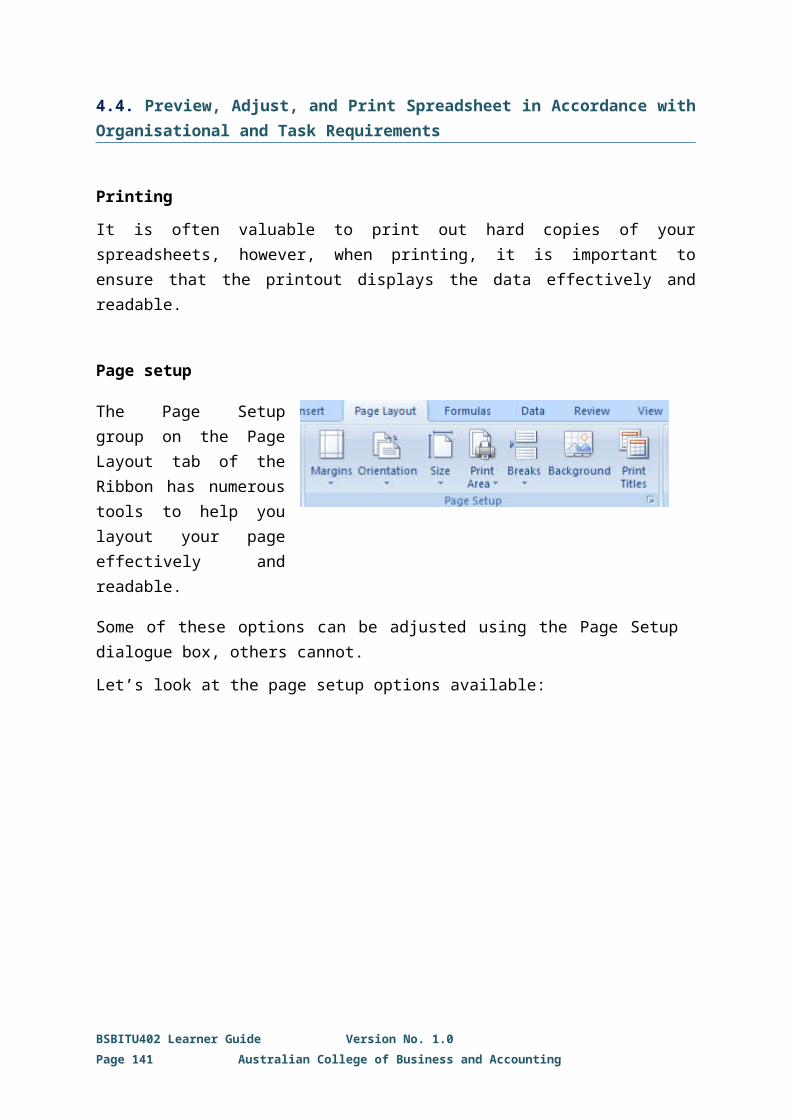
Activity 3:
Go to the Bureau of Meteorology website and locate the weather observations for your local area.
a) Using that data, create a spreadsheet showing the temperature and apparent temperature for the previous five (5) hours.
b) Create another column that uses a formula to calculate the difference between the temperature and the apparent temperature.
c) Use functions to calculate the average for the temperature and apparent temperature over the 5-hour period.
d) Use functions to determine the maximums and minimums for temperature and apparent temperature over the 5 hours.
Answers to Activity 3:

Activity 4:
a) Open Excel and enter the date 1st January 2013 into a cell. Now open the “Format Cells” dialogue box by right-clicking on the cell and selecting the Format Cells option from the dropdown menu.
b) Select the Date format. In the right-hand side of the dialogue box, you will see a “Type:” window where you can choose from a number of different date display styles.
c) Try selecting different Date format types and you will see the example in the sample window change to display the Date type you have selected.
d) When you have finished, change the number category to various other categories listed.
e) What did you notice?
Answers to Activity 4:
BSBITU402 Learner Guide Version No. 1.0Page 142 Australian College of Business and Accounting

The data typed into the cell conforms to the format selected in the dialogue box. For both instances, Excel records the data for all dates as a date serial number but sets it up according to the format chosen.
BSBITU402 Learner Guide Version No. 1.0Page 143 Australian College of Business and Accounting

Activity 5:
Open Excel and enter the following data:
Now try the following exercises:
a) Enter the following formula into B2 = A2*B1.
Copy the formula from B2 to all of the other cells and consider the resulting values.
b) Change the formula in B2 = $A2*B$1.
Copy the formula from B2 to all of the other cells and consider the resulting values.
c) Change the formula in B2 = $A$2*$B$1.
Copy the formula from B2 to all of the other cells and consider the resulting values.
d) What did you notice?
BSBITU402 Learner Guide Version No. 1.0Page 144 Australian College of Business and Accounting

Answers to Activity 5:
The figures in the cells varied according to the formulas entered. A simple supplement of the $ greatly affects the specific formula and the figures and makes the inputting of information a lot easier.
BSBITU402 Learner Guide Version No. 1.0Page 145 Australian College of Business and Accounting

Activity 6:
Imagine that your workplace uses Excel to track accounts receivable. Every week you and your co-workers each submit a report in which your manager expects to see overdue amounts formatted in the following way:
a) The numbers are bold and red, and
b) the cells have red borders.
Record a macro to apply these formats to a cell.
Answers to Activity 6:
BSBITU402 Learner Guide Version No. 1.0Page 146 Australian College of Business and Accounting

BSBITU402 Learner Guide Version No. 1.0Page 147 Australian College of Business and Accounting
Activity 7:
One common task people need to do in Excel is to print out a specific section of a workbook. While this is straightforward, there are still a few steps you need to remember to complete the task:
1. Select the section of the workbook you want to print.
2. Click on the Office button.
3. Click on Print.
4. Click on the Selection button.
5. Click OK.
Consider how useful it would be to have a button on your Quick Access Toolbar to do this for you in just 2 steps:
1. Select the section of the workbook you want to print.
2. Click on Print Selection button.
Use what you have learned so far to:
a) Create a macro called Print Selection that does this for you.
b) Place that macro on your Quick Access Toolbar.
c) Change the icon for the macro to .
BSBITU402 Learner Guide Version No. 1.0Page 148 Australian College of Business and Accounting
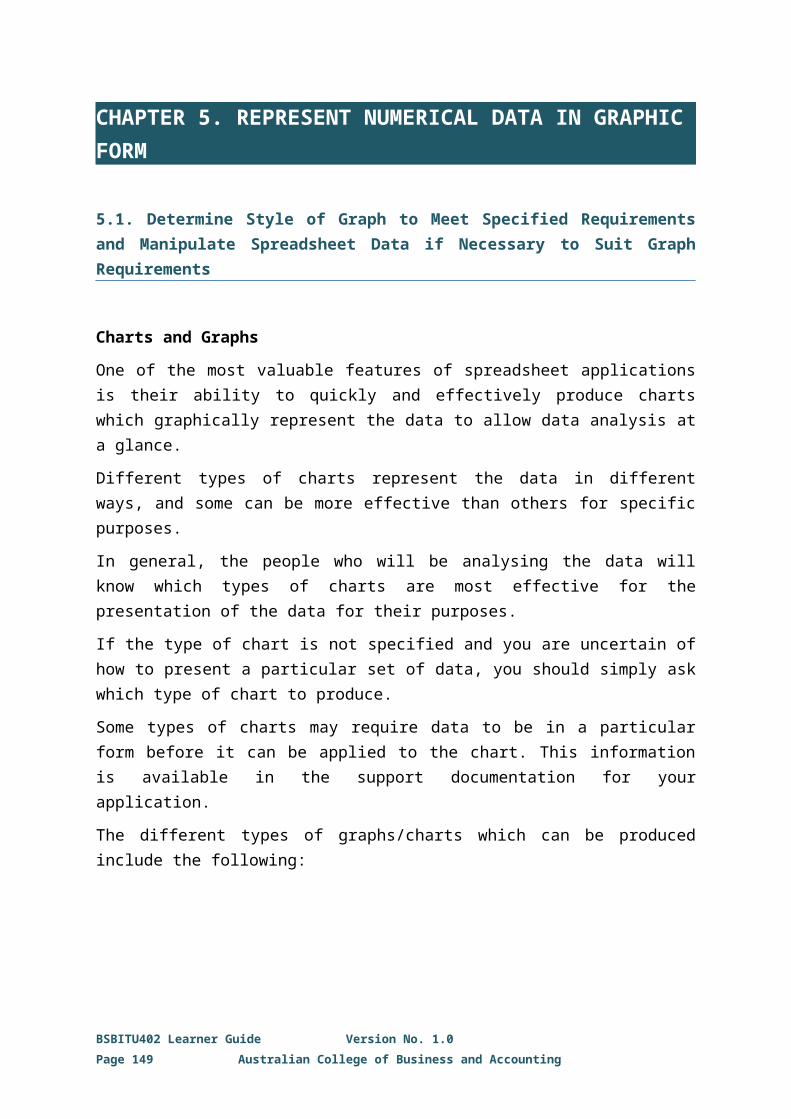
Answers to Activity 7:
BSBITU402 Learner Guide Version No. 1.0Page 149 Australian College of Business and Accounting

Activity 8:
Open a new workbook and record a macro to set the header and footer to the following:
a) Set the Left Header to show your name.
b) Set the Centre Header to &[File] (automatically links to the Workbook Name).
c) Set the Right Header to &[Tab] (automatically links to the Worksheet Name).
d) Set the Centre Footer to Page &[Page] of &[Pages] (automatically shows current page number of total number of page #).
Now open the macro in the VBE. What changes do you think you could easily make this macro?
BSBITU402 Learner Guide Version No. 1.0Page 150 Australian College of Business and Accounting
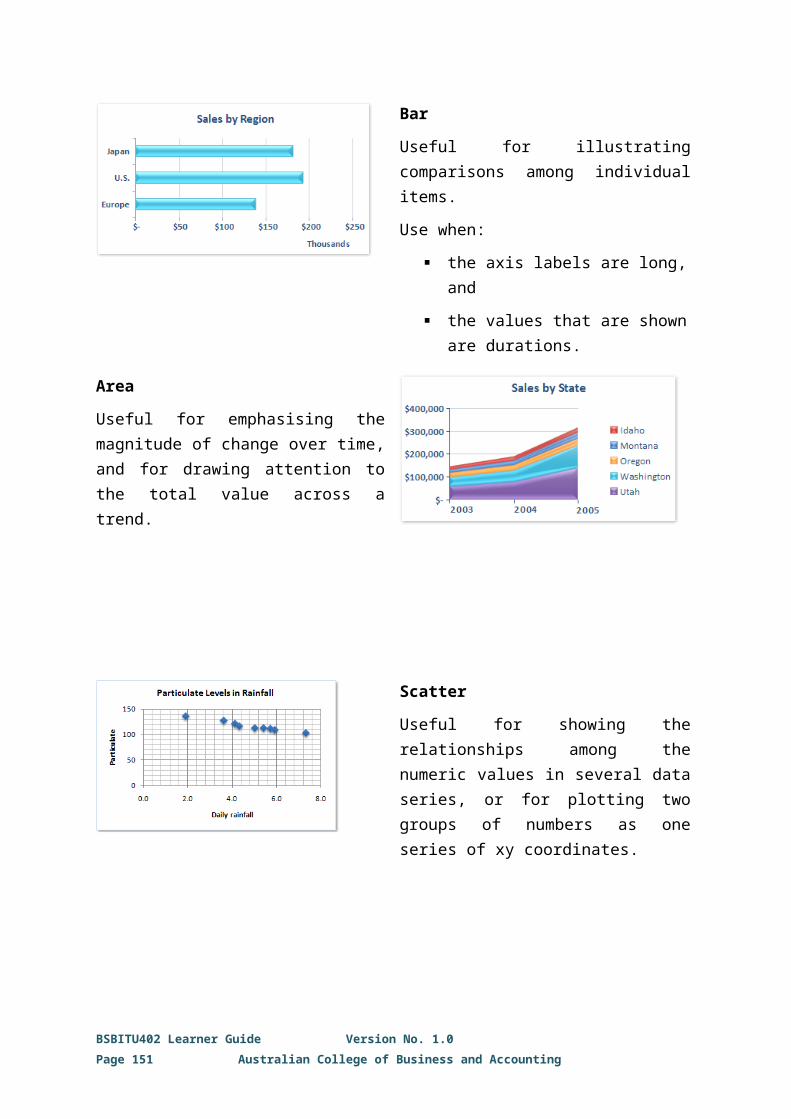
Answers to Activity 8:
BSBITU402 Learner Guide Version No. 1.0Page 151 Australian College of Business and Accounting

Changes in the header and footer settings will be easier because one does not need to make the revisions per page any longer.
BSBITU402 Learner Guide Version No. 1.0Page 152 Australian College of Business and Accounting

Activity 9:
In section three, we listed a number of different statistical functions (including the COUNT and COUNTA functions) but did not cover all of the statistical functions available in Excel.
Use the online help function to examine the COUNTIF function and work through the examples the online help provides.
a) How valuable was this to you?
b) Do you believe you are now able to use COUNTIF effectively in a spreadsheet as a result of using this help function?
c) Can you think of an example where the COUNTIF function might be useful to you in a spreadsheet?
Answers to Activity 9:
a. Very valuable. It shows a detailed description of the function.
b. Yes.
c. You want to count the number of cells that meet a certain criterion. For example, to count the number of times a particular city appears in a customer list.
BSBITU402 Learner Guide Version No. 1.0Page 153 Australian College of Business and Accounting
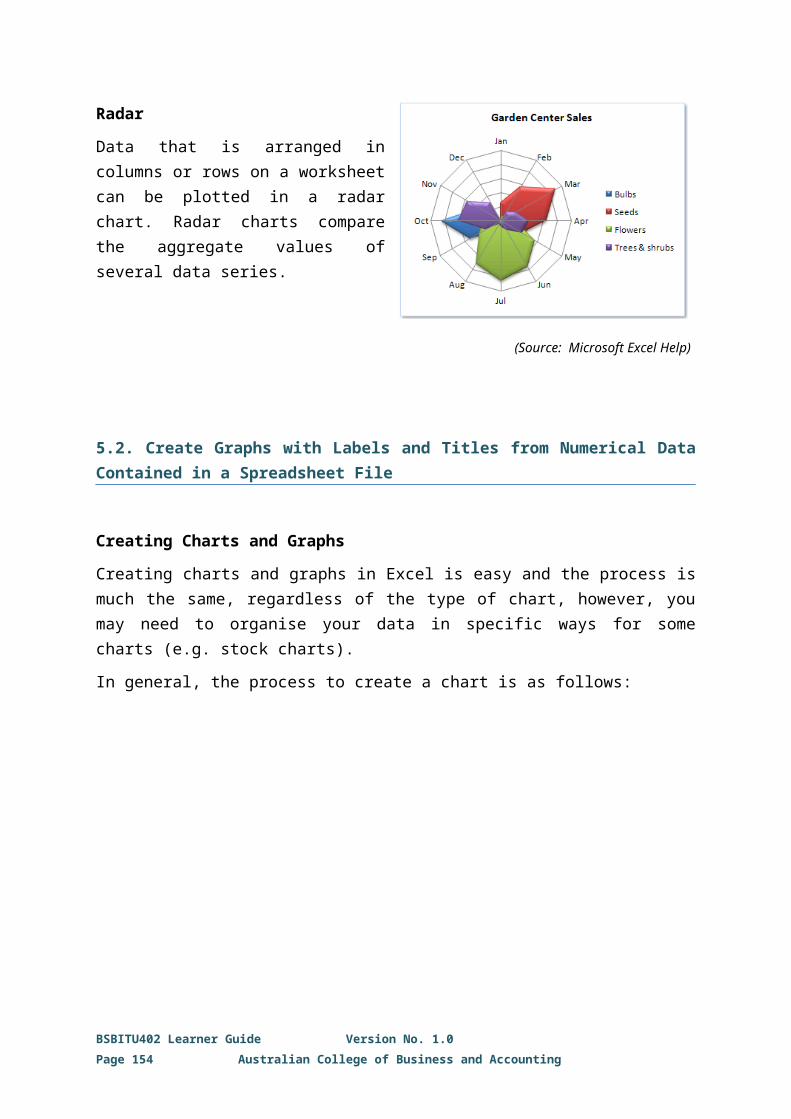
Activity 10:
In activity 9, you used the online help function of Excel to learn about the COUNTIF function.
Not everybody finds the online help as easy and effective to use. Particular types of help are more effective for some people than others.
In this activity, you will use online third-party resources to learn about the COUNTIF function and compare how effective different support styles are for you.
a) Type COUNTIF into a search engine and see what you find.
b) Try looking at different results, forum responses, videos, step-by-step examples, etc.
c) How valuable were the different types of results for you?
d) What type of support was most effective for you?
BSBITU402 Learner Guide Version No. 1.0Page 154 Australian College of Business and Accounting

Answers to Activity 10:
Most are valuable because they cover the COUNTIF function, however, the most relevant and most effective is that supplied by Microsoft Office support.
End of Document
BSBITU402 Learner Guide Version No. 1.0Page 155 Australian College of Business and Accounting