chapter 1. introduction - data mining and reporting -...
TRANSCRIPT

This is a sample copy of the book “KNIME Beginner’s Luck” 12
Chapter 1. Introduction
1.1. Purpose and structure of this book
We live in the age of data! Traditionally every purchase we make is dutifully recorded; every money transaction is carefully registered; every web click
ends up in a web click archive. Nowadays everything around us carries an RFID chip and can record data. We have data available like never before.
What can we do with all this data? Can we make some sense out of it? Can we use it to learn something useful and profitable? We need a tool, a
surgical knife that can empower us to cut deeper and deeper into our data, to look at it from many different perspectives, to represent its underlying
structure.
Let’s suppose then that we have this huge amount of data already available, waiting to be dissected. What are the options for a professional to enter
the world of Business Intelligence (BI) and data analysis? The options available are of course multiple and growing rapidly. If our professional does not
control an excessive budget he could turn to the world of open source software. Open source software, however, is more than a money driven choice.
In many cases it represents a software philosophy for resource sharing that many professionals would like to support.
Inside the open source software world we can find a few data analysis and BI tools. KNIME software represents an easy choice for the non-initiated
professional. It does not require learning a specific script and it offers a graphical way to implement and document analysis procedures. In addition -
and this is not a secondary advantage - KNIME can work as an integration platform into which many other BI and data analysis tools can be plugged. It
is then possible to analyze data with KNIME and to build dashboards on the same processed data with a different BI tool.
Even though KNIME is very simple and intuitive to use, any beginner would profit from an accelerated orientation through all of KNIME’s nodes,
categories, and settings. This book represents the beginner’s luck, because it is aimed to help any beginner to gear up his/her learning process. This
book is not meant to be an exhaustive guide to the whole KNIME software. It does not cover implementations under the KNIME Server, which is not
open source, or topics which are considered advanced. Flow Variables, for example, and implementations of database SQL queries are not discussed
here.
The book is divided into six chapters. The first chapter covers the basic concepts of KNIME, while chapter two takes the reader by the hand into the
implementation of a very first analysis procedure. In the third chapter we investigate data analysis in a more in depth manner. The third chapter
indeed explains how to perform some data visualization, in terms of the nodes and processing flow. Chapter four is dedicated to data modeling. It
covers a few demonstrative approaches to data modeling, from naïve Bayesian networks to decision trees and artificial neural networks. Finally,

This is a sample copy of the book “KNIME Beginner’s Luck” 13
chapters five and six are dedicated to reporting. Usually the results of an investigation based on data visualization or, in a later phase, on data
modeling have to be shown at some point to colleagues, management, directors, customers, or external workers. Reporting represents a very
important phase at the end of the data analysis process. Chapter five shows how to prepare the data for export into a report while chapter six shows
how to build the report itself.
Each chapter guides the reader through a data manipulation or a data analysis process step by step. Each step is explained in details and offers some
explanations about alternative employments of the current nodes. At the end of each chapter a number of exercises are proposed to the reader to
test and perfect what he/she has learned so far.
Examples and exercises in this book have been implemented using KNIME 2.2.0. They should also work under subsequent KNIME versions, although
there might be slight differences in their appearance. Updates and further discussions about the contents of this book can be found at the “KNIME
Beginner’s Luck” web site http://dataminingreporting.weebly.com/knimebeginnersluck.
1.2. The KNIME community
Web Links
http://www.knime.org
This is the first place to look for information about KNIME products. The open source Desktop version can be downloaded from here.
http://tech.knime.org/forum
In the www.knime.org site you can find a number of resources. What I find particularly useful is the KNIME Forum. Here you can ask questions about how to use KNIME or about how to extend KNIME with new nodes. Someone from the KNIME staff will always answer.
http://tech.knime.org/knime-labs
This site contains nodes still under development; i.e. the beta version of new nodes. You can already download them and use them, but they are not of product/release quality yet.
http://nodes4knime.wiki.sourceforge.net/ http://differentize.com/Jymol.aspx
Like for a lot of other open source software, extensions can be found under sourceforge.net as well as a few more web sites.
http://knime.org/supporters-0 This is the site where all contributing supporters (partners, providers, and sponsors) are listed.

This is a sample copy of the book “KNIME Beginner’s Luck” 14
Courses
KNIME User Training
KNIME periodically offers User Training Courses. To check for the next available date and to register, just go to the KNIME Events web site http://knime.org/about/events
KNIME Reporting Training KNIME also offers a course on its reporting suite on a monthly basis. You can find more information about this course on the KNIME Events web site (http://knime.org/about/events) or on the author’s web site (http://dataminingreporting.weebly.com/dmr-courses.html)
KNIME Meetings and Workshops Meetings and workshops are held from time to time all over the world. It is a good chance to present your work with KNIME and to get to know other people from the KNIME Community (http://knime.org/about/events)
Books
KNIME Platform At the moment I do not know of any book about the KNIME platform besides the one that you are currently reading.
Reporting Suite The KNIME Reporting Suite is based on BIRT, another open source tool for reporting. Here is a basic guide on how to use BIRT: D. Peh, N. Hague, J. Tatchell, “BIRT. A field Guide to Reporting.”, Addison-Wesley, 2008
Data Analysis and KNIME This book shows how to apply KNIME to the most common problems in data analysis and data mining: Berthold M.R., Borgelt C., Höppner F., Klawonn F.,“Guide to intelligent data analysis”, Springer 2010.
1.3. Download and install the KNIME Desktop version
To start playing with KNIME, first, you need to download it to your computer.

This is a sample copy of the book “KNIME Beginner’s Luck” 15
There are two available versions of KNIME:
- the open source Desktop KNIME tool, which can be downloaded free of charge at www.knime.org under the GPL version 3 license
- the Enterprise KNIME server, which can be purchased at http://knime.org/enterprise-server
The functionalities of the two versions are very similar. The Enterprise version includes a few more centralized operations that better fit a large
enterprise environment. In this book we work with KNIME Desktop (open source) version 2.2.
Download KNIME Desktop
- Go to www.knime.org
- Select the “Download” tab
- Select “KNIME Desktop” in the submenu
- Select one of the two options (with registration or
without registration, as you prefer)
- Choose the version that suits your environment
(Windows/Linux, 32 bit/64 bit)
- Accept the terms and conditions
- Start downloading
- You will end up with a zipped or a self-extracting
archive file (*.zip or *.exe)
- Unpack your file in the destination folder
- This creates a new subfolder in the selected
destination folder named “knime_2.2.x”, where x
represents the minor release
If you want to move the installation to a different location, just
move the knime. _2.2.x folder to your preferred location.
1.1. The KNIME Download web page
Note. To take advantage of the advanced KNIME features we need to activate the expert mode by adding the following line to the “knime.ini” file
located in knime_2.2.x: -Dknime.expert.mode=true
This is a sample copy of the book “KNIME Beginner’s Luck” 16
We will not use the expert mode and its advanced features in this book. However, since the expert mode might slightly change the appearance of
some KNIME settings, it is turned on for this book as well.
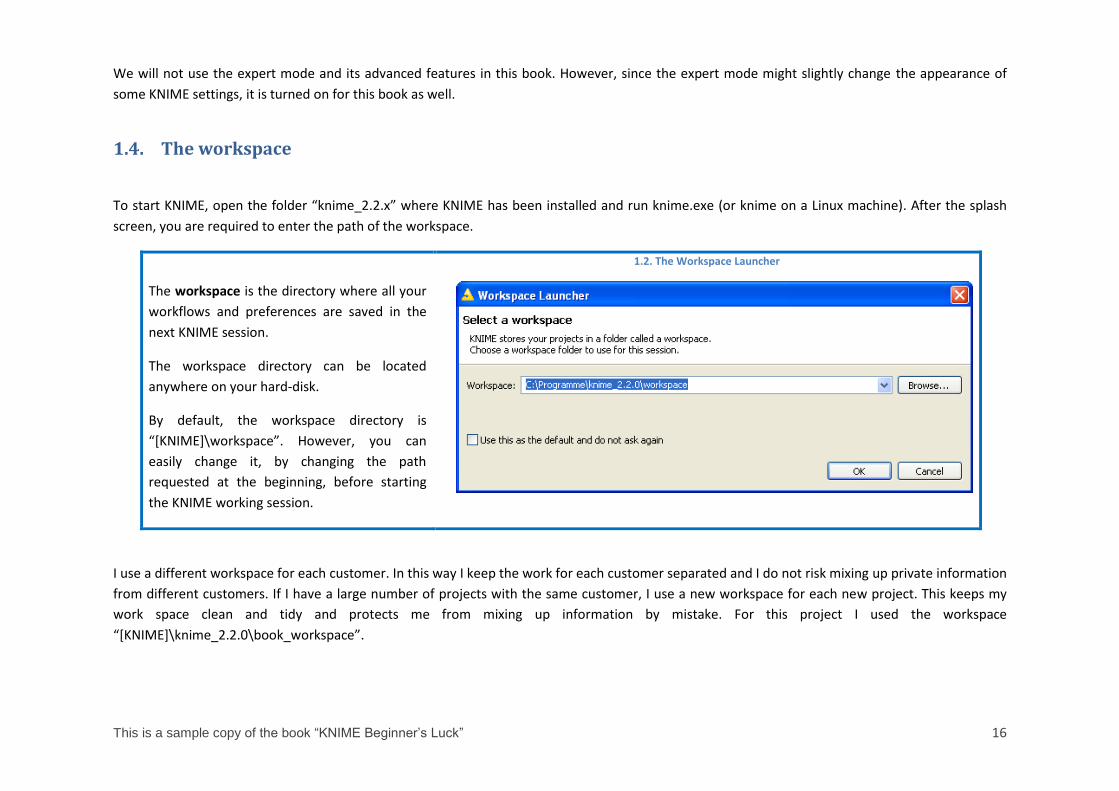
1.4. The workspace
To start KNIME, open the folder “knime_2.2.x” where KNIME has been installed and run knime.exe (or knime on a Linux machine). After the splash
screen, you are required to enter the path of the workspace.
The workspace is the directory where all your
workflows and preferences are saved in the
next KNIME session.
The workspace directory can be located
anywhere on your hard-disk.
By default, the workspace directory is
“*KNIME+\workspace”. However, you can
easily change it, by changing the path
requested at the beginning, before starting
the KNIME working session.
1.2. The Workspace Launcher
I use a different workspace for each customer. In this way I keep the work for each customer separated and I do not risk mixing up private information
from different customers. If I have a large number of projects with the same customer, I use a new workspace for each new project. This keeps my
work space clean and tidy and protects me from mixing up information by mistake. For this project I used the workspace
“*KNIME+\knime_2.2.0\book_workspace”.

This is a sample copy of the book “KNIME Beginner’s Luck” 17
If KNIME is being started for the first time, a screen appears asking you to select between either launching the KNIME workbench or installing
additional nodes. To proceed to the KNIME software, select “Open KNIME Workbench”. From now on whenever KNIME is launched, the welcome
screen is no longer shown.
1.5. Download KNIME extensions
KNIME Desktop is an open source product. As every open source product, it benefits from the feedback and the side utilities that the open source
community develops. A number of extensions are available for KNIME Desktop, which can also be used for the Enterprise version. However the
KNIME Extensions do not come together with the basic version: they need to be installed separately on a running KNIME.
To install a new KNIME extension:
- From the Top Menu, select
Help -> Software Updates
- In the “Software Updates” window,
select Tab “Available Software”
- Open the sites and select all the
extensions that you need (in this example
we chose to install the “KNIME R
Statistics Integration”)
- Click the “Install” button on the top right
Once the KNIME extension has been installed and
KNIME has been restarted, you should see a new
node/category in the “Node Repository” in the
KNIME workbench (see a few sections ahead).
1.3. Install KNIME Extensions

This is a sample copy of the book “KNIME Beginner’s Luck” 18
1.6. The KNIME workflow
KNIME does not work with scripts, it works with workflows.
Note. A workflow is the data analysis algorithm, which in a traditional programming language would be implemented by a series of instructions and
calls to functions. KNIME implements it graphically. This graphical representation makes it easy to keep an overview of the analysis process and to
document it.
What is a workflow
A workflow is an analysis flow, which is the sequence of the analysis
steps necessary to reach a given result. It is the pipeline of the analysis process,
something like:
Step 1. Read data
Step 2. Clean data
Step 3. Filter data
Step 4. Train a model
KNIME implements its workflows graphically. Each step of the data analysis is
executed by a little box, called a node. A sequence of nodes makes a workflow.
In the KNIME whitepaper [1] a workflow is defined as follows:
"Workflows in KNIME are essentially graphs connecting nodes, or more
formally, a direct acyclic graph (DAG). “
(http://www.kdd2006.com/docs/KDD06_Demo_13_Knime.pdf)
Below is an example of a KNIME workflow, with:
- a node to read data from a file,
- a node to exclude some columns,
- a node to filter out some rows,
- a node to write the processed data into a file.
1.4. Example of a KNIME workflow

This is a sample copy of the book “KNIME Beginner’s Luck” 19
1.7. The KNIME workbench
After accepting the path of the workspace, KNIME opens the KNIME workbench. The KNIME workbench includes a workflow editor where the user
can create the workflows. The KNIME workbench was developed as an Eclipse Plug-in and many of its features are inherited from the Eclipse
environment. This means that many items on the workbench are actually referring to a Java programming environment and are not necessarily of
interest for KNIME beginners. I will warn the reader, when the item on the KNIME workbench is not directly related to the creation of KNIME
workflows.
The “KNIME Workbench” consists of a top menu, a tool bar, and a few panels. Panels can be closed and moved around.
What is a node
A node is the single processing unit of a workflow.
A node takes a data set as input, processes it, and makes it available on its
output port. The “processing” action of a node ranges from modeling, like an
Artificial Neural Network Learner node, to data manipulation, like transposing
the input data matrix, from graphical tools, like a scatter plot, to reading/writing
operations.
Every node in KNIME has 3 states:
- Inactive and not yet configured → red traffic light
- Configured but not yet executed → yellow traffic light
- Executed successfully → green traffic light
If the node is executed with errors (unsuccessfully), its status stays at the yellow
traffic light.
Nodes containing other nodes are called meta nodes.
Below are three examples of the same node (a File Reader
node) in each one of the three states.
1.5. File Reader node with different status

This is a sample copy of the book “KNIME Beginner’s Luck” 20
1.6. The KNIME workbench

This is a sample copy of the book “KNIME Beginner’s Luck” 21
Let’s have a closer look at the KNIME workbench.
The KNIME workbench
Top Menu: File, Edit, View, Search, Run, Node, Help
Tool Bar: Create, Save, Run, Open Report (if reporting was installed), Open the “Add Meta node” Dialog, Buttons to reset and/or run selected or all nodes
Workflow Projects
This panel shows the list of
workflow projects in the selected
workspace.
Workflow Editor
The central area consists of the “Workflow Editor” itself.
A node can be selected from the “Node Repository” panel and dragged and
dropped here, in the “Workflow Editor” panel.
Nodes can then be connected by clicking the exit of one node and releasing
the mouse at the entrance of the next node.
Node Description
If a node is selected in the “Workflow
Editor” or in the “Node Repository”, this
panel displays a summary description of
the selected node’s functionalities.
Favorite Nodes
This panel helps you find the
nodes that are used most often or
most recently or that for some
other reason you want to keep at
hand.
Server Workflow Projects
This panel is dedicated to work on the
KNIME Server, which is not part of the
KNIME Desktop open source product.
Node Repository
This panel contains all the nodes
that you can use. It is something
similar to a palette of tools when
working in a report or with web
designer software. There we use
graphical tools, while in KNIME
we use data analysis tools.
Outline
The “Outline” panel contains a small
overview of the contents of the “Workflow
Editor”. The “Outline” panel might not be of
so much interest for small workflows.
However, as soon as the workflows reach a
considerable size, all the workflow’s nodes
may no longer be visible in the “Workflow
Editor” without scrolling. The “Outline”
panel can help you locate newly created
nodes faster.
Console
The “Console” panel displays error and warning messages to the user.
This panel also shows the location of the log file, which might be of
interest when the console does not show all messages.

This is a sample copy of the book “KNIME Beginner’s Luck” 22
Top menu
File Edit View Search
File includes the traditional File commands,
like “New” and “Save”, in addition to some
specific KNIME commands, like:
- Import/Export KNIME workflow
- Switch Workspace
- Preferences
- Update KNIME
Edit contains the usual
commands.
Cut, Copy, Paste, and
Delete refer to selected
nodes in the workflow.
Select All selects all the
nodes of the workflow in
the workflow editor.
View contains the list of panels that can be
opened on the KNIME workbench.
A closed panel can only be re-opened
here.
Also, when the panel disposition is messed
up, the option “Reset Perspective” re-
creates the original panel layout of KNIME
when it was started for the first time.
Search refers to an internal
file search or Java search.
For example, if you type
“column” in the Search
Dialog, you are given the
xml configuration files of all
nodes where a column
name is required.
I found it only moderately
useful especially for
beginners.

This is a sample copy of the book “KNIME Beginner’s Luck” 23
Run Node Help
Run is used to run external tools.
It is useful if you need your data to be generated and/or
manipulated by an external tool.
Node refers to all the possible operations that
can be performed on a node. A node can be:
- Configured
- Executed
- Reset (resets the results of the last
“Execute” operation)
- Cancelled (stopped during execution)
- Given a name and description
- Set to show its View (if any)
Options are only active if they are possible. For
example, an already successfully executed node
is not re-executed unless it is reset or its
configuration has been changed. The “Cancel”
and “Execute” options are then inactive.Option
“Add Meta Node” creates a new meta node in
the workflow editor.
Help Contents provides general Help
about the Eclipse Workbench, BIRT,
and KNIME.
Search opens a panel on the right of
the “Node Description” panel to
search for specific Help topics or
nodes.
Software Updates is the door to install
KNIME Extensions from the KNIME
Update sites.
Cheat Sheets offer tutorials on specific
Eclipse topics: the reporting tool, cvs,
Eclipse Plug-ins.
Key Assist summarizes all keyboard
commands for the workflow editor.

This is a sample copy of the book “KNIME Beginner’s Luck” 24
Let’s now go through the most useful items in the Top Menu.
“File” -> “Import KNIME workflow” is a link function for workflows. It links a workflow
from another workspace to the local workspace. It also works from zipped files. If flag
“Copy projects into workspace” is enabled, the workflow files are copied as well and not
only linked into the local workspace. Notice that changing the linked workflows changes
the original workflows.
“File” -> “Export KNIME workflow” writes the selected local workflow to a zip file. The
option “Exclude data from export” enables the export of only the nodes without the
intermdiate data. This generates considerably smaller export files.
Simply copying a workflow from one folder to another with Windows can create a number
of problems related to internal KNIME updates. Copying workflows from one location to
another by means of “Import KNIME workflow” is definitely safer.
1.7. Import workflows
1.8. The “Software Updates” window with the list of KNIME Update Sites
“File” -> “Update KNIME” and “Help” -> “Software Updates” both link to
the dialog window for the installation of KNIME Extensions from the
KNIME Update sites.

This is a sample copy of the book “KNIME Beginner’s Luck” 25
1.9. The "Preferences" window
File -> Preferences brings you to the window where all settings can be
adjusted. Let’s now check the “KNIME” Settings.
Database Driver specifies the location of database drivers. By default no
database drivers are available in KNIME. Thus, if you work with
databases, the first thing to do is to set here the path of your database
drivers.
KNIME GUI contains a few settings about confirmation message policies
and maximum list size.
Master Key contains the master key to be used in nodes with an
encryption option, like database connection nodes. The workflow is then
saved with the encrypted password. If no master key is set, the password
is stored in plain text!
In Meta Info Preferences you can upload a template for the description
of meta info nodes.
Node Repository Search tool 1.10. The Search box in the "Node Repository" panel
In the “Node Repository” panel there is a search box.
If you type a keyword in the search box and then hit “Enter”, you obtain
the list of nodes with that keyword in the name.
Press the “Esc“ key to see all nodes again
For example, here we searched for all the nodes with the keyword
“Filter” in their name.

This is a sample copy of the book “KNIME Beginner’s Luck” 26
1.8. Data and workflows for this book
In the course of this book we will implement a few workflows to show how KNIME works. In each chapter we build one or more workflows and we
expect the reader to build a few more in the exercises. The data and workflows used and implemented in this book are available in the “Download
Zone” of this book. There you will find a folder for each chapter containing the chapter’s demonstrative workflows and a subfolder “Exercises”. The
subfolder “Exercises” contains the solutions to the exercises in the chapter.
Structure of the “Download Zone”
Data
Data1.txt
Projects.txt
SoccerWorldCup2006.txt
SoccerWorldCup2010.txt
Adult.data
Iris.data
Yellow-small.data (Balloons)
Wine.data
Web site 1.txt
Chapter 2
my_first_workflow.zip
Exercises
o Exercise1.zip
o Exercise2.zip
Chapter 3
writeToDB.zip
my_first_data_exploration.zip
Exercises
o Exercise1.zip
o Exercise2.zip
o Exercise3.zip
Chapter 4
data_preparation.zip
my_first_data_model.zip
my_first_ANN-zip
Clustering and Regression.zip
Exercises
o Exercise1.zip
o Exercise2.zip
o Exercise3.zip
Chapter 5
Projects.zip
Exercises
o Exercise1.zip
o Exercise2.zip
o Exercise3.zip

This is a sample copy of the book “KNIME Beginner’s Luck” 27
The data used for the exercises and for the demonstrative workflows were either generated by the author or downloaded from the UCI Machine
Learning Repository, a public data repository (http://archive.ics.uci.edu/ml/datasets). Data generated by the author, that is not public data, are located
in the “Download zone” in the “Data” folder. If the data set belongs to the UCI Repository, then a full link is provided here to download it.
Data from the UCI Machine Learning Repository:
Adult.data: http://archive.ics.uci.edu/ml/datasets/Adult
Iris data: http://archive.ics.uci.edu/ml/datasets/Iris
Yellow-small.data (Balloons) http://archive.ics.uci.edu/ml/datasets/Balloons
Wine data: http://archive.ics.uci.edu/ml/datasets/Wine
1.9. Exercises
Exercise 1
Create your own workspace and name it “book_workspace”. You will use this workspace for the workflows and the exercises of this book.
Solution to Exercise 1
- Launch KNIME
- Click “Browse”
- Select the path for your new workspace
- Click “OK”
To keep this as your default workspace, enable the option on the bottom
left.
1.11. Exercise 1: Create workspace "book_workspace"

This is a sample copy of the book “KNIME Beginner’s Luck” 28
Exercise 2
Install the following extensions:
- KNIME Math Expression Extension (JEP)
- KNIME External Tool Node
- KNIME Report Designer Feature
- KNIME Reporting Runtime Feature
Solution to Exercise 2
From Top Menu, select “Help“ -> “Software Updates”
Select Tab “Available Software”
Select Extensions
Click “Install”
1.12. Exercise 2: List of KNIME extensions

This is a sample copy of the book “KNIME Beginner’s Luck” 29
Exercise 3
Search all “Row Filter” nodes in the Node Repository.
From the “Node Description” panel, can you explain what the difference is between a “Row Filter”, a “Reference Row Filter”, and a “Nominal Value
Row Filter”?
Show the node effects by using the following data tables:
Original Table
Position name team
1 The Black Rose 4
2 Cynthia 4
3 Tinkerbell 4
4 Mother 4
5 Augusta 3
6 The Seven Seas 3
Reference Table
Ranking scores
1 22
3 14
4 10
Solution to Exercise 3
Row Filter
The node allows for row filtering according to certain criteria. It can include or exclude: certain ranges (by row number), rows with a certain row ID, and rows with a certain value in a selectable column (attribute). In the example below we used the following filter criterion: team > 3

This is a sample copy of the book “KNIME Beginner’s Luck” 30
Original table
Position name team
1 The Black Rose 4
2 Cynthia 4
3 Tinkerbell 4
4 Mother 4
5 Augusta 3
6 The Seven Seas 3
Filtered table
Position name team
1 The Black Rose 4
2 Cynthia 4
3 Tinkerbell 4
4 Mother 4
Reference Row Filter
This node has two input tables. The first input table, connected to the top port, is taken as the reference table; the second input table, connected to
the bottom port, is the table to be filtered. You have to choose the reference column in the reference table and the filtering column in the second table. All rows with a value in the filtering column that also exists in the reference column are kept, if the option “include” is selected; they are removed if the
option ”exclude” is selected.
Ranking scores
1 22
3 14
4 10
Reference Table
Position name team
1 The Black Rose 4
2 Cynthia 4
3 Tinkerbell 4
4 Mother 4
5 Augusta 3
6 The Seven Seas 3
Filtering Table
Position name team
1 The Black Rose 4
3 Tinkerbell 4
4 Mother 4
Resulting Table

This is a sample copy of the book “KNIME Beginner’s Luck” 31
In the example above, we use “Ranking” as the reference column in the reference table and “Position” as the filtering column in the filtering table. We
have chosen to include the common rows.
Nominal Value Row Filter
Filters the rows based on the selected value of a nominal attribute. A nominal column and one or more nominal values of this attribute can be selected
as the filter criterion. Rows that have these nominal values in the selected column are included in the output data. Basically it is a Row Filter applied to a column with nominal values. Nominal columns are string columns and nominal values are the values in it.
In the example below, we use “name” as the nominal column and “name = Cynthia” as the filtering criterion.
Original table
Position name team
1 The Black Rose 4
2 Cynthia 4
3 Tinkerbell 4
4 Mother 4
5 Augusta 3
6 The Seven Seas 3
Filtered table
Position name team
2 Cynthia 4

This is a sample copy of the book “KNIME Beginner’s Luck” 32
Chapter 2. My first workflow
2.1. Workflow operations
If you have started KNIME for the first time, your “Workflow Projects” panel on the top left corner of the KNIME window only contains an empty
workflow named “KNIME_Project”. You can start from this empty workflow or you can create a new one.
First of all, if you are planning on a career working with KNIME, you need to learn how to keep your space clean. Workflow Groups can help you group
workflows by topic or project. I usually define a workflow group for each project or subproject I work on, into which I put all the workflows related to
the same topic. Now let’s create then a new workflow group and call it “Chapter 2”.
Once this has been done, you need to populate the newly
created workflow group with a new workflow, let’s call it
“my_first_workflow”.
Eventually in the “Workflow Projects” panel, you will see
workflow group “Chapter2” with a workflow
“my_first_workflow” in it.
For now, “my_first_workflow” is an empty workflow. If
you double click it in the “Workflow Projects” panel, the
workflow editor opens to an empty page.
2.1. Final workflow structure

This is a sample copy of the book “KNIME Beginner’s Luck” 33
Create a new workflow group
- Right click the “Workflow Projects” panel
- Select “New Workflow Group”
2.2. Create a new workflow group
In the “New Knime workflow group” dialog:
- Enter the name of the group
- Click “Finish”
2.3. Create a new workflow group named "Chapter2"

This is a sample copy of the book “KNIME Beginner’s Luck” 34
Create a new workflow
- Right click the workflow group in the “Workflow
Projects” panel
- Select “New KNIME Workflow”
2.4. Create a new workflow
In the “New KNIME Workflow Wizard” dialog
- Enter the name of the new workflow
- Specify where it should be located, for example under
a workflow group
- Click “Finish”
2.5. Create a new workflow named "my_first_workflow" and placed under "Chapter2"

This is a sample copy of the book “KNIME Beginner’s Luck” 35
Save a workflow
To save the workflow, click the floppy disk icon under the Top Menu
at any time.
Saving the workflow saves the workflow architecture, the nodes’
configuration, and the data at the output of each node.
2.6. Save a workflow
Delete a workflow
To delete a workflow
- Right click the workflow in the “Workflow Projects” panel
- Select “Delete”
In the “Delete Workflow” dialog, the flag “Delete project contents
on disk” removes the workflow project physically from the hard
disk. There is no way to get it back.
2.7. Delete a workflow

This is a sample copy of the book “KNIME Beginner’s Luck” 36
2.2. Node operations
In Chapter 1, we have seen that a node is the basic computational unit of a KNIME workflow. We have also seen that nodes are available in the “Node
Repository” panel on the bottom left, organized in categories. And we have seen that every node has three states: not yet configured (red),
configured (yellow), and successfully executed (green).
In this section we are going to explore:
- How to add a new node to a workflow (status = inactive, not configured; red light)
- How to configure the node (status = configured, not executed; yellow light)
- How to execute the node (status = successfully executed; green light)
Create a new node 2.8. Drag and drop the node into the workflow editor to create a new node
- Drag and drop the node from the “Node Repository” panel
into the workflow editor
- The node is imported with red traffic light status
- To connect the node with existing nodes, click the output
triangle of the first node and release the mouse at the
input triangle of the second node
- If you already have the “Node Description” panel open on
the right, it shows a short description of the node
functionality
- If the “Node Description” panel is not yet open,
o Open the “View” item in the Top Menu,
o Select “Node Description”

This is a sample copy of the book “KNIME Beginner’s Luck” 37
Configure a node
- Double click the node
OR
- Right click the node and select “Configure”
If all input ports are connected, the “Configuration Dialog” appears for you to fill in the
configuration settings.
Every node has a different “Configuration Dialog”, since every node performs a different
task.
After a successful configuration, the node switches its traffic light to yellow.
2.9. Right click the node and select "Configure" to configure the node
Execute a node
The node is now configured, which means it knows what to do.
In order to actually make it perform its task, we need to execute it.
Right click the node
Select “Execute”.
If execution is successful, the node switches its traffic light to green.
2.10. Right click the node and select "Execute" to run the node

This is a sample copy of the book “KNIME Beginner’s Luck” 38
Finally we need to give a meaningful name to this node so that we can easily recognize which task it is performing in the workflow. The default name
assigned to a node by KNIME is “Node n”, where “n” is a progressive number. You can customize the node’s name. Together with the name you can
supply a short description of the node task. This keeps the overview of the workflow clearer and fulfills the purpose of the workflow documentation.
Name and description
In order to change the node’s name:
- Right click the node
- Select “Node name and description”
2.11. Right click the node and select "Node name and description" to enter a name and a description
In the Name and Description dialog:
- Enter the node’s new name
- Enter a description of its task
- Click “OK”
2.12. The "Node Name and Description" dialog

This is a sample copy of the book “KNIME Beginner’s Luck” 39
2.3. Read data from file
The first step in all data analysis works consists of reading data. Data is usually read from a file or from a database (DB). In this chapter we describe
how to read and write data from and to a file. Reading and writing data from and to a database is described in section 3.5 “Database operations”.
View the processed data
If execution was successful (green light), you can see the
processed data by right clicking the node and selecting the last
option.
The option to view the processed data is the last item of the
shortcut menu (right-click menu) for all nodes with output data,
but it takes on different names for different nodes.
The table with the processed data is then shown.
2.13. Right click the node and select the last option to see the processed data
This is a sample copy of the book “KNIME Beginner’s Luck” 40
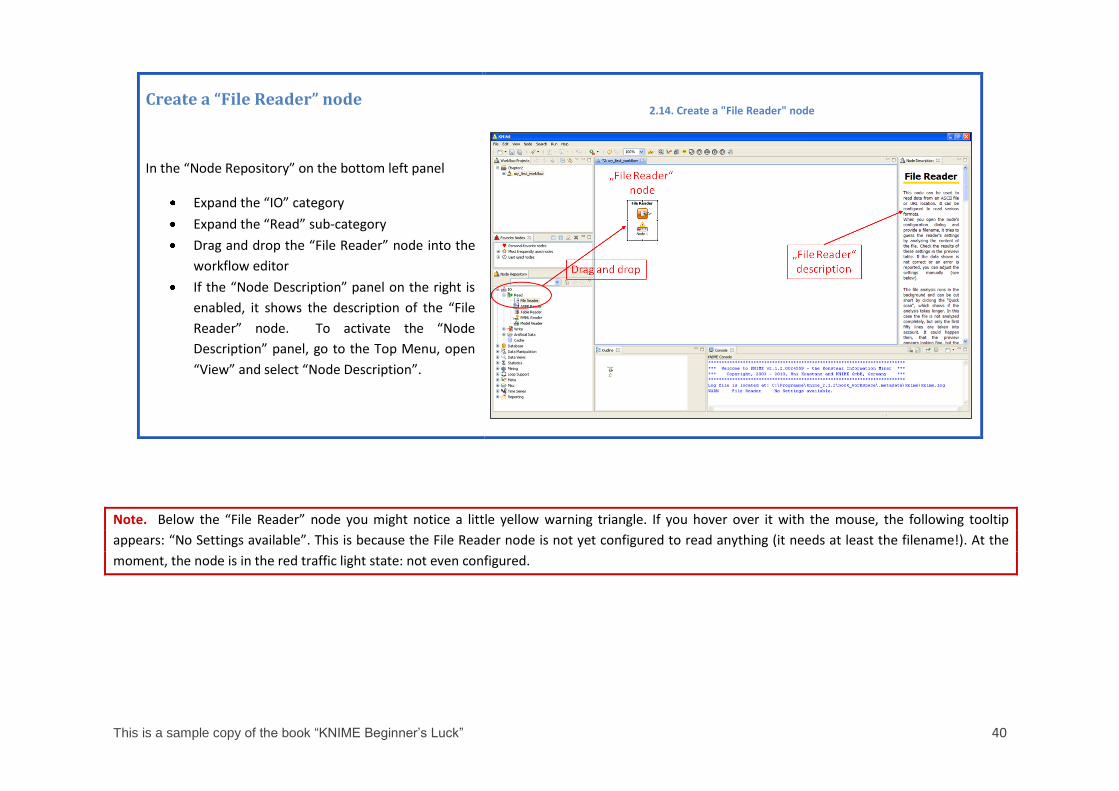
Note. Below the “File Reader” node you might notice a little yellow warning triangle. If you hover over it with the mouse, the following tooltip
appears: “No Settings available”. This is because the File Reader node is not yet configured to read anything (it needs at least the filename!). At the
moment, the node is in the red traffic light state: not even configured.
Create a “File Reader” node
In the “Node Repository” on the bottom left panel
Expand the “IO” category
Expand the “Read” sub-category
Drag and drop the “File Reader” node into the
workflow editor
If the “Node Description” panel on the right is
enabled, it shows the description of the “File
Reader” node. To activate the “Node
Description” panel, go to the Top Menu, open
“View” and select “Node Description”.
2.14. Create a "File Reader" node

This is a sample copy of the book “KNIME Beginner’s Luck” 41
Configure the “File Reader” node
- Double-click the node
OR
- Right-click the node and select “Configure”
- Specify the file path in the configuration dialog. We
used the adult.data file, downloadable from the UCI
Machine Learning Repository
(http://archive.ics.uci.edu/ml/datasets/Adult).
If it is a comma or tab separated file, the File Reader
automatically detects its structure.
- Next, enable/disable the number of respective
checkboxes according to the structure of the data in
the file.
A preview of the data is available on the bottom and reports
possible reading errors.
2.15. "File Reader" node configuration window

This is a sample copy of the book “KNIME Beginner’s Luck” 42
Customize column properties
It is possible to customize the way that column data is read.
For example, let’s read column “fnlwgt” as a String instead of as
an Integer and set “final weight” as column header instead of
“fnlwgt”.
- Click the column header of column “fnlwgt”
- The window to customize the column properties opens
Here you can:
- Change the column name ( = column header) from
“fnlwgt” to “final weight”
- Change the column data type from Integer to String or
Double
- Introduce a special character to represent a missing value
in the data of the file
2.16. Customize how to read columns

This is a sample copy of the book “KNIME Beginner’s Luck” 43
Advanced reading options
Under the “Advanced” button you will find some more reading options. Each option tab is extensively described. I provide brief comments here on
only three of them.
To read the adult.data file however we do not need to enable any of those options, as the adult.data file a pure ASCII file.
“Quote Support” allows the definition of special
quote characters.
Quote characters are essential because they
define the start and the end of a string. The
default quote characters are “ and ‘.
“Short Lines” allows the reading of lines shorter
than expected.
By default, lines with fewer columns than expected
would otherwise cause the node to fail during
execution. If this option is on, such lines are read
and the missing final columns are padded with
missing values.
“Character Decoding” offers you the possibility of
reading files encoded with a different locale than
just ASCII (default).
Files with text in a different language than English
need to have an encoding enabled, in order to be
read properly.
2.17. Advanced settings: Quote Support
2.18. Advanced settings: Short Lines
2.19. Advanced settings: Character Decoding
Click on “OK” at the bottom of the “Advanced Settings” window.
If you are satisfied with the data preview and your settings, click “OK” at the bottom of the “File Reader Configuration” window.

This is a sample copy of the book “KNIME Beginner’s Luck” 44
Note. After configuring the “File Reader” node, its state moves to the yellow traffic light.
We have now changed the name of the “File Reader” node from “Node 1” to “Adult data set”.
In order to make the node read the file, we need to execute it. Proceed as follows:
o Right click the node
o Select “Execute”
Note. If the reading process is successful the node switches its traffic light to green.
Note. On every configuration window you will find a tab, called “Flow Variables”. Flow Variables are used to pass variables from one node to another.
However, we are not going to work with Flow Variables in this book, since they belong to a more advanced course on KNIME usage.
2.4. KNIME data
If execution was successful you can also see the resulting data.
- Right click the “File Reader” node
- Select “File Table”
Finally we need to give this node a meaningful name so that we can easily recognize what its task is in the workflow. The default name of our File
Reader is “Node 1” because it is the first node created in the workflow. In order to change the node’s name:
o Right click the node and select “Node name and description”
o Enter the node’s new name (for example “Adult data set”) and a description of its task
o Click “OK”

This is a sample copy of the book “KNIME Beginner’s Luck” 45
A table with the read data appears. Let’s have a look at this table now to understand how data is structured inside KNIME.
First of all, data in KNIME is organized as a table.
Each row is identified by a Row ID. By default, Row IDs are Strings like “Row n” where “n” is a progressive number. But RowIDs can be forced to be
anything, with the only condition that they must be unique. Not unique RowIDs will cause an error.
Columns are identified by column headers. If no column headers are available, default column headers like “Col n” - where “n” is a progressive
number - are assigned by KNIME. In adult.data file column headers were included. We enabled the checkbox “Read column headers” and we now
have a header for each column in the final data table. Even column headers need to be unique. If a column header is repeated, KNIME adds a suffix
“(#n)” (n = progressive number) to each multiple occurrence of a column header.
Each column contains data with a set data type. A few common data types are defined in KNIME:
Double (“D”)
Integer (“I”)
String (“S”)
Date/time (calendar + clock icon)
Unknown (“?”)
Date/time type is never generated by reading from a file. Dates are read from a text file just as Strings.
Unknown Type refers to columns with mixed data types, for example String and Integer, or with an indefinable data type, for example with all missing
values.
Missing values are data cells with a special “missing value” status and are displayed by default with a question mark (“?”), unless the display character
for the missing value was defined differently in the “File Reader” node configuration.

This is a sample copy of the book “KNIME Beginner’s Luck” 46
KNIME data structure
Data in KNIME is organized as a table with a
fixed number of columns.
Each row is identified by a Row ID.
Columns are identified by column headers.
Each column represents a data type
Double (“D”)
Integer (“I”)
String (“S”)
Date/time (calendar + clock icon)
Unknown (“?”)
2.20. The KNIME data structure
2.5. Filter data columns
In the next step, we want to filter out the column “final weight” from the read data set. In the “Node Repository” panel, on the bottom left, there is a
whole category called “Data Manipulation” with nodes dedicated to managing the data structure. This category includes operations on columns,
rows, and on the full data matrix.

This is a sample copy of the book “KNIME Beginner’s Luck” 47
2.21. Creating and setting up a "Column Filter" node
Create a “Column Filter” node
In the “Node Repository” panel on the bottom left, the node “Column Filter” is located under:
“Data Manipulation” -> “Column” -> “Filter”
Drag and drop the “Column Filter” node from the “Node Repository” panel into the workflow editor panel.
The description for this node appears in the “Node Description” panel on the right.
Connect the “Column Filter” node with the previous node (in our workflow, the “File Reader” node “adult.data set”)

This is a sample copy of the book “KNIME Beginner’s Luck” 48
After completing the configuration, right click the “Column Filter” node and select “Node name and description”.
Give the node a meaningful name. We named it “rm ‘final weight’”.
Right click the node and select “Execute” to run the column filter.
Configure the “Column Filter” node
Double-click the “Column Filter” node to open its configuration window (fig. 2.21).
In the configuration window you see 2 sets of columns:
The columns to be included from the data table (“Include” set on the right)
The columns to be excluded from the data table (“Exclude” set on the left)
You can add and remove columns from one set to the other with the buttons “Add” and “Remove”.
There are 2 column filter modes:
“Enforce Inclusion” keeps the “Include” set fixed. If one more input column is added from the previous node, this new column is
automatically inserted into the “Exclude” set.
“Enforce Exclusion” keeps the “Exclude” set fixed. If one more input column is added from the previous node, this new column is
automatically inserted into the “Include” set.
There are also two “Search” buttons to search for a specific column, in case too many columns are in the “Include” or “Exclude” set.
Set the “Column Filter” configuration properties. We only removed the column “final weight”. We set the column filter mode to
“Enforce Exclusion”, because we want to keep all possible input columns besides “final weight”.
Click “OK”.

This is a sample copy of the book “KNIME Beginner’s Luck” 49
To see the final processed data, right-click the “rm final weight”
node and select “Filtered Table”.
The column “final weight” should no longer be listed.
2.22. The column filtered table does not contain column "final weight"
2.6. Filter data rows
Now let’s retain only those data rows that refer to people born outside of the United States that is only those rows with “native-country” other than
“United States”.
Create a “Row Filter” node
In the “Node Repository” panel on the bottom left, open the node category “Data Manipulation” and navigate to the node “Row Filter” in:
“Data Manipulation” -> “Row” -> “Filter”
Drag and drop the “Row Filter” node from the “Node Repository” panel into the workflow editor panel.
The description for this node appears in the “Node Description” panel on the right.
Connect the “Row Filter” node with the “Column Filter” node “ rm final weight ”

This is a sample copy of the book “KNIME Beginner’s Luck” 50
2.23. Creating and setting up a "Row Filter" node
Configure the “Row Filter” node
Double click the “Row Filter” node to open its configuration window.
The node implements 3 filter criteria, which are shown on the side.
Each of these criteria can be used to include or to exclude rows.
Implement your row filter criterion
Click “OK”
Row Filter criteria
Select rows by attribute value (pattern matching)
Select rows by row number
Select rows by RowID (pattern matching on RowID)

This is a sample copy of the book “KNIME Beginner’s Luck” 51
Row filter criteria
By attribute value All rows, for which the value in a given column
matches a given pattern, are filtered out or kept.
After you “select the column to test”, you need to
define the matching mode.
For String values, “use pattern matching” requires the
given pattern to be either entered manually or
selected from a list of pre-defined patterns.
A matching value with wildcards * (for example
“United*”) or with a regular expression is also
possible.
For Integer values, “use range checking” requires a
lower boundary and/or an upper boundary, which will
be the same value if the condition is equality.
For Missing values, choose the last matching option.
By row number If you know where your desired or undesired rows
are, you can just enter the row number range to be
filtered out.
For example, if I know that the first 10 rows are
garbage, I would select the filter criterion “exclude
row by number” and set the row number range 1-10.
By RowID A special row filter by attribute value runs on the
RowIDs.
Here the matching pattern is given by a regular
expression. The regular expression has to match the
whole RowID or just its beginning,
2.24. Row filter criterion by attribute value
2.25. Row filter criterion by row number
2.26. Row filter by RowID

This is a sample copy of the book “KNIME Beginner’s Luck” 52
In order to retain all rows with data referring to people born outside of the United States, we need to:
Set filter mode “exclude row by attribute value” Set the column to test to “native-country” Enable “use pattern matching”, because it is a string comparison Set pattern “United States”
We have just implemented the following filter criterion: native-country != “United States”
Right click the “Row Filter” node and select “Node name and description”. Give it a meaningful name. We named it “born outside US”. The
name of a node is important for documentation purposes. Since KNIME is a graphical tool, it is easy to keep an overview of what a workflow does if
the name of each node is a clear indication of its task.
Right click the node and select “Execute” to run the row filter
To see the final processed data, right click the “born
outside US” node and select “Filtered”.
There should be no “United States” in column
native-country.
2.27. The row filtered table has no pattern "United States" in column "native-country“

This is a sample copy of the book “KNIME Beginner’s Luck” 53
2.7. Write data to a file
Now we want to write our processed data to a file. There are many nodes that can write to a file. Let’s choose the easiest and most standard format:
the CSV (Comma Separated Values) format.
Create a “CSV Writer” node
In the “Node Repository” in the bottom left
panel:
Expand “IO” category
Expand “Write” sub-category
Drag and drop “CSV Writer” node into
the workflow editor
If the “Node Description” panel on the
right is enabled, it fills up with the
description of the “CSV Writer” node.
To activate the “Node Description”
panel, go to the Top Menu, open “View”
and select “Node Description”.
Right click the node and select
“Configure” to open its configuration
window.
2.28. Create a "CSV Writer" node

This is a sample copy of the book “KNIME Beginner’s Luck” 54
Configure the “CSV Writer” node
“Settings” is the most important tab of this configuration window. It requires:
- The path of the output file
- A few options, such as:
o Write column headers and/or RowID in output file
o Writing mode if file exists
Overwrite
Append
Abort (does not write to file)
There are a few more tabs in this configuration window:
2.29. Configuring a "CSV Writer" node
“Advanced” allows specification of a different separation character other than “,” and a new missing value character.
“Quotes” is for setting quote characters other than the default.
“Comment header” is to write a header with comments on top of the data.
“Decimal Separator” is to specify a new decimal separator (default is “.”)
“Memory Policy” offers a few strategies to handle memory and data. It comes in useful when the workflow deals with a large
amount of data.
In this book we do not investigate the tab “Flow variables”.

This is a sample copy of the book “KNIME Beginner’s Luck” 55
Note. Writing in mode “Append” can be tricky, because it just appends the new data to an existing file. It does not check whether the columns
existing in the file have the same order as the columns to be written from the input data table. If you change the order of the data columns, for
example because of a new or deleted column, the output csv file might not be consistent anymore.
2.8. Exercises
Exercise 1
In a workflow group “Exercises” under the existing workflow group “Chapter2” create an empty workflow “Exercise1”.
Workflow “Exercise1” should perform the following operations:
- Read file data1.txt (from the “Download Zone”) with column “ranking” as String and name “marks”;
- Remove initial comments from data read from file;
- Remove column “class”
Let’s now change the node’s name:
o Right click the node and select “Node name and description”
o Enter the node’s new name (for example “write new file”) and a description of its task
o Click “OK”
o Right click the node and select “Execute”
We have created our first workflow to read data from a file, reorganize rows and
columns, and finally write the data to an output file.
This is what the final workflow looks like.
2.30. Workflow "my_first_workflow"

This is a sample copy of the book “KNIME Beginner’s Luck” 56
- Write final data to file in CSV format (for example with name “data1_new.csv”) using character “;” as separator
Enter a name and a short description for all nodes in the workflow.
Save and execute workflow Exercise1. Execution must be without errors (green lights for all nodes).
Solution to Exercise 1
2.31. Exercise 1: The workflow
2.32. Exercise1: “File Reader” configuration settings
2.33. Exercise 1: "File Reader" “Short Lines” tab configuration

This is a sample copy of the book “KNIME Beginner’s Luck” 57
2.34. Exercise 1: “Row Filter” configuration options
2.35. Exercise 1: “CSV Writer” configuration settings
2.37. Exercise 1: “CSV Writer” “Advanced” tab configuration
2.36. Exercise 1: “Column Filter” configuration options

This is a sample copy of the book “KNIME Beginner’s Luck” 58
Exercise 2
In the workflow group “Chapter2\Exercises” create a workflow “Exercise2” to perform the following operations:
- Read the CSV file written in Exercise1 (data1_new.csv) and rename column “marks” to “ranking”
- Filter out rows with comments = “average”
- Exclude column “ranking”
- Write final data to file in “Append” mode and with a tab as a separating character
Rename all nodes where necessary. Save and execute workflow “Exercise2”.
Solution to Exercise 2
We recycled the workflow structure from the workflow created in Exercise 1. That is we do a “Copy and Paste” operation (Ctrl-C, Ctrl-V) on the whole
Exercise 1 workflow from the workflow editor for Exercise 1 into the workflow editor for Exercise 2.
2.38. Exercise 2: “File Reader” configuration options
2.39. Exercise 2: “Row Filter” configuration options

This is a sample copy of the book “KNIME Beginner’s Luck” 59
2.40. Exercise 2: “Column Filter” configuration options
2.41. Exercise 2: “CSV Writer” configuration options
2.42. Exercise 2: The workflow

This is a sample copy of the book “KNIME Beginner’s Luck” 60
Note. You can disable the option “allow short lines” in the “Advanced Settings” window, because now all the rows of the input file have the same
length. There are no comments anymore.
Note. Notice the yellow triangle under the Column Filter. This is a warning message that comes from the copy of the workflow and that remains even
when the node has the green light. Hovering over the yellow triangle shows the warning message “Some columns are not available: marks”. This is
correct. We renamed column “marks” to “ranking”. However, the column filter still works; only a warning message is issued. We now have a new
column called “ranking”. If we open the configuration window of the column filter, we see that the column “ranking” was automatically inserted into
the “Exclude” set. This is because the option “Enforce Inclusion” is enabled. Clicking the “OK” button accepts the current configuration settings and
makes the yellow triangle disappear.
Note. We saved the data in “Append” mode into the csv file. The data from Exercise2 has only 3 columns, while the existing data in the file has 4
columns. The “CSV Writer” node does not check the consistency of the number and the position of the columns to be written with the number and
the positions of the existing columns. It is possible to write inconsistent data to a file. You need to be careful when working in “Append” mode in
combination with a “CSV Writer” node.