chapter 1 installation instructions 3 chapter 2 basic...
TRANSCRIPT

1
Chapter 1 Installation Instructions ............................................................................ 3
Chapter 2 Basic Operations ........................................................................................ 7
Chapter 3 Screen........................................................................................................ 9
Chapter 4 System...................................................................................................... 11
2
Chapter 1 Installation Instructions ............................................................................ 3
Chapter 2 Basic Operations ........................................................................................ 7
Chapter 3 Screen........................................................................................................ 9
Chapter 4 System...................................................................................................... 11
Chapter 5 Users management .................................................................................. 28
Chapter 6 Local Log................................................................................................. 29
Chapter 7 Recording ................................................................................................ 30
Chapter 8 Advanced.................................................................................................. 32
3
Chapter 1 Installation instructions
1.1Requirements for running CMS on Computer
1.1.1 Hardware Requirements.
• Processor: Intel Pentium IV 2.0 GHz or higher.
• Memory: 1.5 GB
• Video card: ATI 9800 or higher, with at least 256 MB of memory
• Network card: 100/1000 MB / sec.
• Free space on hard disk 100 MB
1.1.2 Software requirements.
CMS of this version can run on Windows XP, Windows 7, and Windows 8. Please close all anti-virus programs and disable
firewall, after that you can install the program correctly; otherwise it may not be able to add a DVR.
1.2 Installation.
1.2.1 Locate "Partizan CMS 3.3.3" on installation CD or download from our website www.partizan-cctv.com and run
installation file.
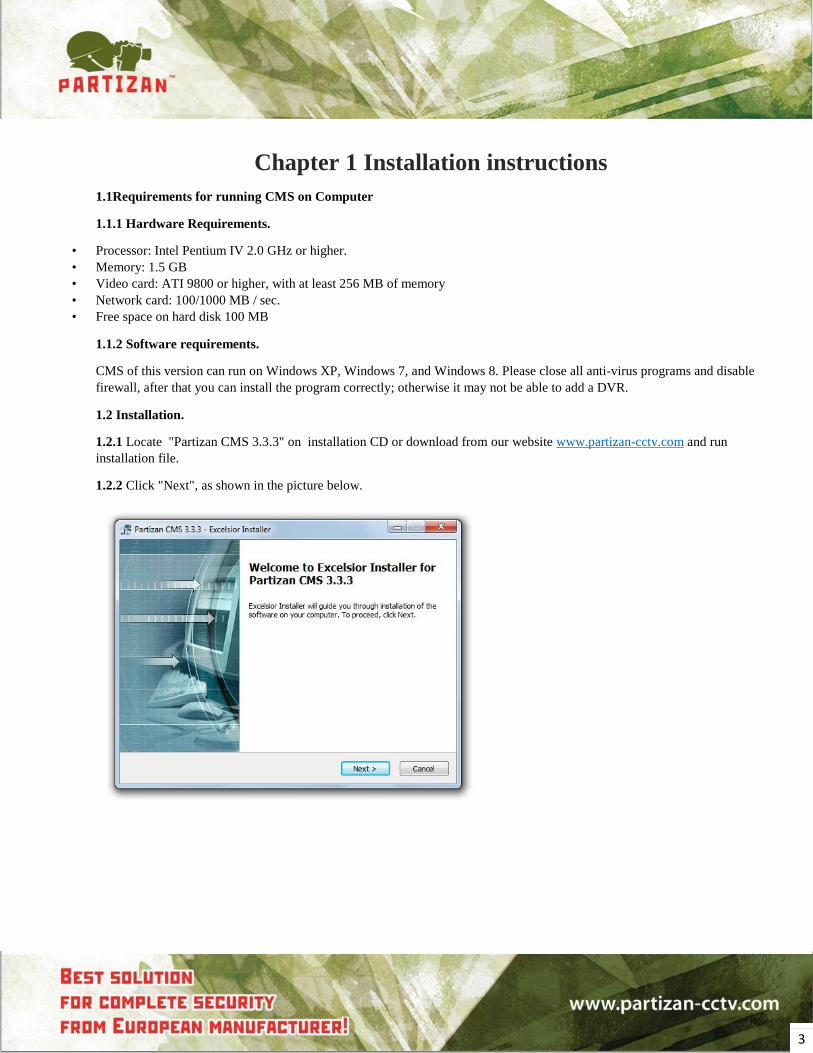
1.2.2 Click "Next", as shown in the picture below.
4
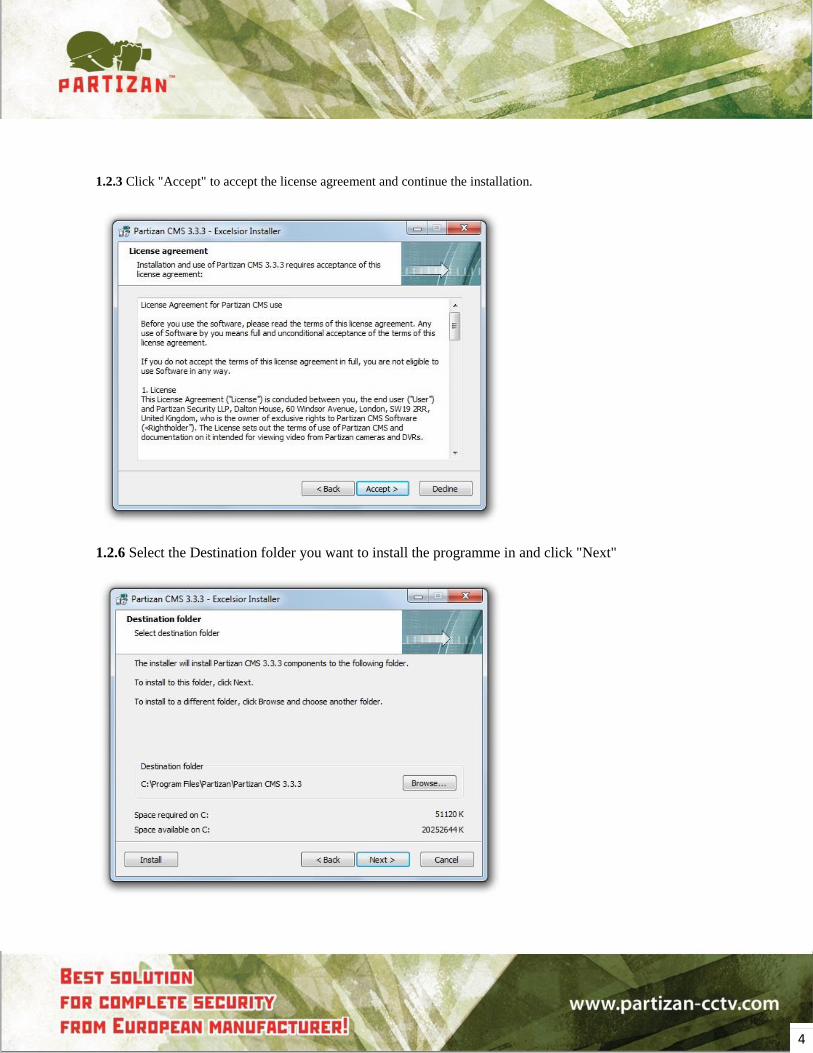
1.2.3 Click "Accept" to accept the license agreement and continue the installation.
1.2.6 Select the Destination folder you want to install the programme in and click "Next"
5
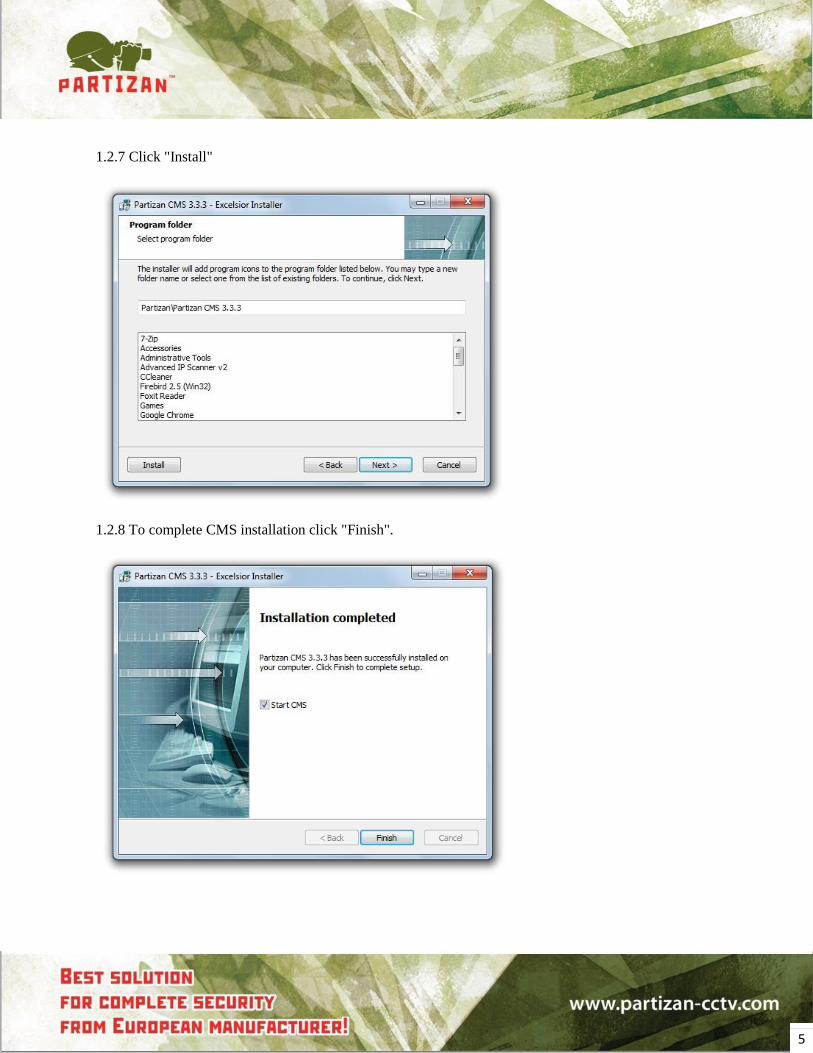
1.2.7 Click "Install"
1.2.8 To complete CMS installation click "Finish".
6
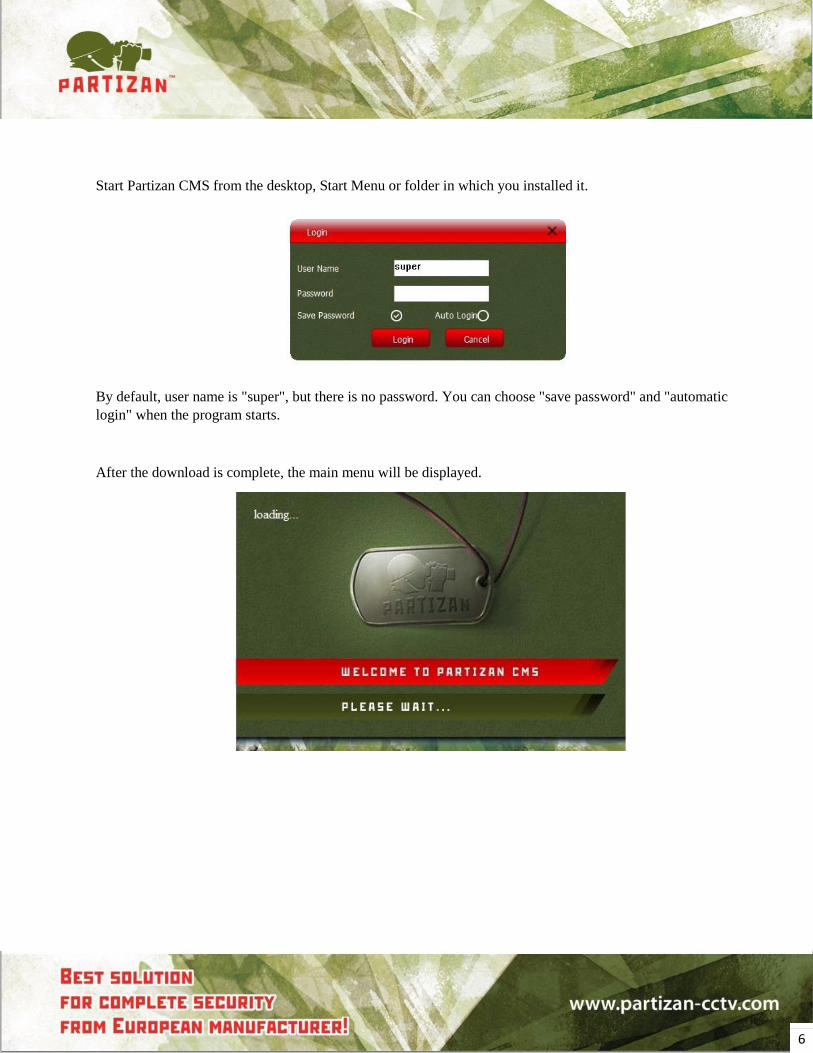
Start Partizan CMS from the desktop, Start Menu or folder in which you installed it.
By default, user name is "super", but there is no password. You can choose "save password" and "automatic
login" when the program starts.
After the download is complete, the main menu will be displayed.
7
Chapter 2 Basic Operations
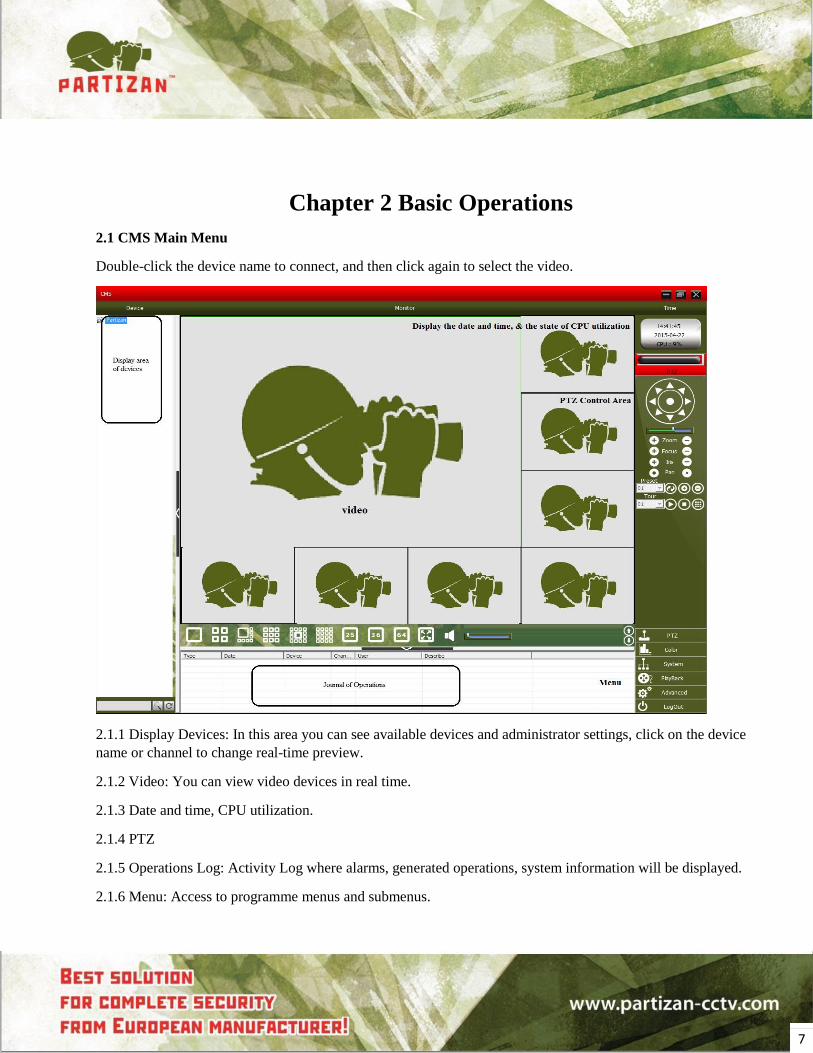
2.1 CMS Main Menu
Double-click the device name to connect, and then click again to select the video.
2.1.1 Display Devices: In this area you can see available devices and administrator settings, click on the device
name or channel to change real-time preview.
2.1.2 Video: You can view video devices in real time.
2.1.3 Date and time, CPU utilization.
2.1.4 PTZ
2.1.5 Operations Log: Activity Log where alarms, generated operations, system information will be displayed.
2.1.6 Menu: Access to programme menus and submenus.

8
Table 1. Menu
№ Main-menu First sub-menu Second sub-menu Functions & description Permissions
1 PTZ Control cameras up, down, left, right, stop with the Panel. Speed
control, zoom, focus, IRIS, presets and tours. Admin/Users
2 Colour Adjust video screen brightness, contrast, saturation and shade Admin/Users
3
system
Device Manager
Add area Add zone for all devices Admin/Users
4 Add device Add a device for watching videos. Admin/Users
5 Modify Change the device name, IP address, user name, or password. Admin/Users
6 Delete Remove the device from the list. Admin/Users
7 Devices imp. Import device configuration Admin/Users
8 Devices exp. Export device configuration Admin/Users
9 Connection test Test the connection with the device Admin/Users
10
Local Config
Base Config Select your language, disk drives, and a list of Maintenance log. Admin/Users
11 Alarm setting Setting the alarm Admin/Users
12 Record plan Setting up a template record Admin/Users
13 DDNS Config Selecting the port and server for DDNS Admin/Users
14 Version info Information about the product Admin/Users
15 Device Config Guide & device Configure connected devices Admin/Users
16 Users management
Group Add and remove users, groups, distribution rights. Admin/Users
17 User Add, delete, and manage users, customize the display of user
names, passwords, and access rights to the menu. Admin/Users
18 Local log View alarm log and performed operations. Admin/Users
19 Playback Play back Search and play back recorded files. Admin/Users
20
Advanced
Decoder Set the DVR and decode. Admin/Users
21 Map Use the map to display each camera on the territory of the
organization, and search currently displayed screen Admin/Users
22 Tour Specify channel display mode and time interval Admin/Users
23 Template conf.
Template Plan List of templates Admin/Users
24 Template Node Information about template configuration Admin/Users
User configurable option rights
9
Chapter 3 Screen
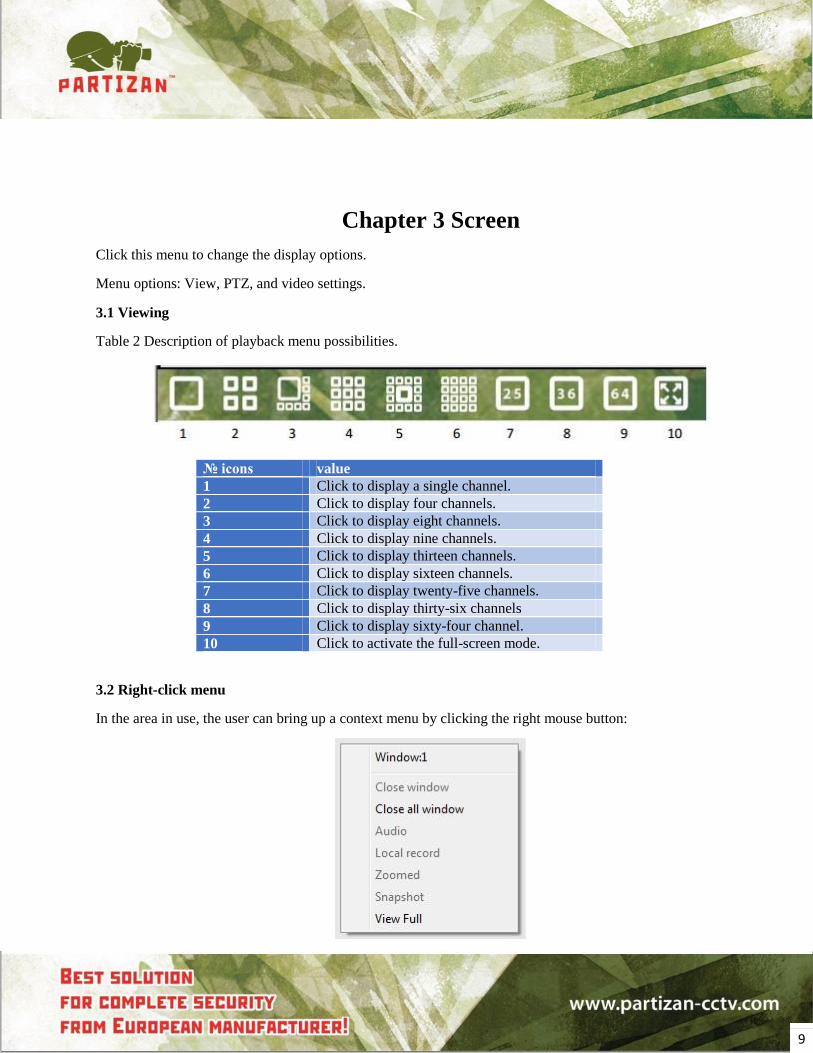
Click this menu to change the display options.
Menu options: View, PTZ, and video settings.
3.1 Viewing
Table 2 Description of playback menu possibilities.
№ icons value
1 Click to display a single channel.
2 Click to display four channels.
3 Click to display eight channels.
4 Click to display nine channels.
5 Click to display thirteen channels.
6 Click to display sixteen channels.
7 Click to display twenty-five channels.
8 Click to display thirty-six channels
9 Click to display sixty-four channel.
10 Click to activate the full-screen mode.
3.2 Right-click menu
In the area in use, the user can bring up a context menu by clicking the right mouse button:
10
• Close window: Closes the current channel.
• Close all windows: closes all channels.
• Audio: enables audio on the current channel.
• Local recording: records the current channel to the configured disk.
• Snapshot: Saves the screenshot to the specified disk.
• Zoom: Digital Zoom.
• Full screen: activates full-screen display.
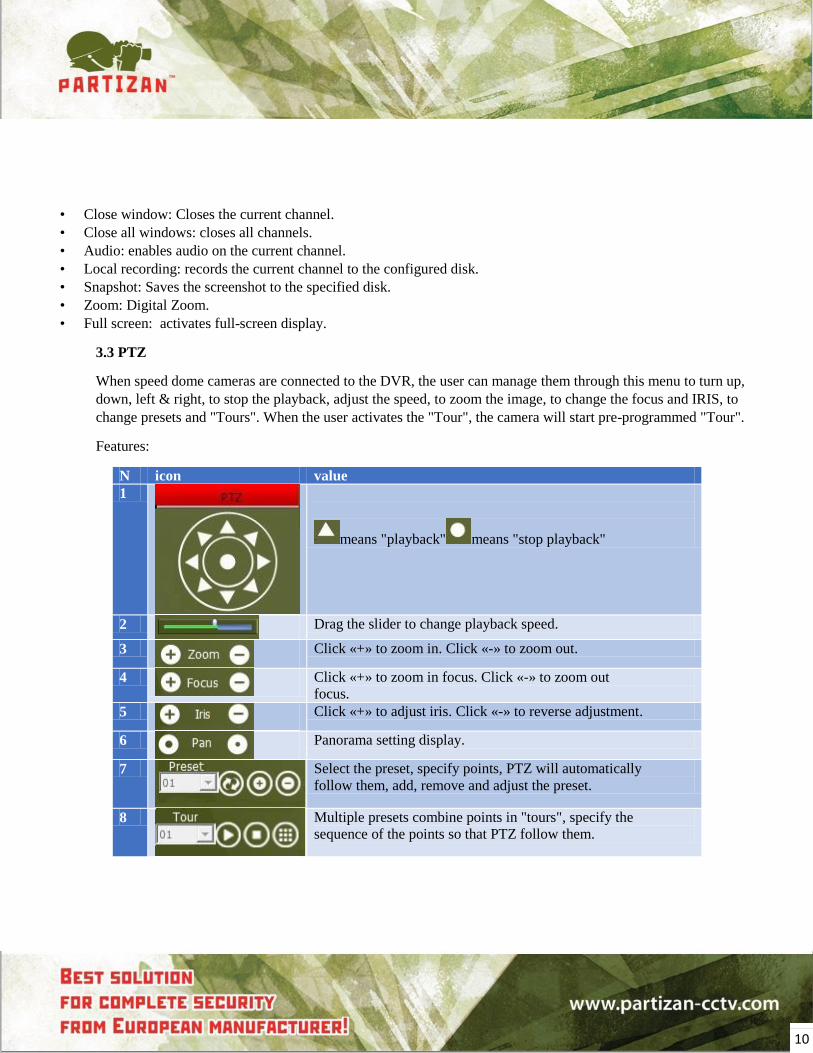
3.3 PTZ
When speed dome cameras are connected to the DVR, the user can manage them through this menu to turn up,
down, left & right, to stop the playback, adjust the speed, to zoom the image, to change the focus and IRIS, to
change presets and "Tours". When the user activates the "Tour", the camera will start pre-programmed "Tour".
Features:
N icon value
1
means "playback" means "stop playback"
2
Drag the slider to change playback speed.
3
Click «+» to zoom in. Click «-» to zoom out.
4
Click «+» to zoom in focus. Click «-» to zoom out
focus.
5
Click «+» to adjust iris. Click «-» to reverse adjustment.
6
Panorama setting display.
7
Select the preset, specify points, PTZ will automatically
follow them, add, remove and adjust the preset.
8
Multiple presets combine points in "tours", specify the
sequence of the points so that PTZ follow them.
11
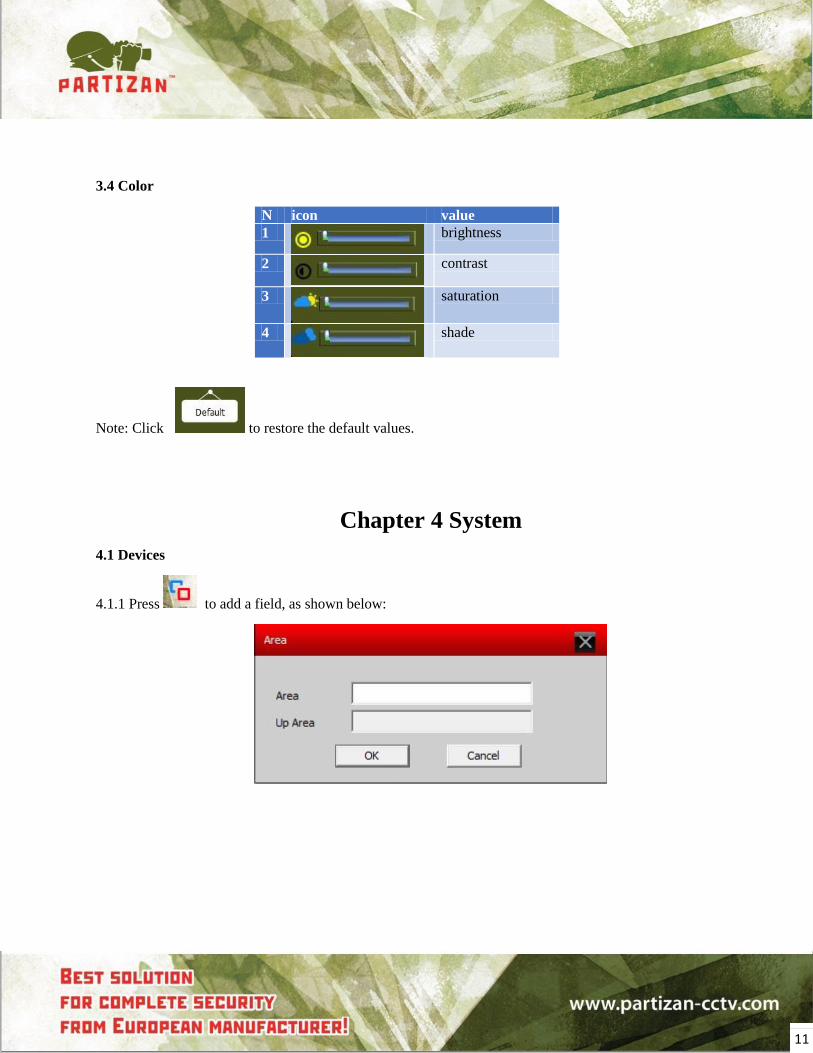
3.4 Color
N icon value
1
brightness
2
contrast
3
saturation
4
shade
Note: Click to restore the default values.
Chapter 4 System
4.1 Devices
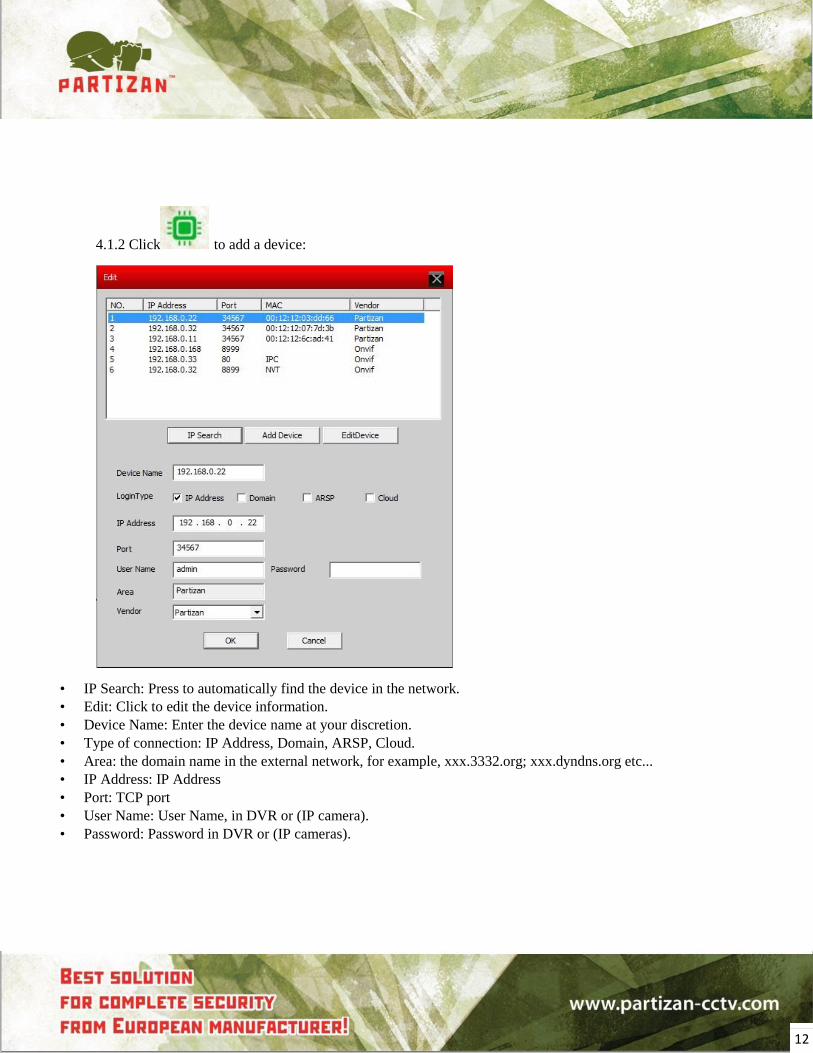
4.1.1 Press to add a field, as shown below:
12
4.1.2 Click to add a device:
• IP Search: Press to automatically find the device in the network.
• Edit: Click to edit the device information.
• Device Name: Enter the device name at your discretion.
• Type of connection: IP Address, Domain, ARSP, Cloud.
• Area: the domain name in the external network, for example, xxx.3332.org; xxx.dyndns.org etc...
• IP Address: IP Address
• Port: TCP port
• User Name: User Name, in DVR or (IP camera).
• Password: Password in DVR or (IP cameras).
13
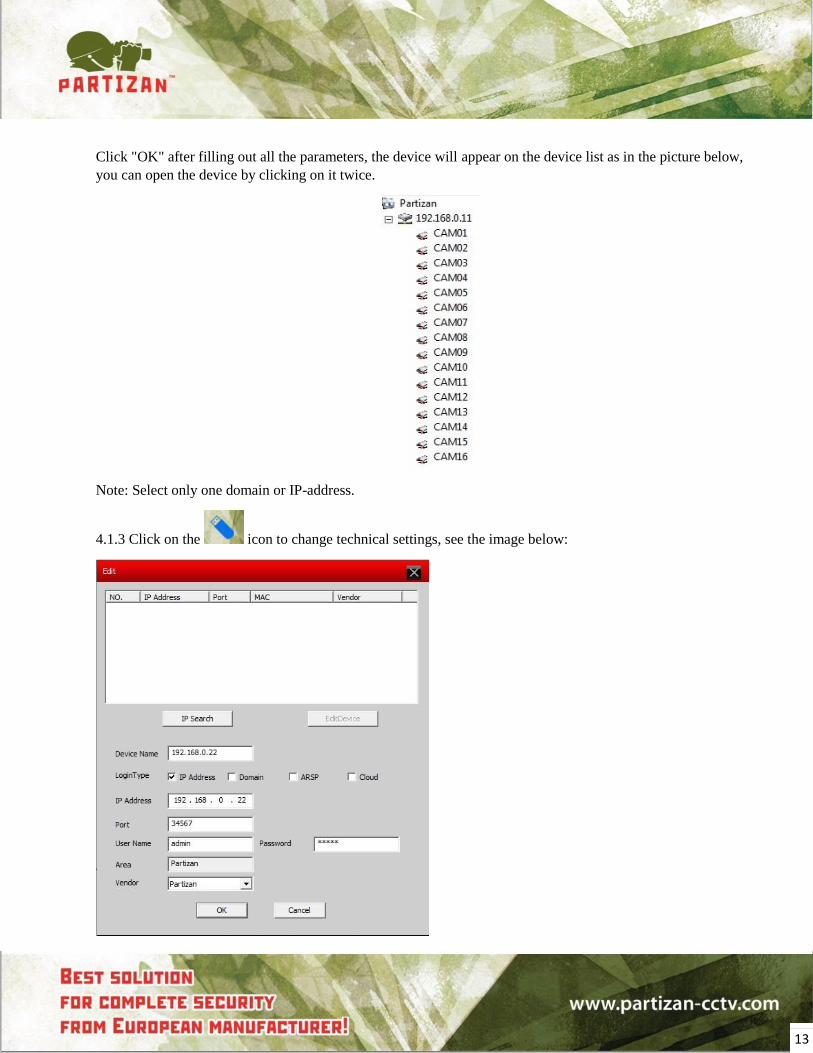
Click "OK" after filling out all the parameters, the device will appear on the device list as in the picture below,
you can open the device by clicking on it twice.
Note: Select only one domain or IP-address.
4.1.3 Click on the icon to change technical settings, see the image below:

14
After completing all the changes, click "OK"
4.1.4 Remove Devices: Select the device you want to delete, then press:
Note: Please make sure your device is turned off before you make changes or remove the device.
4.1.5 Export devices: Select the device you want to export, and then click:
4.1.6 Importing devices: Select the device you want to import, and then click:
4.1.7 Connection Test: Select the device which you want to verify, and then click:
5.2 Local Config
5.2.1 Base Config: See the picture below:
• Log Maintenance: The duration of storage of alarm events, and system events
• Snapshot: folder to save images
• Local record: folder to save video
15
Device:
• Time Synchronization with PC: configures the device and the PC making time overall.
• The Auto Channel latter compound.
• One screen main screen, multi-screen additional stream: In quadmode channels will be displayed in additional
stream, by selecting a channel in full screen, the channel will be displayed in the main stream.
Normal settings:
• Language: Select language for the CMS.
• Run On startup: CMS program will start after Windows loading.
• Automatic connects to the latest monitoring channel: on CMS start, the channels will be opened in the same
sequences as before closing the program.
• Automatic lock screen: Locks programs in standby mode.
• Password is required to exit: To close the program, you have to enter user’s password.
• Auto Login: automatic login.
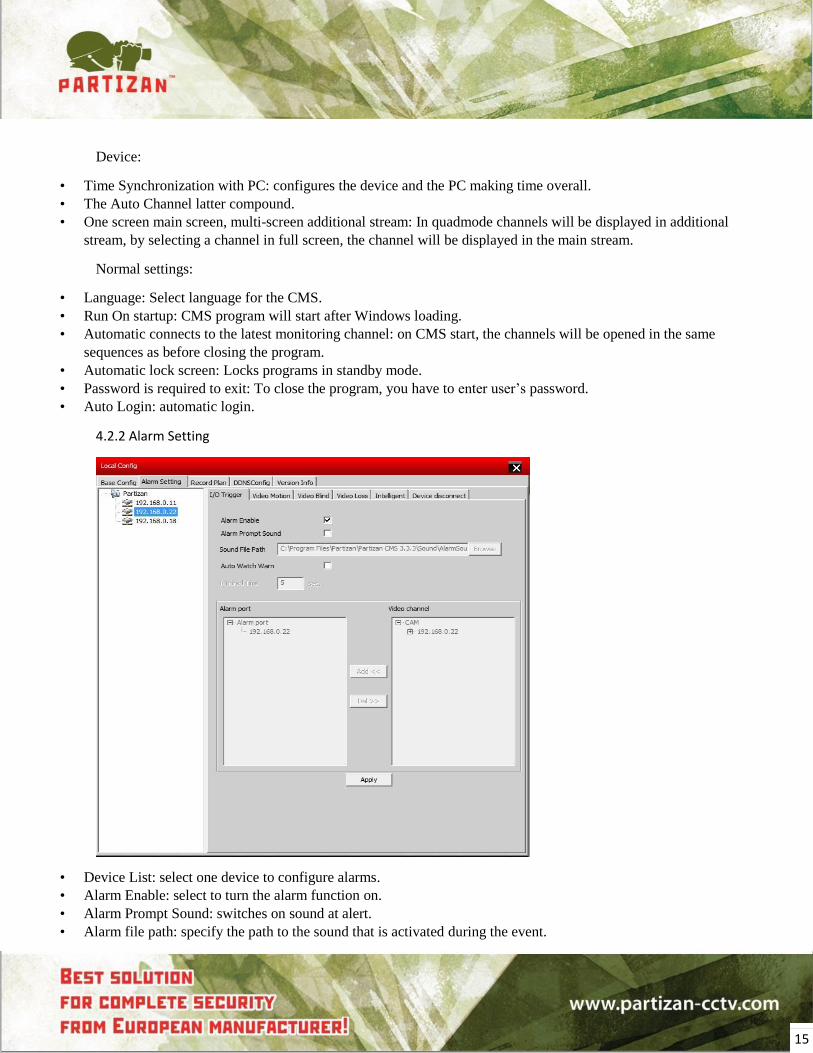
4.2.2 Alarm Setting
• Device List: select one device to configure alarms.
• Alarm Enable: select to turn the alarm function on.
• Alarm Prompt Sound: switches on sound at alert.
• Alarm file path: specify the path to the sound that is activated during the event.
16
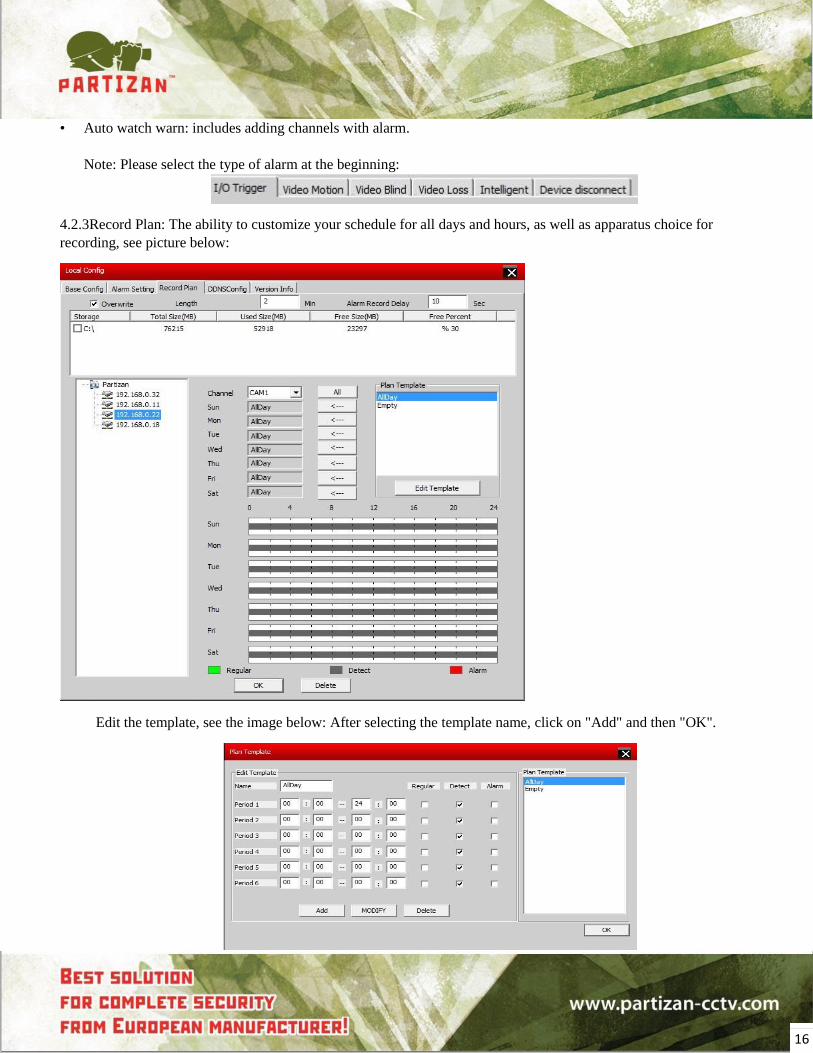
• Auto watch warn: includes adding channels with alarm.
Note: Please select the type of alarm at the beginning:
4.2.3Record Plan: The ability to customize your schedule for all days and hours, as well as apparatus choice for
recording, see picture below:
Edit the template, see the image below: After selecting the template name, click on "Add" and then "OK".
17
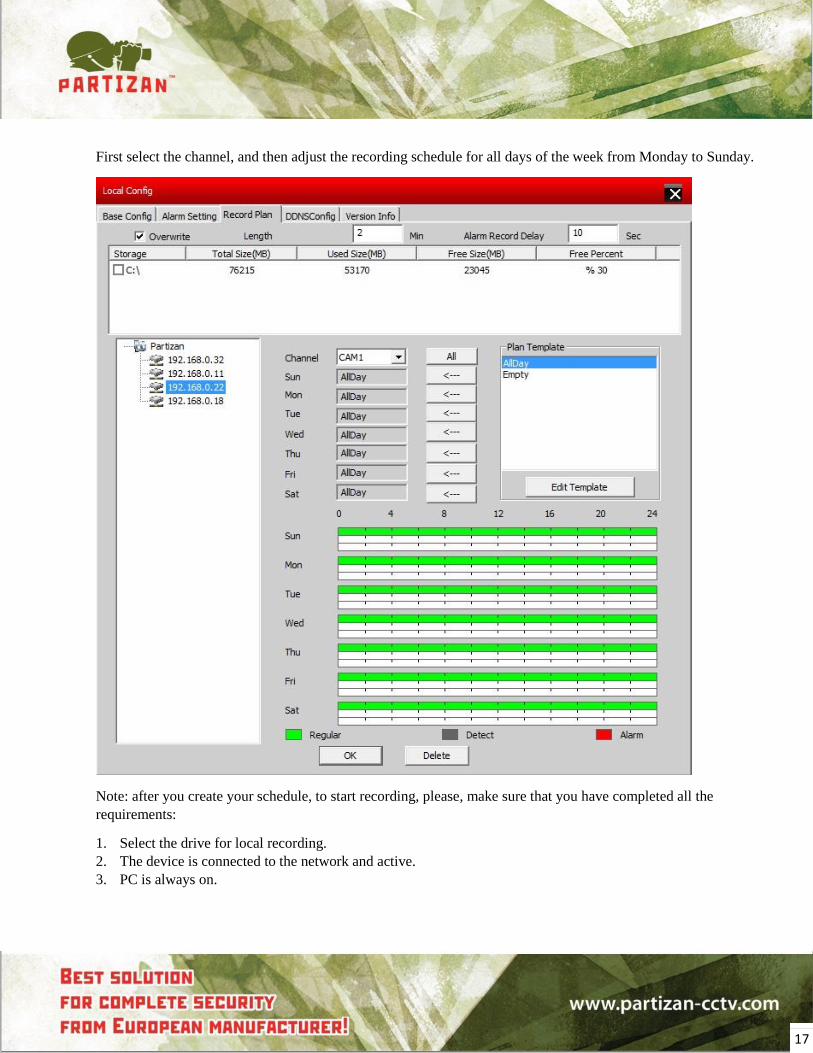
First select the channel, and then adjust the recording schedule for all days of the week from Monday to Sunday.
Note: after you create your schedule, to start recording, please, make sure that you have completed all the
requirements:
1. Select the drive for local recording.
2. The device is connected to the network and active.
3. PC is always on.
18
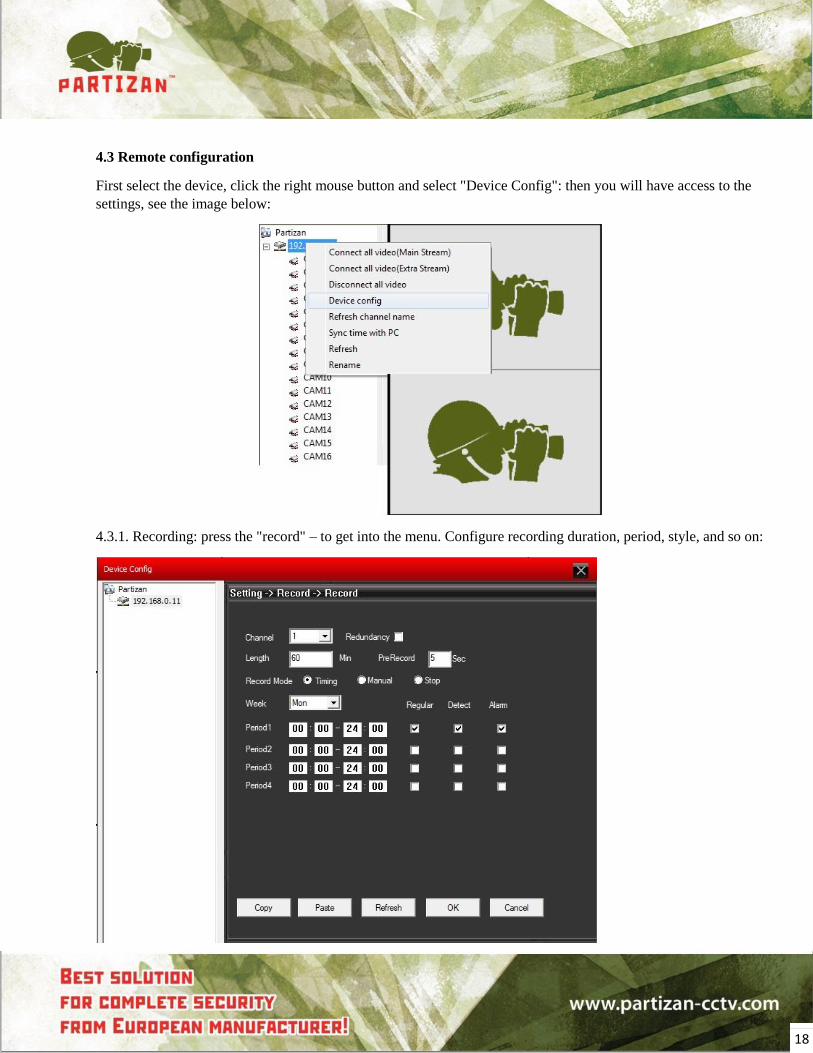
4.3 Remote configuration
First select the device, click the right mouse button and select "Device Config": then you will have access to the
settings, see the image below:
4.3.1. Recording: press the "record" – to get into the menu. Configure recording duration, period, style, and so on:
19
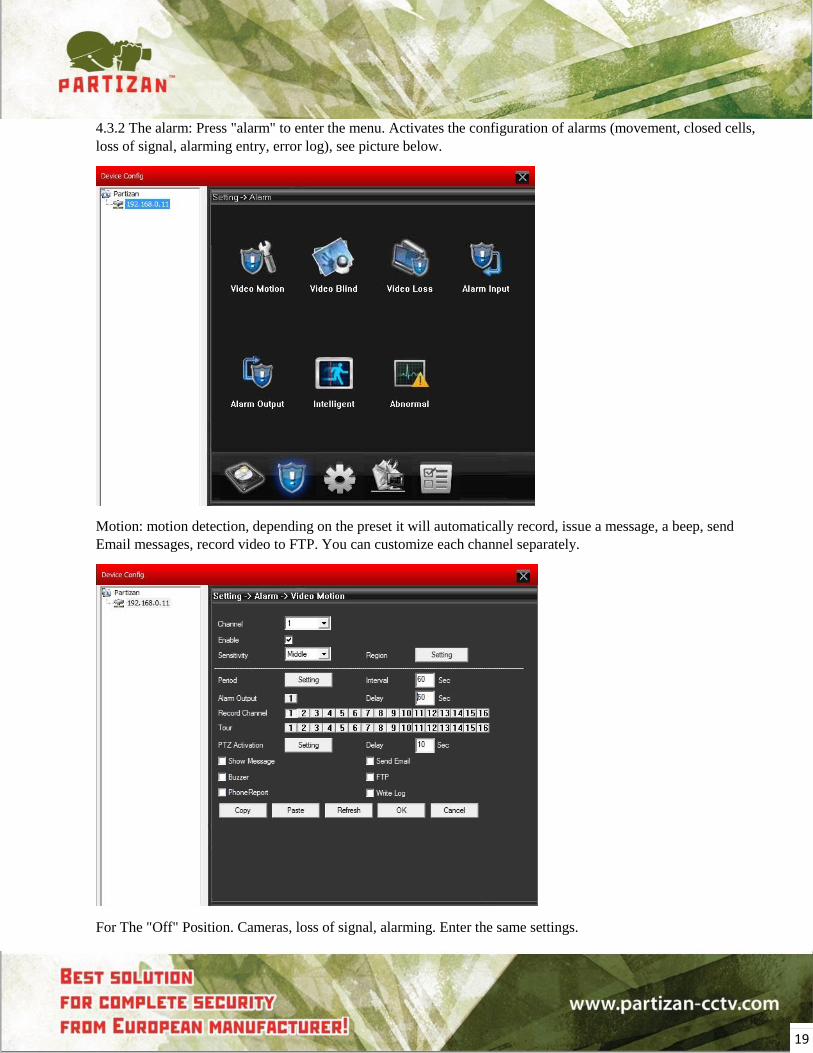
4.3.2 The alarm: Press "alarm" to enter the menu. Activates the configuration of alarms (movement, closed cells,
loss of signal, alarming entry, error log), see picture below.
Motion: motion detection, depending on the preset it will automatically record, issue a message, a beep, send
Email messages, record video to FTP. You can customize each channel separately.
For The "Off" Position. Cameras, loss of signal, alarming. Enter the same settings.
20
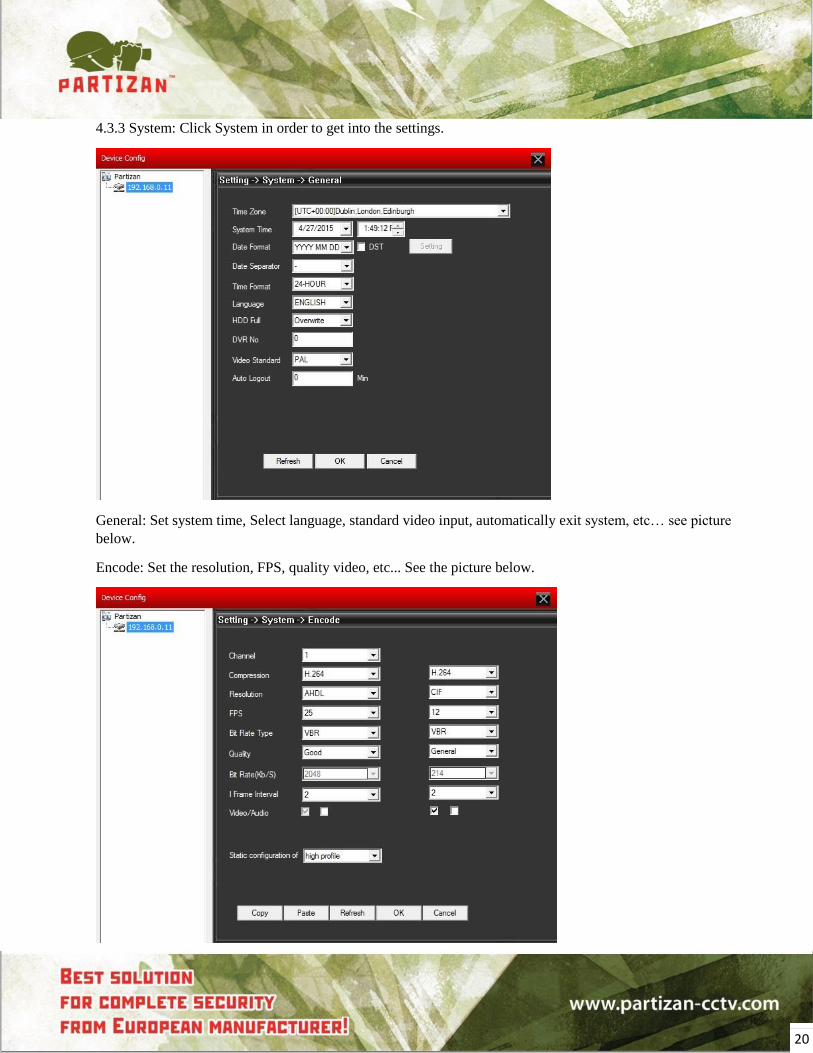
4.3.3 System: Click System in order to get into the settings.
General: Set system time, Select language, standard video input, automatically exit system, etc… see picture
below.
Encode: Set the resolution, FPS, quality video, etc... See the picture below.
21
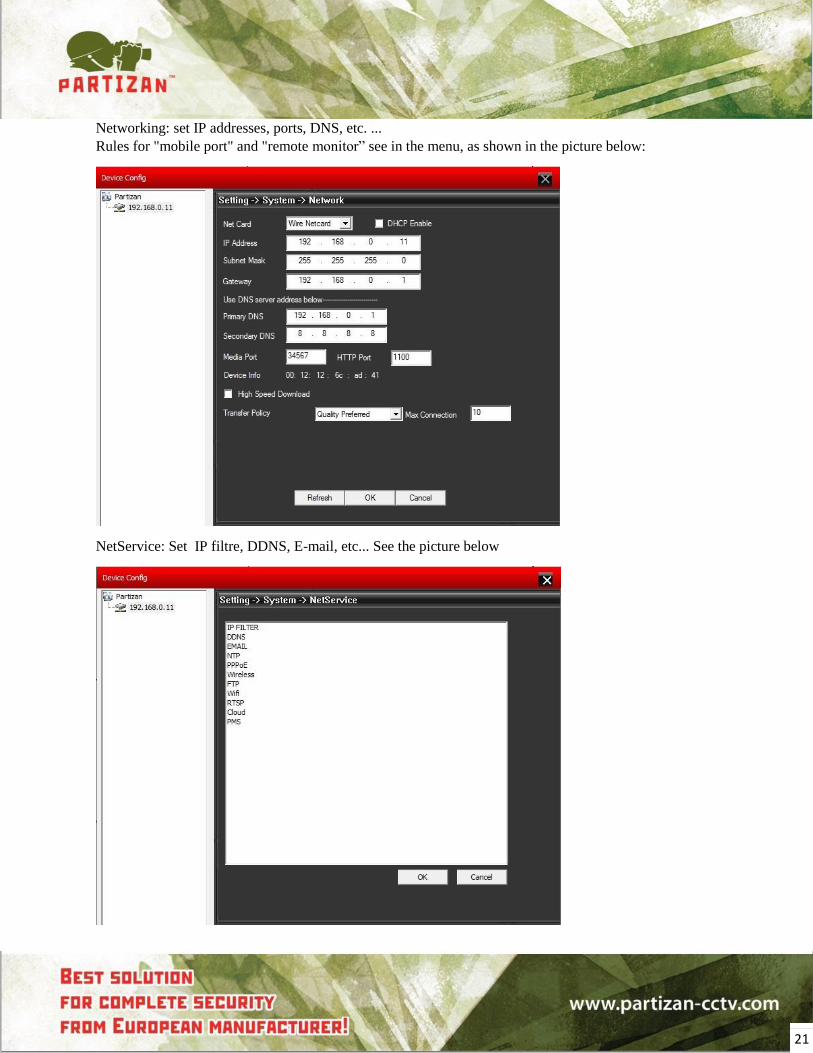
Networking: set IP addresses, ports, DNS, etc. ...
Rules for "mobile port" and "remote monitor” see in the menu, as shown in the picture below:
NetService: Set IP filtre, DDNS, E-mail, etc... See the picture below
22
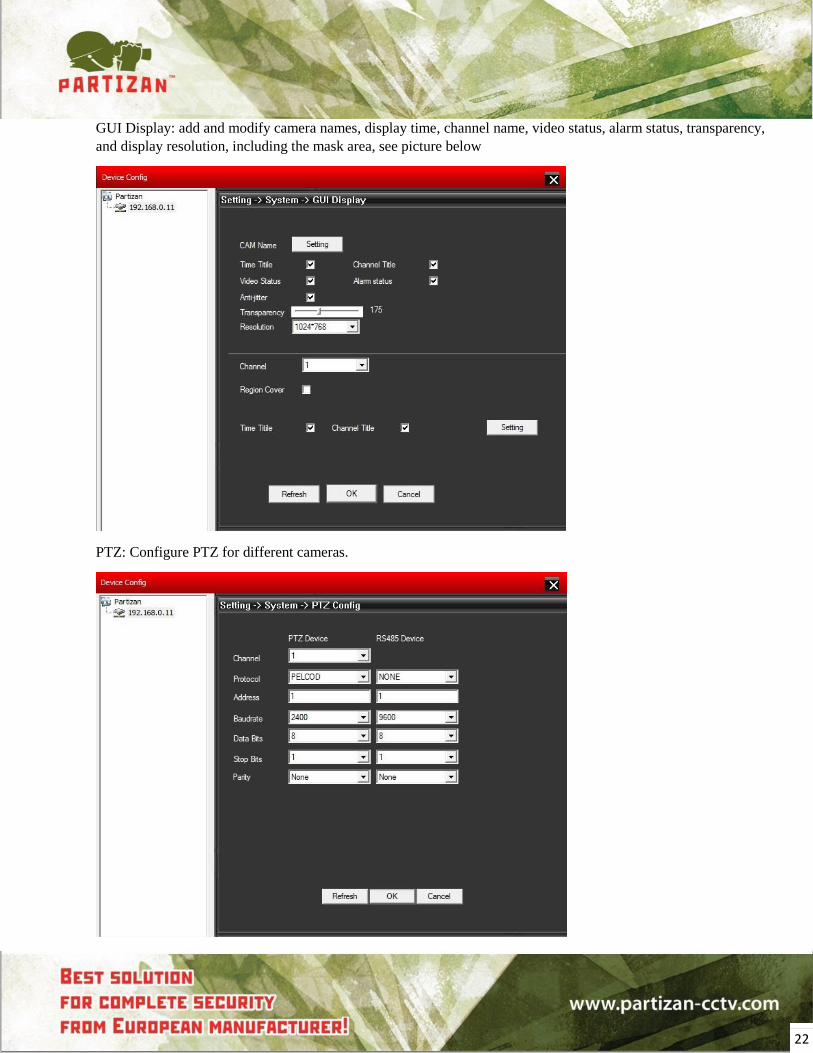
GUI Display: add and modify camera names, display time, channel name, video status, alarm status, transparency,
and display resolution, including the mask area, see picture below
PTZ: Configure PTZ for different cameras.
23
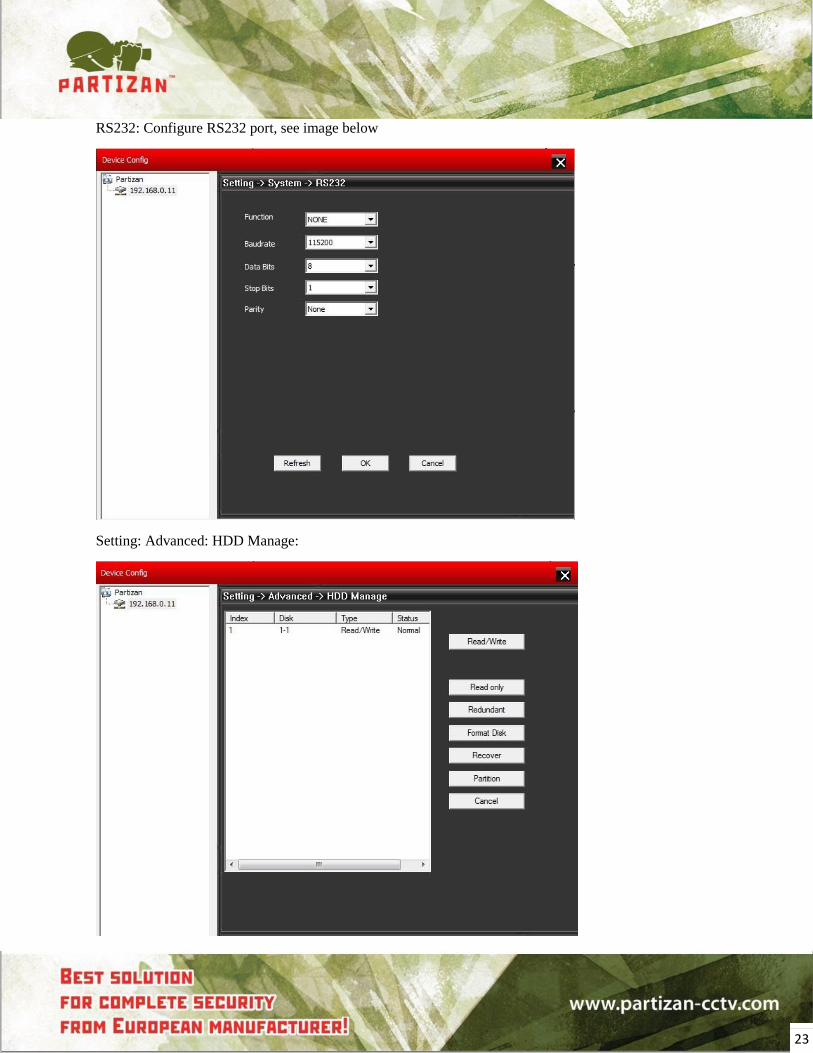
RS232: Configure RS232 port, see image below
Setting: Advanced: HDD Manage:
24
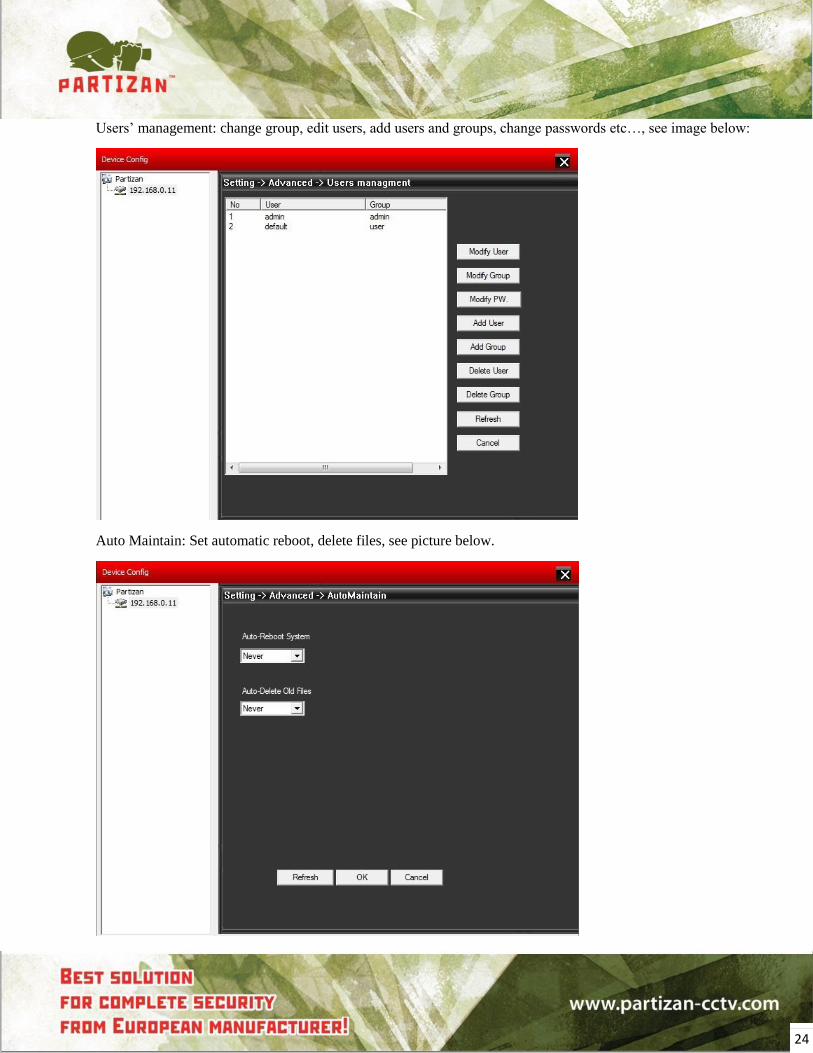
Users’ management: change group, edit users, add users and groups, change passwords etc…, see image below:
Auto Maintain: Set automatic reboot, delete files, see picture below.
25
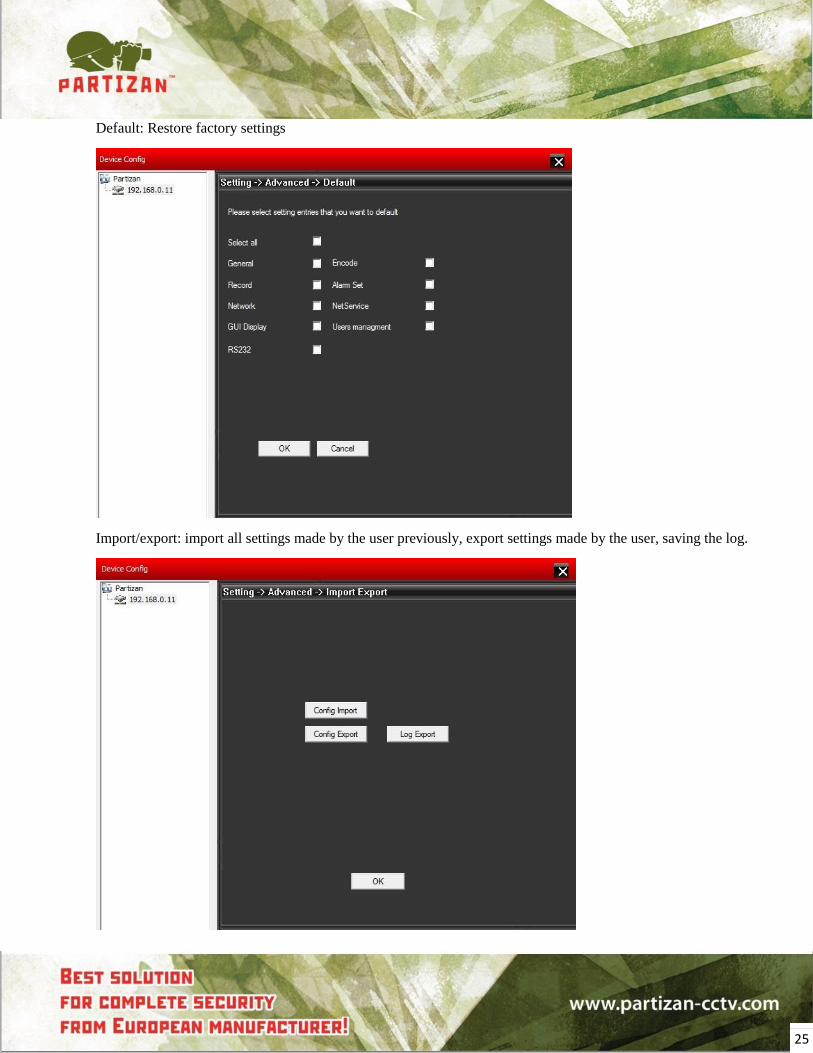
Default: Restore factory settings
Import/export: import all settings made by the user previously, export settings made by the user, saving the log.
26
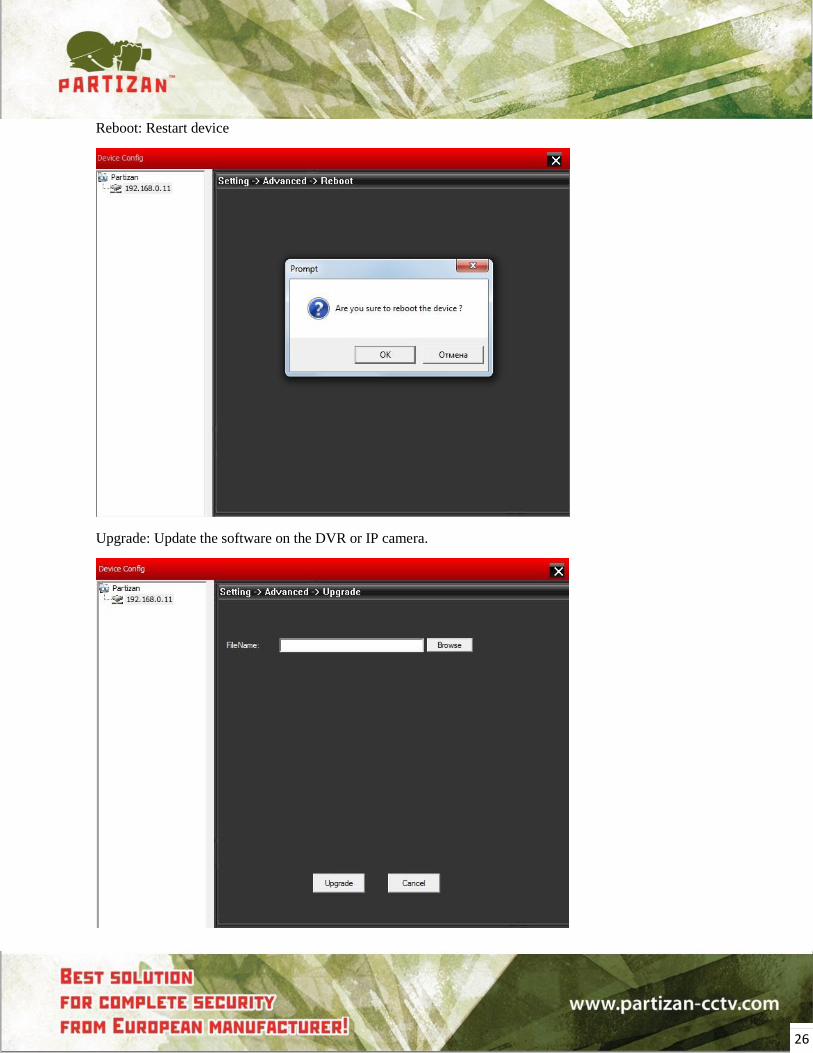
Reboot: Restart device
Upgrade: Update the software on the DVR or IP camera.
27
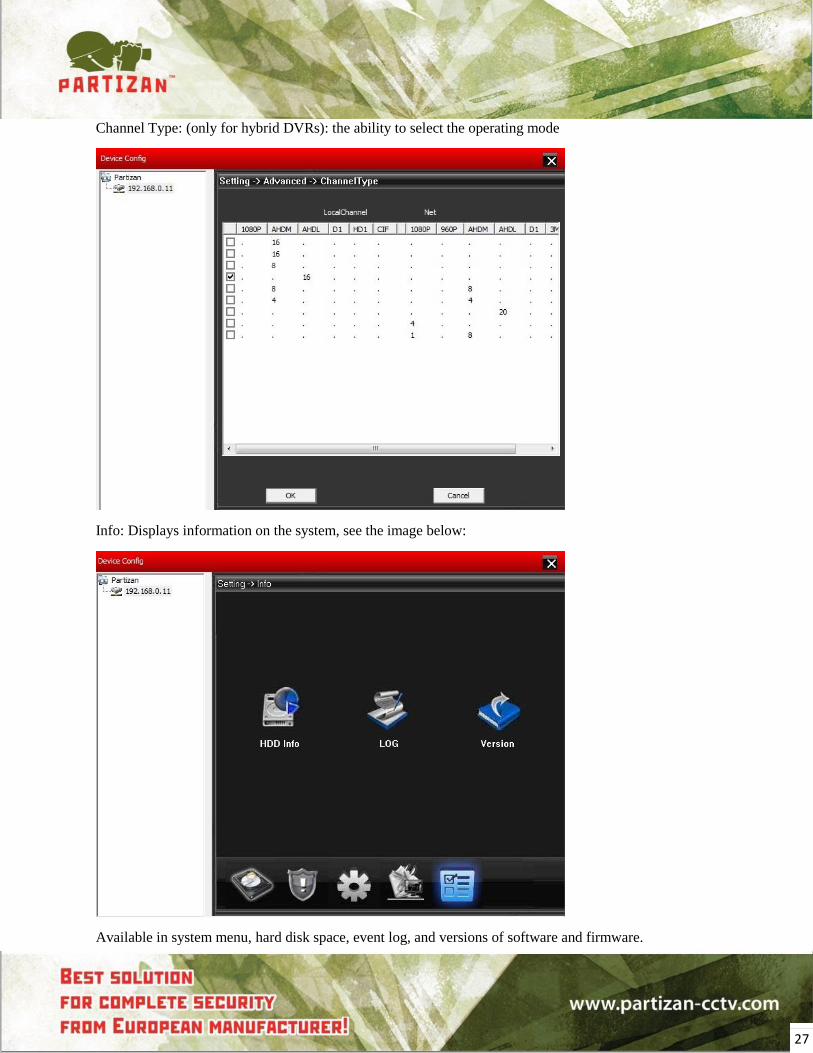
Channel Type: (only for hybrid DVRs): the ability to select the operating mode
Info: Displays information on the system, see the image below:
Available in system menu, hard disk space, event log, and versions of software and firmware.
28
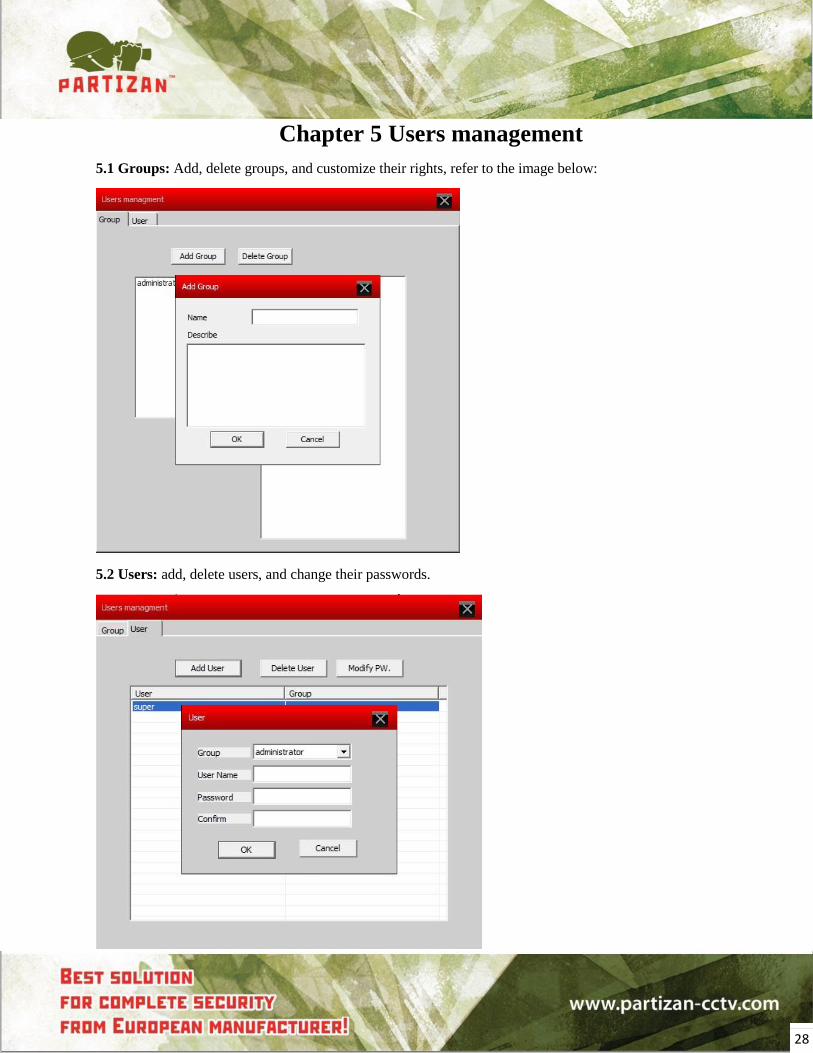
Chapter 5 Users management
5.1 Groups: Add, delete groups, and customize their rights, refer to the image below:
5.2 Users: add, delete users, and change their passwords.
29
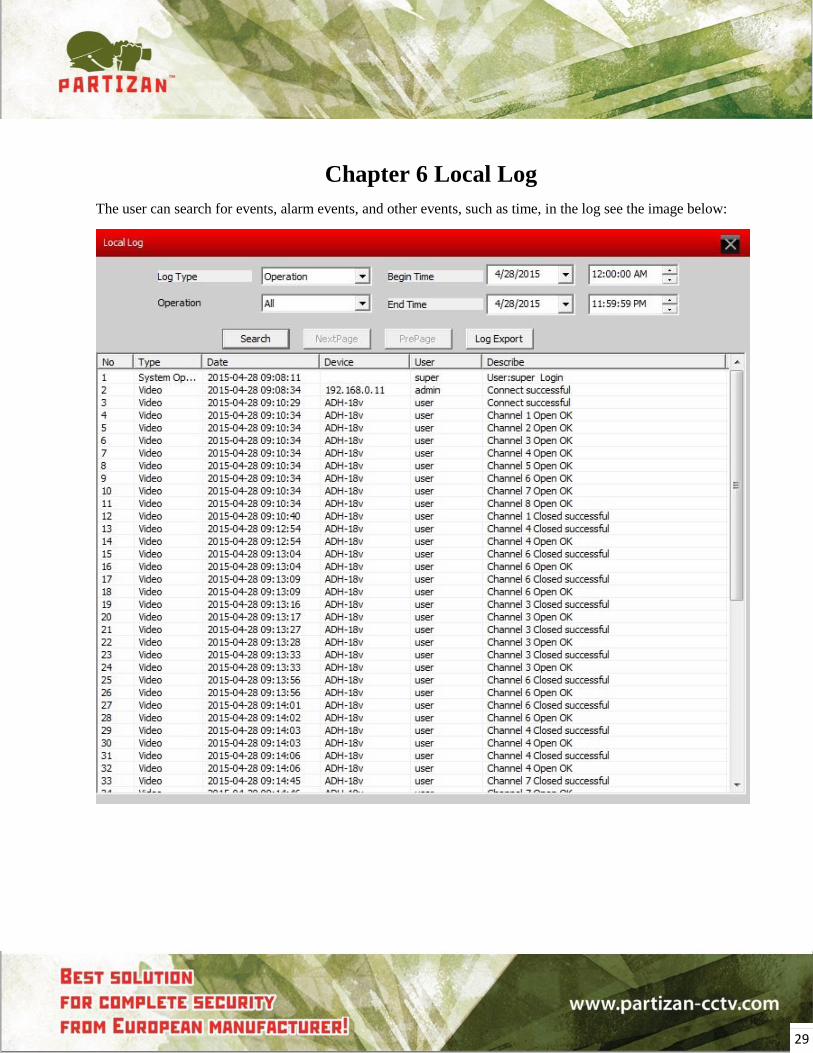
Chapter 6 Local Log
The user can search for events, alarm events, and other events, such as time, in the log see the image below:
30
Chapter 7 Recording
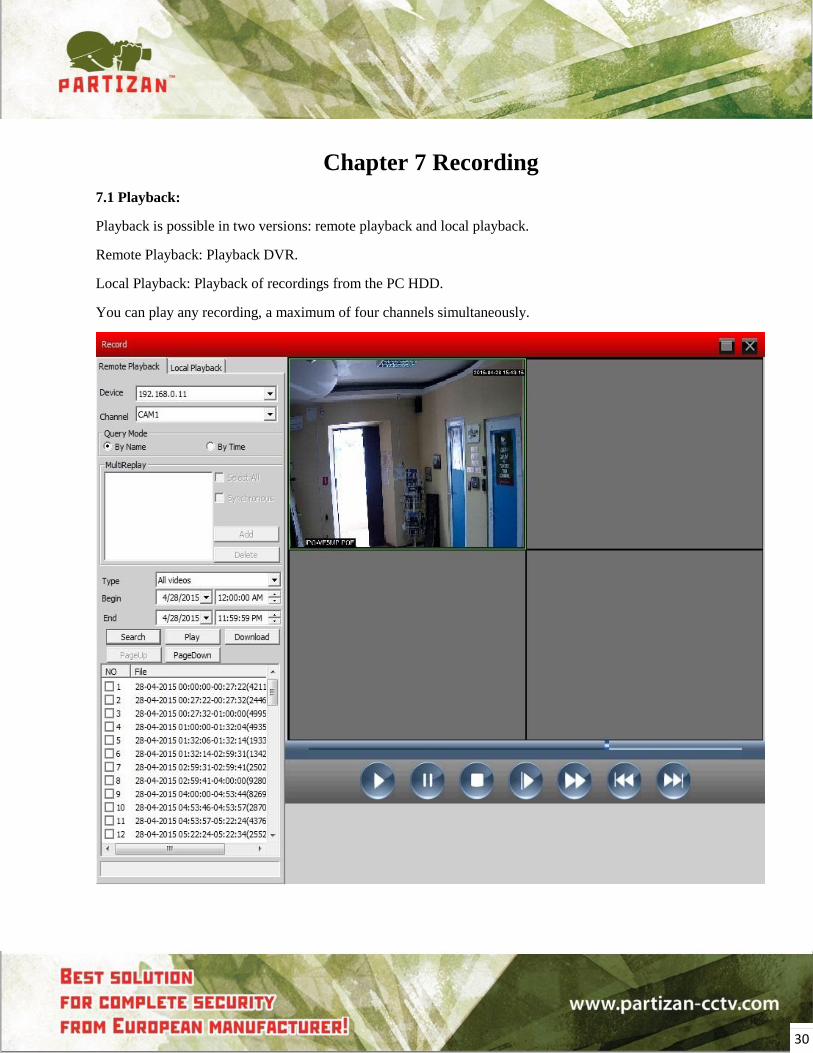
7.1 Playback:
Playback is possible in two versions: remote playback and local playback.
Remote Playback: Playback DVR.
Local Playback: Playback of recordings from the PC HDD.
You can play any recording, a maximum of four channels simultaneously.
31
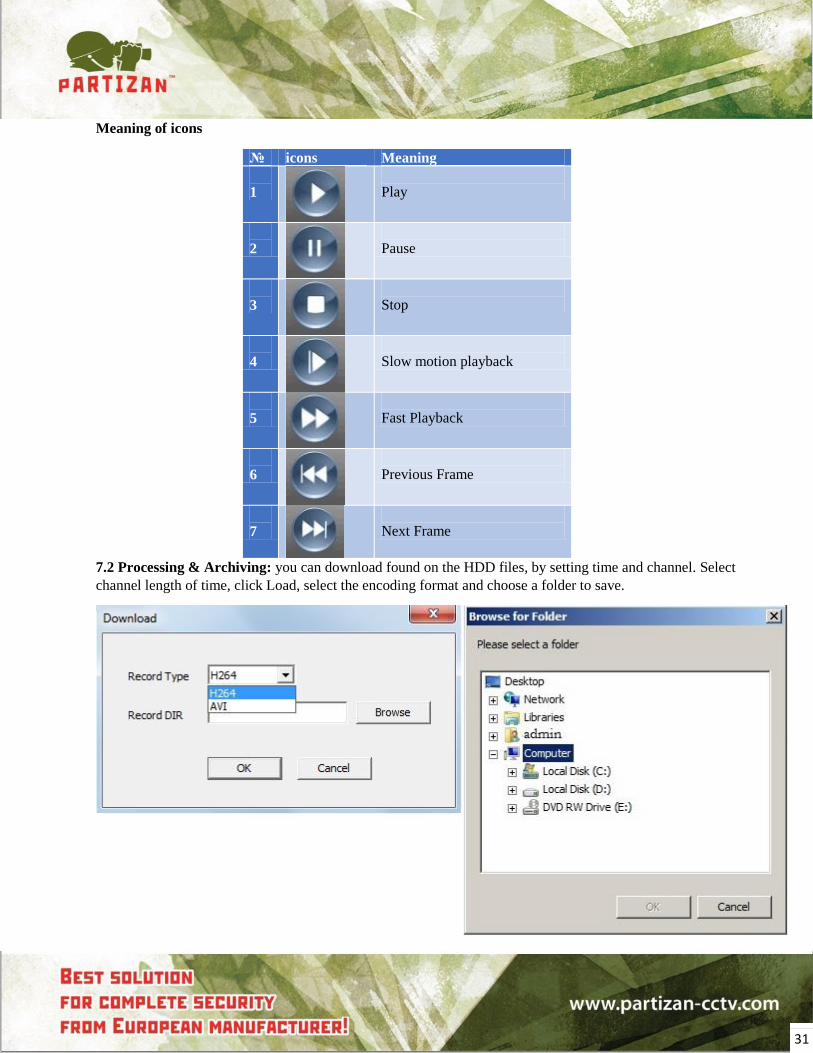
Meaning of icons
№ icons Meaning
1
Play
2
Pause
3
Stop
4
Slow motion playback
5
Fast Playback
6
Previous Frame
7
Next Frame
7.2 Processing & Archiving: you can download found on the HDD files, by setting time and channel. Select
channel length of time, click Load, select the encoding format and choose a folder to save.
32
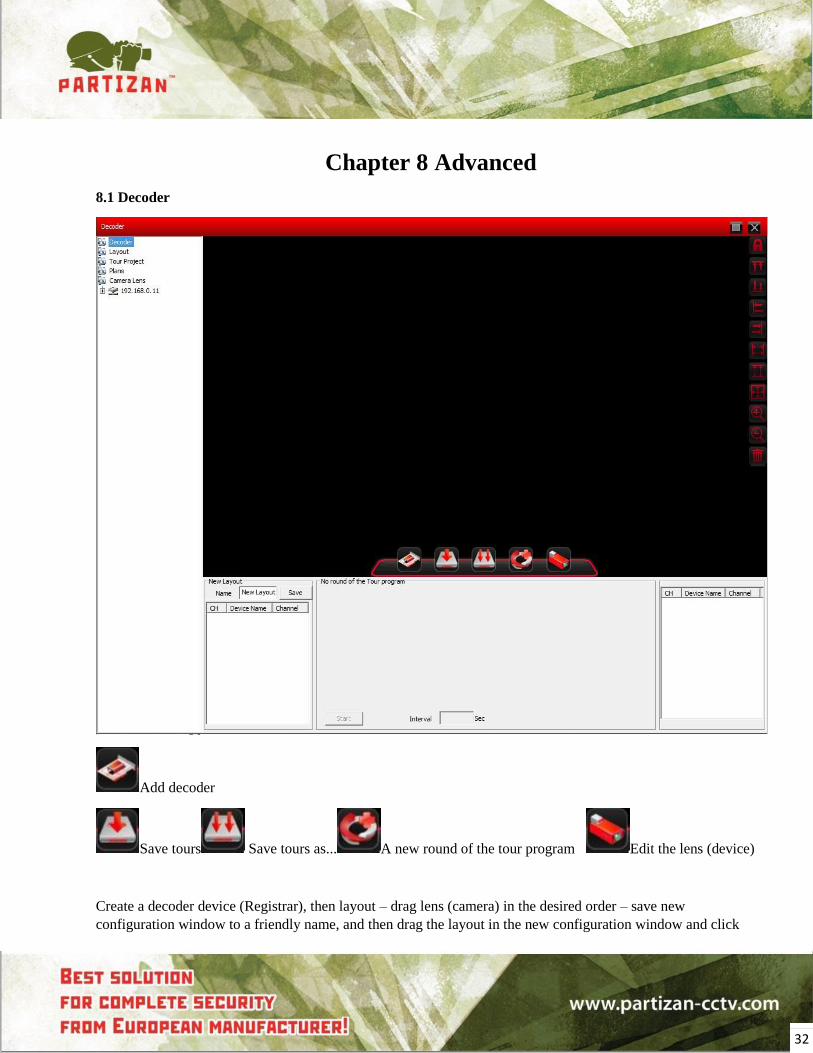
Chapter 8 Advanced
8.1 Decoder
Add decoder
Save tours Save tours as... A new round of the tour program Edit the lens (device)
Create a decoder device (Registrar), then layout – drag lens (camera) in the desired order – save new
configuration window to a friendly name, and then drag the layout in the new configuration window and click
33
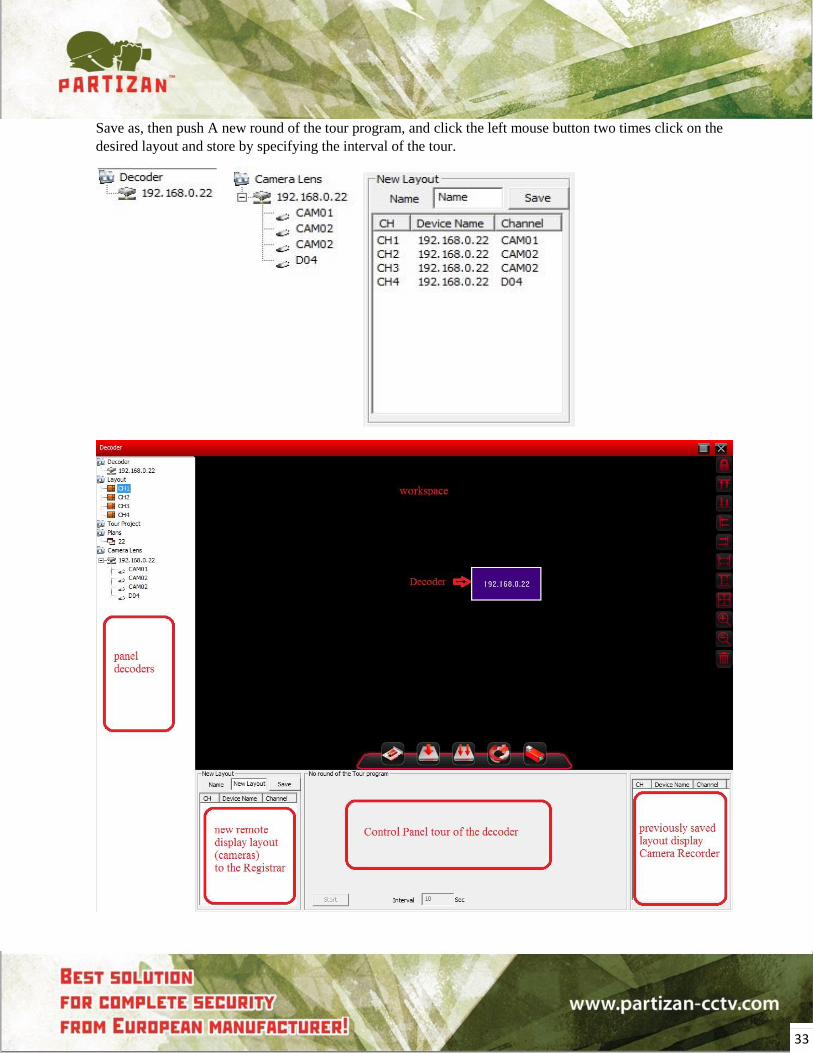
Save as, then push A new round of the tour program, and click the left mouse button two times click on the
desired layout and store by specifying the interval of the tour.
34
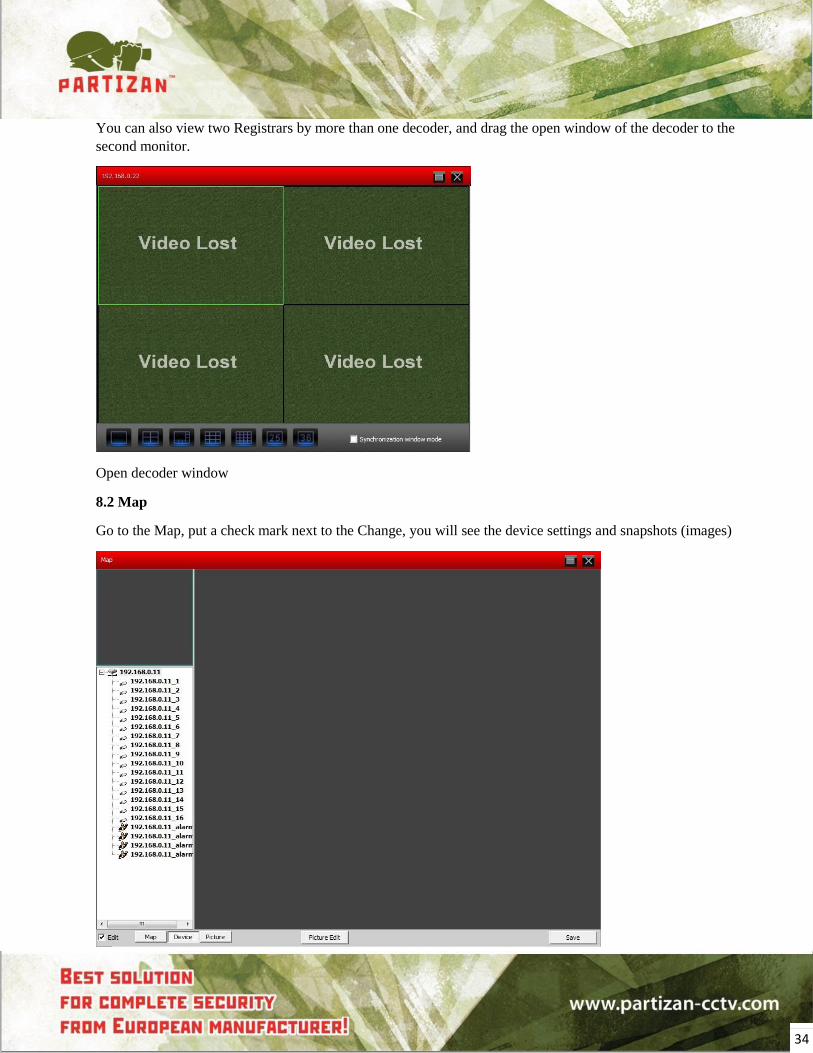
You can also view two Registrars by more than one decoder, and drag the open window of the decoder to the
second monitor.
Open decoder window
8.2 Map
Go to the Map, put a check mark next to the Change, you will see the device settings and snapshots (images)
35
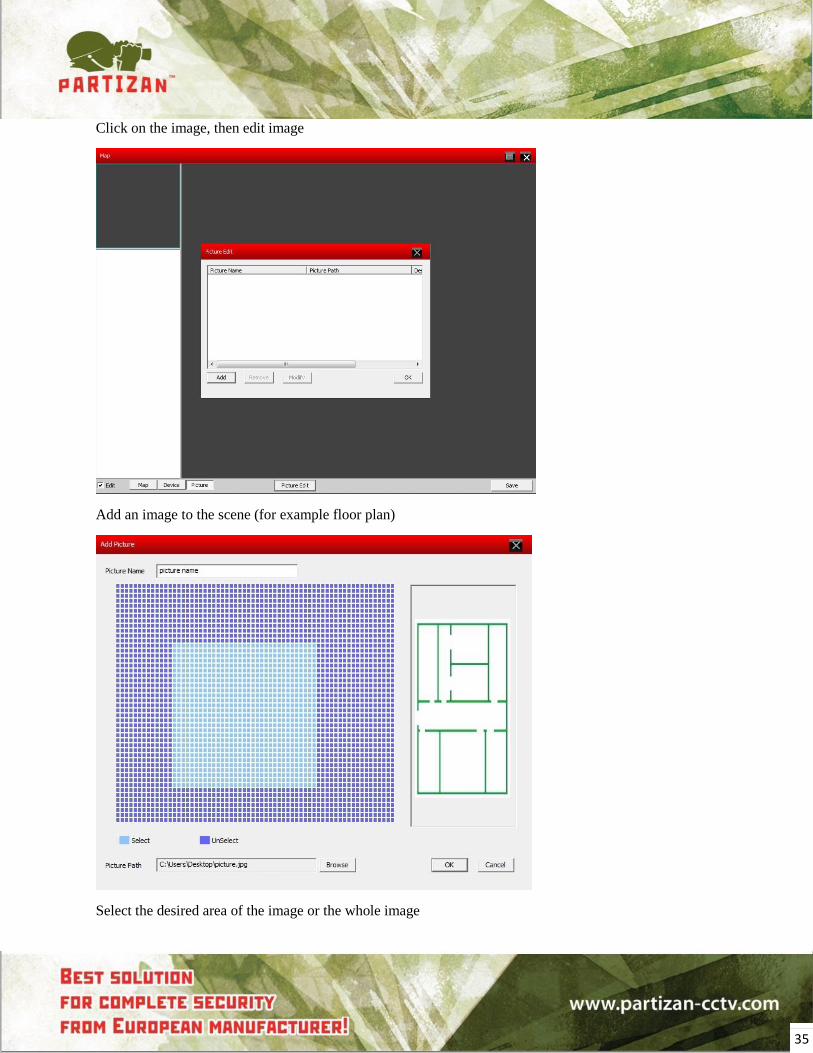
Click on the image, then edit image
Add an image to the scene (for example floor plan)
Select the desired area of the image or the whole image
36
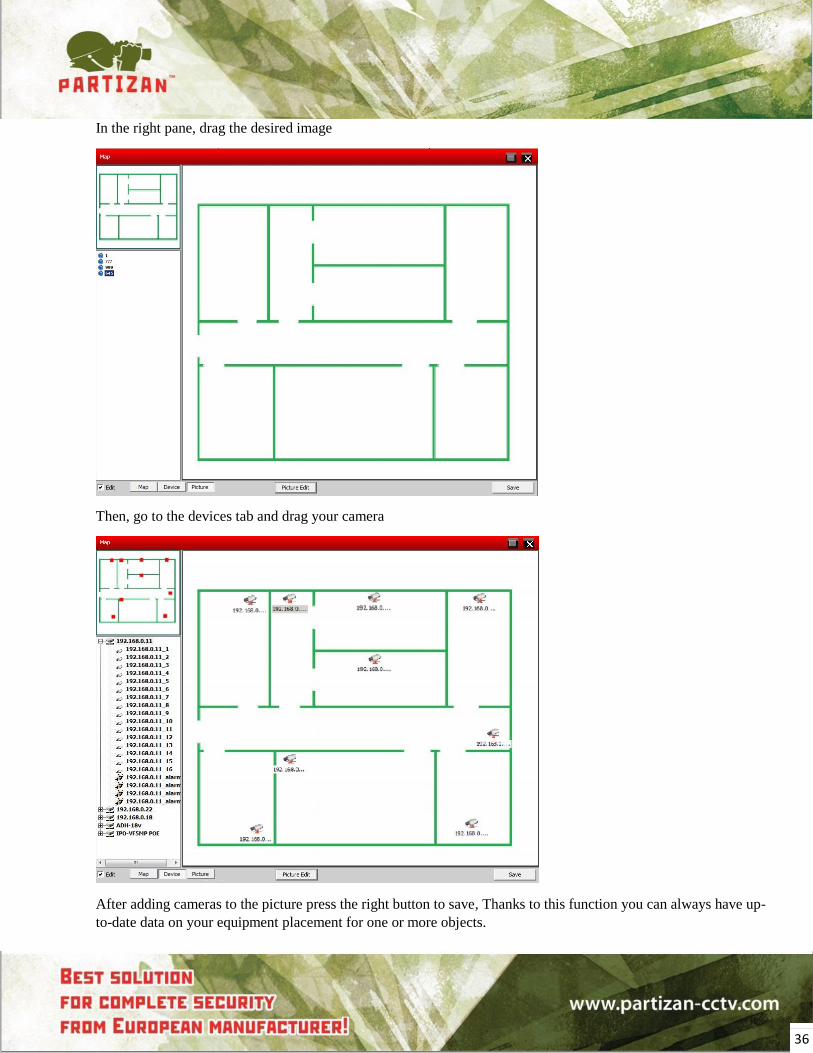
In the right pane, drag the desired image
Then, go to the devices tab and drag your camera
After adding cameras to the picture press the right button to save, Thanks to this function you can always have up-
to-date data on your equipment placement for one or more objects.
37
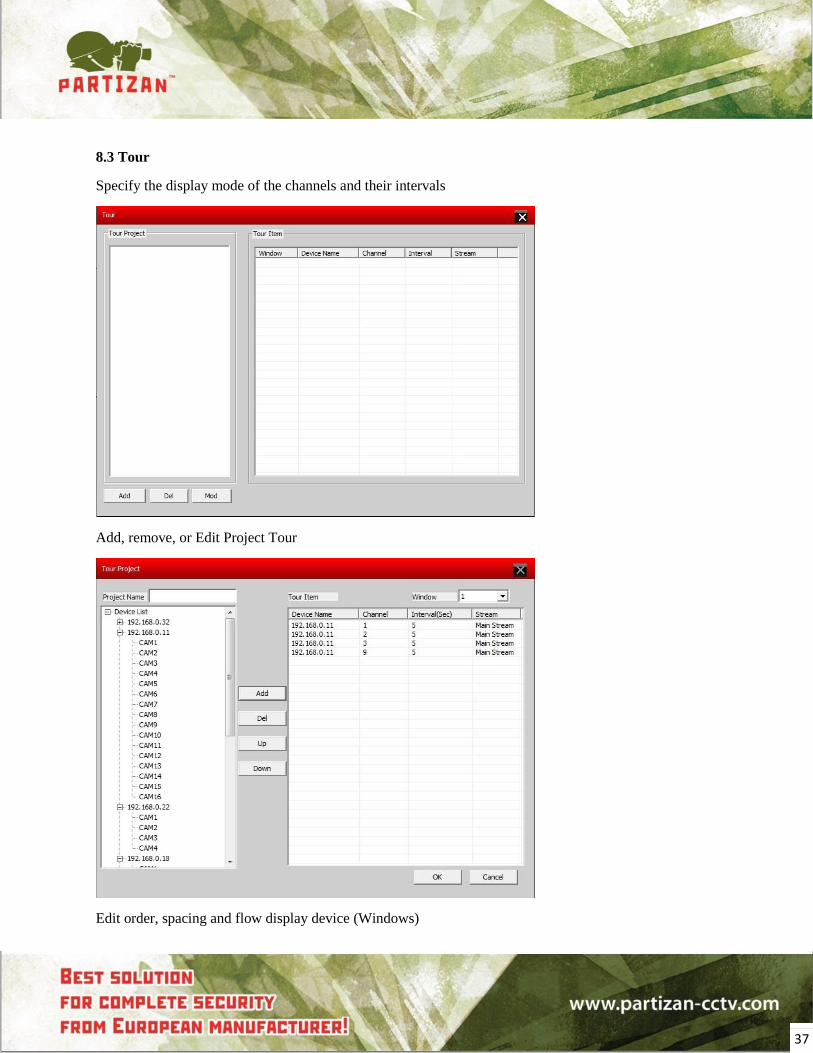
8.3 Tour
Specify the display mode of the channels and their intervals
Add, remove, or Edit Project Tour
Edit order, spacing and flow display device (Windows)
38
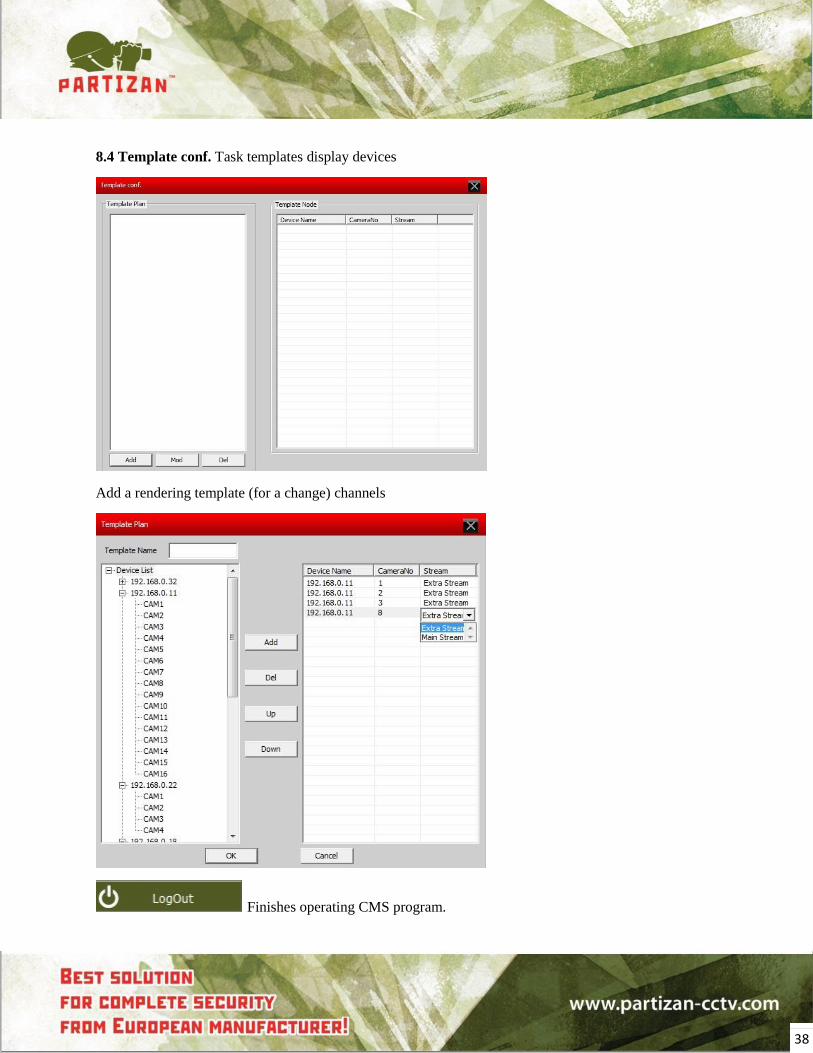
8.4 Template conf. Task templates display devices
Add a rendering template (for a change) channels
Finishes operating CMS program.