chapter 1 exposure triangle - one suffolk...chapter 1 exposure triangle i do not want to preach or...
TRANSCRIPT
BASICS OF PHOTOGRAPHY FOR
BEGINNERS.
Chapter 1 Exposure Triangle
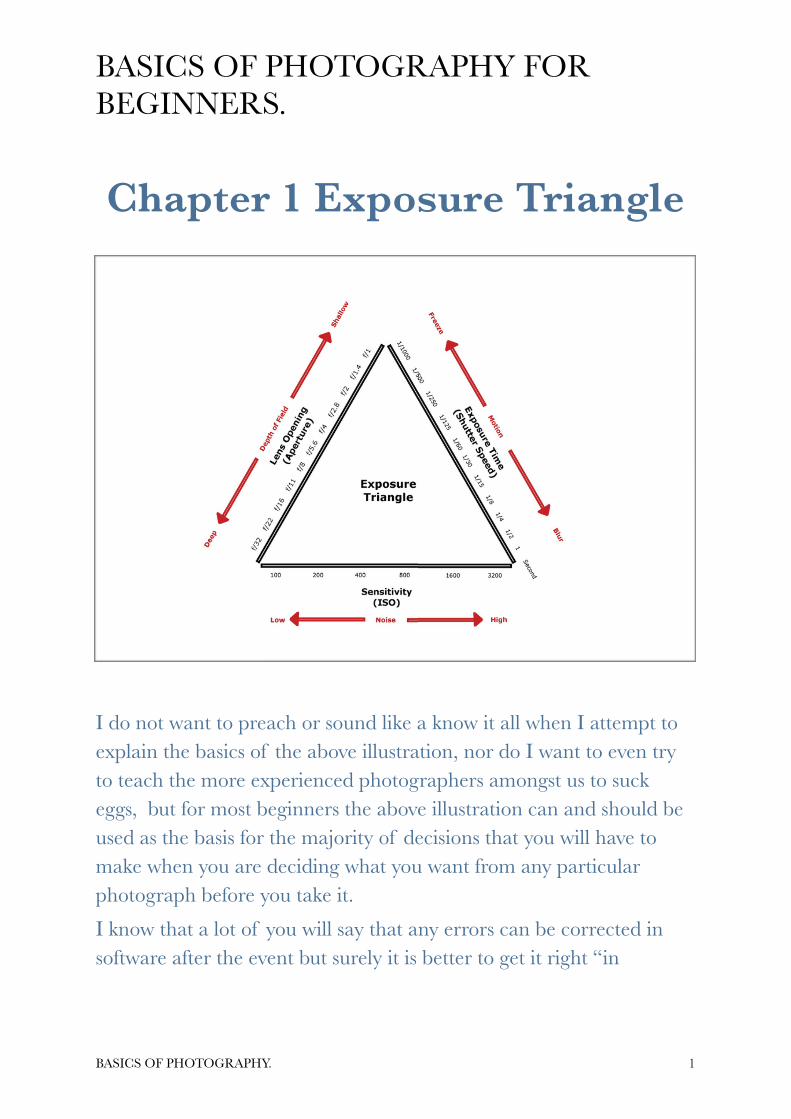
I do not want to preach or sound like a know it all when I attempt to
explain the basics of the above illustration, nor do I want to even try
to teach the more experienced photographers amongst us to suck
eggs, but for most beginners the above illustration can and should be
used as the basis for the majority of decisions that you will have to
make when you are deciding what you want from any particular
photograph before you take it.
I know that a lot of you will say that any errors can be corrected in
software after the event but surely it is better to get it right “in
BASICS OF PHOTOGRAPHY. 1

BASICS OF PHOTOGRAPHY FOR
BEGINNERS.
camera” rather than have to sit for ages in front of a pc screen trying
to correct errors.
Of course there are many errors that simply cannot be corrected after
the event “depth of field” and “camera shake” being but 2 of them,
both of which are affected by the setting of the elements in the above
illustration.
The following definitions were written by photographic author Bryan
Peterson who can write more eloquently and accurately than I can:-
The three elements are:1 ISO – the measure of a digital camera sensor’s
sensitivity to light.
2 Aperture – the size of the opening in the lens when a
picture is taken.
3 Shutter Speed – the amount of time that the shutter is
open.
3 Metaphors for understanding the
digital photography exposure
triangle:Many people describe the relationship between ISO, Aperture and
Shutter Speed using different metaphors to help us get our heads
around it. Let me share three. A quick word of warning first though –
like most metaphors – these are far from perfect and are just for
illustrative purposes:
BASICS OF PHOTOGRAPHY. !2

BASICS OF PHOTOGRAPHY FOR
BEGINNERS.
!
The WindowImagine your camera is like a window with shutters that open and
close.
Aperture is the size of the window. If it’s bigger more light gets
through and the room is brighter.
Shutter Speed is the amount of time that the shutters of the window
are open. The longer you leave them open the more light that comes
in.
Now imagine that you’re inside the room and are wearing sunglasses
(hopefully this isn’t too much of a stretch). Your eyes become
desensitised to the light that comes in (it’s like a low ISO).
There are a number of ways of increasing the amount of light in the
room (or at least how much it seems that there is. You could increase
the time that the shutters are open (decrease shutter speed), you could
increase the size of the window (increase aperture) or you could take
off your sunglasses (make the ISO larger).
BASICS OF PHOTOGRAPHY. !3

BASICS OF PHOTOGRAPHY FOR
BEGINNERS.
Ok – it’s not the perfect illustration – but you get the idea.
!
SunbathingAnother way that a friend recently shared with me is to think about
digital camera exposure as being like getting a sun tan.
Now getting a suntan is something I always wanted growing up – but
unfortunately being very fair skinned it was something that I never
really achieved. All I did was get burnt when I went out into the sun.
In a sense your skin type is like an ISO rating. Some people are more
sensitive to the sun than others.
Shutter speed in this metaphor is like the length of time you spend out
in the sun. The longer you spend in the sun the increased chances of
you getting a tan (of course spending too long in the sun can mean
being over exposed).
Aperture is like sunscreen which you apply to your skin. Sunscreen
blocks the sun at different rates depending upon it’s strength. Apply a
high strength sunscreen and you decrease the amount of sunlight that
BASICS OF PHOTOGRAPHY. !4

BASICS OF PHOTOGRAPHY FOR
BEGINNERS.
gets through – and as a result even a person with highly sensitive skin
can spend more time in the sun (ie decrease the Aperture and you can
slow down shutter speed and/or decrease ISO).
As I’ve said – neither metaphor is perfect but both illustrate the
interconnectedness of shutter speed, aperture and ISO on your digital
camera.
A third metaphor that I’ve heard used is the Garden Hose (the width
of the hose is aperture, the length of time that the hose is left on is
shutter speed and the pressure of the water (the speed it gets through)
is ISO.
Bringing It All TogetherMastering the art of exposure is something that takes a lot of practice.
In many ways it’s a juggling act and even the most experienced
photographers experiment and tweak their settings as they go. Keep in
mind that changing each element not only impacts the exposure of the
image but each one also has an impact upon other aspects of it (ie
changing aperture changes depth of field, changing ISO changes the
graininess of a shot and changing shutter speed impacts how motion
is captured).
The great thing about digital cameras is that they are the ideal testing
bed for learning about exposure. You can take as many shots as you
like at no cost and they not only allow you to shoot in Auto mode and
Manual mode – but also generally have semi-automatic modes like
aperture priority and shutter priority modes which allow you to make
decisions about one or two elements of the triangle and let the camera
handle the other elements.
Of course getting the exposure right is not the be all and end all of
making great images, but hopefully you can see from the above text
that if you change any of the 3 major elements of the triangle you will
in fact need to change them all to get the ‘correct exposure’.
BASICS OF PHOTOGRAPHY. !5
BASICS OF PHOTOGRAPHY FOR
BEGINNERS.
So now let’s have a look at some of the other things we can do to
improve the appearance/presentation of what we shoot.
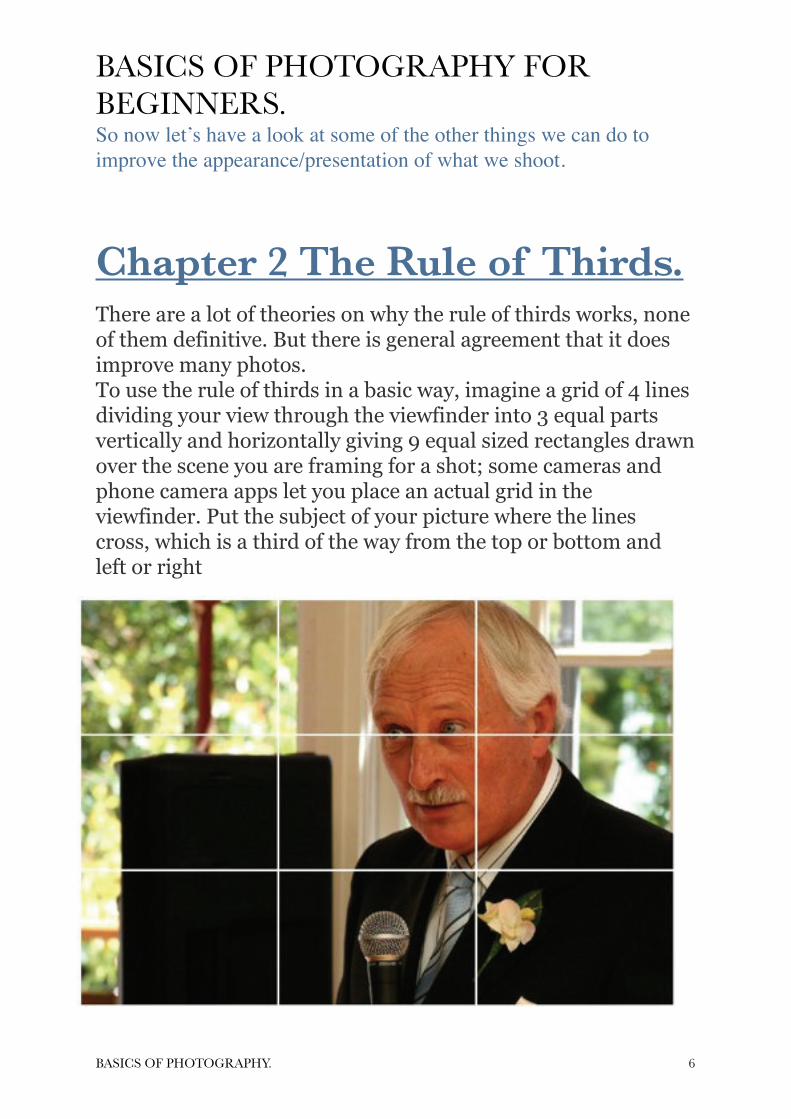
Chapter 2 The Rule of Thirds. There are a lot of theories on why the rule of thirds works, none of them definitive. But there is general agreement that it does improve many photos. To use the rule of thirds in a basic way, imagine a grid of 4 lines dividing your view through the viewfinder into 3 equal parts vertically and horizontally giving 9 equal sized rectangles drawn over the scene you are framing for a shot; some cameras and phone camera apps let you place an actual grid in the viewfinder. Put the subject of your picture where the lines cross, which is a third of the way from the top or bottom and left or right
BASICS OF PHOTOGRAPHY. !6
BASICS OF PHOTOGRAPHY FOR
BEGINNERS.
The man in the above example has space to look into as if he is addressing somebody just out of shot because his eye is placed on one of the thirds.
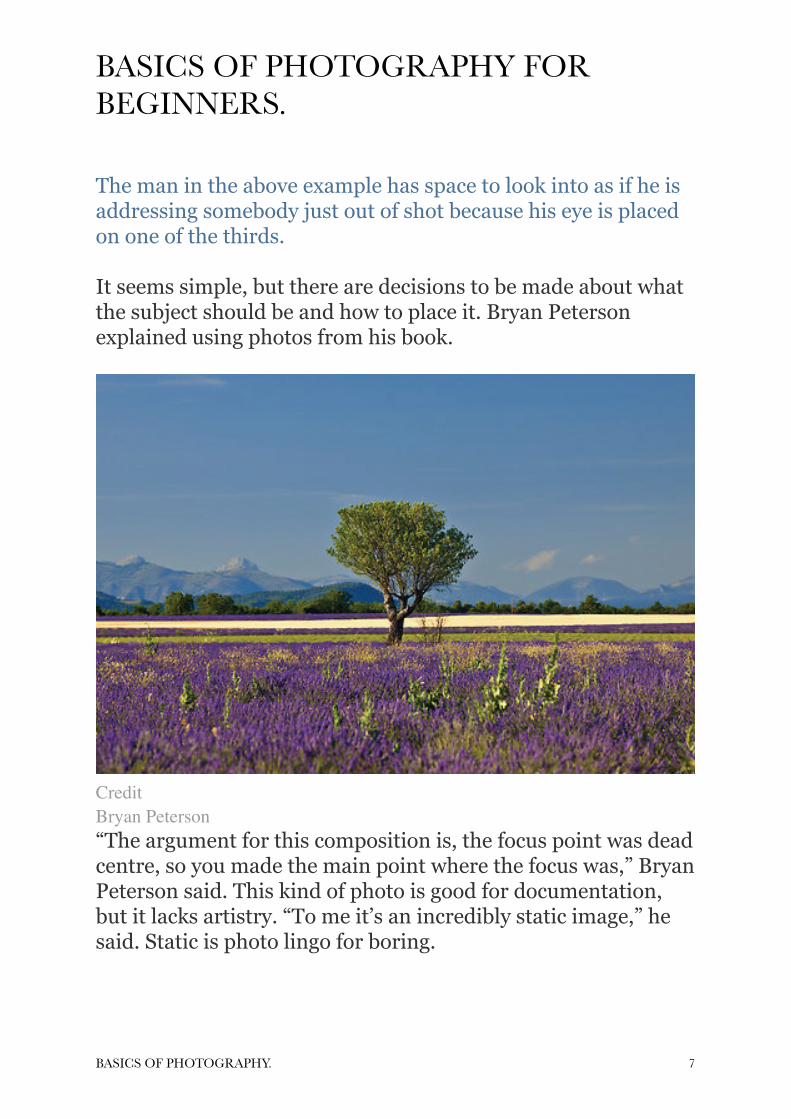
It seems simple, but there are decisions to be made about what the subject should be and how to place it. Bryan Peterson explained using photos from his book.
!
Credit
Bryan Peterson
“The argument for this composition is, the focus point was dead centre, so you made the main point where the focus was,” Bryan Peterson said. This kind of photo is good for documentation, but it lacks artistry. “To me it’s an incredibly static image,” he said. Static is photo lingo for boring.
BASICS OF PHOTOGRAPHY. !7
BASICS OF PHOTOGRAPHY FOR
BEGINNERS.
!
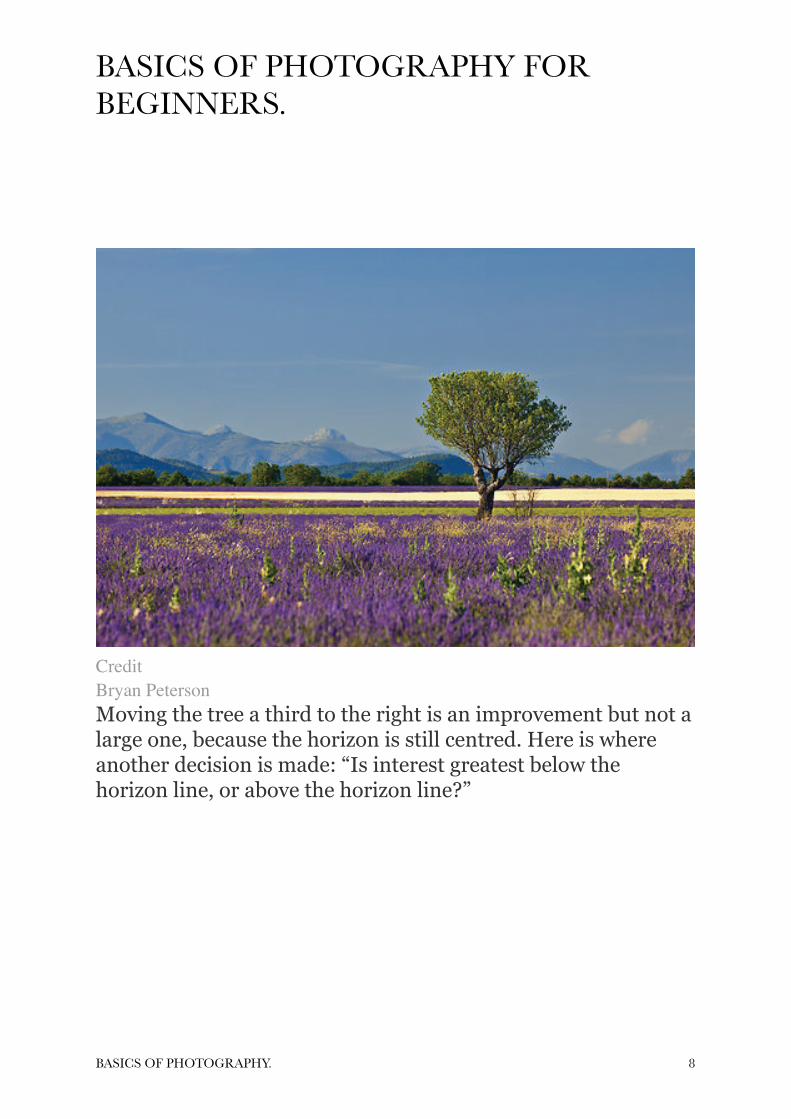
Credit
Bryan Peterson
Moving the tree a third to the right is an improvement but not a large one, because the horizon is still centred. Here is where another decision is made: “Is interest greatest below the horizon line, or above the horizon line?”
BASICS OF PHOTOGRAPHY. !8

BASICS OF PHOTOGRAPHY FOR
BEGINNERS.
!
Credit
Bryan Peterson
Increasing the amount of sky is an improvement — the photo now conforms to the rule of thirds — but Bryan Peterson isn’t finished. The sky, he said, is “what I refer to as ‘vanilla blue.’ There are no white clouds, it’s empty.” So if the question is which is more interesting visually, the sky or the field, the cloudless blue sky loses.
BASICS OF PHOTOGRAPHY. !9

BASICS OF PHOTOGRAPHY FOR
BEGINNERS.
!
Credit
Bryan Peterson
With the tree off centre, and the flowers filling the foreground, “we have introduced some degree of tension,” which is photo-speak for interest, Bryan Peterson said. The rule of thirds works for many compositions, including portraits. The trick, Bryan Peterson said, is to get close and fill the frame: “You’re not close enough until you have cut off part of the person’s forehead. In my opinion, that is when you are close enough for a really intimate portrait.” With that done, most photographers will naturally apply the rule of thirds. There is one technical trick to using the rule of thirds. Most cameras will automatically focus on the centre of a frame, even
BASICS OF PHOTOGRAPHY. !10

BASICS OF PHOTOGRAPHY FOR
BEGINNERS.
if that isn’t the intended subject. There are a number of ways to shift the focus to the subject.
The most obvious is to turn off the automatic setting and focus manually. There is an easier trick that works for most cameras, which is to push the shutter button halfway to hold the focus. All you have to do is to put your subject in the centre of the frame, and press the shutter button halfway. All of the settings will be locked. Now, still holding the button, frame the shot the way you want, and then press the button fully. Your intended subject should still be in focus. Finally, many digital single-lens reflex cameras have movable focus points, meaning the camera can be focused automatically on a point that is not in the centre. Most cameras have at least three focus points; some have more than 60. Check the manual to see how to do it. Using the Rule of Thirds also allows you to position the subject of interest in a position where in the case of an animal it has
BASICS OF PHOTOGRAPHY. !11
BASICS OF PHOTOGRAPHY FOR
BEGINNERS.
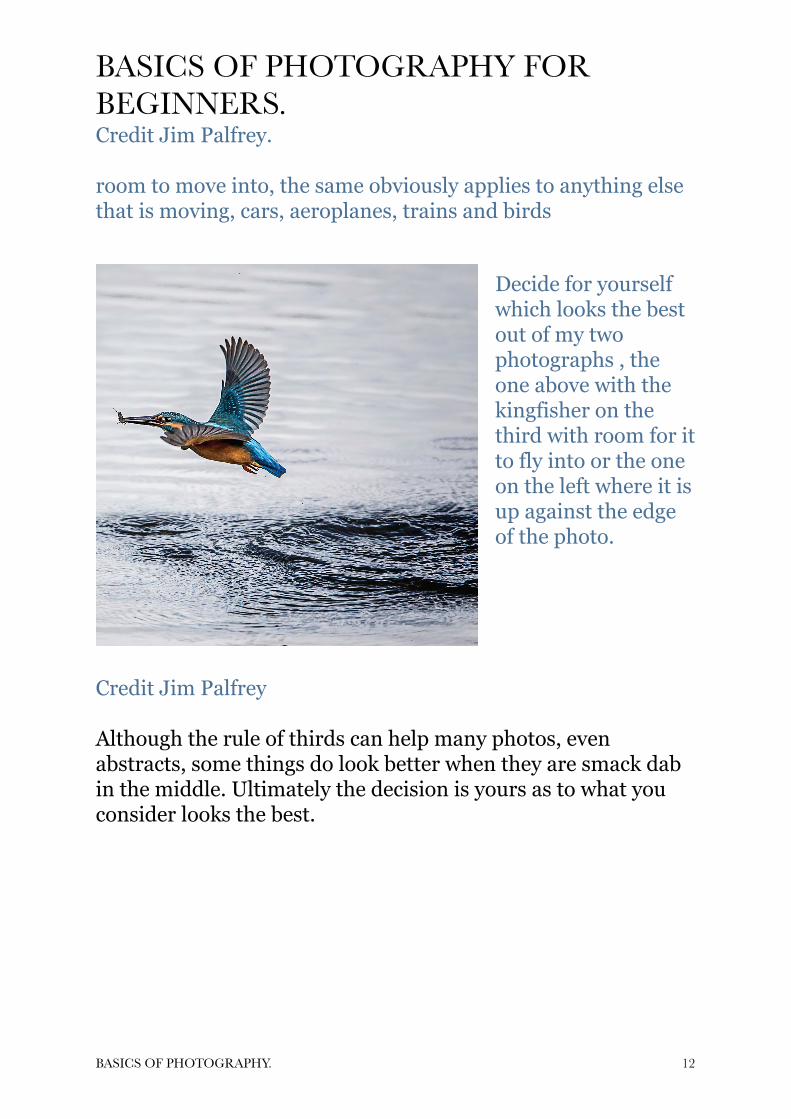
Credit Jim Palfrey.
room to move into, the same obviously applies to anything else that is moving, cars, aeroplanes, trains and birds
Decide for yourself which looks the best out of my two photographs , the one above with the kingfisher on the third with room for it to fly into or the one on the left where it is up against the edge of the photo.
Credit Jim Palfrey
Although the rule of thirds can help many photos, even abstracts, some things do look better when they are smack dab in the middle. Ultimately the decision is yours as to what you consider looks the best.
BASICS OF PHOTOGRAPHY. !12