chapter 02 dft slides 091806 - ubc eceelec578/notes2.pdfgeneration or logic bist generate more...
TRANSCRIPT

EE141
1
VLSI Test Principles and Architectures Ch. 2 - Design for Testability - P. 1
Chapter 2Chapter 2
Design for TestabilityDesign for Testability

EE141
2
VLSI Test Principles and Architectures Ch. 2 - Design for Testability - P. 2
Design For Testability Design For Testability -- contentscontents
� Introduction
� Testability Analysis
� Design for Testability Basics
� Scan Cells Designs
� Scan Architectures
� Scan Design Rules
� Scan Design Flow
� Special-Purpose Scan Designs
� RTL Design for Testability
� Concluding Remarks

EE141
3
VLSI Test Principles and Architectures Ch. 2 - Design for Testability - P. 3
IntroductionIntroduction
� History� During early years, design and test were separate
– The final quality of the test was determined by keeping track of
the number of defective parts shipped to the customer
– Defective parts per million (PPM) shipped was a final test
score.
– This approach worked well for small-scale integrated circuit
� During 1980s, fault simulation was used– Failed to improve the circuit’s fault coverage beyond 80%
� Increased test cost and decreased test quality lead to DFT engineering

EE141VLSI Test Principles and Architectures Ch. 2 - Design for Testability - P. 4
IntroductionIntroduction
� History� Various testability measures & ad hoc testability
enhancement methods – To improve the testability of a design
– To ease sequential ATPG (automatic test pattern generation)
– Still quite difficult to reach more than 90% fault coverage
� Structured DFT– To conquer the difficulties in controlling and observing the
internal states of sequential circuits
– Scan design is the most popular structured DFT approach
� Design for testability (DFT) has migration recently– From gate level to register-transfer level (RTL)

EE141VLSI Test Principles and Architectures Ch. 2 - Design for Testability - P. 5
Testability AnalysisTestability Analysis
� Testability:� A relative measure of the effort or cost of testing a logic
circuit
� Testability Analysis:� The process of assessing the testability of a logic circuit
� Testability Analysis Techniques:
� Topology-based Testability Analysis
– SCOAP - Sandia Controllability/Observability Analysis Program
– Probability-based testability analysis
� Simulation-based Testability Analysis

EE141VLSI Test Principles and Architectures Ch. 2 - Design for Testability - P. 6
Testability Analysis Testability Analysis –– SCOAP
� Controllability
� Reflects the difficulty of setting a signal line to a required logic value from primary inputs
� Observability
� Reflects the difficulty of propagating the logic value of the signal line to primary outputs

EE141VLSI Test Principles and Architectures Ch. 2 - Design for Testability - P. 7
Testability Analysis Testability Analysis –– SCOAP
� calculates six numerical values for each signal s in a logic circuit� CC0(s): combinational 0-controllability of s
� CC1(s): combinational 1-controllability of s
� CO(s): combinational observability of s
� SC0(s): sequential 0-controllability of s
� SC1(s): sequential 1-controllability of s
� SO(s): sequential observability of s

EE141VLSI Test Principles and Architectures Ch. 2 - Design for Testability - P. 8
Testability Analysis Testability Analysis –– SCOAP
� The value of controllability measures range between 1 to infinite
� The value of observability measures range between 0 to infinite� The CC0 and CC1 values of a primary input are set to 1
� The SC0 and SC1 values of a primary input are set to 0
� The CO and SO values of a primary output are set to 0

EE141VLSI Test Principles and Architectures Ch. 2 - Design for Testability - P. 9
Testability Analysis Testability Analysis -- SCOAP
Combinational Controllability Calculation Rules
Stem 1-controllabilityStem 0-controllabilityBranch
min {CC1(a)+CC1(b),
CC0(a)+CC0(b)} + 1
min {CC1(a)+CC0(b),
CC0(a)+CC1(b)} + 1
XNOR
min {CC1(a)+CC0(b),
CC0(a)+CC1(b)} + 1
min {CC1(a)+CC1(b),
CC0(a)+CC0(b)} + 1
XOR
Input 1-controllability + 1Input 0-controllability + 1BUFFER
Σ(input 0-controllabilities) + 1min {input 1-controllabilities} + 1NOR
min {input 0-controllabilities} + 1Σ(input 1-controllabilities) + 1NAND
Input 0-controllability + 1Input 1-controllability + 1NOT
min {input 1-controllabilities} + 1Σ(input 0-controllabilities) + 1OR
Σ(input 1-controllabilities) + 1min {input 0-controllabilities} + 1AND
11Primary Input
1-controllability
(Primary input, output, branch)
0-controllability
(Primary input, output, branch)

EE141VLSI Test Principles and Architectures Ch. 2 - Design for Testability - P. 10
Testability Analysis Testability Analysis -- SCOAP
Combinational Controllability Observability Rules
min {branch observabilities}Stem
a: Σ(output observability, min {CC0(b), CC1(b)}) + 1
b: Σ(output observability, min {CC0(a), CC1(a)}) + 1
XOR / XNOR
Output observability + 1NOT / BUFFER
Σ(output observability, 0-controllabilities of other inputs) + 1OR / NOR
Σ(output observability, 1-controllabilities of other inputs) + 1AND / NAND
0Primary Output
Observability
(Primary output, input, stem)
a, b: inputs of an XOR or XNOR gate

EE141VLSI Test Principles and Architectures Ch. 2 - Design for Testability - P. 11
Testability AnalysisTestability Analysis – SCOAP
.
2/3/3
.
.
2/5/3
.
5/4/0
5/5/0
1/1/4A
B
Cin
Sum
Cout
3/3/2
1/1/4
1/1/4
1/1/4
1/1/4
1/1/5
1/1/5
3/3/2
1/1/4
3/3/5
1/1/7
.
2/3/3
.
.
2/5/3
.
5/4/0
5/5/0
1/1/4A
B
Cin
Sum
Cout
3/3/2
1/1/4
1/1/4
1/1/4
1/1/4
1/1/5
1/1/5
3/3/2
1/1/4
3/3/5
1/1/7
Example of Combinational SCOPA measures
v1/v2/v3 represents the signal’s 0-controllability (v1),
1-controllability (v2), and observability (v3)

EE141VLSI Test Principles and Architectures Ch. 2 - Design for Testability - P. 12
Testability AnalysisTestability Analysis - SCOAP
Sequential Controllability and Observability Calculation
Reset
D Q
CK
dq
r
ab
Reset
D Q
CK
dq
r
ab
SCOAP sequential circuit example
SC1(b) SC1(a) SC1(d)
1 CC1(b) CC1(a) CC1(d)
SC0(b)} {SC0(a),min SC0(d)
1 CC0(b)} {CC0(a),min CC0(d)
+=
++=
=
+=
The combinational and
sequential controllability
measures of signal d:

EE141VLSI Test Principles and Architectures Ch. 2 - Design for Testability - P. 13
Testability AnalysisTestability Analysis - SCOAP
1 SC0(r) SC1(CK) SC0(CK) SC1(d) SC1(q)
CC0(r) CC1(CK) CC0(CK) CC1(d) CC1(q)
++++=
+++=
SC0(CK)} SC1(r) 1, SC0(r) SC1(CK) SC0(CK) {SC0(d)min SC0(q)
CC0(CK)} CC1(r) CC0(r), CC1(CK) CC0(CK) {CC0(d)min CC0(q)
+++++=
++++=
The combinational and sequential controllability and
observability measures of q:

EE141VLSI Test Principles and Architectures Ch. 2 - Design for Testability - P. 14
Testability AnalysisTestability Analysis - SCOAP
1 SC0(r) SC1(CK) SC0(CK) SO(q) SO(d)
CC0(r) CC1(CK) CC0(CK) CO(q) CO(d)
++++=
+++=
The data input d can be observed at q by holding
the reset signal r at 0 and applying a rising clock
edge to CK:
Signal r can be observed by first setting q to 1,
and then holding CK at the inactive state 0:
SC0(CK) SC1(q) SO(q) SO(r)
CC0(CK) CC1(q) CO(q) CO(r)
++=
++=

EE141VLSI Test Principles and Architectures Ch. 2 - Design for Testability - P. 15
Testability AnalysisTestability Analysis - SCOAP
� Two ways to indirectly observe the clock signal CK at q: � set q to 1, r to 0, d to 0, and apply a rising clock edge at CK
� set both q and r to 0, d to 1, and apply a rising clock edge at CK
1SC0(q)}SC1(d)SC1(q),min{SC0(d)SC0(r)SC1(CK)SC0(CK)SO(q) SO(CK)
CC0(q)}CC1(d)CC1(q),min{CC0(d)CC0(r)CC1(CK)CC0(CK)CO(q) CO(CK)
+++++++=
++++++=

EE141VLSI Test Principles and Architectures Ch. 2 - Design for Testability - P. 16
Testability AnalysisTestability Analysis - SCOAP
SC1(a) SO(d) SO(b)
1 CC1(a) CO(d) CO(b)
SC1(b) SO(d) SO(a)
1 CC1(b) CO(d) CO(a)
+=
++=
+=
++=
The combinational and sequential bservability
measures for both inputs a and b:

EE141VLSI Test Principles and Architectures Ch. 2 - Design for Testability - P. 17
Probability-Based Testability AnalysisTestability Analysis
� Used to analyze the random testability of the circuit� C0(s): probability-based 0-controllability of s
� C1(s): probability-based 1-controllability of s
� O(s): probability-based observability of s
� Range between 0 and 1
� C0(s) + C1(s) = 1

EE141VLSI Test Principles and Architectures Ch. 2 - Design for Testability - P. 18
Probability-based controllability calculation rules
Stem 1-controllabilityStem 0-controllabilityBranch
Σ(C0(a) × C0(b), C1(a) × C1(b))1 – 1-controllabilityXNOR
Σ(C1(a) × C0(b), C0(a) × C1(b))1 – 1-controllabiltyXOR
Input 1-controllabilityInput 0-controllabilityBUFFER
Π (input 0-controllabilities)1 – (output 1-controllability)NOR
1 – (output 0-controllability)Π (input 1-controllabilities)NAND
Input 0-controllabilityInput 1-controllabilityNOT
1 – (output 0-controllability)Π (input 0-controllabilities)OR
Π (input 1-controllabilities)1 – (output 1-controllability)AND
p1
= 1 - p0
p0
Primary Input
1-controllability
(Primary input, output, branch)
0-controllability
(Primary input, output, branch)

EE141VLSI Test Principles and Architectures Ch. 2 - Design for Testability - P. 19
Probability-based observability calculation rules
max {branch observabilities}Stem
a: Π (output observability, max {0-controllability of b, 1-controllability of b})
b: Π (output observability, max {0-controllability of a, 1-controllability of a})
XOR / XNOR
Output observabilityNOT / BUFFER
Π (output observability, 0-controllabilities of other inputs)OR / NOR
Π (output observability, 1-controllabilities of other inputs)AND / NAND
1Primary Output
Observability
(Primary output, input, stem)
a, b: inputs of an XOR or XNOR gate

EE141VLSI Test Principles and Architectures Ch. 2 - Design for Testability - P. 20
Difference between SCOAP testability measures and probability-based testability measures of a 3-input ANDgate
v1/v2/v3 represents the signal’s 0-controllability (v1), 1-
controllability (v2), and observability (v3)

EE141VLSI Test Principles and Architectures Ch. 2 - Design for Testability - P. 21
Simulation-Based Testability AnalysisTestability Analysis
� Supplement to static or topology-based testability analysis
� Performed through statistical sampling
� Guide testability enhancement in test generation or logic BIST
� Generate more accurate estimates
� Require a long simulation time

EE141VLSI Test Principles and Architectures Ch. 2 - Design for Testability - P. 22
RTL Testability AnalysisTestability Analysis
� Disadvantages of Gate-Level Testability Analysis
� Costly in term of area overhead
� Possible performance degradation
� Require many DFT iterations
� Long test development time

EE141VLSI Test Principles and Architectures Ch. 2 - Design for Testability - P. 23
RTL Testability AnalysisTestability Analysis
� Advantages of RTL Testability Analysis
� Improve data path testability
� Improve the random pattern testability of a scan-based logic BIST circuit
� Lead to more accurate results
– The number of reconvergent fanouts is much less
� Become more time efficient
– Much simpler than an equivalent gate-level model

EE141VLSI Test Principles and Architectures Ch. 2 - Design for Testability - P. 24
RTL Testability Analysis Testability Analysis -- Example
a0 b0
c0 c1
s0
ai bi
ci ci+1
si
…
an-1 bn-1
cn-1 cout
sn-1
…sn
a0 b0
c0 c1
s0
ai bi
ci ci+1
si
…
an-1 bn-1
cn-1 cout
sn-1
…sn
Ripple-carry adder composed of n full-adders

EE141VLSI Test Principles and Architectures Ch. 2 - Design for Testability - P. 25
RTL Testability Analysis Testability Analysis -- Example
)C1(b )C1(a )C1(c 1)C1(c
))C1(c (2-)C1(c )C1(s
iiii
iii
×+×=+
××+=
α
αα
The probability-based 1-controllability measures of
si and ci+1, denoted by C1(si) and C1(ci+1), are
calculated as follows:
1)cb(ay that probabilit theis )C1(s
1 )b(ay that probabilit theis
)C1(b)C1(a2-)C1(b )C1(a
iiii
ii
iiii
=⊕⊕
=⊕
××+=
α
α

EE141VLSI Test Principles and Architectures Ch. 2 - Design for Testability - P. 26
RTL Testability Analysis Testability Analysis -- Example
The probability-based 0-controllability of each
output l, denoted by C0(l), in the n-bit ripple-carry
adder is 1- C1(l).
O(l, si) is defined as the probability that a signal
change on l will result in a signal change on si.
Since
1-n , ... 1, 0, i where
)O(s )s ,O(c )s ,O(b )s ,O(a iiiiiii
=
===
This calculation is left as a problem at the end of this chapter.

EE141VLSI Test Principles and Architectures Ch. 2 - Design for Testability - P. 27
Design for Testability BasicsDesign for Testability Basics
� Ad hoc DFT� Effects are local and not systematic
� Not methodical
� Difficult to predict
� A structured DFT� Easily incorporated and budgeted
� Yield the desired results
� Easy to automate

EE141VLSI Test Principles and Architectures Ch. 2 - Design for Testability - P. 28
Ad Hoc Approach
� Typical ad hoc DFT techniques
� Insert test points
� Avoid asynchronous set/reset for storage elements
� Avoid combinational feedback loops
� Avoid redundant logic
� Avoid asynchronous logic
� Partition a large circuit into small blocks

EE141VLSI Test Principles and Architectures Ch. 2 - Design for Testability - P. 29
Ad Hoc Approach – Test Point Insertion
Observation point insertion
OP2 shows the structure of an
observation, which is
composed of a
multiplexer (MUX) and a D
flip-flop.
SE
0
1
Low-observability node B
D Q
DI
SO
..CK
OP2
Observation shift register
OP1
.
OP_output
DI
SI
SE
SOSI
SE
.
DI
SO
OP3
SI
SE
.
Low-observability node C.Low-observability node A.
Logic circuit
1
SE
0
1
Low-observability node B
D Q
DI
SO
..CK
OP2
Observation shift register
OP1
.
OP_output
DI
SI
SE
SOSI
SE
.
DI
SO
OP3
SI
SE
.
Low-observability node C.Low-observability node A.
Logic circuit
1

EE141VLSI Test Principles and Architectures Ch. 2 - Design for Testability - P. 30
Ad Hoc Approach – Test Point Insertion
Control point insertion
A MUX is inserted
between the source
and destination ends.
During normal
operation, TM = 0,
such that the value
from the source end
drives the destination
end through the 0
port of the MUX.
During test, TM = 1
such that the value
from the D flip-flop
drives the destination
end through the 1
port of the MUX.
.
.
0
1
Original connection
D Q
Control shift register
CP2
DI
SI SO
DO
TM
.
DI
SO
CP3
SI
TM
Low-controllability node B
DO
TM
CP_input
CK
DI
SO
CP1
SI
TM
DO
Low-controllability node ALow-controllability node C
. .
Logic circuit
xSource Destination
.
.
0
1
Original connection
D Q
Control shift register
CP2
DI
SI SO
DO
TM
.
DI
SO
CP3
SI
TM
Low-controllability node B
DO
TM
CP_input
CK
DI
SO
CP1
SI
TM
DO
Low-controllability node ALow-controllability node C
. .
Logic circuit
xSource Destination

EE141VLSI Test Principles and Architectures Ch. 2 - Design for Testability - P. 31
Structured Approach
� Scan design
� Convert the sequential design into a scan design
� Three modes of operation
– Normal mode
� All test signals are turned off
� The scan design operates in the original functional configuration
– Shift mode
– Capture mode
� In both shift and capture modes, a test mode signal TM is often used to turn on all test-related fixes

EE141VLSI Test Principles and Architectures Ch. 2 - Design for Testability - P. 32
Structured Approach - Scan Design
X2
Combinational logic
X3
X1
Y2
Y1
Q D
FF3
.Q D
FF2
Q D
FF1
.CK
f
0000
0000
1111
X2
Combinational logic
X3
X1
Y2
Y1
Q D
FF3
.Q D
FF2
Q D
FF1
.CK
f
0000
0000
1111
Difficulty in testing a sequential circuit
Assume that a stuck-at fault f in the combinational
logic requires the primary input X3, flip-flop FF2,
and flip-flop FF3, to be set
to 0, 1, and 0.
The main difficulty in testing a sequential circuit
stems from the fact that it
is difficult to control and observe the internal state
of the circuit.

EE141VLSI Test Principles and Architectures Ch. 2 - Design for Testability - P. 33
Structured Approach - Scan Design
Shift register composed of n scan cells
Test stimulus application
Test response upload
Test stimulus Test response1 1
n
n
Shift register composed of n scan cells
Test stimulus application
Test response upload
Test stimulus Test response1 1
n
n
1. Convertingselected storage
elements in the designinto scan cells.
1. Stitching them
together to form scan
chains.
How to detect stuck-at fault f :(1) switching to shift mode and shifting in the desired test
stimulus, 1 and 0, to FF2 and FF3, respectively
(2) driving a 0 onto primary input X3
(3) switching to capture mode and applying one clock
pulse to capture the fault effect into FF1
(4) switching back to shift mode and shifting out the test
response stored in FF1, FF2, and FF3 for comparison with
the expected response.

EE141VLSI Test Principles and Architectures Ch. 2 - Design for Testability - P. 34
Scan Cell DesignScan Cell Design
� A scan cell has two inputs: data input and scan input� In normal/capture mode, data input is selected to update the
output
� In shift mode, scan input is selected to update the output
� Three widely used scan cell designs� Muxed-D Scan Cell
� Clocked-Scan Cell
� LSSD Scan Cell

EE141VLSI Test Principles and Architectures Ch. 2 - Design for Testability - P. 35
Muxed-D Scan Cell
CK
D QDI
SI
0
1
SE
Q/SO
CK
D QDI
SI
0
1
SE
Q/SO
Edge-triggered
muxed-D scan
cell
This scan cell is composed of a D
flip-flop and a multiplexer.
The multiplexer uses an additional
scan enable input SE to select
between the data input DI and the
scan input SI.

EE141VLSI Test Principles and Architectures Ch. 2 - Design for Testability - P. 36
Muxed-D Scan Cell
CK
SE
DI
SI
Q/SO
D1 D2 D3 D4
T1 T2 T3 T4
D1 T3
CK
SE
DI
SI
Q/SO
D1 D2 D3 D4D1 D2 D3 D4
T1 T2 T3 T4T1 T2 T3 T4
D1 T3
Edge-triggered muxed-D scan cell
design and operation
In normal/capture mode, SE is set to 0. The value
present at the data input
DI is captured into the internal D flip-flop when
a rising clock edge is applied.
In shift mode, SE is set to
1. The scan input SI is
used to shift in new data to the D flip-flop, while
the content of the D flip-flop is being shifted out.

EE141VLSI Test Principles and Architectures Ch. 2 - Design for Testability - P. 37
Muxed-D Scan Cell
D QDI
SI
0
1
SE
CK
SOD Q
Q
.
.CK
D QDI
SI
0
1
SE
CK
SOD Q
Q
.
.CK
Level-sensitive/edge-triggered
muxed-D scan cell design
This scan cell is composed of a
multiplexer, a D latch, and a D flip-flop.
In this case, shift operation is
conducted in an edge-triggered
manner, while normal operation and capture operation is
conducted in a level-sensitivemanner.

EE141VLSI Test Principles and Architectures Ch. 2 - Design for Testability - P. 38
Clocked-Scan Cell
SCK
Q/SODI
SI
DCK SCK
Q/SODI
SI
DCK
Clocked-scan cell
In the clocked-scan
cell, input selection is
conducted using two
independent clocks,
DCK and SCK.

EE141VLSI Test Principles and Architectures Ch. 2 - Design for Testability - P. 39
Clocked-Scan Cell
Clocked-scan cell design and
operation
In normal/capture mode, the data clock DCK is used
to capture the contentspresent at the data input DI
into the clocked-scan cell.
In shift mode, the shift
clock SCK is used to shift in new data from the scan
input SI into the clocked -
scan cell, while the content of the clocked-scan cell is
being shifted out.

EE141VLSI Test Principles and Architectures Ch. 2 - Design for Testability - P. 40
LSSD Scan Cell
+L2
C
D . ..
.
A
I .
.
.
.B
+L1
L1
L2
SRL
+L2
C
D . ..
.
A
I .
.
.
.B
+L1
L1
L2
SRL
Polarity-hold SRL
(shift register latch)
An LSSD scan cell is used for level-sensitive
latch base designs.
This scan cell contains
two latches, a master 2-
port D latch L1 and a slave
D latch L2. Clocks C,
A and B are used to select
between the data input D
and the scan input I to
drive +L1 and +L2. In an
LSSD design, either +L1
or +L2 can be used to
drive the combinational
logic of the design.

EE141VLSI Test Principles and Architectures Ch. 2 - Design for Testability - P. 41
LSSD Scan Cell
C
D
I
+L1
D1 D2 D3 D4
T1 T2 T3 T4
D1 T3
A
B
+L2 T3
C
D
I
+L1
D1 D2 D3 D4D1 D2 D3 D4
T1 T2 T3 T4T1 T2 T3 T4
D1 T3
A
B
+L2 T3
Polarity-hold SRL design and
operation
In order to guarantee race-free operation, clocks A, B, and C are
applied in a non-overlapping manner.
The master latch L1 uses the system
clock C to latch system data from the
data input D and to output this data onto +L1. Clock B is used after clock
A to latch the system data from latch L1 and to output this data onto +L2.

EE141VLSI Test Principles and Architectures Ch. 2 - Design for Testability - P. 42
Comparing three scan cell designs
Increase routing complexity
Insert scan into a latch-based design
Guarantee to be race-free
LSSD Scan Cell
Require additional
shift clock routing
No performance degradation Clocked-Scan
Cell
Add a multiplexer delay
Compatibility to modern designs
Comprehensive support
provided by existing design
automation tools
Muxed-D Scan Cell
DisadvantagesAdvantages

EE141
43
VLSI Test Principles and Architectures Ch. 2 - Design for Testability - P. 43
Scan ArchitecturesScan Architectures
� Full-Scan Design
� All or almost all storage element are converted into scan cells and combinational ATPG is used for test generation
� Partial-Scan Design
� A subset of storage elements are converted into scan cells and sequential ATPG is typically used for test generation
� Random-Access Scan Design
� A random addressing mechanism, instead of serial scan chains, is used to provide direct access to read or write any scan cell

EE141VLSI Test Principles and Architectures Ch. 2 - Design for Testability - P. 44
Full-Scan Design
� All storage elements are replaced with scan cells� All inputs can be controlled
� All outputs can be observed
� Advantage:� Converts sequential ATPG into combinational ATPG
� Almost full-scan design � A small percentage of storage elements are not replaced
with scan cells– For performance reasons
� Storage elements that lie on critical paths
– For functional reasons
� Storage elements driven by a small clock domain that are
deemed too insignificant to be worth the additional scan
insertion effort

EE141VLSI Test Principles and Architectures Ch. 2 - Design for Testability - P. 45
Muxed-D Full-Scan Design
.D Q
FF1
CK
X2 Combinational logicX3
X1
Y2
Y1
D Q
FF2
D Q
FF3
..D Q
FF1
CK
X2 Combinational logicX3
X1
Y2
Y1
D Q
FF2
D Q
FF3
.
Sequential circuit example
The three D flip-
flops, FF1, FF2 and
FF3, are replaced
with three muxed-D
scan cells, SFF1,
SFF2 and SFF3,
respectively.

EE141VLSI Test Principles and Architectures Ch. 2 - Design for Testability - P. 46
.
X2Combinational logicX3
X1
Y2
Y1PI
PPI
PO
PPO
DI
Q
SFF1
SI
SE
.
DI
Q
SFF2
SI
SE
SE
DI
Q
SFF3
SI
SE
CK
SI
. .
... SO
.
X2Combinational logicX3
X1
Y2
Y1PI
PPI
PO
PPO
DI
Q
SFF1
SI
SE
.
DI
Q
SFF2
SI
SE
SE
DI
Q
SFF3
SI
SE
CK
SI
. .
... SO
(a) Muxed-D full-scan circuit
Muxed-D Full-Scan Design
To form a scan chain, the scan input SI of
SFF2 and SFF3 are connected to the output
Q of the previous scan
cell, SFF1 and SFF2, respectively. In
addition, the scan input SI of the first scan cell
SFF1 is connected to
the primary input SI, and the output Q of the
last scan cell SFF3 is connected to the
primary output SO.

EE141VLSI Test Principles and Architectures Ch. 2 - Design for Testability - P. 47
Muxed-D Full-Scan Design
• Primary inputs (PIs)– the external inputs to the
circuit
– can be set to any required logic values
– set directly in parallel from the external inputs
• Pseudo primary inputs (PPIs)
– the scan cell outputs
– can be set to any required logic values
– are set serially through scan chain inputs
• Primary outputs (POs)– the external outputs of the
circuit
– can be observed
– are observed directly in
– parallel from the external outputs
• Pseudo primary outputs (PPOs)
– the scan cell inputs
– can be observed
– are observed serially through scan chain outputs

EE141VLSI Test Principles and Architectures Ch. 2 - Design for Testability - P. 48
Muxed-D Full-Scan Design
SE
CK
PI
S C S C
SFF1.Q 0
X
X
1
0
X
1
1
0
1
1
0
L
H
L
L
H
L
1
L
H
0
1
L
1
0
1
1
0
1
L
L
H
SFF2.Q
SFF3.Q
V1: PI V2: PI
V1: PPI V2: PPI
POobservation
PPOobservation
H H
S: shift operation / C: capture operation / H: hold cycle
HSE
CK
PI
S C S C
SFF1.Q 0
X
X
1
0
X
1
1
0
1
1
0
L
H
L
L
H
L
1
L
H
0
1
L
1
0
1
1
0
1
L
L
H
SFF2.Q
SFF3.Q
V1: PI V2: PI
V1: PPI V2: PPI
POobservation
PPOobservation
H H
S: shift operation / C: capture operation / H: hold cycle
H
(b) Test operations

EE141VLSI Test Principles and Architectures Ch. 2 - Design for Testability - P. 49
Muxed-D Full-Scan Design
Circuit operation type and scan cell mode
0
1
0
0
1
1
Normal
Shift
Capture
Normal
Shift
Operation
Capture
Operation
SETMScan
cell
mode
Circuit
Operation
type

EE141VLSI Test Principles and Architectures Ch. 2 - Design for Testability - P. 50
.. .
X2Combinational logicX3
X1
Y2
Y1PI
PPI
PO
PPO
SFF1
.
SFF2
DCKSCK
SI ... SO
DI
QSI
DCK SCK
DI
QSI
DCK SCK
DI
QSI
DCK SCK
SFF3
.. .
X2Combinational logicX3
X1
Y2
Y1PI
PPI
PO
PPO
SFF1
.
SFF2
DCKSCK
SI ... SO
DI
QSI
DCK SCK
DI
QSI
DCK SCK
DI
QSI
DCK SCK
DI
QSI
DCK SCK
DI
QSI
DCK SCK
DI
QSI
DCK SCK
SFF3
Clocked full-scan circuit
Clocked Full-Scan DesignIn a muxed-D full-
scan circuit, a scan
enable signal SE is
used.
In a clocked full-
scan design, two
operations are
distinguished by
properly applying
the two independent
clocks SCK and
DCK during shift
mode and capture
mode.

EE141VLSI Test Principles and Architectures Ch. 2 - Design for Testability - P. 51
LSSD Full-Scan Design
� Single-latch design
� Double-latch design

EE141VLSI Test Principles and Architectures Ch. 2 - Design for Testability - P. 52
LSSD Full-Scan Design
X2
Combinational logic 1X1
Y2
SOD
+L2
SRL1
IC
+L1AB
.
D
+L2
SRL2
IC
+L1AB
D
+L2
SRL3
IC
+L1AB
SI
C1AB
.. ..C2
Combinational logic 2X3
Y1X2
Combinational logic 1X1
Y2
SOD
+L2
SRL1
IC
+L1AB
.
D
+L2
SRL2
IC
+L1AB
D
+L2
SRL3
IC
+L1AB
SI
C1AB
.. ..C2
Combinational logic 2X3
Y1
Single-latch design
The output port
+L1 of the master
latch L1 is used to
drive the
combinational
logic of the
design. In this
case, the slave
latch L2 is only
used for scan
testing.

EE141VLSI Test Principles and Architectures Ch. 2 - Design for Testability - P. 53
LSSD Full-Scan Design
X2 Combinational logic
X3
X1
Y2
Y1
SOD
+L2
SRL1
IC
+L1AB
.
D
+L2
SRL2
IC
+L1AB
D
+L2
SRL3
IC
+L1AB
SI
C1A
C2 or B
.....
. . .
X2 Combinational logic
X3
X1
Y2
Y1
SOD
+L2
SRL1
IC
+L1AB
.
D
+L2
SRL2
IC
+L1AB
D
+L2
SRL3
IC
+L1AB
SI
C1A
C2 or B
.....
. . .
Double-latch design
In normal mode, the C1
and C2 clocks are used in a non-overlapping
Manner.
During the shiftoperation, clocks A and
B are applied in a non-overlapping manner,
the scan cells SRL1 ~ SRL3 form a single
scan chain from SI to
SO. During the capture
operation, clocks C1
and C2 are applied to
load the test response
from the combinational logic into the scan
cells.

EE141VLSI Test Principles and Architectures Ch. 2 - Design for Testability - P. 54
LSSD Design Rules
� All storage elements must be polarity-hold latches.
� The latches are controlled by two or more non-overlapping clocks.
� A set of clock primary inputs must follow three conditions:
� All clock inputs to SRLs must be inactive when clock PIs are inactive
� The clock input to any SRL must be controlled from one or more clock primary inputs
� No clock can be ANDed with another clock or its complement

EE141VLSI Test Principles and Architectures Ch. 2 - Design for Testability - P. 55
LSSD Design Rules
� Clock primary inputs must not feed the data inputs to SRLs either directly or through combinational logic.
� Each system latch must be part of an SRL, and each SRL must be part of a scan chain.
� A scan state exists under certain conditions:
� Each SRL or scan out SO is a function of only the preceding SRL or scan input SI in its scan chain during the scan operation
� All clocks except the shift clocks are disabled at the SRL clock inputs

EE141VLSI Test Principles and Architectures Ch. 2 - Design for Testability - P. 56
Partial-Scan Design
� Was once used in the industry long before full-scan design became the dominant scan architecture.
� Can also be implemented using muxed-D scan cells, clocked-scan cells, or LSSD scan cells.
� Either combinational ATPG or sequential ATPG can be used.

EE141VLSI Test Principles and Architectures Ch. 2 - Design for Testability - P. 57
Partial-Scan Design
.
X2Combinational logicX3
X1
Y2
Y1PI
PPI
PO
PPO
DI
Q
SFF1
SI
SE
.
DI Q
FF2
SE
DI
Q
SFF3
SI
SE
CK
SI .
.
SO
..
X2Combinational logicX3
X1
Y2
Y1PI
PPI
PO
PPO
DI
Q
SFF1
SI
SE
.
DI Q
FF2
SE
DI
Q
SFF3
SI
SE
CK
SI .
.
SO
.
An example of muxed-D partial-
scan design
A scan chain is onstructed
with two scan cells SFF1 and
SFF3, while flip-flop FF2 is
left out.
It is possible to reduce the test
generation complexity by
splitting the single clock into
two separate clocks, one for
controlling all scan cells, the
other for controlling all non-
scan storage elements.
However, this may result in
additional complexity of
routing two separate clock
trees during physical
implementation.

EE141VLSI Test Principles and Architectures Ch. 2 - Design for Testability - P. 58
Partial-Scan Design
� Scan cell selection
� A functional partitioning approach– A circuit is composed of a data path portion and a control portion
– Storage elements on the data path are left out of the scan cell replacement process
– Storage elements on the control path can be replaced with scan cells
� A pipelined or feed-forward partial-scan design approach– Make the sequential circuit feedback-free by selecting the storage
elements to break all sequential feedback loops
– First construct a structure graph for the sequential circuit
� A balanced partial-scan design approach– Use a target sequential depth to simply the test generation process for
the pipelined or feed-forward partial-scan design

EE141VLSI Test Principles and Architectures Ch. 2 - Design for Testability - P. 59
Partial-Scan Design -- Structure GraphStructure Graph
� A feedback-free sequential circuit
� Use a directed acyclic graph (DAG)
� The maximum level in the structure graph is referred to as sequential depth
� A sequential circuit containing feedback loops
� Use a directed cyclic graph (DCG)

EE141VLSI Test Principles and Architectures Ch. 2 - Design for Testability - P. 60
FF1
FF2
C1 FF3
C2 FF4
C3 FF5FF1
FF2
C1 FF3
C2 FF4
C3 FF51
2
3
4
51
2
3
4
51
2
3
4
5
(a) Sequential Circuit (b) Structure graph
Sequential depth is 3
Sequential circuit and its structure graph
The sequential depth of a circuit is equal to the maximum number of clock
cycles that needs to be applied in order to control and observe values to and from all non-scan storage elements
• The sequential depth of a full-scan circuit is 0

EE141VLSI Test Principles and Architectures Ch. 2 - Design for Testability - P. 61
PartialPartial--Scan DesignScan Design
� Advantage:
� Reduce silicon area overhead
� Reduce performance degradation
� Disadvantage:
� Can result in lower fault coverage
� Longer test generation time
� Offers less support for debug, diagnosis and failure analysis

EE141VLSI Test Principles and Architectures Ch. 2 - Design for Testability - P. 62
Random-Access Scan Design
� Advantages of RAS:� Can control or observe individual scan cells without affecting
others
� Reduce test power dissipation
� Simplify the process of performing delay test
� Disadvantages of traditional RAS:� High overhead in scan design and routing
� No guarantee to reduce the test application time
� Progressive Random-Access Scan( PRAS ) was proposed to alleviate the disadvantages in traditional RAS

EE141VLSI Test Principles and Architectures Ch. 2 - Design for Testability - P. 63
Traditional random-access scan architecture
Combinational logic
Column (Y) decoder
SC
AI
PI PO
SC SC…
SC SC SC…
…
SC SC SC
… …
Ro
w (
X)
dec
od
er
Address shift register
SI
SO
SCK
CK
…
Combinational logic
Column (Y) decoder
SC
AI
PI PO
SC SC…
SC SC SC…
…
SC SC SC
… …
Ro
w (
X)
dec
od
er
Address shift register
SI
SO
SCK
CK
…
All scan cells are
organized into a
two-dimensional
array. A ┌ log2n ┐ -
bit address shift
register, where n is
the total number of
scan cells, is used to
specify which scan
cell to access.

EE141VLSI Test Principles and Architectures Ch. 2 - Design for Testability - P. 64
Progressive Random-Access Scan (PRAS)
D Q
Ф Ф
Ф
RE
SD SD
Ф ФФ
D Q
Ф ФФ
Ф
RE
SD SD
ФФ ФФФ
PRAS scan cell design
Structure is similar to that of a static
random access memory (SRAM) cell or a grid addressable latch.
In normal mode, all horizontal row enable (RE) signals are set to 0,
forcing each scan cell to act as a normal D flip-flop.
In test mode, to capture the test
response from D, the RE signal is set
to 0 and a pulse is applied on clock Φ, which causes the value on D to be
loaded into the scan cell.

EE141VLSI Test Principles and Architectures Ch. 2 - Design for Testability - P. 65
Progressive Random-Access Scan (PRAS)
Column line drivers
SC
PI
PO
SC SC…
SC SC SC…
…
SC SC SC
… …
Ro
w e
nab
le s
hif
t re
gis
ter
Column address decoder
Testcontrollogic
…
…
…
CA
Sense-amplifiers & MISR
…
TM
SI/SO
Co
mb
inat
ion
al l
og
ic
CK
Column line drivers
SC
PI
PO
SC SC…
SC SC SC…
…
SC SC SC
… …
Ro
w e
nab
le s
hif
t re
gis
ter
Column address decoder
Testcontrollogic
…
…
…
CA
Sense-amplifiers & MISR
…
TM
SI/SO
Co
mb
inat
ion
al l
og
ic
CK
PRAS Architecture
Rows are enabled in a
fixed order.
It is only necessary to
supply a column address
to specify which scan cell
in an enabled row to
access.

EE141VLSI Test Principles and Architectures Ch. 2 - Design for Testability - P. 66
PRAS - test procedure
for each test vector vi (i = 1, 2, …, N) {
/* Test stimulus application */
/* Test response compression */
enable TM;
for each row rj (j = 1, 2, …, m) {
read all scan cells in rj / update MISR;
for each scan cell SC in rj
/* v(SC): current value of SC */
/* vi(SC): value of SC in vi */
if v(SC) ≠ vi(SC)
update SC;
}
/* Test response acquisition */
disable TM;
apply the normal clock;
}
scan-out MISR as the final test response;
For each test
vector, the test
stimulus
application and
test response
compression are
conducted in an
interleaving
manner when the
test mode signal
TM is enabled.

EE141VLSI Test Principles and Architectures Ch. 2 - Design for Testability - P. 67
Scan Design RulesScan Design Rules
Initialize to known states,
bypass, or make transparent
Not recommended for full-scan
Design
Non-scan storage elements
Use standard cellsNot recommendedCross-coupled NAND/NOR gates
Tie to Vcc or groundNot recommendedFloating inputs
Add bus keepersAvoidFloating buses
Block clocks to the data portionAvoidClocks driving data
Use external pin(s)AvoidAsynchronous set/reset signals
Break the loopsAvoidCombinational feedback loops
Bypass clocksAvoidDerived clocks (muxed-D full-scan)
Enable clocks during shiftAvoid during shiftGated clocks (muxed-D full-scan)
Force to input or output mode
during shift
Avoid during shiftBi-directional I/O ports
Fix bus contention during shiftAvoid during shiftTri-state buses
Recommended SolutionScan Design RuleDesign Style

EE141VLSI Test Principles and Architectures Ch. 2 - Design for Testability - P. 68
Tri-State Buses
.
CK
DI
Q
SFF1
SI
SE
EN2
.
Bus
DI
Q
SFF2
SI
SE
Functionalenablelogic
DI
Q
SFF3
SI
SESE
SI.
..
EN3
EN1
…D1
…D2
D3
…
.
.
CK
DI
Q
SFF1
SI
SE
EN2
.
Bus
DI
Q
SFF2
SI
SE
Functionalenablelogic
Functionalenablelogic
DI
Q
SFF3
SI
SESE
SI.
..
EN3
EN1
…D1
…D2
D3
…
.
Original Circuit
Bus contention occurs when two bus drivers force opposite
logic values onto a tri-state bus.
Bus contention is designed not to happen during the normal
operation, and is typically avoided during the capture
operation.
However, during the shift
operation, no such guarantees can be made.

EE141VLSI Test Principles and Architectures Ch. 2 - Design for Testability - P. 69
.
CK
DI
Q
SFF1
SI
SE
EN2
.
Bus
DI
Q
SFF2
SI
SE
Functionalenablelogic
DI
Q
SFF3
SI
SESE
SI.
..
EN3
EN1
…D1
…D2
D3
…
.
.
Bus keeper
.
.
CK
DI
Q
SFF1
SI
SE
EN2
.
Bus
DI
Q
SFF2
SI
SE
Functionalenablelogic
Functionalenablelogic
DI
Q
SFF3
SI
SESE
SI.
..
EN3
EN1
…D1
…D2
D3
…
.
.
Bus keeper
.
Modified circuit fixing bus contention
Tri-State Buses
EN1 is forced to 1 to enable the D1 bus driver,
while EN2 and EN3 are
set to 0 to disable both D2
and D3 bus drivers, when
SE = 1.
A bus without a pull-up,
pull-down, or bus keeper may result in fault
coverage loss, the bus keeper is added.

EE141VLSI Test Principles and Architectures Ch. 2 - Design for Testability - P. 70
Bi-Directional I/O Ports
. I/OCK BO
BI
DI
QSI
SE
. I/OCK BO
BI
DI
QSI
SE
(a) Original circuit
Conflicts may occur at a
bidirectional I/O port during the shift operation.
Since the output value of the
scan cell can vary during the
shift operation, the output tri-state buffer may become active,
resulting in a conflict if BO and the I/O port driven by the tester
have opposite logic values.

EE141VLSI Test Principles and Architectures Ch. 2 - Design for Testability - P. 71
Bi-Directional I/O Ports
. I/OBO
BI
SE
CK
DI
QSI
SE . I/OBO
BI
SE
CK
DI
QSI
SE
(b) Modified circuit
Fix this problem by forcing the
tri-state buffer to be inactive when SE = 1, and the tester is
used to drive the I/O port during the shift operation.
During the capture operation, theapplied test vector determines
whether a bi-directional I/O port is used as input or output and
controls the tester appropriately.

EE141VLSI Test Principles and Architectures Ch. 2 - Design for Testability - P. 72
Gated Clocks
A
D Q
CK
CEN
D Q
D Q
…
.
Clockgatinglogic
D QG
. .
ENGCK
DFF
LAT
A
D Q
CK
CEN
D Q
D Q
…
.
Clockgatinglogic
D QG
. .
ENGCK
DFF
LAT
(a) Original circuit
Although clock gating is a
good approach for reducing power consumption, it prevents
the clock ports of some flip-flops from being directly
controlled by primary inputs.

EE141VLSI Test Principles and Architectures Ch. 2 - Design for Testability - P. 73
Gated Clocks
D Q
CK
CEN
D Q
D Q
…
.
Clockgatinglogic
D QG
. .
EN GCK
DFF
LAT
TMor
SE B
D Q
CK
CEN
D Q
D Q
…
.
Clockgatinglogic
D QG
. .
EN GCK
DFF
LAT
TMor
SE B
(b) Modified Circuit An OR gate is used to force
CEN to 1 using either the test mode signal TM or the scan
enable signal SE.
The clock gating function should be disabled at least
during the shift operation.

EE141VLSI Test Principles and Architectures Ch. 2 - Design for Testability - P. 74
Derived clocks
.D Q
D Q
.ICK
CK
DFF1
DFF2
D Q .D Q
D Q
.ICK
CK
DFF1
DFF2
D Q
(a) Original circuit
A derived clock is a clock
signal generated internally
from a storage element or aclock generator.
These clock signals need
to be bypassed during the entire test operation.

EE141VLSI Test Principles and Architectures Ch. 2 - Design for Testability - P. 75
Derived clocks
0
1
ICK
CK
TM
.D Q
D Q
.
DFF1
DFF2
D Q
.0
1
ICK
CK
TM
.D Q
D Q
.
DFF1
DFF2
D Q
.
(b) Modified circuit
A multiplexer selects CK,
which is a clock directly
controllable from a primary input, to drive
DFF1 and DFF2, during the entire test operation,
when TM = 1.

EE141VLSI Test Principles and Architectures Ch. 2 - Design for Testability - P. 76
Combinational Feedback Loops
..D S
Combinational logic
..D S
Combinational logic
..D S
Combinational logic
(a) Original circuit
The best way is to
rewrite the RTL
code.
Depending on whether the number of inversions on a
combinational feedback loop is even or odd, it can
introduce either sequential
behavior or oscillation into a
design.
Since the value stored in the loop cannot be controlled or
determined during test, this
can lead to an increase in test generation complexity or
fault coverage loss.

EE141VLSI Test Principles and Architectures Ch. 2 - Design for Testability - P. 77
Combinational Feedback Loops
..D S
Combinational logic
DIQ
SI
CK
SISE SETM
0
1
..D S
Combinational logic
DIQ
SI
CK
SISE SETM
0
1
(b) Modified circuit
It can be fixed by using a
test mode signal TM.
This signal permanently disables the loop
throughout the entire
shift and capture operations, by inserting a
scan point to break the loop.

EE141VLSI Test Principles and Architectures Ch. 2 - Design for Testability - P. 78
Asynchronous Set/Reset Signals
R
CK .
DI
Q
SFF1
SI
SE
DI
Q
SFF2
SI
SE
RL
R
CK .
DI
Q
SFF1
SI
SE
DI
Q
SFF2
SI
SE
RL
(a) Original circuit
Asynchronous set/reset
signals of scan cells that
are not directly controlled
from primary inputs can
prevent scan chains from
shifting data properly.
EE141VLSI Test Principles and Architectures Ch. 2 - Design for Testability - P. 79
Asynchronous Set/Reset Signals
TM
R
CK .
DI
Q
SFF1
SI
SE
DI
Q
SFF2
SI
SE
RL
TM
R
CK .
DI
Q
SFF1
SI
SE
DI
Q
SFF2
SI
SE
RL
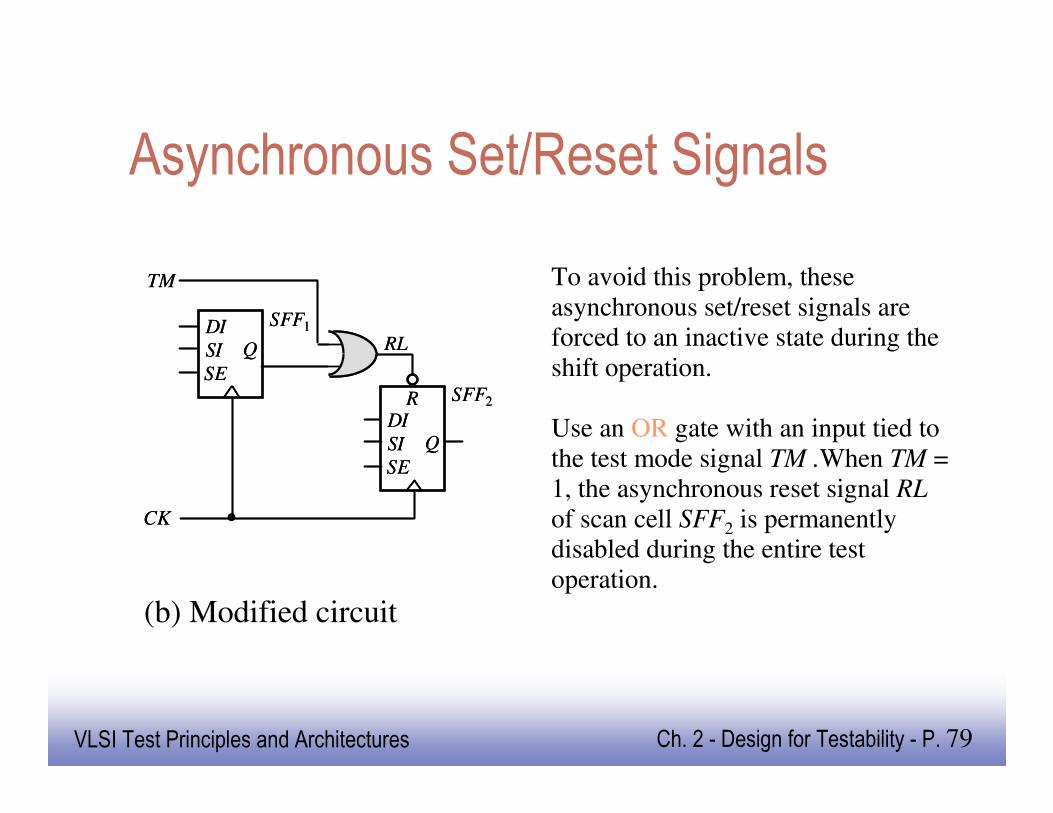
(b) Modified circuit
To avoid this problem, these
asynchronous set/reset signals are forced to an inactive state during the
shift operation.
Use an OR gate with an input tied to
the test mode signal TM .When TM = 1, the asynchronous reset signal RL
of scan cell SFF2 is permanently disabled during the entire test
operation.

EE141VLSI Test Principles and Architectures Ch. 2 - Design for Testability - P. 80
Scan replacement
Scan configuration
Scan stitching
Scan reordering Layoutinformation
Testabledesign
Scandesign
Constraint&
controlinformation
.
.
.
Scan design rule checking and repair
Test generationScan extraction
Scan verification
Scan synthesis
Originaldesign
.
Scan replacement
Scan configuration
Scan stitching
Scan reordering Layoutinformation
Testabledesign
Scandesign
Constraint&
controlinformation
.
.
.
Scan design rule checking and repair
Test generationScan extraction
Scan verification
Scan synthesis
Originaldesign
.
Scan Design FlowScan Design Flow

EE141VLSI Test Principles and Architectures Ch. 2 - Design for Testability - P. 81
Scan Design FlowScan Design Flow
� Scan Design Rule Checking and Repair� Identify and repair all scan design rule violations to convert
the original design into a testable design
� Also performed after scan synthesis to confirm that no new violations exist
� Scan Synthesis� Converts a testable design into a scan design without
affecting the functionality of the original design
– Scan Configuration
– Scan Replacement
– Scan Reordering
– Scan Stitching

EE141VLSI Test Principles and Architectures Ch. 2 - Design for Testability - P. 82
Scan Design FlowScan Design Flow
� Scan Extraction� Is the process used for extracting all scan cell instances from all scan
chains specified in the scan design
� Scan Verification� A timing file in standard delay format (SDF) which resembles the timing
behavior of the manufactured device is used to
– Verifying the scan shift operation
– Verifying the scan capture operation
� Scan Design Costs� Area overhead cost:
� I/O pin cost
� Performance degradation cost
� Design effort cost

EE141VLSI Test Principles and Architectures Ch. 2 - Design for Testability - P. 83
Scan Design Rule Checking and Repair
CD1
CCD2CCD1
CD2 CD3
CD4 CD5 CD6 CD7
CCD3 CCD4
CCD5
CK1
CK2
CK3
CD1
CCD2CCD1
CD2 CD3
CD4 CD5 CD6 CD7
CCD3 CCD4
CCD5
CK1
CK2
CK3
Clock grouping example
An arrow means a data
transfers from one clock domain to a different clock
domain.
7 clock domains, CD1 ~ CD7
5 crossing-clock-domain data
paths, CCD1 ~ CCD5

EE141VLSI Test Principles and Architectures Ch. 2 - Design for Testability - P. 84
Scan Synthesis
� Includes four separate and distinct steps:� Scan Configuration
– The number of scan chains used
– The types of scan cells used to implement these scan chains
– Which storage elements to exclude from the process
– How the scan cells are arranged
� Scan Replacement– Replaces all original storage elements in the testable design with their
functionally-equivalent scan cells
� Scan Reordering– The process of reordering the scan chains based on the physical scan
cell locations, in order to minimize the amount of interconnect wires used to implement the scan chains
� Scan Stitching– Stitch all scan cells together to form scan chains

EE141VLSI Test Principles and Architectures Ch. 2 - Design for Testability - P. 85
Scan Synthesis - Scan ConfigurationMixing negative-edge and positive-edge scan cells in a scan chain
.CK
SC1 SC2
DISI
SEQ
DISI
SEQ
X YSI
.CK
SC1 SC2
DISI
SEQ
DISI
SEQ
DISI
SEQ
X YSI
Circuit Structure
This circuit structure comprising a
negative-edge scan cell followed by a
positive-edge scan cell.
EE141VLSI Test Principles and Architectures Ch. 2 - Design for Testability - P. 86
Scan Synthesis - Scan ConfigurationMixing negative-edge and positive-edge scan cells in a scan chain
D1
CK
D2 D3
D1 D2 D3
X
Y
D1
CK
D2 D3
D1 D2 D3
X
Y
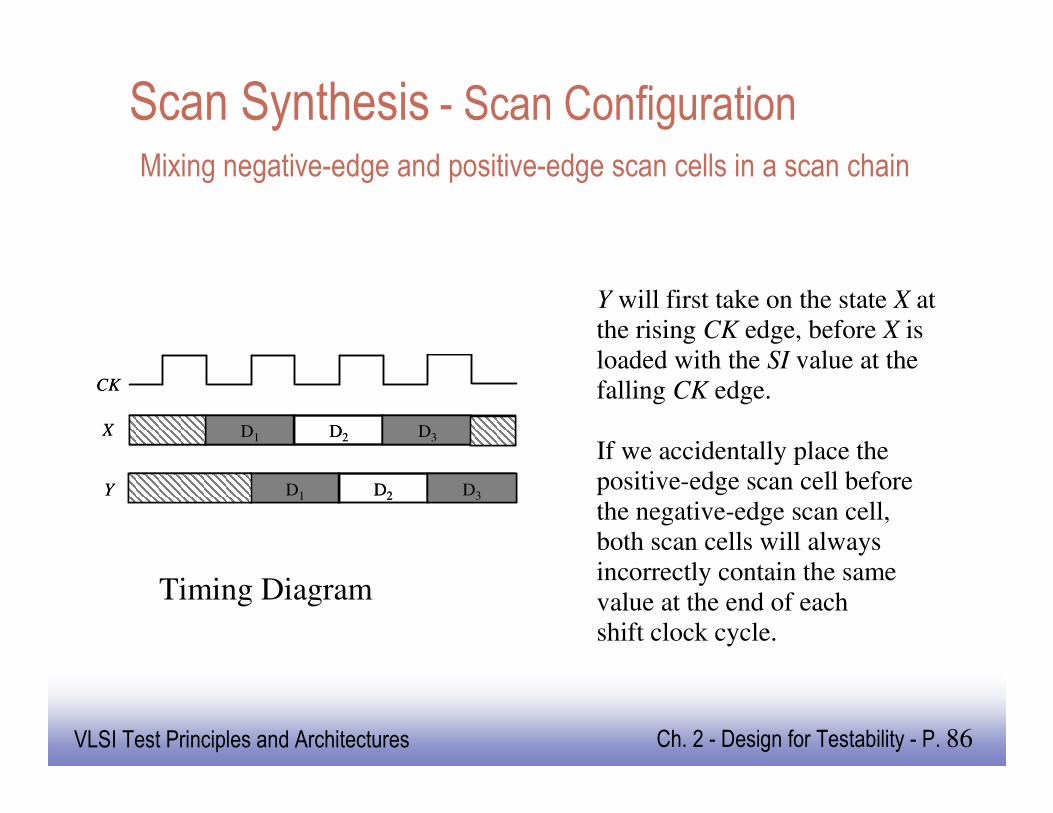
Timing Diagram
Y will first take on the state X at the rising CK edge, before X is
loaded with the SI value at the falling CK edge.
If we accidentally place the positive-edge scan cell before
the negative-edge scan cell,both scan cells will always
incorrectly contain the same
value at the end of eachshift clock cycle.

EE141VLSI Test Principles and Architectures Ch. 2 - Design for Testability - P. 87
Scan Synthesis - Scan Configuration
D Q
Clock domain 1
CK1.
Lock-up latch
CK2
SCp SCq
DISI
SEQ
DI
SISE
Q
Clock domain 2
X Y ZSI D Q
Clock domain 1
CK1.
Lock-up latch
CK2
SCp SCq
DISI
SEQ
DI
SISE
Q
Clock domain 2
X Y ZSI
Circuit Structure
A lock-up latch is inserted between adjacent cross-
clock-domain scan cells, in
order to guarantee that any clock skew between the
clocks can be tolerated.

EE141VLSI Test Principles and Architectures Ch. 2 - Design for Testability - P. 88
Scan Synthesis - Scan Configuration
D1
CK1
CK2
D2 D3
D1 D2 D3
D1 D2 D3
X
Y
Z
D1
CK1
CK2
D2 D3
D1 D2 D3
D1 D2 D3
X
Y
Z
Timing diagram
During each shift clock cycle, X will first take on
the SI value at the rising
CK1 edge. Then, Z will take on the Y value at the rising
CK2 edge.

EE141VLSI Test Principles and Architectures Ch. 2 - Design for Testability - P. 89
SpecialSpecial--Purpose Scan DesignsPurpose Scan Designs
� Enhanced scan
� Snapshot scan
� Error-resilient scan

EE141VLSI Test Principles and Architectures Ch. 2 - Design for Testability - P. 90
Enhanced Scan
�Why enhanced scan is introduced?� Testing for a delay fault requires a pair of test
vector at speed
� Be able to capture the response to the transiton at operating frequency
�What is new?� Allow the typical scan cell to store two bits of data
� Achieved through the addition of a D latch

EE141VLSI Test Principles and Architectures Ch. 2 - Design for Testability - P. 91
Enhanced-scan Architecture and Operation
LA1
D
C
.DI
QSDI
.CK
SFF1
SISESE .
Q.UPDATE
LA2
D
C
.DI
Q
.
SFF2
SISE
Q
.
...X2
Combinational logic
Xn
.
.
X1
. Y2
Ym
Y1
LAs
D
C
DI
Q
SFFs
SISE
Q
.
…
…
……
LA1
D
C
.DI
QSDI
.CK
SFF1
SISESE .
Q.UPDATE
LA2
D
C
.DI
Q
.
SFF2
SISE
Q
.
...X2
Combinational logic
Xn
.
.
X1
. Y2
Ym
Y1
LAs
D
C
DI
Q
SFFs
SISE
Q
.
…
…
……
Enhanced-scan architecture
The first test vector V1 is first
shifted into the scan cells (SFF1
~ SFFs) and then stored into the
additional latches (LA1 ~ LAs) when the UPDATE signal is set
to 1.
The second test vector V2 is
shifted into the scan cells while the UPDATE signal is set to 0.

EE141VLSI Test Principles and Architectures Ch. 2 - Design for Testability - P. 92
Enhanced Scan - Advantages & Disadvantages
�Advantages� High delay fault coverge achieved by applying any
arbitrary pair of test vectors
�Disadvantages� Requiring an additional scan-hold D latch
� Difficulty of maintaining the timing relationship between UPDATE and CK
� Over-test problem caused by false paths

EE141VLSI Test Principles and Architectures Ch. 2 - Design for Testability - P. 93
Snapshot scan
�Why snapshot scan is introduced?� Capture a snapshot of the internal states
� Without disruption of the functional operation
�What is new?� Add a scan cell (2-port D latches) to each storage
element of interest
� Implement scan-set architecture

EE141VLSI Test Principles and Architectures Ch. 2 - Design for Testability - P. 94
Snapshot scan
Scan-set architecture
.
CK
1DC1
C2
2D
Q 1D
C1
C2
2D
Q 1D
C1
C2
2D
Q
1D
2D
C1
C2
Q
1D
2D
1D
2DQ Q. .
..UCK.. …
…
.SDI
C1
C2
C1
C2
..DCKTCK
……
.
… SDO
. . .L1 L2 Ls
SFF1 SFF2 SFFs
...X2
Combinational logic
Xn
.
.
X1
. Y2
Ym
Y1
.
CK
1DC1
C2
2D
Q 1D
C1
C2
2D
Q 1D
C1
C2
2D
Q
1D
2D
C1
C2
Q
1D
2D
1D
2DQ Q. .
..UCK.. …
…
.SDI
C1
C2
C1
C2
..DCKTCK
……
.
… SDO
. . .L1 L2 Ls
SFF1 SFF2 SFFs
...X2
Combinational logic
Xn
.
.
X1
. Y2
Ym
Y1
(1) Test data can be shifted into
and out of the scan cells
(SFF1 ~ SFFs) from the SDI
and SDO pins using TCK.
(2) The test data can be transferred to the system
latches (L1 ~Ls) in parallel
through their 2D inputs using UCK.
(3) The system latch contents can be loaded into the scan
flip-flops through their 1D
inputs using DCK.
(4) The circuit can be operated
in normal mode using CK to capture the values from the
combinational logic into the system latches (L1 ~ Ls).

EE141VLSI Test Principles and Architectures Ch. 2 - Design for Testability - P. 95
Snapshot scan - Advantages & Disadvantage
�Advantages
� Significantly improve the circuit's diagnostic resolution and silicon debug capability
� Allow on-chip, on-board and in-system debug and diagnosis
�Disadvantage
� Increased area overhead

EE141VLSI Test Principles and Architectures Ch. 2 - Design for Testability - P. 96
Error-Resilient scan
�Why is error-resilient scan introduced?� Soft errors are transient single-event upsets with various
causes
� Soft errors increase as shrinking IC geometry and increasing frequency
� Reliability concerns are created for protecting a device from soft errors
�What can error-resilient scan do?� Observe soft errors occurring in memories and storage
elements
� Observe a transient fault in a combinational gate captured by a memory or storage element

EE141VLSI Test Principles and Architectures Ch. 2 - Design for Testability - P. 97
Error-Resilient Scan
..
LA
1D
C1
2D
C2
Q
C1
1DQ
LB
PH1
1D
C1
2D
C2
Q
O2
Scan portion
System flip-flop
O1
C1
1DQ
.CLK
D
UPDATE
CAPTURE
SCASI
SCB
C-element
. .
.
.
Keeper
..
TEST
Q
SO
.PH2
..
LA
1D
C1
2D
C2
Q
C1
1DQ
LB
PH1
1D
C1
2D
C2
Q
O2
Scan portion
System flip-flop
O1
C1
1DQ
.CLK
D
UPDATE
CAPTURE
SCASI
SCB
C-element
. .
.
.
Keeper
..
TEST
Q
SO
.PH2
Error-resilient scan cell
C-element truth table
In test mode, TEST is set to
1, and the C-element acts as an inverter.
In system mode, TEST is set to 0, and the C-element acts
as a hold-state comparator.
1
0
Previous value retained
Previous value retained
0
1
1
0
0
1
0
1
QO2O1

EE141VLSI Test Principles and Architectures Ch. 2 - Design for Testability - P. 98
Error-Resilient scan - Advantages & Disadvantages
�Advantages � Provide online detection and correction of
soft errors
� Embed with scan testing capability
�Disadvantages� Require many test signals and clocks
� Area overhead

EE141VLSI Test Principles and Architectures Ch. 2 - Design for Testability - P. 99
RTL Design for TestabilityRTL Design for Testability
�Why are RTL designs needed?
� Growth of device number
� Tight timing
� Potential yield loss
� Low-power issues
� Increased core reusability
� Time-to market pressure

EE141VLSI Test Principles and Architectures Ch. 2 - Design for Testability - P. 100
Comparison of design flows at RTL and Gate-level
Gate-level testability repair
design flowRTL testability repair
design flow
Logic synthesis
Gate-level design
Testable design
RTL design
Testability repair
Scan design
Scan synthesis
Logic synthesis
Gate-level design
Testable design
RTL design
Testability repair
Scan design
Scan synthesis
Testable RTL design
RTL design
Testability repair
Scan design
Logic/scan synthesis
Testable RTL design
RTL design
Testability repair
Scan design
Logic/scan synthesis

EE141VLSI Test Principles and Architectures Ch. 2 - Design for Testability - P. 101
RTL Scan Design Rule Checking
�Fast synthesis
� Mapped onto combinational primitives and high-level models
� Identify testability problems
� Static solutions (without simulation)
� Dynamic solutions (with simulation)

EE141VLSI Test Principles and Architectures Ch. 2 - Design for Testability - P. 102
RTL Scan Design Repair – An Example
�original
always @(posedge clk) if (q == 4'b1111)
clk_15 <= 1;else
beginclk_15 <= 0;q <= q + 1;
endalways @(posedge clk_15)
d < = start;
clk
Q Q
start
d
Dclk_15
clk
Q Q
start
d
Dclk_15
clk
Q Q
start
d
Dclk_15
Q Q
start
d
Dclk_15
(a) Generated clock (RTL code) (b) Generated clock (Schematic)

EE141VLSI Test Principles and Architectures Ch. 2 - Design for Testability - P. 103
RTL Scan Design Repair – An Example
�Atuomatic repair at the RTL using TM
always @(posedge clk) if (q == 4'b1111)
clk_15 <= 1;else
beginclk_15 <= 0;q <= q + 1;
endassign clk_test = (TM)? clk : clk_15;always @(posedge clk_test)
d < = start;
clk
Q Q
start
d
Dclk_15
0
1
clk_test.
TM
clk
Q Q
start
d
Dclk_15
0
1
clk_test.
TM
(c) Generated clock (RTL code) (d) Generated clock repair (Schematic)

EE141VLSI Test Principles and Architectures Ch. 2 - Design for Testability - P. 104
RTL Scan Synthesis
�RTL scan synthesis� The scan equivalent of each storage element
refers to an RTL structure
� The scan chains are inserted into the RTL design
�Pseudo RTL scan synthesis� Specify pseudo primary inputs and pseudo primary
outputs
� Can cope with many other DFT structures
� Perform one-pass or single-pass synthesis

EE141VLSI Test Principles and Architectures Ch. 2 - Design for Testability - P. 105
RTL Scan Extraction and Verification
�Scan extraction� Rely on performing fast synthesis on the RTL scan design
� Generate a software model for tracing the scan connection
�Scan verification� Rely on generating a flush testbench to simulate flush tests
� The flush testbench can be used for both RTL and gate-level designs
� Apply broadside-load test for verifying the scan capture operation at RTL

EE141VLSI Test Principles and Architectures Ch. 2 - Design for Testability - P. 106
Concluding RemarksConcluding Remarks
�DFT has become vital for ensuring product quality
�Scan design is the most widely used DFT technique
�New design and test challenges� Further reduce test power, test data volume
and test application time
� Cope with physical failures of the nanometer design era