chair pc 6 usermanual
DESCRIPTION
the perfect chair pc 6TRANSCRIPT

©2010 Human Touch®, LLC. Patents pending and intellectual property rights enforced.
No medical claims are warranted or implied by the use of this product.
Human Touch is a trademark of Human Touch®, LLC.
P C - 6 - N A - B 1
humantouch.com800.355.2762
use & care manual
EN
GFR
CE
SN
use & care m
anualm
ode d’emploi et d’entretien
manual de uso y cuidado
pc6

humantouch.com
EN
GLIS
H
You have just purchased one of the finest pieces of ergonomic furniture available. The Human Touch® Perfect Chair® artfully blends the best of aesthetics, technology and wellness in a seating experience that transcends the highest standards of comfort.
The recline system eases the body into a virtually weightless position, as it elevates the legs above the heart and relieves weight from the spine. This remarkable chair relieves the soreness, tension and fatigue caused by the earth’s constant pulling, while its fixed-form seating position ensures maximum ergonomic posture at all recline angles.
To ensure that you don’t overlook any of your chair’s features, and that you use it safely, read this manual carefully. Then sit back, relax, and enjoy!
welcome to human touch®
humantouch.com
Please send any questions or comments regarding this manual to [email protected]
keep it safe
SAVE THESE INSTRUCTIONS
IMPORTANT SAFETY INSTRUCTIONS
• Donotsitonthechairarms.
• Thechairisintendedforstationaryuse,notforrocking.
• Alwaysreclineslowlytomaintainoptimalcontrolofthesuspensionsystem.
• Keepfingersandlooseclothingawayfromtheguiderailsatalltimes.
• Thisproductisnotdesignedforusebydisabledpeopleorchildrenwithoutadultsupervision.
• Ifyouhavechronicbackpain,haveundergonebacksurgery,orhaveanyquestionsaboutusingthisproduct,
consult your physician before use.
• Ifyouexperiencedizzinessornausea,discontinueuseandcontactyourphysicianimmediately.
Do not attempt to repair this product yourself.
• This product is designed for personal in-home use. Commercial use will void warranty.
When using this product, basic precautions should always be followed, including the following:
pc6

humantouch.com2 3
EN
GLIS
Hget readyYour Human Touch Perfect Chair requires some simple assembly. Just attach the headrest/footrest frames, pads, arm caps, and head pillow, and you’re done!
3
INSTALLING THE FOOTREST FRAME
Slide the body pad onto the lower part of the chair frame, making sure that the frame slides into the fabric pocket located on the bottom side of the pad.
Smooth the body pad into place, from the footrest toward the backrest. The pad is automatically secured using the hook and loop fasteners.
ATTACH THE bODY PAD
1. Slide the body pad onto the chair frame.
2. Secure the body pad.
UNPACk THE bOxES
Body pad Arm cap (2)
Head pad
Phillips-head screwdriver
Chair frame Headrest frame
Head sock3/16-inch Allen key
Slide the two ends of the footrest frame into the holes in the front of the chair frame.
2. Slide the footrest frame onto the chair frame.
Using a Phillips-head screwdriver and the two provided screws, secure each side of the footrest frame to the chair frame.
3. Replace the footrest frame screws.
Using both hands, continue to pull the seat canvas all the way forward to cover the footrest frame, then secure the two front and two side flaps, using the hook and loop fasteners.
5. Finish securing the canvas to the frame.
Using the Phillips-head screwdriver (provided), remove the twoscrews from the footrest frame. Retain them for use in step 3.
1. Remove the footrest frame screws.
Footrest frame
Using both hands, gently pull the seat canvas forward just to the top of the footrest frame, then secure the two flaps located underneath the canvas to the footrest frame.
4. Attach the canvas to the footrest frame.
EN
GLIS
H
Lumbar pillow
Head pillow
Some pad sets include a separate lumbar pillow instead of the upgraded body pad with built-in lumbar support.

humantouch.com4 5
EN
GLIS
Hget ready
ATTACH THE ARM CAPS
Remove the three screws taped to the underside of the right-hand arm cap, then place the right-hand arm cap on top of the armrest. From the underside of the armrest, secure the arm cap using the three screws. Repeat these steps to attach the left-hand arm cap.
Slide the head sock over the headrest frame, as far as it will go. The padded side of the head sock should face the back of the chair.
ATTACH THE HEAD PAD
1. Slide the head sock over the headrest frame.
Slide the head pad over the head frame, ensuring that the frame slides into the fabric pocket located on the bottom side of the pad. Pull the head pad down as far as it will go.
2. Slide the head pad over the head frame.
From the front of the chair, tuck the flap on the top of the body pad up into the head pad and smooth it flat. The flap is automatically secured to the pad, using the hook and loop fasteners.
3. Tuck in the body pad flap.
Attach the head pillow straps to the head pad straps using the hook and loop fasteners. Adjust the head pillow height for maximum comfort.
4. Attach the head pillow.
1. Raise the chair to an upright position.
ATTACH THE HEADREST FRAME
For your convenience, and to better position the chair for the remaining assembly, use the recline lever to adjust the chair to an upright position.
Using the Phillips-head screwdriver (provided), remove the twoscrews from the headrest frame. Retain them for use in step 4.
Using a Phillips-head screwdriver, replace the two headrest frame screws, securing the headrest frame to the backrest frame.
2. Remove the headrest frame screws.
3. Insert the headrest frame into the backrest frame.
4. Replace the headrest frame screws.
With the arc of the headrest frame pointing toward the back of the chair, slide the two ends of the headrest frame into the open tube ends at the top of the backrest frame.

humantouch.com6 7
EN
GLIS
Htake a seatUsing your Human Touch Perfect Chair is easy. Just take a seat and adjust the chair to the desired position. The Perfect Chair cradles you in zero-gravity comfort, with your feet above your heart—the ultimate neutral-posture position for back and spine relief.
To recline, gently pull up on the recline lever, lean back on the backrest to adjust it to the desired angle, then release the lever. To incline to a more upright position, gently pull up on the recline lever, then pull up on the armrests with your hands while applying slight downward pressure with your elbows, until the backrest inclines to the desired position. Release the recline lever.
Adjust the headrest
While seated, reach up with both hands and grasp both sides of the headrest. You will feel the rigid frame beneath the soft head pad. Grasping the rigid frame, tilt the headrest forward or back-ward for maximum comfort. The headrest remains in this position until you adjust it again.
When adjusting the footrest up and down, you may notice a slight bumping sensation.
This is caused by the footrest locking mechanism, and is perfectly normal.
Adjust the recline angle
Getting out of the perfect chair
Gently pull up on the recline lever, pull up on the armrests with your hands while applying slight downward pressure with your elbows, until the backrest inclines to a full upright position. Release the recline lever. Use the arms for support when getting up from the chair.NOTE: Lean back against the backrest before reclining the chair.
Adjusting body pad thickness
1. To compress the body pad thickness, sit in the chair, lean against the backrest, then push the ball valve on the back of the body pad. When the pad reaches the desired thickness, release the valve.
2. To reinflate the body pad, push the ball valve without applying any pressure to the pad. When the pad reaches the desired thickness, release the valve.Ittakesapproximatelytensecondsforthe pad to reach its full thickness.
bODY PAD PERFORMANCE NOTES
• You must remove all body weight from the pad when reinflating it.
• Ifthepadhasbeencompressedforalongperiodoftime,itmaytakeuptooneminutetorestoreittoitsfullthickness.
• The colder the pad is, the longer it takes to react to form changes.
• Should the ball valve leak, push the black ball in and, with a cotton swab, apply a small amount of Vaseline inside the valve.
• Keepsharpobjectsawayfromthepad.Thepadcontainsaprecisionair-tightbladderwhichthatwillnotfunctionproperly
if punctured.
Body pad
CAUTION:Donotputanyextrapressureonthefootrestwhilereturningthechairtoanuprightposition.Donotpush on the footrest, or lean against it.
NOTE: If your pad set comes with a separate lumbar pillow instead of built-in lumbar support in the body pad, apply these
instructions to the lumbar pillow to inflate or deflate it as desired.
CAUTION:Donotputanyextrapressureonthefootrestwhilerecliningthechair.Donotpushonthefootrest,orleanagainstit.

humantouch.com8 9
EN
GLIS
H
ChairSize(reclined): 62”Lx32”Wx30”H
Productweight: 81 Lbs.
Requiredreclineclearance: 8”
Maximumloadweight: 285Lbs.
*Specifications are subject to change without prior notice.
Specifications*
To keep your product working and looking its best, please follow these simple care guidelines.
care and maintenance
Cleaning:1. Be sure to disconnect the power cord from the electrical outlet before cleaning.
2. Donotusebenzene,thinneroranyothersolventsonyourmassagechair.
3. Remove dust on the backrest or armrest with a vacuum.
4. Ifthebackrestorarmrestsbecomesoiled,wipewithadampcloth,thenadrycloth.
5. Commonupholsterycleanersmaybeusedfortoughstains.
6. When cleaning the controller or around the power switch, use a dry cloth only. Never use a damp cloth to clean
the controller or power switch.
Fabric Care: To maintain your Human Touch product in optimum condition, dust it frequently and/or vacuum it with a soft brush vacuum extension. SofSuede™ products can also be brushed with a suede brush. Wipe with a slightly damp cloth as necessary. For tougher stains on non-leather products, use a mild detergent mixed with water. Leather products should be wiped down
occasionally with a leather furniture cleaning solution.
WARNING: Be sure to test any cleaning solution on a small, inconspicuous part of the product to ensure that the color does not fade prior to using the solution on the entire product surface.
Maintenance and Repair:1. The mechanics of this product are specially designed and constructed to be maintenance free. No periodic lubrication or servicing is required.
2. Yourchairshouldonlybeservicedbyanauthorizedservicecenter.
Use and Storage Environment:1. When not in use for a long period of time, we recommend that the chair be covered, the power cord be coiled and that the unit be placed in an environment free of dust and moisture.2.Donotstorenearheatoropenflame.3.Donotleavethisproductexposedtodirectsunlightforlongperiodsoftime.Thismaycausefadingordamage.4.Donotuseorstoreinextremetemperatures;productstoredincoldtemperaturesmayrequire48hoursatroom temperature to function properly.5.Productshouldbeusedandstoredinanenvironmentwithnon-condensinghumidityrangingfrom10to80%; excessive humidity will damage the mechanics.
Miscellaneous:1. Foreign objects should not be inserted between the massage nodes or the unit housing.2. Care should be taken not to overload the unit.
FRA
Nç
AIS
humantouch.com800.355.2762
mode d’emploi et d’entretien
pc6

humantouch.com
FRA
Nç
AIS
Vousvenezd’acheterundesmeilleursmeublesergonomiquesquisoit.LeHumanTouchMD Perfect ChairMD offre une expérience assise qui allie le meilleur de l’esthétique, de la technologie et du bien-être, transcendant les normes les plus élevées en matière de confort.
Le système d’inclinaison met le corps en état d’apesanteur virtuel, élevant les jambes au-dessus du cœur et libérant la colonne vertébrale de tout son poids. Ce fauteuil remarquable soulage de la douleur, des tensions et de la fatigue causées par la force de gravité terrestre, tandis que la position du siège fixe garantit une posture ergonomique optimale, sous tous les angles d’inclinaison.
Afin de bénéficier du plein potentiel de toutes les caractéristiques de votre fauteuil, etafindevousassurerquevousenfaitesunusagesécuritaire,lisezceguideattentivement.Celafait,asseyez-vous,détendez-vous,etprofitezduvoyage!
bienvenuechezhuman touchMD
humantouch.com
Veuillezacheminertoutequestionoucommentaireconcernantcemanuelà:[email protected]
©2009 Human TouchMD, LLC. Brevets en instance. Tous droits réservés.
Aucune garantie quant aux bénéfices médicaux de cet appareil n’est offerte, qu’elle soit expresse ou implicite.
Human Touch est une marque de commerce de Human TouchMC, LLC.
• Nevousassoyezpassurlesaccoudoirsdufauteuil.
• Lefauteuilestdestinéàl’usagefixeetnedoitpasserviràsebercer.
• Inclinez-voustoujourslentementafindepréserverleconfortoptimaldusystèmedesuspension.
• Gardezentoustempslesdoigtsetlesvêtementsloindesrailsdeguidage.
• Ceproduitn’estpasconçupourêtreemployéparlespersonneshandicapéesoulesenfantssanslasurveillanced’unadulte.
• Demandezl’avisdevotremédecinavantd’utiliserceproduitsivoussouffrezdedouleurschroniquesaudos,
sivousavezsubiunechirurgieaudosousivousavezdesquestionsconcernantl’utilisationdeceproduit.
• Sivousressentezdesétourdissementsoudesnausées,cessezl’utilisationduproduitetvoyezimmédiatementvotremédecin.
consignes de sécuritéCONSIGNES DE SÉCURITÉ IMPORTANTESLorsque vous utilisez cet appareil, vous devez toujours suivre les précautions de base suivantes :
CONSERVEZ CE MODE D’EMPLOI
Ne réparez pas ce fauteuil vous-même.• Cefauteuilestconçupourunusagepersonnelaufoyer.Toutusageàdesfinscommercialesannulera la garantie.
pc6
humantouch.com14
FRA
Nç
AIS
15
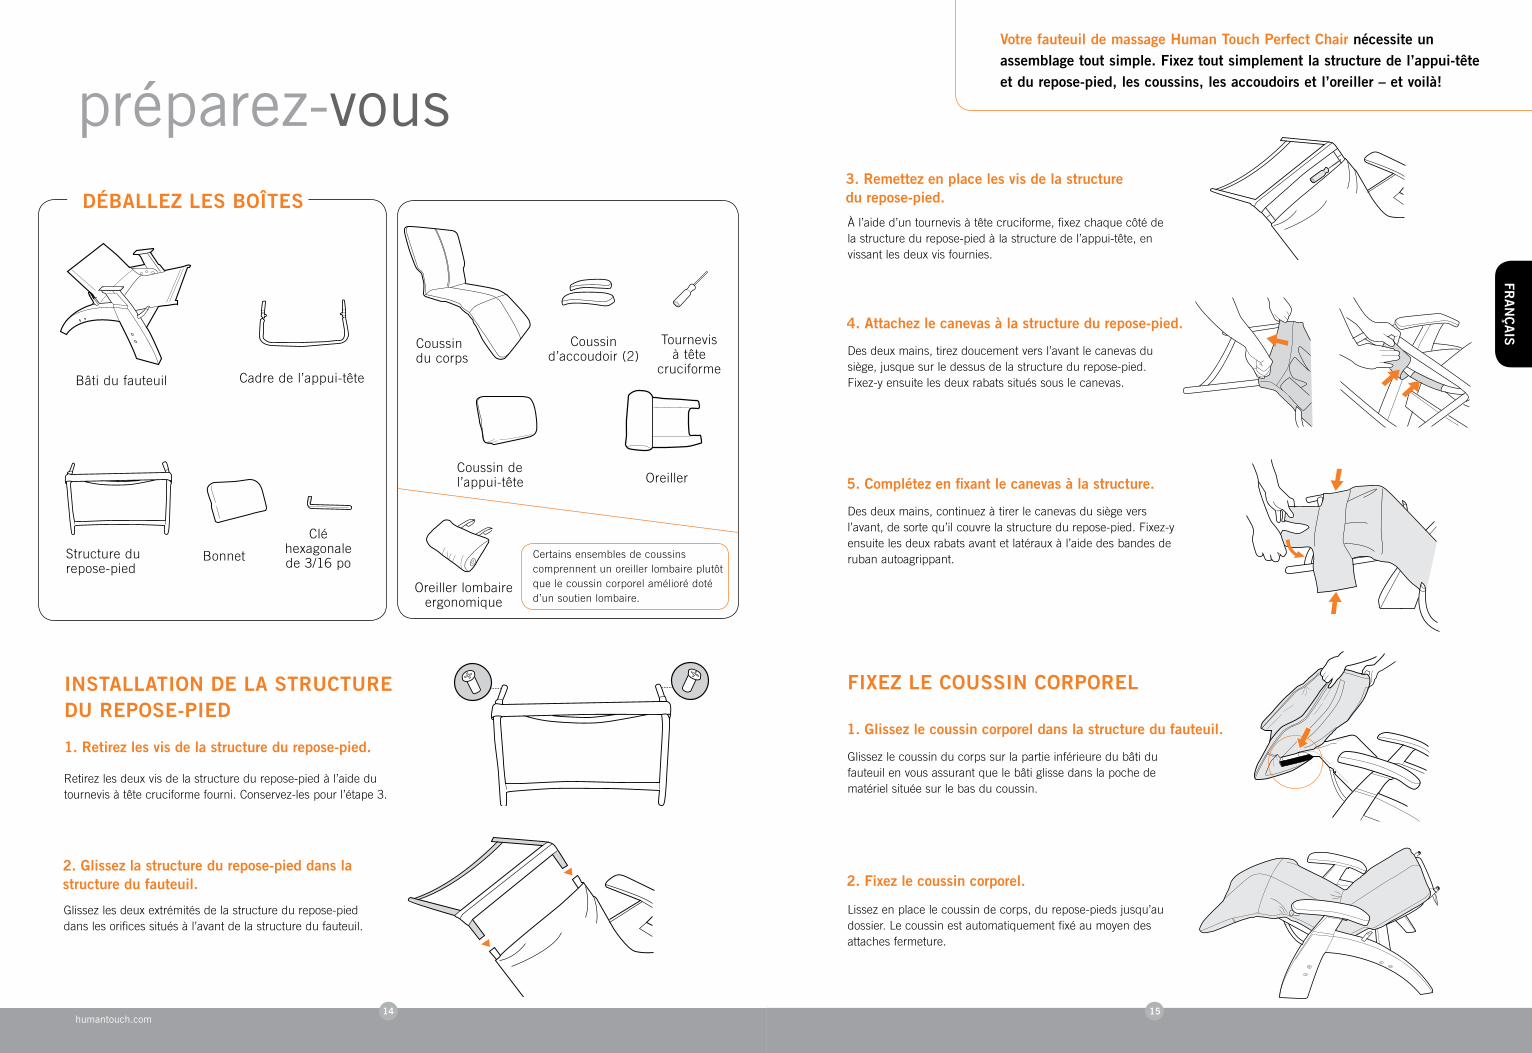
Votre fauteuil de massage Human Touch Perfect Chair nécessite un assemblage tout simple. Fixez tout simplement la structure de l’appui-tête et du repose-pied, les coussins, les accoudoirs et l’oreiller – et voilà!
Glissezlecoussinducorpssurlapartieinférieuredubâtidufauteuilenvousassurantquelebâtiglissedanslapochedematériel située sur le bas du coussin.
Lissezenplacelecoussindecorps,durepose-piedsjusqu’audossier. Le coussin est automatiquement fixé au moyen des attaches fermeture.
FIxEZ LE COUSSIN CORPOREL
1. Glissez le coussin corporel dans la structure du fauteuil.
2. Fixez le coussin corporel.
préparez-vous
Glissezlesdeuxextrémitésdelastructuredurepose-pied danslesorificessituésàl’avantdelastructuredufauteuil.
2. Glissez la structure du repose-pied dans la structure du fauteuil.
Àl’aided’untournevisàtêtecruciforme,fixezchaquecôtédelastructuredurepose-piedàlastructuredel’appui-tête,envissant les deux vis fournies.
3. Remettez en place les vis de la structure du repose-pied.
Desdeuxmains,continuezàtirerlecanevasdusiègeversl’avant,desortequ’ilcouvrelastructuredurepose-pied.Fixez-yensuitelesdeuxrabatsavantetlatérauxàl’aidedesbandesderuban autoagrippant.
5. Complétez en fixant le canevas à la structure.
Retirezlesdeuxvisdelastructuredurepose-piedàl’aidedu tournevisàtêtecruciformefourni.Conservez-lespourl’étape3.
1. Retirez les vis de la structure du repose-pied.
Desdeuxmains,tirezdoucementversl’avantlecanevasdusiège, jusque sur le dessus de la structure du repose-pied. Fixez-yensuitelesdeuxrabatssituéssouslecanevas.
4. Attachez le canevas à la structure du repose-pied.
INSTALLATION DE LA STRUCTURE DU REPOSE-PIED
Bâtidufauteuil Cadre de l’appui-tête
Bonnet
Clé hexagonale de 3/16 po
Structure du repose-pied
Coussin du corps
Coussin d’accoudoir (2)
Tournevis àtête
cruciforme
Coussin de l’appui-tête Oreiller
DÉbALLEZ LES bOîTES
Oreiller lombaire ergonomique
Certains ensembles de coussins comprennentunoreillerlombaireplutôtque le coussin corporel amélioré doté d’un soutien lombaire.

humantouch.com16
FRA
Nç
AIS
17
Retirezlestroisviscolléessouslecoussindel’accoudoirdroit.Placezensuitelecoussindel’accoudoirdroitsurledessusdel’accoudoir.Dudessousdel’accoudoir,fixezlecoussinàl’aidedestroisvis.Répétezcesétapespourfixerlecoussindel’accoudoir gauche.
FIxEZ LES COUSSINS D’ACCOUDOIR
Glissezjusqu’auboutl’enveloppedel’appui-têtesurlebâtidel’appui-tête.
FIxEZ LE COUSSIN DE L’APPUI-TÊTE
1. Glissez le bonnet sur la structure de l’appui-tête.
Glissezlecoussinpar-dessuslastructuredel’appui-tête,enveillantàce que la structure glisse dans la pochette en tissu située sous l’oreiller. Tirezlecoussindel’appui-têteverslebas,aussiloinquepossible.
2. Glissez le coussin de l’appui-tête dans la structure de l’appui-tête.
Del’avantdufauteuil,ramenezlerabatsurledessusducoussindecorps,jusqu’aucoussindel’appui-tête.Lissez-lebien.Lapatteestautomatiquement fixée sur le coussin au moyen des attaches fermeture.
3. Ramenez le rabat du coussin corporel vers l’intérieur.
Attachezlessanglesdel’oreilleraucoussindel’appui-têteàl’aidedesbandesderubanautoagrippant.Ajustezlahauteurdel’oreillerafind’obtenir la position la plus confortable.
4. Fixez l’oreiller.
préparez-vous
1. Élevez le fauteuil en position verticale.
FIxEZ LA STRUCTURE DE L’APPUI-TÊTE
Par commodité, et pour mieux placer le fauteuil pour le restant de l’assemblage, mettez-leenpositionverticaleàl’aidedulevierd’inclinaison.
Retirezlesdeuxvisdelastructuredel’appui-têteàl’aidedu tournevisàtêtecruciformefourni.Conservez-lespourl’étape4.
L’arceauducadredel’appui-têtedirigéversl’arrière,glissezlesdeuxextrémitésdu corps de l’appui-tête dans les orifices du dessus du cadre du dossier.
Àl’aided’untournevisàtêtecruciforme,remettezlesdeuxvisdelastructuredel’appui-tête,enlafixantàlastructuredudossier.
2. Retirez les vis de la structure de l’appui-tête.
3. Insérez la structure de l’appui-tête dans la structure du dossier.
4. Revissez les vis de la structure de l’appui-tête.
Silecadredel’appui-têteestinstalléàl’envers,lesorificesdesvisducadrede l’appui-tête ne seront pas alignés sur ceux du cadre du dossier.
humantouch.com18
FRA
Nç
AIS
19
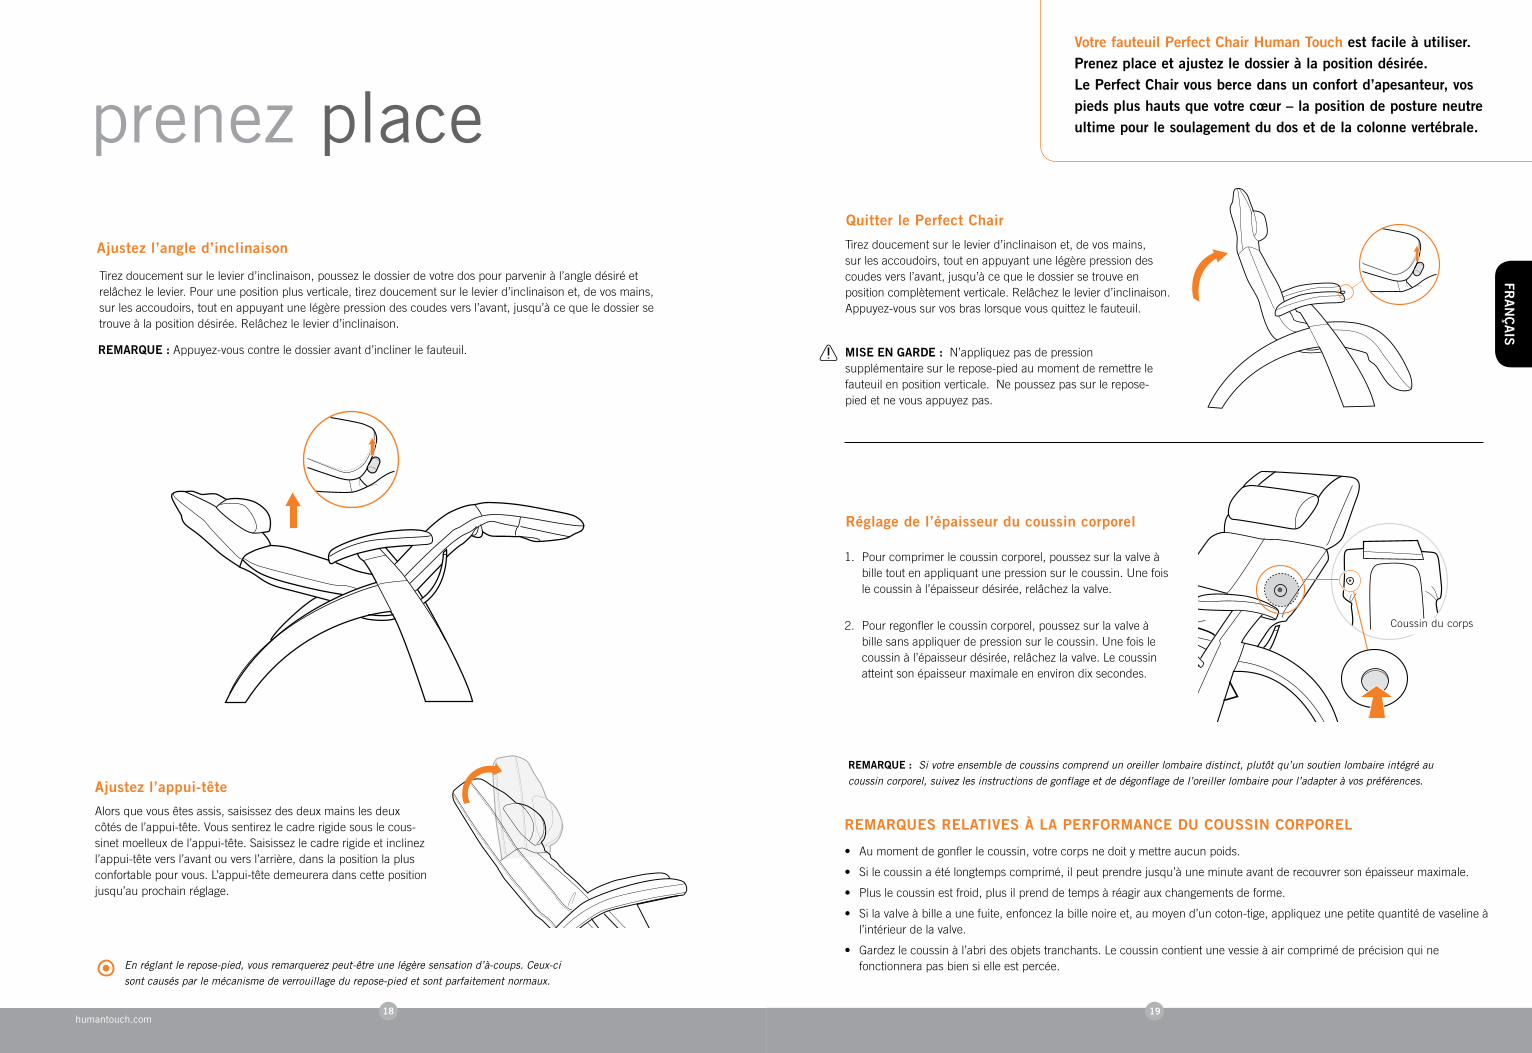
Votre fauteuil Perfect Chair Human Touch est facile à utiliser. Prenez place et ajustez le dossier à la position désirée. Le Perfect Chair vous berce dans un confort d’apesanteur, vos pieds plus hauts que votre cœur – la position de posture neutre ultime pour le soulagement du dos et de la colonne vertébrale.
Ajustez l’appui-tête
Alorsquevousêtesassis,saisissezdesdeuxmainslesdeuxcôtésdel’appui-tête.Voussentirezlecadrerigidesouslecous-sinetmoelleuxdel’appui-tête.Saisissezlecadrerigideetinclinezl’appui-tête vers l’avant ou vers l’arrière, dans la position la plus confortable pour vous. L’appui-tête demeurera dans cette position jusqu’au prochain réglage.
Quitter le Perfect Chair
Tirezdoucementsurlelevierd’inclinaisonet,devosmains,sur les accoudoirs, tout en appuyant une légère pression des coudesversl’avant,jusqu’àcequeledossiersetrouveenpositioncomplètementverticale.Relâchezlelevierd’inclinaison.Appuyez-voussurvosbraslorsquevousquittezlefauteuil.
MISE EN GARDE :N’appliquezpasdepressionsupplémentaire sur le repose-pied au moment de remettre le fauteuilenpositionverticale.Nepoussezpassurlerepose-piedetnevousappuyezpas.
prenez place
Tirezdoucementsurlelevierd’inclinaison,poussezledossierdevotredospourparveniràl’angledésiréetrelâchezlelevier.Pourunepositionplusverticale,tirezdoucementsurlelevierd’inclinaisonet,devosmains,surlesaccoudoirs,toutenappuyantunelégèrepressiondescoudesversl’avant,jusqu’àcequeledossiersetrouveàlapositiondésirée.Relâchezlelevierd’inclinaison.
Ajustez l’angle d’inclinaison
En réglant le repose-pied, vous remarquerez peut-être une légère sensation d’à-coups. Ceux-ci
sont causés par le mécanisme de verrouillage du repose-pied et sont parfaitement normaux.
REMARQUE :Appuyez-vouscontreledossieravantd’inclinerlefauteuil.
Réglage de l’épaisseur du coussin corporel
1. Pourcomprimerlecoussincorporel,poussezsurlavalveà bille tout en appliquant une pression sur le coussin. Une fois lecoussinàl’épaisseurdésirée,relâchezlavalve.
2. Pourregonflerlecoussincorporel,poussezsurlavalveà bille sans appliquer de pression sur le coussin. Une fois le coussinàl’épaisseurdésirée,relâchezlavalve.Lecoussin atteint son épaisseur maximale en environ dix secondes.
REMARQUES RELATIVES À LA PERFORMANCE DU COUSSIN CORPOREL
• Au moment de gonfler le coussin, votre corps ne doit y mettre aucun poids.
• Silecoussinaétélongtempscomprimé,ilpeutprendrejusqu’àuneminuteavantderecouvrersonépaisseurmaximale.
• Pluslecoussinestfroid,plusilprenddetempsàréagirauxchangementsdeforme.
• Silavalveàbilleaunefuite,enfoncezlabillenoireet,aumoyend’uncoton-tige,appliquezunepetitequantitédevaselineà l’intérieur de la valve.
• Gardezlecoussinàl’abridesobjetstranchants.Lecoussincontientunevessieàaircomprimédeprécisionquine fonctionnera pas bien si elle est percée.
Coussin du corps
REMARQUE : Si votre ensemble de coussins comprend un oreiller lombaire distinct, plutôt qu’un soutien lombaire intégré au
coussin corporel, suivez les instructions de gonflage et de dégonflage de l’oreiller lombaire pour l’adapter à vos préférences.
humantouch.com20
FRA
Nç
AIS
21
Dimensionsdufauteuil(incliné): 157,48cm(L)x81,28cm(l)x76,20cm(H)
Poidsduproduit: 36,74kg
Dégagementd’inclinaisonrequis:20,32cm
Poidsdechargemaximal: 129,27kg
*La fiche technique est sujette à changement sans préavis.
Fiche technique*
Entretien et réparation :1.Lamécaniquedecefauteuilaétéconçueetconstruiteafindenenécessiteraucunentretien.Aucunelubrification ni entretien périodique ne sont nécessaires.2. Votre fauteuil ne doit être réparé que par un centre de service agréé.
Rangement : 1. Lorsque le fauteuil ne doit pas être employé sur une longue période, nous vous recommandons d’enrouler le cordon d’alimentation et de placer le fauteuil dans un endroit exempt de poussière et d’humidité.2.Nerangezpaslefauteuilprèsd’uneflammeoud’unesourcedechaleur.N’exposezpascetappareilauxrayons directs du soleil sur une longue période. Cela pourrait le décolorer ou l’endommager.3.Nepasutilisernirangerdansdestempératuresextrêmes;unproduitrangéaufroidpourraitnécessiter48heuresàla température de la pièce avant de bien fonctionner.4.Leproduitdoitêtreutiliséetrangédansunmilieuoùletauxd’humiditérelativesanscondensationvariede10%à80%. Trop d’humidité endommagera la mécanique.
Divers :1.N’insérezpasdecorpsétrangersentrelesnodulesdemassagenidansleboîtierdumoteur.2.Prenezsoindenepassurchargerl’appareil.
Afin de vous assurer que votre fauteuil fonctionne bien et qu’il conserve une belle apparence, veuillez suivre ces consignes faciles d’entretien.
soin et entretien
Nettoyage :
1.Assurez-vousdedébrancherlecordond’alimentationdelaprisemuraleavantlenettoyage.2.N’utilisezpasdebenzène,dediluantnid’autreagentsolvantpournettoyervotrefauteuildemassage.3.Éliminezlapoussièredudossieretdesaccoudoirsàl’aided’unaspirateur.4.Siledossieroulesaccoudoirssesalissent,essuyez-lesàl’aided’unlingehumide,puisséchez-lesàl’aided’un linge sec.5.Lesdétergentscourantspourmeublespeuventêtreemployéspourfairedisparaîtrelestachestenaces.6.N’employezqu’unlingesecpournettoyerlesystèmedecommandeoulazoneautourduboutond’alimentation. Nenettoyezjamaislesystèmedecommandeouleboutond’alimentationàl’aided’unlingehumide.
Soins du tissu :PourmaintenirvotreproduitHumanTouchenétatoptimal,époussetez-lefréquemmentoupassez-leàl’aspirateuràl’aided’unebrossed’aspirateurdouce.Lesproduitsdefauxsuèdepeuventégalementêtrebrossésàl’aided’unebrosseàsuède.Essuyez-leàl’aided’unlingelégèrementhumideaubesoin.Pourlestachesplustenacessurlesproduitsnonrecouvertsdecuir,utilisezundétergentdouxmélangéàl’eau.Lesproduitsencuirdoiventêtreessuyésoccasionnellementàl’aided’unesolution nettoyante pour meubles en cuir.
MISE EN GARDE : Avantdeprocéderaunettoyagedetoutelasurfaceduproduitàl’aided’unesolutionnettoyante,veillezàenfairel’essai surunepetiteportioncamoufléeduproduitafindevousassurerqu’ellen’entraînepasdedécoloration.

ES
PAñ
OL
humantouch.com800.355.2762
manual de uso y cuidad
pc6

humantouch.com
ES
PAñ
OL
Usted acaba de comprar uno de los muebles ergonómicos de mayor calidad disponibles. La Perfect Chair® de Human Touch® combina de manera artística lo mejor de la estética, la tecnología y el bienestar para brindar una experiencia que trasciende los más altos estándares de confort.
El sistema de reclinación eléctrico coloca el cuerpo en una posición virtualmente ingrávida,yaqueelevalaspiernasporencimadelcorazónyaliviaelpesodelacolumnavertebral. Esta silla extraordinaria alivia el dolor, la tensión y la fatiga que provoca la atracciónconstantedelatierra,alavezquesuposicióndesentadodeformafijaasegurauna postura ergonómica óptima en todos los ángulos de reclinación.
Paragarantizarquenoolvideningunadesusfuncionesyquelautilizaráenformasegura, lea este manual detenidamente. ¡Luego siéntese, relájese y disfrute!
humantouch.com
Envíe sus preguntas o comentarios sobre este manual a [email protected]
CONSERVE ESTAS INSTRUCCIONES
• Nosesientesobrelosbrazosdelasilla.
• Lasillaestádiseñadaparausofijoynocomomecedora.
• Siemprereclinelasillalentamenteparamanteneruncontrolóptimodelsistemadesuspensión.
• Mantengalosdedosylasropassueltaslejosdelosrielesguíaentodomomento.
• Esteproductonoestádiseñadoparaserusadoporpersonasdiscapacitadasniporniñossinlasupervisióndeunadulto.
• Sitienedolordeespaldacrónico,sisehasometidoaunacirugíadeespaldaositienecualquierdudarespectodeluso
deesteproducto,consulteconsumédicoantesdeutilizarlo.
• Siexperimentamareosonauseas,descontinúeelusodelproductoycomuníqueseconsumédicoinmediatamente.
No intente reparar este producto usted mismo.
• Esteproductoestádiseñadoparausopersonalencasa.Suusocomercialanulalagarantía.
Le damos la bienvenida a human touch®
manténgala en forma seguraINSTRUCCIONES DE SEGURIDAD IMPORTANTES
Cuando utilice un artefacto eléctrico, debe tener siempre precauciones especiales, incluidas las siguientes:
©2010 Human Touch®, LLC. Patentes en proceso y derechos de propiedad intelectual vigentes.
Elusodeesteproductonogarantizaniimplicadeclaracionesmédicas.
Human Touch es una marca registrada de Human Touch®, LLC.
pc6

humantouch.com26 27
ES
PAñ
OL
Su Perfect Chair® de Human Touch® requiere un armado sencillo. Simplemente coloque los armazones del apoyacabeza y el apoyapies, los almohadones, los cubrebrazos y el cojín de la cabeza y listo.
27
INSTALACIÓN DEL ARMAZÓN DEL APOYAPIES
Coloque el almohadón para el cuerpo sobre la parte inferior del armazóndelasilla,verificandoqueelarmazóningreseenelbolsillo de material ubicado en la cara inferior del almohadón.
Unavezquelohayacolocadoensulugar,aliseelalmohadónparaelcuerpocomenzandodesdeelapoyapieshaciaelespaldar. El almohadón se asegura automáticamente usando los sujetadores de velcro.
COLOQUE EL ALMOHADÓN PARA EL CUERPO
1. Coloque el almohadón para el cuerpo sobre el armazón de la silla.
2. Asegure el almohadón para el cuerpo.
DESEMPAQUE LAS CAJAS
Almohadón para el cuerpo
Cubrebrazos(2)
Almohadón para lacabeza
Destornilladorphillips
Armazóndelasilla Armazóndelapoyacabeza
Funda del apoyacabeza
Llave Allen de 3/16 pulg.
Coloquelosdosextremosdelarmazóndelapoyapiesenlosorificiosubicadosenlapartedelanteradelarmazóndelasilla.
2. Coloque el armazón del apoyapies en el armazón de la silla.
Usando un destornillador phillips y los dos tornillos provistos, asegurecadaladodelarmazóndelapoyapiesalarmazóndelasilla.
3. Coloque nuevamente los tornillos del armazón del apoyapies.
Usandoambasmanos,continúetirandolalonadelasientohaciaadelantehastacubrirelarmazóndelapoyapiesyluegoasegurelas dos solapas delanteras y las dos solapas laterales usando los sujetadores de velcro.
5. Termine de asegurar la lona al armazón.
Usando el destornillador phillips (provisto) retire los dos tornillos delarmazóndelapoyapies.Conservelostornillosparausarlosen el paso 3.
1. Retire los tornillos del armazón del apoyapies.
Armazóndelapoyapies
Usando ambas manos, tire suavemente la lona del asiento haciaadelante,apenashastalapartesuperiordelarmazóndel apoyapies, y luego asegure las dos solapas ubicadas debajodelalonaalarmazóndelapoyapies.
4. Asegure la lona al armazón del apoyapies.
Cojín lumbar
Cojíndelacabeza
En lugar del almohadón para el cuerpo mejorado con apoyo lumbar incorporado, algunos conjuntos de almohadones incluyen un cojín lumbar separado.
prepárese

humantouch.com28 29
ES
PAñ
OL
COLOQUE LOS CUbREbRAZOS
Retire los tres tornillos unidos con cinta a la cara inferior del cubrebrazoderechoyluegocoloqueelcubrebrazoderechosobreelapoyabrazo.Desdelaparteinferiordelapoyabrazo,asegureelcubrebrazousandolostrestornillos.Repitaestospasosparacolocarelcubrebrazoizquierdo.
Coloquelafundadelapoyacabezasobreelarmazóndelapoyacabeza,introduciéndolatantocomoseaposible.Elladoacolchadodelafundadelapoyacabezadebequedarhacialaparte posterior de la silla.
COLOQUE EL ALMOHADÓN PARA LA CAbEZA
1. Coloque la funda del apoyacabeza sobre el armazón del apoyacabeza.
Coloqueelalmohadónparalacabezaenelarmazóndelapoyacabeza,verificandoqueelarmazóningreseenelbolsillode material ubicado en la cara inferior del almohadón. Tire del almohadónparalacabezahaciaabajotantocomoseaposible.
2. Coloque el almohadón para la cabeza en el armazón del apoyacabeza.
Desdeadelantedelasilla,metalasolapadelapartesuperiordel almohadón para el cuerpo hacia el interior del almohadón paralacabezayalíselahastaqueestéplana.Lasolapaquedaautomáticamente asegurada al almohadón mediante los sujetadores de velcro.
3. Meta hacia adentro la solapa del almohadón para el cuerpo.
Asegurelascorreasdelcojíndelacabezaalascorreasdelalmohadón para el cuerpo usando los sujetadores de velcro. Ajustelaalturadelcojíndelacabezaparamáximacomodidad.
4. Asegure el cojín de la cabeza.
1. Suba la silla hasta colocarla en posición vertical.
COLOQUE EL ARMAZÓN DEL APOYACAbEZA
Para su comodidad y a fin de ubicar la silla en una mejor posición para el resto del armado, use la palanca de inclinación eléctrica para colocar la silla en una posición vertical.
Usando un destornillador phillips (provisto), retire los dos tornillos delarmazóndelapoyacabeza.Conservelostornillosparausarlosen el paso 4.
Usando el destornillador phillips, coloque nuevamente los dos tornillosdelarmazóndelapoyacabeza,asegurandoelarmazóndelapoyacabezaalarmazóndelespaldar.
2. Retire los tornillos del armazón del apoyacabeza.
3. Inserte el armazón del apoyacabeza en el armazón del espaldar.
4. Coloque nuevamente los tornillos del armazón del apoyacabeza.
Conelarcodelarmazóndelapoyacabezaapuntandohacialaparteposteriordelasilla,coloquelosdosextremosdelarmazóndelapoyacabezaenlosextremosdetuboabiertosenlapartesuperiordelarmazóndelespaldar.
prepárese

humantouch.com30 31
ES
PAñ
OL
Su Perfect Chair de Human Touch es fácil de usar. Simplemente tome asiento y ajuste la silla hasta lograr la posición deseada. La Perfect Chair lo acuna en la comodidad de la gravedad nula, con sus pies sobre su corazón—la postura neutra ideal para aliviar la espalda y la columna vertebral.
Para reclinar, tire de la palanca de reclinación suavemente hacia arriba, apóyese sobre el espaldar para colocarlo en el ángulo deseado y luego suelte la palanca. Para llevar el espaldar a una posición más vertical, tiredelapalancadereclinaciónsuavementehaciaarriba,luegotiredelosapoyabrazoshaciaarribaconsusmanosalavezqueaplicaunaligerapresióndescendenteconsuscodos,hastaqueelespaldarseinclinehasta la posición deseada. Suelte la palanca de reclinación.
Ajuste el apoyacabeza
Estando sentado, levante ambas manos y tome los dos lados del apoyacabeza.Sentiráelarmazónrígidodebajodelalmohadónblandoparalacabeza.Tomándolodelarmazónrígido,inclineelapoyacabezahaciaadelanteohaciaatrásdemaneradelograrelmáximoconfort.Elapoyacabezapermaneceráenestaposiciónhasta que lo ajuste nuevamente.
Cuando suba o baje el apoyapies es posible que observe una ligera sensación de sacudida.
Esto es provocado por el mecanismo de traba del apoyapies y es perfectamente normal.
Ajuste el ángulo de reclinaciónCómo salir de la Perfect Chair
Tire suavemente de la palanca de reclinación hacia arriba y tire delosapoyabrazoshaciaarribaconsusmanosalavezqueaplica una ligera presión descendente con sus codos, hasta que el espaldar se incline hasta una posición totalmente vertical. Suelte la palanca de reclinación. Para levantarse de la silla use losbrazoscomoapoyo.NOTA: Antes de reclinar la silla apóyese contra el espaldar.
Cómo ajustar el espesor del almohadón para el cuerpo
1. Para comprimir el espesor del almohadón para el cuerpo, siéntese en la silla, apóyese contra el espaldar y presione la válvula de bola que se encuentra en la parte posterior del almohadón. Cuando el almohadón llegue al espesor deseado, suelte la válvula.
2. Para inflar el almohadón para el cuerpo nuevamente, presione la válvula de bola sin aplicar presión al almohadón. Cuando el almohadón llegue al espesor deseado, suelte la válvula.Elalmohadóndemoraaproximadamentediez segundosenalcanzarsuespesortotal.
NOTAS SObRE EL RENDIMIENTO DEL ALMOHADÓN PARA EL CUERPO
• Para inflar nuevamente el almohadón para el cuerpo debe retirar todo el peso del mismo.
• Si el almohadón ha estado comprimido durante un período de tiempo prolongado, es posible que demore hasta un minuto en volver a su espesor total.
• Cuanto más frío esté el almohadón, más demorará en reaccionar a los cambios de forma.
• En caso que la válvula de bola tenga una pérdida, presione la bola negra hacia adentro y con ayuda de un hisopo dealgodónapliqueunapequeñacantidaddeVaselinadentrodelaválvula.
• Mantenga los objetos filosos lejos del almohadón. El almohadón contiene una cámara de aire hermética de precisión que no funcionará correctamente si se perfora.
Almohadón para
el cuerpo
PRECAUCIÓN:Noejerzaningunapresiónadicionalsobre el apoyapies mientras regresa la silla a la posición vertical. No presione sobre el apoyapies ni se apoye sobre el mismo.
NOTA: Si en lugar de un apoyo lumbar incorporado en el almohadón para el cuerpo su conjunto de almohadones viene con un
cojín lumbar separado, aplique estas instrucciones para inflar o desinflar el cojín lumbar según lo desee.
PRECAUCIÓN:Noejerzapresiónadicionalsobreelapoyapiesmientrasreclinalasilla.No presione sobre el apoyapies ni se apoye sobre el mismo.
tome asiento
humantouch.com32 33
ES
PAñ
OL
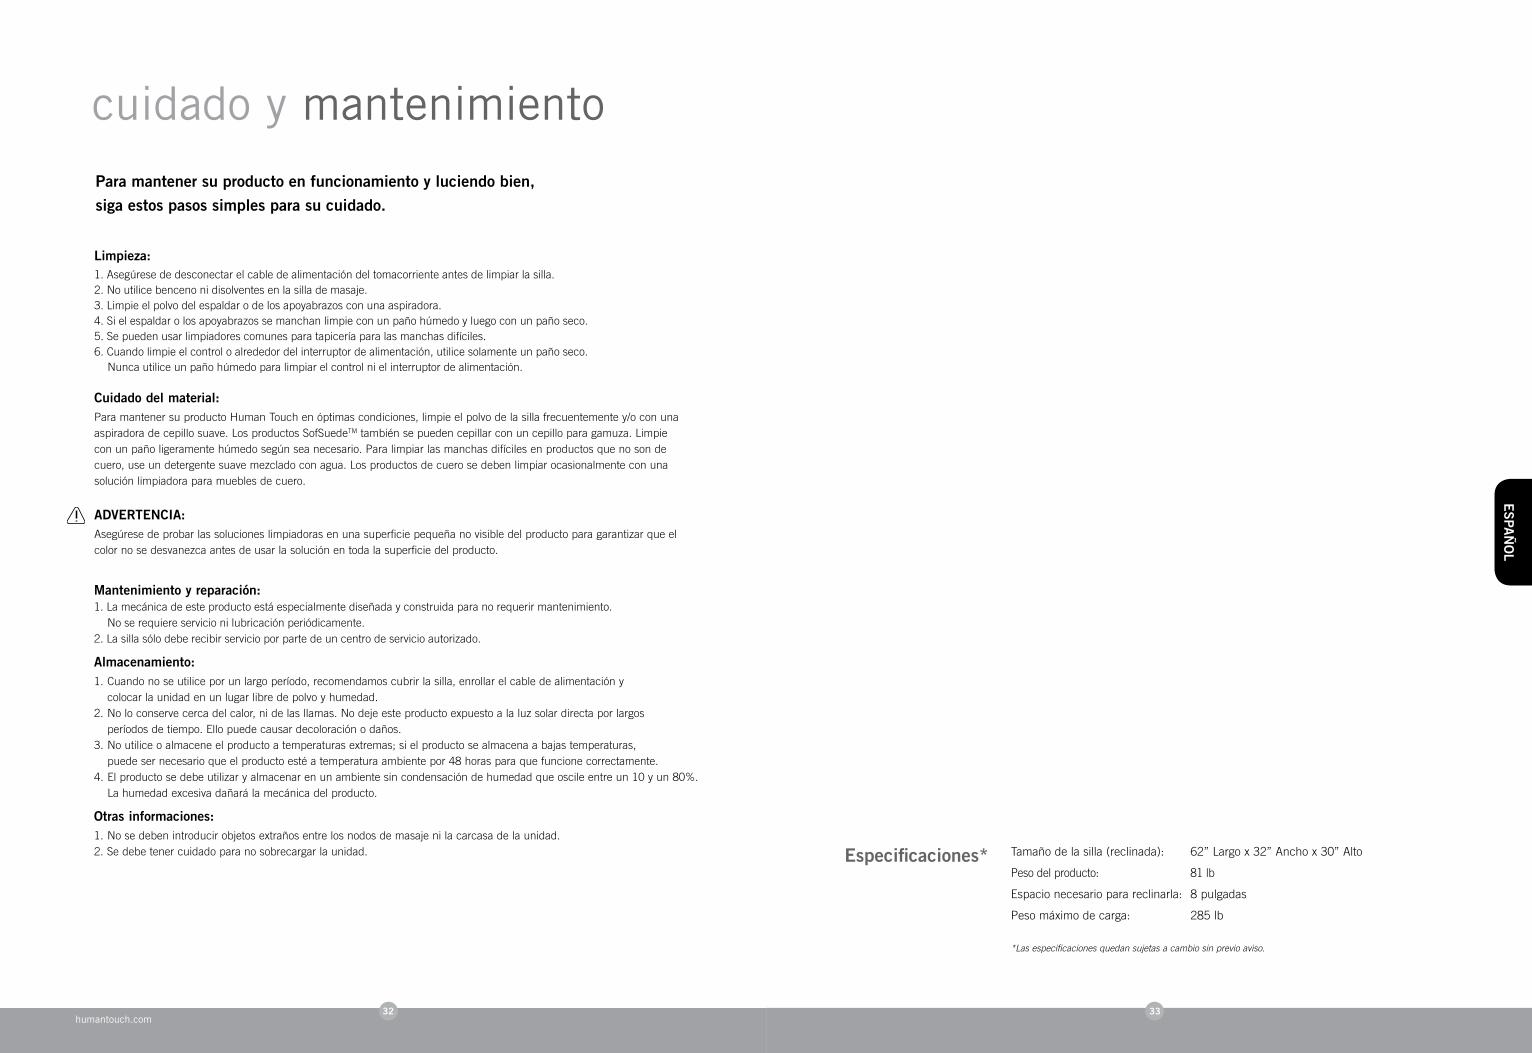
Tamañodelasilla(reclinada): 62”Largox32”Anchox30”Alto
Pesodelproducto: 81lb
Espacionecesarioparareclinarla:8pulgadas
Pesomáximodecarga: 285lb
*Las especificaciones quedan sujetas a cambio sin previo aviso.
Especificaciones*
Para mantener su producto en funcionamiento y luciendo bien, siga estos pasos simples para su cuidado.
cuidado y mantenimiento
Limpieza:1.Asegúresededesconectarelcabledealimentacióndeltomacorrienteantesdelimpiarlasilla.2. No utilice benceno ni disolventes en la silla de masaje.3.Limpieelpolvodelespaldarodelosapoyabrazosconunaaspiradora.4.Sielespaldarolosapoyabrazossemanchanlimpieconunpañohúmedoyluegoconunpañoseco.5.Sepuedenusarlimpiadorescomunesparatapiceríaparalasmanchasdifíciles.6.Cuandolimpieelcontroloalrededordelinterruptordealimentación,utilicesolamenteunpañoseco. Nuncautiliceunpañohúmedoparalimpiarelcontrolnielinterruptordealimentación.
Cuidado del material: Para mantener su producto Human Touch en óptimas condiciones, limpie el polvo de la silla frecuentemente y/o con una aspiradora de cepillo suave. Los productos SofSuedeTMtambiénsepuedencepillarconuncepilloparagamuza.Limpieconunpañoligeramentehúmedosegúnseanecesario.Paralimpiarlasmanchasdifícilesenproductosquenosondecuero,useundetergentesuavemezcladoconagua.Losproductosdecuerosedebenlimpiarocasionalmenteconunasolución limpiadora para muebles de cuero.
ADVERTENCIA: Asegúresedeprobarlassolucioneslimpiadorasenunasuperficiepequeñanovisibledelproductoparagarantizarqueelcolornosedesvanezcaantesdeusarlasoluciónentodalasuperficiedelproducto.
Mantenimiento y reparación:1.Lamecánicadeesteproductoestáespecialmentediseñadayconstruidaparanorequerirmantenimiento. No se requiere servicio ni lubricación periódicamente.2.Lasillasólodeberecibirservicioporpartedeuncentrodeservicioautorizado.
Almacenamiento:1. Cuando no se utilice por un largo período, recomendamos cubrir la silla, enrollar el cable de alimentación y colocar la unidad en un lugar libre de polvo y humedad.2.Noloconservecercadelcalor,nidelasllamas.Nodejeesteproductoexpuestoalaluzsolardirectaporlargos períodosdetiempo.Ellopuedecausardecoloraciónodaños.3.Noutiliceoalmaceneelproductoatemperaturasextremas;sielproductosealmacenaabajastemperaturas, puede ser necesario que el producto esté a temperatura ambiente por 48 horas para que funcione correctamente.4.Elproductosedebeutilizaryalmacenarenunambientesincondensacióndehumedadqueoscileentreun10yun80%. Lahumedadexcesivadañarálamecánicadelproducto.
Otras informaciones:1.Nosedebenintroducirobjetosextrañosentrelosnodosdemasajenilacarcasadelaunidad.2. Se debe tener cuidado para no sobrecargar la unidad.