ceramics: art and perception - ceramicstechnical issue #37
DESCRIPTION
This is a free sample of Ceramics: Art and Perception issue "CeramicsTECHNICAL Issue #37" Download full version from: Apple App Store: https://itunes.apple.com/us/app/id730893785?mt=8&at=1l3v4mh Magazine Description: A journal of exhibition reviews and articles on historic and contemporary ceramics, for all those interested in the ceramic arts. You can build your own iPad and Android app at http://presspadapp.comTRANSCRIPT

Expl
orin
g th
e Su
blim
e
Johanna DeMaine creates a fusion of tradition, industry and
new technologies
It has been argued that clay is always about itself, yet it is one of the most successful mimics in art. A work of ceramic art con-veys meaning of its own kind. To achieve the full potential of this
meaning today the ceramic toolbox needs to be extended and updated. In order to realise my art form I have come to terms with hybrid or
cross disciplinary practices using quasi industrial processes that are still within the economic reach of ceramists. I have married modern tech-nologies with an ancient craft by incorporating the use of the computer, vinyl cutter and sandblaster to facilitate an experimental approach to my work through layering. I have also added overglaze as just another layer in the ceramics continuum.
The history of overglaze is inextricably linked to the development of decoration on a ceramic surface and the discovery of porcelain. I believe we have neglected the technique of overglaze decoration as a valid and enduring element of the entire ceramics process, despite it being an integral part of the character of Asian and Islamic ceramics for the past 1000 years, through the marriage of form and surface. In general terms the aim of this article is to provide a framework of understanding for ceramists so that overglaze can be accepted as a valid technique within our craft/art, whatever our influences, as well as to demonstrate my working techniques.
CeramicsTECHNICAL No. 37 201374
Expl
orin
g th
e Su
blim
e
My work has developed to embrace many different languages,
which have melded together to form a personal visual language communicating my own narra-
tive through landscape, informed by the languages of computer,
music, science, nature and design. ~ Johanna DeMaine
Above left: Bazaar. Porcelain vessel and an example of lustre textured with resist using a Tjanting 24 cm/h.Above right: Peak Hour. Southern Ice porcelain, sand carved, raised enamel with decals. 20 x 17 x 11 cm.
CeramicsTECHNICAL No. 37 2013 75
background
I live with my husband Ted, at Landsborough, on the Sunshine Coast in Queensland, Australia. Born in Holland, my parents emi-grated to Australia in 1954. I initially trained as a high school teacher specialising in Geography, German and French but along the way I also taught History and Economics. Although I have worked in clay for 42 years, I did not have a formal art ceramics education but rather taught myself to throw, glaze and fire my kilns through con-stant practice and from books. While our children were growing up Ted became my apprentice and we operated a production workshop making pots for everyday use. When my husband developed a heart condition in 1989, I knew that I needed to change direction as I did not want to employ any other people in the workshop.
I went back to university in 1993 to get qualifications to teach ceramics at tertiary level and earned my Graduate Diploma in Visual Arts, a Master of Fine Arts and I updated to a Bachelor of Education degree. By then I had started to feel like a perpetual student, so while teaching at our local university I decided to study Computer based Art and Design. My background then was that of a ceramist working in wheel thrown porcelain who discovered overglaze while com-pleting post graduate studies in 1993. I was inspired by the paintings of Austrian artist Gustav Klimt and set out to learn as much as I could about overglaze so that my work would have the same richness and feeling as Klimt’s paintings.
In 2001 I undertook a 10 week Churchill Fellowship research project on health and safety issues involved with overglazes as well as the problems encountered in intensive hand decorating techniques. This has allowed me to further extend my work with lustres as well as to work with enamels and to investigate the making of decals.
After developing a temporary problem with use of my fingers due to peripheral neuropathy from chemotherapy I started to investigate how sandblasting together with the use of a computer controlled plotter/cutter can help to further achieve my aims. I have always been inter-ested in combining the traditional skills of ceramics with techniques used in industry as well as using the computer skills that I have. I like to push the boundaries and I am interested in combining new or alter-native technologies. statement on my work
Form has always been central to my work; the three dimensional pres-ence that draws the eye and displaces space in such a way as to create a communication of beauty inviting the viewer to a closer inti-macy. Twenty years ago I set out to involve the viewer in a deeper conversation and invite an intimacy that transcends time and preserves the concepts of beauty. I believed that I could achieve this through the inspiration of Matisse in the way he used repetitive pattern. But along the way I was seduced by the sensuality of Klimt’s work and by the under-standing of raising the everyday to the ceremonial.
In my work I also explore the notion that the sublime is an extension of beauty. I explore my inner and outer space through the use of preciousness. I attempt to achieve this through the use of higher levels of skill, precious materials and contemporary
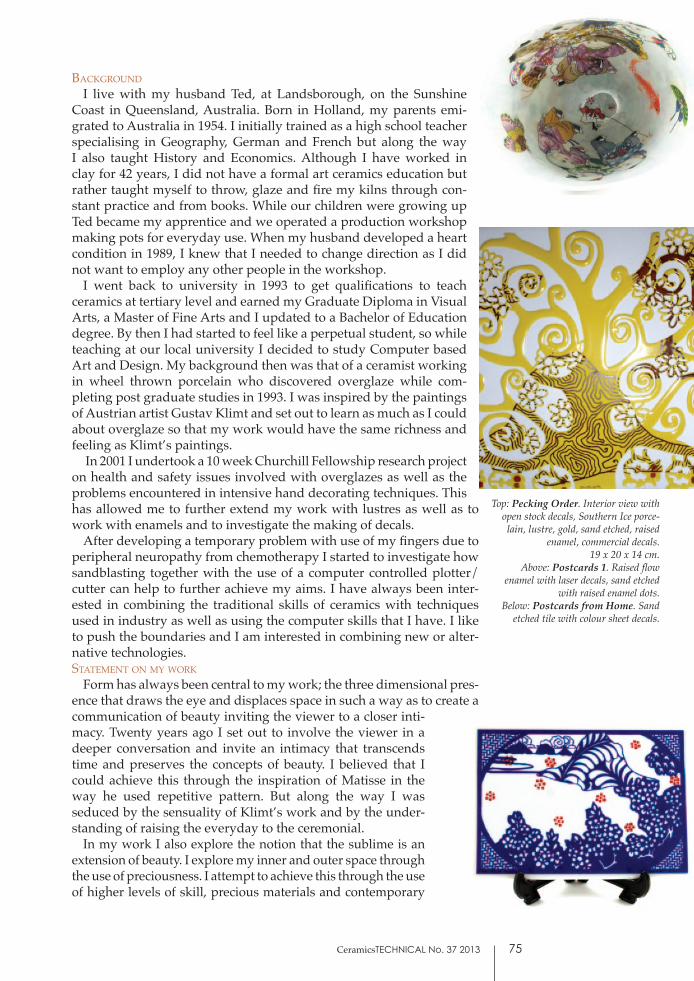
Top: Pecking Order. Interior view with open stock decals, Southern Ice porce-lain, lustre, gold, sand etched, raised
enamel, commercial decals. 19 x 20 x 14 cm.
Above: Postcards 1. Raised flow enamel with laser decals, sand etched
with raised enamel dots.Below: Postcards from Home. Sand
etched tile with colour sheet decals.

CeramicsTECHNICAL No. 37 201376
technology while actively pushing all to their limits. I invite the viewer to have a deeper conversation and emotional connection to the story that the marks on the surface convey. I do this through layering and etching the surface to embrace Matisse’s cut outs and Chinese paper cuts. The reflective surface invites the viewer’s image to become part of the narra-tive, through an involvement in beauty and perception via the eye to the imagination.working techniques
In order to do this I have had to get my head around the overglaze techniques used by both industry and porcelain painters/China painters. Coming to this from a clay worker’s background where water is the predominant medium used both in forming and decorating, I tend to reinterpret this information to the needs of ceramists/clay workers rather than decorators. It has been my goal through my blog to reac-quaint ceramists/clay workers/potters/sculptors (or whatever we label ourselves) with a process that was in evidence in China as early as the 13th century. The overglaze process developed there as part of the ceramics continuum.
Lustres, however, were first in evidence on glass in Egypt in the 4th cen-tury. By the 9th century lustre was being used on ceramics. This is what we know as reduced lustre/Persian lustre, the names both describing the process and the origin. Due to time constraints I chose to work with resinate lustre which is industry’s more reliable interpretation of lustre, despite it not having the same depth and subtle nuances of the reduced lustre, meaning that I was working with a solvent and oil based material, instead of water based. I have adapted my working techniques accord-ingly to minimise the time spent and the contact with the lustre.working with resinate lustres
Lustres are thin films of metals deposited on the surfaces of ware in the same way as noble metals (gold, platinum, copper) and the lustre effect is due to the interference of incident and reflected light. Lustres are made up of solutions and suspensions of metallic resinates in solu-tions of polymers and thickening agents to aid application by brush and machine. The colours are due to metallic oxide films bonded onto the glazed surface by bismuth oxide which must be fired to a low tempera-ture; otherwise the flux would burn out.
Resinate lustre is a product of the ceramics industry as application and controlled firings were standardised for mass production. Resinate lustres are also known as ‘oxidation’ or ‘commercial lustres’. This thin film of metal then dictates the way in which I work.
There are hazardous materials used in some of the overglaze techniques. Unfortunately lustres contain solvents and I found no way around this apart from switching to reduced lustres. That may lie in the future if I can work out how to transfer my present working methods across. As well as from observing all the health and safety advice that I researched which included the construction of a fume booth, I have developed a way of working that limits my exposure to the hazards involved.resist technique
At present I am exploring two processes – resist and etching. I use the resist technique so as to limit my exposure to lustre; 90 percent of my time with lustre is spent in applying inert resist and only 10 percent in actually applying the lustre. My work is built up of layers of lustre, which need to be fired in between each application. After drawing my images on the
Top: Guardian of the Pond. Example of raised enamel dotting. Southern Ice porcelain, lustre, gold, sand etched with raised enamel. 6 x 9.5 x 9.5 cm.Above: Golden Moments. Southern Ice porcelain, lustre, gold, sand etched, with raised enamel. 12.5 x 21 x 21 cm.
Form has always been central to my work; the
three dimensional presence that draws the
eye and displaces space in such a way as to create a
communication of beauty inviting the viewer to a
closer intimacy.

pot with a permanent overhead projector pen (OHP) pen, I draw over these lines with lustre resist using a tjanting, allowing for a great degree of control and I often refer to my technique as batik on clay. I then block in with lustre and fire to 810ºC. The ensuing layers are built up in the same manner and all the fine lines apart from some gold pen work are achieved by resist. As I usually end up firing each piece between 10–15 times for overglaze, depending on the size and complexity of the piece, I am confident that I am limiting my exposure to lustre.
Most resists, apart from waxes, will work as lustre resist. Latex, white poster paint, adhesive tapes, masking laquers, stickers, white-out pens and proprietary lustre resists can all be used. I prefer to use a black lustre resist as this resist can survive several firings without having to be cleaned off and reapplied – essential for the way I work. etching technique
I had always been interested in etching the surface of the glaze before applying the lustre so as to juxtapose the surfaces produced in order to maximise lustre’s potential as lustre takes on the surface qualities of the glaze beneath it. This has been exploited by industry in the gold deco-ration on dinnerware. Industry, however, uses acid to etch and I was not interested in using acid. Eight years ago I was diagnosed with lym-phatic cancer and the subsequent chemotherapy left me with a degree of neuropathy in my fingers. This was the catalyst for the next stage in the development of my work as I was determined to keep on working and looked for alternative methods that I could use.
I was aware that glass workers use sandblasting to etch the surface of glass. I reasoned that if it could be done on glass it should be able to be used for glaze. On the Internet I researched sandblasting and became aware that it involved the use of stencils. I learnt that stencils were rou-tinely cut with vinyl stencil cutters thus eliminating the need for manual dexterity to a large extent. I invested in a portable 15 inch stencil cutter as well as a sandblasting booth. The stencil cutter is a printer with a blade instead of ink. With my computer skills, I quickly learnt how to cut sten-cils through the computer. Now I use the free image manipulation pro-gram, the Gimp, instead of Photoshop. The work sequence is as follows:
• Scan the image required. • Convert it to a bitmap. • Upload the bitmap to the vinyl cutters’ operating program.• Set the program to cut the stencil. (It does this by tracing an outline
and then cutting along the outline.)• Weed out the areas that need to be sandblasted.• Transpose the stencil to the pot via transfer tape.• Sandblast the exposed areas. When the gloss is taken off my glaze
the resultant surface feels like polished marble. Different glazes have different surface qualities when sandblasted. Now I tend to refer to this process as sand etching rather than sand blasting.
• Further enhance the surface with lustre and/or enamel.Highly detailed imagery can be produced by this method. I no longer have the neuropathy but I continue to use this method of working as there are many possiblities to explore within this genre and it still falls within my concept of layering.
health and safety
When working with lustres I take the issue of health and safety seri-ously. I have posted my article “Health and Safety and Overglaze”which
Top: Stages in sandblasting 1. Mask applied and sandblasted.
Above: Stages in sand-blasting 2. Mask removed.
CeramicsTECHNICAL No. 37 2013 77

CeramicsTECHNICAL No. 37 201378
Top: Custom Made Decorating Easel.Centre: Pecking Order. Southern Ice porcelain, lustre, gold, sand etched, raised enamel, with decals. 19 x 20 x 14 cm.Above: A journey of love that isn’t a race. Vessel, por-celain, clear glaze, lustre, gold, sand etched with enamel. 26 x 24 x 22 cm.
was published in The Journal of Australian Ceramics, #45/3, pages 91–94, November 2006, on my web site.
After a bout of tendonitis in my elbow I researched different ways of working on a three dimensional piece without physically holding it. I encountered the old Scott’s Creek easel which had been adapted from an early Spanish idea. I had a friend make up a wooden prototype as well as a scaled down version. I use this easel regularly as it allows me a greater degree of freedom in my work. Once again there is a link to this on my web site.sandblasting bisque
Recently I have extended my sandblasting/etching technique back to the bisque fired work, applying the same stencils on the bisque piece and then carefully sandblasting the surface. In this way I can achieve a finely and intricately carved surface. As I am using a translucent porcelain, Southern Ice, I am obtaining different levels of translucency, continuing with my concept of layering. If I am careful I can carve the rims of the pots in the same way. At times in the learning process I have carved through the bisque but I have learnt to control this now and use it to an advantage. I then glaze the piece with a celadon glaze. laser printed decals
I am frequently experimenting with my work and I like to use the computer as a tool for doing this. Recently I have also been working with laser printed decals, printing images/photos onto waterslide laser decal paper. Only certain black and white printers can be used for this as the black toner used needs to be at least 40 percent black iron oxide. I use a bottom-of-the-range Hewlett Packard laser printer. Colour laser printers are not suit-able as the temperatures used by the printing drum to fuse the colours to the paper will melt the laser decal paper. The most important part of this process is finding the softening tempera-ture of the glaze as it is unfluxed iron oxide that is being used in the decal. Different glazes have different softening points. The glaze I use at present softens at around 1100ºC where it fuses the image to the surface. Another approach is to coat the decal with a covercoat that has a low temperature flux added. At this point this is not suitable for my work as it limits the areas where I can use lustre. More information about this technique can be found on my research web site. more on decals
Recently I have started to use some different decal techniques such as commercial decals to add to my narrative in a collaging
manner. This juxtaposes the handmade with the machine made and can present a nice balance if used in moderation. Decals also reflect the surface to which they adhere, so glossy commercial decals develop a different texture when used over the sand etched areas.
I am also exploring the use of texture decals. These commercial decals are screen printed with a matt overglaze/raised paste usually in white. They pro-vide both a visual and tactile texture to the surface when covered in a separate firing with lustre or overglaze colour.
Colour sheet decals provide me with large expanses of solid overglaze colour when fired. I then collage my vinyl stencils over this surface and then

CeramicsTECHNICAL No. 37 2013 79
sand etch. The result is a crisp outline on the overglaze colour. This is in stark contrast to the painterly techniques used by the porcelain/China painters.
I have also experimented with the use of colour digital decals. I have these printed for me as the acquisition of a digital laser decal printer is costly. I have now started to screen print my own overglaze decals, however, using a water based medium without the use of a covercoat. enamels and raised enamels
I am presently acquiring more skills with overglaze colour. My pref-erence is to use them as flow enamels or raised enamels rather than with the painterly approach. Enamels are overglaze colours to which extra fluxes have been added to give them both relief and opacity. In essence they are just low firing glazes. In 2010 I was fortunate to be able to spend four weeks at the Jingdezhen Ceramics Institute to learn about overglaze enamelling, in particular the ancient technique of fencai which is similar to a flow technique encased within a cloisonné type outline. This is also a water based procedure.
I have been using raised enamel since I started working with lustre. This dotting technique with a stylus also uses a water based medium. Initially I started using this as an accent or highlight but now I am using the dots to give both a visual and tactile texture to major areas of the surface.conclusion
When I set out on this overglaze journey one of my parameters was to use the fewest toxic materials. I am doing this by becoming proficient in one skill at a time and then adding it to my work practice. Overall I think I have succeeded with this ideal and I look forward to adding more techniques to my repertoire.
Johanna DeMaine started potting in 1971 and established DeMaine Pottery Studio Gallery in 1975 in partnership with her husband in Calliope, Queensland. She has participated in numer-ous exhibitions and her work is represented in public art galleries, museums and government collections both in Australia and overseas, including the National Gallery of Australia. Her work has also been presented to HRH Queen Elizabeth II of England, the Governor General of Australia and Crown Prince Frederick and Princess Mary of Denmark. All photos by Johanna DeMaine. Since 1981 DeMaine Pottery Studio has been located at Landsborough, in the hinter-land of the Sunshine Coast (http://johanna.demaine.org) (http://overglaze.info).
Above: Yellow Mountain. Bowl form, example of lustre textured with
resist using a Tjanting. 26 cm.Below, top to bottom:
DeMaine’s Signature.Johanna DeMaine.