central venous access device policy - … · 4 cvad policy v1 april 2018 1. introduction 1.1 the...
TRANSCRIPT
1 CVAD Policy V1 April 2018
CENTRAL VENOUS ACCESS DEVICE POLICY
Version: 1
Date of Issue: April 2018
Review Date: April 2021
Applies to: All clinical staff who care for patients with Central Venous Access Devices (CVADs) as part of their role
This document is available in other formats, including easy read summary versions and other languages upon request. Should you require this please
contact Document Author.

2 CVAD Policy V1 April 2018
DOCUMENT CONTROL
Reference Version 1
Status Final
Author Senior Nurse for Clinical Practice
Amendments CVAD section taken out of Administering Injections policy to create stand-alone policy with associated SOPs for care of specific types of CVADs and troubleshooting
Approving body Clinical Governance Group Date: March 2018
Equality Impact Assessment
Impact Part 1 Date: April 2018
Ratification Body Senior Management Team Date: April 2018
Date of issue April 2018
Review date April 2021
Contact for review Senior Nurse for Clinical Practice
Lead Director Director of Nursing and Patient Safety
CONTRIBUTION LIST Key individuals involved in developing the document
Designation or Group
Senior Nurse for Clinical Practice
Clinical Skills Facilitator
Clinical Skills Facilitator
PICC Team TST
Community Hospital Ward Sisters
Matrons
Ambulatory Care Nurses
Professional Lead District Nurses
Infection Control Specialist Nurse
PICC Team YDH
Clinical Skills lead TST
Lead Cancer Nurse TST
Medicines Management Team (Sompar)
L&D Business Partner and Trainer

3 CVAD Policy V1 April 2018
CONTENTS
Section Page
Contents 3
1. Introduction 4
2. Purpose and rationale 4
3. Policy statement 4
4. Definitions 4
5. Duties and responsibilities 5
6. Policy 6.1 Referral information 6.2 Infection control 6.3 Flushing CVADs 6.4 Removing CVADs 6.5 Documentation 6.6 Cytotoxic pump removal
5
7. Monitoring Compliance and Effectiveness 7
8. Training and Competency Requirements 7
9. References, Acknowledgements and Associated Documents 7
10. Appendix A: CVAD Management by Referring Trust 8
CVAD Standard Operating Procedure 1:
Dressing and Cleaning a PICC Line
10
CVAD Standard Operating Procedure 2: Flushing a PICC Line
13
CVAD Standard Operating Procedure 3:
Blood Sampling from a PICC Line
15
CVAD Standard Operating Procedure 4:
Drug / Fluid Administration Via a CVAD
17
CVAD Standard Operating Procedure 5:
Removal of a PICC Line
19
CVAD Standard Operating Procedure 6: Dressing and Cleaning A Hickman Line
22
CVAD Standard Operating Procedure 7: Flushing a Hickman Line
24
CVAD Standard Operating Procedure 8:
Blood Sampling from a Hickman Line
26
CVAD Standard Operating Procedure 9: Troubleshooting CVAD Complications
28
CVAD Standard Operating Procedure 10: Care of Implanted Venous Access Port
33
4 CVAD Policy V1 April 2018
1. INTRODUCTION
1.1 The use of central venous access devices (CVADs) & Midlines has many healthcare benefits for patients. Some patients have long term CVAD/Midlines to enable long term intravenous medication to be given regularly without the need for frequent peripheral cannulation. Many patients with CVADs have poor vasculature due to frequent long-term invasive treatments. However due to their long-term nature and position in a patient’s vein, CVADs require care by staff who are specifically trained and competent to reduce the risk of infection, thrombosis or migration.
1.2 A 2011 point prevalence survey found that 25.2% of bloodstream infections in England are attributable to CVADs. Bloodstream infections associated with CVADs are potentially among the most dangerous complications associated with healthcare.
2. PURPOSE AND RATIONALE
2.1 The aim of this policy is to provide guidance for all health care practitioners responsible for the care and removal of CVADs.
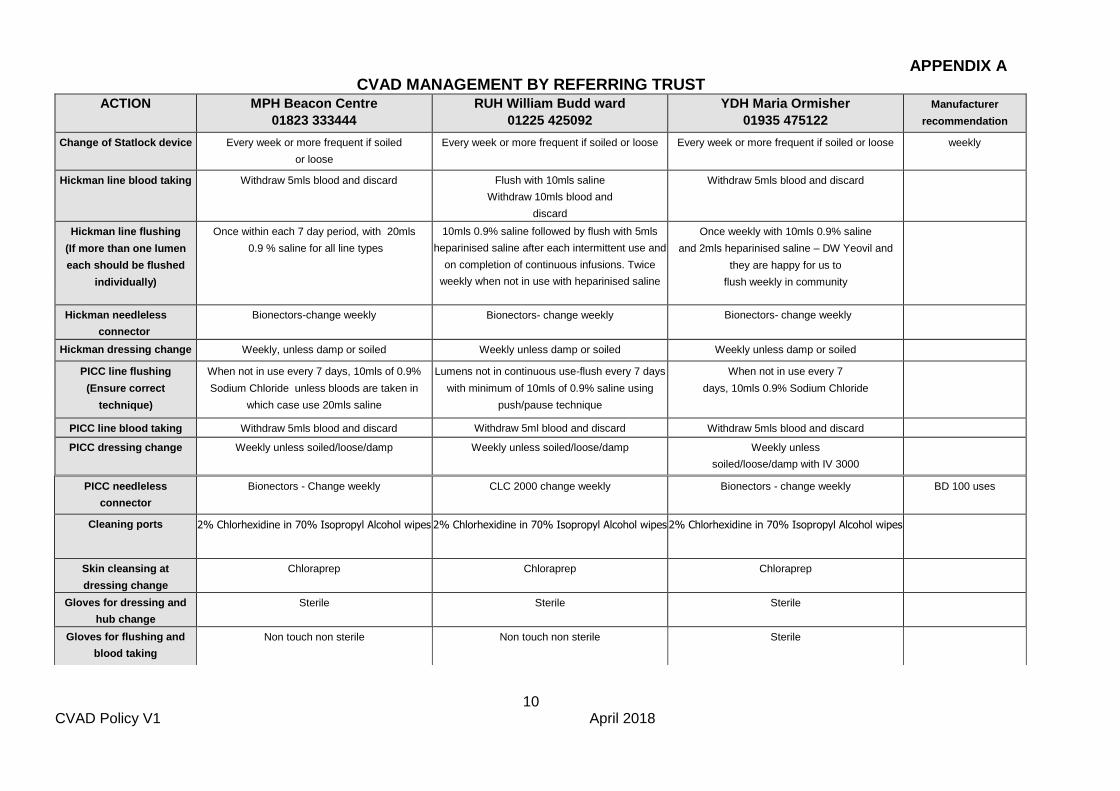
2.2 The guidance will also reflect the differences in management of CVADs in the three main acute hospitals serving Somerset, namely, Musgrove Park Hospital (MPH), Yeovil District Hospital (YDH) and Royal United Hospital (RUH) which are detailed in Appendix A
3. POLICY STATEMENT
3.1 Somerset Partnership NHS Foundation Trust is committed to ensuring safe and effective clinical practice in the care of CVADs through the provision of appropriate training and competency assessment for staff to ensure safe clinical practices.
3.2 Due to the differences in CVAD management at the three main acute hospitals, staff must ensure they follow the patient’s own care plan for management of their CVAD, which has been developed in conjunction with the referring clinician or team. If the patient does not have a valid care plan, ensure the guidance provided in Appendix A is followed for each patient dependent on the referring acute hospital.
4. DEFINITIONS
4.1 Central Line – sited centrally with the tip sitting at the entrance of the right atrium. Rarely used outside an acute setting.
4.2 Hickman Line – is a type of tunneled central line terminating in the superior vena cava (SVC). Trade name for central line.
4.3 Intravenous – within a vein

5 CVAD Policy V1 April 2018
4.4 PICC Line – Peripherally (above elbow not forearm/hand) Inserted Central Catheter terminating in the SVC
4.5 Mid Line - Peripherally inserted catheter. Terminates at the mid axilla. The tip is not centrally placed.
4.6 Portacath – Implanted Venous Access Device
4.7 Groshong line - a modification of the Hickman catheter with a valve that is closed when the catheter is not in use
4.8 Personal Protective Equipment (PPE) – should be worn when all other measures are inadequate to control exposure. It protects only the wearer, while being worn and includes such items as gloves, aprons, respirators and eye goggles.
5. DUTIES AND RESPONSIBILITIES
5.1 The Trust Board, via the Chief Executive has overall responsibility for procedural documents and delegates responsibility as appropriate.
5.2 The Executive Lead is the Director of Nursing and Patient Safety with delegated
responsibility to ensure this SOP is reviewed at least once every three years or sooner if national or local procedures change.
5.3 The Community Hospitals Best Practice Group and the District Nursing Best Practice
Group, will provide assurance that the policy and relevant SOPs are being adhered too when delivering CVAD care.
5.4 All managers are responsible for ensuring that staff who provide care for CVADs as
part of their role are aware of the policy and SOPs and that any training and competency needs are identified and addressed.
5.5 All staff who provide care for CVADs as part of their role are responsible for
complying with the guidance set out in this document.
5.6 The Clinical Practice Team are responsible for liaising with the acute Trusts to discuss incidents and other issues related to CVAD care.
6. POLICY
Referral Information
6.1 Before accepting a patient with a CVAD onto a caseload or ward, the minimum referral details must include:
Reason for line insertion
Specific type of CVAD line (e.g. PICC)
Length of line from insertion site to hub
Any specific issues with the CVAD care

6 CVAD Policy V1 April 2018
Any escalation / TEP / DNACPR plans
Contact details of the referring Lead Clinician
6.2 Additionally a patient specific care plan compiled by their referring clinician should be available for staff to refer to. If no care plan is available then the hospital specific guidelines detailed in Appendix A of this document should be followed in the interim until more information can be obtained from the referring clinician.
Infection Control
6.3 All care of CVADs must be undertaken using an aseptic non-touch technique. Please see the Indwelling Devices policy for further information.
6.4 When undertaking any CVAD intervention it is important to assess for possible infection (especially if patient is immunosuppressed). Undertake physiological observations and screen for sepsis using NEWS and Sepsis Screening & Action tool. Record, report and escalate care as appropriate (Be guided by any specific care plans / treatment escalation plans (TEP) if available).
6.5 Patients should be provided with safety netting advice about what to do if they are concerned they may have or be developing an infection. Refer to their specific patient care plan / treatment escalation plan (TEP) if available.
Flushing CVADs
6.6 All CVADs must be flushed weekly, (unless advised otherwise by the care plan or Appendix A), following any use, and if blood is observed in the line. They should be flushed with at least 10mls 0.9% sodium chloride (or alternative as indicated by the care plan or Appendix A) to prevent occlusion, using the push pause positive pressure technique. No syringe smaller than 10mls should be used to flush CVADs due to the risk of rupture.
6.7 If an alternative flush to 0.9% saline is indicated, by the patient’s care plan or referring Trust guidelines, this must be prescribed for the patient.
Removing CVADs
6.8 A CVAD may only be removed if advised by the referring clinician. This must be in writing (including email or fax). The date the line can be removed must be established prior to removal. If the patient cannot have the line removed on the specified date, then the clinician must plan care with the patient to maintain the line (in line with the care plan) until it can be removed.
Documentation
6.9 All CVAD care must be documented in the patient’s record. A copy of the CVAD Management Evaluation Record is available on the Clinical Practice intranet pages.
Cytotoxic Pump Removal
7 CVAD Policy V1 April 2018
6.10 For disconnection and disposal of cytotoxic infusion pumps, please refer to The Standard Operating Procedure for Disconnection and Disposal of Cytotoxic Infusion Pumps
7. MONITORING COMPLIANCE AND EFFECTIVENESS
7.1 Complaints, incidents and feedback will be monitored by the Clinical Practice Team and fed back through the Community Hospital and District Nurse Best Practice Groups. Good practice, learning points and related issues will be discussed at the relevant Best Practice Groups and disseminated appropriately. Learning from incidents will be used to update the CVAD training.
8 TRAINING AND COMPETENCY REQUIREMENTS 8.1 Prior to undertaking CVAD training, staff must complete and be assessed as
competent in the following training: Medicines Management training (eLearning and local assessment) Anaphylaxis (eLearning) Intravenous administration of medicines Medical Devices Specific intravenous infusion device (if administering IV’s through CVAD)
8.2 CVAD training is available through the Learning and Development Department. The training includes an eLearning package of theoretical information followed by a classroom day of practical skills. This will be followed by a period of supervised practice and formal assessment of competence using the agreed Trust competency framework and documentation found on the Learning and Development intranet page under ‘Competencies’.
8.3 Specific training will be provided for staff who will be caring for patients with an implanted venous access device. This will be on a named patient basis only. Care of these devices must not be undertaken without specific training. The training will be delivered by the referring acute hospital.
9. REFERENCES, ACKNOWLEDGEMENTS AND ASSOCIATED DOCUMENTS
9.1 References
Health Protection Agency (2012) English National Point Prevalence Survey on Healthcare Associated Infections and Antimicrobial use 2011. Preliminary data. Health Protection Agency: London
Loveday, H.P., et al (2014). epic3: National Evidence-Based Guidelines for Preventing Healthcare-Associated Infections in NHS Hospitals in England. Journal of Hospital Infection. Vol.86 (Suppl. 1 Jan) S1-70
Royal College of Nursing, 2016. Standards for Infusion Therapy. 4th Edition
Royal Marsden Manual of Clinical Nursing Procedures (2017). 9th ed.

8 CVAD Policy V1 April 2018
Musgrove Park Hospital (2016) Vascular Access Device Policy
9.2 Cross reference to other procedural documents
Consent and Capacity to Consent to Treatment Policy Healthcare (Clinical) Waste Policy Indwelling Devices policy Infection Control Policy Injection Policy Medicines Policy Needlestick and Contamination Injury Policy Record Keeping and Records Management Policy Syringe Driver Policy All current policies and procedures are accessible in the policy section of the public website (on the home page, click on ‘Policies and Procedures’). Trust Guidance is accessible to staff on the Trust Intranet.
10. APPENDICES
10.1 For the avoidance of any doubt the appendices in this policy are to constitute part of the body of this policy and shall be treated as such. This should include any relevant Clinical Audit Standards.
Appendix A: CVAD Management by Referring Trust
CVAD Standard Operating Procedure 1: Dressing and Cleaning a PICC Line
CVAD Standard Operating Procedure 2: Flushing a PICC Line
CVAD Standard Operating Procedure 3: Blood Sampling from a PICC Line
CVAD Standard Operating Procedure 4: Drug / Fluid Administration Via a CVAD
CVAD Standard Operating Procedure 5: Removal of a PICC Line
CVAD Standard Operating Procedure 6: Dressing and Cleaning A Hickman Line
CVAD Standard Operating Procedure 7: Flushing a Hickman Line
CVAD Standard Operating Procedure 8: Blood Sampling from a Hickman Line
CVAD Standard Operating Procedure 9: Troubleshooting CVAD Complications
CVAD Standard Operating Procedure 10: Care of Implanted Venous Access Port

9 CVAD Policy V1 April 2018
10 CVAD Policy V1 April 2018
APPENDIX A CVAD MANAGEMENT BY REFERRING TRUST
ACTION MPH Beacon Centre
01823 333444
RUH William Budd ward
01225 425092
YDH Maria Ormisher
01935 475122
Manufacturer
recommendation
Change of Statlock device Every week or more frequent if soiled
or loose
Every week or more frequent if soiled or loose Every week or more frequent if soiled or loose weekly
Hickman line blood taking Withdraw 5mls blood and discard Flush with 10mls saline
Withdraw 10mls blood and
discard
Withdraw 5mls blood and discard
Hickman line flushing
(If more than one lumen
each should be flushed
individually)
Once within each 7 day period, with 20mls
0.9 % saline for all line types
10mls 0.9% saline followed by flush with 5mls
heparinised saline after each intermittent use and
on completion of continuous infusions. Twice
weekly when not in use with heparinised saline
Once weekly with 10mls 0.9% saline
and 2mls heparinised saline – DW Yeovil and
they are happy for us to
flush weekly in community
Hickman needleless
connector
Bionectors-change weekly Bionectors- change weekly Bionectors- change weekly
Hickman dressing change Weekly, unless damp or soiled
Weekly unless damp or soiled Weekly unless damp or soiled
PICC line flushing
(Ensure correct
technique)
When not in use every 7 days, 10mls of 0.9%
Sodium Chloride unless bloods are taken in
which case use 20mls saline
Lumens not in continuous use-flush every 7 days
with minimum of 10mls of 0.9% saline using
push/pause technique
When not in use every 7
days, 10mls 0.9% Sodium Chloride
PICC line blood taking Withdraw 5mls blood and discard Withdraw 5ml blood and discard Withdraw 5mls blood and discard
PICC dressing change Weekly unless soiled/loose/damp Weekly unless soiled/loose/damp Weekly unless
soiled/loose/damp with IV 3000
PICC needleless
connector
Bionectors - Change weekly CLC 2000 change weekly Bionectors - change weekly BD 100 uses
Cleaning ports 2% Chlorhexidine in 70% Isopropyl Alcohol wipes 2% Chlorhexidine in 70% Isopropyl Alcohol wipes 2% Chlorhexidine in 70% Isopropyl Alcohol wipes
Skin cleansing at
dressing change
Chloraprep Chloraprep Chloraprep
Gloves for dressing and
hub change
Sterile Sterile Sterile
Gloves for flushing and
blood taking
Non touch non sterile Non touch non sterile Sterile

11 CVAD Policy V1 April 2018
CVAD Standard Operating Procedure 1
1.1.0 DRESSING AND CLEANING A PICC LINE
1.1.1 General Principles
The dressing must be assessed and changed in the first 24 to 48 hours after
insertion, to check for accumulation of blood, fluid or moisture beneath the dressing
1.1.2 To prevent infection of the catheter, PICC line insertion sites must be redressed
every 7 days, or more frequently if the dressing becomes loose, damp, soiled or
blood stained.
1.1.3 During all dressing changes, the external length of the catheter must be assessed to determine if any migration/withdrawal of the catheter has occurred. If the PICC line has migrated, follow the guidance in CVAD Standard Operating Procedure 9.
1.1.4 The Procedure
Equipment required:
Sterile Dressing pack
Sterile Nitrile examination gloves
Steri - strips (12mm x 100mm) x 5
Permeable sterile transparent dressing – IV3000
Cleaning agent 2% Chlorhexidine in 70% Isopropyl alcohol –
Chloraprep
Non- sterile gloves for removal of old dressing Statlock device (if required)
Action No
Procedure Rationale
1 Explain procedure to the patient Ensure patient understands and required to obtain informed consent
2 Wash hands, and put on plastic apron To reduce risk of infection
3 Open sterile dressing pack and prepare dressing and cleaning equipment
To reduce risk of infection
4 Place sterile dressing towel under patient’s arm To reduce risk of infection

12 CVAD Policy V1 April 2018
5 Carefully remove old dressing and Steri Strips, stabilizing the line at the insertion site with fingertip pressure on the outside, ‘easing’ the dressing from the line, while using a “from the bottom up” technique. Avoid tugging or moving the catheter and NEVER use scissors or sharp objects near the line. Check for any signs of damage to the line and IMMEDIATETLY escalate any concerns to the patients referring clinican or team
Reduce risk of dislodging the catheter and maintain its integrity
6 If there is a Statlock device in situ replace the device weekly. When removing the statock ALWAYS secure the line with a steri-strip before removing the Statlock. If it is causing irritation or discomfort on removal discuss this with the patient’s referring clinician
Ensures extra stability of the external catheter to prevent migration. Less frequent device changes reduce risk of impaired skin integrity.
7 Inspect the catheter exit site for signs of damage, movement / migration (of more than 2cms from original length) & infection – swelling, redness, or oozing. Notify the patient’s referring clinician or team if there are any concerns. If any signs of infection are evident, assess physiological observations and screen for sepsis using NEWS and sepsis screening tool, Escalate care as appropriate (in line with any TEP)
To ensure infection is recognised and treated promptly.
To identify and manage potential damage to line and concerning movement
8 Wash hands thoroughly and put on sterile nitrile examination gloves To reduce risk of infection
9 Clean the catheter exit site with 2% chlorhexidine solution in circular movements, moving away each time from the exit site until at least 5cms in diameter has been reached. (Repeat twice and-remove use once only) allow the skin to dry for 30 seconds.
NB: the initial gauze dressing should be removed after 24-48 hours following insertion and not replaced unless excess oozing is observed
To minimise risk of infection spread from a ‘dirty’ to a ‘clean’ area. To complete the decontamination process.
10 Apply new steri strips – in a “kiss” or “cross” position, but ensuring the exit site is visible at all times. Avoid ANY acute kinks in line when securing
To ensure patient comfort and secure positioning of the PICC line. To avoid ruptures of line.
11 Apply new sterile dressing – IV3000- using aseptic technique, ensuring the catheter exit site is in the middle of the dressing and the port is left uncovered for easy access.
To keep the line free from infection and secure.
12 A tubi-fast may be used to cover the PICC.
To aid patient comfort and PICC line security.
13 Dispose of all clinical waste and sharps as per policy To ensure safe disposal in the
correct containers and avoid laceration or injury of other staff.

13 CVAD Policy V1 April 2018
14 Document external line length in cm, site observations, cleansing and dressing change in the patient’s record and care plan.
To ensure good communication, documentation and continuity of care

14 CVAD Policy V1 April 2018
CVAD Standard Operating Procedure 2 2.1.0 FLUSHING A PICC LINE
2.1.1 The Procedure
Equipment required:
Sterile dressing pack
Sterile Nitrile examination gloves
Cleaning agent 2% Chlorhexidine in 70% Isopropyl alcohol wipes
Minimum size 10 ml syringe
10mls of 0.9% Sodium Chloride (or alternative as indicated by the patient specific care
plan or referring Trust guidance)
21G needle (green) or drawing up needle
New sterile needless injection port if being used
Action No
PROCEDURE RATIONALE
1 Explain procedure to patient Ensure patient understands obtain informed consent
2 Inspect the catheter exit site for signs of damage, migration (of more than 2cms from original length) & infection – swelling, redness, or oozing. Notify the patient’s referring clinician or team if there are any concerns.
To identify and manage potential damage to line and concerning movement
3 Wash hands, and put on plastic apron To reduce risk of infection
4 Open sterile dressing pack and prepare dressing and cleaning equipment
To reduce risk of infection
5 Place sterile dressing towel under patient’s arm
To reduce risk of infection
6 Draw up 10mls 0.9% Sodium Chloride (or alternative) into 10 or 20ml syringe using a green needle
To reduce risk of infection To ensure patency
To ensure patency 7 Remove needle from syringe
To establish connection between cap an syringe

15 CVAD Policy V1 April 2018
8 Put on sterile nitrile gloves and clean the needle free injection port with 2% chlorhexidine swab and allow to dry for 30 seconds
To reduce risk of infection
9 Connect syringe to the needle-free injection port using a firm twisting motion and flush using a ‘push, pause’ technique. On the final push, maintain positive pressure as the syringe is withdrawn from the cap
NB: some needle-free injection ports already have an integral positive pressure mechanism e.g. BD Posiflow, CLC 2000
To create turbulence in order to flush the catheter effectively
10 Please follow the patient’s specific care plan or hospital specific guidance In Appendix A for frequency of changing needle free injection port.
Using a sterile non-touch aseptic technique, remove the needle free injection port. Clean the external part of the catheter hub with a sterile 2% chlorhexidine cleansing swab and allow to dry for 30 seconds. Attach new sterile needle free injection port. and document
To reduce risk of infection
11 Dispose of all clinical waste and sharps as per policy
To ensure safe disposal in the correct containers and avoid laceration or injury of other staff.
12 Document procedure in the patient’s record
To ensure good communication, documentation and continuity of care
#

16 CVAD Policy V1 April 2018
CVAD Standard Operating Procedure 3
3.1.0 BLOOD SAMPLING FROM A PICC LINE
(The Venepuncture Policy must be followed when taking blood from a CVAD).
3.1.1 The Procedure
Equipment required:
Sterile dressing pack Sterile nitrile examination gloves 1 x 20 ml luer lock syringe 1 x 21g (green) needle 20mls 0.9% sodium chloride Cleaning agent - 2% chlorhexidine in 70% isopropyl alcohol Vacutainer system and blood specimen tubes 1 x 10 ml syringe for removing initial 5mls of blood for discarding New sterile needle free injection port if required
Action No
PROCEDURE RATIONALE
1 Explain procedure to patient Ensure patient understands and obtain informed consent
2 Wash hands, and put on plastic apron To reduce risk of infection
3 Open sterile dressing pack and prepare dressing and cleaning equipment
To reduce risk of infection
4 Place sterile dressing towel under patient’s arm
To reduce risk of infection
5
Draw up 20mls 0.9% Sodium Chloride into 20ml syringe using the green needle
To flush line post blood taking and maintain patency confirm line patency
T
To flush line

17 CVAD Policy V1 April 2018
6 Connect the 10ml syringe and withdraw 5mls of blood then discard
NB: samples required for blood cultures do not require the disposal of this sample as line contents are required for analysis.
Ensure line patency and position
Ensure removal of any saline solution or heparin or other intravenous medications from the “dead space” that may result in incorrect blood results
7 Using the correct order of draw, attach the required Vacutainer bottles and withdraw the required samples
Ensuring blood sample follows correct procedures and guidelines
8 Remove the Vacutainer system, clean the port with a new sterile 2% Chlorhexidine cleansing swab
To reduce risk of infection
9 Following blood sampling, the PICC line MUST BE FLUSHED with 20mls 0.9% Sodium Chloride in a 20 ml syringe, using the ‘push, pause’ method
To create turbulence and ensure removal of all blood in the catheter and prevent occlusion
10 Replace with a new sterile needless injection port unless otherwise stated in patients own care plan or Appendix A
To prevent infection
11 Dispose of all clinical waste and sharps as per policy
To ensure safe disposal in the correct containers and avoid laceration or injury of other staff.
12 Document procedure in the patient’s record including the name of the clinician responsible for following up the results
To ensure good communication, documentation and continuity of care

18 CVAD Policy V1 April 2018
CVAD Standard Operating Procedure 4
4.1.0 DRUG / FLUID ADMINISTRATION VIA A CVAD
4.1.1 The Procedure
Equipment Required:
Sterile dressing pack Sterile nitrile examination gloves 1 x 10ml luer lock sterile syringe 2 x 10-20 ml luer lock sterile syringe 2 x 10ml 0.9% sodium chloride for pre and post flushing Extra flushes and syringes for in between flushing after each medication being administered. 21g green needles for drawing up flushes and medication Taunton and Somerset NHS Foundation Trust drug monographs for each medication being administered intravenously (IV) Intravenous Infusion Device if required 2 x 2% chlorhexidine in 70% isopropyl alcohol cleansing wipes Sterile needless injection port if required.
Action No
Procedure Rationale
1 Explain procedure to patient Ensure patient understands and required to obtain informed consent
2 Wash hands, and put on plastic apron To reduce risk of infection
3 Open sterile dressing pack and prepare cleaning equipment , syringes and flushes
To reduce risk of infection
4 Place a sterile dressing towel under the CVAD port
To reduce risk of infection
19 CVAD Policy V1 April 2018
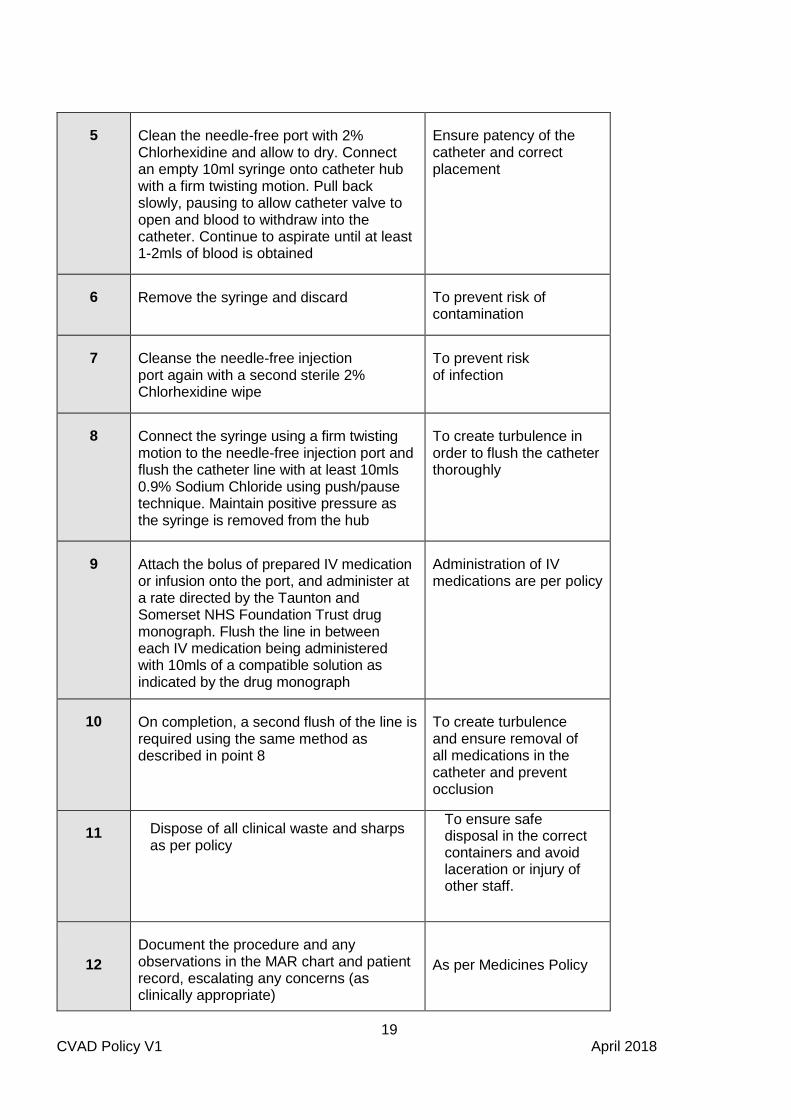
5 Clean the needle-free port with 2% Chlorhexidine and allow to dry. Connect an empty 10ml syringe onto catheter hub with a firm twisting motion. Pull back slowly, pausing to allow catheter valve to open and blood to withdraw into the catheter. Continue to aspirate until at least 1-2mls of blood is obtained
Ensure patency of the catheter and correct placement
6 Remove the syringe and discard To prevent risk of contamination
7 Cleanse the needle-free injection port again with a second sterile 2% Chlorhexidine wipe
To prevent risk of infection
8 Connect the syringe using a firm twisting motion to the needle-free injection port and flush the catheter line with at least 10mls 0.9% Sodium Chloride using push/pause technique. Maintain positive pressure as the syringe is removed from the hub
To create turbulence in order to flush the catheter thoroughly
9 Attach the bolus of prepared IV medication or infusion onto the port, and administer at a rate directed by the Taunton and Somerset NHS Foundation Trust drug monograph. Flush the line in between each IV medication being administered with 10mls of a compatible solution as indicated by the drug monograph
Administration of IV medications are per policy
10 On completion, a second flush of the line is required using the same method as described in point 8
To create turbulence and ensure removal of all medications in the catheter and prevent occlusion
11 Dispose of all clinical waste and sharps as per policy
To ensure safe disposal in the correct containers and avoid laceration or injury of other staff.
12
Document the procedure and any observations in the MAR chart and patient record, escalating any concerns (as clinically appropriate)
As per Medicines Policy
20 CVAD Policy V1 April 2018
CVAD Standard Operating Procedure 5
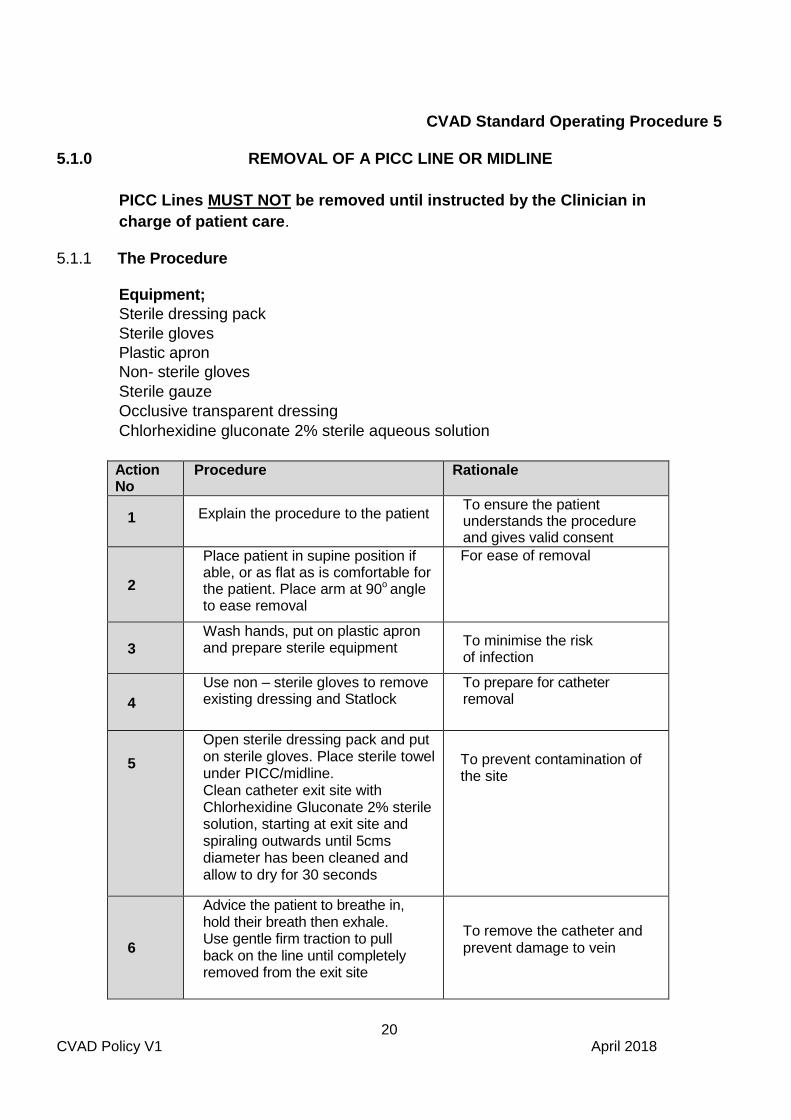
5.1.0 REMOVAL OF A PICC LINE OR MIDLINE
PICC Lines MUST NOT be removed until instructed by the Clinician in
charge of patient care.
5.1.1 The Procedure Equipment;
Sterile dressing pack
Sterile gloves
Plastic apron
Non- sterile gloves
Sterile gauze
Occlusive transparent dressing
Chlorhexidine gluconate 2% sterile aqueous solution
Action No
Procedure Rationale
1 Explain the procedure to the patient To ensure the patient understands the procedure and gives valid consent
2
Place patient in supine position if able, or as flat as is comfortable for the patient. Place arm at 90o
angle to ease removal
For ease of removal
3
Wash hands, put on plastic apron and prepare sterile equipment
To minimise the risk of infection
4
Use non – sterile gloves to remove existing dressing and Statlock
To prepare for catheter removal
5
Open sterile dressing pack and put on sterile gloves. Place sterile towel under PICC/midline. Clean catheter exit site with Chlorhexidine Gluconate 2% sterile solution, starting at exit site and spiraling outwards until 5cms diameter has been cleaned and allow to dry for 30 seconds
To prevent contamination of the site
6
Advice the patient to breathe in, hold their breath then exhale. Use gentle firm traction to pull back on the line until completely removed from the exit site
To remove the catheter and prevent damage to vein

21 CVAD Policy V1 April 2018
7
Apply pressure to the exit site for approximately 2-4 minutes with sterile gauze until haemostasis is achieved
To minimise blood loss and bruising
8 Stop if any resistance is felt and seek specialist advice
To prevent breakage of line, or damage to the patient’s vein
9
Apply clean sterile gauze and an occlusive dressing and keep in place for 48 hours
To provide protection to entry site
10
Examine tip of PICC/Midline to ensure complete. The length removed should be the same as documented at insertion. If it does NOT have a groshong valve, the tip should have a straight, clean, horizontal cut. There should be no ragged edges. If this is observed contact the centre where the PICC was inserted and retain the PICC for inspection If it has a groshong valve and the valve is missing (i.e. the tip is open ended) it may have been cut. This is a surgical emergency. A tourniquet should be placed on the arm and an ambulance must be called to take the patient to an acute hospital for urgent treatment.
To ensure complete catheter has been removed
If a line fracture is suspected it is a surgical emergency
11
Catheter tip will only need to be sent to Microbiology if infection is queried, requesting investigations for microscopy, culture and sensitivity. Using sterile scissors cut off approx. 5 cm from the tip and place in a sterile pot. Assess physiological observations and screen for sepsis using NEWS and sepsis screening tool. If infection is a concern, escalate care as appropriate (in line with any TEP that is in place)
To detect any infection related to the catheter and thus provide necessary treatment.
(As per policy for MPH, RUH and YDH)
12 Dispose of all clinical waste and sharps as per policy
To ensure safe disposal in the correct containers and avoid laceration or injury of other staff.
22 CVAD Policy V1 April 2018
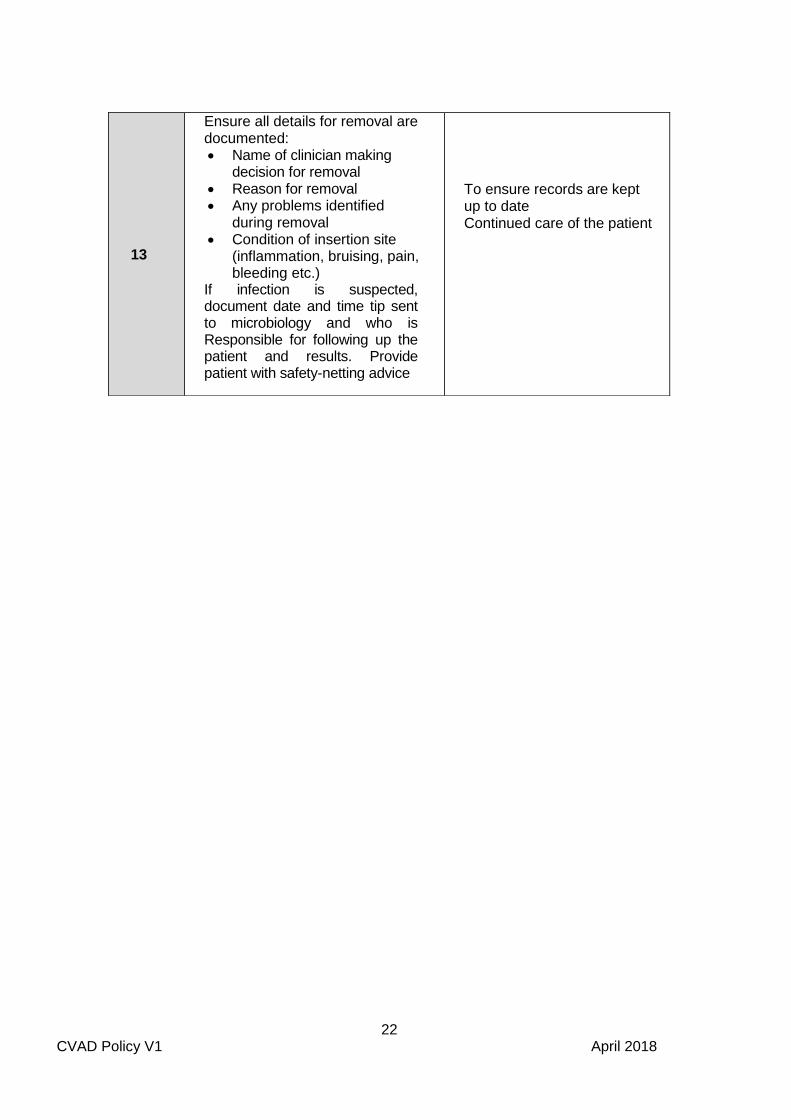
13
Ensure all details for removal are documented: Name of clinician making
decision for removal Reason for removal Any problems identified
during removal Condition of insertion site
(inflammation, bruising, pain, bleeding etc.)
If infection is suspected, document date and time tip sent to microbiology and who is Responsible for following up the patient and results. Provide patient with safety-netting advice
To ensure records are kept up to date Continued care of the patient

23 CVAD Policy V1 April 2018
CVAD Standard Operating Procedure 6
6.1.0 DRESSING AND CLEANING A HICKMAN LINE
6.1.1 The dressing must be changed at 24 hours after insertion, and weekly thereafter, or when the dressing becomes damp, loose or soiled.
6.1.2 Entry site steri-strips must be removed after 7 days post insertion, and sutures removed 21 days post insertion or until the cuff fibroses and the surrounding catheter tissue secures the catheter in place. The sutures should only be removed within an acute hospital environment.
6.1.3 Hickman lines can be open-ended or valved, and have up to three lumens. Groshong catheters are valved. Open-ended catheters have a clamp on each lumen which must remain closed/clamped at all times when not in use.
6.1.4 During all dressing changes, the external length of the catheter must be assessed and measured to determine if migration of the catheter has occurred and to ensure the Dacron cuff is not visible.
6.1.5 The Procedure
Equipment required:
Sterile dressing pack Sterile nitrile examination gloves Transparent semi-permeable film dressing – iv3000 Non sterile gloves for removal of old dressing 2% chlorhexidine in 70% Isopropyl Alcohol cleansing solution – Chloraprep
Action No
Procedure Rationale
1 Explain procedure to the patient Ensure patient understands and obtain informed consent
2 Wash hands and put on plastic apron To reduce risk of infection
3 Open sterile dressing pack and prepare dressings and cleaning equipment.
To reduce risk of infection
4 Place sterile dressing towel under exit site To reduce risk of infection

24 CVAD Policy V1 April 2018
5 Carefully remove the old dressing using a “from the bottom up” technique, whilst avoiding tugging or moving the catheter
Reduce risk of dislodging the catheter and maintain
6 NEVER use sharp objects near the line To maintain its integrity
7 Inspect the catheter exit site for signs of damage or infection – swelling, redness, or oozing. Notify referring clinician if signs of infection are evident
To ensure infection is recognised and treated promptly & potential concerns escalated
8 Wash hands thoroughly and put on sterile Nitrile examination gloves
To reduce risk of infection
9 Clean the catheter exit site with 2% Chlorhexidine in circular movements moving away each time from the exit site until at least 5cms in diameter has been reached including the part of the catheter that is under the dressing. Repeat twice and allow the skin to dry for 30 seconds
To minimise risk of infection spread from a ‘dirty’ to a ‘clean’ area. To complete the decontamination process
10 Apply new sterile dressing – IV3000- using an aseptic technique, over the whole site. Loop the catheter if required but avoid kinking
To minimise risk of infection and provide security of the line
11 Dispose of all clinical waste and sharps as per policy
To ensure safe disposal in the correct containers and avoid laceration or injury of other staff.
12 Document external line length in cm, site observations, cleansing and dressing change in the patient’s record
To ensure good communication, documentation and continuity of care

25 CVAD Policy V1 April 2018
CVAD Standard Operating Procedure 7
7.1.0 FLUSHING A HICKMAN LINE
7.1.1 The Groshong skin-tunnelled catheter does not have a clamp but has a
three-position, pressure sensitive valve at the tip of the catheter.
7.1.2 Positive pressure needleless connectors should be used for open ended catheters.
7.1.3 The Procedure
Equipment required: Sterile Nitrile examination gloves 2 x 2% Chlorhexidine in 70% Isopropyl Alcohol cleansing wipes 10ml or 20 ml syringe 10-20mls 0.9% Sodium Chloride (or alternative if 5mls Heparinised saline if required Recommended needless injection port if required Sterile dressing pack
Action No
Procedure Rationale
1
Explain procedure to patient Ensure patient understands and obtain informed consent
2 Wash hands and put on plastic apron To reduce risk of infection
3 Open sterile dressing pack and prepare cleaning equipment
To reduce risk of infection
3 Draw up the appropriate recommended flush or flushes (may require heparinised saline) as per patients care plan or referring Trust guidelines in Appendix A
To ensure adequate flushing within the catheter line
4 Place sterile dressing towel under line
To reduce risk of infection
5 Put on sterile gloves
To prevent cross infection
6 Clean needle-free injection port thoroughly with Chlorhexidine/ alcohol wipe. Allow port to dry for 30 seconds
To reduce risk of infection

26 CVAD Policy V1 April 2018
7 Connect syringe directly onto needle free injection port using a firm twisting motion To reduce risk of infection
and ensure safety of procedure
8 Flush with push -pause action and use positive pressure technique when removing syringe after flush complete. Both lumens will need to be flushed.
To ensure adequate turbulence is created within the catheter
9 Change needless injection port as recommended by the patients care plan or referring Trust guidelines in Appendix A
Remove the needle-free injection port
Clean catheter hub with a new 2 % Chlorhexidine wipe
Allow to dry
To minimise risk of infection and provide security of the line
10
Apply new needle-free injection port
11
11
Dispose of all clinical waste and sharps as per policy
To ensure safe disposal in the correct containers and avoid laceration or injury of other staff.
12 Document care given in the patient’s record
To ensure good communication, documentation and continuity of care

27 CVAD Policy V1 April 2018
CVAD Standard Operating Procedure 8
BLOOD SAMPLING FROM A HICKMAN LINE
8.1.1 The red lumen is larger than the white so should be used for blood sampling if possible.
8.1.2 Drugs requiring ‘levels’ should be given down the white lumen, so that blood can be taken from the red lumen. Using the same lumen for giving the drug and taking blood levels can lead to misleading results.
8.1.3 All infusions (both lumens) via the catheter should be stopped before taking blood, otherwise results may be unreliable. A suitable period of time should be allowed between stopping infusions and withdrawal of blood samples to prevent erroneous results.
8.1.4 If blood sampling is difficult it may help to lie the patient down as this will
encourage venous filling and reduce the possibility of damage to the vessel wall due to suction.
8.1.5 Procedure
Equipment required: Sterile dressing pack Sterile nitrile examination gloves 1 x 20 ml luer lock syringe 1 x 21g (green) needle 20mls 0.9% sodium chloride Cleaning agent - 2% chlorhexidine in 70% isopropyl alcohol Vacutainer system and blood specimen tubes 1 x 10 ml syringe for removing initial 5mls of blood for discarding New sterile needle free injection port if required
Action No
PROCEDURE RATIONALE
1 Explain procedure to patient Ensure patient understands
and obtain informed consent
2 Wash hands, and put on plastic apron To reduce risk of infection
3 Open sterile dressing pack and prepare equipment To reduce risk of infection
4 Draw up 20mls 0.9% Sodium Chloride into 20ml syringe using the green needle
To reduce risk of infection

28 CVAD Policy V1 April 2018
5 Put on sterile gloves To prevent cross infection
6 Place sterile dressing towel under the patient’s arm
To reduce risk of infection
7 Clean the needle free injection port with 2 % Chlorhexidine and allow to dry for 30 seconds
To reduce the risk of infection
8 Attach the 10 ml syringe and withdraw the first 5mls of blood and discard
Ensure removal of any saline solution or heparin or other intravenous medications from the dead space that may result in obscured blood results
9 Connect the necessary Vacutainer blood sampling tubes withdraw the necessary amount of blood for testing. Ensure the correct order of withdrawal is carried out
Each vacutainer bottle requires a specified amount of blood for testing. Avoids cross contamination with mediums in the bottles.
10 Remove the Vacutainer system, clean the needle free injection port with a new sterile 2 % Chlorhexidine cleansing swab
To reduce risk of infection.
11
Following blood sampling, the line MUST BE FLUSHED with 20mls 0.9% Sodium Chloride in 20 ml syringe, using the ‘push, pause’ method NB: dependent on the patients specific care plan, a second flush using heparinised saline solution may also be required
To create turbulence and ensure removal of all blood
in the catheter and prevent occlusion
12
Replace with a new sterile needless injection port unless otherwise stated in patients own care plan or hospital specific guidelines at Appendix A
To prevent infection
13 Dispose of all clinical waste and sharps as per policy
To ensure safe disposal in the correct containers and avoid laceration or injury of other staff.
14
Document care given in the patient’s record, including the clinician who is responsible for following up the results
To ensure good communication, documentation and continuity of care

29 CVAD Policy V1 April 2018
CVAD Standard Operating Procedure 9
TROUBLESHOOTING CVAD COMPLICATIONS
9.1.0 This list is not exhaustive and serves as a brief guide for actions to be taken if problems arise. A degree of clinical judgement is called for, but all incidents and/ or complications must be discussed with the referring clinician or team. It may be necessary for the patient to be referred back to the original unit for further assessment.
9.2.0 MANAGING BLOCKED CVADs
9.2.1 When it is not possible to withdraw a sample blood from a CVAD, follow the steps in the algorithm at the end of this SOP.
9.2.2 If there is resistance to flushing, the flush must NEVER be forced, as this can cause a fracture and extravasation.
9.2.3 If difficulties with flushing or withdrawing blood from a CVAD persist, expert advice should be sought from the patient’s referring clinician or team and the patient referred back to the originator.
9.3.0 TOTALLY OCCLUDED CENTRAL CATHETER AND PERSISTENT
WITHDRAWAL OCCLUSION (PWO)
9.3.1 Occluded Lines
9.3.2 Definition
A totally occluded catheter is when there is an inability to infuse/flush solutions into, or withdraw from the CVAD.
9.3.3 Causes
Fibrin sheath formation
Blood occlusion
Drug therapy – e.g. Chemotherapy agents, antibiotics and lipid residues
Catheter tip or valve pressed against the vein well or valve causing damage
Too large a catheter in too small a vein
Traumatic cannulation
Health status- malignancy, dehydration, venous compression due to tumour or metastases, sepsis, previous history of venous access device placement, previous history of thrombus
9.3.4 Preventative strategies
Adhere to recommended flushing protocols and techniques. Ensure prophylactic therapy with an anticoagulant for patients who are more at risk.
30 CVAD Policy V1 April 2018
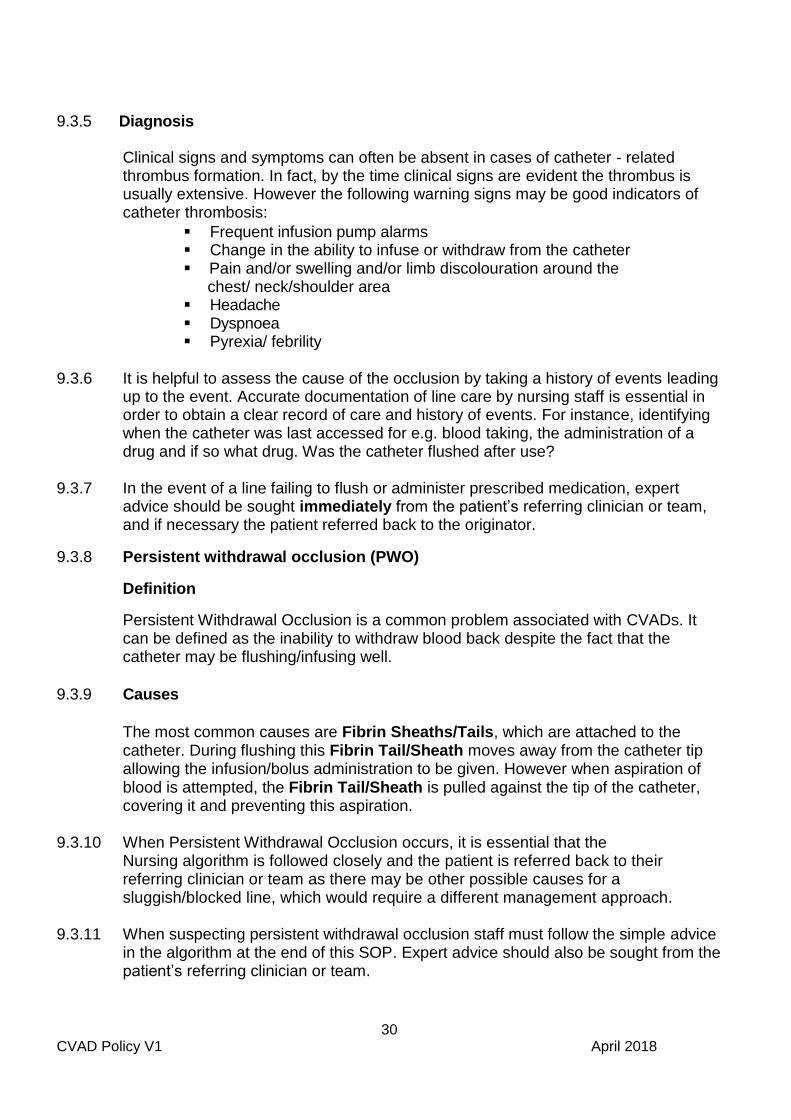
9.3.5 Diagnosis
Clinical signs and symptoms can often be absent in cases of catheter - related thrombus formation. In fact, by the time clinical signs are evident the thrombus is usually extensive. However the following warning signs may be good indicators of catheter thrombosis:
Frequent infusion pump alarms Change in the ability to infuse or withdraw from the catheter Pain and/or swelling and/or limb discolouration around the
chest/ neck/shoulder area Headache Dyspnoea Pyrexia/ febrility
9.3.6 It is helpful to assess the cause of the occlusion by taking a history of events leading up to the event. Accurate documentation of line care by nursing staff is essential in order to obtain a clear record of care and history of events. For instance, identifying when the catheter was last accessed for e.g. blood taking, the administration of a drug and if so what drug. Was the catheter flushed after use?
9.3.7 In the event of a line failing to flush or administer prescribed medication, expert advice should be sought immediately from the patient’s referring clinician or team, and if necessary the patient referred back to the originator.
9.3.8 Persistent withdrawal occlusion (PWO)
Definition
Persistent Withdrawal Occlusion is a common problem associated with CVADs. It can be defined as the inability to withdraw blood back despite the fact that the catheter may be flushing/infusing well.
9.3.9 Causes
The most common causes are Fibrin Sheaths/Tails, which are attached to the catheter. During flushing this Fibrin Tail/Sheath moves away from the catheter tip allowing the infusion/bolus administration to be given. However when aspiration of blood is attempted, the Fibrin Tail/Sheath is pulled against the tip of the catheter, covering it and preventing this aspiration.
9.3.10 When Persistent Withdrawal Occlusion occurs, it is essential that the Nursing algorithm is followed closely and the patient is referred back to their referring clinician or team as there may be other possible causes for a sluggish/blocked line, which would require a different management approach.
9.3.11 When suspecting persistent withdrawal occlusion staff must follow the simple advice in the algorithm at the end of this SOP. Expert advice should also be sought from the patient’s referring clinician or team.

31 CVAD Policy V1 April 2018
9.3.12 Diagnosis Carry out the following interventions:
Check for kinks or constriction on the line Move patient’s arm, shoulder, and head. Change their position Attempt to aspirate blood clot (see below) If the blockage is known or thought to be due to a clot, aspiration can
be attempted as small clots can be dislodged. This should be carried out with heparinised saline by competent staff (NB the heparinised saline must be prescribed)
Urokinase may be used to unblock a CVAD in an acute setting
9.3.13 NB: under no circumstance should an attempt be made to force fluid into the line as this may result in the clot being forced into the circulation resulting in cerebrovascular or pulmonary embolism
9.4.0 ASPIRATION DIFFICULTIES
Carry out the following interventions: Check for kinks or constrictions on the line Get patient to move their arm, shoulder and head, change their position Following an attempt at gentle flushing, where no resistance is felt,
flush vigorously with 10ml of 0.9% sodium chloride. If resistance to infusion is felt check for signs of extravasation
Seek advice from the referring clinician or team
9.5.0 BLEED-BACK INTO THE LINE Carryout the following interventions:
Flush line and review frequency of flushing Ensure line is kept clamped (if appropriate) Ensure all flushes end with positive pressure
9.6.0 CATHETER DAMAGE
Seek urgent advice from the referring clinician or team. If the split is high then the catheter will need to be removed by medical staff. PICC/ Midlines can be repaired if the split is between the insertion site and the hub. A check CXR may be required to make sure the shortening ensures that the line is still in a suitable position for treatment.
Carry out the following interventions:
STOP any infusion Determine site of damage If possible clamp the catheter using non-toothed forceps and gauze to
protect the line, proximal to damage

32 CVAD Policy V1 April 2018
9.7.0 DISPLACEMENT
Carry out the following interventions: There is a risk that the line may become partially or completely displaced.
This will be indicated by: - o Obvious line removal o Detectable lengthening of the external part of the line by 2cms or
more from original measurement or visibility of the cuff o Difficulty aspirating or infusing fluids o Local pain swelling / pain on administration of fluids
9.7.1 Partial displacement
Carry out the following interventions: If the catheter is partially displaced there is a risk of fluid / drug
extravasation Seek IMMEDIATE advice from the referring clinician or team as well as
following any medicines management guidelines about the specific drug being administered
9.7.2 Total removal
Carry out the following interventions: If the catheter falls out completely apply pressure dressing and seek
immediate advice from the referring clinician or team.
9.8.0 AIR EMBOLUS (Hickman lines only)
Carry out the following interventions:
Lie patient head down and administer emergency oxygen if required (does not need prescription if embolus is suspected)
Clamp catheter using non-toothed forceps and gauze to protect line, proximal to damage
Attempt to aspirate as much air as possible Call 999 Ensure injection caps are correctly fitted Ensure connections are not loose Check catheter is not damaged, e.g. holes or splits
9.9.0 FLUID LEAKAGE FROM AROUND CATHETER EXIT SITE
Carry out the following interventions: Check for catheter damage, e.g. punctured by suture needle, trocar,
scalpel, scissors, ruptured if occluded Seek immediate advice from the referring clinician or team

33 CVAD Policy V1 April 2018
ALGORITHM FOR PERSISTENT WITHDRAWAL OCCLUSION
Adapted From Standards for Infusion Therapy, RCN 2016
Blood return is
absent
Flush central venous catheter with 0.9% sodium chloride in
10ml syringe using a brisk ‘push pause’
technique. Check for flashback of blood. Do not
flush against any resistance
Ask patient to cough, deep breathe, change position, stand up or lie with foot
of the bed tipped up
Proceed (if line flushes) and happy to do so as long as there
are no other complications or pain.
Contact referring
Clinician.
Patient to receive highly irritant/vesicant drugs
e.g. antibiotics
Blood return obtained – use central venous
catheter as usual
DO NOT PROCEED WITH TREATMENT. REDRESS THE LINE and CONTACT THE
REFERRING CLINICIAN FOR
ADVICE.
Blood return still
absent
NO YES
Unable to flush/
resistance felt

34 CVAD Policy V1 April 2018
CVAD Standard Operating Procedure 10
CARE OF IMPLANTED VENOUS ACCESS PORT
10.1.0 General principles
10.1.1 Care of an implanted venous access port is patient specific, and training is provided only for the named patients with these ports in situ. A competency assessment for this specific device will not be required as it is not a high risk procedure, providing those undertaking the care and management of the venous access port have previously undertaken training and assessment in Intravenous Administration and Management of CVADs. An implanted venous access device may also be known as a Port-a-cath.
10.1.2 Implanted ports are used for long term venous access and are implanted subcutaneously under surgical conditions. The port must not be used for venous blood sampling.
10.1.3 The device is comprised of two components; a reservoir with a self sealing septum which is attached to a silicone catheter. This can be either open ended or have a Groshong valve. The port is accessed by piercing the skin with a needle into the septum of the port reservoir, which when removed, allows the septum to seal it itself. The ports are generally inserted into the chest wall. They require minimal care of the site as the skin is intact. When not in use they require monthly flushing with heparinised saline. The risk of infection is low and they allow minimal interference with activities of daily living, such as bathing.
10.1.4 Only Huber point (non-coring) ‘Gripper’ needles must be used to access an implanted venous access port to prevent coring of the silicone septum. Needle length needs to be verified correct for portal/patient; if too long, needle and/or portal may be damaged at insertion; if too short, needle may not completely pierce portal septum, and medication may be delivered into surrounding tissue and/or needle may be blocked. Selection of needle length is dependent on patient BMI and depth of insertion. This should be part of the patient’s clinical management plan provided by the referring clinician.
10.1.5 The disadvantage of these devices is that when access to the port is required, it can cause discomfort for the patient as the skin is pierced with the needle. This discomfort can be overcome by using a topical anaesthetic gel (which must be prescribed).
10.1.6 The potential problems that can occur are:
The needle can become dislodged during administration causing extravasation, or misplaced during insertion causing infiltration into the surrounding tissue.
Difficulty in aspirating blood.
10.2.0 Maintenance of the Implanted Port
10.2.1 Patients may be discharged home with continuous intravenous therapy via the implanted port in progress. The non - coring needle (Huber) is held in place with a transparent occlusive dressing, to maintain a barrier and prevent the needle
35 CVAD Policy V1 April 2018
from moving. This may already be in place at the time of referral to Trust services. This must be confirmed at time of handover.
10.2.2 A needle and giving-set must be changed every 7 days, if treatment is continuous.
10.2.3 Following discontinuation of any treatment, the port must be flushed with 20mls 0.9% sodium chloride followed by heparinised saline to prevent clot formation. The port must then be maintained and flushed with heparinised saline on a four weekly basis when it is not in use for administration of medication. Please refer to each hospital care plan for amounts and strengths of heparinised saline solution (Appendix A).The heparinised saline must be prescribed.
10.2.4 When not in use, the site does not required to be dressed routinely as the port is buried beneath the skin. Occasionally following removal of the needle there may be a small amount of blood present, and a small temporary dressing may be required.
10.2.5 Regular assessment of the port is required to check for signs of infection/infiltration or extravasation during and following treatment.
10.2.6 The management of an implanted port is similar to that of any central line, and therefore asepsis must be maintained for any procedure involving the port.
10.3.0 Procedure for Removal of Needle from the Port
10.3.1 For disconnection and disposal of cytotoxic waste please refer to The specific Standard Operating procedure for this.
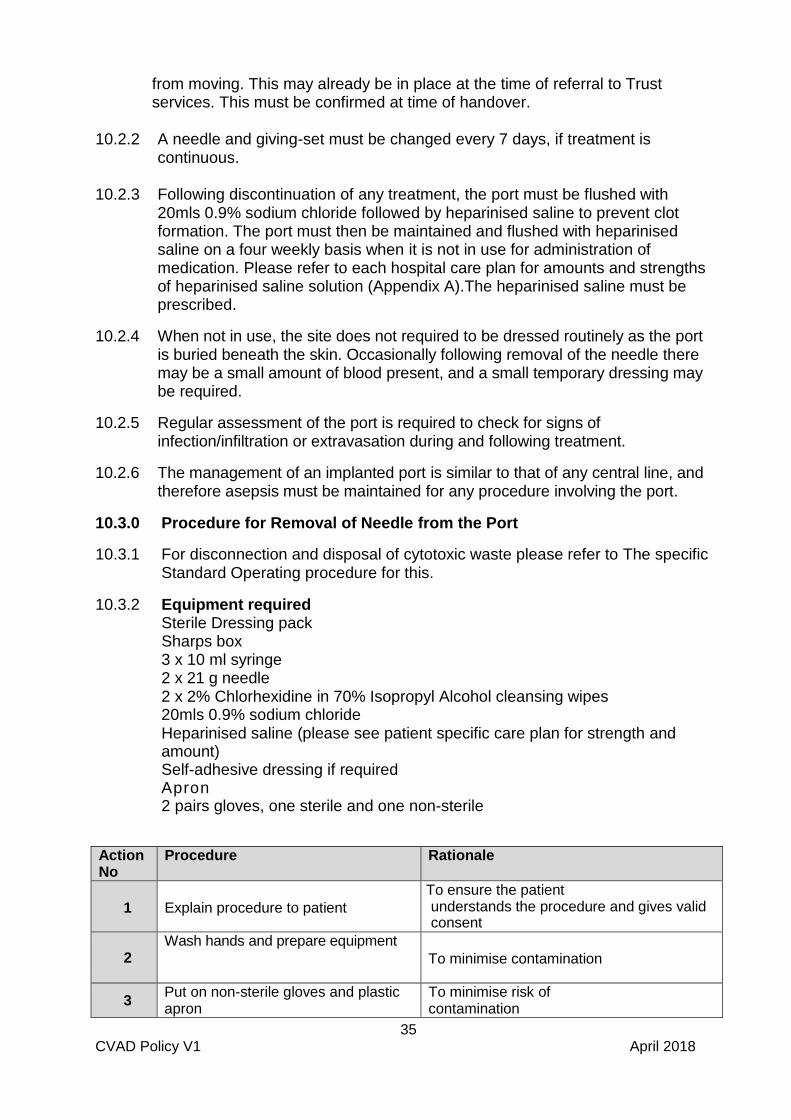
10.3.2 Equipment required Sterile Dressing pack Sharps box 3 x 10 ml syringe 2 x 21 g needle 2 x 2% Chlorhexidine in 70% Isopropyl Alcohol cleansing wipes 20mls 0.9% sodium chloride Heparinised saline (please see patient specific care plan for strength and amount) Self-adhesive dressing if required Apron 2 pairs gloves, one sterile and one non-sterile
Action No
Procedure Rationale
1 Explain procedure to patient
To ensure the patient understands the procedure and gives valid consent
2 Wash hands and prepare equipment
To minimise contamination
3 Put on non-sterile gloves and plastic apron
To minimise risk of contamination

36 CVAD Policy V1 April 2018
4 Disconnect and dispose of waste and pump (if used) as per policy
To follow guidelines and prevent risk from spillage or contamination
5 Remove dressing carefully, keeping Huber needle in place
6 Check site for any redness or swelling or pain
Signs of developing infection
7 Discard gloves and apron as above As above
8 Wash hands thoroughly As per infection, prevention and control, hand hygiene.
10
Put on apron, sterile gloves, open dressing pack and prepare equipment To minimise contamination
11
Draw up 0.9% sodium chloride using two 10ml syringes and green needle
Used to check positioning of needle and patency of port and to flush reservoir ensure the drug has been fully administered.
12
Clean end of needleless connector connected to Huber needle with 2% Chlorhexidine in 70% Isopropyl Alcohol cleansing wipes and allow to dry
To minimise risk of contamination
13 Connect syringe to needleless connector
Needles are not to be used, therefore risking damage to the catheter
14 Maintain stability of port with forefinger and index finger whilst flushing
To ensure port remains stable and the needle does not move
15 Draw back on syringe to check for return of blood
To check the needle is in the correct position and that the port is patent
16
Flush the port with 20 ml of 0.9% saline observing for swelling or complaints of pain.
To check for patency and correct positioning and to flush through remaining medication that has accumulated in the reservoir
17
Draw up heparinised saline (ensure this is done after flushing with the saline to prevent mix up of solutions) Please refer to patient specific care plan for strength and amount
This assists in maintaining the patency of the port and catheter over a period of time, by preventing formation of clots
18
Using a pulsating push/ pause technique administer heparinised saline finishing with positive end pressure before removing the syringe
By finishing with positive pressure this prevents backflow of blood and possible formation of a clot
19
Discard of syringe into cytotoxic sharps waste As per Healthcare waste (Clinical Waste)
policy
37 CVAD Policy V1 April 2018
10.4.0 Procedure for insertion of non – coring needle (Huber) and for monthly maintenance of patency of port and catheter
10.4.1 The insertion of the non – coring needle (Huber) must be performed by a Registered Nurse trained and competent in the care and management of an implanted venous access port. This procedure is to be carried out every 4 weeks when the port is not in use.
10.4.2 Equipment Required Dressing pack Sterile gloves Non – coring needle (Huber)* Chlorhexidine 2% w/v sterile aqueous solution 1x 10 ml syringes 1x 21 gauge needles Heparinised saline, (please see patient specific care plan for strength and amount) Local anaesthetic cream, especially if the site is tender or if the port is newly implanted (this must be prescribed).
*A straight non - coring needle or an angled needle with integral extension set maybe used, if so this will need to be flushed to prime the needle.
Action No
Procedure Rationale
1 Explain the procedure to the
patient
To ensure the patient understands the procedure and gives valid consent
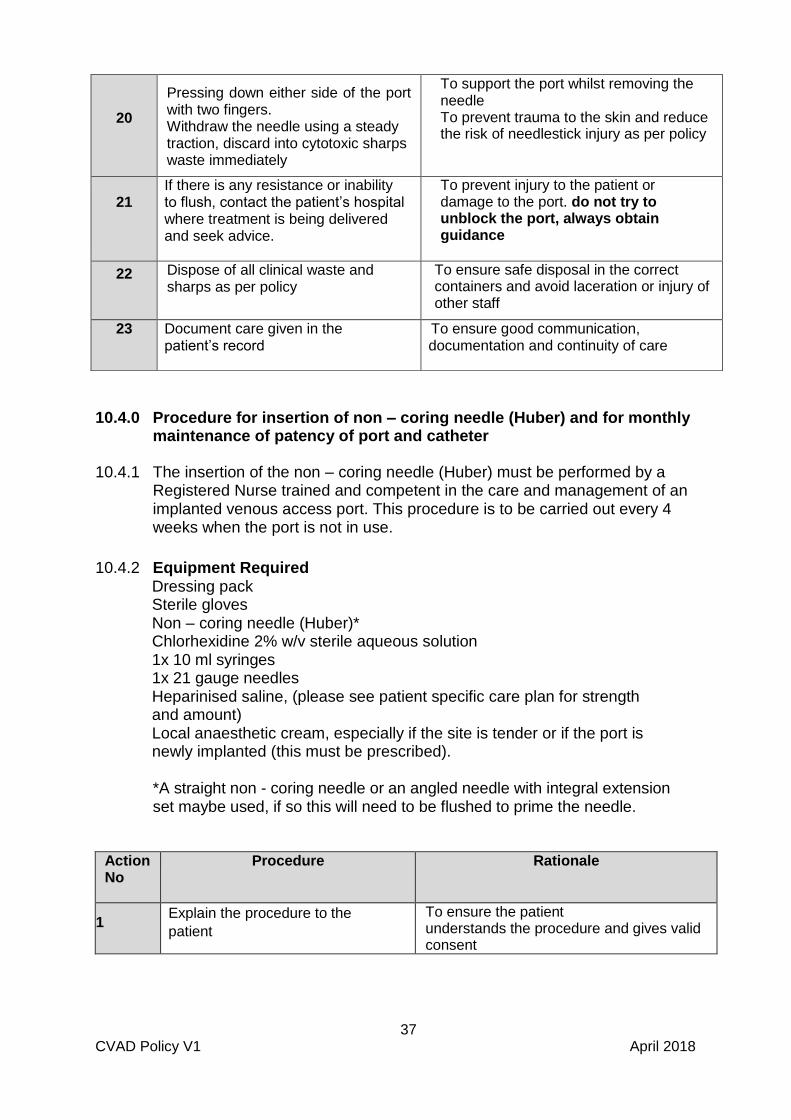
20
Pressing down either side of the port with two fingers. Withdraw the needle using a steady traction, discard into cytotoxic sharps waste immediately
To support the port whilst removing the needle To prevent trauma to the skin and reduce the risk of needlestick injury as per policy
21 If there is any resistance or inability to flush, contact the patient’s hospital where treatment is being delivered and seek advice.
To prevent injury to the patient or damage to the port. do not try to unblock the port, always obtain guidance
22 Dispose of all clinical waste and sharps as per policy
To ensure safe disposal in the correct containers and avoid laceration or injury of other staff
23 Document care given in the patient’s record
To ensure good communication, documentation and continuity of care

38 CVAD Policy V1 April 2018
2
Apply local anaesthetic cream (if
required) approx. 30 – 60 minutes
before procedure
(Ensure cream is prescribed)
To reduce the feeling of pain on needle
insertion
3 Ensure the patient is comfortable To aid comfort and allow access to the port
4 Wash hands and put on plastic apron To prevent contamination
5
Locate the port and identify the
septum, assess the depth of the port
and the thickness of the skin
In order to select the correct length of needle
6 Choose an appropriate sizes Huber
needle (gauge and length)
To prevent damage to the port, accidental
infiltration of heparinised saline into
surrounding tissue and patient discomfort
7 Wash hands again as per policy To prevent contamination
8 Open dressing pack using non –
touch technique
To prevent contamination
9 open sterile items onto field, again
using non touch technique
To reduce risk of
contamination and to prevent interruptions
delaying the process
10 Clean hands and put on sterile gloves To minimise risk of contamination
11
Using Chlorhexidine 2% clean the
skin over the port, using in a spiral
motion, inside to outside. Allow to
dry
To minimise risk of
contamination and destroy skin flora
12
Draw up heparinised saline into
the 10 ml syringe using a green
needle
Used to ensure patency is maintained over a
4 week period
13
Flush the needle (and if using, prime
the extension line) with the
heparinised saline and expel any air
To check for patency of needle and
set and to prevent injection of air
14
Stabilise the port between
forefinger and index finger with
the non-dominant hand.
Holding the needle in the dominant
hand, insert the needle into the
middle of the port septum
To ensure the port is stabilised and
does not move when needle is
inserted
15
Flush using a pulsating push/ pause
technique administer heparinised
saline finishing with positive end
pressure before removing the syringe.
This technique helps maintain patency and
prevention of clot formation. the positive
end pressure prevents backflow of blood
16
Pressing down either side of the port
with two fingers
withdraw the needle using a
steady traction
To support the port to prevent it from
moving
17
Dispose of all clinical waste and sharps as per policy
To ensure safe disposal in the correct containers and avoid laceration or injury of other staff.
18
Document care given in the patient’s record
To ensure good communication, documentation and continuity of care
39 CVAD Policy V1 April 2018
10.5.0 COMPLICATIONS
10.5.1 If there are any concerns at any time, please contact the specialist unit in charge of the patient’s care.
10.5.2 Needle Dislodgement
Remove needle as detailed above and arrange for another to be inserted.
10.5.3 Extravasation of cytotoxic IV medication
Stop the infusion; contact the patient’s specialist unit.
10.5.4 Persistent withdrawal occlusion when flushing
Confirm the needle has not dislodged
Check for kinks / clamps still closed on the extension set
Request the patient to change position
Contact the patient’s specialist unit as a clot formation may have occurred
10.5.5 Blockage
The patient must be referred back to their specialist unit as there may be other possible causes for a sluggish/blocked line, which would require a different management approach.
Under no circumstances should an attempt be made to force fluid into a venous access port. This may result in a clot being forced into the patient’s circulation potentially causing an embolism to occur.
10.5.6 Port Leak
May occur if a forceful flush is attempted when the line is blocked,or if the wrong type of needle is repeatedly used damaging the diaphragm. Diagnosis of this will need to be made at the patient’s specialist unit.
10.5.7 Suspected localised infection around the port
Clean and dress the area if required, and contact the referring specialist unit for advice. If able, take bloods from the patient for inflammatory markers. Undertake full set of physiological observations & assess for potential sepsis using NEWS and Sepsis Screening & Action Pathway, escalate any concerns as clinically appropriate with consideration to any treatment escalation plan (TEP) that the patient may have in place.