central office (co) code (nxx) user guide 2.0v … · co code user guide 2.0v 3neustar, inc. 2012...
TRANSCRIPT

Central Office (CO) Code (NXX)
User Guide
2.0v
November 1, 2012

CO Code User Guide 2.0v
Neustar, Inc. 2012 2
TABLE OF CONTENTS
1.0 Introduction ........................................................................................................ 3
1.1 NAS Overview as it Relates to CO Code Request Processing ............................................. 3
2.0 CO Code Requests ............................................................................................. 3
2.1 Part 1 Requests ...................................................................................................................... 3 2.1.1 New ................................................................................................................................ 3 Figure 2.1.1 ............................................................................................................................. 4 2.1.1.1 Initial Requests............................................................................................................ 4
2.1.1.2 Growth Requests ....................................................................................................... 11
2.1.2 Change ............................................................................................................................. 20
2.1.2.1 OCN Change ............................................................................................................. 20
2.1.2.2 Switching Identification Change............................................................................... 26 2.1.2.3 Rate Center Change .................................................................................................. 30 2.1.2.4 Tandem Homing CLLI change ................................................................................. 38
2.1.2.5 Effective Date Change .............................................................................................. 43 2.1.2.6 LATA Change .......................................................................................................... 49
2.1.3 Returns ............................................................................................................................. 54
2.1.4 Suspensions ...................................................................................................................... 58 2.1.5 Reservation ...................................................................................................................... 62
2.2 Search Forms ...................................................................................................................... 62 2.2.1 View CO Code Forms .................................................................................................. 63
2.2.2 Search CO Code Forms ............................................................................................... 65
3.0 CO Code Reports ............................................................................................. 69
3.1 CO Code Utilized Report .................................................................................................... 69 3.2 CO Code Assignment Records ........................................................................................... 71
3.3 Submitted Part 1s Report .................................................................................................... 73 3.4 Part 3 Report ....................................................................................................................... 74 3.5 Submitted Part 4s ................................................................................................................ 76 3.6 Assignments Needing Part 4 ............................................................................................... 77

CO Code User Guide 2.0v
Neustar, Inc. 2012 3
1.0 Introduction This document provides instruction for making requests for assignments and changes of CO
(NXX) codes via the NANP Administration System (NAS). It also provides information
regarding the capabilities for queries and reports in NAS. All instructions and field information
apply for both Service Provider Applicants (SPA) and Service Provider Consultants (SPC) unless
otherwise noted.
1.1 NAS Overview as it Relates to CO Code Request Processing
The following list includes some of the CO Code request processing and reporting capabilities
available in NAS:
Entering and submitting Part 1 requests for new NPA-NXX code assignments;
Entering and submitting Part 1 requests for changes to existing NPA-NXX code
assignments;
Entering and submitting Part 1 requests for returns of NPA-NXX code assignments;
Entering and submitting previously suspended Part 1 requests;
Searching for all forms tied to code requests (Part 1s, Part 3s, MTEs, Part 4s & Part 5s);
Reports capabilities
o CO Code Utilized Report
o CO Code Assignment Records
o Part 3 Report
o Submitted Part 4’s Report
o Assignments Needing Part 4 Report
2.0 CO Code Requests
2.1 Part 1 Requests
2.1.1 New
This section discusses the creation of Part 1 requests for new NPA-NXX code assignments and
reservation of NPA-NXX codes via NAS. Please note that any field marked with a red asterisk
is a required field and must be populated based on the criteria indicated in the field requirements
listed below.

CO Code User Guide 2.0v
Neustar, Inc. 2012 4
NAS Landing Page
Figure 2.1.1
2.1.1.1 Initial Requests
The following section describes the steps to create and submit a Part 1 request in NAS for an
Initial NPA-NXX code assignment.
Creating and Submitting a Part 1 Request for an Initial NPA-NXX code
Step 1: To create a Part 1 request for an Initial NPA-NXX code assignment, click on the + sign
next to “Part 1/MTE” (see Figure 2.1.1). This will bring down a list of Part 1 request form
options.
Step 2: Click on “New.” The New Code Assignment Request (Part 1) screen is displayed as
shown in Figure 2.1.2.

CO Code User Guide 2.0v
Neustar, Inc. 2012 5
Figure 2.1.2
Step 3: Select information from the dropdown lists in the following fields.
OCN: Click on the OCN field to bring up the list of Company OCNs. Select an OCN
from this list. Note: The OCNs listed in the drop-down are from your NAS profile. If an
OCN is not listed, you will need to update your profile.
NPA: Click on the NPA field to bring up the list of NPA(s). Select an NPA from this
list. The screen will refresh and load the appropriate rate centers based on the NPA
selected. Note: The NPAs listed in the drop-down are from your NAS profile. If a NPA
is not listed, you will need to update your profile.
Rate Center: Click on the Rate Center field to bring up a list of Rate Centers. Select the
Rate Center for the code assignment.
Type of request: Click on the Type of Request field to bring up a list of Part 1
application choices. Select “Initial.”
Click on the “Continue” button.
NAS will perform validations to confirm that the request being submitted is a valid Initial
request. If NAS confirms that the request for an Initial code is invalid, it will return a Validation
error message, “Invalid Request Type: There are currently existing assignments or pending
assignment requests. Please request Growth” (see Figure 2.1.3).

CO Code User Guide 2.0v
Neustar, Inc. 2012 6
Figure 2.1.3
If NAS confirms that the request for an Initial code is valid, it will bring up the Part 1 form
screen as shown in Figure 2.1.4.

CO Code User Guide 2.0v
Neustar, Inc. 2012 7
Figure 2.1.4
Step 4: Complete fields on the Part 1 form as follows:

CO Code User Guide 2.0v
Neustar, Inc. 2012 8
Section 1.1
Company/Entity Name: The Company/Entity Name field is pre-populated.
Headquarters Address: The Headquarters Address fields are pre-populated.
Service Provider Consultants – The Headquarters Address fields are pre-populated if the
user profile has headquarters information included. If not, then the SPC will be required to
complete the Part1 form Headquarters Address fields for the SP for which the SPC is
submitting a Part 1.
Headquarters Address: This field allows a maximum of 100 characters.
Headquarters City, State and Zip: Enter the City, State and Zip code for the
headquarters address. This is a required field, which allows a maximum of 125
characters.
Code Administrator information: Code Administrator information is pre-populated with the
name and information for the NANPA Code Administrator assigned to the specific NPA in
which the request is being made.
Section 1.2
NPA: The NPA is pre-populated.
LATA: The LATA field allows a minimum of 3, a maximum of 5 alphanumeric characters.
OCN: The OCN is pre-populated.
Parent Company OCN: Select the Parent Company OCN from a drop-down menu containing
the Parent Company OCNs appearing in the user’s profile.
Switch Identification: The Switch Identification field is an 11 character alphanumeric field
(spaces are allowed). If less than 11 characters (including spaces) are entered you will receive a
Validation Error message at the time of submission of your Part 1.
Locality/City/Wire Center: Enter the Locality/City/Wire Center for the code that is being
requested. This field allows for a maximum of 80 alphanumeric characters.
Rate Center: The Rate center is pre-populated.
Homing Tandem Operating Company: Enter the name of the Homing Tandem Operating
Company. This field allows for a maximum of 80 alphanumeric characters.
Tandem Homing CLLI: The Tandem Homing CLLI field is an 11 character alphanumeric field.
NAS will not allow you to enter more than 11 characters. If less than 11 characters (including
spaces) are entered you will receive a Validation Error message at the time of submission of your
Part 1.
Section 1.3
Date of Application: The Date of Application field is pre-populated with the current date and
time (EST).
CO Code User Guide 2.0v
Neustar, Inc. 2012 9
Requested Effective Date: The Requested Effective Date is pre-populated with the current date
+ 59 days (the standard interval required to process a request). You may enter a different date
(mm/dd/yyyy).
Expedite Checkbox: Place a checkmark in this box if the Requested Effective Date is less than
59 days from the current date.
Expedite Explanation: If you check the Expedite checkbox, an explanation for the expedite
must be entered in this field. A maximum of 1024 characters is allowed in the Expedite
Explanation field.
Effective Date Checkbox: You many check this box to request the earliest possible effective
date that NANPA may grant for a NON-EXPEDITED request.
Section 1.4
Type of Company: Select the Type of Company from the dropdown list.
Type of Service: Select Type of Service from the dropdown list.
NXX assignment preference: Enter any NXX assignment preference(s). This field allows for a
maximum of 1000 characters. Note: NXX preferences are not guaranteed.
Undesirable NXX codes: Enter any undesired NXX code(s). This field allows for a maximum
of 1000 characters.
Section 1.5
Pooling Indicator Checkbox: Leave the checkbox blank and only place a checkmark in the
Pooling Indicator Checkbox if the code you are requesting will be a pooled code.
NPA Jeopardy Criteria Checkbox: This checkbox is pre-populated if the NPA is a Jeopardy
NPA.
Additional Documentation: Select the method you will use to send additional documents to
NANPA (along with your Part 1 request) from the dropdown list.
Comments: Enter any additional pertinent or required information in the Comments field. This
field allows for a maximum of 1024 characters.
Buttons on the Part 1 form:
The “Submit” button will submit the Part 1 request in NAS. Upon successful submission
NAS will display a confirmation page with a tracking number.
The “Cancel” button will allow you to completely cancel the Part 1 request and return to
the NAS Landing page.
The “Back” button will take the user back to the first Part 1 page where modifications
can be made to selections made from the dropdown lists then return to the Part 1 form to
continue.

CO Code User Guide 2.0v
Neustar, Inc. 2012 10
The “Reset” button clears current data entered by the user.
Step 5: Submit the Part 1 request by clicking on the “Submit” button.
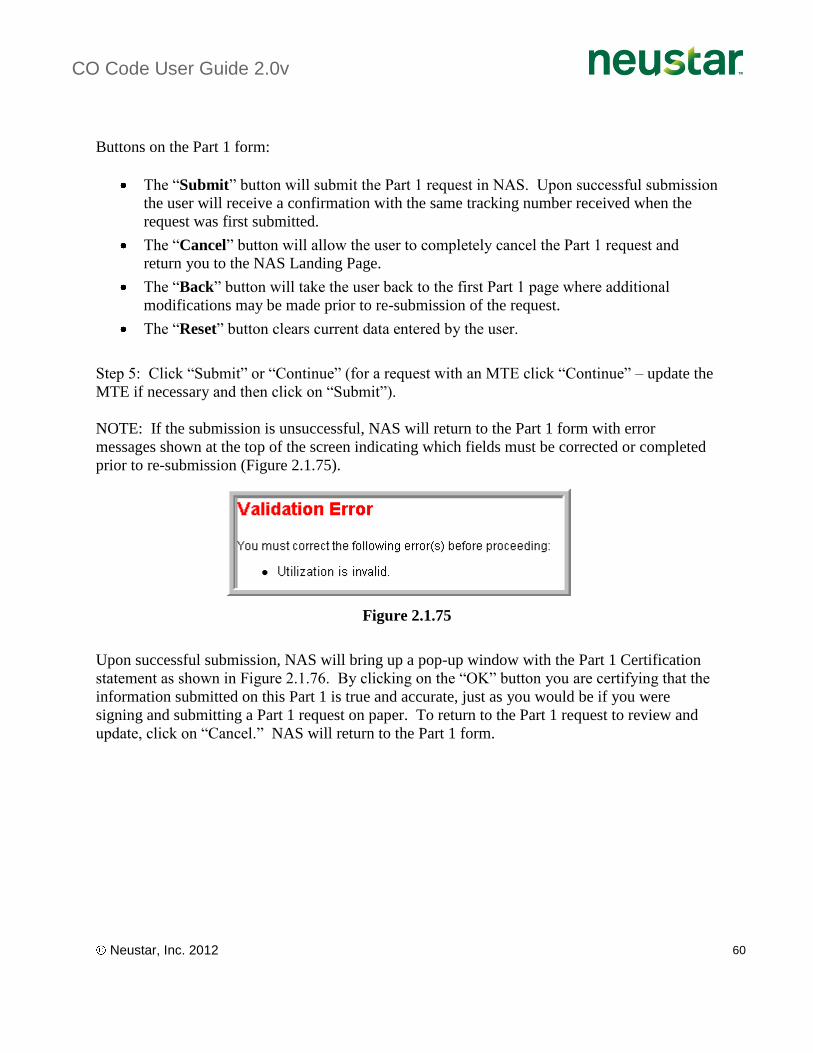
NOTE: If the submission is unsuccessful, NAS will return the user to the Part 1 form with error
messages at the top of the screen indicating what field(s) must be corrected or completed prior to
re-submission.
If the request is successfully submitted, NAS will bring up a pop-up window with the Part 1
Certification statement as shown in Figure 2.1.5. By clicking on the “OK” button, you are
certifying that the information submitted on this Part 1 is true and accurate, just as you would be
if you were signing and submitting a Part 1 request on paper. To return to the Part 1 request for
review and update, click on “Cancel.” NAS will return to the Part 1 form.
Figure 2.1.5
After clicking on the “OK” button NAS will respond with a Confirmation page as shown in
Figure 2.1.6. The confirmation page will provide a tracking number and will indicate that you
have successfully submitted your Part 1 request. A reminder will appear on the confirmation
page informing you of possible documentation that you may be required to submit along with
your Part 1 submission. In addition, you may view the Part 1 that you submitted by clicking on
the “View Part One” button.

CO Code User Guide 2.0v
Neustar, Inc. 2012 11
Figure 2.1.6
2.1.1.2 Growth Requests
The following section describes the steps to create and submit a Part 1 request in NAS for a
Growth NPA-NXX code.
Please note that any field marked with a red asterisk is a required field and must be populated
based on the requirements indicated in the field requirements listed below.
NAS Landing Page
Figure 2.1.7
Creating and Submitting a Part 1 Request for a Growth NPA-NXX code
Step 1: To create a Part 1 request for a Growth NPA-NXX code, click on the + sign next to “Part
1/MTE.” This will bring down a list of Part 1 request form options. (See Figure 2.1.7)
Step 2: Click on “New.” The New Code Assignment Request (Part 1) screen is displayed as
shown in Figure 2.1.8.

CO Code User Guide 2.0v
Neustar, Inc. 2012 12
Figure 2.1.8
Step 3: Select information from the dropdown lists in the following fields.
OCN: Click on the OCN field to bring up the list of Company OCNs from the user
profile. Select an OCN from this list. Note: The OCNs listed in the drop-down are from
your NAS profile. If an OCN is not listed, you will need to update your profile.
NPA: Click on the NPA field to bring up the list of NPAs from the user profile. Select
an NPA from this list. The screen will refresh and load the appropriate rate centers based
on the NPA selected. Note: The NPAs listed in the drop-down are from your NAS
profile. If a NPA is not listed, you will need to update your profile.
Rate Center: Click on the Rate Center field to bring up a list of Rate Centers tied to the
selected NPA.
Type of request: Click on the Type of Request field to bring up a list of Part 1
application choices. Select “Growth.”
Click on the “Continue” button.
NAS will perform validations to confirm that the request being submitted is a valid Growth
request. If NAS confirms that the request for a Growth code is invalid, it will return a Validation
error message, “Invalid Request Type: There are currently no existing assignments or pending
assignment requests. Please request Initial” (see Figure 2.1.9).

CO Code User Guide 2.0v
Neustar, Inc. 2012 13
Figure 2.1.9
If NAS confirms that the request for a Growth code is valid, it will bring up the Part 1 form
screen as shown in Figure 2.1.10.

CO Code User Guide 2.0v
Neustar, Inc. 2012 14
Figure 2.1.10
Step 4: Complete fields on the Part 1 form as follows:
Section 1.1
Company/Entity Name: The Company/Entity Name field is pre-populated.
Headquarters Address: The Headquarters Address fields are pre-populated.

CO Code User Guide 2.0v
Neustar, Inc. 2012 15
Service Provider Consultants – The Headquarters Address fields are pre-populated if the
user profile has headquarters information included. If not, then the SPC will be required to
complete the Part1 form Headquarters Address fields for the SP for which the SPC is
submitting a Part 1.
Headquarters Address: This field allows a maximum of 100 characters.
Headquarters City, State and Zip: Enter the City, State and Zip code for the
headquarters address. This is a required field, which allows a maximum of 125
characters.
Code Administrator information: Code Administrator information is pre-populated with the
name and information for the NANPA Code Administrator assigned to the specific NPA in
which the request is being made.
Section 1.2
NPA: The NPA is pre-populated.
LATA: The LATA field allows a minimum of 3, a maximum of 5 alphanumeric characters.
OCN: The OCN is pre-populated.
Parent Company OCN: Select the Parent Company OCN from a drop-down menu containing
the Parent Company OCNs appearing in the user’s profile.
Switch Identification: The Switch Identification field is an 11 character alphanumeric field
(spaces are allowed). If less than 11 characters (including spaces) are entered you will receive a
Validation Error message at the time of submission of your Part 1.
Locality/City/Wire Center: Enter the Locality/City/Wire Center for the code that is being
requested. This field allows for a maximum of 80 alphanumeric characters.
Rate Center: The Rate center is pre-populated.
Homing Tandem Operating Company: Enter the name of the Homing Tandem Operating
Company. This field allows for a maximum of 80 alphanumeric characters.
Tandem Homing CLLI: The Tandem Homing CLLI field is an 11 character alphanumeric field.
NAS will not allow you to enter more than 11 characters. If less than 11 characters (including
spaces) are entered you will receive a Validation Error message at the time of submission of your
Part 1.
Section 1.3
Date of Application: The Date of Application field is pre-populated with the current date and
time (EST).
Requested Effective Date: The Requested Effective Date is pre-populated with the current date
+ 59 days (the standard interval required to process a request). You may enter a different date
(mm/dd/yyyy).
Expedite Checkbox: Place a checkmark in this box if the Requested Effective Date is less than
59 days from the current date.

CO Code User Guide 2.0v
Neustar, Inc. 2012 16
Expedite Explanation: If you check the Expedite checkbox, an explanation for the expedite
must be entered in this field. A maximum of 1024 characters is allowed in the Expedite
Explanation field.
Effective Date Checkbox: You many check this box to request the earliest possible effective
date that NANPA may grant for a NON-EXPEDITED request.
Section 1.4
Type of Company: Select the Type of Company from the dropdown list.
Type of Service: Select Type of Service from the dropdown list.
NXX assignment preference: Enter any NXX assignment preference(s). This field allows for a
maximum of 1000 characters. Note: NXX preferences are not guaranteed.
Undesirable NXX codes: Enter any undesired NXX code(s). This field allows for a maximum
of 1000 characters.
Section 1.5
Pooling Indicator Checkbox: Leave the checkbox blank and only place a checkmark in the
Pooling Indicator Checkbox if the code you are requesting will be a pooled code.
NPA Jeopardy Criteria Checkbox: This checkbox is pre-populated if the NPA is a Jeopardy
NPA.
Additional Documentation: Select the method you will use to send additional documents to
NANPA (along with your Part 1 request) from the dropdown list.
Comments: Enter any additional pertinent or required information in the Comments field. This
field allows for a maximum of 1024 characters.
Buttons on the Part 1 form:
The “Submit” button will submit the Part 1 request in NAS. Upon successful submission
NAS will display a confirmation page with a tracking number.
The “Cancel” button will allow you to completely cancel the Part 1 request and return to
the NAS Landing page.
The “Back” button will take the user back to the first Part 1 page where modifications
can be made to selections made from the dropdown lists then return to the Part 1 form to
continue.
The “Reset” button clears current data entered by the user.
Step 5: Submit the Part 1 request by clicking on the “Submit” button.
NOTE: If the Part 1 is incomplete or has errors, NAS will return to the Part 1 form with error
messages at the top of the screen indicating what field(s) must be corrected or completed prior to
continuing to the MTE screen.

CO Code User Guide 2.0v
Neustar, Inc. 2012 17
This will bring up the CO Code Assignment Month to Exhaust Certification Worksheet – TN
Level screen and form as shown above in Figure 2.1.11. Navigate through the Months to
Exhaust form by using the tab key to move from field to field or by clicking your mouse on each
field.
Figure 2.1.11
Step 6: Complete the fields on the MTE as follows:
Date: The date field is pre-populated with today’s date.
Company Name: The Company Name field is pre-populated.
Rate Center: The Rate Center field is pre-populated.
NPA(s) – NXXs included in growth calculation: List all NPA-NXX(s) included in the
growth calculation. Code Applicant: The Code Applicant field is pre-populated.
Title: The Title field is pre-populated.
Phone: The Phone field is pre-populated.
Fax: The Fax field is pre-populated.
Telephone Numbers Available for Assignment: Enter the total number of telephone
numbers that are available for assignment in this NPA and Rate Center. This field allows
for a maximum of 20 digits, including commas.
Previous 6-months growth history: Enter the net change in the TNs no longer available
for assignment in each of the previous 6 months starting with the most distant month as
Month #1 and Month #6 as the current month. Each of these fields is required. Negative

CO Code User Guide 2.0v
Neustar, Inc. 2012 18
numbers, positive numbers and zeroes are all valid entries. A maximum of 8 digits,
including commas, are allowed.
Forecast – Next months 1-12: Enter the forecast of TNs needed in each of the following
12 months, starting with the most recent month as Month #1. Each of these fields is
required. Negative numbers, positive numbers and zeroes are all valid entries. A
maximum of 8 digits, including commas, are allowed.
Average Monthly Forecast (calculated): The Average Monthly Forecast will be
calculated by NAS. If you wish to see the calculation prior to submission, you can click
on the “Calculate” button found below the “Explanation” field. NAS will perform the
necessary calculations and return a forecast figure in the field.
Months to Exhaust (calculated): The Months to Exhaust field will also be calculated by
NAS. This calculation can be seen prior to submission by clicking on the “Calculate”
button.
Utilization Level: Enter the Utilization Level. This is a percentage from 0 to 100%. The
field allows for up to three decimal places.
Explanation: The Explanation field allows for an explanation of up to 1024 characters to
be entered.
Buttons on the MTE form:
The “Submit” button will calculate “Average Monthly Forecast” and the “Months to
Exhaust” fields and submit the request into NAS.
The “Calculate” button allows NAS to calculate the “Average Monthly Forecast” and the
“Months to Exhaust” and show the results in the fields prior to submission of the request.
The “Cancel” button will allow the user to completely cancel the Part 1 request and
return to the NAS Landing Page.
The “Reset” button clears current data entered by the user.
The “Back” button will take the user back to the Part 1 form screen to review or edit
fields. (NAS will retain the information entered on the MTE so that the user does not
have to re-enter everything upon return to the MTE screen.)
Step 7: Submit the Part 1 request by clicking on the “Submit” button.
NOTE: If the submission is unsuccessful, NAS will return to the Months to Exhaust worksheet
with error messages showing at the top of the screen (Figure 2.1.12) indicating which fields(s)
must be corrected or completed prior to re-submission.
CO Code User Guide 2.0v
Neustar, Inc. 2012 19
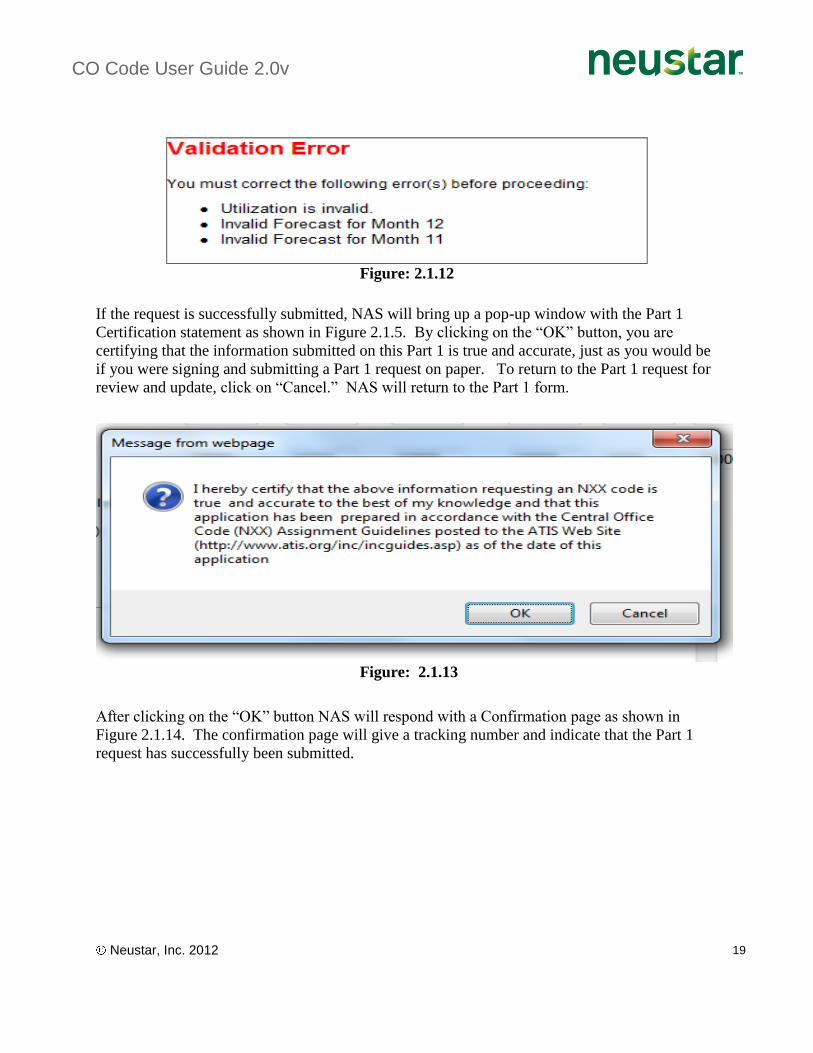
Figure: 2.1.12
If the request is successfully submitted, NAS will bring up a pop-up window with the Part 1
Certification statement as shown in Figure 2.1.5. By clicking on the “OK” button, you are
certifying that the information submitted on this Part 1 is true and accurate, just as you would be
if you were signing and submitting a Part 1 request on paper. To return to the Part 1 request for
review and update, click on “Cancel.” NAS will return to the Part 1 form.
Figure: 2.1.13
After clicking on the “OK” button NAS will respond with a Confirmation page as shown in
Figure 2.1.14. The confirmation page will give a tracking number and indicate that the Part 1
request has successfully been submitted.

CO Code User Guide 2.0v
Neustar, Inc. 2012 20
Figure 2.1.14
A reminder will appear on the confirmation page informing the user of possible documentation
that may be required to be submitted along with the Part 1 submission.
2.1.2 Change
This section discusses the creation of Part 1 requests for changes to existing NPA-NXX codes
via NAS. The user will select one or more change reasons from the of “type of change”
checkboxes on the first Change Part 1 screen. Note that any field marked with a red asterisk is a
required field and must be populated based on the requirements indicated in the field
requirements listed below.
2.1.2.1 OCN Change
The following section describes the steps to create and submit a Part 1 request in NAS for an
OCN change on an existing NPA-NXX code.

CO Code User Guide 2.0v
Neustar, Inc. 2012 21
NAS Landing Page
Figure 2.1.29
Creating and Submitting a Part 1 Request for an OCN change for an existing NPA-NXX
code assignment
Step 1: To create a Part 1 request for an OCN change for an existing NPA-NXX code, click on
the + sign next to “Part 1/MTE” (see Figure 2.1.29). This will bring down a list of Part 1 request
form options.
Figure 2.1.30

CO Code User Guide 2.0v
Neustar, Inc. 2012 22
Step 2: Click on “Change.” The Change Code Request (Part 1) screen is displayed as shown in
Figure 2.1.30.
Step 3: Complete the fields on the first Part 1 change screen as follows:
Enter NPA-NXX: Enter the NPA-NXX that is being changed.
Requested Effective Date: The Requested Effective Date is pre-populated with the
current date + 59 days (the standard interval required to process a request). The user may
enter a different date (mm/dd/yyyy).
Effective Date Checkbox: You many check this box to request the earliest possible
effective date that NANPA may grant for a NON-EXPEDITED request.
Expedite Checkbox: Place a checkmark in this box if the date entered is less than
today’s date plus 59 days.
Expedite Explanation: If the Expedite checkbox is checked the user will be required to
enter an explanation of the reason for the expedite request in this field. A maximum of
1024 alphanumeric characters is allowed in the Expedite Explanation field.
Select type of change(s): Place a checkmark in the appropriate “OCN” change type:
OCN: Intra-company: Select if you are the current Code Holder
OCN: Inter-company: Select if you are not the current Code Holder
Note: In addition to the OCN being changed, additional fields such as the Switching
Identification field can be changed by marking all appropriate checkboxes as needed.
Click on the “Continue” button.
This will bring up the Part 1 form screen as shown in Figure 2.1.31. The current information on
the NPA-NXX is pre-populated in this screen. Note the red asterisk next to the field label
indicates fields that are editable for this change request.

CO Code User Guide 2.0v
Neustar, Inc. 2012 23
Figure 2.1.31
Step 4: Make the appropriate changes (as determined by the checkboxes selected on the first
Change Part 1 screen) to the Part 1 form fields.
Part 1 - Section 1.2
OCN: Select the new OCN for the NPA-NXX from the OCNs in the dropdown list. Also
make any additional changes as indicated (dropdown is populated with OCNs from the
user’s profile).

CO Code User Guide 2.0v
Neustar, Inc. 2012 24
Part 1 - Section 1.4
OCN Change Reason: Select the reason for the OCN change from one of the reasons in
the dropdown list.
If Other Explain - If “Other” is selected as the OCN change reason above, then you will
be required to enter an explanation in the space provided.
Buttons on the Part 1 form:
The “Submit” button will submit the Part 1 request in NAS. Upon successful submission
NAS will display a confirmation page with a tracking number.
The “Cancel” button will allow the user to completely cancel the Part 1 request and
return to the NAS Landing Page.
The “Back” button will take the user back to the first Part 1 page where selections can be
modified from the dropdown lists then return to the Part 1 form to continue.
The “Reset” button clears current data entered by the user.
Step 5: Submit the Part 1 request by clicking on the “Submit” button.
NOTE: If the submission is unsuccessful, NAS will return to the Part 1 form with error
messages showing at the top of the screen indicating which fields must be corrected or
completed prior to re-submission (Figure 2.1.32).
Figure 2.1.32
Upon successful submission, NAS will bring up a pop-up window with the Part 1 Certification
statement as shown in Figure 2.1.33. By clicking on the “OK” button you are certifying that the
information submitted on this Part 1 is true and accurate, just as you would be if you were
signing and submitting a Part 1 request on paper.

CO Code User Guide 2.0v
Neustar, Inc. 2012 25
Figure 2.1.33
After clicking on the “OK” button NAS will respond with a Confirmation page. The
confirmation page will show a tracking number and indicate that the Part 1 request has been
successfully submitted. A reminder will appear on the confirmation page informing you of
possible documentation that you may be required to submit along with your Part 1 submission.
Figure 2.1.34

CO Code User Guide 2.0v
Neustar, Inc. 2012 26
2.1.2.2 Switching Identification Change
The following section describes the steps to create and submit a Part 1 request in NAS for a
Switching Identification change on an existing NPA-NXX code.
NAS Landing Page
Figure 2.1.35
Creating and Submitting a Part 1 Request for a Switching Identification change for an
existing NPA-NXX code assignment
Step 1: To create a Part 1 request for a Switching Identification change for an existing NPA-
NXX code, click on the + sign next to “Part 1/MTE” (see Figure 2.1.35). This will bring down a
list of Part 1 request form options.
Step 2: Click on “Change.” The Change Code Request (Part 1) screen is displayed as shown in
Figure 2.1.36.

CO Code User Guide 2.0v
Neustar, Inc. 2012 27
Figure 2.1.36
Step 3: Complete the fields on the first Part 1 change screen as follows:
Enter NPA-NXX: Enter the NPA-NXX that is being changed
Requested Effective Date: The Requested Effective Date is pre-populated with the
current date + 59 days (the standard interval required to process a request). You may
enter a different date (mm/dd/yyyy).
Effective Date Checkbox: You many check this box to request the earliest possible
effective date that NANPA may grant for a NON-EXPEDITED request.
Expedite Checkbox: If a checkmark is placed in the Expedite checkbox an expedite
explanation must be entered in this field.
Expedite Explanation: If the Expedite checkbox is checked the user will be required to
enter an explanation of the reason for the expedite request in this field. A maximum of
1024 alphanumeric characters is allowed in the Expedite Explanation field.
Select type of change(s): Place a checkmark in the “Switching id” type of change
checkbox.
NOTE: In addition to the Switching id being changed, additional fields such as the Tandem
Homing CLLI field may be changed by marking all appropriate checkboxes as needed.

CO Code User Guide 2.0v
Neustar, Inc. 2012 28
Click on the “Continue” button.
This will bring up the Part 1 form screen as shown in Figure 2.1.37. The current information on
the NPA-NXX is pre-populated in this screen. Note the red asterisk next to the field label
indicates fields that are editable for this change request.
Figure 2.1.37

CO Code User Guide 2.0v
Neustar, Inc. 2012 29
Step 4: Enter the new Switching id in Section 1.2. Also, make any additional changes as
determined by the checkboxes selected on the first Change Part 1 screen.
Buttons on the Part 1 form:
The “Submit” button will submit the Part 1 request in NAS. Upon successful submission
NAS will display a confirmation page with a tracking number.
The “Cancel” button will allow the user to completely cancel the Part 1 request and
return you to the NAS Landing Page.
The “Back” button will take the user back to the first Part 1 page where modifications to
selections can be made from the dropdown lists then return to the Part 1 form to continue.
The “Reset” button clears current data entered by the user.
Step 5: Submit the Part 1 request by clicking on the “Submit” button.
NOTE: If the submission is unsuccessful, NAS will return to the Part 1 form with error
messages shown at the top of the screen indicating which fields must be corrected or completed
prior to re-submission (Figure 2.1.38).
Figure 2.1.38
Upon successful submission, NAS will bring up a pop-up window with the Part 1 Certification
statement as shown in Figure 2.1.39. By clicking on the “OK” button you are certifying that the
information submitted on this Part 1 is true and accurate, just as you would be if you were
signing and submitting a Part 1 request on paper. To return to the Part 1 request to review and
update, click on “Cancel.” NAS will return to the Part 1 form.

CO Code User Guide 2.0v
Neustar, Inc. 2012 30
Figure 2.1.39
After clicking on the “OK” button NAS will respond with a Confirmation page. The
confirmation page will provide a tracking number and will indicate that the Part 1 request was
successfully submitted. A reminder will appear on the confirmation page informing users of
possible documentation that may be required to be submitted along with the Part 1 application.
Figure 2.1.40
2.1.2.3 Rate Center Change
The following section describes the steps to create and submit a Part 1 request in NAS for a Rate
Center change on an existing NPA-NXX code.

CO Code User Guide 2.0v
Neustar, Inc. 2012 31
NAS Landing Page
Figure 2.1.41
Creating and Submitting a Part 1 Request for a Rate Center change for an existing NPA-
NXX code assignment
Step 1: To create a Part 1 request for a Rate Center change for an existing NPA-NXX code,
click on the + sign next to “Part 1/MTE” (see Figure 2.1.41). This will bring down a list of Part
1 request form options.
Step 2: Click on “Change.” The Change Code Request (Part 1) screen is displayed as shown in
Figure 2.1.42.
Figure 2.1.42

CO Code User Guide 2.0v
Neustar, Inc. 2012 32
Step 3: Complete the fields on the first Part 1 change screen as follows:
Enter NPA-NXX: Enter the NPA-NXX that is being changed
Requested Effective Date: The Requested Effective Date is pre-populated with the
current date + 59 days (the standard interval required to process a request). The user may
enter a different date (mm/dd/yyyy).
Effective Date Checkbox: You many check this box to request the earliest possible
effective date that NANPA may grant for a NON-EXPEDITED request.
Expedite Checkbox: Place a checkmark in this box if the date entered is less than
today’s date plus 59 days.
Expedite Explanation: If a checkmark is placed in the Expedite checkbox an expedite
explanation must be entered in this field. A maximum of 1024 characters is allowed in
the Expedite Explanation field.
Select type of change(s): Place a checkmark in the “Rate Center” checkbox.
Note: In addition to the Rate Center being changed, additional fields such as the Switching
Identification field may be changed by marking all appropriate checkboxes as needed.
Click on the “Continue” button. This will bring up the Part 1 form screen as shown in Figure
2.1.43. The current information on the NPA-NXX is pre-populated in this screen. Note the red
asterisk next to the field label indicates fields that are editable for this change request.

CO Code User Guide 2.0v
Neustar, Inc. 2012 33
Figure 2.1.43
Step 4: Select the new Rate Center in Section 1.2 using the provided dropdown box. Also, make
any additional changes as determined by the checkboxes selected on the first Change Part 1
screen.
Buttons on the Part 1 form:

CO Code User Guide 2.0v
Neustar, Inc. 2012 34
The “Submit” button will submit the Part 1 request in NAS. Upon successful submission
NAS will display a confirmation page with a tracking number.
The “Cancel” button will allow you to completely cancel the Part 1 request and return
you to the NAS Landing Page.
The “Back” button will take the user back to the first Part 1 page where modifications
can be made to selections made from the dropdown lists then return to the Part 1 form to
continue.
The “Reset” button clears current data entered by the user.
Step 5: Submit the Part 1 request by clicking on the “Submit” button.
NAS will perform a validation process. If the code that is being changed is currently “in
service”, NAS will proceed to Step 7. If the code that is being changed is not currently “in
service” and the rate center change is to a rate center that currently has other codes assigned to
the Company OCN listed on the Part 1 request, NAS will bring up the CO Code Assignment
Month to Exhaust Certification Worksheet – TN Level screen and form as shown in Figure
2.1.44.
Figure 2.1.44
You can navigate through the Months to Exhaust form by using the tab key to move from field to
field or by clicking your mouse on each field.

CO Code User Guide 2.0v
Neustar, Inc. 2012 35
Step 6: Complete the fields on the MTE as follows:
Date: The date field is pre-populated with today’s date.
Company Name: The Company Name field is pre-populated.
Rate Center: The Rate Center field is pre-populated.
NPA(s) – NXXs included in growth calculation: Enter the NPA-NXX(s) that are
included in the growth calculation.
Code Applicant: The Code Applicant field is pre-populated.
Title: The Title field is pre-populated.
Phone: The Phone field is pre-populated.
Fax: The Fax field is pre-populated.
Telephone Numbers Available for Assignment: Enter the total number of telephone
numbers that are available for assignment in this NPA and Rate Center. This field
allows for a maximum of 20 digits, including commas.
Previous 6-months growth history: Enter the net change in TNs no longer available
for assignment in each of the previous 6 months starting with the most distant month as
Month #1 and Month #6 as the current month. Each of these fields is required.
Negative numbers, positive numbers and zeroes are all valid entries. A maximum of 8
digits, including commas is allowed.
Forecast – Next months 1-12: Enter the forecast of TNs needed in each of the
following 12 months, starting with the most recent month as Month #1. Each of these
fields is required. Negative numbers, positive numbers and zeroes are all valid entries.
A maximum of 8 digits, including commas is allowed.
Average Monthly Forecast (calculated): The Average Monthly Forecast will be
calculated by NAS. If you wish to see the calculation prior to submission, you can
click on the “Calculate” button found below the “Explanation” field. NAS will perform
the necessary calculations and return a forecast figure in the field for you.
Months to Exhaust (calculated): The Months to Exhaust field will also be calculated
by NAS. You may also see this calculation prior to submission by clicking on the
“Calculate” button.
Utilization Level: Enter the Utilization Level. This is a percentage from 0 to 100%.
The field allows for up to three decimal places. This is a required field.
Explanation: The Explanation field allows for an explanation of up to 1024 characters
to be entered. This is an optional field.
Buttons on the MTE form:
The “Submit” button will calculate “Average Monthly Forecast” and the “Months to
Exhaust” fields and submit your request into NAS.

CO Code User Guide 2.0v
Neustar, Inc. 2012 36
The “Calculate” button allows you have NAS calculate the “Average Monthly
Forecast” and the “Months to Exhaust” and show the results in the fields prior to
submitting your request.
The “Cancel” button will allow you to completely cancel the Part 1 request and
return you to the NAS Landing Page.
The “Reset” button clears current data entered by the user.
The “Back” button will take you back to the Part 1 form screen to review or edit
fields. (NAS will retain the information you entered on the MTE so that you do not
have to re-enter everything upon your return to the MTE screen.)
Step 7: Submit the Part 1 request by clicking on the “Submit” button.
NOTE: If the submission is unsuccessful, NAS will return to the Months to Exhaust worksheet
with error messages at the top of the screen indicating what fields must be corrected or
completed prior to re-submission (Figure 2.1.45).
Figure 2.1.45
Upon successful submission, NAS will bring up a pop-up window with the Part 1 Certification
statement as shown in Figure 2.1.46. By clicking on the “OK” button you are certifying that the
information submitted on this Part 1 is true and accurate, just as you would be if you were
signing and submitting a Part 1 request on paper. To return to the Part 1 request to review and
update, click on “Cancel.” NAS will return to the Part 1 form.

CO Code User Guide 2.0v
Neustar, Inc. 2012 37
Figure 2.1.46
After clicking on the “OK” button NAS will respond with a Confirmation page. The
confirmation page will provide a tracking number and will indicate that the Part 1 request was
successfully submitted (Figure 2.1.47). A reminder will appear on the confirmation page
informing the user of possible documentation that may be required to be submitted along with
the Part 1 application.
Figure 2.1.47
CO Code User Guide 2.0v
Neustar, Inc. 2012 38
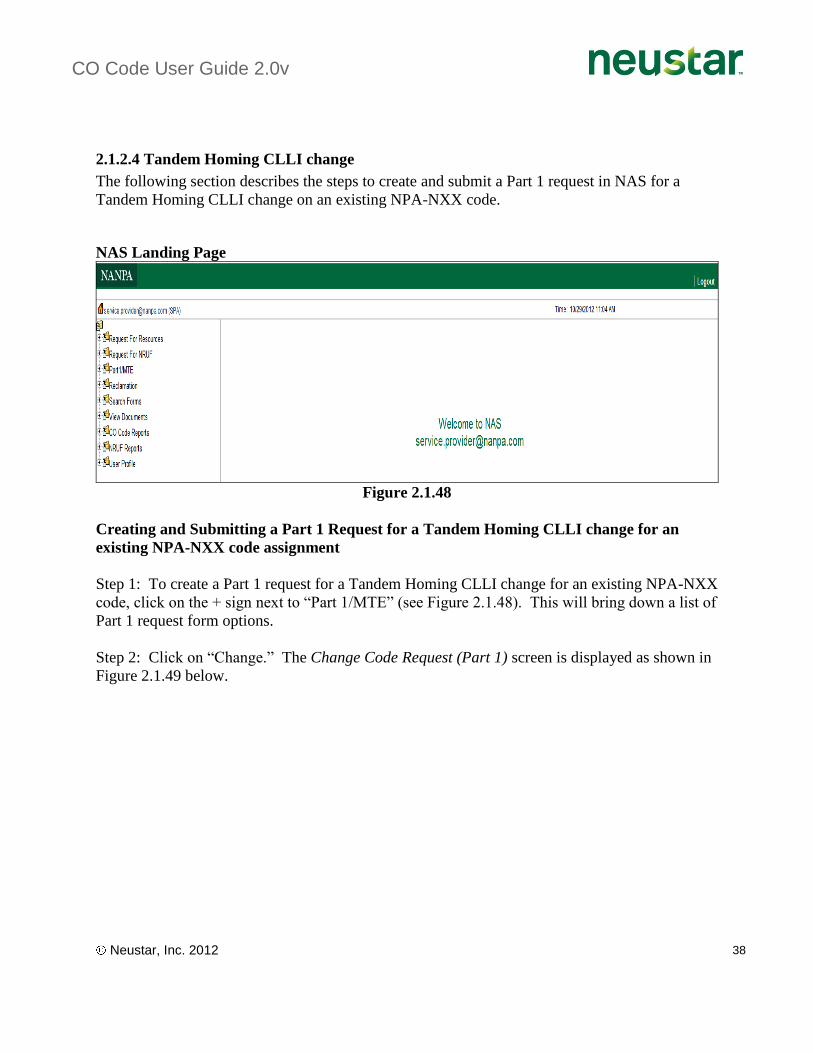
2.1.2.4 Tandem Homing CLLI change
The following section describes the steps to create and submit a Part 1 request in NAS for a
Tandem Homing CLLI change on an existing NPA-NXX code.
NAS Landing Page
Figure 2.1.48
Creating and Submitting a Part 1 Request for a Tandem Homing CLLI change for an
existing NPA-NXX code assignment
Step 1: To create a Part 1 request for a Tandem Homing CLLI change for an existing NPA-NXX
code, click on the + sign next to “Part 1/MTE” (see Figure 2.1.48). This will bring down a list of
Part 1 request form options.
Step 2: Click on “Change.” The Change Code Request (Part 1) screen is displayed as shown in
Figure 2.1.49 below.

CO Code User Guide 2.0v
Neustar, Inc. 2012 39
Figure 2.1.49
Step 3: Complete the fields on the first Part 1 change screen as follows:
Enter NPA-NXX: Enter the NPA-NXX that is being changed
Requested Effective Date: The Requested Effective Date is pre-populated with the
current date + 59 days (the standard interval required to process a request). You may
enter a different date (mm/dd/yyyy).
Effective Date Checkbox: You many check this box to request the earliest possible
effective date that NANPA may grant for a NON-EXPEDITED request.
Expedite Checkbox: Place a checkmark in this box if the date entered is less than
today’s date plus 66 days.
Expedite Explanation: If the Expedite checkbox is checked the user will be required to
enter an explanation of the reason for the expedite request in this field. A maximum of
1024 alphanumeric characters is allowed in the Expedite Explanation field.
Select type of change(s): Place a checkmark in the “Tandem Homing CLLI” type of
change checkbox.

CO Code User Guide 2.0v
Neustar, Inc. 2012 40
Note: In addition to the Tandem Homing CLLI being changed, additional fields such as the
Switching Identification field may be changed by marking all appropriate checkboxes as needed.
Click on the “Continue” button. This will bring up the Part 1 form screen as shown in Figure
2.1.50. The current information on the NPA-NXX is pre-populated in this screen. Note the red
asterisk next to the field label indicates fields that are editable for this change request.
Figure 2.1.50

CO Code User Guide 2.0v
Neustar, Inc. 2012 41
Step 4: Enter the new Tandem Homing CLLI in Section 1.2. When a Tandem Homing CLLI
change is requested, the Homing Tandem Company can also be changed if needed. Also, make
any additional changes as determined by the checkboxes selected on the first Change Part 1
screen.
Buttons on the Part 1 form:
The “Submit” button will submit the Part 1 request in NAS. Upon successful submission
NAS will display a confirmation page with a tracking number.
The “Cancel” button will allow you to completely cancel the Part 1 request and return
you to the NAS Landing Page.
The “Back” button will take the user back to the first Part 1 page where modifications
can be made to selections made from the dropdown lists then return to the Part 1 form to
continue.
The “Reset” button clears current data entered by the user.
Step 5: Submit the Part 1 request by clicking on the “Submit” button.
NOTE: If the submission is unsuccessful, NAS will return to the Part 1 form with error
messages shown at the top of the screen indicating what fields must be corrected or completed
prior to re-submission.
Figure 2.1.51
Upon successful submission, NAS will bring up a pop-up window with the Part 1 Certification
statement as shown in Figure 2.1.52. By clicking on the “OK” button you are certifying that the
information submitted on this Part 1 is true and accurate, just as you would be if you were
signing and submitting a Part 1 request on paper. To return to the Part 1 request to review and
update, click on “Cancel.” NAS will return to the Part 1 form.

CO Code User Guide 2.0v
Neustar, Inc. 2012 42
Figure 2.1.52
After clicking on the “OK” button NAS will respond with a Confirmation page. The
confirmation page will provide a tracking number and will indicate that the Part 1 request was
successfully submitted (Figure 2.1.53). A reminder will appear on the confirmation page
informing you of possible documentation that may be required to be submitted along with the
Part 1 submission.
Figure 2.1.53

CO Code User Guide 2.0v
Neustar, Inc. 2012 43
2.1.2.5 Effective Date Change
The following section describes the steps to create and submit a Part 1 request in NAS for an
Effective Date change on an existing NPA-NXX code assignment.
NAS Landing Page
Figure 2.1.54
Creating and Submitting a Part 1 Request for an Effective Date change for an existing
NPA-NXX code assignment
Step 1: To create a Part 1 request for an Effective Date change for an existing NPA-NXX code,
click on the + sign next to “Part 1/MTE” (see Figure 2.1.54). This will bring down a list of Part
1 request form options.
Step 2: Click on “Change.” The Change Code Request (Part 1) screen is displayed as shown in
Figure 2.1.55.

CO Code User Guide 2.0v
Neustar, Inc. 2012 44
Figure 2.1.55
Step 3: Complete the fields on the first Part 1 change screen as follows:
Enter NPA-NXX: Enter the NPA-NXX that is being changed
Requested Effective Date: The Requested Effective Date is pre-populated with the
current date + 59 days (the standard interval required to process a request). DO NOT
UPDATE THIS FIELD. PLEASE WAIT UNTIL ACTUAL PART 1 FORM IS
DISPLAYED TO UPDATE.
Effective Date Checkbox: You many check this box to request the earliest possible
effective date that NANPA may grant for a NON-EXPEDITED request.
Expedite Checkbox: Place a checkmark in this box if the date entered is less than
today’s date plus 59 days. PLEASE WAIT UNTIL ACTUAL PART 1 FORM IS
DISPLAYED TO UPDATE.
Expedite Explanation: If the Expedite checkbox is checked the user will be required to
enter an explanation of the reason for the expedite request in this field. A maximum of
1024 alphanumeric characters is allowed in the Expedite Explanation field. PLEASE
WAIT UNTIL ACTUAL PART 1 FORM IS DISPLAYED TO UPDATE.
Select type of change(s): Place a checkmark in the “Effective Date” checkbox for Type
of Change.
Note: In addition to the Effective Date being changed, additional fields such as the Switching
Identification field may be changed by marking all appropriate checkboxes as needed.

CO Code User Guide 2.0v
Neustar, Inc. 2012 45
Click on the “Continue” button.
This will bring up the List of Pending Part 1(s) screen (Figure 2.1.56). This screen shows all
pending Part 1 requests (with Effective Dates in the future).
Figure 2.1.56
Step 4: Select the specific Part 1 request that will be have a change to the Effective Date by
clicking on the tracking number. This will bring up the Part 1 form screen as shown in Figure
2.1.57. The current information on the NPA-NXX is pre-populated in this screen. Note the red
asterisk next to the field label indicates fields that are editable for this change request.

CO Code User Guide 2.0v
Neustar, Inc. 2012 46
Figure 2.1.57
Step 5: Enter the new Effective Date in Section 1.3. Also, make any additional changes as
determined by the checkboxes selected on the first Change Part 1 screen.
Expedite Checkbox: Place a checkmark in this box if the date entered is less than
today’s date plus 66 days.

CO Code User Guide 2.0v
Neustar, Inc. 2012 47
Expedite Explanation: If the Expedite checkbox is checked the user will be required to
enter an explanation of the reason for the expedite request in this field. A maximum of
1024 alphanumeric characters is allowed in the Expedite Explanation field.
NOTE: The red asterisk next to the field label indicates fields that are editable for this change
request.
Buttons on the Part 1 form:
The “Submit” button will submit the Part 1 request in NAS. Upon successful submission
NAS will display a confirmation page with a tracking number.
The “Cancel” button will allow the user to completely cancel the Part 1 request and
return to the NAS Landing Page.
The “Back” button will take the user back to the first Part 1 page where modifications
can be made to selections made from the dropdown lists then return to the Part 1 form to
continue.
The “Reset” button clears current data entered by the user.
Step 6: Submit the Part 1 request by clicking on the “Submit” button.
NOTE: If the submission is unsuccessful, NAS will return to the Part 1 form with error
messages shown at the top of the screen indicating which fields must be corrected or completed
prior to re-submission (Figure 2.1.58).
Figure 2.1.58
Upon successful submission, NAS will bring up a pop-up window with the Part 1 Certification
statement as shown in Figure 2.1.59. By clicking on the “OK” button you are certifying that the
information submitted on this Part 1 is true and accurate, just as you would be if you were
signing and submitting a Part 1 request on paper. To return to the Part 1 request to review and
update, click on “Cancel.” NAS will return to the Part 1 form.

CO Code User Guide 2.0v
Neustar, Inc. 2012 48
Figure 2.1.59
After clicking on the “Ok” button NAS will respond with a Confirmation page. The
confirmation page will provide a tracking number and will indicate that the Part 1 request was
successfully submitted (Figure 2.1.60). A reminder will appear on the confirmation page
informing the user of possible documentation that may be required to be submitted along with
the Part 1 application.
Figure 2.1.60

CO Code User Guide 2.0v
Neustar, Inc. 2012 49
2.1.2.6 LATA Change
The following section describes the steps to create and submit a Part 1 request in NAS for a
LATA change on an existing NPA-NXX code assignment.
NAS Landing Page
Figure 2.1.61
Creating and Submitting a Part 1 Request for a LATA change for an existing NPA-NXX
code assignment
Step 1: To create a Part 1 request for a LATA change for an existing NPA-NXX code
assignment, click on the + sign next to “Part 1/MTE” (see Figure 2.1.61). This will bring down a
list of Part 1 request form options.
Step 2: Click on “Change.” The Change Code Request (Part 1) screen is displayed as shown in
Figure 2.1.62.
CO Code User Guide 2.0v
Neustar, Inc. 2012 50
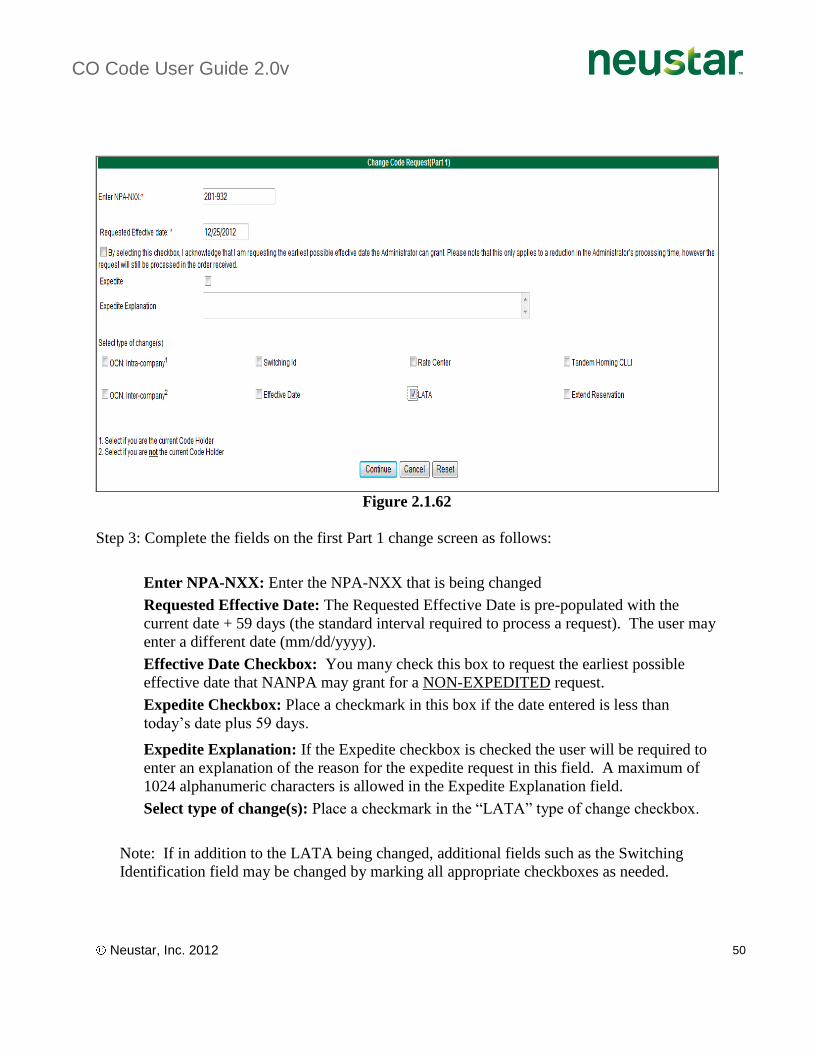
Figure 2.1.62
Step 3: Complete the fields on the first Part 1 change screen as follows:
Enter NPA-NXX: Enter the NPA-NXX that is being changed
Requested Effective Date: The Requested Effective Date is pre-populated with the
current date + 59 days (the standard interval required to process a request). The user may
enter a different date (mm/dd/yyyy).
Effective Date Checkbox: You many check this box to request the earliest possible
effective date that NANPA may grant for a NON-EXPEDITED request.
Expedite Checkbox: Place a checkmark in this box if the date entered is less than
today’s date plus 59 days.
Expedite Explanation: If the Expedite checkbox is checked the user will be required to
enter an explanation of the reason for the expedite request in this field. A maximum of
1024 alphanumeric characters is allowed in the Expedite Explanation field.
Select type of change(s): Place a checkmark in the “LATA” type of change checkbox.
Note: If in addition to the LATA being changed, additional fields such as the Switching
Identification field may be changed by marking all appropriate checkboxes as needed.

CO Code User Guide 2.0v
Neustar, Inc. 2012 51
Click on the “Continue” button.
This will bring up the Part 1 form screen as shown in Figure 2.1.63. The current information on
the NPA-NXX is pre-populated in this screen. Note the red asterisk next to the field label
indicates fields that are editable for this change request.
Figure 2.1.63

CO Code User Guide 2.0v
Neustar, Inc. 2012 52
Step 4: Enter the new LATA in Section 1.2. Also, make any additional changes as determined
by the checkboxes selected on the first Change Part 1 screen.
Buttons on the Part 1 form:
The “Submit” button will submit the Part 1 request in NAS. Upon successful submission
NAS will display a confirmation page with a tracking number.
The “Cancel” button will allow the user to completely cancel the Part 1 request and
return to the NAS Landing Page.
The “Back” button will take the user back to the first Part 1 page where modifications
can be made to selections made from the dropdown lists then return to the Part 1 form to
continue.
The “Reset” button clears current data entered by the user.
Step 5: Submit the Part 1 request by clicking on the “Submit” button.
NOTE: If the submission is unsuccessful, NAS will return to the Part 1 form with error
messages shown at the top of the screen indicating what fields must be corrected or completed
prior to re-submission.
Figure 2.1.64
Upon successful submission, NAS will bring up a pop-up window with the Part 1 Certification
statement as shown in Figure 2.1.65. By clicking on the “OK” button you are certifying that the
information submitted on this Part 1 is true and accurate, just as you would be if you were
signing and submitting a Part 1 request on paper. To return to the Part 1 request to review and
update, click on “Cancel.” NAS will return to the Part 1 form.

CO Code User Guide 2.0v
Neustar, Inc. 2012 53
Figure 2.1.65
After clicking on the “Yes” button NAS will respond with a Confirmation page. The
confirmation page will provide a tracking number and will indicate that the Part 1 request was
successfully submitted (Figure 2.1.66). A reminder will appear on the confirmation page
informing users of possible documentation that may be required to be submitted along with the
Part 1 application.
Figure 2.1.66
CO Code User Guide 2.0v
Neustar, Inc. 2012 54
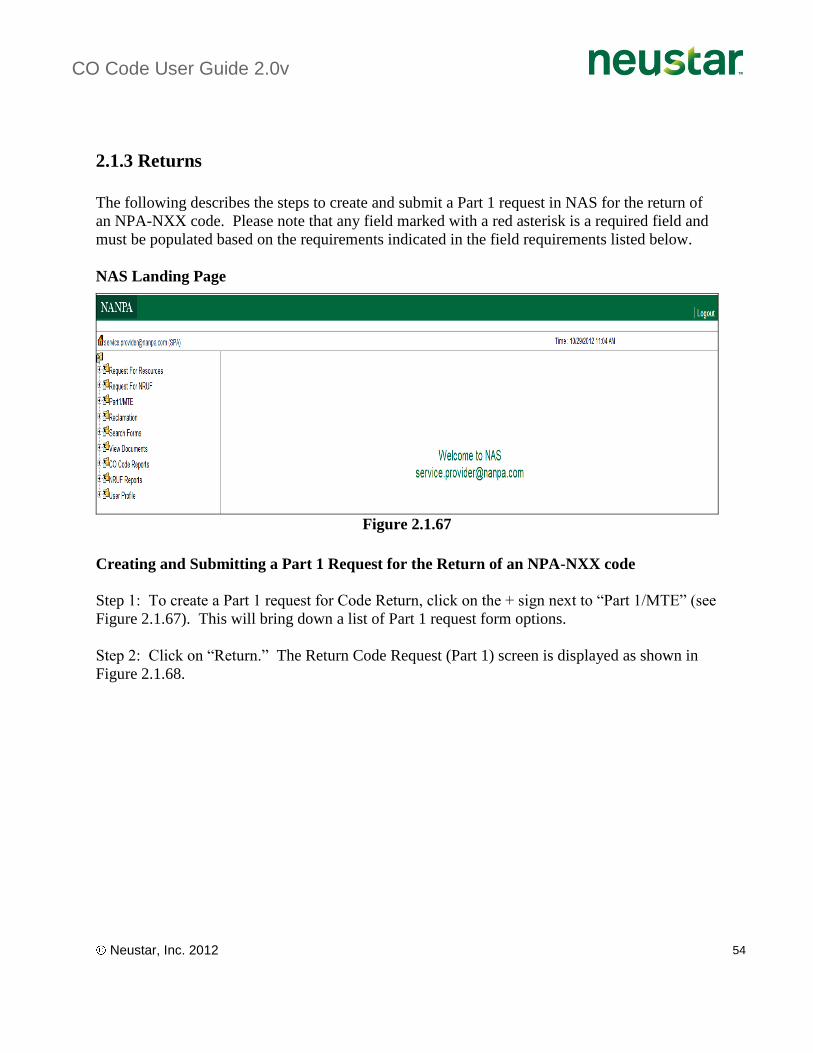
2.1.3 Returns
The following describes the steps to create and submit a Part 1 request in NAS for the return of
an NPA-NXX code. Please note that any field marked with a red asterisk is a required field and
must be populated based on the requirements indicated in the field requirements listed below.
NAS Landing Page
Figure 2.1.67
Creating and Submitting a Part 1 Request for the Return of an NPA-NXX code
Step 1: To create a Part 1 request for Code Return, click on the + sign next to “Part 1/MTE” (see
Figure 2.1.67). This will bring down a list of Part 1 request form options.
Step 2: Click on “Return.” The Return Code Request (Part 1) screen is displayed as shown in
Figure 2.1.68.

CO Code User Guide 2.0v
Neustar, Inc. 2012 55
Figure 2.1.68
Step 3: Select information from the dropdown lists in the following fields.
Enter NPA-NXX: Enter the NPA-NXX that is being returned.
Requested Effective Date: The Requested Effective Date is pre-populated with the
current date + 59 days (the standard interval required to process a request). The user may
enter a different date (mm/dd/yyyy).
Effective Date Checkbox: You many check this box to request the earliest possible
effective date that NANPA may grant for a NON-EXPEDITED request.
Expedite Checkbox: Place a checkmark in this box if the date entered is less than
today’s date plus 59 days.
Expedite Explanation: If the Expedite checkbox is checked the user will be required to
enter an explanation of the reason for the expedite request in this field. A maximum of
1024 alphanumeric characters is allowed in the Expedite Explanation field.
Comments: Enter any additional pertinent or required information in the Comments
field. This field allows for a maximum of 1024 characters.

CO Code User Guide 2.0v
Neustar, Inc. 2012 56
Buttons on the Part 1 form:
The “Submit” button will submit the Part 1 request in NAS. Upon successful submission
NAS will display a confirmation page with a tracking number.
The “Cancel” button will allow the user to completely cancel the Part 1 request and
return to the NAS Landing Page.
The “Reset” button clears current data entered by the user.
Click on the “Submit” button.
NOTE: If the submission is unsuccessful, NAS will return to the Part 1 form with error
messages shown at the top of the screen indicating which fields must be corrected or completed
prior to re-submission (Figure 2.1.69).
Figure 2.1.69
Upon successful submission, NAS will bring up a pop-up window with the Part 1 Certification
statement as shown in Figure 2.1.70. By clicking on the “OK” button you are certifying that the
information submitted on this Part 1 is true and accurate, just as you would be if you were
signing and submitting a Part 1 request on paper. To return to the Part 1 request to review and
update, click on “Cancel.” NAS will return to the Part 1 form.

CO Code User Guide 2.0v
Neustar, Inc. 2012 57
Figure 2.1.70
After clicking on the “OK” button NAS will respond with a Confirmation page. The
confirmation page will provide a tracking number and will indicate that the Part 1 request was
successfully submitted.
Figure 2.1.71

CO Code User Guide 2.0v
Neustar, Inc. 2012 58
2.1.4 Suspensions
The following section describes the steps to retrieve, update and re-submit a Part 1 request that
has been suspended for “additional information from the Service Provider.” Once the Part 1 has
been re-submitted, NANPA will complete processing of the request with a final Part 3 response.
NAS Landing Page
Figure 2.1.72
Retrieving and re-submitting a Suspended Part 1 Request in NAS
Step 1: To retrieve a Suspended Part 1 request, click on the + sign next to “Part 1/MTE” (see
Figure 2.1.72). This will bring down a list of Part 1 request form options.
Step 2: Click on “Suspended.” The List of Suspended Part 1s screen is displayed as shown in
Figure 2.1.73 below.
Figure 2.1.73
Step 3: Select a Part 1 for re-submission by clicking on the tracking number. This will bring up
the Part 1 form screen as shown in Figure 2.1.74.

CO Code User Guide 2.0v
Neustar, Inc. 2012 59
Figure: 2.1.74
Step 4: Update the fields as needed on the Part 1 and, if applicable, the Months to Exhaust
worksheet as instructed by NANPA on the Part 3 response for this request.
CO Code User Guide 2.0v
Neustar, Inc. 2012 60
Buttons on the Part 1 form:
The “Submit” button will submit the Part 1 request in NAS. Upon successful submission
the user will receive a confirmation with the same tracking number received when the
request was first submitted.
The “Cancel” button will allow the user to completely cancel the Part 1 request and
return you to the NAS Landing Page.
The “Back” button will take the user back to the first Part 1 page where additional
modifications may be made prior to re-submission of the request.
The “Reset” button clears current data entered by the user.
Step 5: Click “Submit” or “Continue” (for a request with an MTE click “Continue” – update the
MTE if necessary and then click on “Submit”).
NOTE: If the submission is unsuccessful, NAS will return to the Part 1 form with error
messages shown at the top of the screen indicating which fields must be corrected or completed
prior to re-submission (Figure 2.1.75).
Figure 2.1.75
Upon successful submission, NAS will bring up a pop-up window with the Part 1 Certification
statement as shown in Figure 2.1.76. By clicking on the “OK” button you are certifying that the
information submitted on this Part 1 is true and accurate, just as you would be if you were
signing and submitting a Part 1 request on paper. To return to the Part 1 request to review and
update, click on “Cancel.” NAS will return to the Part 1 form.

CO Code User Guide 2.0v
Neustar, Inc. 2012 61
Figure 2.1.76
After clicking on the “OK” button NAS will respond with a Confirmation page. The
confirmation page will provide the original tracking number received when the request was first
submitted and will indicate that the Part 1 has been successfully re-submitted (Figure 2.1.77). A
reminder will appear on the confirmation page informing the user of possible documentation that
may be required to submit along with the Part 1 submission.
2.1.77

CO Code User Guide 2.0v
Neustar, Inc. 2012 62
2.1.5 Reservation
The Central Office Code (NXX) Assignment Guidelines, Section 4.5, permit an applicant to
request the reservation of a code. However, the applicant must meet code assignment criteria
outlined in Section 4 for initial codes (Section 4.2.1 – 4.2.2.) or for additional codes (Section 4.3
– 4.3.3), depending upon whether the reserved code is to be an initial or growth code.
A reservation request cannot be input directly into NAS. The Part 1 CO/NXX Assignment Form
must be downloaded from http://www.atis.org/inc/incguides.asp and emailed or faxed directly to
the appropriate NANPA Code Administrator. Code Administrator contacts can be located at the
NANPA home page (www.nanpa.com) under “Contact Us.”
If a reserved code is not activated within twelve months, the code will be released from
reservation unless a reservation extension request is submitted to the NANPA Code
Administrator. Upon written request to the NANPC Code Administrator(s), one reservation
extension of six months will be granted when the holder of the reserved code cannot activate the
code within the initial twelve month reservation period due to circumstances beyond the control
of the holder (e.g., hardware, software provision delays, regulatory delays, etc.).
Reservation requests must be submitted directly to the Pooling Administrator if the requested CO
code is in a mandatory pooling rate center.
2.2 Search Forms
This section outlines the search capabilities of NAS as it relates to CO Code forms. NAS allows
a user to search for, view and print all forms related to a Part 1 request including Part 1s, MTEs,
Part 3s, Part 4s and Part 5s.
There are several options available to the NAS user for searching for CO Code forms. The
following describes the options that users have for searching for CO Code forms in NAS and the
steps to perform those searches.

CO Code User Guide 2.0v
Neustar, Inc. 2012 63
NAS Tools frame
Figure 2.2.84
2.2.1 View CO Code Forms
Searching for forms via the Tracking Number
Click on “View CO Code Forms” under “Search Forms” on the tools frame. This will bring up
the “Search for CO Code Form” window (Figure 2.2.85). In the “Tracking Number” field, enter
a tracking number (format XXX-XXXXXX), then click on “Continue.”
Figure 2.2.85
This will bring up a list of all CO Code forms tied to the tracking number queried, including Part
1s, MTEs, Part 3, Part 4s and Part 5s. Tracking number search cannot be used in conjunction
with any other search criteria (Figure 2.2.86). Click on the “Form Type” to view a particular
form.

CO Code User Guide 2.0v
Neustar, Inc. 2012 64
Figure 2.2.86
Searching for forms via the NPA-NXX
Click on “View CO Code Forms” under “Search Forms” on the tools frame. This will bring up
the “Search for CO Code Form” window (Figure 2.2.87). In the “NPA-NXX” field, enter an
NPA-NXX (format NPA-NXX), then click on “Continue.”
Figure 2.2.87
This will bring up a list of all CO Code forms tied to the NPA-NXX queried, including Part 1s,
MTEs, Part 3, Part 4s and Part 5s. NPA-NXX search cannot be used in conjunction with any
other search criteria (Figure 2.2.87). Click on the “Form Type” to view a particular form.

CO Code User Guide 2.0v
Neustar, Inc. 2012 65
2.2.2 Search CO Code Forms
Step 1: To begin the search for CO Code forms, click on the + sign next to “Search Forms” on
the tools frame to the left of the screen (see Figure 2.2.84). This will bring down a list of search
options.
Step 2: Click on “Search CO Code Forms.” The Search for CO Code Forms screen is displayed
as shown in Figure 2.2.88.
Figure 2.2.88
There are several ways to search for CO Code forms (Figure 2.2.88):
A user can search for all forms for a specific NPA, Rate Center or OCN;
A search can also be done by date or date range; and
A combination of search criteria can be entered to limit the size of the resulting list, i.e.
the user chooses a search for all Part 1s submitted in NPA 801 between the dates of
December 1, 2003 and January 1, 2004.
From any of the resulting lists of forms that met the search selection criteria, the user can view
and print any of the forms by clicking on the Form Type.

CO Code User Guide 2.0v
Neustar, Inc. 2012 66
Step 3: Select a search method from the list of options available. Complete the search and get a
list of forms that meet the search criteria.
NPA – To search for all forms in a specific NPA, click on “NPA” then select an NPA from the
dropdown list. Click “Continue.” This will bring up a list of all CO Code forms that were
submitted for any OCN within the user’s profile. NPA search can be used in conjunction with
any other search criteria to limit the search results (Figure 2.2.89).
Figure 2.2.89
Rate Center – The Rate Center Search must be used in conjunction with the NPA search. To
search for all forms in a specific Rate Center, first click on “NPA” then select an NPA from the
dropdown list. Click on “Rate Center” and select a Rate Center from the dropdown list. Click
“Continue.” This will bring up a list of all CO Code forms that were submitted for any OCN
within the user’s profile. This search can be limited further by making selections from the OCN
field. It can also be limited by choosing which forms (Part 1, Part 3, etc.) are being pulled up on
the search results.

CO Code User Guide 2.0v
Neustar, Inc. 2012 67
Figure 2.2.90
OCN – To search for all forms for a specific OCN within the user’s profile, click on “OCN” then
select an OCN from the dropdown list. Click “Continue.” This will bring up a list of all CO
Code forms that were submitted for the specified OCN. This search can be limited further by
making selections from the NPA and Rate Center fields. It can also be limited by choosing
which forms are being pulled up on the search results.
Figure 2.2.91
Start Date, End Date - To search for CO Code forms by a specific date enter the same date in
both the “Start Date” and the “End Date” fields. To search a date range, enter the earliest date of
the date range in the “Start Date” field and the latest date of the date range in the “End Date”
field. Click “Continue.”

CO Code User Guide 2.0v
Neustar, Inc. 2012 68
Figure 2.2.92
This will bring up a list of all CO Code forms that were submitted for any OCN within the user’s
profile within the date(s) indicated in the search criteria. This search can be limited further by
making selections from the NPA, Rate Center and OCN search criteria. It can also be limited by
choosing which forms are being pulled up on the search results (Figure 2.2.92).
By Form – To limit CO Code form searches to specific form types, select the forms by clicking
on the checkbox next to the form name (Part 1, MTE Part 3, Part 4 and Part 5). The user can
select one, several or all CO Code Forms for the search. This search criterion can be used in
conjunction with any other search criteria to limit the search results.

CO Code User Guide 2.0v
Neustar, Inc. 2012 69
3.0 CO Code Reports This section outlines the reports available for the CO Code module in NAS. These reports are
downloadable and can be accessed under the CO Code Reports section of the tools frame (Figure
3.0.93).
Figure 3.0.93
3.1 CO Code Utilized Report
The Central Office Code Utilized Report is generated “real time.” This report provides an up-to-
date list of central office codes assigned in a NPA.
To access the Central Office Code Utilized Report:
Step 1 – Click on “CO Code Utilized Report” under the CO Code Reports section of the tools
frame (Figure 3.0.93). This will bring up a selection screen for designating the state and
NPA that the report will be generated for (Figure 3.1.94).
Figure 3.1.94

CO Code User Guide 2.0v
Neustar, Inc. 2012 70
Step 2 – Select a state. The screen will refresh and provide a list of NPAs based on the state
selected. Select an NPA then click on the “Continue” button. This will bring up a list of
NPA-NXXs that are currently assigned (Figure 3.1.95).
Figure 3.1.95
Fields on the Report – State, NPA, NXX, Use (Code state), OCN, Company Name, Rate
Center, Switch, Initial/Growth (assignment type), Assigned Date, Effective Date
This report is downloadable to an Excel file. At the bottom of the report is a “Download Report
to Excel File” button. By clicking on the Excel button, this report is automatically converted to
an Excel spreadsheet which can be manipulated and saved.

CO Code User Guide 2.0v
Neustar, Inc. 2012 71
3.2 CO Code Assignment Records
The Central Office Code Assignment Records report is generated and updated daily. This report
provides a daily updated listing of assigned, available and unavailable central office codes by
NPA. It is available in two downloadable formats; text file, or Excel Spreadsheet. The text files
are separated into 8 geographic sub-regions with two separate files for each region, one for
utilized codes and one for available codes. The Excel Spreadsheet is separated into three
geographic regions with one file for each region for both utilized and available codes. There is a
separate tab on the Excel spreadsheet for each state. Field definitions and code use states are
listed in the following chart.
CO Codes Field Definitions
Field Definition
State Abbreviation Standard two character abbreviation
NPA-NXX Area Code and Prefix
OCN Operation Company Number
Company Name Full Company Name: Company Names are enclosed with quotes if
they contain special characters
Rate Center 10 character abbreviation for the Rate Center in which the code is
assigned.
Future Effective Date
(Effective Date)
The future date when a new code will be in service (for new codes
only). Once the effective date is reached, this date will no longer
appear.
USE
VC Code is vacant; it is available for assignment to a service provider.
AS Code is assigned to a service provider.
PR Code is for a split; that is, the code is assigned in the old or the new
NPA and cannot be assigned in the other NPA until after the end of
permissive dialing.
RV Code is reserved by a service provider. The identity of the service
provider is considered proprietary information and will not be shown.
UA Code is unavailable for assignment. Such codes include, but are not
limited to, test and special use codes (e.g., 958, 959, 555, time), N11
and other unique codes (e.g., 976, 950), codes set aside for pooling and
codes with special dialing arrangements (e.g., 7-digit dialing cross NPA
boundary).
Assigned Date
(AssignDate)
Date the code was assigned to the service provider by NANPA. This
field is populated only for those codes assigned from January 2001 to
the present.
Initial or Growth Initial is the first geographic NXX code assigned at a unique switching

CO Code User Guide 2.0v
Neustar, Inc. 2012 72
(Initial/Growth) entity or point of interconnection for a service provider. Growth is a
code assigned to a switching entity or point of interconnection
subsequent to the assignment of the first code, for the same purpose as
a code that was previously assigned for a service provider to the same
switching entity or point of interconnection.
Pooled Code Indicates if a code is pooled (Y) or not pooled (N).
To access the Central Office Code Assignment Records reports:
Step 1 - Click on “CO Code Assignment Records” under the CO Code Reports section of the
tools frame (Figure 3.0.93). This will bring up the Central Office Code Assignment Activity
Records page. The first listings of report selections are the text based reports. Scroll below
this list to access the Excel Spreadsheet version of the reports (Figure 3.2.96).
Figure 3.2.96
Step 2– Select the specific report and version from the report lists. NAS will bring up a zip
file which can be opened for viewing.

CO Code User Guide 2.0v
Neustar, Inc. 2012 73
Fields on the Reports:
Text Version Available Codes – State, NPA and NXX
Text Version Utilized Codes – State, NPA, NXX, OCN, Company, Rate Center,
Effective Date, Use (code state), Assign Date, Initial/Growth
Excel Spreadsheet Version Available & Utilized together – NPA-NXX, Use (code
state), OCN, Company, Rate Center, Initial/Growth, Assign Date, Effective Date
3.3 Submitted Part 1s Report
The “Submitted Part 1s Report” shows Part 1s that have been submitted for all OCNs listed in
the user’s profile. There are several options available for generating this report (Figure 3.3.97):
Figure 3.3.97
All Submitted Part 1s: To generate the “Submitted Part 1s Report” for all Part 1s that have been
submitted for all OCNs within the user’s profile, simply make no selections from the dropdown
lists and click “Continue.”
Submitted Part 1s by OCN: To generate “Submitted Part 1s Report” for a specific OCN within
the user’s profile, select an OCN from the OCN dropdown list then click on “Continue.”
Submitted Part 1s by Date: To generate the “Submitted Part 1s Report” for a specific date,
enter the same date in both the “Submit Date or Start Date for Range” field and the “End Date
for Range” field. Click “Continue.”
Submitted Part 1s by Date Range: To generate the “Submitted Part 1s Report” for a date
range, enter the earliest date of the date range in the “Submit Date or Start Date for Range” field
and the latest date of the date range in the “End Date for Range” field. Click “Continue.”

CO Code User Guide 2.0v
Neustar, Inc. 2012 74
Submitted Part 1s by State: To generate the “Submitted Part 1s Report” for a specific State,
select a state from the State dropdown list then click “Continue.”
Submitted Part 1s by NPA: To generate the “Submitted Part 1s Report” for a specific NPA,
select an NPA from the NPA dropdown list then click “Continue.”
Figure 3.3.98
Report fields: The fields shown on the “Submitted Part 1`s Report are: Tracking number, NPA,
NXX, Type of Request, (Initial, Growth, change, etc.) Submit Date, Requested Effective Date,
OCN, Switch and Rate Center.
3.4 Part 3 Report
The “Part 3 Report” shows Part 3s that have been generated by NANPA in response to Part 1
requests from Service Provider Applicants and Service Provider Consultants. There are several
options available for generating this report (Figure 3.4.99):
Figure 3.4.99

CO Code User Guide 2.0v
Neustar, Inc. 2012 75
All Assigned NXX (Part 3s):– To generate the “Assigned NXX (Part 3s)” report for all Part 3s
that have been created for all OCNs within the user’s profile, simply make no selections from the
dropdown lists and click “Continue.”
Assigned NXX (Part 3s) by OCN: To generate the “Assigned NXX (Part 3s)” report for a
specific OCN within the user’s profile, select an OCN from the OCN dropdown list then click
“Continue.”
Assigned NXX (Part 3s) by Date: To generate the “Assigned NXX (Part 3s)” report for a
specific date, enter the same date in both the “Submit Date or Start Date for Range” field and the
“End Date for Range” field. (Check Field labels)
Assigned NXX (Part 3s) by Date Range: To generate the “Assigned NXX (Part 3s)” report for
a date range, enter the earliest date for the date range in the “Submit Date or Start Date for
Range” field and the latest date for the date range in the “End Date for Range” field then click
“Continue.” (Check Field labels)
Assigned NXX (Part 3s) by NPA: To generate the “Assigned NXX (Part 3s)” report for a
specific NPA, select an NPA from the NPA dropdown list then click “Continue.”
Assigned NXX (Part 3s) by State: To generate the “Assigned NXX (Part 3s)” report for a
specific State, select a state from the State dropdown list then click “Continue.”
Figure 3.4.100
Report fields: The fields shown on “Part 3 Report” are: Tracking number, NPA, NXX, State,
Type of Request, Disposition, Effective Date, OCN and Rate Center.

CO Code User Guide 2.0v
Neustar, Inc. 2012 76
3.5 Submitted Part 4s
The “Submitted Part 4s” report shows Part 4s that have been submitted for all OCNs listed in the
user’s profile. There are several options available for generating this report (Figure 3.5.101):
Figure 3.5.101
All Submitted Part 4s – To generate the “Submitted Part 4s” report for all Part 4s that have
been submitted for all OCNs within the user’s profile, simply make no selections from the
dropdown lists and click “Continue.”
Submitted Part 4s by OCN – To generate the “Submitted Part 4s” report for a specific OCN
within the user’s profile, select an OCN from the OCN dropdown list then click “Continue.”
Submitted Part 4s by Date– To generate the “Submitted Part 4s” report for a specific date,
enter the same date in both the “Submit Date or Start Date for Range” field and the “End Date
for Range” field.
Submitted Part 4s by Date Range - To generate the “Submitted Part 4s” report for a date range,
enter the earliest date for the date range in the “Submit Date or Start Date for Range” field and
the latest date for the date range in the “End Date for Range” field then click “Continue.”
Submitted Part 4s by NPA – To generate the “Submitted Part 4s” report for a specific NPA,
select an NPA from the NPA dropdown list then click “Continue.”
Submitted Part 4s by State - To generate the “Submitted Part 4s” report for a specific State,
select a state from the State dropdown list then click “Continue.”
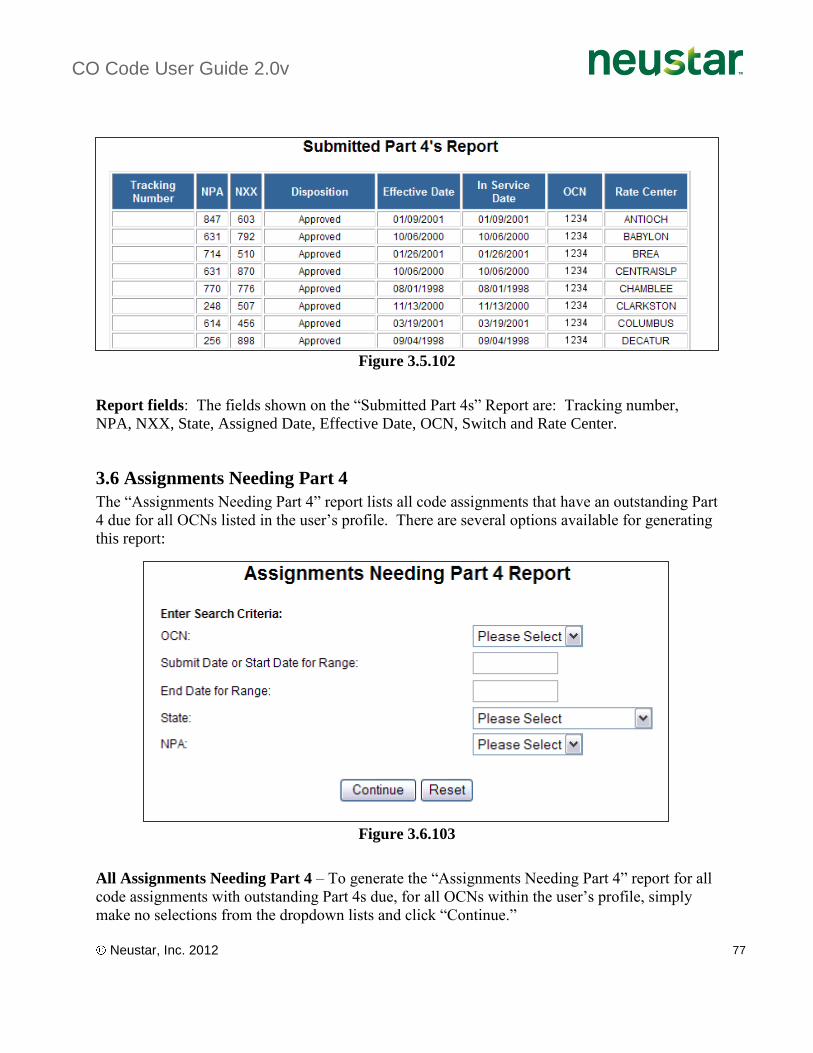
CO Code User Guide 2.0v
Neustar, Inc. 2012 77
Figure 3.5.102
Report fields: The fields shown on the “Submitted Part 4s” Report are: Tracking number,
NPA, NXX, State, Assigned Date, Effective Date, OCN, Switch and Rate Center.
3.6 Assignments Needing Part 4
The “Assignments Needing Part 4” report lists all code assignments that have an outstanding Part
4 due for all OCNs listed in the user’s profile. There are several options available for generating
this report:
Figure 3.6.103
All Assignments Needing Part 4 – To generate the “Assignments Needing Part 4” report for all
code assignments with outstanding Part 4s due, for all OCNs within the user’s profile, simply
make no selections from the dropdown lists and click “Continue.”

CO Code User Guide 2.0v
Neustar, Inc. 2012 78
Assignments Needing Part 4 by OCN – To generate the “Assignments Needing Part 4” report
for a specific OCN within the user’s profile, select an OCN from the OCN dropdown list then
click “Continue.”
Assignments Needing Part 4 by Date– To generate the “Assignments Needing Part 4” report
for a specific date, enter the same date in both the “Submit Date or Start Date for Range” field
and the “End Date for Range” field.
Assignments Needing Part 4 by Date Range - To generate the “Assignments Needing Part 4”
report for a date range, enter the earliest date for the date range in the “Submit Date or Start Date
for Range” field and the latest date for the date range in “End Date for Range” field then click
“Continue.”
Assignments Needing Part 4 by NPA – To generate the “Assignments Needing Part 4” report
for a specific NPA, select an NPA from the NPA dropdown list then click “Continue.”
Assignments Needing Part 4 by State - To generate the “Assignments Needing Part 4” report
for a specific State, select a state from the State dropdown list then click “Continue.”
Figure 3.6.104
Report fields: The fields shown on the “Assignments Needing Part 4” Report are: Tracking
number, OCN, NPA, NXX, Part 4 Due Date and Effective Date.