cells unit guide - wikispacesmnwikiks3scienceyear1.wikispaces.com/file/view/cells+scheme+of... ·...
TRANSCRIPT

A Unit guideCells
© Harcourt Education Ltd 2003 Catalyst 1 This worksheet may have been altered from the original on the CD-ROM. Sheet 1 of 1
Where this unit fits in Prior learningThis unit builds on:unit 6B the concepts that living things have processes in common, and that plants and animalshave structures with specific functions (3B, 5B, 3A, 4A, 5A).
The concepts in this unit are: cells. Pupils are introduced to the concept of cells as the basic unit of life.
This unit leads onto:units 7B Reproduction, 8B Respiration and 8C Microbes and disease.
Framework yearly teaching objectives – Cells• Describe a simple model for cells that recognises those features all cells have in common and the differences between animal and plant cells.• Explain that some living organisms are only one cell but that others are multicelled.• Explain that growth means an increase in the size and number of cells.• Explain that similar specialised cells can be grouped together to form tissues, that tissues can form organs, and that these do not all develop and
grow at the same time; use this to explain why and how some organisms care for and protect their offspring.
Expectations from the QCA Scheme of WorkAt the end of this unit …
… most pupils will … … some pupils will not have made somuch progress and will …
… some pupils will have progressedfurther and will …
in terms of scientific enquiry NC Programme of Study Sc1 1c; 2a, c, d, e, h, j, k, o
• describe some earlier ideas about thestructure of living things and relate these toevidence from microscopic observations
• make observations using a microscope andrecord them in simple drawings
• suggest a question about pollen tubes thatcan be investigated and use an appropriatesample
• present results in an appropriate graph andexplain what these show.
• relate drawings to observations made using amicroscope and describe what they found outduring their investigation.
• explain how evidence from microscopeobservations changed ideas about thestructure of living things
• estimate sizes of specimens viewed under themicroscope and justfy the sample chosen inan investigation of pollen tubes.
in terms of life processes and living things NC Programme of Study Sc2 1a, b, c, d, e
• identify and name features of cells anddescribe some differences between plant andanimal cells
• explain that growth occurs when cells divideand increase in size
• describe how cells are grouped to form tissues.
• recognise that all organisms are made fromcells
• name some parts of a cell.
• recognise that viruses are not cells• describe how some cells in an organism are
specialised to carry out particular functions.
Suggested lesson allocation (see individual lesson planning guides)Direct route
A1Organs, cells, tissues
A2Building blocks
A3Cells and growth
A4Scaling up anddown: Think aboutscales
A5Flower cells
Extra lessons (not in pupil book)
A1 Organs, cells, tissues.Extra lesson may beneeded depending onchoice of main activities.
A2 Building blocks.Extra lesson may beneeded depending onchoice of mainacitivities.
A5 Investigate: Whatmakes pollen tubesgrow?
Review and assessprogress(distributedappropriately)
MisconceptionsPupils often do not relate the 2D diagrams to a 3D shape, so work with models is essential. They think of cells as unmoving and unchanging, whichdoes not help them understand that cells are the basic unit of life. They often think that bacteria and yeast are not cells. They often think that plantcells do not have a cell membrane, because of the presence of the cell wall.
Additional informationSome schools have experienced difficulties with the pollen tube investigation suggested in the QCA SoW. Activity A5c has therefore been designatedas a planning investigation activity. There will be other opportunities in the course to discuss sampling.
Health and safety (see activity notes to inform risk assessment)Microscopes should not be used with sunlight as the light source. Pupils should wash their hands after handling any biological material.
To make good progress, pupils starting this unitneed to understand:• how to recognise living things and distinguish
them from things that are not living• that plants and animals are made up of
structures, e.g. muscles and roots, that fulfilspecific functions
• the functions of a flower (reproduction).

A1Lesson planning
guideOrgans, cells, tissues
© Harcourt Education Ltd 2003 Catalyst 1 This worksheet may have been altered from the original on the CD-ROM. Sheet 1 of 1
Learning outcomes
Most pupils will … Some pupils, making less progress will … Some pupils, making more progress will …• review knowledge that humans and
flowering plants contain structures withspecific functions
• have learnt that these structures arecalled organs (and be able to giveexamples), that organs are made up oftissues and that each tissue is made upof many similar cells
• be able to use a microscope to aidobservation
• know that humans and flowering plantscontain structures with specific functions (e.g.muscle, leaf) and that humans and floweringplants are made up of cells
• learn to use a microscope to aid observation.
• also learn that tissues can be identified withspecific names and be able to give at least oneexample (epidermis)
• also explain how using microscopes has changedscientists’ ideas about the structure of livingthings.
Learning objectivesi Living things contain structures, called organs, with specific functions; examples of these, e.g. leaf.ii Organs are made up of tissues and tissues are made up of cells.iii A tissue is made up of cells that are very similar.iv The parts of a microscope.
Scientific enquiryv Prepare a simple slide and observe it using a microscope. (Framework YTO Sc1 7d)vi Scientists in the past had different ideas about the structure of living things to those we hold today and these changed because of observations
made using microscopes. (Framework YTO Sc1 7a)
Suggested alternative starter activities (5–10 minutes)
Introduce the unit Share learning objectives Word game (1) Word game (2) Capture interest
Unit map for Cells. • Find out what organs andtissues are made of.
• Be able to use a microscope tolook at cells. (Sc1)
Pelmanism on thecharacteristics of life.
Wordsearch on microscopekey words.
Pupils use a milk-bottletop magnifier.
Suggested alternative main activitiesActivity Learning
objectivesee above
Description Approx.timing
Target group
C H E S
Textbook A1 i, ii and iii Teacher-led explanation and questioning OR pupils work individually, inparis or in small groups through the in-text questions and then ontothe end-of-spead questions if time allows.
20 min R/G
G R S
Activity A1aPractical
vi Looking at small objects Pupils use magnifying glass/microscope toobserve objects. They do some magnification calculations.
20 min ✓ ✓
Activity A1b Paper iv The parts of the microscope Pupils identify and label diagram ofmicroscope.
10 min ✓ (✓ )
Activity A1c Paper vi Robert Hooke Reading/comprehension activity on the work of RobertHooke.
15 min ✓ ✓
Activity A1dPractical
i, ii, iii and v Looking at plant tissue Pupils prepare a slide of onion cells, view itunder a microscope and draw what they see.
25 min ✓
Activity A1ePractical
v Looking at animal cells If local regulations allow, pupils should maketheir own slide of cheek cells, or use a pre-prepared slide.
10 min ✓
Activity A1fCatalyst InteractivePresentations 1
i Support animation with immediate feedback about animals and plantscontaining structures with functions.
10 min ✓
Suggested alternative plenary activities (5–10 minutes)Review learning Sharing responses Group feedback Word game Looking aheadShow a cross-sectionthrough a leaf to reviewkey words from lesson.
Whole-class discussion ofresponses and feedback onActivities looking at cellsA1a, A1d and A1e.
Groups of pupils compareand discuss their drawingsof the onion cells fromActivity A1b.
Pupils work in pairs andcarry out a card sort.
Pupils suggest what cellsare made of, if organs aremade of tissues and tissuesare made of cells.
Key wordsmicroscope, organ, tissue, cell, magnifies, red only: multicellular,unicellular organisms, palisade cells, mesophyll cells, epidermis
Out-of-lesson learningHomework A1Textbook A1 end-of-spread questions
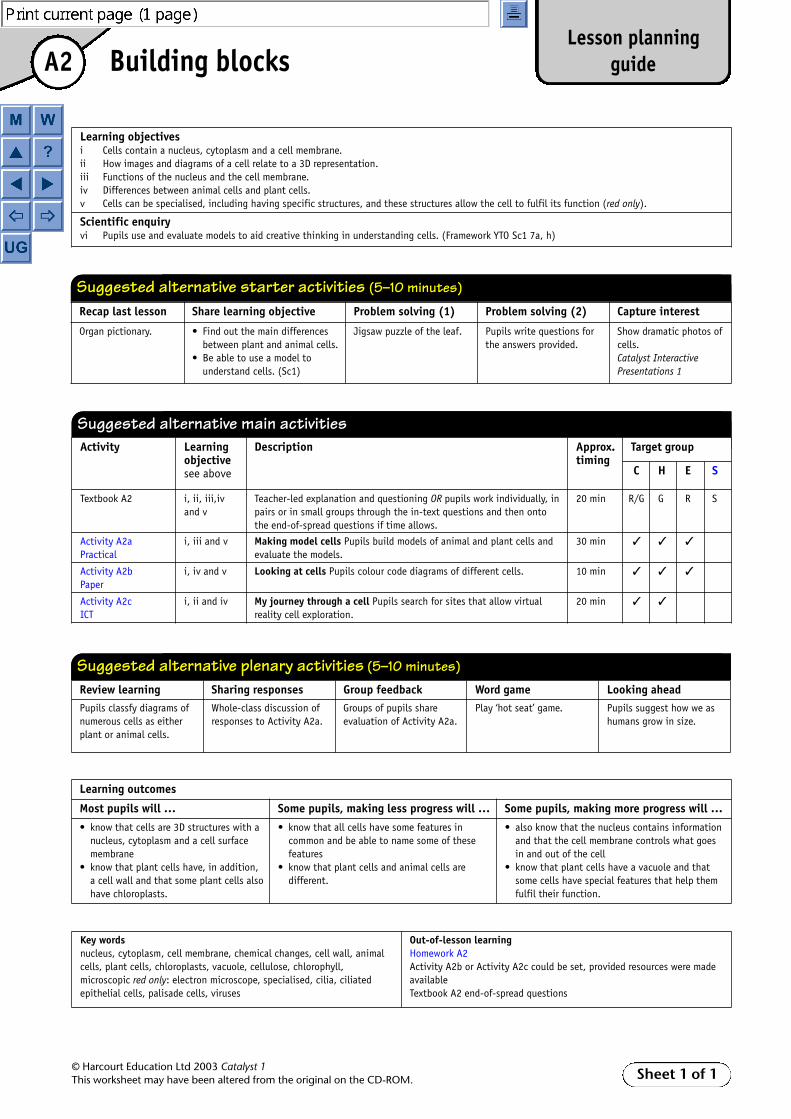
A2Lesson planning
guideBuilding blocks
© Harcourt Education Ltd 2003 Catalyst 1 This worksheet may have been altered from the original on the CD-ROM. Sheet 1 of 1
Learning outcomes
Most pupils will … Some pupils, making less progress will … Some pupils, making more progress will …
• know that cells are 3D structures with anucleus, cytoplasm and a cell surfacemembrane
• know that plant cells have, in addition,a cell wall and that some plant cells alsohave chloroplasts.
• know that all cells have some features incommon and be able to name some of thesefeatures
• know that plant cells and animal cells aredifferent.
• also know that the nucleus contains informationand that the cell membrane controls what goesin and out of the cell
• know that plant cells have a vacuole and thatsome cells have special features that help themfulfil their function.
Learning objectivesi Cells contain a nucleus, cytoplasm and a cell membrane.ii How images and diagrams of a cell relate to a 3D representation.iii Functions of the nucleus and the cell membrane.iv Differences between animal cells and plant cells.v Cells can be specialised, including having specific structures, and these structures allow the cell to fulfil its function (red only).
Scientific enquiryvi Pupils use and evaluate models to aid creative thinking in understanding cells. (Framework YTO Sc1 7a, h)
Suggested alternative starter activities (5–10 minutes)
Recap last lesson Share learning objective Problem solving (1) Problem solving (2) Capture interest
Organ pictionary. • Find out the main differencesbetween plant and animal cells.
• Be able to use a model tounderstand cells. (Sc1)
Jigsaw puzzle of the leaf. Pupils write questions forthe answers provided.
Show dramatic photos ofcells.Catalyst InteractivePresentations 1
Suggested alternative main activitiesActivity Learning
objectivesee above
Description Approx.timing
Target group
C H E S
Textbook A2 i, ii, iii,ivand v
Teacher-led explanation and questioning OR pupils work individually, inpairs or in small groups through the in-text questions and then ontothe end-of-spread questions if time allows.
20 min R/G G R S
Activity A2aPractical
i, iii and v Making model cells Pupils build models of animal and plant cells andevaluate the models.
30 min ✓ ✓ ✓
Activity A2bPaper
i, iv and v Looking at cells Pupils colour code diagrams of different cells. 10 min ✓ ✓ ✓
Activity A2cICT
i, ii and iv My journey through a cell Pupils search for sites that allow virtualreality cell exploration.
20 min ✓ ✓
Suggested alternative plenary activities (5–10 minutes)Review learning Sharing responses Group feedback Word game Looking aheadPupils classfy diagrams ofnumerous cells as eitherplant or animal cells.
Whole-class discussion ofresponses to Activity A2a.
Groups of pupils shareevaluation of Activity A2a.
Play ‘hot seat’ game. Pupils suggest how we ashumans grow in size.
Key wordsnucleus, cytoplasm, cell membrane, chemical changes, cell wall, animalcells, plant cells, chloroplasts, vacuole, cellulose, chlorophyll,microscopic red only: electron microscope, specialised, cilia, ciliatedepithelial cells, palisade cells, viruses
Out-of-lesson learningHomework A2Activity A2b or Activity A2c could be set, provided resources were madeavailableTextbook A2 end-of-spread questions
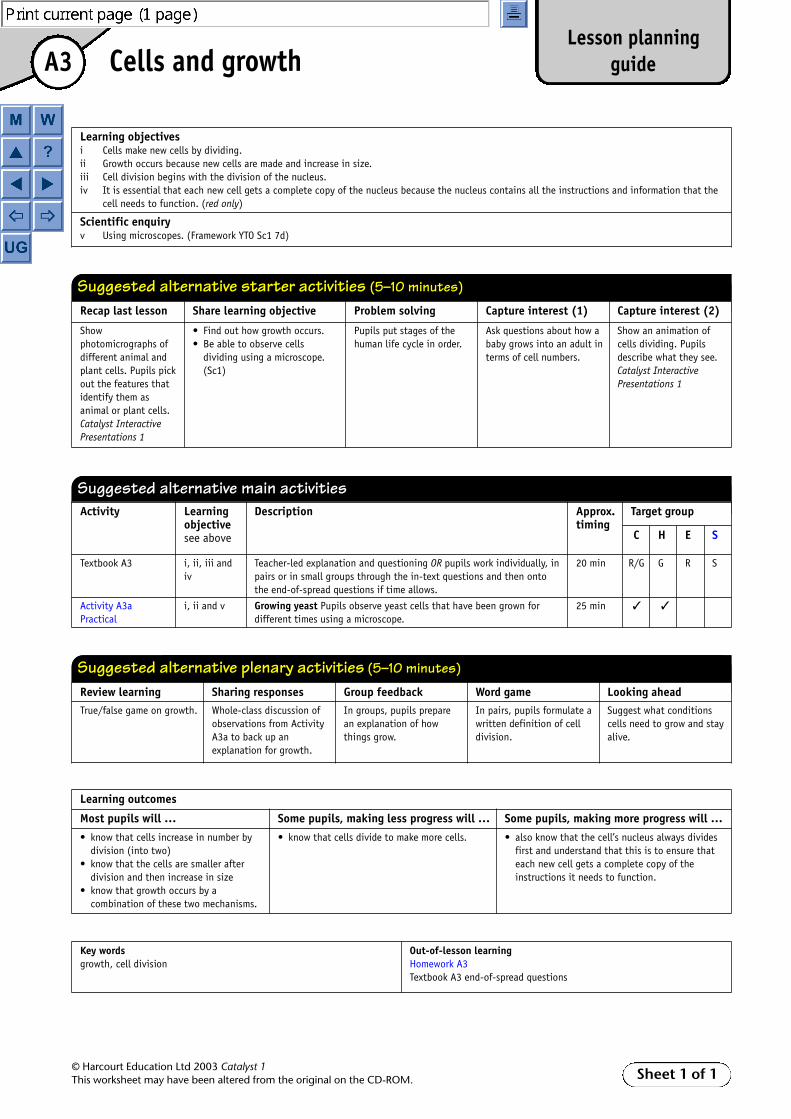
A3Lesson planning
guideCells and growth
© Harcourt Education Ltd 2003 Catalyst 1 This worksheet may have been altered from the original on the CD-ROM. Sheet 1 of 1
Learning outcomes
Most pupils will … Some pupils, making less progress will … Some pupils, making more progress will …
• know that cells increase in number bydivision (into two)
• know that the cells are smaller afterdivision and then increase in size
• know that growth occurs by acombination of these two mechanisms.
• know that cells divide to make more cells. • also know that the cell’s nucleus always dividesfirst and understand that this is to ensure thateach new cell gets a complete copy of theinstructions it needs to function.
Learning objectivesi Cells make new cells by dividing.ii Growth occurs because new cells are made and increase in size.iii Cell division begins with the division of the nucleus.iv It is essential that each new cell gets a complete copy of the nucleus because the nucleus contains all the instructions and information that the
cell needs to function. (red only)
Scientific enquiryv Using microscopes. (Framework YTO Sc1 7d)
Suggested alternative starter activities (5–10 minutes)
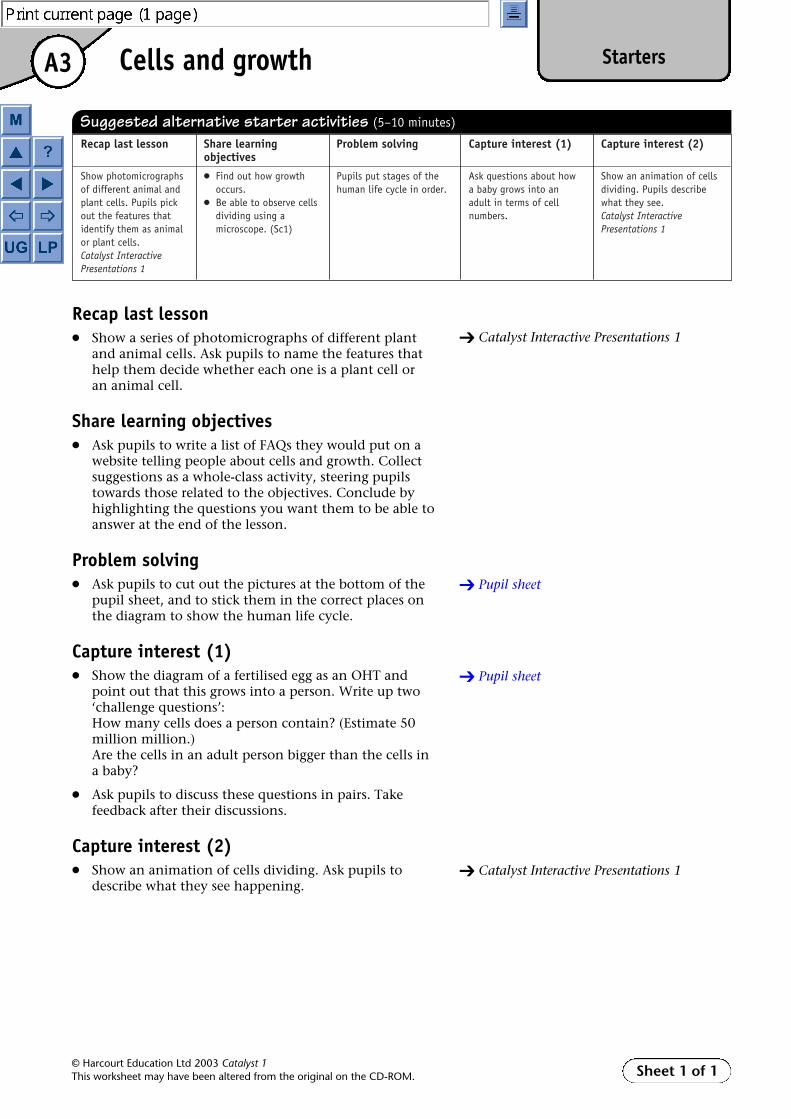
Recap last lesson Share learning objective Problem solving Capture interest (1) Capture interest (2)
Showphotomicrographs ofdifferent animal andplant cells. Pupils pickout the features thatidentify them asanimal or plant cells.Catalyst InteractivePresentations 1
• Find out how growth occurs.• Be able to observe cells
dividing using a microscope.(Sc1)
Pupils put stages of thehuman life cycle in order.
Ask questions about how ababy grows into an adult interms of cell numbers.
Show an animation ofcells dividing. Pupilsdescribe what they see.Catalyst InteractivePresentations 1
Suggested alternative main activitiesActivity Learning
objectivesee above
Description Approx.timing
Target group
C H E S
Textbook A3 i, ii, iii andiv
Teacher-led explanation and questioning OR pupils work individually, inpairs or in small groups through the in-text questions and then ontothe end-of-spread questions if time allows.
20 min R/G G R S
Activity A3aPractical
i, ii and v Growing yeast Pupils observe yeast cells that have been grown fordifferent times using a microscope.
25 min ✓ ✓
Suggested alternative plenary activities (5–10 minutes)
Review learning Sharing responses Group feedback Word game Looking aheadTrue/false game on growth. Whole-class discussion of
observations from ActivityA3a to back up anexplanation for growth.
In groups, pupils preparean explanation of howthings grow.
In pairs, pupils formulate awritten definition of celldivision.
Suggest what conditionscells need to grow and stayalive.
Key wordsgrowth, cell division
Out-of-lesson learningHomework A3Textbook A3 end-of-spread questions

A4Lesson planning
guideScaling up and down – Thinkabout scales
© Harcourt Education Ltd 2003 Catalyst 1 This worksheet may have been altered from the original on the CD-ROM. Sheet 1 of 1
Learning outcomes
Most pupils will … Some pupils, making less progress will … Some pupils, making more progress will …
• have an appreciation of scale factorsand, with guidance, work out the scalefactor of a diagram.
• know that an image or diagram can be to scaleand that it can be larger or smaller than thereal object.
• be able to work out scale factors independently,without reference to a method.
Learning objectivesi An image or diagram can be to scale and it can be larger or smaller than the real object.ii Calculate scale factors using ratios.The structure of this lesson is based around the CASE approach. The starter activities give concrete preparation. The main activities move away from theconcrete towards a challenging situation, where pupils need to think. The extended plenary gives pupils time to discuss what they have learnt, tonegotiate a method to commit to paper and express their ideas verbally to the rest of the class.
Scientific enquiryiii Application of ratios in a scientific context (developing analytical skills). (Framework YTO Sc1 7g part)
Suggested alternative starter activities (5–10 minutes)
Bridging to the unit Setting the context Concrete preparation (1) Concrete preparation (2)
Show a photomicrograph of a cellwith a scale showing themagnification.Catalyst Interactive Presentations 1
Introduce scaling up and scalingdown.
Pupils put things in order of size.Catalyst Interactive Presentations 1
Pupils answer questions about apassage from Alice in Wonderland.
Suggested main activitiesActivity Learning
objectivesee above
Description Approx.timing
Target group
C H E S
Textbook A4 i and ii Teacher-led explanation and questioning OR pupils work individually, inpairs or in small groups through the in-text questions and then ontothe end-of-spread questions if time allows.
30 min R/G G R S
Activity A4aPaper
ii and iii Scale factors Diagrams of objects and their real sizes. Pupils work outscale factor.
10 min ✓ ✓
Activity A4b Catalyst InteractivePresentations 1
i and ii Support animation for pupils who find the numeracy content veryalienating and difficult.
20 min ✓
Suggested alternative plenary activities (5–10 minutes)
Group feedback Bridging to other topicsPupils discuss, write down or display their explanation of how to workout a scale factor.
Ask pupils to think of instances where scaling up or down could be usedin other contexts, e.g. medicine.Also refer to Unit 8D, which covers quadrats.
Key wordsscale diagram, scaling up, scaling down, scale factor
Out-of-lesson learningTextbook A4 in-text/end-of-spread questionsActivity A4a
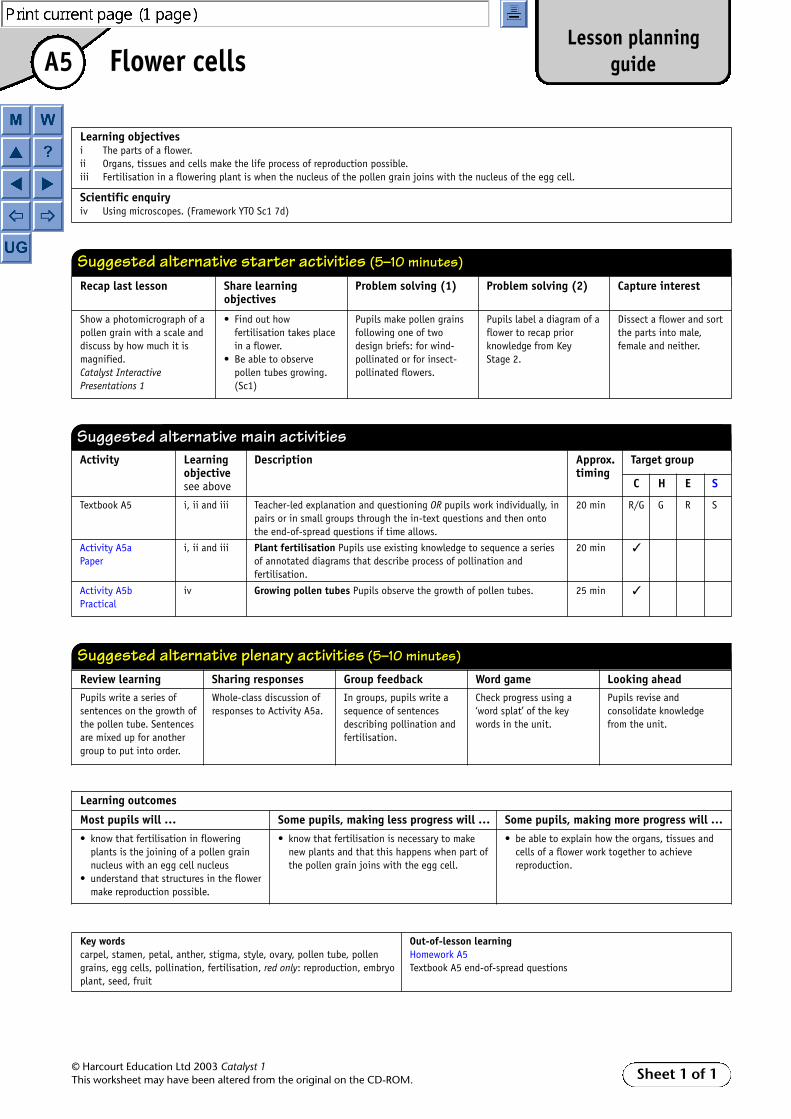
A5Lesson planning
guideFlower cells
© Harcourt Education Ltd 2003 Catalyst 1 This worksheet may have been altered from the original on the CD-ROM. Sheet 1 of 1
Learning outcomes
Most pupils will … Some pupils, making less progress will … Some pupils, making more progress will …
• know that fertilisation in floweringplants is the joining of a pollen grainnucleus with an egg cell nucleus
• understand that structures in the flowermake reproduction possible.
• know that fertilisation is necessary to makenew plants and that this happens when part ofthe pollen grain joins with the egg cell.
• be able to explain how the organs, tissues andcells of a flower work together to achievereproduction.
Learning objectivesi The parts of a flower.ii Organs, tissues and cells make the life process of reproduction possible.iii Fertilisation in a flowering plant is when the nucleus of the pollen grain joins with the nucleus of the egg cell.
Scientific enquiryiv Using microscopes. (Framework YTO Sc1 7d)
Suggested alternative starter activities (5–10 minutes)
Recap last lesson Share learningobjectives
Problem solving (1) Problem solving (2) Capture interest
Show a photomicrograph of apollen grain with a scale anddiscuss by how much it ismagnified.Catalyst InteractivePresentations 1
• Find out howfertilisation takes placein a flower.
• Be able to observepollen tubes growing.(Sc1)
Pupils make pollen grainsfollowing one of twodesign briefs: for wind-pollinated or for insect-pollinated flowers.
Pupils label a diagram of aflower to recap priorknowledge from KeyStage 2.
Dissect a flower and sortthe parts into male,female and neither.
Suggested alternative main activitiesActivity Learning
objectivesee above
Description Approx.timing
Target group
C H E S
Textbook A5 i, ii and iii Teacher-led explanation and questioning OR pupils work individually, inpairs or in small groups through the in-text questions and then ontothe end-of-spread questions if time allows.
20 min R/G G R S
Activity A5aPaper
i, ii and iii Plant fertilisation Pupils use existing knowledge to sequence a seriesof annotated diagrams that describe process of pollination andfertilisation.
20 min ✓
Activity A5bPractical
iv Growing pollen tubes Pupils observe the growth of pollen tubes. 25 min ✓
Suggested alternative plenary activities (5–10 minutes)Review learning Sharing responses Group feedback Word game Looking aheadPupils write a series ofsentences on the growth ofthe pollen tube. Sentencesare mixed up for anothergroup to put into order.
Whole-class discussion ofresponses to Activity A5a.
In groups, pupils write asequence of sentencesdescribing pollination andfertilisation.
Check progress using a‘word splat’ of the keywords in the unit.
Pupils revise andconsolidate knowledgefrom the unit.
Key wordscarpel, stamen, petal, anther, stigma, style, ovary, pollen tube, pollengrains, egg cells, pollination, fertilisation, red only: reproduction, embryoplant, seed, fruit
Out-of-lesson learningHomework A5Textbook A5 end-of-spread questions
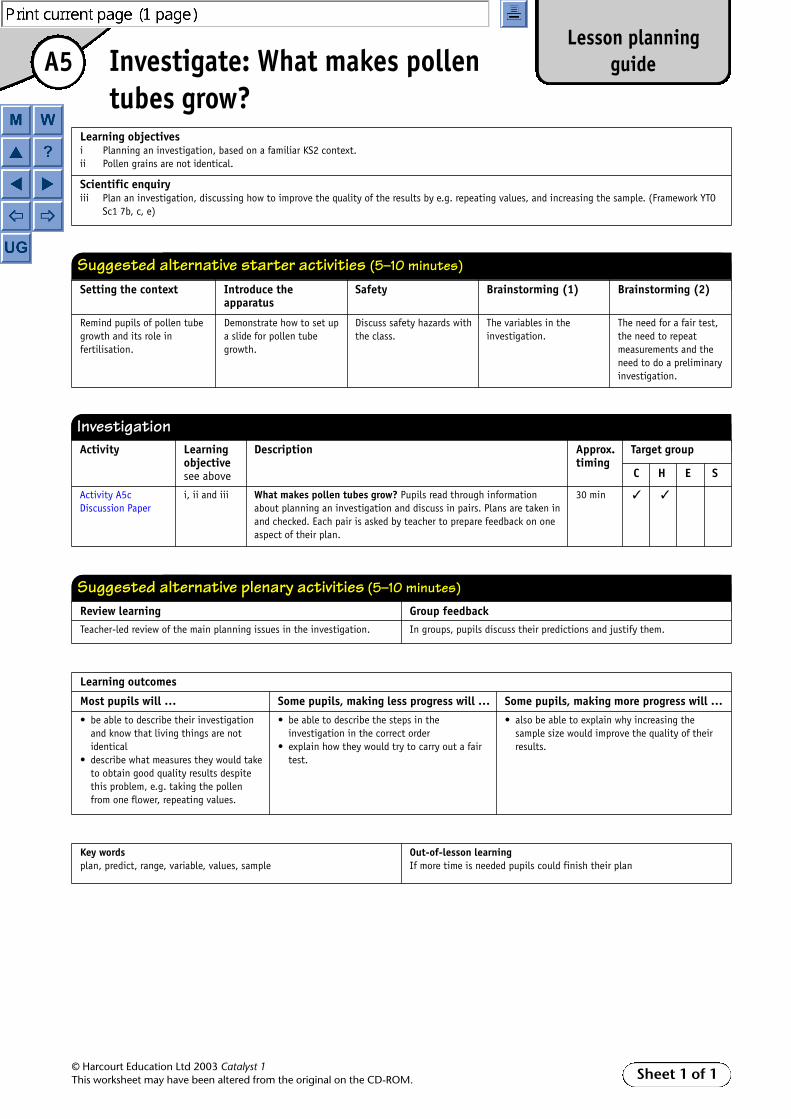
A5Lesson planning
guideInvestigate: What makes pollentubes grow?
© Harcourt Education Ltd 2003 Catalyst 1 This worksheet may have been altered from the original on the CD-ROM. Sheet 1 of 1
Learning outcomes
Most pupils will … Some pupils, making less progress will … Some pupils, making more progress will …
• be able to describe their investigationand know that living things are notidentical
• describe what measures they would taketo obtain good quality results despitethis problem, e.g. taking the pollenfrom one flower, repeating values.
• be able to describe the steps in theinvestigation in the correct order
• explain how they would try to carry out a fairtest.
• also be able to explain why increasing thesample size would improve the quality of theirresults.
Learning objectivesi Planning an investigation, based on a familiar KS2 context.ii Pollen grains are not identical.
Scientific enquiryiii Plan an investigation, discussing how to improve the quality of the results by e.g. repeating values, and increasing the sample. (Framework YTO
Sc1 7b, c, e)
Suggested alternative starter activities (5–10 minutes)
Setting the context Introduce theapparatus
Safety Brainstorming (1) Brainstorming (2)
Remind pupils of pollen tubegrowth and its role infertilisation.
Demonstrate how to set upa slide for pollen tubegrowth.
Discuss safety hazards withthe class.
The variables in theinvestigation.
The need for a fair test,the need to repeatmeasurements and theneed to do a preliminaryinvestigation.
InvestigationActivity Learning
objectivesee above
Description Approx.timing
Target group
C H E S
Activity A5cDiscussion Paper
i, ii and iii What makes pollen tubes grow? Pupils read through informationabout planning an investigation and discuss in pairs. Plans are taken inand checked. Each pair is asked by teacher to prepare feedback on oneaspect of their plan.
30 min ✓ ✓
Suggested alternative plenary activities (5–10 minutes)Review learning Group feedbackTeacher-led review of the main planning issues in the investigation. In groups, pupils discuss their predictions and justify them.
Key wordsplan, predict, range, variable, values, sample
Out-of-lesson learningIf more time is needed pupils could finish their plan

A1
© Harcourt Education Ltd 2003 Catalyst 1This worksheet may have been altered from the original on the CD-ROM.
StartersOrgans, cells, tissues
Sheet 1 of 1
Introduce the unit Share learning Word game (1) Word game (2) Capture interestobjectives
Unit map for Cells. ● Find out what organs and Pelmanism on the Wordsearch on Pupils use a milk-bottle tissues are made of. characteristics of life. microscope key words. top magnifier.
● Be able to use a microscope to look at cells. (Sc1)
Suggested alternative starter activities (5–10 minutes)
Introduce the unit● Either draw the outline of the unit map on the board
then ask pupils to give you words to add, saying whereto add them. Suggest some words yourself whennecessary to keep pupils on the right track.
● Or give out the unit map and ask pupils to work ingroups deciding how to add the listed words to thediagram. Then go through it on the board as eachgroup gives suggestions.
Share learning objectives● Ask pupils to write a list of FAQs they would put on a
website telling people about organs, cells and tissues.Collect suggestions as a whole-class activity, steeringpupils towards those related to the objectives. Concludeby highlighting the questions you want them to be ableto answer at the end of the lesson.
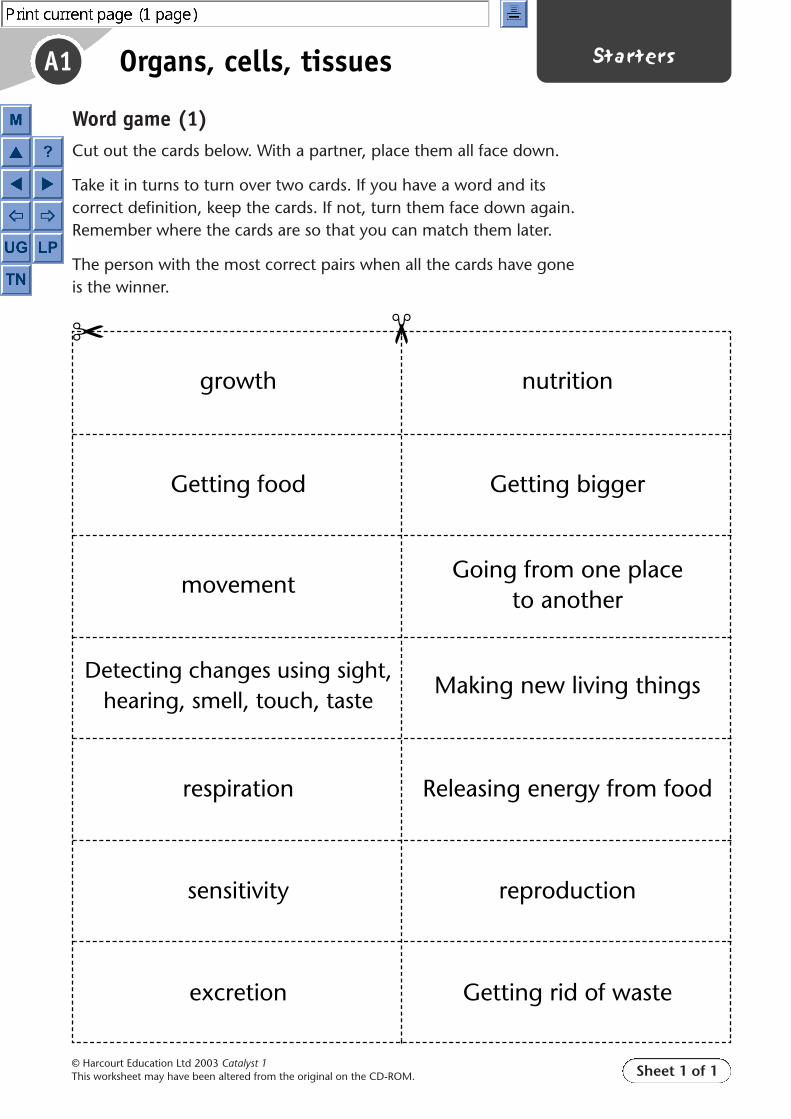
Word game (1)● Pupils work in pairs and place all the cards from the
pupil sheet face down. They take it in turns to turnover two cards and look at them. If they have a wordand its correct definition, they keep the pair. If not,they put the cards back face down. They need toremember where the cards are so that they can turn upa word and its definition together later. The personwith the most correct pairs when all the cards havegone is the winner.
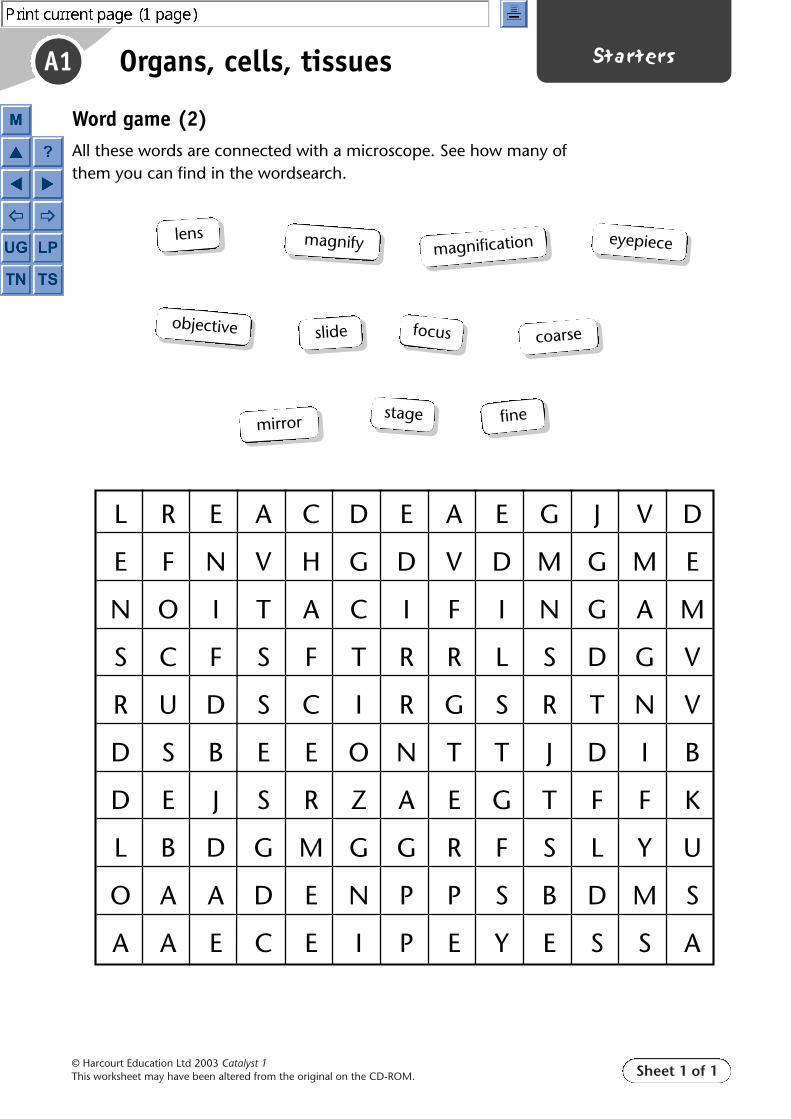
Word game (2)● Ask pupils to do the wordsearch on the pupil sheet.
● Show the answers as an OHT for them to check theiranswers. Use the words on it to introduce the lesson.
Capture interest● Use aluminium bottle tops and make a small hole in
them (about 1 mm across). Tell pupils to place onewater droplet onto the hole, and to look through thedroplet at their fingertip. The droplet acts as amagnifier, and they should be able to see quite a bit ofdetail. Ask them to draw their fingerprint.
➔ Pupil sheet
➔ Unit map
➔ Pupil sheet
➔ Teacher sheet
© Harcourt Education Ltd 2003 Catalyst 1This worksheet may have been altered from the original on the CD-ROM. Sheet 1 of 1
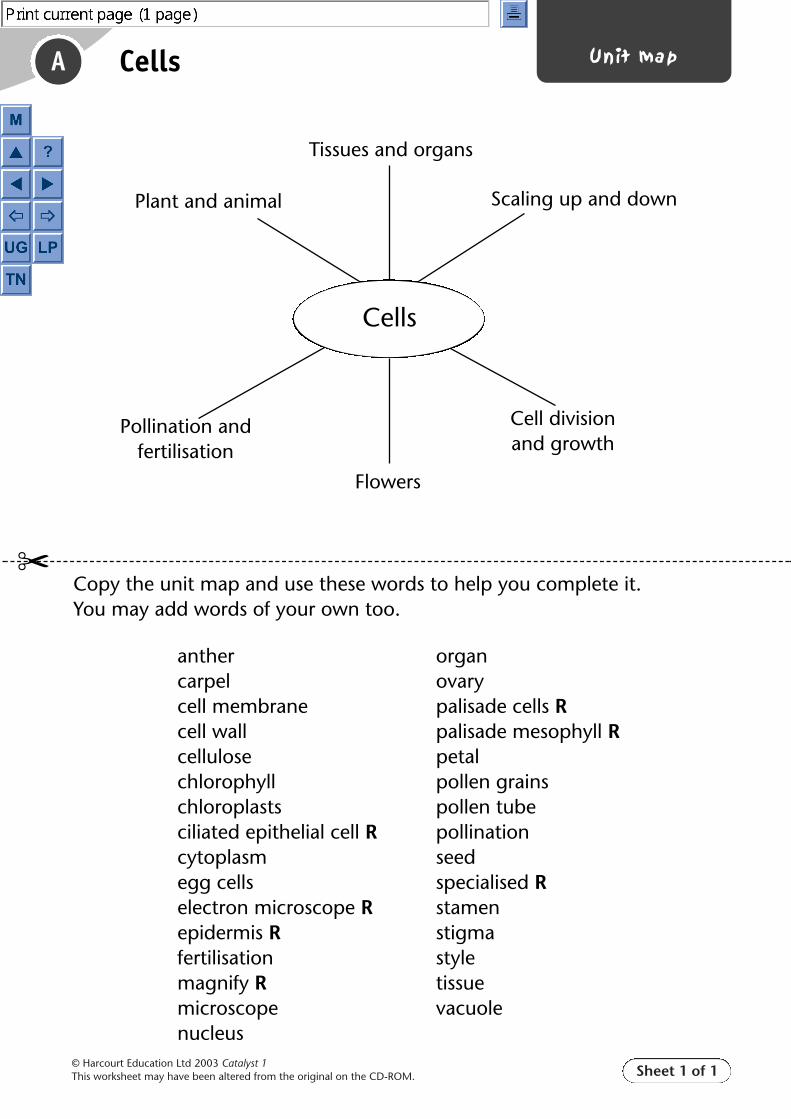
A Unit mapCells
anthercarpelcell membranecell wallcellulosechlorophyllchloroplastsciliated epithelial cell Rcytoplasmegg cellselectron microscope Repidermis Rfertilisationmagnify Rmicroscopenucleus
organovarypalisade cells Rpalisade mesophyll Rpetalpollen grainspollen tubepollinationseedspecialised Rstamenstigmastyletissuevacuole
Copy the unit map and use these words to help you complete it.You may add words of your own too.
�
Cells
Plant and animal Scaling up and down
Pollination andfertilisation
Flowers
Cell divisionand growth
Tissues and organs
© Harcourt Education Ltd 2003 Catalyst 1This worksheet may have been altered from the original on the CD-ROM. Sheet 1 of 1
Word game (1)Cut out the cards below. With a partner, place them all face down.
Take it in turns to turn over two cards. If you have a word and itscorrect definition, keep the cards. If not, turn them face down again.Remember where the cards are so that you can match them later.
The person with the most correct pairs when all the cards have goneis the winner.
A1 StartersOrgans, cells, tissues
Detecting changes using sight,hearing, smell, touch, taste
Making new living things
movementGoing from one place
to another
Getting food Getting bigger
growth nutrition
Releasing energy from foodrespiration
sensitivity reproduction
excretion Getting rid of waste
�
�
© Harcourt Education Ltd 2003 Catalyst 1This worksheet may have been altered from the original on the CD-ROM. Sheet 1 of 1
A1 StartersOrgans, cells, tissues
L R E A C D E A E G J V D
E F N V H G D V D M G M E
N O I T A C I F I N G A M
S C F S F T R R L S D G V
R U D S C I R G S R T N V
D S B E E O N T T J D I B
D E J S R Z A E G T F F K
L B D G M G G R F S L Y U
O A A D E N P P S B D M S
A A E C E I P E Y E S S A
Word game (2)All these words are connected with a microscope. See how many ofthem you can find in the wordsearch.
lens magnify
coarse
magnification eyepiece
objective slide focus
finemirror
stage

© Harcourt Education Ltd 2003 Catalyst 1This worksheet may have been altered from the original on the CD-ROM. Sheet 1 of 1
Word game (2)
A1 StartersOrgans, cells, tissues
L R E A C D E A E G J V D
E F N V H G D V D M G M E
N O I T A C I F I N G A M
S C F S F T R R L S D G V
R U D S C I R G S R T N V
D S B E E O N T T J D I B
D E J S R Z A E G T F F K
L B D G M G G R F S L Y U
O A A D E N P P S B D M S
A A E C E I P E Y E S S A
Recap last lesson Share learning Problem solving (1) Problem solving (2) Capture interestobjectives
Organ pictionary. ● Find out the main Jigsaw puzzle of the leaf. Pupils write questions for Show dramatic photos of differences between the answers provided. cells. plant and animal cells. Catalyst Interactive
● Be able to use a model Presentations 1to understand cells. (Sc1)
A2
© Harcourt Education Ltd 2003 Catalyst 1This worksheet may have been altered from the original on the CD-ROM.
StartersBuilding blocks
Sheet 1 of 1
Suggested alternative starter activities (5–10 minutes)
Recap last lesson● Pupils work in threes to play organ pictionary. One
pupil takes a card and tries to describe the organpictured on the card without using its name. One ofthe other pupils tries to guess the name, while the thirdpupil times for 1 minute.
Share learning objectives● Ask pupils to write a list of FAQs they would put on a
website telling people about animal and plant cells.Collect suggestions as a whole-class activity, steeringpupils towards those related to the objectives. Concludeby highlighting the questions you want them to be ableto answer at the end of the lesson.
Problem solving (1)● Ask pupils to cut out the pieces of the leaf jigsaw puzzle
on the pupil sheet and fit them together.
● Tell pupils to label a cell and a tissue, and to name theorgan, having stuck down the completed jigsaw puzzle.
Problem solving (2)● Ask pupils to write a question for each answer opposite.
● Ask individual pupils for their questions and discussthese with the class. Are any other answers possible?
Capture interest● Show dramatic photos of a variety of animal and plant
cells and discuss how pupils can tell they are cells.
● Explain what the photos show.
➔ Pupil sheet
➔ Pupil sheet
Answerscell, tissue, organ
➔ Catalyst Interactive Presentations 1

© Harcourt Education Ltd 2003 Catalyst 1This worksheet may have been altered from the original on the CD-ROM. Sheet 1 of 1
Recap last lesson
A2 StartersBuilding blocks

© Harcourt Education Ltd 2003 Catalyst 1This worksheet may have been altered from the original on the CD-ROM. Sheet 1 of 1
Problem solving (1)
A2 StartersBuilding blocks
Recap last lesson Share learning Problem solving Capture interest (1) Capture interest (2)objectives
Show photomicrographs ● Find out how growth Pupils put stages of the Ask questions about how Show an animation of cells of different animal and occurs. human life cycle in order. a baby grows into an dividing. Pupils describeplant cells. Pupils pick ● Be able to observe cells adult in terms of cell what they see.out the features that dividing using a numbers. Catalyst Interactiveidentify them as animal microscope. (Sc1) Presentations 1or plant cells.Catalyst InteractivePresentations 1
A3
© Harcourt Education Ltd 2003 Catalyst 1This worksheet may have been altered from the original on the CD-ROM.
StartersCells and growth
Sheet 1 of 1
Suggested alternative starter activities (5–10 minutes)
Recap last lesson● Show a series of photomicrographs of different plant
and animal cells. Ask pupils to name the features thathelp them decide whether each one is a plant cell oran animal cell.
Share learning objectives● Ask pupils to write a list of FAQs they would put on a
website telling people about cells and growth. Collectsuggestions as a whole-class activity, steering pupilstowards those related to the objectives. Conclude byhighlighting the questions you want them to be able toanswer at the end of the lesson.
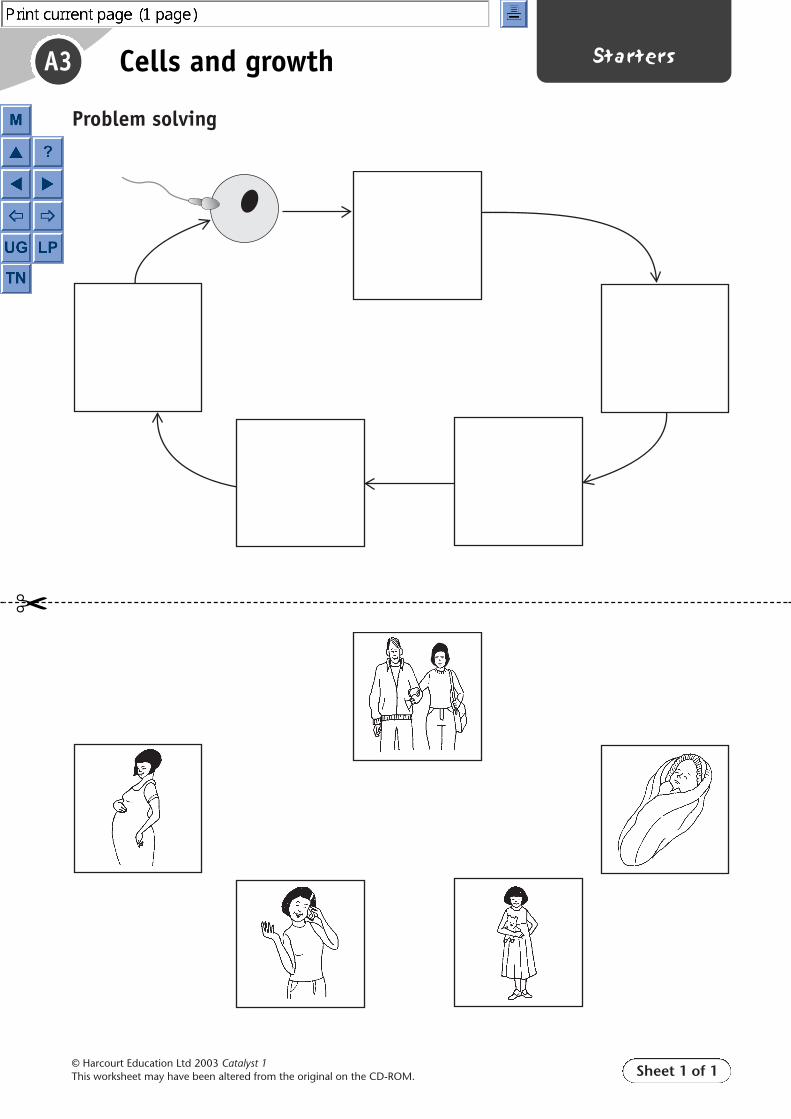
Problem solving● Ask pupils to cut out the pictures at the bottom of the
pupil sheet, and to stick them in the correct places onthe diagram to show the human life cycle.
Capture interest (1)● Show the diagram of a fertilised egg as an OHT and
point out that this grows into a person. Write up two‘challenge questions’: How many cells does a person contain? (Estimate 50million million.) Are the cells in an adult person bigger than the cells ina baby?
● Ask pupils to discuss these questions in pairs. Takefeedback after their discussions.
Capture interest (2)● Show an animation of cells dividing. Ask pupils to
describe what they see happening.
➔ Pupil sheet
➔ Catalyst Interactive Presentations 1
➔ Pupil sheet
➔ Catalyst Interactive Presentations 1
© Harcourt Education Ltd 2003 Catalyst 1This worksheet may have been altered from the original on the CD-ROM. Sheet 1 of 1
Problem solving
A3 StartersCells and growth
�

© Harcourt Education Ltd 2003 Catalyst 1This worksheet may have been altered from the original on the CD-ROM. Sheet 1 of 1
Capture interest (1)
A3 StartersCells and growth
fertilised egg

A4
© Harcourt Education Ltd 2003 Catalyst 1This worksheet may have been altered from the original on the CD-ROM.
StartersScaling up and down – Think about
Sheet 1 of 1
Bridging to the unit● Refer back to the photos of cells in the pupil book and
discuss how much bigger they show cells than theyreally are (on page 2 of the Red book, approximately�1500 for the cheek cells and onion cells).
● Show a photomicrograph of a cell with a scale anddiscuss what this means in terms of magnifying andscaling up.
Setting the context● Discuss maps, which are scaled down from real life.
● Discuss other applications such as cinema screens thatshow images scaled up from real life.
● Discuss why it is useful and necessary to scale up andscale down.
Concrete preparation (1)● Show the photos of a map, a slide for viewing under a
microscope, an electron micrograph and a photo of realpeople.
● Ask pupils to put these in order of size of the real objectrepresented in the picture, biggest first. Ask them tocompare their orders in groups.
● Ask pupils to estimate the sizes of the real objects, andto estimate how much bigger or smaller each one isthan the others. Introduce the terms ‘scale up’ and‘scale down’.
Concrete preparation (2)● Read out the text from the pupil sheet or leave pupils
to read it to each other in groups.
● Pupils answer questions based on a passage from Alicein Wonderland. This acts as an introduction to scalingup and down. Less able pupils may need more helpwith calculating changes in size.
Suggested alternative starter activities (5–10 minutes)
Bridging to the unit Setting the context Concrete preparation (1) Concrete preparation (2)
Show a photomicrograph of a Introduce scaling up and scaling Pupils put things in order of size. Pupils answer questions about acell with a scale showing the down. Catalyst Interactive Presentations 1 passage from Alice in Wonderland. magnification.Catalyst Interactive Presentations 1
➔ Catalyst Interactive Presentations 1
➔ Catalyst Interactive Presentations 1
➔ Pupil sheet
Answers1 six times smaller or one-sixth the height2 4.16 cm (4.2 cm or 4 cm)

© Harcourt Education Ltd 2003 Catalyst 1This worksheet may have been altered from the original on the CD-ROM. Sheet 1 of 1
Concrete preparation (2)
A4 StartersScaling up and down
1 At the start of this passage, Alice was 150 cm high. How manytimes smaller did she become after drinking the bottle?
2 Imagine Alice shrinks by the same amount again. How tall is shenow?
3 If Alice had managed to get into the garden, she would have hada very different view from normal. Describe what you think shemight have seen on opening the little door.
4 Imagine Alice grows 20 times taller than her usual size. Describethree ways in which her view of the world would be different.
Alice found a little bottle on the table, (‘which certainly was not here before,’ said
Alice,) and round the neck of the bottle was a paper label, with the words ‘DRINK
ME’ beautifully printed on it in large letters. Alice ventured to taste it, and finding
it very nice, (it had, in fact, a sort of mixed flavour of cherry-tart, custard, pine-
apple, roast turkey, toffee, and hot buttered toast,) she very soon finished it off.
‘What a curious feeling!’ said Alice; ‘I must be shutting up like a telescope.’
And so it was indeed: she was now only ten inches [25 cm] high and her face
brightened up at the thought that she was now the right size for going though the
little door into that lovely garden. First, however, she waited for a few minutes to
see if she was going to shrink any further: she felt a little nervous about this; ‘for it
might end, you know,’ said Alice to herself, ‘in my going out altogether, like a
candle. I wonder what I should be like then?’ And she tried to fancy what the
flame of a candle is like after the candle is blown out, for she could not remember
ever having seen such a thing.
After a while, finding that nothing more happened, she decided on going into
the garden at once; but, alas for poor Alice! when she got to the door, she found he
had forgotten the little golden key, and when she went back to the table for it, she
found she could not possibly reach it: she could see it quite plainly through the
glass, and she tried her best to climb up one of the legs of the table, but it was too
slippery; and when she had tired herself out with trying, the poor little thing sat
down and cried. from Alice’s Adventures in Wonderland by Lewis Carroll
Recap last lesson Share learning Problem solving (1) Problem solving (2) Capture interestobjectives
Show a photomicrograph ● Find out how fertilisation Pupils make pollen grains Pupils label a diagram of a Dissect a flower and sort of a pollen grain with a takes place in a flower. following one of two flower to recap prior the parts into male, scale and discuss by how ● Be able to observe pollen design briefs: for wind- knowledge from Key female and neither. much it is magnified. tubes growing. (Sc1) pollinated or for insect- Stage 2.Catalyst Interactive pollinated flowers.Presentations 1
A5
© Harcourt Education Ltd 2003 Catalyst 1This worksheet may have been altered from the original on the CD-ROM.
StartersFlower cells
Sheet 1 of 1
Suggested alternative starter activities (5–10 minutes)
Recap last lesson● Show a photomicrograph of a pollen grain with a scale
on it. Discuss by how much the pollen grain ismagnified.
● Calculate with the class the actual size of the pollengrain.
Share learning objectives● Ask pupils to write a list of FAQs they would put on a
website telling people about fertilisation in a flower.Collect suggestions as a whole-class activity, steeringpupils towards those related to the objectives. Concludeby highlighting the questions you want them to be ableto answer at the end of the lesson.
Problem solving (1)● Pupils design artificial pollen grains in response to a
design brief. Divide the class into groups of two orthree. Give half the class brief 1 and the other half brief 2.
Problem solving (2)● Ask pupils to label the diagram of a flower on the pupil
sheet to recap knowledge from Key Stage 2.
Capture interest● As a demonstration, or as a class dissection, dissect
several simple flowers.
● Ask pupils to sort the structures into groups that looksimilar (e.g. petals in one group, stamens in another),and to use sticky tape to attach them to a piece ofpaper.
● Ask pupils to name the parts they can identify. Discusswhich flower parts are male, which are female andwhich are neither male nor female. Ask pupils to addthe labels ‘male’, ‘female’ or ‘neither’ to each part.
➔ Catalyst Interactive Presentations 1
➔ Pupil sheet
➔ Pupil sheet
Equipmentseveral simple flowersscalpel with guardwhite tilesticky tapepiece of white paper

© Harcourt Education Ltd 2003 Catalyst 1This worksheet may have been altered from the original on the CD-ROM. Sheet 1 of 1
Problem solving (1)Your teacher will tell you which design brief to use.
Read the design brief and discuss in your group what features yourpollen grain would need to have.
Design brief 1Design a pollen grain that will be easily carried through the air by thewind.
You can choose what shape and size to make your structure.
To help you, think about things that easily fly through the air. Whatfeatures do they have that help them to move quickly, and to stay upin the air?
Design brief 2Design a pollen grain that can be easily carried through the air byan insect.
You can choose what shape and size to make your structure.
Think about how the structure will attach itself to the insect, andwhat shapes and sizes of structure the insect will easily carry.
A5 StartersFlower cells

© Harcourt Education Ltd 2003 Catalyst 1This worksheet may have been altered from the original on the CD-ROM. Sheet 1 of 1
Problem solving (2)Label the diagram of the flower using the words below.
A5 StartersFlower cells
................................
................................
................................
................................
................................
................................
stigmapetal style ovary
stamen sepal

Setting the context Introduce the Safety Brainstorming (1) Brainstorming (2)apparatus
Remind pupils of pollen Demonstrate how to set Discuss safety hazards The variables in the The need for a fair test, tube growth and its role up a slide for pollen tube with the class. investigation. the need to repeat in fertilisation. growth. measurements and the
need to do a preliminaryinvestigation.
A5
© Harcourt Education Ltd 2003 Catalyst 1This worksheet may have been altered from the original on the CD-ROM.
StartersInvestigate: What makespollen tubes grow?
Sheet 1 of 1
Suggested alternative starter activities (5–10 minutes)
Setting the context● Remind pupils of pollen tube growth and its role in
fertilisation.
● Point out that pollen tubes do not always grow afterpollination, and explain that this investigation willfocus on the factors that affect pollen tube growth.
Introduce the apparatus● Demonstrate how to set up a slide for pollen tube
growth, as detailed in Activity A5cde.
Safety● Ask pupils to work in pairs to list the hazards involved
in this investigation.
● Pupils then decide how to minimise the dangerpresented by each hazard.
● Pairs report back to a class discussion during which afinal set of safety procedures is listed on the board.
Brainstorming (1)● Ask pupils to discuss in groups what the variables are in
the investigation.
● Ask them to decide what variable should be changed(input variable) and what should be measured duringthe investigation (outcome variable).
● Ask individual pupils for their ideas. Use classdiscussion to finalise details of the two dependentvariables.
Brainstorming (2)● Ask pupils to work in groups to consider the questions
opposite.
● Use answers from individual pupils to initiate classdiscussion about fair testing and reliability of results.
QuestionsWhat needs to be done to make this a fairtest?Will the experiments need to be repeated?Why?Will a preliminary investigation be needed?Why?

Sheet 1 of 1© Harcourt Education Ltd 2003 Catalyst 1This worksheet may have been altered from the original on the CD-ROM.
Running the activityIt is likely that even if pupils have encountered a microscope before they will needinstructing in its use. Demonstrate this before attempting the rest of the activity.There are three relevant skill sheets for this lesson, detailed below. These shouldallow able pupils to work independently, allowing you more time with those whoneed more support. You will need to establish group size in relation the numbers ofmicroscopes available.Core: The sheet gives instructions for looking at objects under a magnifying glass anda microscope, and introduces the concept of making scientific drawings from thefield of view. Pupils do a simple magnification calculation – Skill sheet 2:Magnification will help with this.Extension: Pupils are introduced to the concept of measuring objects under themicroscope and also to calculating the size of the field of view. Skill sheet 3:Microscope magnification will help with this. The numeracy content can be difficultand you may wish pupils to work together.
Other relevant materialSkill sheet 1: Using a microscopeSkill sheet 2: MagnificationSkill sheet 3: Microscope magnification
Expected outcomesCore: Pupils use a microscope to observe an object, perhaps for the first time, andbegin to develop competence in using a microscope and an understanding ofmagnification. They make observations using a microscope and record them insimple drawings. Extension: Pupils also learn about field of view and how this changes withmagnification. They estimate the size of an object under the microscope.
PitfallsWarn pupils to remove only their own hair and not that of others!Take care on sunny days that magnifying glasses are not used to burn objects.
Safety notesPupils should be warned about winding the microscope objective down too far andsmashing the coverslip and slides. They should not use microscopes that needdaylight illumination anywhere where direct sunlight can strike the mirror as theymay suffer permanent retinal damage or even blindness.
AnswersCore:
It made them look bigger.It made them look bigger and clearer.the microscopeThe magnification of the microscope is greater.3.5 � 10 � 35 mm (Emphasise units in marking feedback.)
Extension:the microscopeIt is greater.approximately 0.1 mm at this level of accuracy (0.05–0.2 mm would be acceptable)No, the size of the object remains the same.
A1aTeacher
activity notesLooking at small objects
Practical Pupils look at small objects with a magnifying glass and microscope to compare them, Core, Extension and to understand magnification.
Type Purpose Differentiation
3
12
45
3
12
4

Sheet 1 of 1© Harcourt Education Ltd 2003 Catalyst 1This worksheet may have been altered from the original on the CD-ROM.
Other relevant materialSkill sheet 1: Using a microscope
Skill sheet 2: Magnification
Skill sheet 3: Microscope magnification
Equipment For each group:● a magnifying glass (hand lens or other suitable small lens)● a microscopes● two microscope slides● small pieces of newsprint and tissue paper torn by hand (not cut)● a slide with a scale marked in 0.1 mm divisions (for Extension)
For your information Running the activityIt is likely that even if pupils have encountered a microscope before they willneed instructing in its use. Demonstrate this before attempting the rest of theactivity. There are three relevant skill sheets for this lesson, detailed below. Theseshould allow able pupils to work independently, allowing you more time withthose who need more support. You will need to establish group size in relationthe numbers of microscopes available.
Core: The sheet gives instructions for looking at objects under a magnifying glassand a microscope, and introduces the concept of making scientific drawings fromthe field of view. Pupils do a simple magnification calculation – Skill sheet 2:Magnification will help with this.
Extension: Pupils are introduced to the concept of measuring objects under themicroscope and also to calculating the size of the field of view. Skill sheet 3:Microscope magnification will help with this. The numeracy content can bedifficult and you may wish pupils to work together.
Expected outcomesCore: Pupils use a microscope to observe an object, perhaps for the first time, andbegin to develop competence in using a microscope and an understanding ofmagnification. They make observations using a microscope and record them insimple drawings.
Extension: Pupils also learn about field of view and how this changes withmagnification. They estimate the size of an object under the microscope.
PitfallsWarn pupils to remove only their own hair and not that of others!Take care on sunny days that magnifying glasses are not used to burn objects.
Safety notesPupils should be warned about winding the microscope objective down too farand smashing the coverslip and slides. They should not use microscopes thatneed daylight illumination anywhere where direct sunlight can strike the mirroras they may suffer permanent retinal damage or even blindness.
A1aTechnician
activity notesLooking at small objects
Practical Pupils look at small objects with a magnifying glass and microscope to compare them, Core, Extensionand to understand magnification.
Type Purpose Differentiation

Sheet 1 of 1
A1a
© Harcourt Education Ltd 2003 Catalyst 1This worksheet may have been altered from the original on the CD-ROM.
ActivityCore
You are going to use a magnifying glass and a microscope tolook at some everyday objects more closely.
Equipment ● a magnifying glass● a microscope● two glass microscope slides● one of your own hairs● small pieces of newspaper and tissue paper
Obtaining evidence1 Using the magnifying glass look closely at the strand of your hair
and the small pieces of newspaper or tissue paper.2 Place the strand of hair between two microscope slides, trying
not to put any fingerprints on the glass.3 Carefully focus the microscope using the low power lens first.
Then look more closely using the high power lens.4 Look at the pieces of newspaper or tissue paper under the
microscope in the same way.5 Choose one of the objects that you have looked at and make
careful drawings of what you could see using the magnifyingglass and the microscope. Label your drawings.
Considering the evidenceHow did the magnifying glass help you observe the objects?How did the microscope help you observe the objects?Which one helped you look more closely at the objects?What does this tell you about the magnification of themicroscope?The width of a capital M on this page is 3.5 mm. How big will itlook through a microscope lens of magnification �10?
Looking at small objects
2
3
4
5
1
Take care! Ifyou hit the
thin glass slideswhen you focus themicroscope they willbreak.
Never use amicroscope wherethe Sun’s rays couldreflect off the mirror.
!

Sheet 1 of 1
A1a
© Harcourt Education Ltd 2003 Catalyst 1This worksheet may have been altered from the original on the CD-ROM.
ActivityExtension
You are going to use a magnifying glass and a microscope to look at some everyday objects more closely.
Equipment ● a magnifying glass● a microscope● two glass microscope slides● one of your own hairs● small pieces of newspaper and tissue paper● slide scale
Obtaining evidence1 Using the magnifying glass look closely at the strand of your hair
and the small pieces of newspaper or tissue paper.2 Place the strand of hair between two microscope slides, trying not
to put any fingerprints on the glass.3 Carefully focus the microscope using the low power lens first.
Then look more closely using the high power lens.4 Look at newspaper or tissue paper under the microscope in the
same way.5 Choose one of the objects that you looked at and make careful
labelled drawings of what you could see using the magnifying glass and the microscope.
6 Place a scale slide (like a tiny ruler) under the objective lens at low power and work out the size of the field of view. Do the same for the high power lens. Your teacher may give you a Skill sheet to help.
7 Calculate the magnification of your microscope at low and at high power. Copy and complete the table below.
Considering the evidenceWhich helped you look in more detail at the objects, the magnifying glass or the microscope?What does this tell you about the magnification of the microscope compared with the that of magnifying glass?Using the scale slide, estimate the width of one of your hairs.You have measured the size of the field of view at both magnifications, high and low. Should this affect your estimate of the width of your hair?
Looking at small objects
Magnification Number of divisions Size of field of view
low power lens
high power lens
3
4
2
1
Take care! Ifyou hit the
thin glass slideswhen you focus themicroscope they willbreak.
Never use amicroscope wherethe Sun’s rays couldreflect off the mirror.
!
Sheet 1 of 1© Harcourt Education Ltd 2003 Catalyst 1This worksheet may have been altered from the original on the CD-ROM.
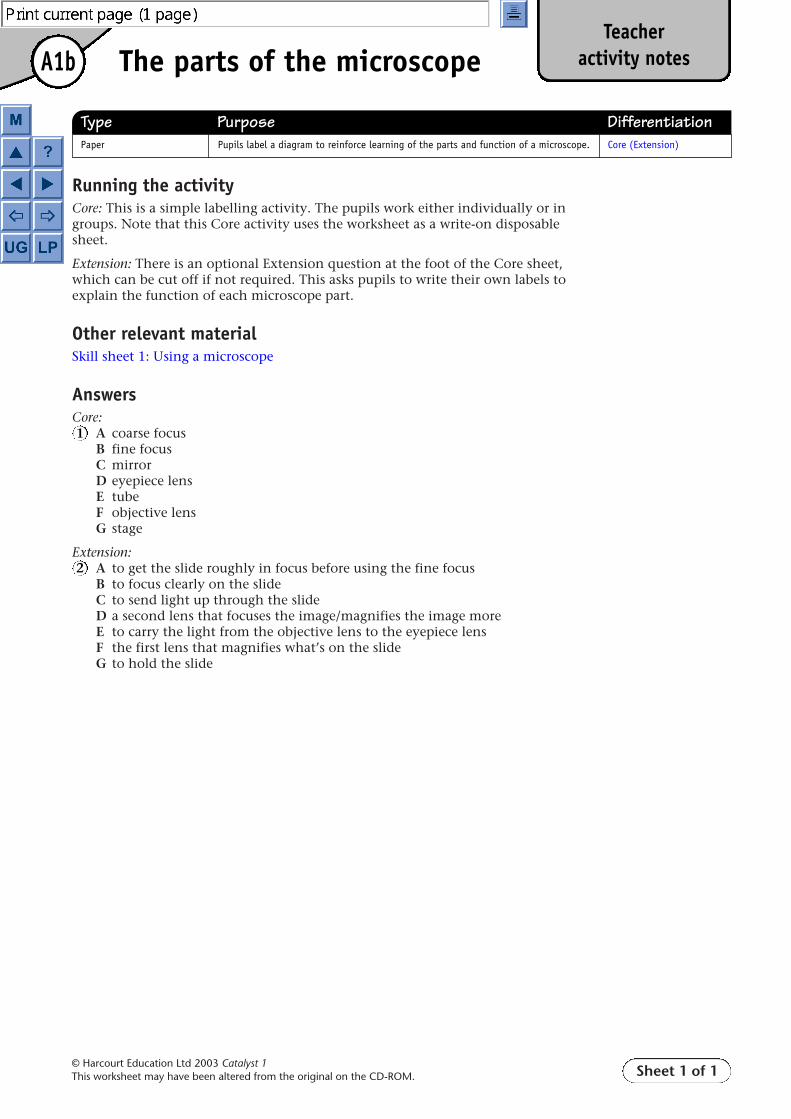
Running the activityCore: This is a simple labelling activity. The pupils work either individually or ingroups. Note that this Core activity uses the worksheet as a write-on disposablesheet.
Extension: There is an optional Extension question at the foot of the Core sheet,which can be cut off if not required. This asks pupils to write their own labels toexplain the function of each microscope part.
Other relevant materialSkill sheet 1: Using a microscope
AnswersCore:
A coarse focusB fine focusC mirrorD eyepiece lensE tubeF objective lensG stage
Extension:A to get the slide roughly in focus before using the fine focusB to focus clearly on the slideC to send light up through the slideD a second lens that focuses the image/magnifies the image moreE to carry the light from the objective lens to the eyepiece lensF the first lens that magnifies what’s on the slideG to hold the slide
A1bTeacher
activity notesThe parts of the microscope
Paper Pupils label a diagram to reinforce learning of the parts and function of a microscope. Core (Extension)
Type Purpose Differentiation
1
2

Sheet 1 of 1
A1b
© Harcourt Education Ltd 2003 Catalyst 1This worksheet may have been altered from the original on the CD-ROM.
ActivityCore
A microscope is very useful for looking at living things. You aregoing to label a diagram to help you learn the parts of amicroscope.
Use the words below to label the parts of the microscope on thediagram.
The parts of the microscope
�
Write a short explanation of what each part does.
A ............................................
B ............................................
C ............................................
G ............................................
F ............................................
E ............................................
D ............................................
stage eyepiece lens objective lens
mirror
tube
coarse focus fine focus
Never use amicroscope
where the Sun’s rayscould reflect off themirror.
!
2
1
Extension

Sheet 1 of 1© Harcourt Education Ltd 2003 Catalyst 1This worksheet may have been altered from the original on the CD-ROM.
Running the activityPupils read the passage about Robert Hooke, which is the same on both Core andHelp sheets, or the passage could be read aloud to the class or by volunteers ingroups.
Core: Pupils then answer the questions.
Help: The questions provide a basic writing frame for the answers to the Corequestions. This could be used as a write-on sheet or as a guide.
ICT opportunitiesSearches for Robert Hooke on the internet bring up a wealth of material.Compiling a fact file or biography on him could be a useful extension orhomework activity.
AnswersCore and Help:
Robert Hooke
It had three lenses instead of two or it made a clearer image.
insects, small living things, feathers, cork
cells
He saw what it was made up of or realised that he could see new things.
A1cTeacher
activity notesRobert Hooke
Paper Pupils carry out a reading and comprehension activity to emphasise earlier ideas about Core, Helpliving things and relate this to evidence from microscopic observations.
Type Purpose Differentiation
3
1
2
4
5

Sheet 1 of 1
A1c
© Harcourt Education Ltd 2003 Catalyst 1This worksheet may have been altered from the original on the CD-ROM.
ActivityCore
You are going to read the description of the life and work ofRobert Hooke and then answer some questions.
Robert Hooke
Robert Hooke was one of the best scientists of the 17th century. One of his
most famous inventions was a new kind of microscope.
It was different from earlier microscopes because it had three glass lenses to
magnify the object, rather than two. This means that you get a clearer image of
the object. It was called the compound microscope.
Although this microscope looked very different from modern ones, being over
half a metre tall, the microscope in your classroom is based on the same
design.
This new microscope allowed Robert Hooke to observe things people had
never seen before. He looked at many things including insects, other tiny living
things and feathers.
He is most famous for his description of a slice of cork which he noticed was
divided into small sections which he called ‘cells’, because they reminded him
of the rooms or cells in a monastery.
Robert Hooke recorded his observations in a book called Micrographia.
His observations of cork were very important because until then scientists had
not realised that by looking at things closely you could see new things that
could not be seen at a distance, such as cells.
Who invented the compound microscope?How was the compound microscope different from earliermicroscopes?What kind of things did Robert Hooke look at?What did Robert Hooke call the structures in cork that no oneelse had seen before?Why were his observations of cork so important?
3
4
5
2
1

Sheet 1 of 1
A1c
© Harcourt Education Ltd 2003 Catalyst 1This worksheet may have been altered from the original on the CD-ROM.
ActivityHelp
......................... ......................... invented the compound microscope.
It was different from earlier microscopes because it had
........................ ........................ instead of .........................
Robert Hooke looked at lots of things including
..............................................................................................................................................................
He called the structures he saw in cork ........................ .
His observations of cork were important because he noticed
..............................................................................................................................................................
Robert Hooke
You are going to read the description of the life and work ofRobert Hooke and then answer some questions.
Robert Hooke was one of the best scientists of the 17th century. One of his
most famous inventions was a new kind of microscope.
It was different from earlier microscopes because it had three glass lenses to
magnify the object, rather than two. This means that you get a clearer image of
the object. It was called the compound microscope.
Although this microscope looked very different from modern ones, being over
half a metre tall, the microscope in your classroom is based on the same
design.
This new microscope allowed Robert Hooke to observe things people had
never seen before. He looked at many things including insects, other tiny living
things and feathers.
He is most famous for his description of a slice of cork which he noticed was
divided into small sections which he called ‘cells’, because they reminded him
of the rooms or cells in a monastery.
Robert Hooke recorded his observations in a book called Micrographia.
His observations of cork were very important because until then scientists had
not realised that by looking at things closely you could see new things that
could not be seen at a distance, such as cells.
3
4
5
2
1

Sheet 1 of 1© Harcourt Education Ltd 2003 Catalyst 1This worksheet may have been altered from the original on the CD-ROM.
Running the activityFirst of all use a sprouting or flowering onion (or a diagram of one) to show pupilsthat this is an organ, then demonstrate dissection of a bulb to obtain (epithelial)tissue.
Pupils work in pairs. The activity sheet gives a method for carrying out thepractical, along with analysis questions at the end. A microscope could be linkedto a video camera (e.g. Flexicam) to display slides to the whole class.
Other relevant materialSkill sheet 1: Using a microscope
Expected outcomesPupils produce a labelled drawing of plant tissue as seen under the microscope.
PitfallsSome pupils may need help with peeling a thin layer of onion skin.
Pupils should take care to avoid introducing air bubbles under the coverslip.
Safety notesIodine is harmful. Pupils should be shown how to cut the onion safely, perhapsunder water to avoid tears! If in doubt, the pieces of onion could be cut ready forthem.
Pupils should be warned about winding the microscope objective down too farand smashing the coverslip and slides. They should not use microscopes thatneed daylight illumination anywhere where direct sunlight can strike the mirroras they may suffer permanent retinal damage or even blindness.
AnswersPupils should see small boxes/sections/compartments. Onion tissue is madeup of small sections.
The iodine acts as a stain, making more structures in the cells visible.
Green parts use light to make food. Onion bulbs are underground so receiveno light.
A1dTeacher
activity notesLooking at plant tissue
Practical Pupils prepare and observe slides of onion cells to practise using a microscope and Core reinforce knowledge of cells.
Type Purpose Differentiation
3
1
2
Sheet 1 of 1© Harcourt Education Ltd 2003 Catalyst 1This worksheet may have been altered from the original on the CD-ROM.
Other relevant materialSkill sheet 1: Using a microscope
EquipmentFor the class:
● a large Spanish onion● a video camera, e.g. Flexicam (optional)
For each pair:
● a craft knife or scalpel● a white tile● forceps● a microscope slide● iodine drop bottle● a coverslip● a mounted needle● a microscope
For your information
Running the activityFirst of all use a sprouting or flowering onion (or a diagram of one) to show pupilsthat this is an organ, then demonstrate dissection of a bulb to obtain (epithelial)tissue.
Pupils work in pairs. The activity sheet gives a method for carrying out thepractical, along with analysis questions at the end. A microscope could be linkedto a video camera (e.g. Flexicam) to display slides to the whole class.
Expected outcomesPupils produce a labelled drawing of plant tissue as seen under the microscope.
PitfallsSome pupils may need help with peeling a thin layer of onion skin.
Pupils should take care to avoid introducing air bubbles under the coverslip.
Safety notesIodine is harmful. Pupils should be shown how to cut the onion safely, perhapsunder water to avoid tears! If in doubt, the pieces of onion could be cut ready forthem.
Pupils should be warned about winding the microscope objective down too farand smashing the coverslip and slides. They should not use microscopes thatneed daylight illumination anywhere where direct sunlight can strike the mirroras they may suffer permanent retinal damage or even blindness.
A1dTechnician
activity notesLooking at plant tissue
Practical Pupils prepare and observe slides of onion cells to practise using a microscope and Core reinforce knowledge of cells.
Type Purpose Differentiation

Sheet 1 of 1
A1d
© Harcourt Education Ltd 2003 Catalyst 1This worksheet may have been altered from the original on the CD-ROM.
ActivityCore
You are going to look closely at some plant tissue using amicroscope.
Obtaining evidence1 Carefully cut a small piece of onion. Peel off a piece of the inner
surface. This should be very thin and look like tissue paper.
2 Put this thin piece of onion onto a slide.3 Add two drops of iodine solution to stain the cells.
4 Lower a coverslip gently onto the slide using a mounted needle.
5 Place the slide on a microscope stage.6 Focus using the low power lens first and then make it look bigger
by using the high power lens.7 Draw a small area of the tissue.8 Label your drawing.
Considering the evidenceWrite a sentence about what you could see under the microscope.What do you think this tells you about onion tissue?Why do you think you added the iodine solution? What does it do?Many parts of a plant are green. Why is this tissue not green?
Looking at plant tissue
3
2
1
Take care! Ifyou hit the
thin glass slides whenyou focus themicroscope they willbreak.
Never use amicroscope where theSun’s rays couldreflect off the mirror.
Take care – sharp knife.
Iodine solution isharmful and it canstain your skin andclothes.
!
Sheet 1 of 1© Harcourt Education Ltd 2003 Catalyst 1This worksheet may have been altered from the original on the CD-ROM.
Running the activityPupils work in pairs. The activity sheet gives a method for carrying out thepractical, along with some questions. A microscope could be linked to a videocamera (e.g. Flexicam) to display slides to the whole class.
Other relevant materialSkill sheet 1: Using a microscope
Expected outcomesPupils produce a labelled drawing of animal cells as seen under the microscope.
Safety notesPupils should be warned about winding the microscope objective down too farand smashing the coverslip and slides. They should not use microscopes thatneed daylight illumination anywhere where direct sunlight can strike the mirroras they may suffer permanent retinal damage or even blindness.
Cheek cell sampling can be done using cotton buds from a newly opened pack.The inside of the mouth, around the gums, is swabbed with a clean cotton bud,smeared onto a slide, stained if required and topped with a coverslip. Used cottonbuds, slides and coverslips should be placed into a freshly made 1% sodiumchlorate(I) (hypochlorite) solution.
AnswersPupils should be able to see individual, irregular-shaped cells withmembranes and sometimes a nucleus, otherwise not many features arevisible.
No, because animal cells do not have cell walls.
A1eTeacher
activity notesLooking at animal cells
Practical Pupils look at pre-prepared animal cell slides using a microscope. Core
Type Purpose Differentiation
1
2

Sheet 1 of 1© Harcourt Education Ltd 2003 Catalyst 1This worksheet may have been altered from the original on the CD-ROM.
Other relevant materialSkill sheet 1: Using a microscope
Equipment For the class:● a video camera, e.g. Flexicam (optional)
For each pair:● pre-prepared slides – pupils own cheek cells may be used unless prohibited by
local rules. It is possible to use the epithelial cells from the trachea of a pig orsheep, obtained from a local butcher. Alternatively, place a piece of Sellotapeonto a wrist, pull off and stick onto a slide.
● a microscope
For your information
Running the activityPupils work in pairs. The activity sheet gives a method for carrying out thepractical, along with some questions. A microscope could be linked to a videocamera (e.g. Flexicam) to display slides to the whole class.
Expected outcomesPupils produce a labelled drawing of animal cells as seen under the microscope.
Safety notesPupils should be warned about winding the microscope objective down too farand smashing the coverslip and slides. They should not use microscopes thatneed daylight illumination anywhere where direct sunlight can strike the mirroras they may suffer permanent retinal damage or even blindness.
Cheek cell sampling can be done using cotton buds from a newly opened pack.The inside of the mouth, around the gums, is swabbed with a clean cotton bud,smeared onto a slide, stained if required and topped with a coverslip. Used cottonbuds, slides and coverslips should be placed into a freshly made 1% sodiumchlorate(I) (hypochlorite) solution.
A1eTechnician
activity notesLooking at animal cells
Practical Pupils look at pre-prepared animal cell slides using a microscope. Core
Type Purpose Differentiation

Sheet 1 of 1
A1e
© Harcourt Education Ltd 2003 Catalyst 1This worksheet may have been altered from the original on the CD-ROM.
ActivityCore
Like plants, animals are made of tiny building blocks called cells.You are going to look closely at some animal cells using amicroscope.
Obtaining evidence
1 Your teacher will give you a slide that has already been set up.Put this slide on your microscope stage.
2 Focus using the low power lens to find the cells.3 Draw a diagram of one of the animal cells that you can see under
the low power lens. Label the parts of the cell that you can see.4 Now look at your slide using the high power lens.5 Draw a diagram of one of the cells and label the parts that you
can see.
Considering the evidenceDescribe what the animal cell looks like under the microscope.Would you expect to see a cell wall? Explain your answer.
Looking at animal cells
2
1
Take care! Ifyou hit the
thin glass slideswhen you focus themicroscope they willbreak.
Never use amicroscope wherethe Sun’s rays couldreflect off the mirror.
!
Sheet 1 of 2© Harcourt Education Ltd 2003 Catalyst 1This worksheet may have been altered from the original on the CD-ROM.
Running the activityPupils work in groups, each group producing either a plant or animal cell. Youmay decide to direct groups to make certain models. Their finished models can bedisplayed in the classroom. It may be best to pair up groups working on animaland plant cells from the same level of pupil sheet.
Core: Pupils follow the instructions to build the model, then discuss and sharewith another group, drawing a labelled diagram and answering questions toreinforce their understanding and evaluate the models.
Help: As for Core, but pupils are told more explicitly how to use the apparatus,and build their models from diagrams.
Extension: Pupils are given the apparatus and have to select the best material torepresent each part of the cell. They then build a further solid model of each typeof cell before evaluating the models.
Other relevant materialA range of textbooks, Microsoft® Encarta or the internet could be used to findpictures of cells.
Expected outcomesEach group should produce models of cells which can be used for displaypurposes. This should enable pupils to view the cell as a three-dimensional objectrather than just a two-dimensional drawing.
PitfallsIt would be easier to plan the groups at different levels before the lesson. Theactivity can be messy. Have plenty of paper towels ready in case of wallpaperpaste being spilled.
Some pupils may have difficulty in visualising the cell as a three-dimensionalobject and may need help in building their models.
Safety notesWarn pupils to clear up any liquid spilled on the floor to avoid accidents.Wallpaper paste contains fungicide – wash hands thoroughly after use.
AnswersCore:
Check pupils’ diagrams.
cell membrane (plastic bag) – clear and thin; nucleus (round object: ball orPlasticine) – has the right size and shape; cytoplasm (thick liquid) – jelly-like
as above plus: chloroplasts (green Plasticine) – right colour; cell wall (box) –rigid; vacuole (smaller plastic bag) – thin and clear; liquid in vacuole (water) –watery substance
Yes, because they show cells in 3D and give an idea of size. You can touchthem. Accept any other reasonable suggestion.
A2aTeacher
activity notesMaking model cells
Practical Pupils make models of plant or animal cells and discuss their model with another Core, Help, Extensiongroup. This introduces the idea of a model, and helps them realise what each part of the model represents.
Type Purpose Differentiation
3
12
4

Sheet 2 of 2© Harcourt Education Ltd 2003 Catalyst 1This worksheet may have been altered from the original on the CD-ROM.
A2aTeacher
activity notesMaking model cells (continued)
Help:Check pupils’ diagrams contain the following labels:
Animal cell: cell membrane; nucleus; cytoplasm.
Plant cell: as animal cell plus chloroplasts; cell wall; vacuole; liquid insidevacuole.
Check pupils’ diagrams.
It is bigger/simpler/easier to see. Accept any other reasonable suggestion.
Extension:Check pupils’ diagrams.
Animal cell: cell membrane (plastic bag) – clear and thin; nucleus (roundobject: ball or Plasticine) – has the right size and shape; cytoplasm (thickliquid) – jelly-like; plant cell: as for animal cell plus: chloroplasts (greenPlasticine) – right colour; cell wall (box) – rigid; vacuole (smaller plastic bag) –thin and clear; liquid in vacuole (water) – watery substance.
Yes, because they show cells in 3D and give an idea of size. You can touchthem. Accept any other reasonable suggestion.
They are bigger, 3D, you can touch them, structures are clearer.
In a leaf (or stem): they must be exposed to light because they havechloroplasts or make food.
Not every section through a cell would contain all the structures, e.g. someslices don’t have any nucleus in them.
3
1
2
3
1
2
45
6

Sheet 1 of 1© Harcourt Education Ltd 2003 Catalyst 1This worksheet may have been altered from the original on the CD-ROM.
Other relevant materialA range of textbooks, Microsoft® Encarta or the internet could be used to findpictures of cells.
EquipmentFor each group:● two clear plastic bags (cell membrane)● green Plasticine (chloroplasts)● a shoe box (cell wall)● red Plasticine (nucleus)● small balls or other spherical shapes (nucleus)● a smaller plastic bag (vacuole)● thick liquid, e.g. wallpaper paste (cytoplasm)● water (sap)● a plastic knife for slicing Plasticine● a board to work Plasticine onAdditional for Extension:● various colours of Plasticine
For your informationRunning the activityPupils work in groups, each group producing either a plant or animal cell. Youmay decide to direct groups to make certain models. Their finished models can bedisplayed in the classroom. It may be best to pair up groups working on animaland plant cells from the same level of pupil sheet.
Core: Pupils follow the instructions to build the model, then discuss and sharewith another group, drawing a labelled diagram and answering questions toreinforce their understanding and evaluate the models.
Help: As for Core, but pupils are told more explicitly how to use the apparatus,and build their models from diagrams.
Extension: Pupils are given the apparatus and have to select the best material torepresent each part of the cell. They then build a further solid model of each typeof cell before evaluating the models.
Expected outcomes
Each group should produce models of cells which can be used for displaypurposes. This should enable pupils to view the cell as a three-dimensional objectrather than just a two-dimensional drawing.
Pitfalls
It would be easier to plan the groups at different levels before the lesson. Theactivity can be messy. Have plenty of paper towels ready in case of wallpaperpaste being spilled.
Some pupils may have difficulty in visualising the cell as a three-dimensionalobject and may need help in building their models.
Safety notes
Warn pupils to clear up any liquid spilled on the floor to avoid accidents.Wallpaper paste contains fungicide – wash hands thoroughly after use.
A2aTechnician
activity notesMaking model cells
Practical Pupils make models of plant or animal cells and discuss their model with another Core, Help, Extensiongroup. This introduces the idea of a model, and helps them realise what each part of the model represents.
Type Purpose Differentiation

Sheet 1 of 1
A2a
© Harcourt Education Ltd 2003 Catalyst 1This worksheet may have been altered from the original on the CD-ROM.
ActivityCore
A microscope lets us see cells clearly. Sometimes making models of things can help us understand them. You are going to make a large model of a cell. Your teacher will tell you which type of cell to make, animal or plant.
Equipment ● clear plastic bags ● a smaller plastic bag● green Plasticine ● thick liquid● a shoe box ● water● red Plasticine ● a plastic knife● small balls ● a board
Make a model animal cell1 Decide on a round shape (a ball or some red Plasticine)
and put it in a large plastic bag.2 Put some thick liquid in the plastic bag and tie a knot in
the top.
Make a model plant cell3 Decide on a round shape (a ball or some red
Plasticine) and put it in a large plastic bag.4 Cut the green Plasticine. Make marble-sized balls
and flatten them into sausage shapes. Put them into the bag.
5 Take a smaller plastic bag and put some water in it. Tie a knot in the top and put this bag into the larger bag.
6 Add some thick liquid and tie a knot in the top.7 Put the bag into a shoe box.
Considering the evidence and evaluating8 Join up with another group who made a different type of cell from you.
Show them your model and answer the following questions together.
Draw a diagram of each model. Label the cell parts with their names and the material you used to make them, for example: red Plasticine = nucleus.
For each part used in the animal cell model, write down why the material is well suited to represent that part of the cell.Do the same for the plant cell model.Do you think these are good models? Write a sentence explaining youranswer.
Making model cells
34
Take care notto spill liquid
on the floor. If youdo, clear it upstraight away.
Wash your handsafter the activity.
!
2
1

Sheet 1 of 1
A2a
© Harcourt Education Ltd 2003 Catalyst 1This worksheet may have been altered from the original on the CD-ROM.
ActivityHelp
Sometimes scientists use models to help them understandthings. You are going to use models to help you learn aboutcells.
Equipment● clear plastic bags (cell membrane)● green Plasticine cut into small sausage-shaped pieces
(chloroplasts)● a shoe box (cell wall)● small balls (nucleus) ● a smaller plastic bag (vacuole)● thick liquid (cytoplasm)● water (liquid in vacuole)
Make a model animal cell1 Use this diagram to help you make an animal cell model.
Make a model plant cell2 Use this diagram to help you make a plant cell model.
Considering the evidence and evaluating3 Join up with another group who made a different
cell. Show them your model. Answer the questions together.
Draw a diagram of each model. Use the equipment list to labelwhat each part of the models represents in a real cell.Label which diagram is a plant cell and which is an animal cell.How is your model different from a real cell? (Is it bigger, forexample?)
Making model cells
3
2
1
Take care notto spill liquid
on the floor. If youdo, clear it upstraight away.
Wash your handsafter the activity.
!
Sheet 1 of 1
A2a
© Harcourt Education Ltd 2003 Catalyst 1This worksheet may have been altered from the original on the CD-ROM.
ActivityExtension
We often look at cells using a microscope to make them look bigger. You are going to make large models of cells to help you learn about these building blocks of life. Make either an animal or a plant cell.
Equipment ● clear plastic bags ● small balls ● a box● Plasticine in various colours ● thick liquid ● water
Make a model animal cell1 Decide what you will use for the cell membrane.2 Choose a nucleus and place this inside the cell membrane.3 Decide what you will use as cytoplasm. Add this to your model.
Make a model plant cell4 Decide what you will use for the cell membrane.5 Choose a nucleus and place this inside the cell membrane.6 Decide what you will use to make chloroplasts.7 Decide how you will show the vacuole. Think what it should look like.8 Decide how you will make the cell wall to complete your model.
Make a section through a cell9 Make a small, solid model of a plant and animal cell using
Plasticine only for the different parts.10 Cut slices of these models. Does each slice contain a section of
the nucleus?
Considering the evidence and evaluating11 Join with another group who made a different type of cell. Show
them your model and answer the following questions together.
Draw a diagram of each model. Label the cell parts with their names and the material used to make them.For both models, write down why the material you used was well suited to represent each part.Do you think these are good models? Explain your answer.How are your cell models different from how cells would look under a microscope?The plant cell model has chloroplasts. In what part of a plant might this cell be found? Why do you think this?Explain what your solid models have shown you about taking sections (slices) of cells.
Making model cells
3
4
5
6
2
Take care notto spill liquid
on the floor. If youdo, clear it upstraight away.
Wash your handsafter the activity.
!
1

Sheet 1 of 1© Harcourt Education Ltd 2003 Catalyst 1This worksheet may have been altered from the original on the CD-ROM.
Running the activityPupils work individually or in pairs. Note that all three activities use theworksheets as write-on disposable sheets.
Core, Help: Pupils colour-code the key first. They will need six colours includinggreen. They colour each diagram, identifying each part of the cell. Pupils doingthe Core activity then decide whether each is an animal or plant cell.
Extension: This has diagrams of more specialised cells and the questions begin torelate form to function. The Extension activity also requires access to resourcessuch as suitable books or CD-ROMs for pupils to identify each type of cell.
Other relevant materialFor Extension: books or other resources for identifying cells.
ICT opportunitiesFor Extension: CD-ROMs for identifying cells.
AnswersCore:
Check pupils’ diagrams correspond with their key.
A animal, B plant, C plant, D animal
Help:Check pupils’ diagrams correspond with their key.
Extension:Check pupils’ diagrams correspond with their key.
A animal, B plant, C animal, D plant, E animal (protozoan), F animal
A cheek cell, B leaf (palisade) cell, C nerve cell, D root hair cell, E amoeba, Fsperm cell
A round, largely unspecialised, B contains lots of chloroplasts forphotosynthesis, C long, insulated, D shape gives a large surface area, E able tochange shape or flow, F has a tail for movement
A2bTeacher
activity notesLooking at cells
Paper Pupils colour-code drawings of different cells to consolidate learning about cells. Core, Help, Extension
Type Purpose Differentiation
12
1
3
1
2
4

Sheet 1 of 1
A2b
© Harcourt Education Ltd 2003 Catalyst 1This worksheet may have been altered from the original on the CD-ROM.
ActivityCore
You are going to complete some colour-coded diagrams of cells.This will help you learn about all the structures inside cells.
Colour in the key using six different colours, including green.Then colour each diagram using your key.
cell membrane cell wall
cytoplasm chloroplasts
nucleus vacuole
Looking at cells
Write next to each cell whether it is an animal cell or a plant cell.
A
C
B
D
1
2

Sheet 1 of 1
A2b
© Harcourt Education Ltd 2003 Catalyst 1This worksheet may have been altered from the original on the CD-ROM.
ActivityHelp
You are going to complete some colour-coded diagrams of cells.This will help you learn about all the structures inside cells.
Colour in the key using six different colours, including green.Then colour each diagram using your key.
cell membrane cell wall
cytoplasm chloroplasts
nucleus vacuole
Looking at cells
A
B
1

Sheet 1 of 1
A2b
© Harcourt Education Ltd 2003 Catalyst 1This worksheet may have been altered from the original on the CD-ROM.
ActivityExtension
You are going to complete some colour-coded diagrams of cells. This will help you learn about all the structures inside cells.
Colour in the key using six different colours, including green. Then colour each diagram using your key.
cell membrane cell wall cytoplasm
chloroplasts nucleus vacuole
Looking at cells
Write next to each cell whether it is an animal cell or a plant cell.Using textbooks or any other sources of information, try to findout what each type of cell is and label it.We say that some cells are adapted to their function. Can youexplain how each of these cells is shaped to carry out its job well?
3
4
A B
C D
E F
2
1

Sheet 1 of 1© Harcourt Education Ltd 2003 Catalyst 1This worksheet may have been altered from the original on the CD-ROM.
Running the activityYou may wish to browse the internet before the lesson to establish some useful,current websites. Very little of the material available on cells is at the basic level ofKey Stage 3. There is a cell animation provided on the Catalyst InteractivePresentations 1 CD-ROM at an appropriate level.
Pupils will come across all the cell’s organelles. Skill sheets 4: Web searches and19: Writing frame: Research encourage pupils to be selective with informationgained and use only information that they understand. You may wish to directindividual pupils regarding the depth to which they should research information.After a period of time to gather information, the final writing could be set as auseful out-of-class activity.
Core: Pupils are asked to search the internet and write a story. A few ideas aregiven to get them started.
Help: The sheet provides a tailored writing frame for pupils who would find theliteracy demand difficult, but allows mixed-level groups to use computerstogether.
Other relevant materialSkill sheet 4: Web searches
Skill sheet 19: Writing frame: Research
Catalyst Interactive Presentations 1
ICT opportunitiesThe activity gives opportunities for well-targeted internet research. At the time ofwriting a good selection of material is available at:
Cells Alive website
Biology4Kids website
A2cTeacher
activity notesMy journey through a cell
ICT Pupils search the internet to find animations and more information on cells to help Core, Helpthem write a creative account titled ‘My journey through a cell’.
Type Purpose Differentiation
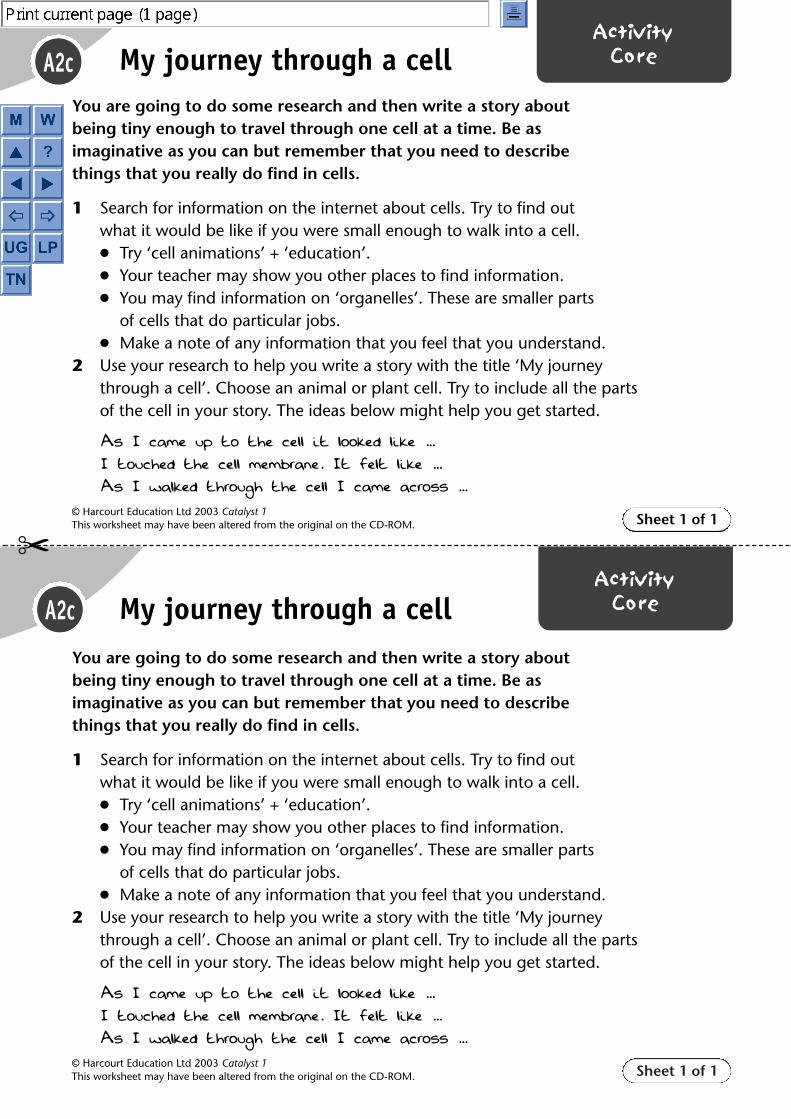
Sheet 1 of 1
A2c
© Harcourt Education Ltd 2003 Catalyst 1This worksheet may have been altered from the original on the CD-ROM.
ActivityCore
You are going to do some research and then write a story about being tiny enough to travel through one cell at a time. Be as imaginative as you can but remember that you need to describe things that you really do find in cells.
1 Search for information on the internet about cells. Try to find out what it would be like if you were small enough to walk into a cell.● Try ‘cell animations’ + ‘education’.● Your teacher may show you other places to find information.● You may find information on ‘organelles’. These are smaller parts
of cells that do particular jobs.● Make a note of any information that you feel that you understand.
2 Use your research to help you write a story with the title ‘My journeythrough a cell’. Choose an animal or plant cell. Try to include all the partsof the cell in your story. The ideas below might help you get started.
As I came up to the cell it looked like …
I touched the cell membrane. It felt like …
As I walked through the cell I came across …
My journey through a cell
A2cActivity
Core
�
You are going to do some research and then write a story about being tiny enough to travel through one cell at a time. Be as imaginative as you can but remember that you need to describe things that you really do find in cells.
1 Search for information on the internet about cells. Try to find out what it would be like if you were small enough to walk into a cell.● Try ‘cell animations’ + ‘education’.● Your teacher may show you other places to find information.● You may find information on ‘organelles’. These are smaller parts
of cells that do particular jobs.● Make a note of any information that you feel that you understand.
2 Use your research to help you write a story with the title ‘My journeythrough a cell’. Choose an animal or plant cell. Try to include all the partsof the cell in your story. The ideas below might help you get started.
As I came up to the cell it looked like …
I touched the cell membrane. It felt like …
As I walked through the cell I came across …
My journey through a cell
Sheet 1 of 1© Harcourt Education Ltd 2003 Catalyst 1This worksheet may have been altered from the original on the CD-ROM.

Sheet 1 of 1
A2c
© Harcourt Education Ltd 2003 Catalyst 1This worksheet may have been altered from the original on the CD-ROM.
ActivityHelp
You are going to do some research and then write a story aboutbeing tiny enough to travel through one cell at a time. Be asimaginative as you can but remember that you need to describethings that you really do find in cells.
1 Search for information on the internet about cells. Try to find outwhat it would be like if you were small enough to walk into a cell.● Try ‘cell animations’ + ‘education’.● Your teacher may show you other places to find information.● You may find information on ‘organelles’. These are smaller
parts of cells that do particular jobs.● Make a note of any information that you feel that you
understand.2 Use your research to help you write a story called ‘My journey
through a cell’. Choose an animal or plant cell. Try to include allthe parts of the cell in your story. Use the ideas below to help getyour story in the right order. You can add other things if youwant to.
My journey through a cell
As I came up to the outside of the cell its shape was .........................................................................
I pushed against the cell membrane with my hand. It was like ......................................and my hand went through.
I took a deep breath and walked through the cell membrane into the inside of the cell.
This main part is called the ............................................. . It was a bit like .............................................
I could see lots of tiny bits floating in the cytoplasm. I thought that these could be
......................................................................................................................................................................................................
A little way off I could see a large, dark blob. I thought that this could be the.......................................
Its job is .................................................................................................................................................................................
I made my way over to the nucleus. Getting there was quite ....................................................
The nucleus looked like ............................................................................................................................................
I left the cell at the other side. I felt ................................................................................................................

Sheet 1 of 2© Harcourt Education Ltd 2003 Catalyst 1This worksheet may have been altered from the original on the CD-ROM.
Running the activityPupils work in groups. The practical instructions on the sheets are the same at alllevels so that you can discuss or demonstrate the method to the whole class.
You may wish to set a time limit on making the observations, as graph drawingcan be a lengthy process. Plotting a line of best fit is not mentioned specifically onthe pupil sheets, but you can choose to direct individuals or small groups to dothis. Alternatively, you can take the opportunity to instruct the whole class in this.
Core, Help: The Help sheet gives assistance with drawing the table and graph, andcould also be used as a hint sheet for pupils struggling with the Core activity.
Other relevant materialSkill sheet 1: Using a microscope
Skill sheet 5: Drawing charts and graphs
Skill sheet 6: Interpreting graphs
ICT opportunitiesResults could be collected in a spreadsheet and graphs drawn from that. A sample set of results could be set up in advance for group discussion or forgroups who fail to gain satisfactory results.
Expected outcomesEach pupil should have a clear table of results with times in sequence. Pupils plota graph showing an increase in number of yeast cells (y-axis) over time (x-axis).
Core: Some pupils will be able to use the prompts to draw conclusions andevaluate their equipment.
PitfallsEnsure the yeast solutions are thoroughly suspended (agitate frequently).
Ensure pupils use separate clean pipettes for each solution (you may wish to havethem in different locations in the laboratory).
If pupils experience difficulty counting yeast cells you could suggest they use ahigher magnification.
Safety notesPupils should be warned about winding the microscope objective down too farand smashing the coverslip and slides. They should not use microscopes thatneed daylight illumination anywhere where direct sunlight can strike the mirroras they may suffer permanent retinal damage or even blindness.
Pupils should wash their hands after handling yeast.
Warn pupils of the dangers of getting liquid on electrical appliances.
Answers Core:
Relate to pupils’ graphs: they should show an increase in number of yeast cellsover time.
A3aTeacher
activity notesGrowing yeast
Practical Pupils sample and count yeast cells from cultures started and left to divide for different Core, Helplengths of time to make direct observations of growth and practise graph-drawing and concluding skills.
Type Purpose Differentiation
1
Sheet 2 of 2© Harcourt Education Ltd 2003 Catalyst 1This worksheet may have been altered from the original on the CD-ROM.
A3aTeacher
activity notesGrowing yeast (continued)
Growth increases over time.
Relate to pupils’ predictions.
1
no
Accept any sensible comments, ideally repeat results.
Help:
increases
Relate to pupils’ predictions.
no
Accept any sensible comments, ideally repeat results.
3
2
4
5
6
3
1
2
4

Sheet 1 of 1© Harcourt Education Ltd 2003 Catalyst 1This worksheet may have been altered from the original on the CD-ROM.
Other relevant materialSkill sheet 1: Using a microscopeSkill sheet 5: Drawing charts and graphs Skill sheet 6: Interpreting graphs
EquipmentFor the class:● A yeast culture needs to be set up in optimal conditions and split equally five
ways. Leave it to grow in these conditions for 10, 20, 30, 40, 50 minutes andstop each by adding ethanol and putting on ice. Label the flasks to show whichculture is which. Thoroughly re-suspend the yeast just before use.
For each group:● a microscope● five clean pipettes● five slides and coverslips
For your information Running the activityPupils work in groups. The practical instructions on the sheets are the same at alllevels so that you can discuss or demonstrate the method to the whole class.You may wish to set a time limit on making the observations, as graph drawingcan be a lengthy process. Plotting a line of best fit is not mentioned specifically onthe pupil sheets, but you can choose to direct individuals or small groups to dothis. Alternatively, you can take the opportunity to instruct the whole class in this.Core, Help: The Help sheet gives assistance with drawing the table and graph, andcould also be used as a hint sheet for pupils struggling with the Core activity.
ICT opportunitiesResults could be collected in a spreadsheet and graphs drawn from that. A sample set of results could be set up in advance for group discussion or forgroups who fail to gain satisfactory results.
Expected outcomesEach pupil should have a clear table of results with times in sequence. Pupils plota graph showing an increase in number of yeast cells (y-axis) over time (x-axis).Core: Some pupils will be able to use the prompts to draw conclusions andevaluate their equipment.
PitfallsEnsure the yeast solutions are thoroughly suspended (agitate frequently).Ensure pupils use separate clean pipettes for each solution (you may wish to havethem in different locations in the laboratory).If pupils experience difficulty counting yeast cells you could suggest they use ahigher magnification.
Safety notesPupils should be warned about winding the microscope objective down too farand smashing the coverslip and slides. They should not use microscopes thatneed daylight illumination anywhere where direct sunlight can strike the mirroras they may suffer permanent retinal damage or even blindness.Pupils should wash their hands after handling yeast.Warn pupils of the dangers of getting liquid on electrical appliances.
A3aTechnician
activity notesGrowing yeast
Practical Pupils sample and count yeast cells from cultures started and left to divide for different Core, Helplengths of time to make direct observations of growth and practise graph-drawingand concluding skills.
Type Purpose Differentiation
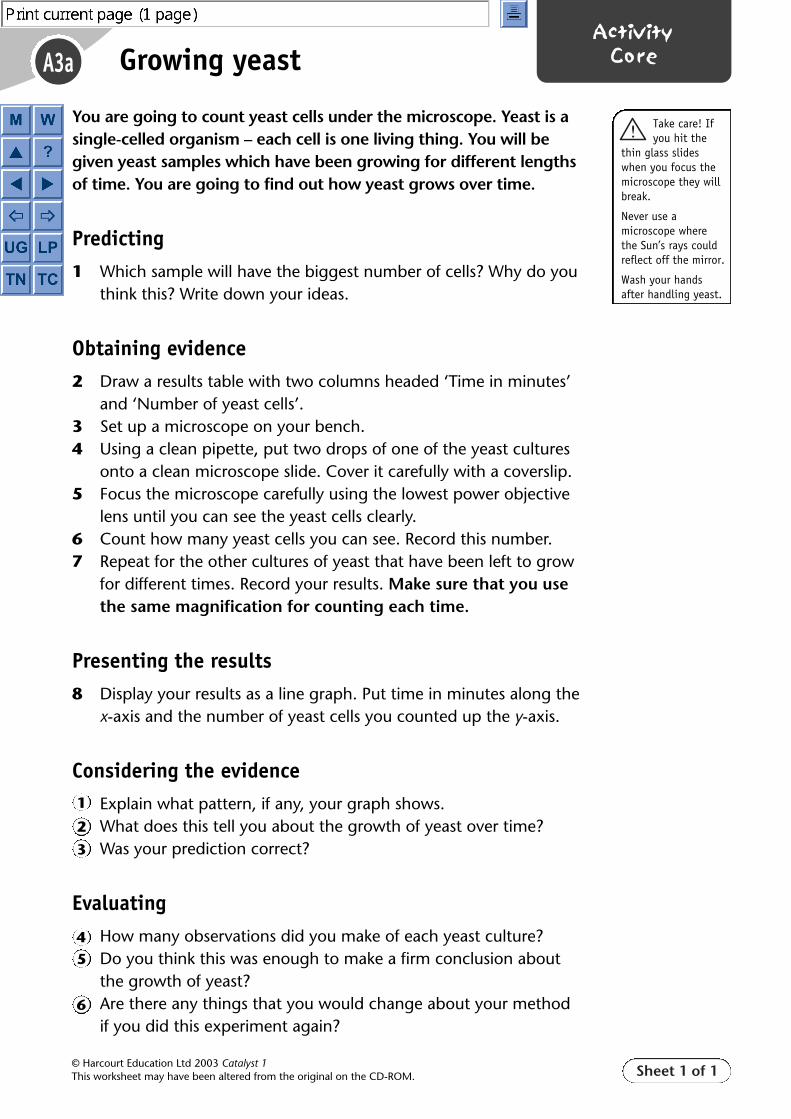
Sheet 1 of 1
A3a
© Harcourt Education Ltd 2003 Catalyst 1This worksheet may have been altered from the original on the CD-ROM.
ActivityCore
You are going to count yeast cells under the microscope. Yeast is asingle-celled organism – each cell is one living thing. You will begiven yeast samples which have been growing for different lengthsof time. You are going to find out how yeast grows over time.
Predicting1 Which sample will have the biggest number of cells? Why do you
think this? Write down your ideas.
Obtaining evidence2 Draw a results table with two columns headed ‘Time in minutes’
and ‘Number of yeast cells’.3 Set up a microscope on your bench.4 Using a clean pipette, put two drops of one of the yeast cultures
onto a clean microscope slide. Cover it carefully with a coverslip.5 Focus the microscope carefully using the lowest power objective
lens until you can see the yeast cells clearly.6 Count how many yeast cells you can see. Record this number.7 Repeat for the other cultures of yeast that have been left to grow
for different times. Record your results. Make sure that you usethe same magnification for counting each time.
Presenting the results 8 Display your results as a line graph. Put time in minutes along the
x-axis and the number of yeast cells you counted up the y-axis.
Considering the evidence Explain what pattern, if any, your graph shows.What does this tell you about the growth of yeast over time?Was your prediction correct?
EvaluatingHow many observations did you make of each yeast culture?Do you think this was enough to make a firm conclusion aboutthe growth of yeast?Are there any things that you would change about your methodif you did this experiment again?
Growing yeast
3
4
5
6
2
1
Take care! Ifyou hit the
thin glass slideswhen you focus themicroscope they willbreak.
Never use amicroscope wherethe Sun’s rays couldreflect off the mirror.
Wash your handsafter handling yeast.
!
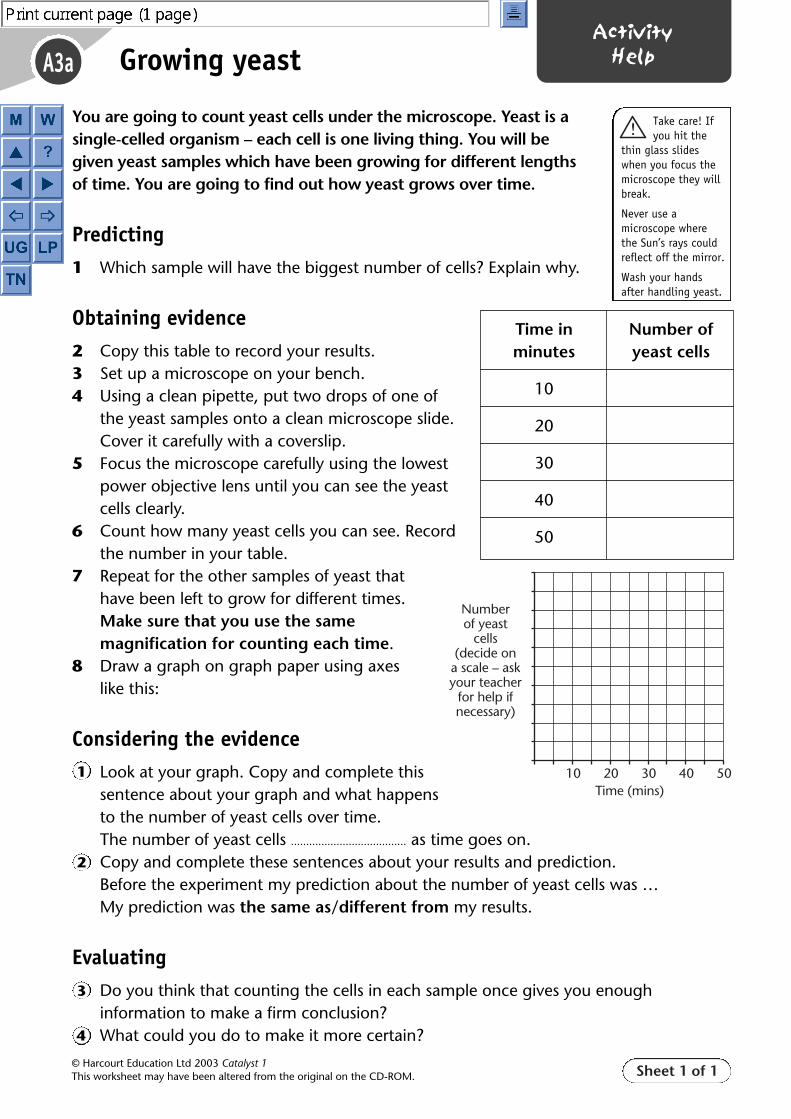
Sheet 1 of 1
A3a
© Harcourt Education Ltd 2003 Catalyst 1This worksheet may have been altered from the original on the CD-ROM.
ActivityHelp
You are going to count yeast cells under the microscope. Yeast is a single-celled organism – each cell is one living thing. You will be given yeast samples which have been growing for different lengths of time. You are going to find out how yeast grows over time.
Predicting 1 Which sample will have the biggest number of cells? Explain why.
Obtaining evidence2 Copy this table to record your results.3 Set up a microscope on your bench.4 Using a clean pipette, put two drops of one of
the yeast samples onto a clean microscope slide. Cover it carefully with a coverslip.
5 Focus the microscope carefully using the lowest power objective lens until you can see the yeast cells clearly.
6 Count how many yeast cells you can see. Record the number in your table.
7 Repeat for the other samples of yeast thathave been left to grow for different times.Make sure that you use the samemagnification for counting each time.
8 Draw a graph on graph paper using axes like this:
Considering the evidence Look at your graph. Copy and complete this sentence about your graph and what happens to the number of yeast cells over time. The number of yeast cells ...................................... as time goes on.Copy and complete these sentences about your results and prediction.Before the experiment my prediction about the number of yeast cells was …My prediction was the same as/different from my results.
EvaluatingDo you think that counting the cells in each sample once gives you enoughinformation to make a firm conclusion?What could you do to make it more certain?
Growing yeast
Time in Number ofminutes yeast cells
10
20
30
40
50
Numberof yeast
cells(decide on
a scale – askyour teacher
for help ifnecessary)
10 20 30 40 50Time (mins)
3
4
2
1
Take care! Ifyou hit the
thin glass slideswhen you focus themicroscope they willbreak.
Never use amicroscope wherethe Sun’s rays couldreflect off the mirror.
Wash your handsafter handling yeast.
!

Sheet 1 of 1© Harcourt Education Ltd 2003 Catalyst 1This worksheet may have been altered from the original on the CD-ROM.
Running the activityThis activity provides more practice at calculating scale factors as described in theRed book spread.
Core: A table is provided to help pupils with the calculations.
Extension: The sheet gives a brief reminder of the formula for a scale factor, thenpupils calculate, showing their own working. They decide whether the scalefactors give enlargements or reductions. Finally, they use a scale factor to calculatethe real size of a millipede.
AnswersCore:
Extension:
The millipede is 19 mm long in real life.
A4aTeacher
activity notesScale factors
Paper Pupils practise calculating scale factors. Core, Extension
Type Purpose Differentiation
Object Real size Picture size Scale factor
cup 10 cm 1 cm �10
daffodil 5.5 cm 2.25 cm �2
car 3 m 0.03 m �100
Object Real size Picture size Scale factor(real size ÷ picture size)
cup 10 cm 1 cm �10 (reduction)
daffodil 5.5 cm 2.25 cm �2 (reduction)
car 3 m 0.03 m �100 (reduction)
ladybird 3 mm 12 mm �0.25 (enlargement)
2 3
4
2 3

Sheet 1 of 1
A4a
© Harcourt Education Ltd 2003 Catalyst 1This worksheet may have been altered from the original on the CD-ROM.
ActivityCore
You are going to practise calculating scale factors.
Look at the pictures of objects. Their real sizes are shown, alongwith the sizes of the pictures.
Copy the table below. Complete the first two columns with thereal size and the picture size for each object.
Then calculate the real size divided by the picture size in the thirdcolumn. This will give you the scale factor to write into the fourthcolumn.
Scale factors
Object Real size Picture size Real size ÷ Scale factor picture size
cup
daffodil
car
real size 10 cmpicture size 1 cm
cup
daffodil
car
real size 5.5 cmpicture size 2.25 cm
real size 3 mpicture size 0.03 m
3
2
1

Sheet 1 of 1
A4a
© Harcourt Education Ltd 2003 Catalyst 1This worksheet may have been altered from the original on the CD-ROM.
ActivityExtension
You are going to practise calculating scale factors.
Remember: scale factor �
Look at the pictures of objects. Their real sizes are shown, alongwith the sizes of the pictures.
Calculate the scale factor for each one. Show your working.Say which pictures are a reduction from real size and which arean enlargement from real size.The picture shows a millipede with its scale factor. Measure thelength of the drawing between the two lines and calculate thereal length of the millipede.
real sizepicture size
Scale factors
real size 10 cmpicture size 1 cm
real size 3 mmpicture size 12 mm
cup
daffodil
car
real size 5.5 cmpicture size 2.25 cm
real size 3 mpicture size 0.03 m
millipede �3
3
4
2
1

Sheet 1 of 1© Harcourt Education Ltd 2003 Catalyst 1This worksheet may have been altered from the original on the CD-ROM.
Running the activityPupils match the text labels to the pictures to help them work out what thepictures show, and then to put them in order. They write a description of what ishappening.
Lower ability pupils could be allowed to cut up the picture boxes and stick themdown with the correct text label instead of sketching the pictures and writingtheir own labels.
Answers B A bee visits the flower to collect nectar and brushes against an anther.A The bee visits another flower and pollen brushes off its body onto the stigma.C A pollen grain sticks to the stigma.E A pollen tube grows.D The pollen grain nucleus reaches the ovary and joins the egg cell nucleus.
A5aTeacher
activity notesPlant fertilisation
Paper Pupils order diagrams and text to consolidate the sequence of events in plant Corepollination and fertilisation.
Type Purpose Differentiation
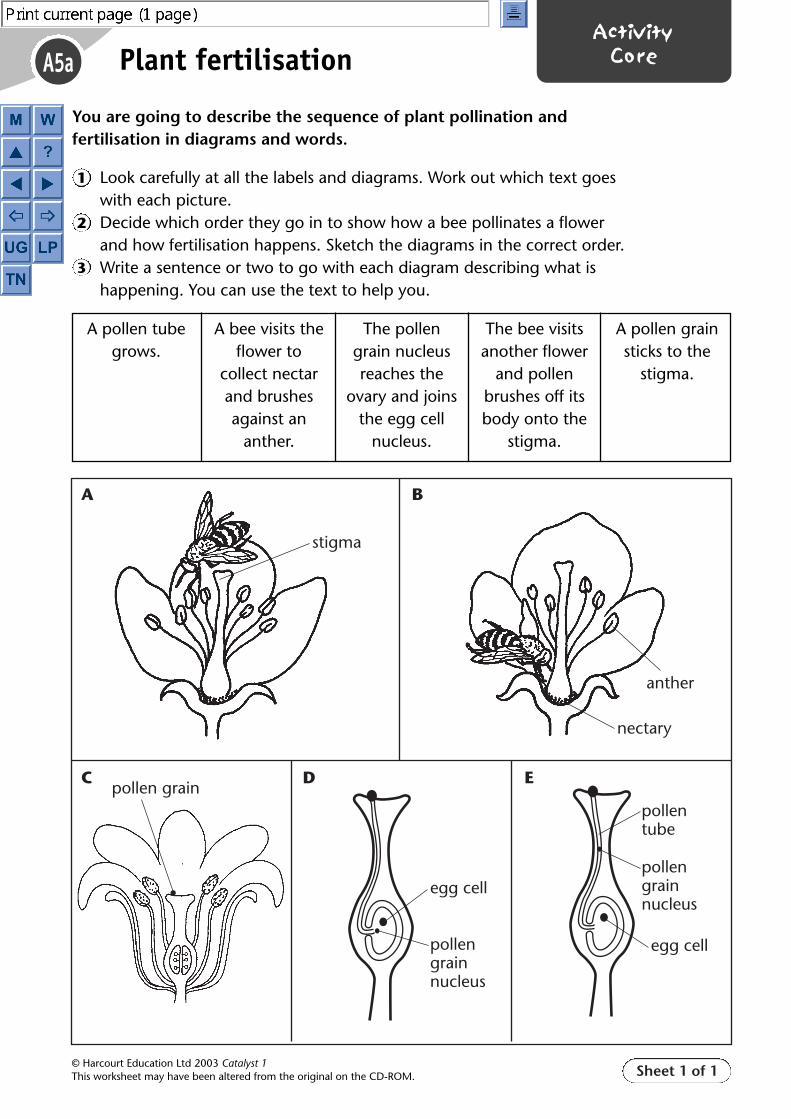
Sheet 1 of 1
A5a
© Harcourt Education Ltd 2003 Catalyst 1This worksheet may have been altered from the original on the CD-ROM.
ActivityCore
You are going to describe the sequence of plant pollination and fertilisation in diagrams and words.
Look carefully at all the labels and diagrams. Work out which text goes with each picture.Decide which order they go in to show how a bee pollinates a flower and how fertilisation happens. Sketch the diagrams in the correct order.Write a sentence or two to go with each diagram describing what is happening. You can use the text to help you.
Plant fertilisation
anther
stigma
A
C D E
B
nectary
pollen grainpollentube
pollengrainnucleus
egg cellpollen grainnucleus
egg cell
A pollen tubegrows.
A bee visits theflower to
collect nectarand brushesagainst an
anther.
The pollengrain nucleusreaches the
ovary and joinsthe egg cell
nucleus.
The bee visitsanother flower
and pollenbrushes off itsbody onto the
stigma.
A pollen grainsticks to the
stigma.
2
3
1

Sheet 1 of 1© Harcourt Education Ltd 2003 Catalyst 1This worksheet may have been altered from the original on the CD-ROM.
Running the activityPupils work in pairs. They prepare a slide of pollen grains in sucrose solution.These must be left in a warm place for 30 minutes before being observed underthe microscope. The pollen grains could be incubated before the lesson if time isshort. Pupils observe and record the growth of the pollen tube during the lesson.
Other relevant materialSkill sheet 1: Using a microscope
Expected outcomesPupils observe the growth of the pollen tube over 10-minute periods using amicroscope, and draw a flow diagram to record their observations.
Safety notesPupils should be warned about winding the microscope objective down too farand smashing the coverslip and slides. They should not use microscopes thatneed daylight illumination anywhere where direct sunlight can strike the mirroras they may suffer permanent retinal damage or even blindness.
Students should wash their hands after handling plant material.
Plant pollens may cause allergic reactions in asthmatics and those who sufferfrom hay fever. Teachers need to check for any students at risk before the activity.
A5bTeacher
activity notesGrowing pollen tubes
Practical Pupils use a microscope to observe the growth of a pollen tube and reinforce Coreunderstanding of plant reproduction.
Type Purpose Differentiation

Sheet 1 of 1© Harcourt Education Ltd 2003 Catalyst 1This worksheet may have been altered from the original on the CD-ROM.
Other relevant materialSkill sheet 1: Using a microscope
EquipmentFor each pair:● a flower (e.g. lily or buttercup) ● a cavity slide● sucrose solution (10%) and dropping pipette● a coverslip● a mounted needle● a microscope● access to a warm area for incubating pollen (25–30 °C)● a fine art brush (optional)
For your information
Running the activityPupils work in pairs. They prepare a slide of pollen grains in sucrose solution.These must be left in a warm place for 30 minutes before being observed underthe microscope. The pollen grains could be incubated before the lesson if time isshort. Pupils observe and record the growth of the pollen tube during the lesson.
Expected outcomesPupils observe the growth of the pollen tube over 10-minute periods using amicroscope, and draw a flow diagram to record their observations.
Safety notesPupils should be warned about winding the microscope objective down too farand smashing the coverslip and slides. They should not use microscopes thatneed daylight illumination anywhere where direct sunlight can strike the mirroras they may suffer permanent retinal damage or even blindness.
Students should wash their hands after handling plant material.
Plant pollens may cause allergic reactions in asthmatics and those who sufferfrom hay fever. Teachers need to check for any students at risk before the activity.
A5bTechnician
activity notesGrowing pollen tubes
Practical Pupils use a microscope to observe the growth of a pollen tube and reinforce Core understanding of plant reproduction.
Type Purpose Differentiation

Sheet 1 of 1
A5b
© Harcourt Education Ltd 2003 Catalyst 1This worksheet may have been altered from the original on the CD-ROM.
ActivityCore
After the pollen lands on the stigma, a pollen tube grows downthe style. This pollen tube grows into the ovary and then entersthe ovule until it reaches the egg cell. The pollen grain nucleuspasses down this tube to join with the egg cell.
You are going to observe the growth of the pollen tube.
Obtaining evidence1 Place a few drops of sucrose solution onto a cavity slide.2 Place some pollen grains in the solution, either by shaking the
flower or using a fine paintbrush.3 Lower a coverslip over the slide.4 Leave the pollen grains for about 30 minutes in a warm place
(about 25–30 °C).5 Place the slide onto the microscope stage.6 Observe the pollen grains every 10 minutes.7 Record your observations about the growth of the tubes.8 Draw a flow diagram showing what happens when the pollen
tube grows.
Growing pollen tubes
Take care! Ifyou hit the
thin glass slideswhen you focus themicroscope they willbreak.
Never use amicroscope wherethe Sun’s rays couldreflect off the mirror.
Do not eat theplants.
Tell your teacher ifyou suffer fromasthma or hay feverbefore you handlethe pollen.
!

Sheet 1 of 1© Harcourt Education Ltd 2003 Catalyst 1This worksheet may have been altered from the original on the CD-ROM.
Running the activityIf pupils have not carried out Activity A5b, you may wish to demonstrate thebasic procedure for observing pollen grains growing in sucrose solution. Youcould also have an example slide of germinated pollen grains so that pupils cansee what they will be looking for in their investigation.
Core: Pupils read the Resource sheet and write down the statements they agreewith. They then plan their own experiment.
Help: Pupils read the Resource sheet and colour in the statements they agree with.If you want to keep the Resource sheet for later re-use, instruct pupils to write outthe statements rather than colouring. Pupils follow the guided instructions todevelop their plan, filling in their answers on the sheet to reduce the writingburden.
Other relevant materialA5c Resource sheet
AnswersThese will be personal to the pupils for all the questions. Aim to guide them tothe idea that they need to make observations of about 20 pollen grains over aboutfour or five different concentrations. Some pupils will struggle with the concept ofchoosing 20 grains and recording how many are germinated from them; insteadthey may plan to look for 20 germinated grains.
A5cTeacher
activity notesInvestigate: What makespollen tubes grow?
Paper Pupils plan an investigation into the growth of pollen tubes in sucrose solutions of Core, Helpdifferent concentrations. Resource
Type Purpose Differentiation
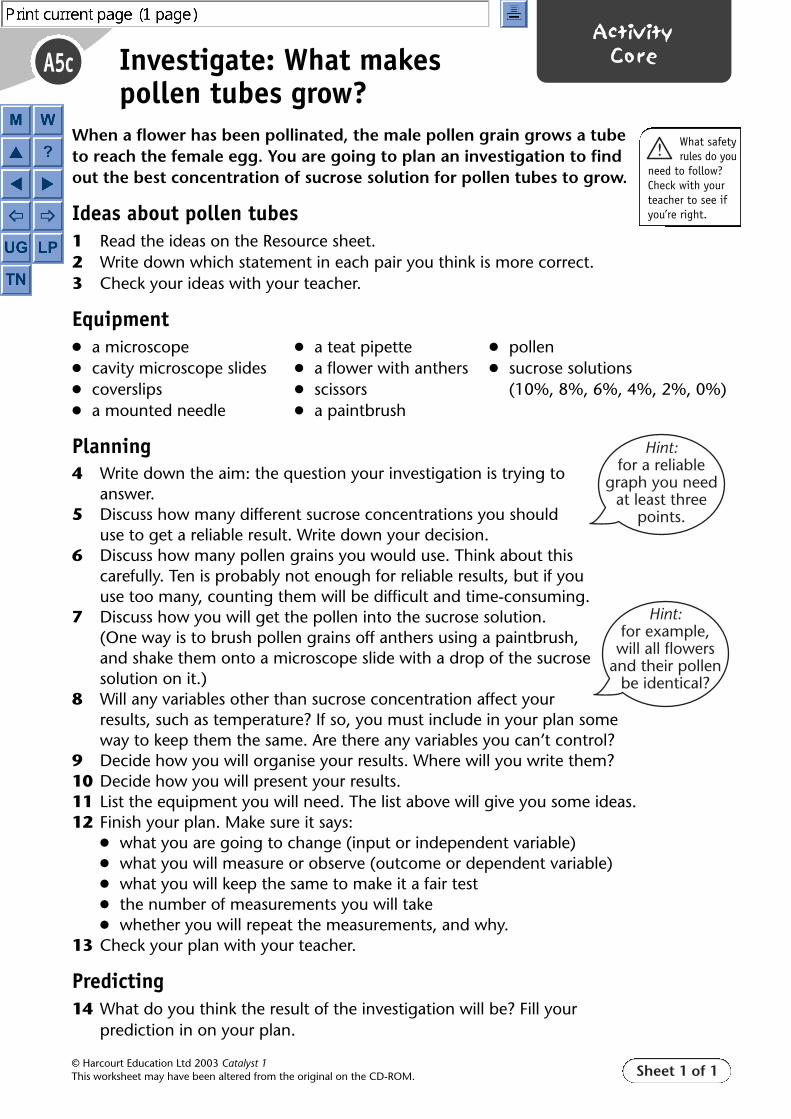
Sheet 1 of 1
A5c
© Harcourt Education Ltd 2003 Catalyst 1This worksheet may have been altered from the original on the CD-ROM.
ActivityCoreInvestigate: What makes
pollen tubes grow?When a flower has been pollinated, the male pollen grain grows a tube to reach the female egg. You are going to plan an investigation to find out the best concentration of sucrose solution for pollen tubes to grow.
Ideas about pollen tubes1 Read the ideas on the Resource sheet.2 Write down which statement in each pair you think is more correct.3 Check your ideas with your teacher.
Equipment● a microscope ● a teat pipette ● pollen● cavity microscope slides ● a flower with anthers ● sucrose solutions● coverslips ● scissors (10%, 8%, 6%, 4%, 2%, 0%)● a mounted needle ● a paintbrush
Planning4 Write down the aim: the question your investigation is trying to
answer.5 Discuss how many different sucrose concentrations you should
use to get a reliable result. Write down your decision.6 Discuss how many pollen grains you would use. Think about this
carefully. Ten is probably not enough for reliable results, but if you use too many, counting them will be difficult and time-consuming.
7 Discuss how you will get the pollen into the sucrose solution. (One way is to brush pollen grains off anthers using a paintbrush, and shake them onto a microscope slide with a drop of the sucrose solution on it.)
8 Will any variables other than sucrose concentration affect your results, such as temperature? If so, you must include in your plan some way to keep them the same. Are there any variables you can’t control?
9 Decide how you will organise your results. Where will you write them?10 Decide how you will present your results.11 List the equipment you will need. The list above will give you some ideas.12 Finish your plan. Make sure it says:
● what you are going to change (input or independent variable)● what you will measure or observe (outcome or dependent variable)● what you will keep the same to make it a fair test● the number of measurements you will take● whether you will repeat the measurements, and why.
13 Check your plan with your teacher.
Predicting14 What do you think the result of the investigation will be? Fill your
prediction in on your plan.
Hint:for a reliable
graph you needat least three
points.
Hint:for example,
will all flowersand their pollen
be identical?
What safetyrules do you
need to follow?Check with yourteacher to see ifyou’re right.
!

Sheet 1 of 1
A5c
© Harcourt Education Ltd 2003 Catalyst 1This worksheet may have been altered from the original on the CD-ROM.
ActivityHelp
When a flower has been pollinated, the male pollen grain grows a tube to reach the female egg. You are going to plan an investigation to find out the best concentration of sucrose solution for pollen tubes to grow.
Ideas about pollen tubes1 Read the ideas on the Resource sheet.2 Colour in the statements you agree with from each pair.3 Check your ideas with your teacher.
Equipment● a microscope ● a teat pipette ● pollen● cavity microscope slides ● scissors ● sucrose solutions● coverslips ● a paintbrush (10%, 8%, 6%, 4%, 2%, 0%)● a mounted needle ● a flower with anthers
Planning and predicting4 Discuss each point below in your group. Fill in the gaps as you go.
Investigate: What makespollen tubes grow?
A Aim: The question we want to answer is .....................................................................................................
B Input variable: we will change the concentration of sucrose.
We will use ......................... different sucrose solutions.(Hint: you need enough results to draw a good graph, at least four.)
C Outcome variable: we will see how many pollen tubes grow in each sucrose solution.
We will measure/observe (one thing only) ................................................................................................
D Fair test: we will keep these variables the same (make a list):
......................................................................................................................................................................................................
E Equipment we will need: (The list above will give you some ideas.)
......................................................................................................................................................................................................
F Reliable results: The number of pollen grains we will use is .........................(Hint: you need more than 10 for a fair test, 25 would be too many to count.)
G Predicting: When we change ...............................................................................................................................
we think what will happen to ..............................................................................................................................
is .................................................................................................................................................................................................
We think this because ................................................................................................................................................
5 Check your plan with your teacher.
What safetyrules do you
need to follow?Check with yourteacher to see ifyou’re right.
!

Sheet 1 of 1
A5c
© Harcourt Education Ltd 2003 Catalyst 1This worksheet may have been altered from the original on the CD-ROM.
ActivityResource
Ideas about pollen tubesSome pupils in Class 7p were going to carry out an investigation tofind out what conditions were best for growing pollen tubes. Hereare their ideas.
Investigate: What makespollen tubes grow?
No, Ithink a hand
lens will be goodenough.
No, weshould give the
pollen tubestime to grow.
I thinkwe need to use a
microscope to lookat the pollen
grains.
We shouldcheck as many
pollen grains as wecan see to get the
most results.
We shouldlook at themimmediately.
We’llneed two differentconcentrations ofsucrose solution –a strong one and
a weakerone.
We couldbe more certain
about what the resultsmean if we used more
than two differentconcentrations.
I think that weshould count the samenumber of pollen grainseach time and work outhow many of the grains
grow a pollentube.

Suggested alternative plenary activities (5–10 minutes)
Review learning Sharing responses Group feedback Word game Looking ahead
A1
© Harcourt Education Ltd 2003 Catalyst 1This worksheet may have been altered from the original on the CD-ROM.
PlenariesOrgans, cells, tissues
Sheet 1 of 1
Suggested alternative plenary activities (5–10 minutes)
Review learning● Show a cross-section through a leaf. Ask pupils to
identify the tissues and cells present.
Sharing responses● Ask pupils to name one thing that the use of a
microscope has allowed them to observe first hand.
● Discuss the usefulness of a microscope compared with amagnifying glass to view cells.
Group feedback● Pupils compare and discuss their drawings of the onion
cells. Carry out a class scan and identify two or threepupils’ work to transfer onto an OHT slide.
● Discuss the OHT drawings with regard to size of cells,grouping of cells and shape of cells. The pupils’ workneeds to allow discussion and clarification of the factthat the choice of size may be different between theexamples but that each cell in a given example isuniform in size (this leads onto the scale lesson). Eachcell is completely surrounded – no gaps. Cells have auniform shape so that should be consistent across thethree examples.
Word game● Give out a set of cards to each pair of pupils. Pairs put
each card into one of three piles: examples of cells,examples of tissues or examples of organs. Cards thatpupils are unsure about are left to one side.
● Each pair then discusses their decisions with anotherpair. At this point they may decide to regroup thecards. Carry out a class scan during this activity andnote any ideas that need to be followed up in thewhole-class discussion.
Looking ahead● The question can be set for individuals to consider and
suggest answers to. They then share responses withother pupils. Make it clear that they may not know theanswer and need to suggest their ideas and predictions.
● Suggestions can be summarised and recorded in pupils’books to reconsider after further lessons.
Show a cross-sectionthrough a leaf to reviewkey words from lesson.
Whole-class discussion ofresponses and feedback onActivities looking at cellsA1a, A1d and A1e.
Groups of pupils compareand discuss their drawingsof the onion cells fromActivity A1b.
Pupils work in pairs andcarry out a card sort.
Pupils suggest what cellsare made of if organs aremade of tissues and tissuesare made of cells.
➔ Pupil sheet
➔ Interactive Presentations for Catalyst 1
➔ Pupil sheet
QuestionHow are cells made up, if organs are madeof tissues and tissues are made of cells?

© Harcourt Education Ltd 2003 Catalyst 1This worksheet may have been altered from the original on the CD-ROM. Sheet 1 of 1
Review learning
A1 PlenariesOrgans, cells, tissues

© Harcourt Education Ltd 2003 Catalyst 1This worksheet may have been altered from the original on the CD-ROM. Sheet 1 of 1
Word gameGroup the cards so that you have three groups:
A1 PlenariesOrgans, cells, tissues
sperm egg
heart lung
ear leaf
brain root
bone blood
outer layer of skin
�
pollen
muscle nerve
�
Organs Tissues Cells

A2
© Harcourt Education Ltd 2003 Catalyst 1This worksheet may have been altered from the original on the CD-ROM.
PlenariesBuilding blocks
Sheet 1 of 1
Review learning● Pupils sort diagrams of cells into plant cells or animal
cells.
Sharing responses● Individual pupils demonstrate on an OHT/PowerPoint
copy of the Activity sheet what they coloured and why,for each of the cell examples. Ask pupils to describewhat clues or evidence they looked for to help themdecide.
Group feedback ● Encourage pupils to talk about their models to the
group.
● Guide pupils to identify the strengths and weaknessesof their models and to suggest how they might beimproved.
Word game● Identify one pupil and place them in the ‘hot seat’.
Hand the pupil a card with a type or part of a cellwritten on it. Allow only this pupil to see the card. Askthe class to direct questions to the pupil in the ‘hotseat’ to determine what was written on the card.
● The pupil in the ‘hot seat’ can only respond by sayingyes or no. Challenge the class as to how few questionscan they use to identify the contents of the card.
● The kinds of questions you might want to prompt thepupils to ask are shown on the right:
Looking ahead ● Set the context for the next lesson on cell division.
Elicit pupils’ ideas and misconceptions in relation tohow living things grow. Keep a note of these to allowyou to address them in the next lesson.
● The question can be set for individuals to consider andsuggest answers to. They then share responses withother pupils. Make it clear that they may not know theanswer and need to suggest their ideas and predictions.
● Suggestions can be summarised and recorded in pupils’books to reconsider after further lessons.
Review learning Sharing responses Group feedback Word game Looking ahead
Suggested alternative plenary activities (5–10 minutes)
Pupils classify diagrams ofnumerous cells as eitherplant or animal cells.
Whole-class discussion ofresponses to Activity A2a.
Groups of pupils shareevaluation of Activity A2a.
Play ‘hot seat’ game. Pupils suggest how we ashumans grow in size.
➔ Pupil sheet
➔ Pupil sheet
QuestionsAre you a tissue/cell/organ?
Are you found in a plant/animal?(narrows search down to plant or animalrelated cell, tissue, and organ)
Do you contain information? (narrowsanswer down to nucleus)
QuestionHow do you think we as humans grow insize?

© Harcourt Education Ltd 2003 Catalyst 1This worksheet may have been altered from the original on the CD-ROM. Sheet 1 of 1
Review learningClassify these diagrams of cells as either plant or animal cells.
A2 PlenariesBuilding blocks

© Harcourt Education Ltd 2003 Catalyst 1This worksheet may have been altered from the original on the CD-ROM. Sheet 1 of 1
Word game
A2 PlenariesBuilding blocks
sperm egg heart
lung ear leaf
brain root bone
blood pollen outer layerof skin
muscle nerve plant cell
animal cellcell
membrane nucleus
cell wall vacuole cellulose
�
�

A3
© Harcourt Education Ltd 2003 Catalyst 1This worksheet may have been altered from the original on the CD-ROM.
PlenariesCells and growth
Sheet 1 of 1
Review learning● Display each scenario on an OHT so that pupils can
decide if statements on growth are true/false.
● Then ask pupils to give reasons for their true/false answers.
Sharing responses● In pairs, pupils decide on one observation from Activity
A3a that backs up the explanation of growth they havelearned.
● Share a number of these ideas with the class and makesure that all the key evidence is highlighted.
Group feedback● In groups, pupils write an explanation of how things grow.
● Ask a pupil to read out what they have written.
● Ask other groups to offer their responses and state iftheir thoughts support or challenge the first response.
● Remain impartial to the suggestions offered and help thepupils to summarise the key evidence.
● Each pupil could then write a two- or three-linesummary.
Word game
● Individually, pupils identify key phrases/ideas that aworking definition of cell division must include.
● Pupils then work in pairs to formulate a written definition.
● Ask pairs to share their ideas. Select a definition for allpupils to record in their books.
Looking ahead
● Pupils need to realise that an individual cell also has thecharacteristics of living things. Pupils may recognise andaccept that the organism itself, be it a plant or animal,will need food, water etc. but may not recognise thatthese needs are a consequence of what is required atcellular level.
● The question can be set for individuals to consider andsuggest answers to. They then share responses with otherpupils. Make it clear that they may not know the answerand need to suggest their ideas and predictions.
● Suggestions can be summarised and recorded in pupils’books to reconsider after further lessons.
Review learning Sharing responses Group feedback Word game Looking ahead
Suggested alternative plenary activities (5–10 minutes)
True/false game ongrowth.
Whole-class discussion ofobservations from ActivityA3a to back up anexplanation for growth.
In groups, pupils preparean explanation of howthings grow.
In pairs, pupils formulatea written definition of celldivision.
Suggest what conditionscells need to grow and stayalive.
➔ Pupil sheet
QuestionWhat conditions do cells need to growand stay alive?
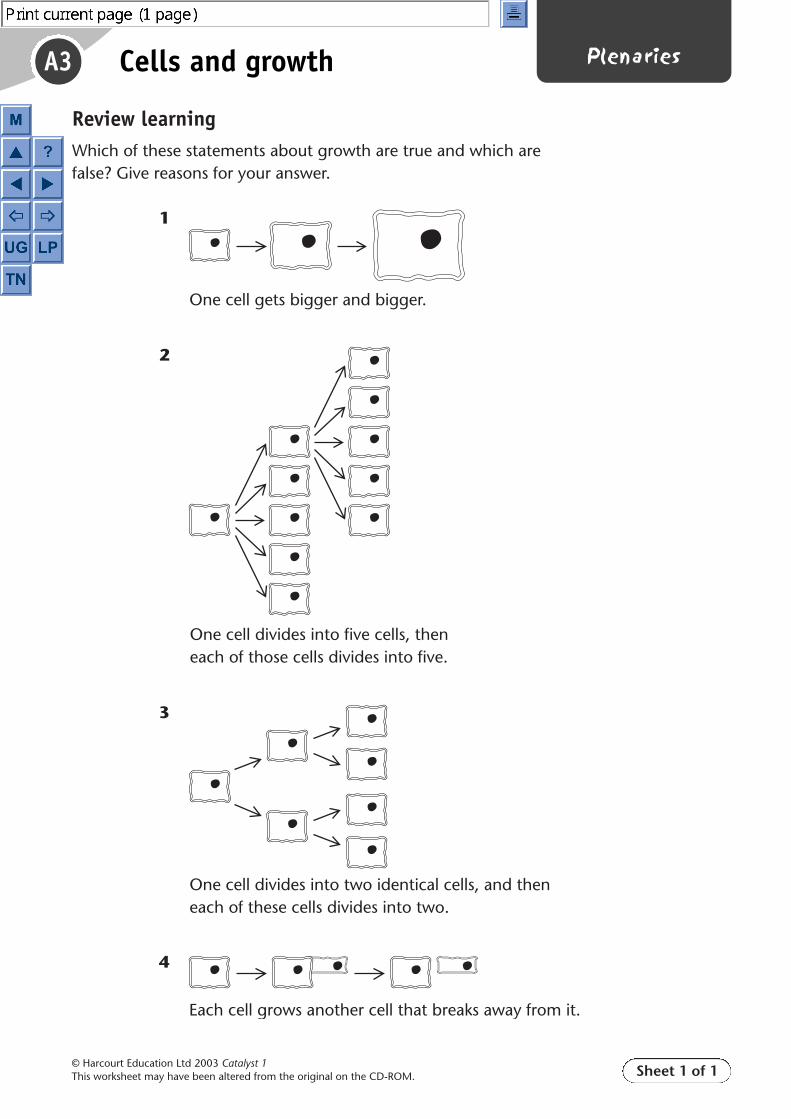
© Harcourt Education Ltd 2003 Catalyst 1This worksheet may have been altered from the original on the CD-ROM. Sheet 1 of 1
Review learningWhich of these statements about growth are true and which arefalse? Give reasons for your answer.
A3 PlenariesCells and growth
1
One cell gets bigger and bigger.
One cell divides into five cells, theneach of those cells divides into five.
3
One cell divides into two identical cells, and theneach of these cells divides into two.
2
4
Each cell grows another cell that breaks away from it.

A4
© Harcourt Education Ltd 2003 Catalyst 1This worksheet may have been altered from the original on the CD-ROM.
PlenariesScaling up and down – Thinkabout
Sheet 1 of 1
Group feedback● Pairs or trios of pupils have 5–10 minutes to discuss,
write down or display their explanation of how to workout a scale factor.
● Take feedback from five pairs/trios and display all themethods.
Bridging to other topics● Pupils work in groups to decide where scaling up and
down could be useful in other contexts. Examples are:
To show real structures that are too small to deal with,e.g. microscopes scale up cells.
To model structures that are too big, e.g. scaling downthe solar system in an orrery, or models of buildings.
Giving appropriate doses of medicine to adults and toyoung children
Adapting a recipe to produce a sponge cake for twentypeople instead of for four people
Designing false limbs for people.
● Tell pupils they will need the skill of scaling up anddown in future units, e.g. in Unit 8D when dealingwith quadrats.
Group feedback Bridging to other topics
Pupils discuss, write down or display Ask pupils to think of instances where their explanation of how to work out scaling up or down could be used in a scale factor. other contexts, e.g. medicine.
Also refer to Unit 8D, which covers quadrats.
Suggested alternative plenary activities (5–10 minutes)

A5
© Harcourt Education Ltd 2003 Catalyst 1This worksheet may have been altered from the original on the CD-ROM.
PlenariesFlower cells
Sheet 1 of 1
Review learning ● Working in pairs, pupils write a series of sentences on
strips of paper to describe the growth of the pollen tube.They need to keep their sentences as concise and few innumber as possible. Ask pupils to do this from memorywithout reference to the lesson materials.
● Sentences can then be mixed up and given to anothergroup to put in order.
Sharing responses● Ask a pupil to identify the correct order for the diagrams
and then to read out his or her description.
● Ask other pupils to add any extra detail to the description.
Group feedback● Pupils work in pairs and each pair is given one of the
following aspects of a flower’s reproductive process todescribe in their own words: pollination, growth of apollen tube or fertilisation.
● Each pair then meets up with two pairs who worked onthe other stages and together they put their sentencesinto the correct sequence of events.
● Ask a group to read their sequence out. The class canidentify the strengths of statements in terms of accuracyand use of appropriate scientific language
Word game● Initiate a ‘word splat’ by asking pupils to devise questions
that can be answered by pointing to the key words forthe lesson. The key words should be written on theboard/OHP.
● Divide the class into two groups and a pupil from eachgroup should be invited to stand close to the board/OHP.
● Choose a pupil to ask a question. The pupils by theboard/OHP must each say the word and try to point to itfirst. The loser chooses another member of his or hergroup to stand at the board/OHP.
Looking backPupils revise and consolidate knowledge from the unit.They can use the Unit map, Pupil check list, or the Testyourself questions.
Review learning Sharing responses Group feedback Word game Looking back
Suggested alternative plenary activities (5–10 minutes)
Pupils write a series ofsentences on the growthof the pollen tube.Sentences are mixed up foranother group to put intoorder.
Whole-class discussion ofresponses to Activity A5a.
In groups, pupils write asequence of sentencesdescribing pollination andfertilisation.
Check progress using a‘word splat’ of the keywords in the unit.
Pupils revise andconsolidate knowledge fromthe unit.
Wordsorgan, tissue, plant cell, animal cell,growth, factor of 10, pollen
➔ Unit map
➔ Pupil check list
➔ Test yourself

A5
© Harcourt Education Ltd 2003 Catalyst 1This worksheet may have been altered from the original on the CD-ROM.
PlenariesInvestigate: What makespollen tubes grow?
Sheet 1 of 1
Review learning● Discuss the decisions pupils made on sucrose
concentration and how many pollen grains to use.
● Discuss what other variables they identified in theinvestigation that needed controlling and how theydecided to do that.
● Discuss what method they used to get the pollen grainsinto the sucrose solution. Suggest other alternatives.
● Ask pupils to say how they laid out their results tables.
Group feedback● In groups, pupils discuss the predictions they made.
Ask them to justify why they made them.
● Ask them to discuss any differences in the predictionsin the group.
Review learning Group feedback
Teacher-led review of the main planning In groups, pupils discuss their predictionsissues in the investigation. and justify them.
Suggested alternative plenary activities (5–10 minutes)

Sheet 1 of 2
A1
© Harcourt Education Ltd 2003 Catalyst 1This worksheet may have been altered from the original on the CD-ROM.
Specials
1 Cross out the wrong words. Underline the right words.
Every living thing is made up of tiny units calledcells / tissues / organs .
A cell / tissue / organ is made up of lots of the samekind of cell.
An cell / tissue / organ is made up of different tissues.These tissues work together to do a job.
2 Here is a word list of some organs and tissues.Use the words to fill in the gaps.
a This organ pumps blood around my body.
.......................................
b This tissue moves my bones. .......................................
c This organ makes food for the plant. .......................................
d This tissue carries information between my
brain and body. .......................................
e This organ starts to break down my food so
my body can use it. .......................................
f These organs get water from the soil for the
plant. .......................................
Organs, cells, tissues
leaf stomachroots
heart muscle nerve

A1
© Harcourt Education Ltd 2003 Catalyst 1This worksheet may have been altered from the original on the CD-ROM.
SpecialsOrgans, cells, tissues (continued)
3 Here are some pictures of organs, tissues and cells.
a Colour the organs in red.
b Colour the tissues in blue
c Colour the cells in yellow.
Sheet 2 of 2
leaf heart
roots skin cell
muscle tissue stomach
plant cell outer skin tissue

1 Use these words to label the diagrams. You may usewords more than once.
2 a Which cell parts are in both plant and animal cells?List them here.
.......................................................................................................................................................
b Which cell parts are only found in plant cells? Listthem here.
.......................................................................................................................................................
A2
© Harcourt Education Ltd 2003 Catalyst 1This worksheet may have been altered from the original on the CD-ROM.
SpecialsBuilding blocks
Sheet 1 of 2
an animal cell
a plant cell
vacuole cytoplasm nucleus
cell wall chloroplastscell membrane

A2
© Harcourt Education Ltd 2003 Catalyst 1This worksheet may have been altered from the original on the CD-ROM.
SpecialsBuilding blocks (continued)
3 Cut out these jigsaw pieces. Then match the cell parts tothe jobs they do. When you’re sure, stick them down.
Sheet 2 of 2
cellmembrane
This contro
ls ever
ything
that hap
pens in
side
the cell.
nucleus
This surrounds the cell.
It lets things move in
and out of the cell.
cell wallA space filled with a
liquid. It is only found
in plant cells.
cytoplasm
Packets o
f green colour
which help the plant
make food.
chloroplasts
A tough wall around plant cells. It supports
the cell.
vacuole
A liquid where
chemical changes
happen.
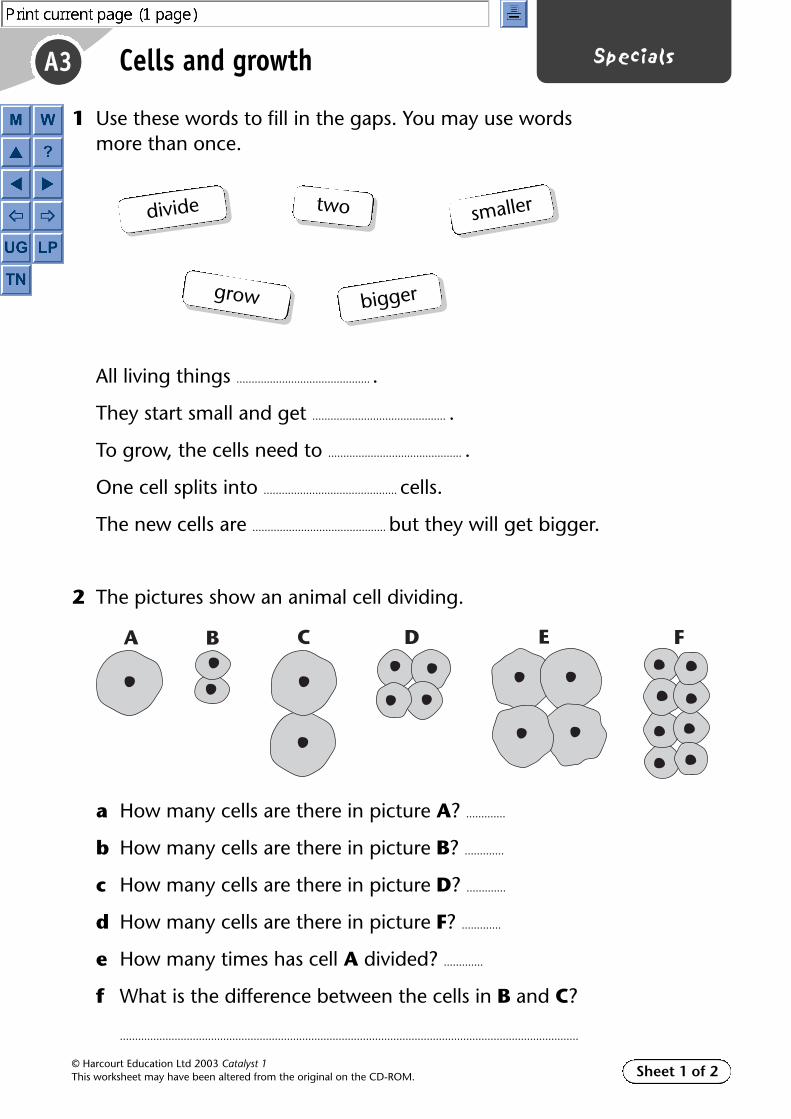
A3
© Harcourt Education Ltd 2003 Catalyst 1This worksheet may have been altered from the original on the CD-ROM.
SpecialsCells and growth
1 Use these words to fill in the gaps. You may use wordsmore than once.
All living things ............................................ .
They start small and get ............................................ .
To grow, the cells need to ............................................ .
One cell splits into ............................................ cells.
The new cells are ............................................ but they will get bigger.
2 The pictures show an animal cell dividing.
a How many cells are there in picture A? .............
b How many cells are there in picture B? .............
c How many cells are there in picture D? .............
d How many cells are there in picture F? .............
e How many times has cell A divided? .............
f What is the difference between the cells in B and C?
.......................................................................................................................................................
Sheet 1 of 2
A B C D E F
divide two
grow
smaller
bigger
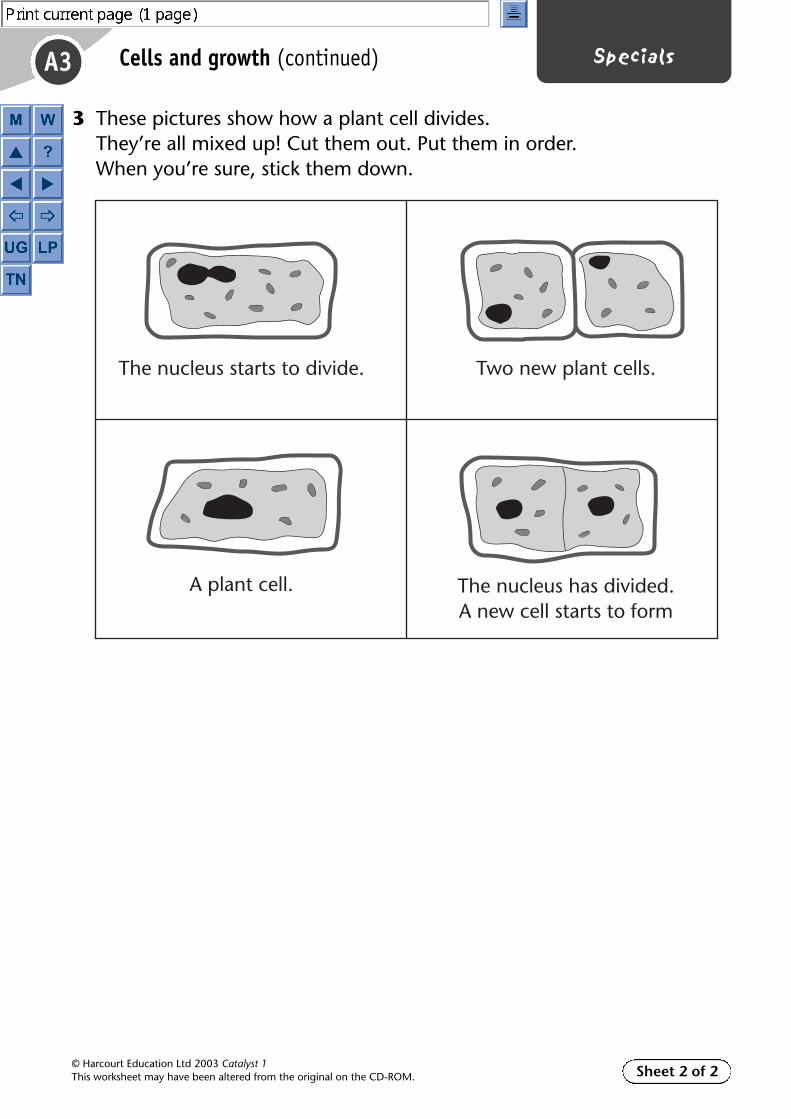
A3
© Harcourt Education Ltd 2003 Catalyst 1This worksheet may have been altered from the original on the CD-ROM.
SpecialsCells and growth (continued)
3 These pictures show how a plant cell divides.They’re all mixed up! Cut them out. Put them in order.When you’re sure, stick them down.
Sheet 2 of 2
The nucleus starts to divide.
A plant cell.
Two new plant cells.
The nucleus has divided.A new cell starts to form
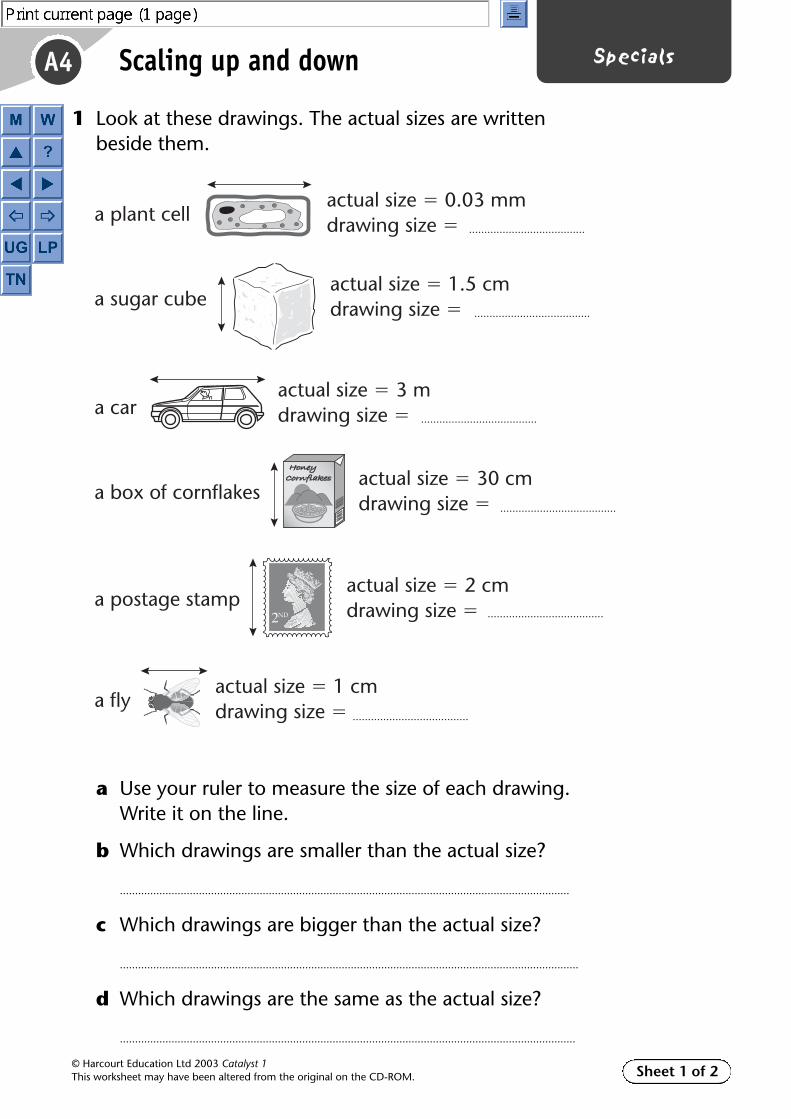
A4
© Harcourt Education Ltd 2003 Catalyst 1This worksheet may have been altered from the original on the CD-ROM.
SpecialsScaling up and down
1 Look at these drawings. The actual sizes are writtenbeside them.
a Use your ruler to measure the size of each drawing.Write it on the line.
b Which drawings are smaller than the actual size?
....................................................................................................................................................
c Which drawings are bigger than the actual size?
.......................................................................................................................................................
d Which drawings are the same as the actual size?
......................................................................................................................................................
Sheet 1 of 2
a plant cell
a sugar cube
actual size � 0.03 mmdrawing size �
actual size � 1.5 cmdrawing size �
a box of cornflakesactual size � 30 cmdrawing size �
a postage stampactual size � 2 cmdrawing size �
a flyactual size � 1 cmdrawing size � ......................................
......................................
......................................
......................................
......................................
......................................
a caractual size � 3 mdrawing size �

A4
© Harcourt Education Ltd 2003 Catalyst 1This worksheet may have been altered from the original on the CD-ROM.
SpecialsScaling up and down (continued)
2 Look at these pictures of the same cell.They have been drawn using different scale factors.
a Which picture has been drawn with
the biggest scale factor? .............
b Which picture has been drawn with
the smallest scale factor? .............
Sheet 2 of 2
A B C D E
Use yourruler if you’re
not sure.

A5
© Harcourt Education Ltd 2003 Catalyst 1This worksheet may have been altered from the original on the CD-ROM.
SpecialsFlower cells
1 Look at this picture of a flower.a Draw a line to match the name of each part
to the picture.b Colour to match each part to the job it does.
2 Match the words to their meanings.
Sheet 1 of 2
petal The male sex cells from adifferent plant stick to this topollinate it.
The female sex cell.
Makes the male sex cells.
The male sex cell.
Makes the female sex cells.
Attracts insects to the plantto take the pollen to anotherflower.egg cell
stigma
ovary
pollen grain
stamen
pollination
pollen grain
egg cell
reproduction
The male sex cell in a flower.
The female sex cell in a flower.
When pollen lands on the stigma.
What living things do tomake more of themselves.
When a male sex cell joins with afemale sex cell to make a new life.
fertilisation

A5
© Harcourt Education Ltd 2003 Catalyst 1This worksheet may have been altered from the original on the CD-ROM.
SpecialsFlower cells (continued)
3 a Look at the pictures below. They show one way thatflowers can be pollinated.
b Read the captions. Match them to the pictures.
Sheet 2 of 2
1
2
3
4
The bee flies to another flower, carrying the pollen with it.
The bee lands on a
flower. Pollen from the
stamen sticks to it.
A tube grows from the pollen grain to the ovary. The nucleus moves down it and fertilises an egg cell. This turns into a seed.
Pollen from the bee
sticks to the stigma.
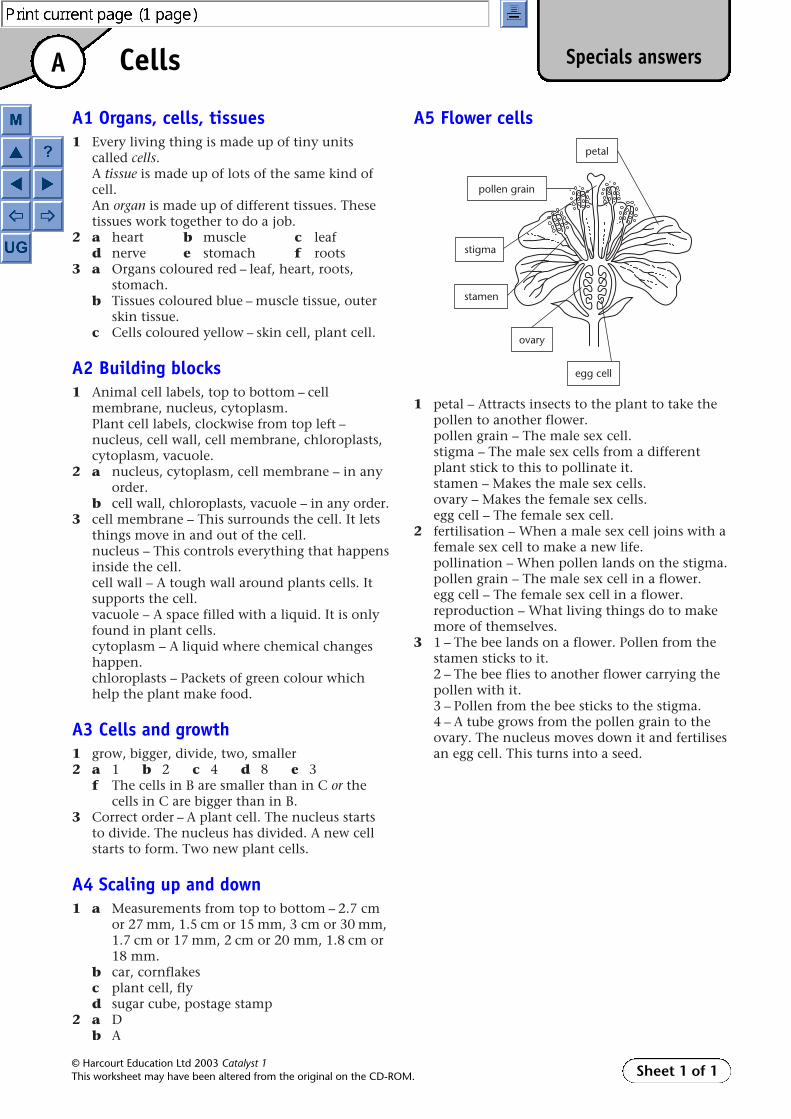
A1 Organs, cells, tissues1 Every living thing is made up of tiny units
called cells.A tissue is made up of lots of the same kind ofcell.An organ is made up of different tissues. Thesetissues work together to do a job.
2 a heart b muscle c leafd nerve e stomach f roots
3 a Organs coloured red – leaf, heart, roots,stomach.
b Tissues coloured blue – muscle tissue, outerskin tissue.
c Cells coloured yellow – skin cell, plant cell.
A2 Building blocks1 Animal cell labels, top to bottom – cell
membrane, nucleus, cytoplasm.Plant cell labels, clockwise from top left –nucleus, cell wall, cell membrane, chloroplasts,cytoplasm, vacuole.
2 a nucleus, cytoplasm, cell membrane – in anyorder.
b cell wall, chloroplasts, vacuole – in any order.3 cell membrane – This surrounds the cell. It lets
things move in and out of the cell.nucleus – This controls everything that happensinside the cell.cell wall – A tough wall around plants cells. Itsupports the cell.vacuole – A space filled with a liquid. It is onlyfound in plant cells.cytoplasm – A liquid where chemical changeshappen.chloroplasts – Packets of green colour whichhelp the plant make food.
A3 Cells and growth1 grow, bigger, divide, two, smaller2 a 1 b 2 c 4 d 8 e 3
f The cells in B are smaller than in C or thecells in C are bigger than in B.
3 Correct order – A plant cell. The nucleus startsto divide. The nucleus has divided. A new cellstarts to form. Two new plant cells.
A4 Scaling up and down1 a Measurements from top to bottom – 2.7 cm
or 27 mm, 1.5 cm or 15 mm, 3 cm or 30 mm,1.7 cm or 17 mm, 2 cm or 20 mm, 1.8 cm or18 mm.
b car, cornflakesc plant cell, flyd sugar cube, postage stamp
2 a D b A
A5 Flower cells
1 petal – Attracts insects to the plant to take thepollen to another flower.pollen grain – The male sex cell.stigma – The male sex cells from a differentplant stick to this to pollinate it.stamen – Makes the male sex cells.ovary – Makes the female sex cells.egg cell – The female sex cell.
2 fertilisation – When a male sex cell joins with afemale sex cell to make a new life.pollination – When pollen lands on the stigma.pollen grain – The male sex cell in a flower.egg cell – The female sex cell in a flower.reproduction – What living things do to makemore of themselves.
3 1 – The bee lands on a flower. Pollen from thestamen sticks to it.2 – The bee flies to another flower carrying thepollen with it.3 – Pollen from the bee sticks to the stigma.4 – A tube grows from the pollen grain to theovary. The nucleus moves down it and fertilisesan egg cell. This turns into a seed.
A Specials answersCells
Sheet 1 of 1© Harcourt Education Ltd 2003 Catalyst 1This worksheet may have been altered from the original on the CD-ROM.
petal
egg cell
stigma
ovary
pollen grain
stamen

Sheet 1 of 4
A1
© Harcourt Education Ltd 2003 Catalyst 1This worksheet may have been altered from the original on the CD-ROM.
Homework
HELP1 a Stick down the wordsearch. Find the seven organs listed below.
b Copy the table below. Write the words you found in thewordsearch in the correct columns.
c Copy and complete the table below. It is about the functions ofthe organs in the wordsearch.
Organs, cells, tissues
Animal organs Plant organs
Organ Function
heart
to support leaves and flowers and hold them up in the light
root
muscle
stomach
to receive light so that you can see
leaf muscleheart stem
stomach eye root

A1
© Harcourt Education Ltd 2003 Catalyst 1This worksheet may have been altered from the original on the CD-ROM.
HomeworkOrgans, cells, tissues (continued)
CORE2 Look at the diagram of a microscope. Write a list of labels for
parts A to F.
3 Copy and complete these sentences about the parts of a microscope.a We use a slide to …
b The job of the two lenses is to …
c We need both a coarse focus and a fine focus because …
4 a Explain the difference between:i a cell and a tissueii a tissue and an organ.
b Is skin a tissue or an organ? Explain your answer.
Sheet 2 of 4
A
D
E
F
B
C
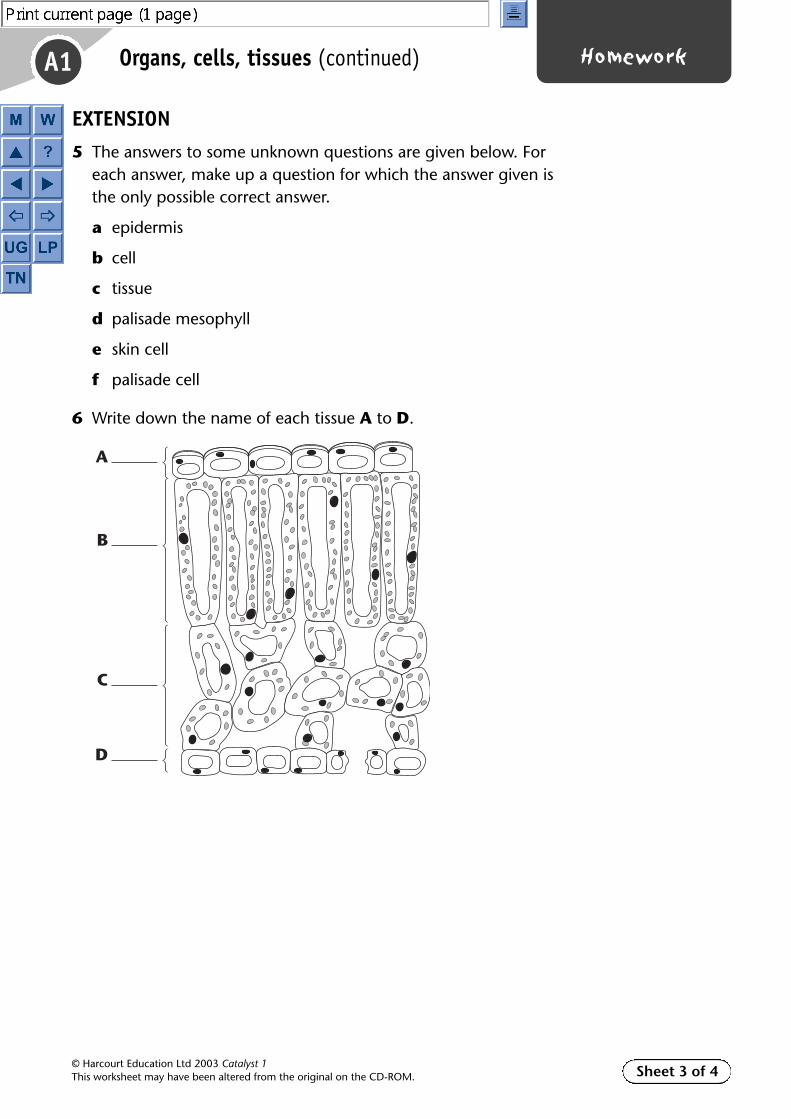
A1
© Harcourt Education Ltd 2003 Catalyst 1This worksheet may have been altered from the original on the CD-ROM.
HomeworkOrgans, cells, tissues (continued)
EXTENSION5 The answers to some unknown questions are given below. For
each answer, make up a question for which the answer given isthe only possible correct answer.
a epidermis
b cell
c tissue
d palisade mesophyll
e skin cell
f palisade cell
6 Write down the name of each tissue A to D.
Sheet 3 of 4
A
D
B
C

A1
© Harcourt Education Ltd 2003 Catalyst 1This worksheet may have been altered from the original on the CD-ROM.
HomeworkOrgans, cells, tissues (continued)
HELPWordsearch
Sheet 4 of 4
D E E Y E U S I S A P E
C O P E X T Y F A T G O
N C I L M T A Y E H E Z
K P U Q R R C R O O T M
L E H A N P H E L P Q J
F R E D D Y T W L A R D
P H L O L S T O M A C H
C R I M C E L L N O T E
A M U S C L E F I B U E
R O M E T E R N A O L X
D R O N E A A N D N P E
S E M L O F S C I E N C
A1 Homework
✂
Organs, cells, tissues (continued)
HELPWordsearch
D E E Y E U S I S A P E
C O P E X T Y F A T G O
N C I L M T A Y E H E Z
K P U Q R R C R O O T M
L E H A N P H E L P Q J
F R E D D Y T W L A R D
P H L O L S T O M A C H
C R I M C E L L N O T E
A M U S C L E F I B U E
R O M E T E R N A O L X
D R O N E A A N D N P E
S E M L O F S C I E N C
© Harcourt Education Ltd 2003 Catalyst 1This worksheet may have been altered from the original on the CD-ROM. Sheet 4 of 4
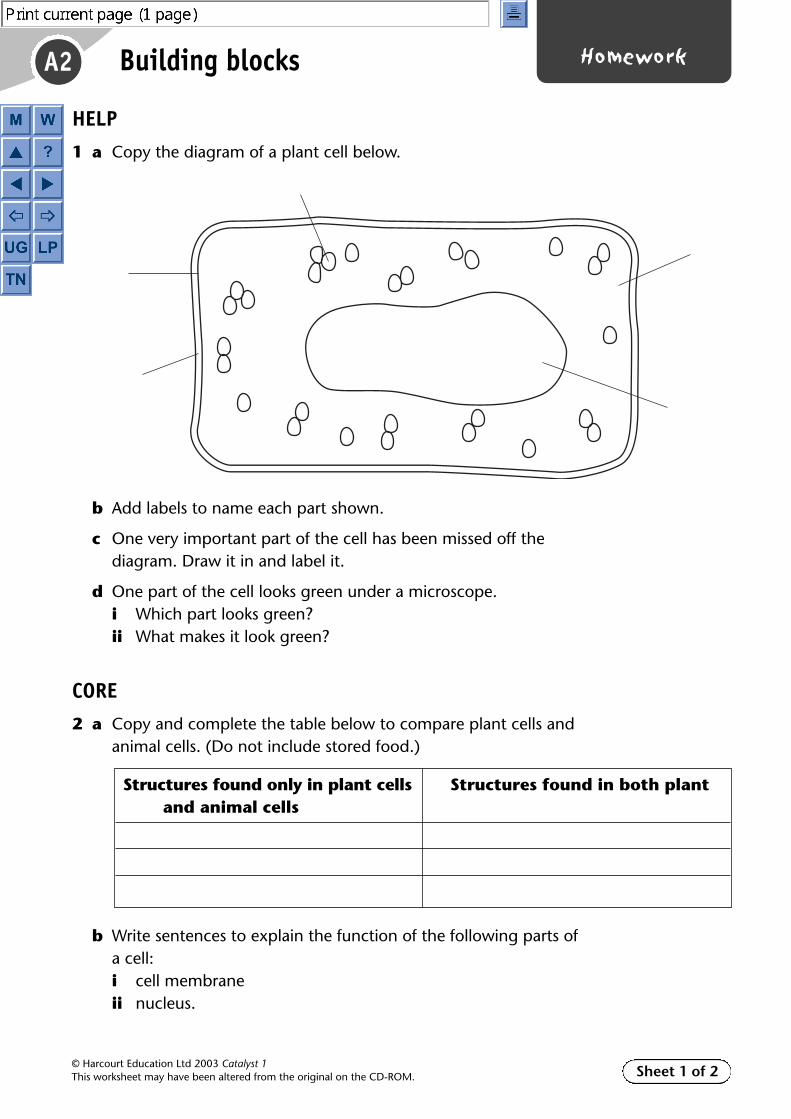
A2
© Harcourt Education Ltd 2003 Catalyst 1This worksheet may have been altered from the original on the CD-ROM.
HomeworkBuilding blocks
HELP1 a Copy the diagram of a plant cell below.
b Add labels to name each part shown.
c One very important part of the cell has been missed off thediagram. Draw it in and label it.
d One part of the cell looks green under a microscope.i Which part looks green? ii What makes it look green?
CORE2 a Copy and complete the table below to compare plant cells and
animal cells. (Do not include stored food.)
b Write sentences to explain the function of the following parts ofa cell:i cell membraneii nucleus.
Sheet 1 of 2
Structures found only in plant cells Structures found in both plantand animal cells

A2
© Harcourt Education Ltd 2003 Catalyst 1This worksheet may have been altered from the original on the CD-ROM.
HomeworkBuilding blocks (continued)
EXTENSIONThese questions are about how microscopes have helped to developour modern understanding of how living things work. Read thepassage, and then answer the questions about it.
3 What makes a compound microscope different from the one builtby Antoni von Leeuwenhoek?
4 Why does a specimen need to be thin to see it under a lightmicroscope?
5 Who discovered that cells can reproduce to make new cells?
6 Why do you think that Robert Hooke is considered to be animportant figure in the world of animal and plant science?
7 Rudolph Virchow talked about ‘vital units’ in his theory. What doyou think we would call these ‘vital units’ today?
8 After Robert Hooke invented the first compound microscope, itwas another hundred years or so before scientists stated a newtheory about cells. Suggest two reasons why it might have takenthem so long.
9 A light microscope has an eyepiece lens of �10 magnification,and three objective lenses of �10, �50 and �100. Calculate themagnification produced by each combination of eyepiece andobjective lenses. Show your working.
Sheet 2 of 2
In the early seventeenth century, people thought
that an animal or plant had to be complete to be
alive. If you cut off a flower and stood it in water
in a vase, for example, it was no longer alive. This
idea was called vitalism. We do not believe this
idea now, partly because microscopes have
enabled us to see parts of living things that are too
small to be seen with the naked eye.
In 1670, a Dutchman called Antoni von
Leeuwenhoek made a microscope with just one
lens. He could look at objects such as the legs of
flies and butterfly wings with it. Scientists
thought it was a wonderful invention. A few years
later a British scientist called Robert Hooke added
a second lens, so making the first compound
microscope. This could magnify things even
better, and it allowed him to see that cork is made
from tiny boxes, which he called cells. All these
microscopes are light microscopes, because they
work by shining a light up through the specimen
on the microscope stage, into the lens and
eventually into our eye.
In the nineteenth century, Matthias Schlieden and
Theodor Schwann looked at hundreds of animals
and plants and found that they were all made
from cells. Schwann also discovered that cells
could divide to make new cells. This showed that
cells are alive, so the old vitalist theory was
disproved. In 1858, Rudolph Virchow stated a
new theory. Virchow’s theory says: ‘Every
animal (and plant) appears as a sum of its vital
units, each of which bears in itself the complete
characteristics of life.’
Nearly one hundred years later, in 1932, a
German engineer called Ernst Ruska built the first
electron microscope. This uses electrons instead
of light, and can reach very high magnifications.
Now it is possible to see right inside cells to look
at the fine detail of the parts they contain and
which make them work.

A3
© Harcourt Education Ltd 2003 Catalyst 1This worksheet may have been altered from the original on the CD-ROM.
HomeworkCells and growth
HELP1 a Copy and complete these sentences by choosing from the
words below.
All living things ...................................... , which means they start
...................................... and get ...................................... . They grow by the
process of cell ...................................... .
b These sentences are in the wrong order. Copy them out in thecorrect order to explain what happens during cell division.
A The cell starts to divide into two.
B The nucleus divides into two.
C The cell finishes dividing and two new cells have beenproduced.
D There are two copies of the nucleus in the same cell.
CORE2 Cell division happens in three main stages, which are:
1 The nucleus divides.2 The cell divides.3 The new cells grow.
a Draw a diagram for each of these three stages, showing whatthe cell or cells might look like under a microscope.
b Suggest a reason why, after the cell divides, each new cellgrows before it can divide again.
c Only stage 3 increases the size of an organ. Suggest whatmight happen to the size of the organ if all the cells in itcompleted stage 3 at the same time.
Sheet 1 of 2
small smaller big bigger grow division

A3
© Harcourt Education Ltd 2003 Catalyst 1This worksheet may have been altered from the original on the CD-ROM.
HomeworkCells and growth (continued)
EXTENSIONRead the passage about the cell division of cholera bacteria, and thenanswer the questions about it.
3 The passage says that cholera bacteria can multiply ‘prolifically’.Use a dictionary to write a definition of the word ‘prolific’.
4 In the digestive system, a cholera bacterium can divide every hour.Suppose you swallowed some water containing 1000 cholerabacteria. Assuming that none of them died, how many would bein your digestive system:
a after 1 hour?
b after 5 hours?
c after 12 hours?
Show your working for each one.
5 Cholera is passed from one person to another when bacteria fromthe digestive system get into water that the second person drinks.Suggest how this might happen easily in a crisis situation like arefugee camp or after an earthquake. (Hint: think about anypictures of these events that you may have seen and remember thatthe answer is pretty unpleasant.)
6 Write a sentence or two to explain why it is very important, duringcell division, that the nucleus always divides first.
Sheet 2 of 2
Some illnesses are caused by bacteria, which multiply very quickly. Oneexample is cholera, which affects people who are crowded together in veryunsanitary conditions, such as you might find in a refugee camp or in a hotcountry after an earthquake. Cholera bacteria are swallowed when a persondrinks contaminated water or eats contaminated food. In their digestive system,where the conditions are just right, the cholera bacteria multiply prolifically. Ifit is not treated very quickly, cholera causes death within a few hours.

A5
© Harcourt Education Ltd 2003 Catalyst 1This worksheet may have been altered from the original on the CD-ROM.
HomeworkFlower cells
HELPThis question is to help you remember things you learned about flowers when you werein Year 5 or Year 6.
1 Copy and complete these sentences by choosing from the words below.
a A flower has ...................................... to attract insects.
b The male sex cell in a flower is called the ...................................... ...................................... .
c The female sex cell in a flower is the ...................................... ...................................... .
d During ......................................, the male sex cell becomes stuck onto the ......................................of another flower.
e During fertilisation, the ...................................... from the pollen cell must join with the nucleus in the egg cell.
CORE2 a Stick down the flower diagram.
b Complete the labels using these words.
c Draw a circle in red round the label of the male sex cell.
d Draw a box in green round the label of the female sex cell.
e Underline the name of the male sex organ in red.
f Underline the name of the female sex organ in green.
3 These sentences are in the wrong order. Copy them out in the correct order to explain fertilisation in a flowering plant.
A The nucleus of the pollen grain joins with the nucleus of the egg cell.
B The pollen tube grows into the ovary, then into the egg cell.
C Having landed on the stigma, a pollen grain grows a pollen tube down the style, taking the pollen nucleus with it.
D Fertilisation has now occurred.
Sheet 1 of 3
petal stigma
stamen
petals
pollinationfertilisation
pollen grain stigma stamen nucleus carpel
egg cell
pollen grain

A5
© Harcourt Education Ltd 2003 Catalyst 1This worksheet may have been altered from the original on the CD-ROM.
HomeworkFlower cells (continued)
EXTENSIONThese questions are about the wider aspects of pollination in plants.They are designed to make you think a bit. You will not find theanswers in your textbook.
4 Grass does not have pretty flowers. Its flowers are small, green andnot very obvious. Insects do not pollinate grass flowers. Suggesthow grass might be pollinated, and why grass needs to producevery large amounts of pollen. (Hint: hay fever sufferers are oftenvery badly affected by grass pollen during early May.)
5 Some pollen grains are quite sticky. Others have tiny hooks orspikes all over their surface. How would these special features ofpollen grains help plants to pollinate successfully?
6 Sugar is a very important nutrient because it provides a very quicksource of energy. Energy is needed for cells to divide or to grow.Suggest why the stigmas of most flowers contain quite a lot ofsugar.
Sheet 2 of 3
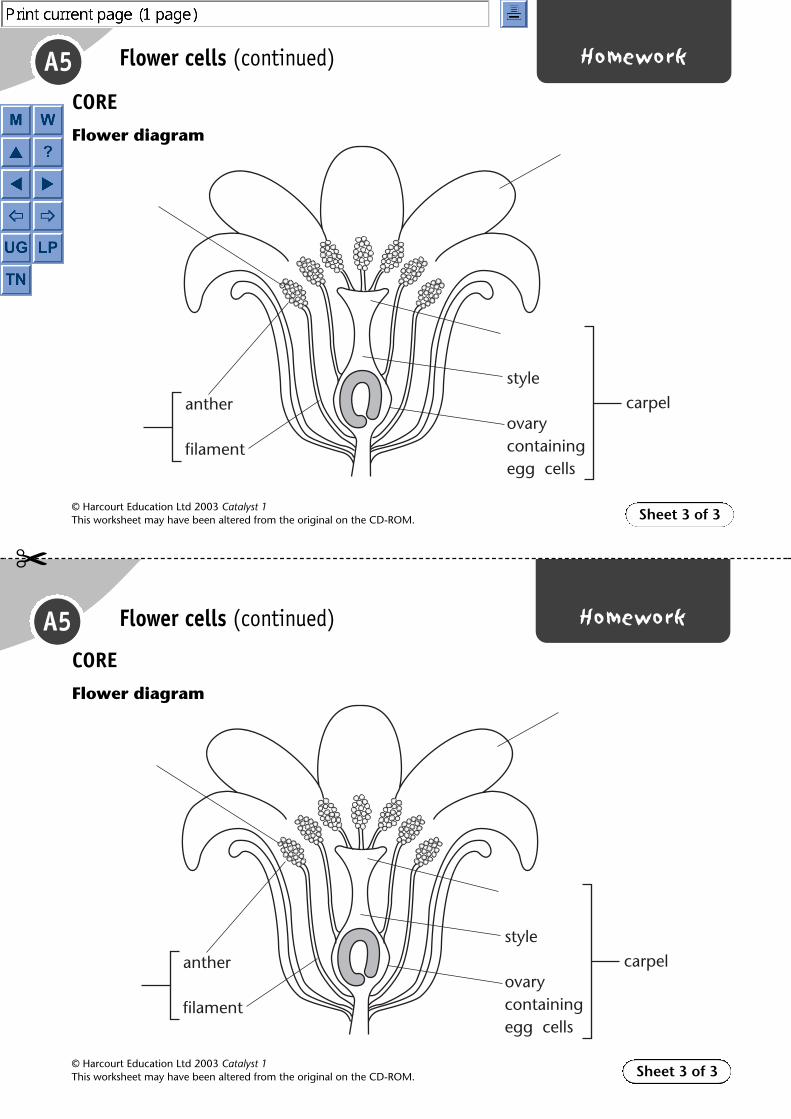
A5
© Harcourt Education Ltd 2003 Catalyst 1This worksheet may have been altered from the original on the CD-ROM.
HomeworkFlower cells (continued)
Sheet 3 of 3
style
ovarycontainingegg cells
carpelanther
filament
style
ovarycontainingegg cells
carpelanther
filament
COREFlower diagram
A5 Homework
✂
Flower cells (continued)
COREFlower diagram
© Harcourt Education Ltd 2003 Catalyst 1This worksheet may have been altered from the original on the CD-ROM. Sheet 3 of 3
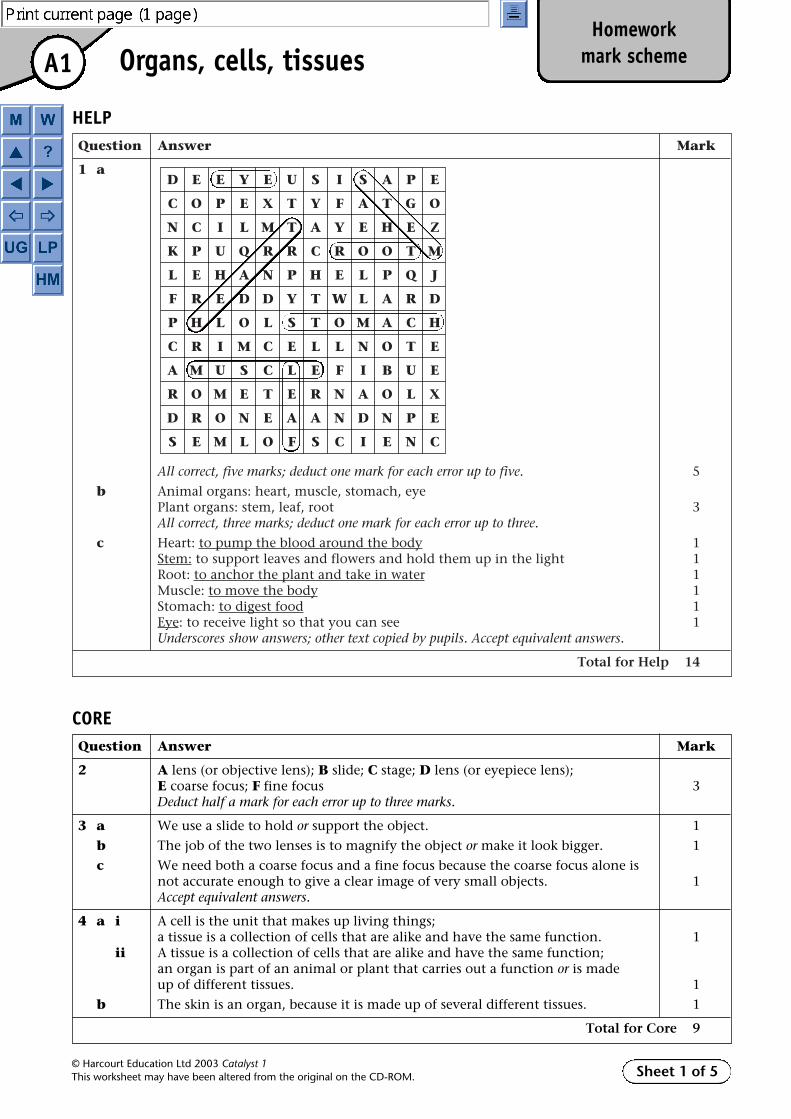
Question Answer Mark
1 a
All correct, five marks; deduct one mark for each error up to five. 5
b Animal organs: heart, muscle, stomach, eyePlant organs: stem, leaf, root 3All correct, three marks; deduct one mark for each error up to three.
c Heart: to pump the blood around the body 1Stem: to support leaves and flowers and hold them up in the light 1Root: to anchor the plant and take in water 1Muscle: to move the body 1Stomach: to digest food 1Eye: to receive light so that you can see 1Underscores show answers; other text copied by pupils. Accept equivalent answers.
Total for Help 14
D E E Y E U S I S A P E
C O P E X T Y F A T G O
N C I L M T A Y E H E Z
K P U Q R R C R O O T M
L E H A N P H E L P Q J
F R E D D Y T W L A R D
P H L O L S T O M A C H
C R I M C E L L N O T E
A M U S C L E F I B U E
R O M E T E R N A O L X
D R O N E A A N D N P E
S E M L O F S C I E N C
A1
© Harcourt Education Ltd 2003 Catalyst 1This worksheet may have been altered from the original on the CD-ROM.
Homeworkmark schemeOrgans, cells, tissues
Sheet 1 of 5
HELP
Question Answer Mark
2 A lens (or objective lens); B slide; C stage; D lens (or eyepiece lens); E coarse focus; F fine focus 3Deduct half a mark for each error up to three marks.
3 a We use a slide to hold or support the object. 1
b The job of the two lenses is to magnify the object or make it look bigger. 1
c We need both a coarse focus and a fine focus because the coarse focus alone is not accurate enough to give a clear image of very small objects. 1Accept equivalent answers.
4 a i A cell is the unit that makes up living things;a tissue is a collection of cells that are alike and have the same function. 1
ii A tissue is a collection of cells that are alike and have the same function;an organ is part of an animal or plant that carries out a function or is made up of different tissues. 1
b The skin is an organ, because it is made up of several different tissues. 1
Total for Core 9
CORE

A1
© Harcourt Education Ltd 2003 Catalyst 1This worksheet may have been altered from the original on the CD-ROM.
Homeworkmark schemeOrgans, cells, tissues (continued)
Sheet 2 of 5
Question Answer Mark
5 a For example: What is the name of the outer tissue in human skin? 1
b For example: What is the small unit that makes up all organisms? 1
c For example: What is a group of similar cells that have the same function? 1
d For example: What is the tissue that carries out photosynthesis in a leaf? 1
e For example: What sort of cells make up the epidermis of skin? 1
f For example: What sort of cell makes up the palisade mesophyll? 1
6 A upper epidermis; B palisade mesophyll; C spongy mesophyll;D lower epidermis All correct, three marks; three correct, two marks; one or two correct, one mark. 3
Total for Extension 9
EXTENSION
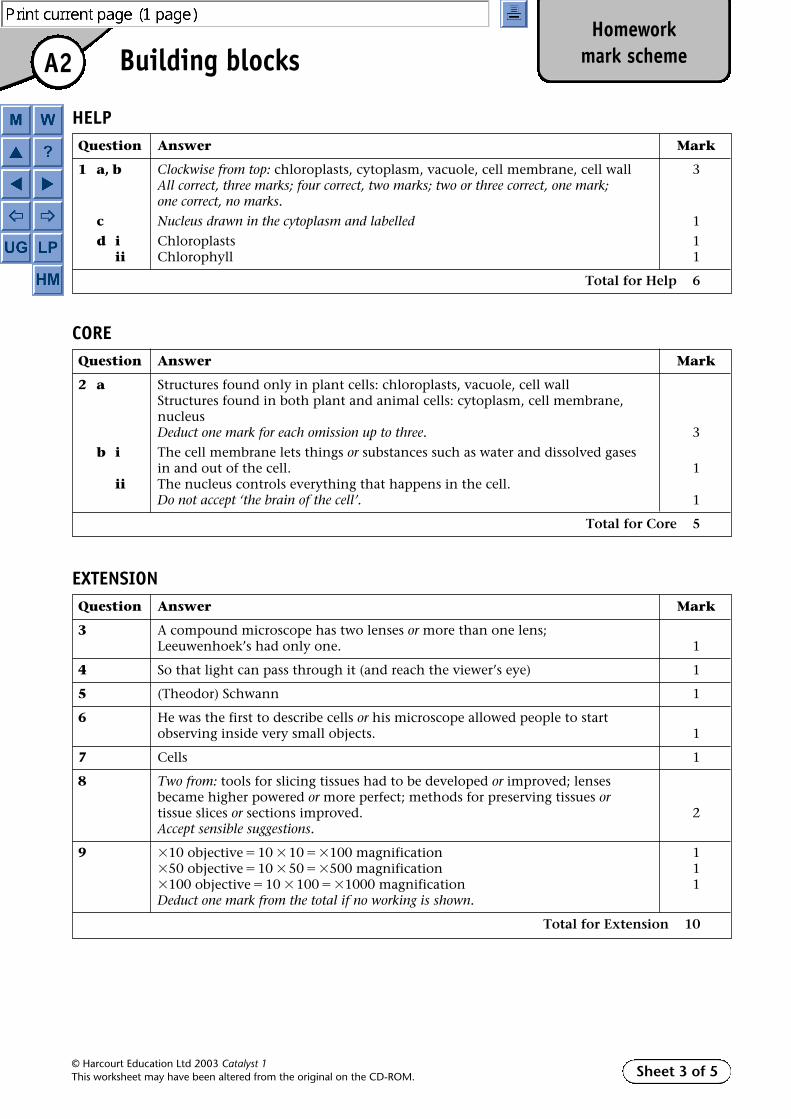
A2
© Harcourt Education Ltd 2003 Catalyst 1This worksheet may have been altered from the original on the CD-ROM.
Homeworkmark schemeBuilding blocks
Sheet 3 of 5
Question Answer Mark
1 a, b Clockwise from top: chloroplasts, cytoplasm, vacuole, cell membrane, cell wall 3All correct, three marks; four correct, two marks; two or three correct, one mark; one correct, no marks.
c Nucleus drawn in the cytoplasm and labelled 1
d i Chloroplasts 1ii Chlorophyll 1
Total for Help 6
HELP
Question Answer Mark
2 a Structures found only in plant cells: chloroplasts, vacuole, cell wallStructures found in both plant and animal cells: cytoplasm, cell membrane, nucleusDeduct one mark for each omission up to three. 3
b i The cell membrane lets things or substances such as water and dissolved gases in and out of the cell. 1
ii The nucleus controls everything that happens in the cell.Do not accept ‘the brain of the cell’. 1
Total for Core 5
CORE
Question Answer Mark
3 A compound microscope has two lenses or more than one lens; Leeuwenhoek’s had only one. 1
4 So that light can pass through it (and reach the viewer’s eye) 1
5 (Theodor) Schwann 1
6 He was the first to describe cells or his microscope allowed people to start observing inside very small objects. 1
7 Cells 1
8 Two from: tools for slicing tissues had to be developed or improved; lenses became higher powered or more perfect; methods for preserving tissues or tissue slices or sections improved. 2Accept sensible suggestions.
9 �10 objective�10 �10� �100 magnification 1�50 objective�10 �50� �500 magnification 1�100 objective�10 �100� �1000 magnification 1Deduct one mark from the total if no working is shown.
Total for Extension 10
EXTENSION
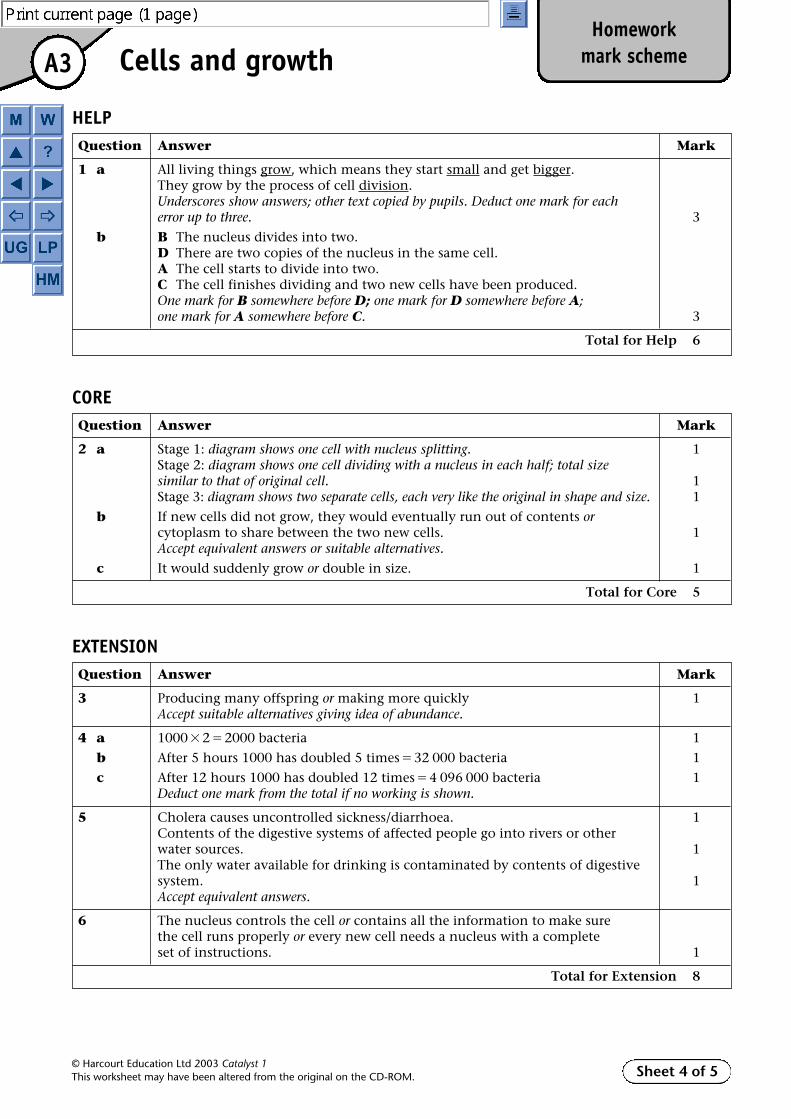
A3
© Harcourt Education Ltd 2003 Catalyst 1This worksheet may have been altered from the original on the CD-ROM.
Homeworkmark schemeCells and growth
Sheet 4 of 5
Question Answer Mark
1 a All living things grow, which means they start small and get bigger. They grow by the process of cell division.Underscores show answers; other text copied by pupils. Deduct one mark for each error up to three. 3
b B The nucleus divides into two.D There are two copies of the nucleus in the same cell.A The cell starts to divide into two.C The cell finishes dividing and two new cells have been produced.One mark for B somewhere before D; one mark for D somewhere before A; one mark for A somewhere before C. 3
Total for Help 6
HELP
Question Answer Mark
2 a Stage 1: diagram shows one cell with nucleus splitting. 1Stage 2: diagram shows one cell dividing with a nucleus in each half; total size similar to that of original cell. 1Stage 3: diagram shows two separate cells, each very like the original in shape and size. 1
b If new cells did not grow, they would eventually run out of contents orcytoplasm to share between the two new cells. 1Accept equivalent answers or suitable alternatives.
c It would suddenly grow or double in size. 1
Total for Core 5
CORE
Question Answer Mark
3 Producing many offspring or making more quickly 1Accept suitable alternatives giving idea of abundance.
4 a 1000�2�2000 bacteria 1
b After 5 hours 1000 has doubled 5 times�32 000 bacteria 1
c After 12 hours 1000 has doubled 12 times�4 096 000 bacteria 1Deduct one mark from the total if no working is shown.
5 Cholera causes uncontrolled sickness/diarrhoea. 1Contents of the digestive systems of affected people go into rivers or other water sources. 1The only water available for drinking is contaminated by contents of digestive system. 1Accept equivalent answers.
6 The nucleus controls the cell or contains all the information to make sure the cell runs properly or every new cell needs a nucleus with a complete set of instructions. 1
Total for Extension 8
EXTENSION

A5
© Harcourt Education Ltd 2003 Catalyst 1This worksheet may have been altered from the original on the CD-ROM.
Homeworkmark schemeFlower cells
Sheet 5 of 5
Question Answer Mark
1 a A flower has petals to attract insects.Underscores show answers; other text copied by pupils. 1
b The male sex cell in a flower is called the pollen grain. 1
c The female sex cell in a flower is the egg cell. 1
d During pollination, the male sex cell becomes stuck onto the stigma of another flower. 2
e During fertilisation, the nucleus from the pollen cell must join with the nucleus in the egg cell. 1
Total for Help 6
HELP
Question Answer Mark
2 a, b Clockwise from top: pollen grain, petal, stigma, stamen 3
c ‘Pollen grain’ circled in red 1
d ‘Egg cells’ boxed in green 1
e ‘Stamen’ underlined in red 1
f ‘Carpel’ underlined in green 1
3 C Having landed on the stigma, a pollen grain grows a pollen tube down the style, taking the pollen nucleus with it.
B The pollen tube grows into the ovary, then into the egg cell.A The nucleus of the pollen grain joins with the nucleus of the egg cell.D Fertilisation has now occurred. 3One mark for C somewhere before B; one mark for B somewhere before A; one mark for A somewhere before D.
Total for Core 10
CORE
Question Answer Mark
4 Grass pollen is blown by the wind onto another grass stigma 1so lots of pollen is needed to ensure grass flowers are pollinated. 1Accept equivalent answers.
5 Pollen sticks or catches onto an animal, 1which moves and puts the pollen on another flower. 1
6 The pollen grain needs energy to grow its pollen tube.Accept an argument based on attracting insects. 1
Total for Extension 5
EXTENSION
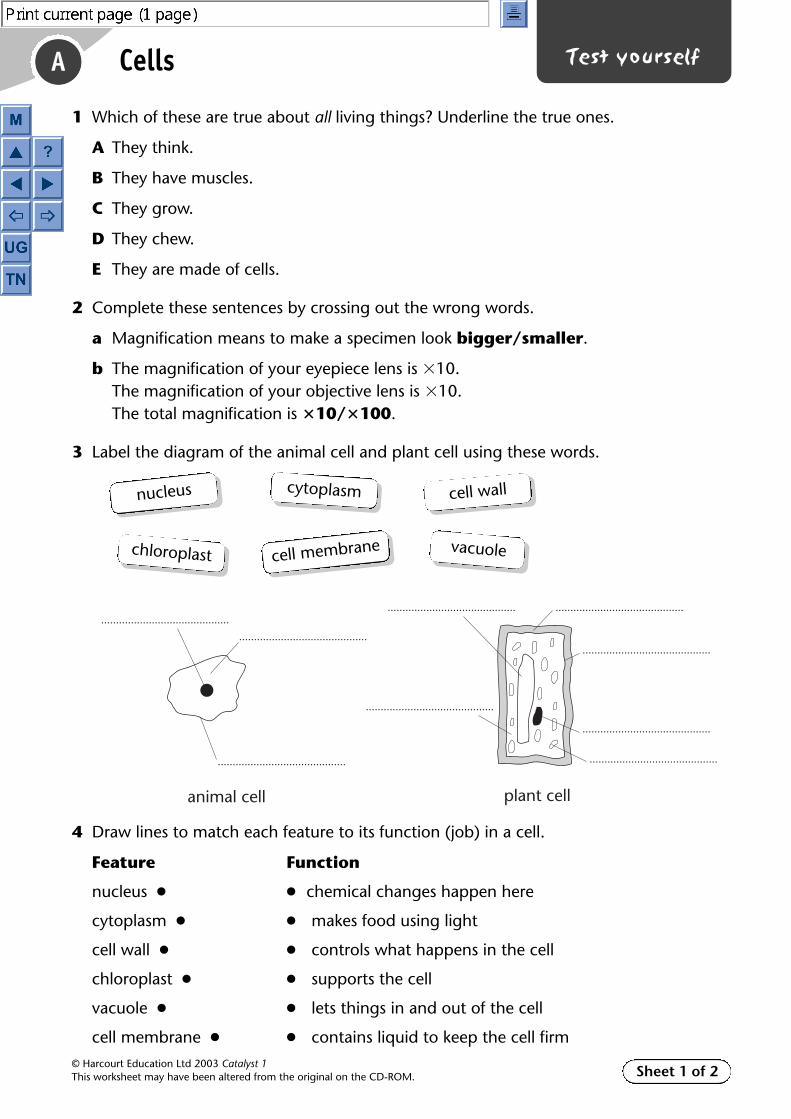
A
© Harcourt Education Ltd 2003 Catalyst 1This worksheet may have been altered from the original on the CD-ROM.
Test yourselfCells
1 Which of these are true about all living things? Underline the true ones.
A They think.
B They have muscles.
C They grow.
D They chew.
E They are made of cells.
2 Complete these sentences by crossing out the wrong words.
a Magnification means to make a specimen look bigger/smaller.
b The magnification of your eyepiece lens is �10.The magnification of your objective lens is �10.The total magnification is �10/�100.
3 Label the diagram of the animal cell and plant cell using these words.
4 Draw lines to match each feature to its function (job) in a cell.
Feature Function
nucleus ● ● chemical changes happen here
cytoplasm ● ● makes food using light
cell wall ● ● controls what happens in the cell
chloroplast ● ● supports the cell
vacuole ● ● lets things in and out of the cell
cell membrane ● ● contains liquid to keep the cell firm
Sheet 1 of 2
...........................................
...........................................
...........................................
...........................................
...........................................
...........................................
...........................................
...........................................
...........................................
animal cell plant cell
cell membrane
nucleus cytoplasm cell wall
chloroplast vacuole
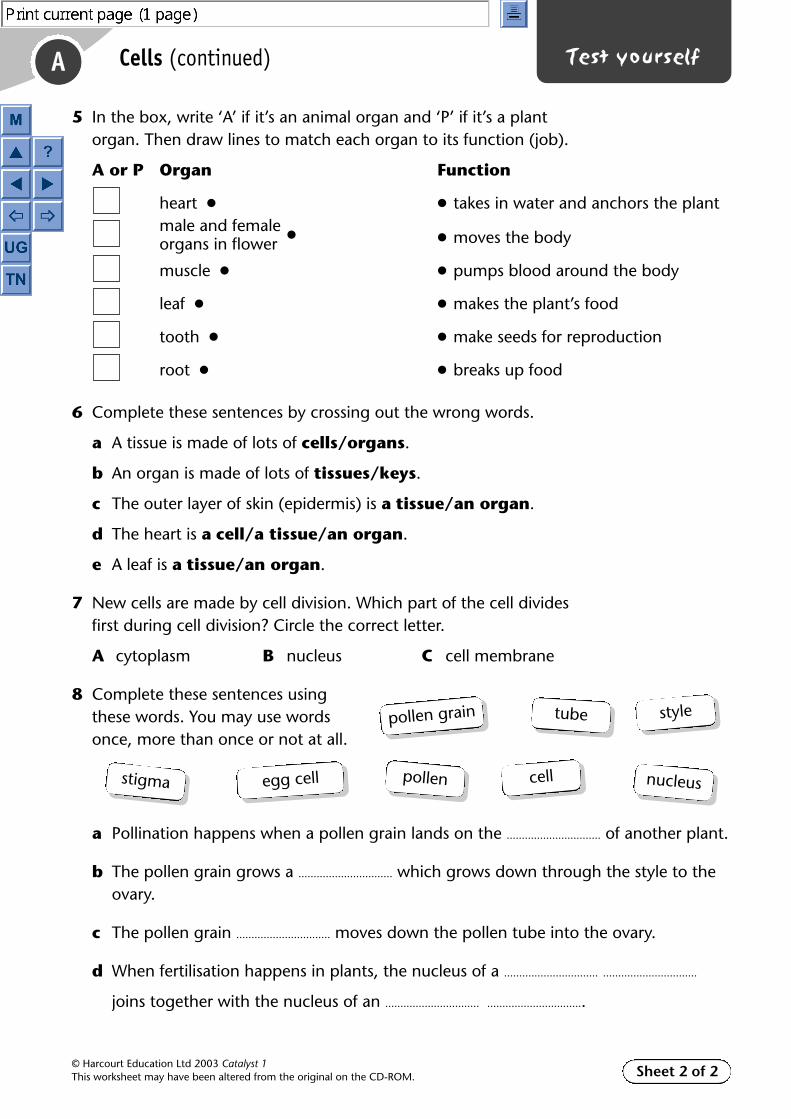
A
© Harcourt Education Ltd 2003 Catalyst 1This worksheet may have been altered from the original on the CD-ROM.
Test yourselfCells (continued)
5 In the box, write ‘A’ if it’s an animal organ and ‘P’ if it’s a plant organ. Then draw lines to match each organ to its function (job).
A or P Organ Function
heart ● ● takes in water and anchors the plantmale and femaleorgans in flower ● ● moves the body
muscle ● ● pumps blood around the body
leaf ● ● makes the plant’s food
tooth ● ● make seeds for reproduction
root ● ● breaks up food
6 Complete these sentences by crossing out the wrong words.
a A tissue is made of lots of cells/organs.
b An organ is made of lots of tissues/keys.
c The outer layer of skin (epidermis) is a tissue/an organ.
d The heart is a cell/a tissue/an organ.
e A leaf is a tissue/an organ.
7 New cells are made by cell division. Which part of the cell divides first during cell division? Circle the correct letter.
A cytoplasm B nucleus C cell membrane
8 Complete these sentences using these words. You may use words once, more than once or not at all.
a Pollination happens when a pollen grain lands on the ............................... of another plant.
b The pollen grain grows a ............................... which grows down through the style to theovary.
c The pollen grain ............................... moves down the pollen tube into the ovary.
d When fertilisation happens in plants, the nucleus of a ............................... ...............................
joins together with the nucleus of an ............................... ................................
Sheet 2 of 2
egg cell
pollen grain tube style
pollen cellstigma nucleus

A
© Harcourt Education Ltd 2003 Catalyst 1This worksheet may have been altered from the original on the CD-ROM.
Test yourselfAnswersCells
1 Which of these are true about all living things? Underline the true ones.
A They think.
B They have muscles.
C They grow.
D They chew.
E They are made of cells.
2 Complete these sentences by crossing out the wrong words.
a Magnification means to make a specimen look bigger/smaller.
b The magnification of your eyepiece lens is �10.The magnification of your objective lens is �10.The total magnification is �10/�100.
3 Label the diagram of the animal cell and plant cell using these words.
4 Draw lines to match each feature to its function (job) in a cell.
Feature Function
nucleus ● ● chemical changes happen here
cytoplasm ● ● makes food using light
cell wall ● ● controls what happens in the cell
chloroplast ● ● supports the cell
vacuole ● ● lets things in and out of the cell
cell membrane ● ● contains liquid to keep the cell firm
Sheet 1 of 2
...........................................
...........................................
...........................................
...........................................
...........................................
...........................................
...........................................
...........................................
...........................................
nucleus
cytoplasm
cell membrane
vacuole
cytoplasm
chloroplast
nucleus
cell membrane
cell wall
animal cell plant cell
cell membrane
nucleus cytoplasm cell wall
chloroplast vacuole

A
© Harcourt Education Ltd 2003 Catalyst 1This worksheet may have been altered from the original on the CD-ROM.
Test yourselfAnswersCells (continued)
5 In the box, write ‘A’ if it’s an animal organ and ‘P’ if it’s a plant organ. Then draw lines to match each organ to its function (job).
A or P Organ Function
heart ● ● takes in water and anchors the plantmale and femaleorgans in flower ● ● moves the body
muscle ● ● pumps blood around the body
leaf ● ● makes the plant’s food
tooth ● ● make seeds for reproduction
root ● ● breaks up food
6 Complete these sentences by crossing out the wrong words.
a A tissue is made of lots of cells/organs.
b An organ is made of lots of tissues/keys.
c The outer layer of skin (epidermis) is a tissue/an organ.
d The heart is a cell/a tissue/an organ.
e A leaf is a tissue/an organ.
7 New cells are made by cell division. Which part of the cell divides first during cell division? Circle the correct letter.
A cytoplasm B nucleus C cell membrane
8 Complete these sentences using these words. You may use words once, more than once or not at all.
a Pollination happens when a pollen grain lands on the ............................... of another plant.
b The pollen grain grows a ............................... which grows down through the style to theovary.
c The pollen grain ............................... moves down the pollen tube into the ovary.
d When fertilisation happens in plants, the nucleus of a ............................... ..............................
joins together with the nucleus of an ............................... ................................
P
A
P
A
P
A
Sheet 2 of 2
egg cell
pollen grain tube style
pollen cellstigma nucleus
stigma
tube
nucleus
pollen
egg cell
grain
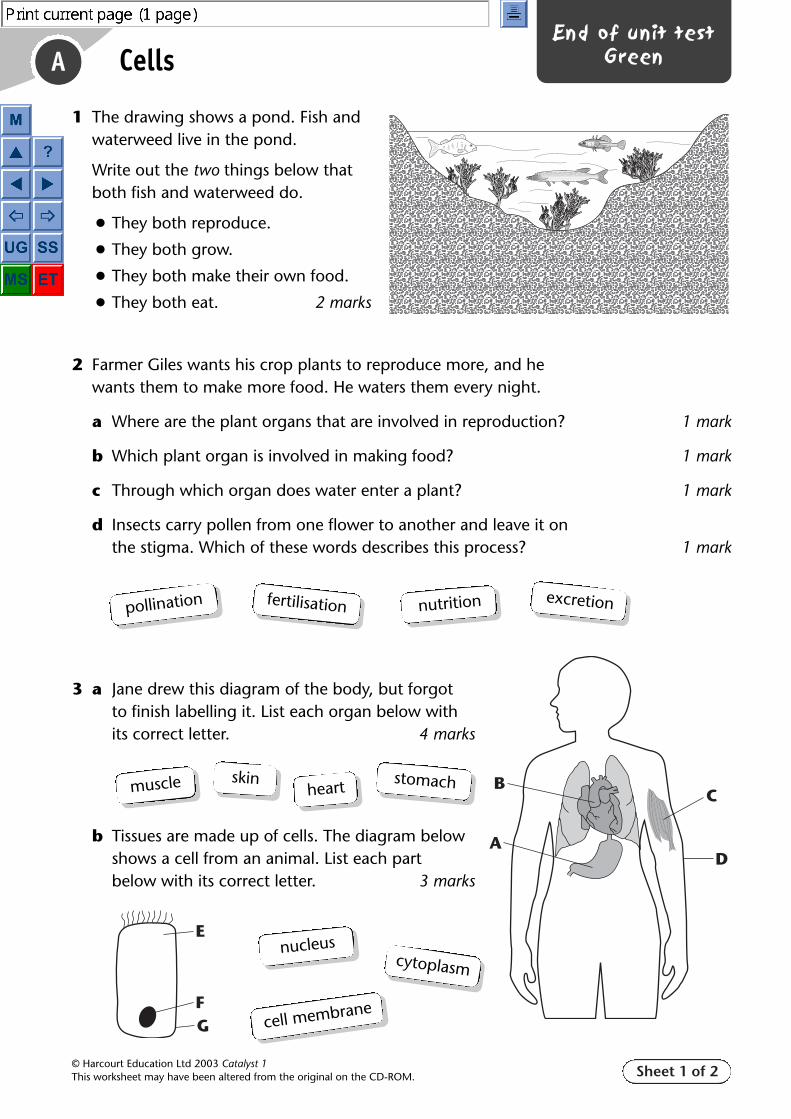
Sheet 1 of 2
A
© Harcourt Education Ltd 2003 Catalyst 1This worksheet may have been altered from the original on the CD-ROM.
End of unit testGreen
1 The drawing shows a pond. Fish and waterweed live in the pond.
Write out the two things below that both fish and waterweed do.
● They both reproduce.
● They both grow.
● They both make their own food.
● They both eat. 2 marks
2 Farmer Giles wants his crop plants to reproduce more, and he wants them to make more food. He waters them every night.
a Where are the plant organs that are involved in reproduction? 1 mark
b Which plant organ is involved in making food? 1 mark
c Through which organ does water enter a plant? 1 mark
d Insects carry pollen from one flower to another and leave it on the stigma. Which of these words describes this process? 1 mark
3 a Jane drew this diagram of the body, but forgot to finish labelling it. List each organ below with its correct letter. 4 marks
b Tissues are made up of cells. The diagram below shows a cell from an animal. List each part below with its correct letter. 3 marks
Cells
pollination nutritionfertilisation excretion
skin stomachmuscle heart
A
B
D
C
E
FG
nucleuscytoplasm
cell membrane

A
© Harcourt Education Ltd 2003 Catalyst 1This worksheet may have been altered from the original on the CD-ROM.
End of unit testGreenCells (continued)
4 Scientists from the Natural History Museum spent 1996 in the Gobi Desert in Mongolia. They found a group of fossilised cells, which are shown in the picture opposite.
a Are these plant or animal cells? Explain how you know this. 2 marks
b Which part of the plant or animal might these cells have come from? Explain your answer. 2 marks
c Which group contains some cells that have just divided? Explain how you know. 2 marks
d Why do cells divide? 1 mark
5 a Colin was using a microscope. His teacher told him that each space on this scale slide was equal to 0.1 mm.
i How many spaces are there across the scale slide? 1 markii If each space is 0.1 mm, how many millimetres
does this scale slide measure across? 1 mark
b Colin made this slide using the skin from inside an onion. He stained it using iodine.
i How many cells does the black line cross? 1 markii The black line measures 1 mm across. Estimate
the width of one onion cell. 1 markiii Why did Colin use iodine to stain the cells? 1 mark
Sheet 2 of 2
BA
not to scale
not to scale
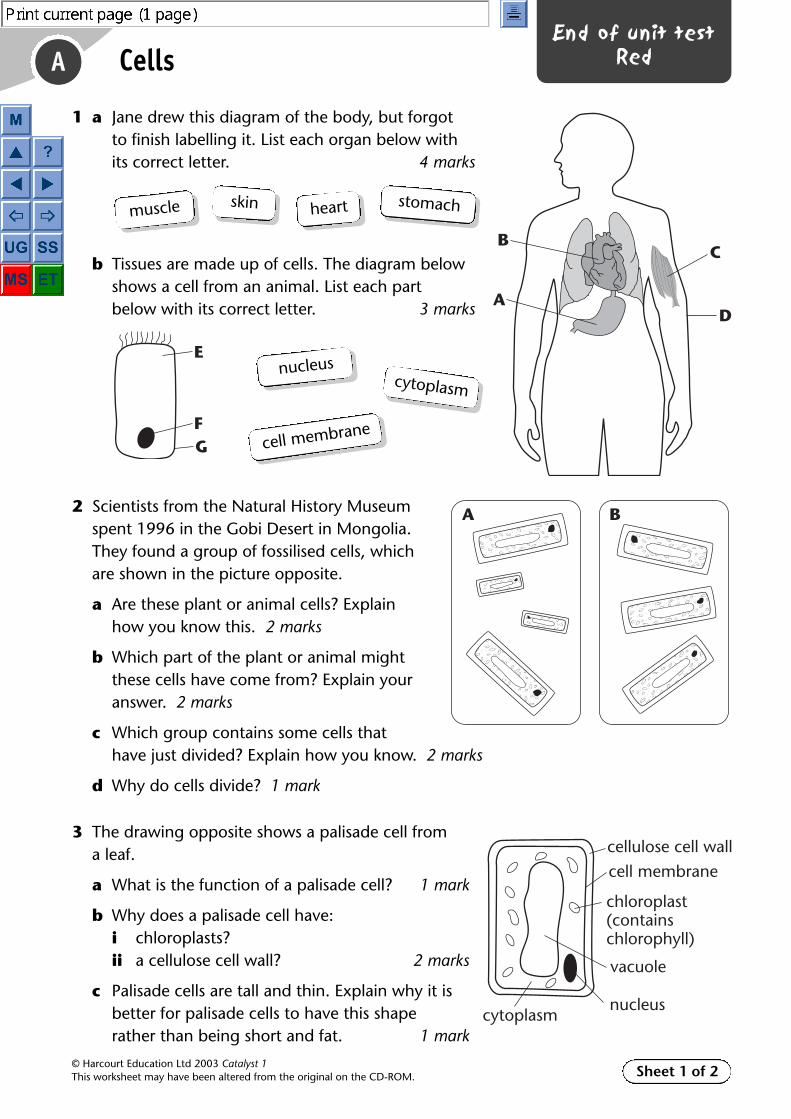
A
© Harcourt Education Ltd 2003 Catalyst 1This worksheet may have been altered from the original on the CD-ROM.
End of unit testRedCells
1 a Jane drew this diagram of the body, but forgot to finish labelling it. List each organ below with its correct letter. 4 marks
b Tissues are made up of cells. The diagram below shows a cell from an animal. List each part below with its correct letter. 3 marks
2 Scientists from the Natural History Museum spent 1996 in the Gobi Desert in Mongolia. They found a group of fossilised cells, which are shown in the picture opposite.
a Are these plant or animal cells? Explain how you know this. 2 marks
b Which part of the plant or animal might these cells have come from? Explain your answer. 2 marks
c Which group contains some cells that have just divided? Explain how you know. 2 marks
d Why do cells divide? 1 mark
3 The drawing opposite shows a palisade cell from a leaf.
a What is the function of a palisade cell? 1 mark
b Why does a palisade cell have:i chloroplasts?ii a cellulose cell wall? 2 marks
c Palisade cells are tall and thin. Explain why it is better for palisade cells to have this shape rather than being short and fat. 1 mark
Sheet 1 of 2
skin stomachmuscle heart
A
B
D
C
E
FG
nucleuscytoplasm
cell membrane
BA
cellulose cell wallcell membrane
chloroplast(containschlorophyll)
vacuole
cytoplasmnucleus

A
© Harcourt Education Ltd 2003 Catalyst 1This worksheet may have been altered from the original on the CD-ROM.
End of unit testRedCells (continued)
4 Bacteria and viruses can both cause diseases. The diagrams show a bacterium and a virus. Although the bacterium has no nucleus, it is still called a cell because it has most of the other features that cells have.
a Do you think the virus is a cell? 1 mark
b Explain your answer. 1 mark
5 a Colin made this slide using the skin from inside an onion. He stained it using iodine.i How many cells does the black line cross? 1 markii The black line measures 1 mm across.
Estimate the width of one onion cell. 1 markiii Why did Colin use iodine to stain the cells? 1 mark
b In part a above the cells are at �100 magnification.These are the same cells at a higher magnification. The black line now measures 0.25 mm across.i How many times bigger are the cells now? 1 markii What is the magnification of the cells now? 1 mark
Sheet 2 of 2
bacterium
virus
not to scale
not to scale
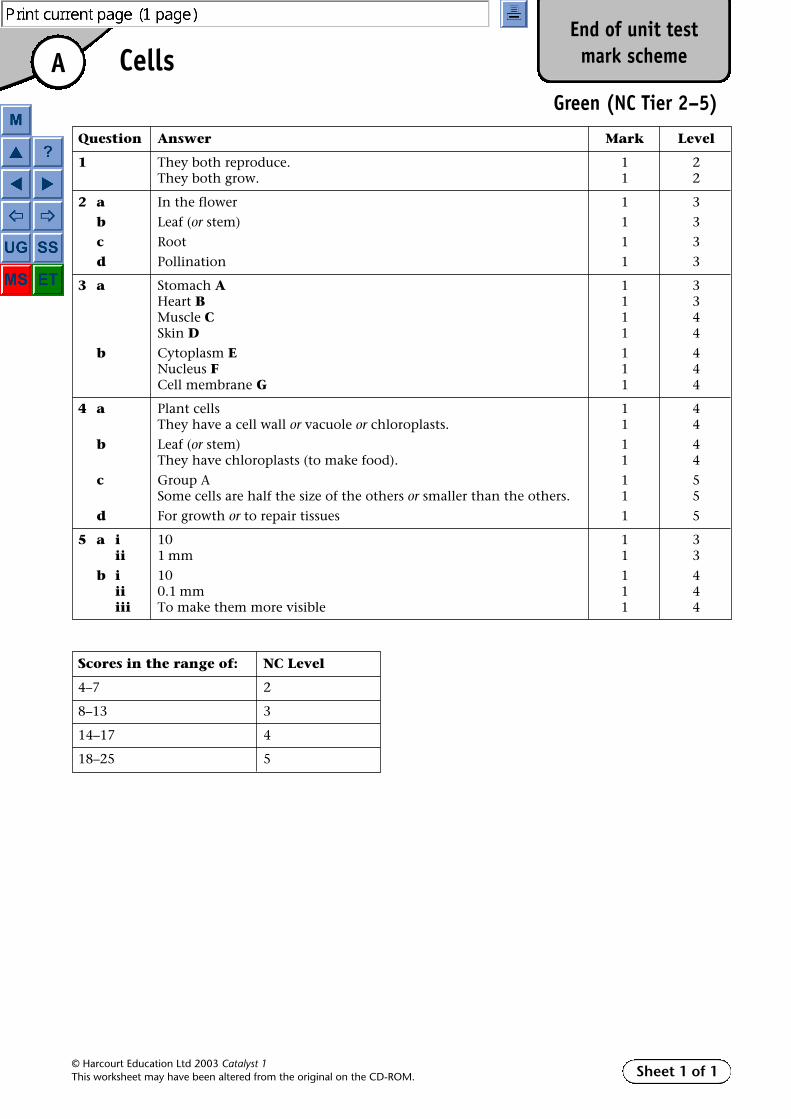
A
© Harcourt Education Ltd 2003 Catalyst 1This worksheet may have been altered from the original on the CD-ROM.
End of unit testmark schemeCells
Sheet 1 of 1
Green (NC Tier 2–5)
Question Answer Mark Level
1 They both reproduce. 1 2They both grow. 1 2
2 a In the flower 1 3
b Leaf (or stem) 1 3
c Root 1 3
d Pollination 1 3
3 a Stomach A 1 3Heart B 1 3Muscle C 1 4Skin D 1 4
b Cytoplasm E 1 4Nucleus F 1 4Cell membrane G 1 4
4 a Plant cells 1 4They have a cell wall or vacuole or chloroplasts. 1 4
b Leaf (or stem) 1 4They have chloroplasts (to make food). 1 4
c Group A 1 5Some cells are half the size of the others or smaller than the others. 1 5
d For growth or to repair tissues 1 5
5 a i 10 1 3ii 1 mm 1 3
b i 10 1 4ii 0.1 mm 1 4iii To make them more visible 1 4
Scores in the range of: NC Level
4–7 2
8–13 3
14–17 4
18–25 5

A
© Harcourt Education Ltd 2003 Catalyst 1This worksheet may have been altered from the original on the CD-ROM.
End of unit testmark schemeCells
Sheet 1 of 1
Red (NC Tier 3–6)
Question Answer Mark Level
1 a Stomach A 1 3Heart B 1 3Muscle C 1 4Skin D 1 4
b Cytoplasm E 1 4Nucleus F 1 4Cell Membrane G 1 4
2 a Plant cells 1 4They have a cell wall or vacuole or chloroplasts. 1 4
b Leaf (or stem) 1 4They have chloroplasts (to make food). 1 4
c Group A 1 5Some cells are half the size of the others or smaller than the others. 1 5
d For growth or to repair tissues 1 5
3 a To trap sunlight to make food 1 4
b i To make food 1 5ii To support the cell 1 5
c The tall thin shape allows many cells to fit in a leaf. Accept equivalent answers. 1 5
4 a No 1 6
b The virus does not have cytoplasm or a cell membrane or a nucleus. 1 6(Two are required for the mark.)
5 a i 10 1 4ii 0.1 mm 1 4iii To make them more visible 1 4
b i Four times 1 5ii �400 1 5
Scores in the range of: NC Level
4–8 3
9–14 4
15–18 5
19–25 6
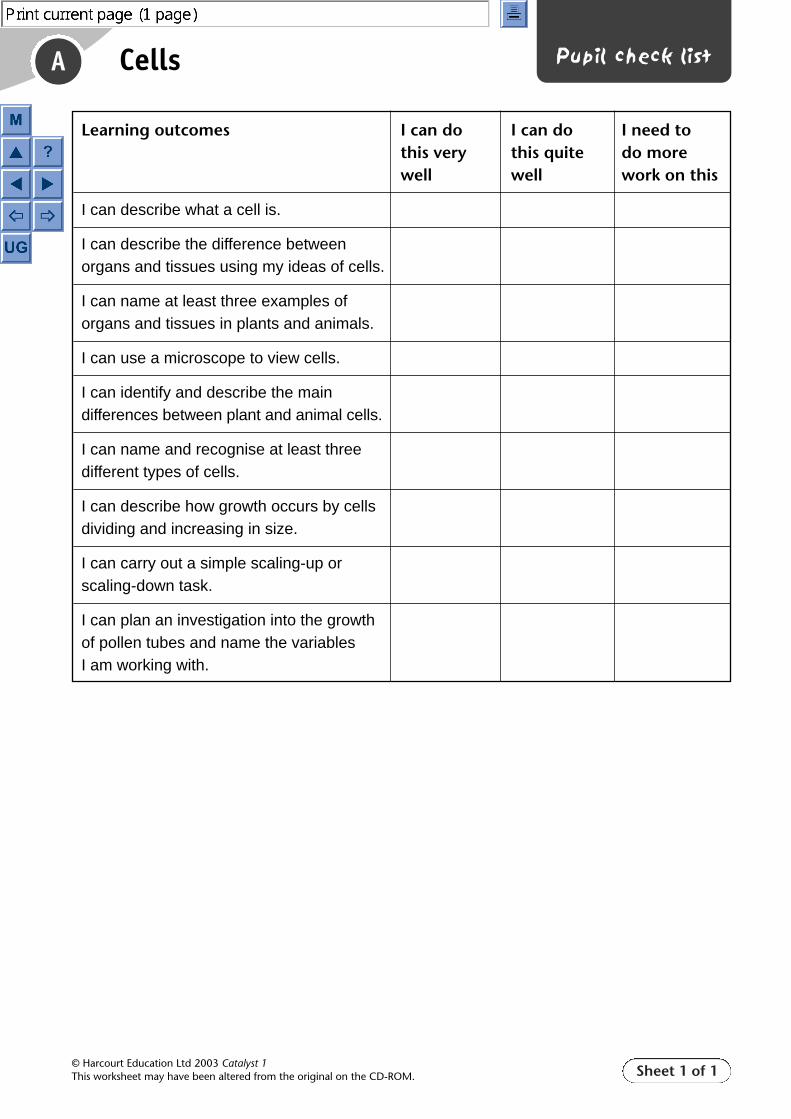
Sheet 1 of 1
A
© Harcourt Education Ltd 2003 Catalyst 1This worksheet may have been altered from the original on the CD-ROM.
Pupil check list
Learning outcomes I can do I can do I need tothis very this quite do more well well work on this
I can describe what a cell is.
I can describe the difference between organs and tissues using my ideas of cells.
I can name at least three examples of organs and tissues in plants and animals.
I can use a microscope to view cells.
I can identify and describe the main differences between plant and animal cells.
I can name and recognise at least three different types of cells.
I can describe how growth occurs by cells dividing and increasing in size.
I can carry out a simple scaling-up or scaling-down task.
I can plan an investigation into the growth of pollen tubes and name the variables I am working with.
Cells
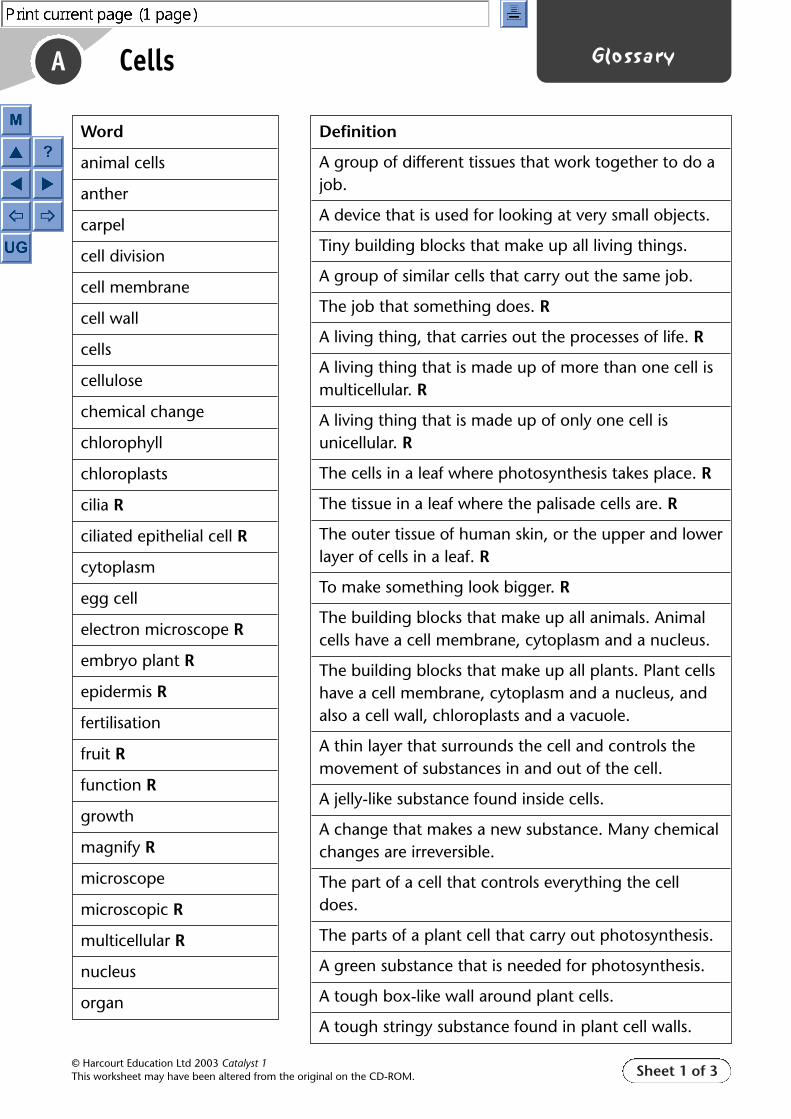
Sheet 1 of 3
A
© Harcourt Education Ltd 2003 Catalyst 1This worksheet may have been altered from the original on the CD-ROM.
Glossary
Word
animal cells
anther
carpel
cell division
cell membrane
cell wall
cells
cellulose
chemical change
chlorophyll
chloroplasts
cilia R
ciliated epithelial cell R
cytoplasm
egg cell
electron microscope R
embryo plant R
epidermis R
fertilisation
fruit R
function R
growth
magnify R
microscope
microscopic R
multicellular R
nucleus
organ
Definition
A group of different tissues that work together to do ajob.
A device that is used for looking at very small objects.
Tiny building blocks that make up all living things.
A group of similar cells that carry out the same job.
The job that something does. R
A living thing, that carries out the processes of life. R
A living thing that is made up of more than one cell ismulticellular. R
A living thing that is made up of only one cell isunicellular. R
The cells in a leaf where photosynthesis takes place. R
The tissue in a leaf where the palisade cells are. R
The outer tissue of human skin, or the upper and lowerlayer of cells in a leaf. R
To make something look bigger. R
The building blocks that make up all animals. Animalcells have a cell membrane, cytoplasm and a nucleus.
The building blocks that make up all plants. Plant cellshave a cell membrane, cytoplasm and a nucleus, andalso a cell wall, chloroplasts and a vacuole.
A thin layer that surrounds the cell and controls themovement of substances in and out of the cell.
A jelly-like substance found inside cells.
A change that makes a new substance. Many chemicalchanges are irreversible.
The part of a cell that controls everything the celldoes.
The parts of a plant cell that carry out photosynthesis.
A green substance that is needed for photosynthesis.
A tough box-like wall around plant cells.
A tough stringy substance found in plant cell walls.
Cells

Sheet 2 of 3
A
© Harcourt Education Ltd 2003 Catalyst 1This worksheet may have been altered from the original on the CD-ROM.
Glossary
Word
organism R
ovary
palisade cells R
palisade mesophyll R
petal
plant cells
pollen grains
pollen tube
pollination
reproduction
scale diagram
scale factor
scaling down
scaling up
seed
specialised R
stamens
stigma
style
tissue
unicellular R
vacuole
viruses R
Definition
A bag inside plant cells that contains a liquid whichkeeps the cell firm.
A microscope that uses electrons instead of light. Itmakes things look very much larger. R
Something that can only be seen with a microscope ismicroscopic. R
A cell that is adapted to carry out a particular functionis specialised. R
Tiny hairs on the outside of some types of cell. R
A specialised type of cell with cilia on its surface. R
A group of microorganisms that are not made of cellsbut reproduce inside other cells. Viruses cause disease.R
Increase in size. Organisms grow by increasing thenumber of cells and increasing the size of the cells.
A cell splits into two to make more cells.
The female sex cell in an animal or plant. The egg celljoins with the male sex cell in reproduction.
A drawing that shows something bigger or smallerthan it really is.
Making something bigger.
Making something smaller.
A number used in scale drawing. You multiply by thescale factor to scale something up. You divide by thescale factor to scale it down.
The part of the stamen in a flower that makes thepollen.
The male organs in a flower, that produce the pollen.
The female organ in a flower, that produces the eggcells.
The part of a flower that is often colourful and attractsinsects.
Cells (continued)
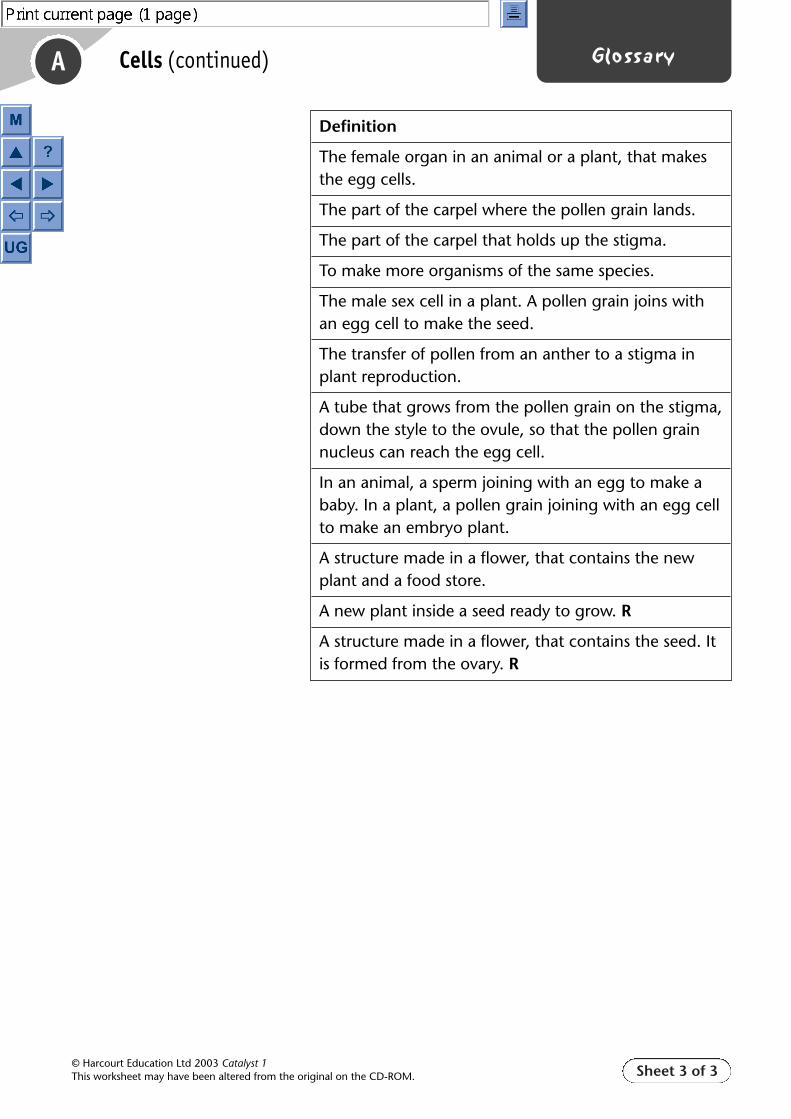
Sheet 3 of 3
A
© Harcourt Education Ltd 2003 Catalyst 1This worksheet may have been altered from the original on the CD-ROM.
Glossary
Definition
The female organ in an animal or a plant, that makesthe egg cells.
The part of the carpel where the pollen grain lands.
The part of the carpel that holds up the stigma.
To make more organisms of the same species.
The male sex cell in a plant. A pollen grain joins withan egg cell to make the seed.
The transfer of pollen from an anther to a stigma inplant reproduction.
A tube that grows from the pollen grain on the stigma,down the style to the ovule, so that the pollen grainnucleus can reach the egg cell.
In an animal, a sperm joining with an egg to make ababy. In a plant, a pollen grain joining with an egg cellto make an embryo plant.
A structure made in a flower, that contains the newplant and a food store.
A new plant inside a seed ready to grow. R
A structure made in a flower, that contains the seed. Itis formed from the ovary. R
Cells (continued)

Sheet 1 of 1
A
© Harcourt Education Ltd 2003 Catalyst 1This worksheet may have been altered from the original on the CD-ROM.
Key wordsCells
animal cellsanthercarpelcell divisioncell membranecell wallcellscellulosechemical changechlorophyllchloroplastscilia Rciliated epithelial cell Rcytoplasmegg cellelectron microscope Rembryo plant R
epidermis Rfertilisationfruit Rfunction Rgrowthmagnify Rmicroscopemicroscopic Rmulticellular Rnucleusorganorganism Rovarypalisade cells Rpalisade mesophyll Rpetalplant cells
pollen grainspollen tubepollinationreproductionscale diagramscale factorscaling downscaling upseedspecialised Rstamenstigmastyletissueunicellular Rvacuoleviruses R
A Key words
�
Sheet 1 of 1© Harcourt Education Ltd 2003 Catalyst 1This worksheet may have been altered from the original on the CD-ROM.
Cells
animal cellsanthercarpelcell divisioncell membranecell wallcellscellulosechemical changechlorophyllchloroplastscilia Rciliated epithelial cell Rcytoplasmegg cellelectron microscope Rembryo plant R
epidermis Rfertilisationfruit Rfunction Rgrowthmagnify Rmicroscopemicroscopic Rmulticellular Rnucleusorganorganism Rovarypalisade cells Rpalisade mesophyll Rpetalplant cells
pollen grainspollen tubepollinationreproductionscale diagramscale factorscaling downscaling upseedspecialised Rstamenstigmastyletissueunicellular Rvacuoleviruses R

A1 Organs, cells, tissuesGreena Heartb Leavesc i skin cell
ii skiniii handiv human
1 Plants have many organs including stems,leaves and roots. Each organ is made of layerscalled tissues. Each tissue is made up of cells.The cells in a tissue are alike and do the samejob.
2 Human, skin, outer layer of skin, skin cell.
Reda i Various: lung, breathing; liver, controls
tissue fluids; kidney, regulates water; etc.ii Various: stem, support; petal, attracts
insects; stigma, landing for pollen; etc.b The organ is the overall basic structure which
provides a place to live; tissues are the partsmaking the organ, as the walls and roof; cellsare like the bricks and roof tiles.
1 a An organ is made up of tissues.b A tissue is made of cells which are all alike.c A cell is the basic living structure which
makes up tissues.2 a Organism, organ, tissue, cell.
b Plant, leaf, palisade mesophyll, palisade cell.3 a Any seven from: skin, teeth, heart, kidney,
liver, lung, muscle, leaf, stem, stamen,anther, stigma, ovary, root, style, petal.
b Epidermis, upper epidermis, palisademesophyll layer, spongy mesophyll layer,lower epidermis.
A2 Building blocksGreena i The cell membrane lets things in and out
of the cell.ii The nucleus controls everything that
happens inside the cell.b cytoplasmc cellulosed They contain chlorophyll.1 All cells have a cell membrane, cytoplasm
and a large nucleus. Plant cells also have a cellwall and a large vacuole. Green plant cellsalso have chloroplasts.
2 a P and A b Pc P and A d P and Ae P f P
3 a nucleusb cell membranec cytoplasm
4 Individual answers.
Reda The cell membrane controls what goes in and
out of the cell.b The cell wall and the vacuole.c A is an animal cell. It does not have a vacuole,
it does not have chloroplasts, it does not have acell wall; it does have cilia. B is a plant cell. Ithas a large vacuole, it has chloroplasts and acell wall.
1 a Similarities: cell membrane, nucleus,cytoplasm.
b Differences: vacuole, cell wall, chloroplasts.2 a nucleus
b cell wallc vacuoled chloroplaste cell membranef cytoplasm
3 a i Chloroplasts contain chlorophyll whichtraps light energy to make food forplant cells.
ii Cilia are tiny hairs which help animalcells to move.
4 Viruses have to be made inside a cell fromanother organism.
5 Individual answers.
A3 Cells and growthGreena Twiceb Cell division.c It would disappear/die.1 All cells are made from other cells. This is
called cell division. Growth happens whenmore cells are made and the cells divide.
2 a twob nucleusc smallerd they grow
3 B, C, A
Reda 8b About 0.85 mm; width about 0.80 mm; both
� 0.05 mm.c The cell walld It would disappear/die.1 a N, O, M
b Plant cells. The cell walls are easily visible.c The nucleusd The nucleus contols the cell and contains all
the information to make sure the cell runsproperly.
e To make the parts of the cells more clearlyseen.
f The cells grow in size.2 a 32, 64, 128.
b 64
A Book answersCells
Sheet 1 of 3© Harcourt Education Ltd 2003 Catalyst 1This worksheet may have been altered from the original on the CD-ROM.

A Book answers
Sheet 2 of 3© Harcourt Education Ltd 2003 Catalyst 1This worksheet may have been altered from the original on the CD-ROM.
A4 Scaling up and downGreena Individual answers.b Name Picture height Real height
� scale factor in cmMrs Beetroot 4 � 40 160Nick 3 � 40 120Aileen 2 � 40 80
c Individual answers.d Name Real height Scale factor Real height � Picture height
in cm scale factor in cmMrs Beetroot 160 20 160 � 20 8Nick 120 20 120 � 20 6Aileen 80 20 80 � 20 4
1 a Object Real measurement Picture measurement Scale factorin cm in cm
length of car 300 10 30length of pencil 20 2 10
b Object Real measurement Picture measurement Scale factorin cm in cm
height of car 150 5 30height of bicycle 80 4 20
2 Individual answers.
Reda Individual answers.b Name Picture height Real height
� scale factor in cmMrs Beetroot 4 � 40 160Nick 3 � 40 120Aileen 2 � 40 80
c Individual answers.d Name Real height Scale factor Real height � Picture height
in cm scale factor in cmMrs Beetroot 160 20 160 � 20 8Nick 120 20 120 � 20 6Aileen 80 20 80 � 20 4
e Object Real height Picture height Real height � Scale factorin cm in cm picture height
science book 30 3 10 10house 800 40 20 20TV 60 12 5 5
1 50 � 5 = 10
2 Object Real measurement Picture measurement Scale factorin cm in cm
length of car 300 10 30length of pencil 20 2 10width of garden 600 12 50
3 Individual answers.
A5 Flower cellsGreena i The anther makes pollen grains.
ii The ovary makes egg cells.b Pollination is the transfer of pollen grains from
the anther of one plant to the stigma of anotherplant.
c Bee or butterfly.d A pollen tube.e In the ovary.f The nucleus of the male sex cell with the
nucleus of the female sex cell.1 anther – makes pollen grains
ovary – makes eggspetal – attracts beesstigma – landing platform for pollenstyle – holds up stigma
2 Insects and wind.3 The pollen grain grows a pollen tube. The
nucleus from the pollen grain travels down thepollen tube to the ovary.
Reda Bee or butterfly.b Pollination is the process which puts pollen
grains on the stigma. Fertilisation is when thenucleus of a pollen grain joins with the nucleusof an egg cell.
c From photosynthesis in the leaves.1 plant → bee → pollen grain → stamens →
pollination → carpel → pollen tube → egg cell→ fertilisation → embryo.
2 a Egg cells form the embryo plant. Pollengrains are the male sex cells.
b They join together to form a ‘full-sized’nucleus.
3 After fertilisation, the ovule forms a seed withthe embryo plant inside it.
4 The seed protects the embryo plant andcontains a food store for the plant.
A Book answers
Sheet 3 of 3© Harcourt Education Ltd 2003 Catalyst 1This worksheet may have been altered from the original on the CD-ROM.