cee3430 engineering hydrology hec hms bare...
TRANSCRIPT

1
CEE3430EngineeringHydrologyHEC‐HMSBareEssentialsTutorialandExampleMargaret Matter and David Tarboton February 2010
This tutorial provides some bare essentials step by step guidance on starting to use HEC‐HMS following Example 5‐1
(page 335) of Bedient et al. (2008), but presented in terms of the current version of HEC‐HMS (Version 3.5). This is not
intended to be comprehensive or to replace the HEC‐HMS documentation; rather it is a getting started guide intended
to get you through a first run using the program and provide the bare essential knowledge from which you can learn
more by exploring the software and more comprehensive manuals.
HECHMSwebsiteandresources(a) Main HEC‐HMS website: http://www.hec.usace.army.mil/software/hec‐hms/
(b) HEC‐HMS , version 3.5 download: http://www.hec.usace.army.mil/software/hec‐hms/download.html
(c) User’s Manual: http://www.hec.usace.army.mil/software/hec‐hms/documentation/HEC‐
HMS_Users_Manual_3.5.pdf
(d) Quick Start Guide(for new users and includes a tutorial): http://www.hec.usace.army.mil/software/hec‐
hms/documentation/HEC‐HMS_QuickStart_Guide_3.5.pdf
1. Stepsfordownloadandinstallation: On the “Download” page, under the “Windows” section, click on “Primary Download Site”
A “File Download – Security Warning” will appear with the question, “Do you want to run or save this file?”
Click on “Run” to run Setup.exe
Takes a few seconds to download
Message appears: “Welcome to the InstallShield Wizard for HEC‐HMS 3.5”, click “Next”
Read Terms and Conditions, and click “I agree to the above Terms and Conditions for Use”, and click “Next”
Destination Folder: If the program is to be save on in a location other than the default, click “Change”
And near the top, under “Look In,” select the drive and folder in which the program will be stored
Additional Tasks: “Would you like setup to create a shortcut which will appear on every users desktop?” Check
“Create a desktop shortcut,” and click “Next”
Click “Install” ‐‐‐takes seconds to install
A final InstallShield message appears: click “Finish”

2. RThis f
curre
Steps
a. D
b. O
c. T
Runningasfollows Exam
ent HEC‐HMS
s:
Double click o
On the menu
For new p
For existin
The “New” pr
Create a p
Select wh
Provide a
Select the
Click “Cre
simplecase:mple 5.1, the “
version (3.5)
on the HEC‐HM
bar, click on
projects, click
ng projects, c
roject will be t
project name
ere the proje
description,
e units to use
ate
“Small‐Waters
).
MS 3.5 icon a
“File”
on “New”
lick on “Open
the setup in E
(I chose “Ex5
ect work will b
and
.
shed Example
and the progr
n ” and select
Example 5.1
5.1”),
be stored,
2
e,” from page
am screen, si
t from existing
e 335 of Bedie
imilar to the p
g projects.
ent et al. (200
picture below
08) upgraded
w, appears
d for the
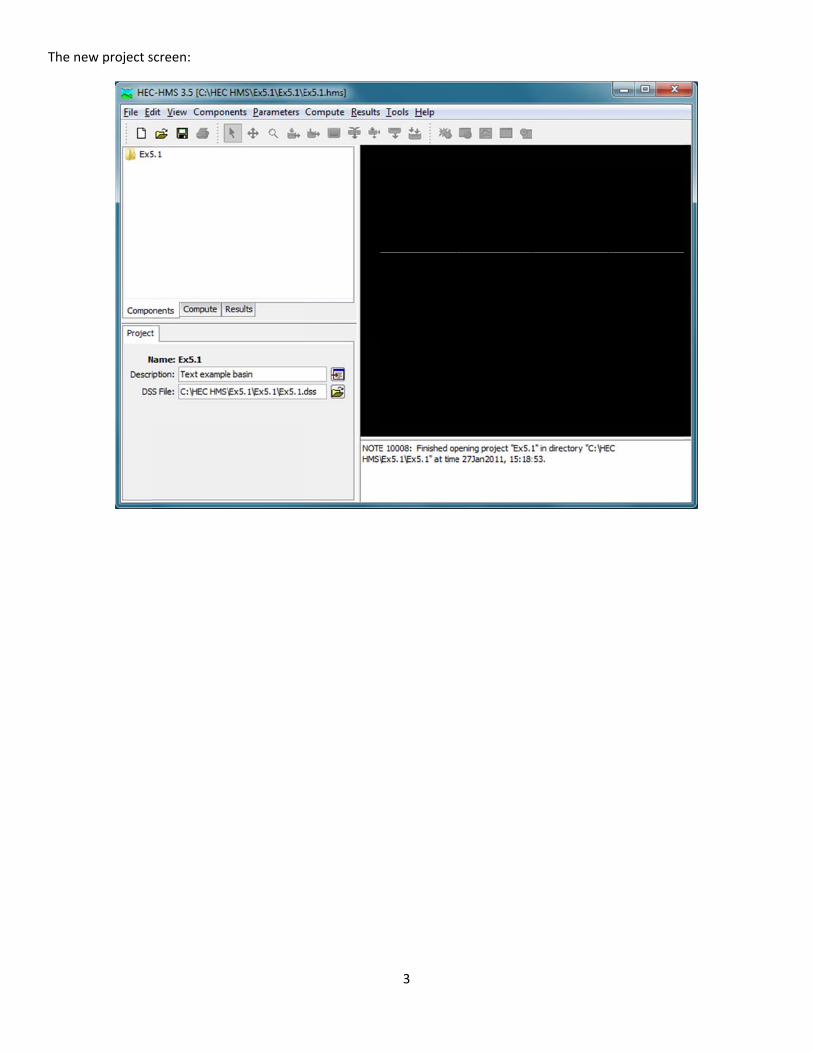
The n
new project sscreen:
3
d. B
e. S
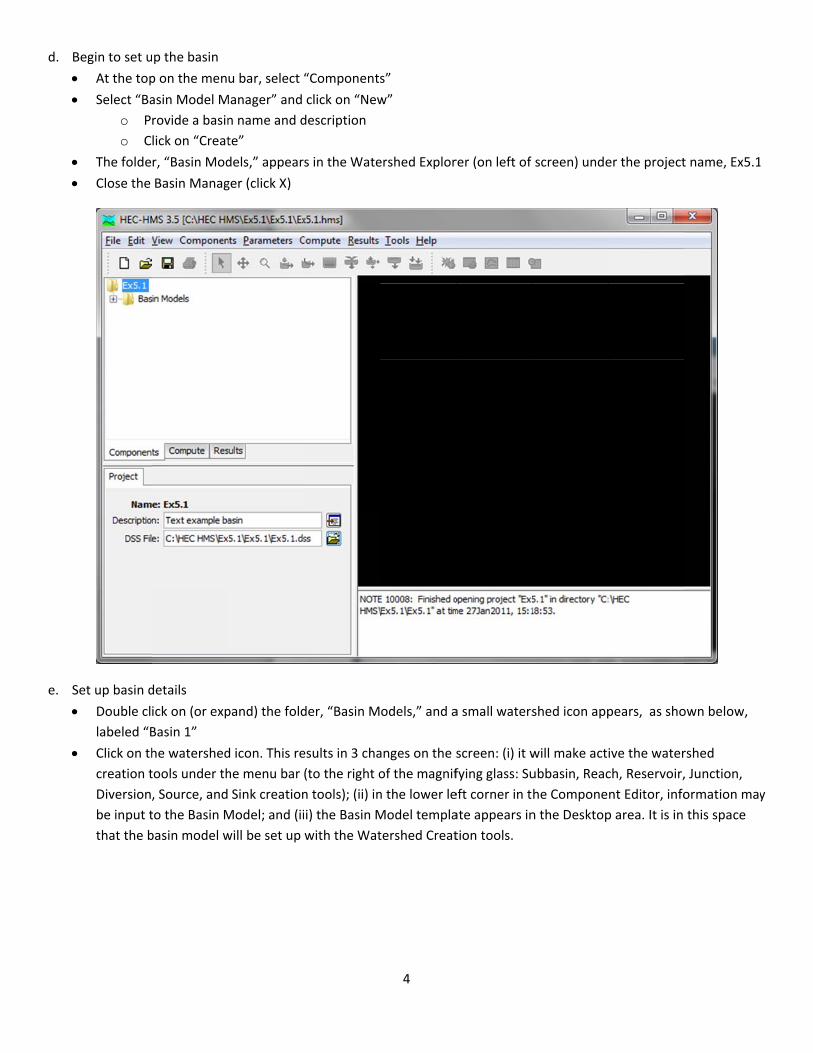
Begin to set u
At the top
Select “Ba
o P
o C
The folde
Close the
Set up basin d
Double cl
labeled “B
Click on th
creation t
Diversion,
be input t
that the b
p the basin
p on the men
asin Model M
rovide a basin
lick on “Creat
r, “Basin Mod
Basin Manag
details
ick on (or exp
Basin 1”
he watershed
tools under th
, Source, and
to the Basin M
basin model w
u bar, select
Manager” and
n name and d
te”
dels,” appear
ger (click X)
pand) the fold
d icon. This re
he menu bar
Sink creation
Model; and (ii
will be set up
“Components
click on “New
description
s in the Wate
der, “Basin M
esults in 3 cha
(to the right o
n tools); (ii) in
i) the Basin M
with the Wat
4
s”
w”
ershed Explor
odels,” and a
anges on the s
of the magnif
n the lower le
Model templa
tershed Creat
rer (on left of
a small waters
screen: (i) it w
fying glass: Su
eft corner in t
ate appears in
tion tools.
screen) unde
shed icon app
will make act
ubbasin, Reac
he Compone
n the Desktop
er the project
pears, as sho
ive the water
ch, Reservoir,
nt Editor, info
p area. It is in
t name, Ex5.1
own below,
rshed
, Junction,
ormation may
this space
1
y

Refer to E
HMS is fle
create a p
o A
th
to
C
th
o Lo
th
o A
ar
o A
d
At this po
should be
to be con
arrow poi
Downstre
the juncti
to the rea
Example 5.1 fo
exible on how
project waters
dding 3 subb
he pointer cu
o place the su
lick “Create”
he 2 remainin
ocation of the
he arrow tool
dding the 2 ju
rea and place
dd a channel
ragging) a rea
int you have
e connected t
nected to the
inter and righ
eam”; the cur
on. Similarly
ach. Once this
or details abo
w you may pre
shed and ent
asins: Click o
rsor should tu
ubbasin, and a
when finishe
ng subbasins.
e features ad
, left‐clicking
unctions: Clic
e the 2 junctio
reach for the
ach in your ba
the necessar
o Junction‐1
e reach and th
ht‐clicking on
sor turns to c
, connect the
s is done the “
out the water
efer to organi
er informatio
n the Subbas
urn to a cross
a popup will a
ed. A subbasi
ded to the wa
on the objec
ck on the “Jun
ons on the wa
e reach from
asin model de
y component
(at location A
he reach to ju
the upstream
crosshairs and
e other 2 subb
“reach” shou
5
rshed.
ize steps in cr
on and data.
in Creation to
shairs for plac
appear in wh
n feature app
atershed with
ct and draggin
nction Creatio
atershed tem
A to B. Click
esktop area.
ts, but they n
A) and Subbas
unction 2. Co
m object (e.g.,
d connect Sub
basins and th
ld be a thicke
reating a mod
ool. Move the
cement of the
ich a subbasi
pears on the b
h the creation
ng it to a diffe
on tool” and m
mplate.
on the “Reac
eed to be con
sin‐3 to Junct
onnecting the
, Subbasin‐1)
bbasin‐1 to Ju
e reach to th
er blue line an
del, so the ste
e cursor over
e subbasin. C
n name and d
basin templat
n tools may b
erent location
move the cur
ch Creation To
nnected. Spe
tion‐2 (at loca
e features is d
; from the me
unction‐1 dow
e appropriate
nd the conne
eps below are
to the deskto
lick on the de
description m
te. Repeat th
be changed by
n.
sor over to th
ool” and plac
ecifically subb
ation B). Junc
done by select
enu, select “C
wnstream by
e junctions, a
ctions should
e one way to
op area, and
esktop area
may be input.
he steps for
y selecting
he Desktop
e (by
basins 1 & 2
ction 1 needs
ting the
Connect
clicking on
nd junction 1
d be thinner
1

black line
to arrange
Input bas
To input i
created in
particular
o C
Lo
ap
o Su
ar
C
o C
o C
Similarly,
Subbasin‐
specified
the Transf
Input Unit
o G
o D
s as indicated
e the layout n
in informatio
nformation fo
n the Desktop
r feature appe
lick on Subba
oss, Transform
ppear/disapp
ubbasin tab: T
rea but may a
hange the ba
lick on the los
lick on transf
enter data fo
‐3: Enter the a
Unit Hydrogr
form tab are
t Hydrograph
o to Compon
ata Type: Scr
d. You can m
nicely
n to element
or an elemen
p area or in th
ear in the Com
asin‐1. Initially
m, Baseflow a
pear.
The “downstr
also be entere
seflow metho
ss tab and inp
orm tab and
or Subbasin 2
area and set
raph for the T
not active.
h for Subbasin
nents on the m
roll down and
ove the objec
s of the wate
nt of the wate
he Watershed
mponent Edit
y, there are 5
and Options.
ream” point i
ed or edited h
od to none. C
put SCS curve
Input TC and
.
baseflow met
Transform Me
n‐3:
main menu at
d select “Unit
6
cts around th
ershed:
ershed, click o
d Explorer. Th
tor in the low
tabs in the C
Depending o
s already fille
here. Enter t
Check that th
e number from
R from page
thod to 0. Set
ethod. Until th
t the top, sele
Hydrograph C
e screen and
on the elemen
he appropriat
wer left corner
Component Ed
n the method
ed, in since th
the area. Cha
he transforma
m page 335.
335.
t loss method
he hydrograp
ect “Paired D
Curves”
by clicking o
nt either in th
te informatio
r
ditor (Left‐ha
ds selected th
he connection
ange the loss
ation method
d and CN. Th
ph informatio
ata Manager,
n the labels,
he conceptua
on input fields
and corner): S
hese tabs will
n was made in
method to cu
is Clark Unit
is subbasin h
on has been in
,”
move them
al basin
s for the
Subbasin,
l
n the Desktop
urve number.
Hydrograph.
as a user‐
nput, cells of
p
.

o C
o In
“U
w
C
d
Note the
at the ma
Select Sub
pattern (e
Reach‐1:
o R
o R
h
Input Hye
o In
o D
A
o A
o Ex
lick “New” on
n the Watersh
Unit Hydrogra
with the name
omponent Ed
ata for Subba
data entered
in menu), an
bbasin‐3 in th
eg, Pattern) to
each tab: Inp
outing tab: M
ow many sub
etograph:
n Component
ata Type: Sel
nd close.
folder, “Time
xpand in sequ
n the right—p
hed Explorer,
aph Curves,”
e it was given
ditor. Set the
asin 3 from pa
are colored b
d the data tu
he Watershed
o use for Sub
ut informatio
Muskingum K
breaches the r
s on the main
ect “Precipita
e Series Data,
uence to “Pre
provide name
the folder, “P
and double c
(eg, Pattern
e units and du
age 335.
blue, indicati
rn from blue
d Manager: U
basin‐3 in sim
on from page
and x, and 2
reach is split
n menu at the
ation gage”, c
,” is added to
ecipitation Ga
7
e and descript
Paired Data”
click on the “U
1). Click on th
uration. Switc
ng that the d
to black, indi
nder the Tran
mulations.
335 for Musk
subreaches (
in to).
e top, select “
click on “New
o the Watersh
ages,” then “G
tion; then cli
was created;
Unit Hydrogra
he Unit Hydro
ch to the “Tab
ata are not p
icating that th
nsform tab in
kingum Routi
(2 subreaches
“Time Series
w,” provide na
hed Manager
Gage 1,”
ck “Create”
; double click
aph Curves fo
ograph icon to
ble” tab and e
permanent. Sa
hey are now
n the Compon
ing
s is somewha
Data Manage
ame and desc
.
to expand to
older to get th
o get the Pair
enter the Unit
ave the file (ie
permanent.
nent Editor, se
at arbitrary an
er”,
cription, and c
o the folder
he UH icon
red Data
t Hydrograph
e, “File, Save”
elect the UH
nd indicates
click “Create.
”
”

o U
an
o Fi
o Ti
o Ti
o Ta
th
Fi
in
o Sa
Under Co
descriptio
o A
o Ex
o In
o U
o U
nder “Gage 1
nd informatio
ill in informat
ime‐Series Ga
ime Window:
able tab: Hou
he Time Wind
ig. E5‐1(b) in
ncrements.
ave the file.
mponent on
on, and click “
s before, a fo
xpand the fol
n the Compon
nder Precipit
nder “Units S
1” is a storm e
on.
tion on the fo
age tab: Units
: define the ti
urly time incre
dow tab. Ente
the text. At t
the Main me
“Create.”
older, “Meteo
der out to “M
nent editor, u
tation, select
System,” sele
event with a g
ollowing tabs
s = Increment
ime window t
ements shoul
er hourly prec
he end of the
nu , select “M
orologic Mode
Met 1”
under the Met
“Specified Hy
ct the units to
8
generic date.
: Time‐Series
tal inches, an
to include tim
ld be on the l
cipitation incr
e precipitation
Meteorologic
els” is added
teorology Mo
yetograph”
o be used.
Click on the
s Gage, Time
d Time Interv
me for the pre
eft side of th
rements inter
n event, inpu
Model Mana
to the Basin‐
odel tab,
storm event
Window, and
val = 1 Hr
ecipitation ev
e table for th
rpreted from
t zeroes for t
ager,” click “N
1 schematic i
to enter hye
d Table
vent.
he period defi
the precipita
the remaining
New;” fill in n
in the Waters
tograph data
ned under
ation plot in
g time
ame and
shed Explorer
r.

o B
ri
is
o Fr
an
o Sa
asins tab: the
ght, under th
s distributed u
rom “Met 1”
nd assign a pr
ave the proje
e basin mode
he column hea
uniformly ove
in the Water
recipitation g
ect, since it’s a
l to be used a
ading, “Includ
er the basin.
shed Explore
gage to each s
a good habit.
9
already be ide
de Subbasins,
r, double clic
subbasin (in t
entified on th
,” select “Yes
k on the raind
this case, the
he left side of
,” since it is a
drops icon fo
same one to
the table, an
assumed that
or “Specified H
the 3 subbas
nd on the
precipitation
Hyetograph”
sins).
n

Model Co
o U
d
th
o Ex
o D
19
Save the p
Running S
o M
o C
o B
&
ontrol Specific
nder Compon
escription, an
he Watershed
xpand the fol
efine the tim
983, 24:00).
project.
Simulations a
Main Menu: Se
reate a simul
1st step
2nd ste
3rd ste
4th ste
elow the Mai
& yellow sun (t
cations:
nents, select
nd click “Crea
d Explorer.
der out to “C
e window to
nd Viewing R
elect “Compu
ation run wit
p: the name,
ep: select the
p: select a me
p: lastly, sele
in Menu, righ
the “compute
“Control Spe
te.” A folder,
Control 1,” clic
include time
esults (an exa
ute”, then sel
h a name, wh
click “Next”
basin model,
eteorological
ect a control s
ht of the comp
e current fun
10
cifications M
, “Control Spe
ck on it, and f
for the rainfa
ample of one
ect “Create a
hich can be de
, then click “N
model, then
specifications
ponent creati
” button). Cli
anager,” and
ecifications” i
fill in the info
all as well as t
e method):
a Simulation R
escribed afte
Next”
click “Next”
s model, and
ion tools, is a
ck it to run th
click “New.”
is added to th
ormation in th
the runoff re
Run”
er it is created
click “Finish”
n button with
he simulation
Add name an
he Basin‐1 sch
he Componen
sponse (I wen
d; there are 4
h a raindrop n
n.
nd
hematic in
nt Editor area
nt to 20 June
steps:
next to a red
.

o A
m
o Er
ar
Viewing R
o R
it
message box
message box.
rrors in mode
rea.
Results:
ight of the “R
to view a sum
x appears say
el runs, as we
Run Simulatio
mmary of sim
ying that HEC‐
ll in building
n” button, is
mulation resul
11
‐HMS is finish
the basin mo
a button tab
ts.
hed computin
odel, appear i
le with a glob
ng your simula
n the messag
bal, the “Glob
ation run; clo
ge area below
bal Summary”
ose the
w the Desktop
” button. Click
p
k
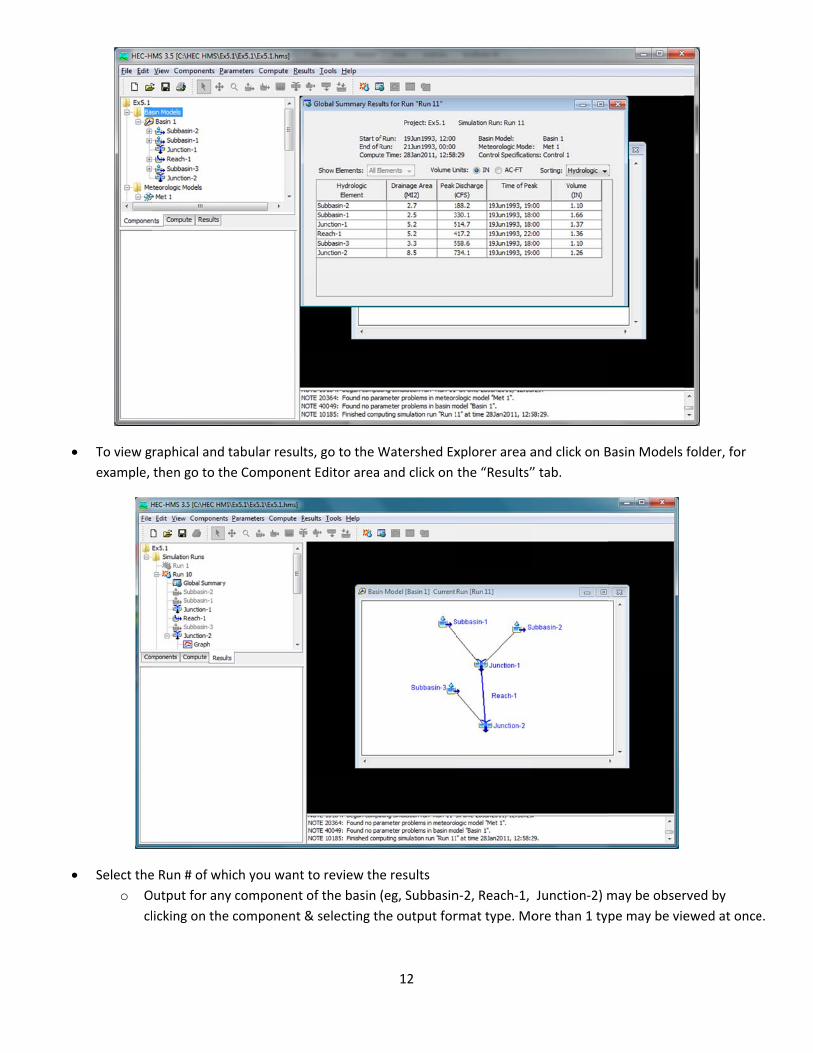
To view g
example,
Select the
o O
cl
raphical and
then go to th
e Run # of wh
Output for any
icking on the
tabular result
he Componen
ich you want
y component
e component
ts, go to the W
nt Editor area
to review th
of the basin
& selecting th
12
Watershed Ex
and click on
e results
(eg, Subbasin
he output for
xplorer area a
the “Results”
n‐2, Reach‐1,
rmat type. Mo
and click on B
” tab.
Junction‐2) m
ore than 1 ty
Basin Models
may be obser
pe may be vie
folder, for
rved by
ewed at oncee.

RefeBedie
erenceent, P. B., W. C. Huber andd B. E. Vieux, (2008), Hydro
13
ology and Flooodplain Analyysis, 4th Editi
ion, Prentice Hall, 795 p.