cctc ai record updated for november 26, 2015 revisions · cctc ai record updated for november 26,...
TRANSCRIPT
CCTC AI Record
Updated for November 26, 2015
Revisions
CCTC Nursing Documentation Information
Brenda Morgan, CNS, CCTC

A Few Points
• Use tick boxes to identify protocols that are in
effect (e.g., VAP prophylaxis, electrolyte
protocol); you don’t need to write this
narratively
• Describe abnormal findings and patient
specific details in the narrative space
A Few Points
• It is assumed that monitoring will be
according to CCTC standards (be sure you
know what they are by reviewing website)
• You don’t need to describe routine care in the
narrative note
• The “test” of whether monitoring is performed
as per standard is the actual documented
assessments

Reminders
• means that everything is the same as per
the last entry before arrowing began
• If you chart that something is abnormal or
outside of defined/normal limits, remember to
document the return to normal before arrowing
• If the last entry is an abnormal finding,
arrowing over means the abnormal state is
continuing
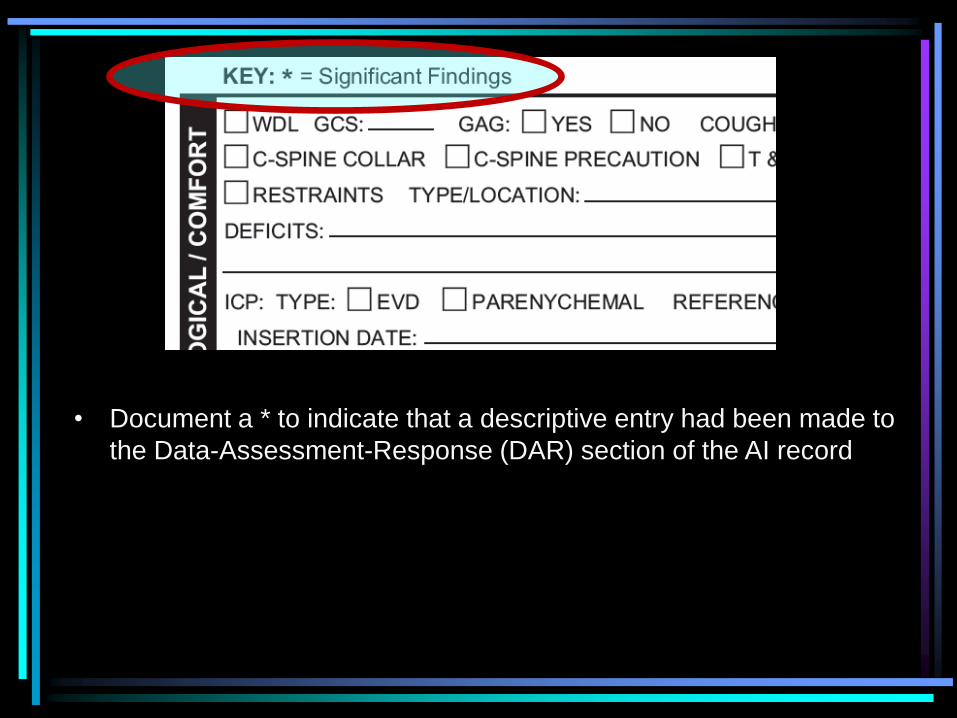
• Document a * to indicate that a descriptive entry had been made to
the Data-Assessment-Response (DAR) section of the AI record

Reminders
• Document the Plan of Care at the start of the
shift (days and nights)
• At end of shift, summarize the response to
the plan or any plan modifications
• Communicate the plan/modifications to
oncoming shift to ensure that the “loop is
closed” and issues do not get dropped
Reminders
• Narrative charting should focus on significant
findings, interventions and patient response
• Routine care per standard does not require
narrative entries unless response is not within
normal of defined parameter; record in
graphic record
• REMEMBER to document patient response to
interventions
Physician Notification
• When you page/speak with a physician about a
problem, include the name of the physician in
the documentation
• When you document that a physician is
notified, outline briefly the specific information
communicated (don’t just state “MD updated”
E.g., Dr. X notified of low BP, oliguria and
tachycardia.
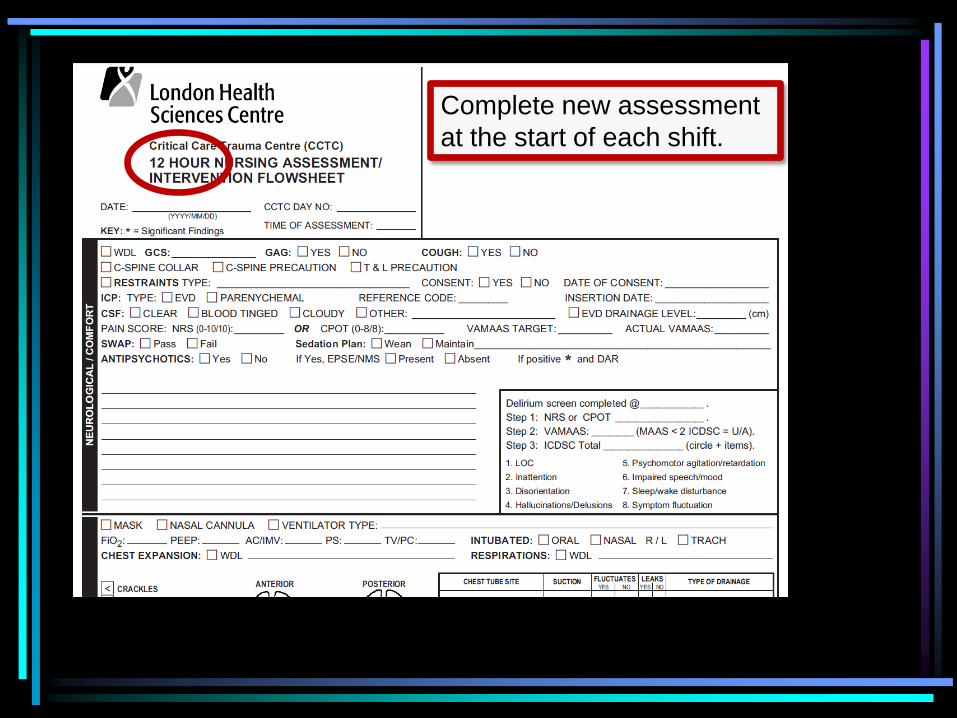
Complete new assessment
at the start of each shift.

Enter the date, admission day
AND time when assessment
performed.
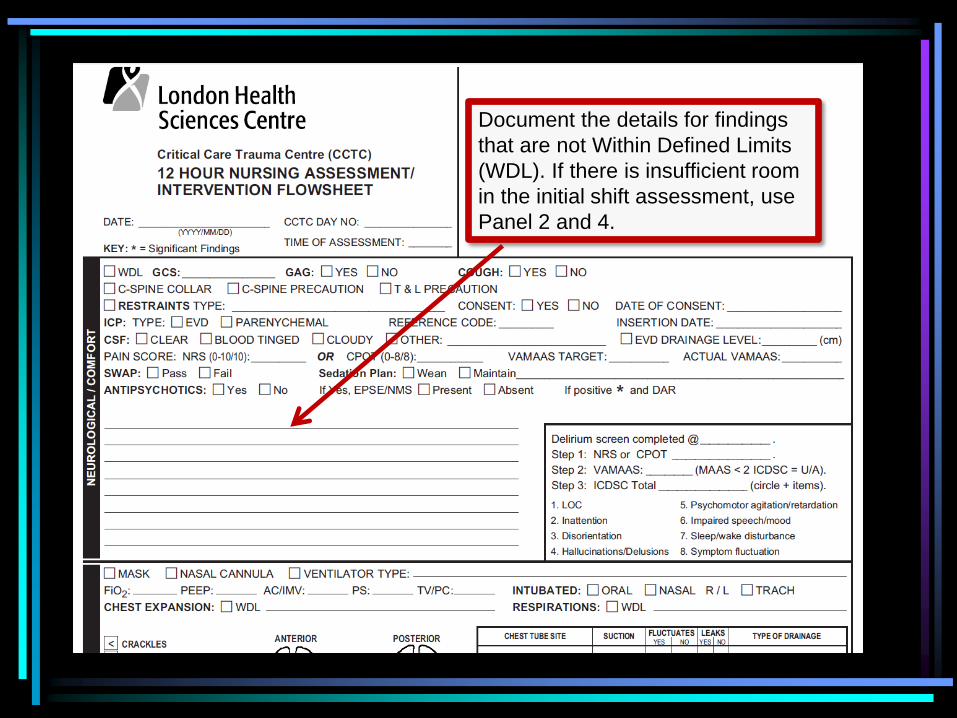
Document the details for findings
that are not Within Defined Limits
(WDL). If there is insufficient room
in the initial shift assessment, use
Panel 2 and 4.
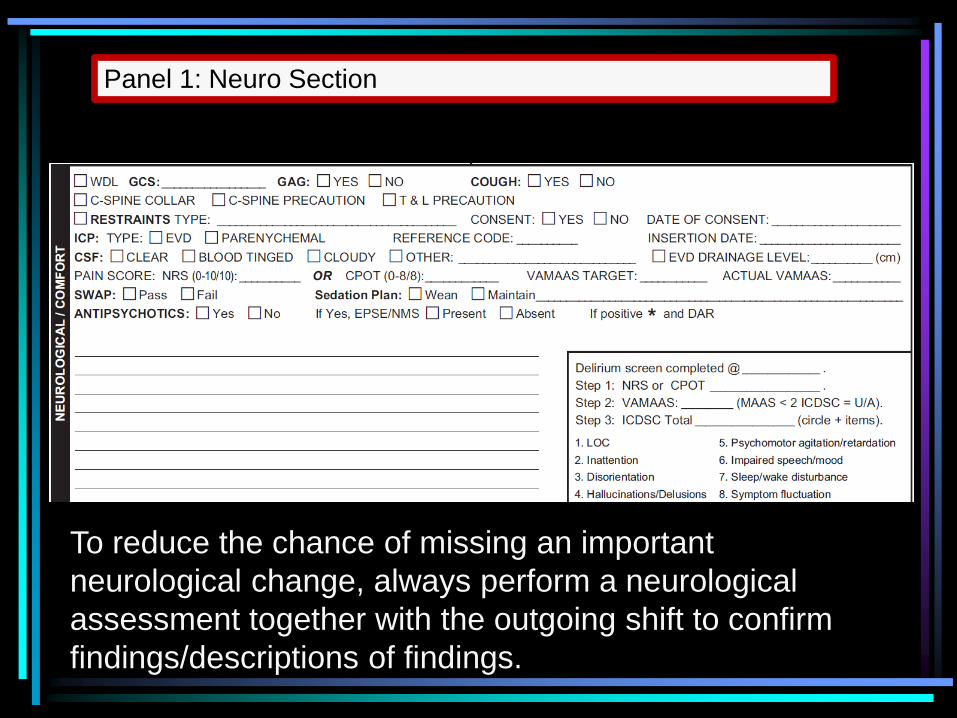
Panel 1: Neuro Section
To reduce the chance of missing an important
neurological change, always perform a neurological
assessment together with the outgoing shift to confirm
findings/descriptions of findings.
Neuro/Comfort Section
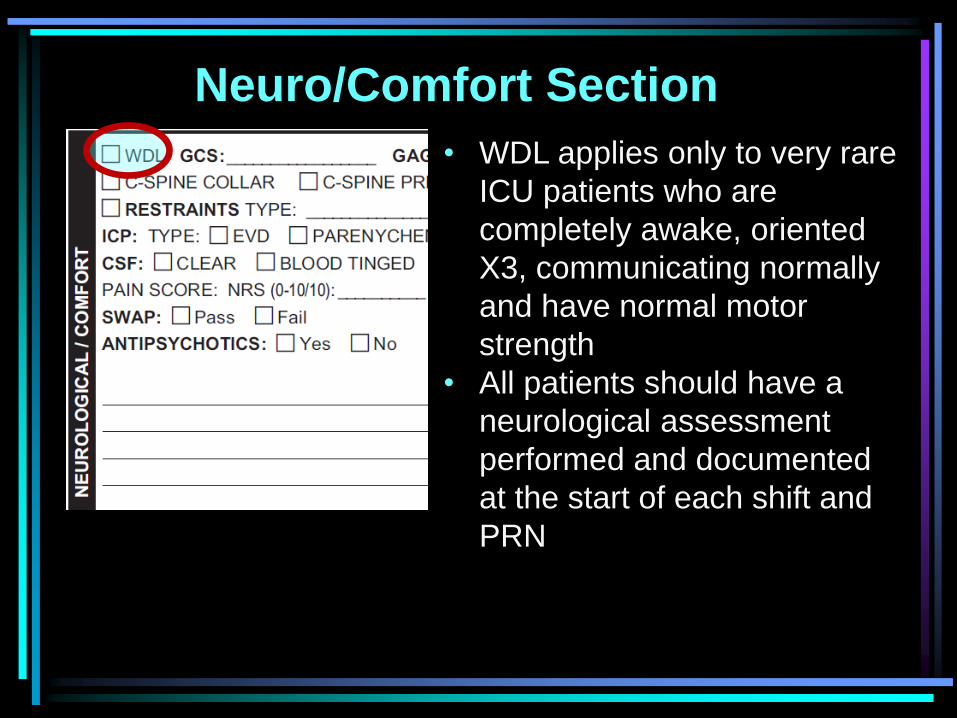
• WDL applies only to very rare
ICU patients who are
completely awake, oriented
X3, communicating normally
and have normal motor
strength
• All patients should have a
neurological assessment
performed and documented
at the start of each shift and
PRN
Neuro/Comfort Section
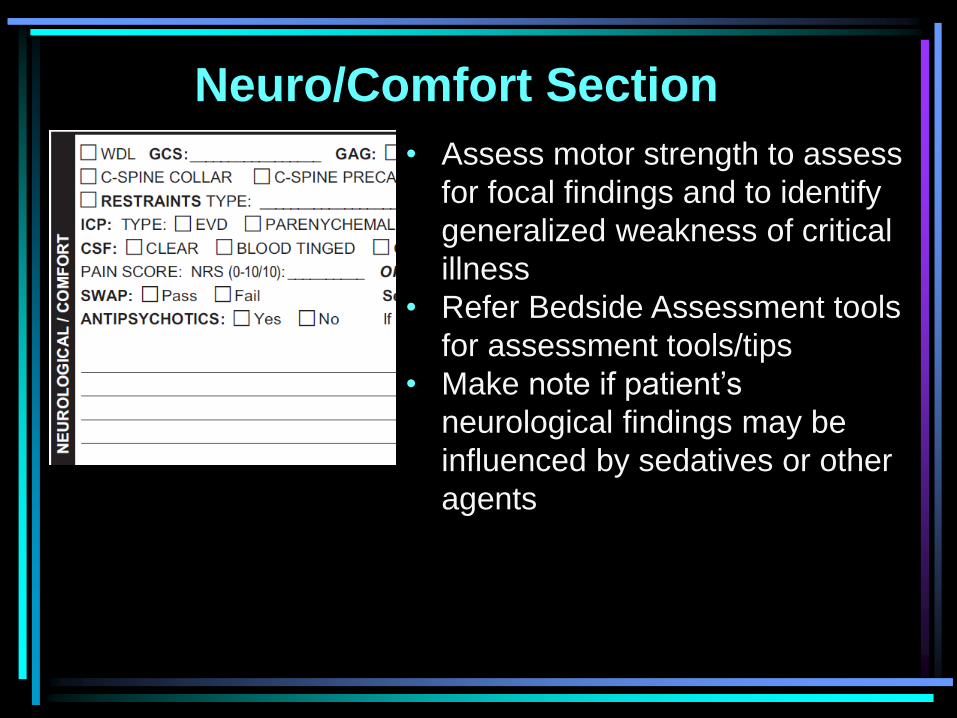
• Assess motor strength to assess
for focal findings and to identify
generalized weakness of critical
illness
• Refer Bedside Assessment tools
for assessment tools/tips
• Make note if patient’s
neurological findings may be
influenced by sedatives or other
agents
Neuro/Comfort Section
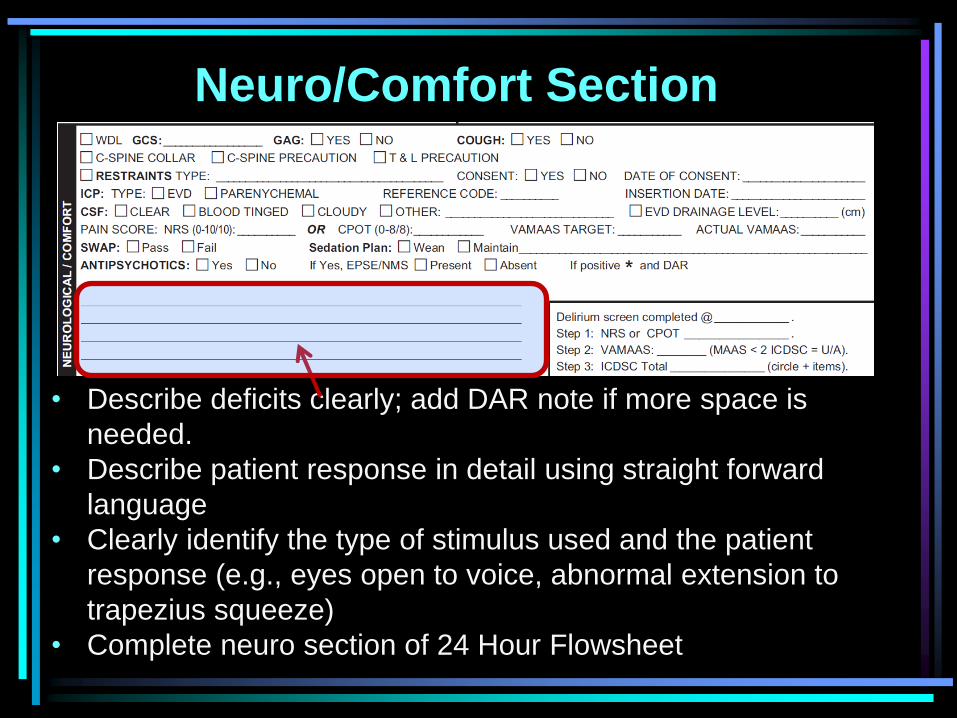
• Describe deficits clearly; add DAR note if more space is
needed.
• Describe patient response in detail using straight forward
language
• Clearly identify the type of stimulus used and the patient
response (e.g., eyes open to voice, abnormal extension to
trapezius squeeze)
• Complete neuro section of 24 Hour Flowsheet
Neuro/Comfort Section
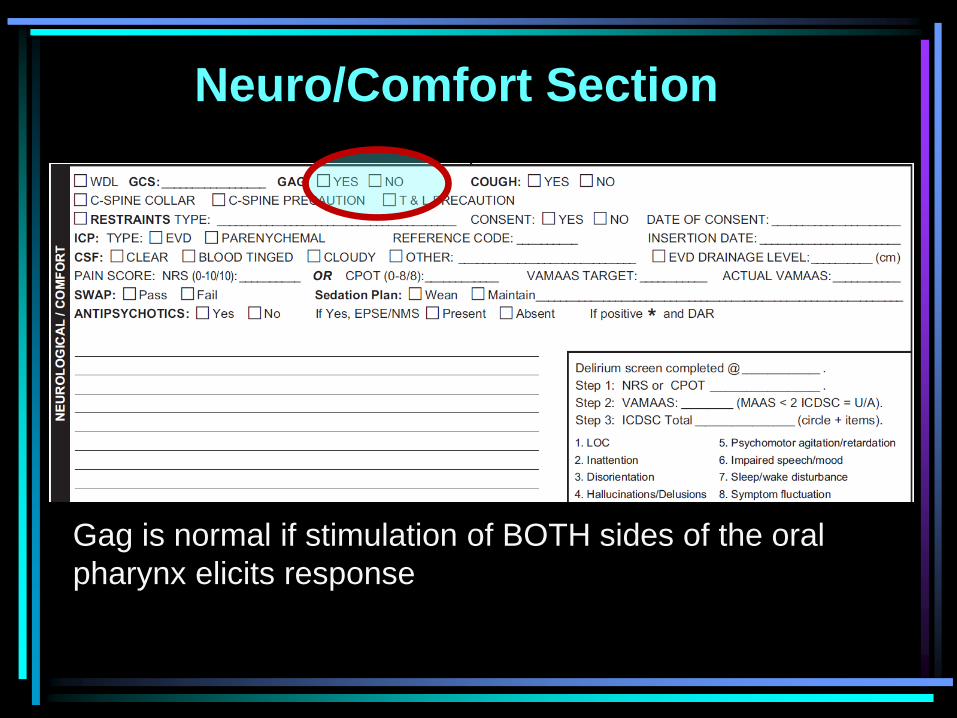
Gag is normal if stimulation of BOTH sides of the oral
pharynx elicits response
Neuro/Comfort Section
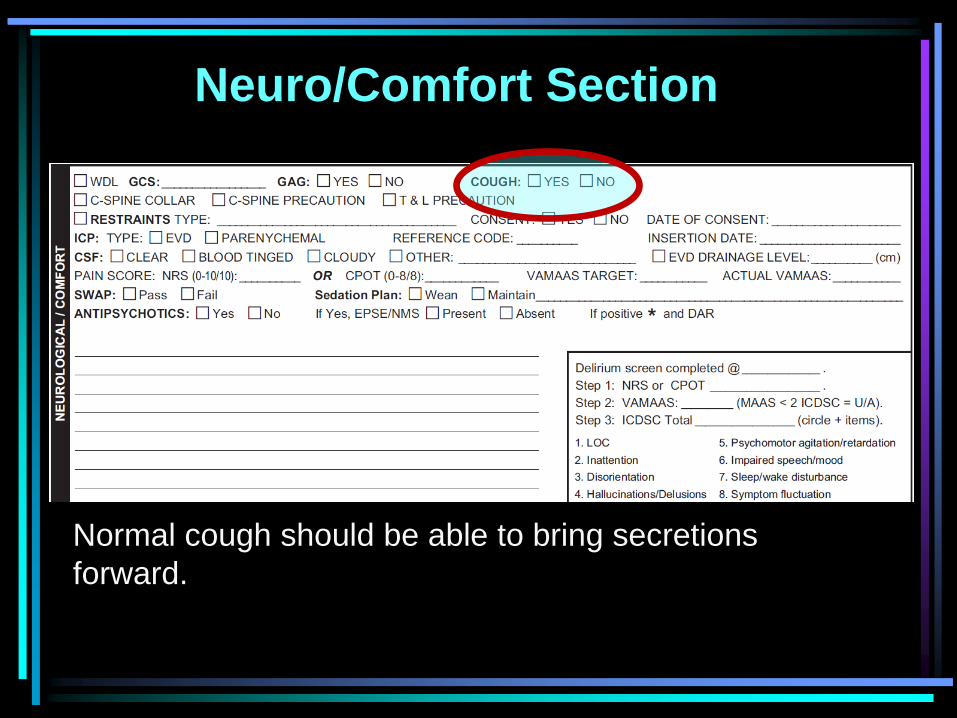
Normal cough should be able to bring secretions
forward.
Neuro/Comfort Section
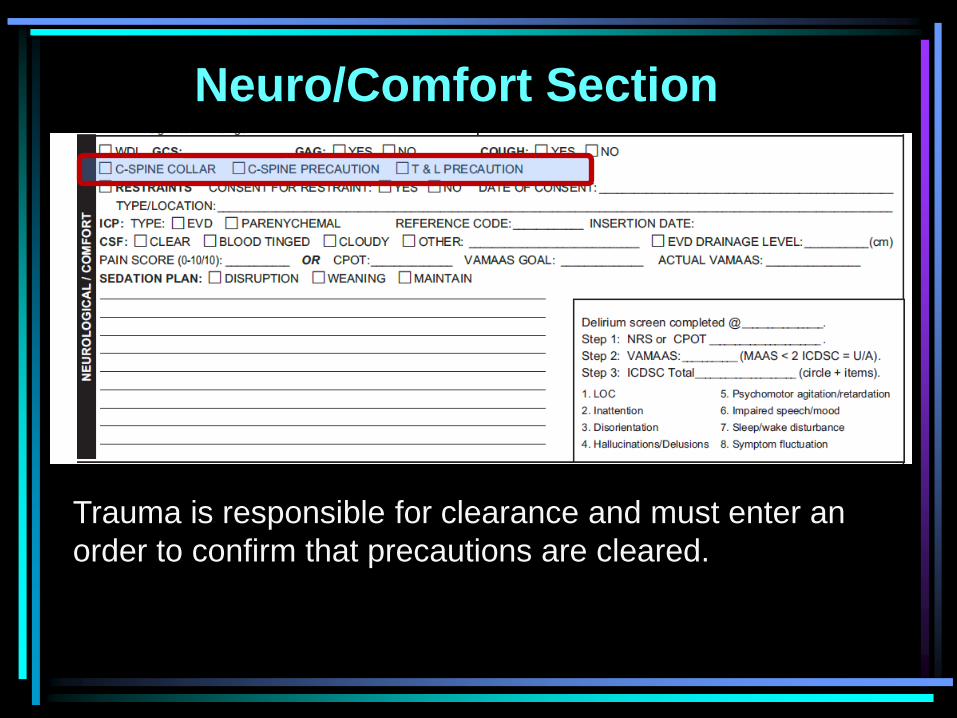
Trauma is responsible for clearance and must enter an
order to confirm that precautions are cleared.
Neuro/Comfort Section
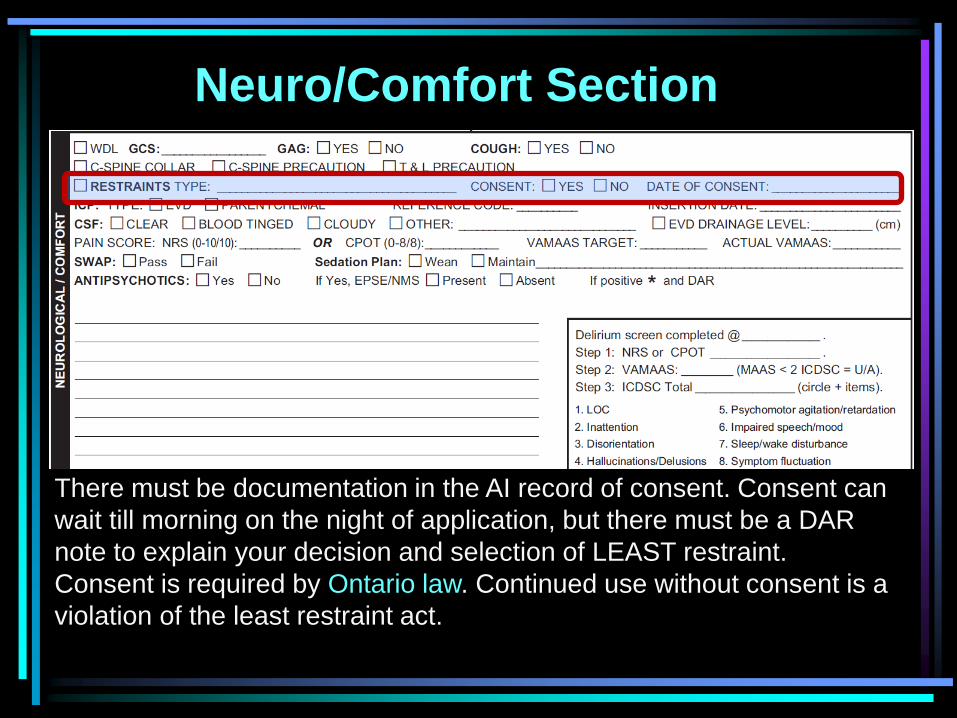
There must be documentation in the AI record of consent. Consent can
wait till morning on the night of application, but there must be a DAR
note to explain your decision and selection of LEAST restraint.
Consent is required by Ontario law. Continued use without consent is a
violation of the least restraint act.
Neuro/Comfort Section
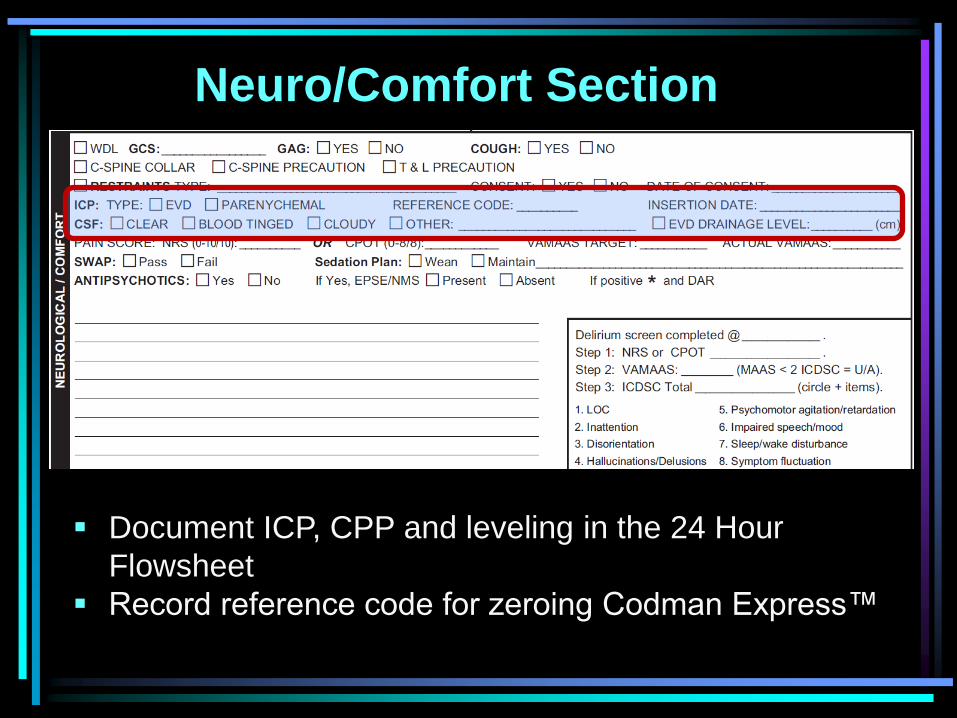
Document ICP, CPP and leveling in the 24 Hour
Flowsheet
Record reference code for zeroing Codman Express™
Neuro/Comfort Section
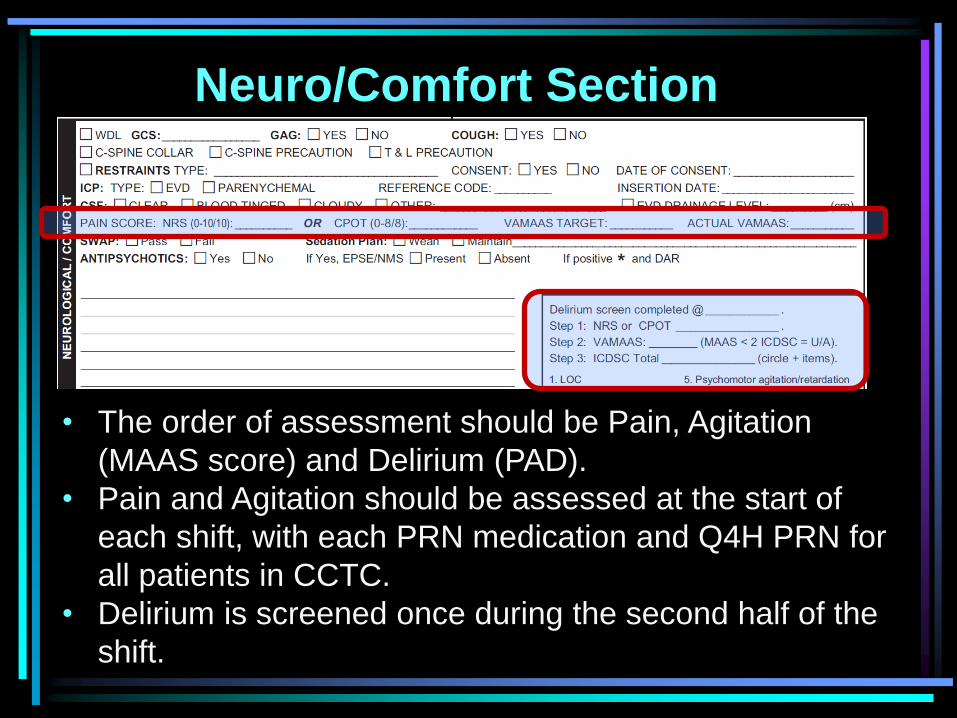
• The order of assessment should be Pain, Agitation
(MAAS score) and Delirium (PAD).
• Pain and Agitation should be assessed at the start of
each shift, with each PRN medication and Q4H PRN for
all patients in CCTC.
• Delirium is screened once during the second half of the
shift.
Neuro/Comfort Section
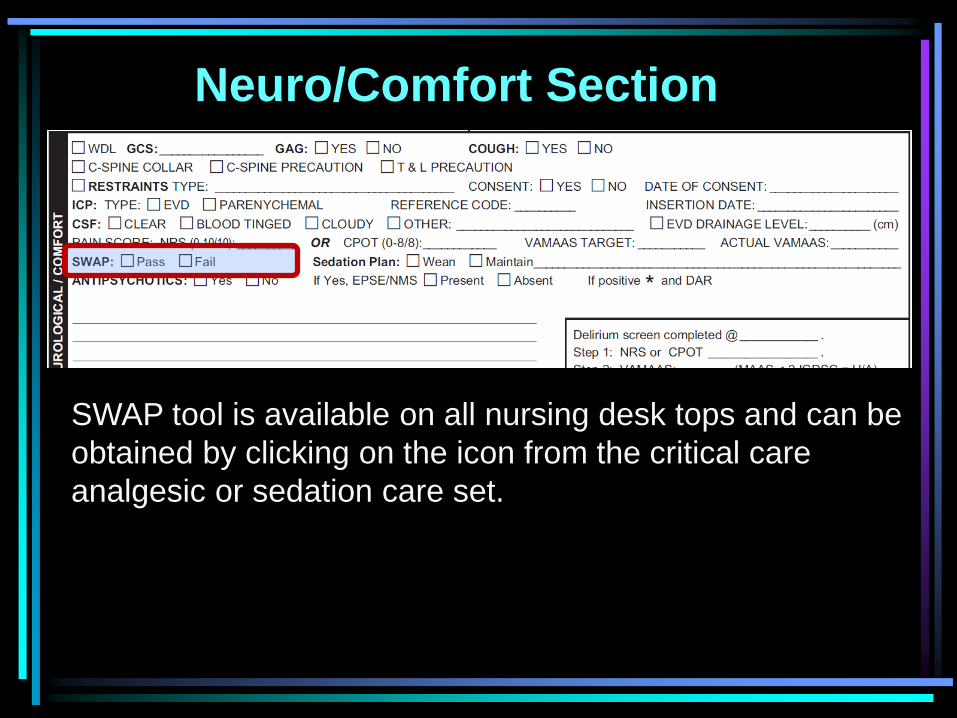
SWAP tool is available on all nursing desk tops and can be
obtained by clicking on the icon from the critical care
analgesic or sedation care set.
Neuro/Comfort Section
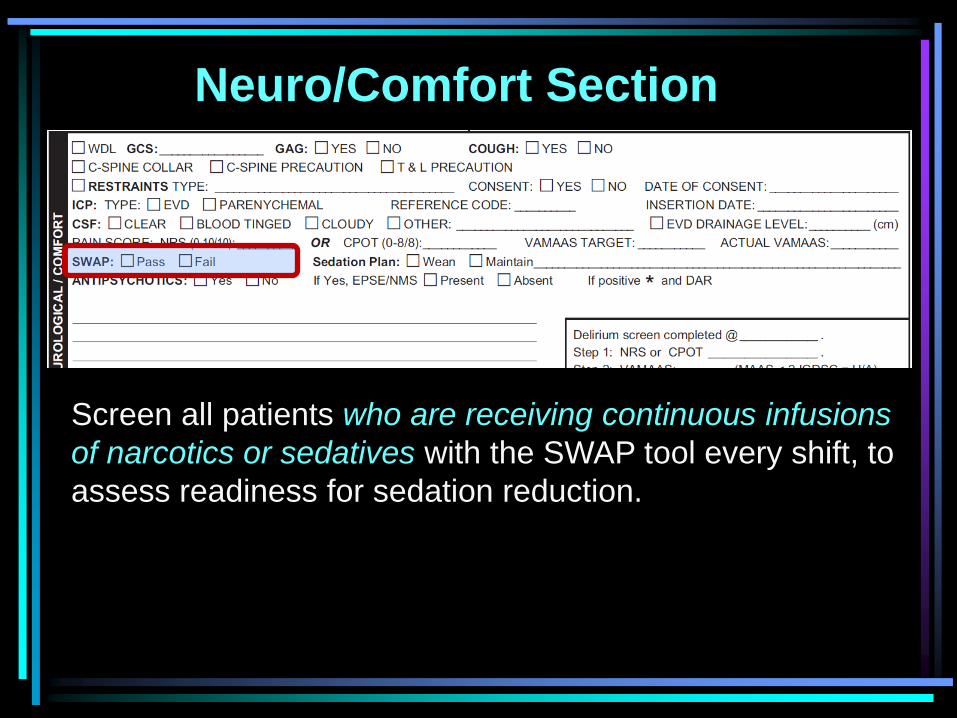
Screen all patients who are receiving continuous infusions
of narcotics or sedatives with the SWAP tool every shift, to
assess readiness for sedation reduction.
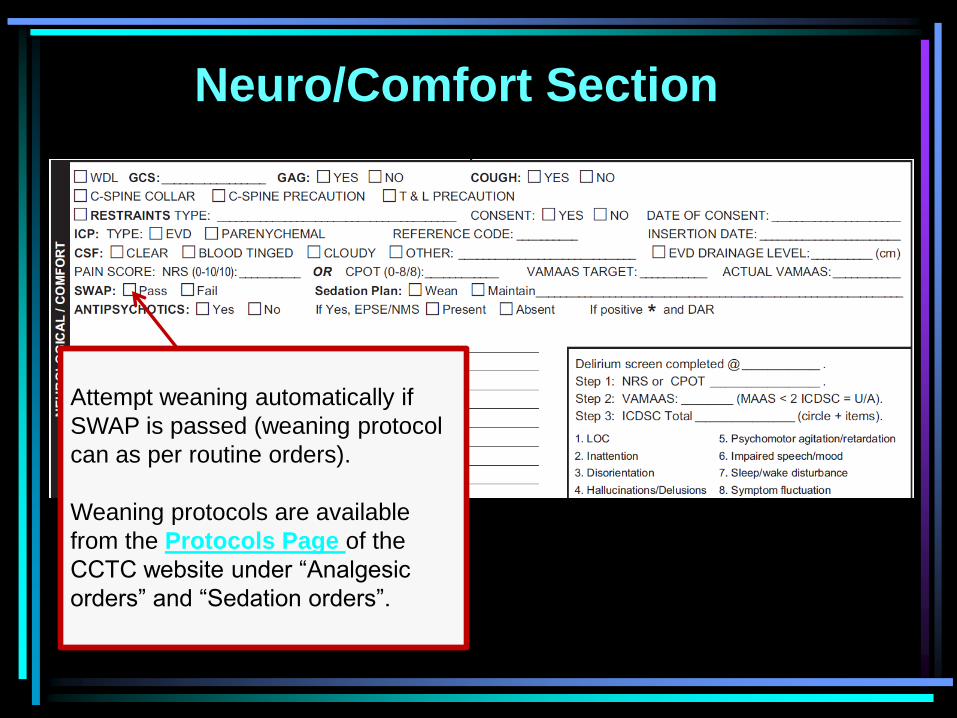
Attempt weaning automatically if
SWAP is passed (weaning protocol
can as per routine orders).
Weaning protocols are available
from the Protocols Page of the
CCTC website under “Analgesic
orders” and “Sedation orders”.
Neuro/Comfort Section

If SWAP assessment is failed, review
sedation plans during rounds.
*Even when deep sedation remains the
target, slow and cautious reduction can be
attempted to see if targets can still be
achieved with less medication (except when
neuromuscular blockade is in use).
Neuro/Comfort Section
Neuro/Comfort Section
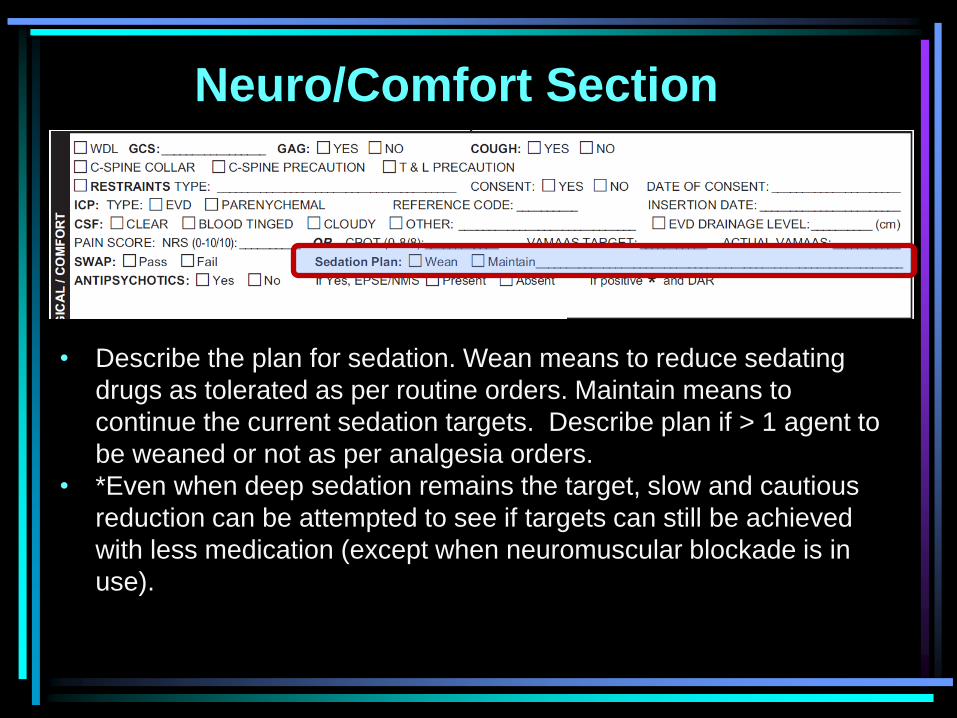
• Describe the plan for sedation. Wean means to reduce sedating
drugs as tolerated as per routine orders. Maintain means to
continue the current sedation targets. Describe plan if > 1 agent to
be weaned or not as per analgesia orders.
• *Even when deep sedation remains the target, slow and cautious
reduction can be attempted to see if targets can still be achieved
with less medication (except when neuromuscular blockade is in
use).
Neuro/Comfort Section
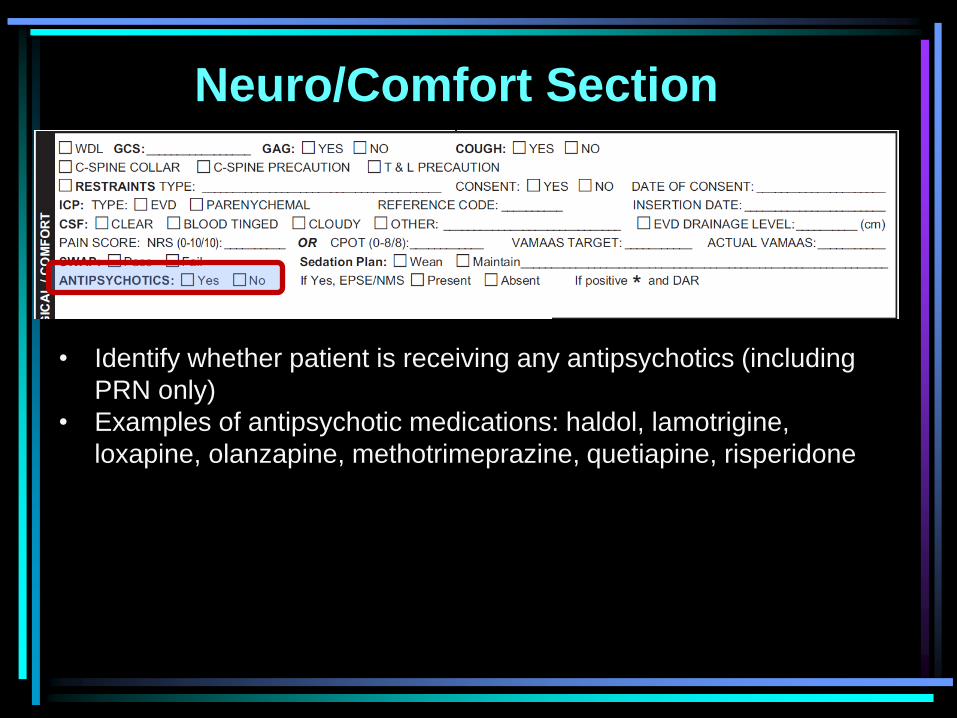
• Identify whether patient is receiving any antipsychotics (including
PRN only)
• Examples of antipsychotic medications: haldol, lamotrigine,
loxapine, olanzapine, methotrimeprazine, quetiapine, risperidone
Neuro/Comfort Section
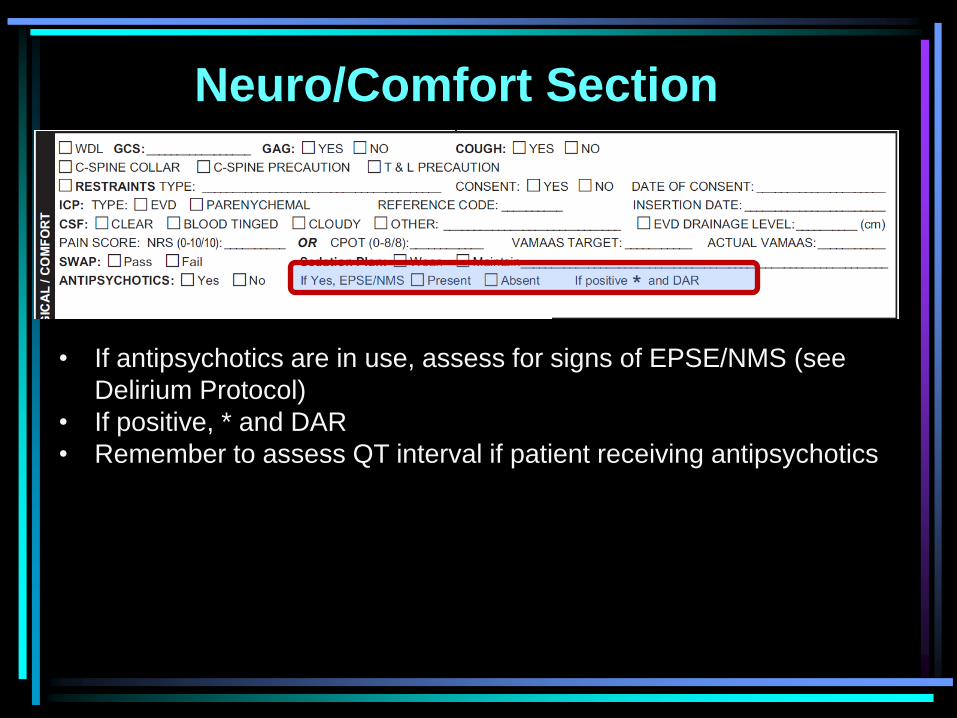
• If antipsychotics are in use, assess for signs of EPSE/NMS (see
Delirium Protocol)
• If positive, * and DAR
• Remember to assess QT interval if patient receiving antipsychotics
Neuro/Comfort Section
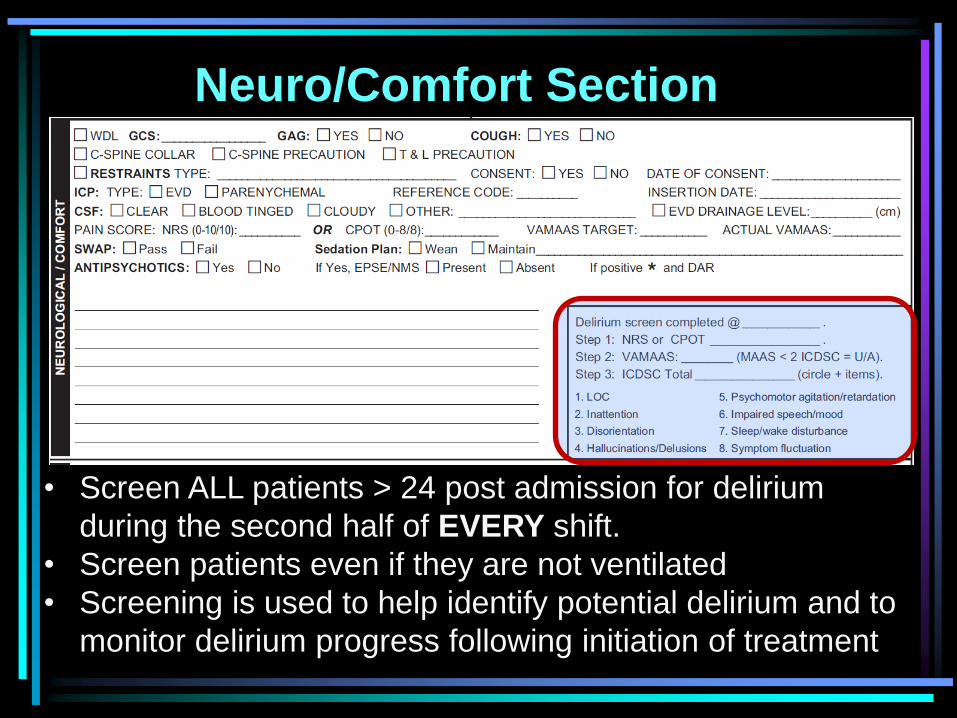
• Screen ALL patients > 24 post admission for delirium
during the second half of EVERY shift.
• Screen patients even if they are not ventilated
• Screening is used to help identify potential delirium and to
monitor delirium progress following initiation of treatment
Neuro/Comfort Section
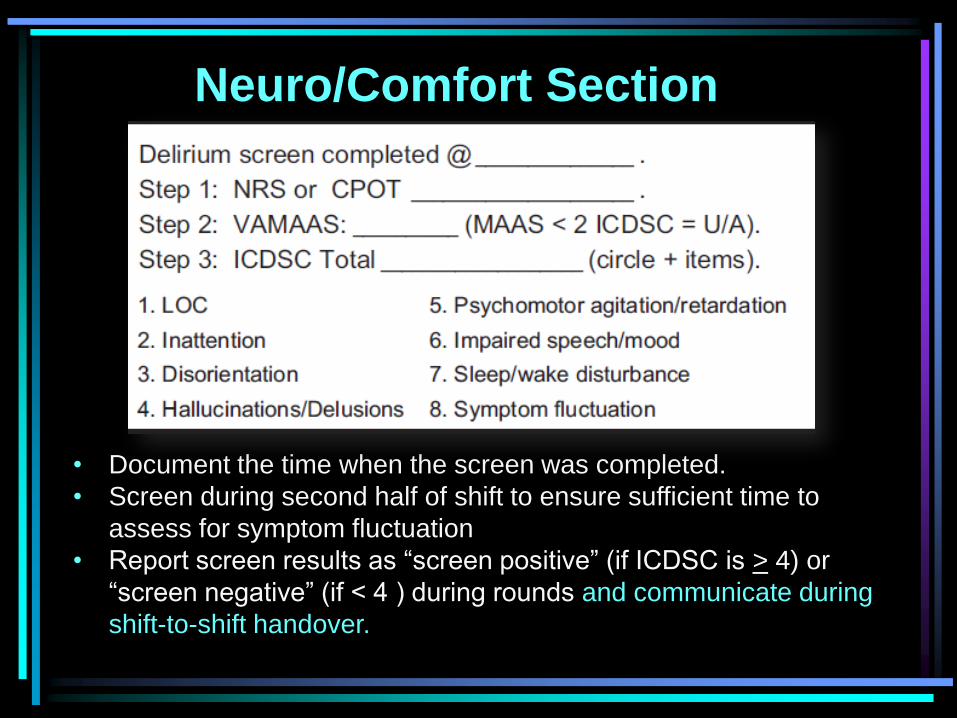
• Document the time when the screen was completed.
• Screen during second half of shift to ensure sufficient time to
assess for symptom fluctuation
• Report screen results as “screen positive” (if ICDSC is > 4) or
“screen negative” (if < 4 ) during rounds and communicate during
shift-to-shift handover.
Neuro/Comfort Section
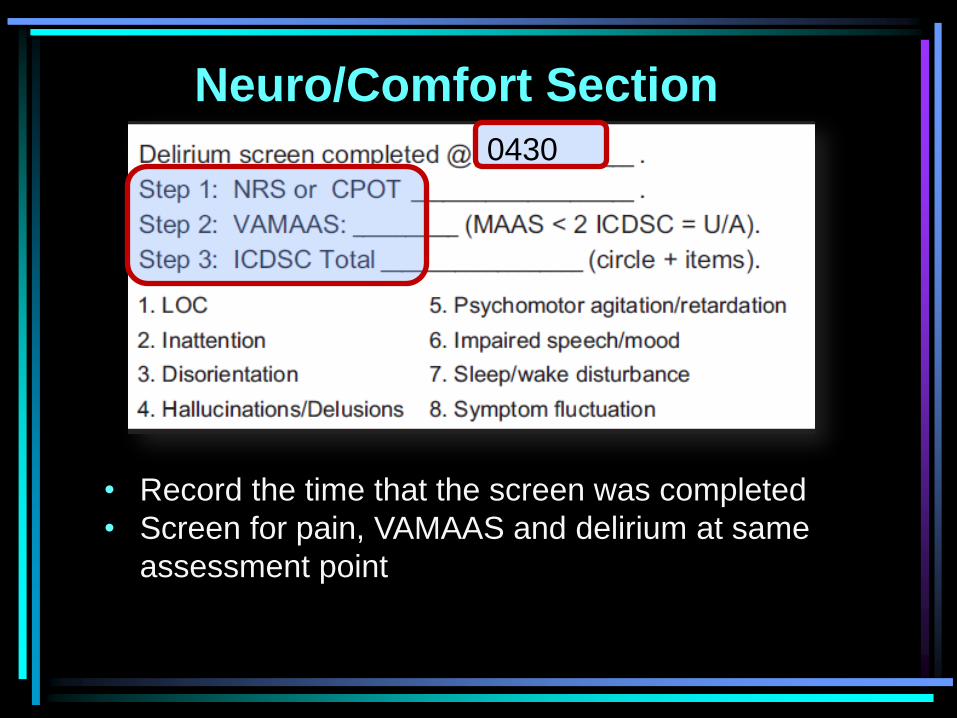
• Record the time that the screen was completed
• Screen for pain, VAMAAS and delirium at same
assessment point
0430
Neuro/Comfort Section
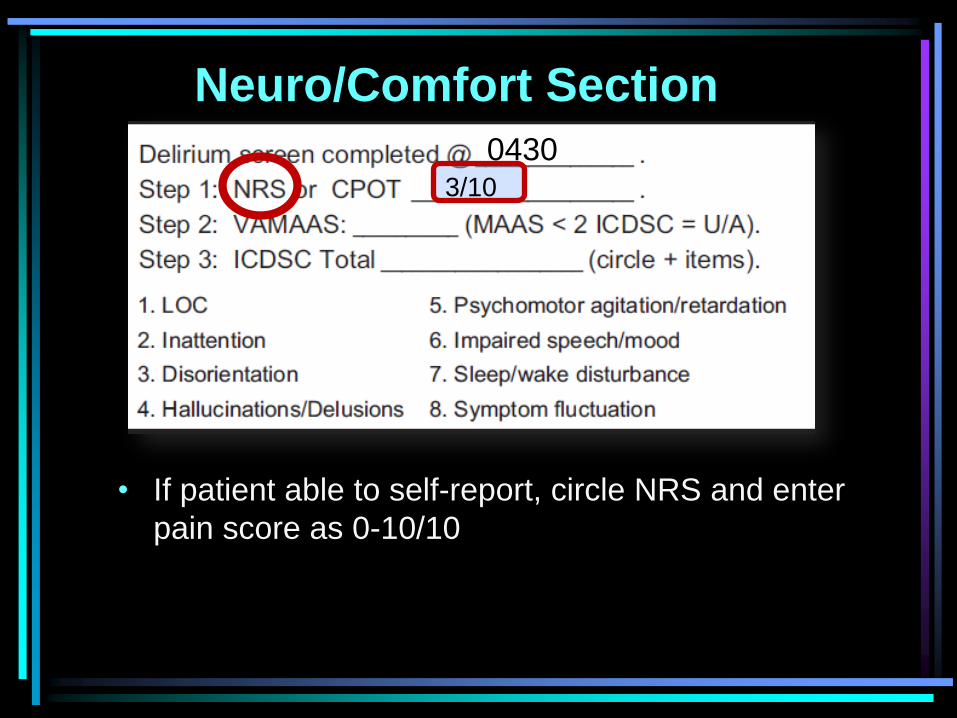
• If patient able to self-report, circle NRS and enter
pain score as 0-10/10
0430 3/10
Neuro/Comfort Section
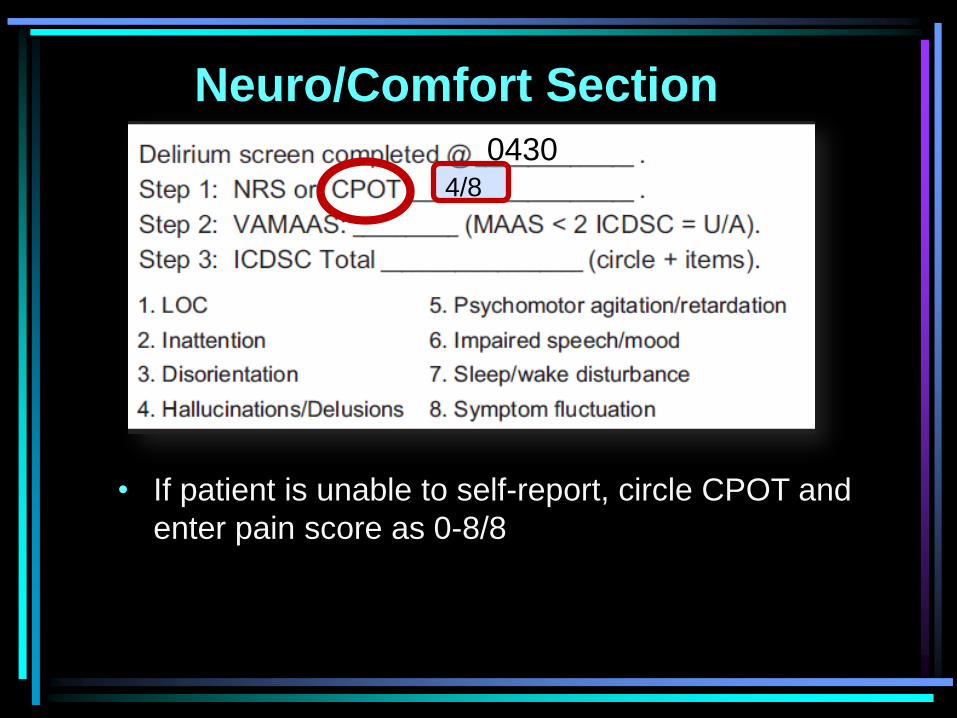
• If patient is unable to self-report, circle CPOT and
enter pain score as 0-8/8
0430 4/8
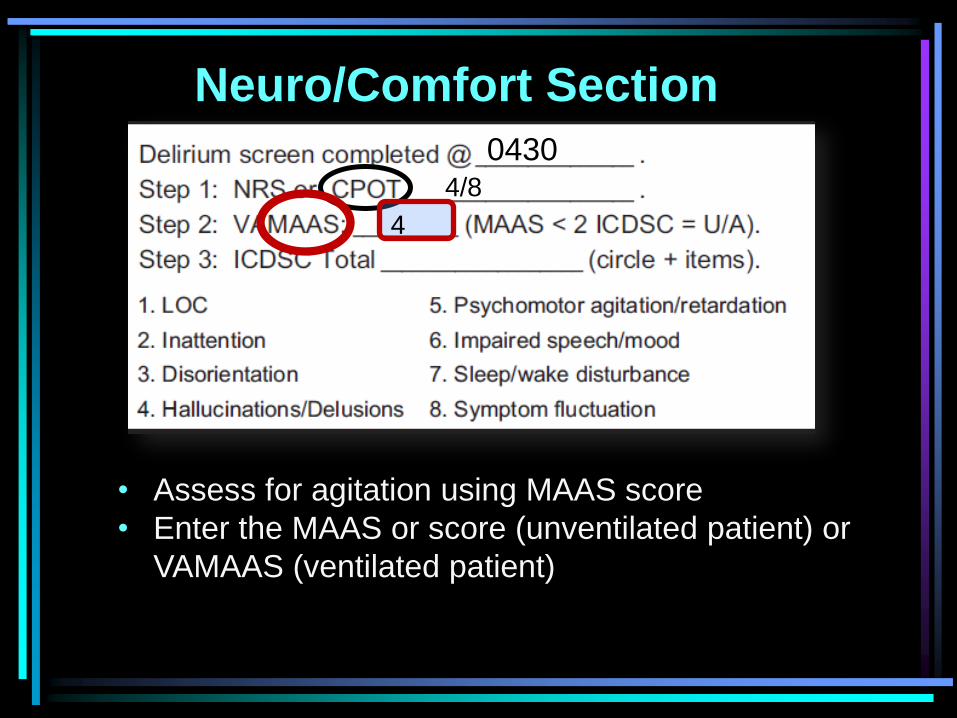
Neuro/Comfort Section
• Assess for agitation using MAAS score
• Enter the MAAS or score (unventilated patient) or
VAMAAS (ventilated patient)
0430 4/8
4
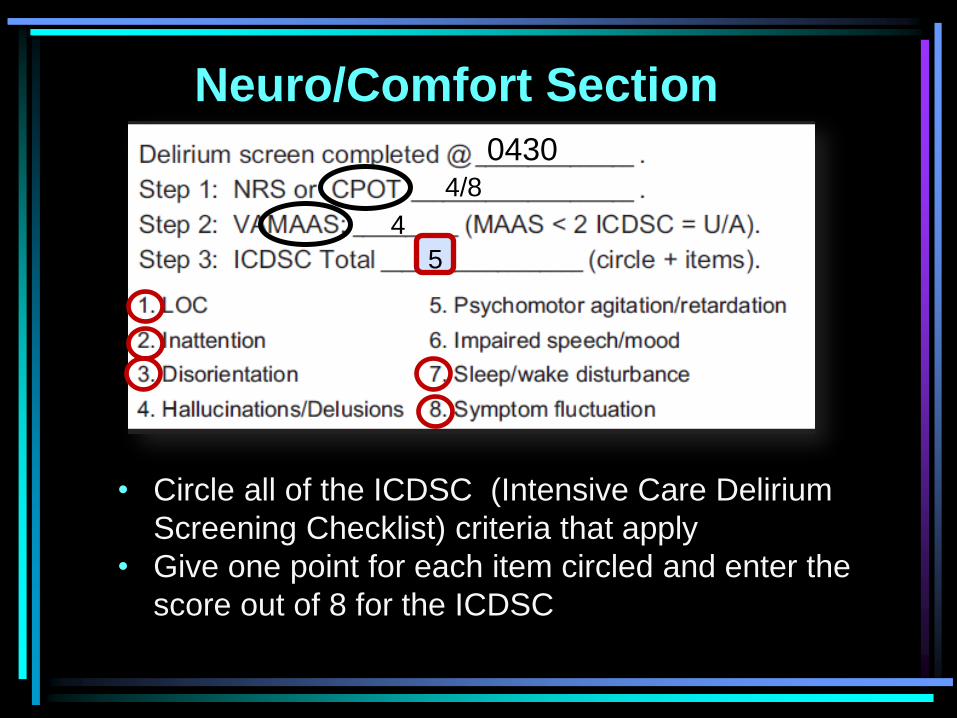
Neuro/Comfort Section
• Circle all of the ICDSC (Intensive Care Delirium
Screening Checklist) criteria that apply
• Give one point for each item circled and enter the
score out of 8 for the ICDSC
0430 4/8
4
5

Neuro/Comfort Section
• If any criteria from 1-7 change between between day
and night shift or throughout your shift, assign a point
for #8 symptom fluctuation.
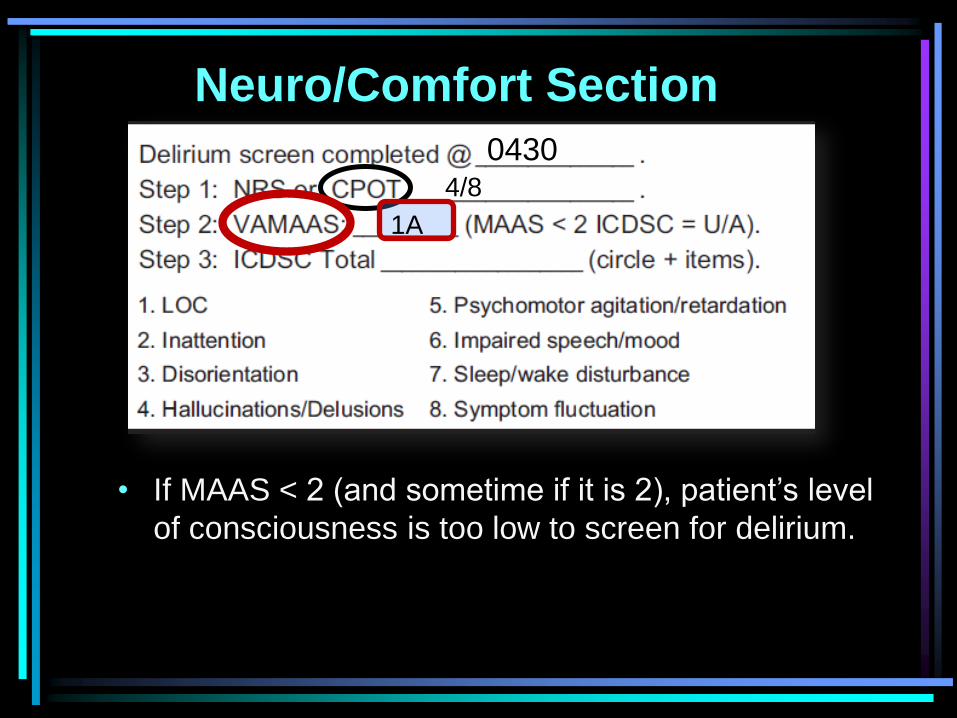
Neuro/Comfort Section
• If MAAS < 2 (and sometime if it is 2), patient’s level
of consciousness is too low to screen for delirium.
0430 4/8
1A
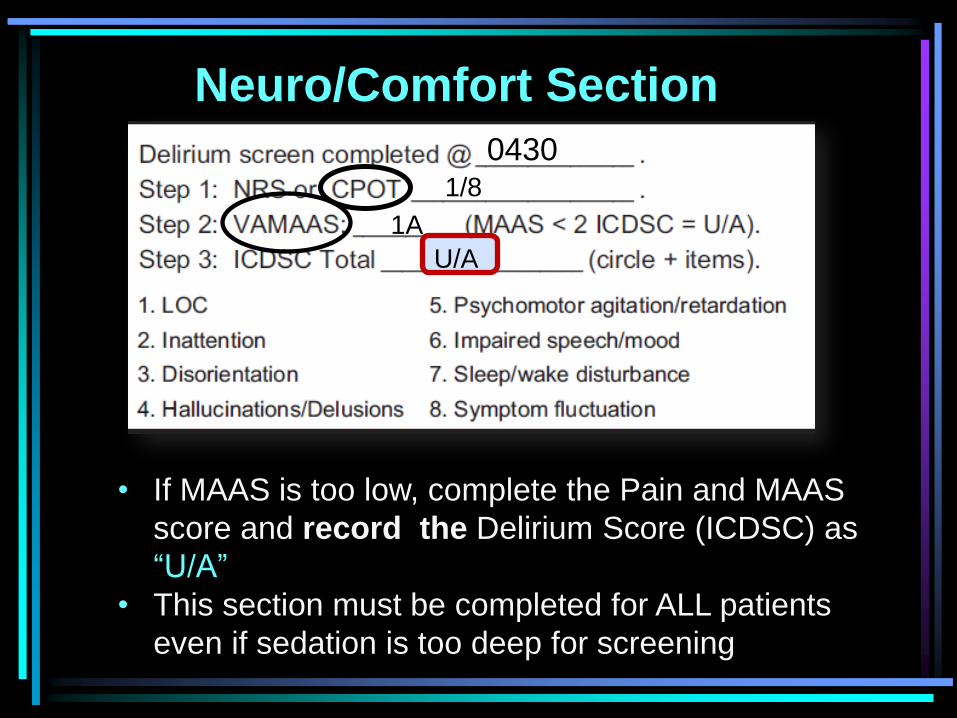
Neuro/Comfort Section
• If MAAS is too low, complete the Pain and MAAS
score and record the Delirium Score (ICDSC) as
“U/A”
• This section must be completed for ALL patients
even if sedation is too deep for screening
0430 1/8
1A
U/A
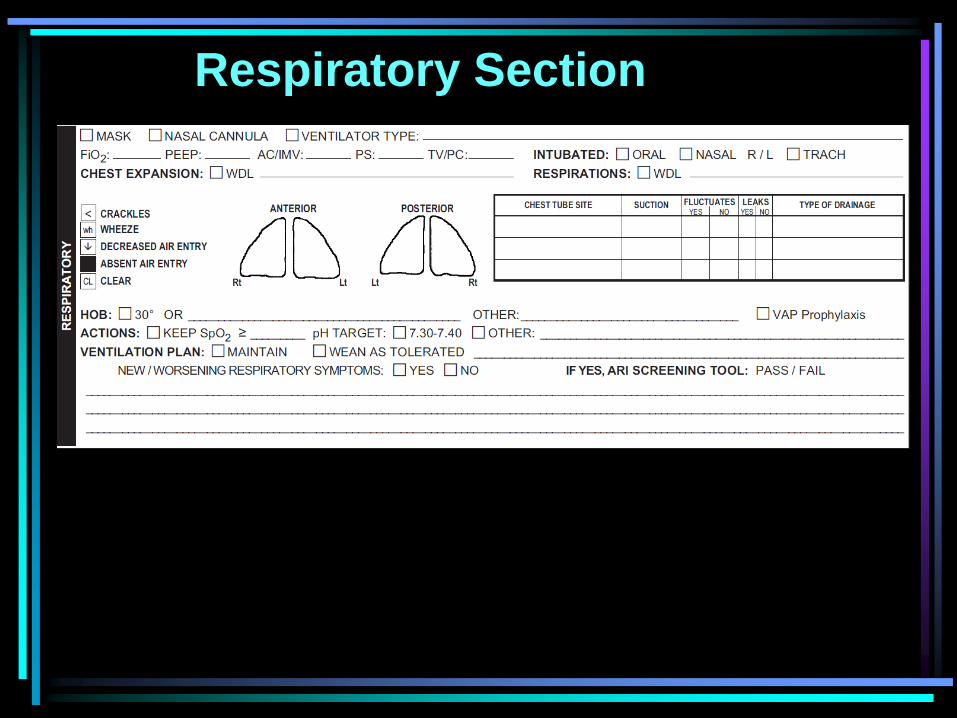
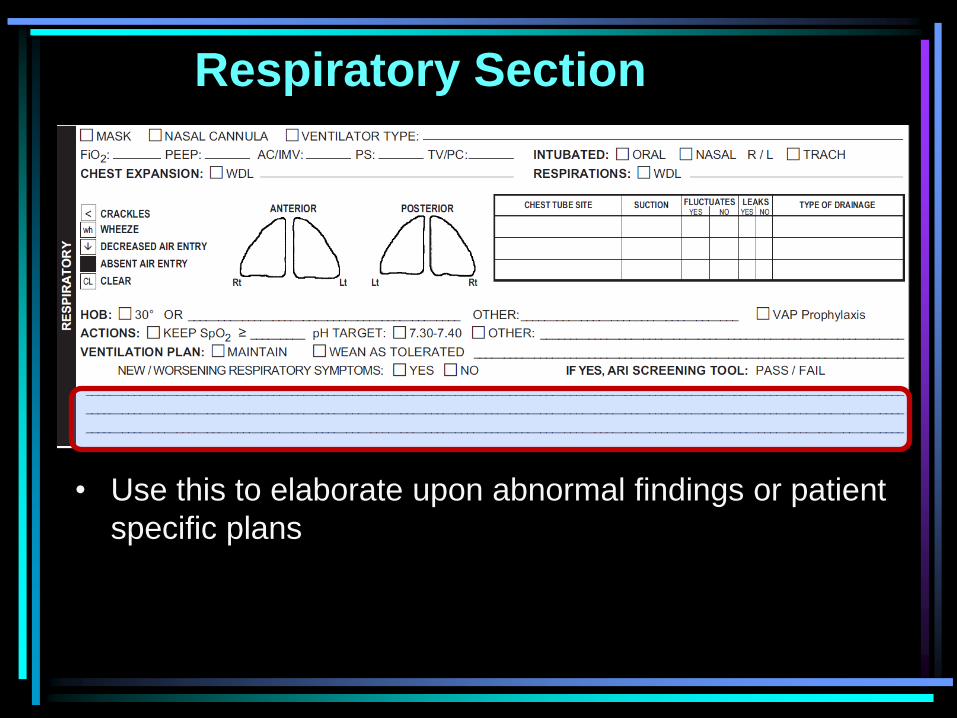
Respiratory Section

Respiratory Section
• Identify and oxygen or ventilation support that is in use
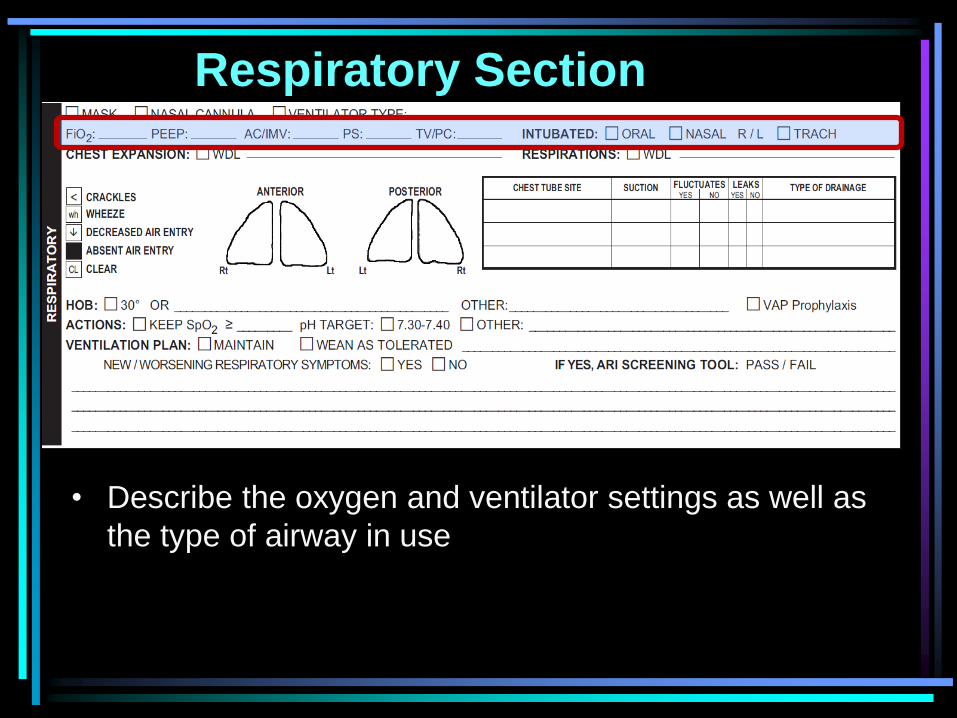
Respiratory Section
• Describe the oxygen and ventilator settings as well as
the type of airway in use
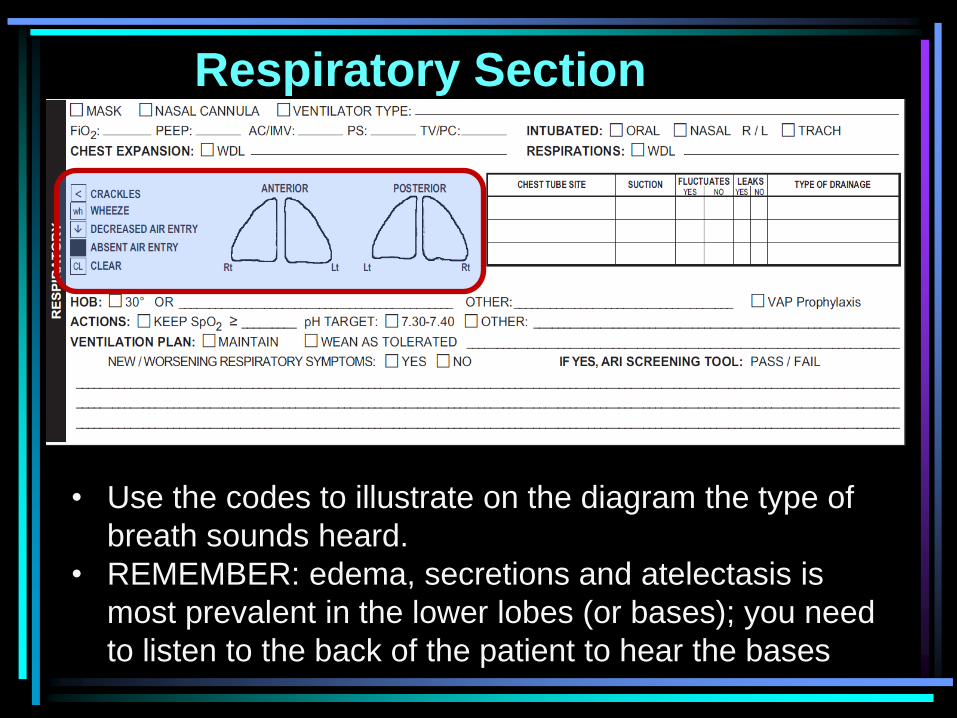
Respiratory Section
• Use the codes to illustrate on the diagram the type of
breath sounds heard.
• REMEMBER: edema, secretions and atelectasis is
most prevalent in the lower lobes (or bases); you need
to listen to the back of the patient to hear the bases
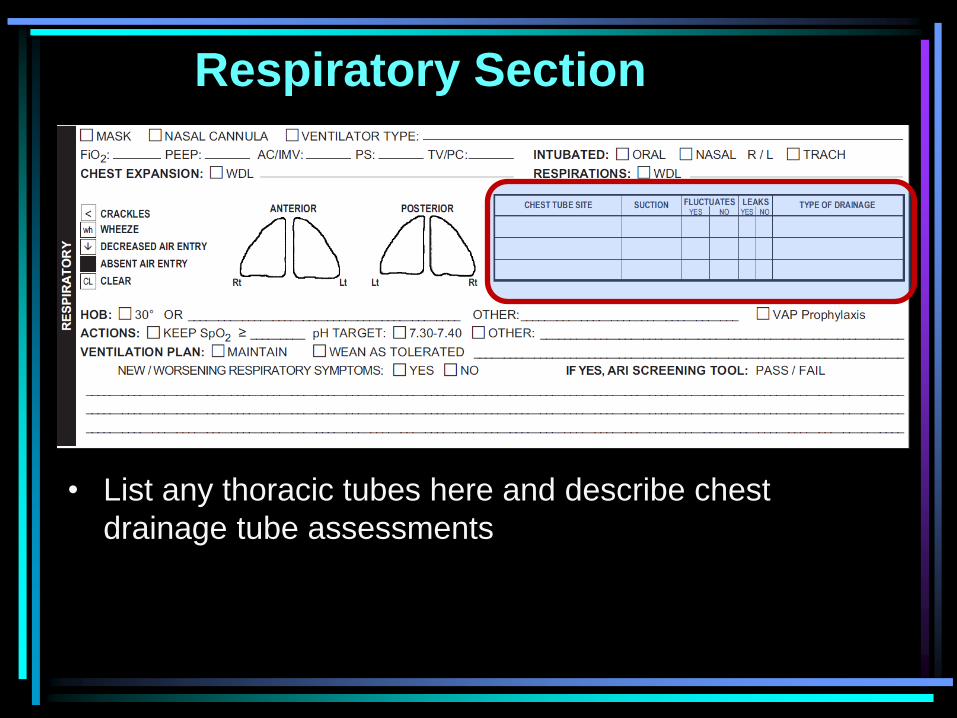
Respiratory Section
• List any thoracic tubes here and describe chest
drainage tube assessments
Respiratory Section
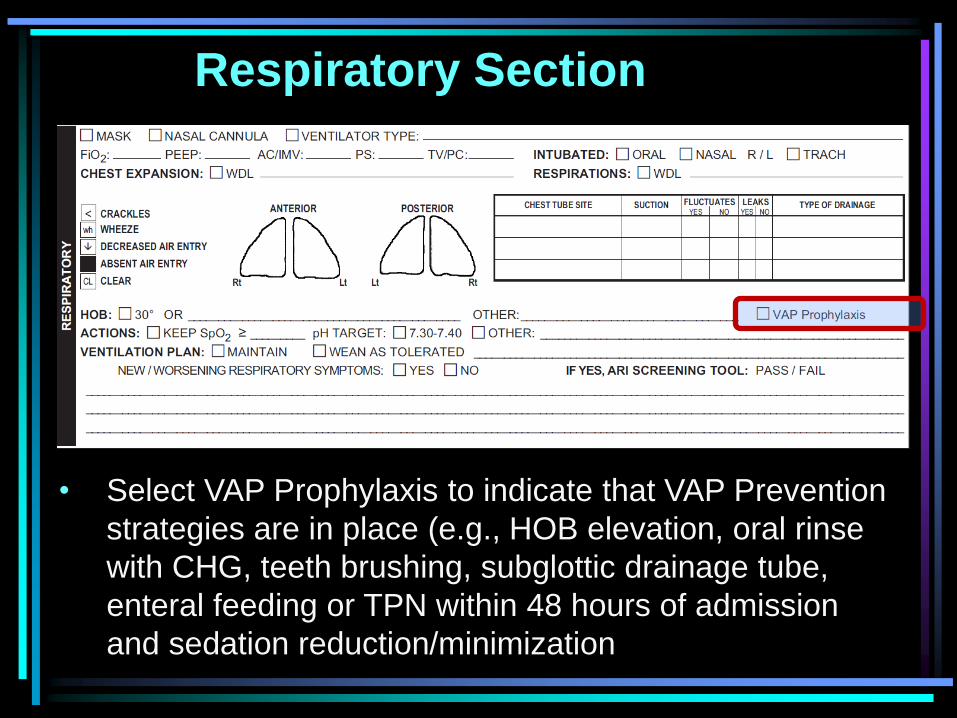
• Select VAP Prophylaxis to indicate that VAP Prevention
strategies are in place (e.g., HOB elevation, oral rinse
with CHG, teeth brushing, subglottic drainage tube,
enteral feeding or TPN within 48 hours of admission
and sedation reduction/minimization
Respiratory Section
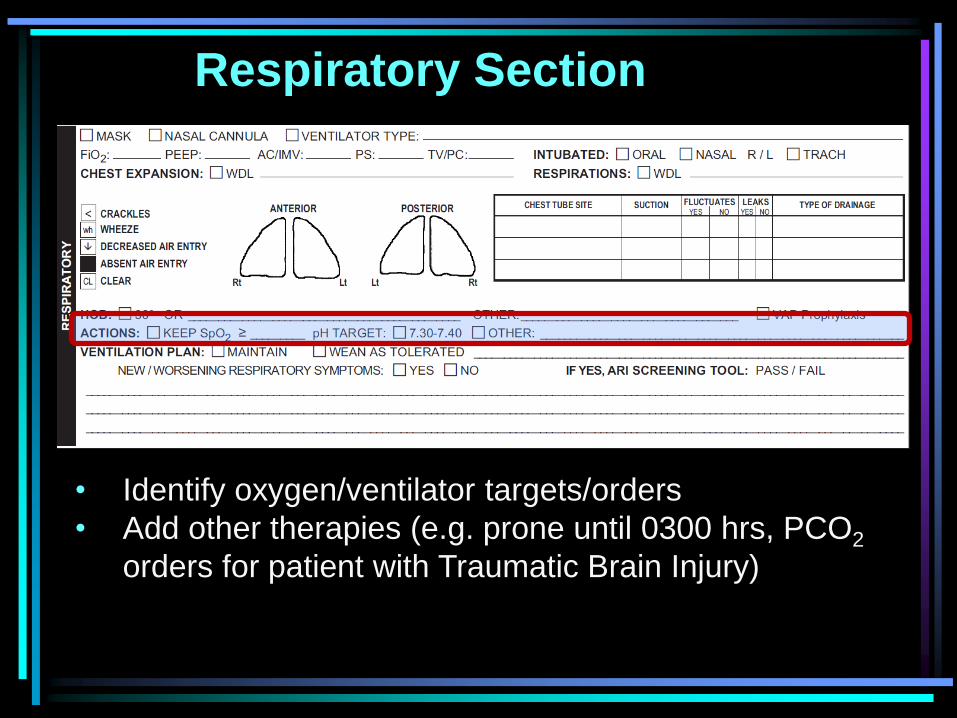
• Identify oxygen/ventilator targets/orders
• Add other therapies (e.g. prone until 0300 hrs, PCO2
orders for patient with Traumatic Brain Injury)
Respiratory Section
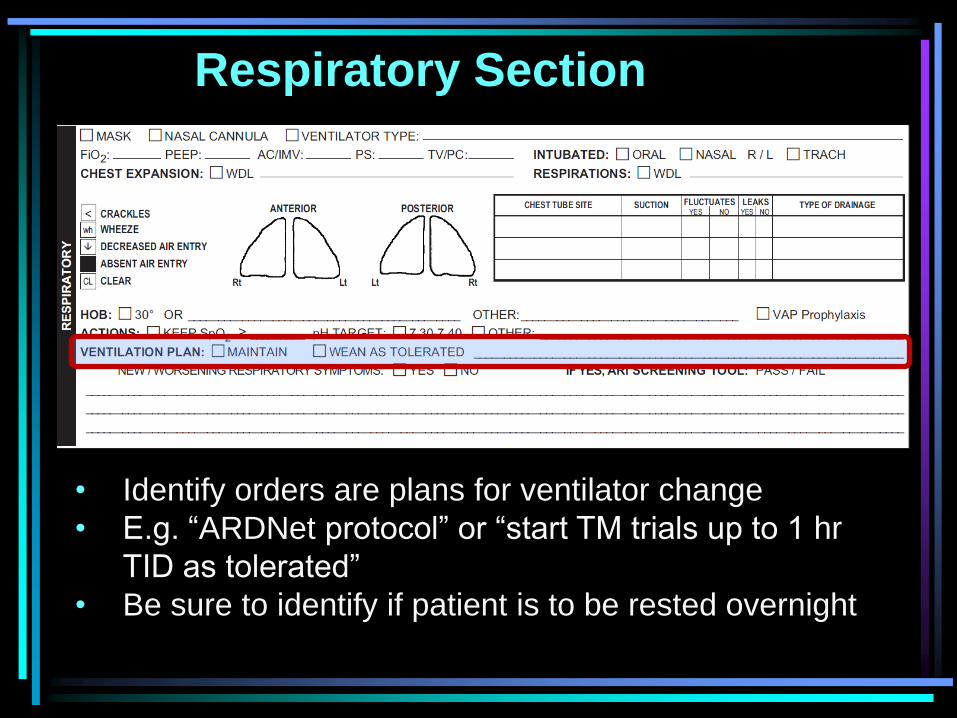
• Identify orders are plans for ventilator change
• E.g. “ARDNet protocol” or “start TM trials up to 1 hr
TID as tolerated”
• Be sure to identify if patient is to be rested overnight
Respiratory Section
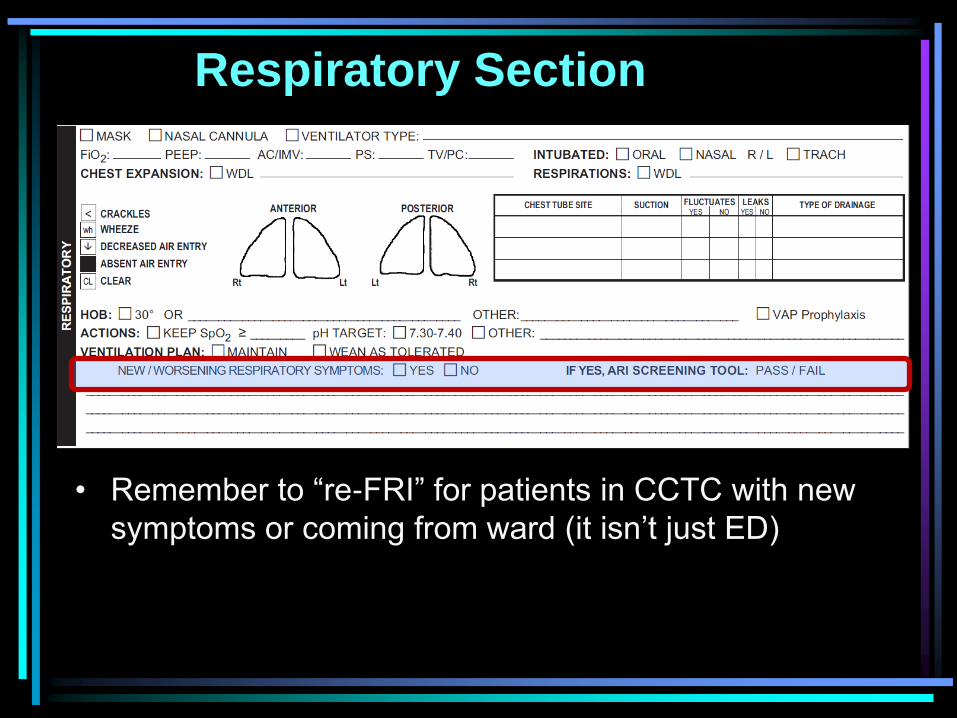
• Remember to “re-FRI” for patients in CCTC with new
symptoms or coming from ward (it isn’t just ED)
Respiratory Section
• Use this to elaborate upon abnormal findings or patient
specific plans

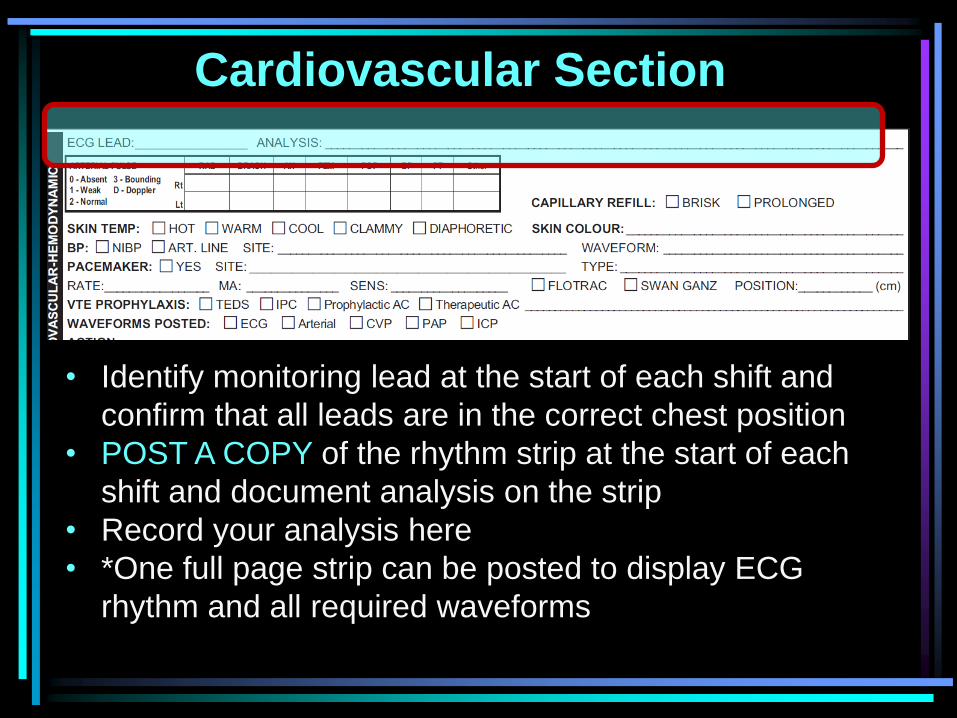
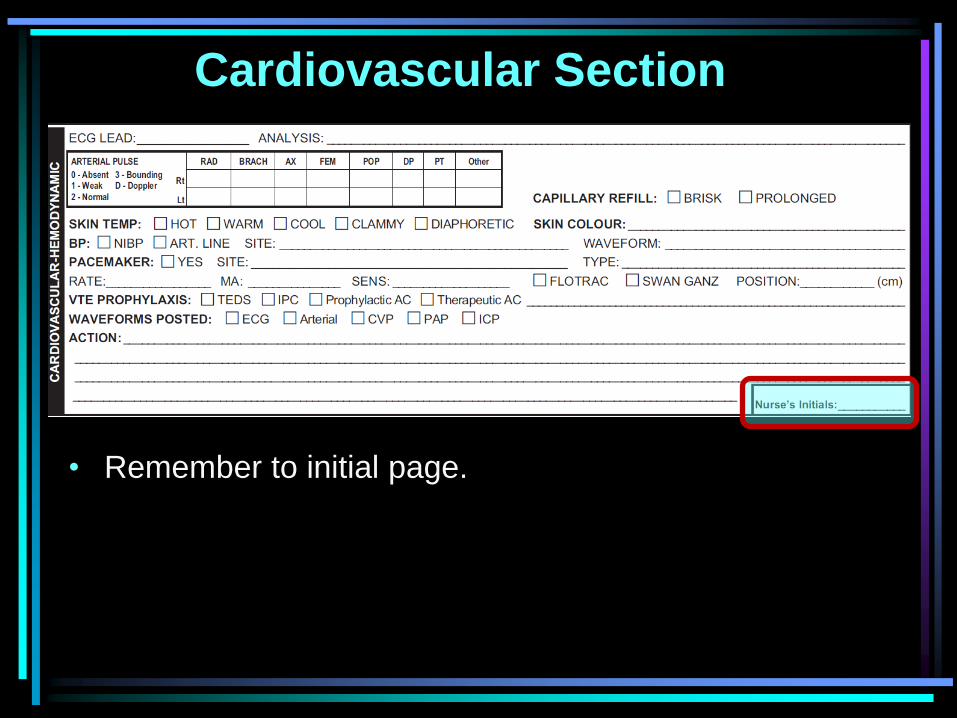
Cardiovascular Section
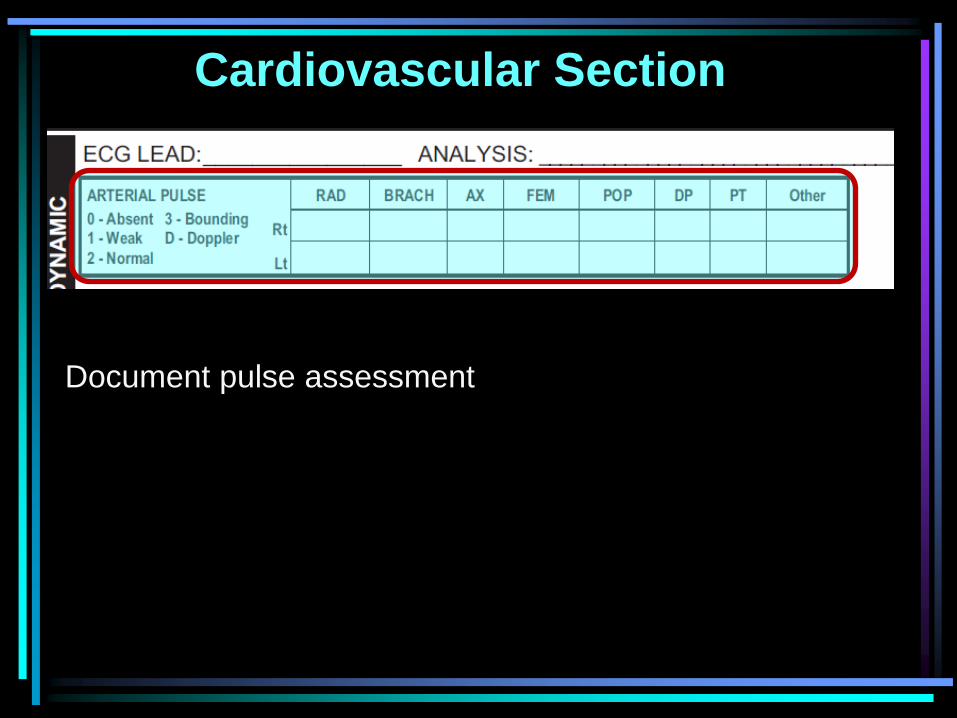
Cardiovascular Section
• Identify monitoring lead at the start of each shift and
confirm that all leads are in the correct chest position
• POST A COPY of the rhythm strip at the start of each
shift and document analysis on the strip
• Record your analysis here
• *One full page strip can be posted to display ECG
rhythm and all required waveforms
Cardiovascular Section
Document pulse assessment
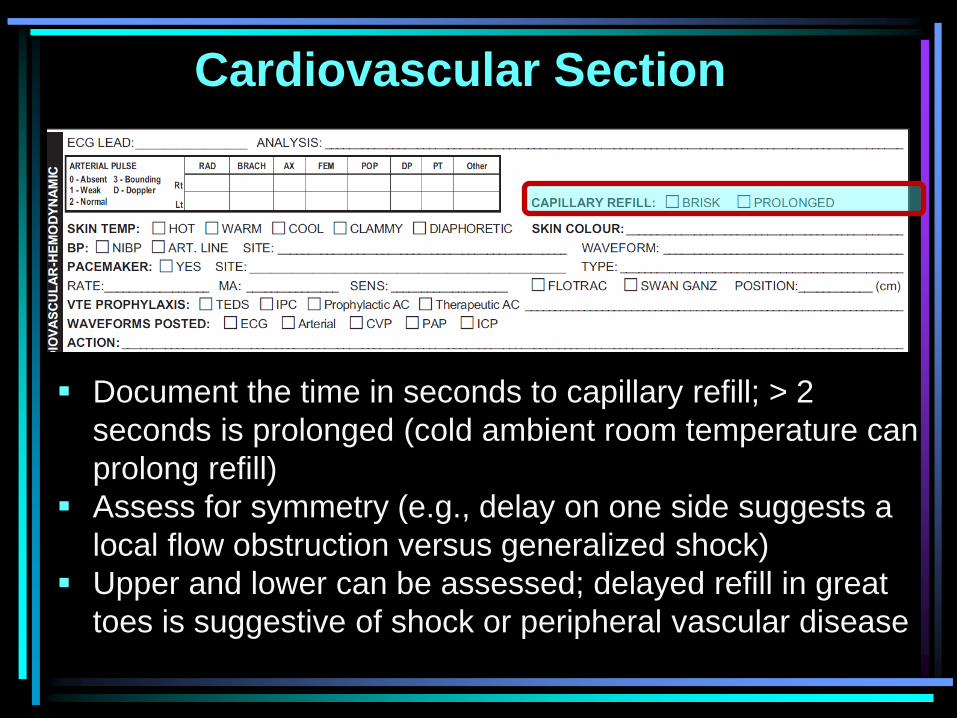
Cardiovascular Section
Document the time in seconds to capillary refill; > 2
seconds is prolonged (cold ambient room temperature can
prolong refill)
Assess for symmetry (e.g., delay on one side suggests a
local flow obstruction versus generalized shock)
Upper and lower can be assessed; delayed refill in great
toes is suggestive of shock or peripheral vascular disease
Cardiovascular Section
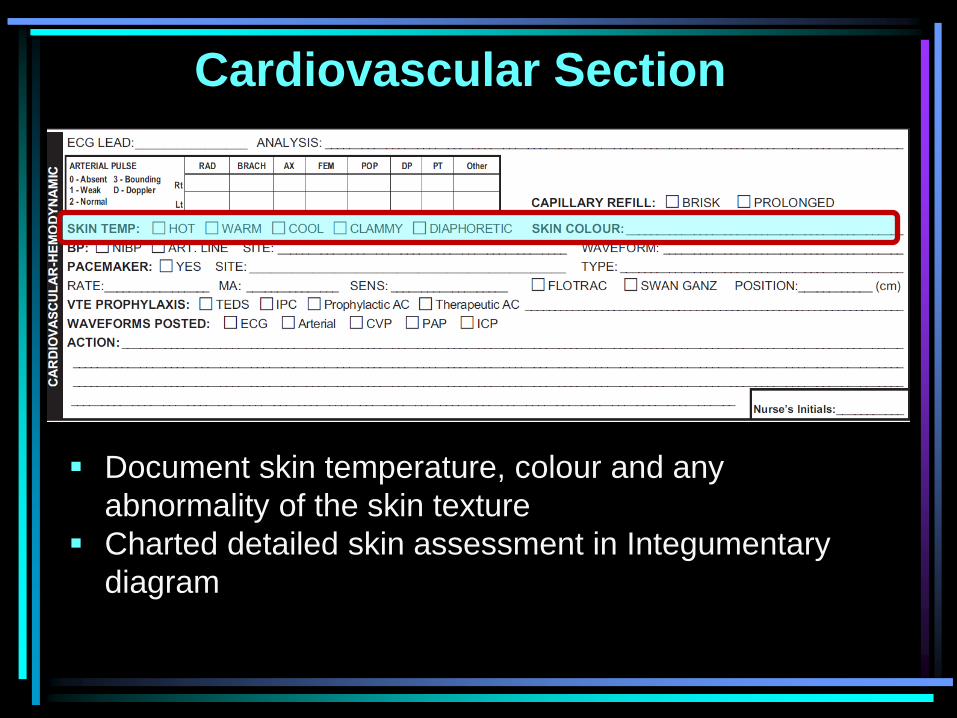
Document skin temperature, colour and any
abnormality of the skin texture
Charted detailed skin assessment in Integumentary
diagram
Cardiovascular Section
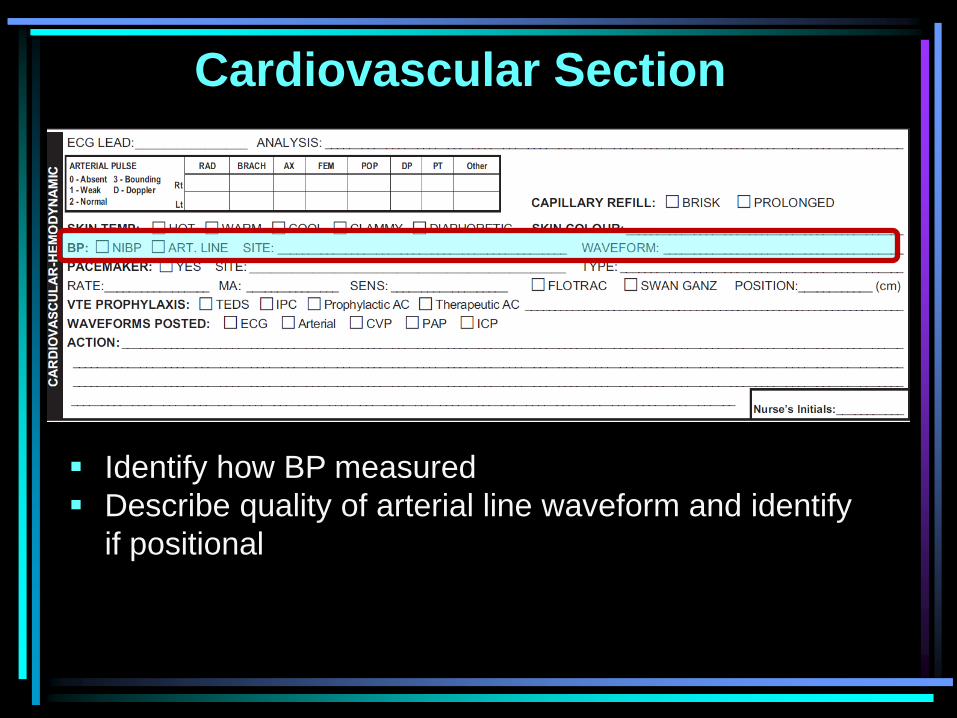
Identify how BP measured
Describe quality of arterial line waveform and identify
if positional
Cardiovascular Section
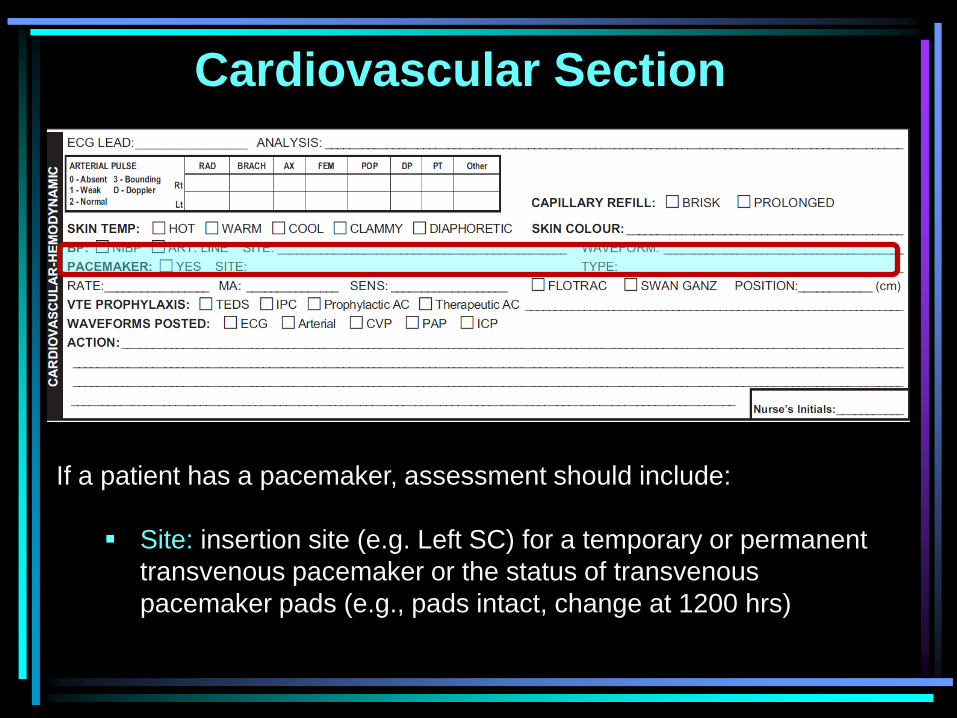
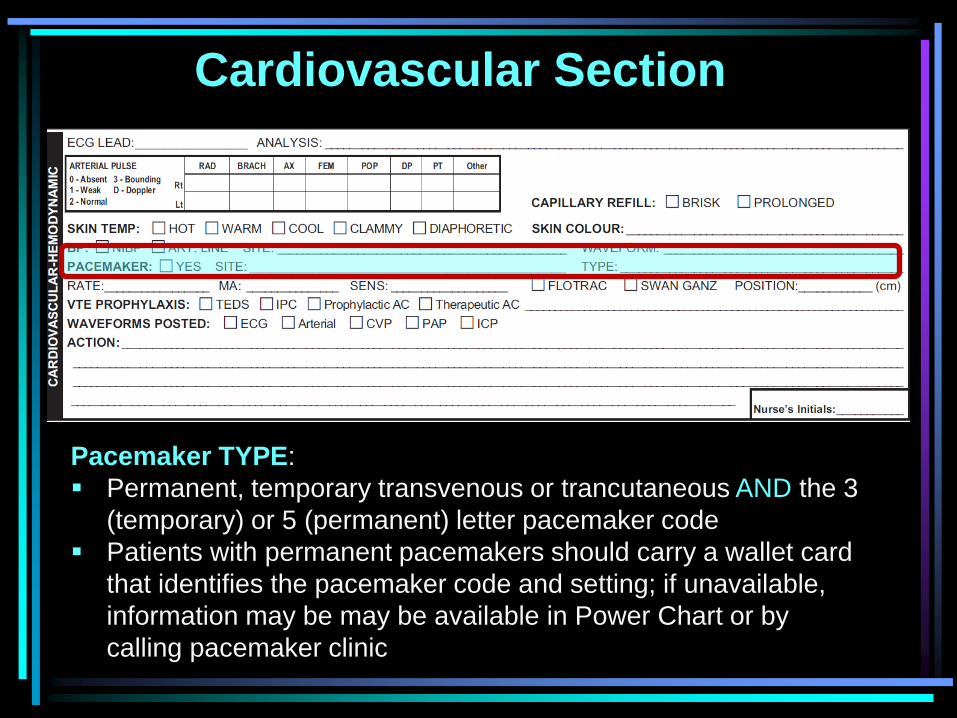
If a patient has a pacemaker, assessment should include:
Site: insertion site (e.g. Left SC) for a temporary or permanent
transvenous pacemaker or the status of transvenous
pacemaker pads (e.g., pads intact, change at 1200 hrs)
Cardiovascular Section
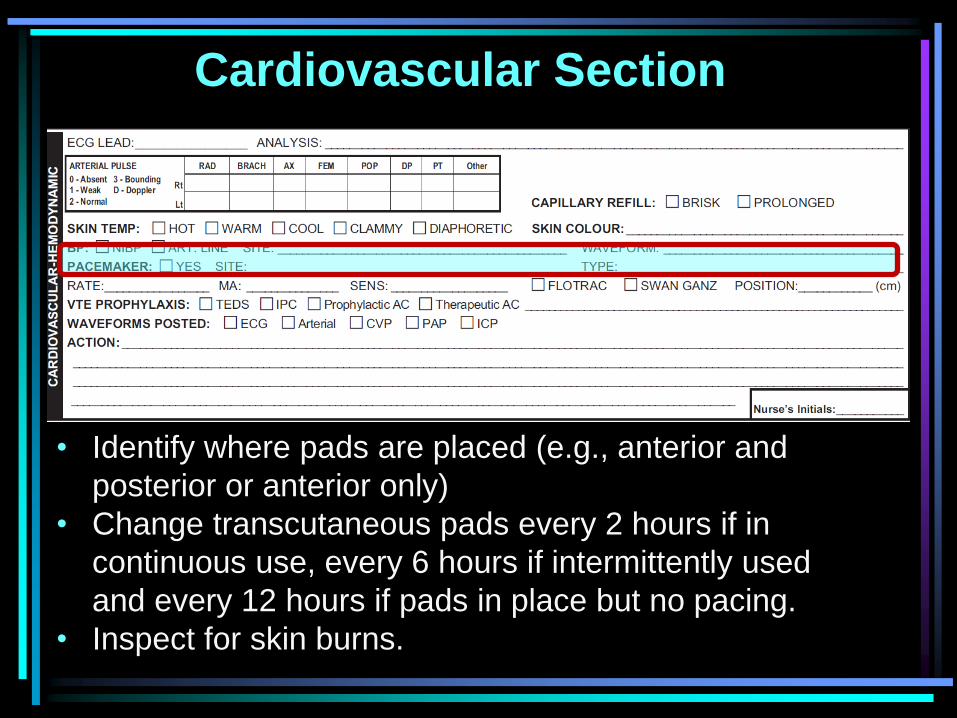
• Identify where pads are placed (e.g., anterior and
posterior or anterior only)
• Change transcutaneous pads every 2 hours if in
continuous use, every 6 hours if intermittently used
and every 12 hours if pads in place but no pacing.
• Inspect for skin burns.
Cardiovascular Section
Pacemaker TYPE:
Permanent, temporary transvenous or trancutaneous AND the 3
(temporary) or 5 (permanent) letter pacemaker code
Patients with permanent pacemakers should carry a wallet card
that identifies the pacemaker code and setting; if unavailable,
information may be may be available in Power Chart or by
calling pacemaker clinic
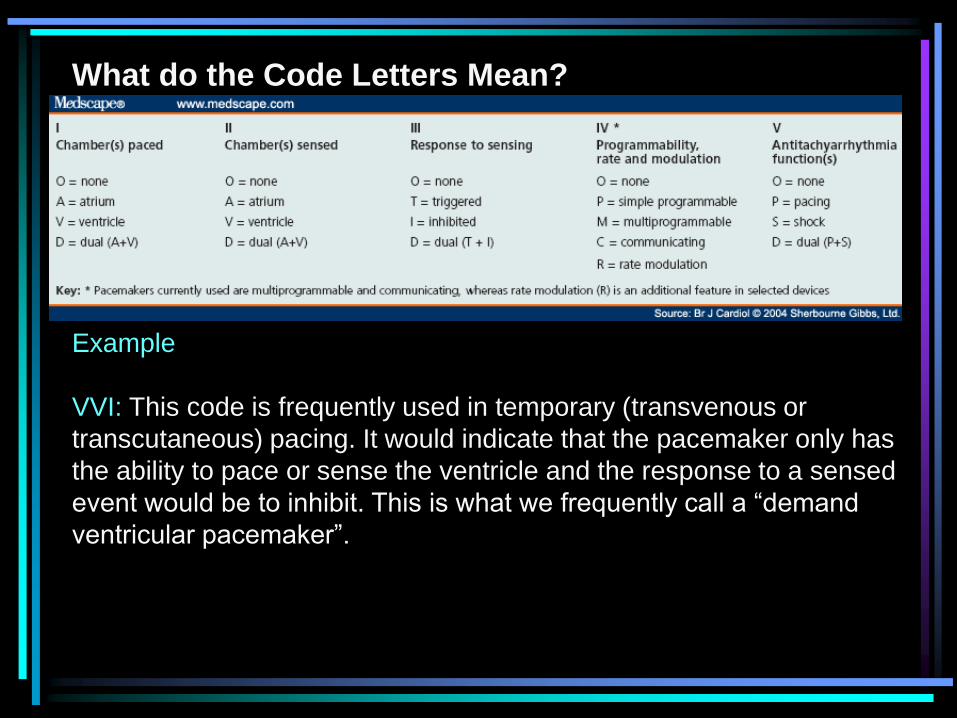
Example
VVI: This code is frequently used in temporary (transvenous or
transcutaneous) pacing. It would indicate that the pacemaker only has
the ability to pace or sense the ventricle and the response to a sensed
event would be to inhibit. This is what we frequently call a “demand
ventricular pacemaker”.
What do the Code Letters Mean?
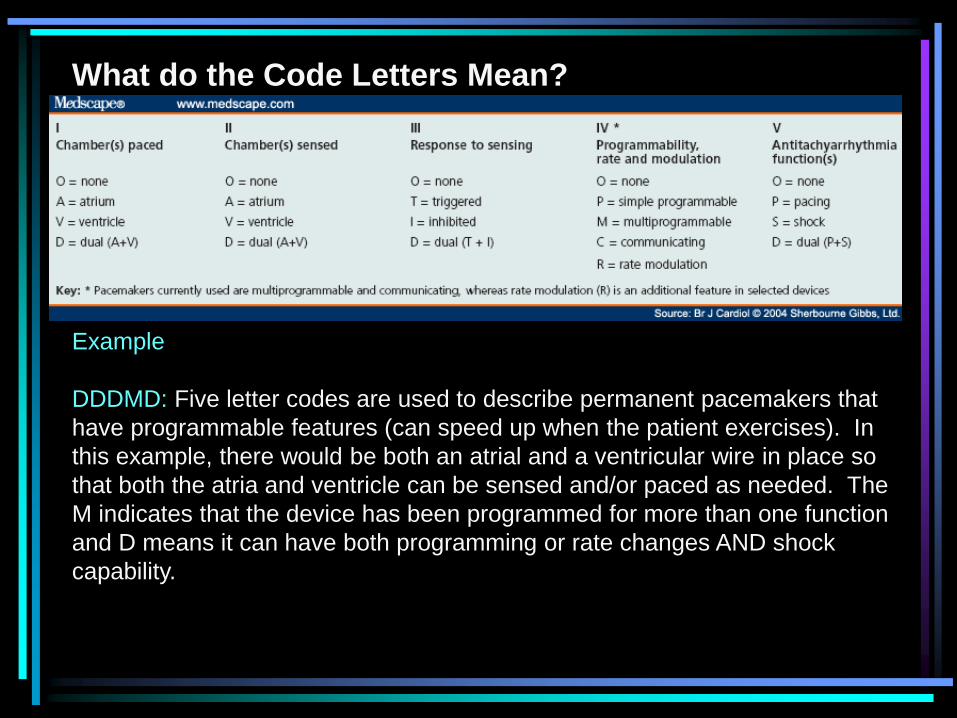
Example
DDDMD: Five letter codes are used to describe permanent pacemakers that
have programmable features (can speed up when the patient exercises). In
this example, there would be both an atrial and a ventricular wire in place so
that both the atria and ventricle can be sensed and/or paced as needed. The
M indicates that the device has been programmed for more than one function
and D means it can have both programming or rate changes AND shock
capability.
What do the Code Letters Mean?
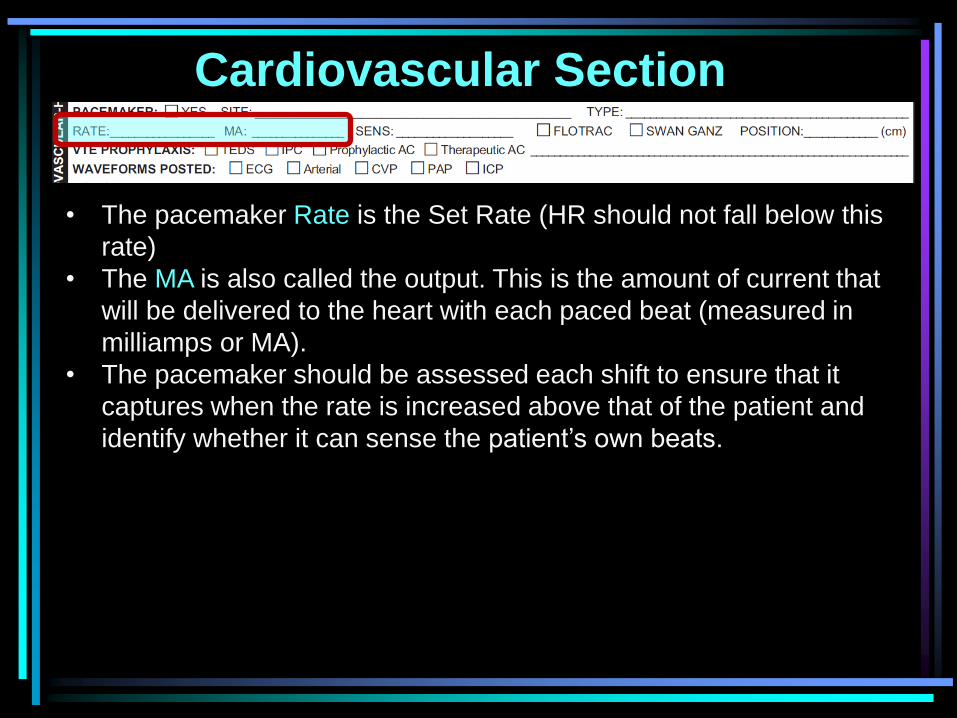
Cardiovascular Section
• The pacemaker Rate is the Set Rate (HR should not fall below this
rate)
• The MA is also called the output. This is the amount of current that
will be delivered to the heart with each paced beat (measured in
milliamps or MA).
• The pacemaker should be assessed each shift to ensure that it
captures when the rate is increased above that of the patient and
identify whether it can sense the patient’s own beats.
Cardiovascular Section
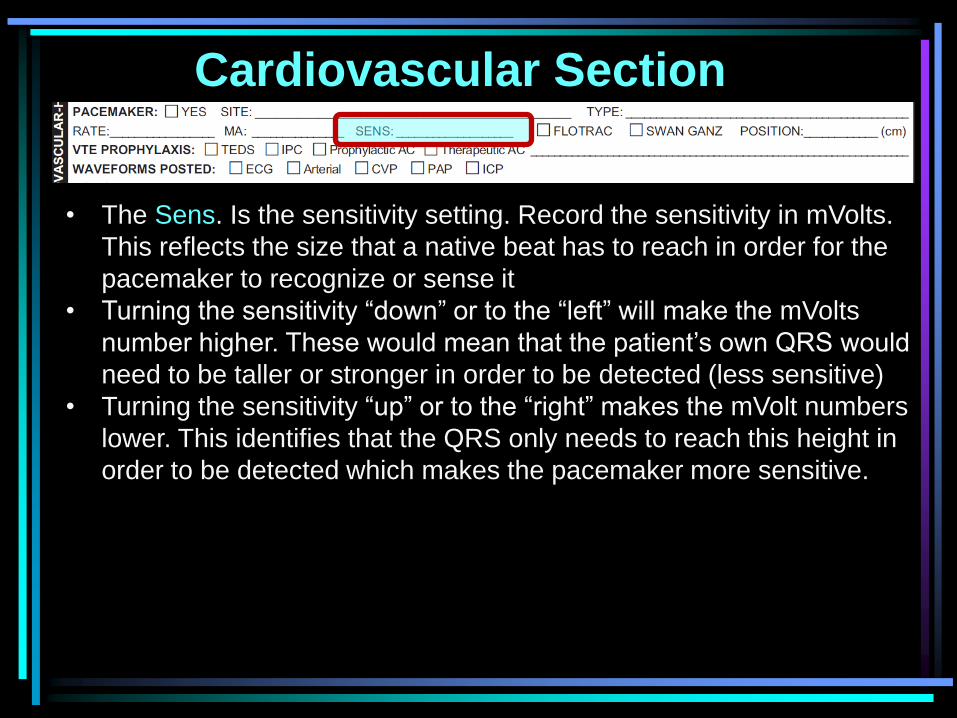
• The Sens. Is the sensitivity setting. Record the sensitivity in mVolts.
This reflects the size that a native beat has to reach in order for the
pacemaker to recognize or sense it
• Turning the sensitivity “down” or to the “left” will make the mVolts
number higher. These would mean that the patient’s own QRS would
need to be taller or stronger in order to be detected (less sensitive)
• Turning the sensitivity “up” or to the “right” makes the mVolt numbers
lower. This identifies that the QRS only needs to reach this height in
order to be detected which makes the pacemaker more sensitive.
Cardiovascular Section
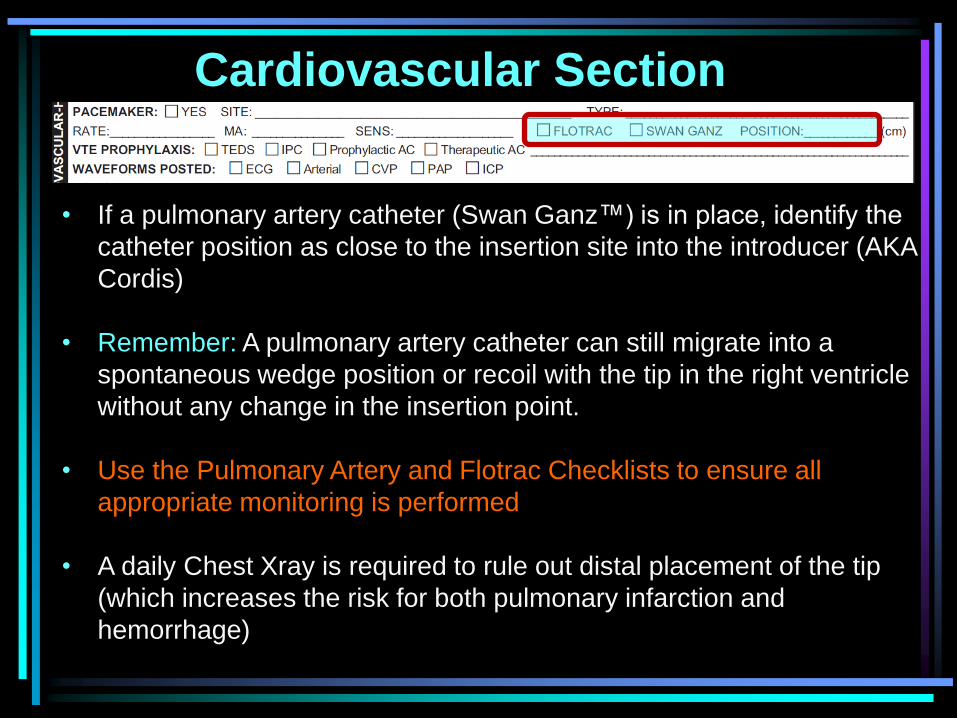
• If a pulmonary artery catheter (Swan Ganz™) is in place, identify the
catheter position as close to the insertion site into the introducer (AKA
Cordis)
• Remember: A pulmonary artery catheter can still migrate into a
spontaneous wedge position or recoil with the tip in the right ventricle
without any change in the insertion point.
• Use the Pulmonary Artery and Flotrac Checklists to ensure all
appropriate monitoring is performed
• A daily Chest Xray is required to rule out distal placement of the tip
(which increases the risk for both pulmonary infarction and
hemorrhage)
Cardiovascular Section
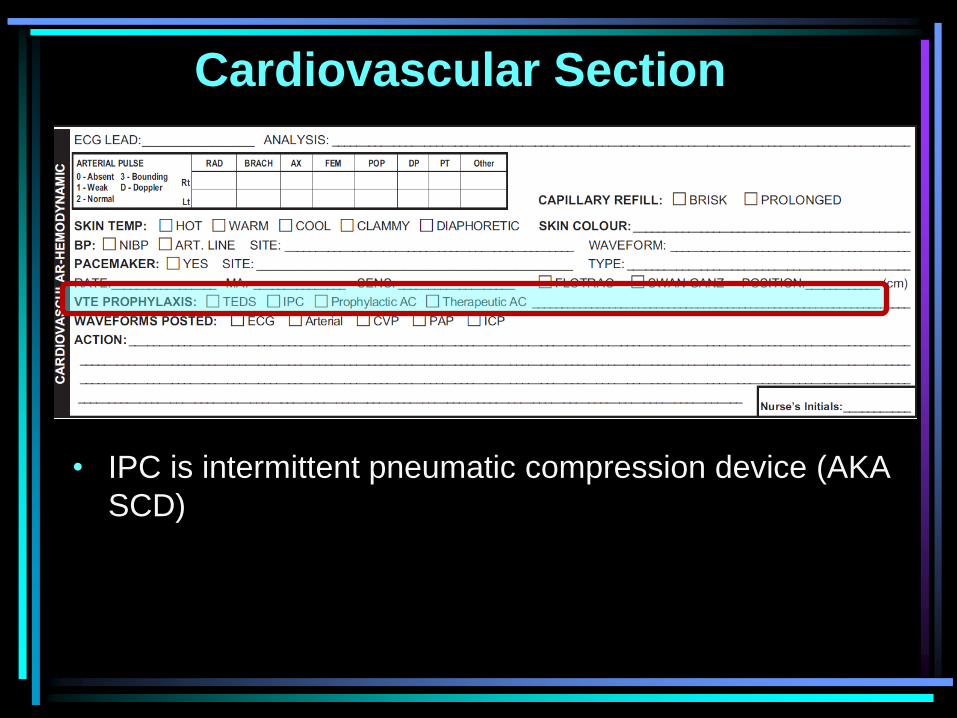
• IPC is intermittent pneumatic compression device (AKA
SCD)
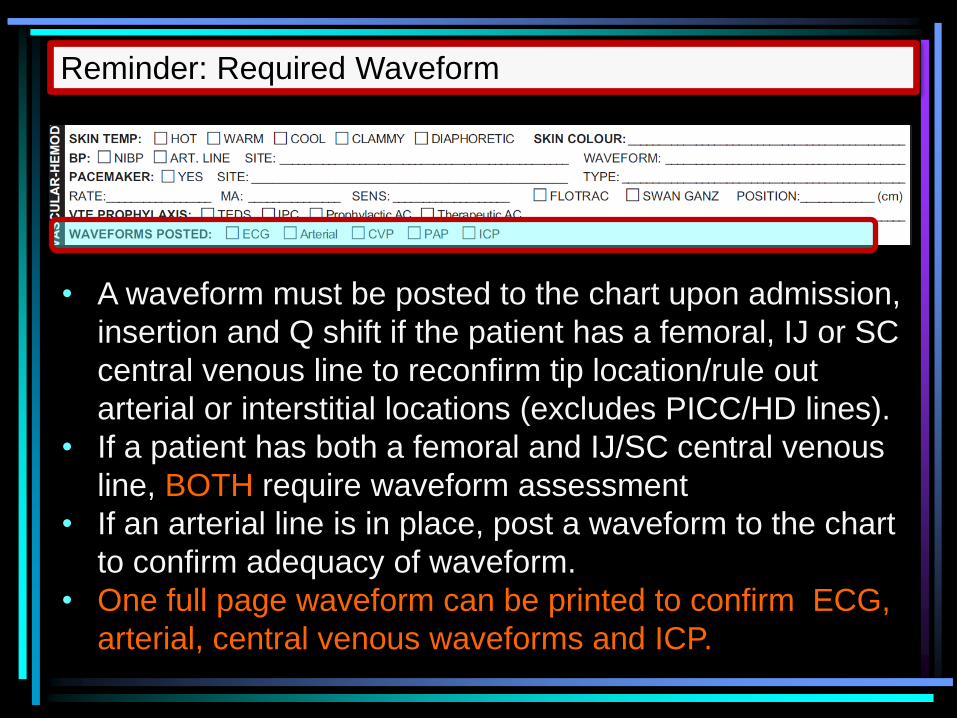
• A waveform must be posted to the chart upon admission,
insertion and Q shift if the patient has a femoral, IJ or SC
central venous line to reconfirm tip location/rule out
arterial or interstitial locations (excludes PICC/HD lines).
• If a patient has both a femoral and IJ/SC central venous
line, BOTH require waveform assessment
• If an arterial line is in place, post a waveform to the chart
to confirm adequacy of waveform.
• One full page waveform can be printed to confirm ECG,
arterial, central venous waveforms and ICP.
Reminder: Required Waveform
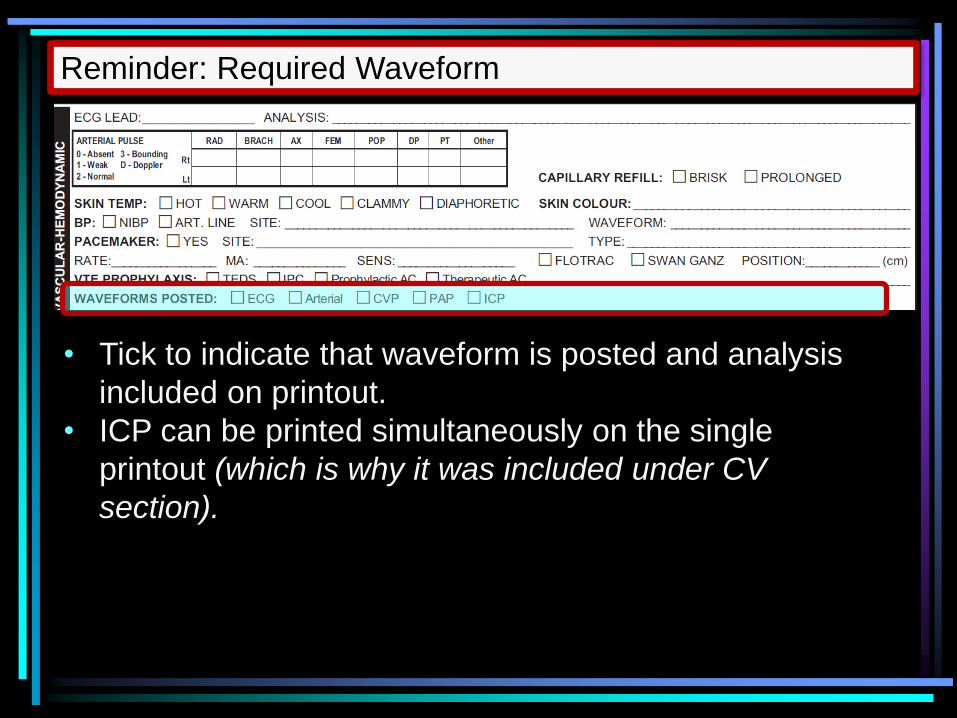
• Tick to indicate that waveform is posted and analysis
included on printout.
• ICP can be printed simultaneously on the single
printout (which is why it was included under CV
section).
Reminder: Required Waveform
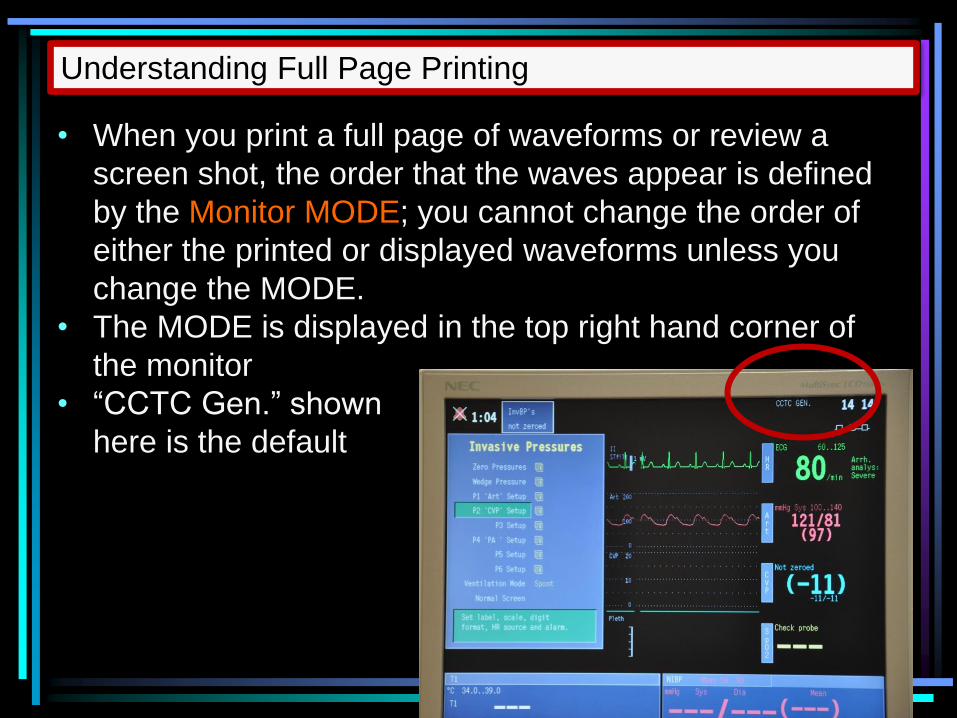
• When you print a full page of waveforms or review a
screen shot, the order that the waves appear is defined
by the Monitor MODE; you cannot change the order of
either the printed or displayed waveforms unless you
change the MODE.
• The MODE is displayed in the top right hand corner of
the monitor
• “CCTC Gen.” shown
here is the default
Understanding Full Page Printing
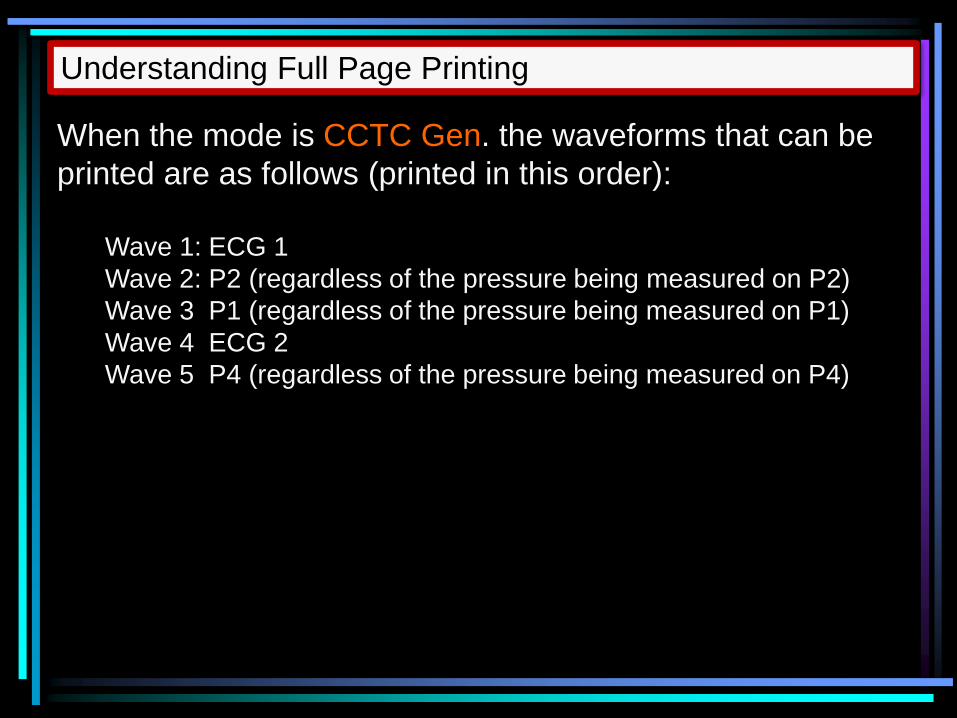
When the mode is CCTC Gen. the waveforms that can be
printed are as follows (printed in this order):
Wave 1: ECG 1
Wave 2: P2 (regardless of the pressure being measured on P2)
Wave 3 P1 (regardless of the pressure being measured on P1)
Wave 4 ECG 2
Wave 5 P4 (regardless of the pressure being measured on P4)
Understanding Full Page Printing
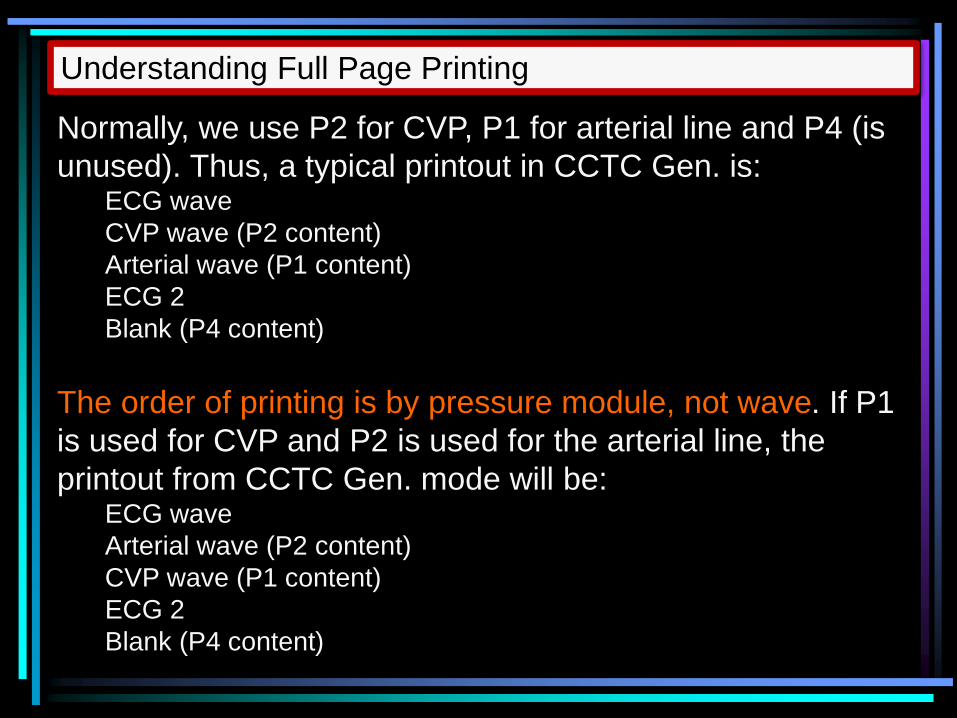
Normally, we use P2 for CVP, P1 for arterial line and P4 (is
unused). Thus, a typical printout in CCTC Gen. is: ECG wave
CVP wave (P2 content)
Arterial wave (P1 content)
ECG 2
Blank (P4 content)
The order of printing is by pressure module, not wave. If P1
is used for CVP and P2 is used for the arterial line, the
printout from CCTC Gen. mode will be: ECG wave
Arterial wave (P2 content)
CVP wave (P1 content)
ECG 2
Blank (P4 content)
Understanding Full Page Printing
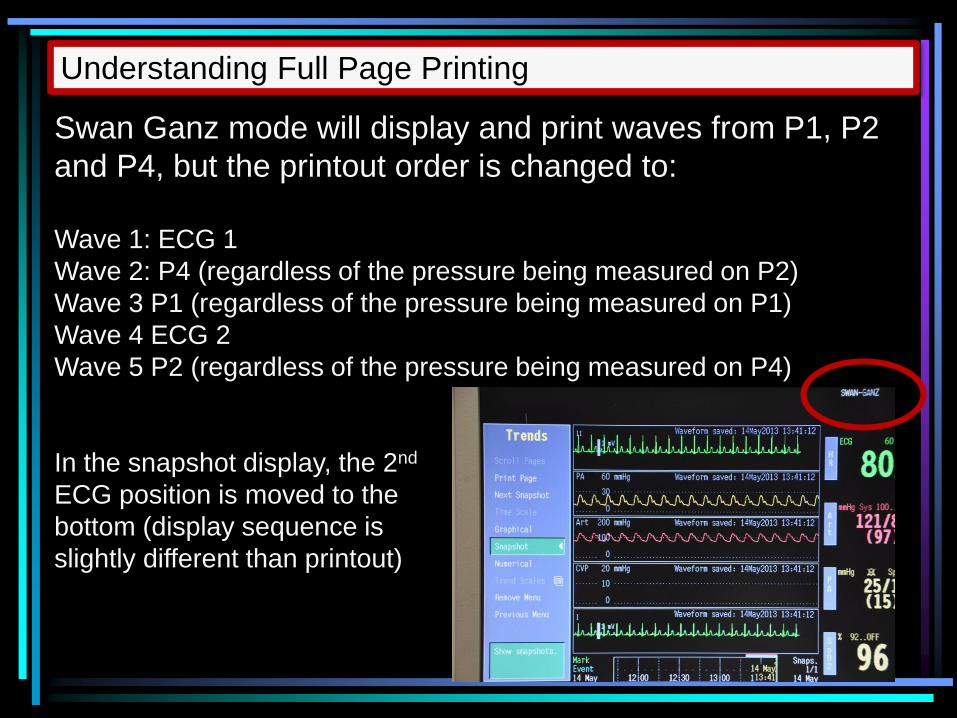
Swan Ganz mode will display and print waves from P1, P2
and P4, but the printout order is changed to:
Wave 1: ECG 1
Wave 2: P4 (regardless of the pressure being measured on P2)
Wave 3 P1 (regardless of the pressure being measured on P1)
Wave 4 ECG 2
Wave 5 P2 (regardless of the pressure being measured on P4)
In the snapshot display, the 2nd
ECG position is moved to the
bottom (display sequence is
slightly different than printout)
Understanding Full Page Printing
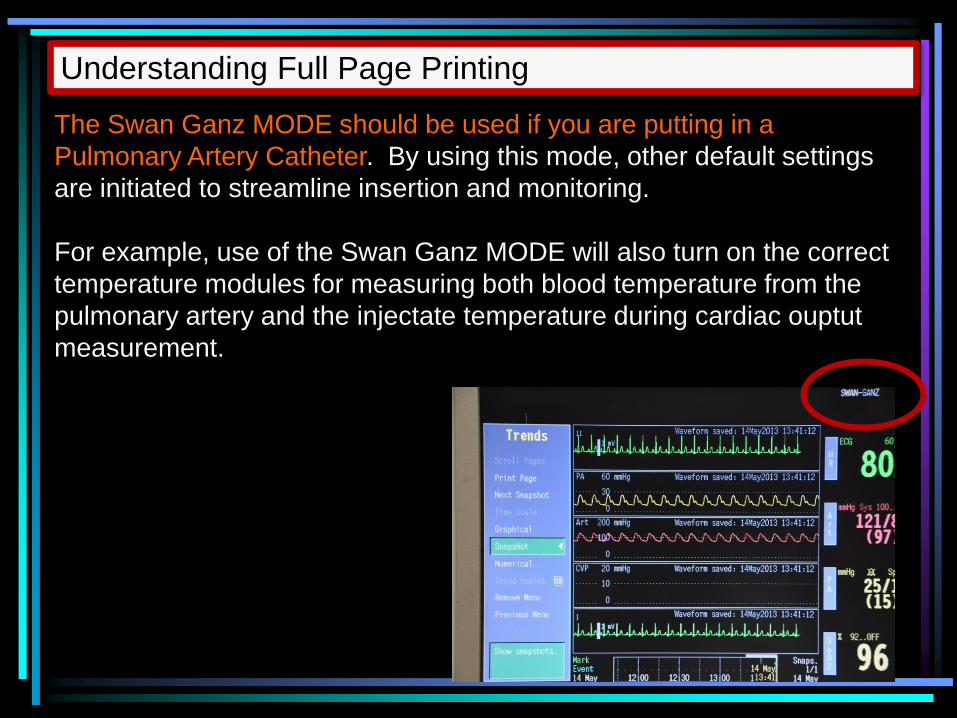
The Swan Ganz MODE should be used if you are putting in a
Pulmonary Artery Catheter. By using this mode, other default settings
are initiated to streamline insertion and monitoring.
For example, use of the Swan Ganz MODE will also turn on the correct
temperature modules for measuring both blood temperature from the
pulmonary artery and the injectate temperature during cardiac ouptut
measurement.
Understanding Full Page Printing
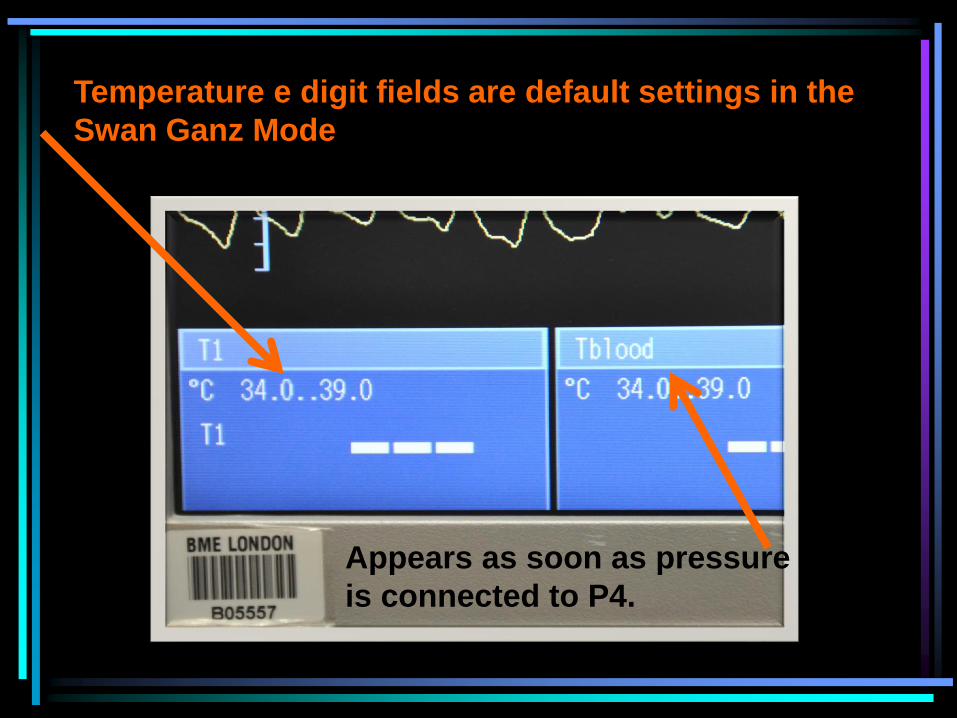
Appears as soon as pressure
is connected to P4.
Temperature e digit fields are default settings in the
Swan Ganz Mode
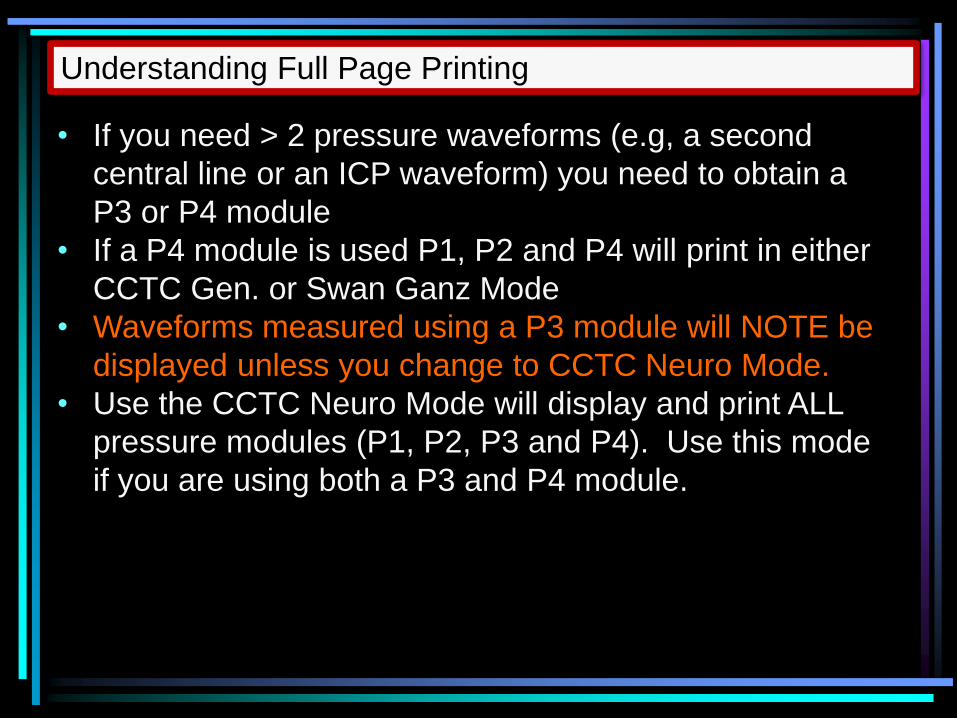
• If you need > 2 pressure waveforms (e.g, a second
central line or an ICP waveform) you need to obtain a
P3 or P4 module
• If a P4 module is used P1, P2 and P4 will print in either
CCTC Gen. or Swan Ganz Mode
• Waveforms measured using a P3 module will NOTE be
displayed unless you change to CCTC Neuro Mode.
• Use the CCTC Neuro Mode will display and print ALL
pressure modules (P1, P2, P3 and P4). Use this mode
if you are using both a P3 and P4 module.
Understanding Full Page Printing
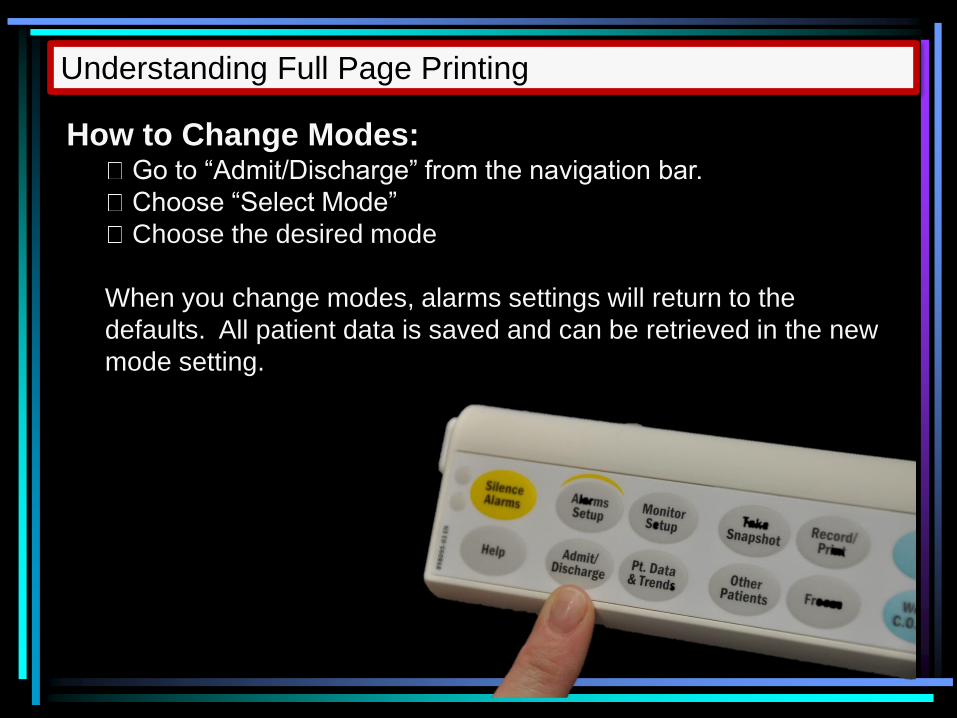
How to Change Modes: Go to “Admit/Discharge” from the navigation bar.
Choose “Select Mode”
Choose the desired mode
When you change modes, alarms settings will return to the
defaults. All patient data is saved and can be retrieved in the new
mode setting.
Understanding Full Page Printing
ECG and all waveforms (including ICP) can be printed
on a single page.
Use CCTC NEURO MODE if you use a P3 module (both
P3 and P4 will print in this mode). P3 waves will NOT
print in the CCTC Gen. or the Swan Ganz modes.
Instruction on the use of Modes/Printing can be found
from the CCTC Procedures menu under “Monitor
Modes”
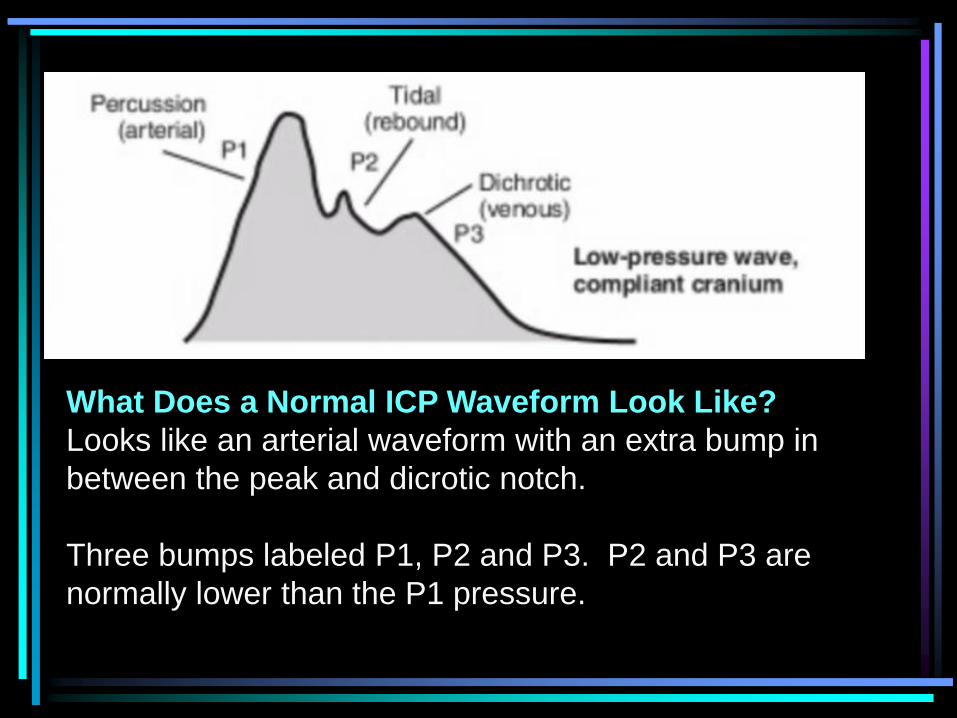
What Does a Normal ICP Waveform Look Like?
Looks like an arterial waveform with an extra bump in
between the peak and dicrotic notch.
Three bumps labeled P1, P2 and P3. P2 and P3 are
normally lower than the P1 pressure.

Normal ICP:
Note that P2 or P3 have become equal to or higher than P1. The
entire waveform may “merge together” into one full figured bump.
These subtle changes may demonstrate that brain is “tight” before the
pressure rises significantly and offers an earlier warning.
Decreased
Brain
Compliance
Cardiovascular Section
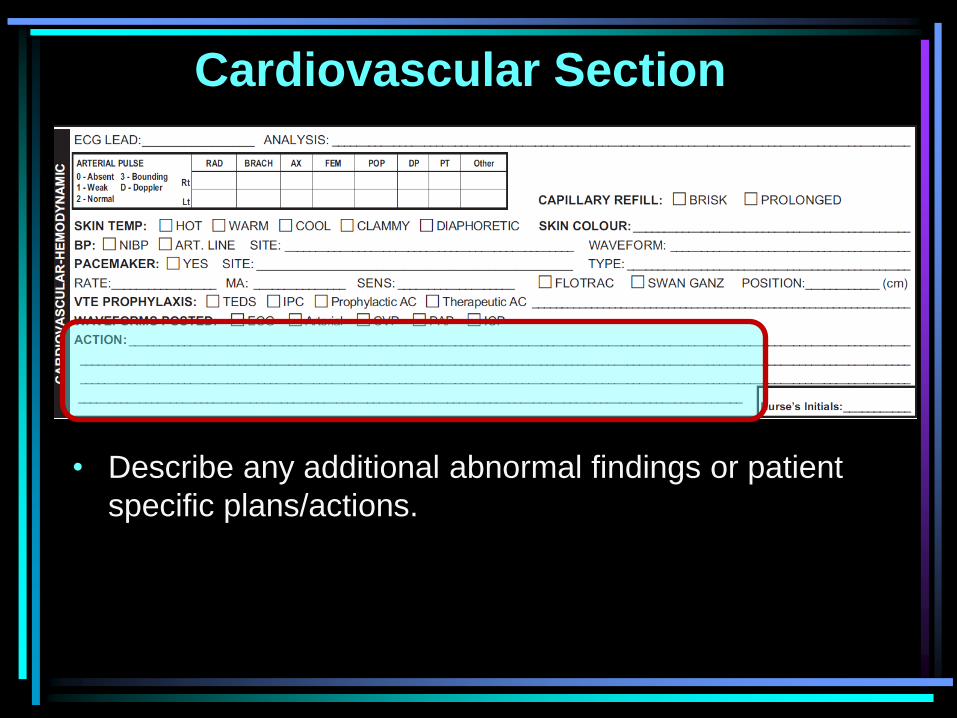
• Describe any additional abnormal findings or patient
specific plans/actions.
Cardiovascular Section
• Remember to initial page.
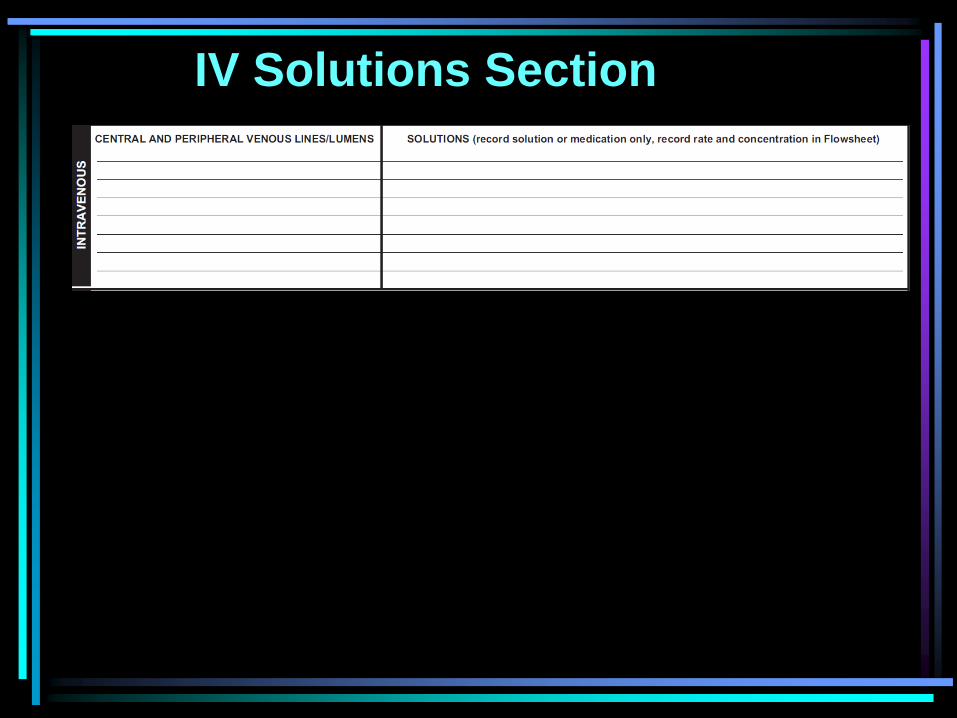
IV Solutions Section
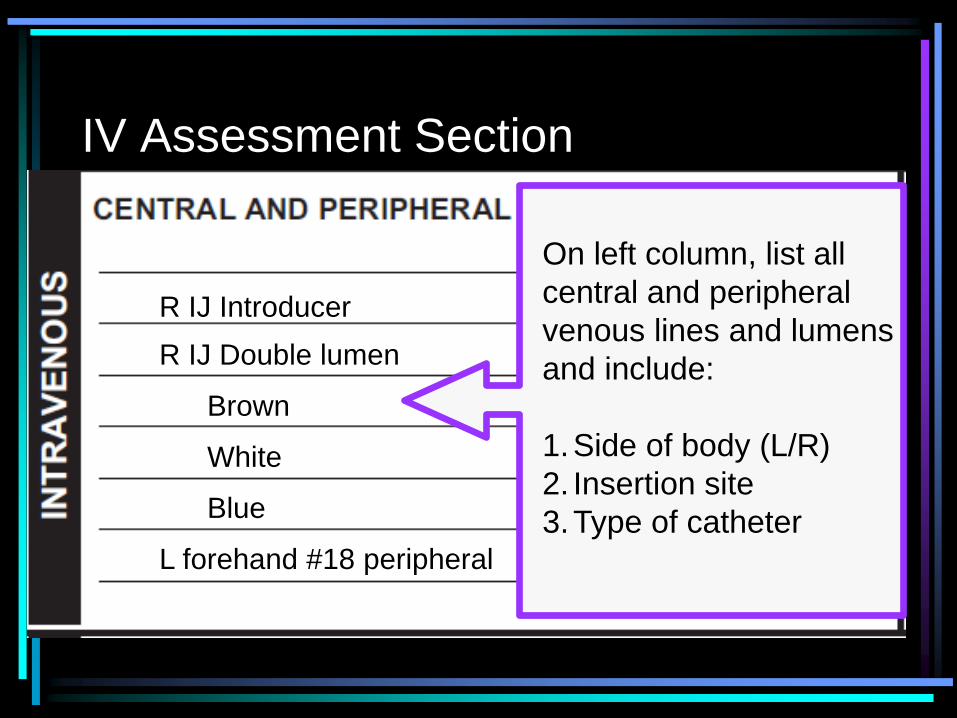
On left column, list all
central and peripheral
venous lines and lumens
and include:
1.Side of body (L/R)
2. Insertion site
3.Type of catheter
R IJ Introducer
R IJ Double lumen
Brown
White
Blue
L forehand #18 peripheral
IV Assessment Section

Documentation Standards for IV
Solutions
R IJ Introducer
R IJ Triple lumen:
Brown
White
Blue
L forehand #18 peripheral
0.9% Normal Saline
CVP/0.9% normal saline
Levophed
TPN
Saline Lock
• On right column, record ONLY the SOLUTION and
MEDICATION ADDED.
• This documentation identifies where solutions are running.
• If you change either the site, solution or medication, you
must make a DAR entry to indicate the change.
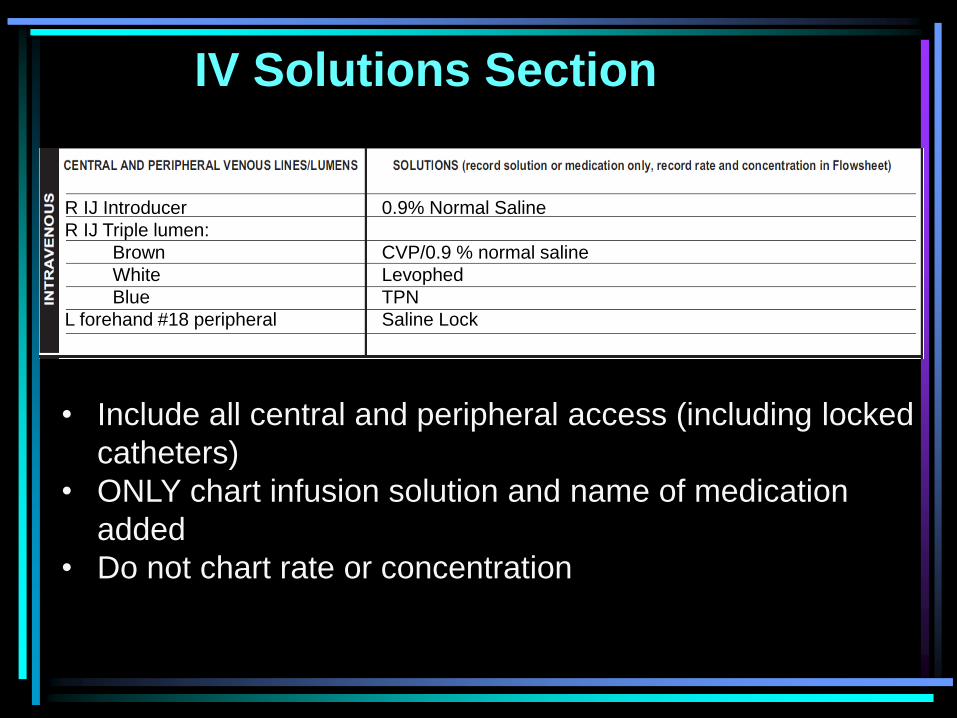
IV Solutions Section
• Include all central and peripheral access (including locked
catheters)
• ONLY chart infusion solution and name of medication
added
• Do not chart rate or concentration
R IJ Introducer
R IJ Triple lumen:
Brown
White
Blue
L forehand #18 peripheral
0.9% Normal Saline
CVP/0.9 % normal saline
Levophed
TPN
Saline Lock
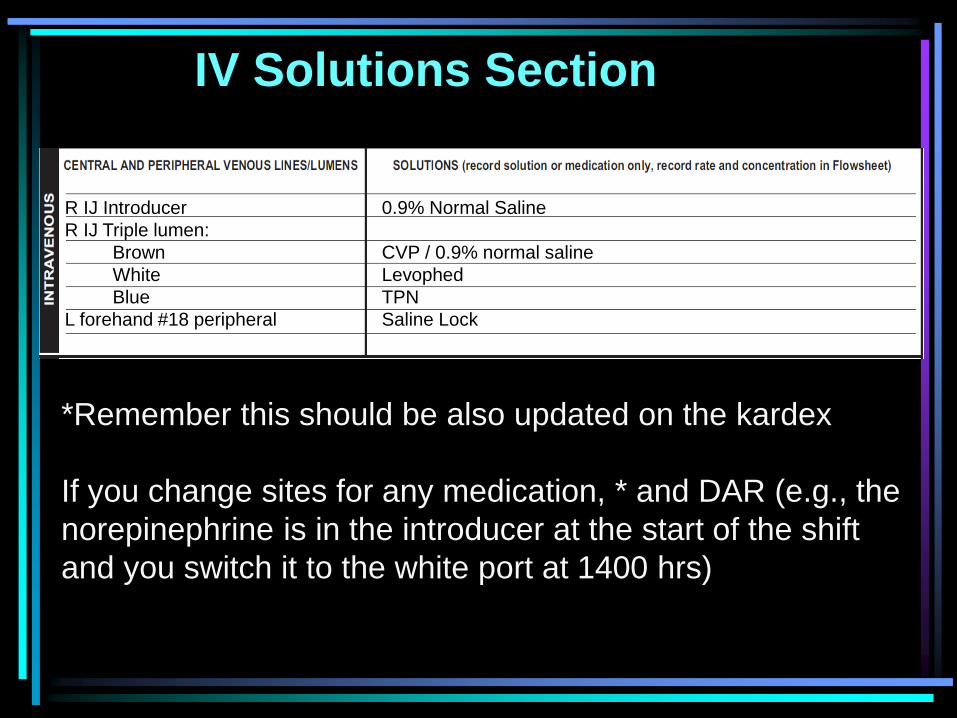
IV Solutions Section
*Remember this should be also updated on the kardex
If you change sites for any medication, * and DAR (e.g., the
norepinephrine is in the introducer at the start of the shift
and you switch it to the white port at 1400 hrs)
R IJ Introducer
R IJ Triple lumen:
Brown
White
Blue
L forehand #18 peripheral
0.9% Normal Saline
CVP / 0.9% normal saline
Levophed
TPN
Saline Lock
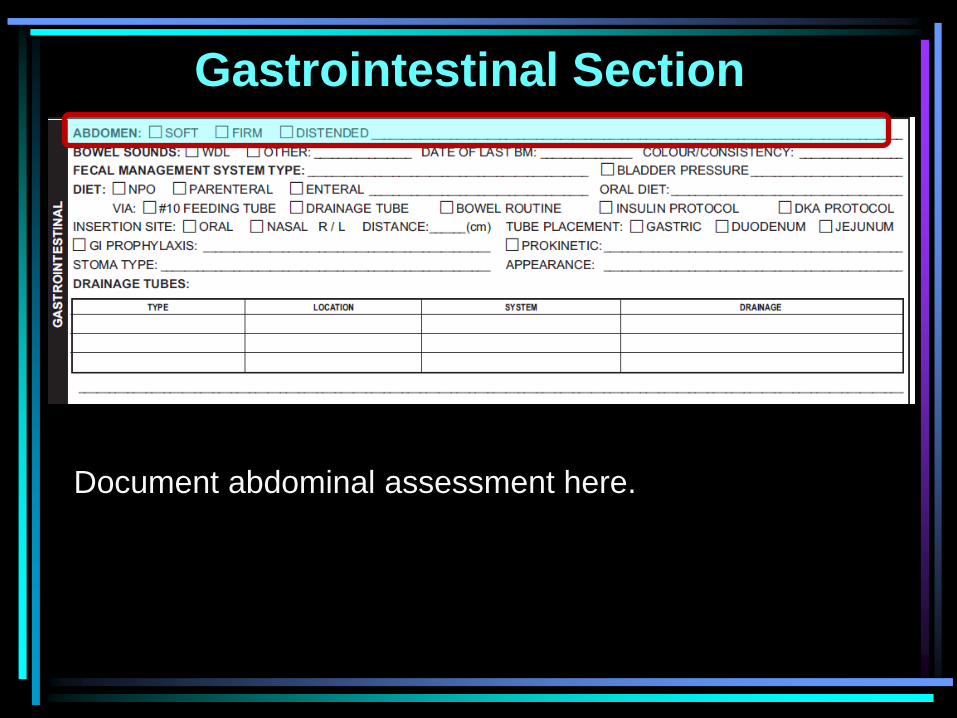
Gastrointestinal Section
Document abdominal assessment here.
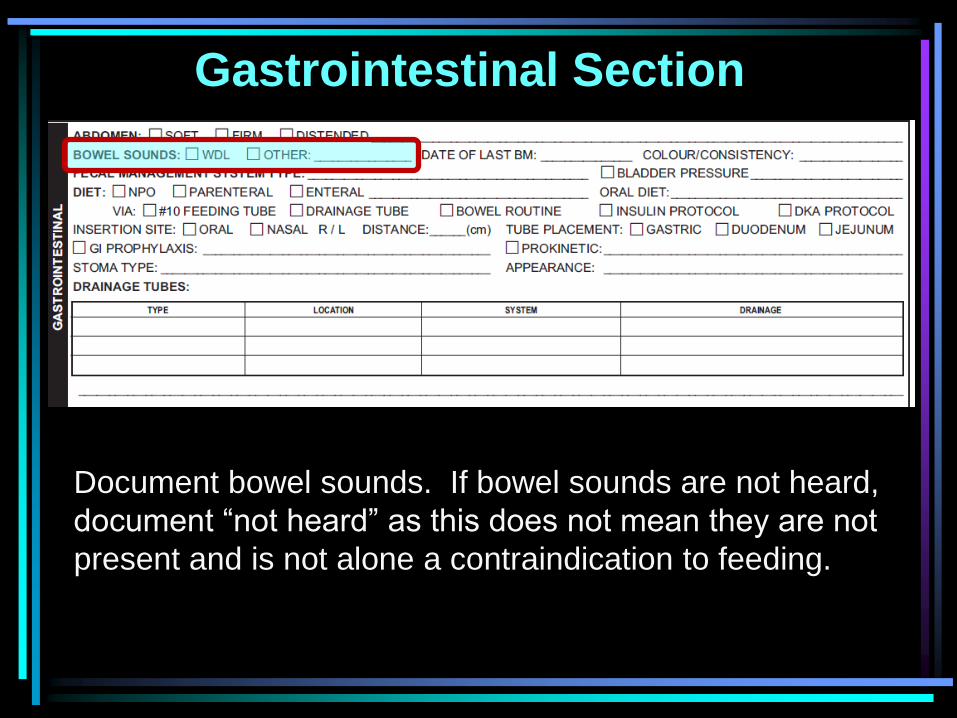
Gastrointestinal Section
Document bowel sounds. If bowel sounds are not heard,
document “not heard” as this does not mean they are not
present and is not alone a contraindication to feeding.
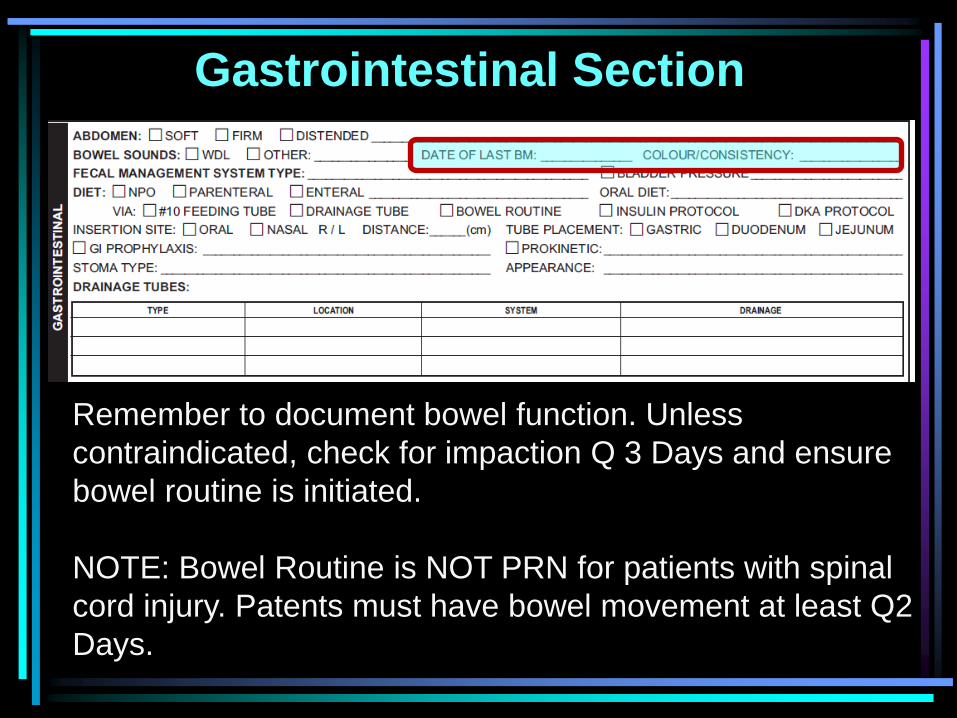
Gastrointestinal Section
Remember to document bowel function. Unless
contraindicated, check for impaction Q 3 Days and ensure
bowel routine is initiated.
NOTE: Bowel Routine is NOT PRN for patients with spinal
cord injury. Patents must have bowel movement at least Q2
Days.
Gastrointestinal Section
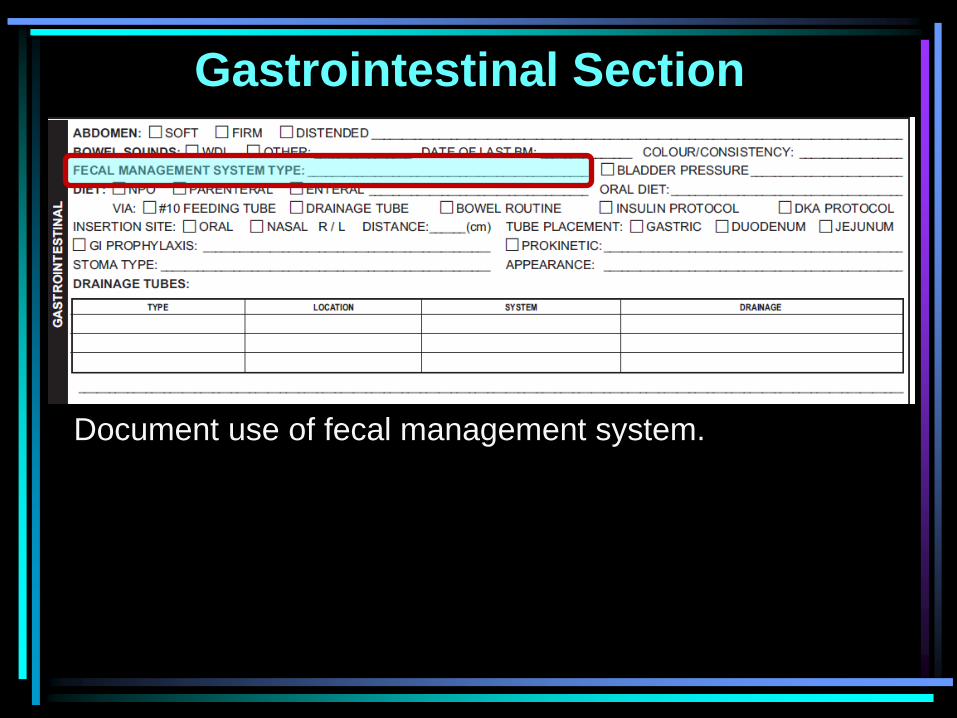
Document use of fecal management system.

Gastrointestinal Section
Tick if bladder pressure is being monitored
Gastrointestinal Section
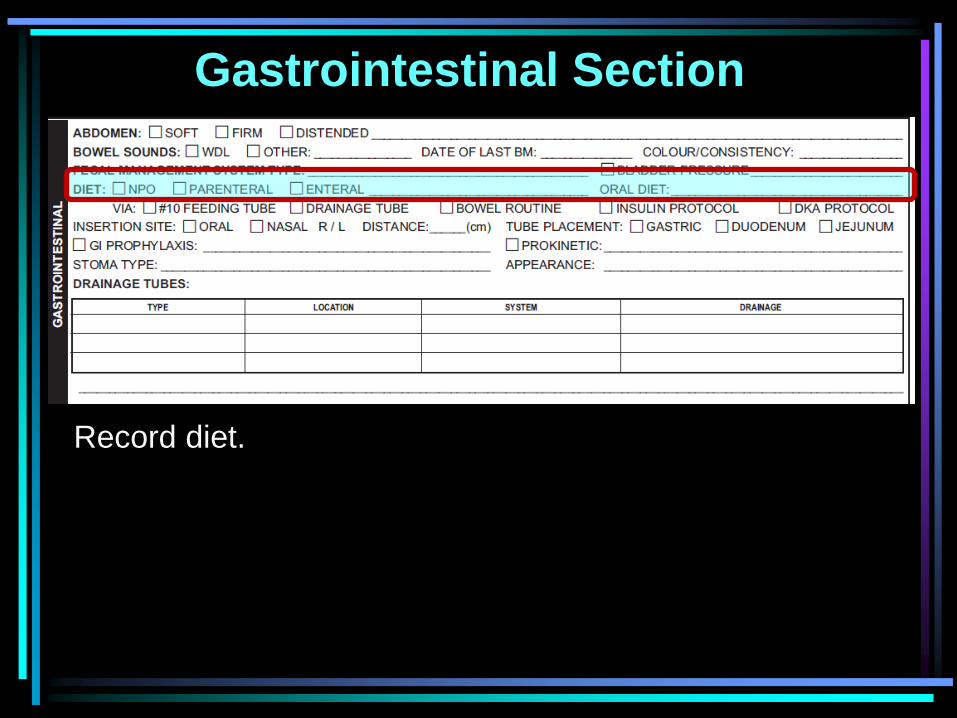
Record diet.
Gastrointestinal Section
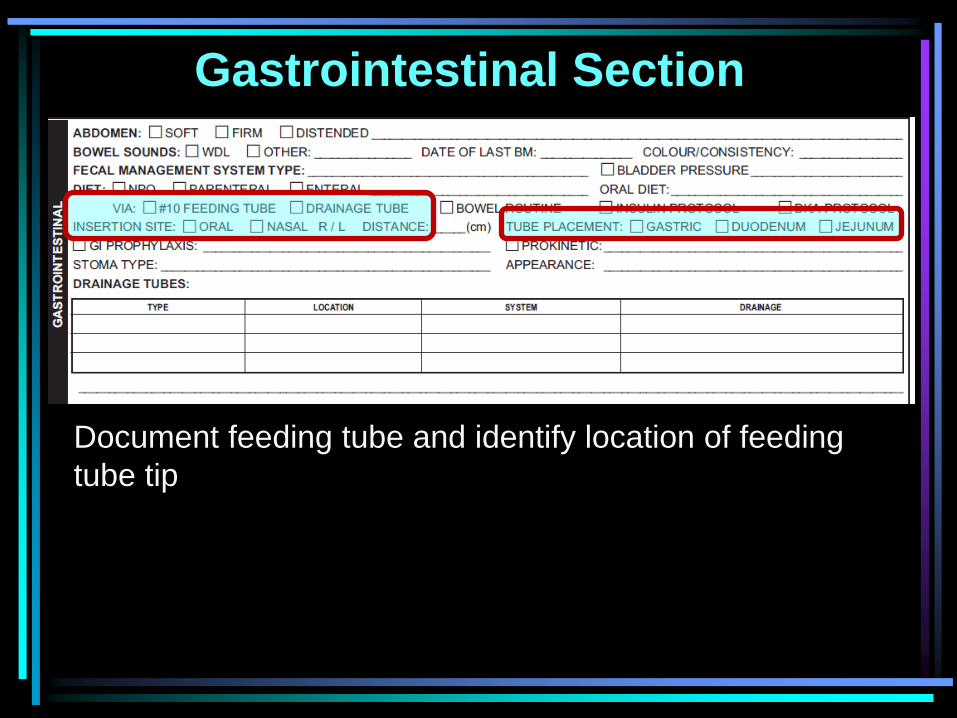
Document feeding tube and identify location of feeding
tube tip
Gastrointestinal Section
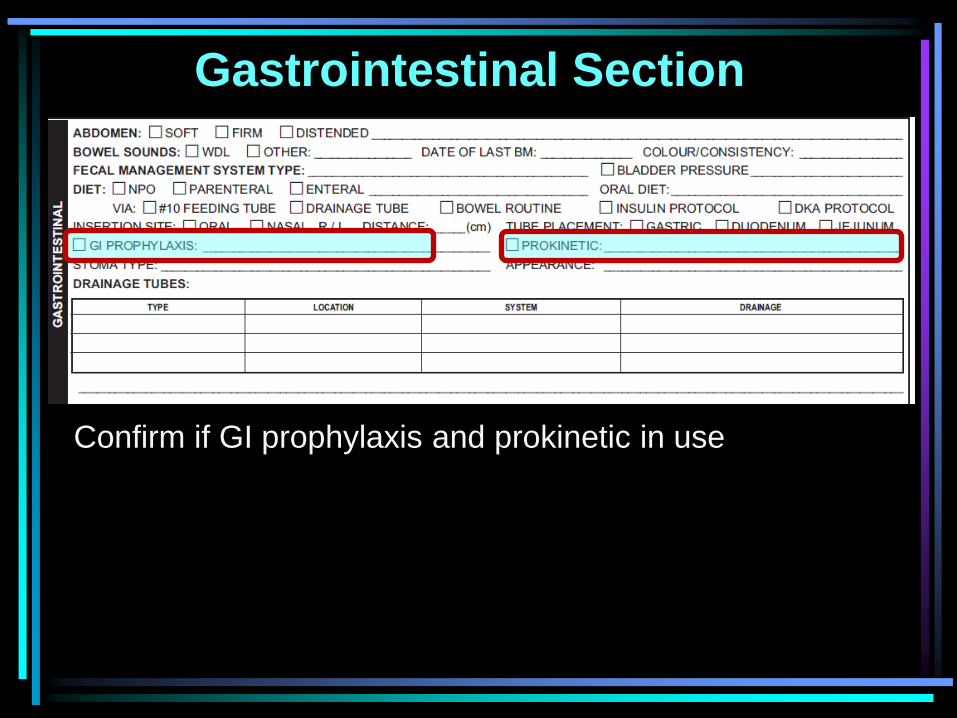
Confirm if GI prophylaxis and prokinetic in use
Gastrointestinal Section
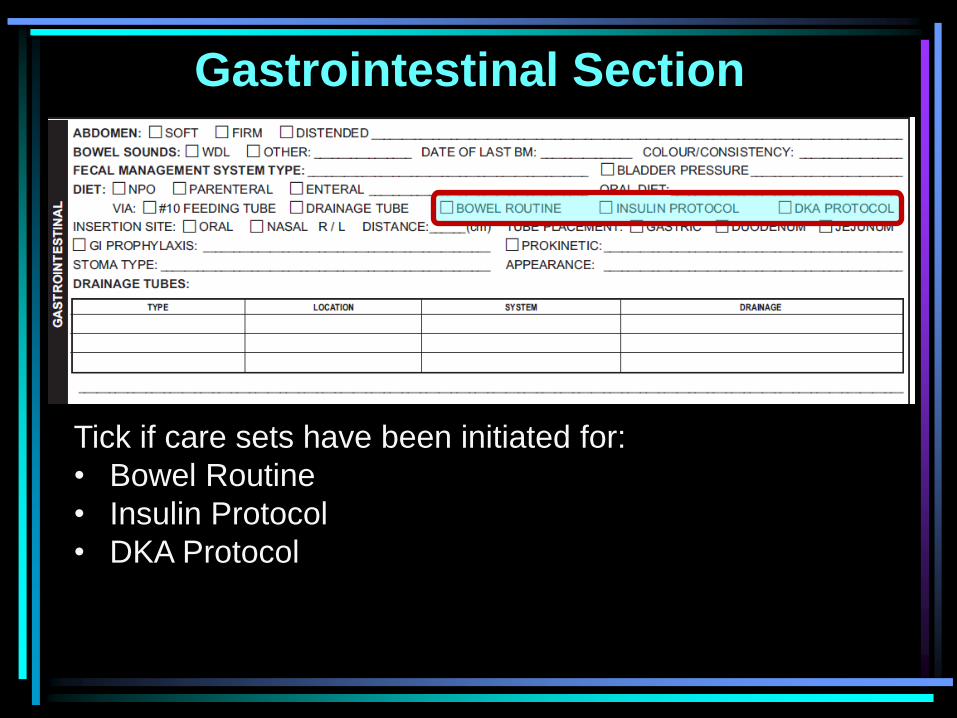
Tick if care sets have been initiated for:
• Bowel Routine
• Insulin Protocol
• DKA Protocol
Gastrointestinal Section
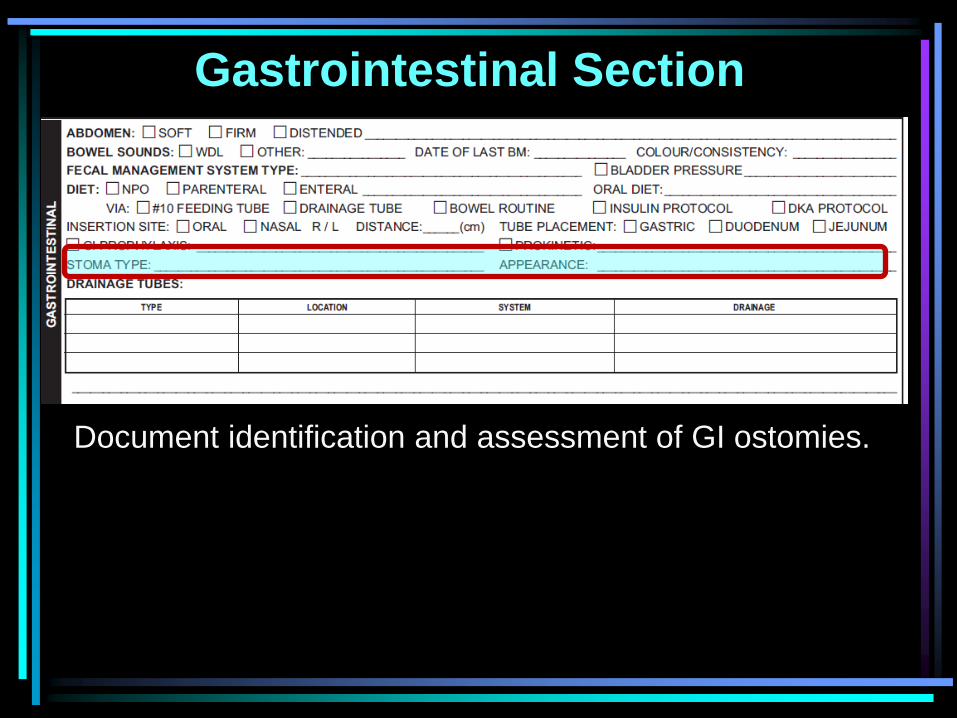
Document identification and assessment of GI ostomies.
Gastrointestinal Section
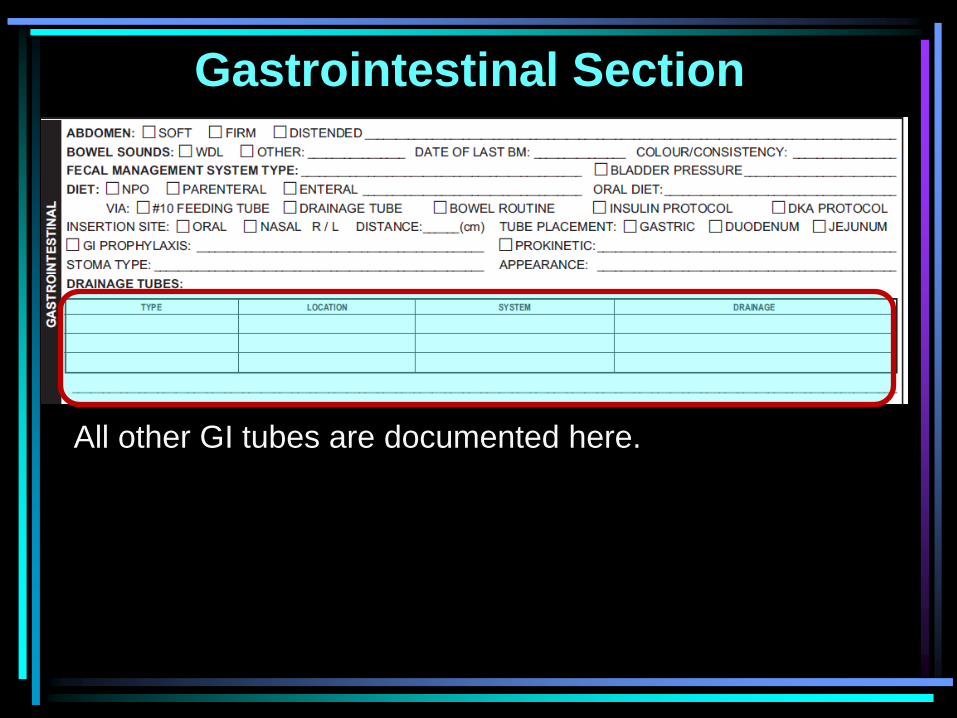
All other GI tubes are documented here.
Gastrointestinal Section
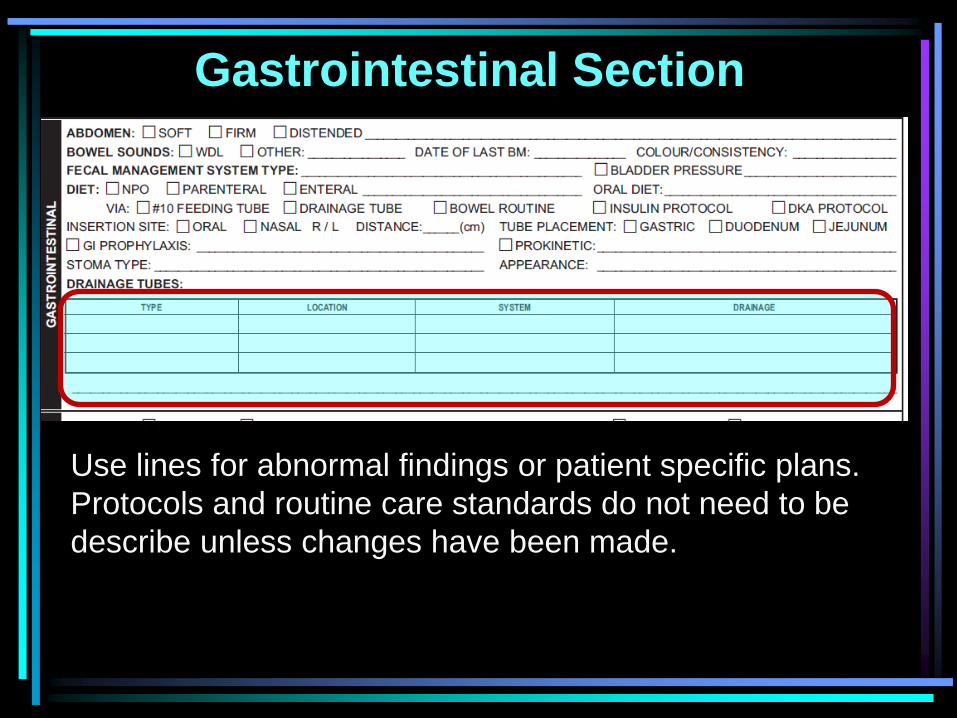
Use lines for abnormal findings or patient specific plans.
Protocols and routine care standards do not need to be
describe unless changes have been made.
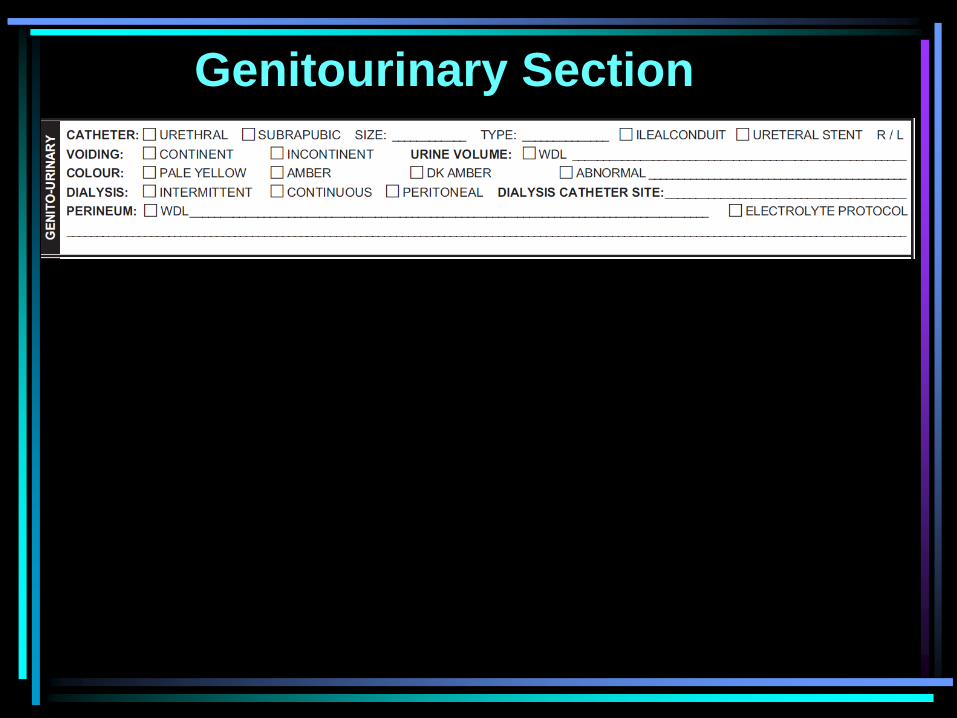
Genitourinary Section
Genitourinary Section
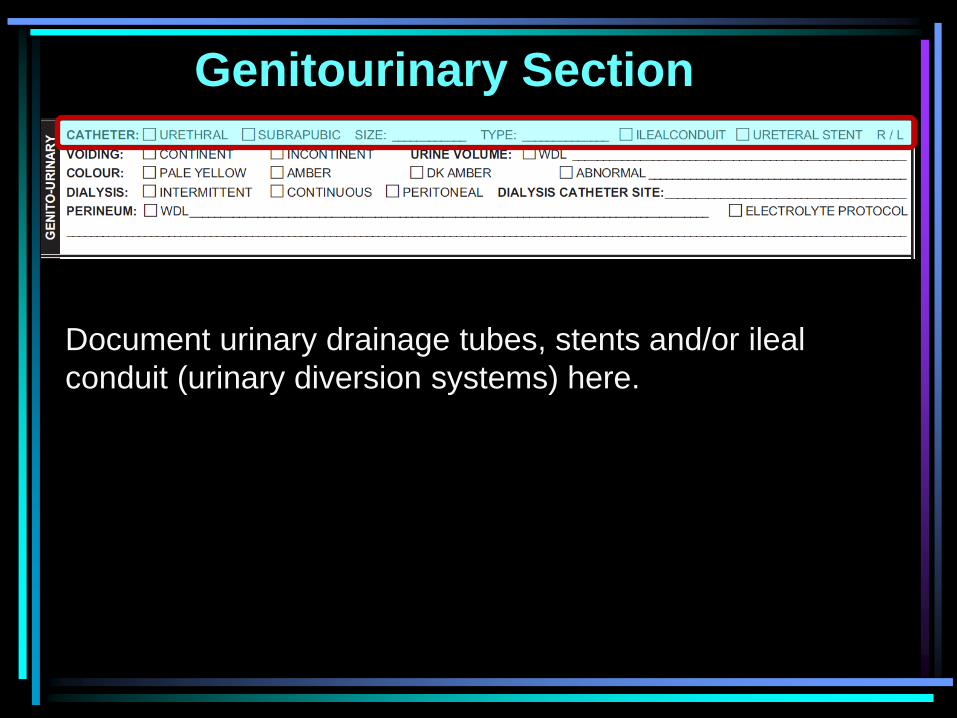
Document urinary drainage tubes, stents and/or ileal
conduit (urinary diversion systems) here.
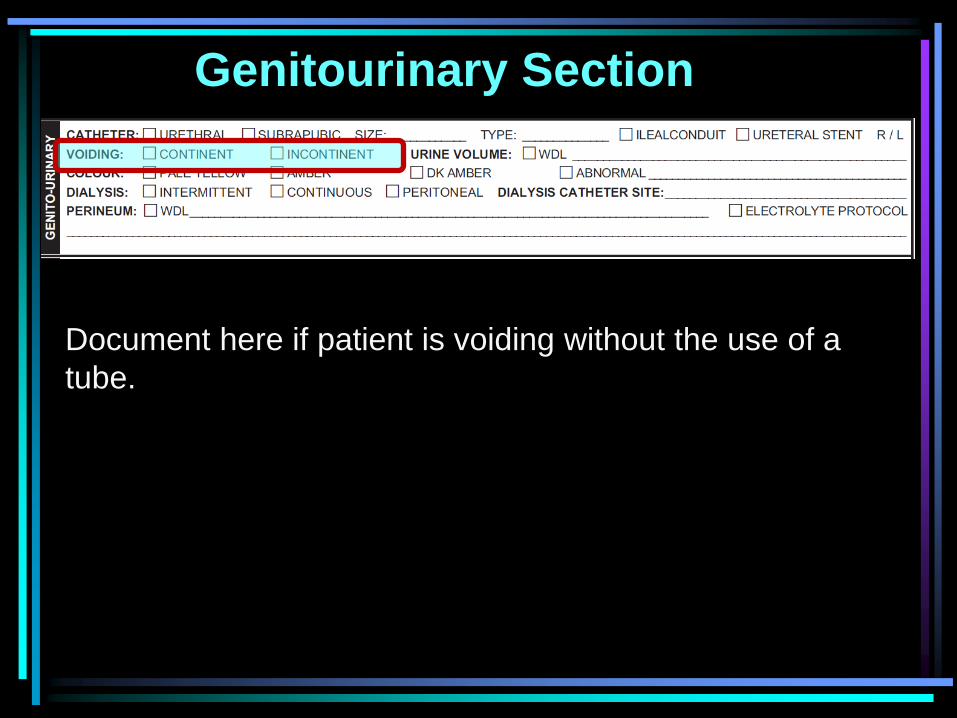
Genitourinary Section
Document here if patient is voiding without the use of a
tube.
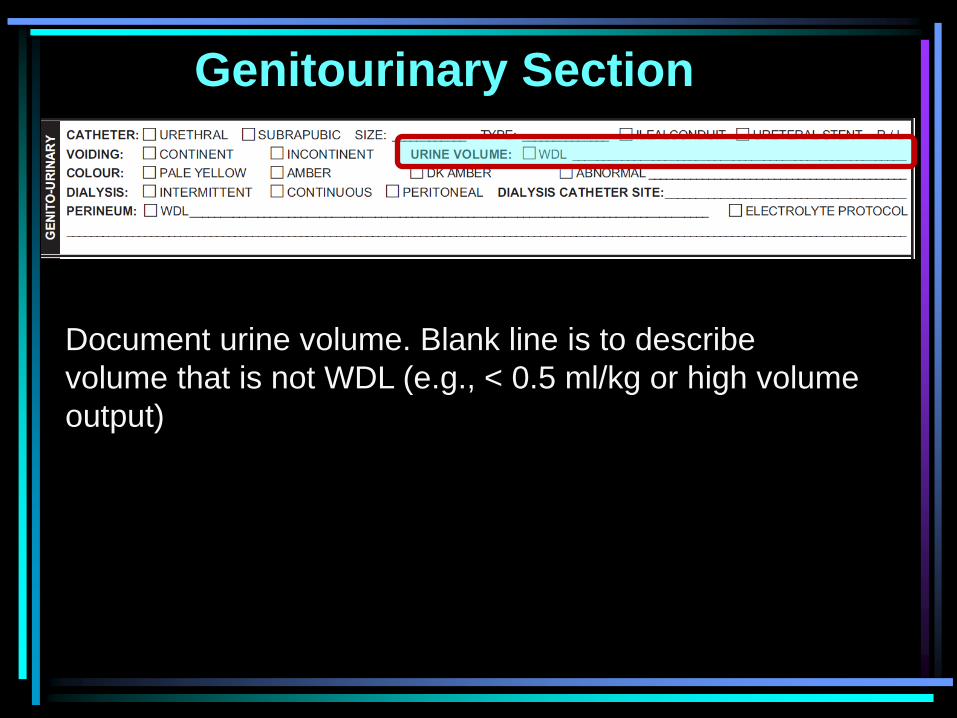
Genitourinary Section
Document urine volume. Blank line is to describe
volume that is not WDL (e.g., < 0.5 ml/kg or high volume
output)
Genitourinary Section
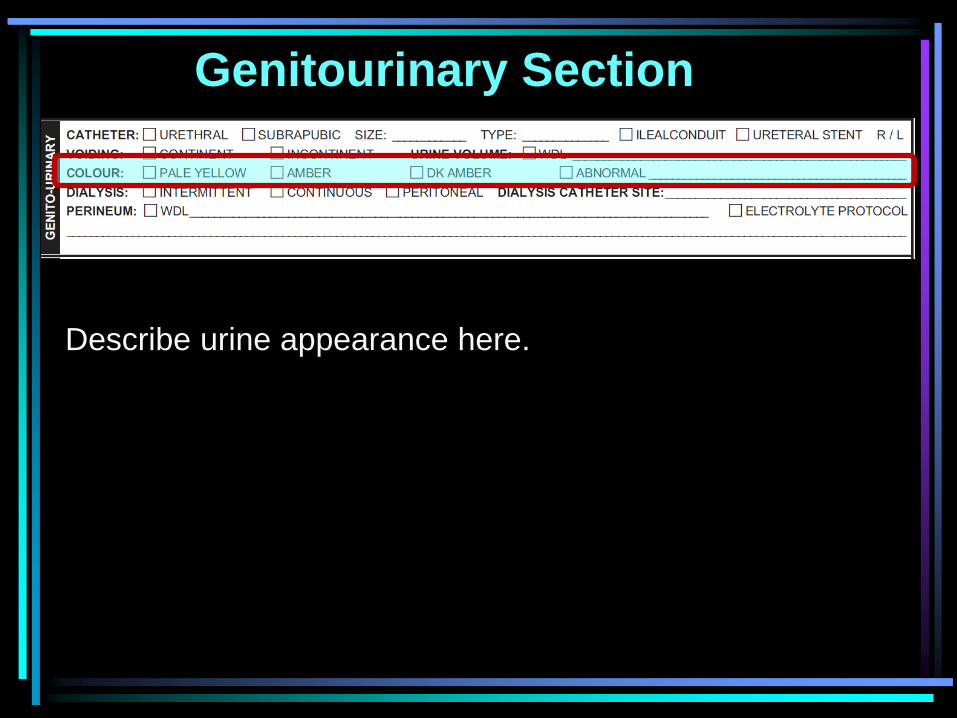
Describe urine appearance here.
Genitourinary Section
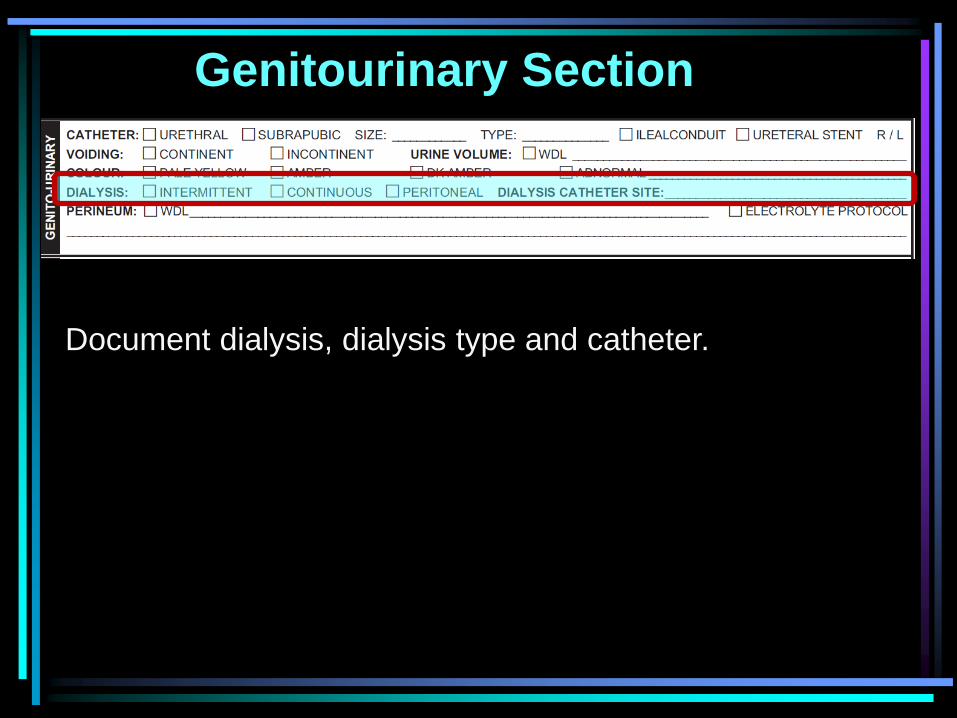
Document dialysis, dialysis type and catheter.
Genitourinary Section
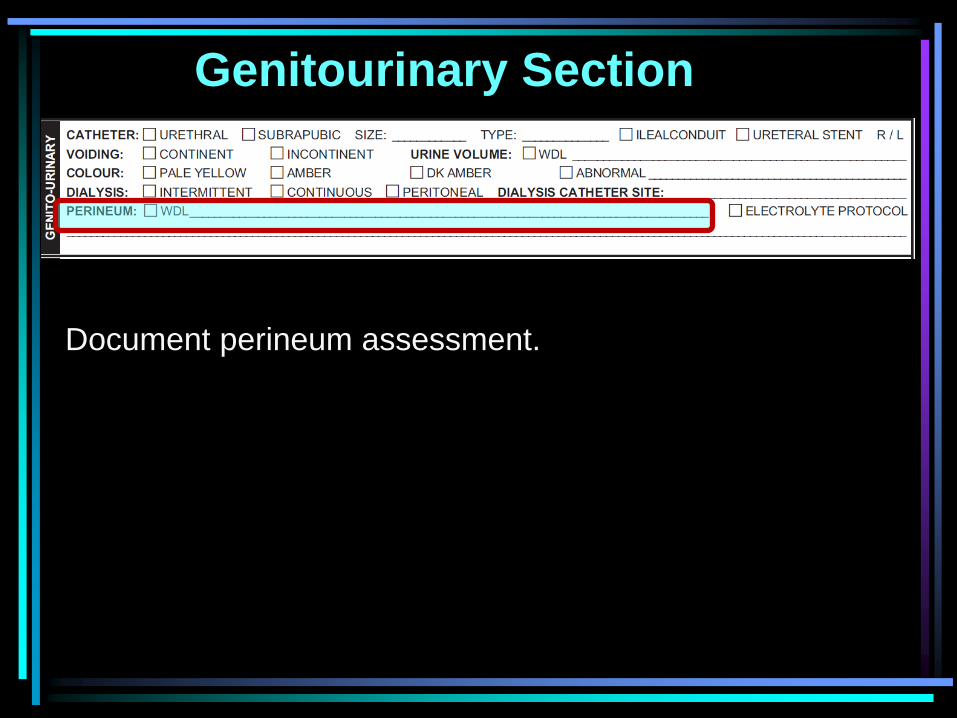
Document perineum assessment.
Genitourinary Section
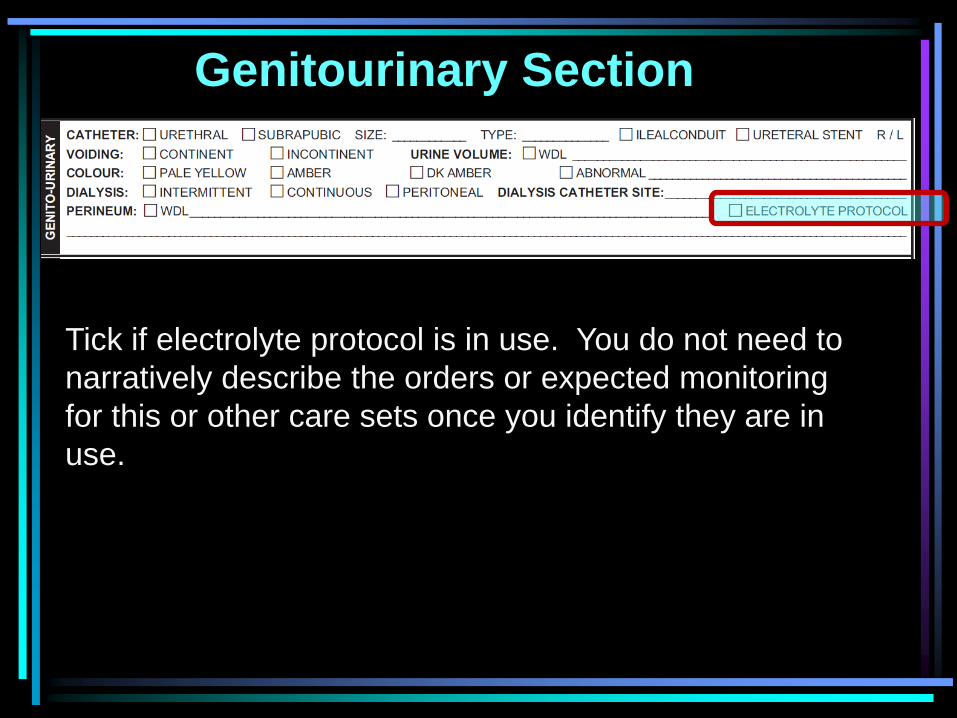
Tick if electrolyte protocol is in use. You do not need to
narratively describe the orders or expected monitoring
for this or other care sets once you identify they are in
use.
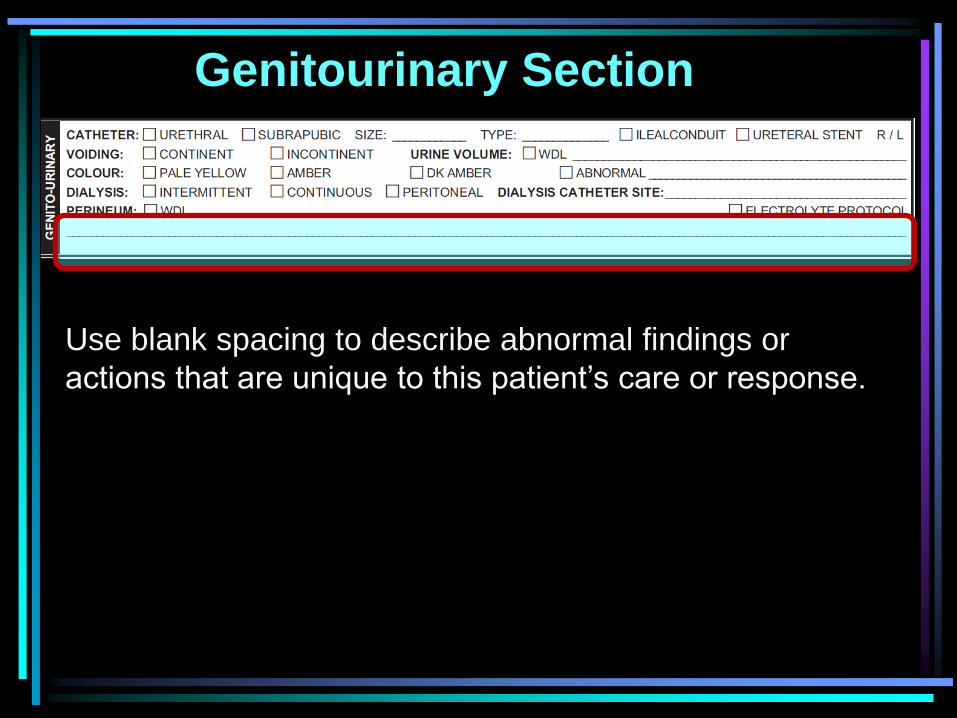
Genitourinary Section
Use blank spacing to describe abnormal findings or
actions that are unique to this patient’s care or response.
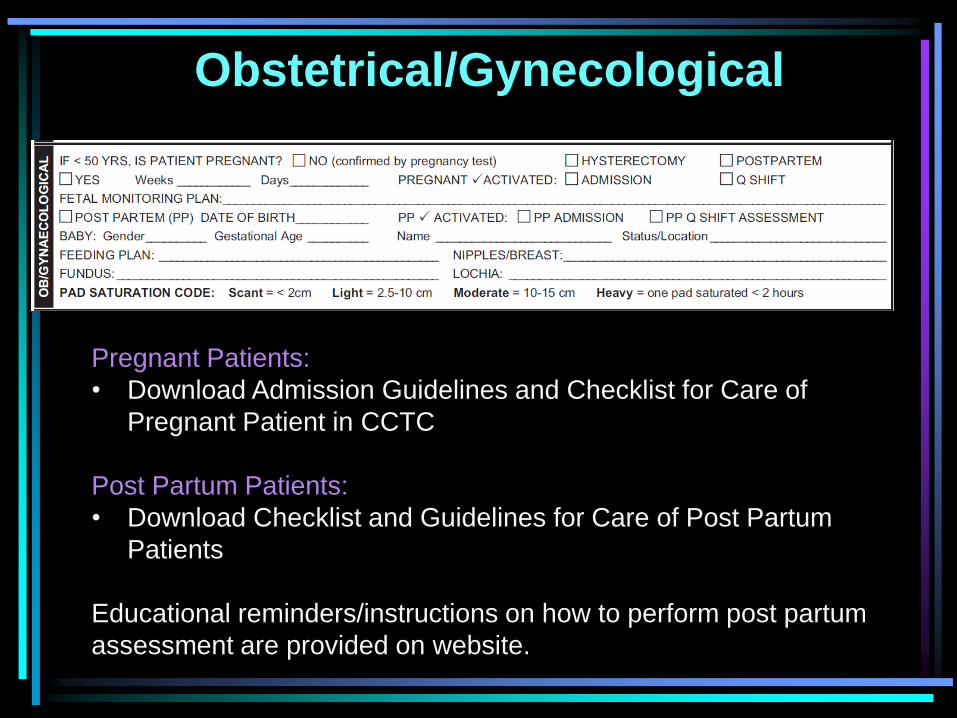
Obstetrical/Gynecological
Pregnant Patients:
• Download Admission Guidelines and Checklist for Care of
Pregnant Patient in CCTC
Post Partum Patients:
• Download Checklist and Guidelines for Care of Post Partum
Patients
Educational reminders/instructions on how to perform post partum
assessment are provided on website.
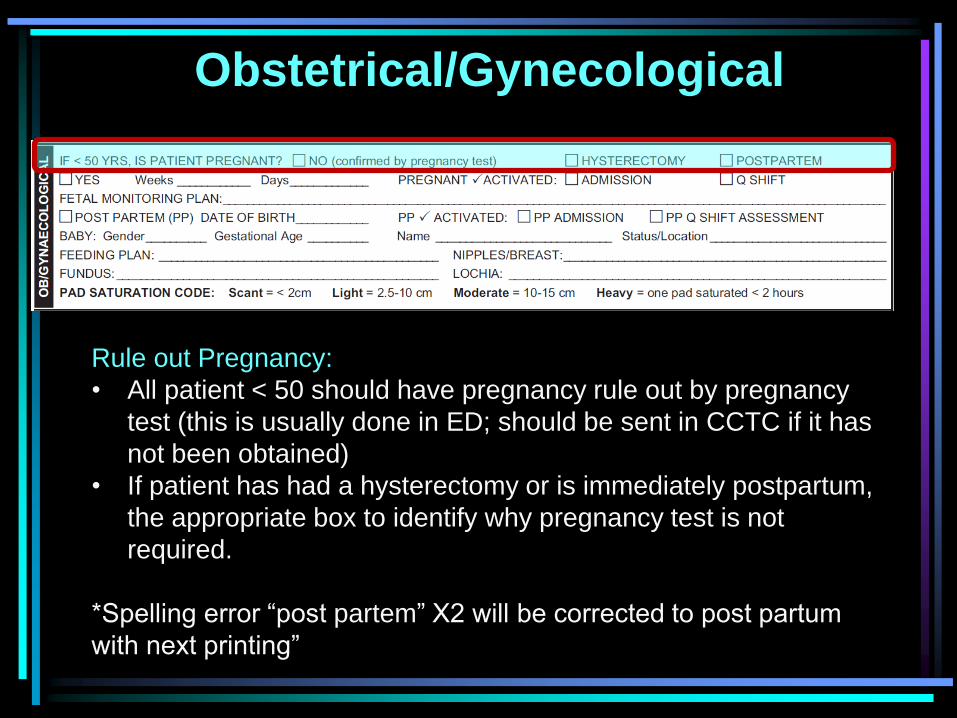
Obstetrical/Gynecological
Rule out Pregnancy:
• All patient < 50 should have pregnancy rule out by pregnancy
test (this is usually done in ED; should be sent in CCTC if it has
not been obtained)
• If patient has had a hysterectomy or is immediately postpartum,
the appropriate box to identify why pregnancy test is not
required.
*Spelling error “post partem” X2 will be corrected to post partum
with next printing”
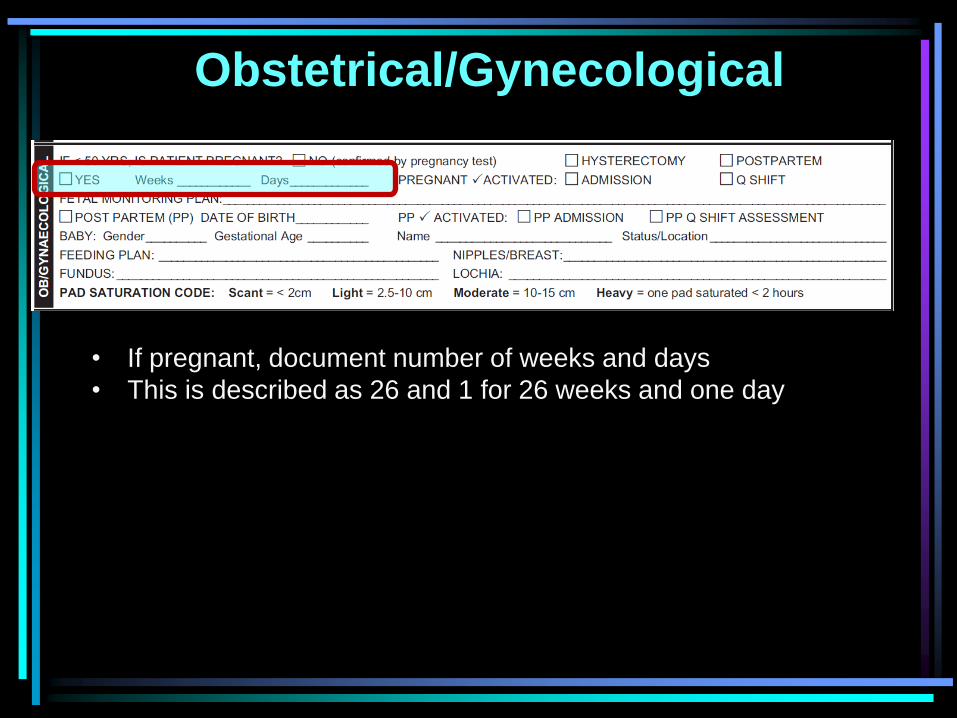
Obstetrical/Gynecological
• If pregnant, document number of weeks and days
• This is described as 26 and 1 for 26 weeks and one day

Obstetrical/Gynecological
Pregnant Patients:
• Confirm that admission/Q shift checklist for a pregnant patient
has been activated.
Obstetrical/Gynecological
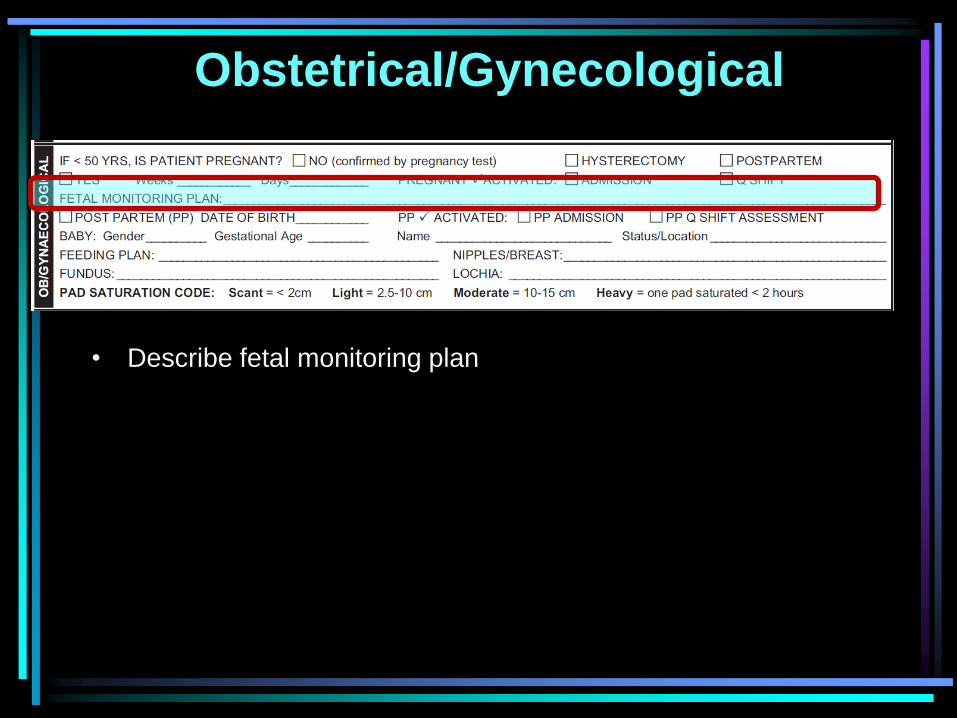
• Describe fetal monitoring plan
Obstetrical/Gynecological
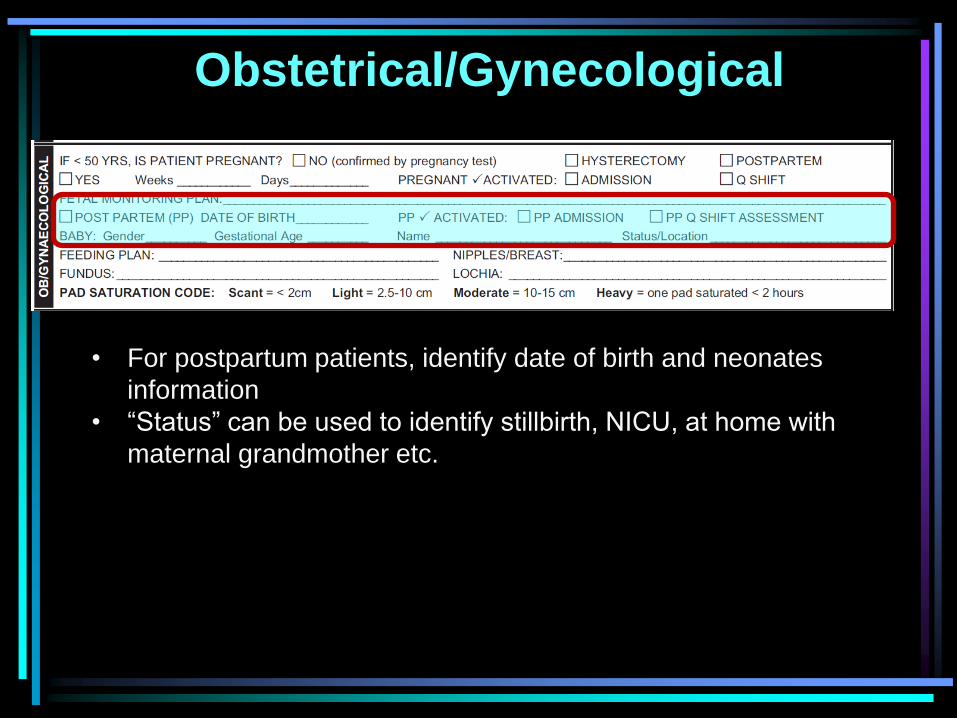
• For postpartum patients, identify date of birth and neonates
information
• “Status” can be used to identify stillbirth, NICU, at home with
maternal grandmother etc.
Obstetrical/Gynecological
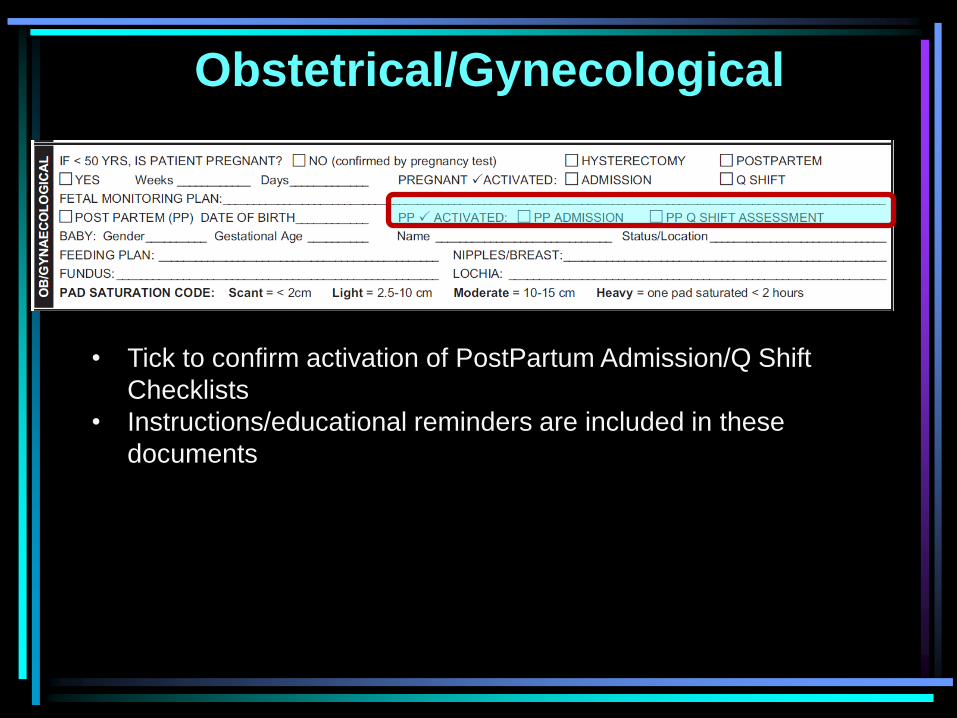
• Tick to confirm activation of PostPartum Admission/Q Shift
Checklists
• Instructions/educational reminders are included in these
documents

Obstetrical/Gynecological
• Document feeding plan/mother’s wishes regarding lactation and
breast/nipple assessment
Obstetrical/Gynecological
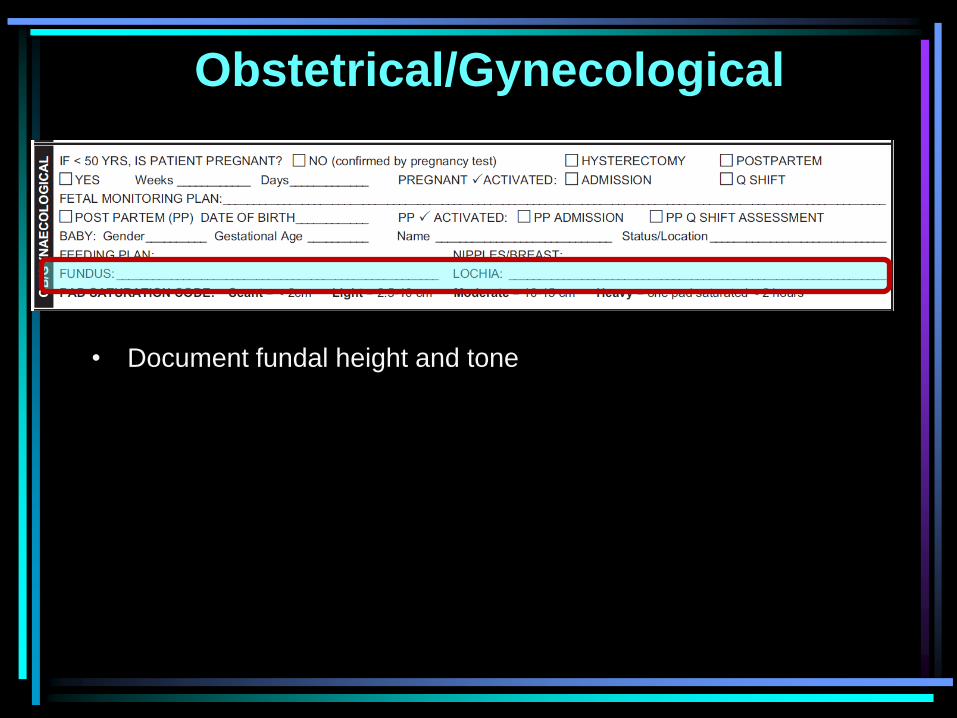
• Document fundal height and tone
Obstetrical/Gynecological
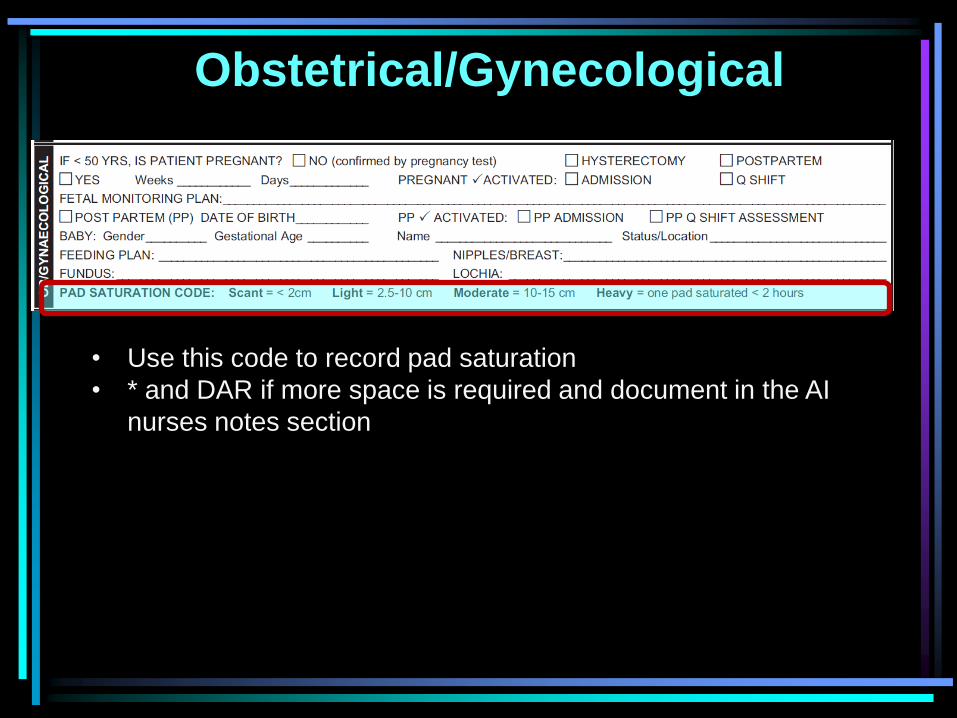
• Use this code to record pad saturation
• * and DAR if more space is required and document in the AI
nurses notes section
Integumentary Section
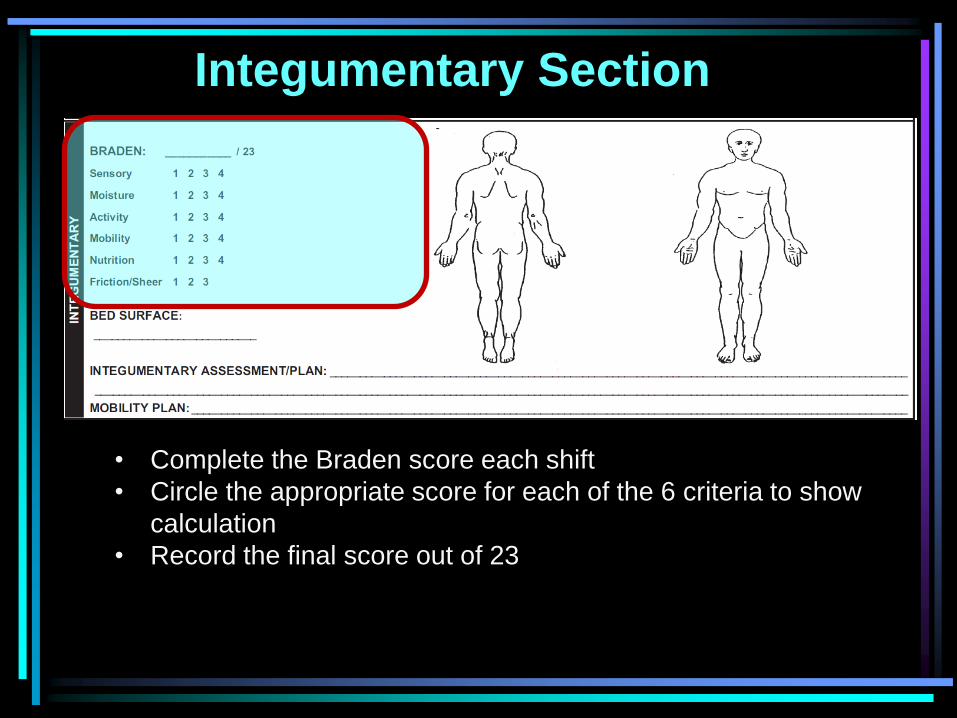
• Complete the Braden score each shift
• Circle the appropriate score for each of the 6 criteria to show
calculation
• Record the final score out of 23
Integumentary Section
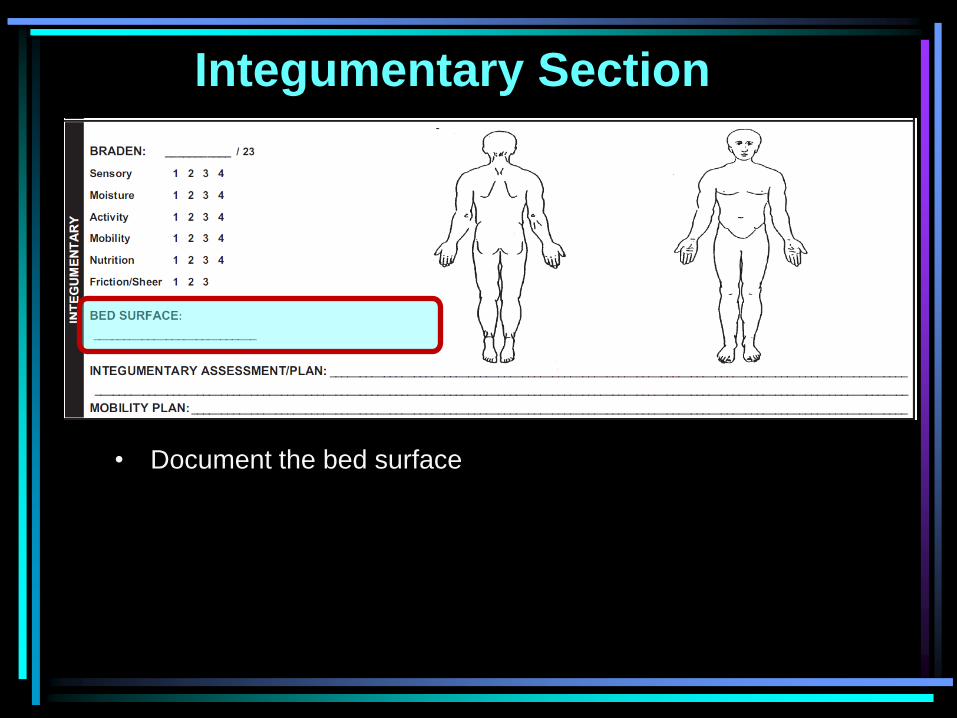
• Document the bed surface
Integumentary Section
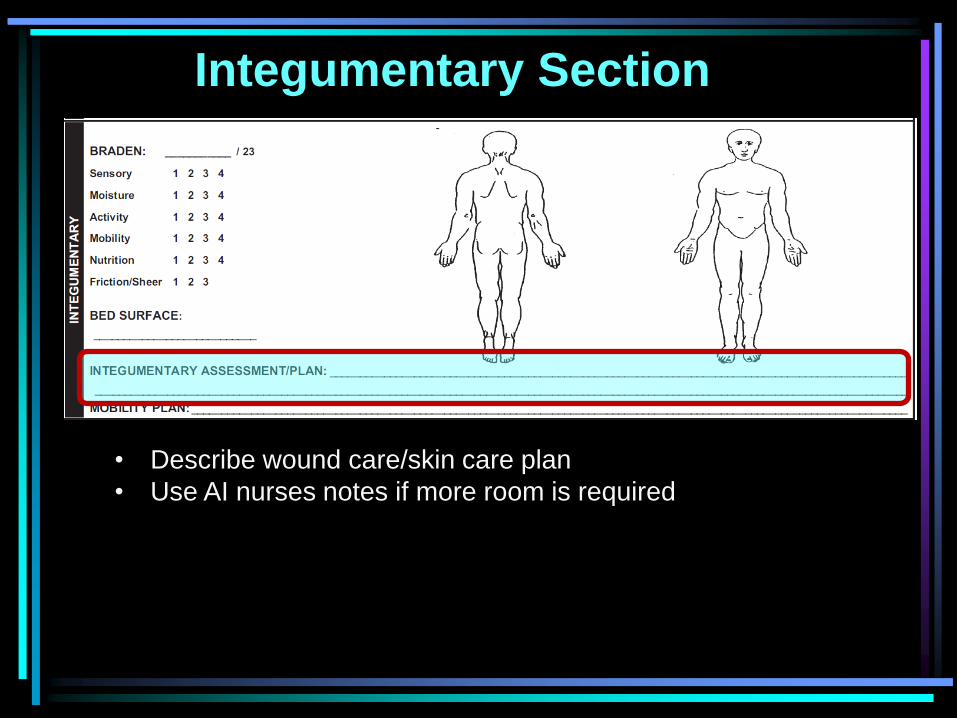
• Describe wound care/skin care plan
• Use AI nurses notes if more room is required
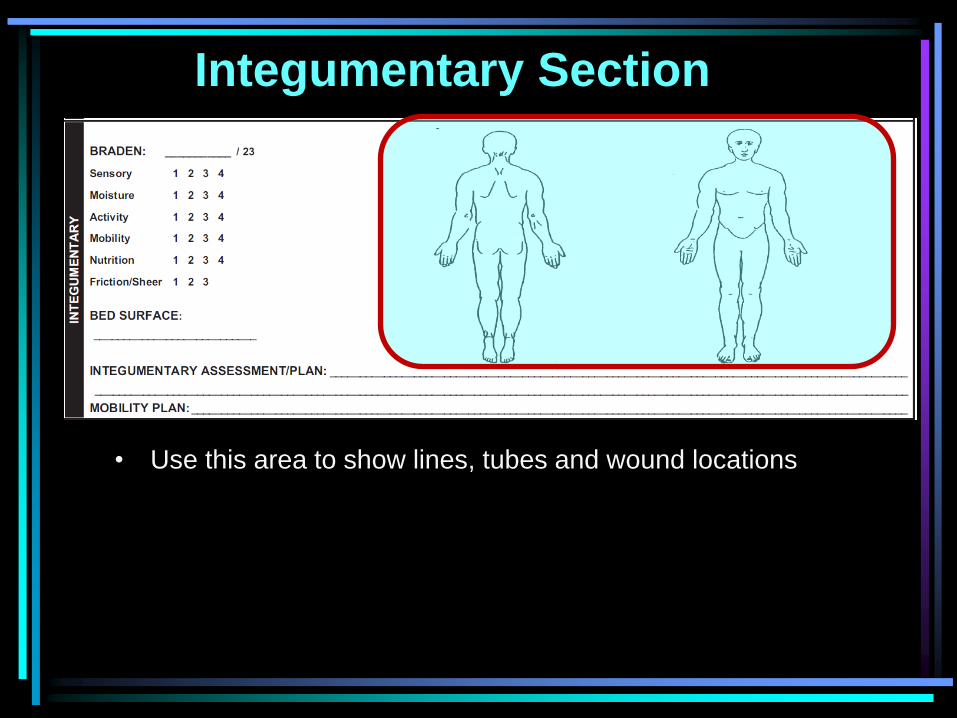
Integumentary Section
• Use this area to show lines, tubes and wound locations
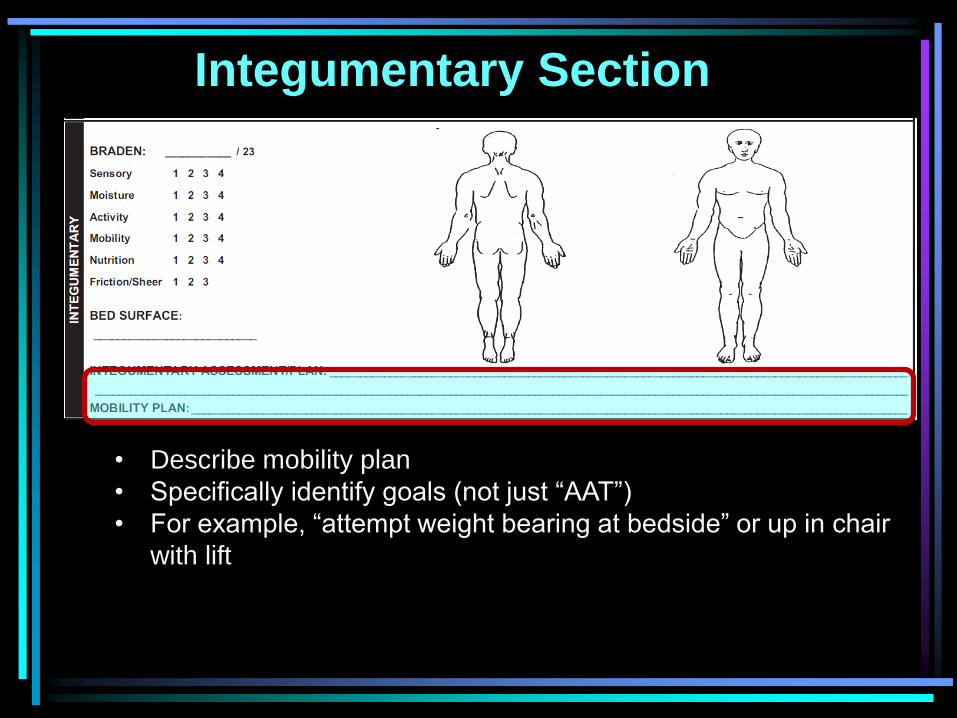
Integumentary Section
• Describe mobility plan
• Specifically identify goals (not just “AAT”)
• For example, “attempt weight bearing at bedside” or up in chair
with lift
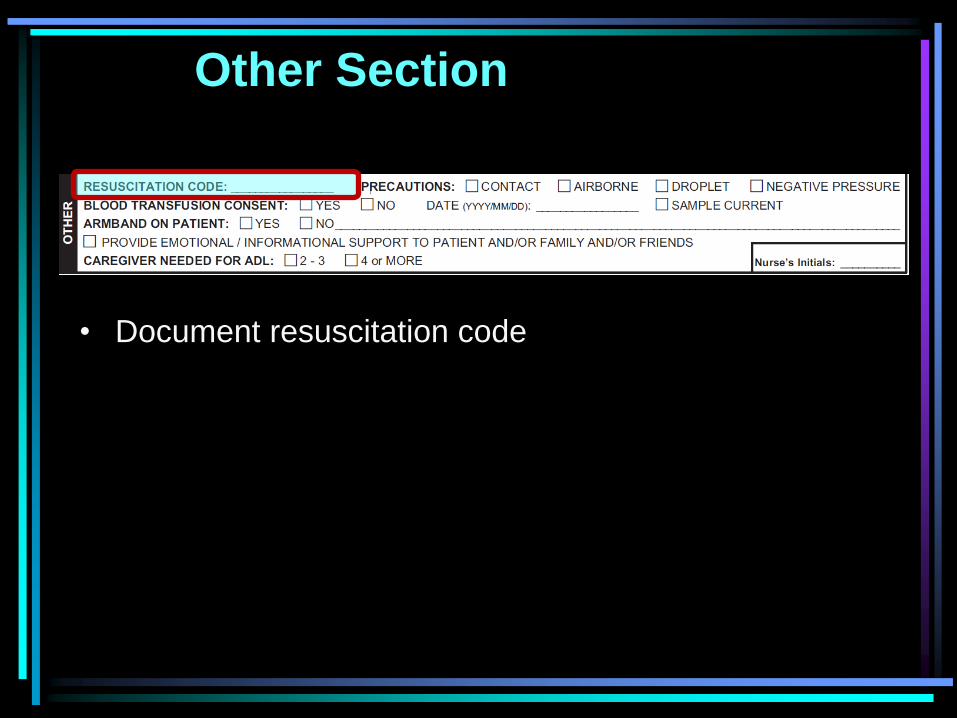
Other Section
• Document resuscitation code
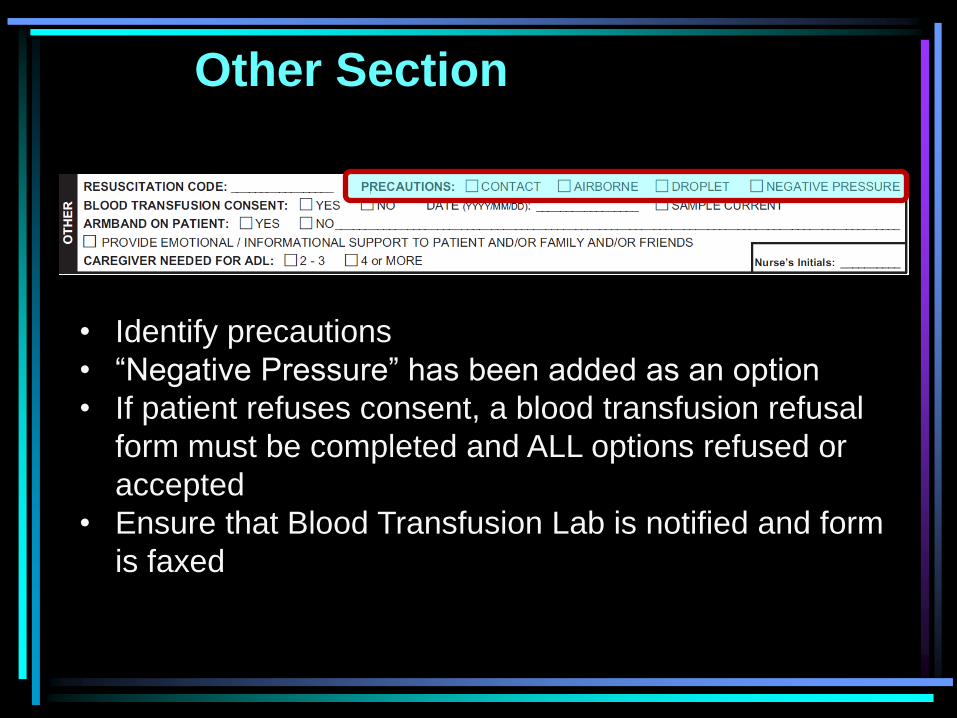
Other Section
• Identify precautions
• “Negative Pressure” has been added as an option
• If patient refuses consent, a blood transfusion refusal
form must be completed and ALL options refused or
accepted
• Ensure that Blood Transfusion Lab is notified and form
is faxed
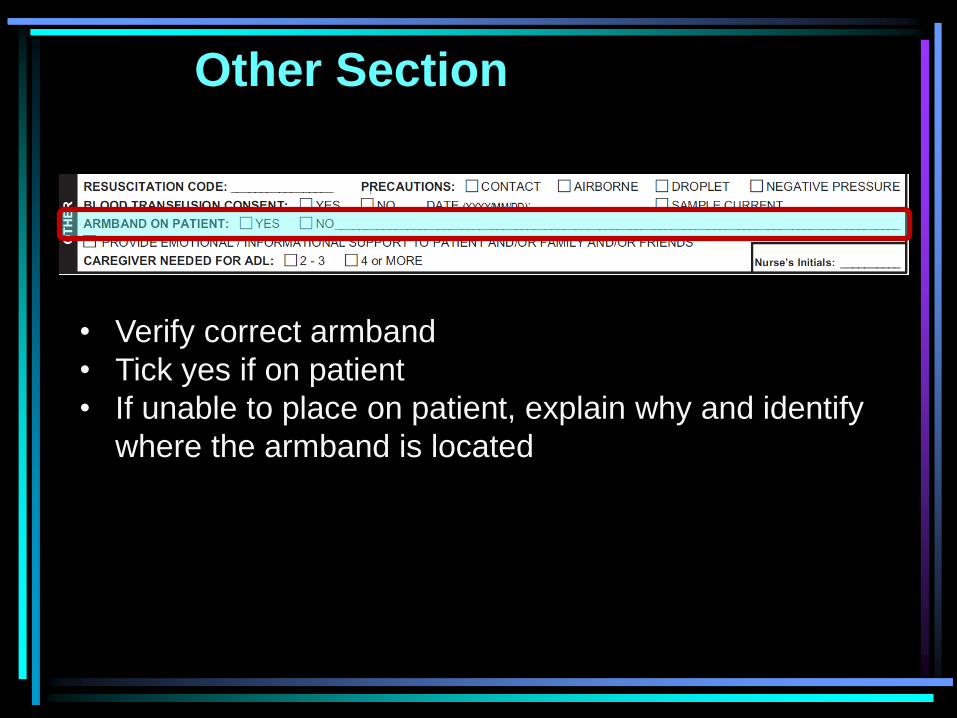
Other Section
• Verify correct armband
• Tick yes if on patient
• If unable to place on patient, explain why and identify
where the armband is located
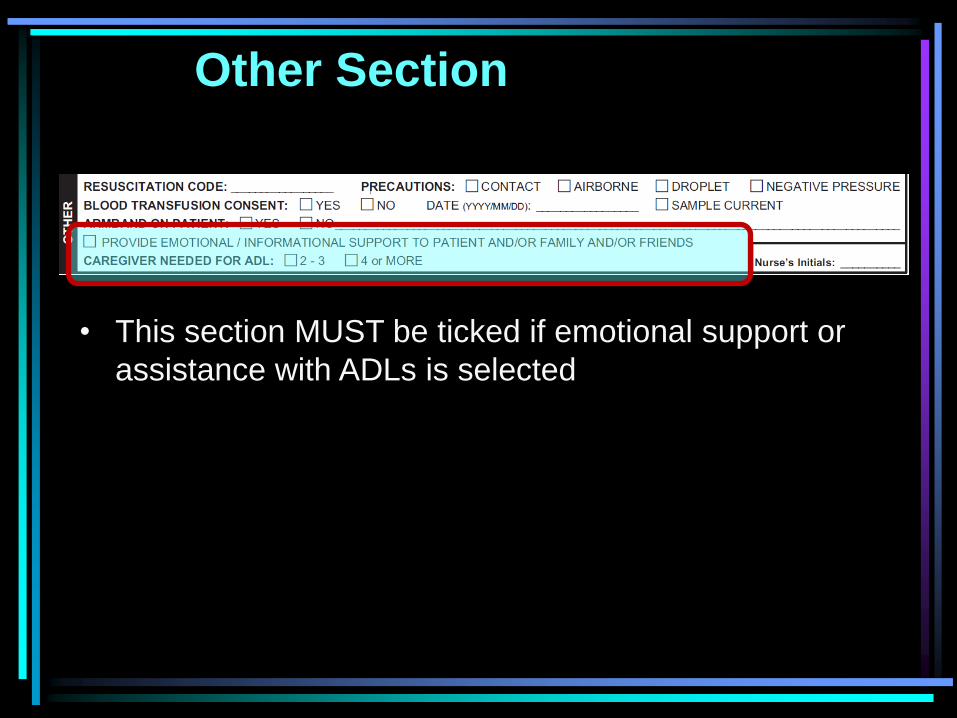
Other Section
• This section MUST be ticked if emotional support or
assistance with ADLs is selected
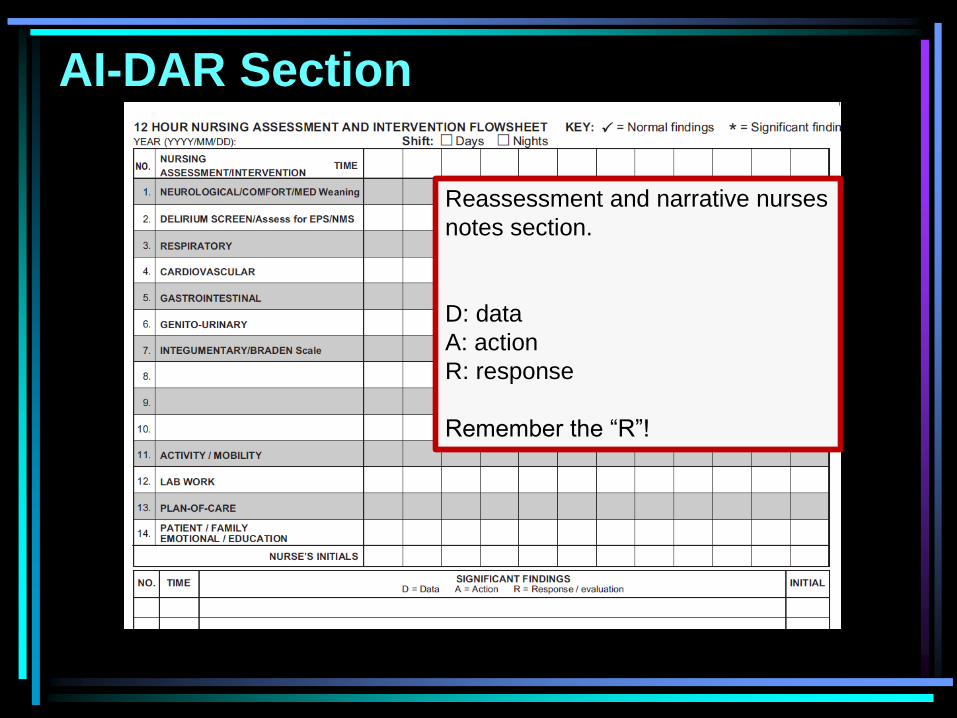
AI-DAR Section
Reassessment and narrative nurses
notes section.
D: data
A: action
R: response
Remember the “R”!
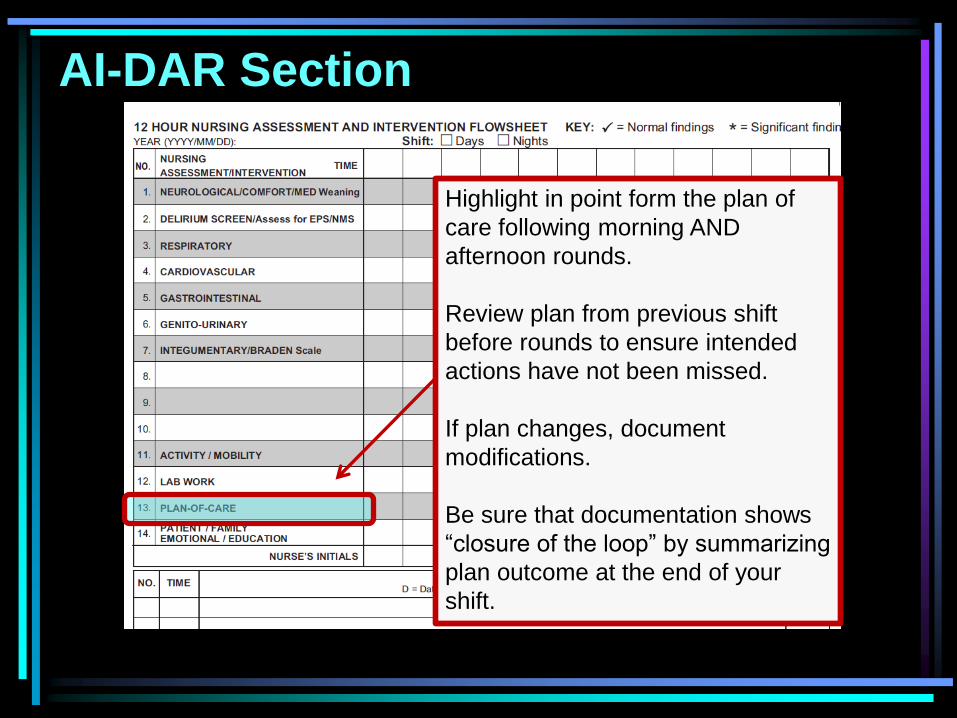
AI-DAR Section
Highlight in point form the plan of
care following morning AND
afternoon rounds.
Review plan from previous shift
before rounds to ensure intended
actions have not been missed.
If plan changes, document
modifications.
Be sure that documentation shows
“closure of the loop” by summarizing
plan outcome at the end of your
shift.
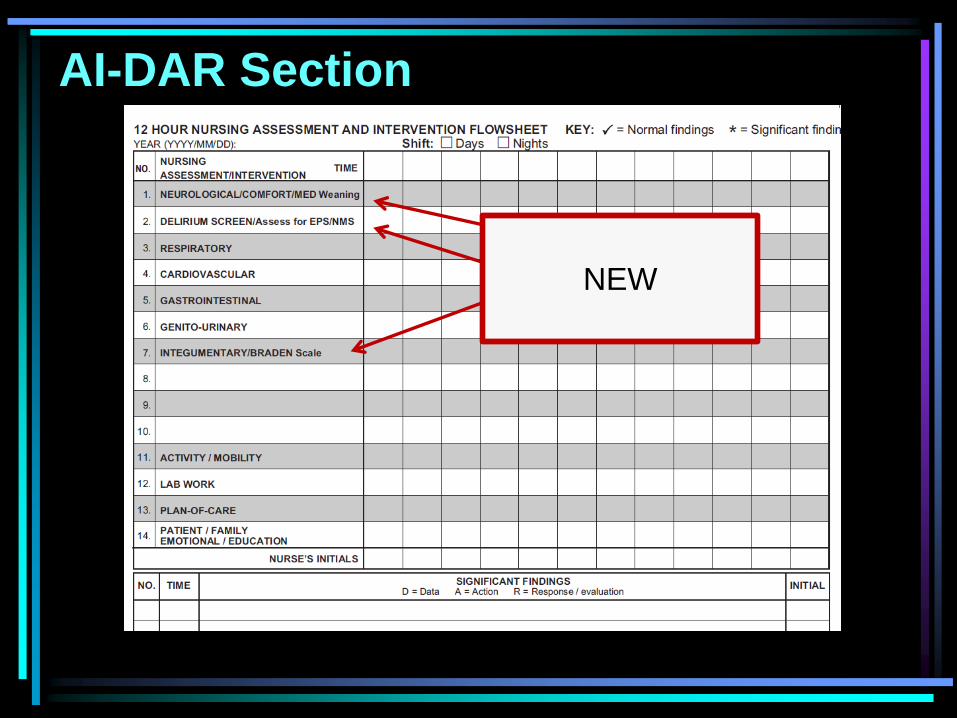
AI-DAR Section
NEW
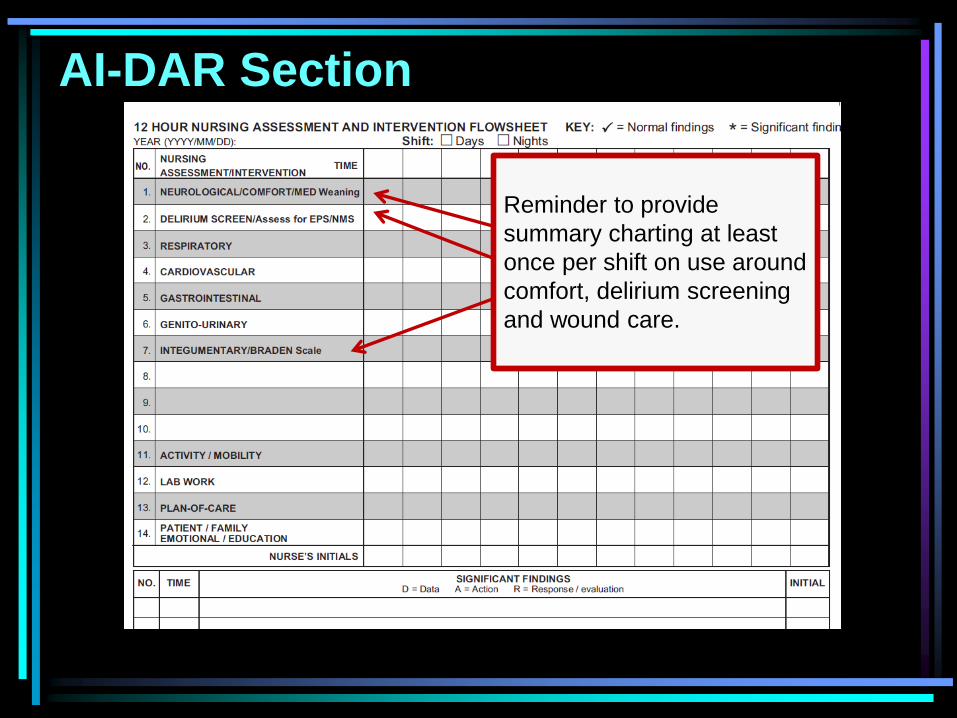
AI-DAR Section
Reminder to provide
summary charting at least
once per shift on use around
comfort, delirium screening
and wound care.

AI-DAR Section
Reminder to provide summary charting
at least once per shift on “Patient
Comfort”.
This should include weaning actions and
response to weaning of medications.
Plan for sedation is outlined in initial
assessment.
Minimum charting is an end of shift
summary to describe patient comfort and
response to treatment or weaning.
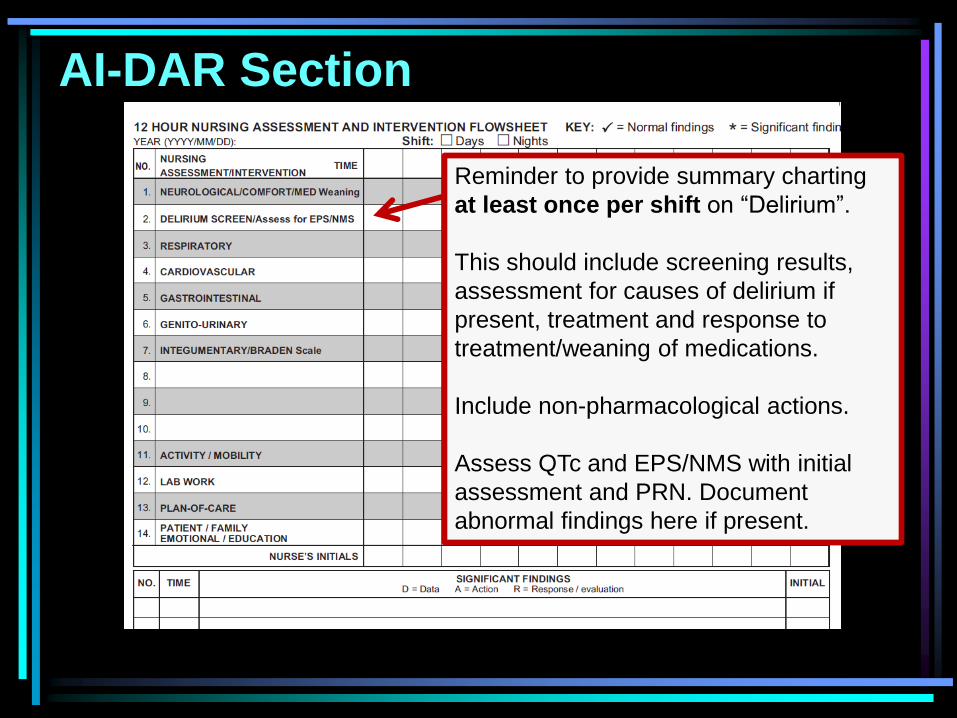
AI-DAR Section
Reminder to provide summary charting
at least once per shift on “Delirium”.
This should include screening results,
assessment for causes of delirium if
present, treatment and response to
treatment/weaning of medications.
Include non-pharmacological actions.
Assess QTc and EPS/NMS with initial
assessment and PRN. Document
abnormal findings here if present.

AI-DAR Section
Document if risks change from initial
assessment, bed changes, wound
descriptions and any interventions to
address/prevent skin issues.
If no change from initial assessment and
no wound care interventions, arrow over.
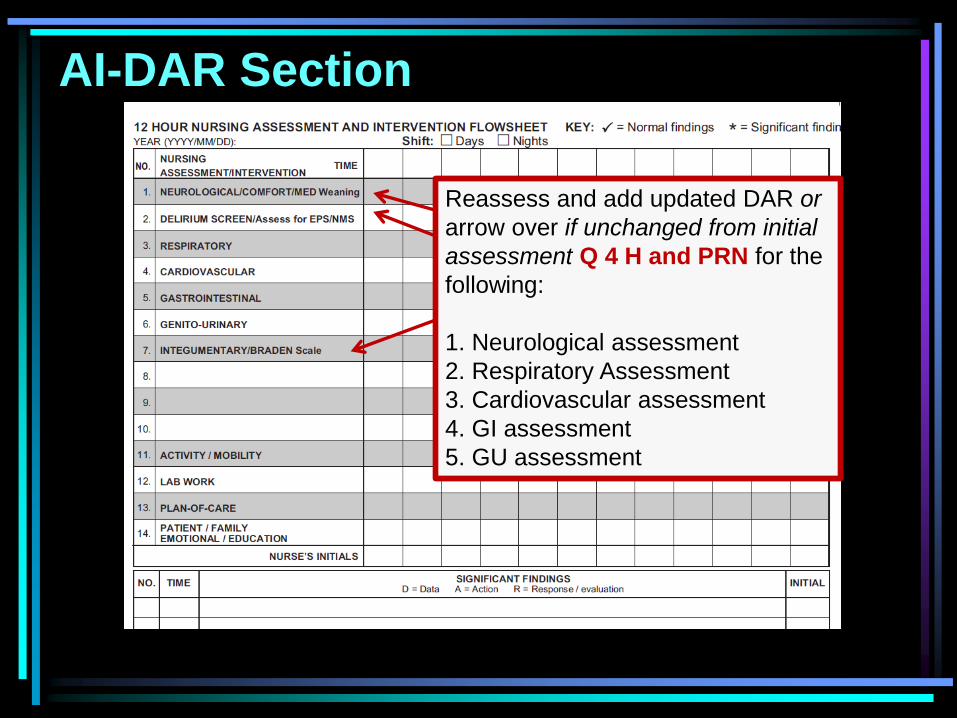
AI-DAR Section
Reassess and add updated DAR or
arrow over if unchanged from initial
assessment Q 4 H and PRN for the
following:
1. Neurological assessment
2. Respiratory Assessment
3. Cardiovascular assessment
4. GI assessment
5. GU assessment
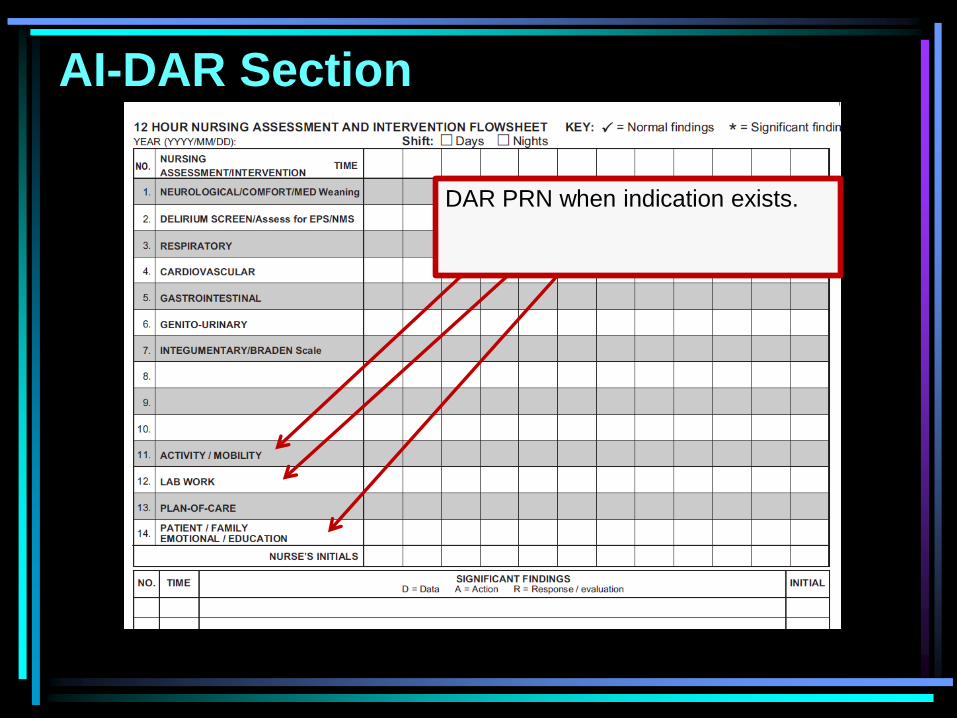
AI-DAR Section
DAR PRN when indication exists.