cavity wall brochure(inner)3 - uk.siggroup.comuk.siggroup.com/media/1205/ciga-installing-cwi.pdf ·...
TRANSCRIPT

Technician’s guide to best practice Version 2.0 - Issued July 2002
Installing cavitywall insulation
Published by: Cavity Insulation Guarantee Agency, CIGA House, 3 Vimy Court, Vimy Road,Leighton Buzzard, LU7 1FG. Tel: 01525 853300 Fax: 01525 385926

PREFACE
Installing cavity wall insulation provides technicians with a comprehensive guide to best practicefor the installation of Cavity Wall Insulation (CWI). It offers practical examples of procedures to becarried out by the competent technician. The guide should be followed by all cavity wall installersand used in conjunction with recommended training programmes.
The British Board of Agrément (BBA) is linked to Government. TheGoverning Board includes representation on behalf of the Secretary of Statefor the Environment Transport and the Regions. The BBA assesses and testsconstruction products, issuing Agrément Certificates to those that meet itshigh standards. An Agrément Certificate gives an independent andauthoritative opinion of the fitness for purpose of a product or system. TheBBA also assesses installers of cavity wall insulation. Approved Installers aresubject to regular surveillance by BBA Inspectors.
The Energy Efficiency Best Practice Programme (EEBPP) is the UKGovernment's principal energy efficiency information, advice and researchprogramme for organisations in the public and private sectors. Since it wasestablished in 1989, it has helped many organisations to save up to 20% oftheir energy bills, and stimulated UK energy savings of around £650M ayear. It also maintains the biggest library of independent information onenergy efficiency in the UK. The programme is managed in the buildingssectors by BRECSU, part of the Building Research Establishment.
1st Insulation Partners
British Gypsum-Isover Ltd.
BIP Ltd.
Certainfil Ltd
Instafoam & Fibre Ltd.
KnaufAlcopor Ltd
Rockwool Ltd.
Tebway Ltd.
CONTENTS
INTRODUCTION 1 – 2
BUILDING REGULATIONS 3
BUILDING ASSESSMENT & SURVEY 4
Exposure
IDENTIFYING CAVITY WALLS 5 - 8Other forms of constructionOther non-traditional construction
PRE-EXTERNAL CHECKS 9 - 13 Garage roofsGlass & plastic roofsFlues, chimneys & combustion air ventilatorsOther ventilatorsCavity brushesCondition of external wallsWeathering detailsFinlock gutters
PRE-INTERNAL CHECKS 14 - 16Dampness & condensationPossible routes for water ingressFlues, chimneys & combustion air ventilatorsOther ventilators
DRILLING OPERATION 17
CAVITY BARRIERS 18Fitting the barriers
REMOVAL & SLEEVING OF VENTILATORS 19
Staggered or offset air vents
INJECTION MACHINERY 20Blowing machines for mineral woolInjections sytems for beadInjection systems for foam
QUALITY CHECKS 21Mineral wool – density box testBead flow rate testFoam flow rate test
MINERAL WOOL FILLING OPERATION 22
POLYSTYRENE BEAD FILLING OPERATION 23
FOAM FILLING OPERATION 24
MAKING GOOD 25 - 26Making good holesBrick-faced propertyRendered or Tyrolean-faced wallsPebble-dash or chipping face finishes
POST-INTERNAL CHECKS 27
POST-EXTERNAL CHECKS 28
INSTALLED DENSITY CHECKS 29
HEALTH & SAFETY 30Installation equipmentProtective clothesHandling materialCompressed airLaddersPipes & cablesHand care
CUSTOMER CARE 31
BUILDINGS UNDER CONSTRUCTION 32 - 33
TECHNICIAN’S TRAINING COURSE FORM 34
INTRODUCTION
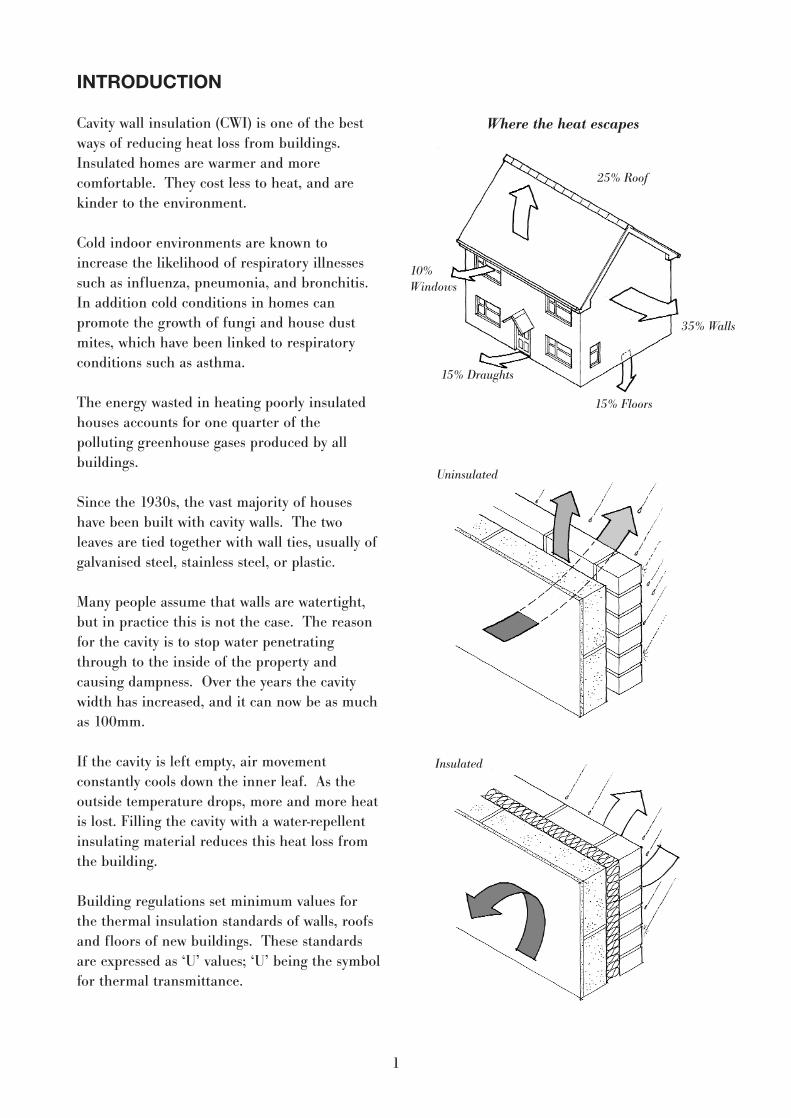
Cavity wall insulation (CWI) is one of the bestways of reducing heat loss from buildings.Insulated homes are warmer and morecomfortable. They cost less to heat, and arekinder to the environment.
Cold indoor environments are known toincrease the likelihood of respiratory illnessessuch as influenza, pneumonia, and bronchitis.In addition cold conditions in homes canpromote the growth of fungi and house dustmites, which have been linked to respiratoryconditions such as asthma.
The energy wasted in heating poorly insulatedhouses accounts for one quarter of thepolluting greenhouse gases produced by allbuildings.
Since the 1930s, the vast majority of houseshave been built with cavity walls. The twoleaves are tied together with wall ties, usually ofgalvanised steel, stainless steel, or plastic.
Many people assume that walls are watertight,but in practice this is not the case. The reasonfor the cavity is to stop water penetratingthrough to the inside of the property andcausing dampness. Over the years the cavitywidth has increased, and it can now be as muchas 100mm.
If the cavity is left empty, air movementconstantly cools down the inner leaf. As theoutside temperature drops, more and more heatis lost. Filling the cavity with a water-repellentinsulating material reduces this heat loss fromthe building.
Building regulations set minimum values forthe thermal insulation standards of walls, roofsand floors of new buildings. These standardsare expressed as ‘U’ values; ‘U’ being the symbolfor thermal transmittance.
Where the heat escapes
1
25% Roof
10% Windows
35% Walls
15% Draughts
15% Floors
Uninsulated
Insulated
With new construction, there are variousmethods of insulating the cavity, but wherehouses are already built the only way of fillingthe cavity is by blowing or pumping cavity wallinsulation through the outer leaf. There arethree types of material in use today: mineralwool (rockwool or glass wool), polystyrenebeads, and UF foam.
The various CWI systems and the installingcompanies have to be approved by the BritishBoard of Agrément (BBA), or the BritishStandards Institution (BSI). The BBA isresponsible for the technical surveillancescheme that monitors this process on behalf ofthe industry. Technicians employed by theinstalling companies are trained and approvedby the systems suppliers and also have to beregistered with the BBA.
When CWI is carried out, a 25-year guarantee isissued to the homeowner by the CavityInsulation Guarantee Agency (CIGA). Installingcompanies are registered with CIGA, which wasset up by all sectors of the industry, inconjunction with Government. The public canhave every confidence in the system, knowingthat there is strong industry backing for theproduct and the service.
This manual describes in detail the variousfacets of insulation installation and thetechniques and requirements involved.
2
CIGA House, 3 Vimy Court, Vimy Road, Leighton Buzzard, LU7 1FG.Tel: 01525 853000
BUILDING REGULATIONS
The United Kingdom has three sets of BuildingRegulations:
The Building Regulations- covering England and Wales
The Building Standards (Scotland)Regulations - covering Scotland
The Building Regulations (NorthernIreland) - covering Northern Ireland
Whilst each set of Regulations are different inexpression and interpretation they all requirebuilding materials and works to be fit for theintended purpose.
The insertion of CWI is controlled by theBuilding Regulations.
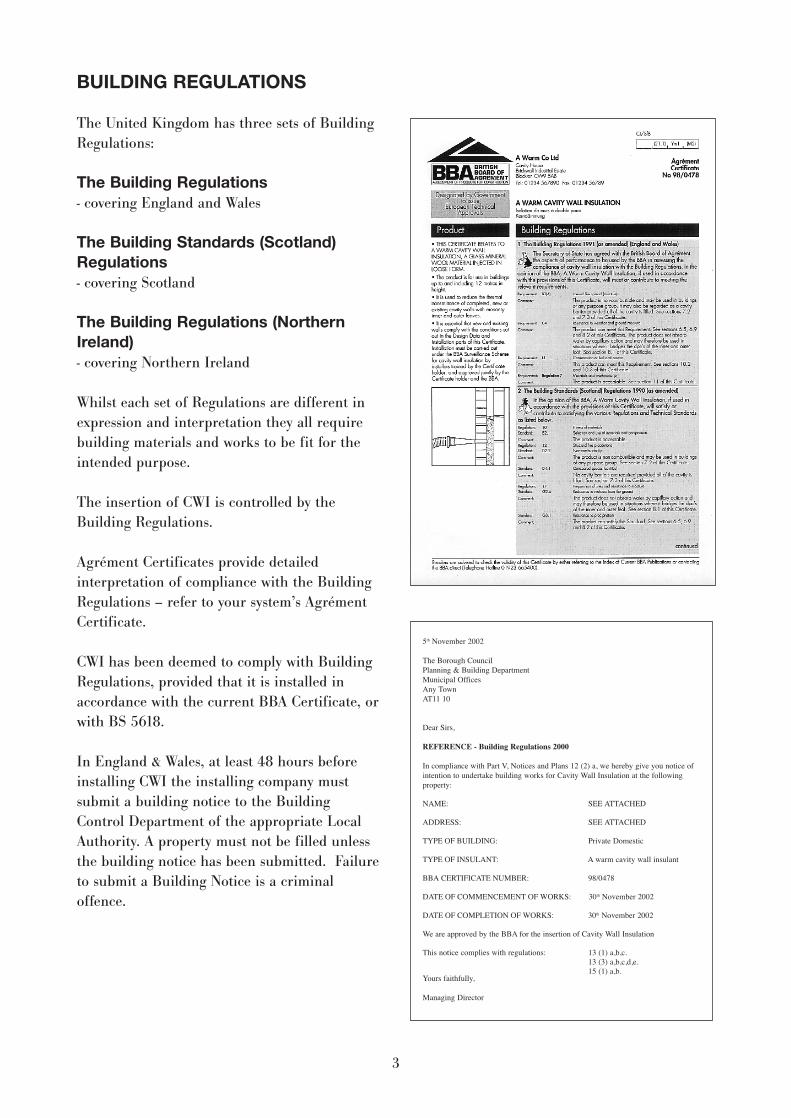
Agrément Certificates provide detailedinterpretation of compliance with the BuildingRegulations – refer to your system’s AgrémentCertificate.
CWI has been deemed to comply with BuildingRegulations, provided that it is installed inaccordance with the current BBA Certificate, orwith BS 5618.
In England & Wales, at least 48 hours beforeinstalling CWI the installing company mustsubmit a building notice to the BuildingControl Department of the appropriate LocalAuthority. A property must not be filled unlessthe building notice has been submitted. Failureto submit a Building Notice is a criminaloffence.
3
5th November 2002
The Borough CouncilPlanning & Building DepartmentMunicipal OfficesAny TownAT11 10
Dear Sirs,
REFERENCE - Building Regulations 2000
In compliance with Part V, Notices and Plans 12 (2) a, we hereby give you notice ofintention to undertake building works for Cavity Wall Insulation at the followingproperty:
NAME: SEE ATTACHED
ADDRESS: SEE ATTACHED
TYPE OF BUILDING: Private Domestic
TYPE OF INSULANT: A warm cavity wall insulant
BBA CERTIFICATE NUMBER: 98/0478
DATE OF COMMENCEMENT OF WORKS: 30th November 2002
DATE OF COMPLETION OF WORKS: 30th November 2002
We are approved by the BBA for the insertion of Cavity Wall Insulation
This notice complies with regulations: 13 (1) a,b,c.13 (3) a,b,c,d,e.15 (1) a,b.
Yours faithfully,
Managing Director
BUILDING ASSESSMENT
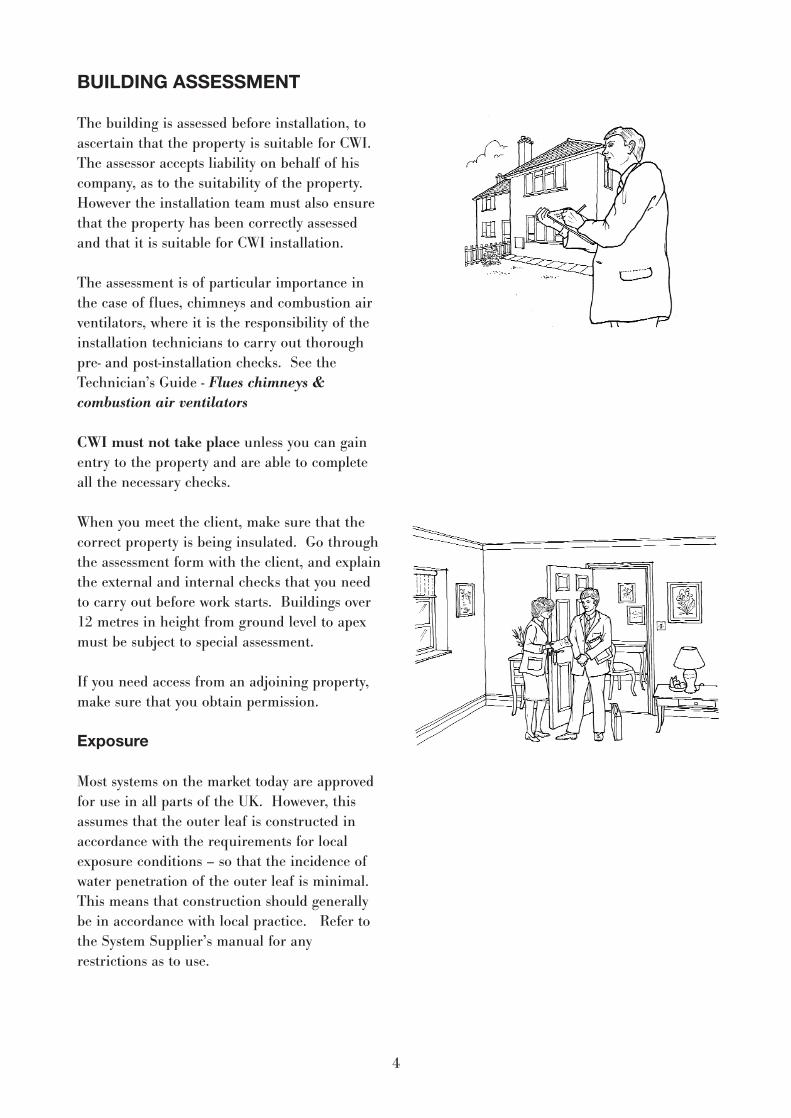
The building is assessed before installation, toascertain that the property is suitable for CWI.The assessor accepts liability on behalf of hiscompany, as to the suitability of the property.However the installation team must also ensurethat the property has been correctly assessedand that it is suitable for CWI installation.
The assessment is of particular importance inthe case of flues, chimneys and combustion airventilators, where it is the responsibility of theinstallation technicians to carry out thoroughpre- and post-installation checks. See theTechnician’s Guide - Flues chimneys &combustion air ventilators
CWI must not take place unless you can gainentry to the property and are able to completeall the necessary checks.
When you meet the client, make sure that thecorrect property is being insulated. Go throughthe assessment form with the client, and explainthe external and internal checks that you needto carry out before work starts. Buildings over12 metres in height from ground level to apexmust be subject to special assessment.
If you need access from an adjoining property,make sure that you obtain permission.
Exposure
Most systems on the market today are approvedfor use in all parts of the UK. However, thisassumes that the outer leaf is constructed inaccordance with the requirements for localexposure conditions – so that the incidence ofwater penetration of the outer leaf is minimal.This means that construction should generallybe in accordance with local practice. Refer tothe System Supplier’s manual for anyrestrictions as to use.
4
IDENTIFYING CAVITY WALLS
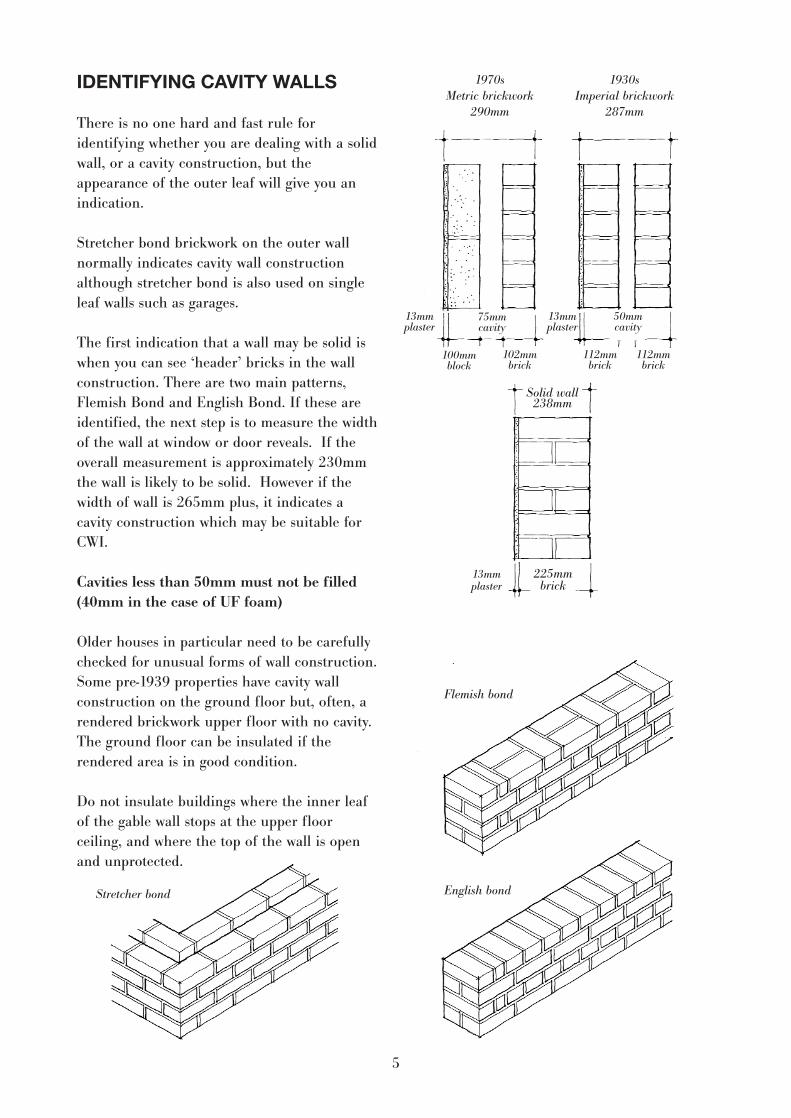
There is no one hard and fast rule foridentifying whether you are dealing with a solidwall, or a cavity construction, but theappearance of the outer leaf will give you anindication.
Stretcher bond brickwork on the outer wallnormally indicates cavity wall constructionalthough stretcher bond is also used on singleleaf walls such as garages.
The first indication that a wall may be solid iswhen you can see ‘header’ bricks in the wallconstruction. There are two main patterns,Flemish Bond and English Bond. If these areidentified, the next step is to measure the widthof the wall at window or door reveals. If theoverall measurement is approximately 230mmthe wall is likely to be solid. However if thewidth of wall is 265mm plus, it indicates acavity construction which may be suitable forCWI.
Cavities less than 50mm must not be filled(40mm in the case of UF foam)
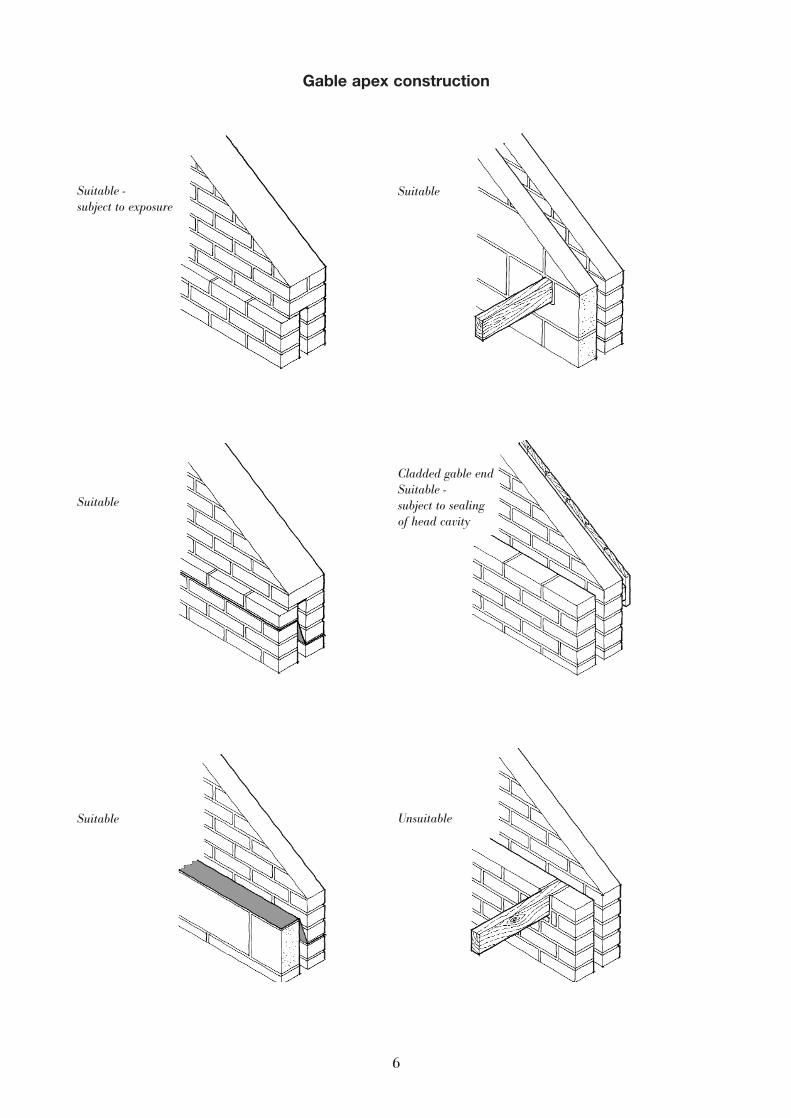
Older houses in particular need to be carefullychecked for unusual forms of wall construction.Some pre-1939 properties have cavity wallconstruction on the ground floor but, often, arendered brickwork upper floor with no cavity.The ground floor can be insulated if therendered area is in good condition.
Do not insulate buildings where the inner leafof the gable wall stops at the upper floorceiling, and where the top of the wall is openand unprotected.
5
1970sMetric brickwork
290mm
1930sImperial brickwork
287mm
13mmplaster
13mmplaster
13mmplaster
100mmblock
75mmcavity
102mmbrick
112mmbrick
112mmbrick
50mmcavity
Solid wall238mm
225mmbrick
English bond
Flemish bond
Stretcher bond
6
Suitable
Suitable
Gable apex construction
Suitable -subject to exposure
Unsuitable
Cladded gable endSuitable - subject to sealing of head cavity
Suitable
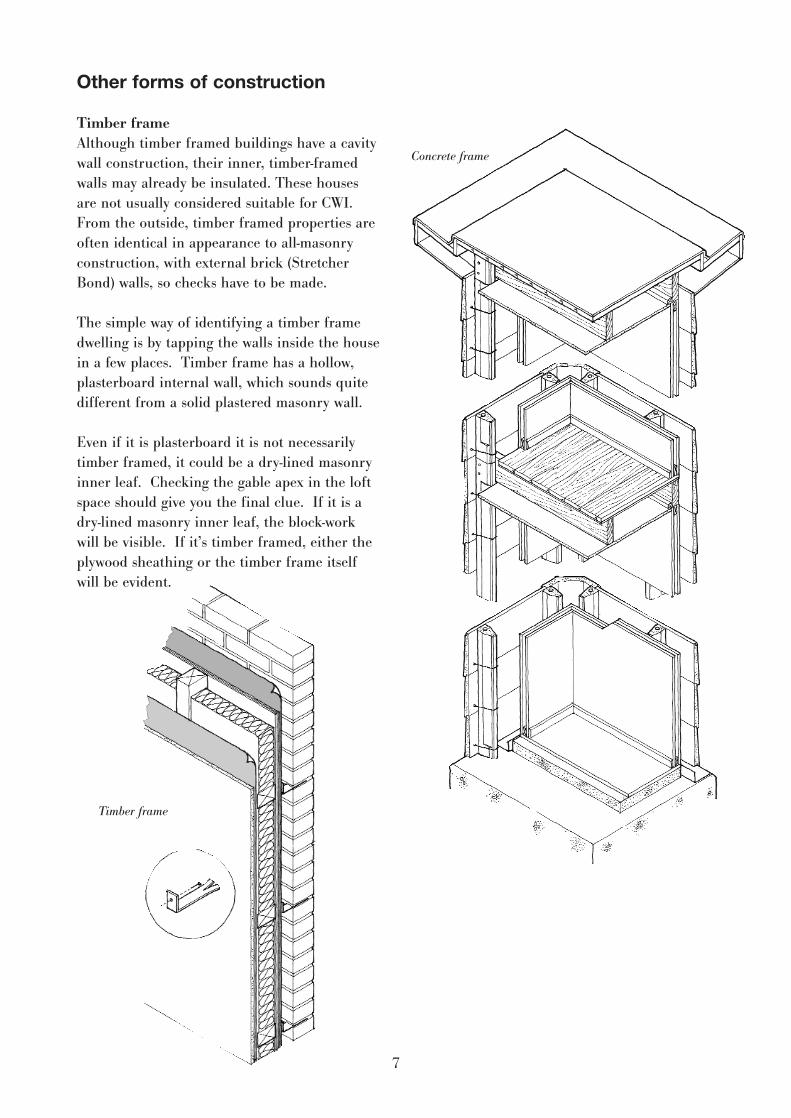
Other forms of construction
Timber frameAlthough timber framed buildings have a cavitywall construction, their inner, timber-framedwalls may already be insulated. These housesare not usually considered suitable for CWI.From the outside, timber framed properties areoften identical in appearance to all-masonryconstruction, with external brick (StretcherBond) walls, so checks have to be made.
The simple way of identifying a timber framedwelling is by tapping the walls inside the housein a few places. Timber frame has a hollow,plasterboard internal wall, which sounds quitedifferent from a solid plastered masonry wall.
Even if it is plasterboard it is not necessarilytimber framed, it could be a dry-lined masonryinner leaf. Checking the gable apex in the loftspace should give you the final clue. If it is adry-lined masonry inner leaf, the block-workwill be visible. If it’s timber framed, either theplywood sheathing or the timber frame itselfwill be evident.
7
Timber frame
Concrete frame
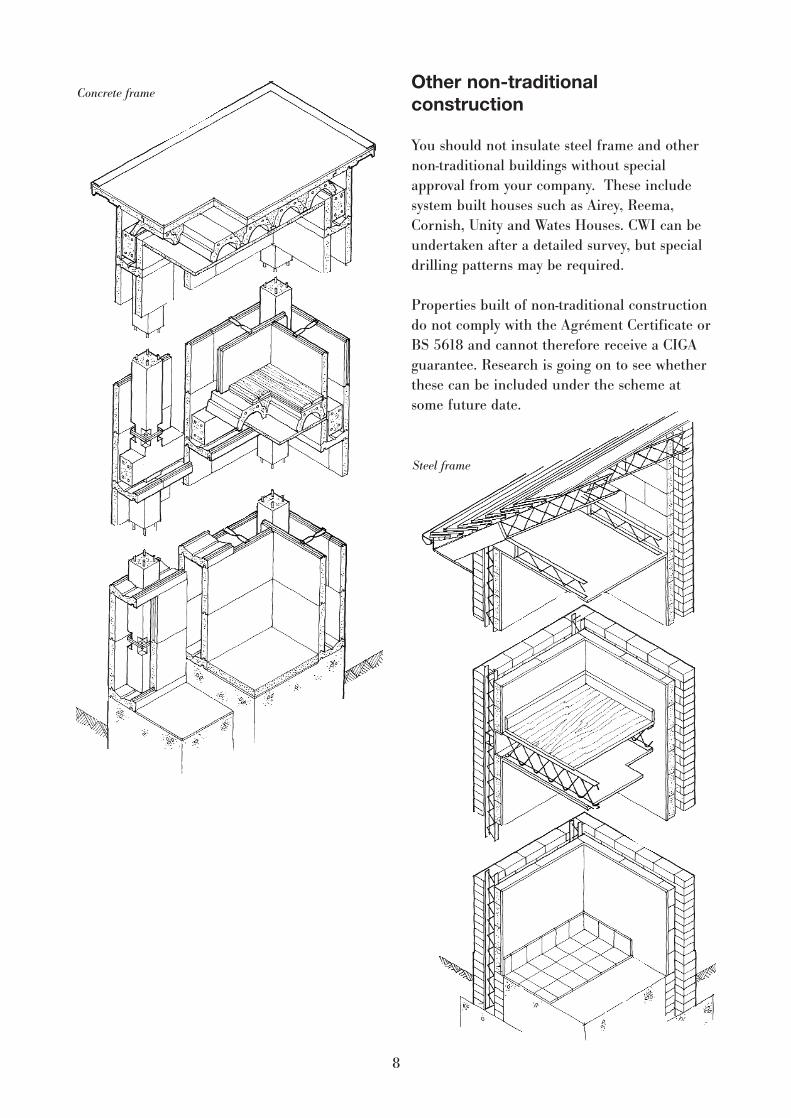
Other non-traditionalconstruction
You should not insulate steel frame and othernon-traditional buildings without specialapproval from your company. These includesystem built houses such as Airey, Reema,Cornish, Unity and Wates Houses. CWI can beundertaken after a detailed survey, but specialdrilling patterns may be required.
Properties built of non-traditional constructiondo not comply with the Agrément Certificate orBS 5618 and cannot therefore receive a CIGAguarantee. Research is going on to see whetherthese can be included under the scheme atsome future date.
8
Concrete frame
Steel frame
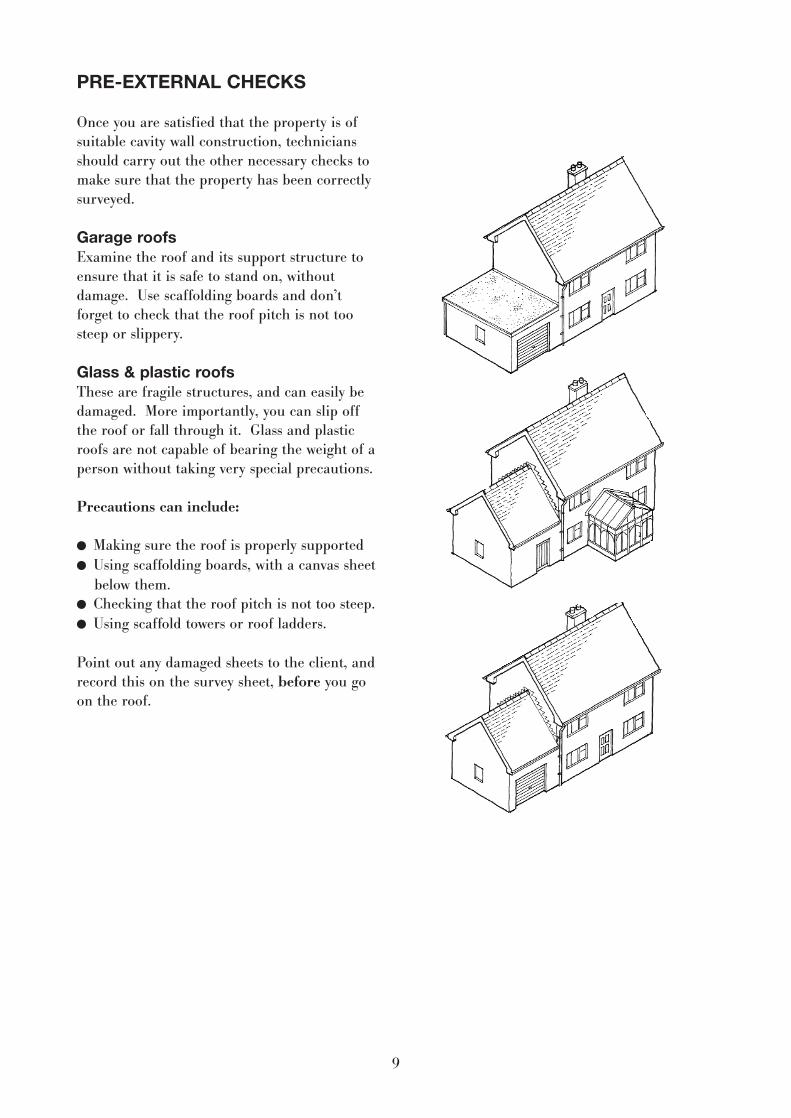
PRE-EXTERNAL CHECKS
Once you are satisfied that the property is ofsuitable cavity wall construction, techniciansshould carry out the other necessary checks tomake sure that the property has been correctlysurveyed.
Garage roofsExamine the roof and its support structure toensure that it is safe to stand on, withoutdamage. Use scaffolding boards and don’tforget to check that the roof pitch is not toosteep or slippery.
Glass & plastic roofsThese are fragile structures, and can easily bedamaged. More importantly, you can slip offthe roof or fall through it. Glass and plasticroofs are not capable of bearing the weight of aperson without taking very special precautions.
Precautions can include:
� Making sure the roof is properly supported� Using scaffolding boards, with a canvas sheet
below them.� Checking that the roof pitch is not too steep.� Using scaffold towers or roof ladders.
Point out any damaged sheets to the client, andrecord this on the survey sheet, before you goon the roof.
9
Flues, chimneys & combustion airventilators
It is vital that these are thoroughly checked. Ifyou block the combustion air ventilators orflues of fuel-burning appliances, there is a riskof someone becoming ill or dying, from carbonmonoxide poisoning. See the Technician’sGuide - Flues, chimneys & combustion airventilators.
Initially you must locate, identify and note theposition of flues, chimneys & combustion airventilators for all fuel-burning appliances in theproperty.
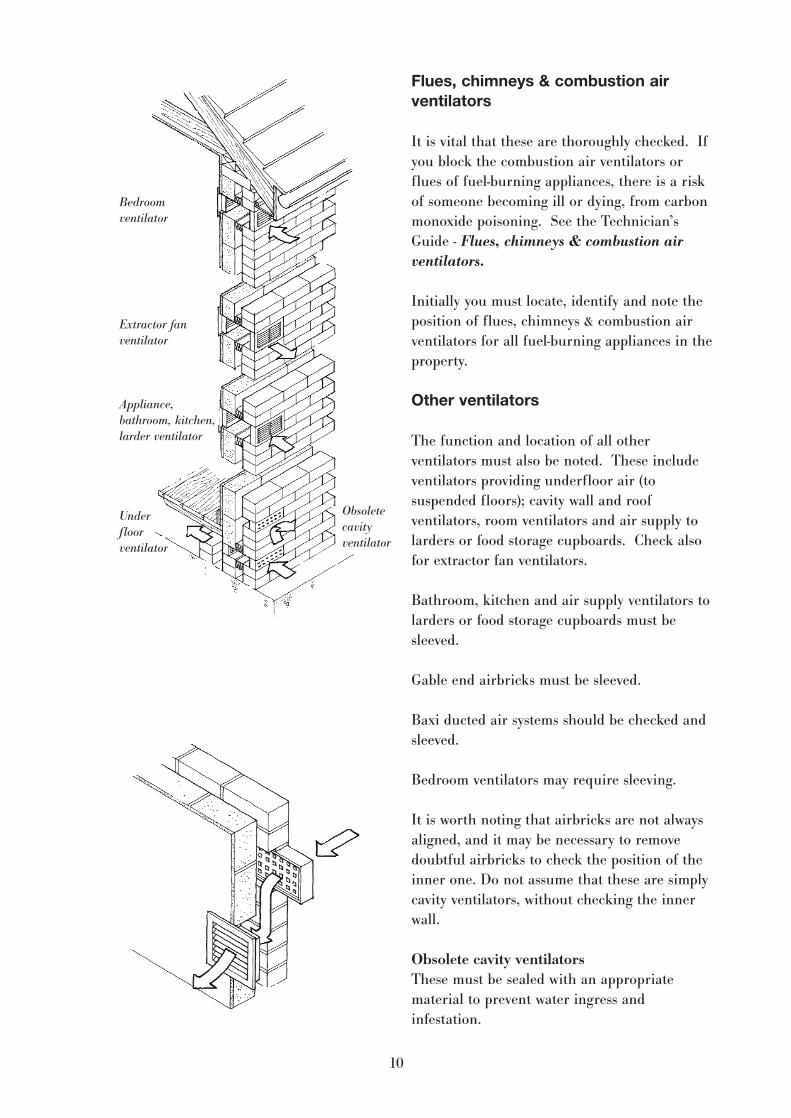
Other ventilators
The function and location of all otherventilators must also be noted. These includeventilators providing underfloor air (tosuspended floors); cavity wall and roofventilators, room ventilators and air supply tolarders or food storage cupboards. Check alsofor extractor fan ventilators.
Bathroom, kitchen and air supply ventilators tolarders or food storage cupboards must besleeved.
Gable end airbricks must be sleeved.
Baxi ducted air systems should be checked andsleeved.
Bedroom ventilators may require sleeving.
It is worth noting that airbricks are not alwaysaligned, and it may be necessary to removedoubtful airbricks to check the position of theinner one. Do not assume that these are simplycavity ventilators, without checking the innerwall.
Obsolete cavity ventilatorsThese must be sealed with an appropriatematerial to prevent water ingress andinfestation.
10
Bedroomventilator
Extractor fanventilator
Appliance,bathroom, kitchen,larder ventilator
Under floorventilator
Obsolete cavityventilator
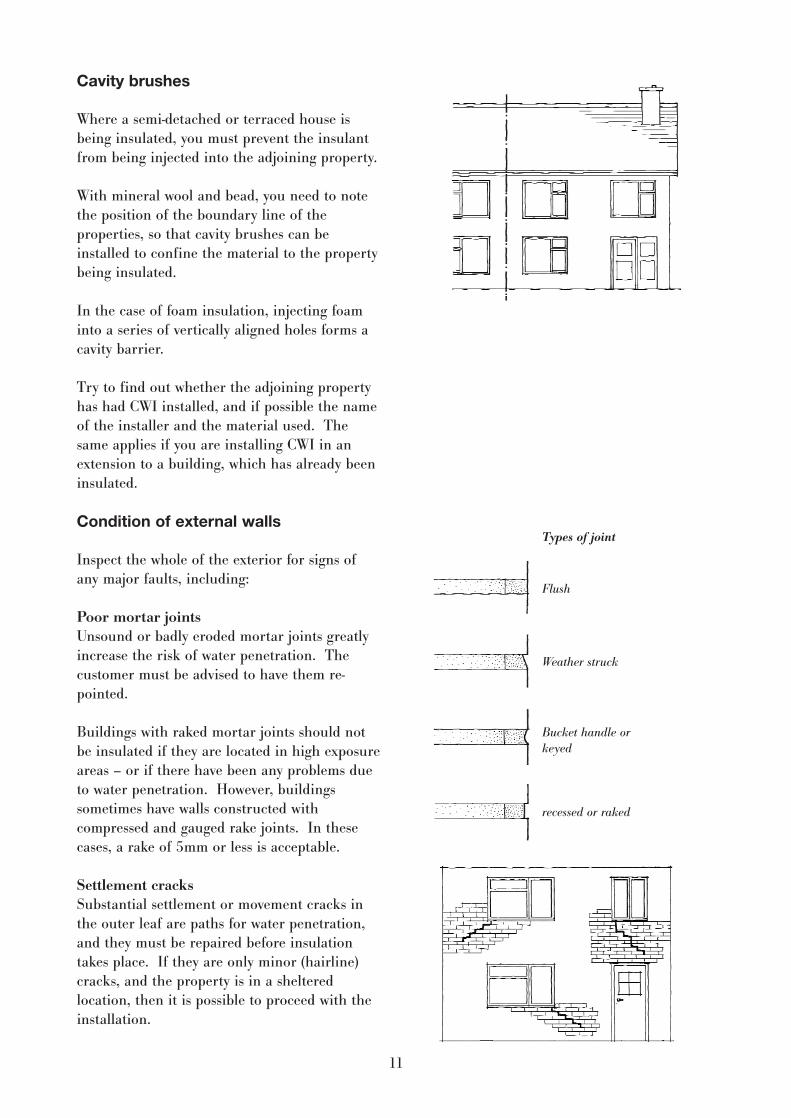
Cavity brushes
Where a semi-detached or terraced house isbeing insulated, you must prevent the insulantfrom being injected into the adjoining property.
With mineral wool and bead, you need to notethe position of the boundary line of theproperties, so that cavity brushes can beinstalled to confine the material to the propertybeing insulated.
In the case of foam insulation, injecting foaminto a series of vertically aligned holes forms acavity barrier.
Try to find out whether the adjoining propertyhas had CWI installed, and if possible the nameof the installer and the material used. Thesame applies if you are installing CWI in anextension to a building, which has already beeninsulated.
Condition of external walls
Inspect the whole of the exterior for signs ofany major faults, including:
Poor mortar jointsUnsound or badly eroded mortar joints greatlyincrease the risk of water penetration. Thecustomer must be advised to have them re-pointed.
Buildings with raked mortar joints should notbe insulated if they are located in high exposureareas – or if there have been any problems dueto water penetration. However, buildingssometimes have walls constructed withcompressed and gauged rake joints. In thesecases, a rake of 5mm or less is acceptable.
Settlement cracksSubstantial settlement or movement cracks inthe outer leaf are paths for water penetration,and they must be repaired before insulationtakes place. If they are only minor (hairline)cracks, and the property is in a shelteredlocation, then it is possible to proceed with theinstallation.
11
Types of joint
Flush
Weather struck
Bucket handle orkeyed
recessed or raked
Flaking or spalling masonryThe property must not be insulated until the defective brickwork has been replaced.
Hollow renderRender may become detached from thebrickwork, but still appear to be normal. Tapthe render and listen for a hollow sound.Drilling hollow render is liable to crack therender and it could fall off.
Cracked or crazed renderingIf the external rendering is cracked or spallingin places, advise the customer that it must berectified before CWI takes place.
Weathering details
A number of building details need to bechecked before you can safely say that theproperty is suitable for CWI, in accordance withthe Agrément Certificate or BS 5618.
The following illustrations give some commonexamples, but it is not possible to show everykind of detail that you will come across.
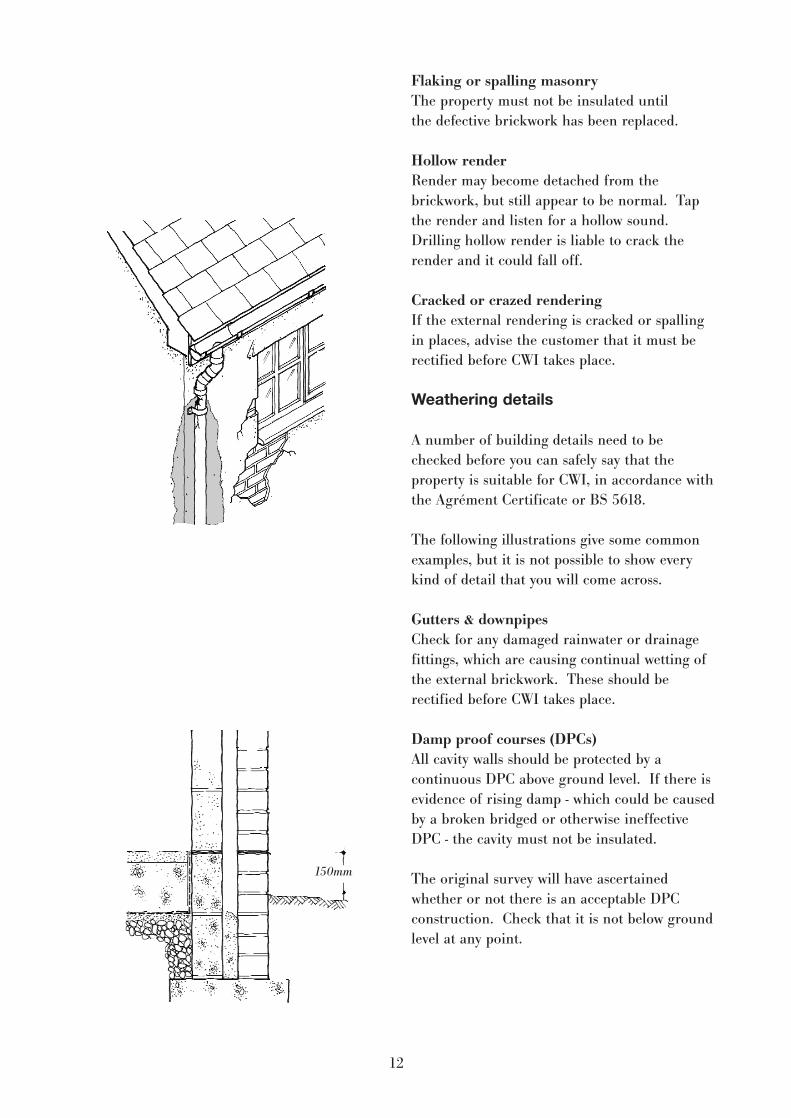
Gutters & downpipesCheck for any damaged rainwater or drainagefittings, which are causing continual wetting ofthe external brickwork. These should berectified before CWI takes place.
Damp proof courses (DPCs)All cavity walls should be protected by a continuous DPC above ground level. If there isevidence of rising damp - which could be causedby a broken bridged or otherwise ineffectiveDPC - the cavity must not be insulated.
The original survey will have ascertainedwhether or not there is an acceptable DPCconstruction. Check that it is not below groundlevel at any point.
12
150mm
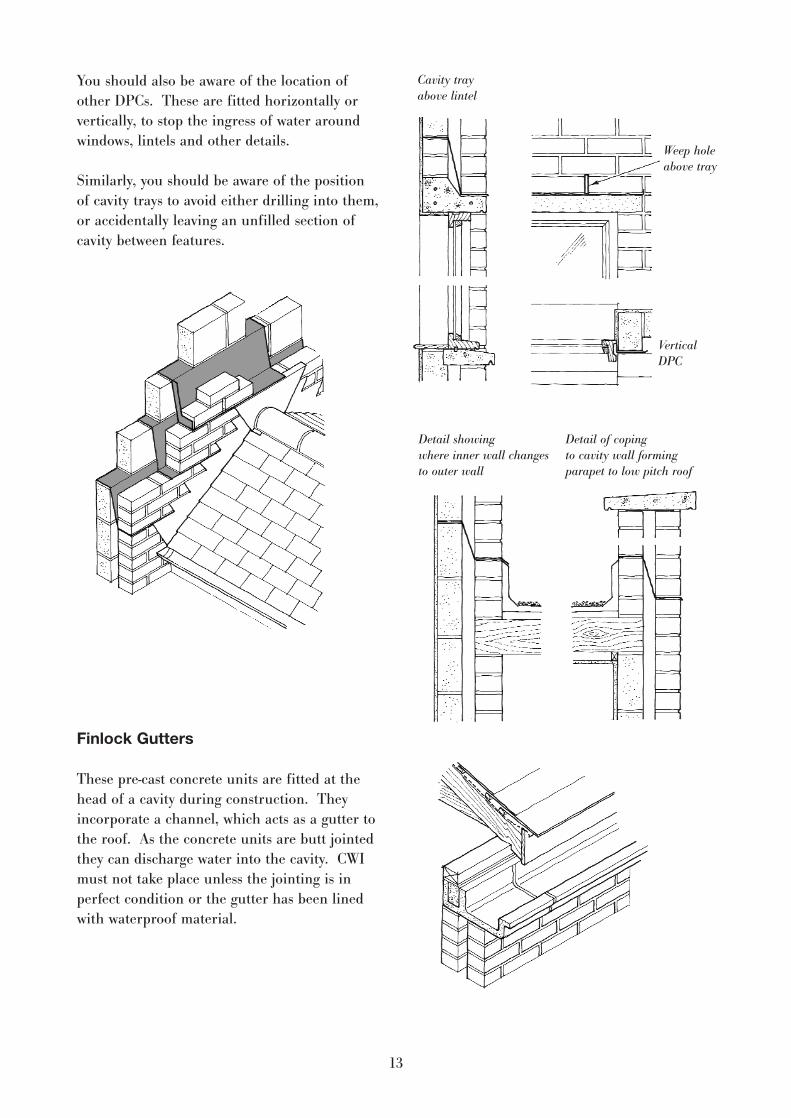
You should also be aware of the location ofother DPCs. These are fitted horizontally orvertically, to stop the ingress of water aroundwindows, lintels and other details.
Similarly, you should be aware of the positionof cavity trays to avoid either drilling into them,or accidentally leaving an unfilled section ofcavity between features.
Finlock Gutters
These pre-cast concrete units are fitted at thehead of a cavity during construction. Theyincorporate a channel, which acts as a gutter tothe roof. As the concrete units are butt jointedthey can discharge water into the cavity. CWImust not take place unless the jointing is inperfect condition or the gutter has been linedwith waterproof material.
13
Cavity trayabove lintel
Detail of copingto cavity wall formingparapet to low pitch roof
Detail showingwhere inner wall changesto outer wall
Weep holeabove tray
VerticalDPC
PRE-INTERNAL CHECKS
To carry out your internal checks, you will needa ladder, a torch and mineral wool quilt. Makesure you have clean overalls, and remove anydirty footwear before entering the property.
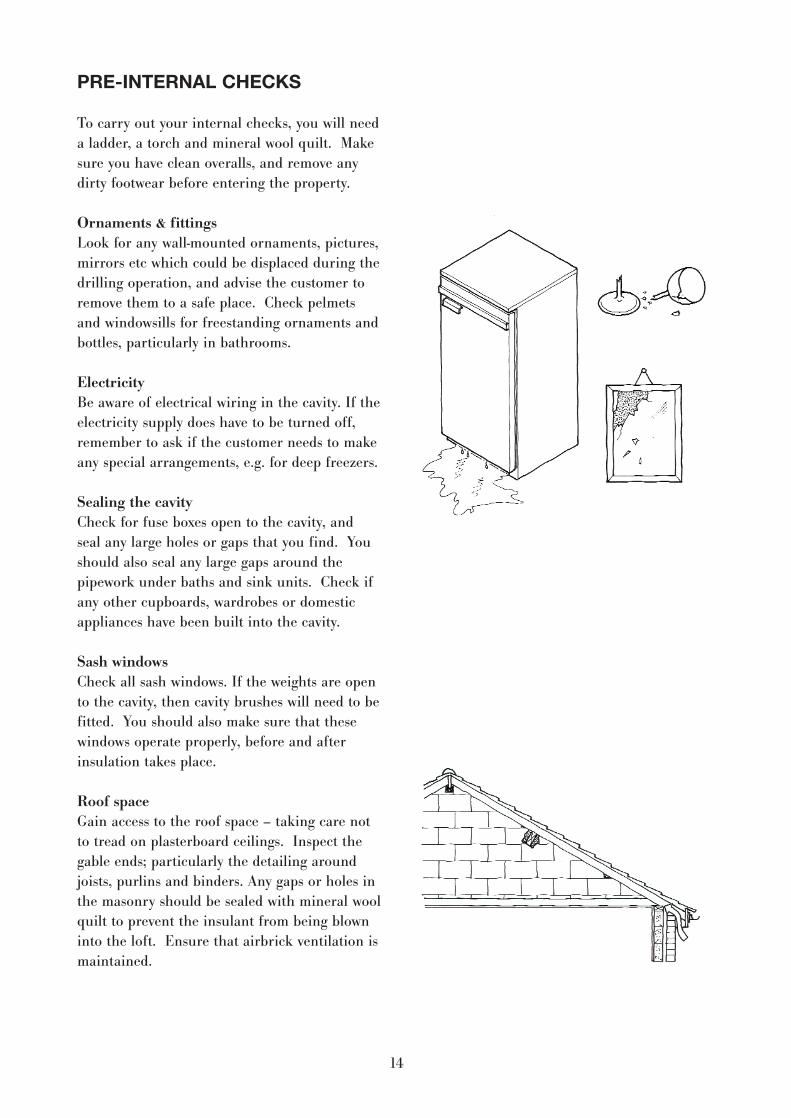
Ornaments & fittingsLook for any wall-mounted ornaments, pictures,mirrors etc which could be displaced during thedrilling operation, and advise the customer toremove them to a safe place. Check pelmetsand windowsills for freestanding ornaments andbottles, particularly in bathrooms.
ElectricityBe aware of electrical wiring in the cavity. If theelectricity supply does have to be turned off,remember to ask if the customer needs to makeany special arrangements, e.g. for deep freezers.
Sealing the cavityCheck for fuse boxes open to the cavity, andseal any large holes or gaps that you find. Youshould also seal any large gaps around thepipework under baths and sink units. Check ifany other cupboards, wardrobes or domesticappliances have been built into the cavity.
Sash windowsCheck all sash windows. If the weights are opento the cavity, then cavity brushes will need to befitted. You should also make sure that thesewindows operate properly, before and afterinsulation takes place.
Roof spaceGain access to the roof space – taking care notto tread on plasterboard ceilings. Inspect thegable ends; particularly the detailing aroundjoists, purlins and binders. Any gaps or holes inthe masonry should be sealed with mineral woolquilt to prevent the insulant from being blowninto the loft. Ensure that airbrick ventilation ismaintained.
14
Whilst you have access to the roof space, checkthe gable apex for signs of timber frame walls,or non-traditional wall construction (See Page 7:Other forms of construction).
Also take the opportunity to look for signs ofloft condensation, which can be detected on theunderside of the roof sarking felt. The cause ofloft condensation is usually poor ventilation. Ifit is in evidence, advise the customer and recordit on your work sheet.
Dampness & condensation
Ask the customer if there have been anyproblems with rising damp or damp penetrationin the property.
Look for any visible signs during yourinspection.
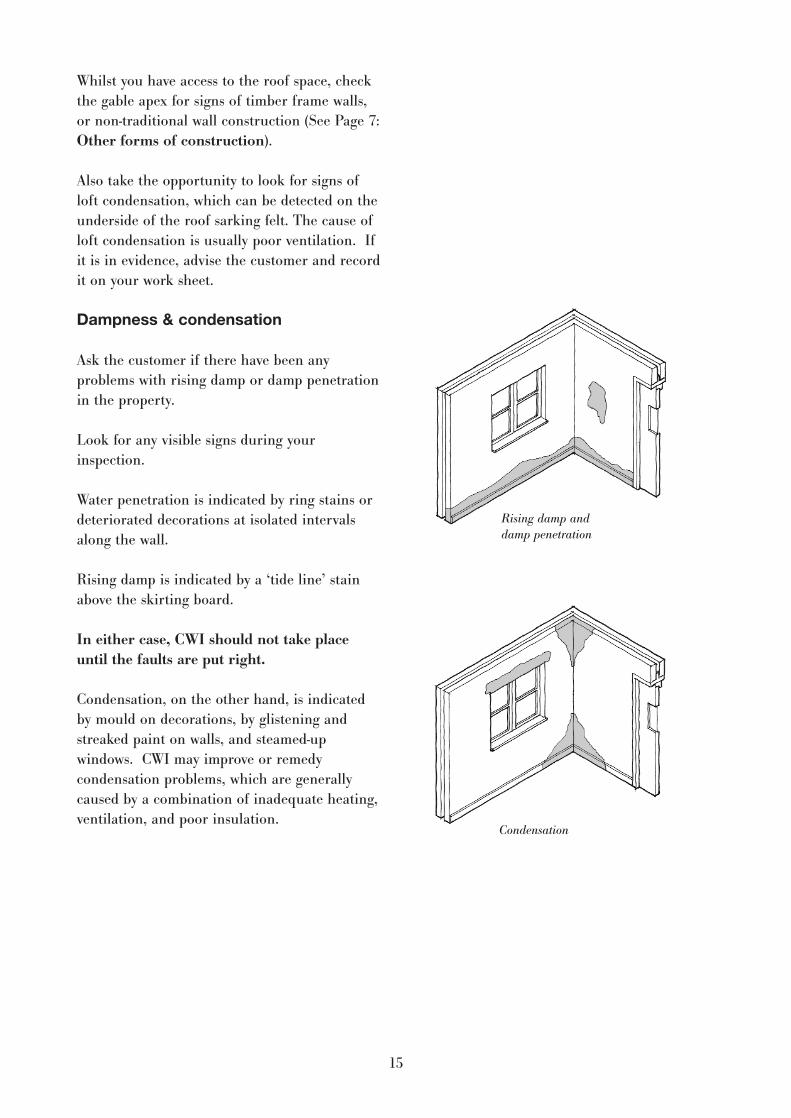
Water penetration is indicated by ring stains ordeteriorated decorations at isolated intervalsalong the wall.
Rising damp is indicated by a ‘tide line’ stainabove the skirting board.
In either case, CWI should not take placeuntil the faults are put right.
Condensation, on the other hand, is indicatedby mould on decorations, by glistening andstreaked paint on walls, and steamed-upwindows. CWI may improve or remedycondensation problems, which are generallycaused by a combination of inadequate heating,ventilation, and poor insulation.
15
Rising damp anddamp penetration
Condensation
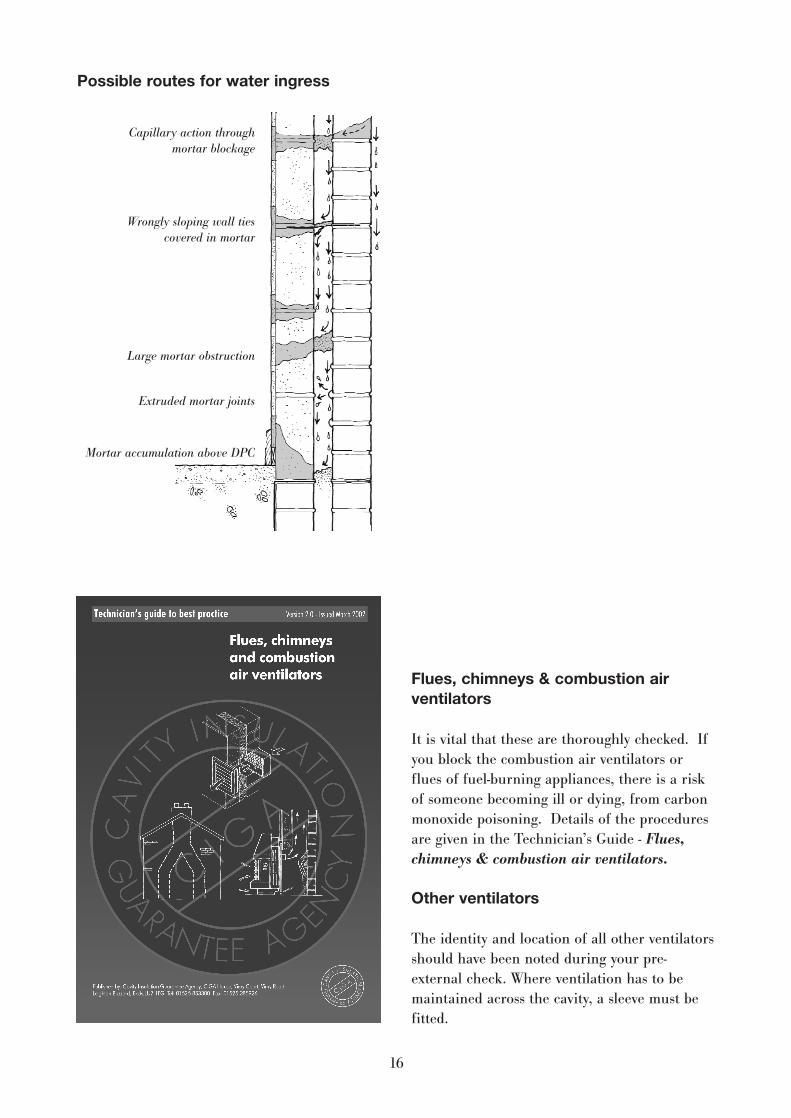
Possible routes for water ingress
Flues, chimneys & combustion airventilators
It is vital that these are thoroughly checked. Ifyou block the combustion air ventilators orflues of fuel-burning appliances, there is a riskof someone becoming ill or dying, from carbonmonoxide poisoning. Details of the proceduresare given in the Technician’s Guide - Flues,chimneys & combustion air ventilators.
Other ventilators
The identity and location of all other ventilatorsshould have been noted during your pre-external check. Where ventilation has to bemaintained across the cavity, a sleeve must befitted.
16
Capillary action throughmortar blockage
Wrongly sloping wall tiescovered in mortar
Large mortar obstruction
Extruded mortar joints
Mortar accumulation above DPC
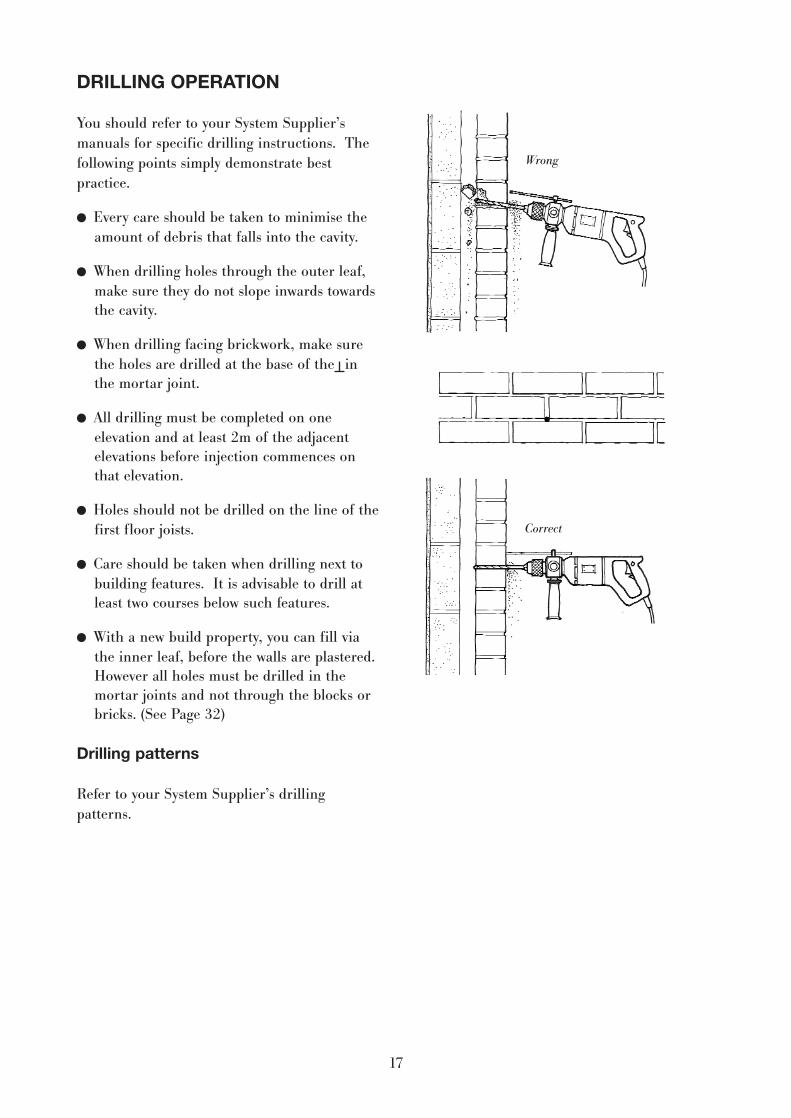
DRILLING OPERATION
You should refer to your System Supplier’smanuals for specific drilling instructions. Thefollowing points simply demonstrate bestpractice.
� Every care should be taken to minimise the amount of debris that falls into the cavity.
� When drilling holes through the outer leaf, make sure they do not slope inwards towards the cavity.
� When drilling facing brickwork, make sure the holes are drilled at the base of the in the mortar joint.
� All drilling must be completed on oneelevation and at least 2m of the adjacent elevations before injection commences on that elevation.
� Holes should not be drilled on the line of the first floor joists.
� Care should be taken when drilling next to building features. It is advisable to drill at least two courses below such features.
� With a new build property, you can fill via the inner leaf, before the walls are plastered. However all holes must be drilled in the mortar joints and not through the blocks or bricks. (See Page 32)
Drilling patterns
Refer to your System Supplier’s drillingpatterns.
17
Wrong
Correct
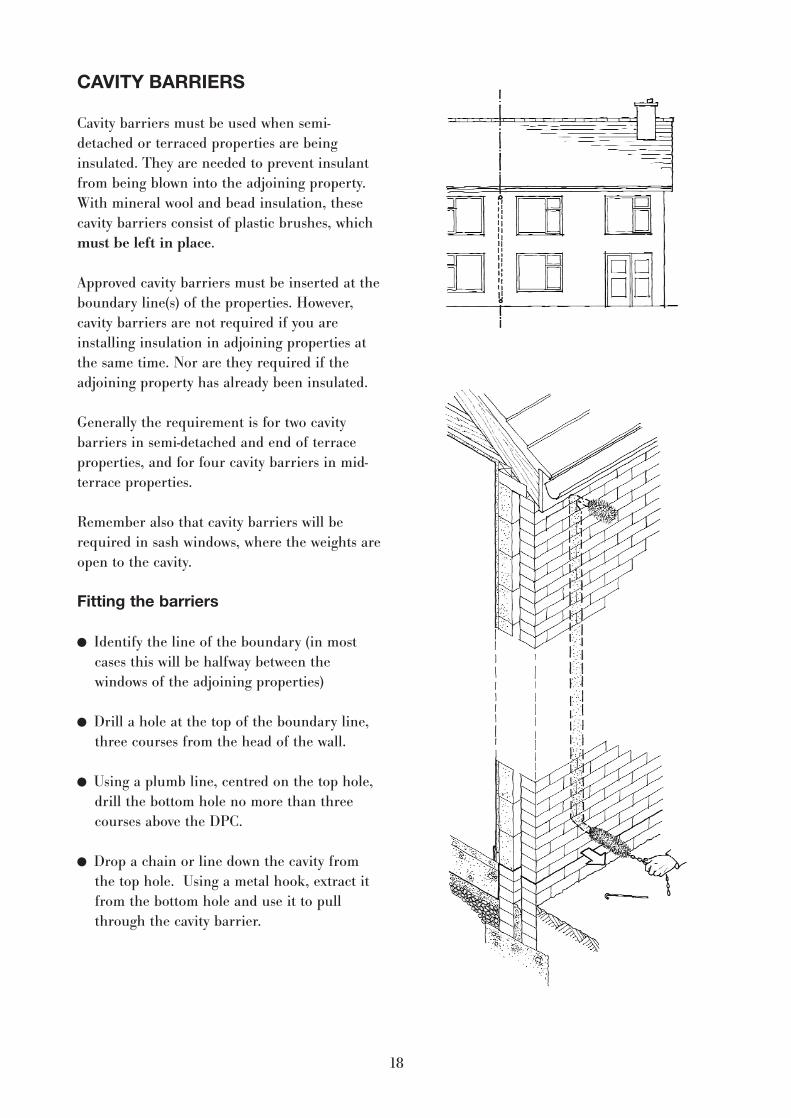
CAVITY BARRIERS
Cavity barriers must be used when semi-detached or terraced properties are beinginsulated. They are needed to prevent insulantfrom being blown into the adjoining property.With mineral wool and bead insulation, thesecavity barriers consist of plastic brushes, whichmust be left in place.
Approved cavity barriers must be inserted at theboundary line(s) of the properties. However,cavity barriers are not required if you areinstalling insulation in adjoining properties atthe same time. Nor are they required if theadjoining property has already been insulated.
Generally the requirement is for two cavitybarriers in semi-detached and end of terraceproperties, and for four cavity barriers in mid-terrace properties.
Remember also that cavity barriers will berequired in sash windows, where the weights areopen to the cavity.
Fitting the barriers
� Identify the line of the boundary (in most cases this will be halfway between the windows of the adjoining properties)
� Drill a hole at the top of the boundary line, three courses from the head of the wall.
� Using a plumb line, centred on the top hole, drill the bottom hole no more than three courses above the DPC.
� Drop a chain or line down the cavity from the top hole. Using a metal hook, extract it from the bottom hole and use it to pull through the cavity barrier.
18
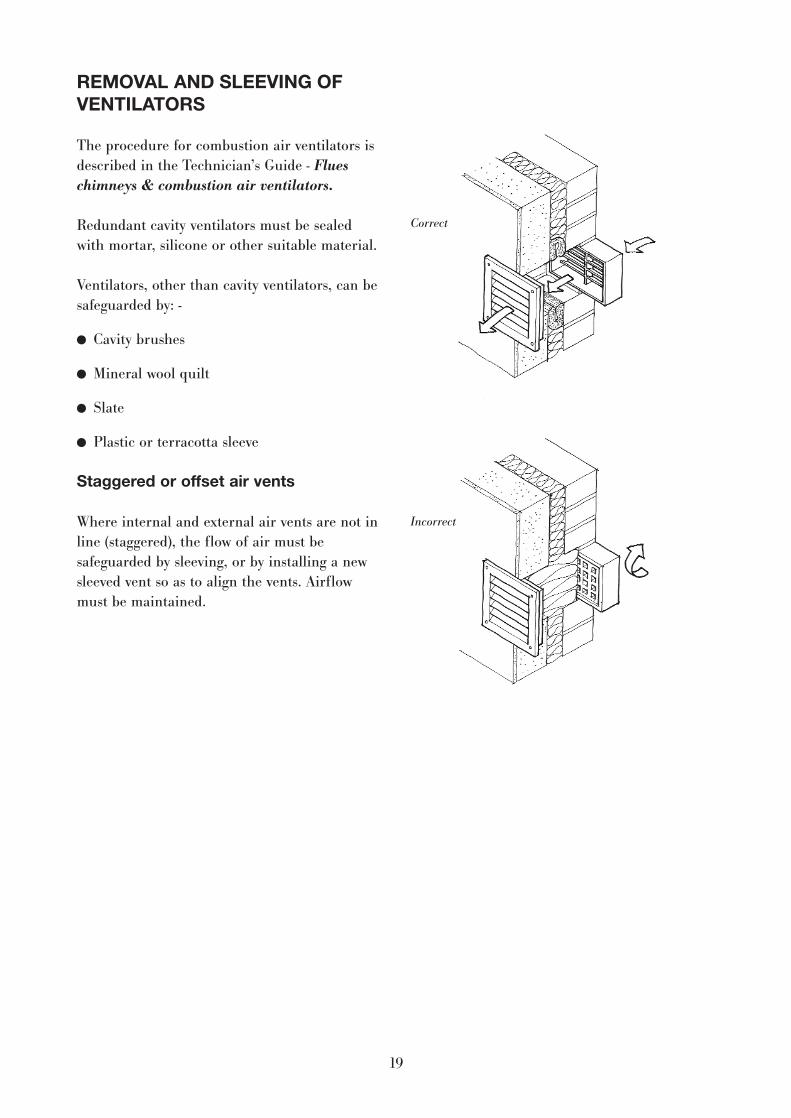
REMOVAL AND SLEEVING OFVENTILATORS
The procedure for combustion air ventilators isdescribed in the Technician’s Guide - Flueschimneys & combustion air ventilators.
Redundant cavity ventilators must be sealedwith mortar, silicone or other suitable material.
Ventilators, other than cavity ventilators, can besafeguarded by: -
� Cavity brushes
� Mineral wool quilt
� Slate
� Plastic or terracotta sleeve
Staggered or offset air vents
Where internal and external air vents are not inline (staggered), the flow of air must besafeguarded by sleeving, or by installing a newsleeved vent so as to align the vents. Airflowmust be maintained.
19
Correct
Incorrect
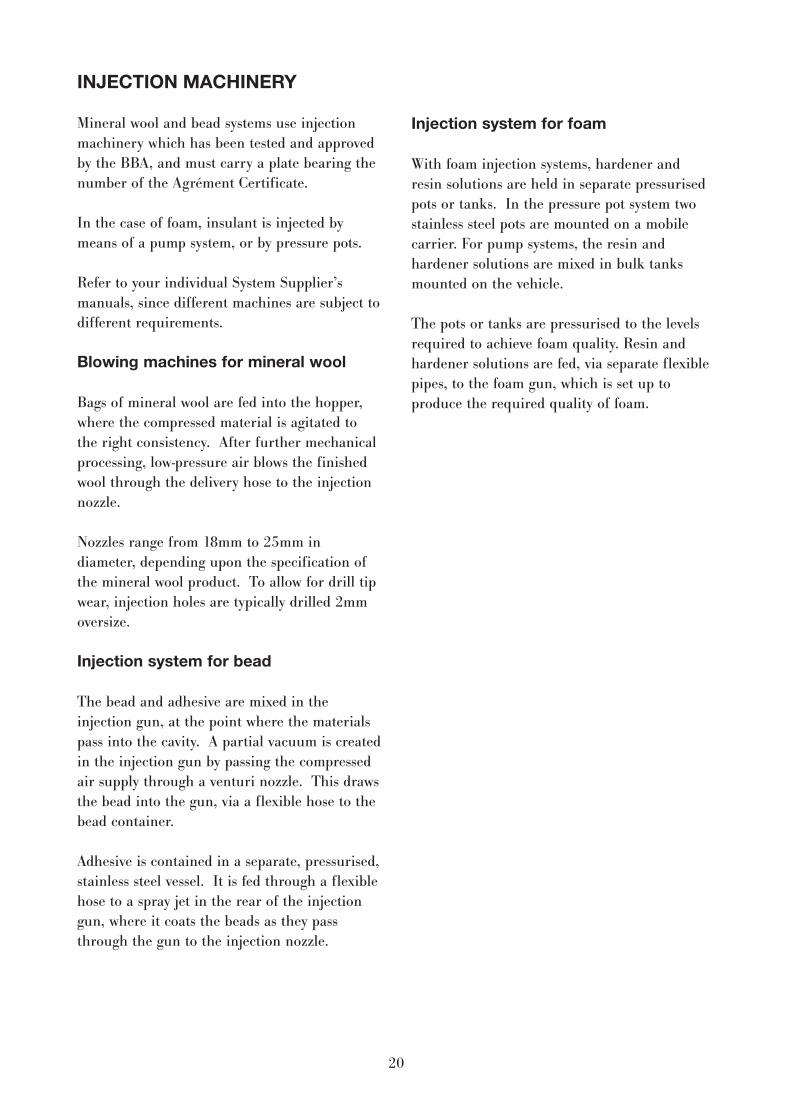
INJECTION MACHINERY
Mineral wool and bead systems use injectionmachinery which has been tested and approvedby the BBA, and must carry a plate bearing thenumber of the Agrément Certificate.
In the case of foam, insulant is injected bymeans of a pump system, or by pressure pots.
Refer to your individual System Supplier’smanuals, since different machines are subject todifferent requirements.
Blowing machines for mineral wool
Bags of mineral wool are fed into the hopper,where the compressed material is agitated tothe right consistency. After further mechanicalprocessing, low-pressure air blows the finishedwool through the delivery hose to the injectionnozzle.
Nozzles range from 18mm to 25mm indiameter, depending upon the specification ofthe mineral wool product. To allow for drill tipwear, injection holes are typically drilled 2mmoversize.
Injection system for bead
The bead and adhesive are mixed in theinjection gun, at the point where the materialspass into the cavity. A partial vacuum is createdin the injection gun by passing the compressedair supply through a venturi nozzle. This drawsthe bead into the gun, via a flexible hose to thebead container.
Adhesive is contained in a separate, pressurised,stainless steel vessel. It is fed through a flexiblehose to a spray jet in the rear of the injectiongun, where it coats the beads as they passthrough the gun to the injection nozzle.
Injection system for foam
With foam injection systems, hardener andresin solutions are held in separate pressurisedpots or tanks. In the pressure pot system twostainless steel pots are mounted on a mobilecarrier. For pump systems, the resin andhardener solutions are mixed in bulk tanksmounted on the vehicle.
The pots or tanks are pressurised to the levelsrequired to achieve foam quality. Resin andhardener solutions are fed, via separate flexiblepipes, to the foam gun, which is set up toproduce the required quality of foam.
20
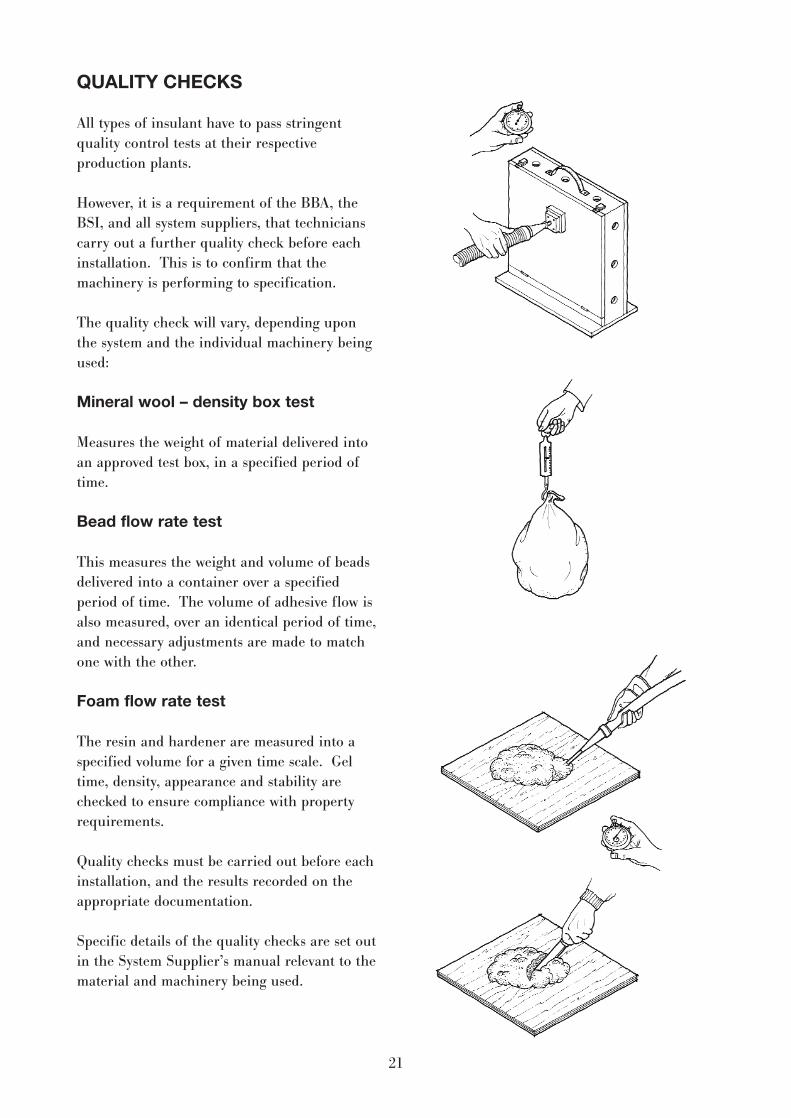
QUALITY CHECKS
All types of insulant have to pass stringentquality control tests at their respectiveproduction plants.
However, it is a requirement of the BBA, theBSI, and all system suppliers, that technicianscarry out a further quality check before eachinstallation. This is to confirm that themachinery is performing to specification.
The quality check will vary, depending uponthe system and the individual machinery beingused:
Mineral wool – density box test
Measures the weight of material delivered intoan approved test box, in a specified period oftime.
Bead flow rate test
This measures the weight and volume of beadsdelivered into a container over a specifiedperiod of time. The volume of adhesive flow isalso measured, over an identical period of time,and necessary adjustments are made to matchone with the other.
Foam flow rate test
The resin and hardener are measured into aspecified volume for a given time scale. Geltime, density, appearance and stability arechecked to ensure compliance with propertyrequirements.
Quality checks must be carried out before eachinstallation, and the results recorded on theappropriate documentation.
Specific details of the quality checks are set outin the System Supplier’s manual relevant to thematerial and machinery being used.
21
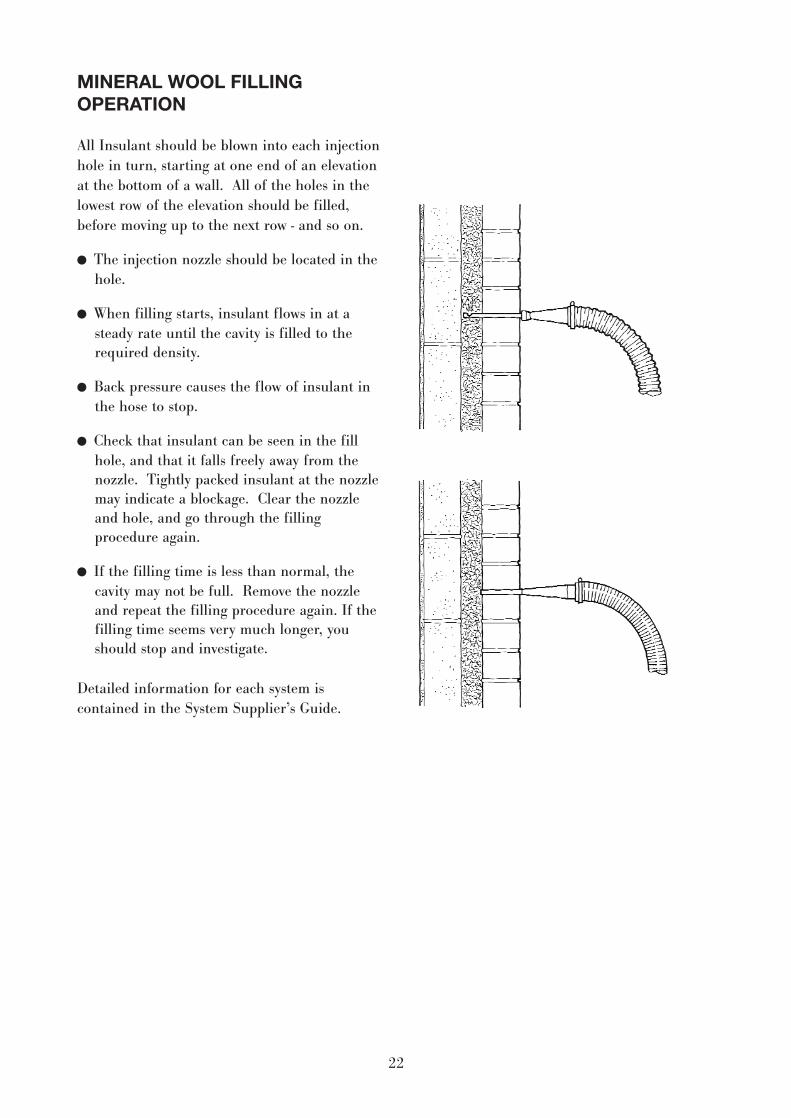
MINERAL WOOL FILLINGOPERATION
All Insulant should be blown into each injectionhole in turn, starting at one end of an elevationat the bottom of a wall. All of the holes in thelowest row of the elevation should be filled,before moving up to the next row - and so on.
� The injection nozzle should be located in the hole.
� When filling starts, insulant flows in at a steady rate until the cavity is filled to the required density.
� Back pressure causes the flow of insulant in the hose to stop.
� Check that insulant can be seen in the fill hole, and that it falls freely away from the nozzle. Tightly packed insulant at the nozzle may indicate a blockage. Clear the nozzle and hole, and go through the filling procedure again.
� If the filling time is less than normal, the cavity may not be full. Remove the nozzle and repeat the filling procedure again. If the filling time seems very much longer, you should stop and investigate.
Detailed information for each system iscontained in the System Supplier’s Guide.
22

POLYSTYRENE BEAD FILLINGOPERATION
The insulation should be injected into eachhole in turn. Start at the bottom corner, andcontinue around the building filling the lowestline of holes – located just below window cills.All of the holes in the lowest row of theelevation should be filled, before moving up tothe next row - and so on.
It is not necessary to fill gable peaks, unlessthey form part of a heated living space. If thatis the case, the drilling and filling processshould be extended to the apex of the gablewalls.
� The injection nozzle should be inserted to a depth of 100mm into each hole.
� Turn on the compressed air. When you can see the beads flowing through the clear section of the hose, turn on the adhesive valve.
� The mixture of beads and adhesive flow into the cavity, building up to form a cohesive mass.
� When the cavity is full, back pressure will stop the flow of beads, at which point the adhesive valve should be closed.
Detailed information for each system iscontained in the System Supplier’s Guide.
23
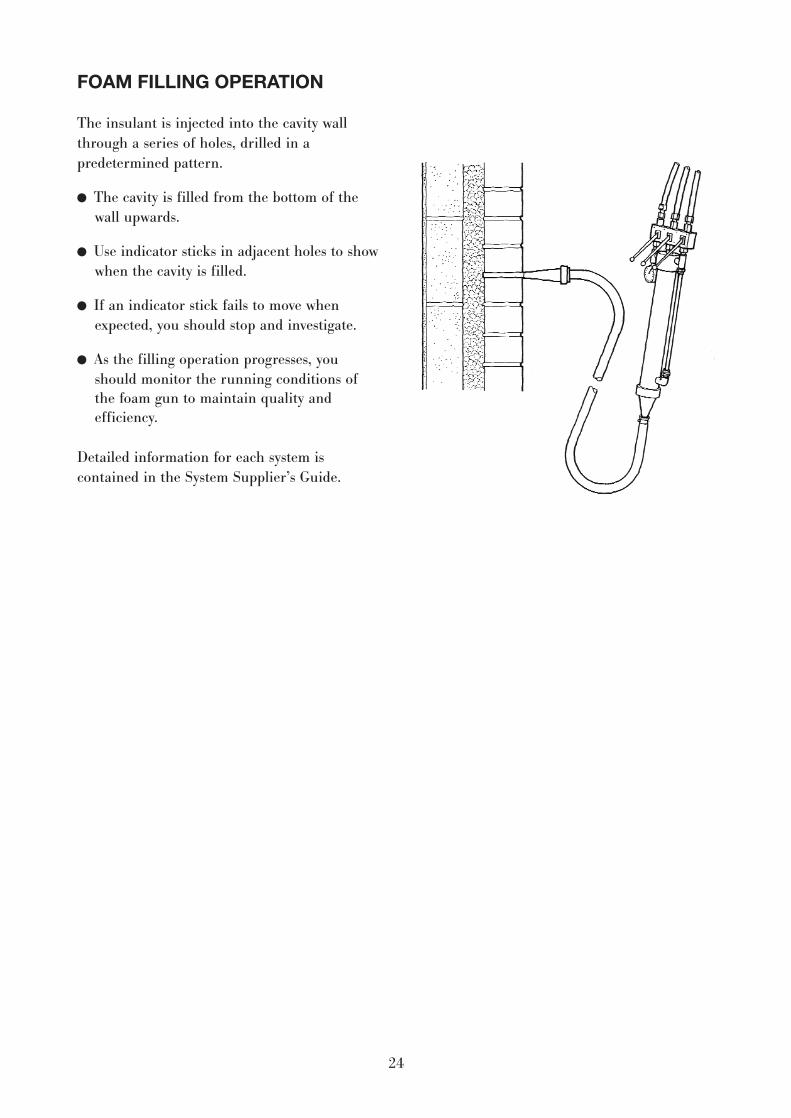
FOAM FILLING OPERATION
The insulant is injected into the cavity wallthrough a series of holes, drilled in apredetermined pattern.
� The cavity is filled from the bottom of the wall upwards.
� Use indicator sticks in adjacent holes to show when the cavity is filled.
� If an indicator stick fails to move when expected, you should stop and investigate.
� As the filling operation progresses, you should monitor the running conditions of the foam gun to maintain quality and efficiency.
Detailed information for each system iscontained in the System Supplier’s Guide.
24
MAKING GOOD
The importance of making good after theinstallation is completed, cannot be over-emphasised. Leaving the property in the samecondition that you found it is the best possibleadvertisement for the industry, and your bestsource of new business leads.
Making good holes
You will need a rubber bucket, a trowel, a hawk,and jointing tools. A mortar mix should bemade up before the filling operation begins.That way, the preceding hole can be made goodwhilst the next one is being filled. It also allowsadjustments to be made to the colour.
Make sure the customer understands thatmaking good can never be an exact match,particularly where paints are to be used.
Clean down walls, windows and woodwork toremove any loose insulant and drilling dust.
Mortar should be mixed:� 1 : 1 : 6 cement lime sand� 1 : 4 cement sandPlasticiser or surfactant should not be used.
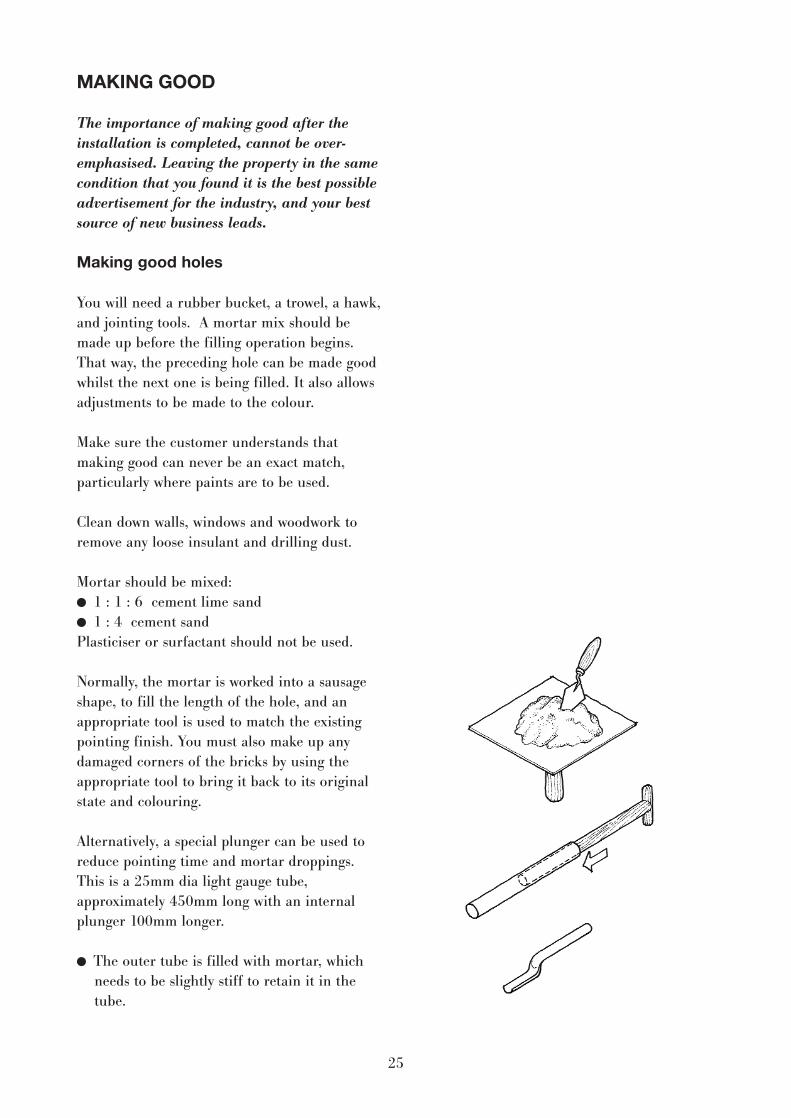
Normally, the mortar is worked into a sausageshape, to fill the length of the hole, and anappropriate tool is used to match the existingpointing finish. You must also make up anydamaged corners of the bricks by using theappropriate tool to bring it back to its originalstate and colouring.
Alternatively, a special plunger can be used toreduce pointing time and mortar droppings.This is a 25mm dia light gauge tube,approximately 450mm long with an internalplunger 100mm longer.
� The outer tube is filled with mortar, which needs to be slightly stiff to retain it in the tube.
25
� More than one tube can be used; allowing you to point up eight or nine holes, which would be sufficient for the area you can reach from a ladder.
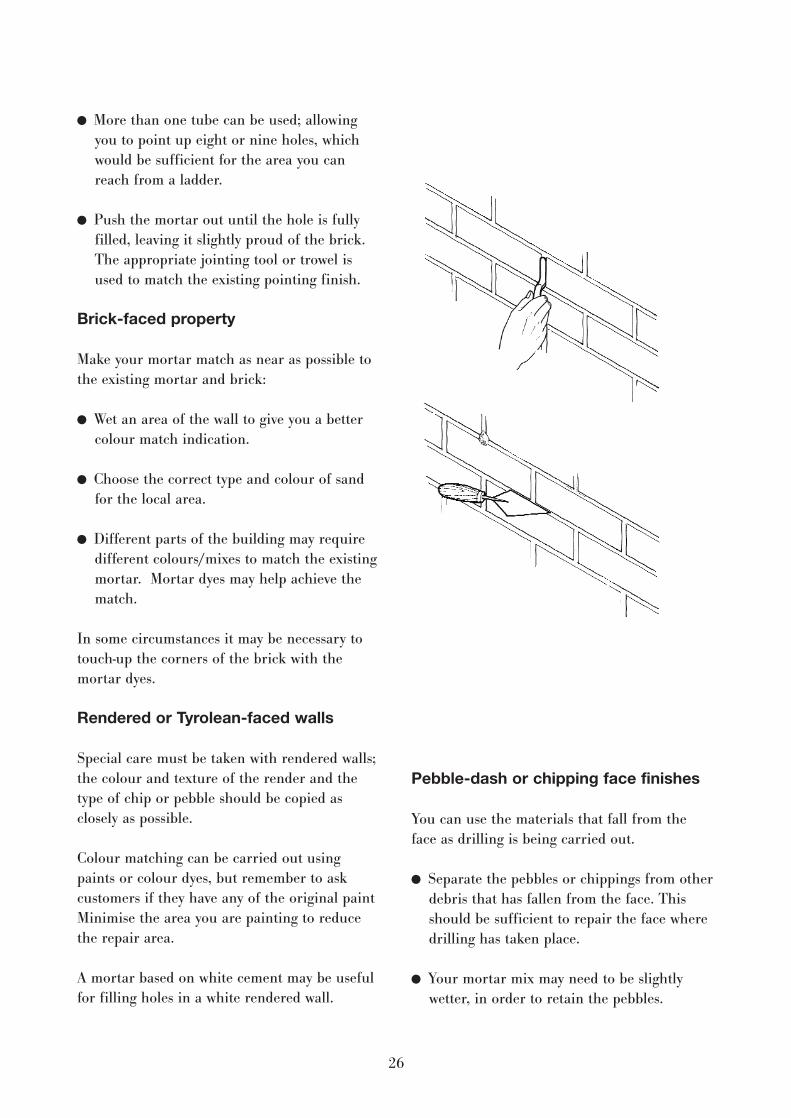
� Push the mortar out until the hole is fully filled, leaving it slightly proud of the brick. The appropriate jointing tool or trowel is used to match the existing pointing finish.
Brick-faced property
Make your mortar match as near as possible tothe existing mortar and brick:
� Wet an area of the wall to give you a better colour match indication.
� Choose the correct type and colour of sand for the local area.
� Different parts of the building may require different colours/mixes to match the existingmortar. Mortar dyes may help achieve the match.
In some circumstances it may be necessary totouch-up the corners of the brick with themortar dyes.
Rendered or Tyrolean-faced walls
Special care must be taken with rendered walls;the colour and texture of the render and thetype of chip or pebble should be copied asclosely as possible.
Colour matching can be carried out usingpaints or colour dyes, but remember to askcustomers if they have any of the original paintMinimise the area you are painting to reducethe repair area.
A mortar based on white cement may be usefulfor filling holes in a white rendered wall.
Pebble-dash or chipping face finishes
You can use the materials that fall from theface as drilling is being carried out.
� Separate the pebbles or chippings from other debris that has fallen from the face. This should be sufficient to repair the face where drilling has taken place.
� Your mortar mix may need to be slightly wetter, in order to retain the pebbles.
26
POST-INTERNAL CHECKS
Remove dirty clothing and footwear, beforeentering the house.
It is vital to carry out post-installation checkson all fuel-burning appliances located onexternal walls, together with their flues,chimneys and combustion air ventilators.Refer to the Technician’s Guide – Flues,chimneys & combustion air ventilators.
� Check the whole building to ensure no insulant has entered. If any insulant has entered the building or roof space - clear it away!
� Make sure that sash windows operate correctly. Check that there is no insulant in the sash boxes to prevent free movement of the weight.
� Check that your operations have not caused any damage. Take any remedial action possible to prevent further damage, record this on your job card and report back to yourcompany.
� Ensure all electrical circuits and appliances are reinstated.
� Make sure that all sliding ventilators are left open.
� Replace any ornaments, mirrors etc which you removed from walls, shelves and pelmets.
27
POST-EXTERNAL CHECKS
After you have made good, and beforeequipment is stowed away, the installation teamshould make a final check to ensure that:
� All drilled holes have been pointed.
� The colour match is satisfactory.
� All dust has been washed or blown off all window ledges and painted surfaces.
� All ventilators are clear of insulant
� Nothing has been left, and any tea cups etc., are returned to the customer.
� Paths and work area are swept, and there is no loose insulant.
Have a last look round the property for anydamage caused by the installation. Take whatremedial action you can, and bring it to thecustomer’s attention. Record any remedialaction on your work order card and informyour supervisor on return to depot.
Once you are sure that everything is satisfactoryand left as it was found, ask the customer tosign your paperwork.
28
INSTALLED DENSITY CHECKS
Mineral wool
How to calculate installed density
density = material usage (kg)volume (m3)
material (kg) = No of bales x weight of bale (kg)
Volume (m3) = net area (m2) x cavity width (m)
Cavity widths can vary considerably, not onlyfrom building to building, but also throughoutthe building.
At least ten cavity width measurements shouldbe made at various places, throughout thebuilding, to give an accurate calculation.
Refer to your individual Systems Supplier’smanuals for specific density checks.
Foam
A sample of foam generated at each installationis kept and tested in accordance with BS 5617.
29
HEALTH & SAFETY
The Health and Safety at Work Act states that itis the duty of every employer to ensure, as far asis reasonably practical, the health and safety atwork of all employees.
It is also the duty of employees to takereasonable care of their health and safety, andto comply with safety regulations.
Acquaint yourself with your company’s currentsafety policy manual. All aspects of safety mustconform to the current Health & Safety at WorkAct regulations
Installation equipment
� Ensure safety systems, including guards, are fitted and in place
� Take care when removing wrapping from bales and filling hopper
� Disconnect the electrical supply when working on equipment.
Protective clothes
The following must be worn during drilling andfilling:
� Protective clothing
� Goggles
� Hard hat
� Dust mask
� Ear defenders
� Gloves
� Protective footwear
Handling material
� Take care when handling all materials
� Wear a dust mask
� acquaint yourself with the health & safety information on the material packaging, and follow all advice.
Compressed air
� Check safety valves weekly
� Replace any split hoses immediately
� Use only correctly sized couplings
� Make sure all valves and fittings are in good condition
� Only competent persons should work on pressure vessels.
Ladders
Must be:
� In good repair
� Checked regularly, repaired and replaced.
� Properly secured.
� Used at correct angles
Pipes and cables
Where pipes and cables cross a public right ofway, such as a footpath, place warning noticesand bridge over the pipes so as to avoid triphazards
Hand care
All technicians should use appropriate barrieror hand creams, to avoid dermatitis and crackedhands.
30
CUSTOMER CARE
The following points may seem so obvious as tobe trivial but remember this: as far as thecustomer is concerned, this is their firstexperience of CWI. You will be judged on whatis important to them – not what matters to you.
� Check you are at the right address, and identify yourself – showing the necessary credentials.
� Talk to the customer personally, without being over-familiar. Customers like their names being used.
� Don’t park vehicles on the customer’s drive without permission.
� Explain to the customer what you intend to do before you start work.
� Remind the customer that you will need access to the building, and what you have to do inside. To you it may be just a property, but to them it’s their home.
� Advise the customer of any precautions needed e.g., removal of ornaments etc., from window sills, desk tops etc.
� Remove all ornaments, above, if the customeris unable to do so.
� If it is a semi-detached house or flat, ask if the neighbours are aware of the work being carried out. If they are not, then let them know what is happening.
� Ask customers and neighbours to move cars, washing or items of property that may be affected by dust. Advise them to close windows.
� Put down dust sheets where required.
� If working in a garage remove items from shelves affected by the work. Make sure theseare replaced.
� Clear up any mess as soon as possible.
� Ask permission if you need to use the customer’s toilet facilities.
� Try not to get involved in any arguments withthe customer, or respond negatively to any complaints or criticism.
� Avoid criticism of other companies.
� Point out any problems or defects to the customer before starting the work.
� If you use towers, ladders, planks scaffolding etc., explain to the customer what you are doing and why.
� Take care with garden plants and lawns. Use planks or boards where necessary.
� If the work being carried out varies from what the customer was originally told, be sure to fully explain why.
� If any damage is caused, however small, inform the customer and report the matter to your company. Tell the customer that the matter will be dealt with appropriately.
� If the customer complains you should record their complaint and refer the matter back to your company with the assurance that it will be dealt with quickly.
� If customers ask about a guarantee, tell them this is issued by the Cavity Insulation Guarantee Agency (CIGA) which will send the guarantee certificate directly to the customer within four to six weeks.
� Ask the customer to examine and inspect the work carried out and sign any appropriate compliance or satisfaction notes etc.
31
BUILDINGS UNDERCONSTRUCTION
Although CIGA guarantees are not currentlyissued to new build, the building must besurveyed in accordance with the Survey Form(shown on page 33).
Injection must not be undertaken until allcavities are sealed. Internal installation shouldpreferably take place before the walls areplastered.
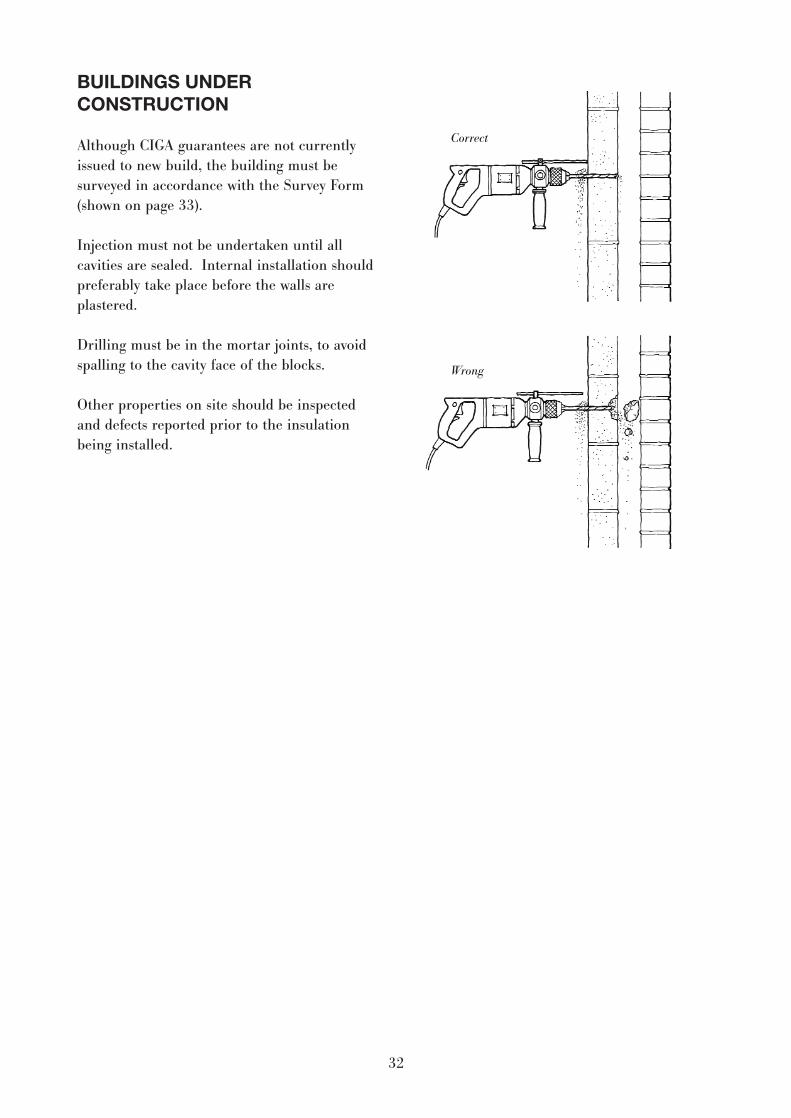
Drilling must be in the mortar joints, to avoidspalling to the cavity face of the blocks.
Other properties on site should be inspectedand defects reported prior to the insulationbeing installed.
32
Wrong
Correct
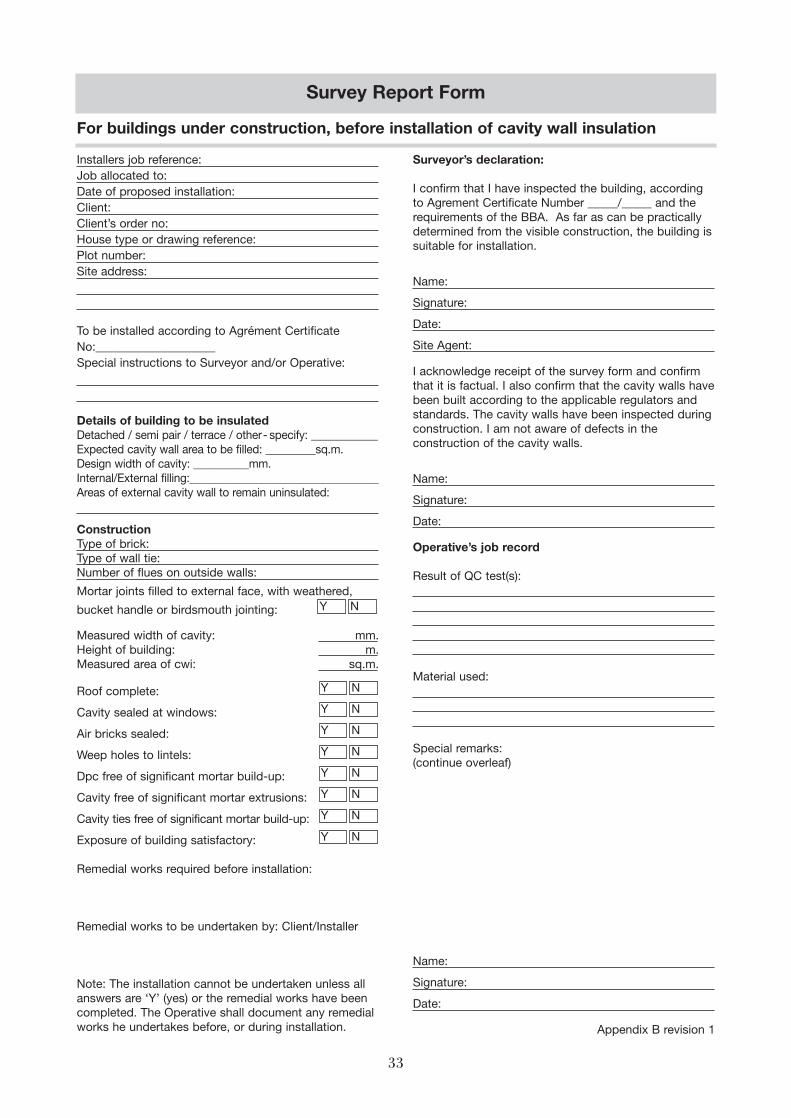
Installers job reference:Job allocated to:Date of proposed installation:Client:Client’s order no:House type or drawing reference: Plot number:Site address:
To be installed according to Agrément CertificateNo:____________________Special instructions to Surveyor and/or Operative:
Details of building to be insulatedDetached / semi pair / terrace / other- specify: ____________Expected cavity wall area to be filled: _________sq.m.Design width of cavity: __________mm.Internal/External filling:__________________________________Areas of external cavity wall to remain uninsulated:
ConstructionType of brick:Type of wall tie:Number of flues on outside walls:
Mortar joints filled to external face, with weathered,
bucket handle or birdsmouth jointing:
Measured width of cavity: mm.Height of building: m.Measured area of cwi: sq.m.
Roof complete:
Cavity sealed at windows:
Air bricks sealed:
Weep holes to lintels:
Dpc free of significant mortar build-up:
Cavity free of significant mortar extrusions:
Cavity ties free of significant mortar build-up:
Exposure of building satisfactory:
Remedial works required before installation:
Remedial works to be undertaken by: Client/Installer
Note: The installation cannot be undertaken unless allanswers are ‘Y’ (yes) or the remedial works have beencompleted. The Operative shall document any remedialworks he undertakes before, or during installation.
Surveyor’s declaration:
I confirm that I have inspected the building, accordingto Agrement Certificate Number _____/_____ and therequirements of the BBA. As far as can be practicallydetermined from the visible construction, the building issuitable for installation.
Name:
Signature:
Date:
Site Agent:
I acknowledge receipt of the survey form and confirmthat it is factual. I also confirm that the cavity walls havebeen built according to the applicable regulators andstandards. The cavity walls have been inspected duringconstruction. I am not aware of defects in theconstruction of the cavity walls.
Name:
Signature:
Date:
Operative’s job record
Result of QC test(s):
Material used:
Special remarks:(continue overleaf)
Name:
Signature:
Date:
Appendix B revision 1
NY
NY
NY
NY
NY
NY
NY
NY
NY
33
Survey Report Form
For buildings under construction, before installation of cavity wall insulation
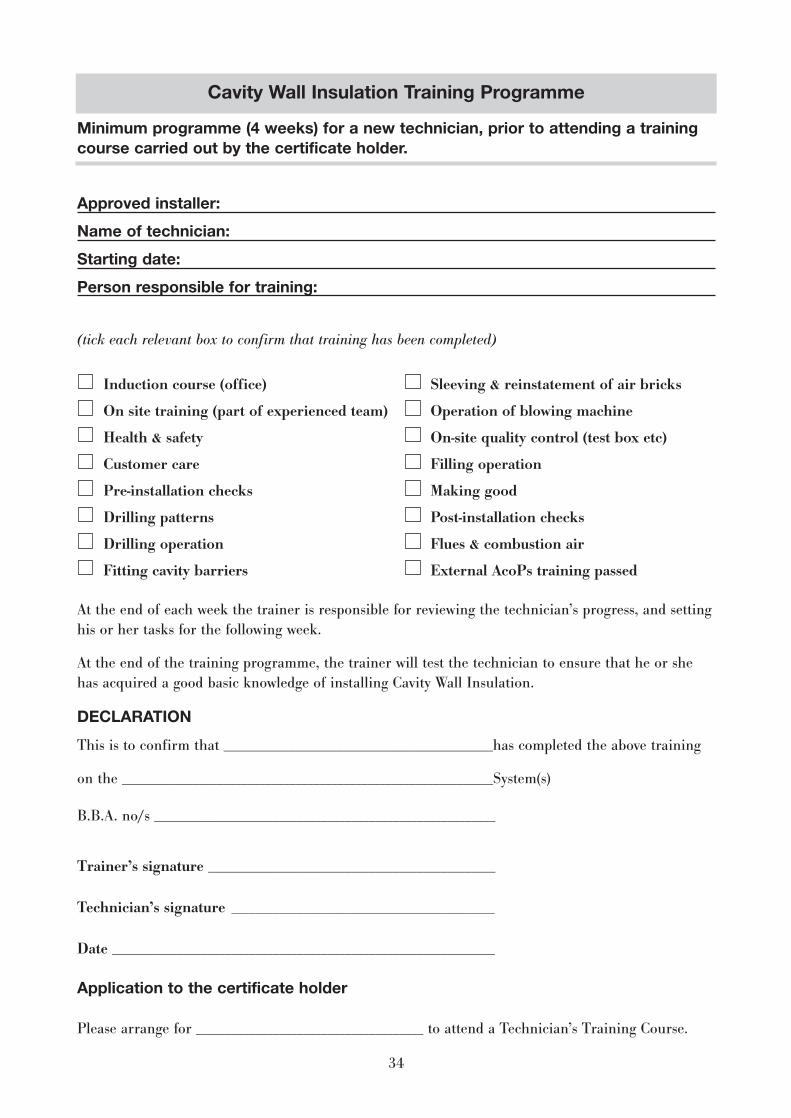
Approved installer:
Name of technician:
Starting date:
Person responsible for training:
(tick each relevant box to confirm that training has been completed)
At the end of each week the trainer is responsible for reviewing the technician’s progress, and settinghis or her tasks for the following week.
At the end of the training programme, the trainer will test the technician to ensure that he or shehas acquired a good basic knowledge of installing Cavity Wall Insulation.
DECLARATION
This is to confirm that _____________________________________________has completed the above training
on the ______________________________________________________________System(s)
B.B.A. no/s _________________________________________________________
Trainer’s signature ________________________________________________
Technician’s signature ____________________________________________
Date ________________________________________________________________
Application to the certificate holder
Please arrange for ______________________________________ to attend a Technician’s Training Course.
34
Cavity Wall Insulation Training Programme
Minimum programme (4 weeks) for a new technician, prior to attending a trainingcourse carried out by the certificate holder.
Induction course (office)
On site training (part of experienced team)
Health & safety
Customer care
Pre-installation checks
Drilling patterns
Drilling operation
Fitting cavity barriers
Sleeving & reinstatement of air bricks
Operation of blowing machine
On-site quality control (test box etc)
Filling operation
Making good
Post-installation checks
Flues & combustion air
External AcoPs training passed


This guide is published by the Cavity Insulation Guarantee Agency (CIGA), as a contribution to bestpractice in cavity wall insulation. Whilst every care has been taken in its preparation, CIGA and itsauthors specifically exclude any liability for errors and omissions or otherwise arising from thecontents of this guide. Readers must understand the principles and practices described in relation toany particular application and, where necessary, take professional advice.
© . . .All rights reserved. No part of this publication may be reproduced, stored in a retrieval system or transmitted in any form or by any means electronic,mechanical recording or otherwise without the prior written permission of the copyright holder.
Produced by [email protected]
£4.95