cashgame premium hud explained - hold'em manager€¦ · using a hud this complex isn't...
TRANSCRIPT

CashGame Premium HUD explained
Content Introduction ............................................................................................................................................................................................ 1
Removed/Replaced Stats ................................................................................................................................................................... 2
Using 2Bet/CC instead of VPIP/PFR ............................................................................................................................................... 3
Additional Stats...................................................................................................................................................................................... 4
Future Stats/Badges/Range Graphs .............................................................................................................................................. 4
Timing tell graphs ................................................................................................................................................................................. 4
Processor Speeds .................................................................................................................................................................................. 6
Editing........................................................................................................................................................................................................ 6
Setup .......................................................................................................................................................................................................... 7
The HUD ................................................................................................................................................................................................. 11
The Popups ............................................................................................................................................................................................ 12
2BET ..................................................................................................................................................................................................... 13
LIMP/CALL ........................................................................................................................................................................................ 13
Hands/Observed Hero ................................................................................................................................................................. 14
3BET IP ................................................................................................................................................................................................ 15
3BET OOP .......................................................................................................................................................................................... 15
4BET ..................................................................................................................................................................................................... 16
V STEAL .............................................................................................................................................................................................. 16
V 3BET ................................................................................................................................................................................................. 17
V 4BET ................................................................................................................................................................................................. 17
Post flop color coding .................................................................................................................................................................. 17
Flop HU SRP as PFR....................................................................................................................................................................... 18
Flop Multiway SRP as PFR .......................................................................................................................................................... 18
Flop HU 3BP as PFR ....................................................................................................................................................................... 19
2
Turn HU SRP as PFR ...................................................................................................................................................................... 19
Turn HU 3BP as PFR ...................................................................................................................................................................... 20
River HU SRP as PFR ..................................................................................................................................................................... 21
Flop HU SRP as PFC ...................................................................................................................................................................... 22
Flop Multiway SRP as PFC .......................................................................................................................................................... 22
Flop HU 3BP as PFC ...................................................................................................................................................................... 23
Turn HU SRP as PFC ...................................................................................................................................................................... 23
River HU as PFC .............................................................................................................................................................................. 25
River .................................................................................................................................................................................................... 27
Showdown ........................................................................................................................................................................................ 27
Range graphs ........................................................................................................................................................................................ 28
Modifying your HUD ......................................................................................................................................................................... 28
Editing a popup ................................................................................................................................................................................... 33
Table set up ........................................................................................................................................................................................... 36
1
Introduction
Using a HUD this complex isn't going to be a plug and play experience, make sure you have time set
aside to get it running. If everything goes as expected you'll load the package with a few clicks,
reprocess your database (which could take hours or a day+ depending on your system and database
size), then assign and place the HUD on the table.
It may be a bit of process to get everything running. I look at issues like this as an entry barrier for
other poker players. Those that are willing to do the work will have a solid advantage. Be assured we
have and are continuing to do everything we can to make the installation and use of our HUD as
seamless as possible.
Most issues that do occur will be related to your system or the size of your database. In a separate
document we offer advice on how to improve your system performance: the NoteCaddy Performance
Guide. If you're still having issues contact us at [email protected].
Spend some time becoming familiar with the HUD using the replayer. Use the replayer like a quiz card
to test your knowledge of the HUD. I took a bunch of screen shots and loaded them into my iPad and
reviewed whenever I had a spare moment. When playing start with a number of tables that will allow
you to spend some time studying the HUD. Taking a few days to really learn the HUD will pay
significant dividends. I know it's tough to become accustomed to a new HUD but please give this one
a chance. Considerable effort was put into figuring out how to present the information to achieve our
goals of ease of use and accuracy. Once you're in tune with the logic of the HUD, badges and popups
you'll see the efficiency of our system.
To achieve our goals we replaced some traditional stats and we tried to avoid using a HUD stat when a
badge would do the same job. Most HUDs have some stats out of habit rather than usefulness. We
took a fresh look at everything.
When playing you may feel like the HUD isn't generating as much information as your normal HM2
HUD and you'll see smaller sample sizes than you are accustomed to but you can be confident that our
HUD offers a significantly higher level of accuracy than any other HUD. The AJA Premium HUD
generates less, but more accurate information. Play vs abnormal bet sizing is ignored. We only use
recent info to generate stats. For example, we'll use the last xxx hands when xxx is the number of
hands that provide reliable information. Psychologically, using xxx hands feels better but given that our
opponent's game is constantly changing our system will provide more reliable information. The sample
size for reliability is figured individually for each stat.
_____________
2
Removed/Replaced Stats
Overall, our HUD, badges and popups contain more information in greater detail than other HUDs. To
achieve our goal of keeping the on table HUD and popups as compact as possible some traditional
stats have been replaced or moved to popups.
We avoid duplicating information. When we took a fresh look at my HUD design I realized it was filled
with duplicate information. This HUD minimizes duplicate information which will initially make it more
difficult to use but once you understand the popup logic it will be much more efficient.
You're not locked into our HUD design. If you feel something is missing you can easily add it. There's a
guide to customizing your HUD later is this document. If you customize your HUD you will need to
manually add new stats and badges with any update that adds stats, badges or range graphs or
modify the updated HUD (if the update is only a bug fix no HUD adjustment is needed). If you use our
default HUD you'll simply need to upload the HUD that comes with the update.
Aggression stats. I've never been a fan of aggression stats and have not used then in 5+ years. We
have all the info we need in the HUD and popups. We have their folding, calling, betting and raising
frequencies for every spot. There is really no need for a composite aggression number.
On table positional RFI. I see a lot of players with positional RFI in their on table HUD, the reasoning
being that the wider the range the more they can 3Bet and CC. That's true in the general sense, but
I've not found the relationship between opening ranges and exploitability to be strongly correlated. At
least not correlated enough that I want to base my play on just that information. Why not go directly
to the their response to your defense? It makes little difference to me if someone is opening up 50%
or 75% of buttons. I want to know their BTN fold vs 3Bet, fold vs the flop Cbet in 3Bet pots, fold vs c/r
on the BTN, fold vs donk when in steal position and turn barrel frequency. Those stats will reveal if they
are exploitable and we have badges to help you identify opponents who are exploitable. Let the
badges save you this HUD space by highlighting their specific exploitability. The only advantage that
on table positional RFI gives you is seeing opening frequencies before you have the sample to know
how they play subsequent to opening. This is an advantage, but not one that I feel is worth a line in my
HUD.
On table positional 3Bet+. We have badges for most 3Bet+ spots and our badges use multiple stats
making them a better indicator of exploitability.
Check Fold and Stab. All spots have badges to show exploitability.
The general category of stats you don't need to know before you act, for example donk bet.
VPIP. For me VPIP served two purposes: To identify recreational players and to get an idea of an
opponent's CC frequency. CC is a superior replacement for VPIP.
3
PFR. Replaced by 2Bet. I abandoned positional PFR a few years ago and replaced it with 2Bet (RFI +
Iso). 2Bet is a much better indicator of an opponent's opening range. Switching from PFR to 2Bet
overall on the HUD is the natural next step. 2Bet numbers tend to be ~8 points higher than PFR, so
you'll need to adjust for that until you become accustomed to labeling your opponents preflop game
using 2Bet. In the popup for this stat you can find RFI with Isolating limper frequency listed below.
I may be projecting my own inability to effectively use a large on table HUD, but my extensive
coaching experience tells me a lot of players get overwhelmed with large HUDs and often end up not
using lower frequency stats. Our badge system significantly reduces the number of stats you need in
you on table HUD. A smaller HUD will be utilized more consistently.
______________
Using 2Bet/CC instead of VPIP/PFR
This will be the toughest transition and one you may choose not to make. If you don’t want to switch
you can replace 2Bet with VPIP and CC with PFR (don't forget to add the popups to the new stats).
If you do wish to make an in game translation to VPIP/PFR:
2Bet will come in higher than PFR as it excludes pots where another player opened before the play had
a chance to act. For regs their 2Bet is usually 7-10 points higher than their PFR, so if you're trying to
covert back to old system you need to adjust 2Bet down to get PFR.
CC can't be added to 2Bet or PFR to get VPIP. Cutting CC in half and adding it to PFR is about right. So
a player who has 2Bet of 25 and a CC of 12 would be a 24 VPIP 18 PFR. I subtracted 7 from their 2Bet
to get PFR and took half of the CC and added to their PFR to get VPIP. You can check this by changing
the player name in HM2, pull up a tables to see how HM2 stats relate to HUD stats.
Rather than try to convert current numbers back to the old system –it's just not efficient to do the
above conversion in game– I suggest using 2Bet/CC numbers to directly identify players. It’s just a
matter of practice. Most regs range from 23-35 2Bet, so that gives you a guide on how much they
open. On average, 2Bet/CC is about 2 for most regs. CC of 15 is average. Preflop it should be noted I'm
not that concerned with opening and cold calling frequencies, I'm primarily interested in fold vs3Bet,
vsSteal and float badges to expand my ranges. 2Bet and CC are used mostly for my postflop
estimation of their ranges.
If CC>2Bet then they are a certain losing player. The larger the difference between CC and 2Bet the
faster they lose. Players which 2Bet/CC=1-1.25 (2Bet=40, CC=32, for example) are also likely losing
players but probably 10-20bb/100. 2Bet/CC 1.25-1.75 usually range from slight winners to less than
10bb/100 losers but there can be exceptions.
_________________
4
Additional Stats
Bet River. This might be replaceable by the bluff river badge, but I feel it's the best quick indicator of
river betting range so we kept it. The Bet River popup also holds all the general bet river range graphs
which would overwhelm the river barrel popup.
Cbet and fold vs Cbet multiway. This one was really close. We included those because I was checking
popups almost every time I was in a multiway pot. You'll find a surprising level of divergence in these
stats, making their on table presence valuable.
River Cbet and fold vs river Cbet. These should be standard in any on table HUD. I use these stats
constantly to plan out my hands on the flop and turn.
__________________
Future Stats/Badges/Range Graphs
We'll be listening closely to customer feedback as to what should be added to the package, however
be aware that with processing power limitations it's not a question of if a stat is potentially useful but
rather, if the a stat worth the processing power.
We extensively tested every spot and we often found when reviewing lower frequency spots that there
just wasn't enough data. Many HUDs (including mine before this HUD) are filled with unreliable
information due to sample sizes issues and serve as more of a psychological crutch. It was almost
physically uncomfortable to abandon some of our stats and badges, but when processing power is at a
premium it's best not to spend it on stats that only return a few instances over large samples for
badges that rarely activate and stats that largely have sample sizes too small to achieve reliability. For
me it was an uncomfortable transition, but one I think significantly increases my efficiency by not
digging through a long list of stats looking for what I need to know.
We're also available for custom work and will be happy to make anything you want. Email
[email protected] if interested.
You can use HM2 generated stats with our HUD and popups for any stat you feel is necessary but isn't
part of the package. I expect most players interested in additional stats will know how do this. If not,
check out the HM2 guide. Using your own NC definitions is possible as long as your processor can
handle the additional workload.
__________________
Timing tell graphs
Timing tells add extra strain to your system. Included in the package are a timing tell HUD and HUD
without timing tells. We strongly encourage you to first try the HUD without timing tells. If you're
happy with the performance of the HUD then try the timing tell HUD. You simply need to change your
assigned HUD to the timing tell HUD.
5
The non-timing HUD is named AJA-6MP-HUD-vx_x, the HUD that includes timing AJA-6MD-HUD-
wTime-vx_x
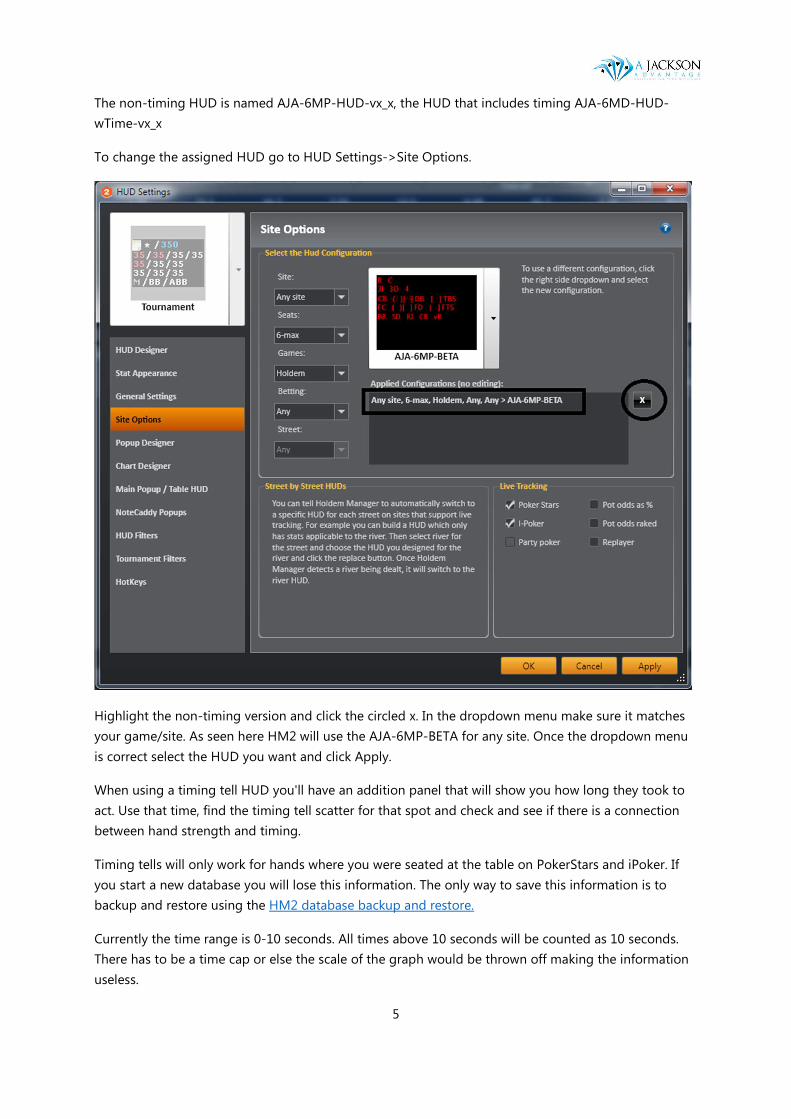
To change the assigned HUD go to HUD Settings->Site Options.
Highlight the non-timing version and click the circled x. In the dropdown menu make sure it matches
your game/site. As seen here HM2 will use the AJA-6MP-BETA for any site. Once the dropdown menu
is correct select the HUD you want and click Apply.
When using a timing tell HUD you'll have an addition panel that will show you how long they took to
act. Use that time, find the timing tell scatter for that spot and check and see if there is a connection
between hand strength and timing.
Timing tells will only work for hands where you were seated at the table on PokerStars and iPoker. If
you start a new database you will lose this information. The only way to save this information is to
backup and restore using the HM2 database backup and restore.
Currently the time range is 0-10 seconds. All times above 10 seconds will be counted as 10 seconds.
There has to be a time cap or else the scale of the graph would be thrown off making the information
useless.
6
You need to enable live tracking in HM2. If the time tells slow your system down too much turn this
back off when you switch to the non-timing tell HUD.
__________________
Processor Speeds
If you system can run NoteCaddy it should handle the AJA Premium HUD. To see how your system
handles our Premium HUD first check note creation speeds. You can see the note creation speed in
NoteCaddy after you install our package and begin note creation. 15-20 hands/second is what we
consider borderline acceptable. Above the note creation speed you'll see how many hands there are to
process. You can do the math and see if the total note creation time is acceptable. If it's not you
should start a new database with only recent hands.
Once your database is processed you should restart your system and pull up a table and check HUD
load times. There shouldn't be more than a slight delay for the first hand you play and each time a new
player joins (once the HUD is loaded for that player you'll no longer have those load times for the
remainder of your session with that player). Note creation has a heavy processor work load so don't
check HUD load times until hand processing is finished. Restart you system after note creation before
you check HUD load times.
Not to state the obvious, but it's important to keep your poker computer operating as efficiently as
possible. Restart before your session, don't run other programs while grinding, run virus scans
regularly and generally keep your computer as clean as possible. Use the NoteCaddy Performance
Guide included in your download.
NoteCaddy processes imported hands before it starts processing hands that you play. Therefore, it's
important that after you start your initial note creation that you let it finish before you start playing. If
you don't let it finish you won't get data processed for hands you are playing until the initial hands are
finished processing. Also, initial note creation uses a lot of processing power and it will slow down
HUD loading significantly.
__________________
Editing
The Premium package is open to editing.
__________________
7
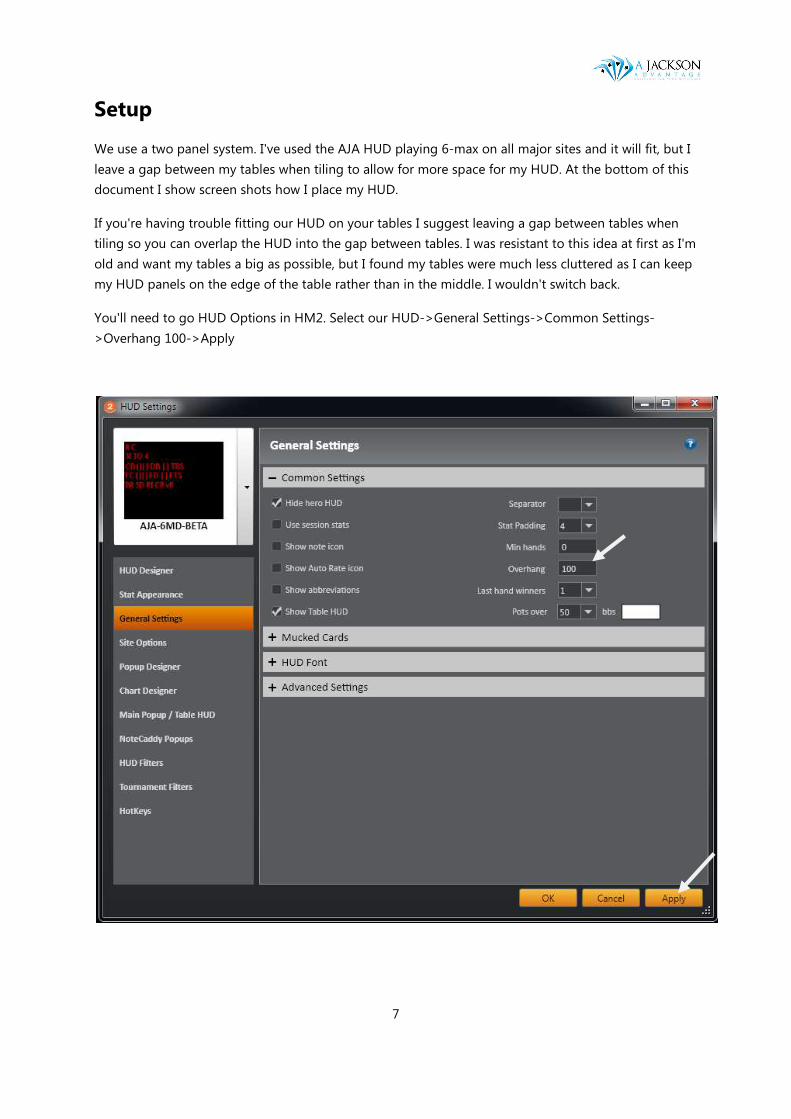
Setup
We use a two panel system. I've used the AJA HUD playing 6-max on all major sites and it will fit, but I
leave a gap between my tables when tiling to allow for more space for my HUD. At the bottom of this
document I show screen shots how I place my HUD.
If you're having trouble fitting our HUD on your tables I suggest leaving a gap between tables when
tiling so you can overlap the HUD into the gap between tables. I was resistant to this idea at first as I'm
old and want my tables a big as possible, but I found my tables were much less cluttered as I can keep
my HUD panels on the edge of the table rather than in the middle. I wouldn't switch back.
You'll need to go HUD Options in HM2. Select our HUD->General Settings->Common Settings-
>Overhang 100->Apply
8
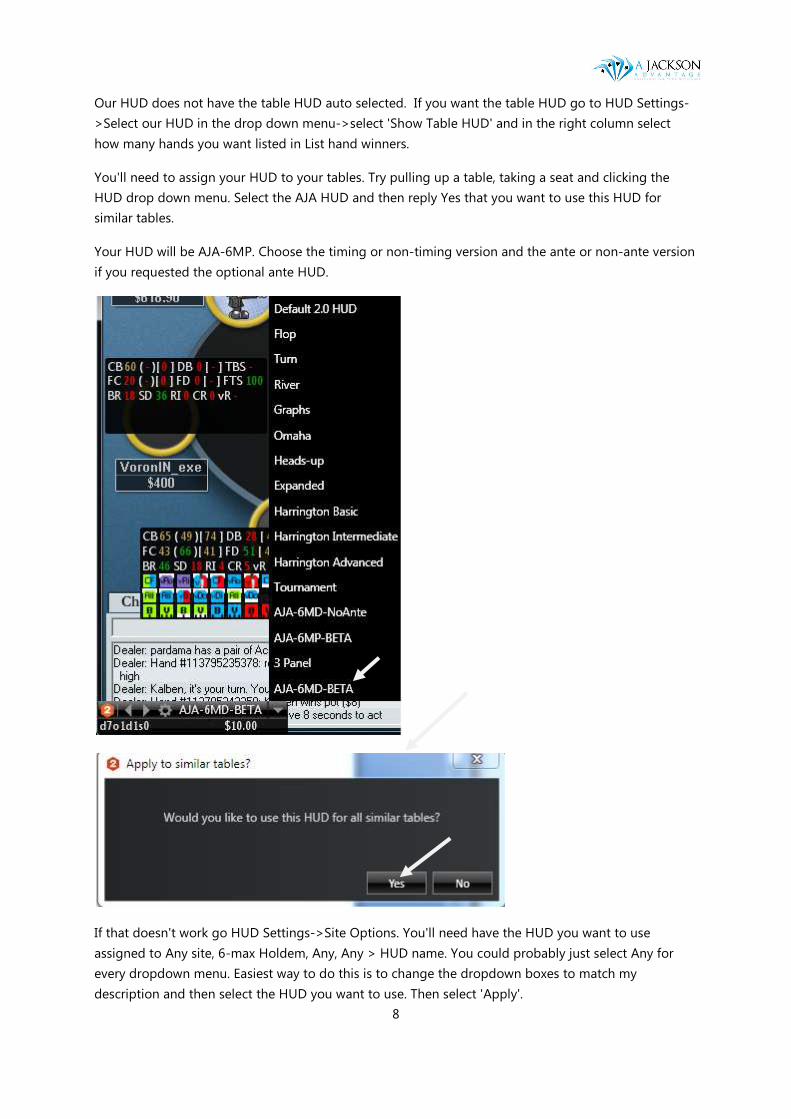
Our HUD does not have the table HUD auto selected. If you want the table HUD go to HUD Settings-
>Select our HUD in the drop down menu->select 'Show Table HUD' and in the right column select
how many hands you want listed in List hand winners.
You'll need to assign your HUD to your tables. Try pulling up a table, taking a seat and clicking the
HUD drop down menu. Select the AJA HUD and then reply Yes that you want to use this HUD for
similar tables.
Your HUD will be AJA-6MP. Choose the timing or non-timing version and the ante or non-ante version
if you requested the optional ante HUD.
If that doesn't work go HUD Settings->Site Options. You'll need have the HUD you want to use
assigned to Any site, 6-max Holdem, Any, Any > HUD name. You could probably just select Any for
every dropdown menu. Easiest way to do this is to change the dropdown boxes to match my
description and then select the HUD you want to use. Then select 'Apply'.
9
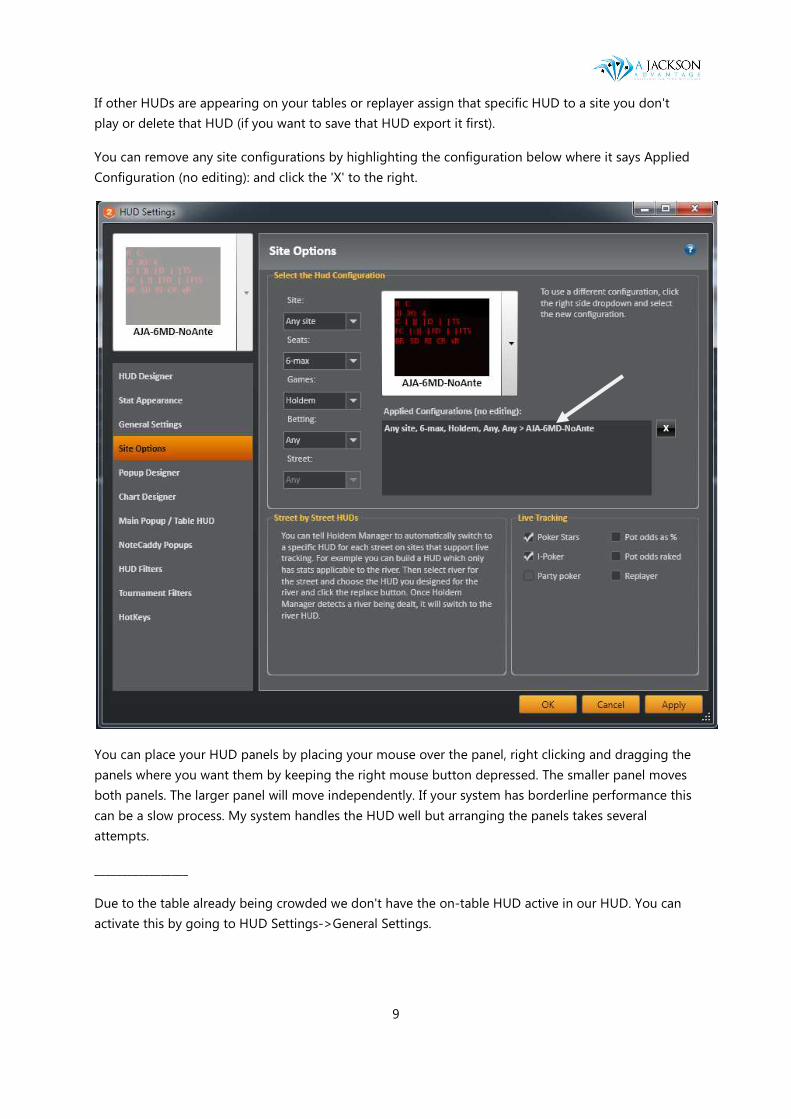
If other HUDs are appearing on your tables or replayer assign that specific HUD to a site you don't
play or delete that HUD (if you want to save that HUD export it first).
You can remove any site configurations by highlighting the configuration below where it says Applied
Configuration (no editing): and click the 'X' to the right.
You can place your HUD panels by placing your mouse over the panel, right clicking and dragging the
panels where you want them by keeping the right mouse button depressed. The smaller panel moves
both panels. The larger panel will move independently. If your system has borderline performance this
can be a slow process. My system handles the HUD well but arranging the panels takes several
attempts.
_________________
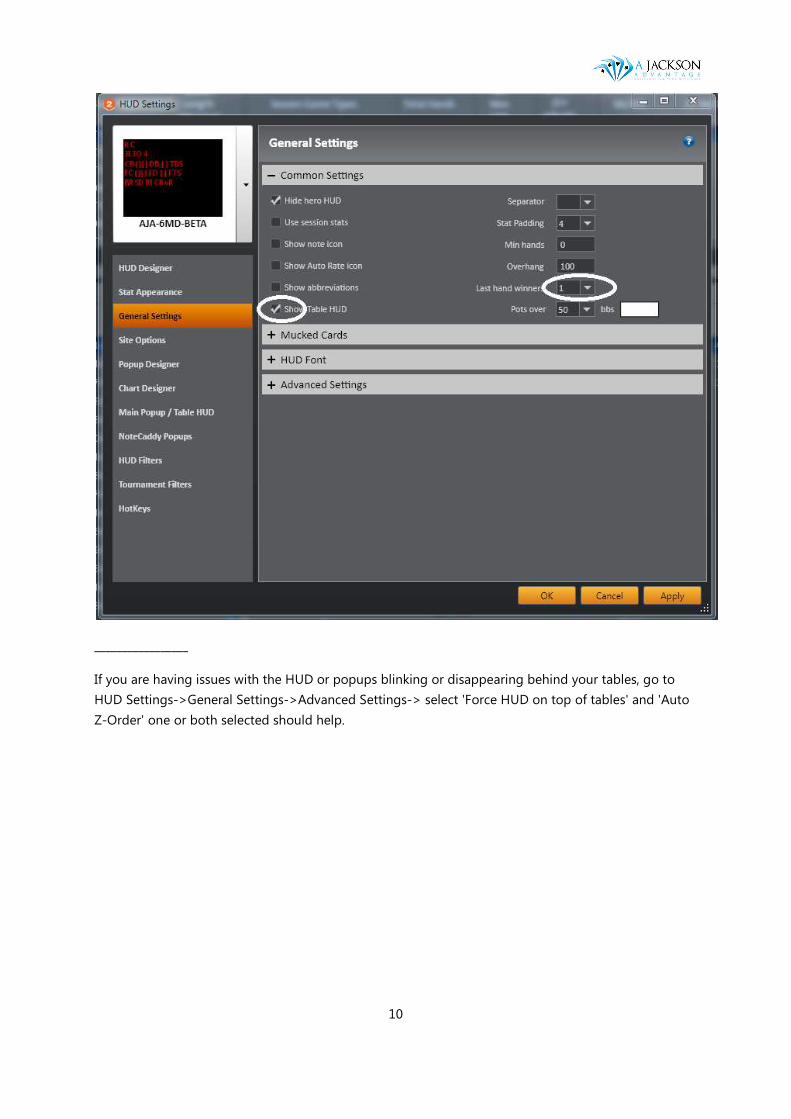
Due to the table already being crowded we don't have the on-table HUD active in our HUD. You can
activate this by going to HUD Settings->General Settings.
10
_________________
If you are having issues with the HUD or popups blinking or disappearing behind your tables, go to
HUD Settings->General Settings->Advanced Settings-> select 'Force HUD on top of tables' and 'Auto
Z-Order' one or both selected should help.

11
__________________
The HUD
Opponent stats, badges and range graphs reflect normalized play and exact situations. For example,
the AJA Premium HUD stat fold vs flop cbet (FC) is for preflop single raised pots, heads up on the flop
and eliminates undersized, oversized and all-in (including effectively all-in) betting. You can find
positional, 3B, 4B and multiway cbet stats, all using the similar criteria, in the HUD or popups.
All HUD stats are color coded. Each color code roughly represents 1/3rd of the reg pool's stat ranges,
I've modified the groupings based on my experience and obvious exploitable levels.
12
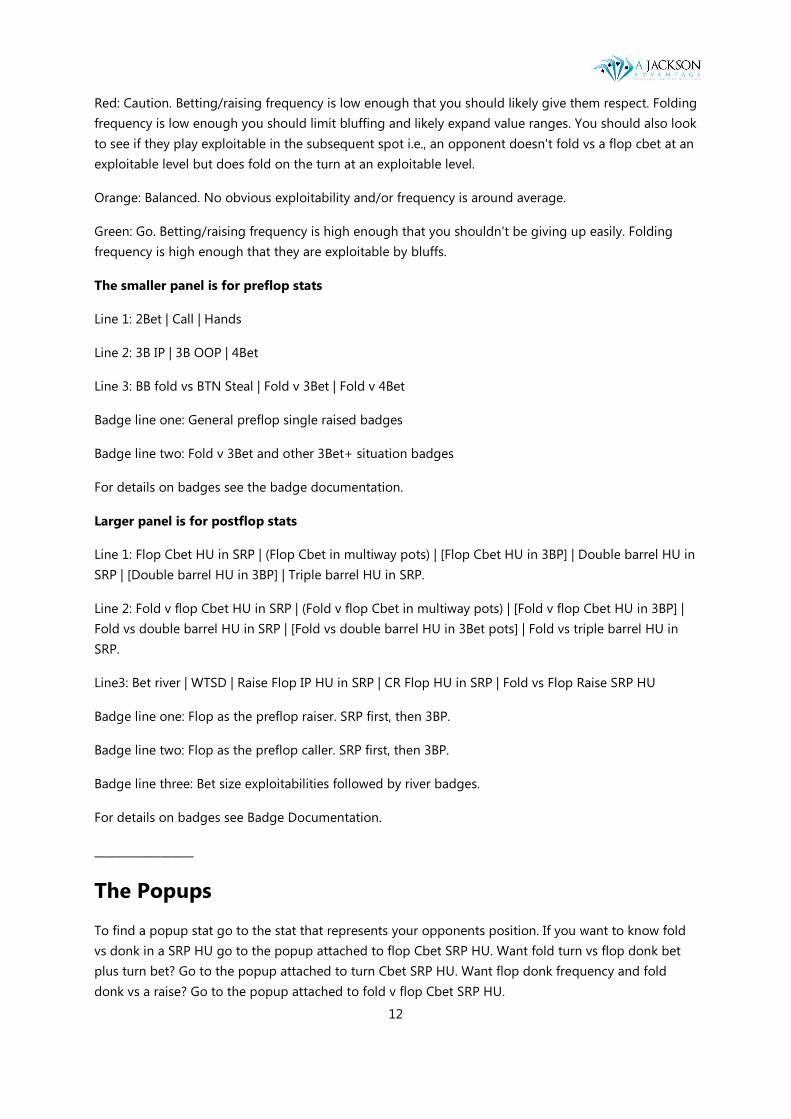
Red: Caution. Betting/raising frequency is low enough that you should likely give them respect. Folding
frequency is low enough you should limit bluffing and likely expand value ranges. You should also look
to see if they play exploitable in the subsequent spot i.e., an opponent doesn't fold vs a flop cbet at an
exploitable level but does fold on the turn at an exploitable level.
Orange: Balanced. No obvious exploitability and/or frequency is around average.
Green: Go. Betting/raising frequency is high enough that you shouldn't be giving up easily. Folding
frequency is high enough that they are exploitable by bluffs.
The smaller panel is for preflop stats
Line 1: 2Bet | Call | Hands
Line 2: 3B IP | 3B OOP | 4Bet
Line 3: BB fold vs BTN Steal | Fold v 3Bet | Fold v 4Bet
Badge line one: General preflop single raised badges
Badge line two: Fold v 3Bet and other 3Bet+ situation badges
For details on badges see the badge documentation.
Larger panel is for postflop stats
Line 1: Flop Cbet HU in SRP | (Flop Cbet in multiway pots) | [Flop Cbet HU in 3BP] | Double barrel HU in
SRP | [Double barrel HU in 3BP] | Triple barrel HU in SRP.
Line 2: Fold v flop Cbet HU in SRP | (Fold v flop Cbet in multiway pots) | [Fold v flop Cbet HU in 3BP] |
Fold vs double barrel HU in SRP | [Fold vs double barrel HU in 3Bet pots] | Fold vs triple barrel HU in
SRP.
Line3: Bet river | WTSD | Raise Flop IP HU in SRP | CR Flop HU in SRP | Fold vs Flop Raise SRP HU
Badge line one: Flop as the preflop raiser. SRP first, then 3BP.
Badge line two: Flop as the preflop caller. SRP first, then 3BP.
Badge line three: Bet size exploitabilities followed by river badges.
For details on badges see Badge Documentation.
__________________
The Popups
To find a popup stat go to the stat that represents your opponents position. If you want to know fold
vs donk in a SRP HU go to the popup attached to flop Cbet SRP HU. Want fold turn vs flop donk bet
plus turn bet? Go to the popup attached to turn Cbet SRP HU. Want flop donk frequency and fold
donk vs a raise? Go to the popup attached to fold v flop Cbet SRP HU.
13
Spark graphs are attached to the popup that applies to the first street where you can anticipate on the
opponents range. Generally this will mean that you'll find a spark attached to the popup that contains
that stat. When you can first anticipate on the next street, such as call v Cbet, that stat will be in the
fold vs flop Cbet SRP HU popup but the spark graph will be in fold vs turn Cbet SRP HU popup.
Initially you'll find the popups confusing. This would be true of any new popup. Once you understand
the logic you'll find these popups incredibly efficient and intuitive.
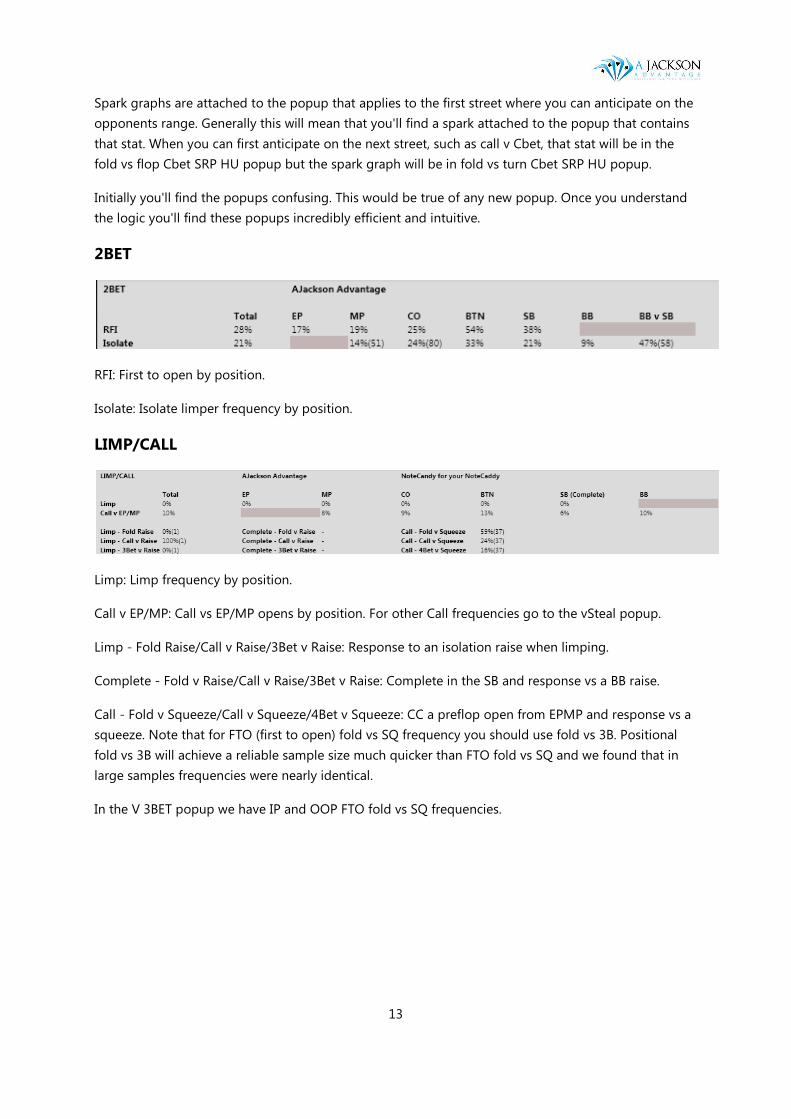
2BET
RFI: First to open by position.
Isolate: Isolate limper frequency by position.
LIMP/CALL
Limp: Limp frequency by position.
Call v EP/MP: Call vs EP/MP opens by position. For other Call frequencies go to the vSteal popup.
Limp - Fold Raise/Call v Raise/3Bet v Raise: Response to an isolation raise when limping.
Complete - Fold v Raise/Call v Raise/3Bet v Raise: Complete in the SB and response vs a BB raise.
Call - Fold v Squeeze/Call v Squeeze/4Bet v Squeeze: CC a preflop open from EPMP and response vs a
squeeze. Note that for FTO (first to open) fold vs SQ frequency you should use fold vs 3B. Positional
fold vs 3B will achieve a reliable sample size much quicker than FTO fold vs SQ and we found that in
large samples frequencies were nearly identical.
In the V 3BET popup we have IP and OOP FTO fold vs SQ frequencies.
14
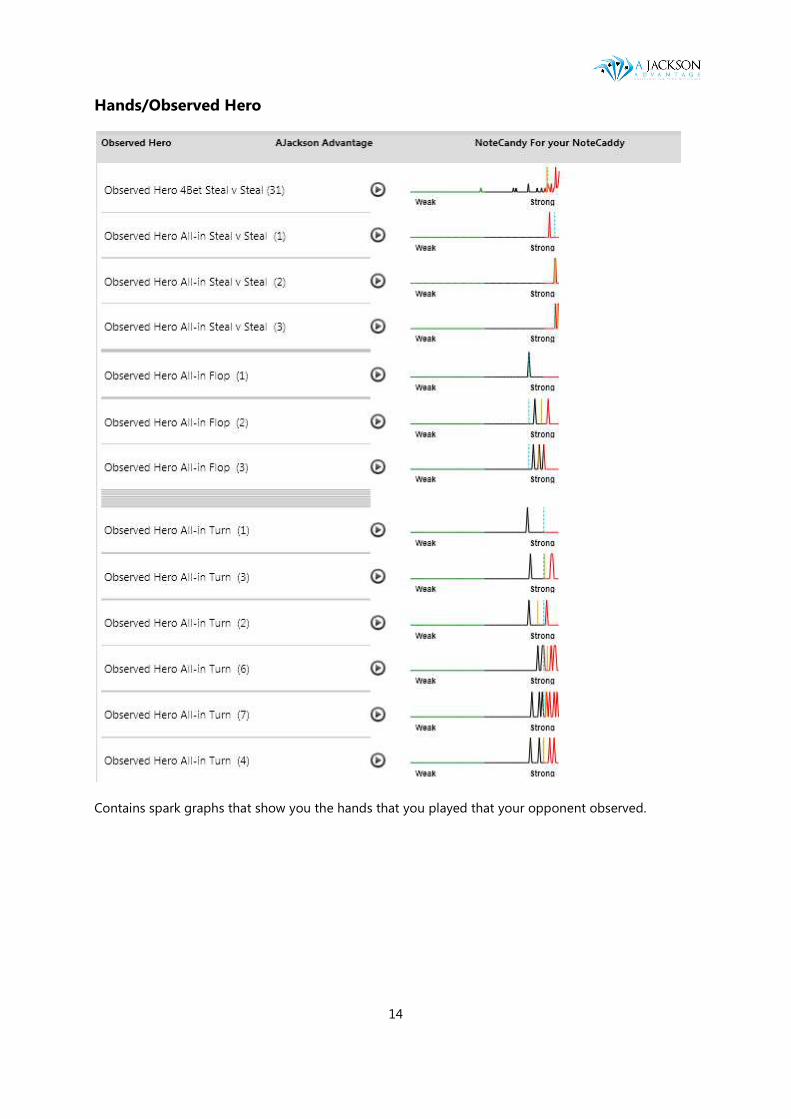
Hands/Observed Hero
Contains spark graphs that show you the hands that you played that your opponent observed.
15
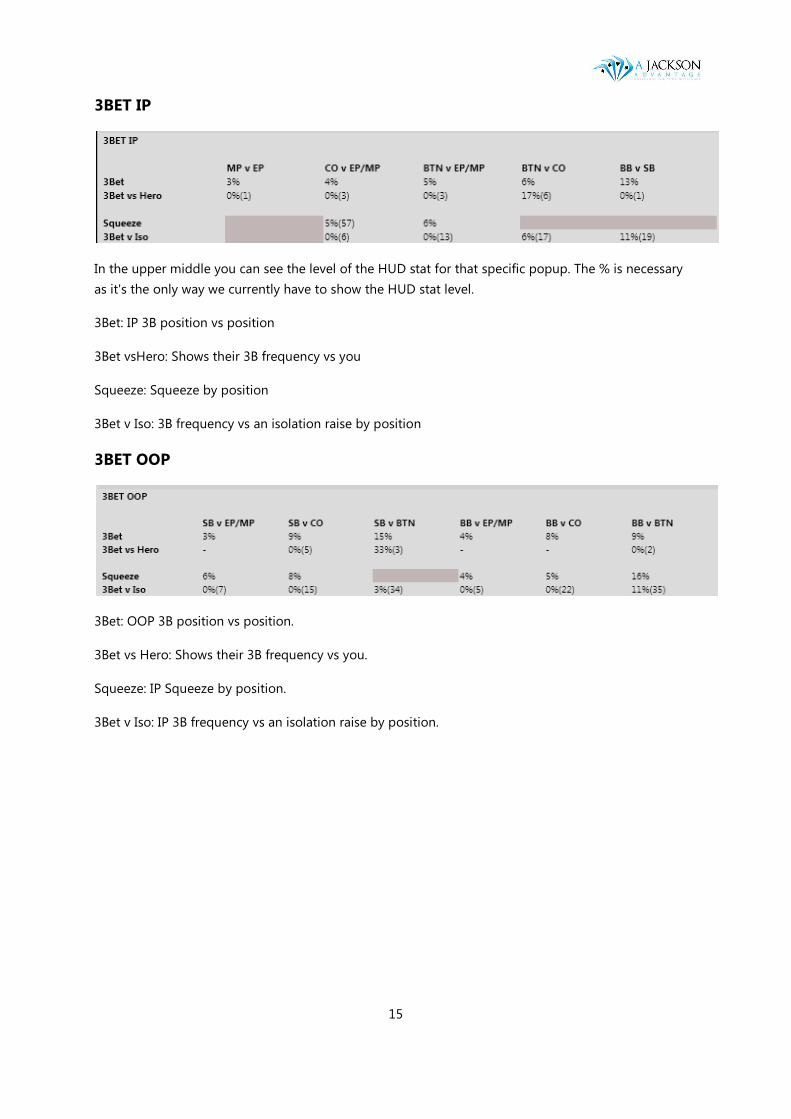
3BET IP
In the upper middle you can see the level of the HUD stat for that specific popup. The % is necessary
as it's the only way we currently have to show the HUD stat level.
3Bet: IP 3B position vs position
3Bet vsHero: Shows their 3B frequency vs you
Squeeze: Squeeze by position
3Bet v Iso: 3B frequency vs an isolation raise by position
3BET OOP
3Bet: OOP 3B position vs position.
3Bet vs Hero: Shows their 3B frequency vs you.
Squeeze: IP Squeeze by position.
3Bet v Iso: IP 3B frequency vs an isolation raise by position.
16
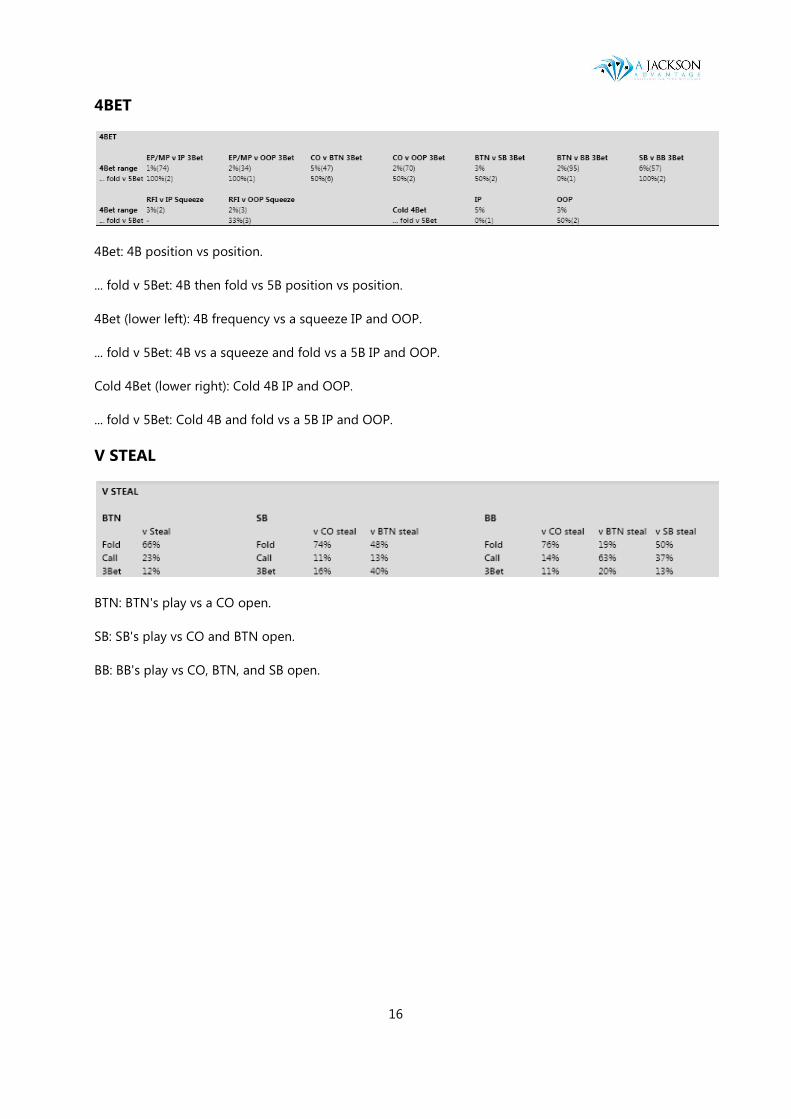
4BET
4Bet: 4B position vs position.
... fold v 5Bet: 4B then fold vs 5B position vs position.
4Bet (lower left): 4B frequency vs a squeeze IP and OOP.
... fold v 5Bet: 4B vs a squeeze and fold vs a 5B IP and OOP.
Cold 4Bet (lower right): Cold 4B IP and OOP.
... fold v 5Bet: Cold 4B and fold vs a 5B IP and OOP.
V STEAL
BTN: BTN's play vs a CO open.
SB: SB's play vs CO and BTN open.
BB: BB's play vs CO, BTN, and SB open.
17
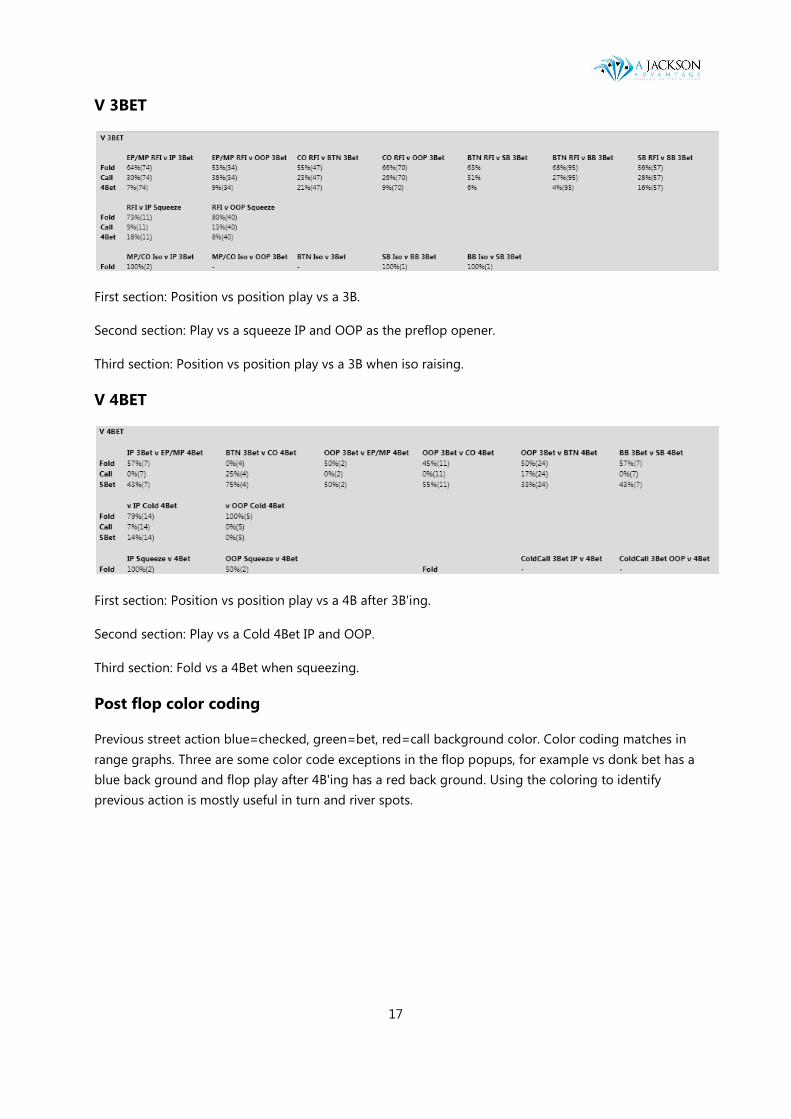
V 3BET
First section: Position vs position play vs a 3B.
Second section: Play vs a squeeze IP and OOP as the preflop opener.
Third section: Position vs position play vs a 3B when iso raising.
V 4BET
First section: Position vs position play vs a 4B after 3B'ing.
Second section: Play vs a Cold 4Bet IP and OOP.
Third section: Fold vs a 4Bet when squeezing.
Post flop color coding
Previous street action blue=checked, green=bet, red=call background color. Color coding matches in
range graphs. Three are some color code exceptions in the flop popups, for example vs donk bet has a
blue back ground and flop play after 4B'ing has a red back ground. Using the coloring to identify
previous action is mostly useful in turn and river spots.
18
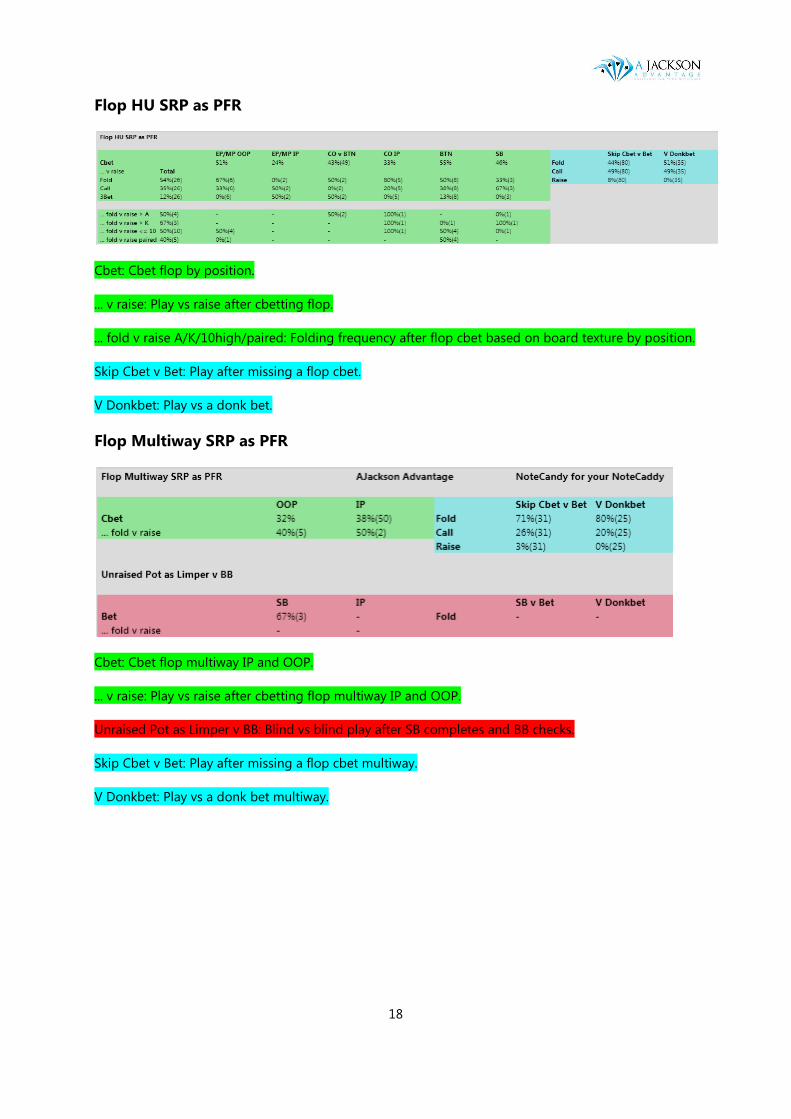
Flop HU SRP as PFR
Cbet: Cbet flop by position.
... v raise: Play vs raise after cbetting flop.
... fold v raise A/K/10high/paired: Folding frequency after flop cbet based on board texture by position.
Skip Cbet v Bet: Play after missing a flop cbet.
V Donkbet: Play vs a donk bet.
Flop Multiway SRP as PFR
Cbet: Cbet flop multiway IP and OOP.
... v raise: Play vs raise after cbetting flop multiway IP and OOP.
Unraised Pot as Limper v BB: Blind vs blind play after SB completes and BB checks.
Skip Cbet v Bet: Play after missing a flop cbet multiway.
V Donkbet: Play vs a donk bet multiway.

19
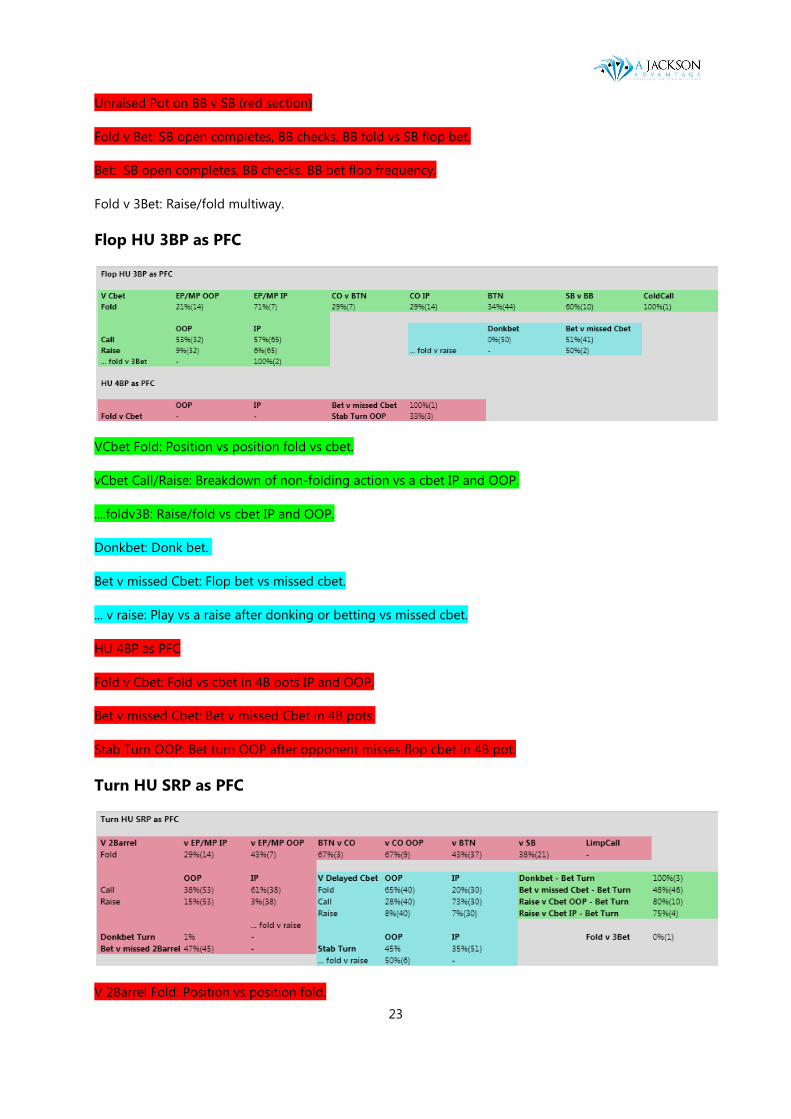
Flop HU 3BP as PFR
Cbet: Cbet flop by position in 3B pots.
... v raise: Play vs raise after cbetting flop IP and OOP.
vColdCall (upper right): Cbet vs an opponent who CC's preflop 3B.
Limp - 3Bet (upper right): Cbet after limp/3B'ing.
HU 4BP as PFR: CB HU in 4B pots IP and OOP.
... fold v raise: Play v a raise after cbetting HU in a 4B pot IP and OOP.
Fold: Folding after skipping a flop cbet in a 4B pot HU IP and OOP.
Skip Cbet v Bet: Play after missing a flop cbet in a 3B pot.
V Donkbet: Play vs a donk bet in a 3B pot.
Turn HU SRP as PFR
2Barrel: Positional turn cbet by position.
... fold v raise: Play vs a raise after a turn cbet IP and OOP.
Skip 2Barrel v Bet: Play vs a bet after missing a turn cbet.
V Turn Donkbet: Play vs a donk bet on the turn.
Delayed Cbet: Frequency for delayed flop cbet on the turn IP and OOP.
... fold v raise: Fold frequency vs a raise with delayed cbet IP and OOP.
20
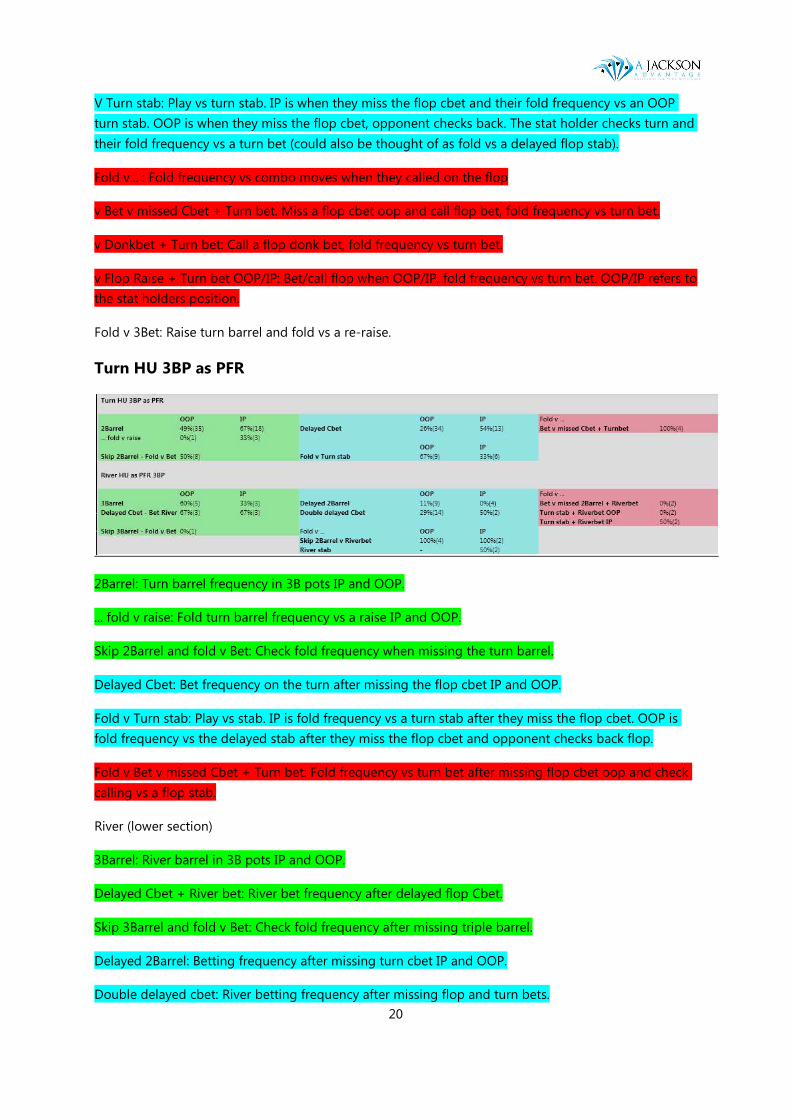
V Turn stab: Play vs turn stab. IP is when they miss the flop cbet and their fold frequency vs an OOP
turn stab. OOP is when they miss the flop cbet, opponent checks back. The stat holder checks turn and
their fold frequency vs a turn bet (could also be thought of as fold vs a delayed flop stab).
Fold v... : Fold frequency vs combo moves when they called on the flop
v Bet v missed Cbet + Turn bet. Miss a flop cbet oop and call flop bet, fold frequency vs turn bet.
v Donkbet + Turn bet: Call a flop donk bet, fold frequency vs turn bet.
v Flop Raise + Turn bet OOP/IP: Bet/call flop when OOP/IP, fold frequency vs turn bet. OOP/IP refers to
the stat holders position.
Fold v 3Bet: Raise turn barrel and fold vs a re-raise.
Turn HU 3BP as PFR
2Barrel: Turn barrel frequency in 3B pots IP and OOP.
... fold v raise: Fold turn barrel frequency vs a raise IP and OOP.
Skip 2Barrel and fold v Bet: Check fold frequency when missing the turn barrel.
Delayed Cbet: Bet frequency on the turn after missing the flop cbet IP and OOP.
Fold v Turn stab: Play vs stab. IP is fold frequency vs a turn stab after they miss the flop cbet. OOP is
fold frequency vs the delayed stab after they miss the flop cbet and opponent checks back flop.
Fold v Bet v missed Cbet + Turn bet: Fold frequency vs turn bet after missing flop cbet oop and check
calling vs a flop stab.
River (lower section)
3Barrel: River barrel in 3B pots IP and OOP.
Delayed Cbet + River bet: River bet frequency after delayed flop Cbet.
Skip 3Barrel and fold v Bet: Check fold frequency after missing triple barrel.
Delayed 2Barrel: Betting frequency after missing turn cbet IP and OOP.
Double delayed cbet: River betting frequency after missing flop and turn bets.
21
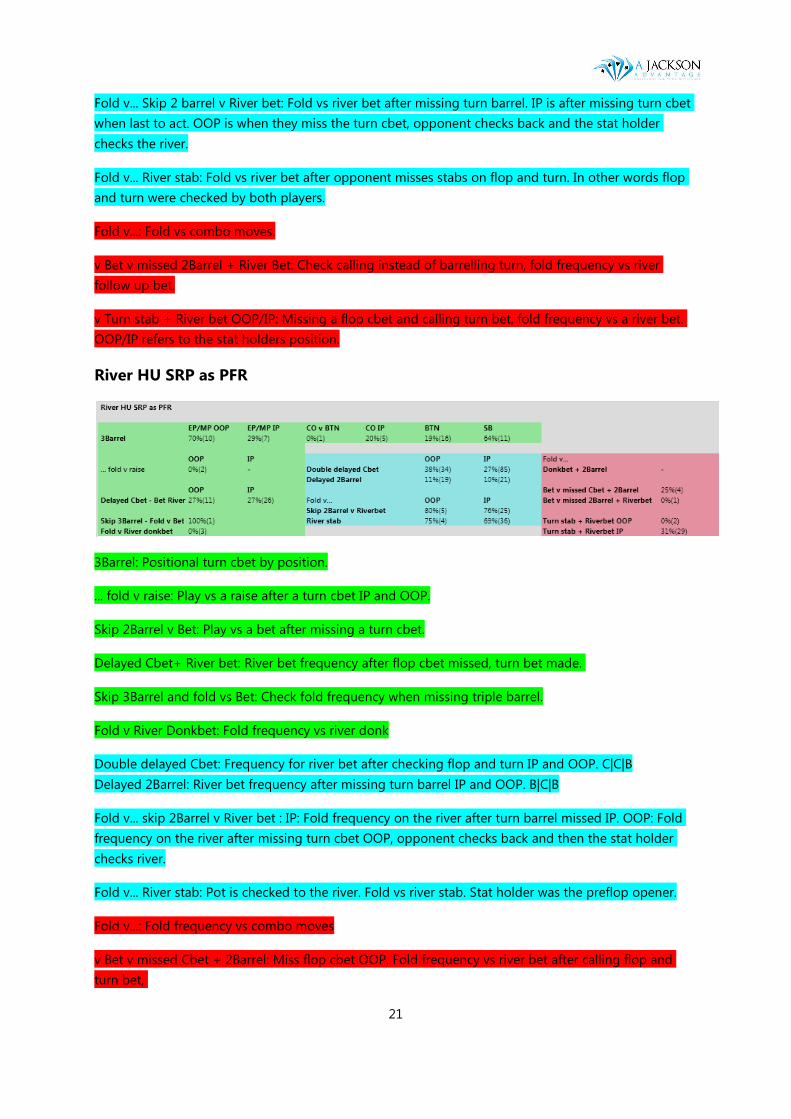
Fold v... Skip 2 barrel v River bet: Fold vs river bet after missing turn barrel. IP is after missing turn cbet
when last to act. OOP is when they miss the turn cbet, opponent checks back and the stat holder
checks the river.
Fold v... River stab: Fold vs river bet after opponent misses stabs on flop and turn. In other words flop
and turn were checked by both players.
Fold v...: Fold vs combo moves.
v Bet v missed 2Barrel + River Bet: Check calling instead of barrelling turn, fold frequency vs river
follow up bet.
v Turn stab + River bet OOP/IP: Missing a flop cbet and calling turn bet, fold frequency vs a river bet.
OOP/IP refers to the stat holders position.
River HU SRP as PFR
3Barrel: Positional turn cbet by position.
... fold v raise: Play vs a raise after a turn cbet IP and OOP.
Skip 2Barrel v Bet: Play vs a bet after missing a turn cbet.
Delayed Cbet+ River bet: River bet frequency after flop cbet missed, turn bet made.
Skip 3Barrel and fold vs Bet: Check fold frequency when missing triple barrel.
Fold v River Donkbet: Fold frequency vs river donk
Double delayed Cbet: Frequency for river bet after checking flop and turn IP and OOP. C|C|B
Delayed 2Barrel: River bet frequency after missing turn barrel IP and OOP. B|C|B
Fold v... skip 2Barrel v River bet : IP: Fold frequency on the river after turn barrel missed IP. OOP: Fold
frequency on the river after missing turn cbet OOP, opponent checks back and then the stat holder
checks river.
Fold v... River stab: Pot is checked to the river. Fold vs river stab. Stat holder was the preflop opener.
Fold v...: Fold frequency vs combo moves
v Bet v missed Cbet + 2Barrel: Miss flop cbet OOP. Fold frequency vs river bet after calling flop and
turn bet,
22
v Bet v missed 2Barrel + River bet: Miss turn barrel OOP. Fold frequency vs river bet after calling turn
bet,
v Donk bet + 2 Barrel: Fold frequency vs river bet after calling flop donk and turn bet.
Turn stab + Cbet OOP/IP: Miss flop cbet OOP/IP. Fold frequency vs river bet after calling turn bet.
OOP/IP refers to the stat holders position. When OOP opponent checked back flop.
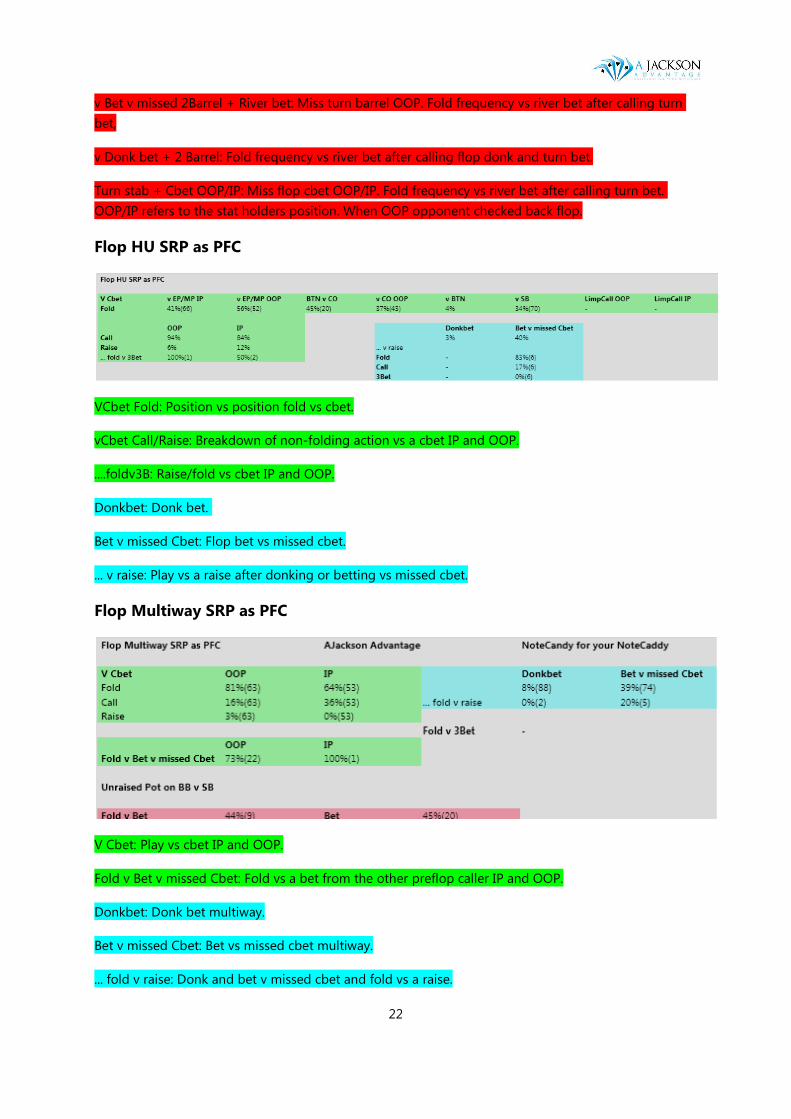
Flop HU SRP as PFC
VCbet Fold: Position vs position fold vs cbet.
vCbet Call/Raise: Breakdown of non-folding action vs a cbet IP and OOP.
....foldv3B: Raise/fold vs cbet IP and OOP.
Donkbet: Donk bet.
Bet v missed Cbet: Flop bet vs missed cbet.
... v raise: Play vs a raise after donking or betting vs missed cbet.
Flop Multiway SRP as PFC
V Cbet: Play vs cbet IP and OOP.
Fold v Bet v missed Cbet: Fold vs a bet from the other preflop caller IP and OOP.
Donkbet: Donk bet multiway.
Bet v missed Cbet: Bet vs missed cbet multiway.
... fold v raise: Donk and bet v missed cbet and fold vs a raise.
23
Unraised Pot on BB v SB (red section)
Fold v Bet: SB open completes, BB checks. BB fold vs SB flop bet.
Bet: SB open completes, BB checks. BB bet flop frequency.
Fold v 3Bet: Raise/fold multiway.
Flop HU 3BP as PFC
VCbet Fold: Position vs position fold vs cbet.
vCbet Call/Raise: Breakdown of non-folding action vs a cbet IP and OOP.
....foldv3B: Raise/fold vs cbet IP and OOP.
Donkbet: Donk bet.
Bet v missed Cbet: Flop bet vs missed cbet.
... v raise: Play vs a raise after donking or betting vs missed cbet.
HU 4BP as PFC
Fold v Cbet: Fold vs cbet in 4B pots IP and OOP.
Bet v missed Cbet: Bet v missed Cbet in 4B pots.
Stab Turn OOP: Bet turn OOP after opponent misses flop cbet in 4B pot.
Turn HU SRP as PFC
V 2Barrel Fold: Position vs position fold.

24
Call/Raise: Play vs a cbet IP and OOP.
Turn Donkbet: Donk bet turn.
... fold v raise: Donk and fold vs raise.
Bet v missed 2Barrel: Bet IP vs a missed turn barrel.
... fold v raise: Bet IP vs a missed turn barrel and fold vs a raise.
V Delayed Cbet: Play vs a delayed cbet IP and OOP.
Stab turn: Bet vs a missed flop cbet. IP: checking after a missed flop cbet and then betting the turn
after their opponent again checks. OOP: bet vs missed flop cbet.
... fold v raise: Stab folding.
Frequency of making specific combo plays
Donkbet + Turn bet: Turn bet frequency after donking flop
Bet v missed Cbet + Turn bet. Opponent misses flop cbet. Turn IP bet frequency after betting flop.
Raise v Cbet + Turn bet OOP/IP: Turn bet frequency after raising flop OOP/IP. OOP/IP is the stat
holders position.
Fold v 3Bet: Raise/fold on the turn
Turn HU 3BP as PFC
V 2Barrel: Play vs a turn cbet IP and OOP.
Bet v missed 2Barrel: Bet IP vs a missed turn barrel.
... fold v raise: Bet vs a missed turn cbet and fold vs a raise.
V Delayed Cbet: Play vs a delayed cbet IP and OOP.
Stab turn: Bet vs a missed cbet. OOP bet vs a missed flop cbet. IP is checking after a missed flop cbet
and then betting the turn after their opponent checks.
25
Bet v missed Cbet + Turn bet: Opponent missed flop cbet OOP. Turn bet frequency after betting flop.
Lower section: River HU as PFC 3BP
Fold v 3Barrel: Fold vs river barrel IP and OOP.
Fold v delayed Cbet + River bet: Fold vs a combo move.
Bet v missed 3Barrel: Bet IP vs a missed river barrel.
Fold v...Double delay Cbet: Fold frequency vs river bet from the preflop opener after both flop and turn
were checked.
Fold v...Delayed turn barrel: Fold frequency vs delayed turn cbet.
Bet River v missed 2Barrel: River bet frequency when opponent misses turn barrel. IP they would need
to check back turn and then bet river.
Stab River: Bet river frequency after flop and turn were checked as the preflop caller.
Frequency of making specific combo plays
Bet v missed 2Barrel + River bet: Opponent misses OOP turn cbet. River bet frequency after betting
turn.
Stab Turn + River bet OOP/IP: Opponent misses flop cbet. River bet frequency after betting turn
OOP/IP. OOP/IP is the stat holders position. IP: checked back the flop, then bet turn and river.
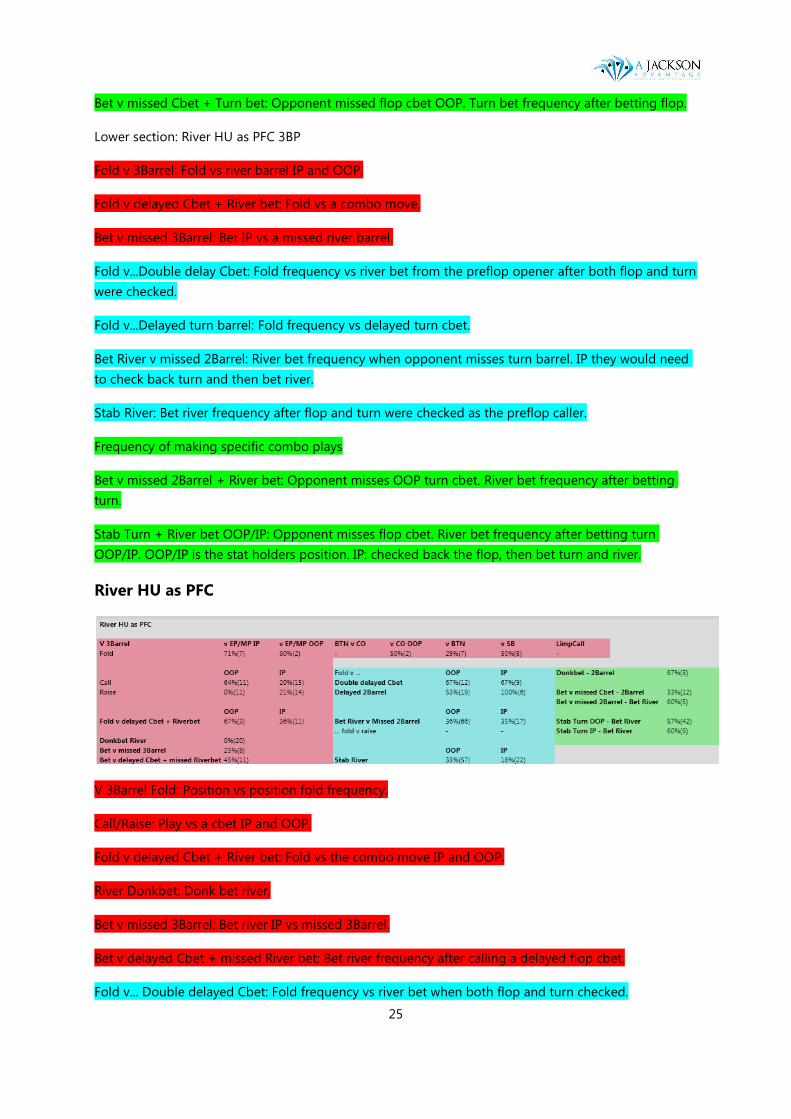
River HU as PFC
V 3Barrel Fold: Position vs position fold frequency.
Call/Raise: Play vs a cbet IP and OOP.
Fold v delayed Cbet + River bet: Fold vs the combo move IP and OOP.
River Donkbet: Donk bet river.
Bet v missed 3Barrel: Bet river IP vs missed 3Barrel.
Bet v delayed Cbet + missed River bet: Bet river frequency after calling a delayed flop cbet.
Fold v... Double delayed Cbet: Fold frequency vs river bet when both flop and turn checked.
26
Fold v... Delayed 2Barrel: Fold frequency vs delayed turn cbet IP and OOP. OOP opponent checked
back turn.
Bet River v Missed 2Barrel: Bet frequency when opponent misses turn cbet. IP turn stab was missed
and they bet the river.
... fold v raise: Bet v Missed 2Barrel and fold vs a raise.
Stab River: Bet river frequency as a delayed stab.
Frequency of making specific combo plays
Donk bet + 2Barrel: Bet river frequency after donking flop and betting turn.
Bet v missed Cbet + 2Barrel: Opponent misses flop cbet. River IP betting frequency after betting flop
and turn.
Bet v missed 2Barrel + River Bet: Opponent missed turn cbet. River IP betting frequency after betting
turn.
Stab Turn + River bet OOP/IP: Opponent misses flop cbet. River bet frequency after betting turn
OOP/IP. OOP/IP is the stat holders position. IP means they checked back flop vs a missed cbet then bet
turn and river.
27
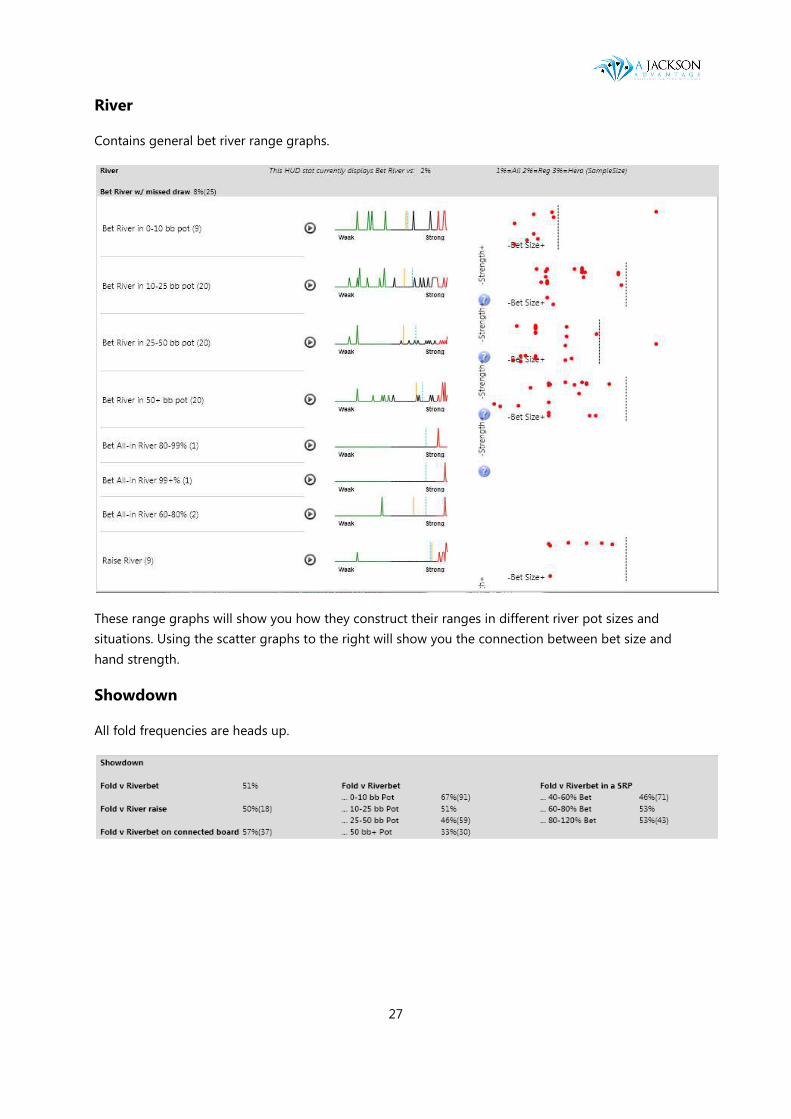
River
Contains general bet river range graphs.
These range graphs will show you how they construct their ranges in different river pot sizes and
situations. Using the scatter graphs to the right will show you the connection between bet size and
hand strength.
Showdown
All fold frequencies are heads up.
28
Range graphs
Range graphs are color coded to match the background in the popup.
Mostly range graphs will be in the same popup as the stat. Exceptions are made when the range can
first be anticipated on at a later next street. For example cold call ranges can be found in the fold vs
flop Cbet popup.
________________
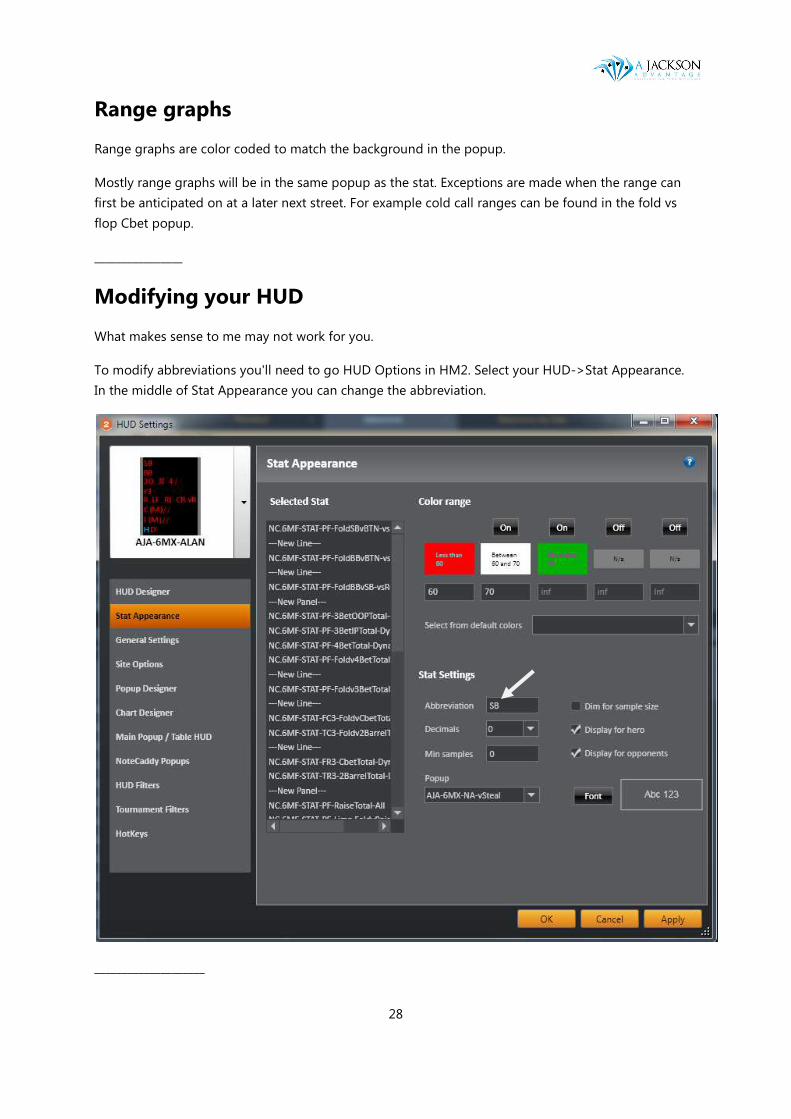
Modifying your HUD
What makes sense to me may not work for you.
To modify abbreviations you'll need to go HUD Options in HM2. Select your HUD->Stat Appearance.
In the middle of Stat Appearance you can change the abbreviation.
____________________
29
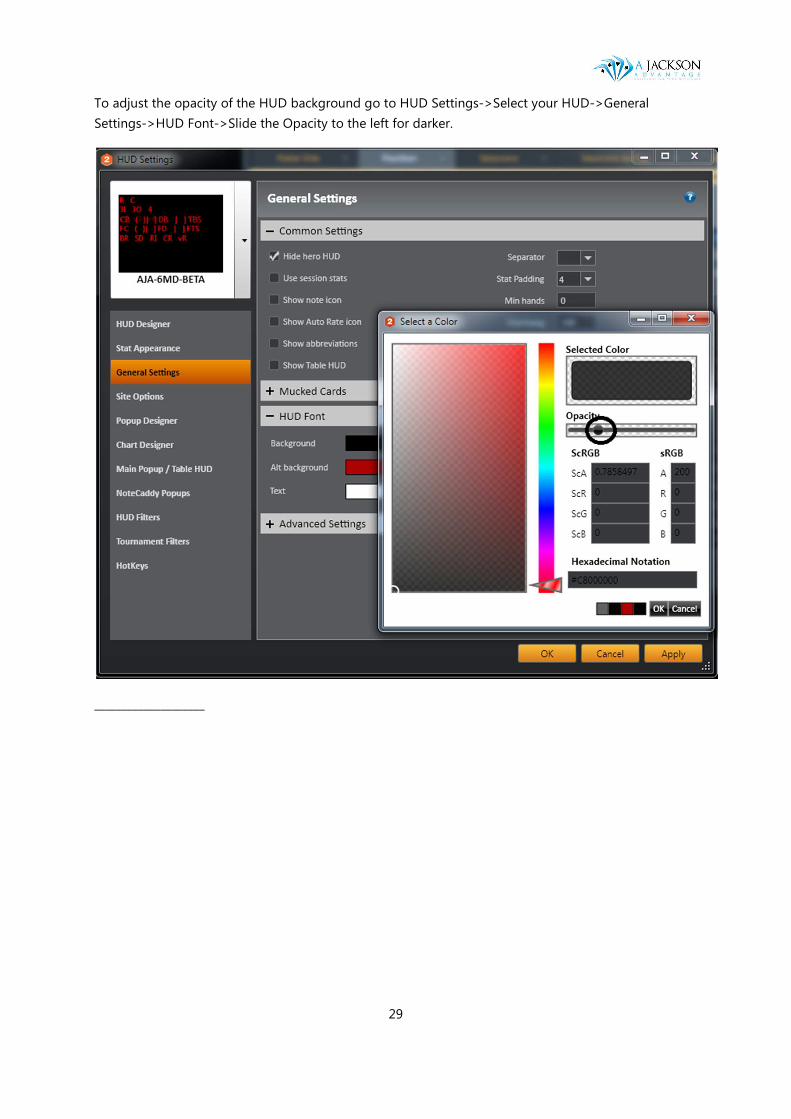
To adjust the opacity of the HUD background go to HUD Settings->Select your HUD->General
Settings->HUD Font->Slide the Opacity to the left for darker.
____________________
30
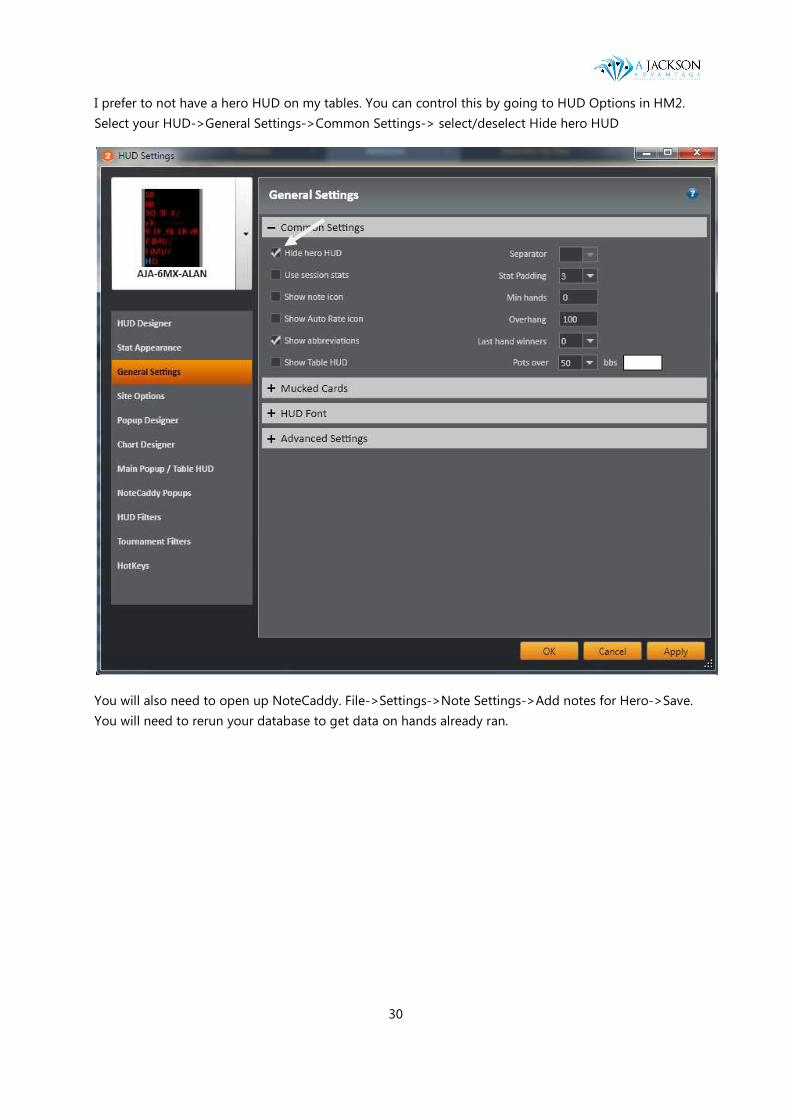
I prefer to not have a hero HUD on my tables. You can control this by going to HUD Options in HM2.
Select your HUD->General Settings->Common Settings-> select/deselect Hide hero HUD
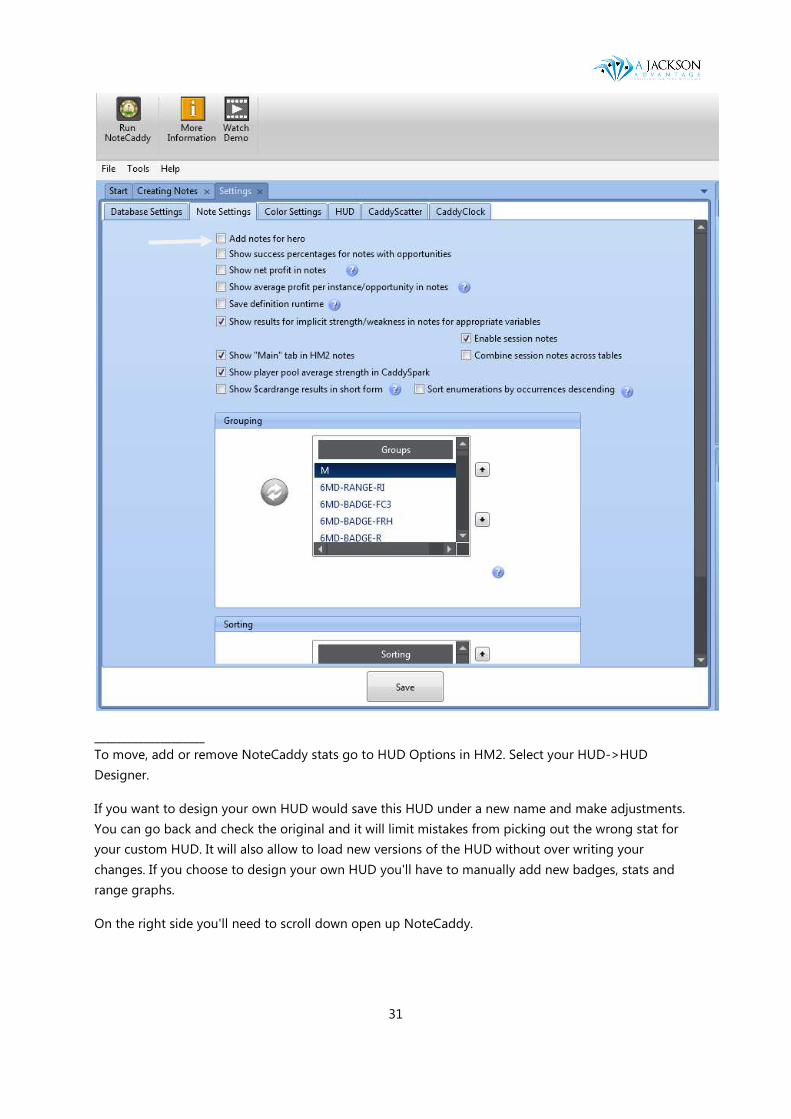
You will also need to open up NoteCaddy. File->Settings->Note Settings->Add notes for Hero->Save.
You will need to rerun your database to get data on hands already ran.
31
____________________
To move, add or remove NoteCaddy stats go to HUD Options in HM2. Select your HUD->HUD
Designer.
If you want to design your own HUD would save this HUD under a new name and make adjustments.
You can go back and check the original and it will limit mistakes from picking out the wrong stat for
your custom HUD. It will also allow to load new versions of the HUD without over writing your
changes. If you choose to design your own HUD you'll have to manually add new badges, stats and
range graphs.
On the right side you'll need to scroll down open up NoteCaddy.
32
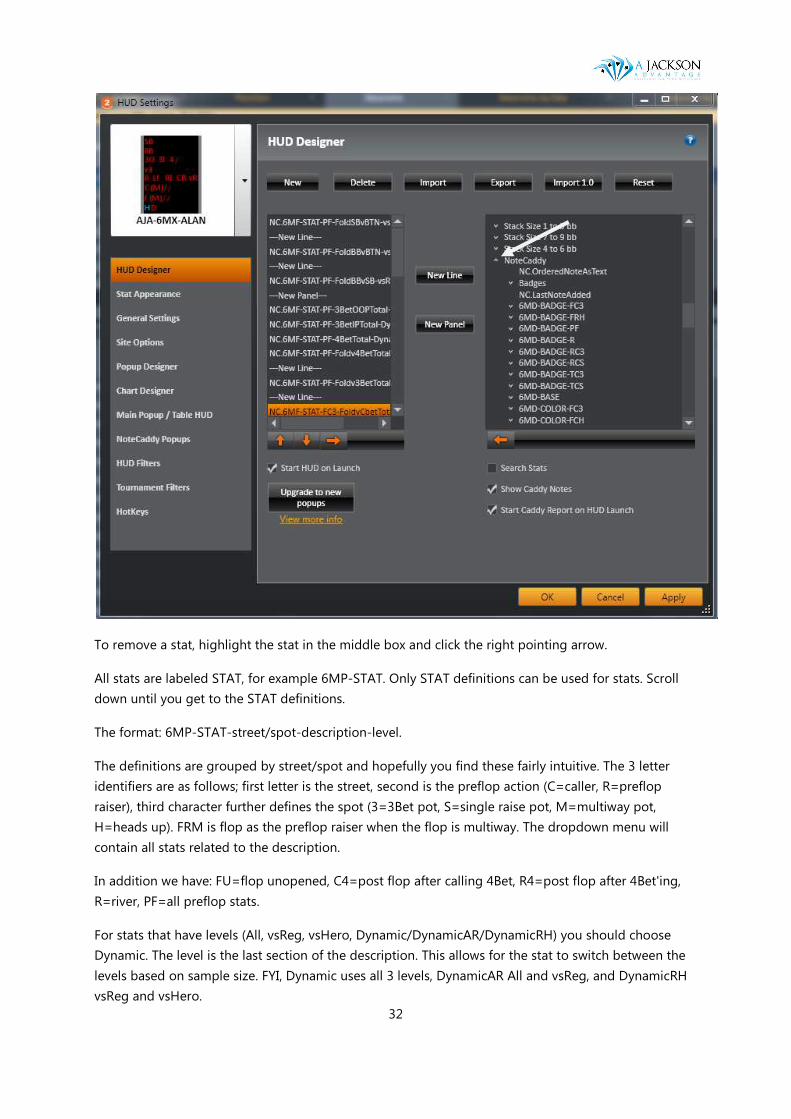
To remove a stat, highlight the stat in the middle box and click the right pointing arrow.
All stats are labeled STAT, for example 6MP-STAT. Only STAT definitions can be used for stats. Scroll
down until you get to the STAT definitions.
The format: 6MP-STAT-street/spot-description-level.
The definitions are grouped by street/spot and hopefully you find these fairly intuitive. The 3 letter
identifiers are as follows; first letter is the street, second is the preflop action (C=caller, R=preflop
raiser), third character further defines the spot (3=3Bet pot, S=single raise pot, M=multiway pot,
H=heads up). FRM is flop as the preflop raiser when the flop is multiway. The dropdown menu will
contain all stats related to the description.
In addition we have: FU=flop unopened, C4=post flop after calling 4Bet, R4=post flop after 4Bet'ing,
R=river, PF=all preflop stats.
For stats that have levels (All, vsReg, vsHero, Dynamic/DynamicAR/DynamicRH) you should choose
Dynamic. The level is the last section of the description. This allows for the stat to switch between the
levels based on sample size. FYI, Dynamic uses all 3 levels, DynamicAR All and vsReg, and DynamicRH
vsReg and vsHero.
33
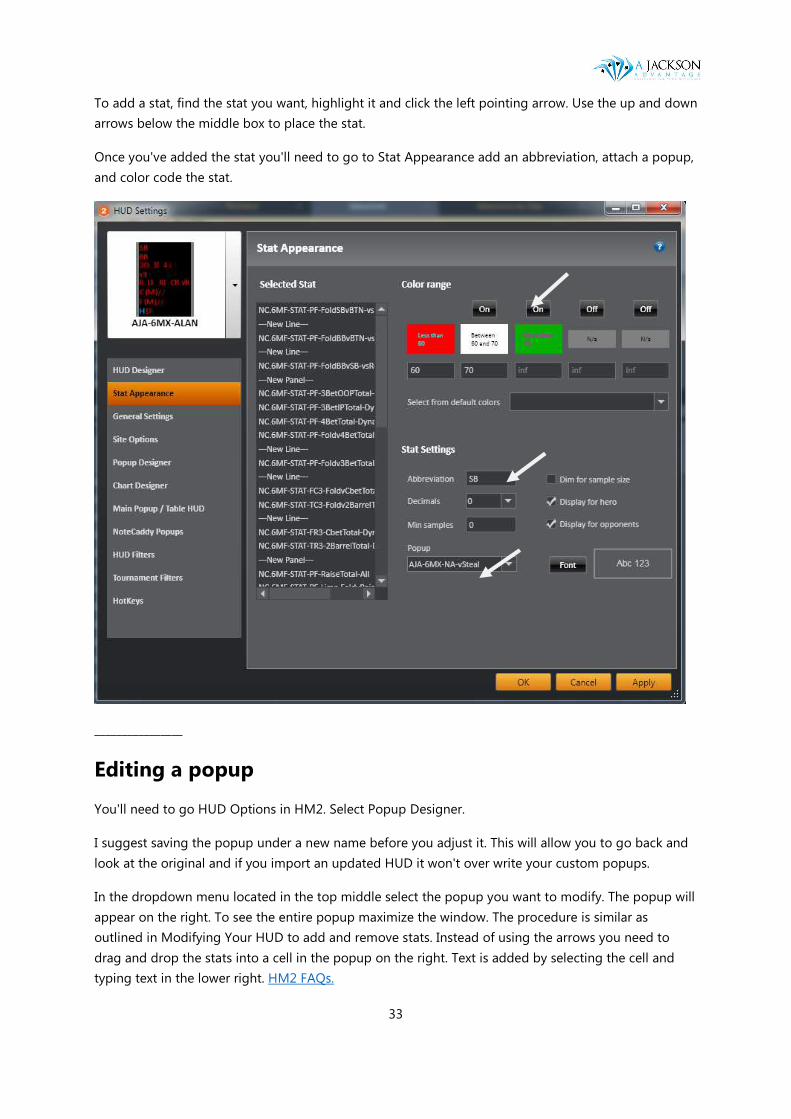
To add a stat, find the stat you want, highlight it and click the left pointing arrow. Use the up and down
arrows below the middle box to place the stat.
Once you've added the stat you'll need to go to Stat Appearance add an abbreviation, attach a popup,
and color code the stat.
________________
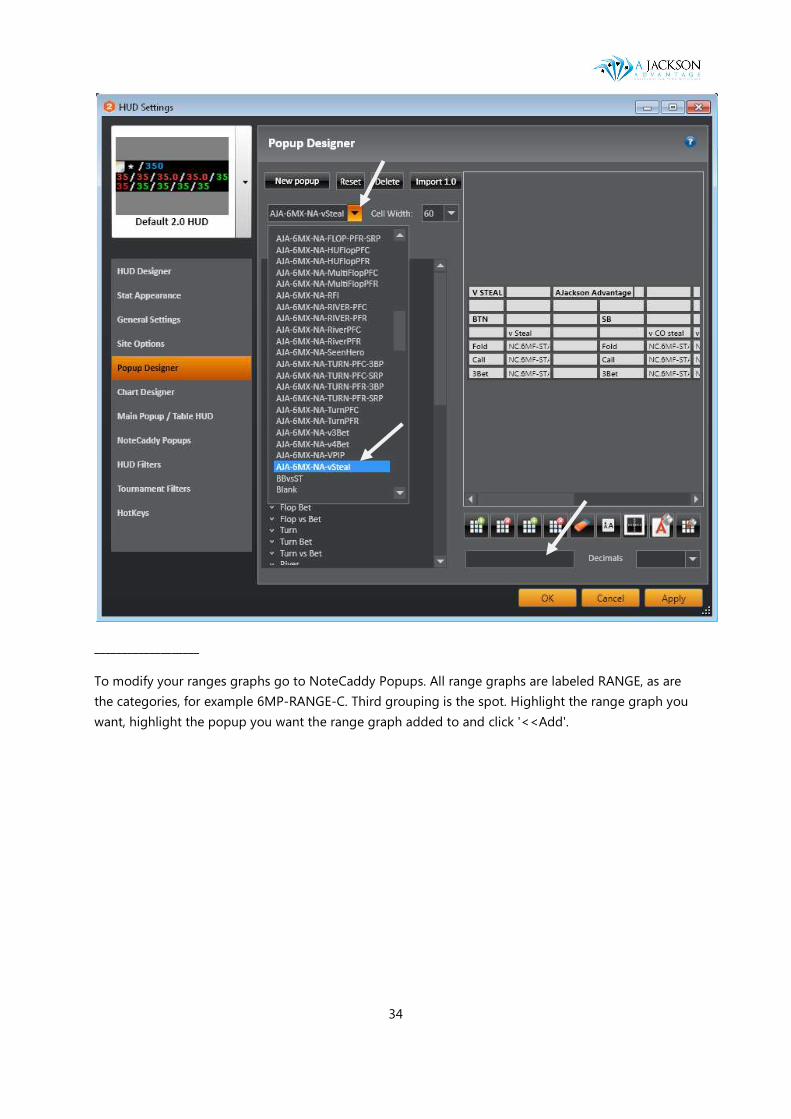
Editing a popup
You'll need to go HUD Options in HM2. Select Popup Designer.
I suggest saving the popup under a new name before you adjust it. This will allow you to go back and
look at the original and if you import an updated HUD it won't over write your custom popups.
In the dropdown menu located in the top middle select the popup you want to modify. The popup will
appear on the right. To see the entire popup maximize the window. The procedure is similar as
outlined in Modifying Your HUD to add and remove stats. Instead of using the arrows you need to
drag and drop the stats into a cell in the popup on the right. Text is added by selecting the cell and
typing text in the lower right. HM2 FAQs.
34
___________________
To modify your ranges graphs go to NoteCaddy Popups. All range graphs are labeled RANGE, as are
the categories, for example 6MP-RANGE-C. Third grouping is the spot. Highlight the range graph you
want, highlight the popup you want the range graph added to and click '<<Add'.

35
___________________

36
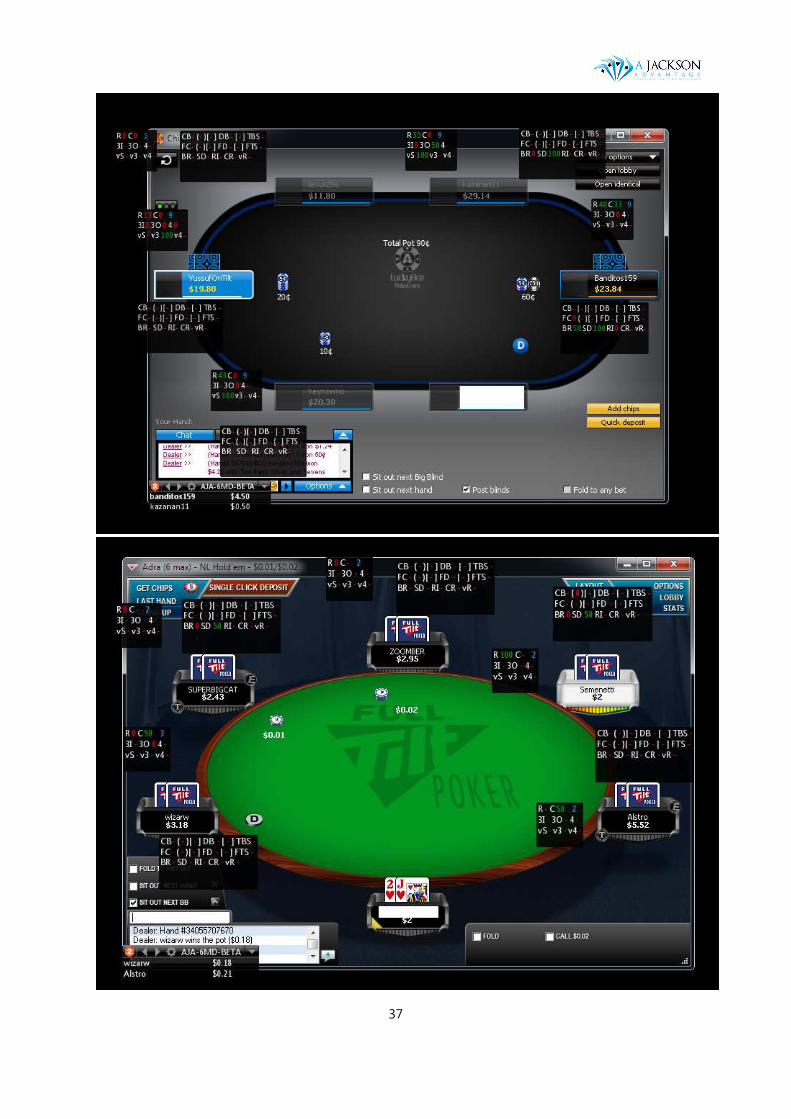
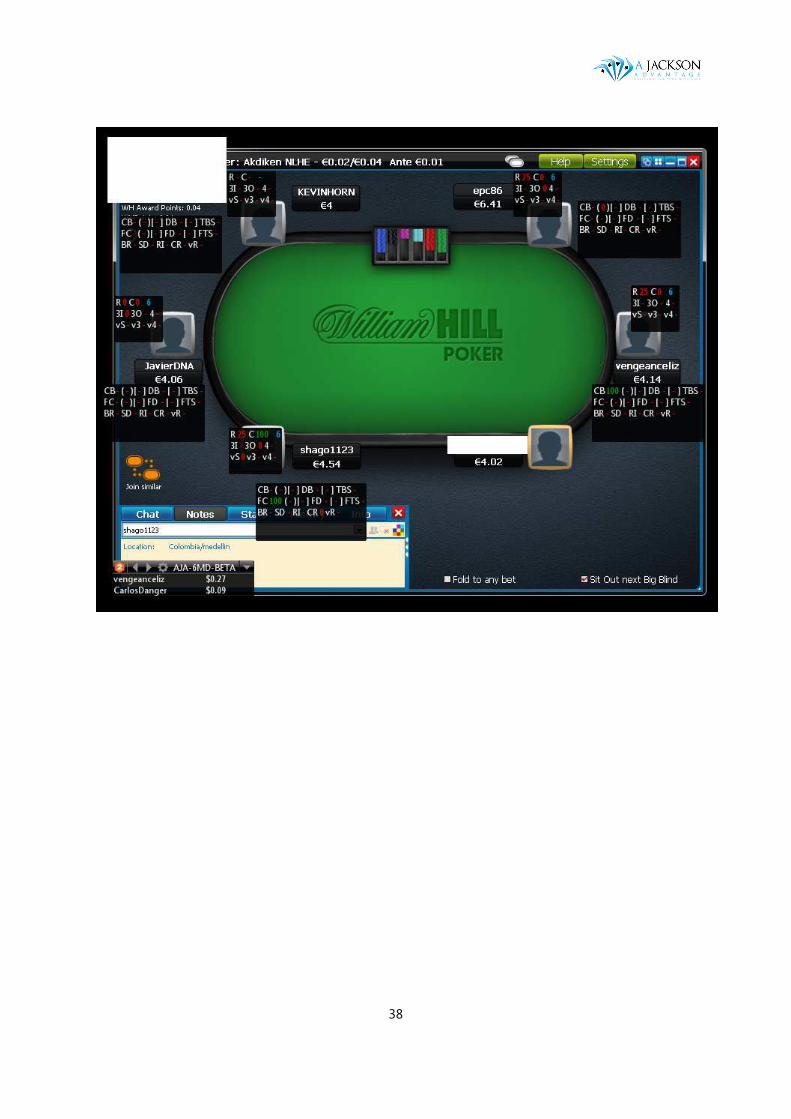
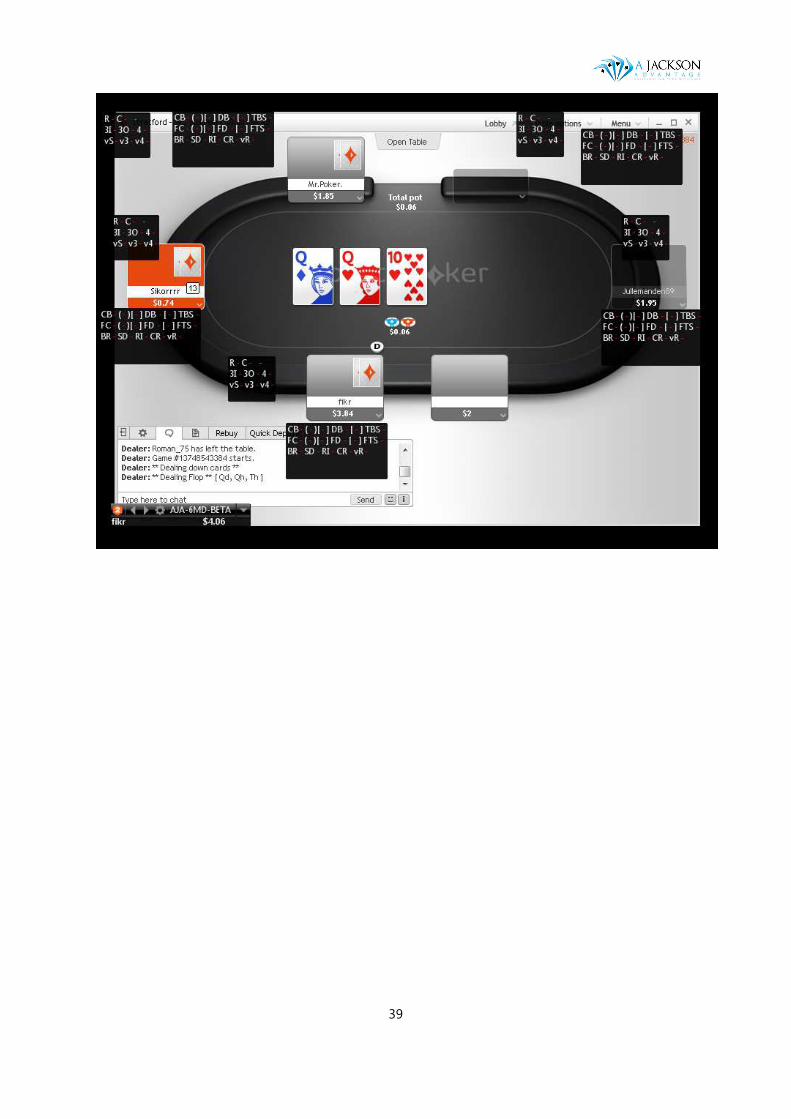
Table set up
Here are some of my set ups on the sites I play. Like I wrote above I leave a gap around my tables to
give more room for my HUD. I really don't like stats in the center of the table. Stars with how they
place the 1 and 6 seat is the toughest site to place your HUD without overhanging your panels. There
are other Stars table layouts that make it a bit easier.
Also, the HUD panels will be larger once they have data. How I have them placed makes it so nothing
is covered when they are at their largest.
37
38
39