cash manager - project management accounting erp...
TRANSCRIPT

Cash Manager Release 2015

Disclaimer
This document is provided “as-is”. Information and views expressed in this document, including URL
and other Internet Web site references, may change without notice. You bear the risk of using it.
Some examples are for illustration only and are fictitious. No real association is intended or inferred.
This document does not provide you with any legal rights to any intellectual property in any Microsoft
product. You may copy and use this document for your internal, reference purposes only.
Sample Code Warranty disclaimer
Microsoft Corporation disclaims any warranty regarding the sample code contained in this
documentation, including the warranties of merchantability and fitness for a particular purpose.
License agreement
Use of this software is covered by a license agreement provided with it. If you have any questions,
please call the Customer Assistance Department at 800-456-0025 (in the United States or Canada) or
+1-701-281-6500.
Copyright
© 2014 Microsoft Corporation. All rights reserved.
Publication Date
September 2014

Contents iii
Contents
Introduction 1
Cash Manager Overview ................................................................................................................. 1 Cash Manager Interaction ................................................................................................ 2
User’s Guide Overview .................................................................................................................... 3 What is Covered in the User’s Guide? ............................................................................. 3 Who Should Use the User’s Guide? ................................................................................. 3 How to Use the User’sGuide ............................................................................................. 3
Task Guidelines 5
Quick Reference Task List .............................................................................................................. 5 How Do I...? ....................................................................................................................... 5 How Do I Close...? ............................................................................................................. 5 How Do I Define...? ........................................................................................................... 5 How Do I Set Up...? ........................................................................................................... 5
Setting Up the Cash Manager Module 7
Setting up the Cash Manager Module ........................................................................................... 7 Establishing Bank Accounts ......................................................................................................... 10 Establishing Bank Accounts with Foreign Currencies ................................................................. 11 Establishing Valid Entry Types ...................................................................................................... 12 Setting Up Cash Accounts ............................................................................................................ 13
Setting Up Cash Accounts in a New Installation ........................................................... 13 Setting Up Existing GL Cash Accounts in Cash Manager.............................................. 15 Setting Up a New Cash Account in Cash Manager ....................................................... 17
Processing Cash Manager Transactions 19
Cash Manager Transaction Flow .................................................................................................. 20 Reconciling Bank Statements ...................................................................................................... 21 Cash Balance Inquiry .................................................................................................................... 23 Forecasting Cash Flow .................................................................................................................. 24 Setting Up the Clear Check/Deposit Import Process .................................................................. 25 Importing Clear Check/Deposit Data ........................................................................................... 27 Clearing Checks/Deposits ............................................................................................................ 28 Closing the Cash Manager Module .............................................................................................. 30 Deleting Cash Manager Detail...................................................................................................... 31 Consolidating Cash Manager Activity ........................................................................................... 32 Reporting Cash Manager Information.......................................................................................... 34
Data Entry Screens 37
Cash Account Transactions (20.010.00) ..................................................................................... 37 Cash Account Transfers (20.020.00) .......................................................................................... 43 Daily Cash Balances (20.200.00) ................................................................................................ 47
Cash Account Balances Sorted By Period (20.200.01)................................................ 49 Cash Account Balance Detail (20.200.02) ................................................................... 51 Cash Account Balances Sorted By Date (20.200.04) .................................................. 53
Bank Reconciliation (20.210.00) ................................................................................................. 55 Reconcile Checks (20.210.01) ...................................................................................... 58 Select Checks to be Reconciled (20.210.02) ............................................................... 60 Reconcile Deposits (20.210.03) .................................................................................... 61 Select Deposits to be Reconciled (20.210.04) ............................................................. 63

iv Cash Manager
Maintenance Screens 65
Cash Account Maintenance (20.250.00) .................................................................................... 65 Entry Type Maintenance (20.260.00) .......................................................................................... 67 Recurring Item Maintenance (20.270.00) .................................................................................. 69 Cash Flow Maintenance (20.280.00) .......................................................................................... 72
Process Screens 75
Release CA Batches (20.400.00) ................................................................................................. 75 Clear Check/Deposit Data Import (20.420.00) ........................................................................... 77 Clear Checks/Deposits (20.440.00) ............................................................................................ 80
Find Match (20.440.01) ................................................................................................. 83 Generate Recurring Transactions (20.500.00) ........................................................................... 86 Generate Consolidation File (20.510.00) .................................................................................... 88 Read Consolidation File (20.520.00) ........................................................................................... 90 Delete CA Detail (20.530.00) ....................................................................................................... 92
Setup and Integrity Screens 95
CA Setup (20.950.00) ................................................................................................................... 95 Clear Check/Deposit Import Setup (20.970.00) ......................................................................... 99 CA Integrity Check (20.990.00) ..................................................................................................101
Reports 103
Check Register (20.600.00) .......................................................................................................103 Daily Cash Balance (20.610.00) ................................................................................................104 Check/Deposit Reconciliation (20.620.00)...............................................................................106
Date Range Entry (20.620.01) .....................................................................................107 Unmatched Item List (20.625.00) .............................................................................................108 Bank Reconciliation (20.630.00) ...............................................................................................109
Date Range Entry (20.630.01) .....................................................................................112 Float Analysis (20.640.00) .........................................................................................................113 Cash Flow Projection (20.650.00) .............................................................................................115 PTD Transaction List (20.660.00) ..............................................................................................118 PTD Distribution List (20.670.00) ..............................................................................................119 Cash Accounts List (20.680.00) .................................................................................................120 Entry Type List (20.690.00) ........................................................................................................121 Recurring Item List (20.700.00) .................................................................................................122 Cash Flow Items List (20.710.00) ..............................................................................................123 Cash Transactions History (20.720.00) .....................................................................................124 Cash Manager Batch Register (20.800.00) ..............................................................................125 CA Edit (20.810.00) ....................................................................................................................127
Index 129

Introduction 1
Introduction
Cash Manager Overview The Cash Manager module in Microsoft Dynamics® SL provides a powerful tool to manage cash and
reconcile banking accounts. Three major functions are provided by this module:
A consolidated point of bank reconciliation. Cash Manager integrates with Accounts Payable,
Accounts Receivable and Order Processing to allow all reconciliation to be centralized into one
location.
A daily up-to-date cash balance. The cash balance of each bank account is updated as each batch
generated from a related Microsoft Dynamics SL module is released (see “Cash Manager
Interaction” for information about module integration). With this function, you can get a summary
of all accounts for a total cash position, or drill down to individual entries that make up a balance
for a particular day.
Powerful cash management reporting. Three different options are available under the Float
Analysis (20.640.00) report: Payee Summary (average days to clear by vendor), Bank Summary
(average days to clear by bank account), and Bank Detail (an “aging” report of all outstanding
checks by bank account). In addition, the Cash Flow Projection (20.650.00) report is available and
can be reported over different time frames and by a variety of payment assumptions.
The Cash Manager module also provides screens for entering transactions which affect cash, such as
bank service charges and wire transfers.

2 Cash Manager
Cash Manager Interaction
Figure 1: Cash Manager Interaction

Introduction 3
User’s Guide Overview This user’s guide provides information regarding the setup and use of the Cash Manager module.
Reviewing the user’s guide can help you make informed decisions regarding the implementation of the
Cash Manager module in your business.
What is Covered in the User’s Guide?
The user’s guide consists primarily of procedures and checklists that describe how to perform the
various tasks featured in the Cash Manager module. The user’s guide also contains topics that help
you become better acquainted with the capabilities of the module. Topics are arranged in a logical
order that builds on information previously presented in other user’s guides.
Who Should Use the User’s Guide?
The user’s guide is designed for readers who are new to Microsoft Dynamics SL. The guide provides
the information necessary for making decisions regarding how to use the Cash Manager module in
order to get the most from your system.
How to Use the User’s Guide
Read the appropriate section of the user’s guide before proceeding with any system customizations.
The user’s guide presents the procedures and steps required for completing the various cash manager
processes. To assist you in locating information, the user’s guide contains:
A Table of Contents of logically organized activities and tasks
An alphabetized Quick Reference Task List of commonly performed tasks
An alphabetized Index of the information provided in the user’s guide

4 Cash Manager

Task Guidelines 5
Task Guidelines
Quick Reference Task List This list contains tasks that are commonly performed with the Cash Manager module. Each task is
cross-referenced to a specific page in the user’s guide.
How Do I...?
Check Cash Balances — see “Cash Balance Inquiry” on page 23
Consolidate Cash Manager Activity — see “Consolidating Cash Manager Activity” on page 32
Forecast Cash — see “Forecasting Cash Flow” on page 24
Reconcile Bank Statements — see “Reconciling Bank Statements” on page 21
Report Cash Manager Information — see “ Reporting Cash Manager Information” on page 34
How Do I Close...?
Cash Manager module — see ”Closing the Cash Manager Module” on page 30
How Do I Define...?
Bank Accounts — see “Establishing Bank Accounts” on page 10
Bank Accounts with Foreign Currency — see ”Establishing Bank Accounts with Foreign Currencies”
on page 11
Valid Entry Types — see “Establishing Valid Entry Types” on page 12
How Do I Set Up...?
Cash Accounts — see “Setting Up Cash Accounts” on page 13
Cash Manager — see “Setting up the Cash Manager Module” on page 7

6 Cash Manager

Setting Up the Cash Manager Module 7
Setting Up the Cash Manager Module
This section provides information and procedures for managing cash and reconciling bank accounts.
These basic tasks include:
Setting up the Cash Manager Module
Establishing Bank Accounts
Establishing Bank Accounts with Foreign Currencies
Establishing Valid Entry Types
Setting Up Cash Accounts
Setting up the Cash Manager Module Once you have established your company’s bank account information and transaction entry types, you
can set up the Cash Manager module for regular operations. This involves defining the cash
management parameters of your company and entering the beginning balances of your cash
accounts.
Note:
The cash account to be used needs to be set up in General Ledger’s Chart of Accounts
Maintenance (01.260.00) as an asset account and it has to be denominated, either in base
currency or a foreign currency if currency manager module is activated.
The AR Holding account must be set up in General Ledger’s Chart of Accounts Maintenance
(01.260.00) as an asset account.
To set up the Cash Manager module:
1. Open CA Setup (20.950.00).
Figure 2: CA Setup (20.950.00)
2. Enter the Accept Transactions Start Date as the date you want the other modules’ transactions to
start flowing over to Cash Manager.
3. Check the Update Cash Accounts used in GL Transactions if you want journal entries from General
Ledger to flow over to Cash Manager.

8 Cash Manager
4. Set up the cash account in Cash Account Maintenance (20.250.00). Click New on the toolbar and
enter all requested account information in the appropriate fields.
5. Check Accept Updates from GL transactions if General Ledger transactions are supposed to flow
over to Cash Manager.
Note: Both CA Setup (20.950.00) and Cash Account Maintenance (20.250.00) must be checked
in order for the General Ledger transactions to flow over to Cash Manager. Enter the information
of any outstanding Accounts Payable or Accounts Receivable module transactions using Cash
Account Transactions (20.010.00).
6. If you are entering new transactions in your database to get the cash account balances started,
the accounts payable checks or electronic payments, payroll checks, accounts receivable
payments and journal transactions in your database are going to update Cash Manager only when
the following criteria is met: accounts receivable payment batch deposit dates, accounts payable
check dates, payroll check dates or general ledger transaction dates are >= the Accept
Transactions Start Date in CA Setup (20.950.00).
Note: All transactions entered in Cash Account Transactions (20.010.00) will immediately update
Cash Manager regardless of the entry type and regardless of the Accept Transactions Start Date in
CA Setup (20.950.00).
7. Locate the bank statement for this cash account. On the bank statement, locate the beginning
and ending statement balances. Make note of these balance amounts.
8. Open Bank Reconciliation (20.210.00). Enter the account and subaccount numbers for the Cash
Account in Bank Acct and Bank Sub. In the grid area, enter data in the following fields:
Statement Date and Reconciliation Date — The beginning and ending date from the latest
bank statement. For example, March bank reconciliation would have a statement date of
03/01/2002 and a reconciliation date of 03/31/2002, or a statement date of 03/31/2002
and a reconciliation date of 03/31/2002.
Statement Balance — The amount of the beginning balance on your bank statement.
9. Click Save on the toolbar. Select Outstanding in the Load Detail section.
10. Click Reconcile Deposits and clear all outstanding deposits identified on the latest bank
statement. To clear a deposit, check Cleared Deposit on the transaction line. Enter the clear
amount UNLESS you have the Provide Reconcilement amount checked in CA Setup (20.950.00).
11. Click OK when finished.
12. Click Reconcile Checks and clear all outstanding checks and electronic payments identified on the
latest bank statement. To clear a check or electronic payment, select Cleared Check on the
transaction line. Enter the clear amount UNLESS you have the Provide Reconcilement amount
checked in CA Setup (20.950.00).
13. Click OK when finished.
14. Click Save on the toolbar.
15. The adjusted balance should be the ending balance on your bank statement. (Beginning Balance
plus Deposits In Transit minus (Outstanding Checks plus Electronic Payments) = Adjusted
Balance.) The adjusted balance should equal the CA Balance.
Note: If CA out of Balance is not equal to zero, then verify that the cleared checks, electronic
payments or deposits from the bank statement items were checked as cleared, and verify that the
statement balance has been entered correctly. There may be some cleared transactions that did
not meet the Accept Transactions Start Date defined in CA Setup (20.950.00) in which case they
did not update Cash Manager. You will need to do the following in order to the Cash Manager
balance started correctly.
16. Enter the CA out of Balance amount as an O entry type in Cash Account Transaction (20.010.00).
Checks, electronic payments and deposits cannot be entered in the same batch.
Enter data in the following fields:

Setting Up the Cash Manager Module 9
Batch Handling: Release Now
Bank Account: Bank account number
Bank Sub: Bank subaccount number
Entry Type: OD entry type if the CA out of balance is negative; OM entry type if the CA out of
balance is positive
RefNbr: Numeric or Alphanumeric
Date: Date that falls within the reconciliation date and statement date
Reconcil Status: Cleared
Cleared Date: Date that falls within the reconciliation date and statement date
17. Click Finish on the toolbar.
18. The CA out of Balance should now display as 0.00 and the bank reconciliation can be checked as
reconciled.

10 Cash Manager
Establishing Bank Accounts Enter the information of your company’s bank accounts (account name, account number, address,
transit number, etc.) on Cash Account Maintenance (20.250.00). General ledger account (and
subaccount) numbers (see the General Ledger Help or user’s guide) are used to uniquely identify each
bank account you define in Cash Account Maintenance (20.250.00)
You normally define the information of all bank accounts before beginning any regular Cash Manager
module operations. However, note that you can enter the information of a new account “on the fly,”
using Quick Maintenance feature (see the System Manager Help or user’s guide).
To set up your company’s bank accounts:
1. Develop an account coding scheme that will help you accurately identify multiple bank accounts.
You can do this several ways:
Set up a separate general ledger account for each cash account and use a prescribed
subaccount structure.
Identify each cash account with a unique account and subaccount number.
2. Obtain a list of your company’s current bank accounts and assign account (and subaccount)
numbers to the accounts in accordance with the bank account coding scheme developed in step
1.
3. Determine how to handle any bank names that may sort differently than desired on reports. By
default, the software sorts names according to the first word in each name. For example, the
software sorts such names as “The First National Bank” and “The Citizens Bank” by the word The.
The “at” sign (@) can be used to designate the primary sort word in a bank name (the word that
the software should use for alphabetizing the name). For example, entering The @First National
Bank and The @Citizens Bank causes the software to sort these bank names by the words First
and Citizens rather than the word The. On reports and lists, these names would appear in the
order: The Citizens Bank and The First National Bank
4. Edit your chart of accounts to include your company’s bank accounts. Use the General Ledger
module’s Chart of Accounts Maintenance (01.260.00) to define bank account information.
5. Enter the information of each bank account into Cash Account Maintenance (20.250.00).
Generate Cash Accounts List (20.680.00) and review its information for accuracy. If there are
errors in the bank account information displayed on the Cash Accounts List (20.680.00), continue
with step 6.
6. Edit the information of any bank accounts in error, using Cash Account Maintenance (20.250.00).

Setting Up the Cash Manager Module 11
Establishing Bank Accounts with Foreign Currencies If you are also using the Currency Manager module, you can maintain bank accounts that use
currencies different from your company’s base currency. However, note that you cannot have bank
accounts with different currencies using the same general ledger account number. This is because
currency is designated at the account level. For example, if you have three bank accounts with three
different currencies, you cannot assign the same general ledger account to all three and differentiate
them with subaccounts.
Below is an example of how you can set up multiple accounts with differing currencies by altering the
subaccount code:
Account Account Name Subaccount Bank Name
1030 Checking — USA XXXXX-01 Bank of New York
1030 Checking — USA XXXXX-02 Bank of Boston
1031 Checking — UK XXXXX-03 Bank of London
1032 Checking — Germany XXXXX-04 Bank of Munich
1032 Checking — Germany XXXXX-05 Bank of Heidelberg
In the above example, accounts 1030 and 1032 have multiple subaccounts. However, both
subaccounts use the same currency. If you do not want to affect bank accounts at the subaccount
level, assign each bank account a separate account number:
Account Account Name Subaccount Bank Name
1030001 Checking — USA XXXXXXX Bank of New York
1030002 Checking — USA XXXXXXX Bank of Boston
1031001 Checking — UK XXXXXXX Bank of London
1032001 Checking — Germany XXXXXXX Bank of Munich
1032002 Checking — Germany XXXXXXX Bank of Heidelberg

12 Cash Manager
Establishing Valid Entry Types Each transaction entered in the Cash Manager module is associated with a record identifier known as
an “entry type.” This ID specifies the type of transaction entered. The following entry types are
predefined in the software:
CK — AP Checks
OA — Outstanding AP Checks/Electronic payments
OD — Outstanding Deposits
OM — Outstanding Misc. Disbursements
OP — Outstanding PR Checks
PA — AR Deposits
UC — Unused Checks
ZZ — Offsetting Entry
To set up entry IDs:
1. Review your past cash management transactions to determine the types of cash management
transactions you normally generate: service charges, wire transfers, outstanding AP checks, AR
deposits, etc.
2. Assign an appropriate description and two-character abbreviation to each type of transaction
identified in step 1. These are your cash management transaction entry types.
3. Determine the information of each entry type. This includes each entry type’s general ledger
account (and subaccount), whether it is used for receipts or disbursements, whether or not the
software should include its transactions in average days to clear calculations, whether or not the
software should create unapplied deposits in Accounts Receivable module records (receipt entry
types), and whether or not the entry should be active (currently available to be assigned to
transactions).
4. Enter the information from steps 2 and 3 on Entry Type Maintenance (20.260.00).
5. Generate the Entry Type List (20.690.00) and review its information for accuracy. If there are
errors in the entry type information displayed on the Entry Type List (20.690.00), continue with
step 6.
6. As necessary, edit the information of any entry types in error, using Entry Type Maintenance
(20.260.00).
Setting Up the Cash Manager Module 13
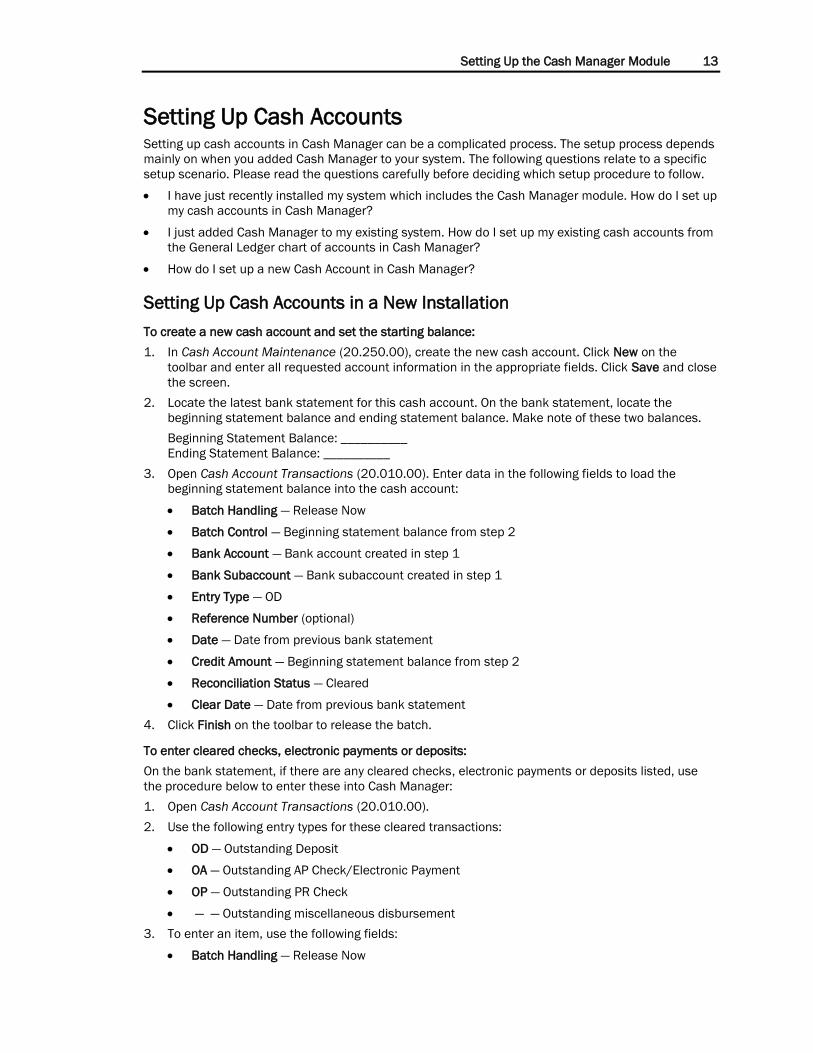
Setting Up Cash Accounts Setting up cash accounts in Cash Manager can be a complicated process. The setup process depends
mainly on when you added Cash Manager to your system. The following questions relate to a specific
setup scenario. Please read the questions carefully before deciding which setup procedure to follow.
I have just recently installed my system which includes the Cash Manager module. How do I set up
my cash accounts in Cash Manager?
I just added Cash Manager to my existing system. How do I set up my existing cash accounts from
the General Ledger chart of accounts in Cash Manager?
How do I set up a new Cash Account in Cash Manager?
Setting Up Cash Accounts in a New Installation
To create a new cash account and set the starting balance:
1. In Cash Account Maintenance (20.250.00), create the new cash account. Click New on the
toolbar and enter all requested account information in the appropriate fields. Click Save and close
the screen.
2. Locate the latest bank statement for this cash account. On the bank statement, locate the
beginning statement balance and ending statement balance. Make note of these two balances.
Beginning Statement Balance: __________
Ending Statement Balance: __________
3. Open Cash Account Transactions (20.010.00). Enter data in the following fields to load the
beginning statement balance into the cash account:
Batch Handling — Release Now
Batch Control — Beginning statement balance from step 2
Bank Account — Bank account created in step 1
Bank Subaccount — Bank subaccount created in step 1
Entry Type — OD
Reference Number (optional)
Date — Date from previous bank statement
Credit Amount — Beginning statement balance from step 2
Reconciliation Status — Cleared
Clear Date — Date from previous bank statement
4. Click Finish on the toolbar to release the batch.
To enter cleared checks, electronic payments or deposits:
On the bank statement, if there are any cleared checks, electronic payments or deposits listed, use
the procedure below to enter these into Cash Manager:
1. Open Cash Account Transactions (20.010.00).
2. Use the following entry types for these cleared transactions:
OD — Outstanding Deposit
OA — Outstanding AP Check/Electronic Payment
OP — Outstanding PR Check
— — Outstanding miscellaneous disbursement
3. To enter an item, use the following fields:
Batch Handling — Release Now

14 Cash Manager
Batch Control — Deposit/check/electronic payment amount
Bank Account — Bank account created in step 1
Bank Subaccount — — Bank subaccount created in step 1
Entry Type — See above list**
Reference Number (optional)
Date — Deposit/check/electronic payment date
Debit or Credit Amount — Deposit/check/electronic payment amount
Reconciliation Status — Outstanding (if value is changeable)
4. Click Finish in the toolbar to release the batch.
5. Open Bank Reconciliation (20.210.00).
6. Enter the account and subaccount numbers for the Cash Account in the Bank Account and Bank
Subaccount fields. Now in the grid area, enter data in the following fields:
Statement Date — Date from the latest bank statement
Statement Balance — Ending Statement balance from step 2
7. Click Save on the toolbar.
8. Click Load Detail on the screen. Select Both and click OK.
9. After loading is complete, click Reconcile Deposits. Now clear all outstanding deposits identified
on the latest bank statement. To clear a deposit, change the value of the clear drop-down list box
on the transaction’s line from No to Yes.
10. Click OK when finished.
11. Click Reconcile Checks. Now clear all outstanding checks or electronic payments identified on the
latest bank statement. To clear a check or electronic payment, change the value of the clear drop
down-box list box on the transaction’s line from No to Yes.
12. Click OK when finished.
13. Click Save on the toolbar.
Now CA Out of Balance should show zero. Also the following fields should contain the ending
statement balance on this screen; CA Balance, Statement Balance, and Adjusted Balance.
Note: If CA Out of Balance is not equal to zero at this point, verify the following items:
Beginning Statement balance — Verify it was entered correctly and released without error as
described in step 3 of “Create a New Cash Account and Set the Starting Balance.”
Ending Statement balance — Verify the correct number was entered into the Statement Balance
field in Bank Reconciliation (20.210.00) as described above in step 6.
Cleared Checks or Deposits — Verify all cleared items from the bank statement were entered as
described above. Also verify that all of these items were cleared as described above.

Setting Up the Cash Manager Module 15
Setting Up Existing GL Cash Accounts in Cash Manager
To reconcile Accounts Payable checks, electronic payments and Payroll checks:
Before completing CA Setup (20.950.00), verify all cleared checks and electronic payments written
against Cash Accounts, which is set up in General Ledger, show a cleared status. These would be
checks and electronic payments entered into Accounts Payable and/or Payroll (if part of your current
installation). For information on clearing Accounts Payable (AP) checks and electronic payments, see
the Reconciling Checks section in the Accounts Payable Help or user’s guide. For information on
clearing Payroll (PR) checks, see the Payroll Check Reconciliation (02.050.00) screen reference in the
Payroll Help or user’s guide.
To set up existing cash accounts in Cash Manager:
1. Complete CA Setup (20.950.00).
Figure 3: CA Setup (20.950.00)
Make sure the Start Accepting Transactions from Other Modules on date is set to the actual date
you plan on implementing Cash Manager. The date will probably be the middle of the next period.
This date can be changed later so it is better to overestimate initially. Also select the Provide
Reconcilement Amount box in the Options section.
Click Save on the toolbar and close the screen.
2. Create the cash account in Cash Manager. In Cash Account Maintenance (20.250.00), Click New
on the toolbar and enter all requested account information in the appropriate fields. Click Save on
the toolbar and close the screen.
3. Locate the latest bank statement for this cash account. On the bank statement, locate the ending
statement balance. Make note of this balance.
Bank Account:____________ Bank SubAccount:____________
Ending Statement Balance:____________
4. If the Accounts Receivable module is part of your system, all outstanding AR deposits for each
cash account will need to be identified. All Accounts Receivable deposits will load into Cash
Manager as outstanding. It will be necessary to distinguish those that have cleared the bank from
those that have not.
To find a list of deposits, run the Cash Transactions History (20.720.00) report available on the
Cash Manager report menu. Be sure to include all accounting periods.
On this report, AR deposit-related transactions are identified by transaction type (Tn Tp): PA,
Payment; PP, Pre-Payment; CS, Cash Sale; RP, Payment Reversal; or NS, NSF Check Reversal. Use

16 Cash Manager
all bank statements prior to the most current one for this cash account to identify which
transactions have been cleared by the bank. Finally, these items will need to be cleared in step 5
of “Enter Cleared Checks or Deposits,” next.
5. Open CA Integrity Check (20.990.00) and run the integrity check for each cash account. It is very
important to select the correct starting period before running integrity check. This starting period
is usually the first accounting period in which Microsoft Dynamics SL was ever used. This is
needed to select all cash transactions from AR, AP, and Payroll (PR), if any of these modules are
part of your system.
To enter cleared checks, electronic payments, or deposits:
In Bank Reconciliation (20.210.00), the following procedure will need to be performed on each Cash
Account:
1. Enter the account and subaccount numbers for the Cash Account in the Bank Account and Bank
Subaccount fields. Now in the grid area, enter data in the following fields:
Statement Date — Date from most current bank statement.
Statement Balance — Ending statement balance.
2. Click Save on the toolbar.
3. Click Load Detail on the screen.
4. Select the Outstanding option and click OK.
5. After the loading is complete, click Reconcile Deposits. Now clear all deposits identified in step 4
of “Set Up Existing Cash Accounts in Cash Manager” (if any) and any on the current bank
statement. To clear a deposit, change the value of the clear drop-down list box on the
transaction’s line from No to Yes.
6. Click OK when finished.
7. Click Reconcile Checks. Now clear all outstanding checks and electronic payments identified on
the current bank statement. To clear a check or electronic payment, change the value of the clear
drop down box on the transaction’s line from No to Yes.
8. Click OK when finished.
9. Click Save on the toolbar.
Now your CA Out of Balance field should show zero and CA Balance should contain your current cash
account balance.
Note: If CA Out of Balance is not equal to zero at this point, verify the following items:
Ending Statement balance — Correct number is entered in the Statement Balance field on Bank
Reconciliation (20.210.00) as described in step 1.
Cleared Checks or Deposits — All cleared items from the bank statement are cleared as described
above.

Setting Up the Cash Manager Module 17
Setting Up a New Cash Account in Cash Manager
1. To create the new cash account, open Cash Account Maintenance (20.250.00). Click New on the
toolbar and enter all requested account information in the appropriate fields. If this new account
has a balance of zero, you are finished. Otherwise, you need to set the beginning account balance
starting with step 2.
2. To set the beginning account balance, you need to know how this money was placed into the
account. If a deposit was made into the account, go to step 3. If money was transferred into this
new cash account from another cash account, go to step 5.
3. If a deposit was made into the account, open Cash Account Transactions (20.010.00) and enter
data in the following fields:
Batch Handling — Release Now
Batch Control — Amount of the deposit
Bank Account — Bank account used in step 1
Bank Subaccount — Bank subaccount used in step 1
Entry Type — PA*
Reference Number (optional)
Date — Date of the deposit
Credit Amount — Amount of the deposit
Reconciliation Status — Outstanding
4. Click Finish on the toolbar to release the batch.
Note: If this payment will be entered in Accounts Receivable, then no transaction entry is needed
in Cash Account Transactions (20.010.00).
5. If money was transferred into this new cash account from another cash account, open Cash
Account Transfers (20.020.00) and enter data in the following fields:
Batch Handling — Release Now
Batch Control — Amount of money transferred
Bank Account (Source area) — Account number money is coming from
Bank Subaccount (Source area) — Subaccount number money is coming from
Bank Account (Destination area) — Account number of new cash account
Bank Subaccount (Destination area) — Subaccount number of new cash account
Reference Number (not optional)
Date — Date of transfer
Transaction Description (optional)
Amount — Amount of money transferred
6. Click Finish on the toolbar to release the batch.

18 Cash Manager

Processing Cash Manager Transactions 19
Processing Cash Manager Transactions
The Processing Cash Manager Transactions section provides information and procedures for
managing cash and reconciling bank accounts. These basic tasks include:
Reconciling Bank Statements
Cash Balance Inquiry
Forecasting Cash Flow
Setting Up the Clear Check/Deposit Import Process
Importing Clear Check/Deposit Data
Clearing Checks/Deposits
Closing the Cash Manager Module
Deleting Cash Manager Detail
Consolidating Cash Manager Activity
Reporting Cash Manager Information

20 Cash Manager
Cash Manager Transaction Flow
Figure 4: Cash Manager Transaction Flow
Enter Transactions
Cash Account Transactions (20.010.00)
Cash Account Transfers (20.020.00)
Generate Recurring Items
Generate Recurring Transactions (20.500.00)
Delete Detail
Delete CA Detail (20.530.00)
Reconcile Bank Statements
Bank Reconciliation (20.210.00)
Make Adjusting Entries
Cash Account Transactions (20.010.00)
Receive Updates from Other Modules
Release Accounts Payable Batches (03.400.00)
Release Accounts Receivable Batches (08.400.00)
Print Reports
Bank Reconciliation (20.630.00)
Cash Flow Projection (20.650.00)
Daily Cash Balance (20.610.00)
Close Cash Manager
Closing Process (01.560.00)
Read Subsidiary Consolidations
Read Consolidation File (20.520.00)
Release Transactions to General Ledger
Release CA Batches (20.400.00)
Release General Ledger Batches (01.010.00)when set up to do so

Processing Cash Manager Transactions 21
Reconciling Bank Statements The Cash Manager module features quick, efficient bank statement reconciliations. All reconciliation
activity is coordinated through Bank Reconciliation (20.210.00) in the Cash Manager module.
Use Bank Reconciliation (20.210.00) to obtain the records of transactions entered in the
Accounts Payable and Accounts Receivable modules for the specified banking period.
The software calculates an adjusted bank-to-book total and compares this total to the balance of
the cash account.
Use Reconcile Checks (20.210.01) and Reconcile Deposits (20.210.03) to select outstanding
checks, electronic payments, and deposits to be cleared.
Though most reconciling periods are monthly, the Cash Manager module can handle any time period
up to a daily reconciliation, if needed.
To reconcile bank statements:
1. Access Bank Reconciliation (20.210.00) and enter the following information, using the bank
statement for reference: bank account (and subaccount) number, statement date, reconciliation
cut-off date, general ledger reconciliation period, and statement balance.
Figure 5: Bank Reconciliation (20.210.00)
2. Select the amount of information to “load” (display) in Bank Reconciliation (20.210.00) in the
Load Detail section.
You can load outstanding items only, cleared items only, or both cleared and outstanding items.
3. Click Reconcile Checks to access Reconcile Checks (20.210.01). The software loads detail for
checks and electronic payments according to the option selected under Load Detail.
4. Select the checks and electronic payments to clear. You can either clear each check or electronic
payment one at a time or select a range of checks/electronic payments to clear.
Note: If you have selected Provide Reconcilement Amt in CA Setup (20.950.00), the software
automatically displays the amount of each check/electronic payment selected as its cleared
amount.
5. Click OK to clear the selected checks/electronic payments. Bank Reconciliation (20.210.00)
automatically returns to the display with the outstanding check, adjusted, and out-of-balance
totals changed to reflect the checks/electronic payments cleared.

22 Cash Manager
6. Click Reconcile Deposits to access Reconcile Deposits (20.210.03). The software loads detail for
deposits according to the option selected under Load Detail.
7. Select the deposit(s) to clear. You can either clear each deposit one at a time or select a range of
deposits to clear.
Note: If you have selected Provide Reconcilement Amt in CA Setup (20.950.00), the software
automatically displays the deposit amount of each deposit selected as its cleared amount.
8. Click OK to clear the selected deposits. Bank Reconciliation (20.210.00) automatically returns to
the display with the appropriate totals changed to reflect the deposits cleared.
9. Make any adjusting entries on Cash Account Transactions (20.010.00). Click Cash Account
Transactions to access Cash Account Transactions (20.010.00).
Note: You can also use Cash Account Transfers (20.020.00) to move cash more efficiently from
one cash account to another, using a single-entry transfer approach rather than the double-sided
transfer entries used in Cash Account Transactions (20.010.00).
After entering any adjusting transactions, select Release Now at Batch Handling and exit the
batch of adjusting transactions. The batch is immediately released for posting. Bank
Reconciliation (20.210.00) returns to the display with the appropriate totals changed to reflect
the adjustments. All transactions must be cleared for balances to be updated. Repeat steps 3
through 8 as needed. If an out-of-balance condition occurs, it must be resolved prior to the next
reconciliation.
10. Click New to perform subsequent reconciliations to the same company ID, bank account, and
subaccount.
Review the summary or detail information of the bank reconciliation(s), as necessary (at this point
in the reconciliation process, you may want to take a closer look at certain reconciliation details).
Use the arrow buttons on the toolbar to navigate between the summary information of
different bank statement reconciliations.
Use Load Detail to review the details of selected statement reconciliation items (cleared
items, outstanding items).
11. Generate Check/Deposit Reconciliation (20.620.00) and Bank Reconciliation (20.630.00) to
support all reconciliation activity just performed.

Processing Cash Manager Transactions 23
Cash Balance Inquiry One of the most important functions of the Cash Manager module is to provide your company with up-
to-date cash balance information. This information is always readily available in Daily Cash Balances
(20.200.00), which lists the current cash balance for each cash account and the combined balance of
all cash accounts. This combined cash balance is always as current as the last batch released by
these modules:
Accounts Payable
Accounts Receivable
Cash Manager
General Ledger (if it is set up to update Cash Manager)
With the Cash Manager module, you do not have to wait for this combined cash balance to post to the
general ledger. You can also drill down to the detail transactions making up the cash balance.
To analyze your current cash position:
1. Access Daily Cash Balances (20.200.00).
Figure 6: Daily Cash Balances (20.200.00)
2. Highlight the detail line of a bank account with information you want to review in more detail;
then, click the Balances by Period or Balances by Date button.
Note: This accesses either Cash Account Balances Sorted By Period (20.200.01) or Cash Account
Balances Sorted By Date (20.200.04). These screens summarize, by period or by transaction
date, the account’s receipts, disbursements, and closing cash balance. The most recent bank
reconciliation is displayed first.
3. Highlight the detail line of a specific day with transaction details you want to review; then, click the
Detail button.
Note: This accesses Cash Account Balance Detail (20.200.02), which lists all transactions that
affected the cash balance for the day selected.
If you are also using the Currency Manager module, you can view account balances in their foreign
denominated currency as well as your company’s base currency by clicking Currency View on the
toolbar.

24 Cash Manager
Forecasting Cash Flow The Cash Manager module provides a powerful set of tools to help you forecast cash flow quickly and
accurately:
Cash Flow Projection (20.650.00) report forecasts cash flow over seven user-defined time periods
and includes items maintained by the Accounts Payable, Purchase Order, and Accounts
Receivable modules.
Cash Flow Maintenance (20.280.00) can be used to add a range of anticipated receipts and
disbursements items that allow you to see the results of many different cash flow scenarios.
To generate cash forecasts:
1. Enter the information of various anticipated receipts or disbursements (for example, litigation
settlements, the sale of plant assets, etc.) on Cash Flow Maintenance (20.280.00).
Figure 7: Cash Flow Maintenance (20.280.00)
2. Generate Cash Flow Projection (20.650.00) report, using the appropriate combination of report
format options to meet your specific cash forecasting informational needs:
Period Frequency — Choose the time period you want the forecast to cover. The time periods
can be daily, weekly, semi-monthly, bi-monthly, or monthly. The report includes seven time
periods.
AP Payment Options — Modify your forecast to assume that payments will be made on the
invoice date, due date, or pay date.
AR Payment Options — Select whether receivables are collected on their invoice date, due
date, or the average days to pay.
Include Purchase Orders — Specify whether or not to include open purchase orders in your
forecast (the payment options assume the Accounts Payable option chosen).
Case Number — On Cash Flow Maintenance (20.280.00), set up multiple “what if” anticipated
cash receipts or disbursements scenarios by assigning a scenario case number to each
anticipated item. Then, select the number of the case you want to use when generating the
Cash Flow Projection (20.650.00) report.
3. Generate the Cash Flow Projection (20.650.00) report as often as is necessary to address the
multiple “what if” scenarios you want to review.

Processing Cash Manager Transactions 25
Setting Up the Clear Check/Deposit Import Process Cash Manager now provides a mechanism to quickly clear checks, electronic payments and deposits
based on electronically transmitted data from a financial institution. This is accomplished by importing
a delimited, ASCII file provided by your bank for a particular cash account.
Figure 8: Clear Check/Deposit Import Setup (20.970.00)
To map the provided cleared check, electronic payment, or deposit data from the bank into Cash
Manager:
1. Open Clear Check/Deposit Import Setup (20.970.00). Select the first empty row in the grid or New
on the toolbar.
2. Enter an Import Setup ID that will uniquely identify this file layout mapping.
3. Enter the Company ID, Bank Account, and Bank Subaccount information in their corresponding
fields that this import file is for.
4. Review the file layout provided with the electronic file the bank has provided. This file layout
should explain what each field represents within the file.
5. Enter the field number that holds the check, electronic payment, or deposit indicator in the
Check/Deposit Indicator Field. Enter the code the bank uses to identify an item as a check or
electronic payment in the Check Indicator field. Enter the code the bank uses to identify an item
as a deposit in the Deposit Indicator field. Note that these fields are optional and are not required
for the import to be successful.
6. Enter the field number that holds the check, electronic payment, or deposit number in the
Check/Deposit Number Field.
7. Enter the field number that holds the check, electronic payment, or deposit amount in the
Check/Deposit Amount Field.
8. If the amount has assumed decimal places, mark the Assume Decimal Places box and then enter
the number of decimal places in the Number of Decimal Places field. When the file is processed, a

26 Cash Manager
decimal point will be inserted into the amounts based on the number of decimal places you
specified.
9. Enter the field number that holds the clear date in the Clear Date Field.
Note: Clear dates must be in the format of MMDDYYYY or MM/DD/YYYY to be interpreted
correctly.
10. Change the Starting Line Number field to the line number that holds the first record with actual
check, electronic payment, or deposit clear data. This is a useful option if the file you receive from
your bank contains header information.
11. Sometimes when importing data from your bank, a record may have data that does not match the
standard record layout, causing an import error. To allow the import to continue processing, an
option was set up to let you decide how many bad data records you will allow the import process
to encounter before quitting. Enter this number in the Stop Importing After # Errors field. If you
would like the import to stop after the first error is found, enter a 1 in this field.
12. In the Field Delimiter field, enter the character that is being used to separate the data fields on
the data record.
13. After you have entered all of the above data, save the information and exit Clear Check/Deposit
Import Setup (20.970.00).

Processing Cash Manager Transactions 27
Importing Clear Check/Deposit Data Use to import delimited, ASCII files of cleared checks, electronic payments, and deposit data provided
by a financial institution. An Import Setup ID is a required field and is defined on Clear Check/Deposit
Import Setup (20.970.00).
Figure 9: Clear Check/Deposit Data Import (20.420.00)
To import the cleared check, electronic payment, or deposit data:
1. Open Clear Check/Deposit Data Import (20.420.00).
2. From the Setup ID field, enter the import setup ID for the import setup record created in Clear
Check/Deposit Import Setup (20.970.00).
3. Enter the fully qualified path and file name of the bank file you wish to import in the Import File
Name field. You can also click on the Folder icon to select the file through a standard Windows file
selection dialogue.
4. Enter a unique import reference number in the Import Reference field. This will place this
reference number on all items imported from this file into Cash Manager. This is useful in keeping
track of how this cleared check, electronic payment or deposit data became available and for
recovering from some external failure in the import process like a power failure or computer
problems.
5. Click on Begin Processing to start the data import.
Note: If the import process is interrupted due to power failure or computer problems (client or server),
the data can be re-imported. If an Import Reference was used when the failure happened, you can re-
use the same one and Cash Manager will remove any items previously imported under this Import
Reference before processing the file again. This is done to eliminate duplicate items caused by the
previous import failure.
28 Cash Manager
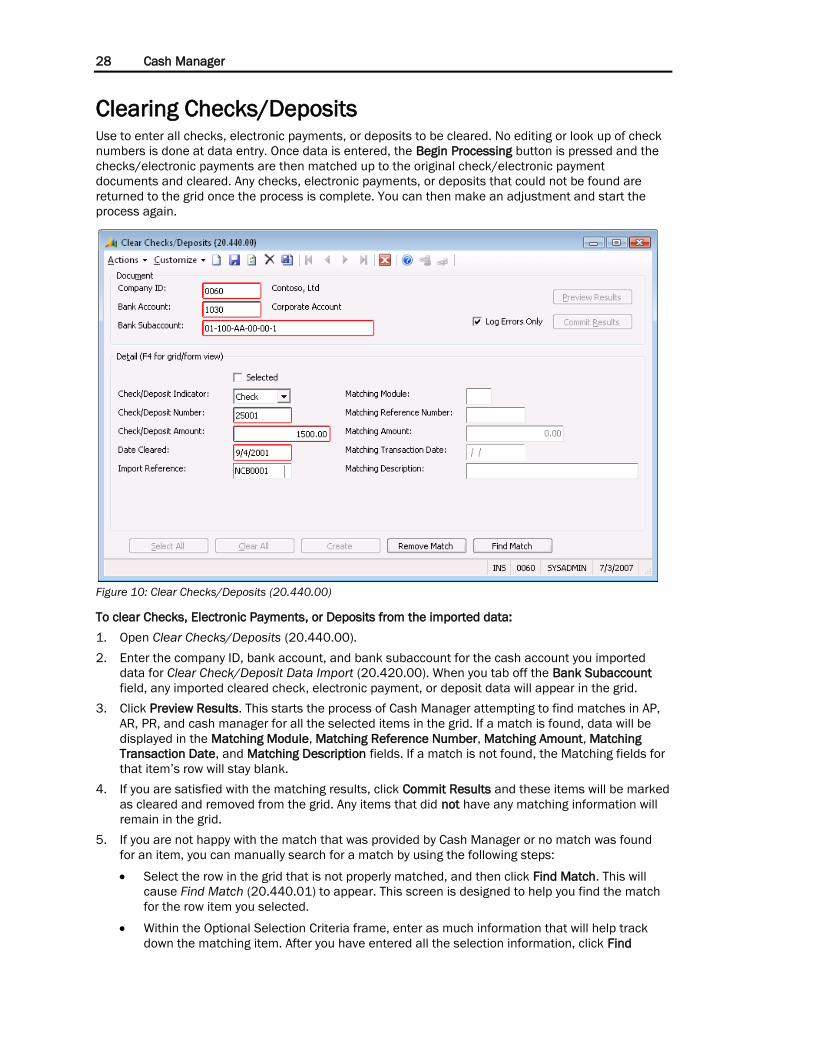
Clearing Checks/Deposits Use to enter all checks, electronic payments, or deposits to be cleared. No editing or look up of check
numbers is done at data entry. Once data is entered, the Begin Processing button is pressed and the
checks/electronic payments are then matched up to the original check/electronic payment
documents and cleared. Any checks, electronic payments, or deposits that could not be found are
returned to the grid once the process is complete. You can then make an adjustment and start the
process again.
Figure 10: Clear Checks/Deposits (20.440.00)
To clear Checks, Electronic Payments, or Deposits from the imported data:
1. Open Clear Checks/Deposits (20.440.00).
2. Enter the company ID, bank account, and bank subaccount for the cash account you imported
data for Clear Check/Deposit Data Import (20.420.00). When you tab off the Bank Subaccount
field, any imported cleared check, electronic payment, or deposit data will appear in the grid.
3. Click Preview Results. This starts the process of Cash Manager attempting to find matches in AP,
AR, PR, and cash manager for all the selected items in the grid. If a match is found, data will be
displayed in the Matching Module, Matching Reference Number, Matching Amount, Matching
Transaction Date, and Matching Description fields. If a match is not found, the Matching fields for
that item’s row will stay blank.
4. If you are satisfied with the matching results, click Commit Results and these items will be marked
as cleared and removed from the grid. Any items that did not have any matching information will
remain in the grid.
5. If you are not happy with the match that was provided by Cash Manager or no match was found
for an item, you can manually search for a match by using the following steps:
Select the row in the grid that is not properly matched, and then click Find Match. This will
cause Find Match (20.440.01) to appear. This screen is designed to help you find the match
for the row item you selected.
Within the Optional Selection Criteria frame, enter as much information that will help track
down the matching item. After you have entered all the selection information, click Find

Processing Cash Manager Transactions 29
Transactions. This starts a process that searches for all transactions that meet your selection
criteria.
When the find process has ended, all matches will be displayed in the grid. If no matches are
found, a message will be displayed saying “no matches were found using the current
selection criteria.” If one of the items within the grid is the correct match, select that grid item
and click Accept. This will copy that “match” information back to original item’s row on Clear
Checks/Deposits (20.440.00).
6. This process can be repeated for as many items as needed.
Note: Every time the Commit Results button is clicked, all selected items with matches will be marked
as “cleared” and removed from the grid. Only the unselected, unmatched items, if any, will remain in
the grid after a Commit Results has been performed. When working with a large number of items,
performing a Commit Results on smaller groups is useful in reducing the number of items within the
grid to a manageable level.

30 Cash Manager
Closing the Cash Manager Module This procedure explains how to close the Cash Manager module for an accounting period. Closing
facilitates balancing cash accounts to the appropriate General Ledger accounts. It also performs
“housekeeping” functions that include:
Deleting unnecessary detail. You can delete unnecessary detail at any time using Delete CA Detail
(20.530.00) or the General Ledger module’s Closing Process (01.560.00).
Note: You do not have to delete Cash Manager detail at the same time you close the Cash
Manager module.
Storing the period’s ending balance for each bank account.
To close the Cash Manager module:
1. Review open cash manager files to ensure that all transactions for the period have been entered.
Generate the CA Edit (20.810.00) report to check for un-released transaction batches.
2. Complete and release any open batches identified in step 1.
3. Log out and back up the database.
4. Log on to Microsoft Dynamics SL and use Closing Process (01.560.00) in the General Ledger
module to close the Cash Manager module.
5. To delete Cash Manager detail while closing, select the Delete Detail check box. It will delete
detail based on the Retention settings on CA Setup (20.950.00) if the Retention settings are for a
longer period of time than the Retention settings on GL Setup (01.950.00). If the General Ledger
Retention settings are for a longer period of time than the Cash Manager Retention settings, the
General Ledger Retention settings are used.

Processing Cash Manager Transactions 31
Deleting Cash Manager Detail Use to remove from cash activity details and balances that are no longer required for operations. Cash
activity details include transactions entered directly using Cash Account Transactions (20.010.00) and
Cash Account Transfers (20.020.00), recurring items that have been generated for their maximum
number of cycles, and consolidation file entries. Balances include daily cash account balances and
monthly average days to clear information.
Figure 11: Delete CA Detail (20.530.00)
To delete obsolete cash activity:
1. Specify on CA Setup (20.950.00) how long the software should retain prior Cash Manager
information. This includes the maximum periods prior to the current one for cash account
balances and Cash Manager transactions. If the Retention settings on CA Setup (20.950.00) are
for a longer period of time than the Retention settings on GL Setup (01.950.00), the Cash
Manager Retention settings are used. If the General Ledger Retention settings are for a longer
period of time, the General Ledger Retention settings are used.
2. Complete the Delete CA Detail (20.530.00) process. The software deletes all cash account activity
and balances from any accounting period that exceeds the maximum retention values specified in
CA Setup (20.950.00).

32 Cash Manager
Consolidating Cash Manager Activity The software can summarize the Cash Manager activity of one or more databases and transfer the
summary (summaries) to another database through a process called consolidation. Consolidation is
normally used by companies with subsidiaries or divisions that maintain their own financial records in
a separate company. Consolidation allows a parent company to store the summarized financial data of
all its subsidiaries in one central database. Once the parent has finished consolidating all subsidiary
databases it can generate consolidated reports that show the cash position of the entire company.
Note: Do not confuse this consolidation process with the consolidation process performed by the
General Ledger module. The purpose of the Cash Manager module’s consolidation function is solely to
transfer cash activity to arrive at a consolidated cash position. It does not post information to the
General Ledger. Also, while General Ledger consolidations are typically performed only at the end of
an accounting period, Cash Manager consolidations can be performed as often as is necessary to get
an accurate picture of current consolidated cash position.
Consolidation of Cash Manager activity is basically a two-step process. First, all subsidiaries create
consolidation files of their individual Cash Manager activity for a specified time period. Each
consolidation file contains a summary of its associated subsidiary’s Cash Manager activity for each
bank account and transaction date. Consolidation files are created using Generate Consolidation File
(20.510.00). Once created, all subsidiary consolidation files are submitted to the parent company.
Next, the information in the consolidation files of all subsidiaries is read (imported) into the parent
company’s database (this company could be on the same or a different computer than the companies
of subsidiaries) using Read Consolidation File (20.520.00).
Subsidiaries can be located in different geographic areas. In addition, each subsidiary can use a
different chart of accounts than the one used by the parent company.
To consolidate one or more subsidiary databases into the parent-company database:
1. Make sure the parent company’s Cash Manager module records contain the information of each
subsidiary’s bank account (and subaccount) as defined in Cash Account Maintenance
(20.250.00).
2. If the parent company’s chart of accounts is different from its subsidiaries’, the parent company
must add the Cash Manager consolidation account (and subaccount) to its database; see Chart of
Accounts Maintenance (01.260.00) in the General Ledger Help or user’s guide.
3. Back up the source consolidation database(s) (the subsidiary database(s) used to generate
consolidation files).
4. Create a consolidation file from each source database, using Generate Consolidation File
(20.510.00); for up-to-the-minute cash account balances, this should be done at least once a day.
5. Read the consolidation files into the target (parent/company) database, using Read Consolidation
File (20.520.00).
6. Review the consolidation event log generated by the consolidation process (step 5) for any
consolidation errors.
7. Revise the consolidation batches created in the parent database, using Cash Account
Transactions (20.010.00) and release for posting.
Note: These released transactions do not update General Ledger information.
Consider the following when completing the consolidation process:
The account number of each transaction is the same as the one at Consol Account in the General
Ledger module’s Chart of Accounts Maintenance (01.260.00).
The subaccount number of each transaction is the same as the Consol Subaccount in the General
Ledger module’s Subaccount Maintenance (01.270.00).
The consolidation process uses the value at Company ID in the General Ledger module’s
Company Information (01.950.01) to identify each consolidation file.

Processing Cash Manager Transactions 33
You can generate consolidation files as often as necessary. Accounts are marked during the
consolidation process so that the next time you complete a consolidation, the resulting file
contains only the net activity posted to the accounts since the last time you completed the
consolidation.
The transactions in a consolidation file have a CO (consolidation) journal type and a CE
(consolidation entry) transaction type. The software automatically enters both designations.
Make a backup copy of the database before beginning the consolidation process. You can use the
backup to repeat the consolidation process should something happen to the original database.

34 Cash Manager
Reporting Cash Manager Information With the Cash Manager module, you can generate a variety of useful reports to supplement your cash
management information needs. The Cash Manager module has four main report categories:
Transaction Listings
PTD Transaction List (20.660.00)
PTD Distribution List (20.670.00)
Cash Transactions History (20.720.00)
Cash Manager Batch Register (20.800.00)
CA Edit (20.810.00)
Cash Management Reports
Daily Cash Balance (20.610.00)
Float Analysis (20.640.00)
Cash Flow Projection (20.650.00)
Reconciliation Reports
Check Register (20.600.00)
Check/Deposit Reconciliation (20.620.00)
Bank Reconciliation (20.630.00)
Maintenance Reports
Cash Accounts List (20.680.00)
Entry Type List (20.690.00)
Recurring Item List (20.700.00)
Cash Flow Items List (20.710.00)
Any of the standard reports can be printed, sent to a file, or viewed on screen. Although each report is
different, the screens used to generate the report are similar. All screens have sort and select
functions that permit you to specify certain criteria to control the contents of the final reports. Click
Sort and Select to access each screen’s sort and select functions.
Sort and Select contains a list of report fields that can serve as the basis for a report’s selection
criteria. Double-click the right mouse button to obtain a listing of report field names available for entry
at Sort and Select. A partial list of fields includes:
ACCOUNT.ACCT (account)
ACCOUNT.ACTIVE (active)
ACCOUNT.SUMMPOST (summary posting)
GLTRAN.PERPOST (period to post)
GLTRAN.TRANDESC (description)
Note that the actual list of fields available varies by report.
Operator contains a specified list of operators including:
Begins with
Less than
Between
Less than or equal to
Contains
Not between
Equal
Not Contains
Greater than
Not equal

Processing Cash Manager Transactions 35
Greater than or equal to
Not in
In
Is not NULL
Is NULL
<None> (this is the default)
Value allows you to input a value that is part of your selection criteria.
Other report options allow you to specify preferences on sort orders, total breaks, and page breaks
(see the System Manager Help or user’s guide for more information).

36 Cash Manager

Data Entry Screens 37
Data Entry Screens
Cash Account Transactions (20.010.00) Use to enter miscellaneous cash transactions not entered in other modules (Accounts Payable,
Accounts Receivable, etc.). A bank service charge is an example of this type of miscellaneous cash
transaction. Once you release transactions entered in this screen, the Cash Manager module updates
the appropriate cash account balances and prepares the transactions for posting to the General
Ledger.
Figure 12: Cash Account Transactions (20.010.00)
Batch Area
Use the Batch area to identify the batch to update.
Number
Numeric code assigned to a transaction batch that uniquely identifies the batch. Otherwise, it will be
blank if adding a new batch.
Period to Post
Fiscal period and year to which the transaction batch should be posted in both the Cash Manager and
General Ledger module records. Fiscal year information, such as the number of periods in your fiscal
year, the calendar year in which your fiscal year begins or ends, and each fiscal period’s ending date,
is configured in General Ledger module’s GL Setup (01.950.00). You can verify the current fiscal
period and year by viewing the Detail General Ledger (01.620.00) report.

38 Cash Manager
Type
Specific kind of Cash Manager transaction (one-time transactions, transactions that occur regularly,
etc).
Recurring — A transaction that occurs regularly for a fixed amount each time. Create recurring
transactions in Recurring Item Maintenance (20.270.00). Generate Recurring Transactions
(20.500.00) creates the recurring transactions that can then be edited using Cash Account
Transactions (20.010.00).
Consolidation — A transaction batch created by the Cash Manager module’s Read Consolidation
File (20.520.00) process.
Revaluation — A transaction batch type that is valid only if you are using the Currency Manager
module and Currency Manager is set to identify currency revaluation entries created by General
Ledger Revaluation (24.500.00) process in the Currency Manager module.
Reconciliation Mode
Specifies how to display and reconcile the detail of a transaction in other screens and on reports (for
example, Daily Cash Balances (20.200.00) or Daily Cash Balance (20.610.00) report). This enables
you to reconcile items at the net deposit or disbursement level. The reconciliation mode options are:
By Detail — Display each detail line of a transaction in other screens and on reports.
By Batch — Display only the final debit and credit total of a transaction in other screens and on
reports (labeled with “Reference Number”). You can still view the details of a transaction in Cash
Account Transactions (20.010.00).
Date
Calendar date (usually the date of batch creation) associated with the transaction batch.
Reference Number
Identifying code assigned to the transaction that distinguishes it from all other transactions in the
database. You can use reference numbers to link transactions to source documents such as purchase
orders, checks, invoices, etc. Reference number identification of transactions is useful for reporting
purposes. Entry of a reference number here is required when using “By Batch” reconciliation mode.
Status
Indicates the current condition of the batch in the system:
On Hold — Not to be released.
Balanced — Ready for release.
Partially Released — Could not be completely released due to an out-of-balance condition or other
problem.
Partially Voided — Void was interrupted and must be completed.
Unposted — Released for posting but not yet posted.
Posted — Released and posted.
Complete — Released but not to be posted to General Ledger.
A batch’s status only changes as a result of changing its batch Handling value prior to finishing the
batch. In the case of a balanced or partially released batch, the status changes automatically when
you use Release CA Batches (20.400.00).
Handling
Controls the batch management function performed when you complete a batch entry. The batch
handling options are:

Data Entry Screens 39
Hold — Save the batch for future editing. Obtain the details of a batch on hold by generating the
CA Edit (20.810.00) report.
Release Later — Set the batch’s status to Balanced to prepare for later release for posting in
Release CA Batches (20.400.00).
Release Now — Release the batch for posting on completing the batch. A warning message
appears if you attempt to release a manual transaction batch that has already been released for
posting to the same period.
No Action — Leave the current batch status unchanged (see Status).
Control
The net effect of all the batch’s debits and credits on the cash account. For example, a batch with
debits of $1,000 and credits of $1,000 has a batch total of $0.00. This should be the same as the
amount in the offset column. If a batch’s control amount does not equal its batch totals, a warning
message appears when you attempt to exit the batch. You can adjust the incorrect amounts, give the
batch a status of On Hold and save it for future editing, or void the batch.
Cash Account Area
Use the Cash Account area to specify the company and bank account to be debited and/or credited.
Company ID
Identification code of the company.
Bank Account
Specifies the bank account to be debited or credited.
Bank Subaccount
Specifies the subaccount to be debited or credited.
Debits Entered
Debit amount entered to the Cash account.
Debits Offset
Debit amount automatically charged to the Cash account.
Debits Total
Running total of all debit amounts in the batch. As you enter the debit portion of a transaction, the
value at Total Debits increments by the debit amount entered.
Credits Entered
Credit amount entered to the Cash account.
Credits Offset
Credit amount automatically charged to the Cash account.
Credits Total
Running total of all credit amounts in the batch. As you enter the credit portion of a transaction, the
value at Total Credits increments by the credit amount entered.
Detail Area
Use the Detail area to enter information about the transaction.
40 Cash Manager
Company ID
Identification code of the company at the transaction level.
Entry Type
Two-character code that identifies the type of transaction being entered (SC for service charge, etc.).
The entry type ID you enter here must be set up in Entry Type Maintenance (20.260.00).
Account
General Ledger account to be updated by the amount of the transaction detail line. A default account
is typically defined for each entry type. The account you enter here must be set up in the General
Ledger module’s Chart of Accounts Maintenance (01.260.00).
Project
The identifier associated with a specific project set up in Project Controller Project Maintenance
(PA.PRJ.00). A project can also be entered using the Quick Maintenance feature (see the System
Manager Help or user’s guide). If you enter a value in Project that is not equal to the Non Post Project
specified on the PC Options and Setup tab of Project Controller Setup (PA.SET.00), in the Project
Controller module, you must also enter a value in Task.
Project is available only if the following conditions are met:
The value in the transaction’s Account field is associated with an account category (see “Chart of
Accounts Maintenance (01.260.00)” in the General Ledger Help or user’s guide).
The Entry Type selected must update General Ledger. It cannot be an entry type of OA, OD, OM, or
OP (for example, a reconciliation entry such as Outstanding Check/Deposit).
In Entry Type Maintenance (20.260.00), the Update Accounts Receivable check box must not be
selected. If the check box is selected, transactions for the entry type will update Accounts
Receivable as unapplied receipt batches. They will update Project Management and Accounting
when payments are applied to an invoice.
The Company ID specified must exist in the current application database.
The Project Controller module must be installed.
Task
The identifier associated with a specific task set up in Project Controller Project Maintenance
(PA.PRJ.00). If you entered a value in Project that is not equal to the Non Post Project specified on the
PC Options and Setup tab of Project Controller Setup (PA.SET.00), in the Project Controller module,
you must also enter a value in Task.
Task is available only if:
A Project that is not equal to the Non Post Project specified on the PC Options and Setup tab of
Project Controller Setup (PA.SET.00), in the Project Controller module has been entered.
The value in the transaction’s Account field is associated with an account category (see “Chart of
Accounts Maintenance (01.260.00)” in the General Ledger Help or user’s guide).
The Project Controller module is installed.
Subaccount
Optional subaccount to be updated by the amount of the transaction detail line. A default subaccount
is typically defined for each entry type. The subaccount you enter here must be set up in the Shared
Information module’s Flexkey Definition (21.320.00) and Flexkey Table Maintenance (21.330.00),
and the General Ledger module’s Subaccount Maintenance (01.270.00).

Data Entry Screens 41
Description
Explains the purpose of the transaction. Transaction descriptions appear on many reports. Note that if
the transaction is associated with a vendor or customer, the vendor or customer name also appears
here.
Ref Nbr
The reference number or identifying code assigned to the transaction that distinguishes it from all
other transactions in the database. You can use reference numbers to link transactions to source
documents such as purchase orders, checks, invoices, etc. Reference number identification of
transactions is useful for reporting purposes.
Customer ID
Specifies an Accounts Receivable transaction’s associated customer. The customer ID you enter must
be set up in Accounts Receivable Customer Maintenance (08.250.00). You can also enter a new
customer’s ID using the Quick Maintenance feature (refer to the System Manager Help or user’s guide
for more information). When you are in Initialize mode and entering your beginning Cash Manager
records, customer IDs are entered in association with customers’ outstanding receivable balances.
Vendor ID
Specifies an Accounts Payable transaction’s associated vendor. The vendor ID you enter must be set
up in Accounts Payable Vendor Maintenance (03.270.00). You can also enter a new vendor’s ID using
the Quick Maintenance feature (see the System Manager Help or user’s guide).
Date
Typically, the date of the transaction’s occurrence as listed on its source document. The default date
is the current date.
Employee ID
Enter an employee ID if the transaction is employee-related. Employee IDs are maintained in Project
Controller Employee Maintenance (PA.EMP.00). The employee ID appears in many Project Controller
transaction detail inquiries and reports. Employee ID is a required field if in General Ledger Chart of
Accounts Maintenance (01.260.00), Project Controller Options, the associated account’s Require
Employee ID check box is selected. Employee ID is unavailable if Project Controller is not installed.
Labor Class
Enter an optional labor class if the transaction is labor-related. Labor class entries are maintained in
Project Controller Code File Maintenance (PA.CFM.00). The labor class can be listed on invoices
generated in the Flexible Billings module and for reporting purposes. Labor Class is unavailable if
Project Controller is not installed.
Billable
Billable specifies whether to mark up, include, or exclude the transaction from revenue recognition
and invoicing in Project Management and Accounting modules. Billable is unavailable if Project
Controller is not installed.
Quantity
Displayed for information purposes only. Quantity is a required field if in General Ledger Chart of
Accounts Maintenance (01.260.00), Project Controller Options, the associated account’s Require
Units check box is selected. Quantity is unavailable if Project Controller is not installed.
Debit Amount
Specifies the amount to debit the transaction’s associated account (and subaccount).

42 Cash Manager
Credit Amount
Specifies the amount to credit the transaction’s associated account (and subaccount).
Rec Status
Indicates whether or not the transaction has cleared the bank. Reconciliation status options are:
Cleared — The transaction has cleared the bank.
Outstanding — The transaction is still outstanding.
Note that some transactions have already cleared the bank before their records are ever entered. You
can clear these transactions in this screen rather than on Bank Reconciliation (20.210.00).
Clear Date
Date when the transaction cleared the bank. You must enter a clear date if the transaction’s reconcile
status is Cleared.

Data Entry Screens 43
Cash Account Transfers (20.020.00) Use to move cash more efficiently from one cash account to another. Cash Account Transfers
(20.020.00) uses a single-entry transfer approach, as opposed to the double-sided transfer entries
used in Cash Account Transactions (20.010.00). This can reduce the time required to complete cash
transfer transactions. In Cash Account Transfers (20.020.00), a single credit entry transfers the
specified cash amount out of its “transfer from” bank account. When you use Release CA Batches
(20.400.00), the software automatically generates the offsetting debit entry needed to transfer the
cash to the appropriate “receiving” bank account.
Figure 13: Cash Account Transfers (20.020.00)
After you release a transaction batch, the software can generate a batch control report listing all
transactions entered. This report is produced only if you select Automatic Batch Reports in GL Setup
(01.950.00).
Batch Area
Use the Batch area to identify which account to use for transfer.
Number (Batch)
Numeric code assigned to a transaction batch that uniquely identifies the batch. The software
automatically assigns a different batch number to each new transaction batch created according to
the batch number format you establish in CA Setup (20.950.00). This number increments by one
(002311, 002312, etc.) for each new batch created and cannot be changed. Because batch number
identification is important for reporting purposes, transactions have their associated batch number
listed beside them on many reports.
To edit a batch, select its batch number. To delete a batch, select its batch number then select the
Delete function. The software prompts you for the correct action:
Yes — Delete the batch (all batch information is removed from the database and the batch is
voided).
No — Stop the delete operation (all batch information is retained in the database).

44 Cash Manager
Period to Post (Batch)
Fiscal period and year to which the transaction batch should be posted in both the Cash Manager and
General Ledger records. For example, 08-1998 causes transactions to be posted to the eighth period
of fiscal year 1998. The default is the current fiscal period-year. The period number entered must
belong to a valid fiscal period as defined in GL Setup (01.950.00). It applies to the entire batch.
Note: You can verify the current fiscal period by viewing the Detail General Ledger (01.620.00) report.
Status (Batch)
Current condition of the batch:
On Hold — Not to be released.
Balanced — Ready for release.
Partially Released — Could not be completely released due to an out-of-balance condition or other
problem.
Partially Voided — Void was interrupted and must be completed.
Unposted — Released for posting but not yet posted.
Posted — Released and posted.
Complete — Released but not to be posted to general ledger records.
A batch’s status only changes as a result of changing its Handling value prior to finishing the batch. In
the case of a balanced or partially released batch, the status changes automatically when you use
Release CA Batches (20.400.00).

Data Entry Screens 45
Handling (Batch)
Controls the batch management function performed when you complete a batch entry. The batch
handling options are:
Hold — Save the batch for future editing. Obtain the details of a batch on hold by generating the
CA Edit (20.810.00) report.
Release Later — Set the batch’s status to Balanced to prepare for later release for posting in
Release CA Batches (20.400.00).
Release Now — Release the batch for posting on completing the batch. A warning message
appears if you attempt to release a manual transaction batch that has already been released for
posting to the same period.
No Action — Leave the current batch status unchanged.
Control (Batch)
Total amount of the batch. For example, a batch with transactions totaling $2,000 has a batch total of
$2,000. If a batch’s control amount does not equal its batch total, a warning message appears when
you attempt to exit the batch. You can adjust the incorrect amounts or give the batch an On Hold
status and save it for future editing, or void the batch.
Total (Batch)
Total cash amount of transfer.
Detail Area
Use the Source area to define the company and cash account from which to transfer funds.
Use the Destination area to define the company and cash account from which to transfer funds.
Source Company ID
Identification code of the company.
Source Bank Account
Specifies the bank account from which funds are being transferred. The account you enter here must
be set up in the General Ledger module’s Chart of Accounts Maintenance (01.260.00) and entered in
Cash Account Maintenance (20.250.00).
Note: If you are also using the Currency Manager module and you are transferring funds of different
foreign currencies between banks, the software stores the initial transfer entry in the currency of the
“transfer from” cash account. Then, when you use Release CA Batches (20.400.00), the offsetting
entry uses the base currency amount of the “transfer from” entry and converts it to the foreign
currency amount of the “transfer to” cash account.
Source Bank Subaccount
Specifies the subaccount from which funds are being transferred. The subaccount you enter here
must be set up in Shared Information module’s Flexkey Definition (21.320.00) and Flexkey Table
Maintenance (21.330.00), and the General Ledger module’s Subaccount Maintenance (01.270.00).
It must also be entered in Cash Account Maintenance (20.250.00).
Destination Company ID
Identification code of the company.

46 Cash Manager
Destination Bank Account
Specifies the bank account to which funds are being transferred. The account you enter here must be
set up in the General Ledger module’s Chart of Accounts Maintenance (01.260.00) and entered in
Cash Account Maintenance (20.250.00).
Note: If you are also using the Currency Manager module and you are transferring funds of different
foreign currencies between banks, the software stores the initial transfer entry in the currency of the
“transfer from” cash account. Then, when you use Release CA Batches (20.400.00), the offsetting
entry uses the base currency amount of the “transfer from” entry and converts it to the foreign
currency amount of the “transfer to” cash account.
Destination Bank Subaccount
Specifies the subaccount to which funds are being transferred. The subaccount you enter here must
be set up in Shared Information module’s Flexkey Definition (21.320.00) and Flexkey Table
Maintenance (21.330.00), and General Ledger module’s Subaccount Maintenance (01.270.00). It
must also be entered in Cash Account Maintenance (20.250.00).
Reference Number (Document)
Identifying code assigned to the transaction that distinguishes it from all other transactions in the
database. Reference number identification of transactions is useful for reporting purposes.
Date (Document)
Date of the transfer’s occurrence as listed on the source document. The default date is the current
date.
Transaction Description (Document)
Explanation of the transaction.
Amount (Document)
Total amount of the transfer transaction.

Data Entry Screens 47
Daily Cash Balances (20.200.00) Use to obtain an up-to-date review of your company’s total cash position. Daily Cash Balances
(20.200.00) displays each of your company’s cash accounts and its current balance (the value at
Currency ID specifies the currency used to denominate each account balance). For each account
displayed, its balance is as current as the last transaction batch released in these modules: Accounts
Payable, Accounts Receivable, and Cash Manager.
Figure 14: Daily Cash Balances (20.200.00)
Note: This allows you to drill down to the receipts and disbursements, as well as the individual
transactions, making up each cash account balance. It also allows you to display the account balances
of selected currencies for more efficient account reviews.
Note: If you are also using the Currency Manager module, you can review each cash account’s balance
in both your company’s base currency and an equivalent foreign denominated currency associated
with the account. To toggle between an account’s base and foreign currency balances, click the
Currency Manager module’s Currency View.
Select Company Area
Use the Select Company area to specify which companies cash accounts to display.
Specific (Company)
Selects a specific category.
All (Company)
Selects all available companies.
Company ID (Company)
Identification code of the company.
Select Currency Area
Use the Select Currency area to specify the currency of the cash accounts displayed.

48 Cash Manager
Specific (Currency)
Selects a specific currency.
All (Currency)
Selects all available currencies.
Currency ID (Currency)
Three-character currency ID abbreviation.
Total Cash in BAS Currency
Sum of all cash account balances.
Detail Area
Use the Detail section to review account information.
Company ID (Detail)
Identification code of the company.
Account (Detail)
General Ledger account number associated with each cash account name listed under Cash Account
Name. The account numbers are defined in Cash Account Maintenance (20.250.00).
Subaccount (Detail)
Subaccount number associated with each cash account name listed under Cash Account Name. The
subaccount numbers are defined in Cash Account Maintenance (20.250.00).
Current Balance
Current cash balance of each cash account listed under Cash Account Name.
Currency ID (Detail)
Three-character currency ID abbreviation (for example, USD for US Dollars, etc.) associated with each
cash account listed under Cash Account Name.
Bank Account Number
Specifies the bank-assigned account number (the bank’s number for the account) for each account
name listed under Cash Account Name.
Cash Account Name
Specifies the account name for each cash account.
Balances by Period (button)
Accesses Cash Account Balances Sorted By Period (20.200.01), which is a subscreen of Daily Cash
Balances (20.200.00) used to view a by-period summary of the total receipts, disbursements, and
closing balance of a selected cash account.
Balances by Date (button)
Accesses Cash Account Balances Sorted By Date (20.200.04), which is a subscreen of Daily Cash
Balances (20.200.00), used to view a by-transaction date summary of the total receipts,
disbursements, and closing balance of a selected cash account.
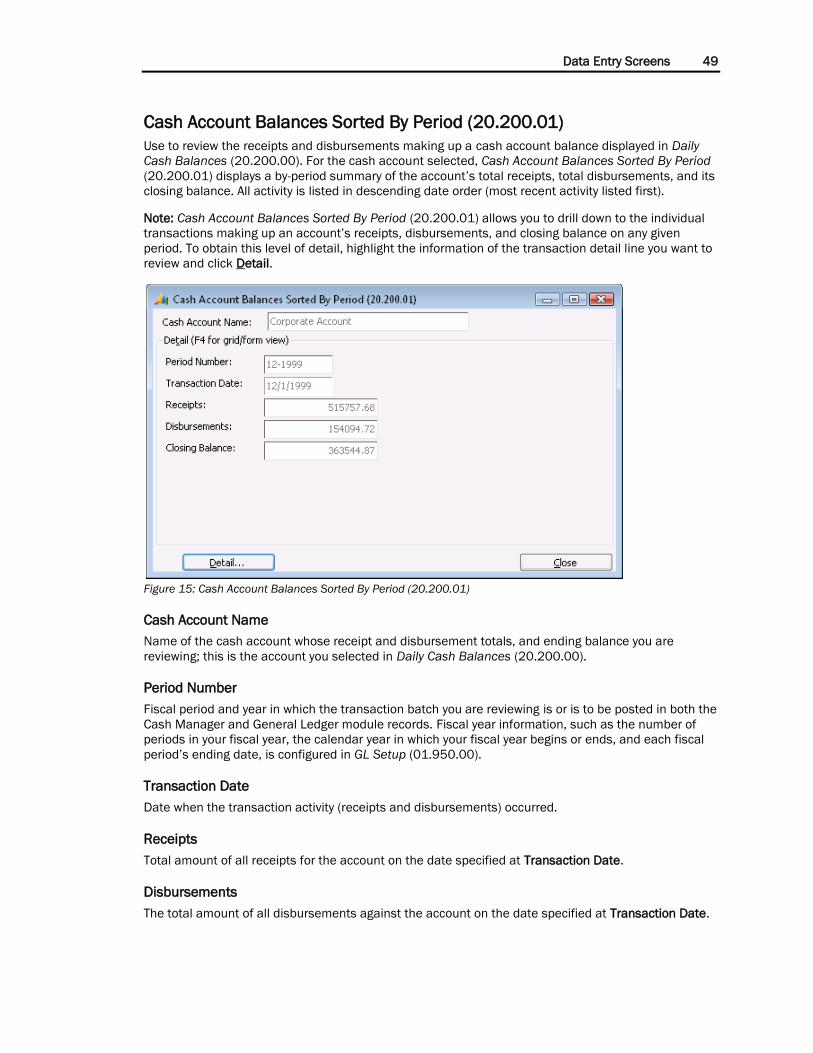
Data Entry Screens 49
Cash Account Balances Sorted By Period (20.200.01)
Use to review the receipts and disbursements making up a cash account balance displayed in Daily
Cash Balances (20.200.00). For the cash account selected, Cash Account Balances Sorted By Period
(20.200.01) displays a by-period summary of the account’s total receipts, total disbursements, and its
closing balance. All activity is listed in descending date order (most recent activity listed first).
Note: Cash Account Balances Sorted By Period (20.200.01) allows you to drill down to the individual
transactions making up an account’s receipts, disbursements, and closing balance on any given
period. To obtain this level of detail, highlight the information of the transaction detail line you want to
review and click Detail.
Figure 15: Cash Account Balances Sorted By Period (20.200.01)
Cash Account Name
Name of the cash account whose receipt and disbursement totals, and ending balance you are
reviewing; this is the account you selected in Daily Cash Balances (20.200.00).
Period Number
Fiscal period and year in which the transaction batch you are reviewing is or is to be posted in both the
Cash Manager and General Ledger module records. Fiscal year information, such as the number of
periods in your fiscal year, the calendar year in which your fiscal year begins or ends, and each fiscal
period’s ending date, is configured in GL Setup (01.950.00).
Transaction Date
Date when the transaction activity (receipts and disbursements) occurred.
Receipts
Total amount of all receipts for the account on the date specified at Transaction Date.
Disbursements
The total amount of all disbursements against the account on the date specified at Transaction Date.

50 Cash Manager
Closing Balance
Day-ending balance of the account (total receipts minus total disbursements) on the date specified at
Transaction Date.
Detail (button)
Accesses Cash Account Balance Detail (20.200.02), which is a subscreen of Daily Cash Balances
(20.200.00), used to view the individual transactions that make up a cash account’s receipt and
disbursement totals on a given date.
Close (button)
Closes screen and returns Daily Cash Balances (20.200.00) to the display.

Data Entry Screens 51
Cash Account Balance Detail (20.200.02)
Use to review individual transactions making up the day-by-day cash account receipt and
disbursement totals displayed in Cash Account Balances Sorted By Period (20.200.01) and Cash
Account Balances Sorted By Date (20.200.04). Reviewing individual cash account transactions is the
finest level of detail available when you are reviewing the daily balances of your company’s cash
accounts. Note that transaction details appearing in this screen are those of transactions originally
entered in the following modules: Accounts Payable, Accounts Receivable, and Cash Manager.
Figure 16: Cash Account Balance Detail (20.200.02)
Cash Account Name
Name of the cash account whose receipt and disbursement details you are reviewing; this is the
account you selected in Daily Cash Balances 20.200.00).
Transaction Date
Date when the transaction activity (receipt or disbursement) occurred.
Total Receipts
Sum of all receipt transactions listed in Cash Account Balance Detail (20.200.02).
Total Disbursements
Sum of all disbursement transactions listed in Cash Account Balance Detail (20.200.02).
Batch Number
Batch number specifies the unique identifying code of the batch under which the transaction was
entered.
Reference Number
Specifies the unique identifying code assigned to the transaction that distinguishes it from all other
transactions in the database. Reference number identification is useful for reporting purposes.

52 Cash Manager
Journal Type
Two-character abbreviation that specifies the transaction’s book of original entry (the source of the
transaction). Typical journal types displayed here are AP (Accounts Payable journal), AR (Accounts
Receivable journal), and CA (Cash Manager journal).
Transaction Type
Two-character code that identifies the transaction’s entry type. Transaction entry types are defined in
Entry Type Maintenance (20.260.00).
Payee ID
Identification code of a vendor who has been issued a check or electronic payment associated with
the transaction. A value appears here only if the transaction is an Accounts Payable transaction
involving a check or electronic payment.
Receipts
Total amount received, if the transaction is a receipt transaction.
Disbursements
Total amount disbursed, if the transaction is a disbursement transaction.
Transaction Description
Explanation of the transaction.
Detail (button)
Accesses the batch entry screen (for example, Cash Account Transfers (20.020.00), the Accounts
Payable module’s Manual Check Entry (03.030.00), etc.) used to create the currently highlighted
transaction. Allows you to review the information of the batch under which the transaction was
originally entered.
Close (button)
Returns Cash Account Balances Sorted By Period (20.200.01) or Cash Account Balances Sorted By
Date (20.200.04) to the display.
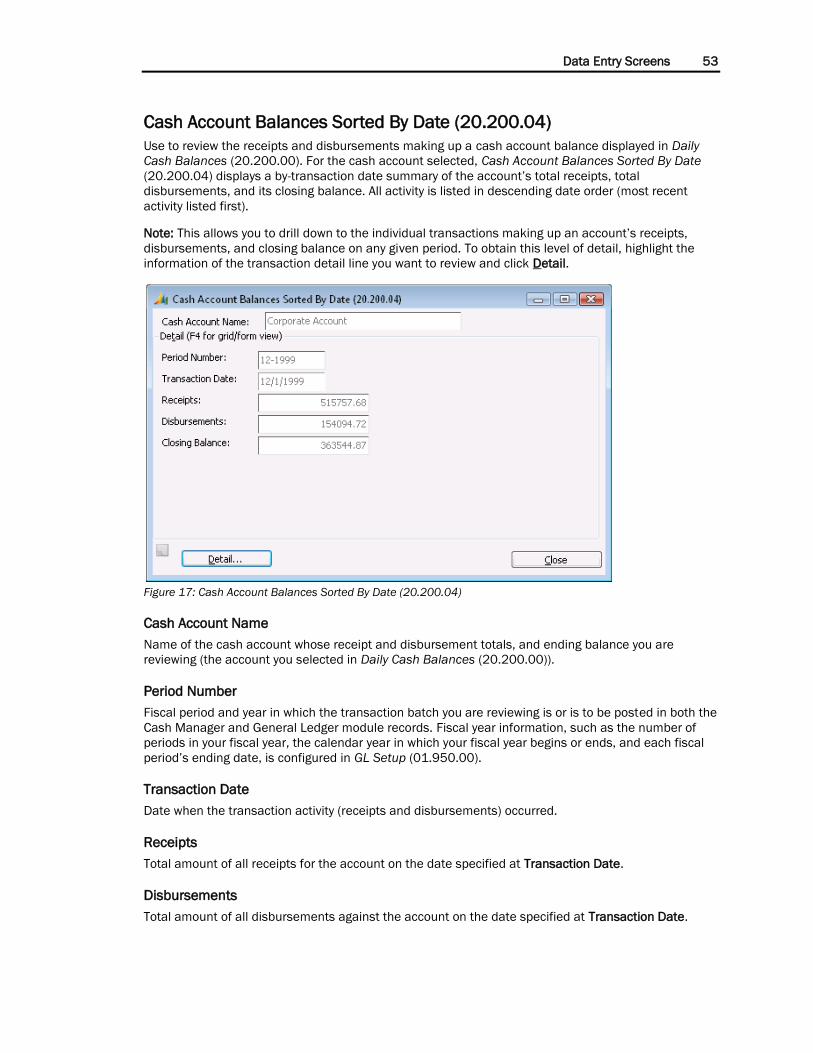
Data Entry Screens 53
Cash Account Balances Sorted By Date (20.200.04)
Use to review the receipts and disbursements making up a cash account balance displayed in Daily
Cash Balances (20.200.00). For the cash account selected, Cash Account Balances Sorted By Date
(20.200.04) displays a by-transaction date summary of the account’s total receipts, total
disbursements, and its closing balance. All activity is listed in descending date order (most recent
activity listed first).
Note: This allows you to drill down to the individual transactions making up an account’s receipts,
disbursements, and closing balance on any given period. To obtain this level of detail, highlight the
information of the transaction detail line you want to review and click Detail.
Figure 17: Cash Account Balances Sorted By Date (20.200.04)
Cash Account Name
Name of the cash account whose receipt and disbursement totals, and ending balance you are
reviewing (the account you selected in Daily Cash Balances (20.200.00)).
Period Number
Fiscal period and year in which the transaction batch you are reviewing is or is to be posted in both the
Cash Manager and General Ledger module records. Fiscal year information, such as the number of
periods in your fiscal year, the calendar year in which your fiscal year begins or ends, and each fiscal
period’s ending date, is configured in GL Setup (01.950.00).
Transaction Date
Date when the transaction activity (receipts and disbursements) occurred.
Receipts
Total amount of all receipts for the account on the date specified at Transaction Date.
Disbursements
Total amount of all disbursements against the account on the date specified at Transaction Date.

54 Cash Manager
Closing Balance
Day-ending balance of the account (total receipts minus total disbursements) on the date specified at
Transaction Date.
Detail (button)
Accesses Cash Account Balance Detail (20.200.02), which is a subscreen of Daily Cash Balances
(20.200.00), used to view the individual transactions that make up a cash account’s receipt and
disbursement totals on a given date.
Close (button)
Closes the screen and returns Daily Cash Balances (20.200.00) to the display.

Data Entry Screens 55
Bank Reconciliation (20.210.00) Use to compare and reconcile checks, electronic payments, and deposits that have been cleared by
the bank with the original amounts of these documents, as this information is recorded. In Bank
Reconciliation (20.210.00) you can adjust a cash account’s current bank statement balance for
outstanding deposits, checks and electronic payments and compare this adjusted balance to the book
cash balance. You can then reconcile checks, electronic payments, or deposits and make any
necessary adjusting entries. Once these operations are completed for a cash account, its balance and
detail line totals reflect the changes or additions made. For information on how to reconcile your bank
account, see “Reconciling Bank Statements” on page21.
Figure 18: Bank Reconciliation (20.210.00)
Document Area
Use the Document area to specify the accounts to reconcile.
Company ID
Identification code of the company.
Cash Account
Cash account for which you are performing the reconciliation. The account you enter here must be set
up in the General Ledger module’s Chart of Accounts Maintenance (01.260.00).
Cash Subaccount
Cash subaccount for which you are performing the reconciliation. The subaccount you enter here must
be set up in the Shared Information module’s Flexkey Definition (21.320.00) and Flexkey Table
Maintenance (21.330.00), and the General Ledger module’s Subaccount Maintenance (01.270.00).
Load Detail Area
Use the Load Detail area to specify the cash account information the software should “load” (display)
in the detail lines of Bank Reconciliation (20.210.00) when Reconcile Deposits or Reconcile Checks is
clicked. For each cash account, this information can include outstanding check, electronic payment,
and deposit information only, cleared check, electronic payment, and deposit information only, or both
outstanding and cleared check, electronic payment, and deposit information.

56 Cash Manager
Outstanding
Specifies that the software should load the information of the cash account’s outstanding checks,
electronic payments, and deposits only. This is the default option.
Cleared
Specifies that the software should load the information of the cash account’s cleared checks,
electronic payments, and deposits only.
Both
Specifies that the software should load the information of both the cleared and outstanding checks,
electronic payments, and deposits for the cash account.
Adjusting Entries Area
Use the Adjusting Entries area to select transactions or transfers.
Cash Account Transactions (button)
Click to select Cash Account Transactions (20.010.00).
Cash Account Transfers (button)
Click to select Cash Account Transfers (20.020.00).
Detail Area
Use the Detail section to review bank statement information.
Reconciled (check box)
Select the check box to indicate this statement is reconciled. It can only be selected if CA Out of
Balance is equal to zero.
Statement Date
Date the bank used to record the account’s closing balance for the statement period, as reported on
the bank statement.
Reconciliation Date
Cutoff date used when reconciling the account’s activity for the statement period. Any account activity
entered after this date is excluded automatically from the current reconciliation process.
Statement Balance
Current balance of the account, as maintained by the bank.
Plus: Deposits In Transit
Total amount of the cash account’s deposits that are currently in transit.
Less: Outstanding Checks
Total amount of the cash account’s checks, electronic payments, or disbursements that are currently
outstanding.
Adjusted Balance
Cash account’s current adjusted cash balance. The software automatically calculates this balance as
follows:
Bank Statement Balance + Dep In Transit – (O/S Checks and O/S Electronic Payments) =
Adjusted Balance

Data Entry Screens 57
CA Balance
Account’s current cash balance as of the reconciliation date. The software automatically calculates
this balance as follows:
Prior bank reconciliation’s (Bank Statement Balance + Dep In Transit – (O/S Checks and O/S
Electronic Payments)) + Current bank reconciliation’s (Receipts – Disbursements) = CA Balance
CA Out Of Balance
Difference between the cash account’s adjusted balance and its cash balance, as calculated by the
software.
GL Period
The accounting period the software uses to determine which of the cash account’s General Ledger
balances it should retrieve for reconciliation with the account’s bank statement balance.
GL Balance
Account’s current cash balance for the specified General Ledger period, as calculated by the software.
GL Out Of Balance
Difference between the cash account’s adjusted balance and its General Ledger balance, as
calculated by the software.
Reconcile Deposits (button)
Accesses Reconcile Deposits (20.210.03), which is subscreen of Bank Reconciliation (20.210.00),
used to quickly clear one or more of the cash account’s outstanding deposits.
Reconcile Checks (button)
Accesses Reconcile Checks (20.210.01), which is a subscreen of Bank Reconciliation (20.210.00),
used to quickly clear the information of one or more of the account’s outstanding checks, electronic
payments, and disbursements.
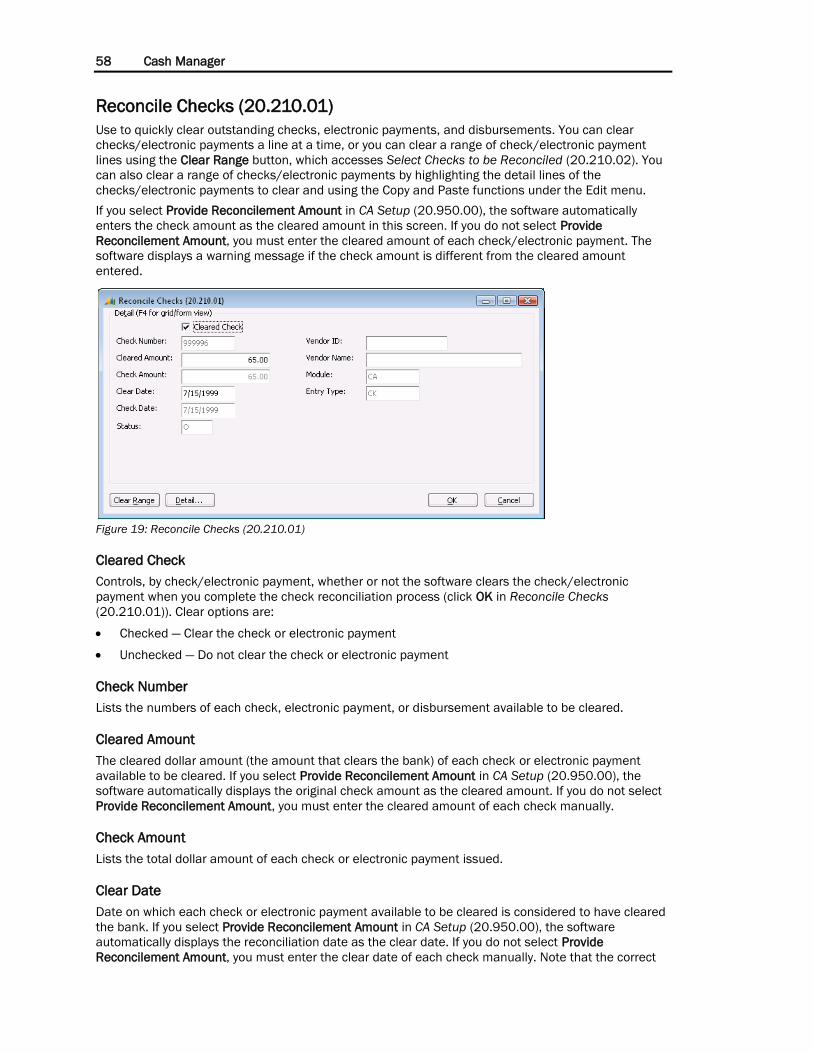
58 Cash Manager
Reconcile Checks (20.210.01)
Use to quickly clear outstanding checks, electronic payments, and disbursements. You can clear
checks/electronic payments a line at a time, or you can clear a range of check/electronic payment
lines using the Clear Range button, which accesses Select Checks to be Reconciled (20.210.02). You
can also clear a range of checks/electronic payments by highlighting the detail lines of the
checks/electronic payments to clear and using the Copy and Paste functions under the Edit menu.
If you select Provide Reconcilement Amount in CA Setup (20.950.00), the software automatically
enters the check amount as the cleared amount in this screen. If you do not select Provide
Reconcilement Amount, you must enter the cleared amount of each check/electronic payment. The
software displays a warning message if the check amount is different from the cleared amount
entered.
Figure 19: Reconcile Checks (20.210.01)
Cleared Check
Controls, by check/electronic payment, whether or not the software clears the check/electronic
payment when you complete the check reconciliation process (click OK in Reconcile Checks
(20.210.01)). Clear options are:
Checked — Clear the check or electronic payment
Unchecked — Do not clear the check or electronic payment
Check Number
Lists the numbers of each check, electronic payment, or disbursement available to be cleared.
Cleared Amount
The cleared dollar amount (the amount that clears the bank) of each check or electronic payment
available to be cleared. If you select Provide Reconcilement Amount in CA Setup (20.950.00), the
software automatically displays the original check amount as the cleared amount. If you do not select
Provide Reconcilement Amount, you must enter the cleared amount of each check manually.
Check Amount
Lists the total dollar amount of each check or electronic payment issued.
Clear Date
Date on which each check or electronic payment available to be cleared is considered to have cleared
the bank. If you select Provide Reconcilement Amount in CA Setup (20.950.00), the software
automatically displays the reconciliation date as the clear date. If you do not select Provide
Reconcilement Amount, you must enter the clear date of each check manually. Note that the correct

Data Entry Screens 59
clear date for all checks/electronic payments is key to performing accurate average days to clear
calculations which appear on the Float Analysis (20.640.00) report.
Status
Status of the check or electronic payment.
Check Date
Lists the date when each check or electronic payment was originally written.
Vendor ID
Lists the identification code of the vendor to whom each check or electronic payment is issued.
Vendor Name
Lists the name of the vendor to whom each Accounts Payable check or electronic payment is issued. If
the transaction is strictly a Cash Manager transaction, Vendor Name displays an explanation of the
transaction.
Module
Two-character abbreviation of the module where each transaction originated: AP (Accounts Payable
module), CA (Cash Manager module).
Entry Type
Two-character code that identifies the transaction entry type (SC for service charge, etc.) used to enter
the transaction. Entry type IDs are defined in Entry Type Maintenance (20.260.00).
Clear Range (button)
Accesses Select Checks to be Reconciled (20.210.02), which is a subscreen of Reconcile Checks
(20.210.01), used to specify a range of checks or electronic payments to be cleared at the same time.
Detail (button)
Displays the transaction entry screen where the batch was originally entered.

60 Cash Manager
Select Checks to be Reconciled (20.210.02)
Use to specify a range of checks/electronic payments to be cleared at the same time. The check
numbers you enter here highlight the appropriate range of checks/electronic payments listed in
Reconcile Checks (20.210.01). Then, when you click OK in Reconcile Checks (20.210.01), the
software automatically clears all checks/electronic payments in the range specified.
Figure 20: Select Checks to be Reconciled (20.210.02)
Starting Check Number
Specifies the first check number in a range of checks/electronic payments the software should clear
at the same time. When you complete the check reconciliation process, the software automatically
clears the checks/electronic payments associated with the starting and ending check numbers and all
checks/electronic payments in between the two.
Ending Check Number
Specifies the last check number in a range of checks/electronic payments that should clear at the
same time. When you complete the check reconciliation process, the software automatically clears the
checks/electronic payments associated with the starting and ending check numbers and all
checks/electronic payments in between the two.

Data Entry Screens 61
Reconcile Deposits (20.210.03)
Use to quickly clear the information of deposits that are in transit. You can clear deposits a line at a
time, or you can clear a range of deposit lines using the Clear Range button, which accesses Select
Deposits to be Reconciled (20.210.04). You can also clear a range of deposits by highlighting the
detail lines of the deposits to clear and using the Copy and Paste functions under the Edit menu.
If you select Provide Reconcilement Amount in CA Setup (20.950.00), the software automatically
enters the deposit amount as the cleared amount in this screen. If you do not select Provide
Reconcilement Amount, you must enter the cleared amount of each deposit. A warning message
displays if the deposit amount is different from the cleared amount.
Figure 21: Reconcile Deposits (20.210.03)
Cleared Deposit
Controls, by deposit, whether or not the deposit clears when you complete the Deposit reconciliation
process (click OK in Reconcile Deposits (20.210.03)). Clear options are:
Checked — Clear the deposit
Unchecked — Do not clear the deposit
Batch Number
Lists the unique identifying code of the batch to which the deposit belongs.
Reference Number
Lists the reference (deposit ticket) number of each deposit available to be cleared.
Cleared Amount
The cleared dollar amount (the amount that clears the bank) of each deposit available to be cleared. If
you select Provide Reconcilement Amount in CA Setup (20.950.00), the software automatically
displays the original deposit amount as the cleared amount. If you do not select Provide
Reconcilement Amount, you must enter the cleared amount of each deposit manually.
Deposit Amount
Lists the total dollar amount of each deposit made.

62 Cash Manager
Payee ID
Lists the identification code of each customer from whom an Accounts Receivable deposit has been
received.
Payee Name
Lists the name each customer from whom an Accounts Receivable deposit has been received.
Module
Two-character abbreviation of the module where each deposit originated (typically AR for the Accounts
Receivable module).
Entry Type
Two-character code that identifies the transaction entry type (TR for transfer, etc.) used to enter the
transaction. Entry type IDs are defined in Entry Type Maintenance (20.260.00).
Clear Date
Date on which each deposit available to be cleared is considered to have cleared the bank. If you
select Provide Reconcilement Amt in CA Setup (20.950.00), the software automatically displays the
reconciliation date as the clear date. If you do not select Provide Reconcilement Amt, you must enter
the clear date of each deposit manually. Note that the correct clear date for all deposits is key to
performing accurate average days to clear calculations which appear on the Float Analysis
(20.640.00) report.
Deposit Date
Lists the date when each deposit was submitted to the bank.
Clear Range (button)
Accesses Select Deposits to be Reconciled (20.210.04), which is a subscreen of Reconcile Checks
(20.210.01), used to specify a range of deposits to be cleared at the same time.
Detail (button)
Displays the transaction entry screen where the batch was originally entered.

Data Entry Screens 63
Select Deposits to be Reconciled (20.210.04)
Use to specify a range of deposits in transit to be cleared at the same time. The deposit numbers you
enter here highlights the appropriate range of deposits listed in Reconcile Deposits (20.210.03). Then,
when you click OK in Reconcile Deposits (20.210.03), the software automatically clears all deposits in
the range of deposits specified.
Figure 22: Select Deposits to be Reconciled (20.210.04)
Select Deposits based on
Specifies how deposit ranges will be selected when clearing a range of deposits. Options are:
Reference Number — select a deposit range based on the reference number of the deposits
Batch Number — select a deposit range based on the batch number of the deposits
Starting Reference “Deposit” Number
Specifies the first deposit number in a range of deposits the software should clear at the same time.
When you complete the deposit reconciliation process, the software automatically clears the deposits
associated with the starting and ending deposit numbers and all deposits in between the two.
Ending Reference “Deposit” Number
Specifies the last deposit number in a range of deposits the software should clear at the same time.
When you complete the deposit reconciliation process, the software automatically clears the deposits
associated with the starting and ending deposit numbers and all deposits in between the two.

64 Cash Manager

Maintenance Screens 65
Maintenance Screens
Cash Account Maintenance (20.250.00) Use to define the bank accounts (and subaccounts) used by the Cash Manager module. Note that you
cannot enter a transaction affecting Cash Manager until you first define the necessary cash accounts
(and subaccounts) in this screen. The Accounts Payable, Order Processing, and Accounts Receivable
modules all validate the checking accounts (and subaccounts) they use to those defined for the Cash
Manager module.
Figure 23: Cash Account Maintenance (20.250.00)
Company ID
The identification code for the company.
Bank Account
The cash account’s General Ledger account number. The account you enter here must be set up in
the General ledger module’s Chart of Accounts Maintenance (01.260.00).
Bank Subaccount
The cash account’s General Ledger subaccount number. The subaccount you enter here must be set
up in the Shared Information module’s Flexkey Definition (21.320.00) and Flexkey Table Maintenance
(21.330.00), and the General Ledger module’s Subaccount Maintenance (01.270.00).
Current Balance
Current balance of the account, as maintained by the software (but not the bank account balance).

66 Cash Manager
Currency ID
The identification code of the currency (U.S. dollars, Canadian dollars, etc.) used to maintain the cash
account’s monetary balance. Currency ID appears if the Currency Manager module has been
activated.
Cash Account Name
Identifies the name of the cash account associated with the account (and subaccount) number.
Bank Account Number
Specifies the bank-assigned account number (the bank’s number for the account).
Transit Number
The bank’s routing number. The banking system uses the routing number to identify the bank and the
Federal Banking district to which it belongs.
Address ID
Unique identifying code that associates the cash account with a specific bank name and address (the
bank maintaining the cash account). The bank address ID you enter here must be defined in the
Shared Information module’s Address Maintenance (21.250.00). Note, however, that you can enter
the address information of a new bank “on the fly” here using the Quick Maintenance feature (see the
System Manager Help or user’s guide).
Name
Bank name associated with the bank address ID.
Last Recon Date
Date when the cash account’s activity was last reconciled with the cash account activity as recorded
on the bank statement.
Last Recon Balance
Account’s balance as of the last time the account’s activity was reconciled with the activity for the
account, as recorded on the bank statement.
Account Status
Specifies whether or not the cash account is active. Active options are:
Active — The account is active.
Inactive — The account is not active.
Note that you cannot enter transactions for inactive cash accounts.
Accept Updates from GL Transactions
Allows cash account updates from GL Transactions to update the Cash Account balance. The Update
Cash Accounts used in GL Transactions option must also be checked on the CA Setup (20.950.00).

Maintenance Screens 67
Entry Type Maintenance (20.260.00) Use to define the types of cash transactions that can be entered in the Cash Manager module: SC
(service charges), CK (checks), PA (AR deposits), etc. For each entry type, you must define its
information before you can enter Cash Manager transactions that use the entry type. However, note
that you can use the Quick Maintenance feature to define an entry type “on the fly” when performing a
possible values lookup at an Entry Type field.
Figure 24: Entry Type Maintenance (20.260.00)
Entry Type
Two-character code you assign to a transaction entry type: SC for service charge, etc. The entry type ID
can be alphanumeric code.
The Cash Manager module comes with eight predefined transaction entry types that are permanently
recorded in the system (cannot be deleted). The first four entry types are:
CK — Used for Accounts Payable checks and electronic payments.
PA — Used for Accounts Receivable payments.
UC — Used to identify Accounts Payable checks that are unused.
ZZ — Used to identify Cash Manager offsetting entries.
Four of the eight types are needed only if you do not have the accounting modules corresponding to
specific transactions but would like to enter outstanding items for reconcilement. Transactions using
these types do not generate transactions for the General Ledger. The four transactions entry types are:
OA — Used for entering outstanding Accounts Payable checks and electronic payments.
OP — Used for entering outstanding Payroll checks.
OD — Used for entering outstanding deposits.
OM — Used for entering outstanding miscellaneous cash transactions.
Note: The TR (transfer) entry type is reserved exclusively for use in Cash Account Transfers
(20.020.00). Because of the TR entry type’s special meaning, you cannot define this entry type in
Entry Type Maintenance (20.260.00). CO and CE entry types are reserved for use by Cash Account
Transactions (20.010.00) for Consolidation Batches.
Description
Explanation of the entry type ID.

68 Cash Manager
Default Account
Specifies the default offset account to be updated for transactions of this entry type entered in Cash
Account Transactions (20.010.00). The account you enter here must be set up in the General Ledger
module’s Chart of Accounts Maintenance (01.260.00). Note that you can override a default offset
account when entering transactions in Cash Account Transactions (20.010.00).
Default Subaccount
Specifies the optional default offset subaccount to be updated for transactions of this entry type
entered in Cash Account Transactions (20.010.00). The subaccount you enter here must be set up in
the Shared Information module’s Flexkey Definition (21.320.00) and Flexkey Table Maintenance
(21.330.00), and the General Ledger module’s Subaccount Maintenance (01.270.00). Note that you
can override a default offset subaccount when entering transactions in the Cash Account Transactions
(20.010.00).
Receipt/Disbursement
Identifies the entry type as either a receipt or a disbursement entry type.
Entry Type Status
Identifies the active status of the entry type.
Calculate Average Days to Clear
Specifies whether or not the software should include the transaction type in the average days to clear
calculations it performs after bank reconciliations when it generates the Float Analysis (20.640.00)
report. Average days options are:
Checked — Include the entry type in average days to clear calculations.
Unchecked — Do not include the entry type in average days to clear calculations.
Update Accounts Receivable
Controls whether or not the software creates unapplied deposits in Accounts Receivable records. The
Cash Manager module allows you to book cash receipts in Cash Manager records first (in order to
keep your cash balance current) before passing these deposits on to the Accounts Receivable module
for application. Selecting Update AR helps the software identify and properly manage those types of
transactions. Update options are:
Checked — Create unapplied deposit batches in Accounts Receivable records (book cash receipts
to Cash Manager records before passing them on to the Accounts Receivable module).
Unchecked — Do not create unapplied deposits in Accounts Receivable records.

Maintenance Screens 69
Recurring Item Maintenance (20.270.00) Use to define the information for transactions that occur regularly for a fixed amount each time they
occur: monthly rent payments, quarterly service fees, etc. Once created, a recurring item is saved in
the database and processed automatically whenever you use Generate Recurring Transactions
(20.500.00). Generating regular items (transactions) from recurring items causes the software to
update the cash information maintained by both the Cash Manager and General Ledger modules for
the amount of the regular items.
Figure 25: Recurring Item Maintenance (20.270.00)
For each recurring item, the values at Frequency, Cycle, and Number of Cycles control the frequency of
generation (every month, every quarter, etc.) and the life of the recurring item (the number of times it
generates a regular cash item). After you have generated a recurring item for its specified number of
cycles, the software deletes the recurring item from the database.
Document Area
Use the Document area to identify the type of item on which to perform maintenance.
Company ID
Identification code of the company.
Recurring ID
Unique identifying code assigned to the recurring item (transaction). The recurring item ID can be any
alphanumeric code (for example, an abbreviated version of the recurring transaction description or a
letter-number combination).
Bank Account
Specifies the bank account to which regular transactions generated from the recurring item
(transaction) should be posted. The account you enter here must be set up in the General Ledger

70 Cash Manager
module’s Chart of Accounts Maintenance (01.260.00) and entered in Cash Account Maintenance
(20.250.00).
Bank Subaccount
Specifies the subaccount to which regular transactions generated from the recurring item
(transaction) should be posted. The subaccount you enter here must be set up in the Shared
Information module’s Flexkey Definition (21.320.00) and Flexkey Table Maintenance (21.330.00),
and the General Ledger module’s Subaccount Maintenance (01.270.00). It must also be entered in
the Cash Account Maintenance (20.250.00).
Next Generation Date
Shows the next date when the software should generate a regular transaction from the recurring item
(transaction). For a new recurring item, the default next generation date is either the current date or
the 28th day of the month, whichever comes first. After the first regular transaction has been
generated, the software automatically increments the next generation date to the date when the next
regular transaction should be generated. The software increments the next generation date by month
rather than day to account for the different number of days in a month.
Frequency
Specifies how often the software should generate a regular transaction from the recurring item
(transaction). Frequency options are: Bi-weekly, Monthly, Semi-monthly, Weekly.
Cycle
Specifies the number of months between generations of regular transactions from the recurring item
(transaction). For example, 01 means that the software generates the regular transaction every
month, 03 means the software generates it every quarter, etc. The maximum cycle allowed is 99. Note
that cycle is available only if the value at Frequency is Monthly.
Number of Cycles
Number of times the software should generate a regular transaction from the recurring item
(transaction). For example, 04 means the software should generate a regular transaction four times.
Each time you generate a regular transaction, using Generate Recurring Transactions (20.500.00),
the software reduces the value displayed here by one. The maximum number of cycles allowed is 99.
Amount
Total dollar amount of the transaction detail line (the amount that updates the detail line’s associated
account/subaccount).
Total
Running total of all transaction detail lines entered for the recurring item (transaction). As you enter
detail lines, the value at Total increments by the detail line amounts entered.
Detail Area
Use the Detail area to review recurring item information.
Company ID
Identification code for the company.
Entry Type
Two-character code that identifies the recurring item’s (transaction’s) transaction entry type (SC for
service charge, etc.). The software enters this entry type automatically for each regular transaction
generated from the recurring item. The entry type ID you enter here must be set up in Entry Type
Maintenance (20.260.00).

Maintenance Screens 71
Account
Account to be updated by the amount of the transaction detail line when a regular transaction is
generated from the recurring item (transaction). A default account is typically defined for each entry
type in Entry Type Maintenance (20.260.00). The account you enter here must be set up in the
General Ledger module’s Chart of Accounts Maintenance (01.260.00).
Subaccount
Optional subaccount to be updated by the amount of the transaction detail line when a regular
transaction is generated from the recurring item (transaction). A default subaccount is typically
defined for each entry type in Entry Type Maintenance (20.260.00). The subaccount you enter here
must be set up in the Shared Information module’s Flexkey Definition (21.320.00) and Flexkey Table
Maintenance (21.330.00), and the General Ledger module’s Subaccount Maintenance (01.270.00).
Reference Number
Identifying code assigned to the transaction detail line that distinguishes it from all other detail lines in
the database. You can use reference numbers to link transaction detail lines to source documents
such as purchase orders, checks, invoices, etc. Reference number identification of transaction detail
lines is useful for reporting purposes.
Description
Description is an explanation of the transaction detail line. Detail line descriptions appear on many
reports. Note that if the detail line is associated with a vendor or customer, the vendor or customer
name also appears here.
Amount
Total of the next regular transaction created from the recurring item (transaction). Note that the
document amount and the total of all transaction detail lines must be equal before you can generate a
regular transaction from the recurring item.
Debit/Credit
Specifies whether the amount at Amount is a debit or a credit amount. Whether Debit/Credit displays
Debit or Credit depends on the entry type ID entered at Entry Type.

72 Cash Manager
Cash Flow Maintenance (20.280.00) Use to enter anticipated items: anticipated cash receipts or anticipated cash disbursements. These
anticipated items help to project cash flow. Note that you can set up multiple “what if” anticipated
item scenarios by assigning a scenario case number to each different anticipated item. Examples of
anticipated items are:
Sale of plant assets
Refunds from litigation
The Cash Flow Projection (20.650.00) report looks at the date entered for these anticipated items and
places them in the proper forecasted period. These items remain on the screen until they are manually
deleted or deleted in Delete CA Detail (20.530.00).
Note: Item Status should be set to Inactive for completed items. Otherwise, if the Cash Flow Projection
(20.650.00) report is printed with Include Overdue Documents selected and an appropriate Case
Number entered, the completed items will be included in the Overdue Documents column of the
report.
Figure 26: Cash Flow Maintenance (20.280.00)
Case Number
Unique identifying code assigned to an anticipated item. The software uses case numbers to
distinguish between the different “what if” anticipated item scenarios you establish. For example,
suppose you establish one scenario assuming 8% interest income rates and another assuming 7%
rates. Each scenario would have a different case number.
Date
Beginning point for calculating the effects of the anticipated item scenario on cash flow (for example,
08/01/98 might specify that the software should use August 1 as the beginning point for calculating
7% interest income rates on available cash).
Description
Explanation of the anticipated item ID entered at Case Number.

Maintenance Screens 73
Company ID
Identification code of the company.
Bank Account
Specifies the bank account associated with the anticipated item (the account that would be affected if
the anticipated item’s scenario became a reality). The account you enter here must be set up in the
General Ledger module’s Chart of Accounts Maintenance (01.260.00).
Bank Subaccount
Specifies the subaccount associated with the anticipated item (the subaccount that would be affected
if the anticipated item’s scenario became a reality). The subaccount you enter here must be set up in
the Shared Information module’s Flexkey Definition (21.320.00) and Flexkey Table Maintenance
(21.330.00), and the General Ledger module’s Subaccount Maintenance (01.270.00).
Anticipated Receipt
Anticipated item’s receipt amount (if the item is a receipt item).
Anticipated Disbursement
Anticipated item’s disbursement amount (if the item is a disbursement item).
Item Status
Specifies whether or not the anticipated item is currently available for use. Active options are:
Active — The software can use the anticipated item to calculate the effects of its parameters on
possible cash flow.
Inactive — The software cannot use the anticipate item to calculate possible cash flow (the item is
unavailable).

74 Cash Manager

Process Screens 75
Process Screens
Release CA Batches (20.400.00) Use to release all balanced, unposted Cash Manager transaction batches for posting to General
Ledger accounts. A transaction batch must have a balanced status before it can be released for
posting. Transactions are posted in the General Ledger module’s Post Transactions (01.520.00). In
addition to releasing batches for posting, the Release Cash Manager Batches process also updates
the Cash Manager module cash balance and transfers unapplied cash receipts to the Accounts
Receivable module.
Note: If Automatic Financial Transaction Transfer is selected on the PC Options and Setup tab of
Project Controller Setup (PA.SET.00), project-related cash account transactions posted to the General
Ledger will be processed automatically by Financial Transaction Transfer (PA.TRN.00). If the option is
not selected, the project-related cash transactions will be processed when Financial Transaction
Transfer (PA.TRN.00) is run for the General Ledger module.
Figure 27: Release CA Batches (20.400.00)
If you select Automatic Batch Reports in GL Setup (01.950.00), Release CA Batches (20.400.00)
generates a batch control report of all batches released during processing.
Use the Select Company area to specify which company batches will be released.
Specific
Specifies a specific company.
All
Selects all available companies.
Company ID (Select Company)
Identification number of the company.

76 Cash Manager
Selected
Specifies by batch whether or not a balanced, unposted transaction batch should be released for
posting to the General Ledger. Batch release options are:
Checked — Release the batch for posting. This is the default option.
Unchecked — Do not release the batch for posting.
Batch Number
Specifies by batch the unique identifying code of each batch that can potentially be released for
posting.
Company ID (Detail)
Identification number of the company.
Screen Number
Specifies by batch the Cash Manager module screen used to enter the batch into the software; for
example, 20010 specifies Cash Account Transactions (20.010.00).
Status
Indicates by batch the current condition of each batch in the system:
On Hold — Not to be released.
Balanced — Ready to be released.
Partially Released — Could not be released do to an out-of-balance condition or some other
problem.
Partially Voided — Void was interrupted and must be completed.
Journal Type
Specifies by batch the identifying code of each batch’s book of original entry (for example, CA specifies
the Cash Manager journal). The software uses journal types to group batches together for more
efficient General Ledger reporting.
Batch Control
Specifies by batch the total amount of all transactions in each batch.
Select All (button)
Selects all unposted batches for release for posting. When you want to release all unposted
transactions, the Select All button is a quick way to select every possible batch.
Clear Selections (button)
Deselects all batches (prevents all unposted batches from being released for posting). This helps
ensure that any batches not to be released are not accidentally selected and released. After clicking
the Clear Selections button, you can use Selected to specify only those batches you definitely want to
release.
Begin Processing (button)
Starts the release for posting process.

Process Screens 77
Clear Check/Deposit Data Import (20.420.00) Use to import delimited, ASCII files of cleared checks, electronic payments, and deposit data provided
by a financial institution. An Import Setup ID is a required field and is defined on Clear Check/Deposit
Import Setup (20.970.00).
Figure 28: Clear Check/Deposit Data Import (20.420.00)
Use the File Import Settings area to display the settings for the selected import setup ID for importing
files.
Setup ID
Identifier of an import file mapping created on Clear Check/Deposit Import Setup (20.970.00).
Company ID
Identification number of the company.
Bank Account
Specifies the bank account associated with this import setup record; must be defined on Cash
Account Maintenance (20.250.00).
Bank Subaccount
Specifies the bank subaccount associated with this import setup record; must be defined with the
Bank Account on Cash Account Maintenance (20.250.00).
Check/Deposit Indicator Field
Specifies the field in each record of the bank-provided cleared check/deposit data file that contains a
code to determine whether the record is a check, an electronic payment, or a deposit. For example,
your bank indicates that field 3 of each record within the file contains a code to determine whether the
record is a check, electronic payment, or deposit.

78 Cash Manager
Check Indicator
Indicates the code the bank uses to identify a record in the bank-provided cleared check/deposit data
file as a check. For example, your bank specifies that a check record will have a “C” in field 3 of each
record within the file.
Deposit Indicator
Indicates the code the bank uses to identify a record in the bank-provided cleared check/deposit data
file as a deposit. For example, your bank specifies that a deposit record will have a “D” in field 3 of
each record within the file.
Check/Deposit Number Field
Specifies what field in a record in the bank-provided cleared check/deposit data file that contains the
check/deposit number.
Check Deposit Amount Field
Specifies what field in a record in the bank-provided cleared check/deposit data file that contains the
check, electronic payment or deposit amount.
Assume Decimal Places
When checked, specifies the amount fields will have a decimal point inserted into them.
Number of Decimal Places
Specifies where to insert the decimal point when “Assume Decimal Places” is checked.
Clear Date Field
Specifies what field on a record in the bank-provided cleared check/deposit data file that contains the
clear date.
Starting Line Number
Specifies what record in the bank-provided cleared check/deposit data file holds the first data record.
This setting is useful if the first few lines of the file are not records that hold cleared check, electronic
payment, or deposit data.
Stop Importing After # Errors
Specifies how many import data errors the import process can encounter before it will stop; zero
means it will stop when one error is encountered.
Field Delimiter
Specifies what character is used to separate the fields in the records in the bank-provided cleared
check/deposit data file.
Import File Name
Holds the fully qualified path and file name of the bank-provided cleared check/deposit data file.
Import Reference
Specifies a unique reference that can be used to later identify all data that was imported from the
supplied file.
Log Errors Only
When checked, specifies that only errors will be written to the process log file. If unchecked, all
process messages will be written to the log file.

Process Screens 79
Begin Processing (button)
Starts the file import process.

80 Cash Manager
Clear Checks/Deposits (20.440.00) Use to clear checks, electronic payments, and deposits from the imported clear check, electronic
payment, or deposit data provided by a bank.
Figure 29: Clear Checks/Deposits (20.440.00)
Document Area
Use the Document area to enter company and cash account information.
Company ID
Identification number of the company.
Bank Account
Specifies the bank account associated with this cash account; must be defined on Cash Account
Maintenance (20.250.00).
Bank Subaccount
Specifies the bank subaccount associated with this cash account; must be defined with the Bank
Account on Cash Account Maintenance (20.250.00).
Log Errors Only
When checked, specifies that only errors will be written to the process log file. If unchecked, all
process messages will be written to the log file.
Preview Results
Performs a system search for transaction matches and returns the results to the grid but does NOT
make any updates to the database.

Process Screens 81
Commit Results
Updates the matches of imported transactions as cleared within the database. Note that although this
button can be used without previewing the matched results first, it is not recommended.
Detail Area
Use the Detail area to review check, electronic payment, and deposit information.
Selected
Indicates that this item should be processed when the Preview Results or Commit Results button is
clicked.
Check/Deposit Indicator
Indicates whether the item in this grid row is a check, electronic payment, deposit, or unknown. This
item was imported from the clear check, electronic payment, or deposit data file from the bank.
Check/Deposit Number
Indicates the check, electronic payment, or deposit number of the item in this grid row. This item was
imported from the clear check, electronic payment, or deposit data file from the bank.
Check/Deposit Amount
Indicates the check, electronic payment, or deposit amount of the item in this grid row. This item was
imported from the clear check/deposit data file from the bank.
Date Cleared
Indicates the date the check, electronic payment or deposit was cleared by the bank. This item was
imported from the clear check/deposit data file from the bank.
Import Reference
Import Reference that was used when the data was imported using Clear Check/Deposit Data Import
(20.420.00).
Matching Module
Indicates the module the matching transaction was found in for this item; field is populated only by the
Preview Results button or the results returned from Find Match (20.440.01).
Matching Reference Number
Indicates the reference number of the matching transaction for this item; field is populated only by the
Preview Results button or the results returned from Find Match (20.440.01).
Matching Amount
Indicates the amount of the matching transaction for this item; field is populated only by the Preview
Results button or the results returned from Find Match (20.440.01).
Matching Transaction Date
Indicates the transaction date of the matching transaction for this item; field is populated only by the
Preview Results button or the results returned from Find Match (20.440.01).
Matching Description
Indicates the description from the matching transaction for this item; field is populated only by the
Preview Results button or the results returned from Find Match (20.440.01).

82 Cash Manager
Select All (button)
Use this button to “check” the Selected check box for all items within the grid.
Clear All (button)
Use this button to “uncheck” the Selected check box for all items within the grid.
Create Transaction (button)
Enters a new batch from Cash Account Transactions (20.010.00).
Remove Match (button)
Use this button to remove the matching transaction information from the selected row in the grid.
Find Match (button)
Use this button to open Find Match (20.440.01), to find the matching transaction for the selected row
in the grid.

Process Screens 83
Find Match (20.440.01)
This subscreen of Clear Checks/Deposits (20.440.00) is used to help find transaction matches that
the Preview Results button process was unable to determine or correct matches that it made before
they are committed to the database.
Figure 30: Find Match (20.440.01)
Company ID
Identification number of the company.
Bank Account
Specifies the bank account associated with this cash account; must be defined on Cash Account
Maintenance (20.250.00).
Bank Subaccount
Specifies the bank subaccount associated with this cash account; must be defined with the Bank
Account on Cash Account Maintenance (20.250.00).

84 Cash Manager
Indicator
Indicates whether the selected item in the grid row on Clear Checks/Deposits (20.440.00) is a check,
electronic payment, deposit, or unknown. This item was imported from the clear check/deposit data
file from the bank.
Number
Indicates the selected check, electronic payment, or deposit number of the item in the grid row on
Clear Checks/Deposits (20.440.00). This item was imported from the clear check/deposit data file
from the bank.
Amount
Indicates the selected check, electronic payment, or deposit amount of the item in the grid row on
Clear Checks/Deposits (20.440.00). This item was imported from the clear check/deposit data file
from the bank.
Module
Used to restrict what module (AP, AR, CA, PR) to search for a transaction match.
Beginning Document Date
Used to restrict the oldest transaction date to be used to find a transaction match. This date can to
used with the Ending Document Date field to establish a transaction date range.
Ending Document Date
Used to restrict the most current transaction date to be used to find a transaction match. This date
can to used with the Beginning Document Date field to establish a transaction date range.
Check/Deposit Indicator
Used to restrict what type (check, electronic payment, or deposit) of transaction to look for.
Check/Deposit Number (Selection Criteria)
Used to restrict the transaction search to items with a specific reference number.
Check/Deposit Amount (Selection Criteria)
Used to restrict the transaction search to items with this specific transaction amount.
Find Transactions (button)
Use to start the transaction search process using all of the entered Optional Selection Criteria. All
results from the search will be displayed in the grid.
Module
Indicates the module where the matched transaction was found.
Check/Deposit Number (Detail)
Indicates the check, electronic payment, or deposit number of the matched transaction.
Check/Deposit Amount (Detail)
Indicates the transaction amount of the matched transaction.
Transaction Date
Indicates the transaction date of the matched transaction.

Process Screens 85
Description
Indicates the transaction description of the matched transaction.
Accept (button)
Moves the contents of the selected item in the grid to the “matching” information fields for the select
item in the grid on Clear Checks/Deposits (20.440.00).
Cancel (button)
Closes the screen and returns to Clear Checks/Deposits (20.440.00).
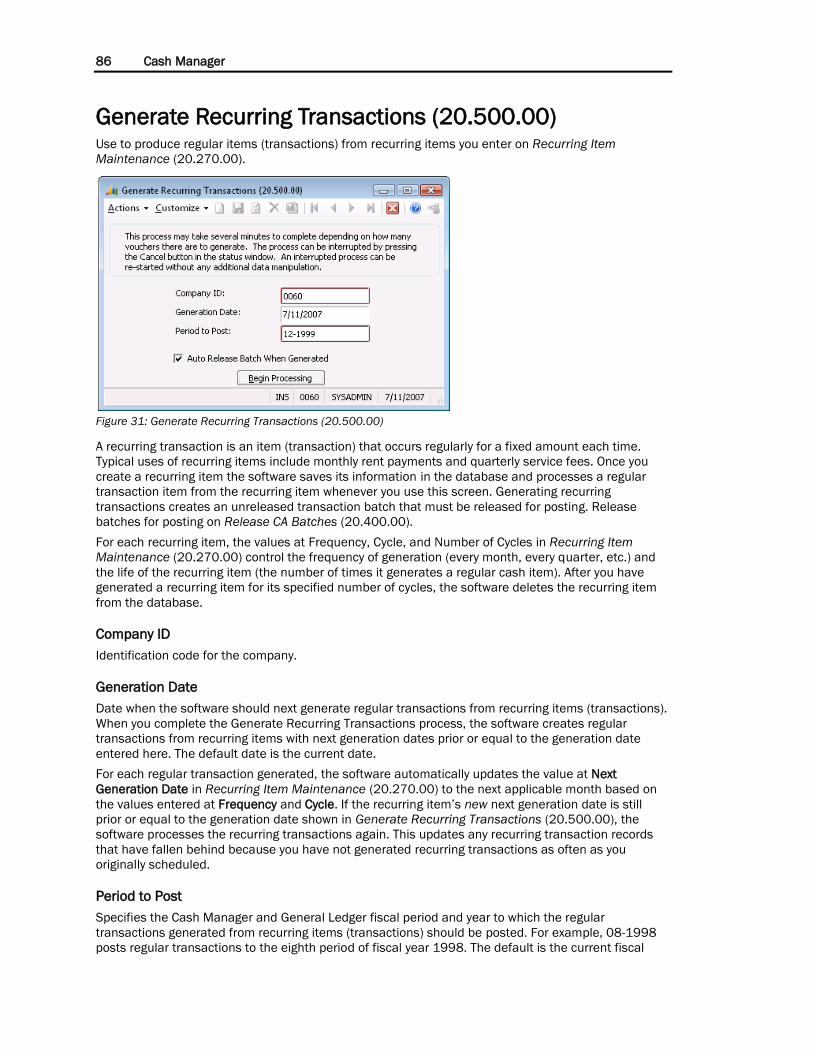
86 Cash Manager
Generate Recurring Transactions (20.500.00) Use to produce regular items (transactions) from recurring items you enter on Recurring Item
Maintenance (20.270.00).
Figure 31: Generate Recurring Transactions (20.500.00)
A recurring transaction is an item (transaction) that occurs regularly for a fixed amount each time.
Typical uses of recurring items include monthly rent payments and quarterly service fees. Once you
create a recurring item the software saves its information in the database and processes a regular
transaction item from the recurring item whenever you use this screen. Generating recurring
transactions creates an unreleased transaction batch that must be released for posting. Release
batches for posting on Release CA Batches (20.400.00).
For each recurring item, the values at Frequency, Cycle, and Number of Cycles in Recurring Item
Maintenance (20.270.00) control the frequency of generation (every month, every quarter, etc.) and
the life of the recurring item (the number of times it generates a regular cash item). After you have
generated a recurring item for its specified number of cycles, the software deletes the recurring item
from the database.
Company ID
Identification code for the company.
Generation Date
Date when the software should next generate regular transactions from recurring items (transactions).
When you complete the Generate Recurring Transactions process, the software creates regular
transactions from recurring items with next generation dates prior or equal to the generation date
entered here. The default date is the current date.
For each regular transaction generated, the software automatically updates the value at Next
Generation Date in Recurring Item Maintenance (20.270.00) to the next applicable month based on
the values entered at Frequency and Cycle. If the recurring item’s new next generation date is still
prior or equal to the generation date shown in Generate Recurring Transactions (20.500.00), the
software processes the recurring transactions again. This updates any recurring transaction records
that have fallen behind because you have not generated recurring transactions as often as you
originally scheduled.
Period to Post
Specifies the Cash Manager and General Ledger fiscal period and year to which the regular
transactions generated from recurring items (transactions) should be posted. For example, 08-1998
posts regular transactions to the eighth period of fiscal year 1998. The default is the current fiscal

Process Screens 87
period-year. The period to post must belong to a valid fiscal period as specified in GL Setup
(01.950.00). It applies to the entire batch.
Note: You can verify the current fiscal period by viewing the Detail General Ledger (01.620.00) report.
Auto Release Batch When Generated
Controls whether or not the software automatically releases for posting regular transactions created
from recurring items (transactions). The default option is selected (release regular transactions
automatically) for all recurring items. Note that you can use Cash Account Transactions (20.010.00) to
review and edit all regular transactions not automatically released for posting.
Begin Processing (button)
Starts the transaction generation process.

88 Cash Manager
Generate Consolidation File (20.510.00) Use to produce a file that consolidates (summarizes) the cash account activity occurring in the
database for a specific period of time. This “consolidation” file is later used to transfer cash account
activity of its originating database into another database. The process of transferring summarized
cash account activity from one database to another is called consolidation.
Figure 32: Generate Consolidation File (20.510.00)
Consolidation is typically performed by multi-subsidiary (divisions, etc.) companies in which each
subsidiary maintains its own financial records in a separate database. At designated time intervals,
each subsidiary produces a “consolidation” file of its cash account activity. The parent company then
“reads” (transfers) the consolidated records of all subsidiaries into the corporate-level database to
update its cash account activity and, thus, provide a consolidated corporate-wide picture of current
cash status.
When you generate a consolidation file, the software creates one transaction per bank account, per
transaction date. Each transaction’s consolidation account (the account into which it should be placed
in the corporate-level database) is determined by the account number entered at Consol Account in
the General Ledger module’s Chart of Accounts Maintenance (01.260.00). Each transaction’s
consolidation subaccount is determined by the subaccount number entered at Consol Subaccount in
Subaccount Maintenance (01.270.00).
Consolidation accounts (and subaccounts) allow subsidiary databases to have different account (and
subaccount) numbers than the corporate database, yet still record financial data accurately. Note that
the parent company cannot process consolidated cash transactions from its subsidiaries until the
consolidated account (and subaccount) is defined in Cash Account Maintenance (20.250.00) of the
parent company’s Cash Manager module.
Also note that consolidated cash account transactions do not have any effect on General Ledger
records. This is done strictly so the Cash Manager module is always able to have a current picture of
its consolidated cash position. You can complete the Generate Consolidation as often as is necessary
to help the corporate database maintain an up-to-the-minute picture your company’s current cash
position.
Each consolidation transaction is comprised of the following:
Bank account number.
Bank subaccount number.
Transaction date in the format MMDDYYYY.
Transaction description, amount, and designation: DR (debit), CR (credit).
The consolidation file is a standard ASCII file that uses this format:

Process Screens 89
Single quotation marks delimiting each data item.
A blank space separating each data item from the next one.
Sets of double quotation marks designating the end of each line.
The “at” sign (@) marking the end of a file.
After the software has generated the consolidation file, it can be read into the consolidation database
using Read Consolidation File (20.520.00).
Use the select company area to specify the company to use for file consolidation.
Specific
Identifies a specific company.
All
Selects all available companies.
Company ID
Identification code for the company.
Name of File to Generate
Specifies the name of the consolidation file. The file name is actually comprised of a fully qualified
path (including disk drive location) and file name. The software automatically displays a default
consolidation file name showing the fully qualified path and using the name format IIIIPPYY.999.
IIII represents the subsidiary company ID, entered at Company ID in GL Setup (01.950.00).
PP represents the fiscal period.
YY represents the fiscal year.
999 represents the last three digits of the database access number in use during file creation.
Browse
Browse accesses Consolidation File to Generate, which is a subscreen of Generate Consolidation
File (20.510.00), used to control the default fully qualified path and file name of the consolidation file
being generated.
Begin Processing (button)
Starts the generate consolidation file process. The time it takes to generate a consolidation file varies,
depending on the number of accounts in the database.

90 Cash Manager
Read Consolidation File (20.520.00) Use to “read” (transfer) the contents of a cash account consolidation file into a database. A
consolidation file contains a series of transactions that summarizes (consolidates) the cash activity
occurring in a database for a specific period of time. This consolidation file is later used to transfer the
cash account activity of its originating database into another database, using Read Consolidation File
(20.520.00).
Figure 33: Read Consolidation File (20.520.00)
Consolidation is typically performed by multi-subsidiary (divisions, etc.) companies in which each
subsidiary maintains its own financial records in a separate database. At designated time intervals,
each subsidiary produces a “consolidation” file of its cash account activity. The parent company then
“reads” (transfers) the consolidated records of all subsidiaries into the corporate-level database to
update its cash account activity and, thus, provide a consolidated corporate-wide picture of current
cash status.
Use the select company area to specify the company to use for file consolidation.
Specific
Identifies a specific company.
All
Selects all available companies.
Company ID
Identification code for the company.
Process Screens 91
Name of File to be Read
Specifies the name of the consolidation file to read into the database. The file “name” is actually
comprised of a fully qualified path (including disk drive location) and file name. When entering the
consolidation file name, use the file name format IIIIPPYY.999 in which:
IIII represents the subsidiary company ID, entered at Company ID in GL Setup (01.950.00).
PP represents the fiscal period.
YY represents the fiscal year.
999 represents the last three digits of the database access number in use during file creation.
Browse
Browse accesses Consolidation File to Read, which is subscreen of Read Consolidation File
(20.520.00), used to select the default fully qualified path and file name of the consolidation file to be
read.
Begin Processing (button)
Starts the read consolidation file process. The time it takes to read a consolidation file varies,
depending on the number of accounts in the database. If you interrupt the reading process prior to
completion, the software does not create a consolidation transaction batch.
The software automatically assigns a batch number to each new consolidation batch created. You can
use the batch number to review or edit the consolidation batch prior to posting it to the General
Ledger. The batch may require editing because of certain errors that can occur during processing.
Consolidation errors occur most often when you are using a consolidation file created outside of
Microsoft Dynamics SL (you did not use Generate Consolidation File (20.510.00) to create the
consolidation file). The error occurs because the transactions in the file are incorrectly formatted (see
the discussion on transaction detail and format earlier in this section), and the software will not read
such transactions into the database. The process log that is generated at the end of this process lists
the batch number and details of any incorrect consolidation transactions. Possible error messages
are:
Invalid Input — The input for a field or fields does not follow the correct data entry format:
alphabetic, numeric, alphanumeric.
Invalid Bank Account — A transaction’s bank account number in the parent-company database is
not the same as the one used for the transaction in the subsidiary database.

92 Cash Manager
Delete CA Detail (20.530.00) Use Delete CA Detail (20.530.00) to remove cash activity details and balances that are no longer
required for operations. Cash activity details include transactions entered directly using Cash Account
Transactions (20.010.00) and Cash Account Transfers (20.020.00), recurring items that have been
generated for their maximum number of cycles, and consolidation file entries. Balances include daily
cash account balances and monthly average days to clear information.
To delete obsolete cash activity, first specify in CA Setup (20.950.00) how long the software should
retain prior Cash Manager information. This includes the maximum periods prior to the current one for
cash account balances and Cash Manager transactions. Then, complete the Delete CA Detail
(20.530.00) process. The software deletes all cash account activity and balances from any accounting
period that exceeds the maximum retention values specified in CA Setup (20.950.00).
Figure 34: Delete CA Detail (20.530.00)
Current CA Fiscal Period
Fiscal period number controls which fiscal period and year should serve as the reference point for
Cash Manager detail deletion. For example, suppose the software is to retain Cash Manager balances
and transactions for 12 periods prior to the current fiscal period. If 08-1998 is the current fiscal
period, the software deletes the activity (transactions, average days to clear, and balances) of period
07-1997---plus any periods prior to this that still have any Cash Manager detail---when you complete
the Delete CA Detail (20.530.00) process.
Note: Fiscal year information, such as the number of periods in your fiscal year, the calendar year in
which your fiscal year begins or ends, and each fiscal period’s ending date, is configured in GL Setup
(01.950.00). You can verify the current fiscal period by viewing the Detail General Ledger (01.620.00)
report.
Delete Detail From
Specifies the fiscal period and year when the software should begin deleting Cash Manager
transactions. The software deletes all transaction details from this period and all periods prior to this
one that still retain details. The period number here is controlled by the value of Periods to Retain
Trans in CA Setup (20.950.00) if the Retention settings are for a longer period of time than the
Retention settings on GL Setup (01.950.00). If the General Ledger Retention settings are for a longer
period of time than the Cash Manager Retention settings, the General Ledger Retention settings are
used.

Process Screens 93
Delete Balances From
Specifies the fiscal period and year when the software should begin deleting Cash Manager account
balances. The software deletes all account balances and bank reconciliation summary records from
this period and all periods prior to this one that still retain balances. The period number here is
controlled by the value of Periods to Retain Balances in CA Setup (20.950.00) if the Retention settings
are for a longer period of time than the Retention settings on GL Setup (01.950.00). If the General
Ledger Retention settings are for a longer period of time than the Cash Manager Retention settings,
the General Ledger Retention settings are used.
Begin Processing (button)
Starts the Cash Manager detail deletion process.

94 Cash Manager

Setup and Integrity Screens 95
Setup and Integrity Screens
CA Setup (20.950.00) Use to adapt the Cash Manager module to the structure of your business. You normally use this
screen when you first install the Cash Manager module but seldom after that. Note that you must
complete GL Setup (01.950.00) before you can complete CA Setup (20.950.00). Also note that you
must complete CA Setup (20.950.00) before you can use other Cash Manager module screens for
regular operations.
Figure 35: CA Setup (20.950.00)
Retention Area
Periods to Retain Balances
Controls the maximum number of periods prior to the current one to retain cash account balances. For
example, 02 indicates that cash account balances should be retained for two periods prior to the
current period. Once an accounting period’s account balances have been retained for a period
exceeding the number specified, the account balances for that period can be deleted using Delete CA
Detail (20.530.00).
To retain year-to-date cash account balances, enter a number larger than the total number of periods
in the fiscal year. Fiscal year information, such as the number of periods in your fiscal year, the
calendar year in which your fiscal year begins or ends, and each fiscal period’s ending date, is
configured in GL Setup (01.950.00). For more information, see “Defining Fiscal Periods” in the
General Ledger Help or user’s guide.
Note: Database storage requirements increase in proportion to the number of periods that cash
account balances are retained. This affects the amount of hard disk free space needed.
Periods in Average Days to Clear
Controls the number of periods of average days to clear information that the software should include
when it generates Float Analysis (20.640.00). As you clear checks, electronic payments, and deposits
in Bank Reconciliation (20.210.00), information is accumulated for the number of checks, electronic
payments, and deposits cleared, number of days to clear, and total amount to clear. This information
is summarized by period. When you generate Float Analysis reports, the software uses the value at
Periods in Average Days to Clear to determine how many periods to include in the calculations.

96 Cash Manager
Periods to Retain CA Transactions
Controls the maximum number of periods prior to the current one to retain Cash Manager
transactions. For example, 02 indicates Cash Manager transactions should be retained for two periods
prior to the current period. Once an accounting period’s Cash Manager transactions have been
retained for a period exceeding the number specified, the Cash Manager transactions for that period
can be deleted using Delete CA Detail (20.530.00).
To retain year-to-date Cash Manager transactions, enter a number larger than the total number of
periods in the fiscal year. Fiscal year information, such as the number of periods in your fiscal year, the
calendar year in which your fiscal year begins or ends, and each fiscal period’s ending date, is
configured in General Ledger module’s GL Setup (01.950.00). For more information, see “Defining
Fiscal Periods” in the General Ledger Help or user’s guide.
Note: Database storage requirements increase in proportion to the number of periods Cash Manager
transactions are retained. This affects the amount of hard disk free space needed.
Current Period Number
Initially, the current period number is the period when you want to initialize the Cash Manager module
(enter opening account balances and outstanding checks/electronic payments). This should be the
period before the one in which you plan to begin regular Cash Manager module operations. For
example, if you plan to begin regular operations in period 09, enter 08 as the current fiscal period.
Do not confuse fiscal period number with month number. For example, if the fiscal year-end for your
company is March 31 and April is the first period of the new fiscal year, enter 01 to initialize the Cash
Manager module in April. Also, the number of the fiscal year is the calendar year in which the fiscal
year begins. For example, if the fiscal year begins August 1, 1998, and runs through July 31, 1997,
and you plan to initialize sometime after the end of calendar year 1998 (for example, February, 1997),
1998 is still the fiscal year you should use for initialization.
The current fiscal period number increments by one at each period closing (see “Closing Process
(01.560.00)” in the General Ledger Help or user’s guide). After the first period closing, the value at
Current Period Number is always the number of the current Cash Manager module accounting period.
The current fiscal year increments by one at each yearly closing.
Note: Fiscal year information, such as the number of periods in your fiscal year, the calendar year in
which your fiscal year begins or ends, and each fiscal period’s ending date, is configured in General
Ledger module’s GL Setup (01.950.00). For more information, see “Defining Fiscal Periods” in the
General Ledger Help or user’s guide.
Last Batch Number
Unique numeric code assigned to a transaction batch that distinguishes the batch from all other
batches in the database. The software automatically assigns a different batch number to each new
transaction batch created. This number increments by one (000242, 000243, etc.) for each new
batch created and cannot be changed.
During Cash Manager module setup, use Last Batch Number to establish your batch number format.
The typical format is 000000, which assigns the lowest possible positive number (000001) to the first
transaction batch. However, other batch number formats are possible. For example, 100000 specifies
that batch numbering should begin with batch number 100001 (100001, 100002, etc.). After you
begin entering batches, Last Batch Number displays the number of the transaction batch most
recently created.
Accept Transaction Start Date
Date used by Cash Manager that specifies when it will start accepting transactions against cash
accounts from other modules like AR or AP.
AR Holding Area
The account and subaccount you enter here will be credited for entry type PA deposit amounts. PA is
the entry type assigned to Accounts Receivable payments. The only entry that uses AR Holding is PA.

Setup and Integrity Screens 97
Account and Subaccount must be the same as the account and subaccount entered for Entry Type of
PA on Entry Type Maintenance (20.260.00).
Account
General Ledger account that is updated by the amount of Accounts Receivable payment transaction
detail lines (entry type PA). The account you enter here must be set up in the General Ledger module’s
Chart of Accounts Maintenance (01.260.00).
Subaccount
Optional subaccount that is updated by the amount of Accounts Receivable payment transaction
detail lines (entry type PA). The subaccount you enter here must be set up in the Shared Information
module’s Flexkey Definition (21.320.00) and Flexkey Table Maintenance (21.330.00), and the
General Ledger module’s Subaccount Maintenance (01.270.00).
Options Area
Provide Reconcilement Amount
Controls whether or not the software automatically displays original check, electronic payment, and
deposit amounts at Cleared Amount in Reconcile Checks (20.210.01) and Reconcile Deposits
(20.210.03). If you do not select Provide Reconcilement Amount, you must enter the cleared amount
of each check, electronic payment, or deposit manually and you must also manually enter the
appropriate clear date at Clear Date in Cash Account Transactions (20.210.00). A warning message
appears if the deposit amount is different from the cleared amount.
If it is important for you to verify the accuracy of every cleared amount, do not select Provide
Reconcilement Amount. However, if you only occasionally encounter minor problems with bank
statement check, electronic payment, and deposit amounts, selecting Provide Reconcilement Amount
can save you data entry time during reconciliations.
Show GL Bank Reconciliation Information
Specifies whether or not general ledger bank reconciliation information appears along with other types
of bank reconciliation information in various Cash Manager module screens and reports.
Generate GL Detail Transactions
Allow reporting of detail entries to a cash account to be visible in the General Ledger using a one-to-
one relationship for the opposite debit/credit amount. This option pertains to cash transactions
entered using Cash Account Transactions (20.010.00) or cash transfers entered using Cash Account
Transfers (20.020.00).
Update Cash Accounts used in GL Transactions
Allows transactions generated in GL against cash accounts to update the cash account balance. The
Accept Updates from GL Transactions must also be checked for each cash account on Cash Account
Maintenance (20.250.00).
GL Posting Option Area
GL Posting Option controls how the software posts Cash Manager activity to General Ledger accounts.
Note that on General Ledger reports, the standard description for summarized Cash Manager postings
is “Summarized by Batch.” If you choose to post activity in summary, make sure you retain all related
batch control reports and generate up-to-date transaction lists. This helps you maintain a detailed
Cash Manager history for auditing purposes.
Detail
For each batch, include the related details of each transaction making up the batch.
Summary
For each batch, summarize, by account, the transactions in the batch and post only these results.

98 Cash Manager
Bank Reconciliations Area
Bank Reconciliation controls the display of bank reconciliation information.
Show All
Displays all bank reconciliations.
Show Last
Displays the last bank reconciliation.
Quick Print (printer icon)
Click the printer icon to print the CA Setup report. This report shows all information that has been
entered into the CA Setup record. This can be used as a record to review CA Setup (20.950.00)
options.
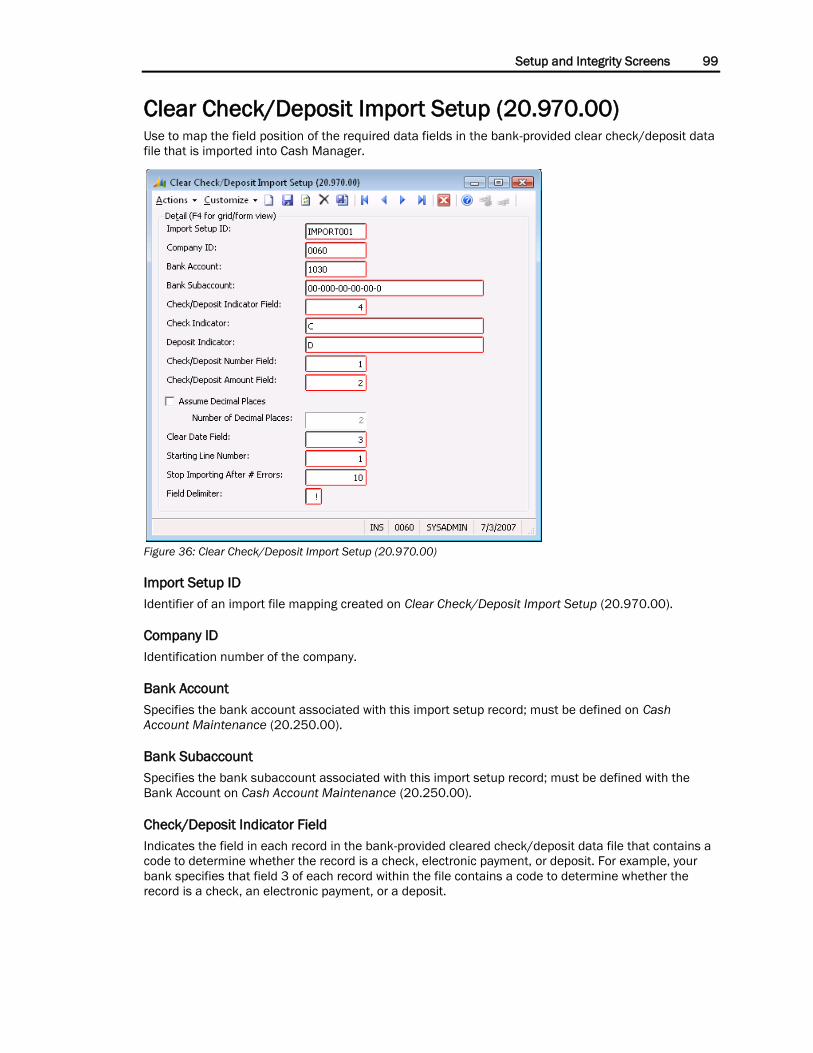
Setup and Integrity Screens 99
Clear Check/Deposit Import Setup (20.970.00) Use to map the field position of the required data fields in the bank-provided clear check/deposit data
file that is imported into Cash Manager.
Figure 36: Clear Check/Deposit Import Setup (20.970.00)
Import Setup ID
Identifier of an import file mapping created on Clear Check/Deposit Import Setup (20.970.00).
Company ID
Identification number of the company.
Bank Account
Specifies the bank account associated with this import setup record; must be defined on Cash
Account Maintenance (20.250.00).
Bank Subaccount
Specifies the bank subaccount associated with this import setup record; must be defined with the
Bank Account on Cash Account Maintenance (20.250.00).
Check/Deposit Indicator Field
Indicates the field in each record in the bank-provided cleared check/deposit data file that contains a
code to determine whether the record is a check, electronic payment, or deposit. For example, your
bank specifies that field 3 of each record within the file contains a code to determine whether the
record is a check, an electronic payment, or a deposit.

100 Cash Manager
Check Indicator
Indicates the code the bank uses to identify a record in the bank-provided cleared check/deposit data
file as a check or electronic payment. For example, your bank specifies that a check record will have a
“C” in field 3 of each record within the file.
Deposit Indicator
Indicates the code the bank uses to identify a record in the bank-provided cleared check/deposit data
file as a deposit. For example, your bank specifies that a deposit record will have a “D” in field 3 of
each record within the file.
Check/Deposit Number Field
Specifies what field in a record in the bank-provided cleared check/deposit data file that contains the
check/deposit number.
Check/Deposit Amount Field
Specifies what field in a record in the bank-provided cleared check/deposit data file that contains the
check, electronic payment or deposit amount.
Assume Decimal Places
When checked, specifies the amount fields will have a decimal point inserted into them.
Number of Decimal Places
Specifies where to insert the decimal point when Assume Decimal Places is checked.
Clear Date Field
Specifies what field on a record in the bank-provided cleared check/deposit data file that contains the
clear date.
Starting Line Number
Specifies what record in the in the bank-provided cleared check/deposit data file holds the first data
record. This setting is useful if the first few lines of the file are not records that hold cleared
check/deposit data.
Stop Importing After # Errors
Specifies how many import data errors the import process can encounter before it will stop. A setting
of zero means it will stop when one error is encountered.
Field Delimiter
Specifies what character is used to separate the fields in the records in the bank-provided cleared
check/deposit data file.

Setup and Integrity Screens 101
CA Integrity Check (20.990.00) Use to check the integrity of cash management totals against the transaction details making up those
totals and to rebuild cash management data to correct totals as necessary.
Figure 37: CA Integrity Check (20.990.00)
Starting Date
The starting date associated with the cash account transactions to be checked. The integrity checking
process uses this date as the beginning point for verifying and rebuilding Cash Manager data. This
entry is required.
Ending Date
The ending date associated with the cash account transactions to be checked. The integrity checking
process uses this date as the ending point for verifying and rebuilding Cash Manager data. This entry
is required.
Fiscal Year
Current Fiscal year. This entry is required. Fiscal year information, such as the number of periods in
your fiscal year, the calendar year in which your fiscal year begins or ends, and each fiscal period’s
ending date, is configured in General Ledger module’s GL Setup (01.950.00). For more information,
see “Defining Fiscal Periods” in the General Ledger Help or user’s guide.
Company ID
Identification code for the company. This entry is optional.
Bank Account
Cash bank account the integrity checking process uses for verifying and rebuilding Cash Manager
data. An entry at Bank Account is optional; however, specifying a cash account here reduces integrity
checking time but narrowing the amount of data the integrity checking process has to review.

102 Cash Manager
Bank Subaccount
Cash bank subaccount the integrity checking process uses for verifying and rebuilding Cash Manager
data. An entry at Bank Subaccount is optional; however, specifying a cash subaccount here reduces
integrity checking time but narrowing the amount of data the integrity checking process has to review.
Begin Processing
Starts the Cash Manager integrity checking process.

Reports 103
Reports
Check Register (20.600.00) The Check Register (20.600.00) report lists the information of all previously processed checks and
electronic payments generated by the Accounts Payable module. Checks and electronic payments are
listed in ascending check number order. Note the following:
Jl Tp specifies whether the check/electronic payment is an Accounts Payable or Cash Manager
check/electronic payment.
Tn Tp specifies the check’s check type: MC (mask check), CK (regular check), EP (electronic
payment, VC (void check), HC (hand-prepared check), SC (stub check), and ZC (zero check).
Payee ID lists the ID of the vendor to whom the check/electronic payment is issued.
Clear Date specifies the fiscal period (mm/dd/yy) when the check/electronic payment was
cleared.
The Check Register (20.600.00) report lists only selected cash account balance information, including
the transaction date, beginning balance, receipts, disbursements, and ending balance.
Figure 38: Check Register (20.600.00) report
Beg/End Period
Specifies the beginning and ending period numbers of a range of accounting periods with Cash
Manager activity to report. On the Daily Cash Balance, all transactions are listed from the beginning
and ending periods, plus all periods in between the two.

104 Cash Manager
Daily Cash Balance (20.610.00) Use the Daily Cash Balance (20.610.00) report to help manage your cash accounts. You can generate
the report in either summary or detail format.
Figure 39: Daily Cash Balance-Summary (20.610.00S) report
Figure 40: Daily Cash Balance-Detail (20.610.00D) report
Report Format
The report format specifies the type of report to generate. Report format options are:

Reports 105
Summary — Generate the report in an encapsulated format that includes only selected cash
account balance information: transaction date, beginning balance, receipts, disbursements,
ending balance.
Detail — Generate the report in an in depth format that includes all account summary information
plus the transaction-level information that produced the current balance displayed: transaction
date, reference number, journal type, transaction description, period posted, etc. Information on
this report is available for review or editing in the Accounts Payable and Accounts Receivable
modules, as well as the Cash Manager module.
On the detail version, note the following for each cash account:
– Jl Tp identifies the module (Accounts Payable, Accounts Receivable, or Cash Manager for
example) where each cash account transaction originated.
– Tn Tp specifies each transaction’s transaction type (for example, TR for transfer, SC for
service charge).
– Payee ID lists the ID of vendors to whom checks/electronic payments listed are issued.
Beg/End Period
Specifies the beginning and ending period numbers of a range of accounting periods with Cash
Manager activity to report. On the Daily Cash Balance, all transactions are listed from the beginning
and ending periods, plus all periods in between the two.
Date Range Entry (20.610.01)
When you select either the summary or detail format of the Daily Cash Balance (20.610.00) report,
Date Range Entry (20.610.01) appears, asking you to enter a date range and optional cash account
selection criteria.
Figure 41: Date Range Entry (20.610.01)
Starting Date
Start date of the range used when selecting transactions for the report.
Ending Date
End date of the range used when selecting transactions for the report.
Bank Account
Optional field that tells the report to only select transactions for this bank account.
Bank Sub Account
Optional field that tells the report to only select transactions for this bank subaccount.

106 Cash Manager
Check/Deposit Reconciliation (20.620.00) The Check/Deposit Reconciliation (20.620.00) report lists, by bank account, all outstanding and
cleared checks, electronic payments, and deposits. On the report, checks and electronic payments are
listed first in ascending check number order. Deposits are listed next in ascending reference number
order. Use the Check/Deposit Reconciliation (20.620.00) report to assist in reconciling bank
statements with cash account balance information maintained by the software (for more on bank
reconciliations, see “Reconciling Bank Statements” on page 21.).
On the Check/Deposit Reconciliation (20.620.00) report, note the following:
Cleared Amount lists the amount of each cleared check, electronic payment, or deposit as it
appears on the bank statement. This amount is entered in Bank Reconciliation (20.210.00).
Difference lists any differences between a check, electronic payment, or deposit’s outstanding
and cleared amounts (the outstanding amount minus the cleared amount).
Stat indicates the status of each check, electronic payment, or deposit: O (outstanding), C
(cleared).
Figure 42: Check/Deposit Reconciliation (20.620.00) report

Reports 107
Date Range Entry (20.620.01)
The Check/Deposit Reconciliation (20.620.00) report displays a subscreen Date Range Entry
(20.620.01) that asks for a date range and optional cash account selection criteria.
Figure 43: Date Range Entry (20.620.01)
Starting Date
Start date of the range used when selecting transactions for the report.
Ending Date
End date of the range used when selecting transactions for the report.
Bank Account
Optional field that tells the report to only select transactions for this bank account.
Bank Sub Account
Optional field that tells the report to only select transactions for this bank subaccount.

108 Cash Manager
Unmatched Item List (20.625.00) The Unmatched Item List (20.625.00) report lists all items that were imported using Clear
Check/Deposit Data Import (20.420.00) but have not been processed by Clear Checks/Deposits
(20.440.00).
The items in the report are sorted in the following order:
Company
Cash Account – account and subaccount number
Item Indicator – check/electronic payment, deposit, or unknown
Check/Deposit Number
A subtotal is displayed for the check, electronic payment, and deposit amount of all items with the
same indicator (check, electronic payment, deposit, or unknown) for each cash account.
Figure 44: Unmatched Item List (20.625.00) report
Report Format
Report Format specifies the type of report to generate. The format of this report is:
Standard — Generate the report in the standard Unmatched Item List format.

Reports 109
Bank Reconciliation (20.630.00) The Bank Reconciliation (20.630.00) report lists for a specific accounting period the statement
balances, outstanding checks, electronic payments, and deposits, and adjusted statement balances
of cash accounts. It also provides a comparison of the adjusted statement balances to the account
balances maintained by the Cash Manager module. Information displayed on the Bank Reconciliation
(20.630.00) report is similar to that maintained by Bank Reconciliation (20.210.00).
You can generate the Bank Reconciliation (20.630.00) report in both summary and detail format. On
the detail version, note the following for each cash account:
Ref Nbr represents either a check/electronic payment number or deposit slip number.
Create Date generally identifies the release date of a transaction and the update date of a daily
cash balance. General Ledger posting could occur on or after this date.
Tran Date identifies the date of the transaction record and equates to the transaction date of a
daily cash balance
Pd to Post is the financial period to post of the transaction record and equates to the period
number of a daily cash balance.
Jl Tp identifies the module (Accounts Payable, etc.) where each cash account transaction
originated (for example, CA specifies that the transaction originated in the Cash Manager module).
Tn Tp specifies each transaction’s transaction type (for example, CK for regular check, SC for
service charge).
Amount lists the amount of each check, electronic payment, or deposit.
Statement to General Ledger balance exception transactions will be reported after Out of Balance in a
subreport with the heading Statement to GL Exceptions. This section will only be printed when the Out
of Balance amount is not equal to zero. Transactions in this section will display the same information
as those for Deposits in Transit and Outstanding Checks/Electronic Payments unless no exceptions
are found; when no exceptions are found the message “No Statement to GL Exceptions Found” will be
displayed.

110 Cash Manager
Once you complete the bank reconciliation for all or selected cash accounts, it is good practice to
generate a new Bank Reconciliation (20.630.00) report and file it with your monthly bank statement
in support of the reconciliation.
Figure 45: Bank Reconciliation-Detail (20.630.00D) report
Figure 46: Bank Reconciliation-Summary (20.630.00S) report

Reports 111
Report Format
The report format specifies the type of report to generate. Report format options are:
Summary — Generate the report in a summarized format that includes only selected account-level
balance information: statement and General Ledger balances, adjustments to these balances,
Cash Manager balances and any out-of-balance amounts with statement and General Ledger
balances, ending General Ledger balance and out-of-balance amount (if any).
Detail — Generate the report in a detailed format that includes all account summary information
plus the transaction-level information that produced the current balances displayed: transaction
date, reference number, journal type, transaction description, transaction amount, etc. This
format also includes an audit trail of transactions that cause out-of-balance conditions.
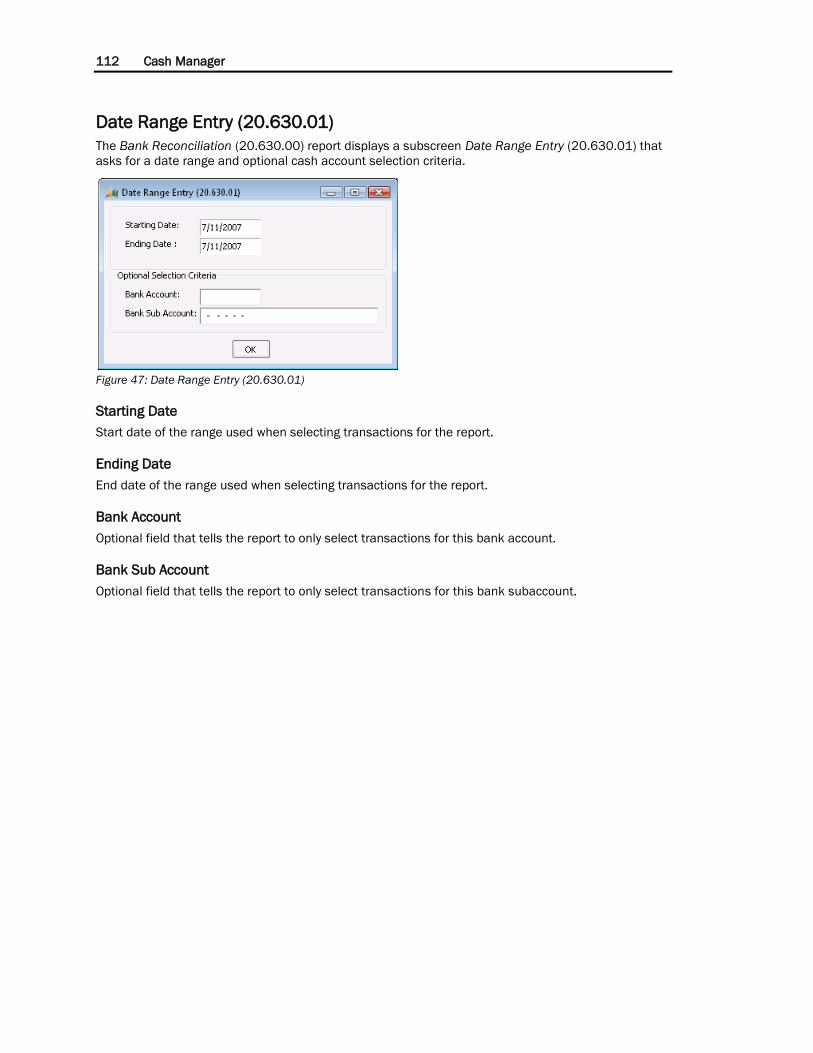
112 Cash Manager
Date Range Entry (20.630.01)
The Bank Reconciliation (20.630.00) report displays a subscreen Date Range Entry (20.630.01) that
asks for a date range and optional cash account selection criteria.
Figure 47: Date Range Entry (20.630.01)
Starting Date
Start date of the range used when selecting transactions for the report.
Ending Date
End date of the range used when selecting transactions for the report.
Bank Account
Optional field that tells the report to only select transactions for this bank account.
Bank Sub Account
Optional field that tells the report to only select transactions for this bank subaccount.

Reports 113
Float Analysis (20.640.00) The Float Analysis (20.640.00) report lists statistical information that can help you accurately analyze
your daily cash “float” capabilities. This report can be generated in three different formats:
Bank summary — a by-account summary showing the average time it takes for checks, electronic
payments, and deposits to clear the bank. Information listed on this version of the report is based
on the value entered at Periods in Average Days to Clear in CA Setup (20.950.00).
When the software generates a bank summary Float Analysis (20.640.00) report, it determines
the number of days needed for each check, electronic payment, or deposit entered within the
specified prior-period time frame (determined by the Periods in Average Days to Clear value) to
clear the bank. It then calculates the total number of days needed for all checks, electronic
payments, and deposits to clear the bank and the total dollar amount of all checks, electronic
payments, and deposits. Finally, it divides the total number of days and total dollar amounts by
the total number of checks, electronic payments, and deposits to arrive at the average time it
takes a check, electronic payment, or deposit to clear the bank account.
Bank detail — a by-account, by-day listing of all outstanding checks, electronic payments, and
deposits and their total amounts. This version of the report identifies which checks and electronic
payments are still in a “float” condition.
Payee summary — a by-payee summary showing the average time it takes for payee checks to
clear the bank. Information listed on this version of the report is based on the value entered at
Periods in Average Days to Clear in CA Setup (20.950.00).
When the software generates a payee summary Float Analysis (20.640.00) report, it determines
average days to clear based on all Accounts Payable checks/electronic payments cleared within
the specified prior-period time frame (determined by the Periods in Average Days to Clear value).
On the payee summary Float Analysis (20.640.00) report, No of Checks lists for each payee the
total number of checks/electronic payments used in the calculation, Avg Days to Clear lists the
average number of days it takes for the payee’s checks/electronic payments to clear, and Average
Amount average amount of each of the payee’s checks/electronic payments.
Figure 48: Float Analysis-Bank Summary (20.640.00S) report
Figure 49: Float Analysis-Bank Detail (20.640.00D) report

114 Cash Manager
Report Format
The report format specifies the type of report to generate. Report format options are:
Bank Summary — Generate the report in a bank summary format.
Bank Detail — Generate the report in a bank detail format.
Payee Summary — Generate the report in a payee summary format.
Bank Summary( - MC — Generate the report in a bank summary format that includes multiple-
currency information (if such information is available from the Currency Manager module).
Bank Detail - MC — Generate the report in a bank detail format that includes multiple-currency
information.
Payee Summary - MC — Generate the report in a payee summary format that includes multiple-
currency information.

Reports 115
Cash Flow Projection (20.650.00) The Cash Flow Projection (20.650.00) report displays cash flow forecasts for a range of time periods,
under various cash receipts and disbursements scenarios. It is a versatile cash management tool that
helps your company more adequately plan for future cash requirements. The software obtains the
information displayed on the report from Accounts Payable, Purchase Order, and Accounts Receivable
records, as well as anticipated transactions entered in Cash Flow Maintenance (20.280.00). The Cash
Flow Projection (20.650.00) report is divided into four sections:
Cash Account Balance — Shows the opening cash balance for each reporting period. The first
period displays the opening balance for each bank account.
Anticipated Cash Receipts — Summarizes anticipated receivables for the reporting periods and
individually lists any anticipated receipts entered in Cash Flow Maintenance (20.280.00). The last
line displays the total cash available for each period.
Anticipated Cash Disbursements — Summarizes anticipated payables (and open purchase orders)
for the reporting periods and individually lists anticipated disbursements entered in Cash Flow
Maintenance (20.280.00).
Ending Cash Balance — Lists the closing cash balance of each forecasted period.
Figure 50: Cash Flow Projection (20.650.00) report
Report Format
The report format specifies the type of report to generate. Report format options are:
Summary by Account — Generate the report in the standard Cash Flow Projection format.
Summary by Customer — Generate the report that includes expected cash receipts and
disbursements in an encapsulated format.
Detail by Customer — Generate the report in a format that includes expected cash receipts and
disbursements and also multiple-currency information, if such information is available from the
Currency Manager module.
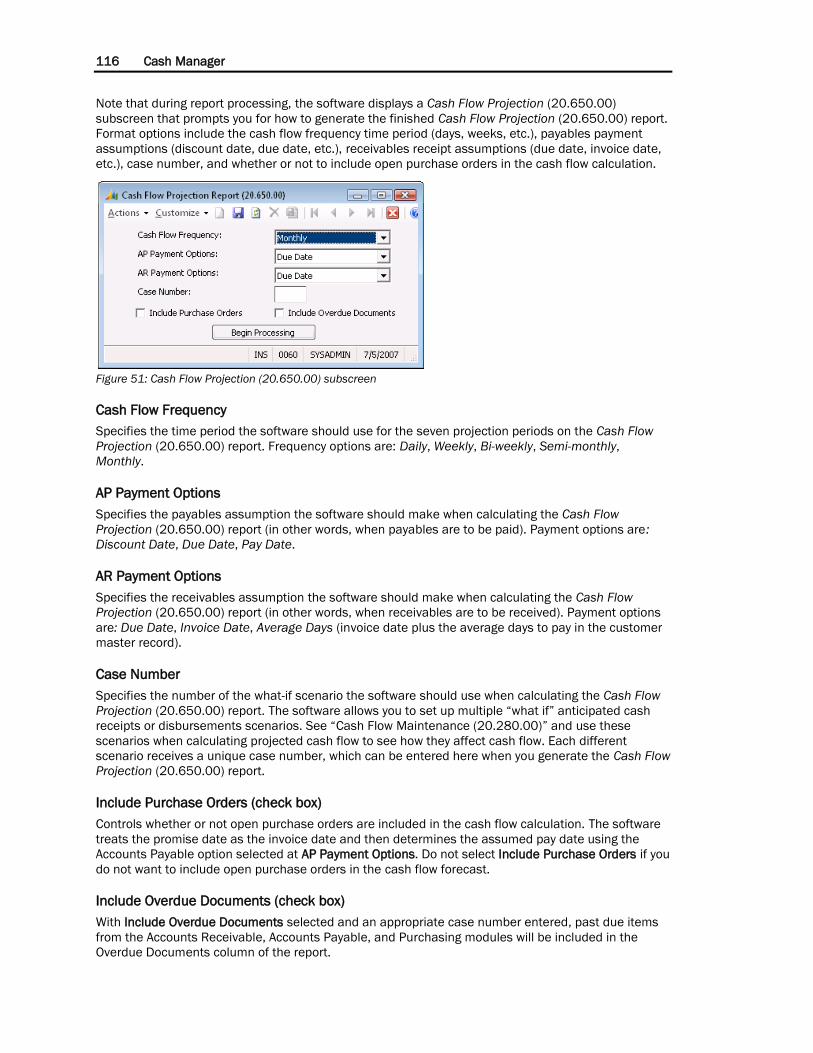
116 Cash Manager
Note that during report processing, the software displays a Cash Flow Projection (20.650.00)
subscreen that prompts you for how to generate the finished Cash Flow Projection (20.650.00) report.
Format options include the cash flow frequency time period (days, weeks, etc.), payables payment
assumptions (discount date, due date, etc.), receivables receipt assumptions (due date, invoice date,
etc.), case number, and whether or not to include open purchase orders in the cash flow calculation.
Figure 51: Cash Flow Projection (20.650.00) subscreen
Cash Flow Frequency
Specifies the time period the software should use for the seven projection periods on the Cash Flow
Projection (20.650.00) report. Frequency options are: Daily, Weekly, Bi-weekly, Semi-monthly,
Monthly.
AP Payment Options
Specifies the payables assumption the software should make when calculating the Cash Flow
Projection (20.650.00) report (in other words, when payables are to be paid). Payment options are:
Discount Date, Due Date, Pay Date.
AR Payment Options
Specifies the receivables assumption the software should make when calculating the Cash Flow
Projection (20.650.00) report (in other words, when receivables are to be received). Payment options
are: Due Date, Invoice Date, Average Days (invoice date plus the average days to pay in the customer
master record).
Case Number
Specifies the number of the what-if scenario the software should use when calculating the Cash Flow
Projection (20.650.00) report. The software allows you to set up multiple “what if” anticipated cash
receipts or disbursements scenarios. See “Cash Flow Maintenance (20.280.00)” and use these
scenarios when calculating projected cash flow to see how they affect cash flow. Each different
scenario receives a unique case number, which can be entered here when you generate the Cash Flow
Projection (20.650.00) report.
Include Purchase Orders (check box)
Controls whether or not open purchase orders are included in the cash flow calculation. The software
treats the promise date as the invoice date and then determines the assumed pay date using the
Accounts Payable option selected at AP Payment Options. Do not select Include Purchase Orders if you
do not want to include open purchase orders in the cash flow forecast.
Include Overdue Documents (check box)
With Include Overdue Documents selected and an appropriate case number entered, past due items
from the Accounts Receivable, Accounts Payable, and Purchasing modules will be included in the
Overdue Documents column of the report.

Reports 117
Begin Processing
The Begin Processing button starts the report generation process (the report is printed, sent to a file,
or displayed on screen).

118 Cash Manager
PTD Transaction List (20.660.00) The PTD Transaction List (20.660.00) displays the information of all transactions entered or
generated in these Cash Manager module screens:
Cash Account Transactions (20.010.00)
Cash Account Transfers (20.020.00)
Generate Recurring Transactions (20.500.00)
Generate Consolidation File (20.510.00)
This report is a reference tool that can list transactions in either batch number or transaction type
order to help you quickly locate and review the details of individual Cash Manager transactions.
Figure 52: PTD Transaction List (20.660.00) report
Note that the PTD Transaction List (20.660.00) has the following variations and/or additions to the
standard extended report options.
Report Format
The report format specifies the type of report to generate. Report format options are:
Batch Number — Generate the report in ascending batch number order and include transaction
subtotals by batch.
Tran Type — Generate the report alphabetically by transaction type (SC, TR, TX, etc.) and include
transaction subtotals by transaction type.
Batch Number - MC — Generate the report in ascending batch number order, and include
transaction subtotals by batch and multi-currency information.
Tran Type - MC — Generate the report alphabetically by transaction type (SC, TR, TX, etc.), and
include transaction subtotals by transaction type and multi-currency information.

Reports 119
PTD Distribution List (20.670.00) The PTD Distribution List (20.670.00) report displays, by account, all Cash Manager module
transactions entered or generated in these Cash Manager module screens:
Cash Account Transactions (20.010.00)
Cash Account Transfers (20.020.00)
Generate Recurring Transactions (20.500.00)
Generate Consolidation File (20.510.00)
This report is a reference tool that can help you quickly locate and review the individual Cash Manager
transactions of your cash accounts.
Figure 53: PTD Distribution List (20.670.00) report
Note that the PTD Distribution List (20.670.00) report has the following variations and/or additions to
the standard extended report options.
Report Format
The report format specifies the type of report to generate. Report format options are:
Standard — Generate the report in the standard PTD Distribution List format.
Multi-Currency — Generate the report in a format that includes multiple-currency information (if
such information is available from the Currency Manager module).

120 Cash Manager
Cash Accounts List (20.680.00) The Cash Accounts List (20.680.00) displays the information (account name and number, bank name,
current balance, etc.) of each of your cash accounts. You can generate the Cash Accounts List in two
different formats to meet different levels of informational needs.
Figure 54: Cash Accounts List-Summary (20.680.00S) report
Figure 55: Cash Accounts List-Detail (20.680.00D) report
Note that the Cash Accounts List has the following variations and/or additions to the standard
extended report options.
Report Format
The report format specifies the type of report to generate. Report format options are:
Summary — Generate the report in a summarized format that includes only selected cash account
information: account name, account number, bank name, currency ID, General Ledger account
(and subaccount), status, transit number, current balance.
Detail — Generate the report in a detailed format that includes all account summary information
plus bank address, telephone and fax number, and key contact information.

Reports 121
Entry Type List (20.690.00) The Entry Type List (20.690.00) displays the information of all Cash Manager module transaction
entry types defined in Entry Type Maintenance (20.260.00). Entry types are used to classify Cash
Manager transactions. Typical entry types are SC (service charges), CK (checks), TR (transfers), etc.
Figure 56: Entry Type List (20.690.00) report

122 Cash Manager
Recurring Item List (20.700.00) The Recurring Item List (20.700.00) displays the information of all recurring items (transactions)
defined in the Recurring Item Maintenance (20.270.00). Recurring items are transactions that occur
regularly for a fixed amount each time they occur: monthly rent payments, quarterly service fees, etc.
Once created, a recurring item is saved in the database and processed automatically whenever you
use Generate Recurring Transactions (20.500.00). This creates a regular cash transaction from the
recurring item.
Figure 57: Recurring Item List (20.700.00) report
Report Format
The report format specifies the type of report to generate. Report format options are:
Standard — Generate the report in the standard Recurring Item List format.
Multi-Currency — Generate the report in a format that includes multiple-currency information (if
such information is available from the Currency Manager module).

Reports 123
Cash Flow Items List (20.710.00) The Cash Flow Items List (20.710.00) displays the information of all anticipated items (anticipated
cash receipts or anticipated cash disbursements) defined in Cash Flow Maintenance (20.280.00).
Anticipated items help you project cash flow. The software can use the anticipated items you define
when it generates the Cash Flow Projection (20.650.00) report to show the effects certain “what if”
scenarios would have on your company’s cash flow (see “Cash Flow Maintenance (20.280.00)” for
more information).
Figure 58: Cash Flow Items List (20.710.00) report
Report Format
The report format specifies the type of report to generate. Report format options are:
Standard — Generate the report in the standard Cash Flow Items List format.
Multi-Currency — Generate the report in a format that includes multiple-currency information (if
such information is available from the Currency Manager module).

124 Cash Manager
Cash Transactions History (20.720.00) The Cash Transactions History (20.720.00) report displays, by bank account, the information of all
Cash Manager transactions maintained. Cash Manager transactions can be reported for the current
fiscal period or any number of prior fiscal periods, depending on the option selected at Periods to
Retain CA Trans in CA Setup (20.950.00). Prior-period Cash Manager transactions are typically
retained for audit trail purposes.
Figure 59: Cash Transactions History (20.720.00) report
Report Format
The report format specifies the type of report to generate. Report format options are:
Standard — Generate the report in the standard Cash Transactions History (20.720.00) report
format.
Multi-Currency — Generate the report in a format that includes multiple-currency information (if
such information is available from the Currency Manager module).
Beg/End Period
Beg/End Period specifies the beginning and ending period numbers of a range of accounting periods
with transaction history to report. On the Cash Transactions History (20.720.00) report, all history is
listed from the beginning and ending periods, plus all periods in between the two.

Reports 125
Cash Manager Batch Register (20.800.00) The Cash Manager Batch Register (20.800.00) is an audit trail tool for monitoring Cash Manager
batch numbers used during the current accounting period. As a further auditing aid, it also lists both
batch and account distributions. If you have set up the software to generate batch control reports
automatically (see “General Ledger Setup (01.950.00)” in the General Ledger Help or user’s guide),
Cash Manager Batch Register (20.800.00) can serve as a summary batch control report should any of
the original batch control reports be lost.
Although complete (C status) batches show account distribution amounts, the software does not post
these batches to General Ledger accounts. Void (V status) and deleted (D status) batches do not show
account distribution amounts because they do not update the General Ledger.
Figure 60: Cash Manager Batch Register-Summary (20.800.00S) report
Figure 61: Cash Manager Batch Register-Detail (20.800.00D) report
Report Format
The report format specifies the type of report to generate. Report format options are:
Summary — Generate the report in a summarized format that includes the selected information of
each batch: batch number, status, journal type, periods entered and posted, data entry screen
number, batch control amount.
Detail — Generate the report in a header-detail format that includes all batch summary
information plus account (subaccount) numbers, account descriptions, transaction amounts, etc.
Summary - MC — Generate the report in a summarized format that includes the multiple-currency
information (if such information is available from the Currency Manager module).

126 Cash Manager
Detail - MC — Generate the report in a detailed format that includes multiple-currency information.

Reports 127
CA Edit (20.810.00) The CA Edit (20.810.00) report lists the information of Cash Manager transaction batches entered in
Cash Account Transactions (20.010.00), Cash Account Transfers (20.020.00), and Generate
Recurring Transactions (20.500.00). This report is useful when you are editing batches before posting
batch transaction amounts to General Ledger accounts. You can also use this report as a record of the
transactions in a batch released for posting.
Figure 62: CA Edit (20.810.00) report
Report Format
The report format specifies the type of report to generate. Report format options are:
Standard — Generate the report in the standard CA Edit (20.810.00) report format.
Multi-Currency — Generate the report in a format that includes multiple-currency information (if
such information is available from the Currency Manager module).

128 Cash Manager
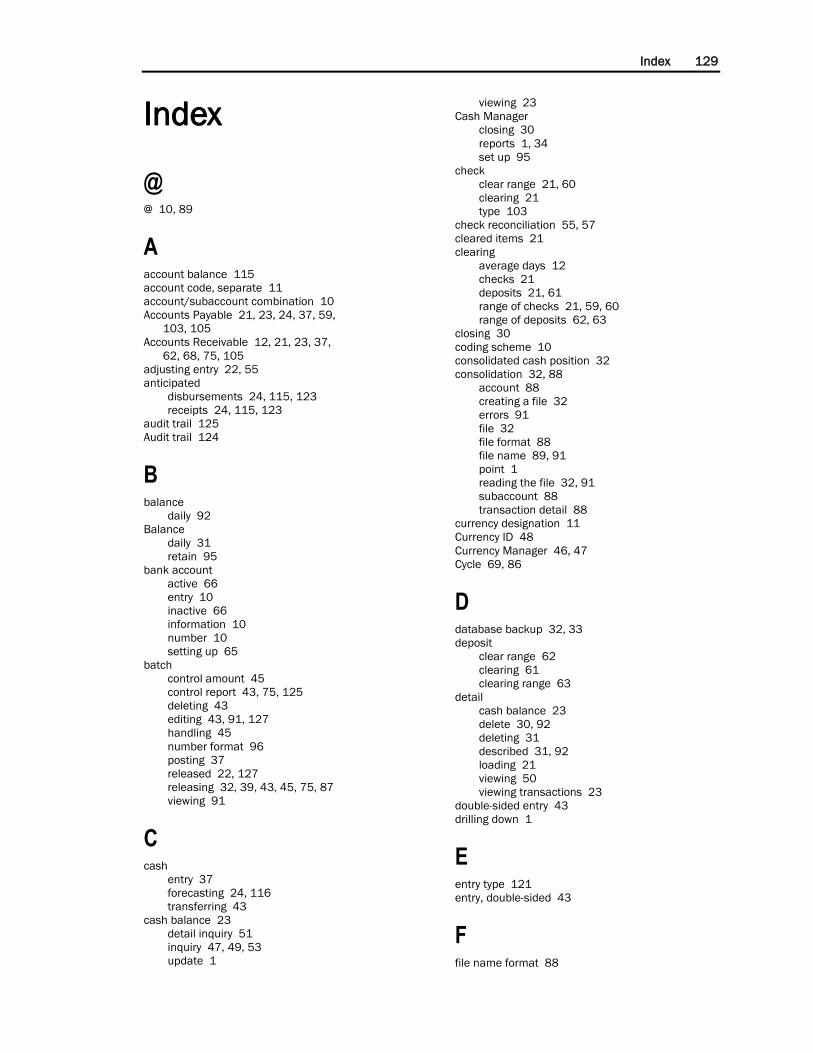
Index 129
Index
@ @ 10, 89
A account balance 115
account code, separate 11
account/subaccount combination 10
Accounts Payable 21, 23, 24, 37, 59,
103, 105
Accounts Receivable 12, 21, 23, 37,
62, 68, 75, 105
adjusting entry 22, 55
anticipated
disbursements 24, 115, 123
receipts 24, 115, 123
audit trail 125
Audit trail 124
B balance
daily 92
Balance
daily 31
retain 95
bank account
active 66
entry 10
inactive 66
information 10
number 10
setting up 65
batch
control amount 45
control report 43, 75, 125
deleting 43
editing 43, 91, 127
handling 45
number format 96
posting 37
released 22, 127
releasing 32, 39, 43, 45, 75, 87
viewing 91
C cash
entry 37
forecasting 24, 116
transferring 43
cash balance 23
detail inquiry 51
inquiry 47, 49, 53
update 1
viewing 23
Cash Manager
closing 30
reports 1, 34
set up 95
check
clear range 21, 60
clearing 21
type 103
check reconciliation 55, 57
cleared items 21
clearing
average days 12
checks 21
deposits 21, 61
range of checks 21, 59, 60
range of deposits 62, 63
closing 30
coding scheme 10
consolidated cash position 32
consolidation 32, 88
account 88
creating a file 32
errors 91
file 32
file format 88
file name 89, 91
point 1
reading the file 32, 91
subaccount 88
transaction detail 88
currency designation 11
Currency ID 48
Currency Manager 46, 47
Cycle 69, 86
D database backup 32, 33
deposit
clear range 62
clearing 61
clearing range 63
detail
cash balance 23
delete 30, 92
deleting 31
described 31, 92
loading 21
viewing 50
viewing transactions 23
double-sided entry 43
drilling down 1
E entry type 121
entry, double-sided 43
F file name format 88
130 Cash Manager
fiscal
period 86, 96
year 96
forecasting 24, 116
Frequency 69, 86
G General Ledger 32
posting option 97
J journal type 33
N Number of Cycles 69, 86
O Operator 34
outstanding
checks 58
items 8, 21
P Payee ID 103
posting 86, 127
Q Quick Maintenance 66, 67
R reading a consolidation file 32, 91
reconciling
deposits 55
reconciling
bank statements 21
checks 55
consolidation point 1
reconciling
checks 57
reconciling
checks 106
reconciling
deposits 106
reconciling 109
recurring transaction 86
report options 35
S Select 34
Shared Information 40, 45, 46, 55, 65,
66, 68, 70, 71, 73, 97
Sort 34
status
batch 44
check 106
deposit 106
System Manager 35, 66
T transaction type 12, 33
U unapplied deposit 68
unmatched items 28, 80
V Value 35
Vendor ID 52, 59, 103
W warning message 58