cascading style sheet (css) - wordpress.com€¦ · cascading style sheet (css) 1 ... among...
TRANSCRIPT

Cascading Style Sheet
(CSS)
1

Recommended by W3C
The Characteristics of CSS The layout of the page can be flexibly
It can specify the font name and size precisely
It can specify margin and indent
It can specify the position of the text and image
The page and web layout can be managed collectively
The changes can be done easily
To validate your style sheet http://jigsaw.w3.org/css-validator/validator-uri.html
2
Cascading Style Sheet (CSS)

Methods of Implementation Following are the 4 methods of implementing the css.
Inline Style sheet (Specify style directly by using the style
attributes)
Embedded style sheet (Define style in advance to STYLE
element, then apply
Linking style sheet (By using LINK elements link the
external file where style has been defined
Import style sheet (By using STYLE element, specify the
external file (define style) to be imported
3
Implementation of CSS

Case by case example
4
When you want to specify
style only at this position
Specify style directly with
[Inline style sheet]
When you want to specify the
common style only on this page
Define and apply style with
[Embedded style sheet]
When you want to specify the
common style on all the pages
Define and apply style in
external file [Linking/Import]
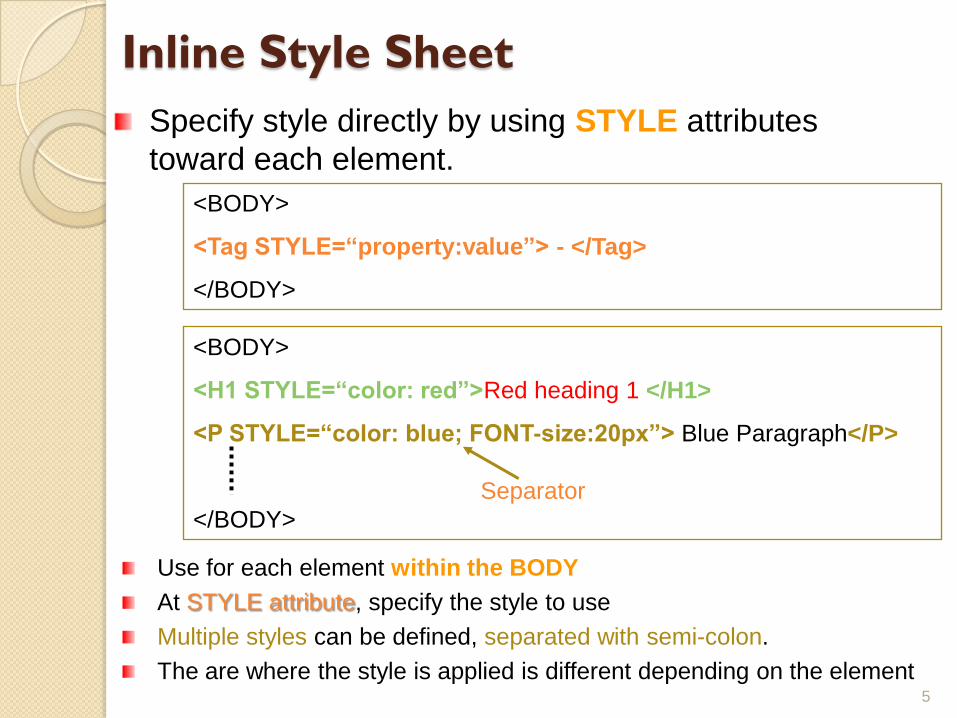
Inline Style Sheet
5
<BODY>
<Tag STYLE=“property:value”> - </Tag>
</BODY>
Specify style directly by using STYLE attributes
toward each element.
<BODY>
<H1 STYLE=“color: red”>Red heading 1 </H1>
<P STYLE=“color: blue; FONT-size:20px”> Blue Paragraph</P>
</BODY>
Separator
Use for each element within the BODY
At STYLE attribute, specify the style to use
Multiple styles can be defined, separated with semi-colon.
The are where the style is applied is different depending on the element
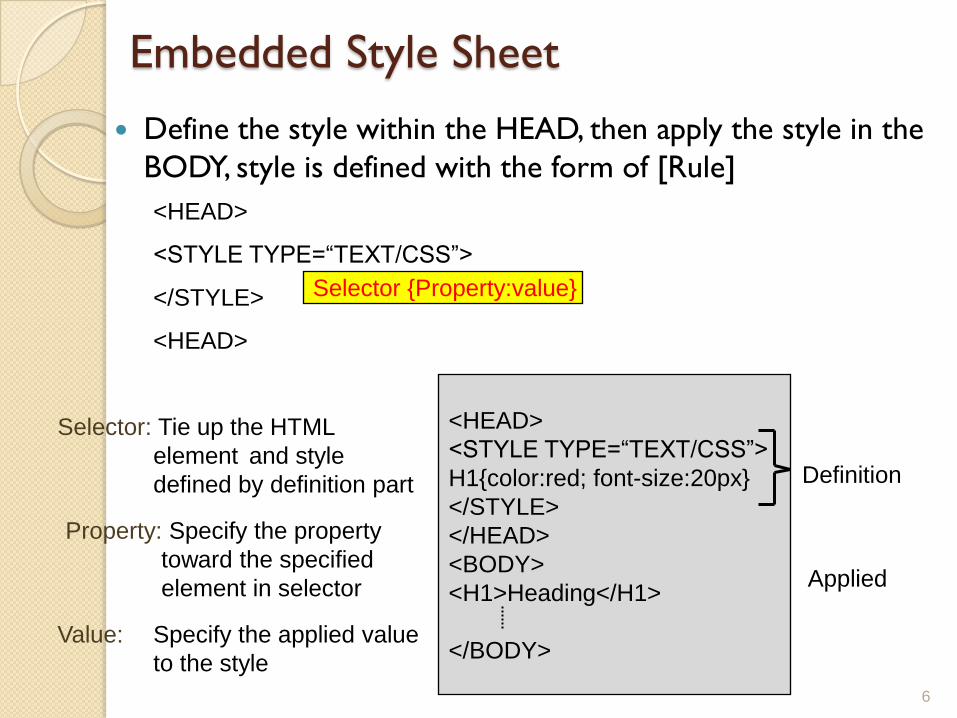
Embedded Style Sheet
Define the style within the HEAD, then apply the style in the
BODY, style is defined with the form of [Rule]
6
<HEAD>
<STYLE TYPE=“TEXT/CSS”>
H1{color:red; font-size:20px}
</STYLE>
</HEAD>
<BODY>
<H1>Heading</H1>
</BODY>
<HEAD>
<STYLE TYPE=“TEXT/CSS”>
</STYLE>
<HEAD>
Selector {Property:value}
Selector: Tie up the HTML
element and style
defined by definition part
Property: Specify the property
toward the specified
element in selector
Value: Specify the applied value
to the style
Definition
Applied

Linking Style Sheet
Link the style and the external file which defines the style within the HEAD.
File Extension is .CSS
7
<HEAD>
<LINK REL=“stylesheet” TYPE=“text/css” HREF=“url”>
</HEAD>
<HEAD>
<TITLE>title</TITLE>
<LINK REL=“stylesheet” TYPE=“text/css” HREF=“style.css”>
</HEAD>
<BODY>
<H1>Heading</H1>
</BODY>
Style file defining
style
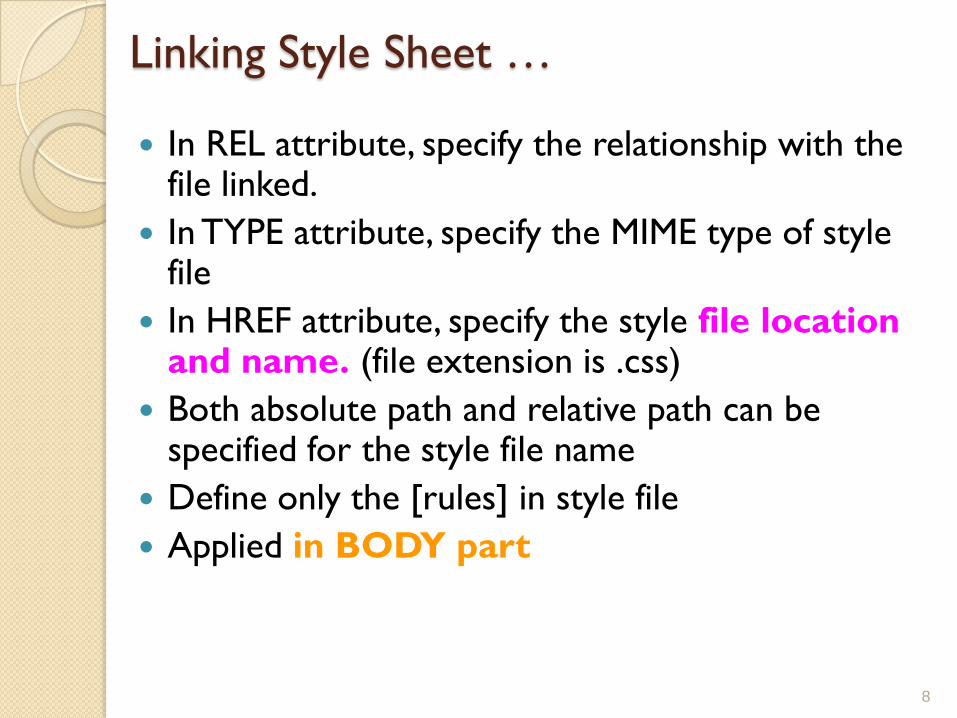
Linking Style Sheet …
In REL attribute, specify the relationship with the file linked.
In TYPE attribute, specify the MIME type of style file
In HREF attribute, specify the style file location and name. (file extension is .css)
Both absolute path and relative path can be specified for the style file name
Define only the [rules] in style file
Applied in BODY part
8

Import Style Sheet
Import the external file where the style has been defined in HEAD part.
9
<HEAD>
<STYLE TYPE=“TEXT/CSS”>
@import url (file name or URL);
</STYLE>
</HEAD>

The Priority among 4 Implementation
Methods
When multiple styles are specified in the document, the following priority order shall be applied.
10
Style sheet by
external files
(Linking/Import)
Embedded Style
sheetInline Style sheet
Define the general style of the Web by [Style sheet by external files]
Define the style of whole page by [Embedded style sheet]
Define individual style by [Inline style sheet]

The Selector
If a element is used in selector, then all style are applied in that element.
Styles can be specified in details using the following 5 methods. Element Selector
Always specify common style toward the element
Class Selector
Create and define optional name to the specify style, then apply it.
ID Selector
Create and define the optional name towards the specify style, and apply it at one place in a document
Group Selector
Apply the common style to multiple elements
Context Selector
Apply style only specified part where multiple elements are all specified.
11

1. Element Selector
The common style can be applied to an element at all time
In Selector, specify the element name to apply the style
12
<HEAD>
<STYLE TYPE=“text/css”>
Element {Property:Value}
</STYLE>
</HEAD>
<HEAD>
<STYLE TYPE=“text/css”>
H1{color:red}
H2{color:blue}
</STYLE>
</HEAD>
<BODY>
<H1>Heading 1</H1>
<H2>Item 1</H2>
<H1>Heading 2</H1>
<H2>Item 2</H2>
</BODY>
Definition
Applied
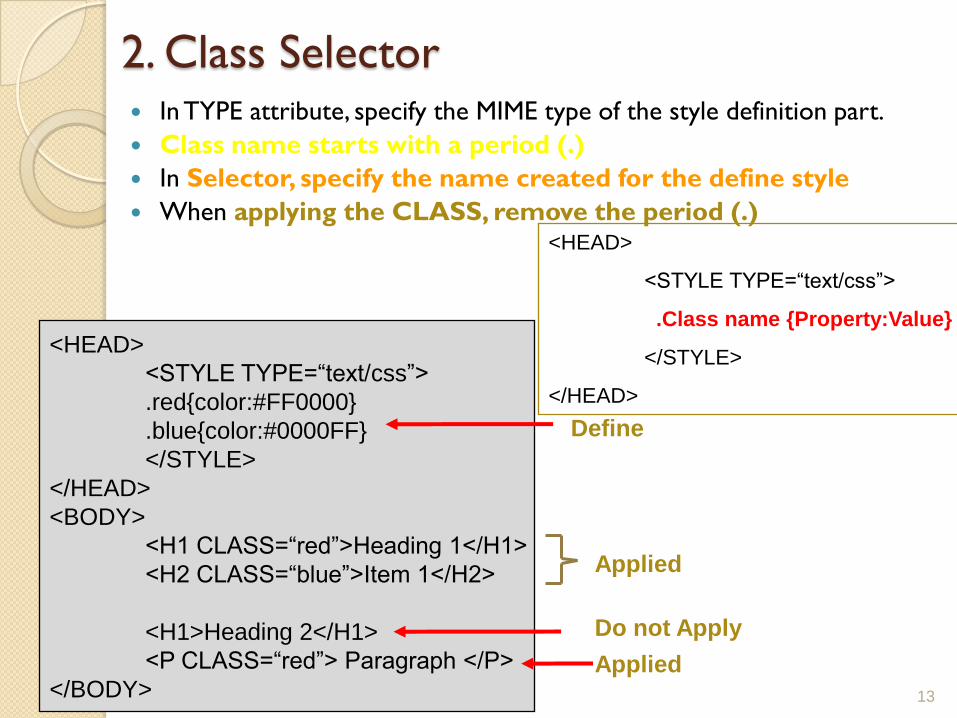
2. Class Selector In TYPE attribute, specify the MIME type of the style definition part.
Class name starts with a period (.)
In Selector, specify the name created for the define style
When applying the CLASS, remove the period (.)
13
<HEAD>
<STYLE TYPE=“text/css”>
.Class name {Property:Value}
</STYLE>
</HEAD>
<HEAD>
<STYLE TYPE=“text/css”>
.red{color:#FF0000}
.blue{color:#0000FF}
</STYLE>
</HEAD>
<BODY>
<H1 CLASS=“red”>Heading 1</H1>
<H2 CLASS=“blue”>Item 1</H2>
<H1>Heading 2</H1>
<P CLASS=“red”> Paragraph </P>
</BODY>
Define
Applied
Applied
Do not Apply

3. ID Selector Define and name a specific style, and apply it by specifying
the name. However it cannot be called twice but some browsers can
use it like the class selector for more than twice (using function)
14
<HEAD>
<STYLE TYPE=“text/css”>
#ID {Property:Value}
</STYLE>
</HEAD><HEAD>
<STYLE TYPE=“text/css”>
#id123{color:red}
</STYLE>
</HEAD>
<BODY>
<H1 ID=“id123”>Heading 1</H1>
<P>Content 1</P>
</BODY>
Define
Applied
When ID is specified, the “sharp”
will be removed
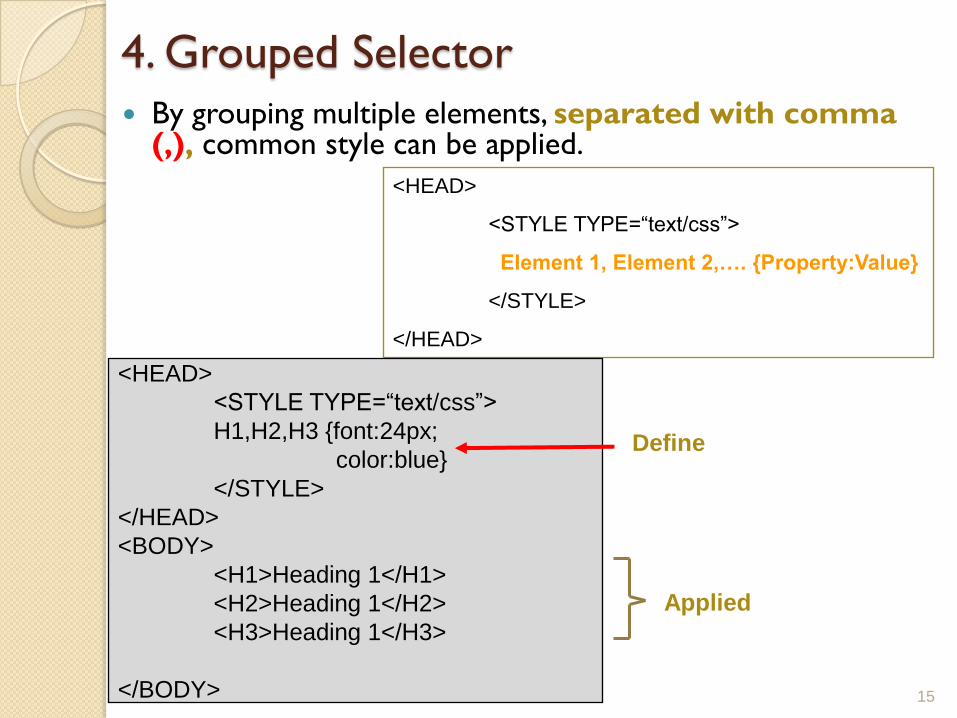
4. Grouped Selector
By grouping multiple elements, separated with comma (,), common style can be applied.
15
<HEAD>
<STYLE TYPE=“text/css”>
Element 1, Element 2,…. {Property:Value}
</STYLE>
</HEAD>
<HEAD>
<STYLE TYPE=“text/css”>
H1,H2,H3 {font:24px;
color:blue}
</STYLE>
</HEAD>
<BODY>
<H1>Heading 1</H1>
<H2>Heading 1</H2>
<H3>Heading 1</H3>
</BODY>
Define
Applied

5. Context Selector A specific style can be applied only when multiple elements are
specified simultaneously.
In Selector, list the elements separated with blank
16
<HEAD>
<STYLE TYPE=“text/css”>
Element 1 Element 2 …. {Property:Value}
</STYLE>
</HEAD>
Define
<HEAD>
<STYLE TYPE=“text/css”>
H1 I {color: red}
</STYLE>
</HEAD>
<BODY>
<H1>Heading 1
<I> 1</I>
</H1>
</BODY>
Applied

SPAN Element and DIV Element
When the style sheet is applied only to the part of the document, it is convenient to use the following elements. SPAN element specifies the range of inline level.
DIV element does the range of block level
Inside DIV element can be applied SPAN element
17
Inline
<SPAN STYLE =color:red>
Inline level is red
</SPAN>
<SPAN CLASS =red>
Inline level is red
</SPAN>
Block
<DIV STYLE =color:blue>
Block level is blue
</DIV>
<DIV CLASS =blue>
Block level is blue
</DIV>
<H1 style=“color:red”> Hello I am Samantha </H1>
<H1 style=“color:red”> Hello I am <SPAN style=“color:blue”>Samantha</SPAN></H1>
<H1 style=“color:red”> Hello I am <DIV style= “color:blue”>Samantha</DIV></H1>

Use of the float property
<html>
<head>
<style type="text/css">
img {
float:right
}
</style>
</head>
<body>
<p>In the paragraph below, we have added an image with style <b>float:right</b>. The result is that the image will float to the right in the paragraph.</p>
<p><img src="logocss.gif" width="95" height="84" />
18
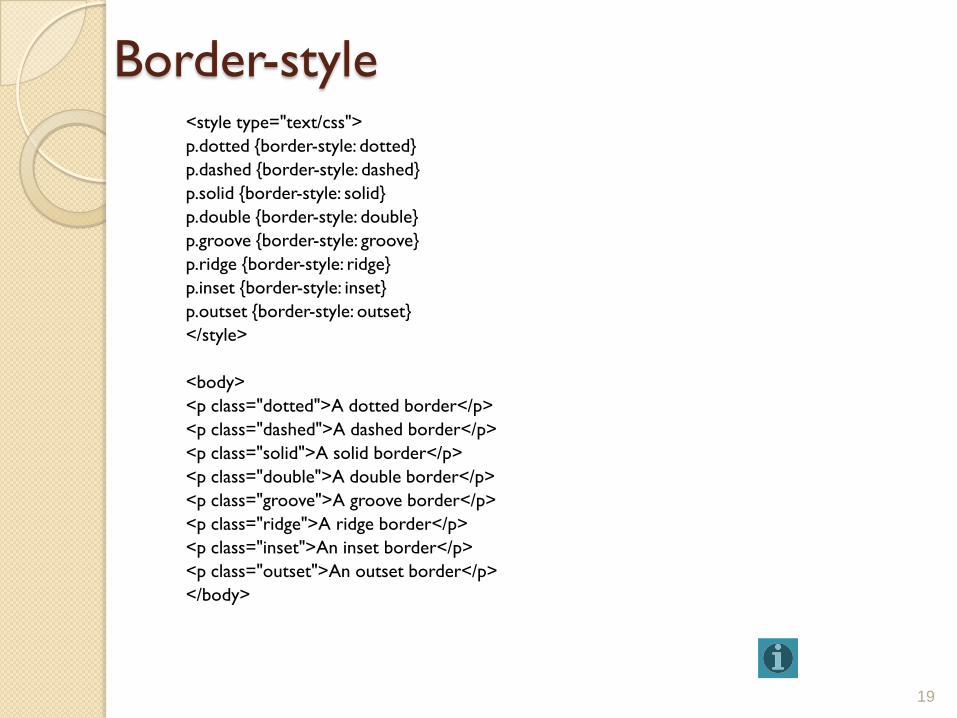
Border-style<style type="text/css">
p.dotted {border-style: dotted}
p.dashed {border-style: dashed}
p.solid {border-style: solid}
p.double {border-style: double}
p.groove {border-style: groove}
p.ridge {border-style: ridge}
p.inset {border-style: inset}
p.outset {border-style: outset}
</style>
<body>
<p class="dotted">A dotted border</p>
<p class="dashed">A dashed border</p>
<p class="solid">A solid border</p>
<p class="double">A double border</p>
<p class="groove">A groove border</p>
<p class="ridge">A ridge border</p>
<p class="inset">An inset border</p>
<p class="outset">An outset border</p>
</body>
19

Div element with float<style type="text/css">
div
{
float:right;
width:120px;
margin:0 0 15px 20px;
padding:15px;
border:1px solid black;
text-align:center;
}
</style>
<body>
<div>
<img src="logocss.gif" width="95" height="84" /><br />
CSS is fun!
</div>
<p>
This is some text. This is some text. This is some text.
This is some text. This is some text. This is some text.
</p>
<p>
In the paragraph above, the div element is 120 pixels wide and it contains the image.
The div element will float to the right.
Margins are added to the div to push the text away from the div.
Borders and padding are added to the div to frame in the picture and the caption.
</p>
20

Float with Menu<head>
<style type="text/css">
ul
{
float:left;
width:100%;
padding:0;
margin:0;
list-style-type:none;
}
a
{
float:left;
width:6em;
text-decoration:none;
color:white;
background-color:purple;
padding:0.2em 0.6em;
border-right:1px solid white;
}
a:hover {background-color:#ff3300}
li {display:inline}
</style>
</head>
<body>
<ul>
<li><a href="#">Link one</a></li>
<li><a href="#">Link two</a></li>
<li><a href="#">Link three</a></li>
<li><a href="#">Link four</a></li>
</ul>
21

CSS Validation
http://jigsaw.w3.org/css-validator/
22

References
http://www.w3schools.com/css/css_examples.
asp
http://www.webcredible.co.uk/
23

Alternative Styles
<link href="css/default.css" rel="stylesheet"
type="text/css" title="Default" />
<link href="css/black.css" rel="alternate stylesheet"
type="text/css" title="High Contrast" />
24
rel = link-types [CI]
This attribute describes the relationship from the current
document to the anchor specified by the href attribute. The
value of this attribute is a space-separated list of link types.
This specification allows authors to specify a preferred style
sheet as well as alternates that target specific users or media.
User agents should give users the opportunity to select from
among alternate style sheets or to switch of off style sheets
altogether.