captureboard c-20s/c-20w - plus vision · captureboard c-20s/c-20w user’s manual thank you for...
TRANSCRIPT

CaptureboardC-20S/C-20W
User’s Manual
Thank you for your purchase of the PLUS Captureboard. Please read this User’s Manual carefully before use to take full advan-tage of the functions of this product. After you have finished reading the manual, please keep it for future reference.

E-2
Introduction
This manual is for both the C-20S and C-20W models.The captureboards come in two sizes: standard size (model C-20S) and wide size (model C-20W).
The descriptions and diagrams in this manual refer to the model C-20S.* When functions or operations are specific to a certain model of captureboard, the model name is speci-
fied.
Cautions on using networksAbout the network connection environment• Therequiredoperatingenvironmentissubjecttochangewithoutnotice.Also,PLUSdoesnotguaranteealloperations.• Even ifall requiredoperatingenvironmentconditionsaremet, itmayhappenthatoperationsdonotworkproperlyor thatsomeproblemsarise.Dependingonthecommunicationsstatus,displaysmaybedelayedandcommunicationerrorsmayoccur.
Disclaimer• PLUSwillacceptno responsibilitywhatsoever foranyconsequencesofproblemsofcommunication impediments incon-necteddevicesduetothenetworkfunctions.
• PLUSwillacceptnoresponsibilitywhatsoeverforimpedimentsincidentaltousageofortheinabilitytousethenetworkfunc-tions(lossofbusinessprofits,lossesduetointerruptionofactivities,etc.).
• PLUSwillacceptnoresponsibilitywhatsoeverformalfunctionsduetocombinationswithconnecteddevicesorthesoftwareused,norfordamagesarisingfromhang-up,etc.
NOTEDo not use ruled type tapes.Donotmovethesheetwithtape,etc.,attachedtoit.Doingsocouldresultinmalfunction.Do not attach template sheets or paper to the sheet.Donotcopywhilefilm-typeobjectsorpapersareattachtothesheet.Doingsocouldresultinmalfunction.
Trademarks • MicrosoftandWindowsareregisteredtrademarksortrademarksintheUnitedStatesandothercountriesoftheMicrosoftCor-poration.
• AdobeandAdobeAcrobatReaderaretrademarksofAdobeSystemsIncorporated.• Safari,Apple,MacOSandMacintosharetrademarksorregisteredtrademarkofAppleComputer,Inc.,oftheUnitedStates.Thetrademarksofthevariouscompaniesandtheproducttrademarks,evenwhennotwrittendown,willbegivenduerespect.Productnamesandcompanynamesappearinginthismanualareregisteredtrademarksortrademarksoftherespectivecompa-nies.
(1) Thecontentsofthismanualmaynotbereprintedinpartorwholewithoutpermission.(2) Thecontentsofthismanualaresubjecttochangewithoutnotice.(3) Greatcarehasbeentakeninthecreationofthismanual;however,shouldanyquestionablepoints,errors,oromissionsbe
apparent,pleasecontactus.(4) NotwithstandingSection(3),thiscompanywillnotberesponsibleforanyclaimsoflossorprofitorothermattersdeemedto
betheresultofusingthisunit.(5) TheuseofaprinterastheperipheraldeviceofthePLUSCaptureboardistakentobeaprerequisite;therefore,operationwill
notbeguaranteedwhentheprinterisusedwithadirectconnectiontoapersonalcomputer.(6) Manualswithincorrectcollatingormissingpageswillbereplaced.

E-3
Table of Contents
Meaning of the Terms Used in this Manual• Mainunit(orset):Thisreferstothecaptureboard.• USBmemory: referstoUSBflashmemory.• USBmemorystorage: meansthesavingofsheetsurfacedatausingMEMORY(i.e.,theUSBport)oftheoperationpanel.• Memoryforcomputerstorage: indicatesatemporarysavinglocationoftheimagethathasbeenread.• “copy”: Both“print”and“USBmemorysaving”meanto“copy.”• “Sheetsurface”: refertothedrawingportion.• “Scroll”or“move”: indicatesfeedingofthesheet• Memoryfornetworkstorage:Memoryusedfornetworkstorage.• Network:Thecommunicationsnetworkonwhichdevicesare interconnected innet fashion for communication (exchangeofdata)betweenthedevices.Forthiscaptureboard,the“network”indicatestheLANbelow.
• LAN(LocalAreaNetwork):Aclosedcommunicationsnetworkforcommunicatingwithinarestrictedarea,suchaswithinacom-pany.
• FTP(FileTransferProtocol):Theprotocol(communicationsrules)usedwhentransferringfilesonaTCP/IPnetwork.
Introduction ...............................................................E-2
Package Contents ......................................................E-4
Names of the Parts ....................................................E-5
Front ...................................................................... E-5
Input/output terminals ............................................. E-6
Changing the Height of the Unit................................ E-7
Control Panel .......................................................... E-8
Functions of the Captureboard .................................E-9
Basic Functions....................................................... E-9
Network Functions .................................................. E-9
Functions specific to the captureboard ..................... E-9
Operation Steps .......................................................E-10
When used as a Copyboard ................................... E-10
When used as a Captureboard ............................... E-11
Setting the Time .......................................................E-12
Printing (printer sold separately) ............................E-14
Preparing the Printer ............................................. E-14
Basic Printing Operation ........................................ E-15
Moving the sheet surface manually .................. E-16
Using USB Memory ..................................................E-17
USB Memory Storage Procedure ............................ E-17
Saving Image Files on a Computer/Deleting Image Files ..................................................................... E-19
Using the captureboard connected to a computer .E-21
Using the Captureboard Connected to a Network ..E-23
Saving scanned images on the captureboard or FTP server ............................................................ E-23
Transferring image files to/deleting them from the computer .............................................................. E-25
When the folder for saving is set to “Board” ...... E-25
Deleting image files from the captureboard ....... E-27
When the folder for saving is set to “FTP Server” ........................................................... E-28
Deleting image files on the FTP server .............. E-29
CB Setup and Network Setting Procedure ..............E-30
CB Setup (operating the captureboard’s buttons) ..... E-30
Basic setting operation .................................... E-30
Table of Function Numbers and Settings ........... E-31
Simple Network Settings (via USB).......................... E-33
Making Detailed Settings (via LAN) ......................... E-35
Basic Setting Operations .................................. E-35
CB Setup ........................................................ E-38
Header/Footer ................................................. E-39
Network Setting .............................................. E-40
User Setting .................................................... E-41
Security Setting ............................................... E-42
Disk management Setting ................................ E-43
CB Information ................................................ E-43
Resetting the Network Settings ........................ E-44
Creating and Registering Headers and Footers .. E-45
Meaning of Error Messages ....................................E-46
Troubleshooting .......................................................E-48
Specifications ..........................................................E-50
Appendix ..................................................................E-51
Connections and Wiring Diagram ........................... E-51

E-4
USB cable (type B ↔ type A) [1][PLUScode715258900]Cableforconnectingthemainunittoacomputer.Usedformakingthedevicesettings.
Notice• Do not use this cable for connection to the printer(soldseparately).
CD-ROM [1]IncludestheUser’sManual(thismanual),SoftwareOperationManual in PDF format, and this unit’s dedicated software,“PLUSC-20Software”.User’s manual (in PDF format)Includesinstructionsonusingtheset.Software Operation Manual (in PDF format)This contains instructions for combining the captureboardandcomputerscreensusingthePLUSC-20Software.
Documents Important Safety Information [1]Includes instructions to be heeded in order to use the setsafely.Assembly and Setup ManualIncludes instructions on installing the set and connecting itwiththeprinter(soldseparately).
Main unit [1]Printer* [1] Pleaseseethe instructionmanualoftheprinter for informa-tionabouttheprinteraccessories.* Depending on the type of product you havepurchased,theprintermaybesoldseparately.
Stand [1]Amobilestand(withcasters)forsupportingthemainunit.AprintertableandACadapterboxareincluded.Forthecon-tentsof the stand’spackageand instructionsonassembly,see the stand’s instructions or the separateAssembly andSetupManual.
Pen tray [1]Pen tray fixing screws (M4× 20) (temporarily fastened onmainunit)C-20S:3screws,C-20W:4screws(SeetheAssemblyandSetupManual forassembly instruc-tions.)
Wall mount printer table [1 set]Bracketfixingscrews(M4×8):4ACpoweradapterbox:1Velcro:2sets* Soldseparately.
Wall brackets [1 set]These are brackets formounting themain unit on awall.(SeetheAssemblyandSetupManual.)
Upperwallbrackets:2
Lowerwallbrackets:2
Mainunitfixingscrews(M4×12:2)* Soldseparatelyforsomeproducts.
Dedicated eraser [1]Usethistoerasethedrawing.
Captureboard Accessories Dedicated markers (One each of black, red, blue, andgreen)Use thesemarkers to draw on thesheetsurface.
AC power adapter (with power cord) [1]Thisisthepoweradapterforsupply-ingpower to the captureboard (SeePageE-51).(LTE36E-S2-3)
Notice• The includedACpoweradapterandACpowercordareexclusively forusewith thisunit.Neveruse themwithotherproducts.
The package contents are as described below. Please check before use.
Package Contents
E-5
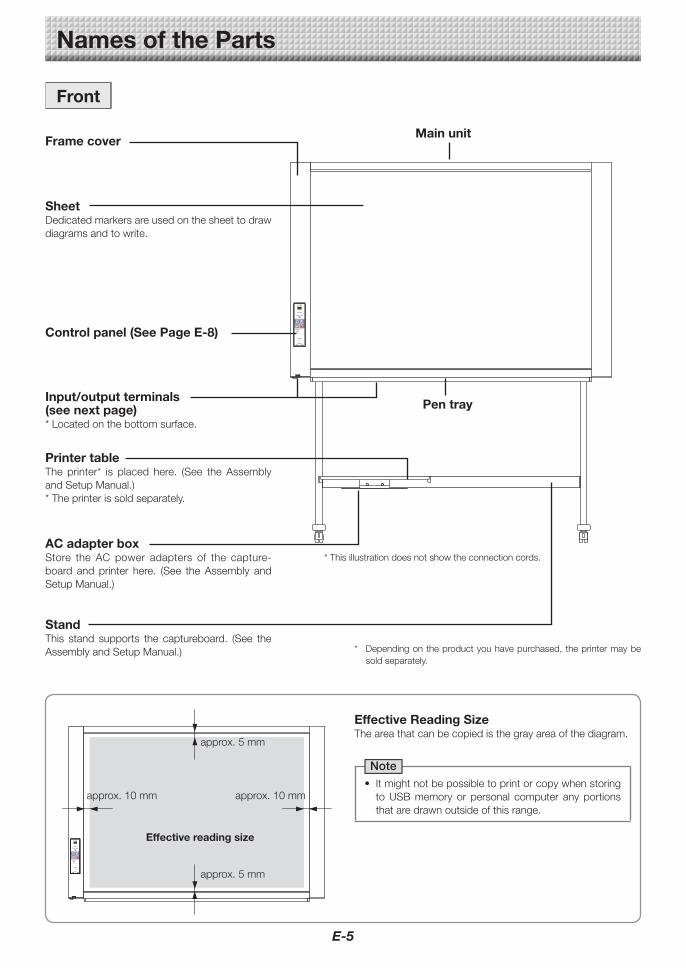
Front
Frame cover
Sheet Dedicatedmarkersareusedonthesheettodrawdiagramsandtowrite.
Control panel (See Page E-8)
Input/output terminals (see next page)*Locatedonthebottomsurface.
Printer tableThe printer* is placed here. (See theAssemblyandSetupManual.)*Theprinterissoldseparately.
AC adapter boxStore the AC power adapters of the capture-board andprinter here. (See theAssembly andSetupManual.)
StandThis stand supports the captureboard. (See theAssemblyandSetupManual.)
Main unit
Names of the Parts
Pen tray
* Dependingontheproductyouhavepurchased,theprintermaybesoldseparately.
*Thisillustrationdoesnotshowtheconnectioncords.
Effective Reading SizeTheareathatcanbecopiedisthegrayareaofthediagram.
Note• ItmightnotbepossibletoprintorcopywhenstoringtoUSBmemory or personal computer anyportionsthataredrawnoutsideofthisrange.
approx.5mm
approx.10mmapprox.10mm
approx.5mm
Effective reading size

E-6
LAN terminal (RJ-45)Connect to a LAN port on the network (switchinghub,etc.)usingacommerciallyavailableLANcable.
USB memory port (type A) Insert a commercially available USBmemory device here. Scanned imagescanbesaved.(SeepageE-17)
DC input connector ConnectthiswiththeDCplugendoftheACpoweradapter.(SeePageE-51.)(OnlyconnectthesuppliedACpoweradapter;nothingelse.)
Printer connector (USB port Type A)Connect thiswith theUSBconnector of the printer(SeePageE-51).(The printer connector is dedicated for usewith aprinter;useitonlywithaprinter.)
* This illustration does not show the printer orconnectioncords.
Personal computer (PC) dedicated USB port (Type B) ConnectthiswiththeUSBport(typeA)ofthePC.Usedtoconnectthecaptureboardtoacomputertomake the captureboard’s device settings.Can alsobeusedtocopyscannedimagesontothecomputer.(SeepageE-21,E-33)
Theconnectorislocatedonthebottomsur-faceofthemainunit.Thediagramviewisseenfromthebottom.
Names of the Parts
Unlock Lock
Caster
Locking/unlocking the stand’s castersAfterinstallation,lockthecasterswiththestoppers.Whenmov-ingthestand,unlockthecaster’sstoppers.Thestoppersarelockedwhenthebottomispressed.Pressthetoptounlockthem.
Input/output terminals

E-7
Names of the Parts
CAUTION• Atleasttwopersonsshouldholdthemainunit.Ifnot,themainunitcoulddroportip,resultinginaccidentalinjury.• Lockthestand’scastersbypressingthebottomofthecasterlockbutton.Ifnot,thestandcouldmovewhilethemainunitisbeingmountedorremoved,resultinginaccidentalinjury.
• Afterunpluggingthepowercordfromthewallpoweroutlet,disconnectalltheconnectioncordsfromtheset’sinput/outputterminals.Ifthesetisremovedwithoutdisconnectingthecords,itcouldtip,resultinginaccidentalinjury.
• Ifaprinterismountedontheset,removetheprinterbeforestarting.Ifnot,thestandcouldtipwhilethemainunitisbeingmountedorremoved,resultinginaccidentalinjuryduetotheprinterdroppingortippingover.
(1) Unplug the power cord from the wall power outlet, then disconnect all the connection cords from the main unit.
(2) Remove the locking knobs (one on each side).
(3) Change the position of the main unit support pieces.
Lift the main unit about 1 cm to unhook it.
Insert the stand’s hooks securely into in the mounting holes in the main unit’s support pieces (one on each side).
(4) Fasten the two locking knobs (left and right) to the mount support pieces.
(5) Connect all the connection cables.
Changing the Height of the UnitThis is the height adjustment when setting up the captureboard on the optional stand. The stand height can be adjusted to 3 levels by 100 mm.
* Thisillustrationdoesnotshowtheconnectioncords.
lock-screws
lock-screw
Hook
MountingholeRearframes
Stand

E-8
6 Save ( ) button (USB memory storage)Thesheetismovedby1screenandread,andtheimageisstoredontheUSBmemorydevice.WhenconnectedtoacomputerbyUSBcable,theimageisstoredinthecaptureboard’sinternalmemory.
7 Network ( ) buttonScrollsandscansthesheetonescreen’sworthandsavesthedatainthefolderforsaving.The data is saved either on the captureboard or in afolderontheFTPserver,aspreviouslyset.
8 Scroll/Stop ( ) button Scrollsthesheetonescreenportionleft,thenstopsauto-matically. A press of this buttonwhile scrollingwill stopthescrolling.
9 USB A Memory port (USB Type A)Saves in commercially-available USBmemory imagesthathavebeenreadbythecaptureboard.
10 StatusTheseindicatorsnotifyoferrorsinthecaptureboard,USBmemorydevice,networkorprinteraccordingtowhetherthey are lit or off and how they light (see table below).Whenthecaptureboardisfunctioningproperly,thestatusindicatorsarelitgreen.(Seetablebelow)Alsochecktheerrormessageonthedisplaywindow.Forerrorinformationandremedies,seepageE-46.
Display window
Meaning USB indicator Printer indicator
Printer problemOff Lit red
An unsupported printer is connected
USB Memory not recognized
Lit red Off
USB Memory storage problem
USB memory not connected
Memory is full
Warning that disconnection of USB memory has been forgotten
Reading error
Flashing red Flashing redSystem error
Time setting error
Security protection
Off Off
Color printed prohibited
LAN cable disconnected
FTP server recognition error
FTP server connection failure
FTP server writing failure
Network or other error
Network setting reset error
Header/footer writing error
*Theletters“USB”scrollonthedisplay.
2
3
4
7
8
1
10
9
5
6
1 ON/Standby ( ) buttonTurns the captureboard’s power on and off (standbymode).
2 Display window The number of copies, operating status and errormes-sagesaredisplayedonthe7-segmentLEDs.
3 Number of Copies ( )/Test print buttonPress this button to set the number of copies to beprinted (max.10).Thenumberofcopies isdisplayedonthedisplaywindow.* “ ”isdisplayedduringtestprinting.
4 Color Print ( ) buttonThesheetismovedby1screenandread,andtheimageis printed in color in the number of copies indicatedonthedisplaywindow.
5 B/W Print ( ) buttonThesheetismovedby1screenandread,andtheimageisprintedinblackandwhiteinthenumberofcopiesindi-catedonthedisplaywindow.
Control Panel
When pressing a button, please press the center area (the square bulge). The button may not work if it is pressed on a corner.
Names of the Parts

E-9
Basic Functions
① Printing ② Storing on USB memory devices
③ Capturing images on a com-puter
Network Functions
④ Viewing images stored on the captureboard via a network
⑤ Viewing images stored on an FTP server via a network
Functions specific to the captureboard
⑥ Combining images projected from a projec-tor with hand-drawn data
⑦ Printing computer data on printer connect-ed to board
Functions of the Captureboard
LAN LAN
Outputtopaper
Viewingofimagesstoredonthecaptureboard
Captureboard’smemory
Projector
ViewingofimagesstoredonFTPserver
Printer
ScanningwiththeC-20Software
Combiningofimageoncomputerwithboard’shand-drawndata
Printingofcombinedimageoncomputerfromprinterconnectedtocaptureboard
C-20Software’spreviewscreen
StoringonUSBmemorydevice
Storingofimageoncomputer
Note• Fordetailsonoperatingthe“PLUSC-20Software”andonconnectingtheequipment,seetheseparate“SoftwareOpera-tionManual”.

E-10
Operation Steps
When used as a Copyboard
The captureboard uses an image scanner to scan characters or diagrams drawn using special markers (four colors). When the Color Print or B/W Print button is pressed, the image on the screen is printed out to the printer. When a USB memory device or computer is connected, the image on the screen is saved as image data when the Save button is pressed. (For the memory for computer storage, one sheet’s worth of data is saved, overwriting previously saved data.)Furthermore, when network settings are made, image files can be saved on the captureboard or FTP server.
Preparation • Setupthenewlypurchasedcaptureboardandconnectaprinter.Seeaseparatemanualtitled“AssemblyandSetupManual.”
• PlugtheACpowerplugsofthecaptureboardandprinterintowallpoweroutlets.• Afterpurchase,besuretosetthecaptureboard’sclock.Ifnot,theproperdateandtimewillnotbedisplayedon
prints or in image files. See page E-12.
Note• Whenturningonthepower,waitabout5secondsormoreafterthepowerplughasbeenconnectedbeforepressingtheON/Standby button.
• ThecoloroftheimageswhenprintedincolororwhensavedinUSBmemorywilldiffersomewhatfromthemarkercolors.• Blurredcharacters, thin lines,overlappingofmarkersandother factorscancausecolors todiffer inplacesandcanalsoresultinportionsthatcannotbescannedsuccessfully.
• ThedatainthememoryforcomputerstorageisdeletedwhentheON/Standby buttonisturnedoff(standbymode)ortheconnectionwiththecomputeriscut.Thedatainthememoryfornetworkstorageisnotdeleted.
Draw on the Sheet SurfacePlease drawwith the dedicatedmarkers that have beensupplied.Ifanythingotherthanthededicatedmarkersoreraserareused,itmaybeimpossibletoerasethesheetorthesheetcouldgetdirty.Tomovethesheetmanually,see“Movingthesheetsurfacemanually”onpageE-16.
Printing(1) SetA4orlettersizepaper. Do not set anything other
thanA4orlettersizepaper.(2) Press the ON/Standby
button of the captureboardandswitchonthepower.
(3) Switchontheprinterpower. For instructions on operating the printer, see the
printer’soperatinginstructions.(4) Press theColorPrint or theB/WPrint button.
The captureboardwillmove a one-screenportion ofsheet,readtheimage,andstartthecopyoperation*.See“Printing”onPageE-14.
When Not Using the Captureboard (1) Byallmeans,cleanlyerasethedrawingfromthesheetsurfacewiththededicatederaser.(Leavingthedrawingforalong
periodwillmakeithardertoerase.)(2) PresstheON/Standby buttonofthecaptureboardandswitchoffthepower(standbymode). ThepowercannotbeswitchedoffwhiletheUSBmemoryremainsinstalled.(Thisisapreventionfunctionagainstforget-
tingtounplugtheUSBmemory.)(3) Switchofftheprinterpower.
Saving to USB Memory (1) PresstheON/Standby buttonof
the captureboard to switch on thepower.
(2) InsertUSBmemory into theMemory port (USBAport)ofthecaptureboard.
(3) PresstheSave button. See“UsingUSBMemory”onPageE-17.
Saving on a computer(1) Press the captureboard’sON/Standby ( ) button to
turnthepoweron.(2) Connectthecaptureboardtothecomputerusingthe
PCdedicatedUSBport.(3) PresstheSave( )button.(4) Theimageissavedonthecomputer.
Using a network (via LAN)(1) Check that the captureboard is connected to a LAN
portonthenetwork.(2) Press the captureboard’sON/Standby button to
turnonthepower.(3) PresstheNetwork button.
See “Using theCaptureboardConnected to aNet-work”onpageE-23.

E-11
Operation Steps
When used as a Captureboard
TheCaptureboardusesaimagesensortoreadthetextanddrawingsthathavebeenwrittendownwithdedicated(4-color)markers,andaccumulatestheimagedataininternalmemory.The“PLUSC-20Software”softwareontheincludedCD-ROMcanbeusedtocombinetheimageoftheprojectorprojectedontothesheetsurfacewiththewordsordiagramsdrawnonthesheetsurface.
When Not Using the Captureboard (1) Byallmeans,cleanlyerasethedrawingfromthesheetsurfacewiththededicatederaser.(Leavingthedrawingforalong
periodwillmakeithardertoerase.)(2) WhendisconnectingtheUSBcableoftheCaptureboardandpersonalcomputer,firstdisconnecttheUSBatthepersonal
computerside.(3) PresstheON/Standby buttonoftheCaptureboardandswitchoffthepower(standbymode).
Note• For details on operatingPLUSC-20Software andonconnecting devices, refer to the separate “SoftwareOperationManual”.
When combining the sheet surface drawing with a projector image (1) Connect the computer onwhich “PLUSC-20Soft-
ware”isinstalledtothecaptureboard.(2) Project the imageof thepersonal computerwith the
projector.(3) Adjusttheprojectedimageforasuitablesize.(4) Use the supplied dedicatedmarker to draw a circle
“o”atthefourcornersoftheprojectionimage.(5) Theimageofthesheetscreenwillberead.Checkthat
thereisacombinedimageonthecomputerscreen.(6) Savethecombinedimageonthepersonalcomputer.
Write and Draw on the Sheet Surface Please use the supplieddedicatedmarkers for drawing. To erase something, erase itwith thesupplieddedicatederaser.Ifanythingotherthanthededicatedmarkersoreraserareused,itmaybeimpossibletoerasethesheetorthesheetcouldgetdirty.

E-12
Setting the Time
The date and time are stamped on the printing paper and recorded in the file information when files are stored on the captureboard and FTP server, so set the captureboard’s time correctly.The time can also be set from a computer via a network (when connected to a LAN). (See page E-38.)
Press the ON/Standby button to turn on the power.Thedisplaywindow’sLEDslightandthepowerturnson.
Press the Number of Copies button while pressing the ON/Standby button,thenreleasethe ON/Standby button.Themodeswitchesto“CBSetup”,and“F1”isdisplayedonthedisplaywindow’sLEDs.Themode returns to thenormalmode if nobuttonsareoper-atedfor10seconds.
Description of Operations
1 Switch to “CB Setup”.With the power turned on, press theNumber ofCopies buttonwhilepressingtheON/Standby button,thenreleasetheON/Standby button.
2 Press the Save button and switch to “Time Setting”.ThemodeswitcheseachtimetheSavebuttonispressed.Contentsofsettingmodedisplayedondisplaywindow
(First2digits) (Last2digits)
Christianyear Month Day Hours Minutes
3 Set the setting mode’s date and time.WhentheColorPrint orB/WPrint buttonispressedonce,thesettingcanbemade.UsetheColorPrint (Increase)andB/WPrint (Decrease)buttonstoset.
4 Press the Save button to enter the setting.Thecaptureboardswitchestothenextsettingposition.Repeatsteps4and5tosetthecurrentdateandtime.• If theON/Standby button ispressedduringsteps3 to5, thepartiallymadesettingiscanceledandthedateandtimereturntothevaluessetbeforetheset-tingwasstarted.
5 Complete the setting.WhentheSave buttonispressedaftertheminute’ssettingposition(c.6display)hasbeenset,the“TimeSetting”iscompletedandthe[F1]display(CBSetup)reap-pears.PresstheON/Standby buttontoreturntothenormalmode.
Normalmode
“CBSetup”mode
Preparations : Connectthepowerplugtoawallpoweroutlet(AC100–240V).[Example]:Settingthedateandtimeto2:16pmOctober8,2011

E-13
Setting the Time
Use the Color Print (Increase) and B/W Print (Decrease)buttonstoselect“14”(thehours),thenpress the Save button to enter.Thedisplayswitchesto“c6”(settingofminutes).
Use the Color Print (Increase) and B/W Print (Decrease)buttonstoselect“08”(theday),thenpress the Save button to enter.Thedisplayswitchesto“c5”(settingofhours).
Use the Color Print (Increase) and B/W Print (Decrease)buttonstoselect“16”(theminutes),then press the Save button to enter.Thedisplayswitchesto“F1”(functionsetting).
Press the ON/Standby button to return to the normal mode.• Thecaptureboardalso returns to thenormalmode if you justwait10seconds.
This completes the time setting.
Use the Color Print (Increase) and B/W Print (Decrease)buttonstoselect“10”(themonth),
then press the Save button to enter.Thedisplayswitchesto“c4”(settingofday).
Use the Color Print (Increase) and B/W Print (Decrease) buttons to select “11” (the last 2
digitsoftheyear),thenpresstheSave button to enter.Thedisplayswitchesto“c3”(settingofmonth).
Press the Save button to move to the last dig-its of the yearThedisplayswitchesto“c2”(last2digitsofyear).Notice:The first twodigitsof theyear (“20”)are fixed.Simplypress theSave button to switch to the last 2digitsof the year settingposition.
While“F1”isdisplayed,presstheSave button to enter.Thedisplayswitchesto“c1”(first2digitsofyear).Ifnobuttonsareoperatedfor10secondswhileinthetimesettingmode,themodereturnstothe“CBSetup”mode.
“CBSetup”mode Normalmode

E-14
Use a printer to print out the image that has been drawn on the sheet surface. Use a PLUS-designated printer.Operations and names of parts differ from printer to printer. For details of operations, see your printer’s operat-ing instructions.
Preparing the Printer
Pleasecheckthatthecaptureboardandtheprinterhavebeenconnected.SeePageE-51.
Printing (printer sold separately)
Set the paper. PleaseuseA4orlettersizeprinterpaper.• Whenusinglettersizepaper,setlettersizepaperinthedevicesettings.(SeepageE-31,E-38.)
1)Arrangethepaperedgessothattheyareeven.2)Insertpaperatthespecifiedpositionofthepapertray.3)Pressthepaperguidegentlyuntilittouchesthepaper.
NoteSeeyourprinter’soperatinginstructionsforadescrip-tionofthepaperthatcanbeused.
Notice• Depending on the printer’s specifications, sometimemayberequiredforcleaningoftheprinthead.
Switch on the power. Pressthepowerswitch.Thepowerindicatorlights.
This completes the preparation of the printer. PresstheColorPrint ortheB/WPrint buttononthecaptureboard’scontrolpanel.Onepageworthofdataisreadandtheprintingoperationstarts.
Notice• Dependingontheprinter,indicators,etc.,mayflashafterthepoweristurneduntiltheprinterispreparedtoprint.Inthiscase,seetheprinter’soperatinginstructionsandcheckthattheprinterisreadybeforestartingtheprintingoperationonthecaptureboard.
When finished printing... Switchofftheprinterpowerandremovethepaper.Closethepapertray.
Notice• Caution:DonotturnoffthepowerordisconnecttheUSBcableduringprinting.
Dischargetray
Paperguide
Paper
Powerswitch
Appearanceofprinterisforillustrationpurposes.
Papertray

E-15
Prepare the printer. (See the previous page.)
Note• When turning on the power,wait about 5 seconds ormore after thepower plug has been connected before pressing theON/Standby button.
• PresstheON/Standby buttontoswitchonthepower.TheLEDofthedisplaywindowwilllight.
• Turnonthecaptureboard’spowerbeforeturningontheprinter’spower.
Press the ON/Standby button and switch on the power.
Press the Scroll/Stop button and display the sheet sur-face you want to print.
ApressoftheScroll/Stop buttonscrollsthesheetsurfaceonescreenportionleftandautomaticallystopsit.
Tostoptheoperationpartwaythrough,presstheScrol/Stop buttonagain.
Note• Theone-screenthatisvisibleisprintableposition.• To fine-adjust thesheetsurfaceposition,with thesheetstopped,movethesheetslowlybyhand.Thesheetcanbemovedeithertotheleftortotheright.
• Printing of the portion located around the sheet surfacemight not bepossible.Pleasesee“Effectivereadingsize”onPageE-5.
Press the Number of Copies button and select the num-ber of copies.
Note• “01”isselectedwhenthepoweristurnedon.• Upto10copiescanbespecifiedanddisplayedonthedisplaywindow.• Thenumberofcopies increasesby1each time theNumberofCopiesbuttonispressed,and“ ” isdisplayedafter“10”(this isusedfortestprinting:seepageE-49).Whenthebutton ispressedagain, thedisplayswitchesto“01”.Thenumberswitchescontinuouslyifthebuttonisheldin.
• After setting the number of copies, proceed to step4within 1minute.Thenumberofcopiesisresetto“01”ifnooperationisperformedwithin1minute.
Basic Printing Operation
Preparation: Preparation: Check that the AC power plugs of the captureboard and printer areconnectedtowallpoweroutlets.
Printing
continued on next page

E-16
Printing
Press the Color Print or the B/W Print button to print.
• Thereadingoperationisperformedforaone-sheetportion(whilethesheet isscrolled)andtheprintingoperationisperformed.
Cancellation of the print operation in progress WhentheON/Standby buttonispressed,thereadingofthesheetstops,andthepartiallyreadimagedataisprinted.Waituntilthesheetisexpelledfromtheprinter.
Note• IftheON/Standby buttonispressedwhilethesheetsurfaceisbeingread,printingisinterruptedandonlypartoftheimagewillbeprinted.
Tomovethesheetsurface,waituntilscrollingstops,thenpresstheScroll/Stop button.• Theone-screenportionisreducedtoA4papersizeandprinted. Forwidetypecaptureboards(modelC-20W),theimageiscompressedabout75%inthehorizontaldirection.Toprintwiththesameproportionsastheimageonthesheetsurface,see“MakingtheDeviceSettings”(pageE-31).
• Aflashing“ ”inthedisplaywindowindicatesaprinterror.See“MeaningofErrorMessages”onPageE-46.• Whenprinting,atimestamp(dateandtime)isprintedatthetoprightofthesheet.See“CBSetup”onpageE-30,E-38.
or
• Switchofftheprinterpower.
Note• WhentheEraseReminderfunctionissetto“Enable” When theON/Standby button is pressed, the displaywindow and all the indicators flashsimultaneously, the sheet automaticallymoves to the surface that is not yet erased and thepowerturnsoff.TosettheEraseReminderfunctionto“Disable”,seepageE-32,E-38.
*TheEraseReminderfunctionmaynotworkproperlyduetodirtonthesheet'sadhesivesec-tionsormarkerresidue.
• Ifnobuttonisoperatedwithin30minutes,thepowerturnsoffautomatically(autopoweroff). Whenthepoweristurnedoff,scannedimagesstoredintheunit’sinternalmemoryarecleared.• TheautopowerofffunctioniscanceledwhenthecaptureboardandcomputerareconnectedbyUSBcable.
Whenthecaptureboardisnotgoingtobeused,presstheON/Standby button and switch off the power (standby mode).
Moving the sheet surface manuallyThe sheet canbemoved evenwhen thepower of the captureboard isswitchedoff.Thesheetcanbemovedwithyourhandeitherinleftorright.Pleaseplaceyourhandattheverticalcenterandmovethesheetslowly.
Notice• Quickmovementcancausedamagetothedrivemechanismofthecaptureboard.
Note• When the EraseReminder function is set to “Enable”, the EraseReminderfunctionmaynotoperateproperlyifthesheetsurfaceismovedbyhand.
E-17
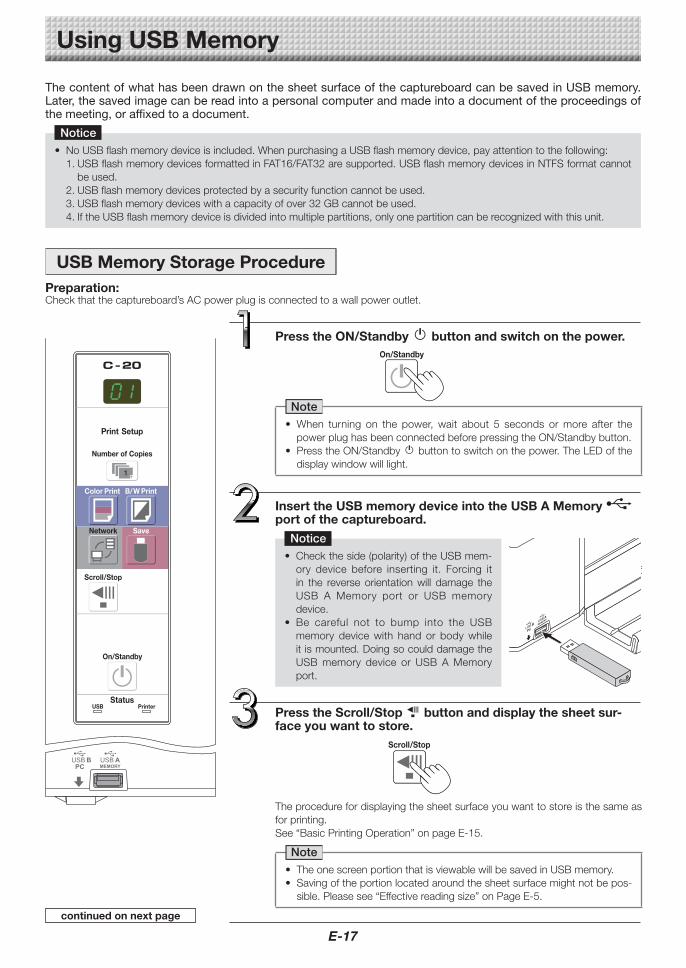
Insert the USB memory device into the USB A Memory port of the captureboard.
Notice• Checktheside(polarity)oftheUSBmem-ory device before inserting it. Forcing itin the reverse orientationwill damage theUSB A Memory port or USB memorydevice.
• Be careful not to bump into the USBmemory devicewith hand or bodywhileitismounted.DoingsocoulddamagetheUSBmemory device or USBAMemoryport.
Using USB Memory
The content of what has been drawn on the sheet surface of the captureboard can be saved in USB memory. Later, the saved image can be read into a personal computer and made into a document of the proceedings of the meeting, or affixed to a document.
Notice• NoUSBflashmemorydeviceisincluded.WhenpurchasingaUSBflashmemorydevice,payattentiontothefollowing:1.USBflashmemorydevicesformattedinFAT16/FAT32aresupported.USBflashmemorydevicesinNTFSformatcannotbeused.
2.USBflashmemorydevicesprotectedbyasecurityfunctioncannotbeused.3.USBflashmemorydeviceswithacapacityofover32GBcannotbeused.4.IftheUSBflashmemorydeviceisdividedintomultiplepartitions,onlyonepartitioncanberecognizedwiththisunit.
USB Memory Storage ProcedurePreparation: Checkthatthecaptureboard’sACpowerplugisconnectedtoawallpoweroutlet.
Press the ON/Standby button and switch on the power.
Note• When turning on the power,wait about 5 seconds ormore after thepowerplughasbeenconnectedbeforepressingtheON/Standbybutton.
• PresstheON/Standby buttontoswitchonthepower.TheLEDofthedisplaywindowwilllight.
Theprocedurefordisplayingthesheetsurfaceyouwanttostoreisthesameasforprinting.See“BasicPrintingOperation”onpageE-15.
Note• TheonescreenportionthatisviewablewillbesavedinUSBmemory.• Savingoftheportionlocatedaroundthesheetsurfacemightnotbepos-sible.Pleasesee“Effectivereadingsize”onPageE-5.
Press the Scroll/Stop button and display the sheet sur-face you want to store.
continued on next page

E-18
Using USB Memory
• Thereadingoperationisperformedforaone-sheetportion(whilethesheetisscrolled)andUSBmemorystoragestarts after the scrolling completes.
The(5second)flashing“US”displayindicatesthattheUSBmemoryhasnotbeeninserted.PleaseinserttheUSBmemoryandthenpresstheSave button.
A (5 second) flashing “FL”display indicates that there is insufficient free capacity topermit storage inUSBmemory.ReplacewithaUSBmemorydevicehavingsufficientcapacity.See“MeaningofErrorMessages”onPageE-46forothererrordisplays.
Note• DependingontheUSBmemory,itmaytaketimeforrecognitionoritmaytaketimeforsaving.• WhentheON/Standby buttonispressedduringthereadingoperation,thereadingoperationwillbediscontin-uedandthepartiallyreadimagedatawillbestoredintheUSBmemory.
Tomovethesheetsurface,waituntilscrollingstops,thenpresstheScroll/Stop button.• Thedateandtimeofthesavedfilewillreflectthecaptureboardtimesetting.See“CBSetup”onPageE-31.• WhenacertainamountoffreecapacityisnotavailableintheUSBmemory,“FL”willbedisplayedwhentheSave
buttonispressed.Deletedata,setthesheetsurfacebacktotheoriginalstatus,thenpresstheSave buttonagain.
• WhenthecaptureboardandacomputerareconnectedbyUSBcable,thedataisstoredinthemainunit’sinternalmemory.
Flashingindicator“rotates”sequentiallyduringUSBmemorystorageoperation.
Displaywindow
Press the Save button to store.
Removing the USB memoryCheckthattheflashingrotationofthedisplaywindowhaschangedtosteadylightingandthattheUSBmemoryaccessindicatorisnotflashing,thenpulltheUSBmemorystraightout.(PleaseseeyourUSBmemorymanualfordetails.)
Notice• DonotunplugtheUSBmemorydeviceduringtheUSBmemorystor-ageoperation (i.e., during the rotating, flashingdisplay in thedisplaywindow),orwhile theaccess indicatorof theUSBmemorydevice isflashingbecausedatawillbedestroyed.
Whenthecaptureboardisnotgoingtobeused,presstheON/Standby button and switch off the power (standby mode).
Note• “ ” lettersappearingatone-second intervals inamovingdisplay inthedisplaywindowindicatethataUSBmemorydeviceismounted.UnpluggingtheUSBmemorydevicewillswitchoffthepower.(AfunctionthatservesasaremindertounplugtheUSBmemorydevice)
• WhenthecaptureboardandacomputerareconnectedbyUSBcable,theautopowerofffunction(whichturnsthepoweroffautomatically)iscanceled.
• ScannedimagefilesstoredinthememoryforcomputerstoragearedeletedwhentheON/Standby button isturnedoff.Filesinthememoryfornetworkstoragearenotdeleted.

E-19
Plug the USB memory device into a USB port of the personal computer
When connecting to the personal computer for the first time,theinstallationofaUSBdriverisrequired.Followthe instructions manual of the USB memory device that you are using.
• Usually, withWindows XP/Windows Vista/Windows 7, thestandard driver is installed automatically and the capture-boardisidentifiedas“Removabledisk”in“MyComputer”(or“Computer”).
Using USB Memory
Saving Image Files on a Computer/Deleting Image Files
Examples of operations follow for saving the image files in the USB memory device to the hard disk of the per-sonal computer, and for deleting the folder when the USB memory capacity is full. (There are various methods that can be used for saving and deleting including the use of Explorer.) See the instruction manual of your per-sonal computer or the software that you are using for information about using a personal computer.
The name of the folder on the USB memory device is “CB_Image”. Image files are stored in this folder.By factory setting upon purchase, image files are named “PV-xxx.jpg” (JPEG files), where “xxx” refers to a 3-digit number starting from 001 (ex.: PV-001.jpg).Images can be stored in JPEG, PNG or PDF format, selectable in the captureboard settings (“CB Setup”). (See pages E-31, E-38.)
Drag to My Documents
Saving the image files of a USB memory device to a personal computer
1. Open “My Computer” (or “Computer”) and fromwithin,openthedriveoftheconnectedUSB memory device.The folder named “CB_Image” is the saved data of thecaptureboard.
2. Store the “CB_Image” folder in “My Docu-ments” or another location. Allofthedatacontainedin“CB_Image”willbestored.
NoticeDepending on the computer’s usage environment, theseoperationsmaynotworkproperly. This couldbe the caseforexample:• whenseveralUSBdevicesareconnectedsimultaneouslytothecomputer.
• when the USB device is connected to a USB hub orwhenitisconnectedusinganextensioncable.
continued on next page

E-20
Deleting USB memory image files with the com-puter
Beforedeletingimportant imagefiles,besuretosavethem on the computer (as a data backup).
1. Open “My Computer (or “Computer”)” and then open the drive icon which shows USB memory.The foldernamed “CB_Image”contains thememorystor-agedataofthecaptureboard.
2. Place the “CB_Image” folder in the “Recy-cleBin”,rightclickontheiconandselect“Empty Recycle Bin” from the pull-down menu. Allofthedatacontainedin“CB_Image”willbedeleted.
Evenwhen the entire folder is deleted, a newCB_Imagefolderwill be created automaticallywhenUSBmemory isusedagainwiththecaptureboard. Drag to the Recycle Bin
Disconnect the USB memoryThe disconnecting procedure depends on the computer’soperatingsystem.Fordetails,refertothecomputer’soperatinginstructionsorhelpfiles.
1. Click the [Hardware Removal] icon that is displayed in the task tray. Click “StopUSBMassstorageDevice -drive (E)”. (TheEdrivecharacterwilldifferdependingonthepersonalcom-putersystem.)
2. When the “USB mass storage device can be safelyremoved.”screenisdisplayed,clickthe display.
3. Click [X] to close.ThisallowstheUSBmemorydevicetobeunpluggedfromthecomputer.
Note• Do not disconnect theUSBmemory devicewhile theUSBmemorydevice’saccessindicatorisflashing.Doingsowilldamagethedata.
• TheUSB drivemay not be disconnected properly, forexampleifthecomputerisintheprocessofcheckingthestatusofperipherals.
“Remove hardware” icon (example)
Using USB Memory

E-21
When the captureboard and a computer are connected by USB cable, the captureboard is recognized as an external memory device (removable device). Below is the procedure for copying the “CBImage” file from this device onto the computer.Images can be stored in JPEG (.jpg), PNG (.png) or PDF (.pdf) format, selectable in the captureboard settings (“CB Setup”). (See pages E-31, E-38.) The factory default is “JPEG”.
CAUTIONWiththisfunction,iftheoperationfordisconnectingtheUSBconnectionbetweenthecapture-boardandcomputerisperformedorthecaptureboard’spoweristurnedoff,theimagedatainthecaptureboard’scomputerstoragememoryisdeleted.Besuretosaveimportantimagedataonthecomputer,etc.
Notice• Onlyonescreen’sworthofdatacanbestoredinthecaptureboard’smemoryforcomputerstorage. Whenthecaptureboard’ssaveoperationisperformedsuccessively,previousdataisoverwritten.• Donotstorecomputerdatainthecaptureboard’smemoryforcomputerstorage.• Thememoryforcomputerstoragecannotbeformattedfromacomputer.• DonotdisconnecttheUSBcableoraccessthecaptureboardwhiledataisbeingsavedafterpressingthecaptureboard’sSave button.Doingsowillcausethecomputer’soperationtobecomeunstable.
• Do not press operation buttons on the captureboardwhile the captureboard’smemory for computer storage is beingaccessedfromthecomputer.Doingsowillresultinincreasedtimeforresponsebetweenthecomputerandcaptureboard,andoperationsmaynotbepossible.
• WhenconnectedtoaMacintoshcomputer,thewarningmessage“Thediskwasnotejectedproperly.”isdisplayed,butthedatacanbestorednormallyinthecomputer’smemory.
Using the captureboard connected to a computer
• Onesheet’sworthof thescreen isscanned (scrolled)andstoring in thememory forcomputerstoragestartsoncescrollingstops.
TheLEDsonthedisplaywindowflashinacircularmotionduringsavinginthememoryforcomputerstorage.
LEDsflashincircularmotionduringsavinginmemoryforcomputerstor-age
Displaywindow
Press the Save button to store.
continued on next page
Turn on the captureboard’s power and connect the PC dedicated USB port (type B) and computer using the USB cable.• Usually,withWindowsXP/WindowsVista/Windows7,thestandarddriver is installedautomaticallyandthecapture-boardisidentifiedbythecomputerasaremovabledevice.
ToUSBportoncomputer(typeA)
USBcableincludedwithcaptureboard
Tocaptureboard’scomputerUSBport(typeB)

E-22
Using the captureboard connected to a computer
DragtoMyDocuments
Onthecomputer,open“MyComputer”,andfrom there open the captureboard identified as a removable device.(1) Double-click the “MyComputer” (or “Computer”) icon to
openit.(2) When thedevice icon for thecaptureboard (displayedasa
C-20)isdouble-clicked,thecaptureboard’sinternalmemoryopens.The“CBImage”fileisthescannedimagefile(“.jpg”,“.png”or“.pdf”,accordingtosetting).• The “setup” folder contains the simple network settingsfile.
(3) Copy the “CBImage” file to [MyDocuments], etc., on thecomputer(“.jpg”,“.png”or“.pdf”,accordingtosetting).
Todisconnect theUSBcable, followtheprocedure instep3onpageE-20.

E-23
Using the Captureboard Connected to a Network
When connecting to the network the first time(1) MakethesettingsoftheIPaddress,etc.,requiredforconnectingthecaptureboardtothenetwork.See“SimpleNetworkSet-
tings(viaUSB)”(pageE-33).(2) UseacommerciallyavailableLANcable(10Base-Tor100Base-TXstraightcable)toconnectthecaptureboard’sLANterminal
totheLANportonahub,etc.(3) Make thecaptureboard’snetworksettingsorFTPserversettings fromawebbrowser. (See“MakingDetailedSettings (via
LAN)”onpageE-35.)Ifyouplantostore imagefilesonanFTPserver,createthefolderforstoringthefilesontheFTPserver.Askyournetworkadministratorforinstructionsonsettingsandcreatingthefolder.
Notice• Besuretotransferimportantimagefilesstoredonthecaptureboarditselftoacomputer(databackup).Ifthecaptureboardshouldforsomereasonmalfunction,dependingonthemalfunctionthestoreddatamaybelostorbecomeimpossibletotransfer.NotethatPLUSwillacceptnoresponsibilitywhatsoeverforlossofdata,etc.
• Thecaptureboardwillnotoperateproperlyifthefirewallisactivated.
The following explanation assumes that the LAN cable has been connected and the various network settings have been completed.
Saving scanned images on the captureboard or FTP server
Preparations : Checkthatthepowerplugisconnectedtoawallpoweroutlet.
Press the Scroll/Stop button to display the image you want to save.
Theprocedurefordisplayingthesheetsurfacetobesaveisthesameasfortheprintingoperation.See“BasicPrintingOperation”onpageE-15.
Note• Whensaving,thevisibleimage(onescreen’sworth)issavedonthecap-tureboardorFTPserver.
• When“Board”(networkstoragememory)isselectedasthesavetoloca-tion,approximately100imagefilescanbesaved.
• Itmaynotbepossibletosavetheedgesofthesheetsurface.See“Aboutthescanningtolerancerange”onpageE-5.
Press the ON/Standby button to turn on the power.
Note• Whenturningonthepowerafterthepowerplughasbeenconnectedorthepowerhasbeen turnedoff (set to the standbymode),wait about5secondsormorebeforepressingtheON/Standbybutton.
• WhentheON/Standbybuttonispressedandthepowerturnson,thedis-playwindow’sLEDslight.
continued on next page

E-24
Press the Network button to save the image.
• Thescanningoperation(scrolling)isperformedoveronesheet’sworthofimage,andwhenscanningstopsthedataisstoredinthesavetolocationsetinthenetworksettings.
Forinstructionsonselectingthesavetolocation,see“NetworkSettings”onpageE-40.
Note• Dependingonthenetworkcommunicationsconditions,sometimemayberequiredforidentificationandstorage.• If“E8”flashes(forabout5seconds),“Invalid”issetat“SecuritySetting”→“NetworkStorage”.(SeepageE-42.)• If “L1” to “L5” flashes (for about 5 seconds), this indicates that the network settings are incorrect. (SeepageE-47.)
• If“FL”flashes(forabout5seconds),thereisnotenoughspaceinthesavetolocation.Deleteimagefilestopro-videspace.(SeepagesE-27andE-29.)
• IftheON/Standby buttonispressedduringthescanningoperation,savingisinterruptedandtheimagedatascanneduptothatpointissaved.
Tomovethesheetsurface,waituntilscrollingstops,thenpresstheScroll/Stopbutton.• WhentheNetwork buttonispressed,imagefilesarestoredsuccessivelyinthesavetolocation. Thecaptureboard’sdateandtimearerecordedasthedateandtimeofsavedfiles.Forinstructionsonsettingthetime,seepagesE-12,E-38.
LEDsflashincircularmotionduringsaving
[Displaywindow]
Whennotusingthecaptureboard,presstheON/Standby button to turn off the power (standby mode).
Using the Captureboard Connected to a Network

E-25
Transferring image files to/deleting them from the computer
Image files stored in the folder for saving (“Board” or “FTP Server”) can be transferred to your own computer.The operation differs according to the setting for where scanned images are stored. (See “Network Settings” on page E-40.)The image files are saved in JPEG (default), PNG or PDF format, according to the image format setting. (See “CB Setup” on pages E-31, E-38.)
The information below must be input to transfer the files.Ifyoudonotknowthisinformation,askyourcompany’snetworkadministrator.Logintothefolderforsaving(meaningconnecttothecommunicationspath):IPaddressofthecaptureboardorFTPserverVerificationscreen:Ifthefolderforsavingissetto“Board”…Usernameandpasswordregisteredat“UserSetting”.Ifthefolderforsavingissetto“FTPServer”…UsernameandpasswordregisteredontheFTPserver
When the folder for saving is set to “Board”Thescannedimagesaresavedonthecaptureboard.Theseimagesaredownloaded(transferred)ontothecomputerconnectedonthenetwork.Downloadingispossibleevenwhenthecaptureboardisinthestandbymode(butnotifthecaptureboard’spowerisnotconnectedtoapoweroutlet).
Launch the web browser on the computer and log into the captureboard.Inputthecaptureboard’sIPaddress,thenpressthe[Enter]key.• Upon shipment from the factory andwhen set to thedefaults,thecaptureboard’sIPaddresshasnotbeenset,sologginginisnotpossible.
Thetopmenuisdisplayed.
Click “Board File List” on the menu.Theverificationscreenopens.
• Nopasswordissetuponpurchase. Fortheusername,input“admin”,thenclickthe[OK]button.• Whenauserpassword isset, inputtheusername(casesensi-tive)andpassword(casesensitive),thenclickthe[OK]button.
Iftheusernameiscorrect,theverificationscreenclosesandthefilelistisdisplayed.
Note• We recommendsettingausernameandpassword topre-ventunwantedpersonsfromlogging in. (See“UserSetting”onpageE-41.)
Using the Captureboard Connected to a Network
continued on next page

E-26
Click the desired date.• Imagefilesaremanagedingroupsbydate(thedatethescannedimagefilesweresaved).Becauseofthis,displaythedatelist.
• Check that “Download” is selected for the [Download/Delete]selectionbutton.
When“▾” isclicked,apull-downlist isdisplayed.Click [Down-load].
Fromthefilelist,selecttheimagetobetransferredto the computer.Whentheradiobutton isclicked,itischecked andapreviewimageisdisplayed.
Download the image onto the computer.(1)Clickthe[Download]button.(2)Thecomputer’s“Saveas…”screenappears.(3)Selectthefolderforsaving,thenclickthe[Save]button. Downloadingstarts. Todownloadotherfiles,click“ReturntotheFileList”toreturntothefilelist,thenrepeatfromstep3.
Close the web browser.Clickthewebbrowser’sclosebutton([X])tocloseit.
[Download/Delete]selectionbutton
Using the Captureboard Connected to a Network
(“ReturntotheFileList”)[Download]button

E-27
Performsteps1,2and3onpageE-25todisplaythe file list screen.
Select [Delete].When“▾”on the [Download/Delete]selectionbutton isclicked,apull-downlistisdisplayed.Click[Delete].When[Delete] isselected,theradiobuttonsswitchtocheckboxes•.
Select the image file to be deleted.To select and delete individual files:Clickthecheckboxfortheimagefiletobedeletedtocheckit.
To delete all files:Click the [Select All] button. All the checkboxes are checked. Ifthere are several files you do notwant to delete, uncheck thecheckboxesforthosefiles.Touncheckthecheckboxesforallthefiles,click[CancelSelectAll]touncheckallthecheckboxes.
Note• Imagesarepreviewedwhentheirfilenameisclicked.• Check the scanned images using their preview imagesbeforedeletingthem.
Delete the file(s).Be sure to transfer important image files to a computer beforedeleting them (data backup).Once deleted, the files cannot beretrieved.When the [Delete]button isclicked, the image fileswhosecheck-boxesarecheckedaredeleted.• When “Invalid” is set at “DeleteUser ImageData” in “SecuritySetting”,themessage“Nodeleteauthority”isdisplayed,indicat-ing that the filescannotbedeleted. (See“SecuritySettings”onpageE-42.)
Deleting image files from the captureboardNotice• When“Invalid” issetat “DeleteUser ImageData” in “SecuritySetting”, filescannotbedeleted.Thiscanbechanged to“Valid”withtheadministrator’sauthority.(SeepageE-42.)
[Download/Delete]selectionbutton
[SelectAll]button [CancelSelectAll]button
Using the Captureboard Connected to a Network

E-28
When the folder for saving is set to “FTP Server”Whenthefolderforsavingissetto“FTPServer”,thescannedimagesaresavedontheFTPserverconnectedonthenetwork.Transfertheseimagesontothecomputerconnectedonthenetwork.ThefollowingexplainshowtotransferthefilesusingExploreronthecomputer.
Clickthecomputericonor,fromtheStartmenu,click “Computer”.Exploreropens.
Log in to the FTP server.ClickonExplorer’saddressfield,inputtheFTPserver’sIPaddressafter“ftp://”,thenpressthe[Enter]key.TheFTPserver’sverificationscreenopens.
Inputtherequiredfieldsontheverificationscreen.InputtheusernameandpasswordregisteredontheFTPserver,thenclickthe[LogIn]button.• Inputtheusername(casesensitive)andpassword(casesensi-tive),thenclickthe[LogIn]button.
Iftheusernameandpasswordarecorrect,theverificationscreenclosesandthefilelistisdisplayed.
Transfer the image file(s) to the computer.From the FTP server’s screen listing the folders/files, select thedesiredfolder(s)orimagefile(s),right-clickthemousetodisplayapull-downmenu,select“Copy”,thencopythefolder(s)orfile(s)toMyComputer,etc.Copyingisalsopossiblebyclickinganddragging.
Close the Explorer window.Click the close button ([X]) on the Explorer window to closeExplorer.
Using the Captureboard Connected to a Network

E-29
Note
• LoggingintotheFTPserverfromawebbrowserTheprocedureisthesameasfor“Whenthefolderforsavingissetto“Board””onpageE-25.However,tologin,inputtheFTPserver’sIPaddress(input“ftp://”,theninputtheIPaddress),andattheverificationscreeninputtheusernameandpasswordregisteredontheFTPserver.
Deleting image files on the FTP serverAtstep4onthepreviouspage,selectthefolder(s)orimagefile(s)tobedeleted,right-clickthemousetodisplayapull-downmenuandselect“Delete”.Attheverificationscreen,click“Yes”.Thefolder(s)orfile(s)aredeleted.
Iffolder(s)orfile(s)cannotbedeleted• IsaccesstotheFTPserver’sfolderrestricted?
Notice• BeverycarefulwhendeletingfoldersorfilesfromtheFTPserver.• Checkagainbeforedeletingtoavoidaccidentallydeletingotherfoldersorfiles.
Using the Captureboard Connected to a Network

E-30
There are three ways to make the device settings: using the captureboard’s operation buttons to make the set-tings (“CB Setup”), making the settings using a USB connection (simple network settings, and making the set-tings via LAN (detailed settings: “CB Setup” and “Network Setting”.
CB Setup (operating the captureboard’s buttons)
Basic setting operation• Checkthatthepowerison(thatthedisplaywindowislit).• Wheninthe“CBSetup”mode,thecaptureboardwillreturntothenormalmodeifnobuttonsareoperatedfor10seconds,sooperatethebuttonswithin10seconds.
CB Setup and Network Setting Procedure
Switch to the CB Setup mode.WhilepressingtheON/Standby button,presstheNumber ofCopies button, then releasetheON/Standby button. The captureboardswitchestotheCBSetupmode.“F1”appearsonthedisplaywindow.“F1” is the time setting. For instructionson thetimesetting,seepageE-12.
Select“thefunctionnumber”,thenpress the Save button.Press the Number of Copies button (thefunction switches each time the button ispressed, returning to F1 after FA) to select thedesiredfunctionnumber,thenpresstheSave buttontosetthatfunctionnumber.Fortheitemnamesofthefunctionnumbers,seethe “Table of FunctionNumbers andSettings”onthefollowingpage.• When the Save button is pressed, thefunctionnumber tobechanged is set andadotlights(ex.:“F6.”).
Select“thesetting”,thenpresstheSave button.PresstheColor PrintorB/WPrint button,check thesetting, thenpress theSave but-tontoset.CheckthesettingaccordingtowhethertheUSBandPrinter Status indicators are lit or off. Seethe “Table of FunctionNumbers andSettings”onthefollowingpage.
Exit the CB Setup mode.PresstheON/Standby button.Thecapture-boardreturnstothenormalmode.The displaywindow returns to the number ofcopiesdisplay.
CBSetupmode
Dotlit
Normalmode

E-31
Table of Function Numbers and SettingsFunctionNumber
SettingItem Description Setting StatusIndicators
TimeSettingThedateandtimearestampedontheprintingpaperand recorded in the file informationwhen files arestored.
Year,month,day,hours,minutes
Notlit
PaperSize
SelectionofwhethertoprintinA4papersizeorlettersize.• Thisoperateswhenthecaptureboardisconnectedtoaprinter.
A4* USB (Lit)
Printer (Off)
Letter USB (Off)
Printer (Lit)
AspectRatioSet-ting
Selection of the image’s vertical-to-horizontal ratio(aspectratio)whenprinting.EqualRatio:Theimageisprintedwiththesameratio
asthecaptureboard’ssheetsurface.Compressed:The image is compressed in the hori-
zontal direction to the ratio of A4 orlettersizepaperforprinting(ex:circlesbecomeellipses).
Compressed* USB (Lit)
Printer (Off)
EqualRatio* USB (Off)
Printer (Lit)
ColorPrinting
Ifthisissetto[Invalid],colorprintingisnotpossible.Valid:Whenthisisset,colorprintingispossible.Invalid:Whenthisisset,colorprintingisnotpossible.
Valid* USB (Lit)
Printer (Off)
Invalid USB (Off)
Printer (Lit)
Resolution
Selectionoftheimagefile’sresolution.Standard:Thevertical/horizontalsizeof thescanned
image is set to 1/2. The amount of datais 1/4 that of when “High Resolution” isselected.
HighResolution:Theimagefilehasthesameresolu-tionas thescanned image (vertical/horizontal size of 1/1). The picturequality is better thanwhen “Stan-dard”isselected.
Standard USB (Lit)
Printer (Off)
HighResolu-tion
USB (Off)
Printer (Lit)
GraphicsFileFormat
Selectionoftheformatinwhichimagefilesaresaved.ScannedimagesareconvertedintoJPEG(extension“.jpg”), PNG (extension “.png”) or PDF (extension“.pdf”)format.
JPEG* USB (Lit)
Printer (Off)
PNG USB (Off)
Printer (Lit)
PDF USB (Lit)
Printer (Lit)
Header/Footer
Settingofwhetherornottooutputtheheader/footerinformationregisteredonthecaptureboard.“Off”:Theheader/footerinformationisnotoutput.“On”: The header/footer information is outputwhenprintingandwhensavingimagefiles.
Note:• Headersandfootersrefertotheinformationatthetop and bottommargins, respectively, of printedpagesor images.Titles,companynamesorothercharacters or images canbe inserted so that thesameinformationisprovidedonallpages.
• For instructions on creating and registering head-ers and footers, see “Creating and RegisteringHeadersandFooters”(pageE-45).
• Dependingon the type of printer, the colorsmaydifferfromtheactualgraphicimage.
Off* USB (Lit)
Printer (Off)
On USB (Off)
Printer (Lit)
CB Setup and Network Setting Procedure
continued on next page

E-32
CB Setup and Network Setting Procedure
FunctionNumber
SettingItem Description Setting StatusIndicators
EraseReminder
Settingofwhetherornottonotifytheuserthatchar-acters or diagrams drawn on the back side of thecaptureboard’ssheetsurfacehavenotbeenerased.Thisiseffectiveforconfidentialmeetings,etc.Disable:TheEraseReminderfunctiondoesnotwork.
(Settinguponfactoryshipment)Enable:When theON/Standbybutton is pressed to
turnthepoweroff,thedisplaywindowonthecaptureboard’s operation panel flashes andthecaptureboardautomaticallymovestothenon-erased surface, afterwhich the powerturnsoff.
• TheEraseReminder functionmaynotworkprop-erly due to dirt on the sheet adhesive ormarkertraces.
Disable* USB (Lit)
Printer (Off)
Enable USB (Off)
Printer (Lit)
TimeDayStampFormat
Selectionoftheformatinwhichthedateandtimearedisplayed.Examplesofdisplays:YYYY/M/D 2011/1/2301:23DD-MMM-YYYY 23-Jan-201101:23MMM-DD-YYYY Jan-23-201101:23
YYYY/M/D* USB (Lit)
Printer (Off)
DD-MMM-YYYY
USB (Off)
Printer (Lit)
MMM-DD-YYYY
USB (Lit)
Printer (Lit)
Printfromcap-tureboardprinter
Printingispossiblefromtheprinterconnectedtothecaptureboardusingthecomputer.Disable:Setting for disablingprinting from the com-
puterEnable:Setting for enabling printing from the com-
puter* Use theCD-ROM includedwith thecaptureboardtoinstallthedriver.
Disable* USB (Lit)
Printer (Off)
Enable USB (Off)
Printer (Lit)
ResetDeviceSet-tings
This restores thecaptureboarddevicesettingsatF2to F9 to their defaults (settings upon factory ship-ment).Thesettingsmarked“*”arethedefaults.(1) SelectFA,thenpresstheSave button.“FA.”
isdisplayed(withthedotlit).(2) PresstheSave buttonagain.Thesettingsare
reset.
— — —

E-33
Simple Network Settings (via USB)
Uponpurchase(bydefault),thecaptureboard’sIPaddressandsubnetmaskarenotyetset.Whenfirstconnectingthecaptureboardtoanetworktouseit,usethesimplenetworksettingstosetthecaptureboard’sIPaddressonthenetworkfollowingtheprocedurebelow.
Notice• Whenmakingnetworksettings,followingtheinstructionsofthenetworkadministrator.• Itisnotpossibletoformatthecomputerstoragememoryfromthecomputer.• Donotpressoperationbuttonsonthecaptureboardwhilethecomputerstoragememoryisbeingaccessedfromthecom-puter.Doingsowillresultinincreasedtimeforresponsebetweenthecomputerandcaptureboard,andoperationsmaynotbepossible.
Turn on the captureboard’s power and connect the captureboard’s computer USB port for (type B) to the computer using a USB cable.• Normally,onWindowsXP/WindowsVista/Windows7, thestandarddriver is installedautomaticallyand thecapture-boardisrecognizedbythecomputerasaremovabledevice.
Open“MyComputer”,andinthisopenthecaptureboard(removabledevice).1 Double-clickthe“MyComputer”(or“Computer”)icontoopen.2 Double-clickthecaptureboard(adevicedisplayedasaremovabledisk)toopenthecaptureboard’scomputerstoragememory.• Tocheck that thecaptureboard isoperatingasadevice, right-click“MyComputer” (or “Computer”) todisplay themenu,thencheckthat“PLUSCaptureboardUSBDevice”isdisplayedasthediskdrivenameat“Management”→“DeviceManager”forWindows7(“Properties”→“DeviceManager”forWindowsXP).
Useaprogramonthecomputer(Notepad,etc.)toopenthe“setting.ini”fileinthe“setup”folder.1 Double-clickthe“setup”foldertoopenit.2 Open the“setting.ini” file (text format) located in this folderusingNotepadoranotherprogramon thecomputeranddirectlyoverwritethecontentsofthesettingsfile.• Theonlycharactersthatcanbeinputarenumbersandperiods. Donotinsertanyspaces.Ifso,thefilewillbeidentifiedascorruptwhenthecaptureboardisstartedandthesettingswillberesettothedefaults.
CB Setup and Network Setting Procedure
ToUSBportoncomputer(typeA)
USBcableincludedwithcaptureboard
Tocaptureboard’scomputerUSBport(typeB)
continued on next page
E-34
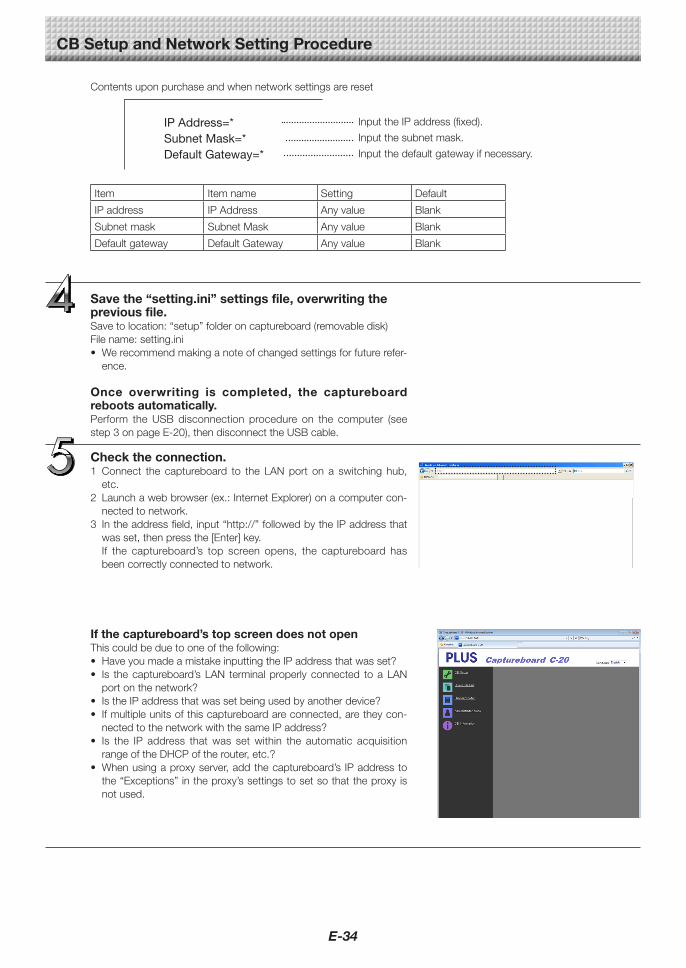
IP Address=*Subnet Mask=*Default Gateway=*
InputtheIPaddress(fixed).
Inputthesubnetmask.
Inputthedefaultgatewayifnecessary.
Contentsuponpurchaseandwhennetworksettingsarereset
Item Itemname Setting Default
IPaddress IPAddress Anyvalue Blank
Subnetmask SubnetMask Anyvalue Blank
Defaultgateway DefaultGateway Anyvalue Blank
Savethe“setting.ini”settingsfile,overwritingtheprevious file.Savetolocation:“setup”folderoncaptureboard(removabledisk)Filename:setting.ini• Werecommendmakinganoteofchangedsettingsforfuturerefer-ence.
Once overwriting is completed, the captureboardreboots automatically.Perform theUSB disconnection procedure on the computer (seestep3onpageE-20),thendisconnecttheUSBcable.
Check the connection.1 Connect the captureboard to the LANport on a switching hub,etc.
2 Launchawebbrowser(ex.:InternetExplorer)onacomputercon-nectedtonetwork.
3 Intheaddressfield,input“http://”followedbytheIPaddressthatwasset,thenpressthe[Enter]key.If the captureboard’s top screen opens, the captureboard hasbeencorrectlyconnectedtonetwork.
If the captureboard’s top screen does not openThiscouldbeduetooneofthefollowing:• HaveyoumadeamistakeinputtingtheIPaddressthatwasset?• Is thecaptureboard’sLAN terminalproperly connected toaLANportonthenetwork?
• IstheIPaddressthatwassetbeingusedbyanotherdevice?• Ifmultipleunitsofthiscaptureboardareconnected,aretheycon-nectedtothenetworkwiththesameIPaddress?
• Is the IP address thatwas setwithin the automatic acquisitionrangeoftheDHCPoftherouter,etc.?
• Whenusingaproxyserver,addthecaptureboard’sIPaddresstothe“Exceptions”intheproxy’ssettingstosetsothattheproxyisnotused.
CB Setup and Network Setting Procedure

E-35
Making Detailed Settings (via LAN)
Use thisprocedure tomake thecaptureboarddevicesettings (“CBSetup”),networksettings,etc.,with thecaptureboardcon-nectedtoalocalareanetwork(hereafterreferredtoas“LAN”or“thenetwork”)usingacomputer’swebbrowser.
Accessauthority isrequiredtomakethedetailedsettings.Therearethree levelsofauthority–“administratorauthority”,“file listbrowsingauthority”and“noauthority”,andtheselectablemenuitems(somesettingitems)arerestrictedaccordingly.Registertheadministratorandusersat“UserSetting”onpageE-41.
Table of Menu Items and Access Authority Levels
MenuItem SomeSettingItems AdministratorAuthority FileListBrowsingAuthority
NoAuthority
CBSetup • • •BoardFileList PreviewandDownload • • —
Delete • — —
Header/Footer • • •AdministratorMenu
NetworkSetting • — —
UserSetting • — —
SecuritySetting • — —
DiskmanagementSetting • — —
CBInformation • • •
•mark:Accessible:—mark:Notaccessible* Whenthe“DeleteUserImageData”securitysettingissetto“Valid”,deletingispossiblewithfilelistbrowsingauthority.
Notice• Whenconnecting thecaptureboard to thenetwork,besure toconsult thenetworkadministratorbeforemaking theset-tings.
Note• Dependingonthenetworkbeingused,thedisplayspeedandbuttonresponsemaybeslowandoperationsmaynotbeperformed. If this happens, consult your network administrator. Also, the captureboardmay not respond if buttons areoperatedsuccessively.Inthiscase,waitawhilethenoperateagain.Ifthereisnoresponseafterawhile,turnoffthecapture-board’spower,thenturnthepowerbackon.
• Ifthetopscreendoesnotdisplaywithawebbrowser,pressthe[Ctrl]+[F5]keystorefreshthewebbrowser’sscreen.• ThecaptureboardusesJavaScriptandcookies.Setthewebbrowsersothatthesefunctionswilloperate.• Thecaptureboardperformsautomaticpagereading(redirecting).Setthewebbrowsersothatthisfunctionwilloperate.
Basic Setting OperationsHereweexplainhowtodisplayandclosethesettingsscreens,usingtheInternetExplorerwebbrowserasanexample.Preparations:1.UseaLANcabletoconnectthecaptureboard’sLANterminaltotheLANportontheswitchinghub.2.Turnonthecaptureboard’spower.
*
Launch the web browser on the computer con-nected to the network.“Pagecannotbedisplayed”mayinsomecasesappear,butsimplycontinuetothenextstep.
CB Setup and Network Setting Procedure
continued on next page

E-36
Input the captureboard’s IP address.In thewebbrowser’sURL field, input “http://” followedby thecap-tureboard’sIPaddress,thenpressthe[Enter]key.Whenthecaptureboardisconnected,thetopscreenappears.
Connecting the captureboard to the network upon purchaseUponpurchase,thecaptureboard’sIPaddressandsubnetmaskarenotyetset.Besure tocheckthesection“SimpleNetworkSettings(viaUSB)”(seepageE-33)andsettheIPaddress,etc.
Fromthemenu,clickthedesiredsettingitem.Whensettingitemsforwhichverificationarerequiredareclicked,theuserverificationscreenisdisplayed.Inputtheusernameandpassword,thenclickthe[OK]button.• Nopasswordissetuponpurchase.Fortheusername,input“admin”,thenclickthe[OK]button.
• At theuserverificationscreen, theadministrator’susernameandadministrator’spasswordcanalsobeusedforverification.
Onceverificationisvalidated,thedesiredpageisdisplayed.Seetherespectivepagesinthismanualforexplanations.CBSetup(pageE-38)BoardFileList(pageE-25)Header/Footer(pageE-39)AdministratorMenuCBInformation(pageE-43)
Click“AdministratorMenu”tochangethesettingsbelow.Themenucanbeaccessedwithadministratorauthority.NetworkSetting(pageE-40)UserSetting(pageE-41)SecuritySetting(pageE-42)DiskmanagementSetting(pageE-43)
1.Click“AdministratorMenu”.Theadministratorverificationscreenappears.
2.Inputtheadministrator’susernameandadministrator’spassword,thenclickthe[OK]button.• Nopasswordissetuponpurchase.Fortheusername,input“admin”,thenclickthe[OK]button.Once verification is validated, the administrator authoritymenu isdisplayed.Clickthedesiredmenuitemtodisplaythesettingspage.
Note• Theusernameandpasswordarecasesensitive.Besure toinputthemproperly.
CB Setup and Network Setting Procedure
E-37
CB Setup and Network Setting Procedure
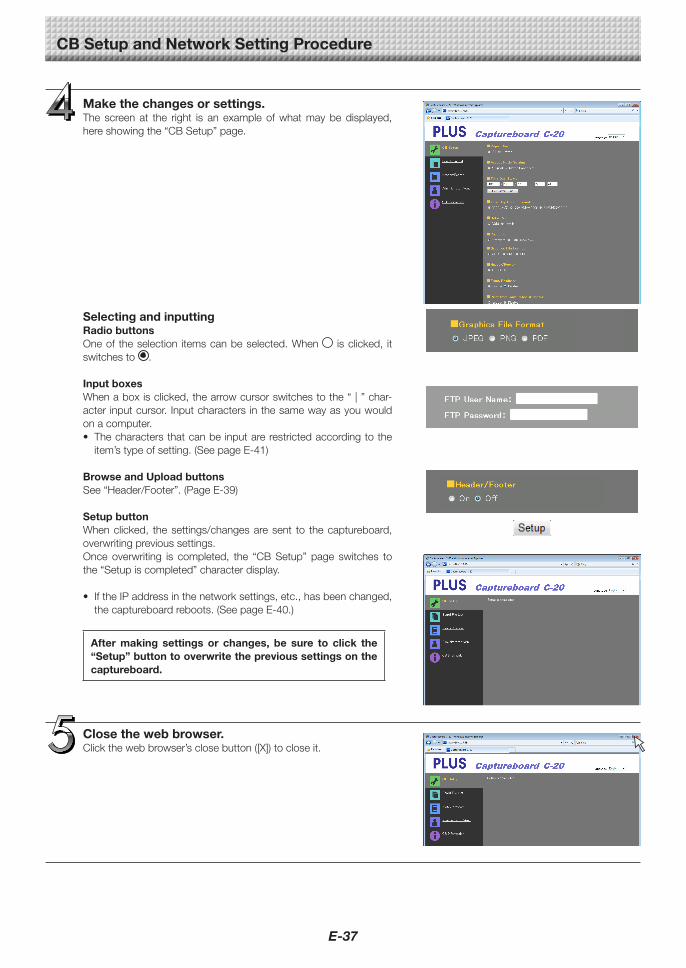
Close the web browser.Clickthewebbrowser’sclosebutton([X])tocloseit.
Make the changes or settings.The screen at the right is an exampleofwhatmaybedisplayed,hereshowingthe“CBSetup”page.
Selecting and inputtingRadio buttonsOneof theselection itemscanbeselected.When isclicked, itswitchesto .
Input boxesWhenaboxisclicked,thearrowcursorswitchestothe“|”char-acterinputcursor.Inputcharactersinthesamewayasyouwouldonacomputer.• Thecharactersthatcanbeinputarerestrictedaccordingtotheitem’stypeofsetting.(SeepageE-41)
Browse and Upload buttonsSee“Header/Footer”.(PageE-39)
Setup buttonWhenclicked, thesettings/changesaresent to thecaptureboard,overwritingprevioussettings.Onceoverwriting is completed, the “CBSetup”page switches tothe“Setupiscompleted”characterdisplay.
• IftheIPaddressinthenetworksettings,etc.,hasbeenchanged,thecaptureboardreboots.(SeepageE-40.)
After making settings or changes, be sure to click the“Setup” button to overwrite the previous settings on the captureboard.

E-38
CB SetupThisisthepagewherethecaptureboard’svariousfunctionsaresetandchanged.Thesettingsarethesameason“TableofFunc-tionNumbersandSettings”inthesectiononmakingthesettingsoperatingthecaptureboard’sbuttons.(Forinstructionsondis-playingthescreen,see“BasicSettingOperations”step3onpageE-36.)
CaptureboardSettingItem Setting/Description Default
Papersize Selecttheprintingpapersize. A4
AspectRatioSetting Selecttheaspectratioforprinting. Matchtoprintingpapersize
TimeDateStamp Setthecaptureboard’sdateandtime.Inputasfollows:Year:4digits,Month:2digits(Ex.:03forMarch),Day:2digits(Ex.:06
forthe6th),Hours:2digitsin24-hourmode(Ex.:14for2pm,06for6am),Minutes:2digits(Ex.:00for0minutes)• Donotinsertspaces.Ifthedateandtimesettingvaluesareincorrect,anerrormessageisdisplayed.
GetCurrentTime:Whenthe“GetCurrentTime”button isclicked,thedisplayswitchestothecomputer’scurrent time.Thiseliminatestheneedtomakethecur-rentdateandtimesetting.
ColorPrinting ColorprintingcanbesettoValidorInvalid. Valid
Resolution Selecttheresolutionatwhichscannedimagesaresaved. Standard
GraphicsFileFormat Selecttheformatinwhichscannedimagesaresaved. JPEG
Header/Footer Setwhetherornottooutputtheheader/footerinformationregisteredonthecaptureboard.
Disable(Off)
EraseReminder Settheerasereminderfunction. Disable
Printfromcaptureboardprinter
Enablesprinting from theprinter connected to thecaptureboardusingthecomputer.
Disable
Setup Whenthe[Setup]buttonisclicked,theabovesettings/changesaresenttothecaptureboard,overwritingprevioussettings.Once overwriting is completed, the “CBSetup” page switches to the“Setupiscompleted”characterdisplay.
CB Setup and Network Setting Procedure

E-39
Header/FooterThisisthescreenforregisteringheadersandfootersonthecaptureboardandcheckingtheimage.(Forinstructionsondisplayingthescreen,see“BasicSettingOperations”step3onpageE-36.)
ImageSelectscreen Previewscreen
ImageSelect/PreviewItem Setting/Description Default
SelectHeader/FooterImage
Selectwhether the image to be registered on the captureboard is aheaderorfooter.Clicktheradiobuttonstoselect.• Forinstructionsoncreatingimages,seepageE-45.
Header
Browse When the [Browse] button is clicked, the computer’s “Browse Files”screenopens.Selecttheimage,thenclickthe[OK]buttontosetit.
—
Upload Thisuploadstheselectedheaderorfooterimagetothecaptureboard.Whenthe[Upload]buttonisclicked,uploadingstarts.• If an image is already registeredon the captureboard, that image isoverwritten.
—
Preview Thisdisplaysapreviewoftheheaderorfooter imageregisteredonthecaptureboard.
—
CB Setup and Network Setting Procedure

E-40
Network SettingMakethesettingsforthecaptureboard’sIPaddress,theFTPserver’sIPaddress,etc.(Forinstructionsondisplayingthescreen,see“BasicSettingOperations”step3onpageE-36.)
NetworkSettingItem Setting/Description Default
IPaddress Change thecaptureboard’s IPaddress.Usea fixed IPaddress for thecaptureboard.WhenconnectingtoanetworkusingtheDHCPofarout-er,etc.,change the IPaddress toone that isoutsideof theautomaticacquisitionrange
Anyvalue
SubnetMask Setthecaptureboard’ssubnetmask. Anyvalue
DefaultGateway Setthecaptureboard’sdefaultgateway. Anyvalue
Folderforsaving Setthefolderinwhichthecaptureboard’sscannedimagesaresaved.Board:Theimagesaresavedonthecaptureboard.FTPServer:The images are saved in the specified folder on the FTP
server.
Board
FTPUserName This is theusernameregisteredontheFTPserver.This is requiredforthecaptureboardtologintotheFTPserverandsaveimagefiles.
Blank
FTPPassword ThisisthepasswordregisteredontheFTPserver.ThisisrequiredforthecaptureboardtologintotheFTPserverandsaveimagefiles.
Blank
FTPServerIPAddress InputtheFTPserver’sIPaddress. Blank
FTPServerPort ThisistheFTPserver’sstandardcontrolportnumber.Normallyusewiththisnumber.IftheFTPserver’sportnumberhasbeenchanged,changethisfollowingtheinstructionsofthenetworkadminis-trator.
21
FTPSaveDirectoryName InputthenameofthesubfolderintheFTPserverfolderinwhichimagefilesaresaved.
Blank
Setup Whenthe[Setup]buttonisclicked,theabovesettings/changesaresenttothecaptureboard,overwritingprevioussettings.Onceoverwritingiscompleted,thedisplayswitchestothe“Setupiscompleted.Rebooting.Waitforawhile.”characterdisplay.IftheIPaddress,subnetmaskordefaultgatewayhavebeenchanged,thecaptureboardautomaticallyreboots.Duringrebooting,thecaptureboard’sdisplaywindowLEDsflashincircu-larmotion.Waituntiltheyturnoff.
—
CB Setup and Network Setting Procedure

E-41
User SettingSettheusernameandpasswordrequiredforadministratoranduserverificationandthenumberrequiredforresettingthenetworksettings.(Forinstructionsondisplayingthescreen,see“BasicSettingOperations”step3onpageE-36.)
UserSettingItem Setting/Description Default
AdminUsername Settheadministrator’susername.• Inputusingnomorethan14characters.Thenamewillbecasesensi-tiveforverification.
admin
AdminPassword Settheadministrator’spassword.• Inputusingnomore than14characters.Thepasswordwillbecasesensitiveforverification.
None
UserName Settheusername.Thelimittothenumbercharactersthatcanbeinputisthesameasfortheadministrator’susername.
admin
Password Setthepassword.Thelimittothenumbercharactersthatcanbeinputisthesameasfortheadministrator’spassword.
None
NetworkResetNo. This is the number used for resetting the network settings. (SeepageE-44)Note:Besure tocopydown thisnumber. Itwillbe required if you forget theadministrator’spassword.
—
Setup Whenthe[Setup]buttonisclicked,theabovesettings/changesaresenttothecaptureboard,overwritingprevioussettings.Onceoverwritingiscompleted,the“CBSetup”pageswitchestothe“Setupiscompleted.”characterdisplay.
—
CB Setup and Network Setting Procedure
Note• Copydowntheusersettingsincaseyoushouldforgetthem.
AdminUsername □□□□□□□□□□□□□□AdminPassword □□□□□□□□□□□□□□UserName □□□□□□□□□□□□□□Password □□□□□□□□□□□□□□NetworkResetNo. □□

E-42
Security SettingThesesecuritysettingscanbemadetorestrictaccesstosettingitems.Forthispage,thesecuritysettingspagecannotbedisplayedunless[AdministratorMenu]isclickedandtheadministrator’susernameandpasswordareinputontheverificationscreen.(Forinstructionsondisplayingthescreen,see“BasicSettingOperations”step3onpageE-36.)
SecuritySettingItem Setting/Description Default
USBMemory SetwhetherornottoenableordisablesavingonUSBmemorydevices. Valid
PCconnection(USB) Setwhether or not to enable or disable saving in a computer storagememory.
Valid
NetworkStorage Setwhetherornottoenableordisabletransferofimagefilestonetworkstorage(folderforsaving:“Board”or“FTPServer”)toacomputerorFTPserver.Notice:• When set to “Invalid”, the network storagememory is formatted.Transferimportantimagefilestoacomputerbeforesettingthis.
Valid
DeleteUserImageData Setwhethertoenableordisablethefilelist“Delete”functionwithfilelistbrowsingauthority.Whensetto“Invalid”,theimagefilesstoredonthecaptureboardcannotbedeleted.
Valid
Setup Whenthe[Setup]buttonisclicked,theabovesettings/changesaresenttothecaptureboard,overwritingprevioussettings.Once overwriting is completed, the “CBSetup” page switches to the“Setupiscompleted.”characterdisplay.
—
CB Setup and Network Setting Procedure

E-43
CB Setup and Network Setting Procedure
Disk management SettingTheamountofdiskspaceusedcanbechecked,thediskcanbecheckedandthediskcanbeformattedhere.(Forinstructionsondisplayingthescreen,see“BasicSettingOperations”step3onpageE-36.)
DiskManagementSettingItem
Setting/Description Default
DiskUsage Thisdisplaystheamountofnetworkstoragememoryused(inpercent-age).
—
DiskCheck Whenthe[DiskCheck]button isclicked,checkingofthenetworkstor-agememory starts.When checking is completed, the results of thecheckaredisplayed.Ifawarningisdisplayed,formatthedisk.
—
DiskFormat Whenthe[DiskFormat]buttonisclicked,thediskisformatted.Notice:• Transferimportantimagefilestoacomputerbeforeformatting.
—
CB InformationThisdisplaysthecontentsofthedetailedsettingsmadeonthecaptureboardandthecaptureboard’sfirmwareversion.Notethatthepasswordsarenotdisplayed.(Forinstructionsondisplayingthescreen,see“BasicSettingOperations”step3onpageE-36.)

E-44
Resetting the Network SettingsOperatethebuttonsonthecaptureboardtoresetthenetworksettingstotheirdefaults.
Settingitemsthatarereset:AdminUsername,AdminPassword,UserName,Password,IPAddress,SubnetMask,DefaultGate-way,Folderforsaving,FTPUserName,FTPPassword,FTPServerIPAddress,FTPServerPort,FTPSaveDirectoryName
Notice• Oncereset,thenetworksettingscannotberestored.
1. While pressing the ON/Standby button,presstheNetwork button.Thecaptureboardswitchesto thenetworksettingsresetmodeand“00” flashesonthedisplaywindow.
2. Press the Color Print (Increase) or B/W Print (Decrease) button to display the network reset number.• The network reset number can be viewedwhenUser Setting is selectedwithadministratorauthority.
ThedisplayswitchesasfollowseachtimetheColorPrint(Increase)buttonispressed:01→02→……→99→00→01ThedisplayswitchesasfollowseachtimetheB/WPrint(Decrease)buttonispressed:99→98→……→01→00→99
3. Press the Save button to enter.Tocancel,presstheON/Standby button.Whentheresetnumbermatches,“LA”flashesfor5secondsonthedisplaywindow,thenthecaptureboard’snetworksettingsareoverwrittenwiththedefaultvaluesandthecaptureboardautomaticallyreboots.
If “LE” flashes for 5 seconds then stops flashing, remaining lit, the reset number iswrong.• PresstheON/Standby buttontocancel,thenstartoverfromstep1.
CB Setup and Network Setting Procedure

E-45
Creating and Registering Headers and FootersTheheader/footerfunctionallowsyoutosuperimposeyourcompanyname,logo,etc.,atthetoporbottomofscannedimagesforprintingordisplay.Thedateandtimeareprintedatthetoprightoftheheader.
Creating header and footer imagesUseyourimagesoftwaretocreateaJPEGfile.Create the image with the resolutions below.Max.sizeforheaderimages:1248×110dots* Imageformat:JPEGMax.sizeforfooterimages:1248×40dots Imageformat:JPEG* Thisissometimesexpressedas“pixels”.
Note• Evenforimagedatawhoseresolutioniswithintheallowablelimits,itmayhappenthatthetopandbottomoftheimagearenotdisplayed.
Image display positionImages are displayed at roughly the center in the horizontal direction. In the vertical direction they are positioned next to thescannedimagearea.Considerthiswhencreatingimageswithlessthanthemaximumsize.
Suggestions on creating imagesScanthelogodatawithanimagescanner,savethisonthecomputerasimagedata,thencroporreduceitssizetofitwithinthespecifiedresolutionandsavethisnewdata.UseWindowsPaint,etc.,topasteimages,inputcharacters,etc.,tocreatetheimage.Whensaving,saveinJPEGformatwithasizewithinthemaximumsize.
Registering created images on the capture-boardExample:Hereweexplainhowtoregisteraheaderimage.Usethesameproceduretoregisterfooterimages.
1.Open the “Header/Footer” screen atDetailedSettings (viaLAN).(SeepageE-35.)
2.Header/FooterImageSelect• Whenapreview isselected,click “ImageSelect”on thesubmenu.
Clickthe“Header”radiobutton.3.Selecttheheaderimageyouhavecreated.Clickthe[Browse]buttontodisplaythecomputer’s“BrowseFiles”screen.Select the image file to be registered as the header, thenclickthe[OK]button.Thefilenameisdisplayed.
4.Click the [Upload]button toupload the image to thecap-tureboard.Whenuploading iscompleted,“Completedsuccessfully” isdisplayed.Atthistime,“HF”flashesonthecaptureboard’sdisplaywin-dow(for5seconds,afterwhichitstopsflashing,remaininglit).If“Datasizeistoolarge”isdisplayed,theimagecannotberegistered.Closethewebbrowser,thenadjusttheimagefile’ssize.
Note• Whenheadersor footersare registered, theheader/footerfunctionissetto“Enable”.
Click“Preview”tochecktheregisteredimage.Thiscompletesregistration.Closethewebbrowser.
CB Setup and Network Setting Procedure

E-46
Captureboard (main unit) related errors
ErrorDisplayNumber ProblemandSolution
Printernotcon-nectedNoprintingpaperPrinterproblem
• Istheprintercableconnected?• Ispowerbeingsuppliedtotheprinter?• WhentheprinterusesanACpoweradapt-er,isthecabledisconnectedsomewhere?
• Connect the printer properly and switchontheprinterpower.
• Haspaperbeensetintheprinter? • Turnthepoweroftheprinteroffandthenonagain,andloadtheprinterwithA4orlettersizepaper.
• Istheprintererrorindicatorflashing(orlit)? • Readtheprinterinstructionmanual.
USBMemorynotrecognized
• IstheUSBmemoryunformatted. • This unit supports the FAT and FAT 32formats. Perform the formattingwith thepersonalcomputer.
• IsaUSBmemory that isnotsupportedbythecaptureboardbeingused?
• ThefileformatsforUSBmemorydevicesthat can be used on this captureboardareFATandFAT32.
• IstheUSBmemorydevicepluggedinfully? • Please check the operationwith a per-sonalcomputer.
• IstheUSBmemorydamaged? —
Memorystorageproblem
• Anerroroccurredduringmemorystorage. • Pleaseperformmemorystorageagain.• DonotinsertorremovetheUSBmemoryduringprocessing.
Readingproblem • There is a lighting fault of the reading lightsource,orareadsignalerror.
• Unplug the power plug from the poweroutletandthenplugitinagain.
Systemerror • Thereisamemoryorinternalfault. • Unplug the power plug from the poweroutletandthenplugitinagain.
Securityprotec-tion
• The operation is set to “Disable” in thesecuritysettings.
• Changethesettingofthedesireditemto“Enable”.(SeepageE-42.)
Colorprintingprohibited
• Coloringprintingissetto“Disable”. • Change the color printing setting to“Enable”.(SeepagesE-31,E-38.)
USBmemorynotconnected
• USBmemorydeviceisnotpluggedintothemainunit.
• Plug the USBmemory device into theUSBport.
Memoryisfull • Thereisnoavailablespace. • Please delete unnecessary data usinga personal computer (See Page E-19,E-27).
Anunsupportedprinteriscon-nected
• Aprinter that isnotsupportedby thecap-tureboardhasbeenconnected.
• Press the ON/Standby button andswitch off the power.When a record isrequired, switch on thepower and savetoUSBmemory.
Timesettingerror • An error has occurred when setting thetime.
• Start over and set the proper date andtime.
When the “USb” letter display isflowing...Warning that disconnec-tionofUSBmemoryhasbeenfor-gotten
• Did you press theON/Standby buttonwhiletheUSBmemorydevicewaspluggedintothemainunit?
• AUSBmemory device is plugged intothemain unit.When the USBmemorydevice is disconnected, the powerwillbeswitchedoffandtheunitwillenterthestandbymode.
Iftheproblempersists,pleasecontactyournearbyPLUSCorporationsalesoffice,dealer,orstore.
Meaning of Error Messages
If any of the following flashing indications appear in the display window of the control panel, please check the matters described below. Error messages flash for 5 seconds, then stop flashing, remaining lit.

E-47
Network (main unit) related errors
ErrorDisplayNumber ProblemandSolution
LANcabledis-connected
• NocableisconnectedtotheLANterminal. • ConnecttheLANcableproperly.
FTPserverrec-ognitionerror
• Theusernameorpasswordiswrong. • Input the correct user name and pass-word.(SeepageE-40.)
FTPservercon-nectionfailure
• TheFTPserver’sIPaddressiswrong. • Consult the network administrator thenset the FTP server’s IP address. (SeepageE-40.)
FTPserverwrit-ingfailure
• ThereisnoFTPstoragefolder. • Consult the network administrator thensettheFTPstoragefolder.
IPaddressnotset,othernet-workerror
• Anerrorother thanone indicatedbyL1 toL4hasoccurred.
• Unplug the power cord from the poweroutletthenplugitbackin.
Networksettingsreseterror
• An error hasoccurred in resetting the net-worksettings.
• Thenetworkresetnumberiswrong.Inputthecorrectnumberandrepeattheopera-tion.(SeepageE-41.)
Header/footerwritingerror
• This occurswhen the size of the insertedimageistoolarge.
• Adjust the image then repeat theopera-tion.
Network-relatederrors indicateerrors inaccessbetweenthecaptureboardandnetwork. Insomecases theyare related to thenetworksystem,soconsultthenetworkadministrator.Iftheproblempersists,itmaybeduetoacaptureboardmalfunction.Con-tactyourstoreofpurchase.
Meaning of Error Messages

E-48
Please check the following matters before making a request for servicing.
Condition Please Check
Cap
ture
bo
ard
Rel
ated
Pressing theON/Standby button doesnotswitchonthepower.
• CheckwhetherthecableoftheACpoweradapterisdisconnectedfromtheDCconnectoroftheCaptureboardorthewalloutlet.(UnplugtheACpowercable from theoutlet,wait several secondsand thenplug it back into theoutletagain.)
Writingonthesheet isnoterasedwiththeeraser.
• Wasamarkerotherthanadedicatedmarkerused?
Parts of characters and lines are not dis-playedonprintoutsorinimagedata.
• Blurred characters and thin linesmay not be displayed onprintouts or inimagedata.
Scanned copy (image) is dirty, EraseReminder function is activated evenwhensheetiserasedwiththeeraser
• Istheremarkerresidueorsubstantialquantitiesofrefuseonthesheet? (Ifthesheetisdirty,moistenasoftclothwithwater,wringwell,thenwipethesheetinastrokingmanner.)
When the captureboard andPC are con-nected, the PC does not recognize thecaptureboard
• Checkwhether thecaptureboard is inanoperablecondition, andwhethertheUSBcableisconnectedproperly.
• IsthecaptureboardconnectedtothePCviaaUSBhub? (ConnectthecaptureboarddirectlytotheUSBportofthePC.)
Thedateisnotupdated. • Thecaptureboard’sbatteryisdead.Contactyourstoreofpurchase.
*Iftheproblempersists,pleasecontactyournearbyPLUSCorporationsalesoffice,dealer,orstore.
Condition Please Check
Pri
nter
Rel
ated
Thecaptureboard’spowerturnson,buttheprinter’spowerdoesnot.
• Checkwhethertheprinter’spowerplug(DCplug)issecurelyinserted. Ifthepowerstilldoesnotturnon,disconnecttheACadapterboxandcheckwhethertheprinter’sACpoweradaptersideplugisunpluggedfromtheACpoweradapter.(Forsomeprintersitisdirectlymounted.)
PrintingisnotpossiblewhenColorPrint(orB/WPrint)buttonispressed.
• Checkthatthepowercableoftheprinterandtheprintercablearesecurelyconnected.
• Checkthattheprinterpowerindicatorislit.• Checkwhether the captureboard’s status indicators and theprinter’s errorindicatorarelit.If an error is displayed on the captureboard’s displaywindow, see pageE-46.(Please see the printer instructionmanual for information about printererrors.)
Thepaperfeedisabnormal. • Possible causes includedamppaper, overly thin or thick paper, only onesheet of paper is set, and a curved setting of the paper. (Please see theinstructionmanualforyourprinter.)
Analteredcolorisprinted,notthespecifiedcolor.
• Pleasereplacetheprintcartridgeswithnewones.
Thereisnoprinting. • Checkthattheprintcartridgeisproperlyset.• Checkthattheprintcartridgeisnotplugged.
• Printisverypale,therearewhitelinesonit,orpageisdirty.
• Printed colors are very different fromthoseofthemarkersthatwereused.
Istheprintcartridge’snozzlepartiallychoked?• Makeatestprintandchecktheconditionsofthenozzle.
Troubleshooting

E-49
Troubleshooting
Also see the descriptions of error indications at “Network (main unit) related errors” on page E-47.
Condition Please Check
Net
wo
rk r
elat
ed
Networkcommunicationsnotpossible • IstheLANcableproperlyinserted?• TheLANcablecouldbedefective.Useastraightcable (10Base-Tor100Base-TXcompatible) toconnect thecaptureboardtothenetwork.
• SettheIPaddressandsubnetmaskat“SimpleNetworkSettings(viaUSB)”.* Besure tocheckwith thenetworkadministratorbeforemakingthevari-oussettings.
Cannotlogin. • Is “Caps Lock” set on the computer’s keyboardwhile inputting the usernameandpassword?
Test Printing 1)With thecaptureboard’spoweron (with thedisplaywindow lit),press theNumberofCopiesbutton repeatedly todisplay“ ”onthedisplaywindow.
2)PresstheColorPrint( )buttonforacolorprint,theB/WPrint( )buttonforablack-and-whiteprint.*Testprintingstarts.
Check the print• Istheeachcolorlineprinteduniformly?• Aretheremissingdots,palelines,lineswiththinnerinkthanothers,etc.?
Remedy• Ifthenozzleispartiallychoked,cleanit.• Ifthequalityoftheprintdoesnotimproveeventhoughthenozzlehasbeencleaned,wipeofftheinkonthesurfaceoftenozzle.
Fordetails,seethe“User’sGuide”includedwiththeprinter.
*Pleaseseeyourprintermanualforinformationaboutprintingproblems,printermaintenance,anddetailsrelatedtoprinting.
Updating the captureboard’s internal programSeethePLUSwebsiteforinstructionsonupdatingtheprogramandtodownloadthelatestprogram.

E-50
BOARD TYPE (Model name) Standard (C-20S) Wide (C-20W)
Form
Installation method Self-standing (T-shaped legs), or wall mounting
External dimensions (T-shaped legs*¹)
W1480 × D675 × H1947*² mm W1980 × D675 × H1947*² mm
Main unit weight 20 kg*³ 25 kg*³
T-shaped legs weight 12.5 kg
BOARD
Panel Size H910 × W1300 mm H910 × W1800 mm
Effective reading size H900 × W1280 mm H900 × W1780 mm
Number of Pages 2
Paging Endless in one direction (Horizontal scrolling)
Drive method Sheet movement
Reading method CIS (Contact Image Sensor)
Reading illumination light source RGB LED
Reading resolutionMain scanning direction (vertical sheet surface) 1.92 dots/mm (50 dpi or equivalent)
Sub scanning direction (horizontal sheet surface) 1.92 dots/mm (50 dpi or equivalent)
Reading timeBlack & white: approx. 15 s
Color: approx. 15 sBlack & white: approx. 21 s
Color: approx. 21 s
Interface
BoardFile format JPEG, PNG, PDF
Screen sizeStandard type: Standard 864 × 1248 dots, High resolution 1728 × 2496 dots
Wide type: Standard 864 × 1728 dots, High resolution 1728 × 3456 dots
External memory
Type USB Flash memory
Compatible FAT types
FAT 16, 32
Interface USB1.1 or USB2.0 *4
Network LAN port RJ-45 (10Base-T/100Base-TX)
Printing
Printing resolution 300 dpi or equivalent
No. print colors 16 or grayscale
Printer interface Conforming to USB 2.0 standards
Added functionsClock Used for the timestamp and for file dating properties
PC connection Images can be acquired and device settings made via USB (using a browser)
Power supplyAC power adapter
Input : AC100–240V/50–60 Hz, Max 0.75 A Output : DC 12 V, 3.0 A
Power consumption In standby: 3 W, During operation: 12 W (not including printer)
Operating conditions
Temperature: 10–35°C
Humidity: 30–85% (No condensation)
Miscellaneous Miscellaneous Dedicated markers (black, red, blue, and green)
Operating environment
OS
Fully IBM PC/AT compatible computer equipped with standard USB portXP (Home Edition /Professional Edition, Service Pack 2 or greater)/Vista (32-bit version)/Windows 7 (32- or 64-bit version)Or, Apple Macintosh computer with standard USB portMac OS X 10.5 or greater
Web browserWindows: Internet Explorer 8.0 or greaterMacintosh: Safari 5 or greater* Enable JavaScript.
Remarks*1: Theheightisadjustableat1747,1847and1947mm.*2: Thevalueindicatedfor“H”(height)isthemaximumheight.*3: Notincludingtheweightoftheprinter.*4: USBmemorydevicenotincluded.Thememorycapacitycorrespondsto32GBorless.
• Pleasenotethatforqualityimprovementpurposes,specificationsanddesignaresubjecttochangewithoutpriornotice.
Specifications

E-51
Appendix
Connections and Wiring Diagram
• Theconnectionsandwiringdiagrambelowisincludedhereforcheckingtheconnections.
[Captureboard and Printer Connections Diagram]
Computer
Captureboardfrontpanel
ToUSBport
ToPCdedicatedUSBport
USBcable(includedwithCaptureboard:3m)
ToPrinterconnector ToDCINPUTconnector
USBcable(suppliedwiththeprinter)
ToUSBconnector
Printer
ToDCconnector
PrinterACpoweradapter(suppliedwiththeprinter)
ACpoweradapter(supplied)
Towallpoweroutlet
*Appearanceofprinterisforillustrationpurposes.
Note• TheACpower adapters of accessories andprinters that havebeen verified to be operationmanydiffer from the onesshownontheconnectionsdiagram(theymaybeofthebuilt-inormounted-ontype).
• When“Printfromcaptureboardprinter”inthecaptureboard’sdevicesettings(“CBSetup”)issetto“Enable” Whenthecomputerandcaptureboardareconnected,youareaskedtoinstalltheprinterdriver. UsetheCD-ROMincludedwiththeprinter,etc.,toinstalltheprinterdriveronthecomputer.

26-4644-11B