captiveradius powered by activeprism · pdf filecaptiveradius powered by activeprism...
TRANSCRIPT
CaptiveRadius powered by ActivePrism Technologies
What is CaptiveRadius?
It’s EASY to get total control of your WiFi, give free access to your users or they can purchase
vouchers. Provides centralized hotspot or non-hotspot connectivity, billing and management
solutions for broadband providers, including wifi, cable companies and Telco’s, reduce the
challenges in deploying and managing a public Internet access offering across a large geographic
area by providing central management and location-based billing and marketing services.
The solution provides centralized AAA functions by interacting with a secure RADIUS server. It
supports portal-based user authentication using PIN numbers, usernames and passwords and has
the ability to create configurable billing plans and tariffs for each hotspot, or common plans for a
chain of hotspots. It can support National Roaming between all hotspots of a particular chain or
between chains. This is a completely web-based service so there is no need to install any
software on the client PCs. The webpages also allow for sufficient branding space to increase
mileage. It has a powerful admin functionality which can be used to view usage statistics,
calculate bandwidth usage at each hotspot, generate monthly revenue reports and calculate
revenue share between partners.
CaptiveRadius software benefits are:
• Easy Installation
• Easy Implementation
• Easy to operate
• Easy to customize
• Full compliance to standards and devices
• High performance
• High Availability and reliability
• Scalability.
CaptiveRadius features:
• Advanced AAA & Billing
• Web based & remote administration
• Live Statistics & advanced Reporting
• Scalable & Redundant
• Branded Captive Portals
• Can be integrated with payment gateways
• Fully Customizable
• Supports complex billing requirement
• Compatible with Mikrotik, DDwrt, CoovaAp, OpenMesh
• Web Self Care module enables user self-account administration
• Automatic Email alerts
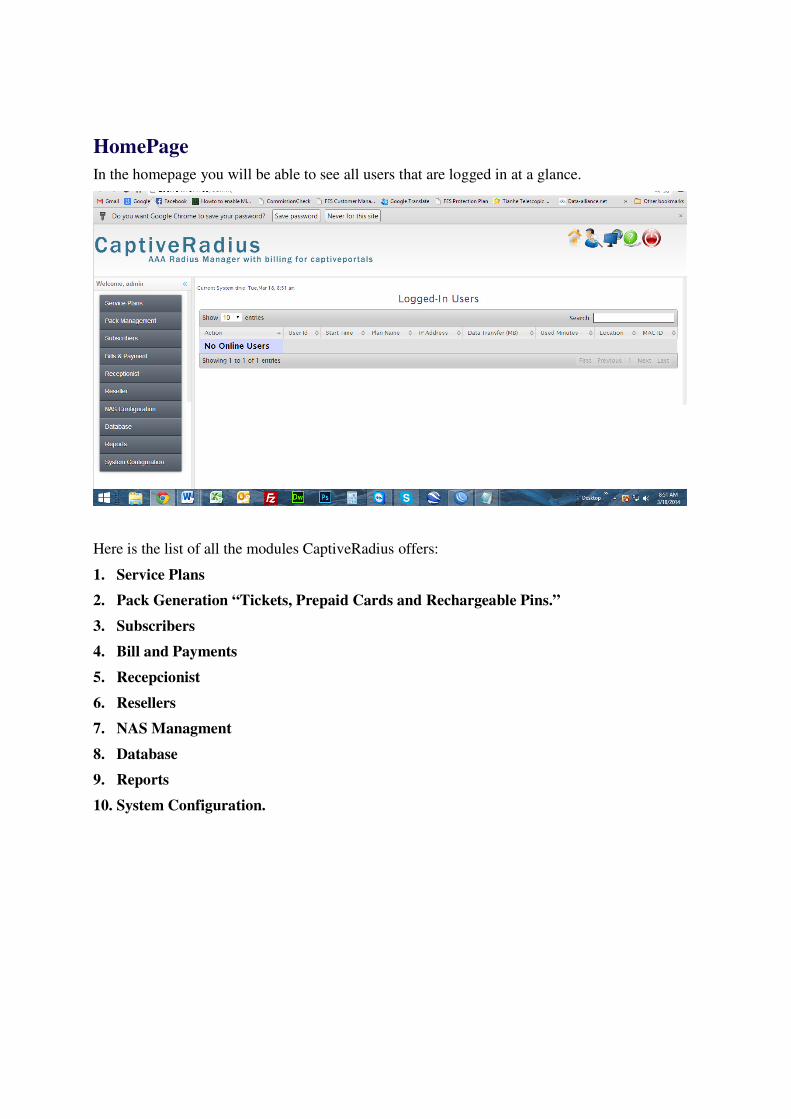
HomePage
In the homepage you will be able to see all users that are logged in at a glance.
Here is the list of all the modules CaptiveRadius offers:
1. Service Plans
2. Pack Generation “Tickets, Prepaid Cards and Rechargeable Pins.”
3. Subscribers
4. Bill and Payments
5. Recepcionist
6. Resellers
7. NAS Managment
8. Database
9. Reports
10. System Configuration.
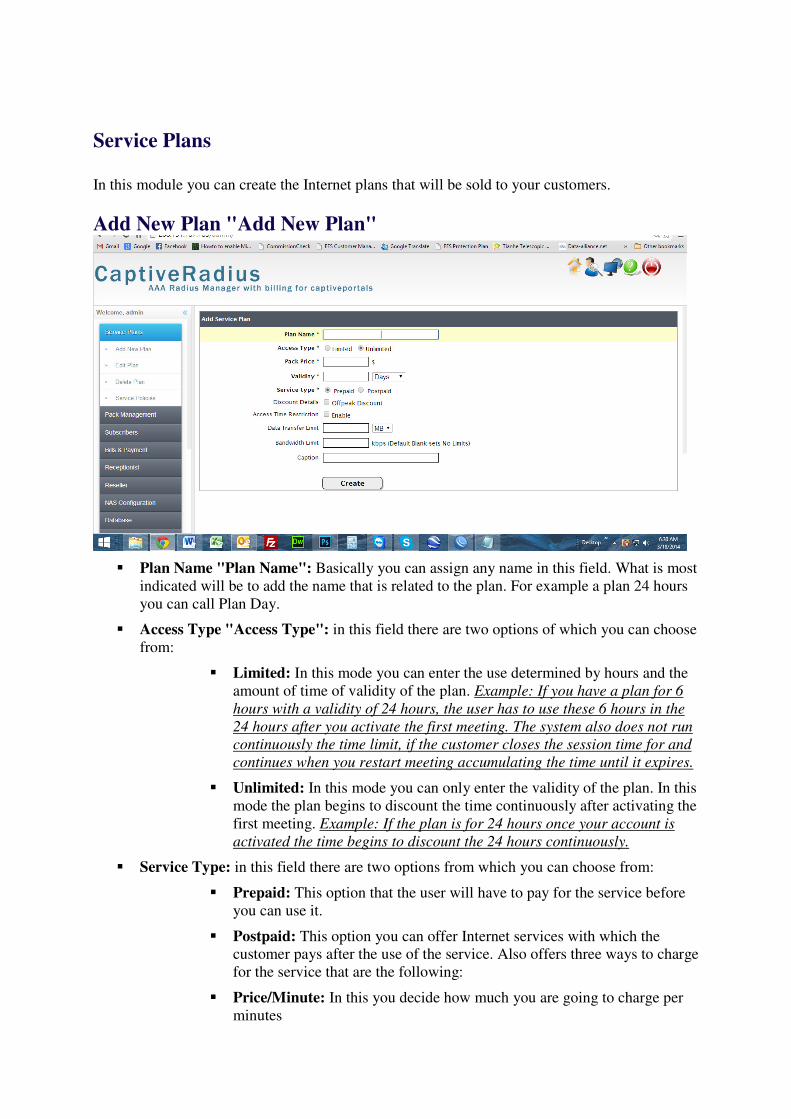
Service Plans
In this module you can create the Internet plans that will be sold to your customers.
Add New Plan "Add New Plan"
� Plan Name "Plan Name": Basically you can assign any name in this field. What is most
indicated will be to add the name that is related to the plan. For example a plan 24 hours
you can call Plan Day.
� Access Type "Access Type": in this field there are two options of which you can choose
from:
� Limited: In this mode you can enter the use determined by hours and the
amount of time of validity of the plan. Example: If you have a plan for 6
hours with a validity of 24 hours, the user has to use these 6 hours in the
24 hours after you activate the first meeting. The system also does not run
continuously the time limit, if the customer closes the session time for and
continues when you restart meeting accumulating the time until it expires.
� Unlimited: In this mode you can only enter the validity of the plan. In this
mode the plan begins to discount the time continuously after activating the
first meeting. Example: If the plan is for 24 hours once your account is
activated the time begins to discount the 24 hours continuously.
� Service Type: in this field there are two options from which you can choose from:
� Prepaid: This option that the user will have to pay for the service before
you can use it.
� Postpaid: This option you can offer Internet services with which the
customer pays after the use of the service. Also offers three ways to charge
for the service that are the following:
� Price/Minute: In this you decide how much you are going to charge per
minutes

• Fixed Rate: This can be used to users that you will pay for a
monthly service at a fixed rate. Monthly, weekly, etc.
• Time Slot Charging: With this mode you build a table where you
charge the client depending on time used. Example: The table you
create can say that if they use 1-10 hours has a certain value, and
11-20 hours another value, and continues in this manner.
� Off Peak Discount: This discount is more like a kind of promotion. The way that works
is that you choose a percentage of discounts of minutes that you are going to give a user
if user purchases a card and the active among a range of hours you assigned. Example:
To do this simple we are going to choose that you will give a 50% discount of minutes to
the customer or user to activate their account between 6pm and 10pm. If the user
activates their new account and browse for 2 hours, at the end of the time of promotion
it will only be deducted 50% of the minutes used, underside of 120min (two hours) it will
only be deducted from 60min (one hour) from its original time of the account.
� Access Time Restriction: This type of constraint is used for accounts that have access
only to certain times and certain days. In our program we have separated into two groups,
Monday to Friday and Saturday to Sunday.
� Data Transfer Limit: in this field you can regulate how much the user has to navigate in
data transfer. This you can configure in MB or GB.
� Excess Data Usage charge: in this field you can put a charge per MB.
� Bandwidth Limit: in this field you can assign the bandwidth speed.
� Caption: Here you can put a subtitle on the plan to print a ticket.

1. Edit Plan
In this section you can modify the plans you've created. The process is simple, just choose
the plan in the list and you click the Edit button.
2. Delete Plan
This section you will be able to delete plans created, when you delete a plan you'll have the
option to delete all the accounts created in the Packet Generator that are associated with this
plan.

3. Service policies:
In this sector you'll have different managements of policy holders. The following are:
� Fair Usage Policy: In this you can define by limits of MB bandwidth and a
proper use for each plan. This is mainly for people who can abuse the service.
� Upload/Download Bandwidth: With this you can define the rate of upload
and download speed limit of the plan.
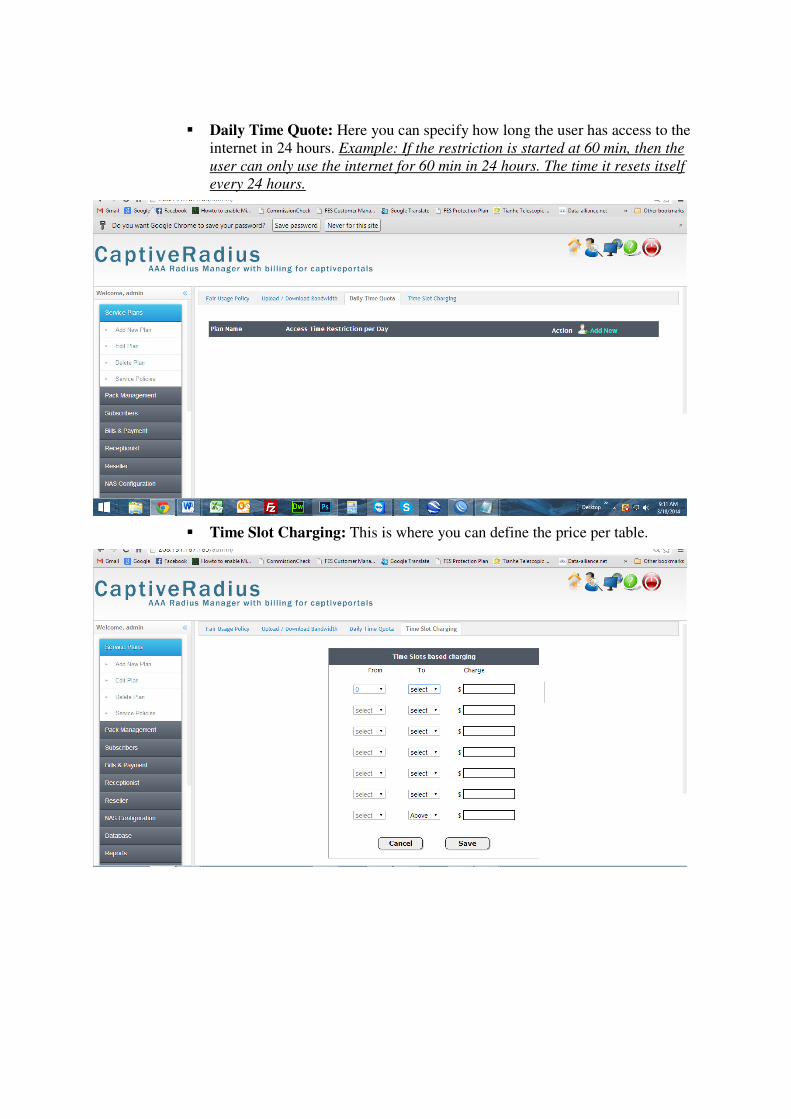
� Daily Time Quote: Here you can specify how long the user has access to the
internet in 24 hours. Example: If the restriction is started at 60 min, then the
user can only use the internet for 60 min in 24 hours. The time it resets itself
every 24 hours.
� Time Slot Charging: This is where you can define the price per table.
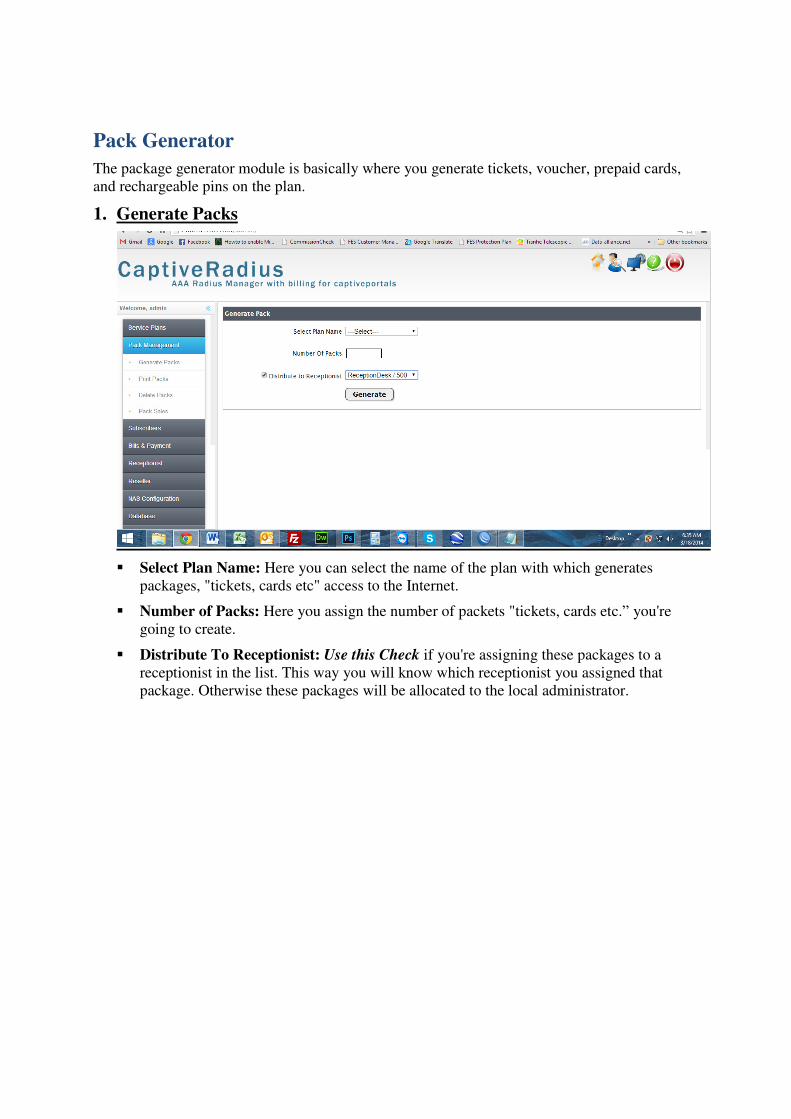
Pack Generator
The package generator module is basically where you generate tickets, voucher, prepaid cards,
and rechargeable pins on the plan.
1. Generate Packs
� Select Plan Name: Here you can select the name of the plan with which generates
packages, "tickets, cards etc" access to the Internet.
� Number of Packs: Here you assign the number of packets "tickets, cards etc.” you're
going to create.
� Distribute To Receptionist: Use this Check if you're assigning these packages to a
receptionist in the list. This way you will know which receptionist you assigned that
package. Otherwise these packages will be allocated to the local administrator.

2. Print Packs
� Pack Number From: Here you can select the serial number of the package that you want
to start printing.
� Pack Number To: Here you can select the serial number of the package that you want to
end printing.
� Header Message: Here you can put the name of the header you want on the printout
� Footer Message: Here you can put the name of the footer you want on the printout
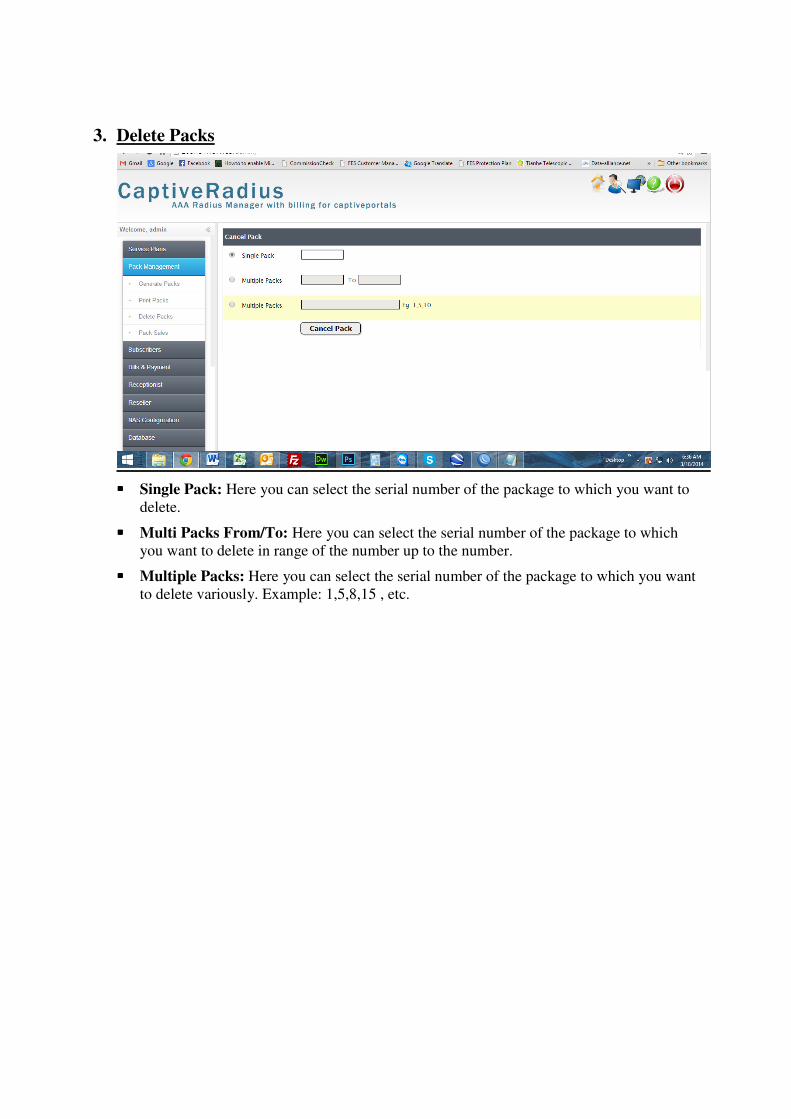
3. Delete Packs
���� Single Pack: Here you can select the serial number of the package to which you want to
delete.
���� Multi Packs From/To: Here you can select the serial number of the package to which
you want to delete in range of the number up to the number.
���� Multiple Packs: Here you can select the serial number of the package to which you want
to delete variously. Example: 1,5,8,15 , etc.

Subscribers
This module is to register a customer that will be using a subscription for the service.
1. Registration
� Name: In field enter the name of the new user.
� Password: Here you will enter the new user's password.
� First Name/Last Name: Here you can enter the full name of the new user.
� Address: Here you can enter the address of the new user.
� Select Plan: Here you can assign the plan to the new user.
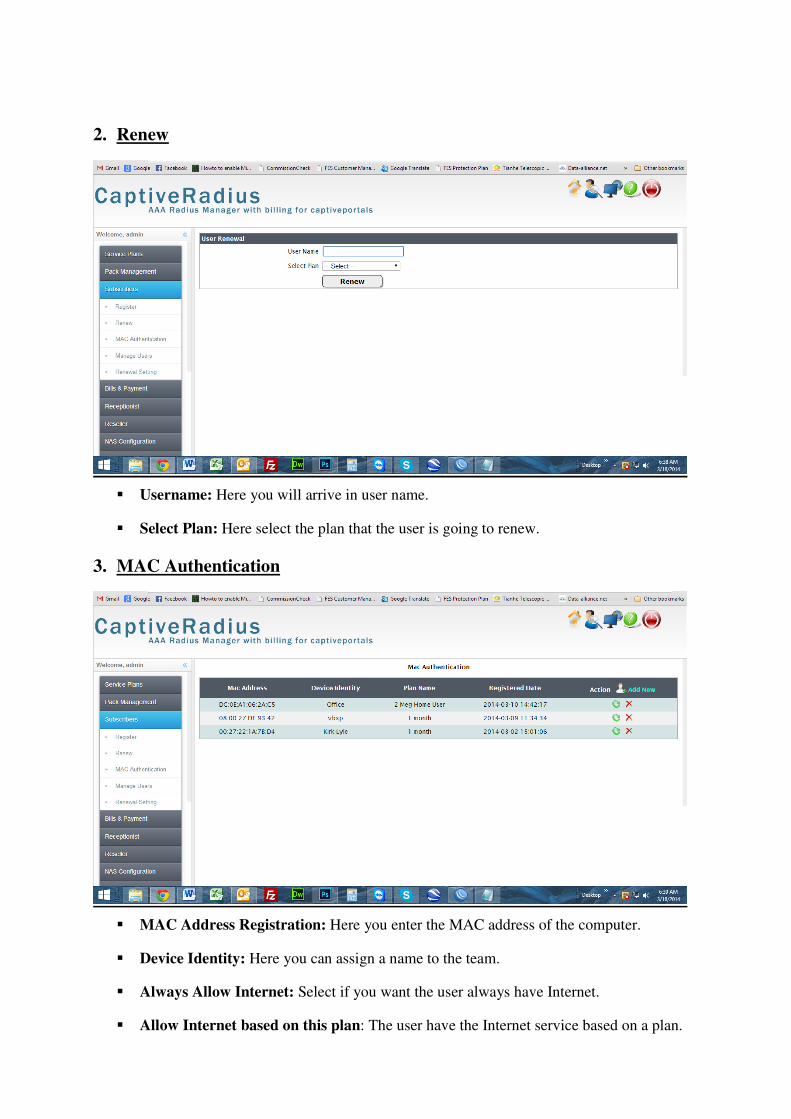
2. Renew
� Username: Here you will arrive in user name.
� Select Plan: Here select the plan that the user is going to renew.
3. MAC Authentication
� MAC Address Registration: Here you enter the MAC address of the computer.
� Device Identity: Here you can assign a name to the team.
� Always Allow Internet: Select if you want the user always have Internet.
� Allow Internet based on this plan: The user have the Internet service based on a plan.
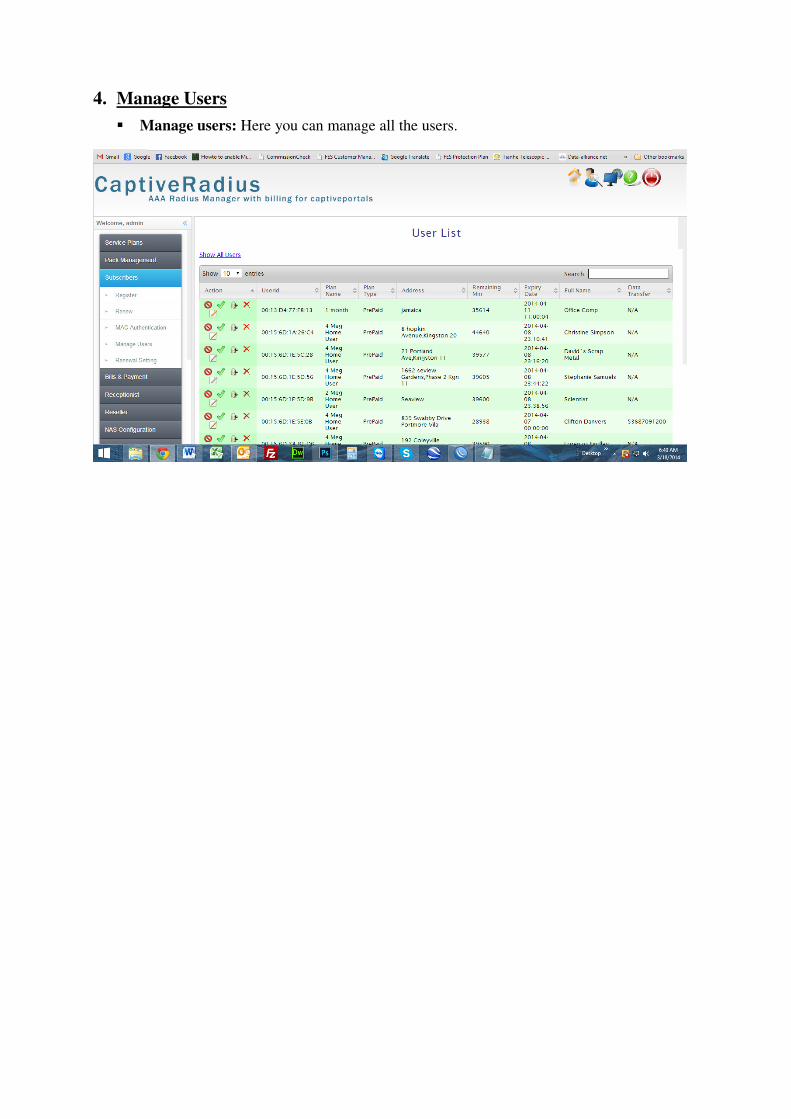
4. Manage Users
� Manage users: Here you can manage all the users.
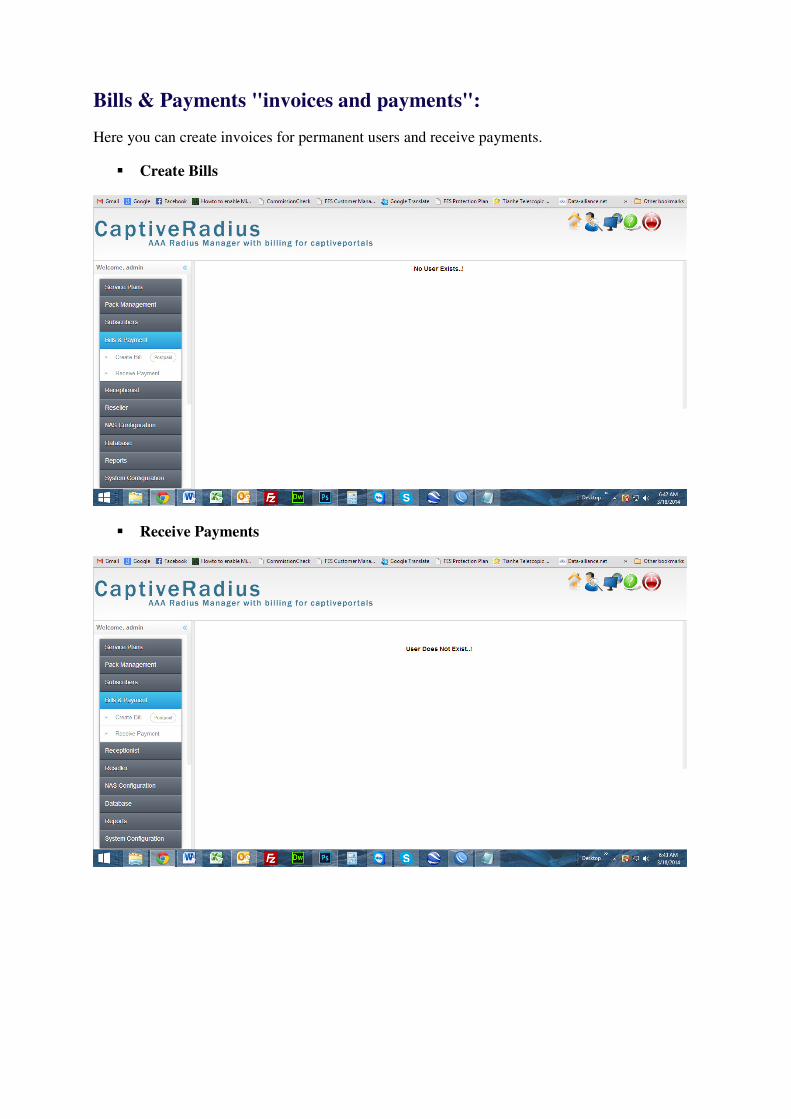
Bills & Payments "invoices and payments":
Here you can create invoices for permanent users and receive payments.
� Create Bills
� Receive Payments
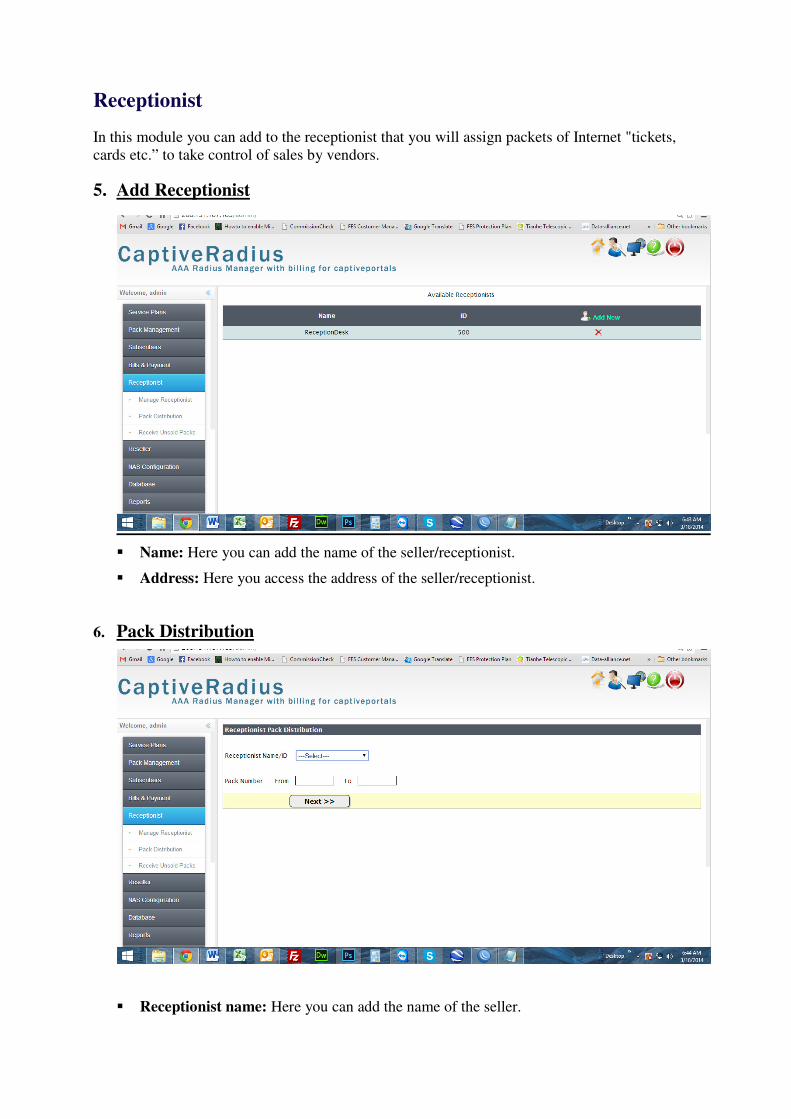
Receptionist
In this module you can add to the receptionist that you will assign packets of Internet "tickets,
cards etc.” to take control of sales by vendors.
5. Add Receptionist
� Name: Here you can add the name of the seller/receptionist.
� Address: Here you access the address of the seller/receptionist.
6. Pack Distribution
� Receptionist name: Here you can add the name of the seller.
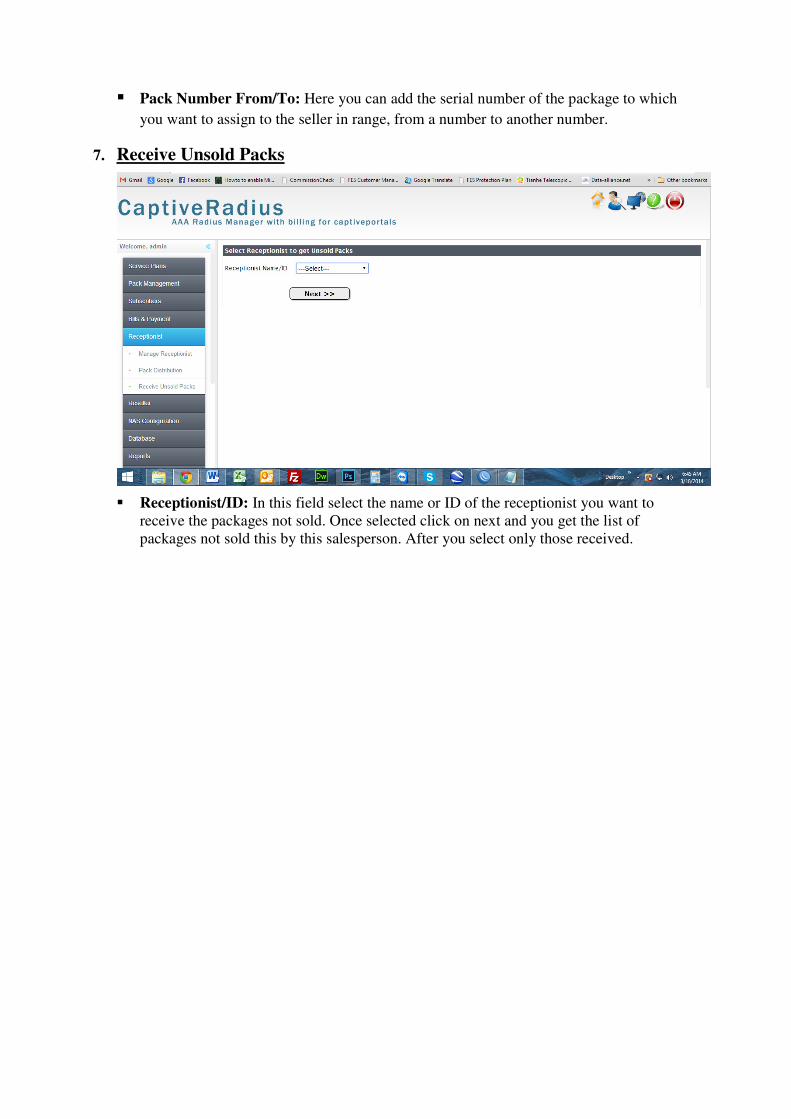
� Pack Number From/To: Here you can add the serial number of the package to which
you want to assign to the seller in range, from a number to another number.
7. Receive Unsold Packs
� Receptionist/ID: In this field select the name or ID of the receptionist you want to
receive the packages not sold. Once selected click on next and you get the list of
packages not sold this by this salesperson. After you select only those received.

Resellers
In this module you can add to resellers of the Internet packets "tickets, cards etc.” that
sacrifice.
1. Add Reseller
� Reseller Name: In this field will add the name of the reseller you are creating.
� Company Name: In this field will add the name of the company.
� Address: Here will add the address of the reseller.
� Phone Number: Here will add a phone number of the reseller.
� Commission Percentage: In this field adds the percentage who will be giving the
reseller in the sale of packages.
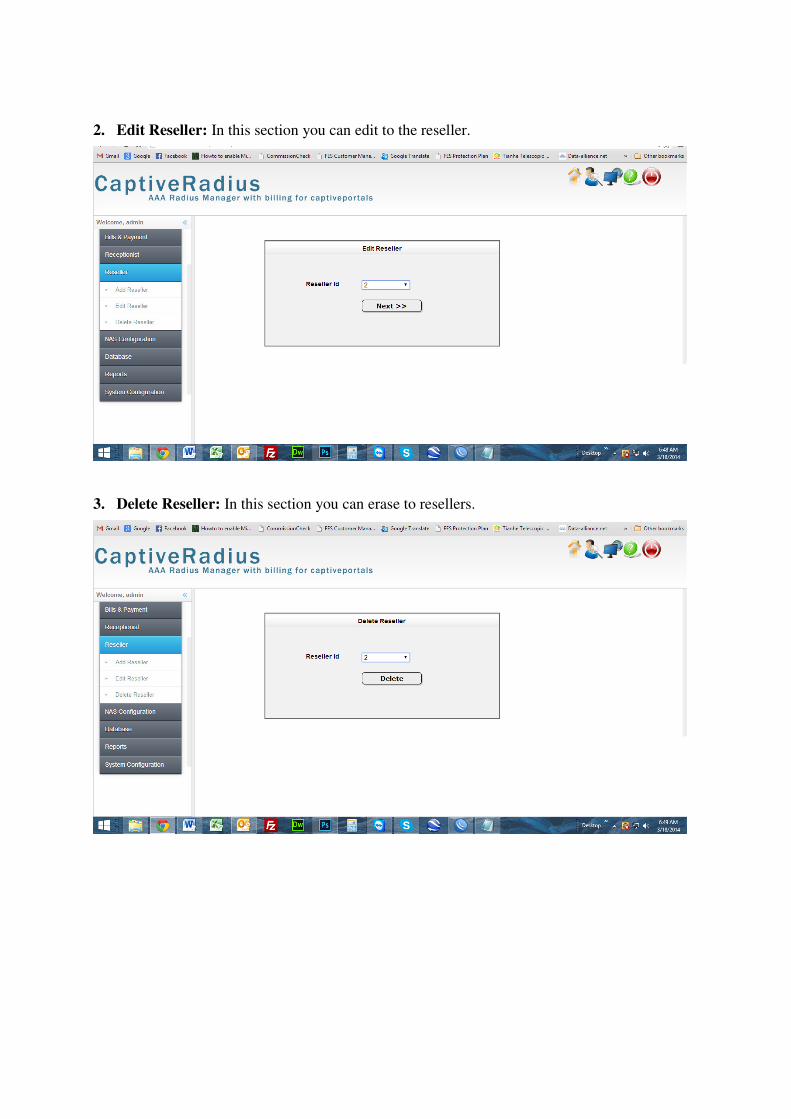
2. Edit Reseller: In this section you can edit to the reseller.
3. Delete Reseller: In this section you can erase to resellers.
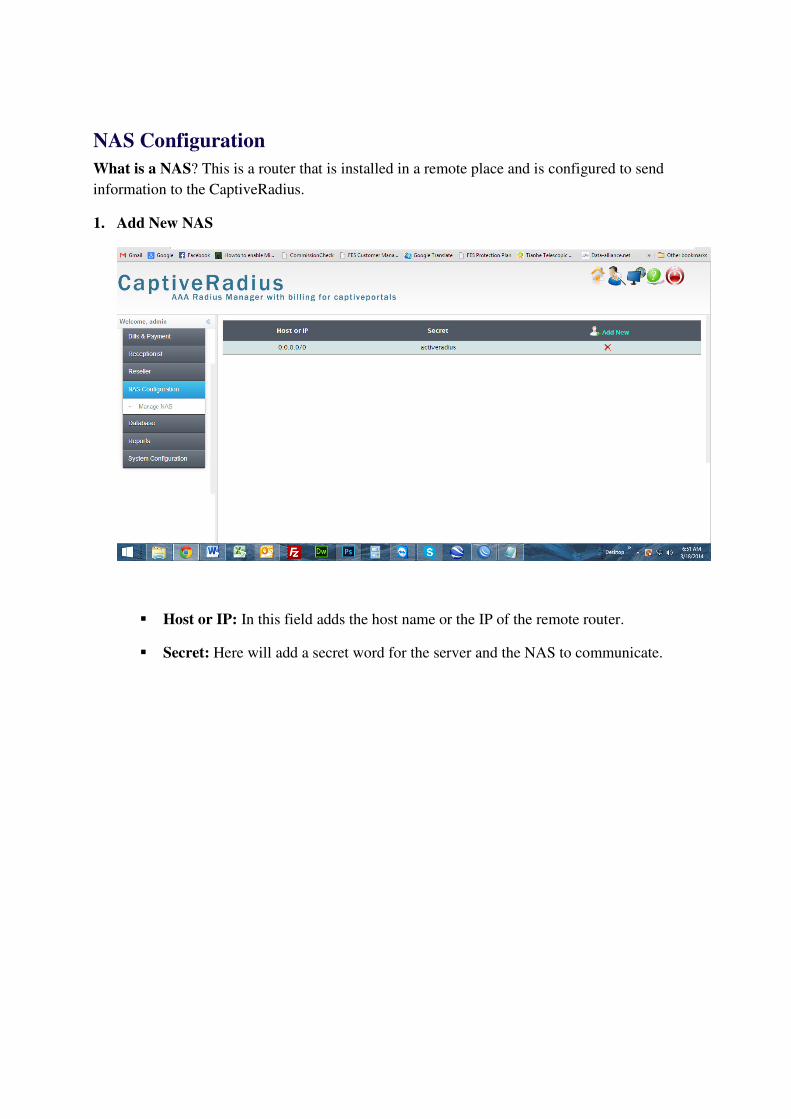
NAS Configuration
What is a NAS? This is a router that is installed in a remote place and is configured to send
information to the CaptiveRadius.
1. Add New NAS
� Host or IP: In this field adds the host name or the IP of the remote router.
� Secret: Here will add a secret word for the server and the NAS to communicate.
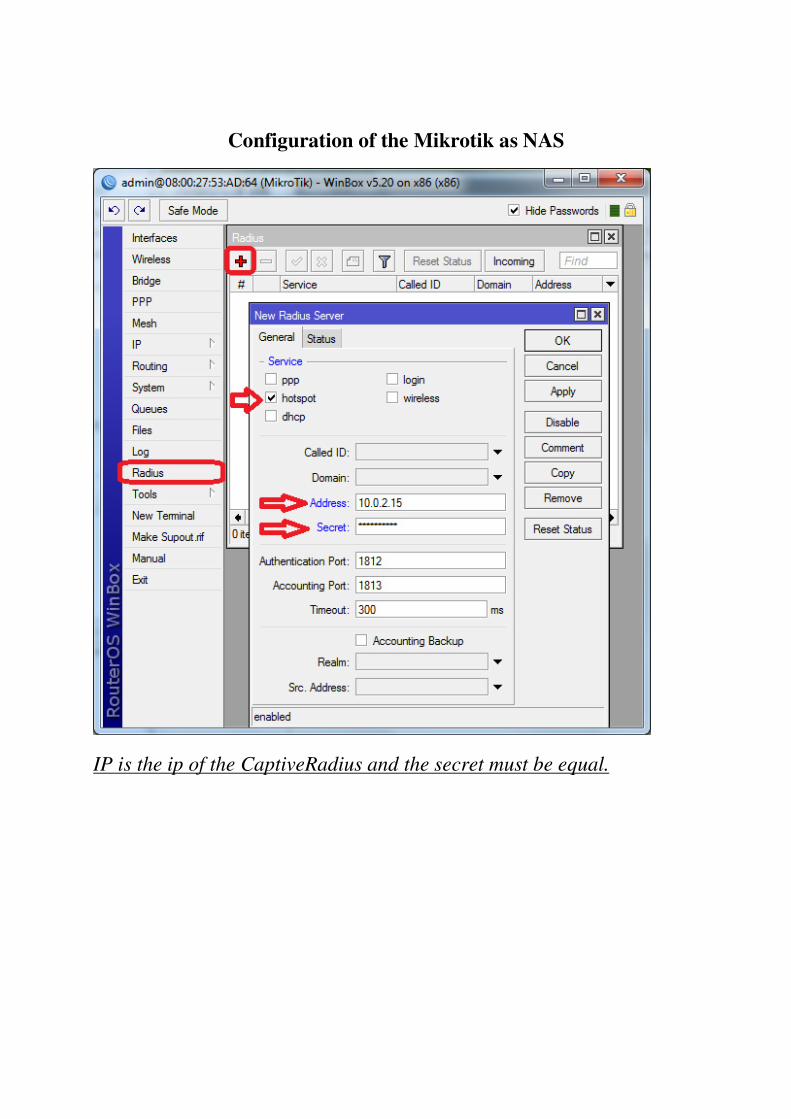
Configuration of the Mikrotik as NAS
IP is the ip of the CaptiveRadius and the secret must be equal.

Database
Here you will be able to backup or restore your database
� Backup: Here you will be able to make a backup of your database.
� Restore: Here you will be able to restore your database.

Reports
In this module will gather information about users and packs. The following are the reports the
system generates. We can also customize reports for an additional cost.